5. Documents
5.1.1. View Documents
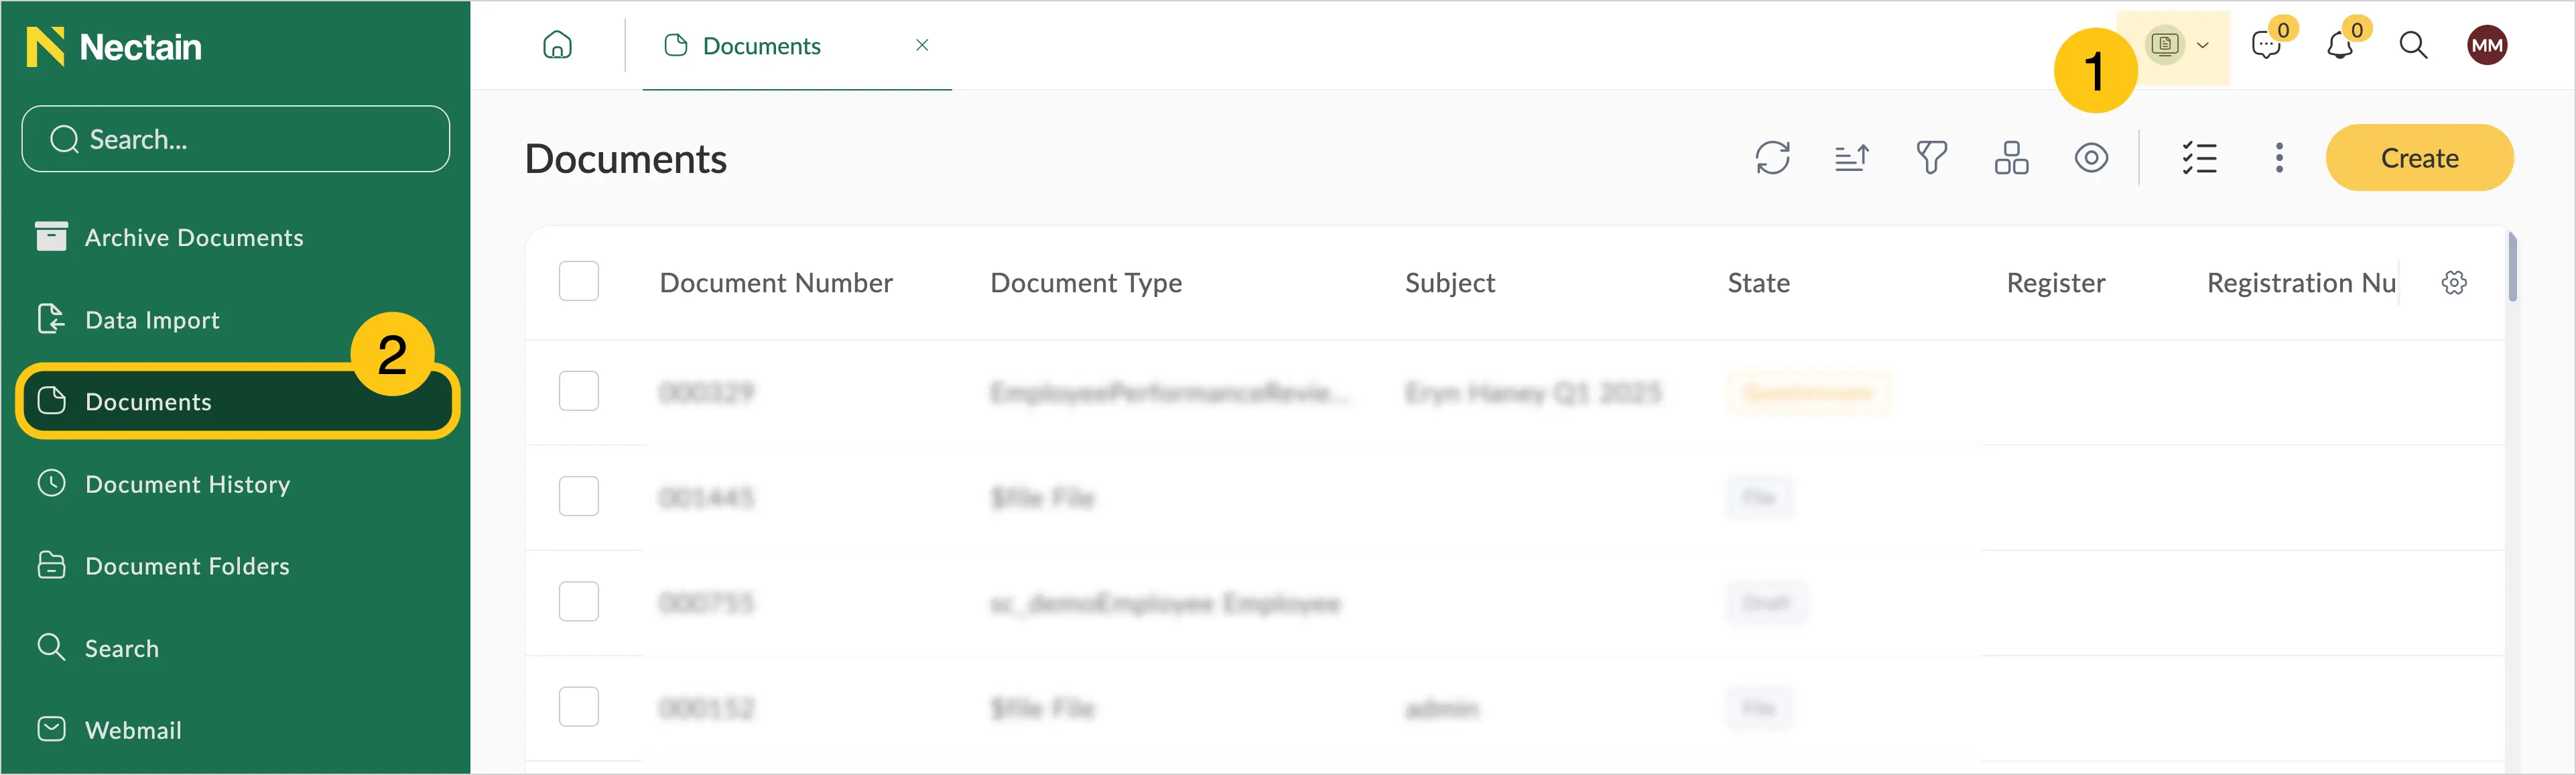
To view documents available to the user, open the Documents workspace and the Documents shortcut. You can also work with documents through custom shortcuts of the Document type.
5.1.2. Create a Document
-
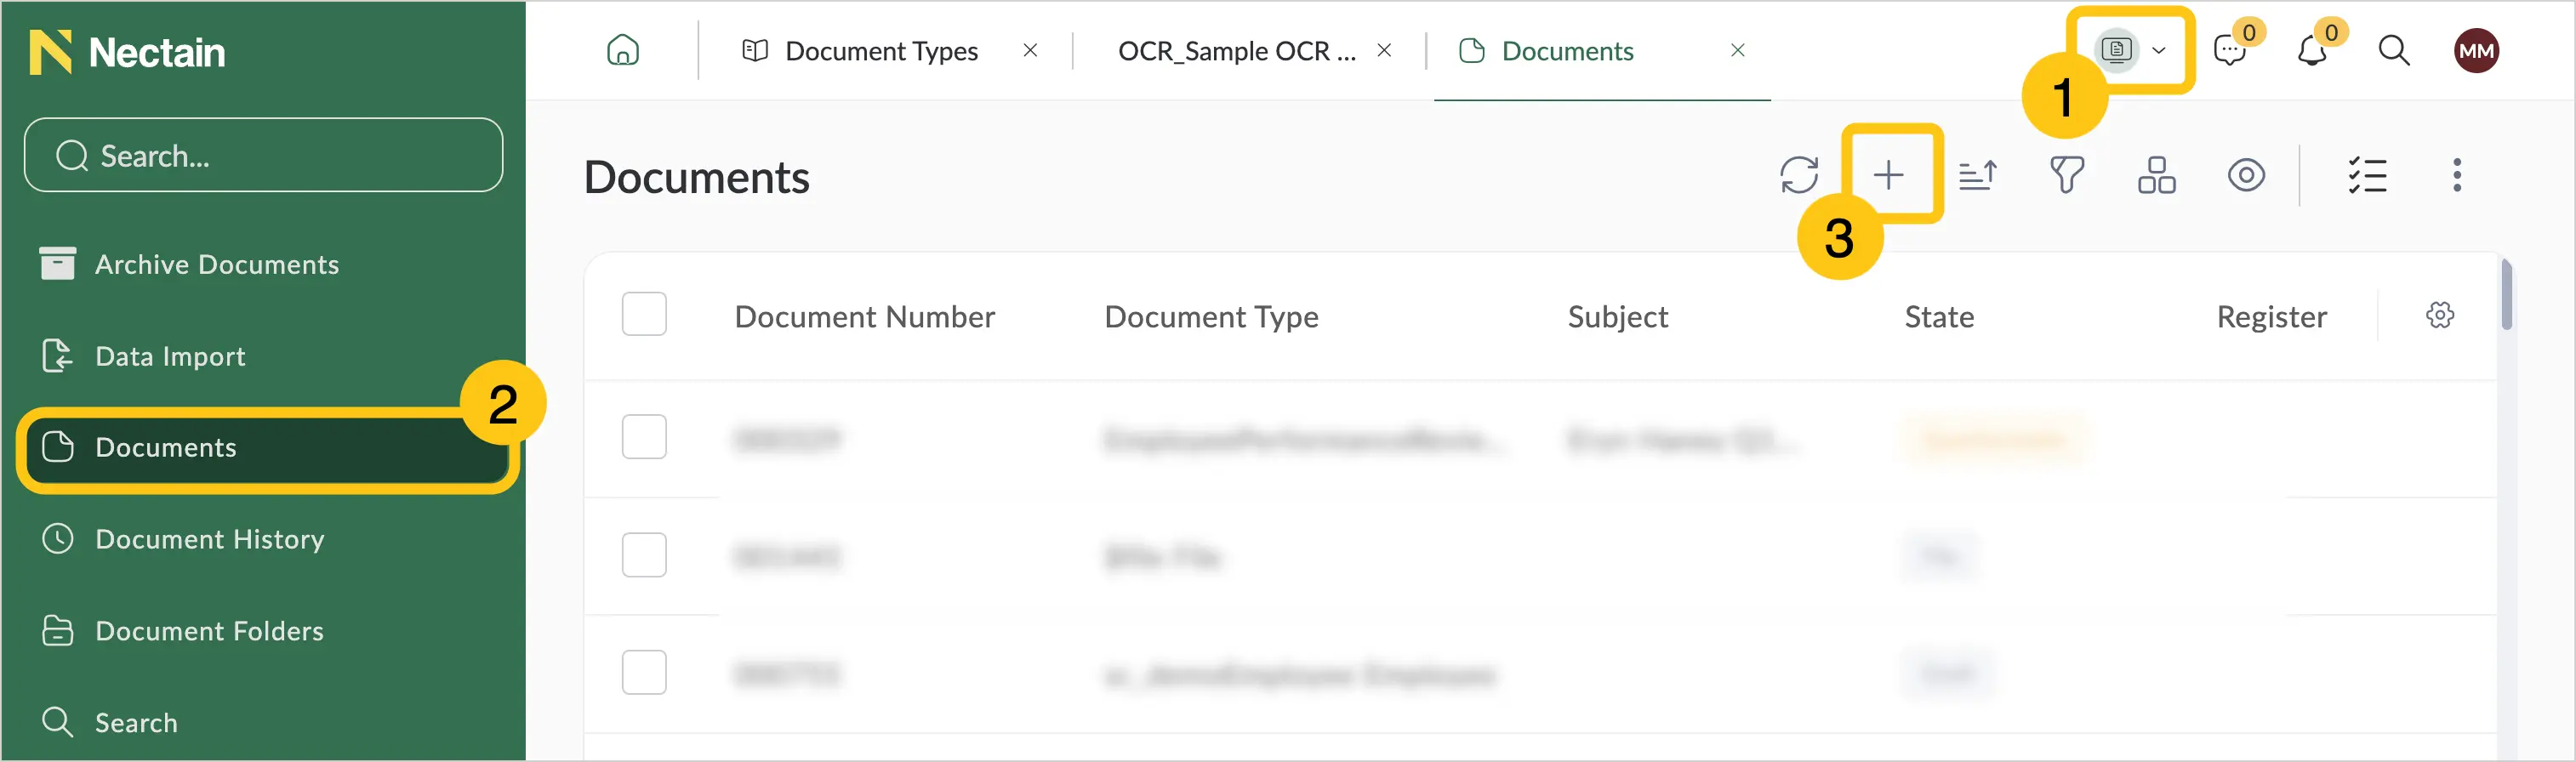
In the navigation pane, select the Documents workspace 1.
-
Select the Documents shortcut 2, and then in the toolbar select Create 3.
-
In the Document Type field 1, select the required type, and then select Create 2.
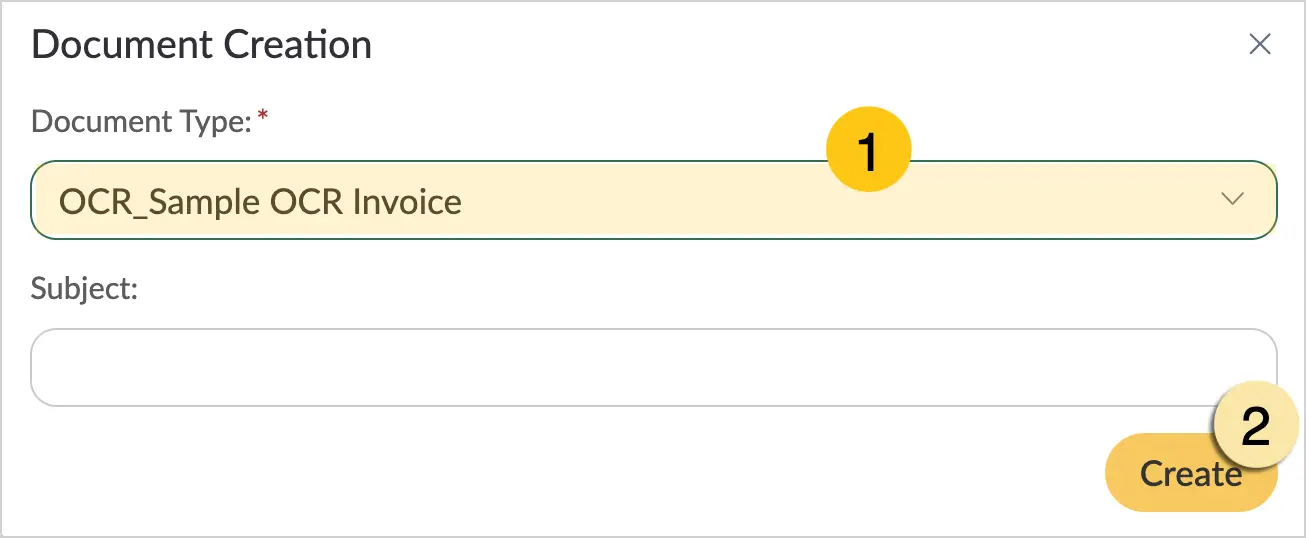
When creating a document, users will only see document types for which they have create permissions (see the Access section).
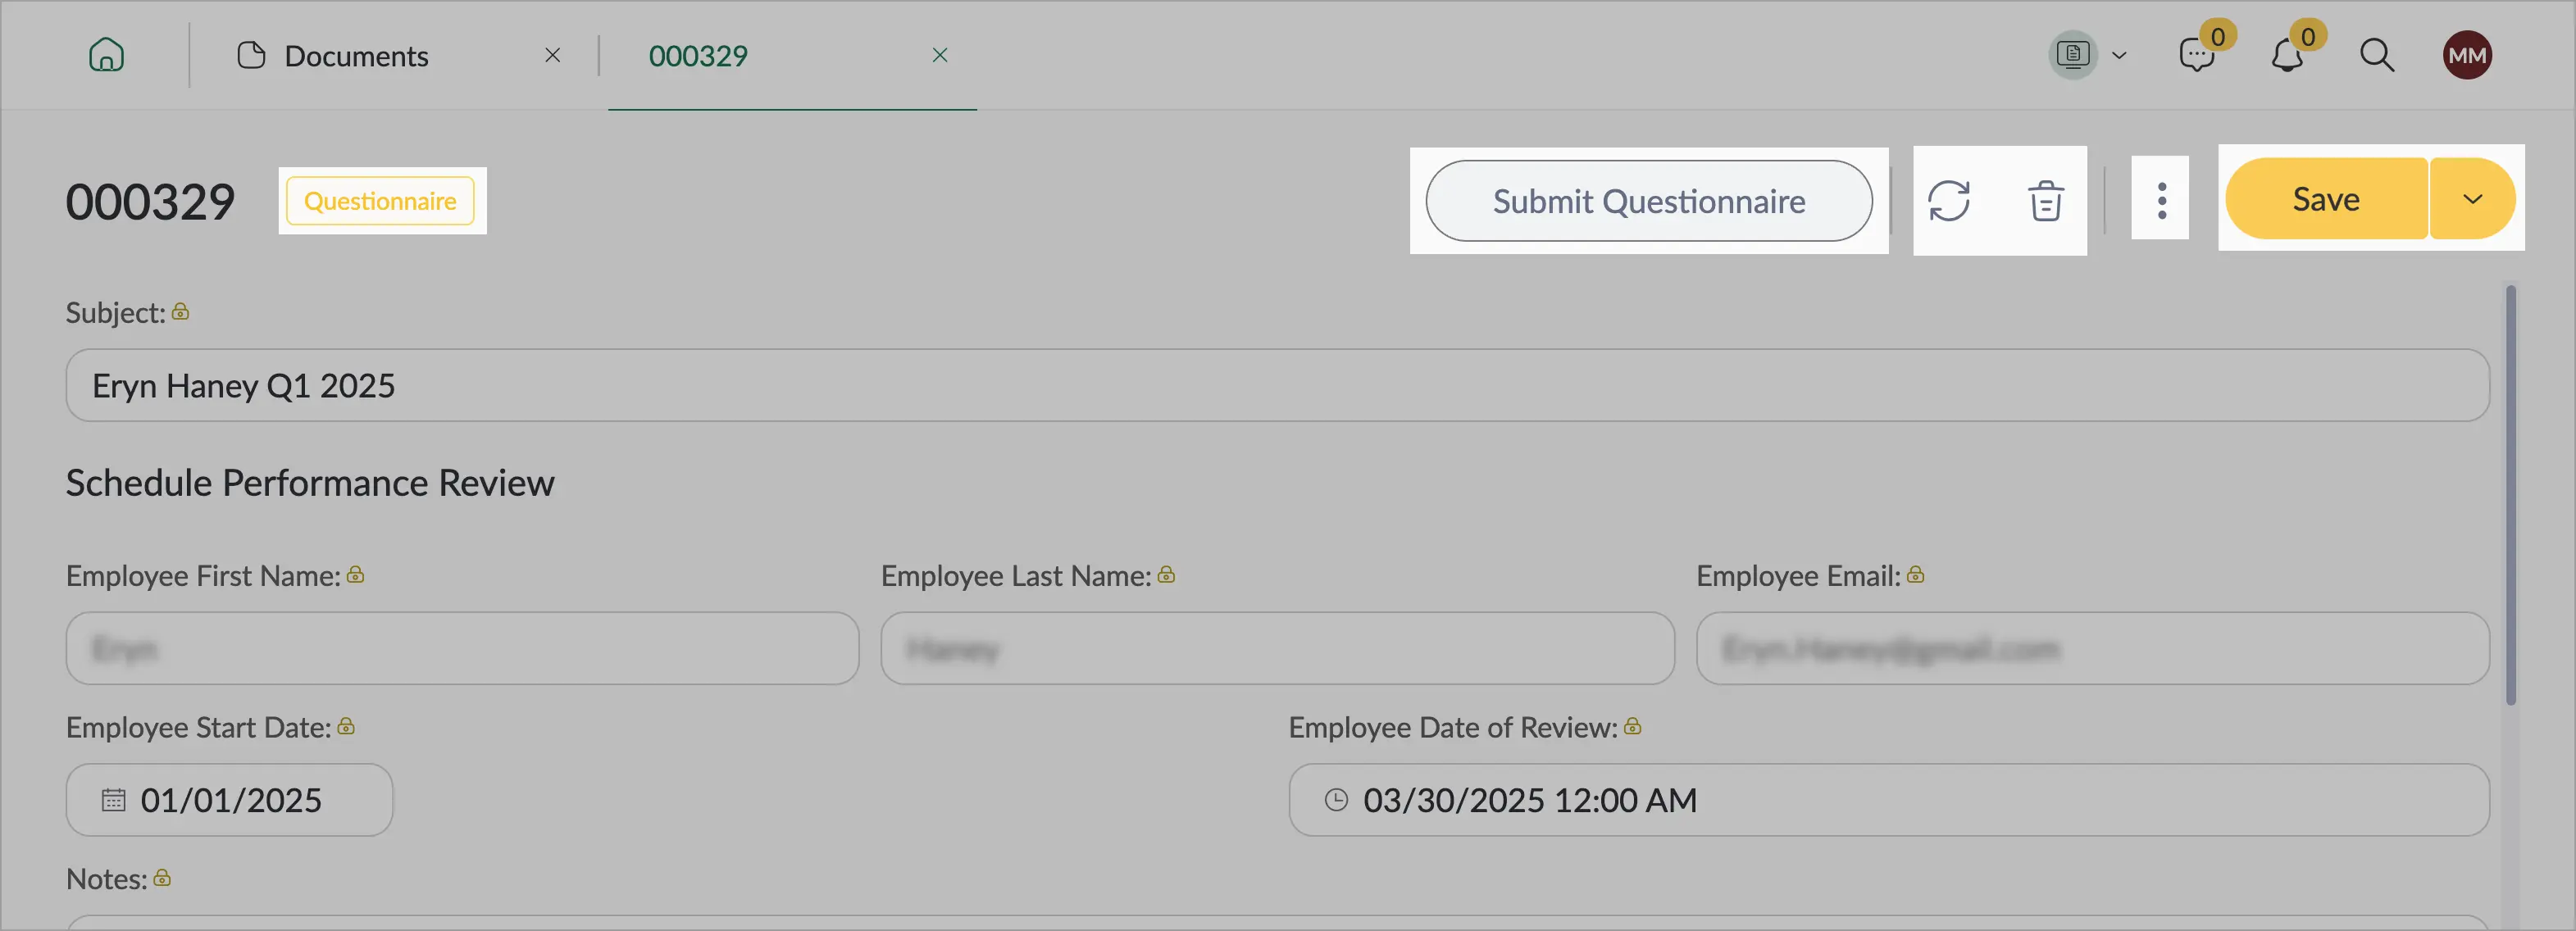
After creating a new document or opening an existing one, users will see the document form configured by the Administrator. In addition to the attributes placed on the form, the following elements are available:
- Refresh, Save, Save and Close, and Delete buttons
- Document Actions buttons (if available)
- Document States
- Document Labels — if labels are assigned, they are displayed next to the document state
- Side Menu (three-dot icon)
If the form contains required fields, they are marked with the "*" symbol.
5.1.3. Additional Menu
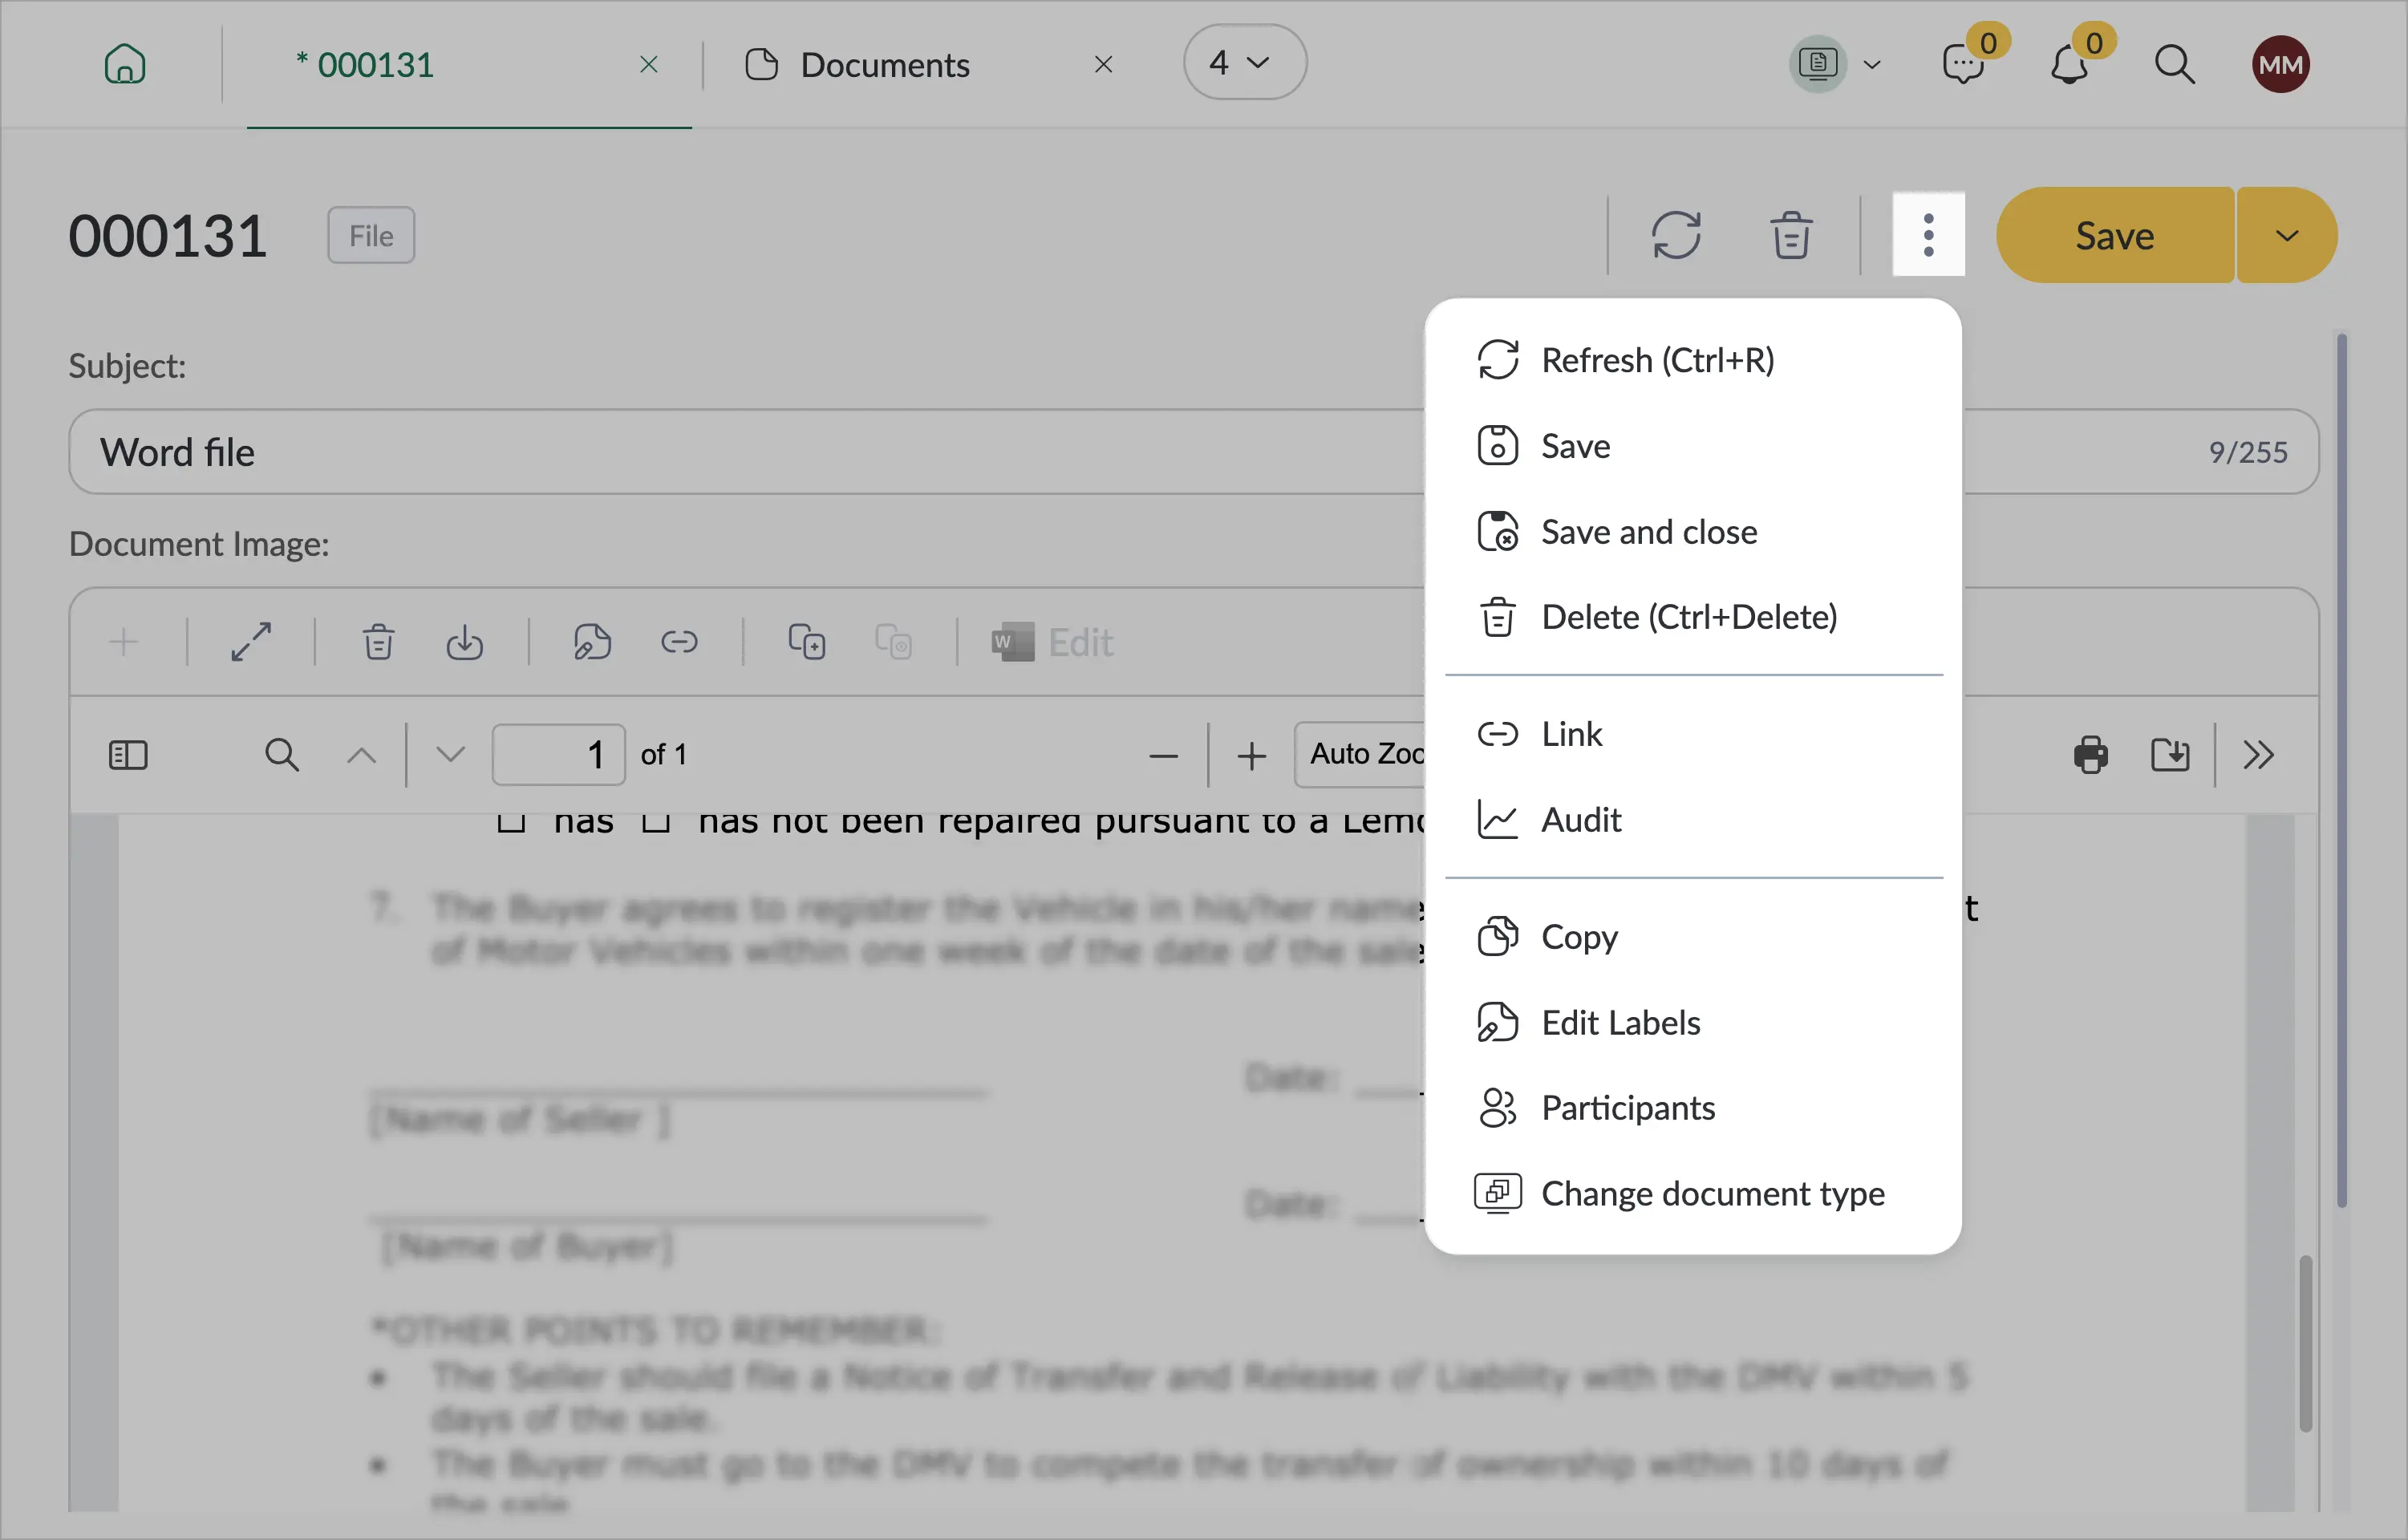
The following actions are available in the additional menu (three-dot icon):
- Refresh
- Save
- Save and Close
- Delete
- Link — copy a link to the current document to the clipboard
- Audit — available to administrators
- Copy
- Edit Labels
- Participants
- Change document type
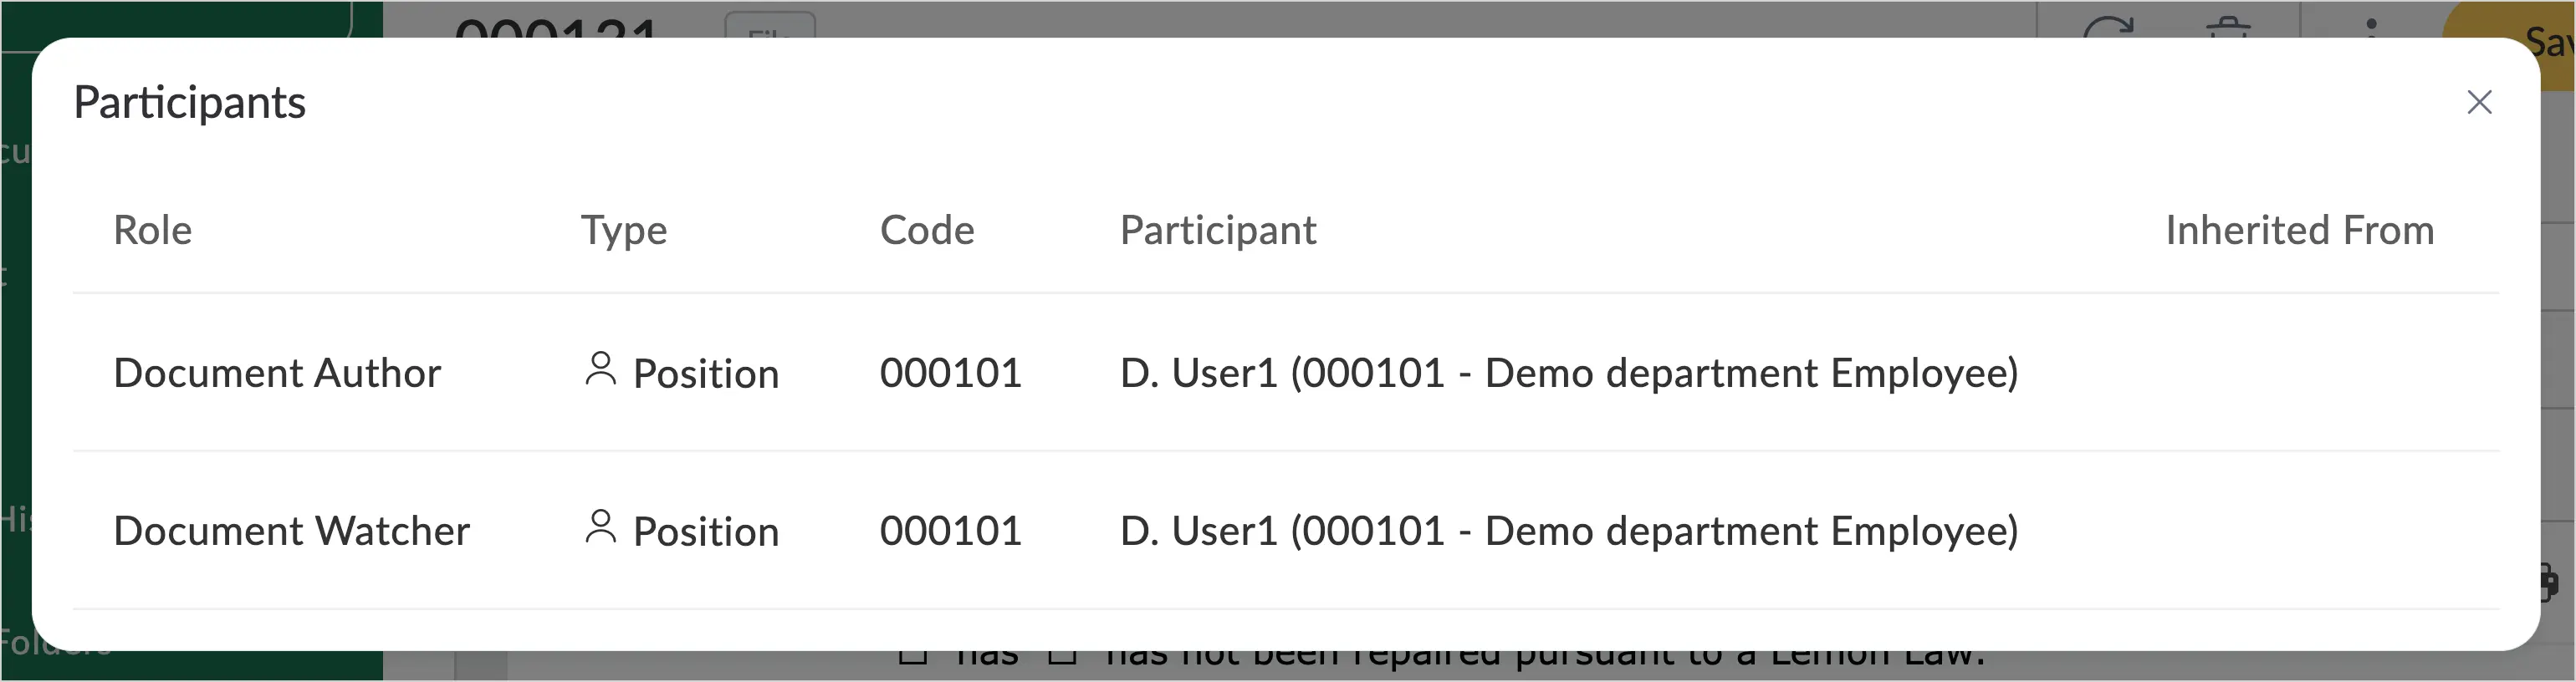
5.1.4. Document Participants
When selecting Document Participants, the system displays a list of document participants — organizational positions and groups that have access to the current document.
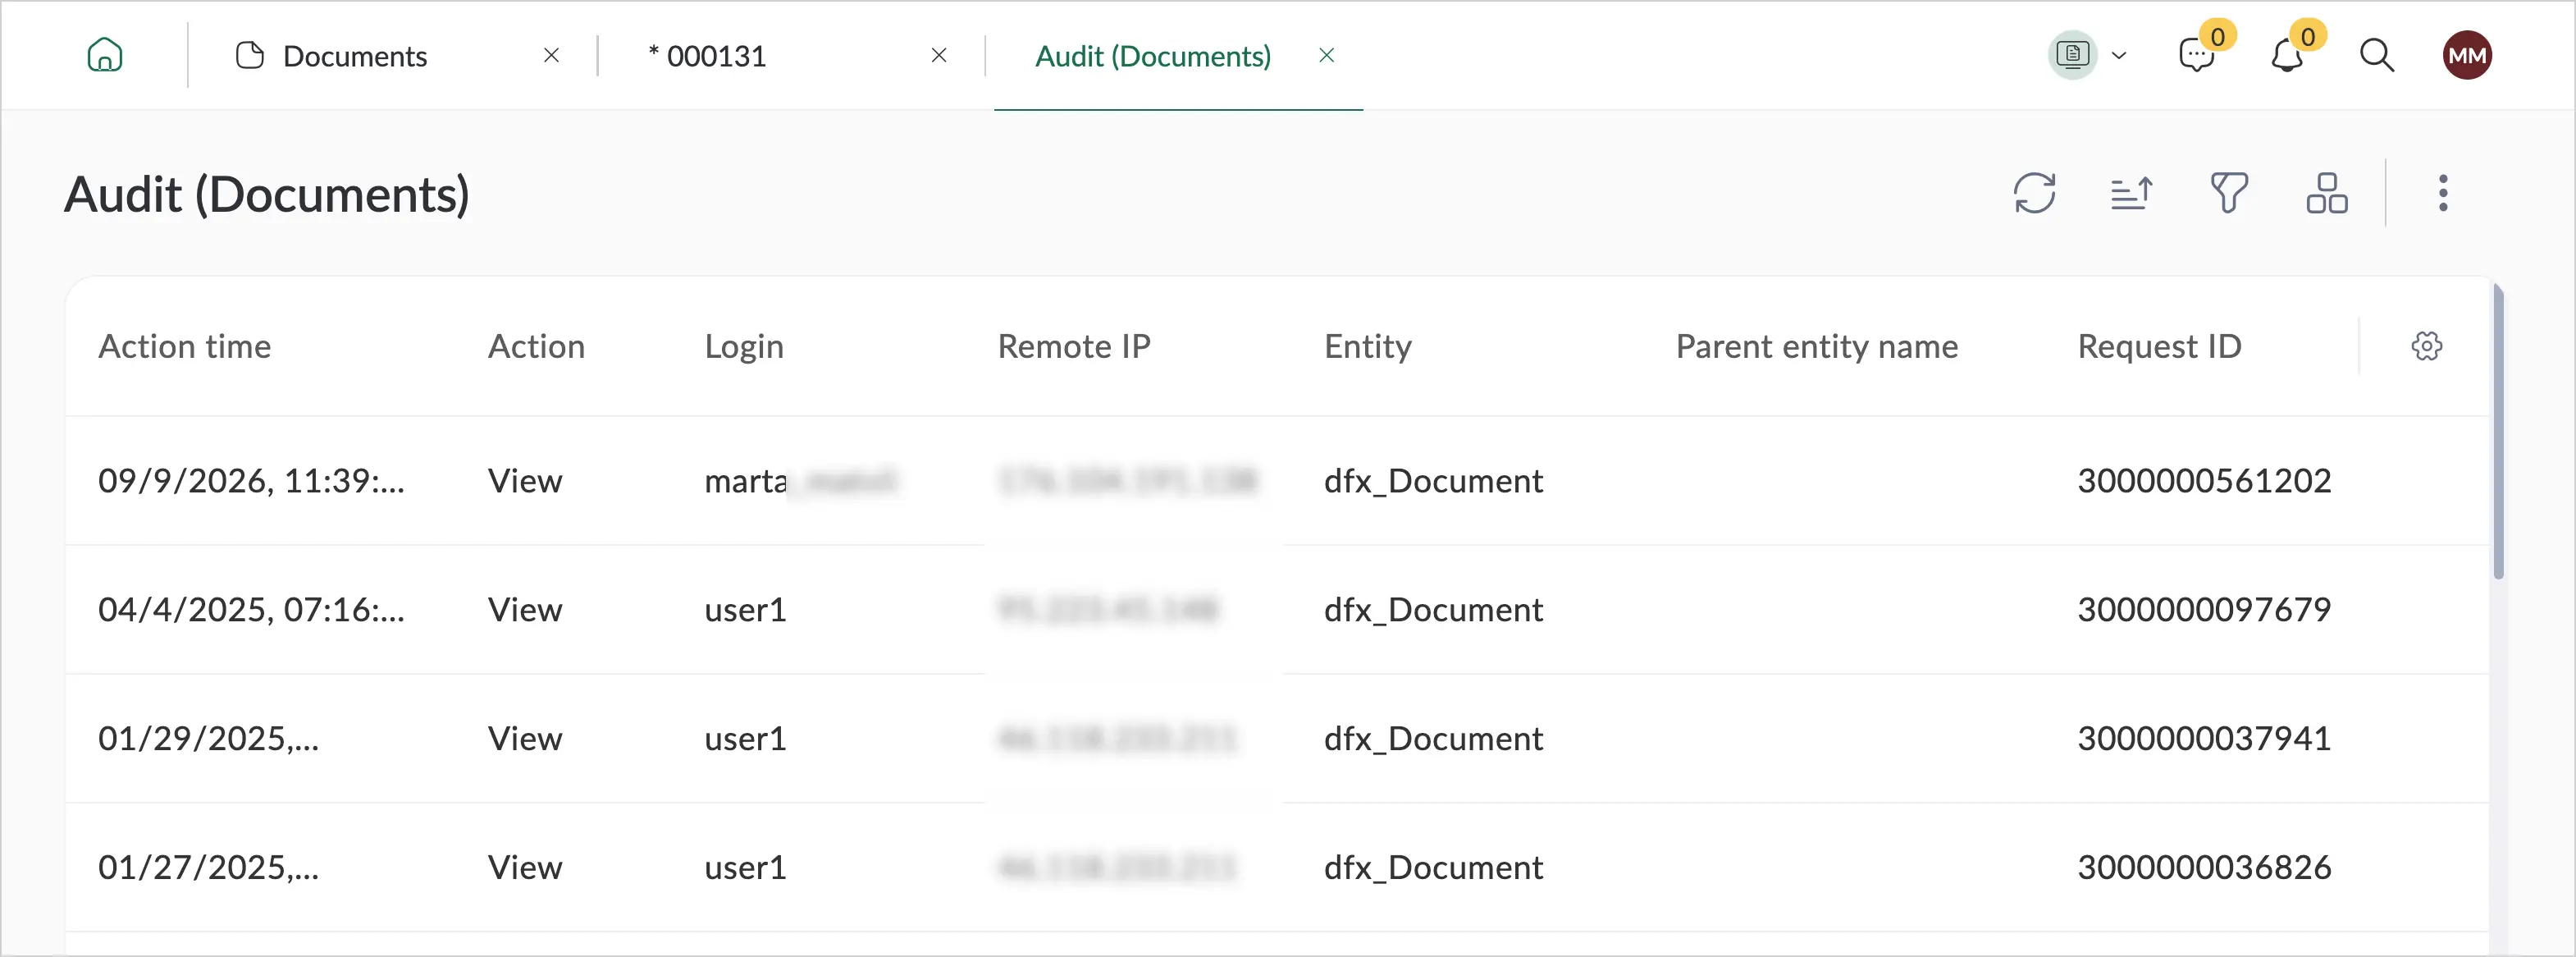
5.1.5. Audit
When selecting Audit, administrators can view a list of actions performed on the document (such as document creation or attribute updates), along with the date, time, and user who performed each action.
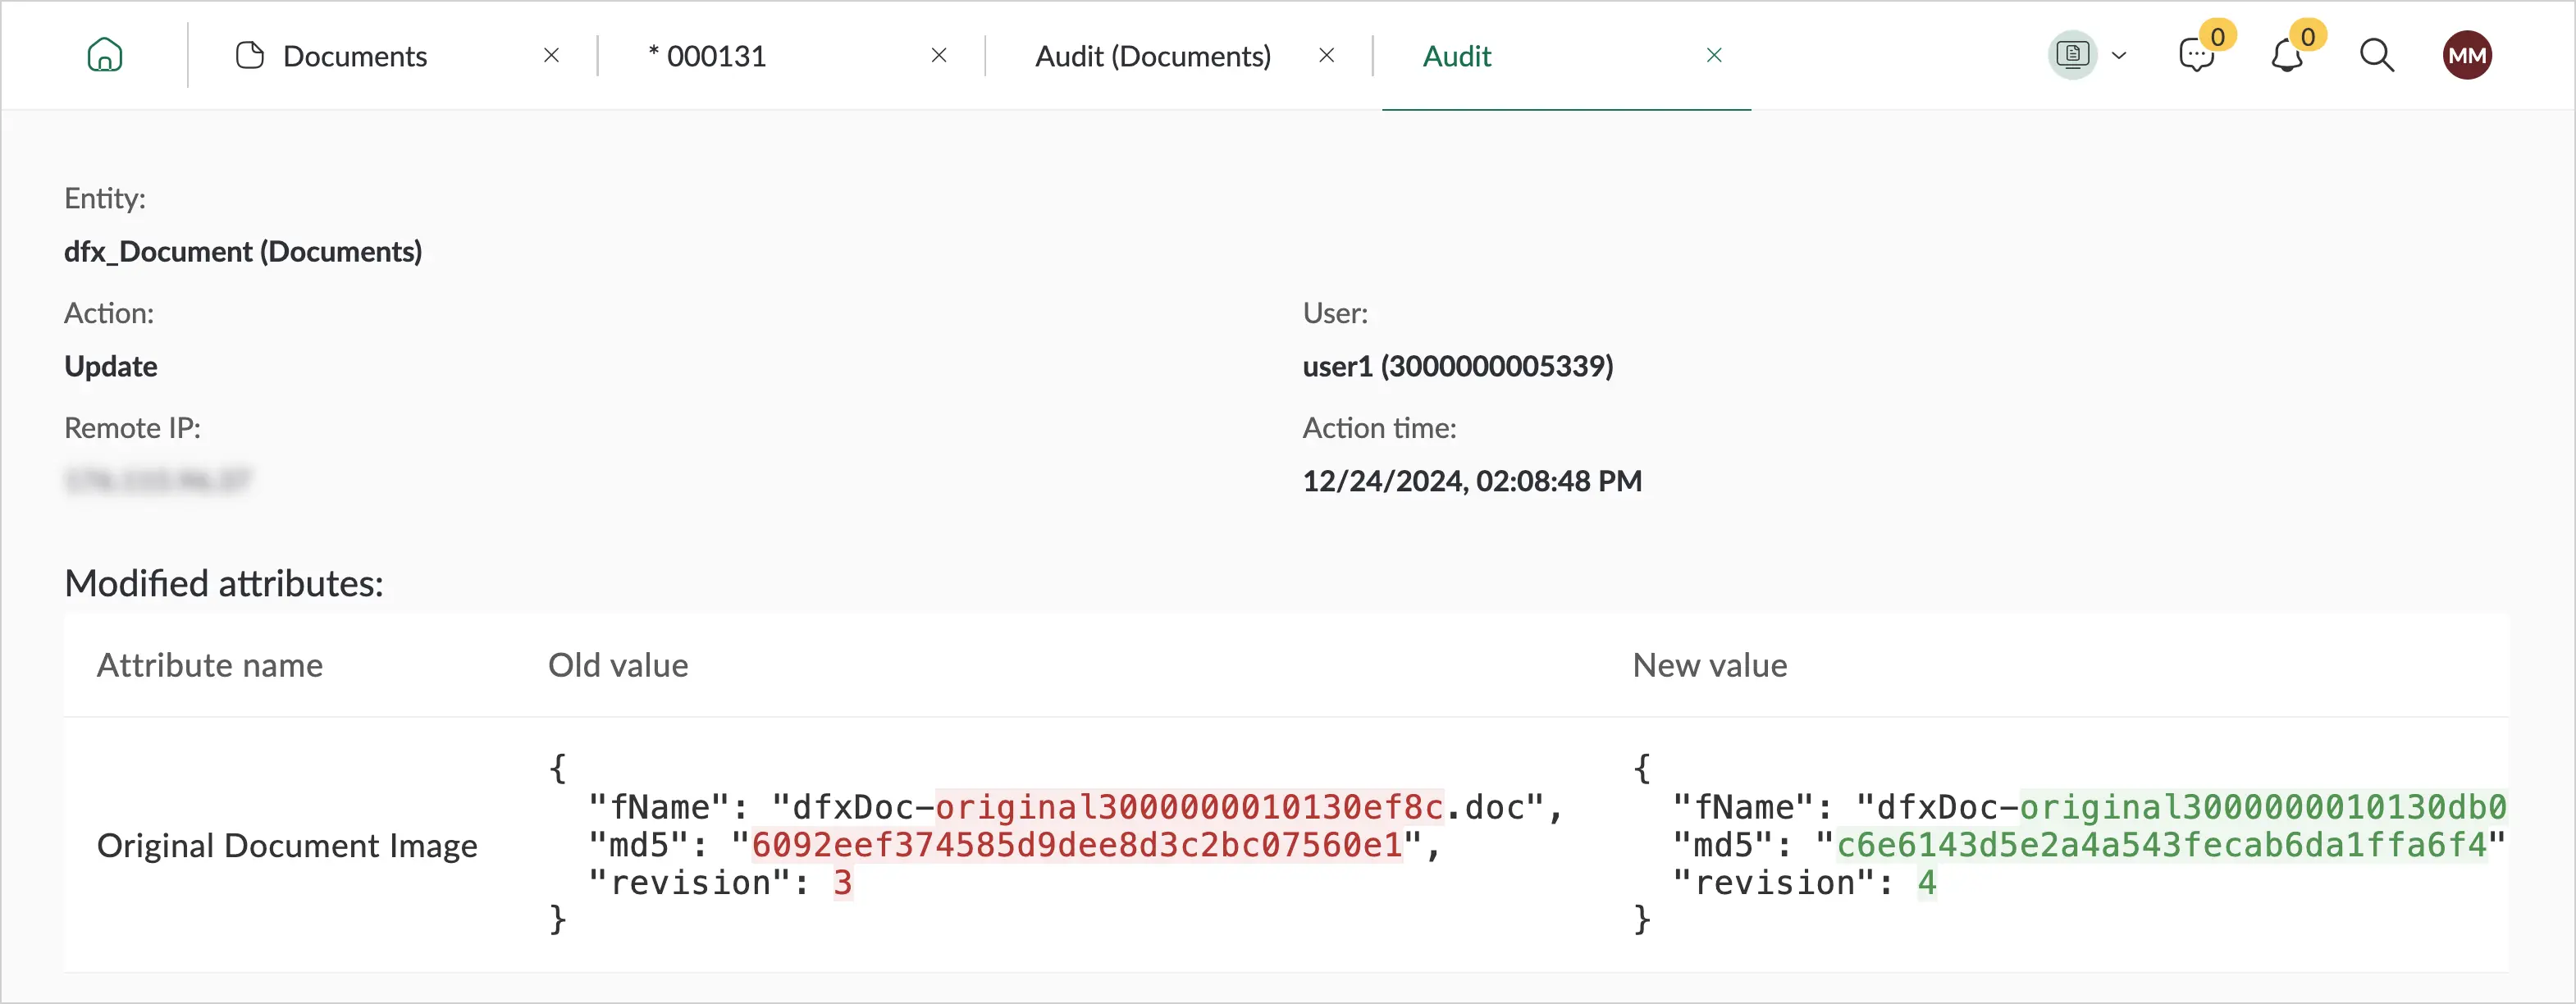
When opening an audit record, the modified attributes are displayed.
5.1.6. Copy Documents
The Copy Documents functionality is similar to Create a Document, but it allows you to create a copy of an existing document with the ability to configure copy parameters and automatically execute additional actions. Event handlers are used to provide flexible control over the copy process.
You can customize copy parameters, for example, configure the state of the future document, bind handlers to the copy event, or add and remove attributes. When a new document is created by copying, unique values such as the document number are not copied.
5.1.6.1. Configure Document Copying
-
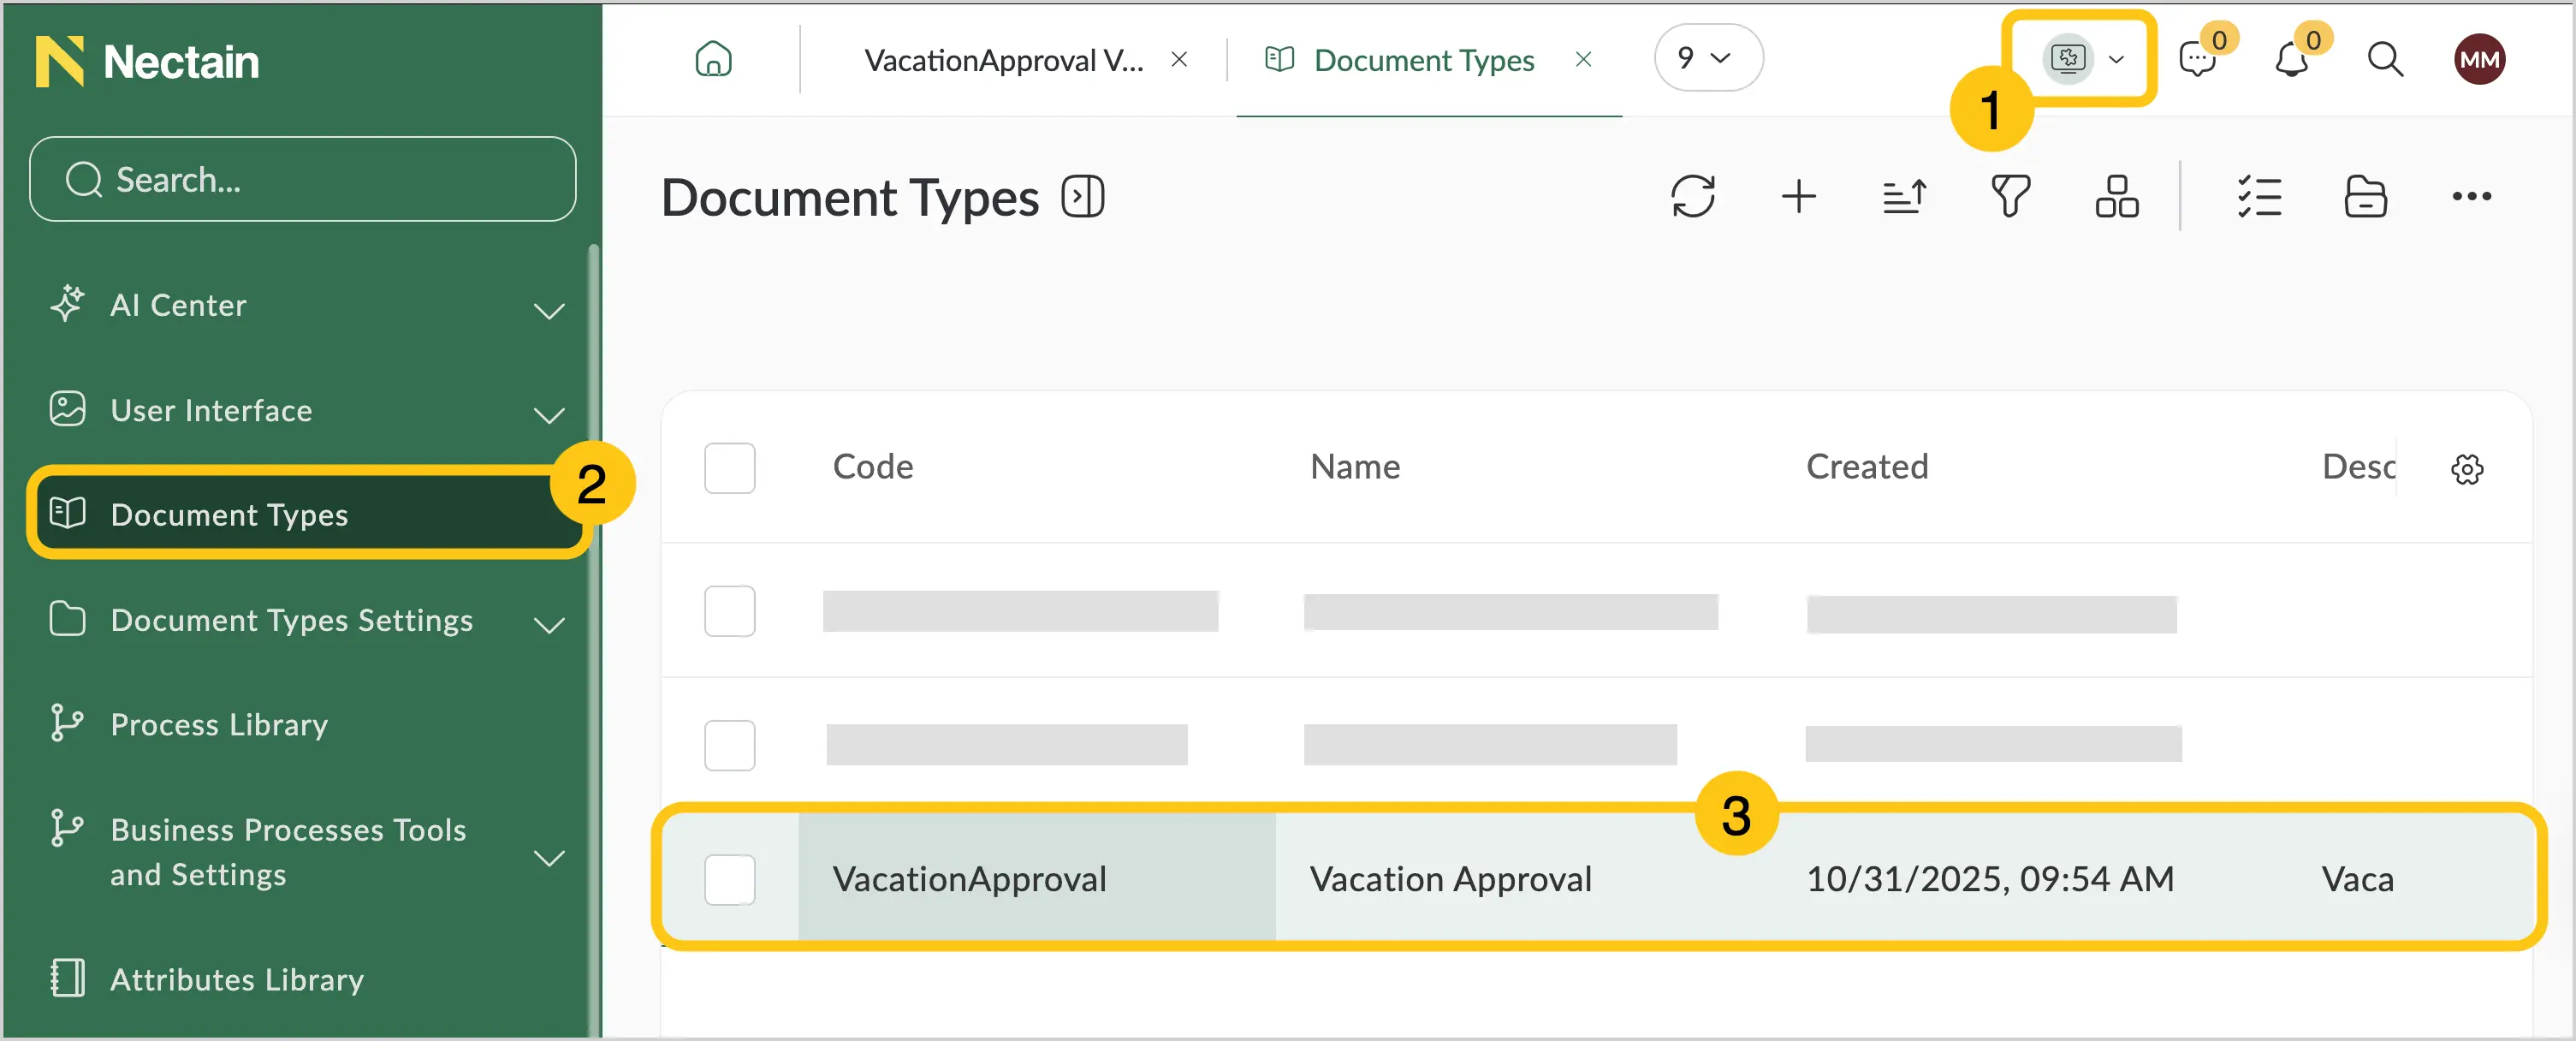
In the navigation pane, select the Studio workspace 1.
-
Select the Document Types shortcut 2.
-
Select the required document type 3.
-
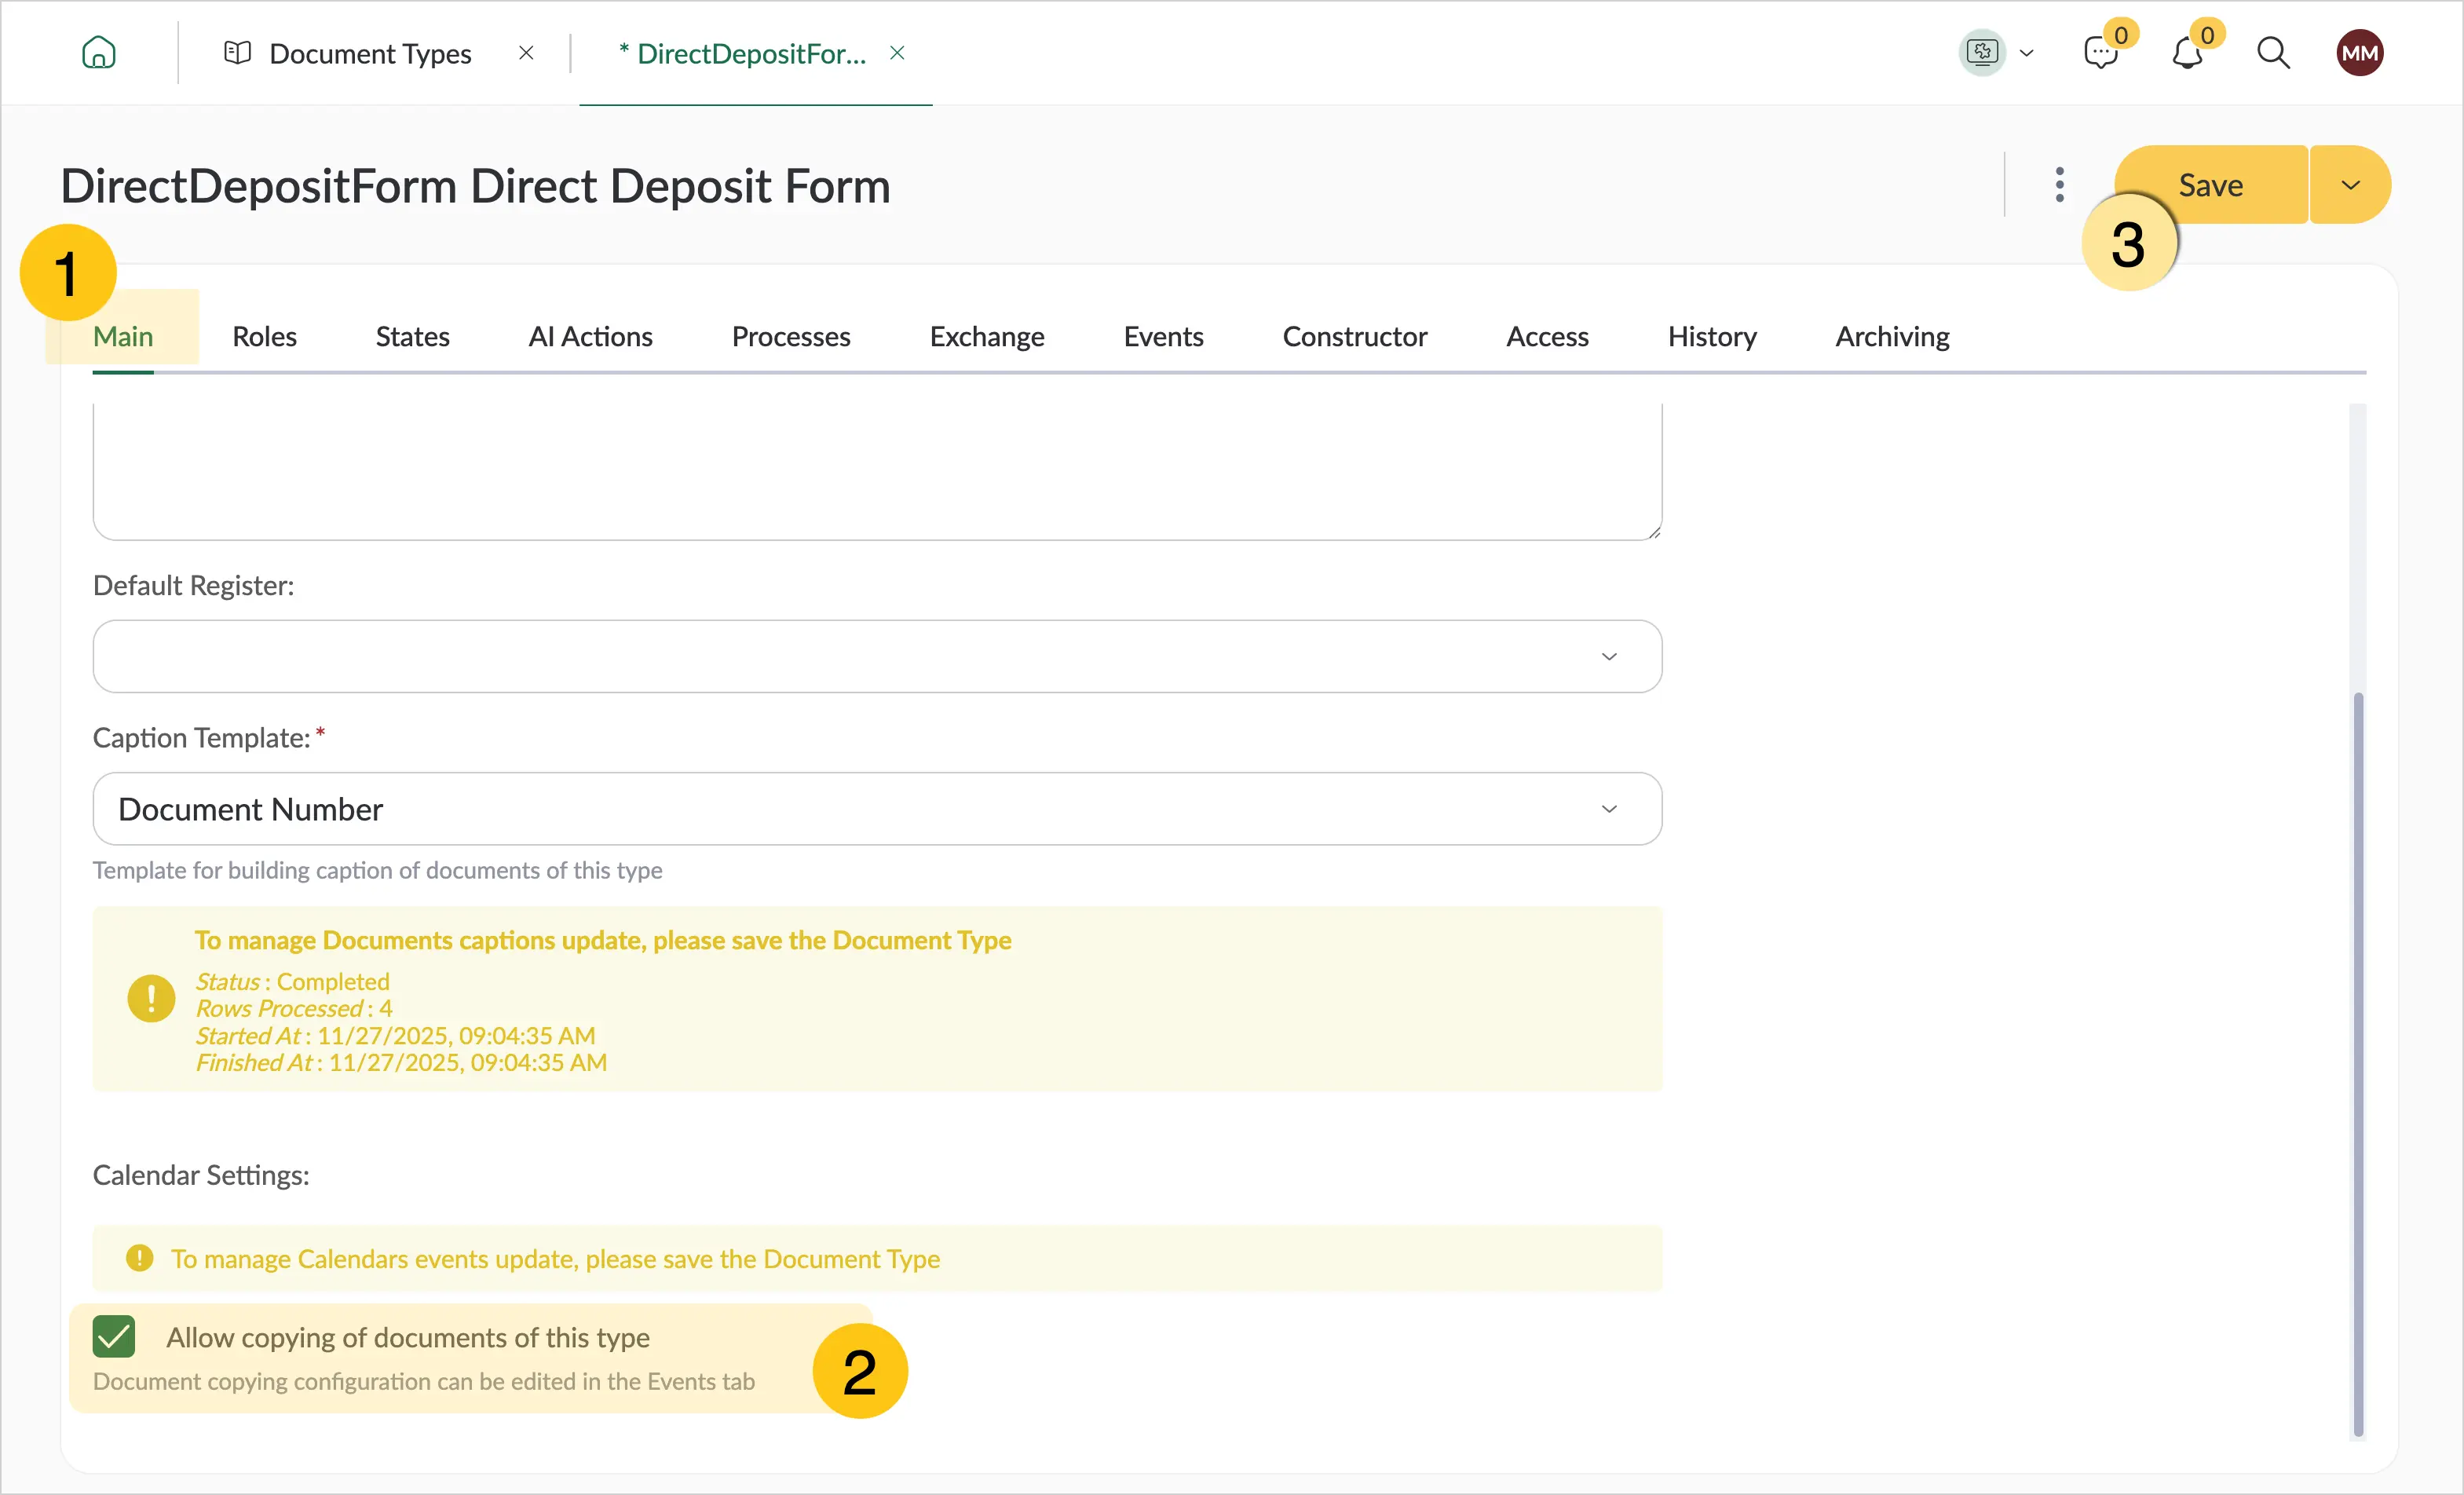
On the Main tab 1, scroll down to the bottom of the page.
-
Select the Allow copying documents of this type checkbox 2.
-
To save the changes, in the toolbar select Save 3.
-
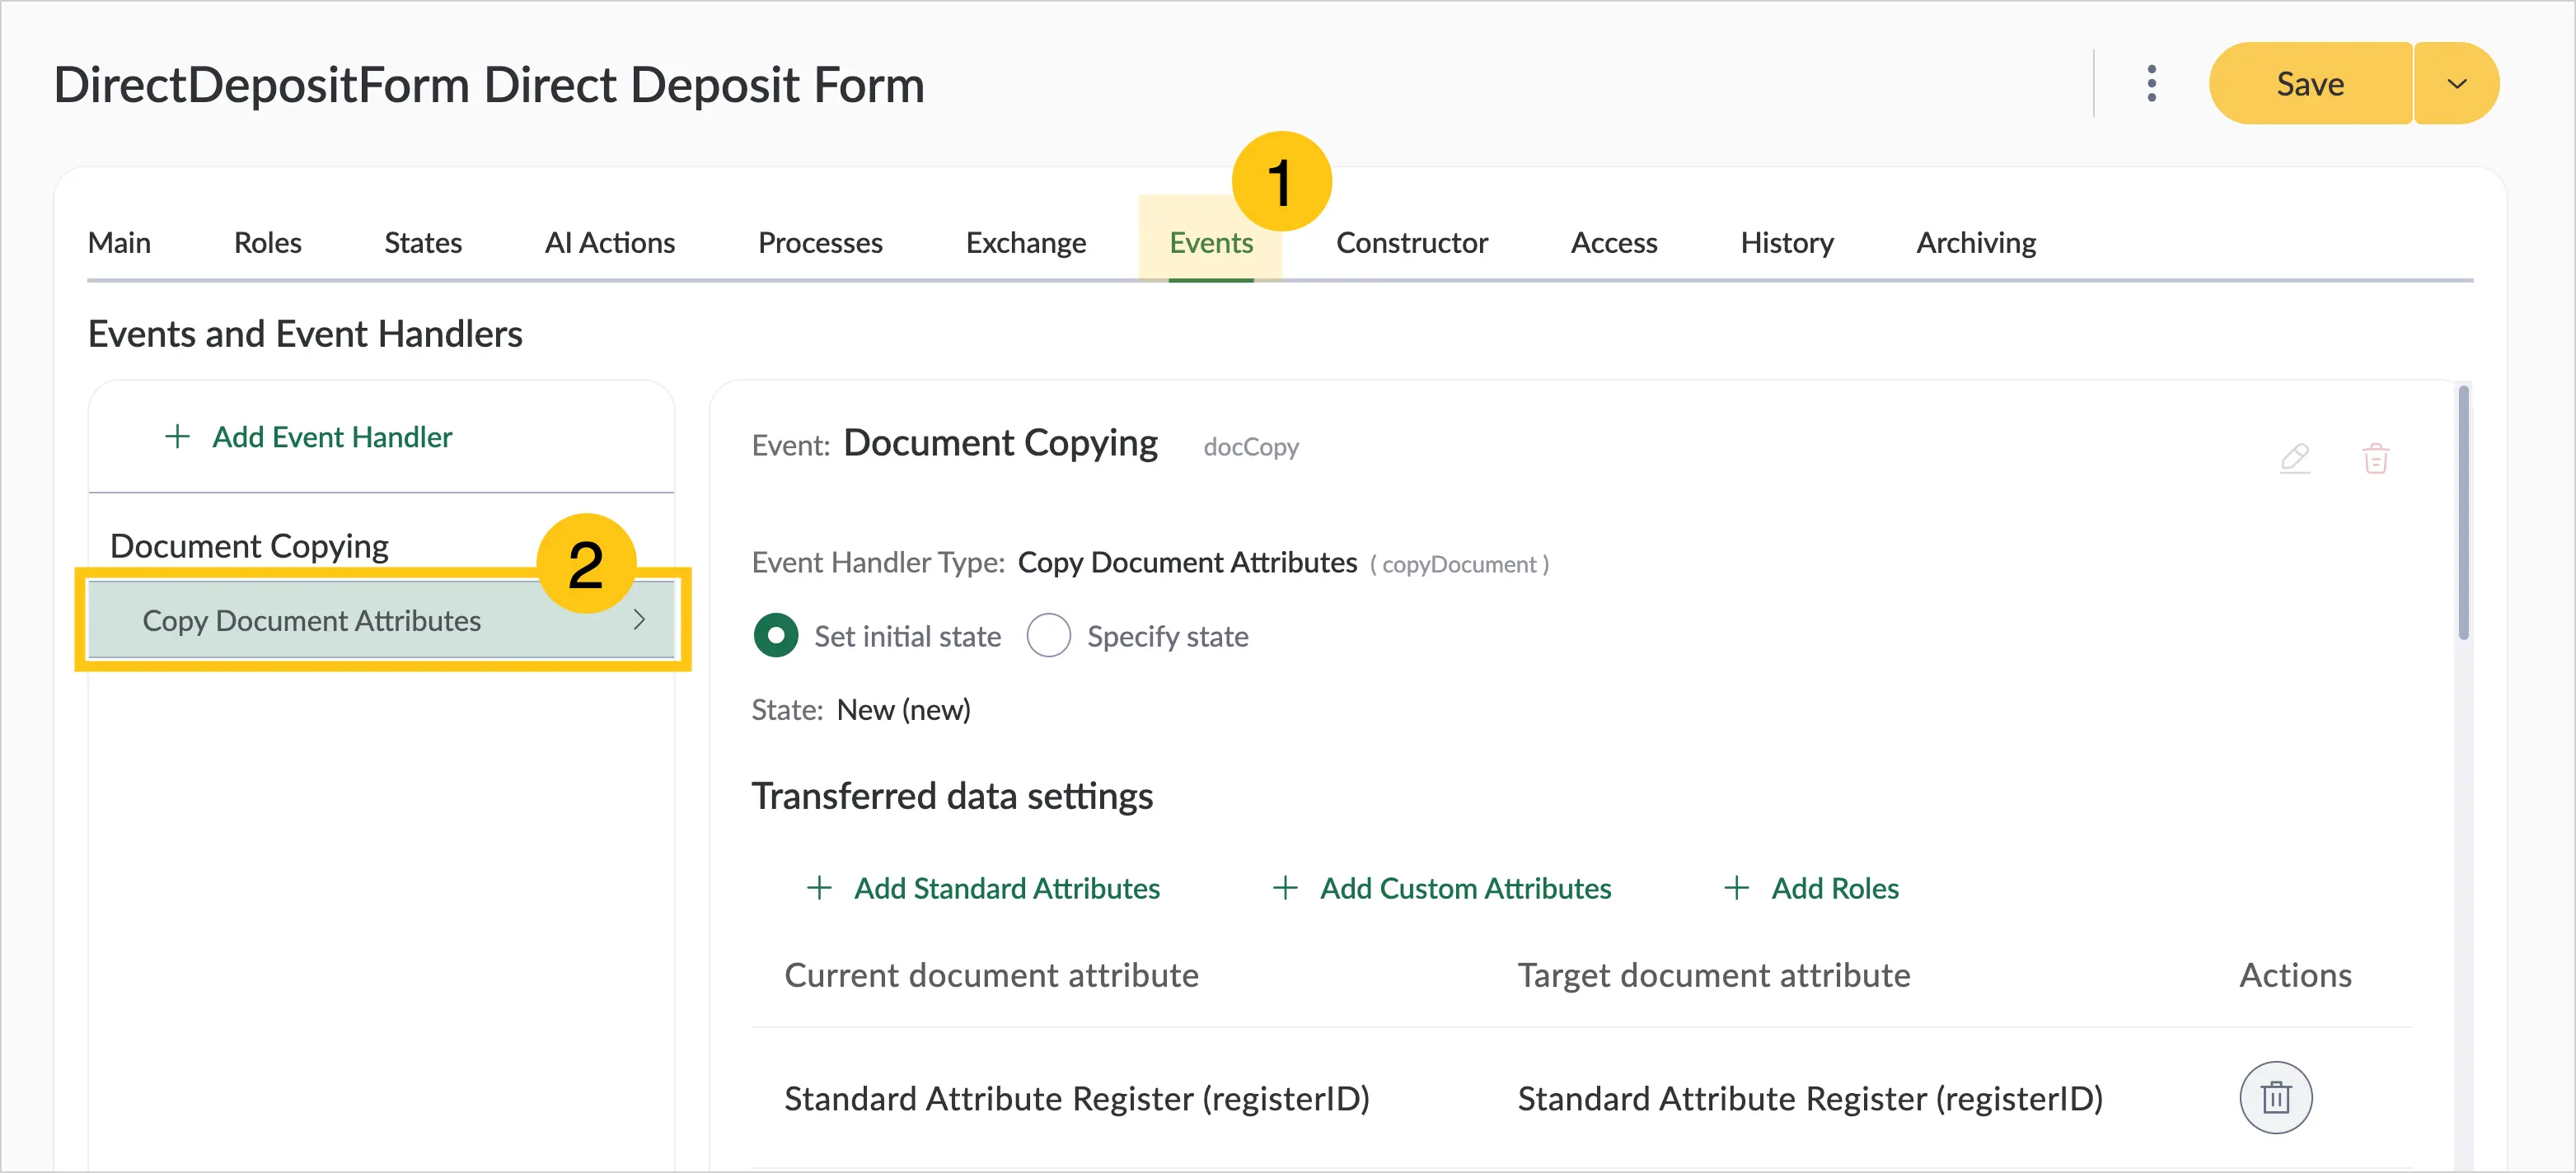
Go to the Events tab 1. As a result of the previous steps, the system automatically created a new Copy Document handler 2 and populated the transfer data. By default, all attributes available on the document form are copied. The new document will receive the same state as the "initial state" of the current document. However, you can change the attribute list and the future document state using the settings described in the next steps.
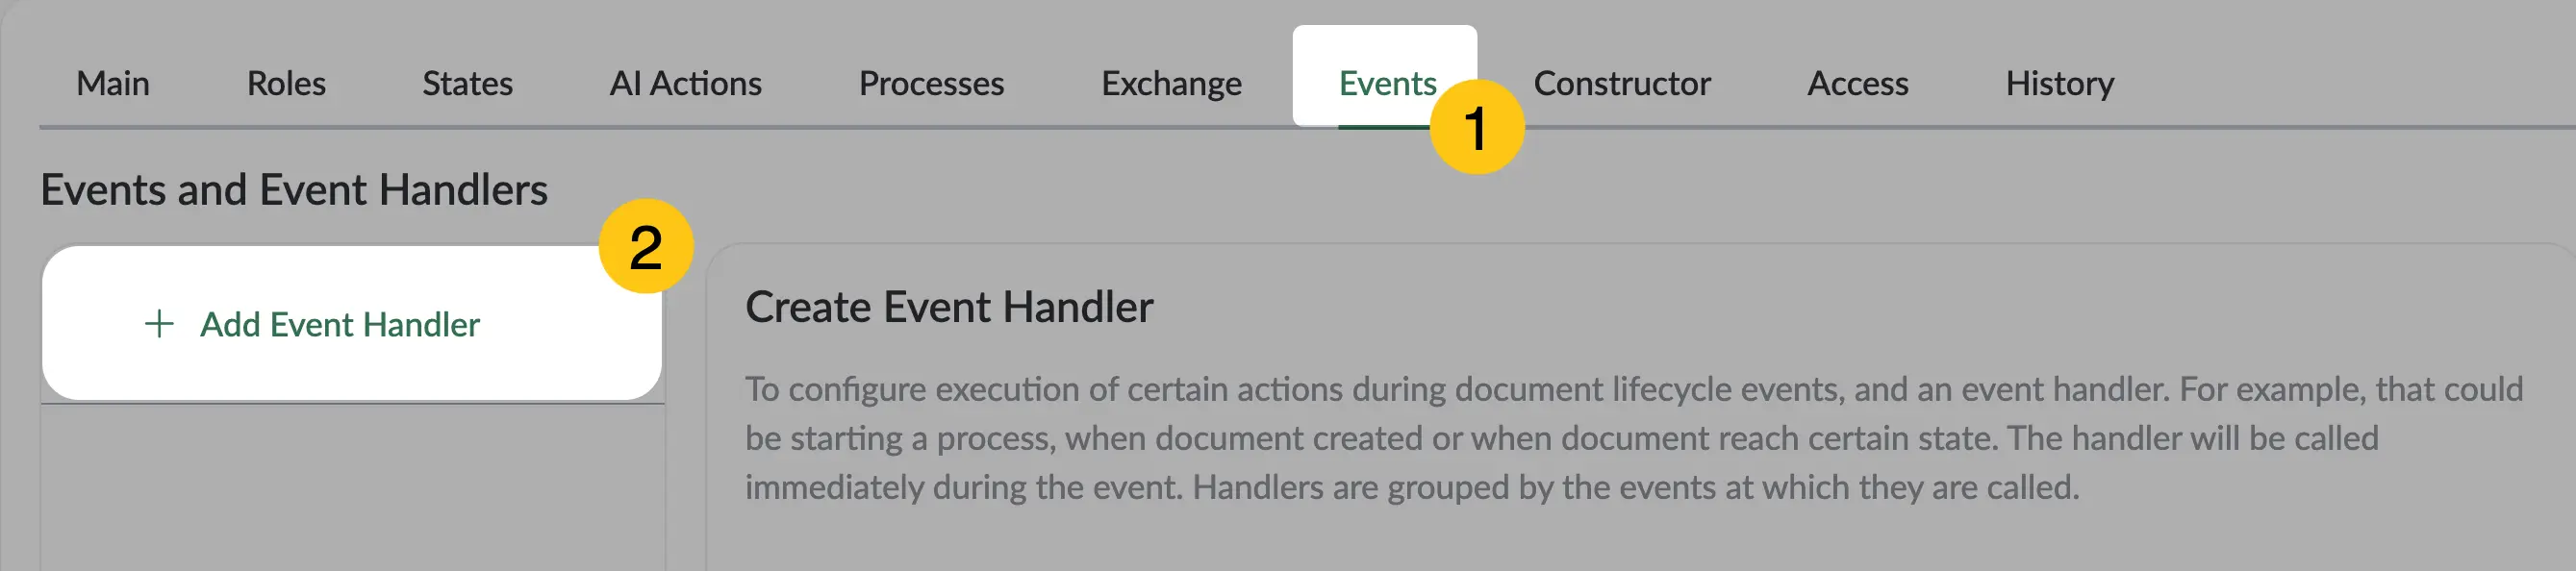
You can configure additional handlers bound to the copy event. This allows you to create separate business logic for copied documents, for example, automatically start a business process after a document is copied.
To do this:
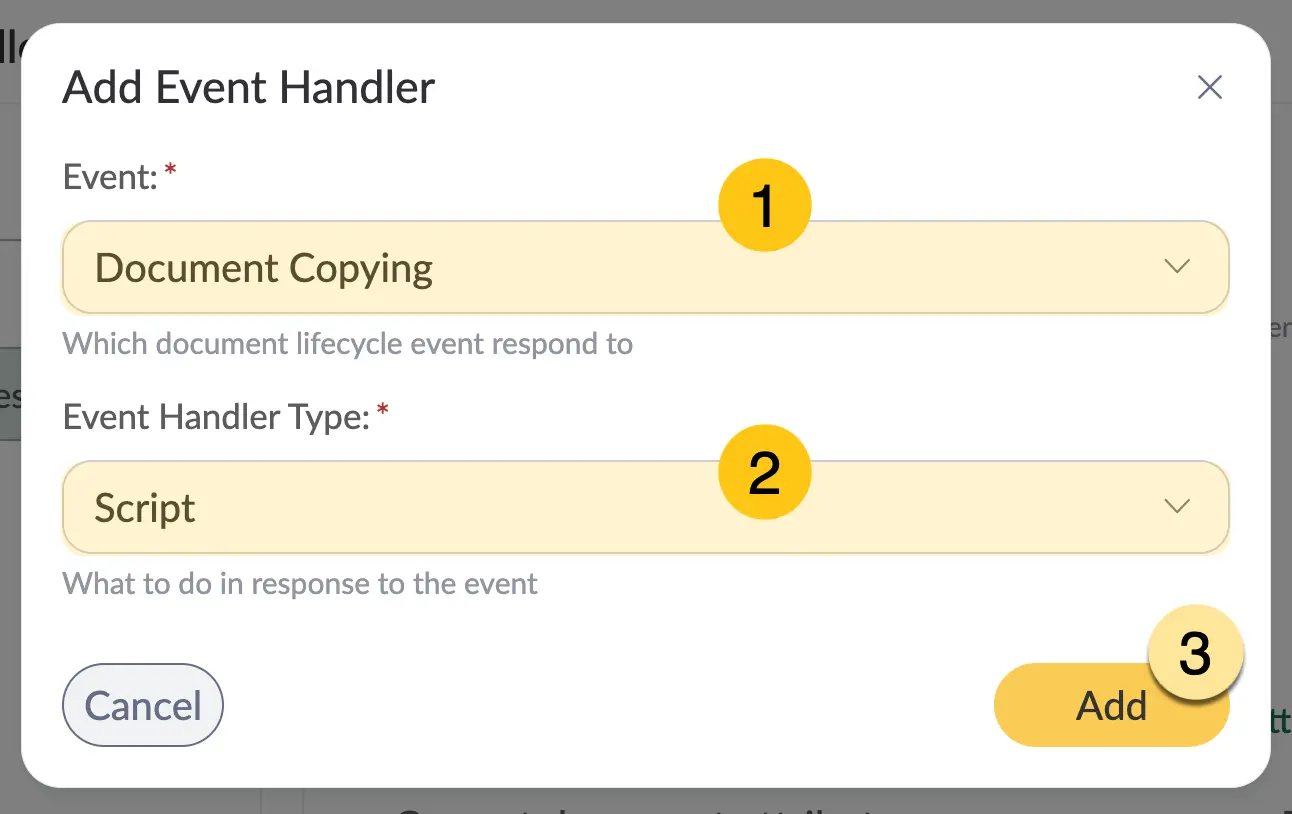
a. On the Events tab 1, select Add Event Handler 2.
b. To configure the handler, in the Event field select Copy Document 1.
c. In the Event Handler Type field, select the action that should be triggered during copying 2.
d. Select Add 3.
-
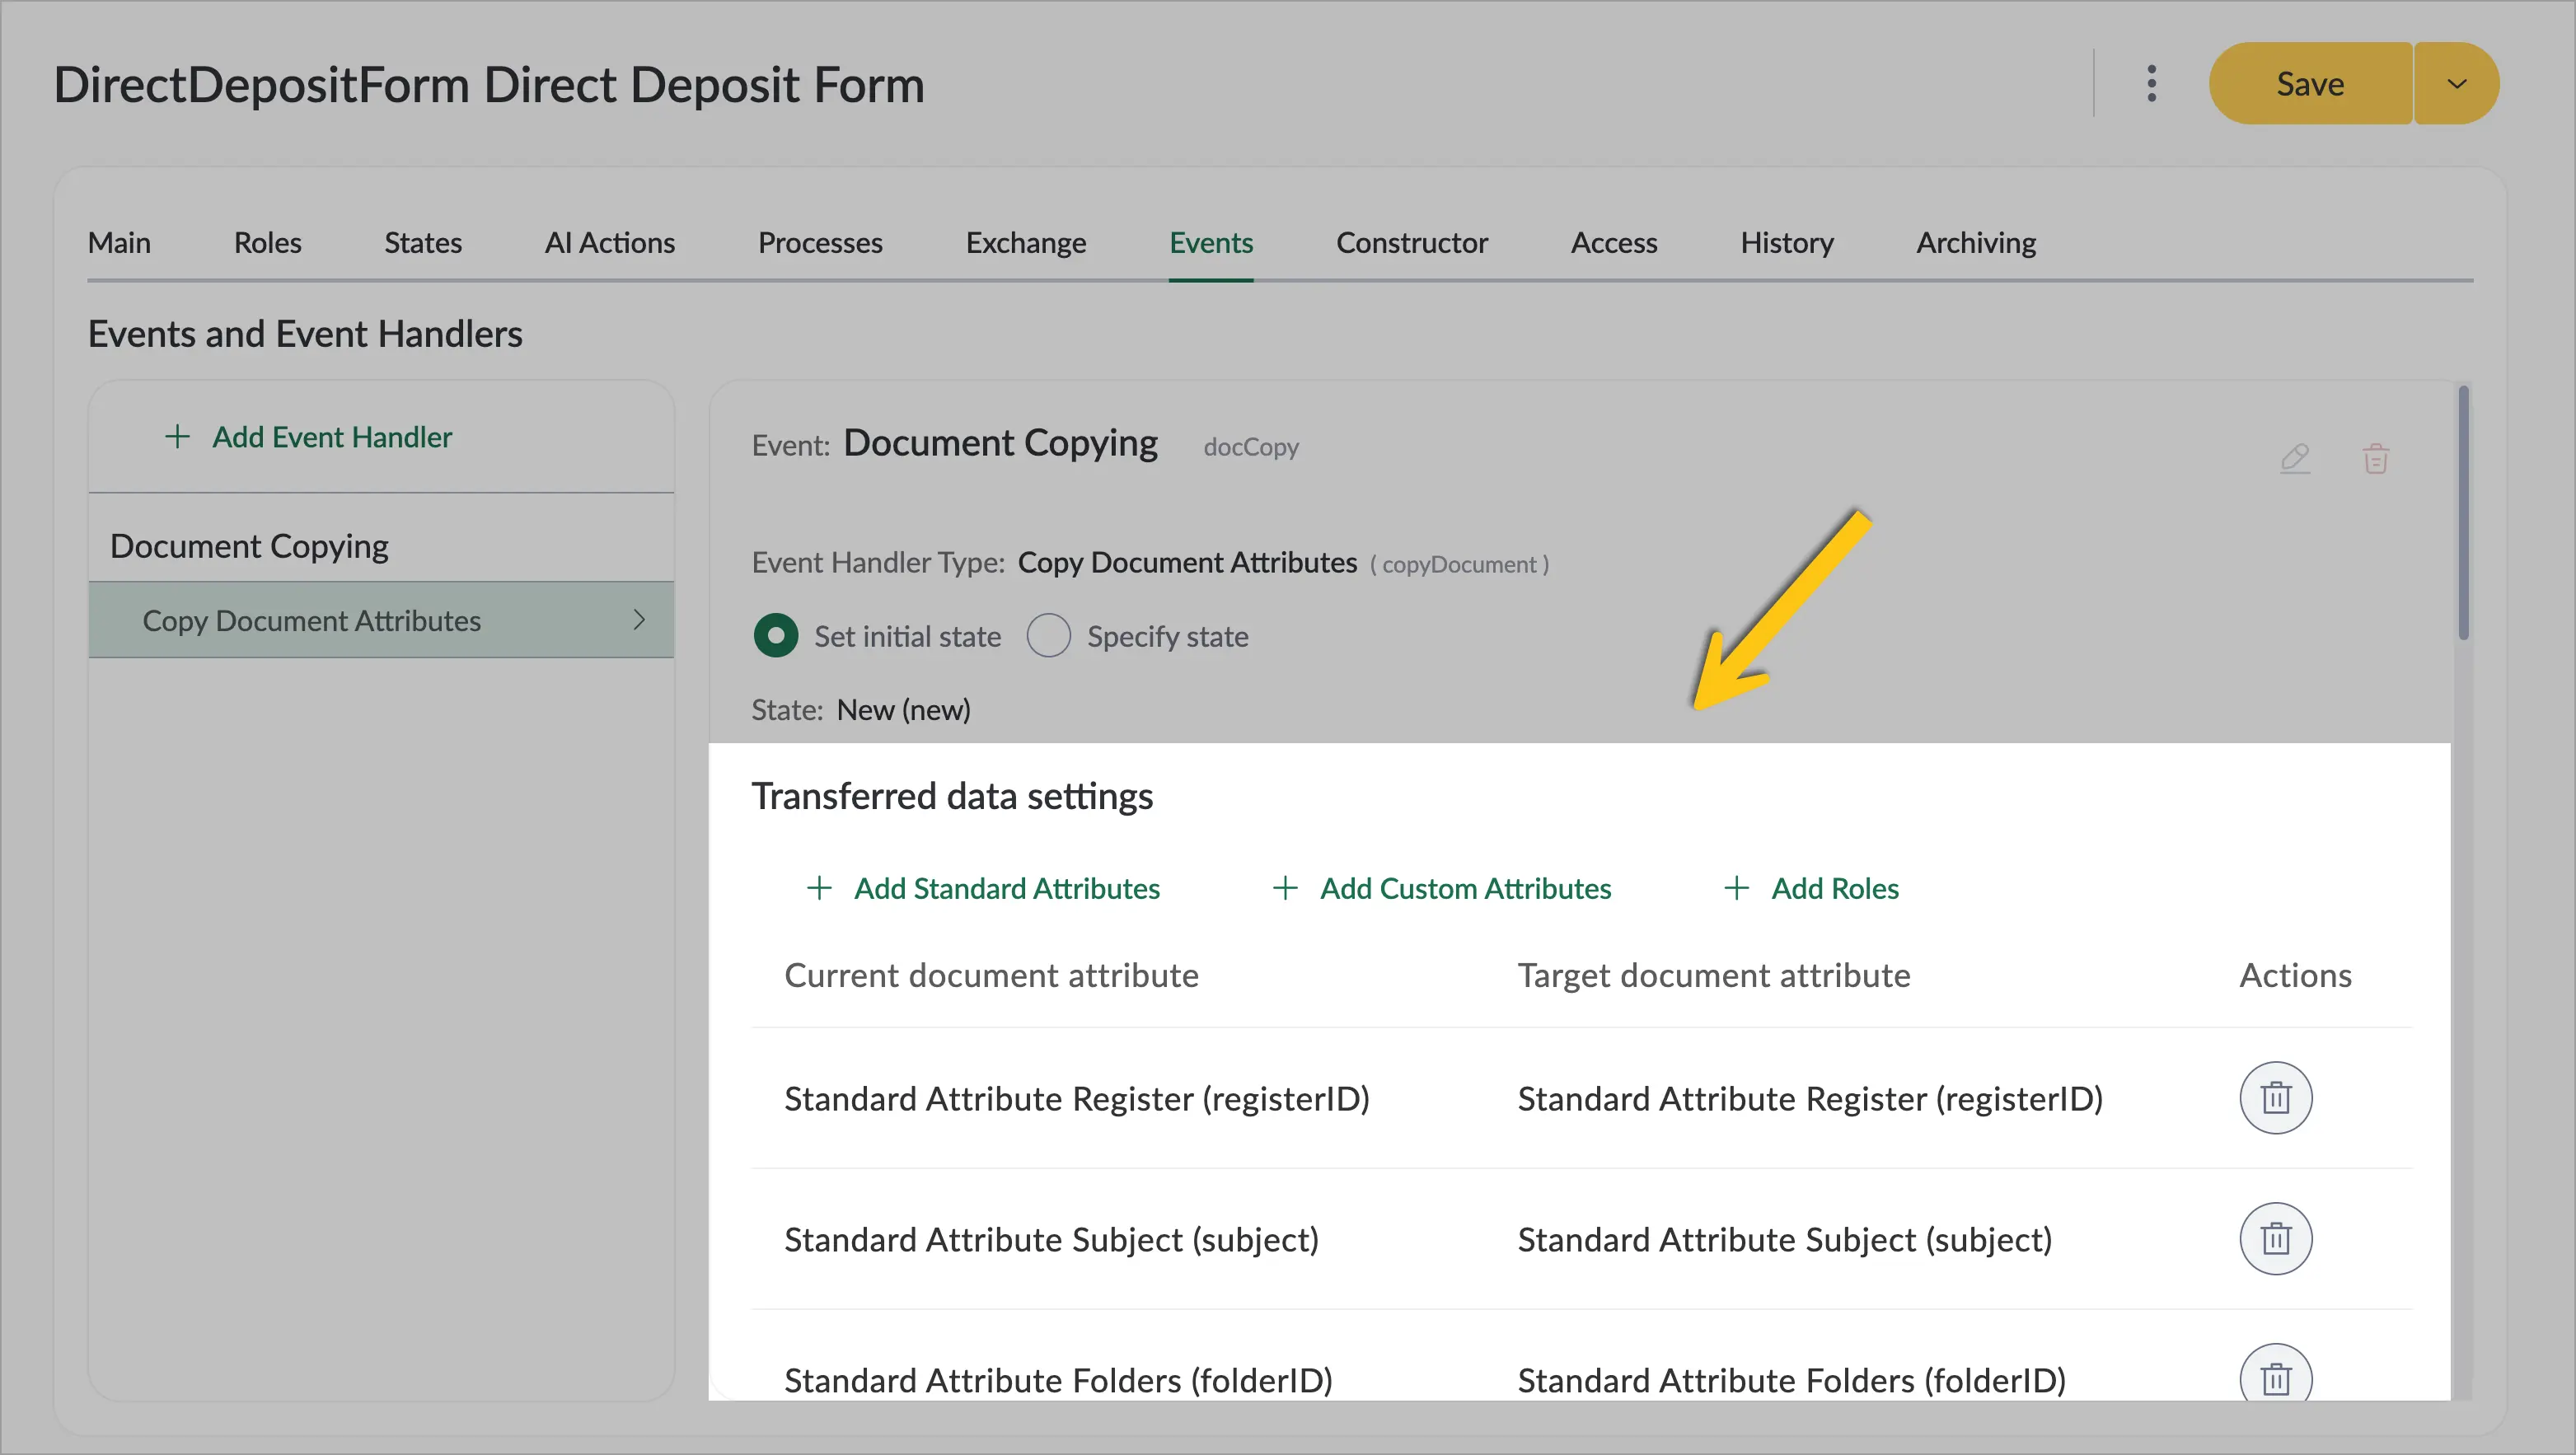
In the handler settings, you can configure the new document state, as well as its attributes and roles.
-
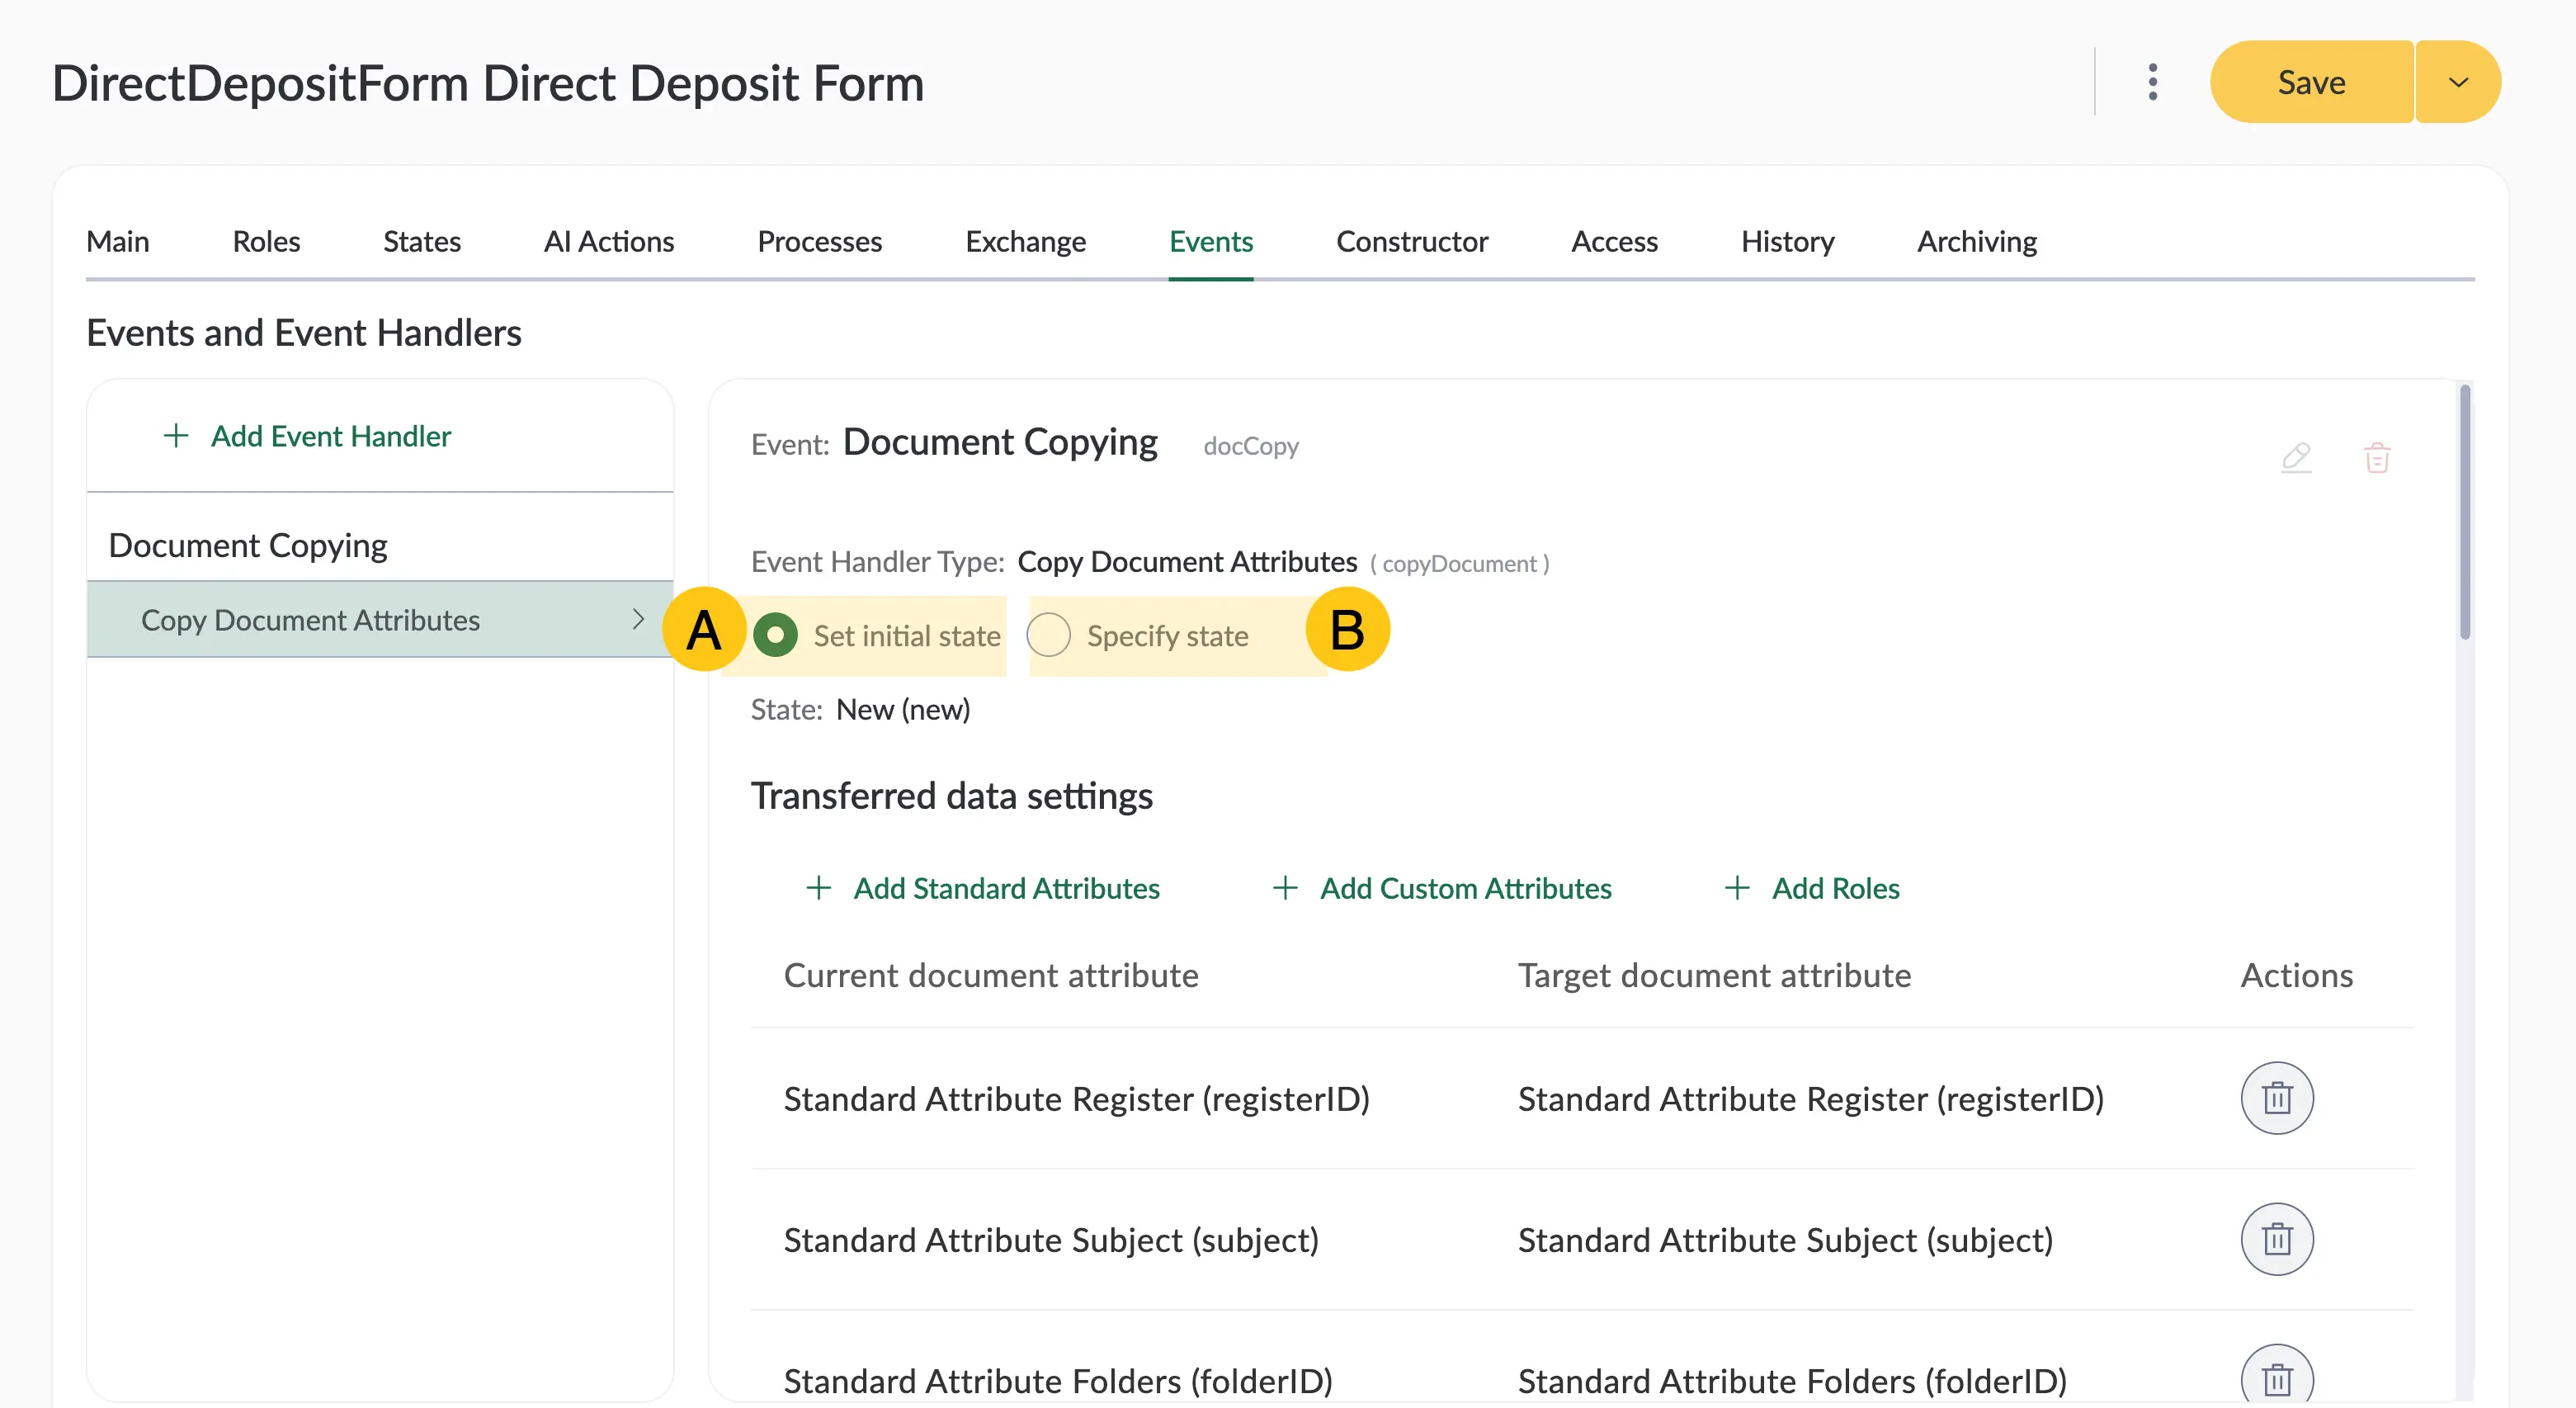
To configure the state of the new document, select one of the following options:
-
A Set Initial State — the copied document will receive the state that you marked as "Initial" on the States tab. If the initial state changes in the document type configuration, the handler automatically applies those changes.
Note:If you disable the "initial state" on the States tab, the system uses the default values configured for the handler.
-
B Specify State — an additional field appears where you can select one of the states enabled for the current document type on the States tab. In this case, changing the initial state of the main document does not affect the copied document — the selected state remains fixed.
Note:If the specified state is deleted for any reason, the system automatically replaces it with the state marked as "Initial".
-
-
You can also remove or add attribute bindings between the current and new document. Bindings can only be added if the source and target attributes are of the same type.
-
-
To save the changes, in the toolbar select Save.
5.1.6.2. Copy a Document
To start copying a document, use one of the following methods:
Method 1. Through the settings menu on the document form
a. Open the required document. To do this:
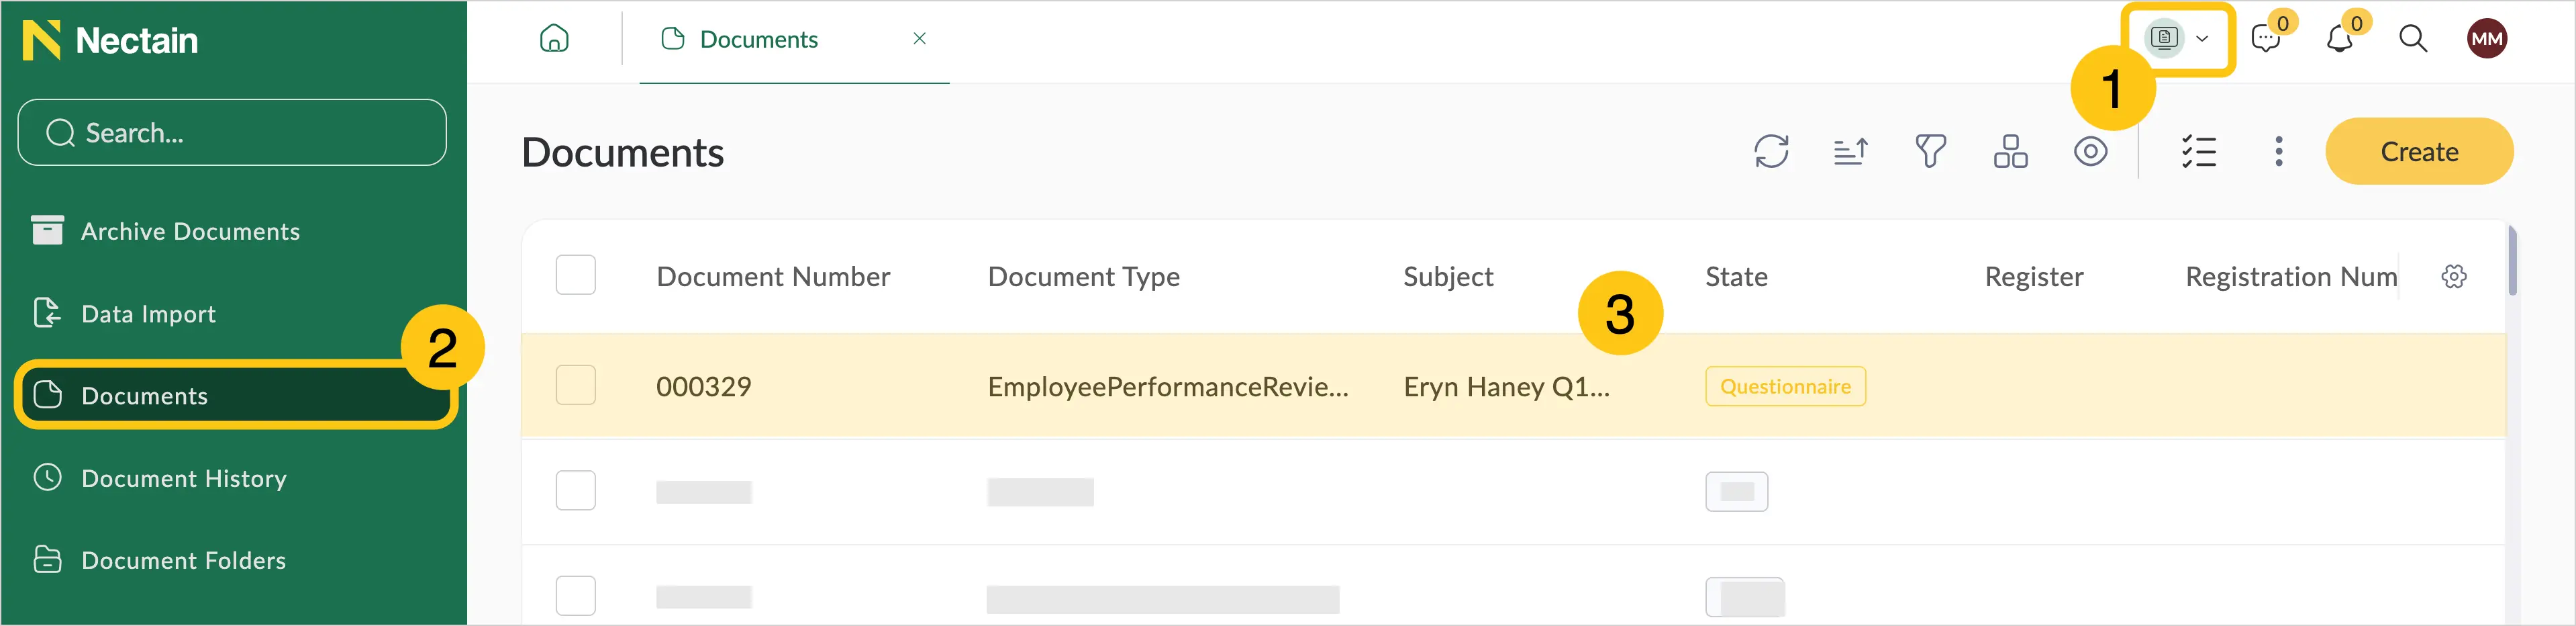
- In the navigation pane, select the Documents workspace 1.
- Select the Documents shortcut 2.
- Use filters to simplify the search.
- Select the required document 3.
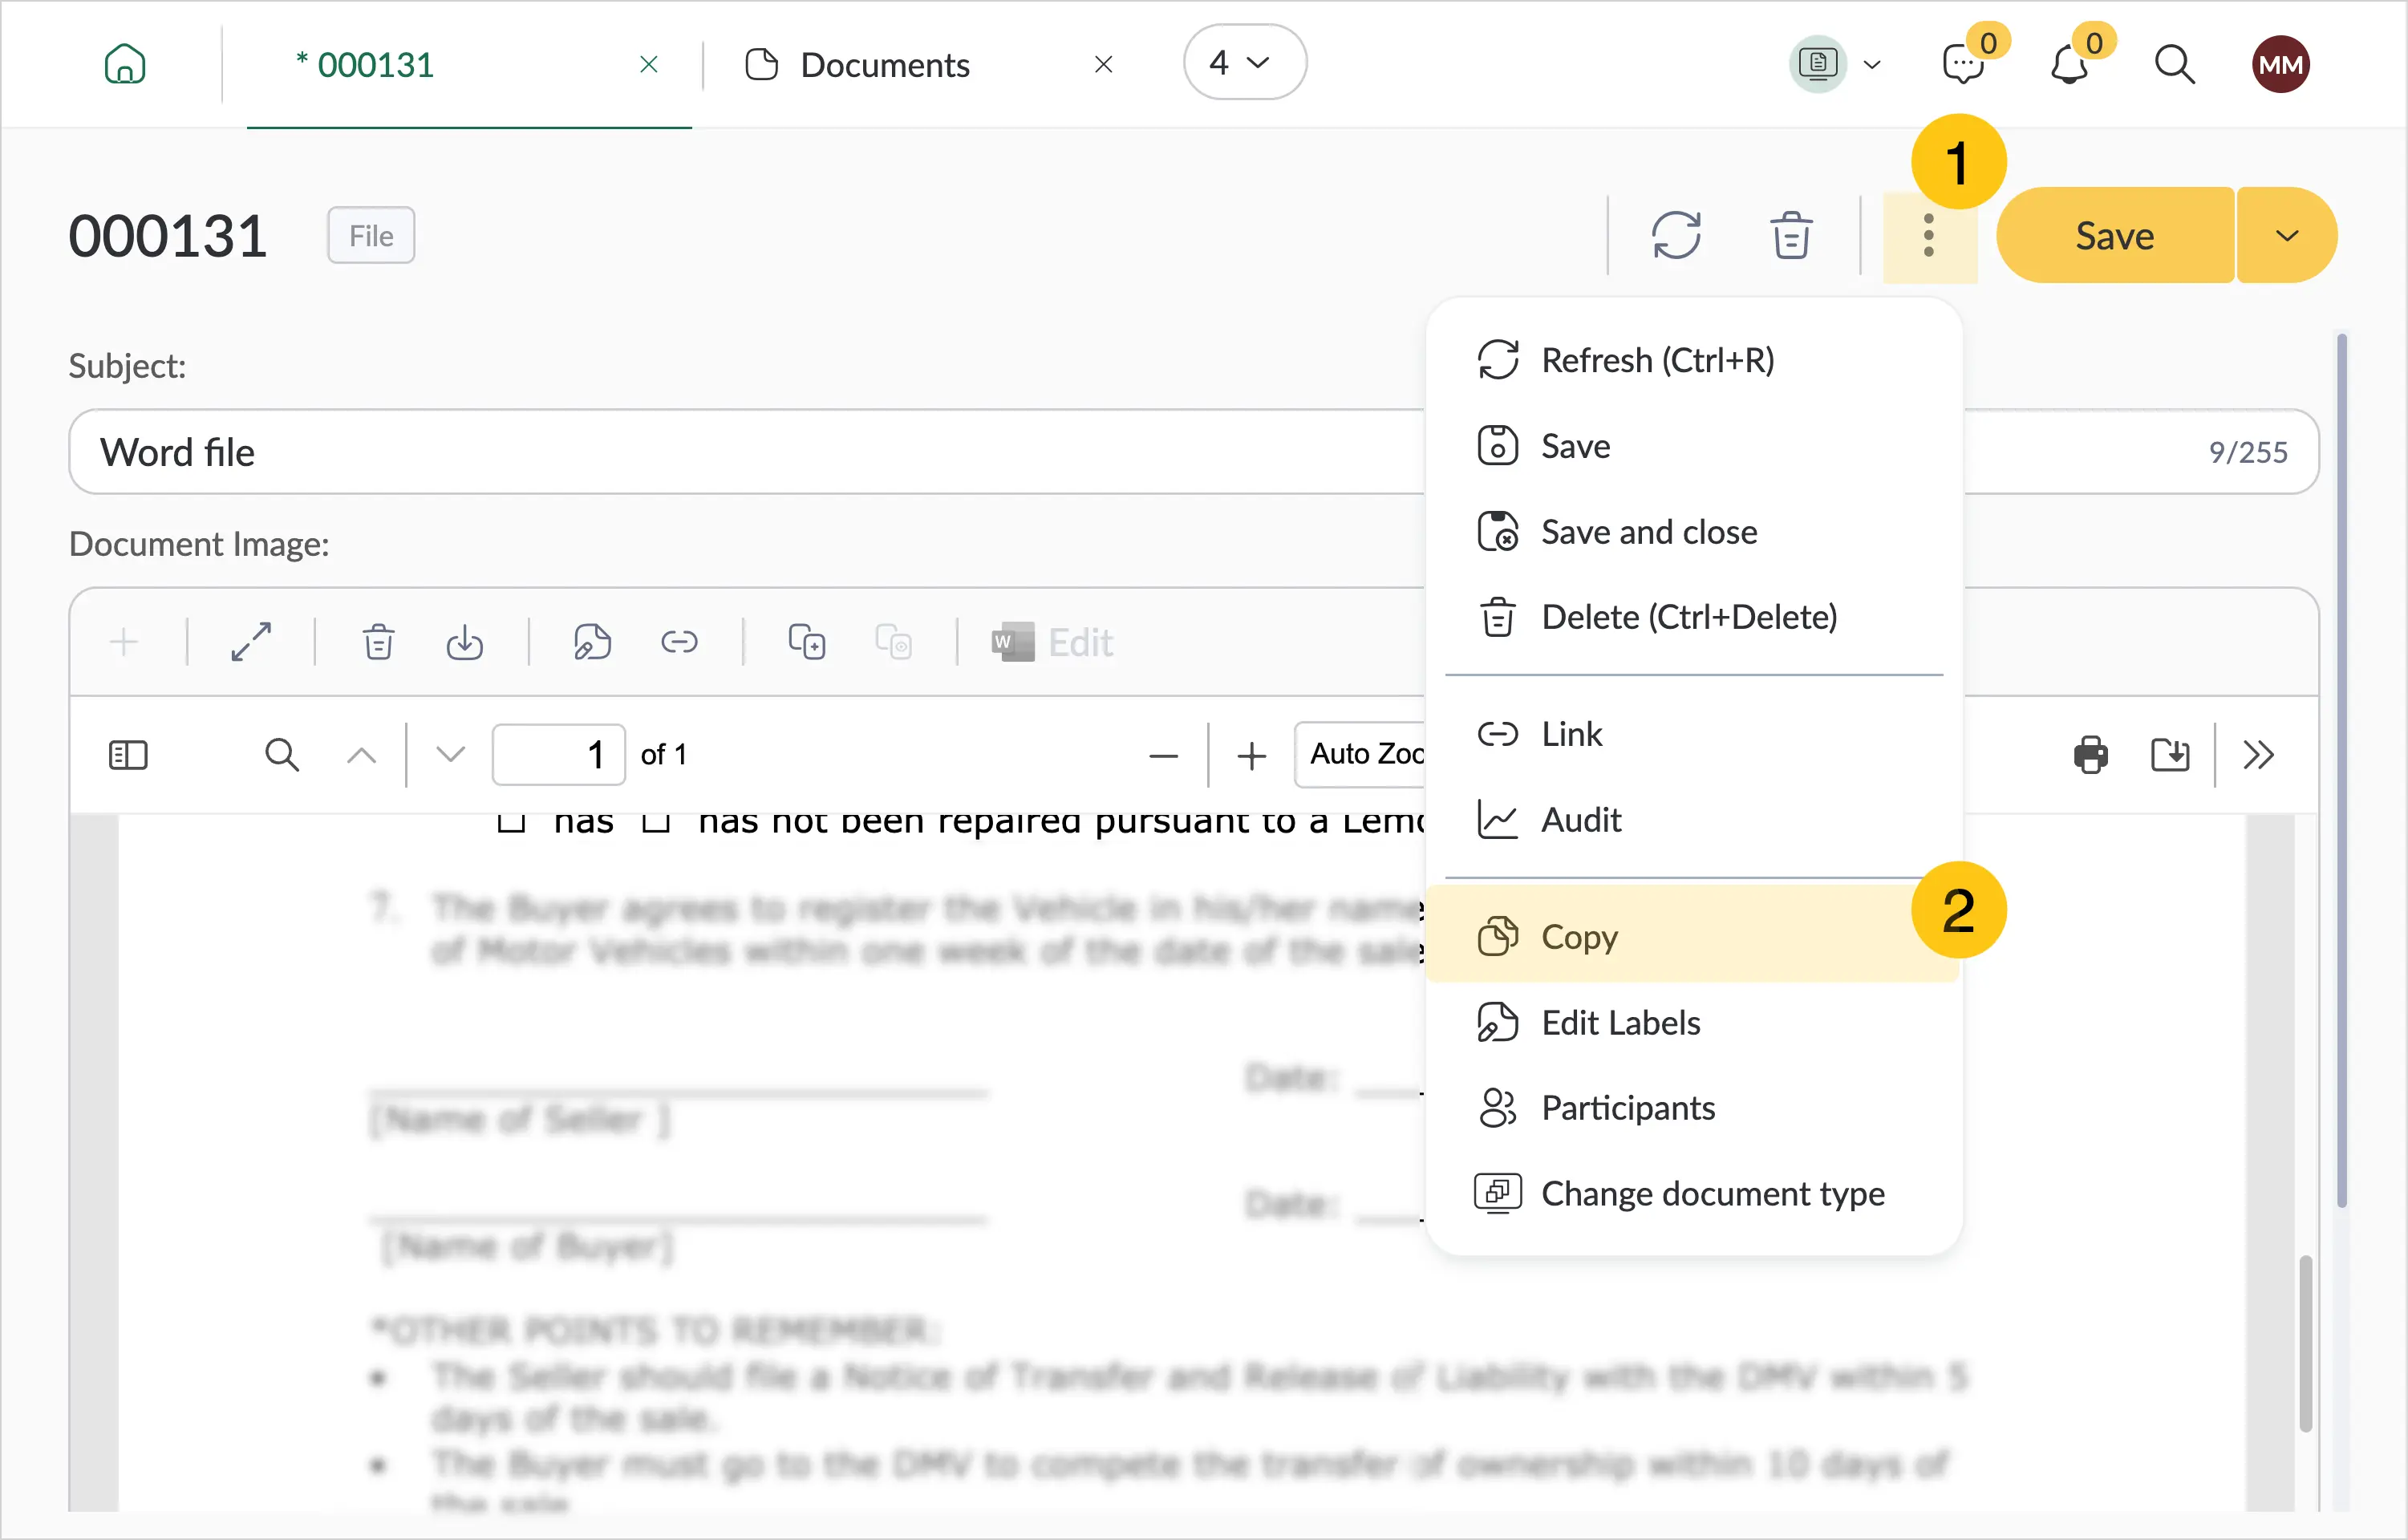
b. On the document form, in the upper-right corner, select the settings icon 1.
c. In the settings menu, select Copy 2.
Method 2. Through the context menu in the document registry
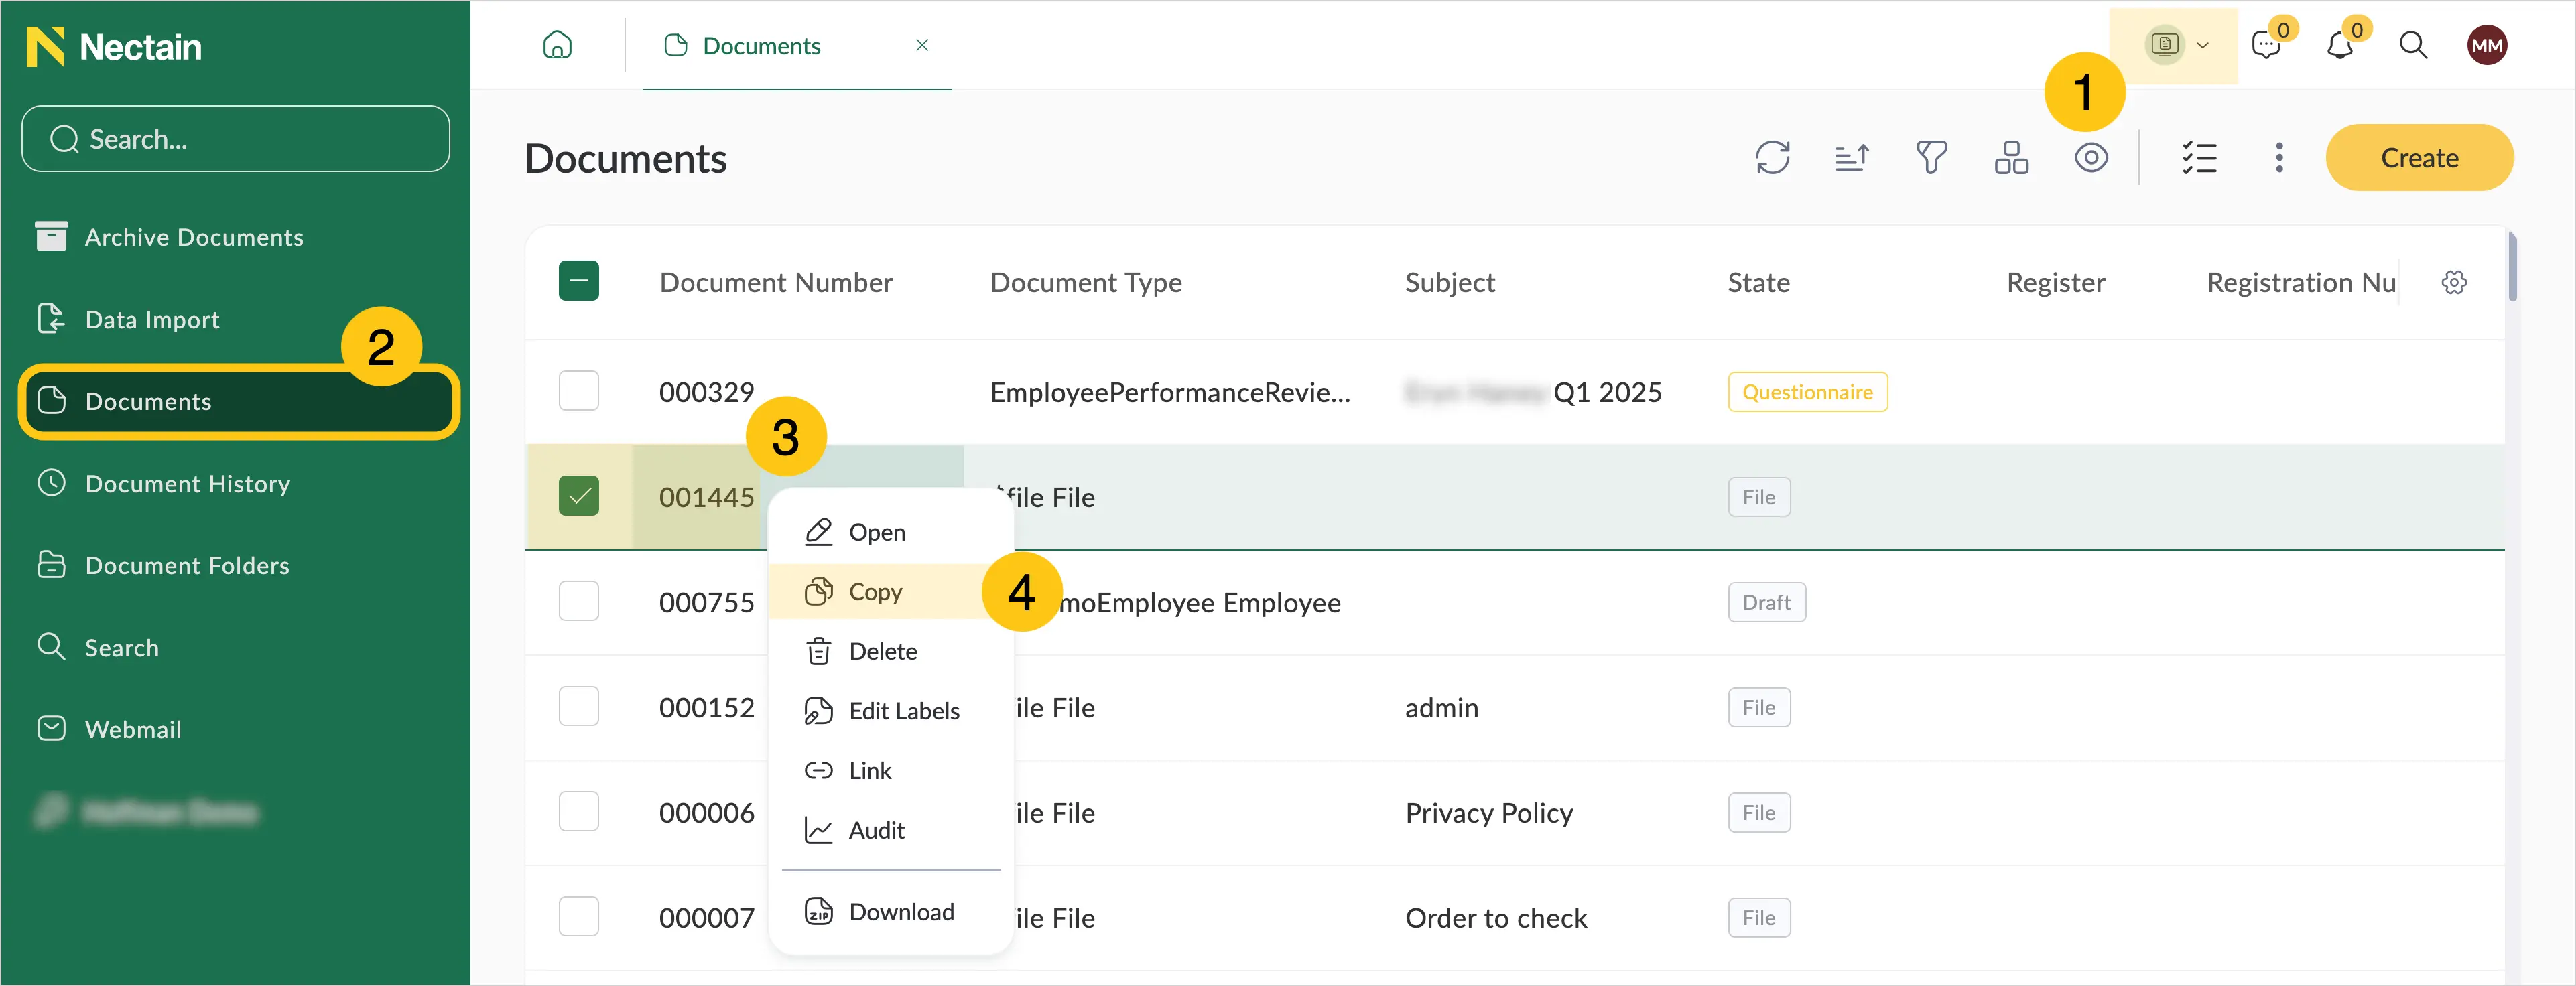
a. In the navigation pane, select the Documents workspace 1.
b. Select the Documents shortcut 2.
c. Right-click the document configured for copying 3.
d. In the context menu, select Copy 4.
5.1.7. Document Discussion (Chat)
To discuss documents with document role participants, you can add the standard Document Discussion attribute to the document or task form. This attribute allows creating general discussions, where all document role participants are automatically included, as well as private discussions — where you need to manually add participants when creating them.
After the first message is sent to the General Discussion, the system starts the discussion and all document role participants are automatically added as members. If participants are added or removed during the document lifecycle, they are automatically added to or removed from the general discussion. To create a Private Discussion, select the New Discussion button, choose participants from the list of system users, optionally set a discussion name, and select Create. Private discussion participants automatically receive observer access (they are added to the Document Observer role). For private discussions, you can manage the participant list — add or remove members. You can also delete a private discussion.
For each discussion, users can manage notification settings. When a discussion is open, you can subscribe or unsubscribe by selecting the bell icon. When subscribed, the user receives pop-up notifications when new messages arrive in the discussion.
For private discussions, notifications are enabled by default for all participants. For the general discussion, notifications are enabled only for the document author. When a notification is selected, an editor opens where you can view and write messages, and navigate to the linked document. You can also minimize the editor — it will remain visible above other system tabs.
To open the full list of messages, select the messages widget, then select View All Discussions. Discussions with unread messages are marked with a blue indicator.
The following actions are available in the editor:
- tag a message participant using the @ symbol
- copy your own and other users' messages
- reply to your own and other users' messages
- edit your own messages
- delete your own messages
- select your own and other users' messages
5.1.7.1. Rename a Chat
For more information about the Document Discussion attribute, see Document Discussion (Chat). You can now rename a chat during document discussions. By default, the dialog window is named after your conversation partner, or the first participant in the discussion group.
To rename a chat:
-
To open the document discussion, navigate to the document form. You can do this in one of two ways.
Method 1: Through the Documents workspace
This method is available if the Document Discussion attribute has been configured for your document. If so:
-
In the navigation panel, select the Documents 1 workspace.
-
Select the Document shortcut 2.
-
Use filters to simplify the search.
-
Select the required document 3.
Method 2: Through the discussions icon
-
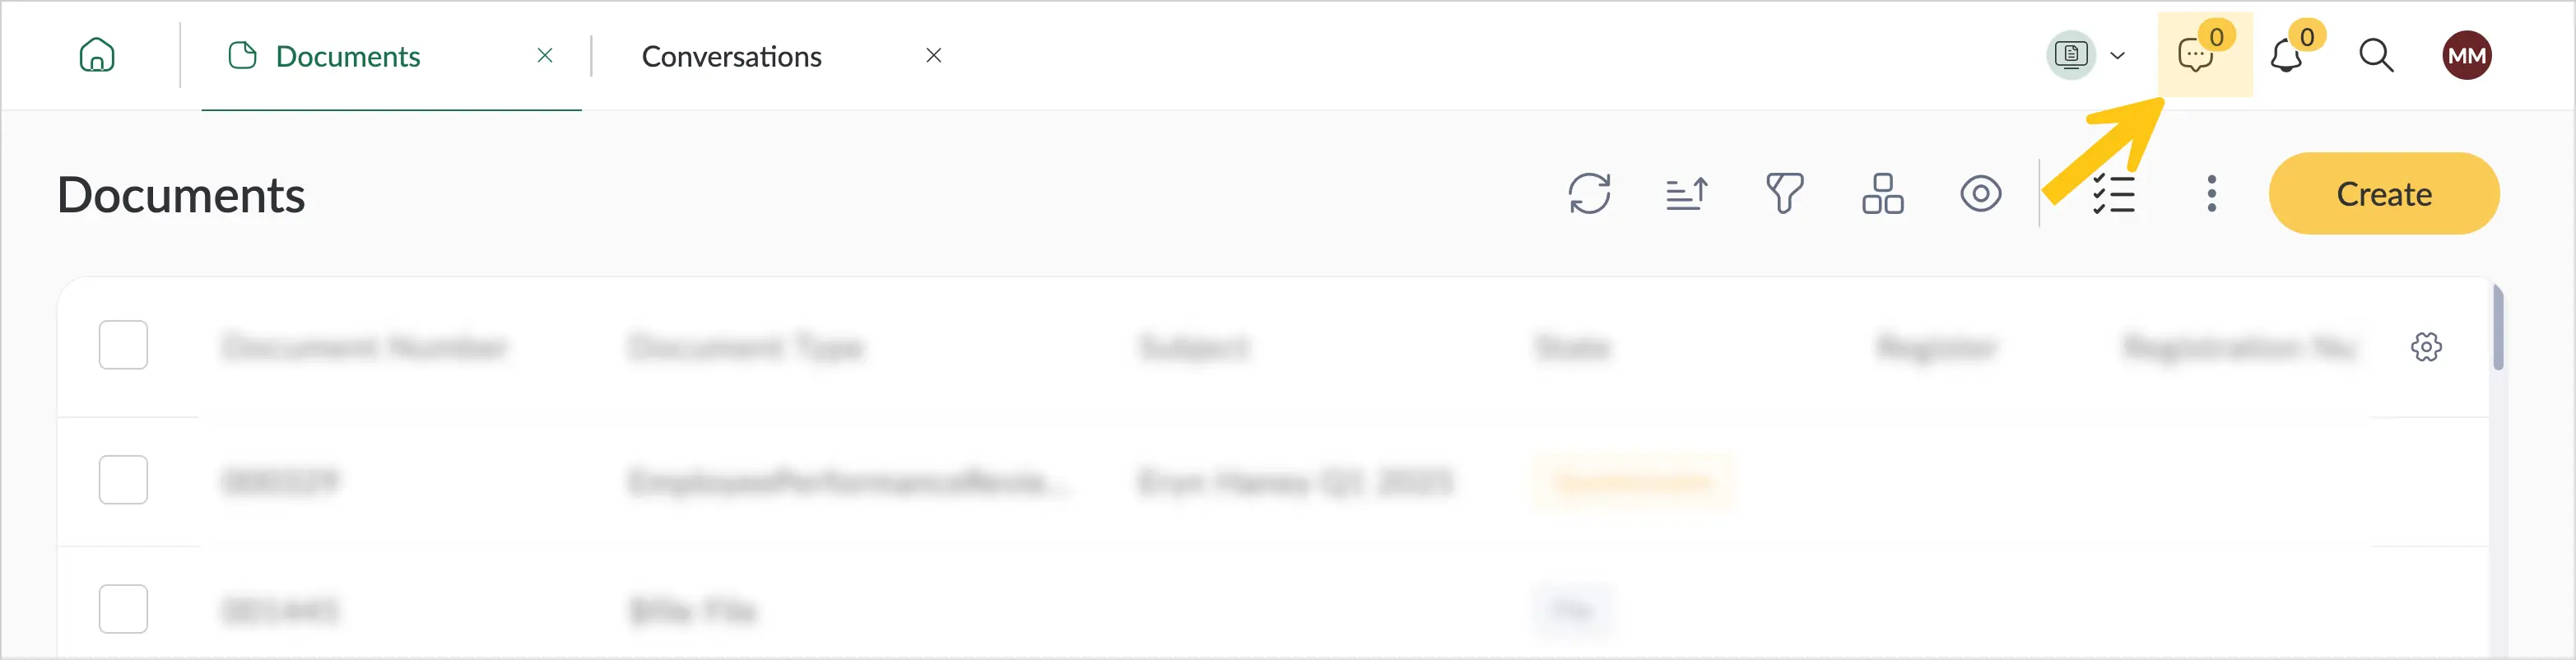
Regardless of the current workspace, select the discussions icon in the upper-right corner of the top panel.
-
In the Recent Discussions A list, find the required chat. Or select View All Discussions B to see the full list of chats:
-
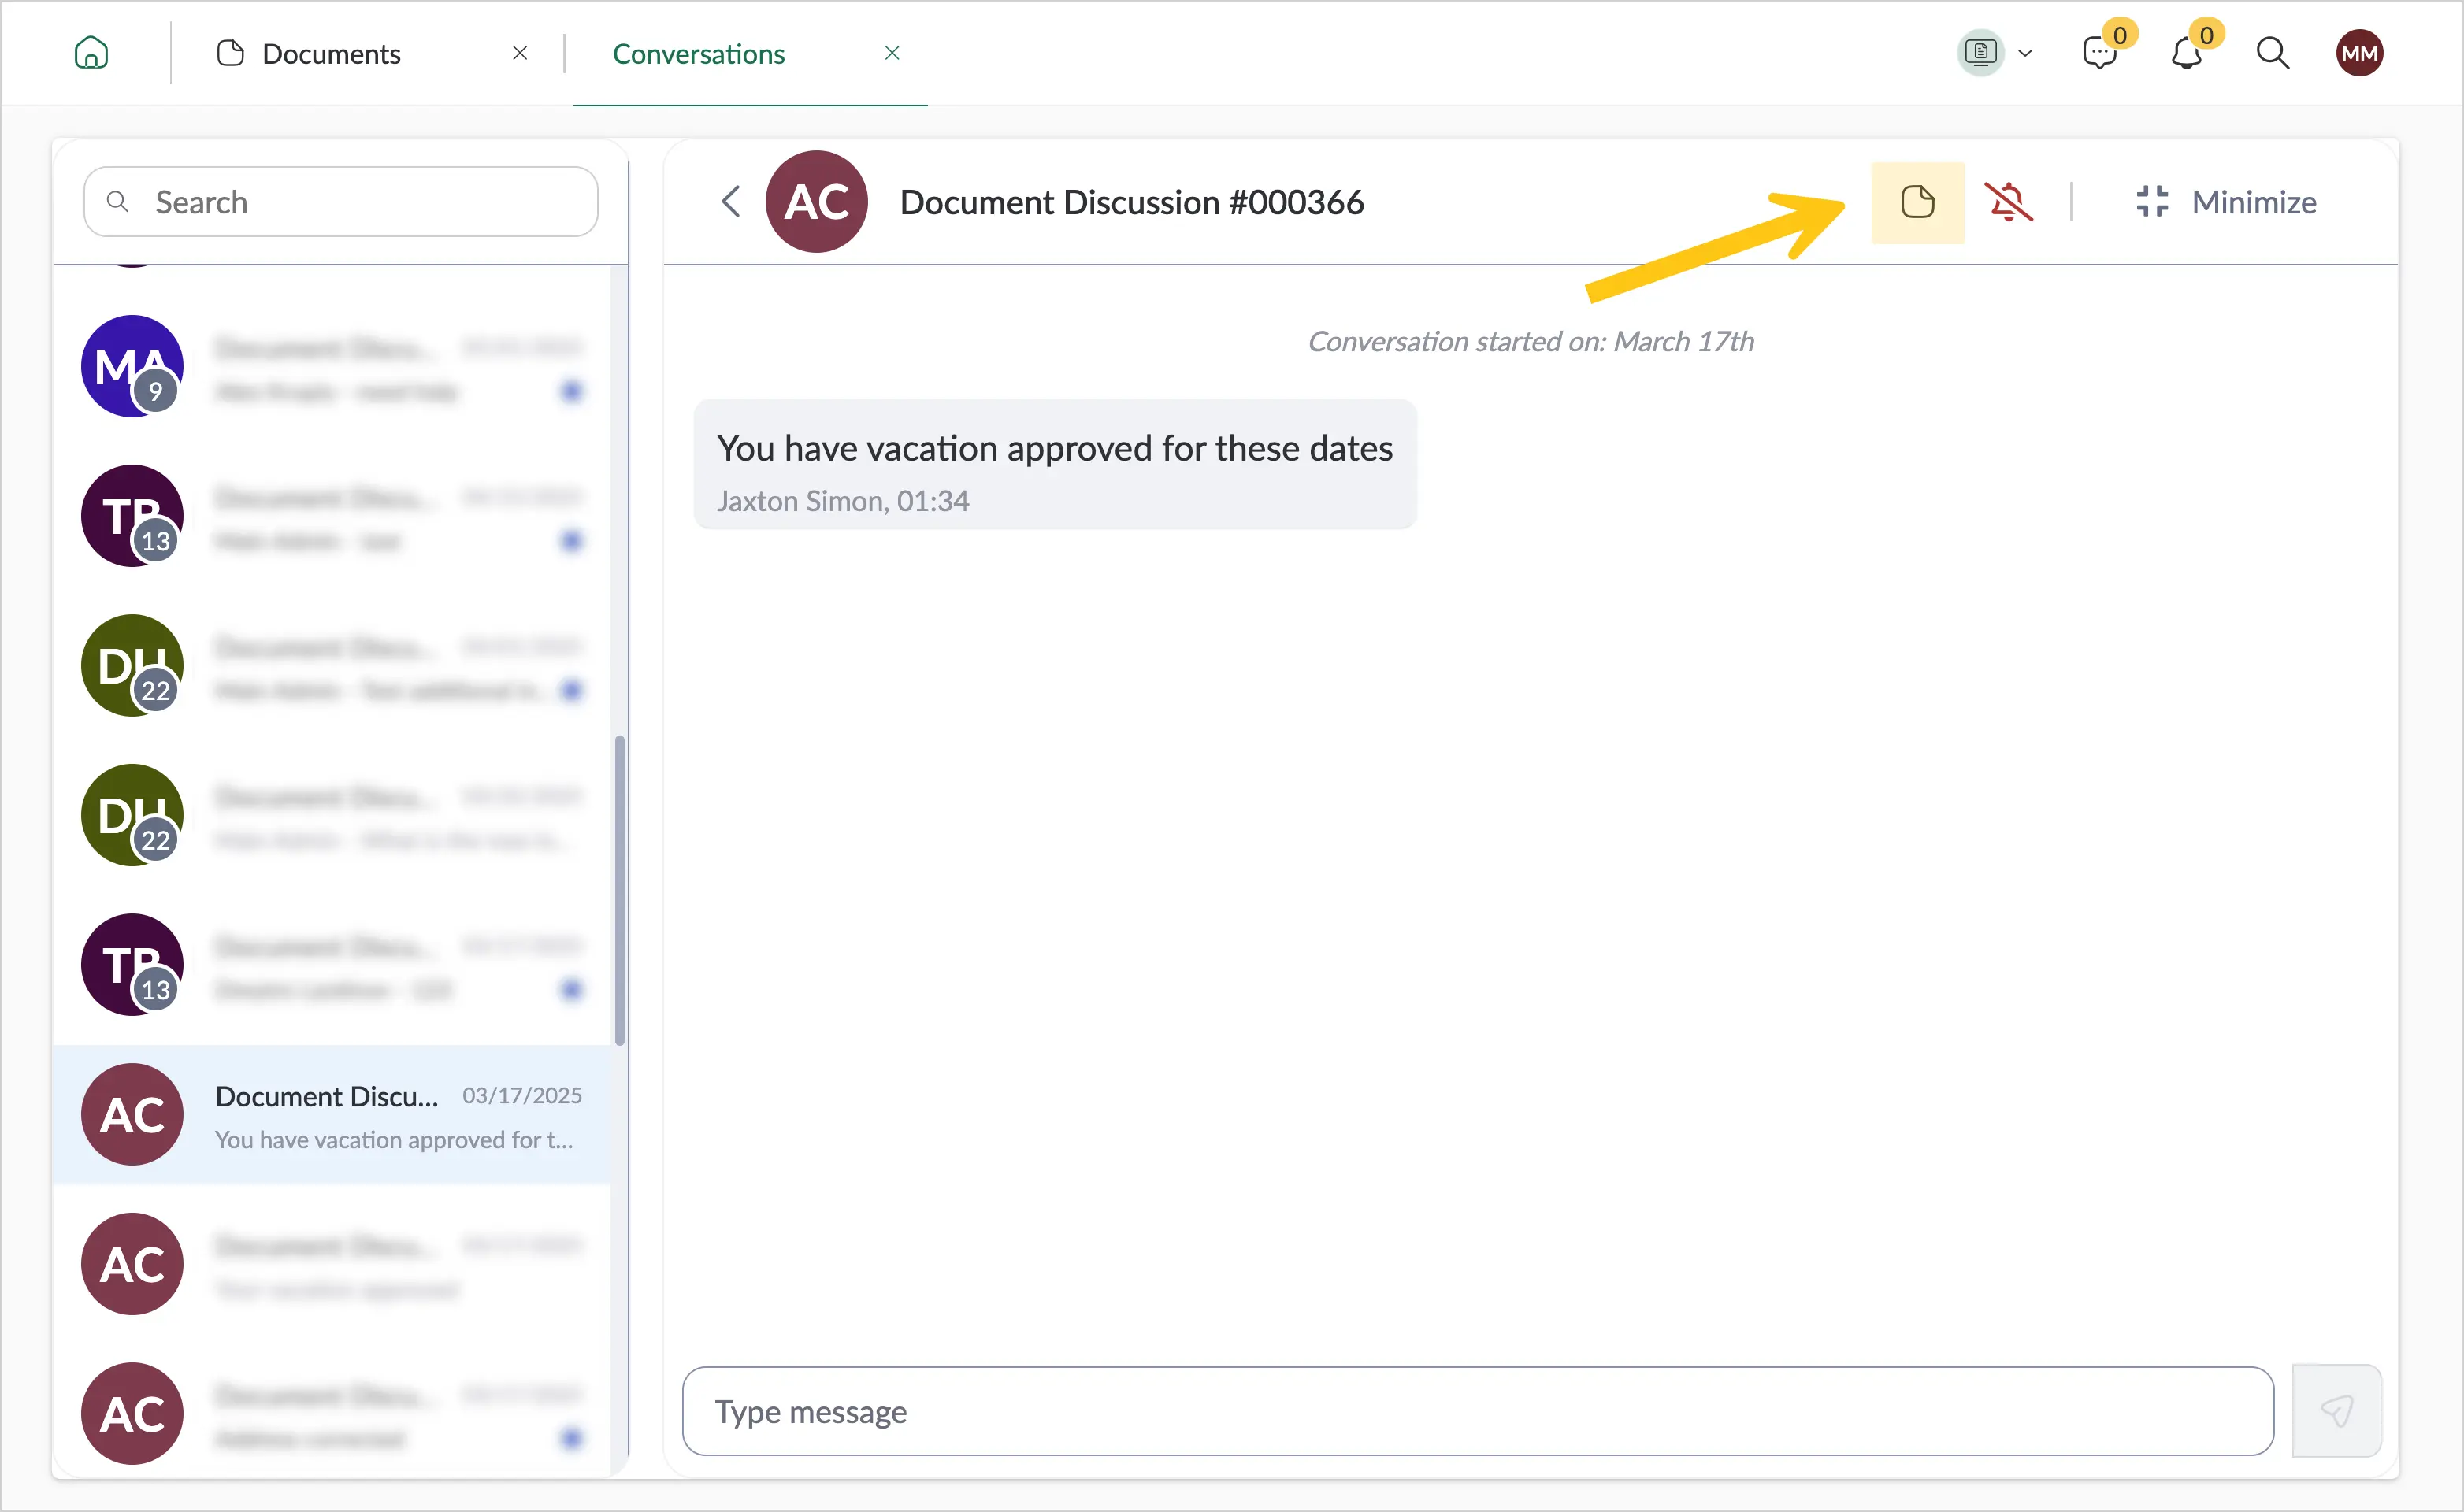
To navigate to the discussion settings on the document form, select the document icon in the dialog window.
-
-
On the document form, navigate to the discussions attribute 1. From the list of dialogs, select the one you want to rename 2.
-
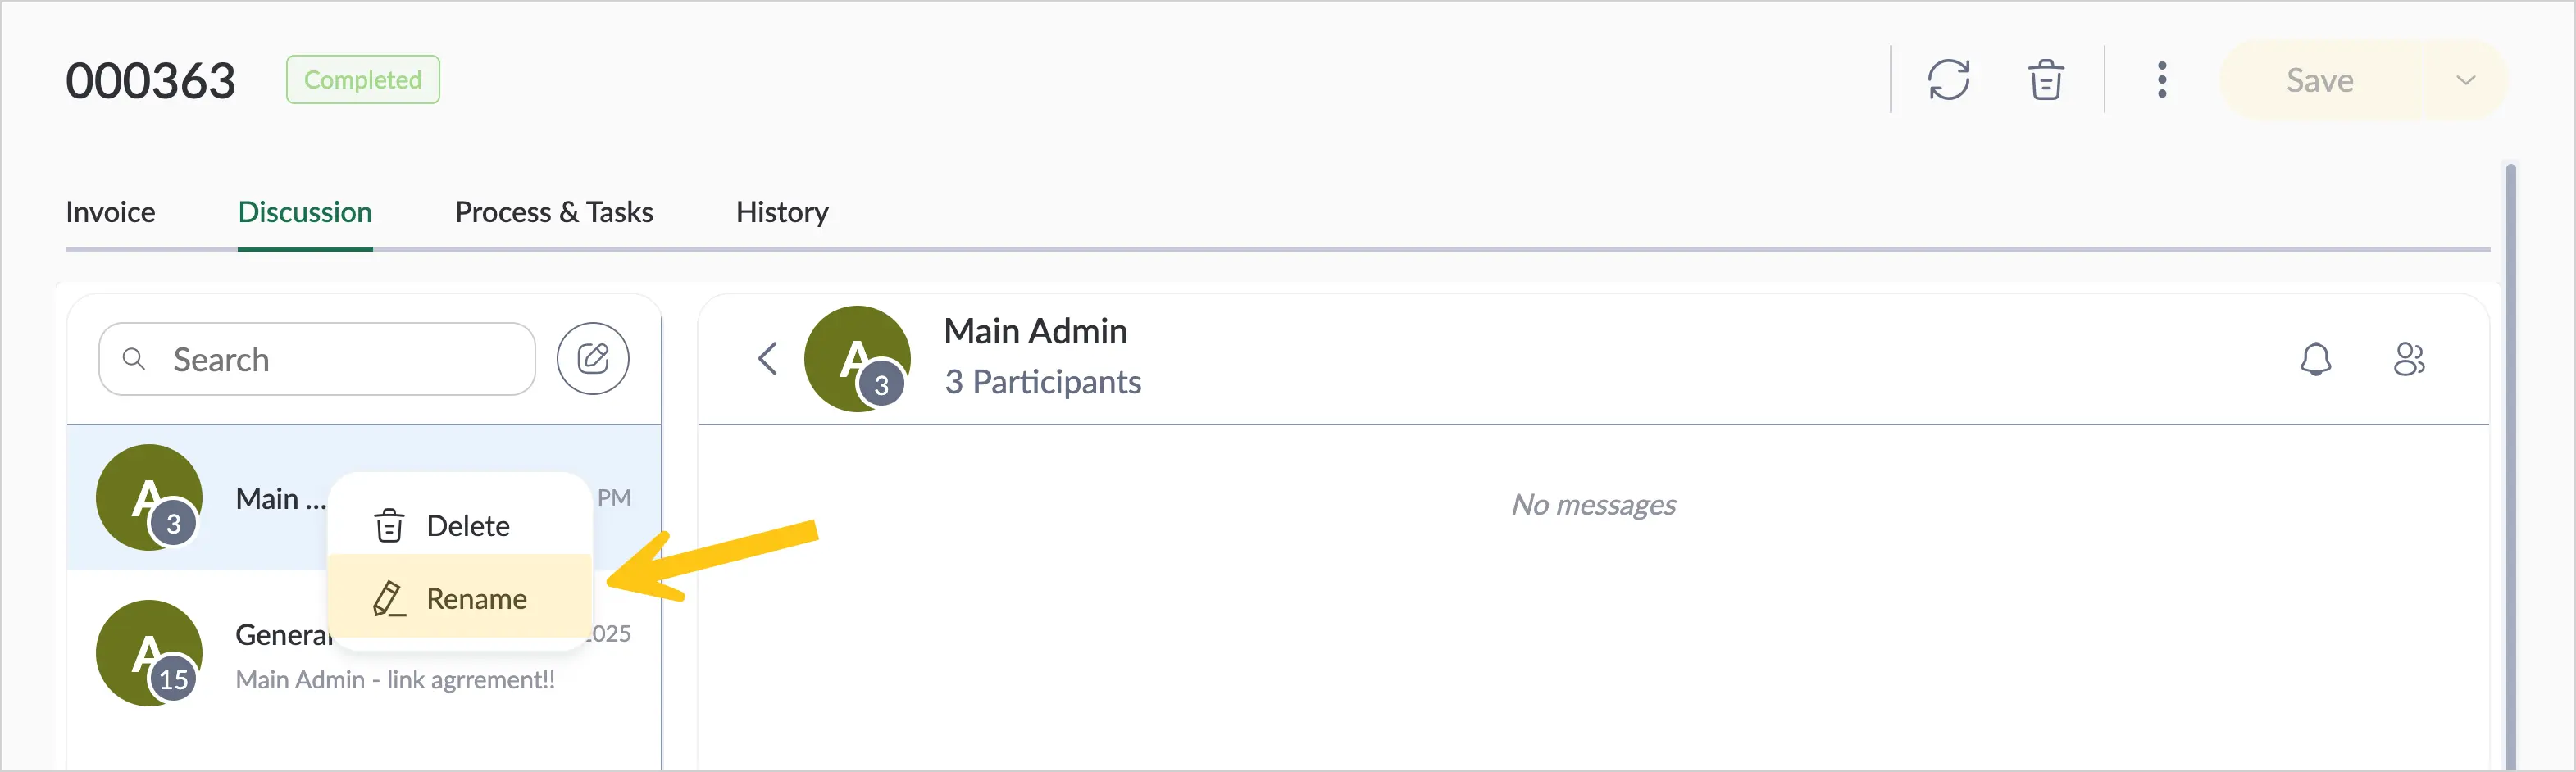
To open additional settings options, right-click the chat name 1. Select Rename 2.
-
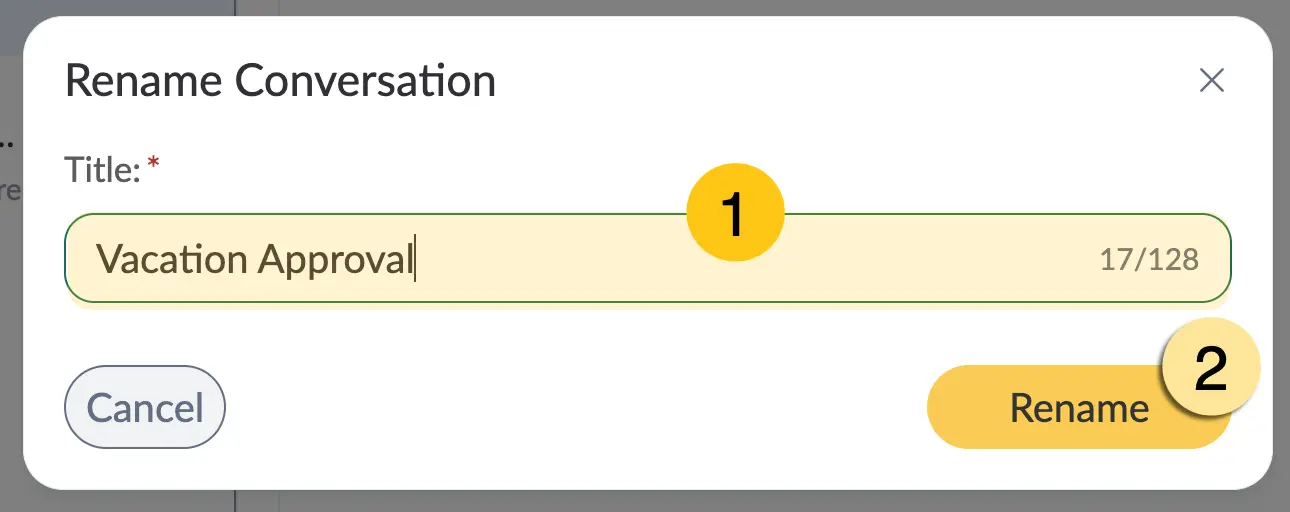
In the Title field, enter a new name for your discussion 1. To save the changes, select Rename 2.
5.1.8. Document/Task Indicator
Using the script module, you can create a document or task indicator that will be displayed in the upper-right corner of the document (see Script Examples).
5.1.9. Document Archiving
This feature is available when the additional package dfx-archive is installed.
Document archiving is used to optimize system performance and reduce the load on the main database. It allows moving inactive or completed documents from the active part of the system to the archive, while still keeping them available for viewing.
When a document is archived, it is moved to the archive together with all associated data, including:
- child documents
- table attribute records
- attachments (files and file collections)
- document versions and signatures
- document change history
- document participants
- links to other documents
- business processes and tasks
- chats and messages (if applicable)
- AI-generated data (for example, summaries or chats)
After archiving, the document is removed from the active part of the system and becomes available only in the Archived Documents shortcut.
5.1.9.1. Configure Automatic Archiving
Automatic archiving allows the system to move documents to the archive automatically based on defined conditions.
You can configure automatic archiving using one of the following methods:
- Using Archiving Rules — allows you to flexibly define the conditions under which documents will be archived (for example, by date, state, or other attributes). This is the primary method for bulk and regular archiving.
- Using a Handler in the Document Type — allows you to trigger archiving within the document's business logic, for example, when a state changes or a specific event occurs.
Method 1: Using Archiving Rules
This method allows documents to be automatically archived based on defined conditions. For example, you can configure archiving for documents that are older than a certain period, have a specific state, or meet other criteria.
After setting up the rule and applying it to a document type, the system will automatically identify documents that meet the conditions and move them to the archive without any user involvement.
-
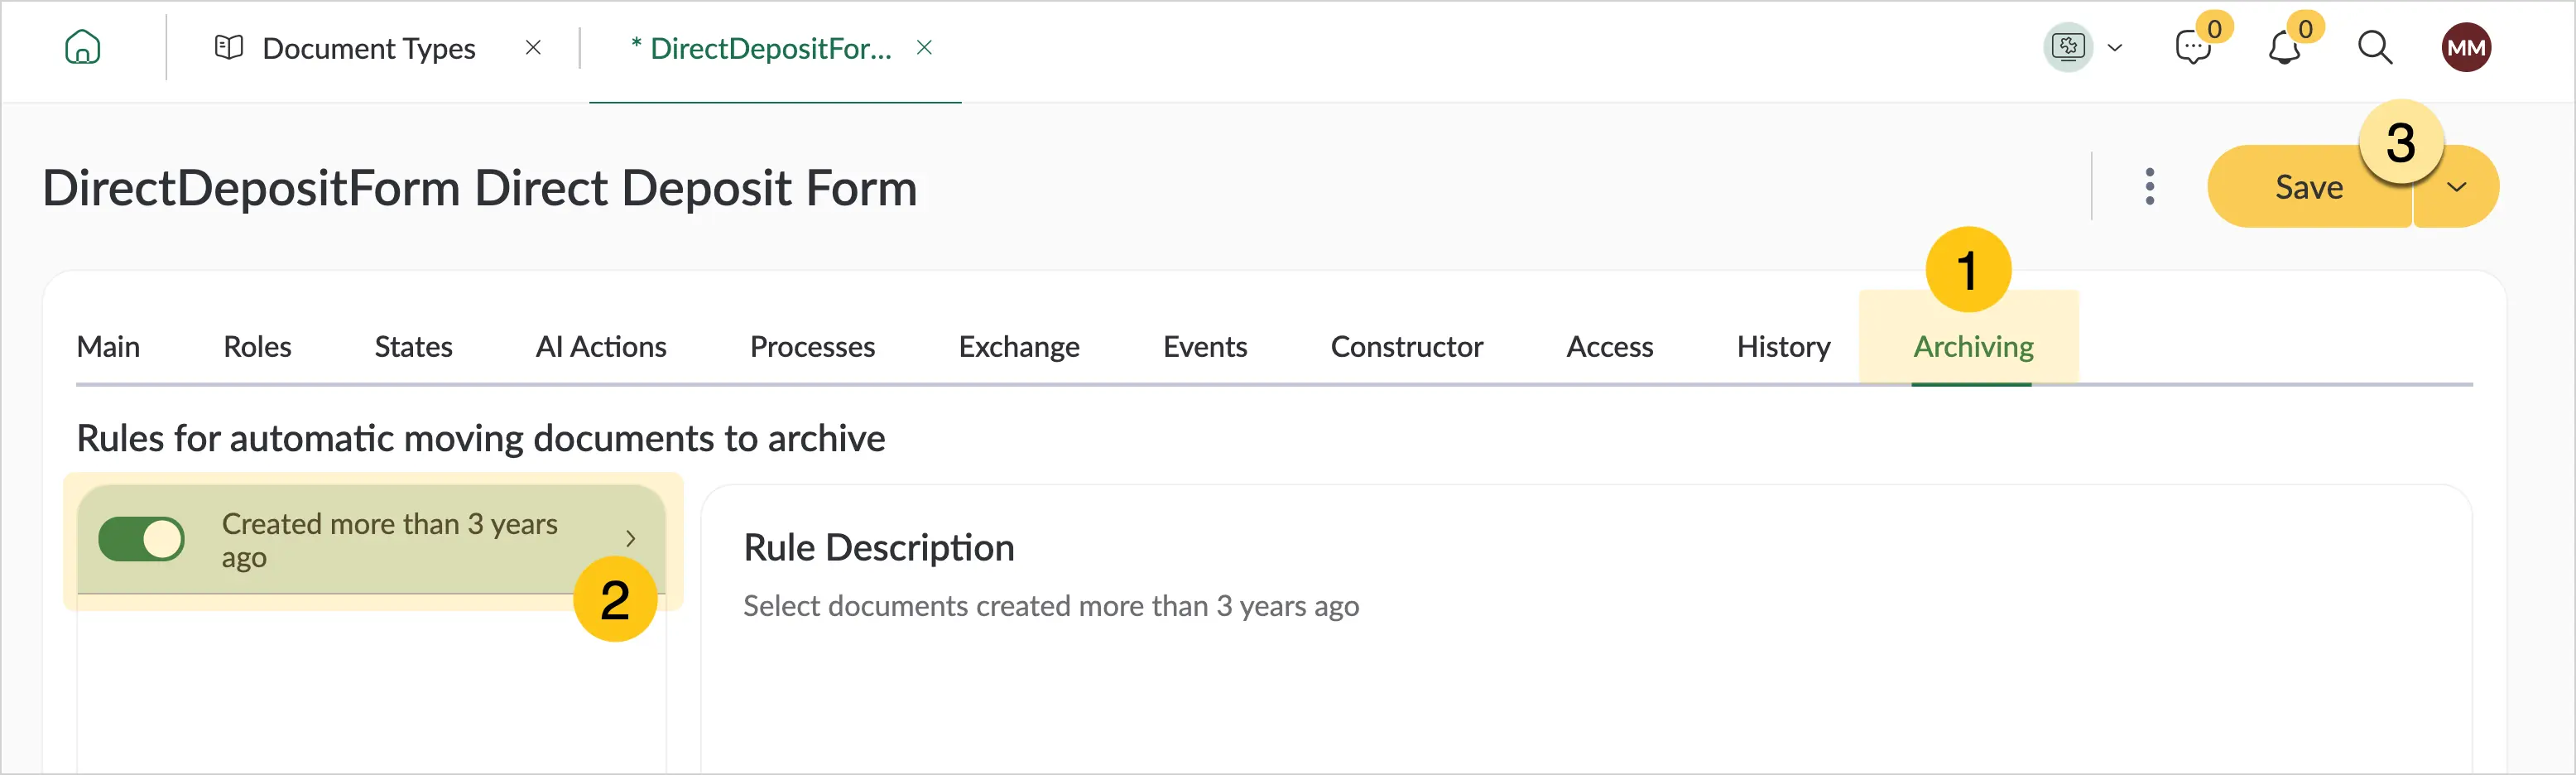
In the document type settings, go to the Archiving tab 1 and enable the toggle for the rule 2 created in the previous step.
-
In the toolbar, select Save 3.
For more information about the Archiving tab settings, see the Archiving section.
Method 2: Using a Handler in the Document Type
This method allows a document to be automatically archived in response to a specific event in its lifecycle (for example, a state change or process completion).
-
In the document type settings, go to the Events tab 1.
-
Add a handler 2 of the Move to Archive type.
Note:For more information about creating and configuring handlers, see the Events section.
The Move to Archive handler can be configured for various events, including:
- the document entering or exiting a specific state
- business process completion
- document copying
- receiving a document from an external system
- execution of any custom actions created during the state-adding stage
This handler type is not available for the Create Document event.
5.1.9.2. Configure Manual Archiving
Only users with the Admin or Archivist role can configure the archiving process and archive documents.
-
Create a new shortcut of the Documents type, or open an existing one for editing.
-
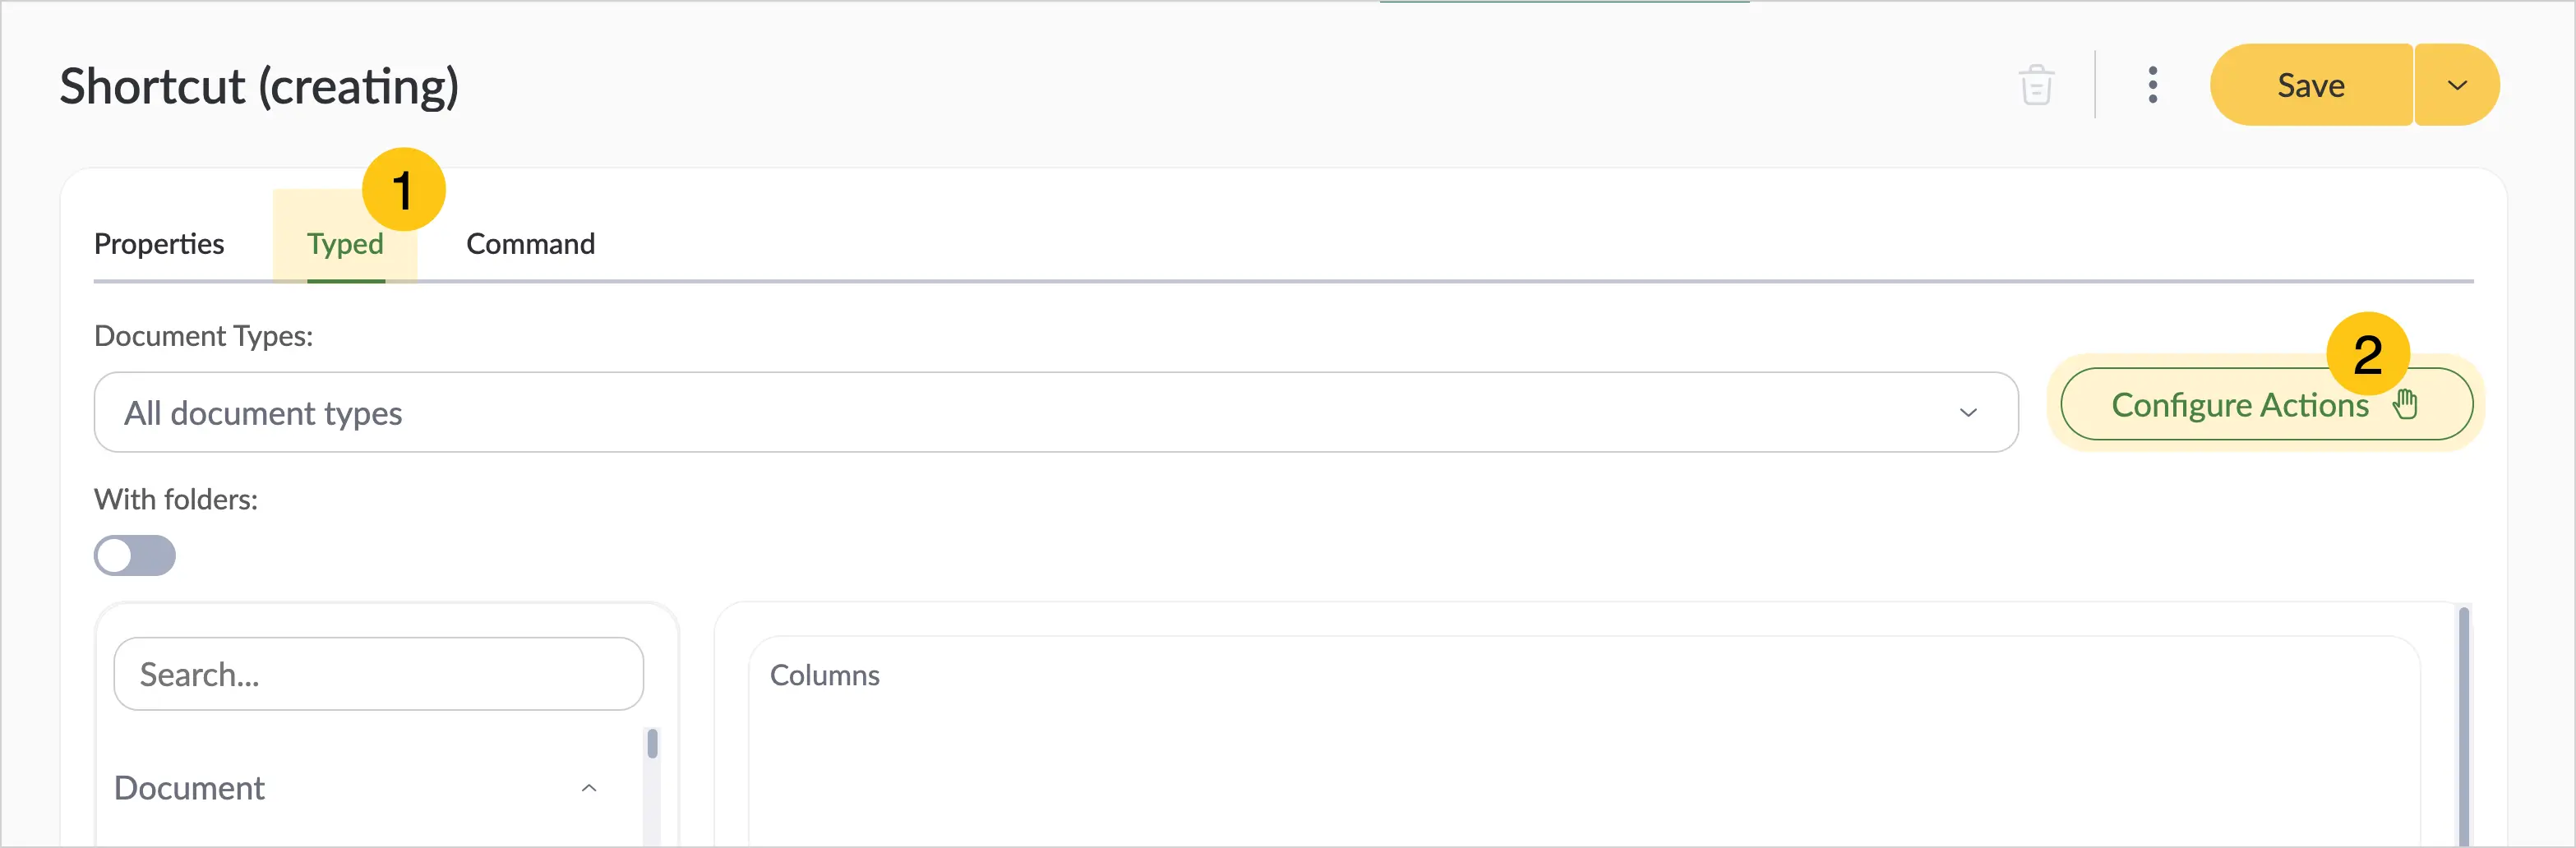
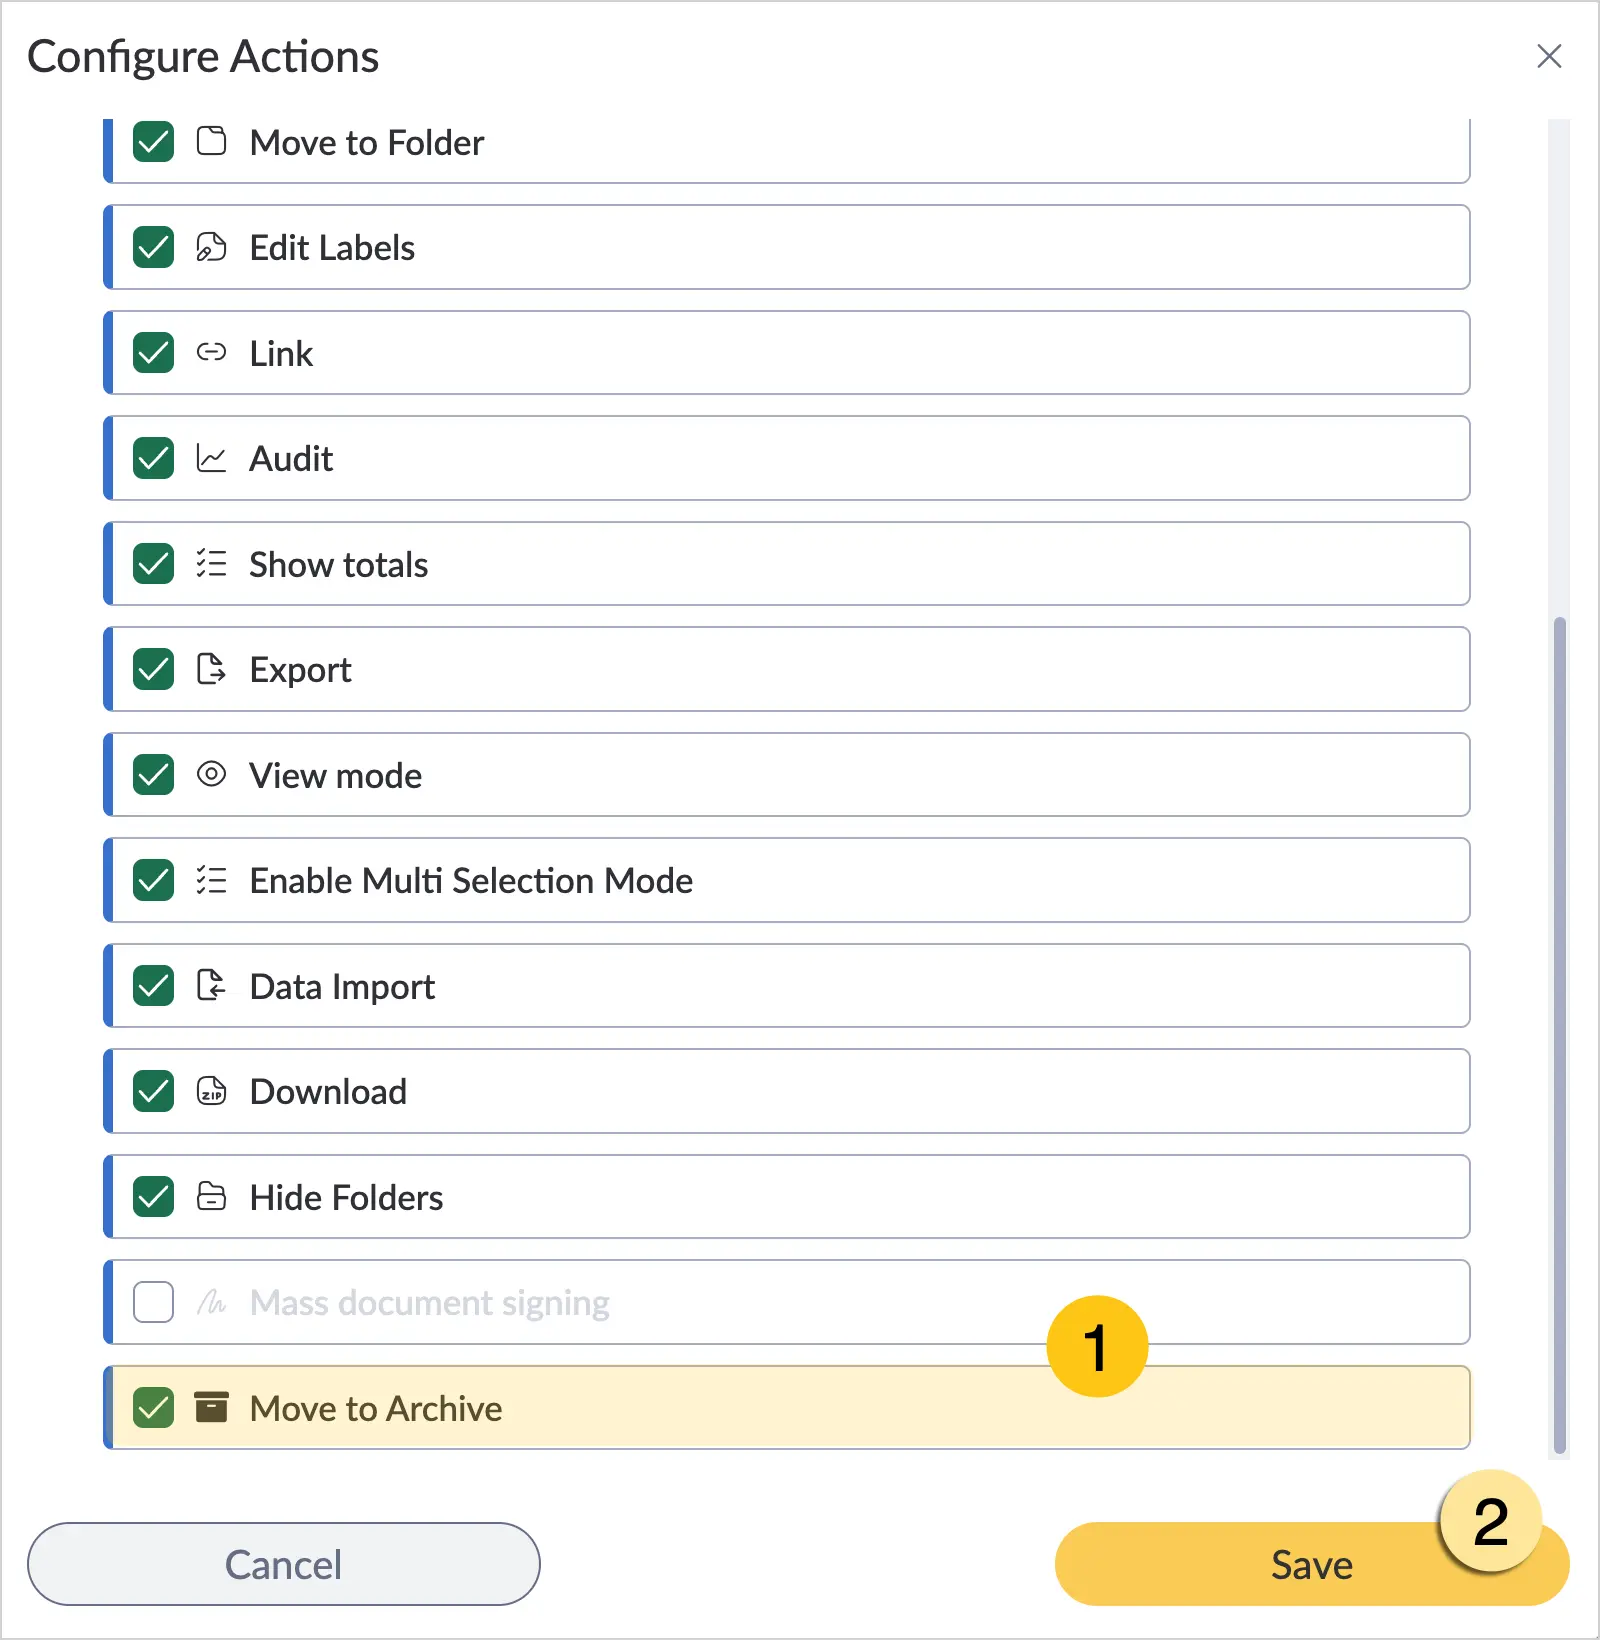
Go to the Typed tab 1 and select Configure Actions 2.
-
Select the Move to Archive checkbox 1, and then select Save 2.
-
In the toolbar, select Save.
After this, users with the Admin or Archivist role will be able to manually move documents to the archive from the corresponding shortcut. For more information, see the Move Documents to Archive section.
5.1.9.3. Move Documents to Archive
The method for moving documents to the archive depends on the archiving configuration you set up. If you configured automatic archiving, documents are moved to the archive automatically based on the defined conditions.
If you configured manual archiving, you can move documents to the archive manually:
- Go to the Documents-type shortcut for which archiving is configured.
- Select the document you want to archive.
or
-
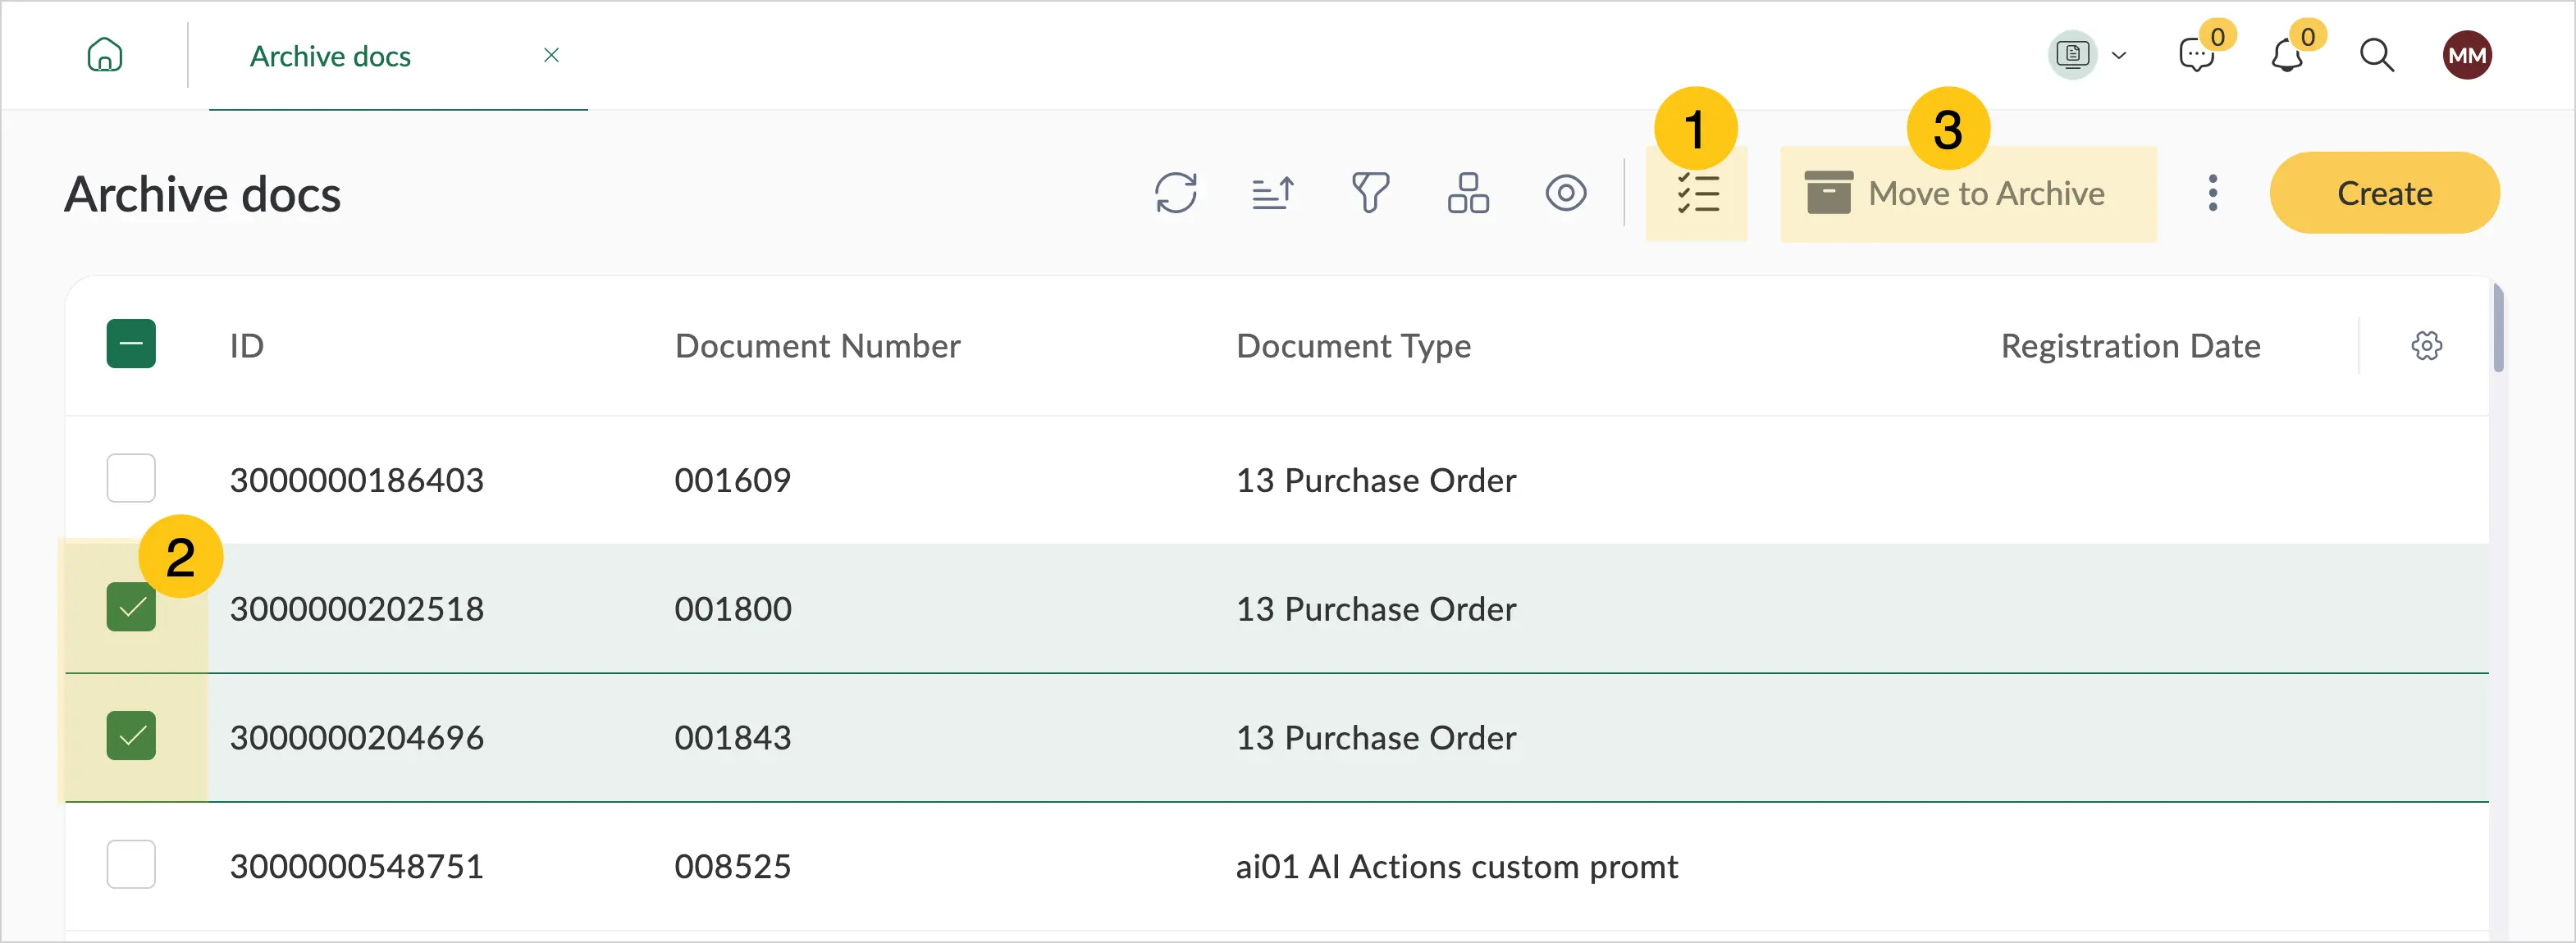
To archive multiple documents at once:
- Enable multi-select mode 1.
- Select the checkboxes next to the documents you want to archive 2.
-
In the toolbar, select Move to Archive 3.
-
Select Move to Archive.
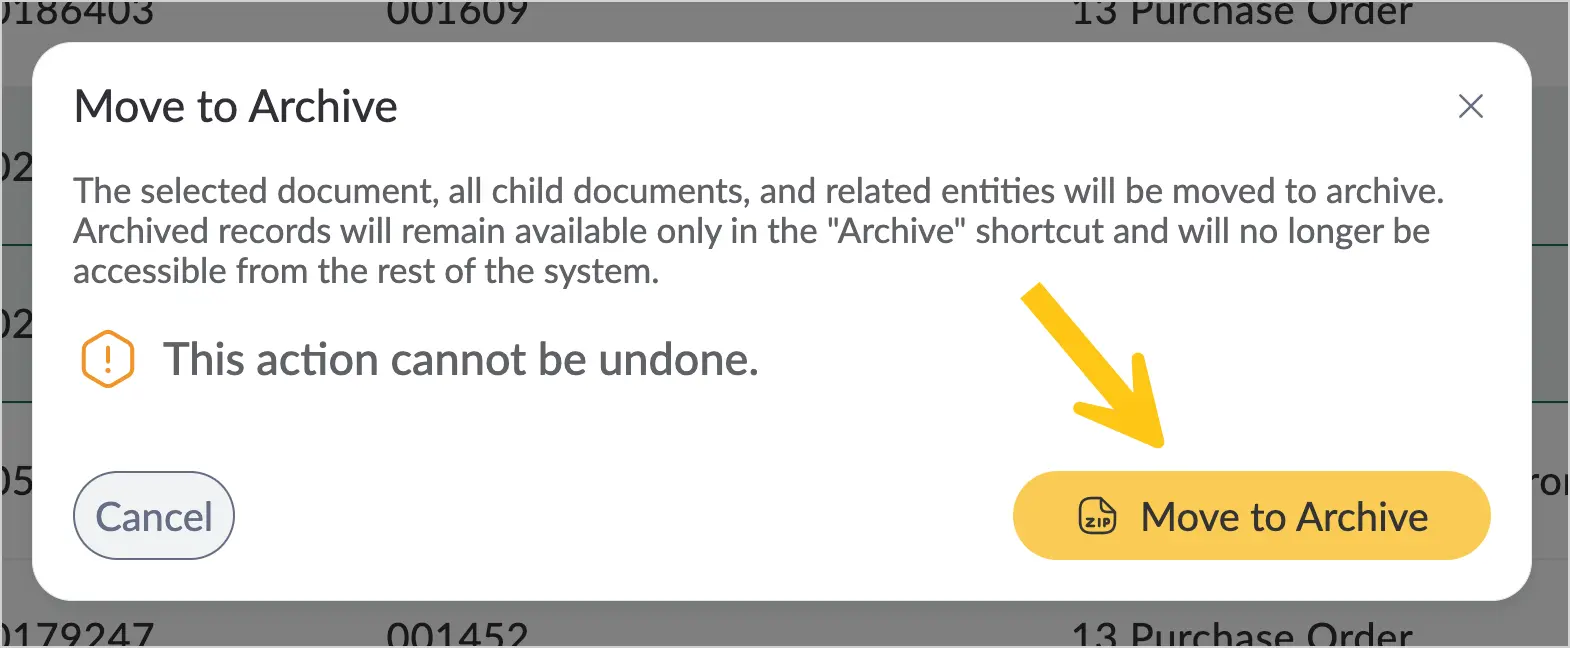
After this, you can view archived documents in the Archived Documents shortcut.
5.1.9.4. View Archived Documents
-
In the navigation panel, select the Documents 1 workspace.
-
Select the Archived Documents shortcut 2.
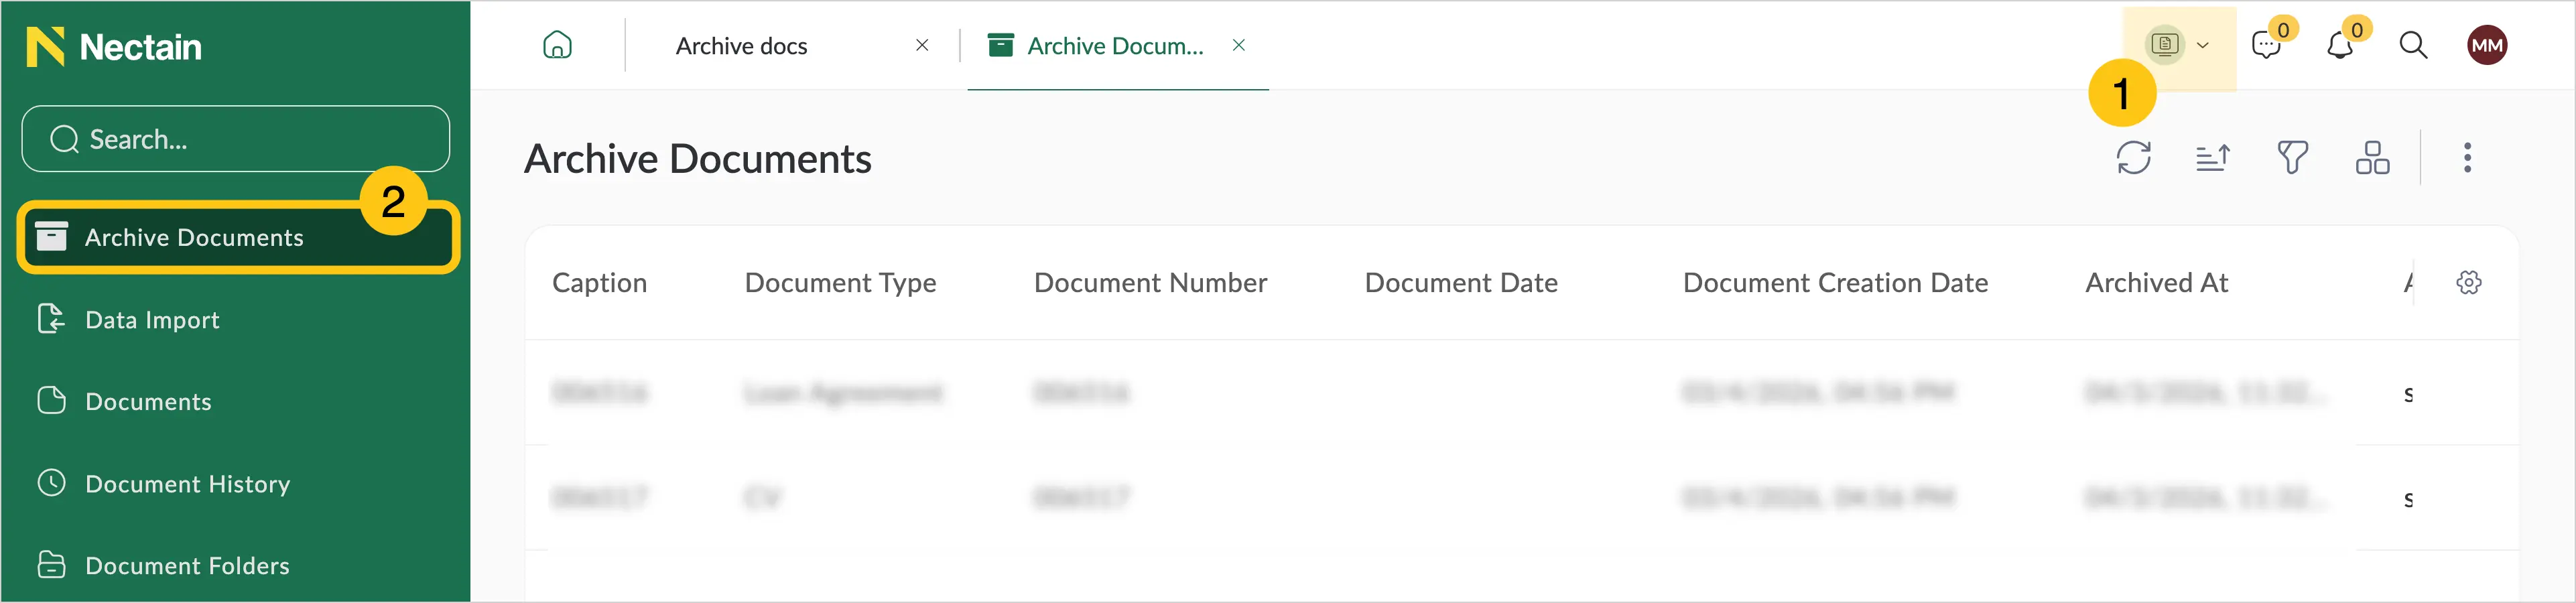
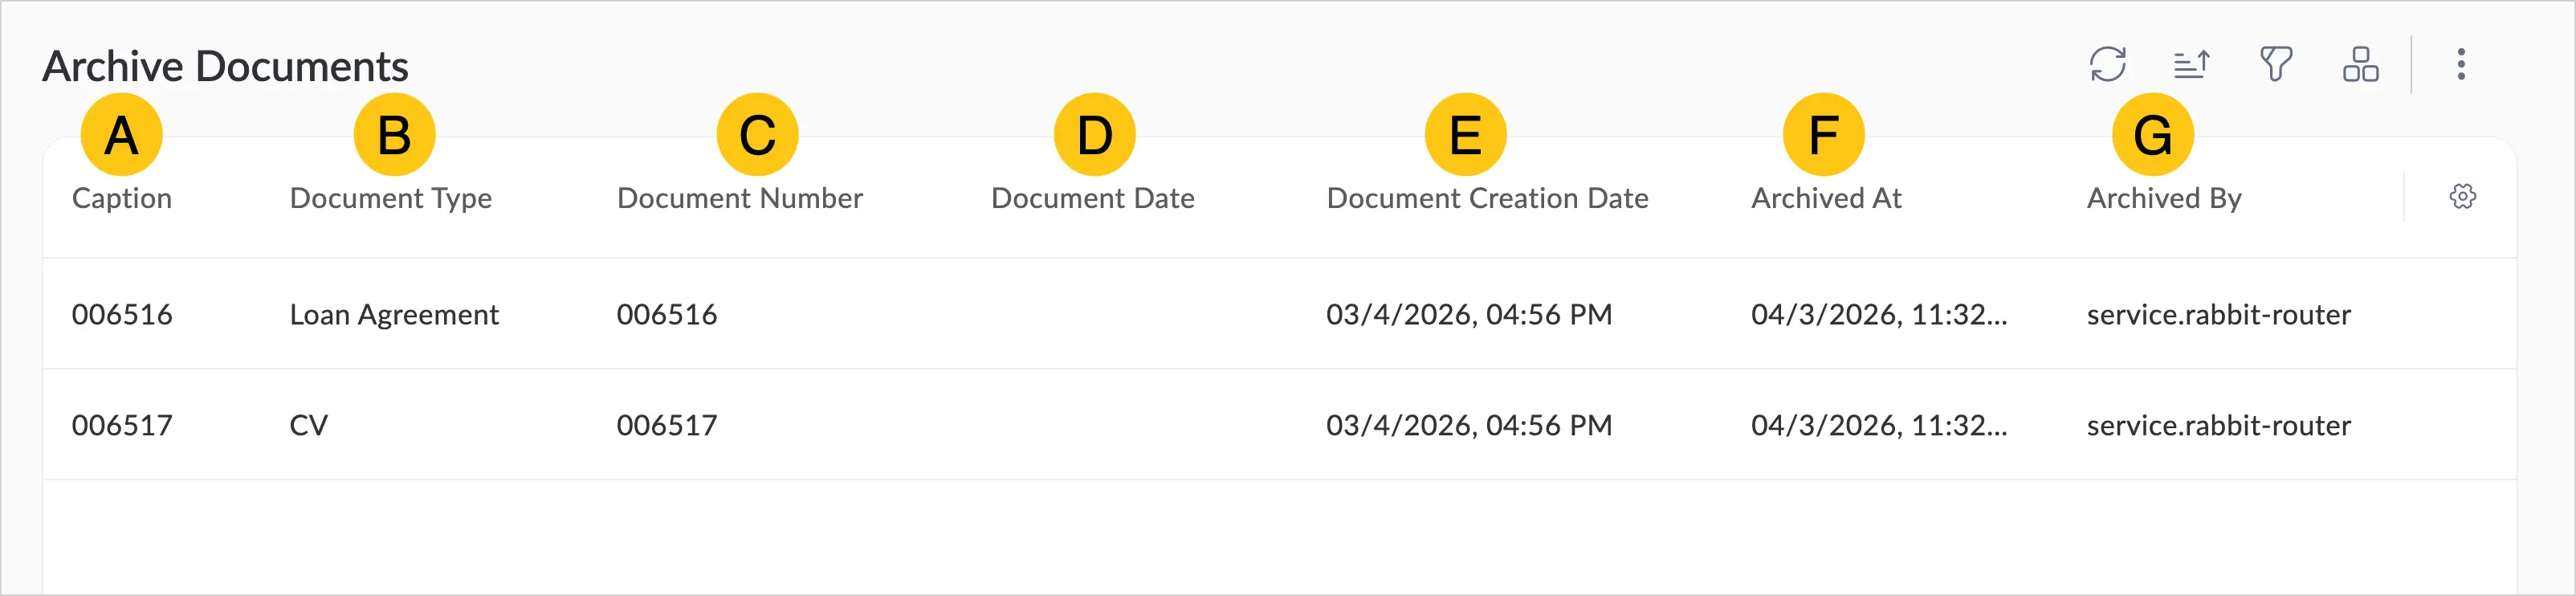
The archived documents registry opens and contains the following columns:
- A Caption — displays the document name. You can configure which value is shown in this column for a specific document type.
- B Document Type
- C Document Number
- D Document Date — the document registration date
- E Document Creation Date
- F Archived At — the date the document was archived
- G Archived By — the user or system that performed the archiving:
- User login — if the document was archived manually
- Root — if archiving was performed automatically using archiving rules (see Method 1: Using Archiving Rules)
- Rabbit router — if archiving was performed automatically using a handler in the document type (see Method 2: Using a Handler in the Document Type)
-
Open the required document. Use filters if needed (for example, by document number) to find the record faster.
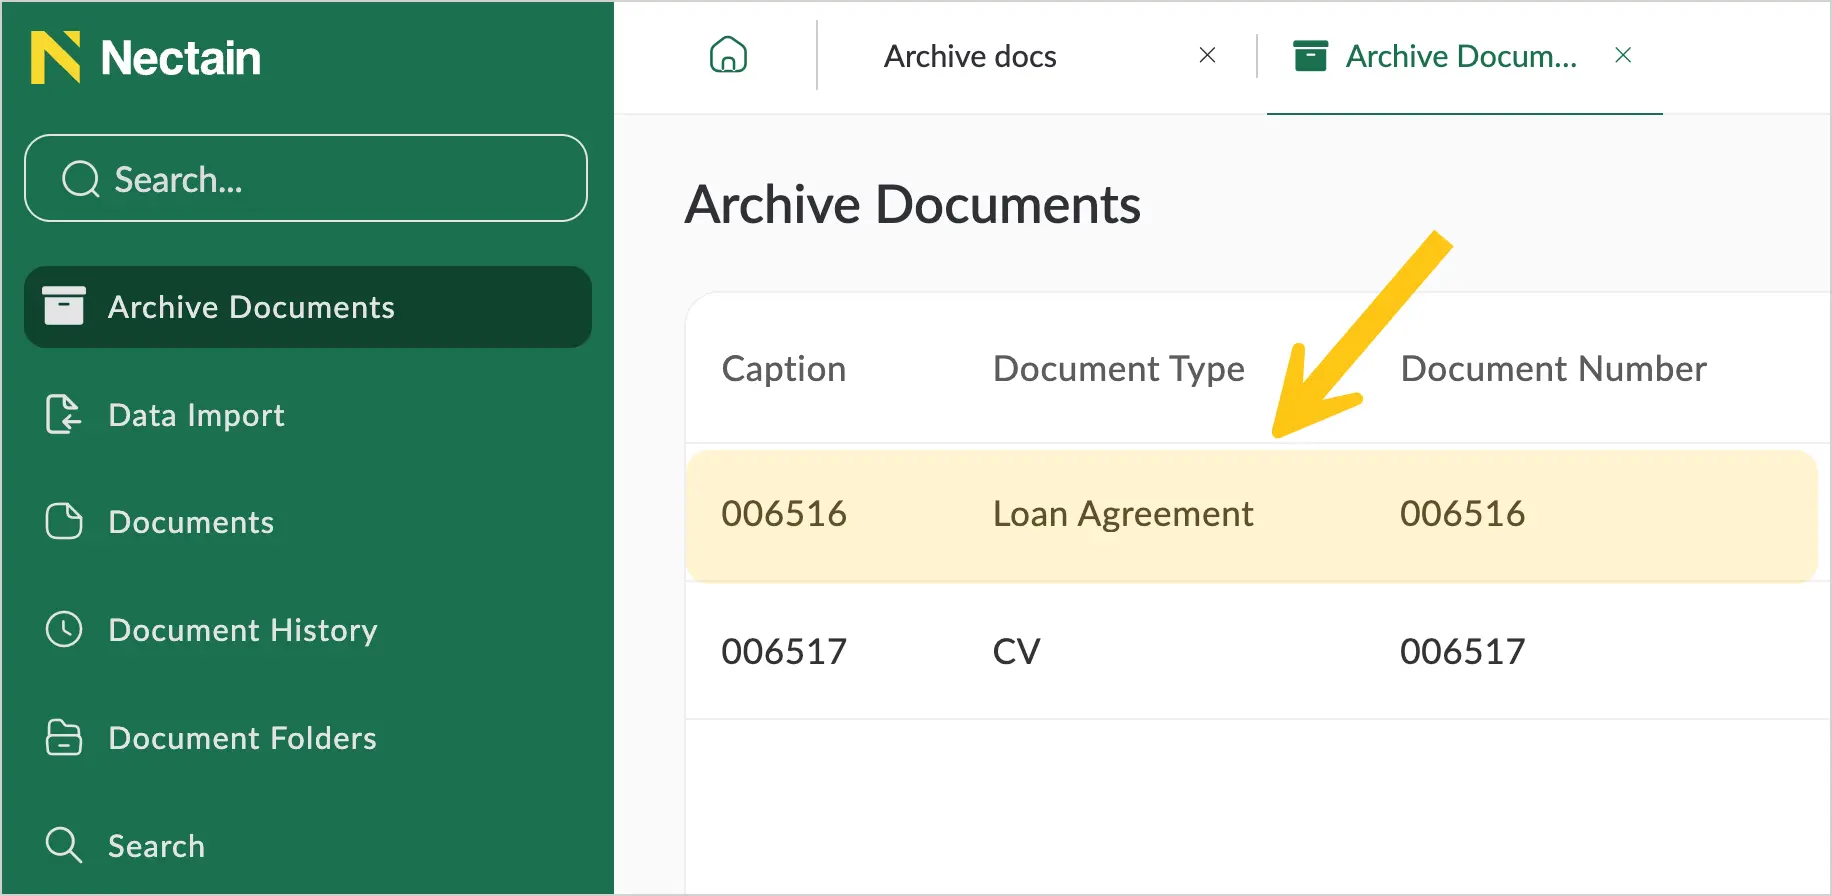
The archived document form is available in view-only mode:
-
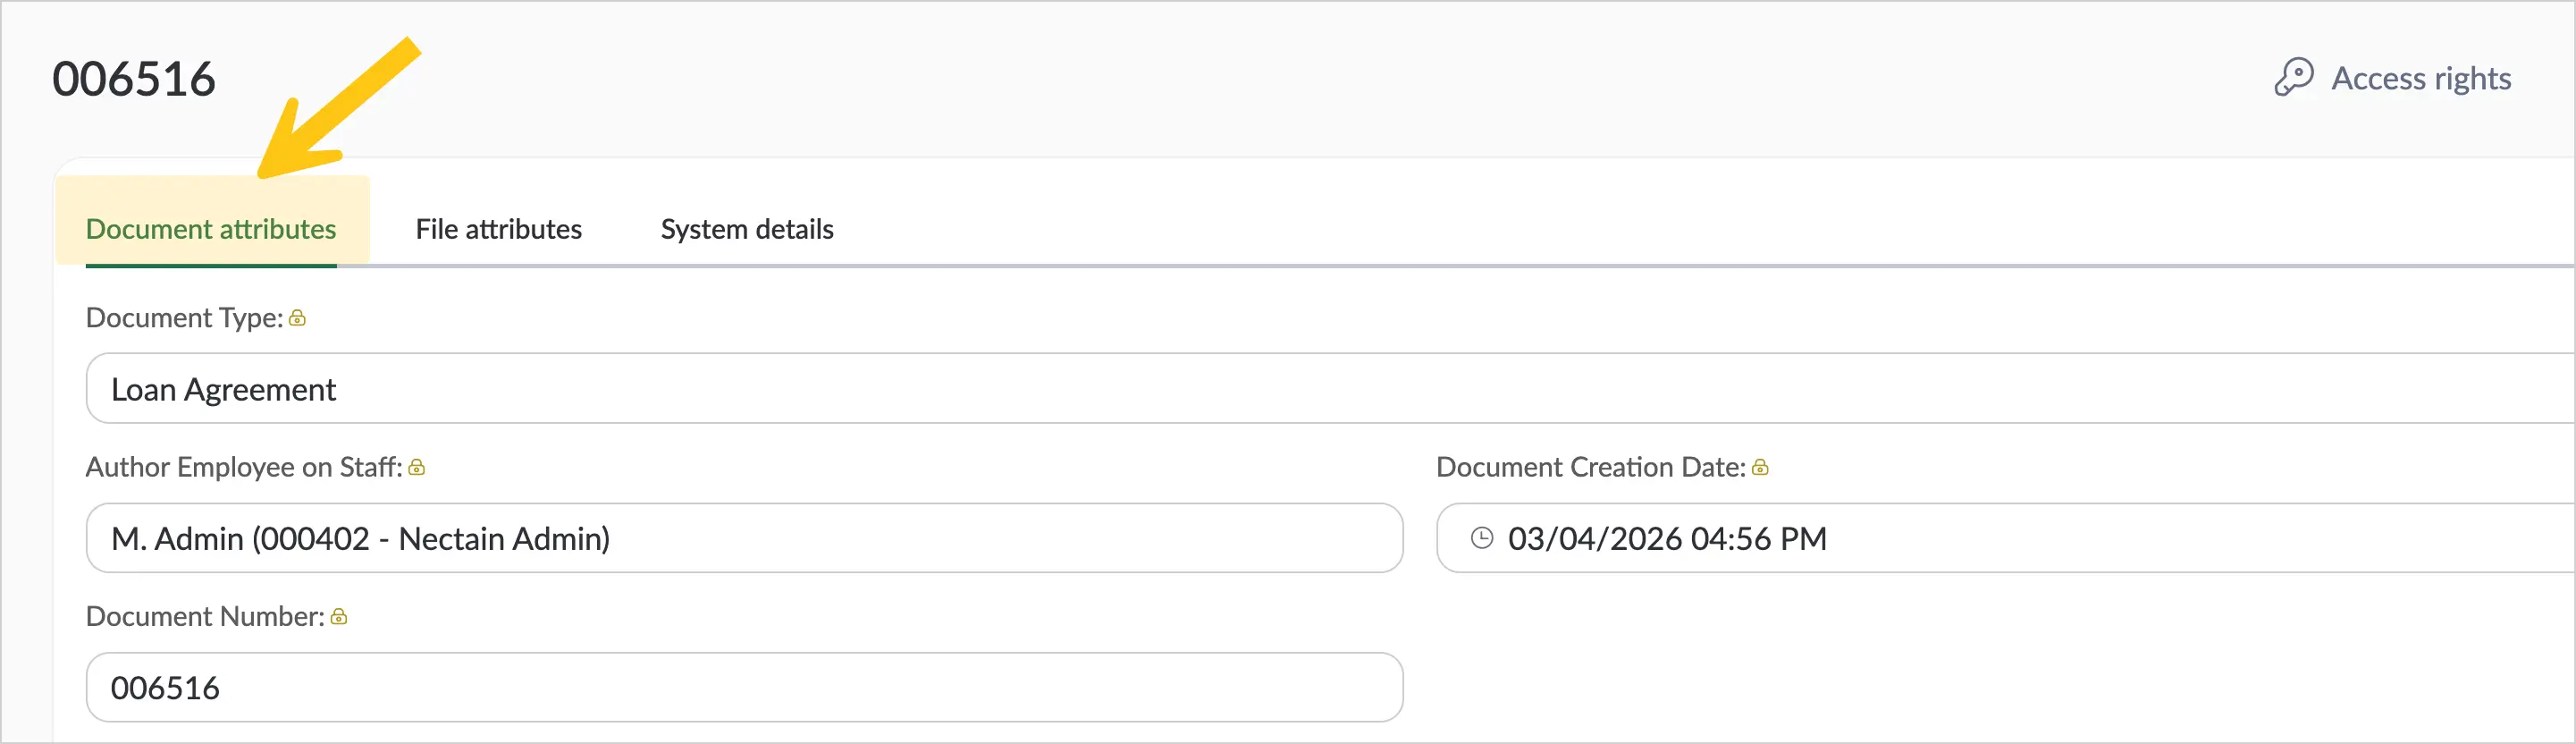
The Document Attributes tab displays all document attributes. Their values are available for viewing only and cannot be changed.
-
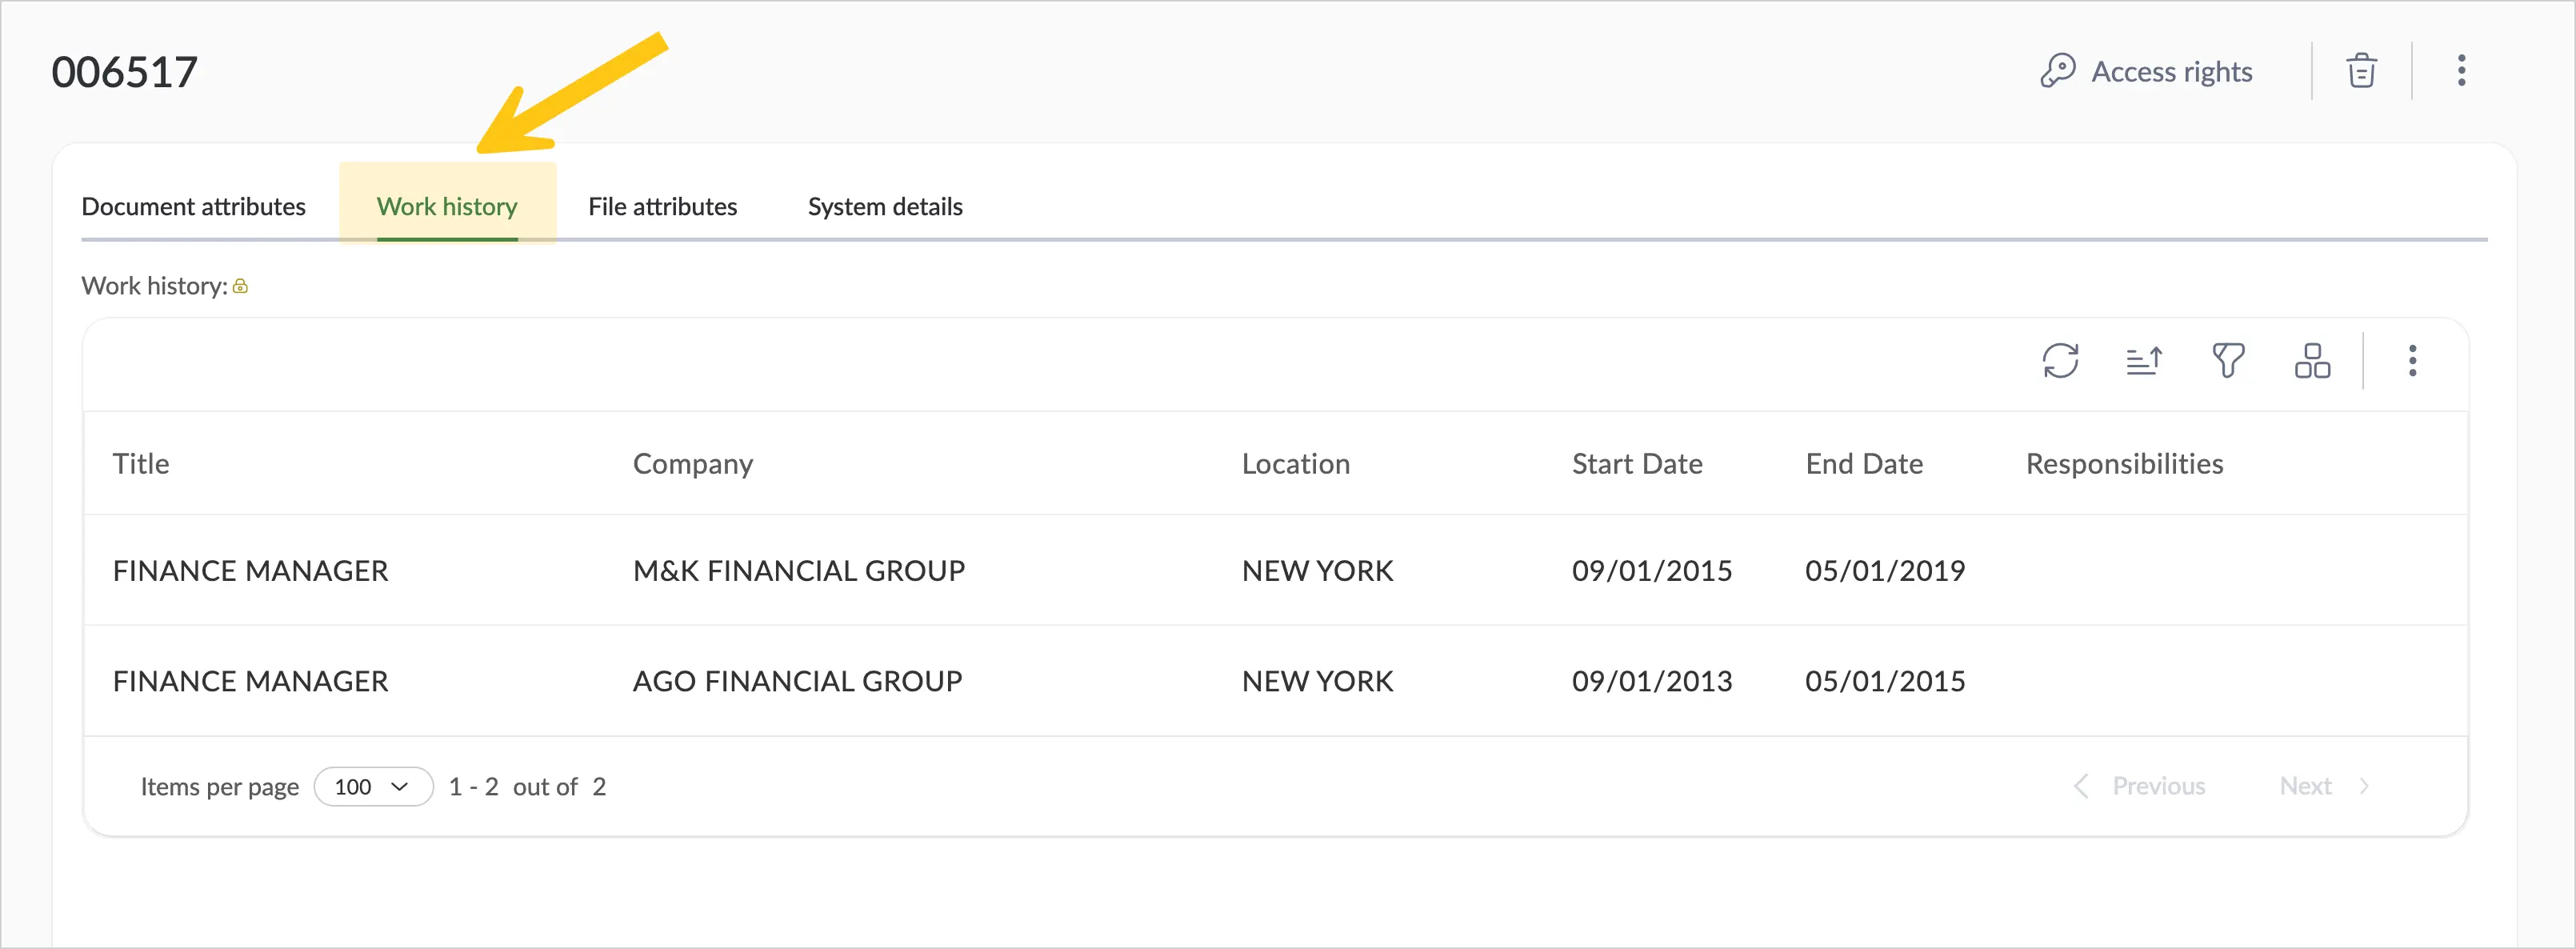
If the document contained table attributes, each table is displayed in a separate tab with the same name as the table.
-
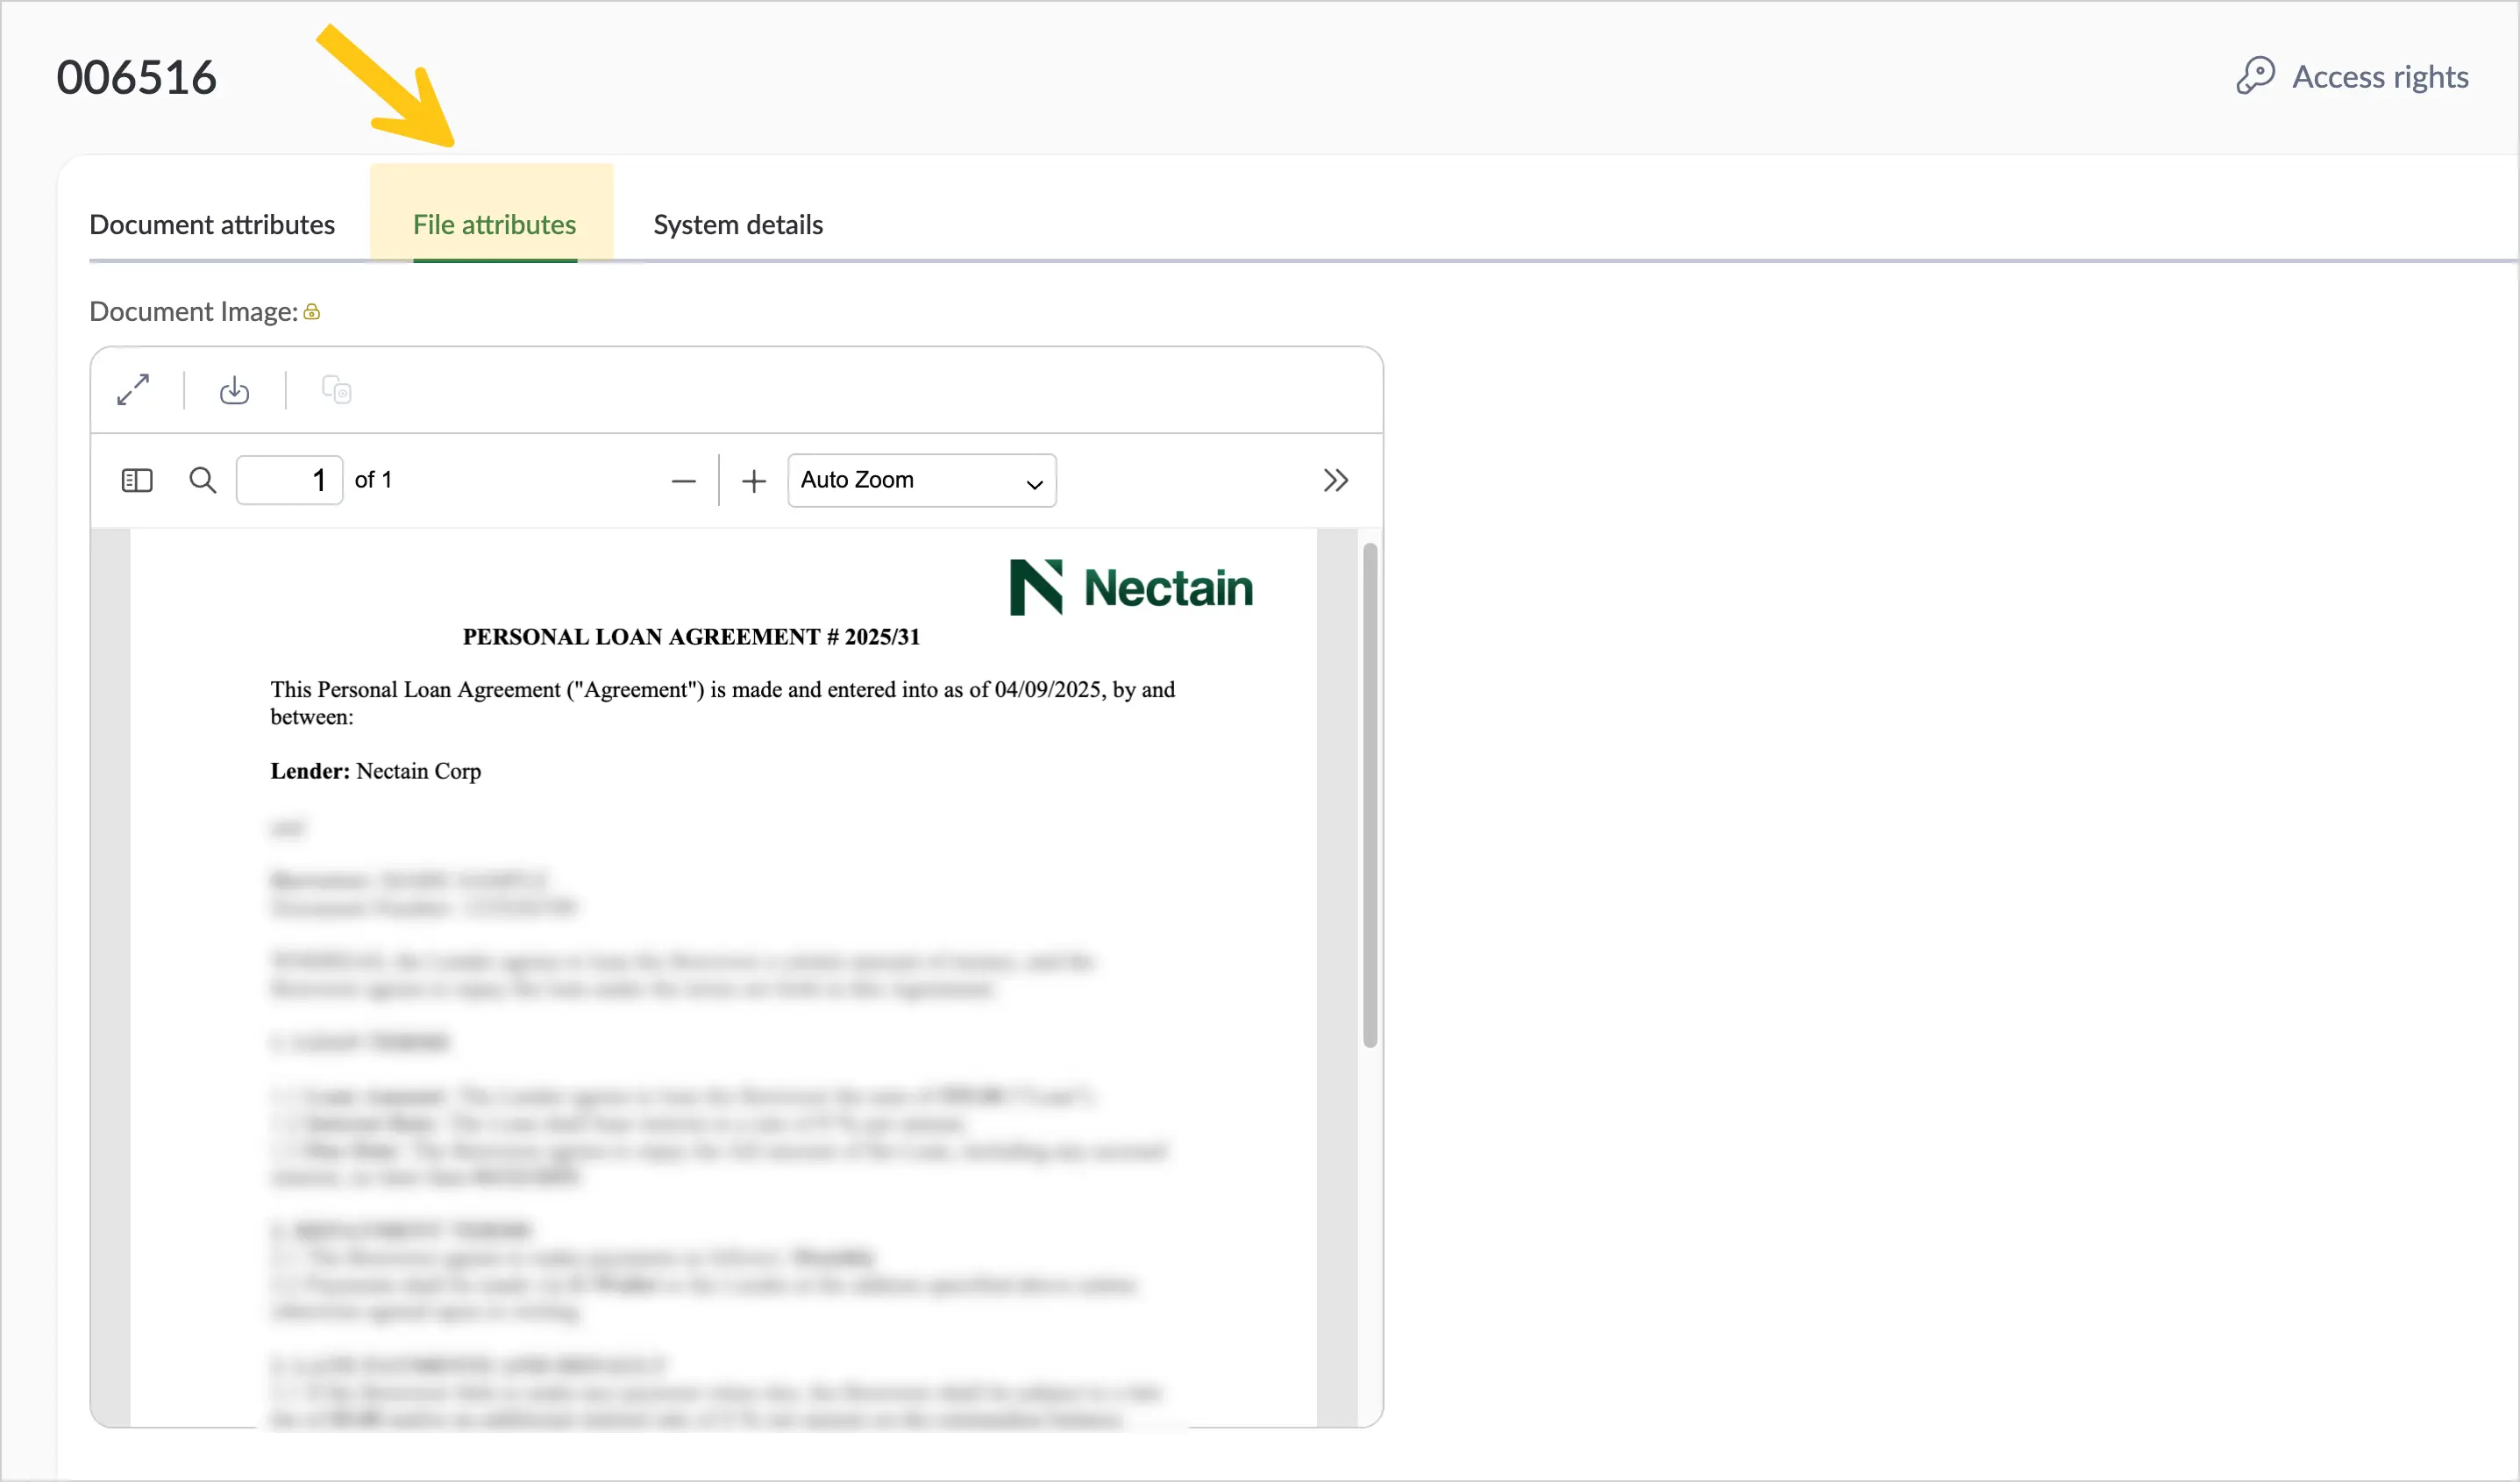
If the document contained file attributes, they are displayed in the File Attributes tab. Versions and signatures (if any) are available for each file.
-
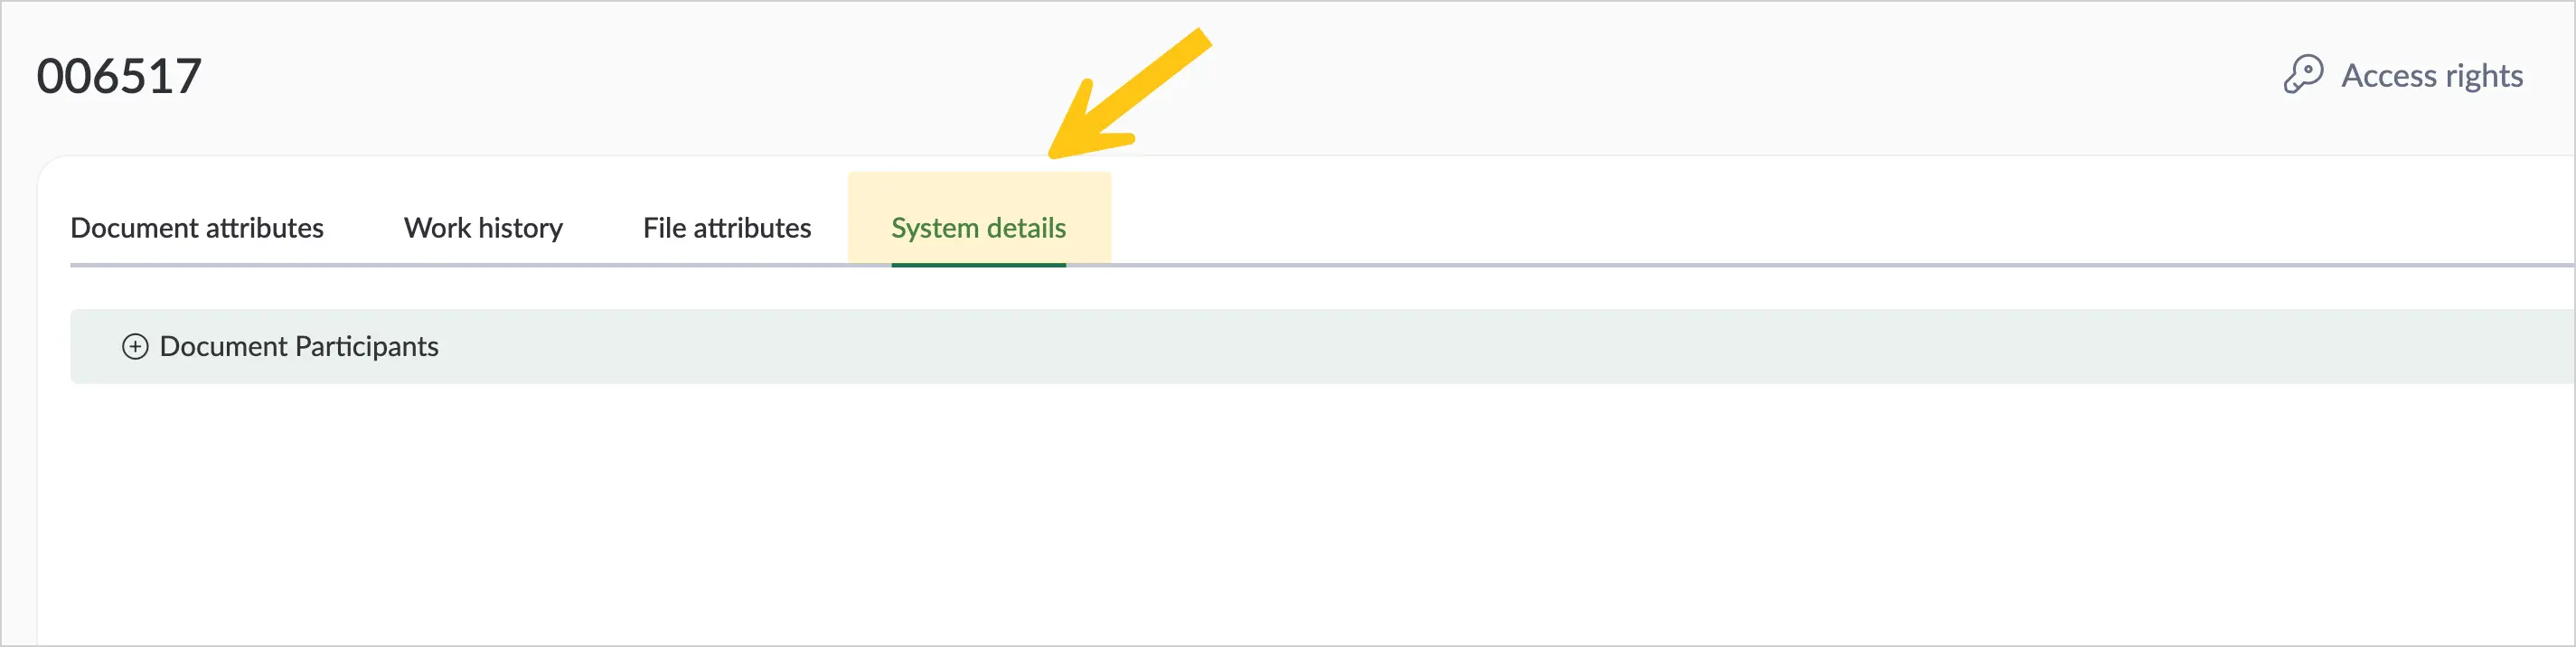
The System Details tab allows you to view:
- A document links
- B document participants
- C document change history
- D related business processes
- E related tasks
5.1.9.5. Grant Access to an Archived Document
Only users with the Admin or Archivist role can grant access to archived documents.
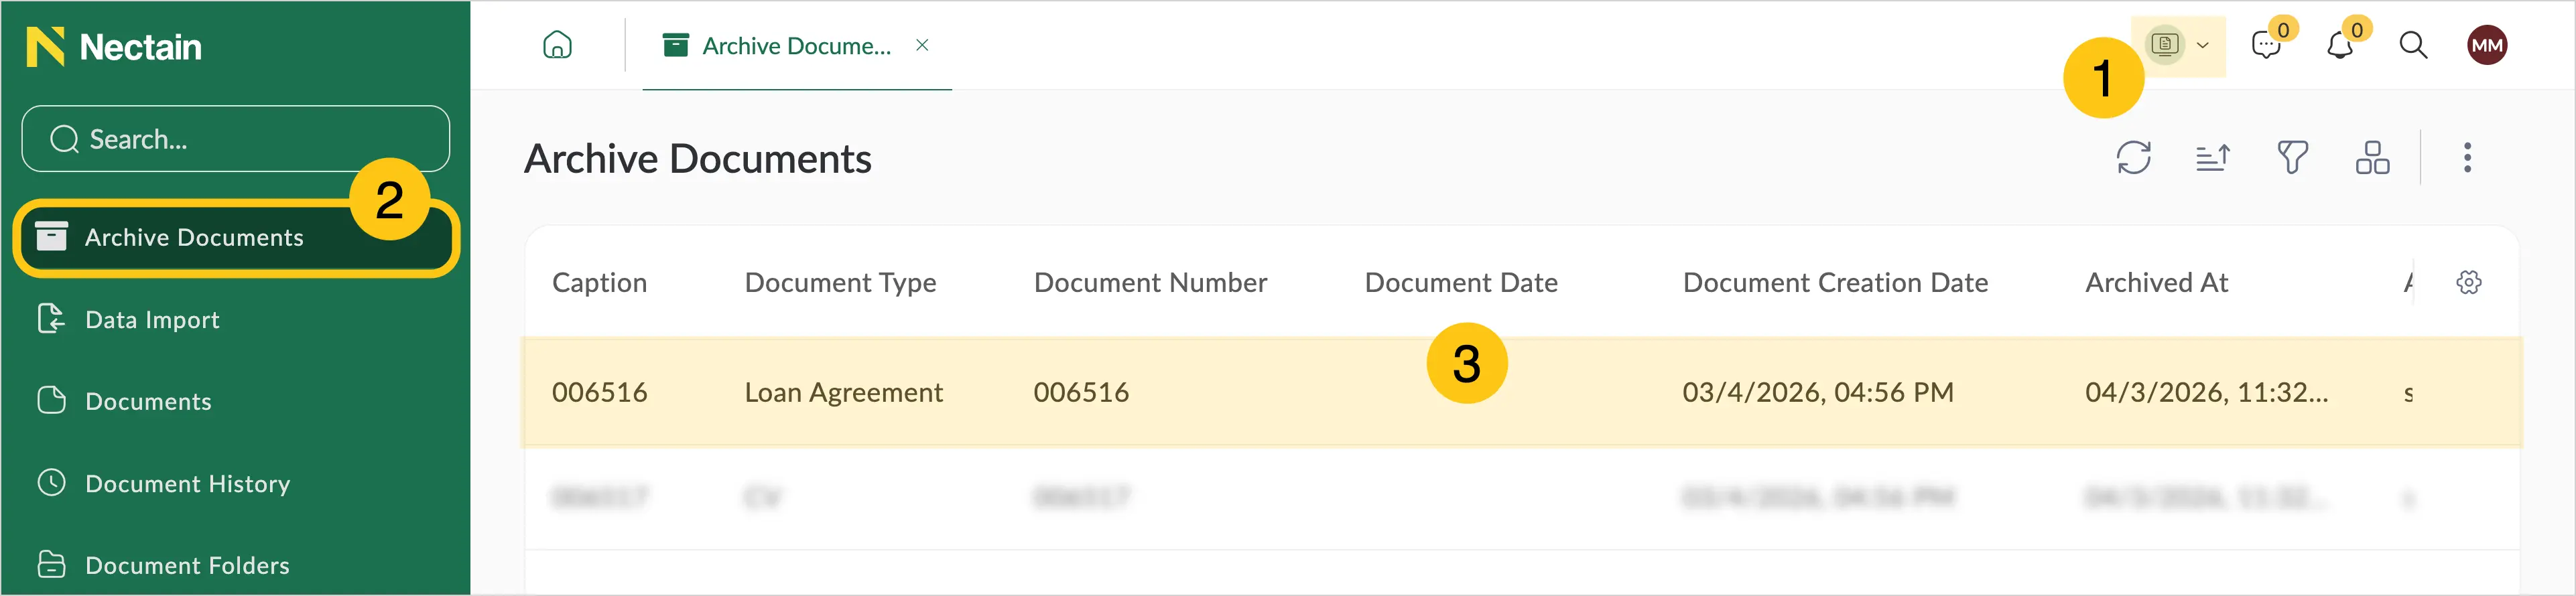
-
In the navigation panel, select the Documents 1 workspace.
-
Select the Archived Documents shortcut 2.
-
Open the document you want to share 3.
-
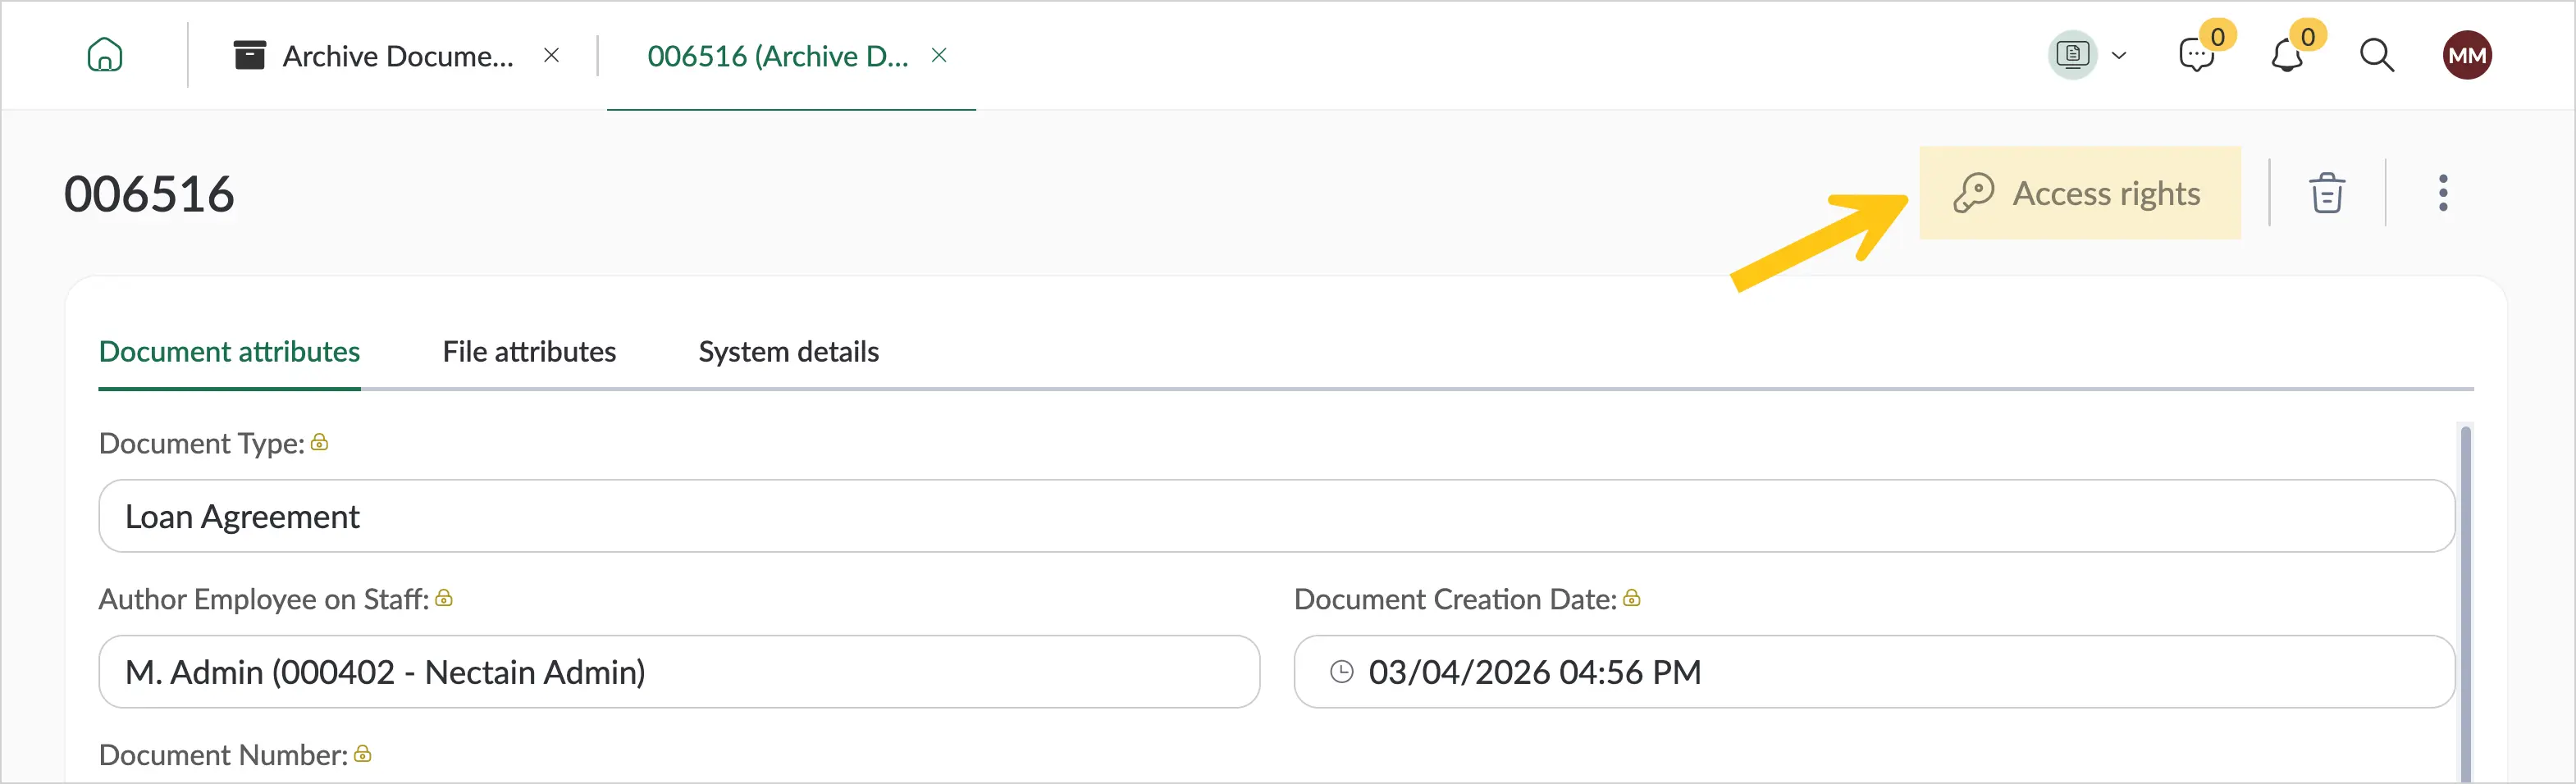
In the toolbar, select Access rights.
-
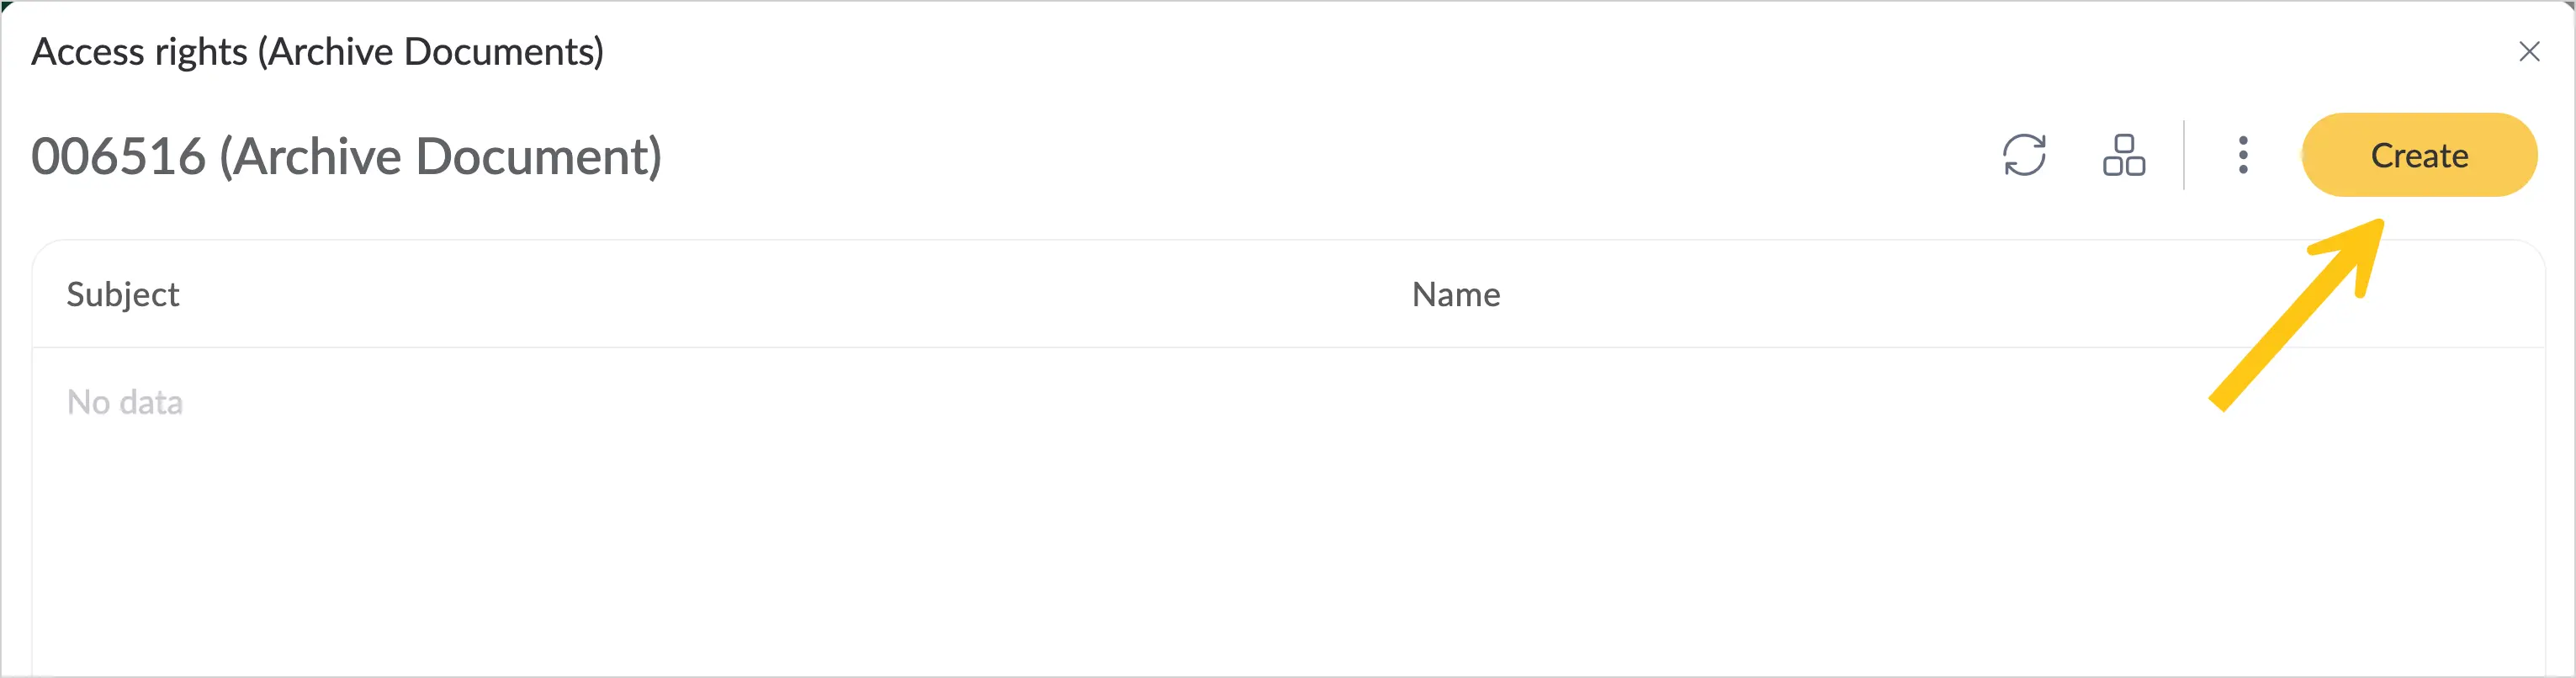
Select Create to add a new access entry.
-
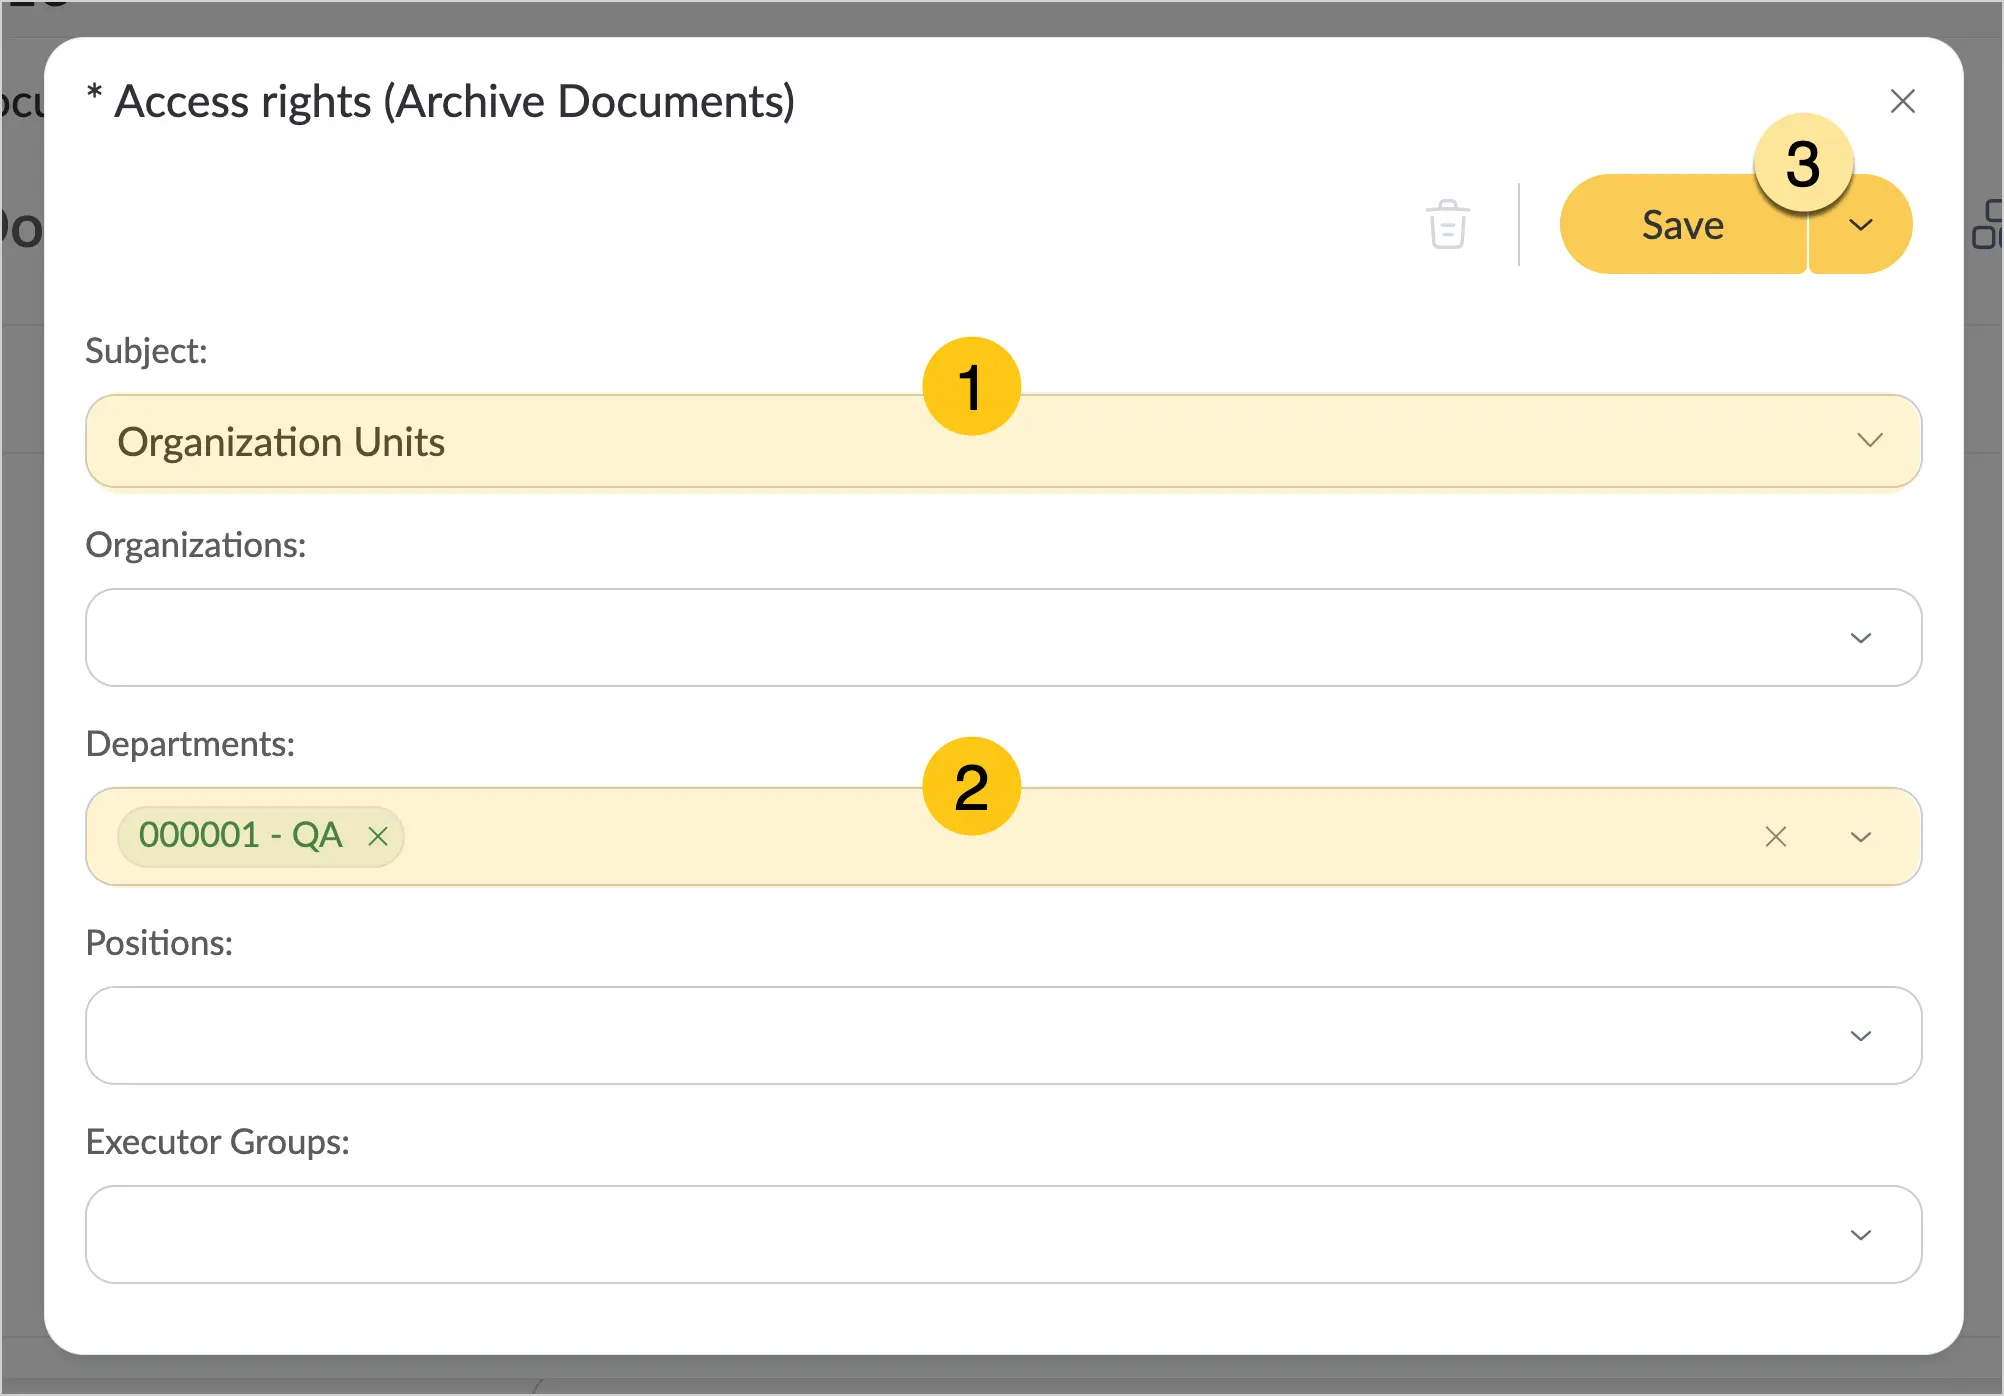
In the Subject field 1, select one of the following options:
-
In the corresponding field, select the user or group to grant access to 2.
-
Select Save 3.
-
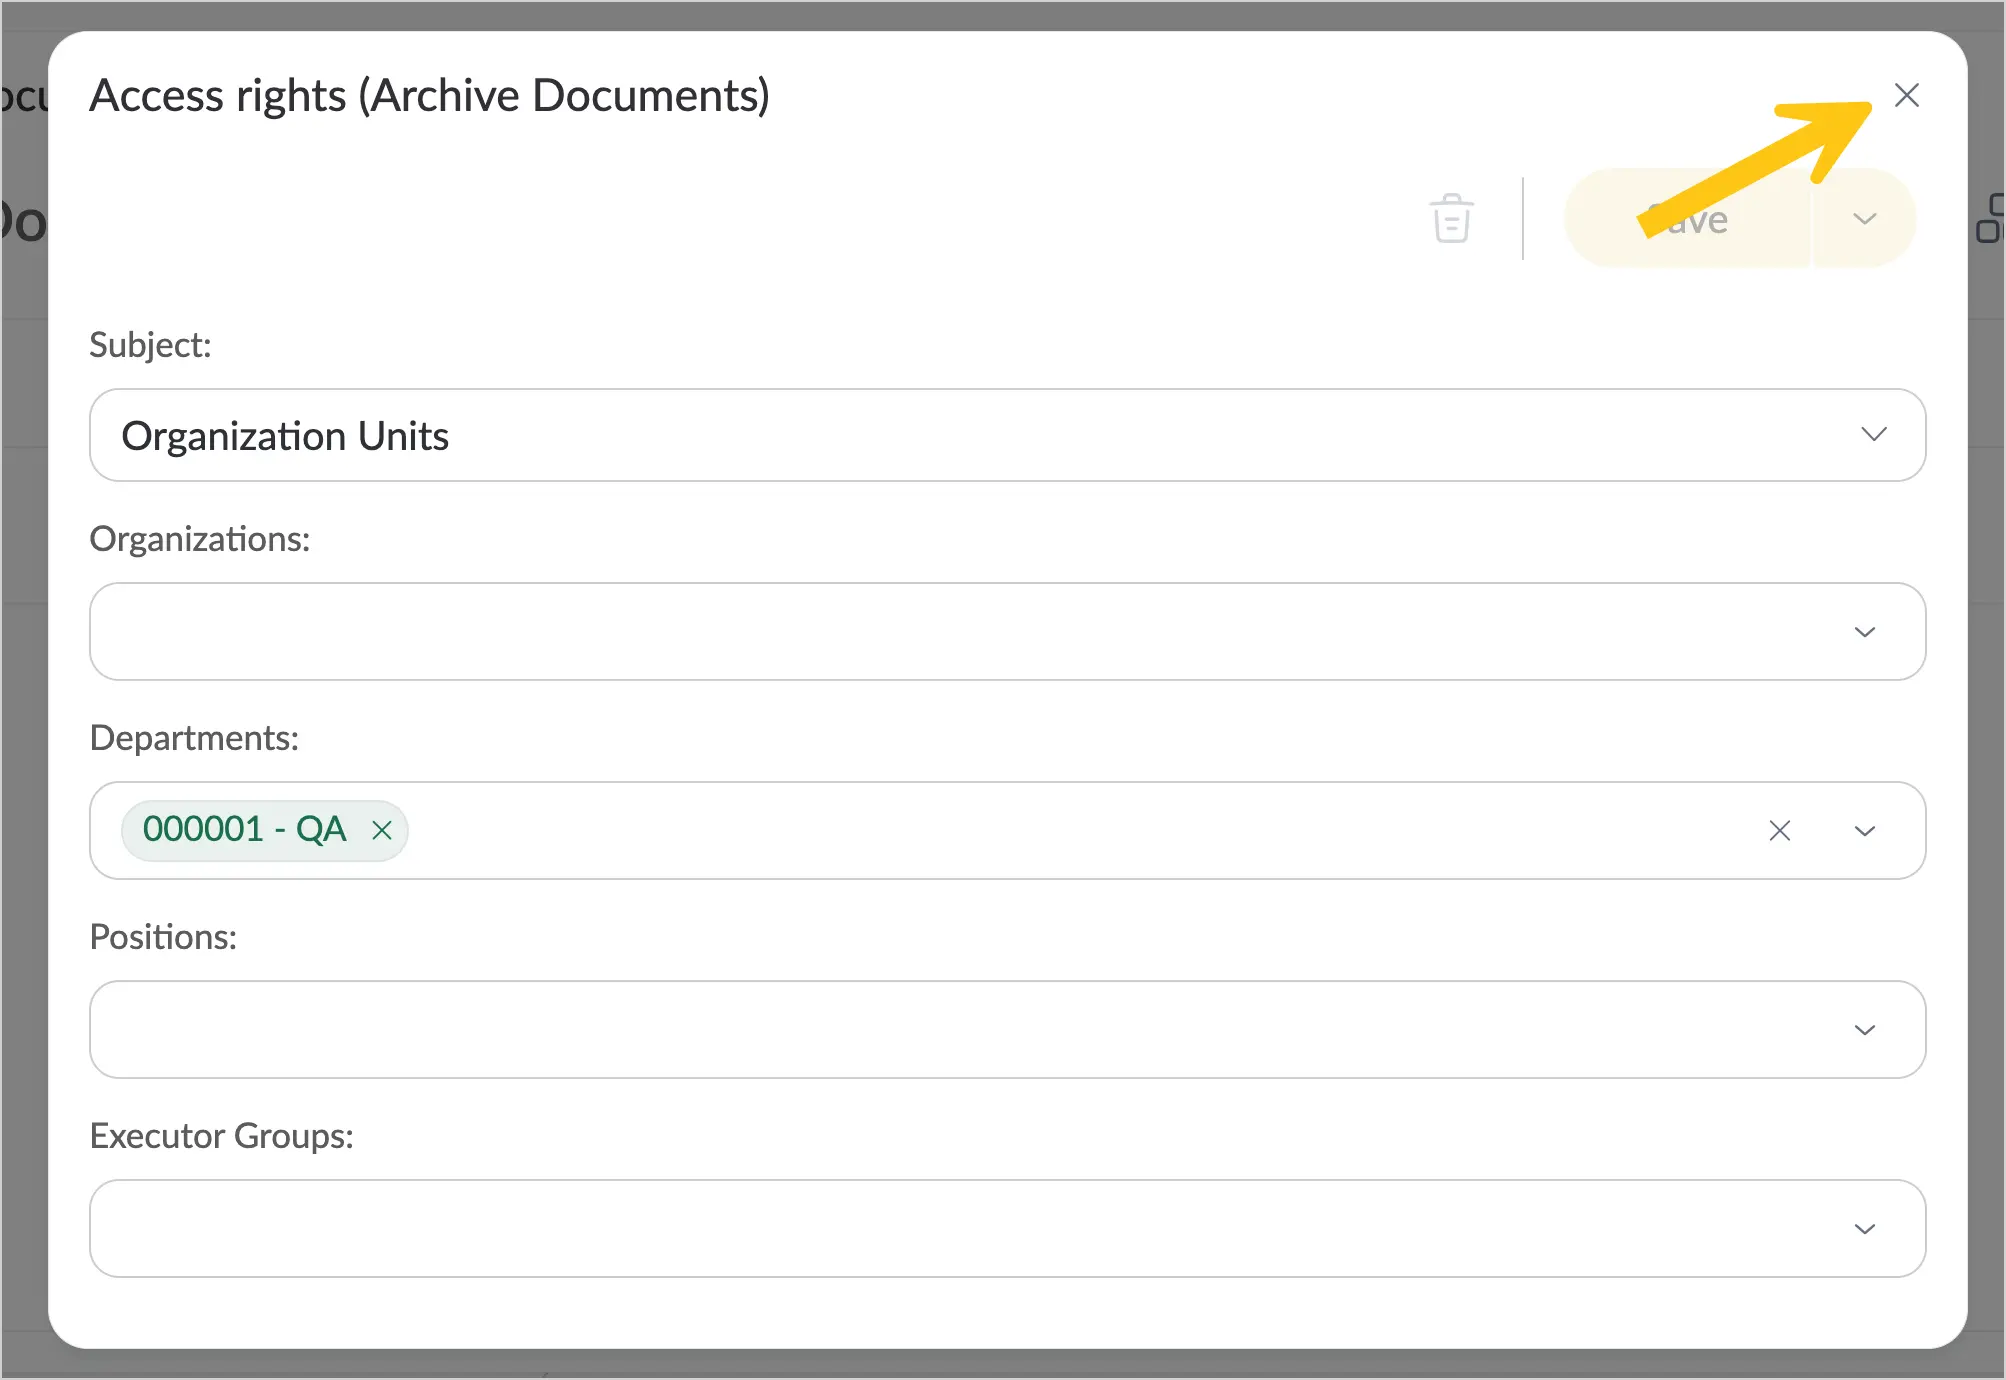
Close the permissions settings window.
-
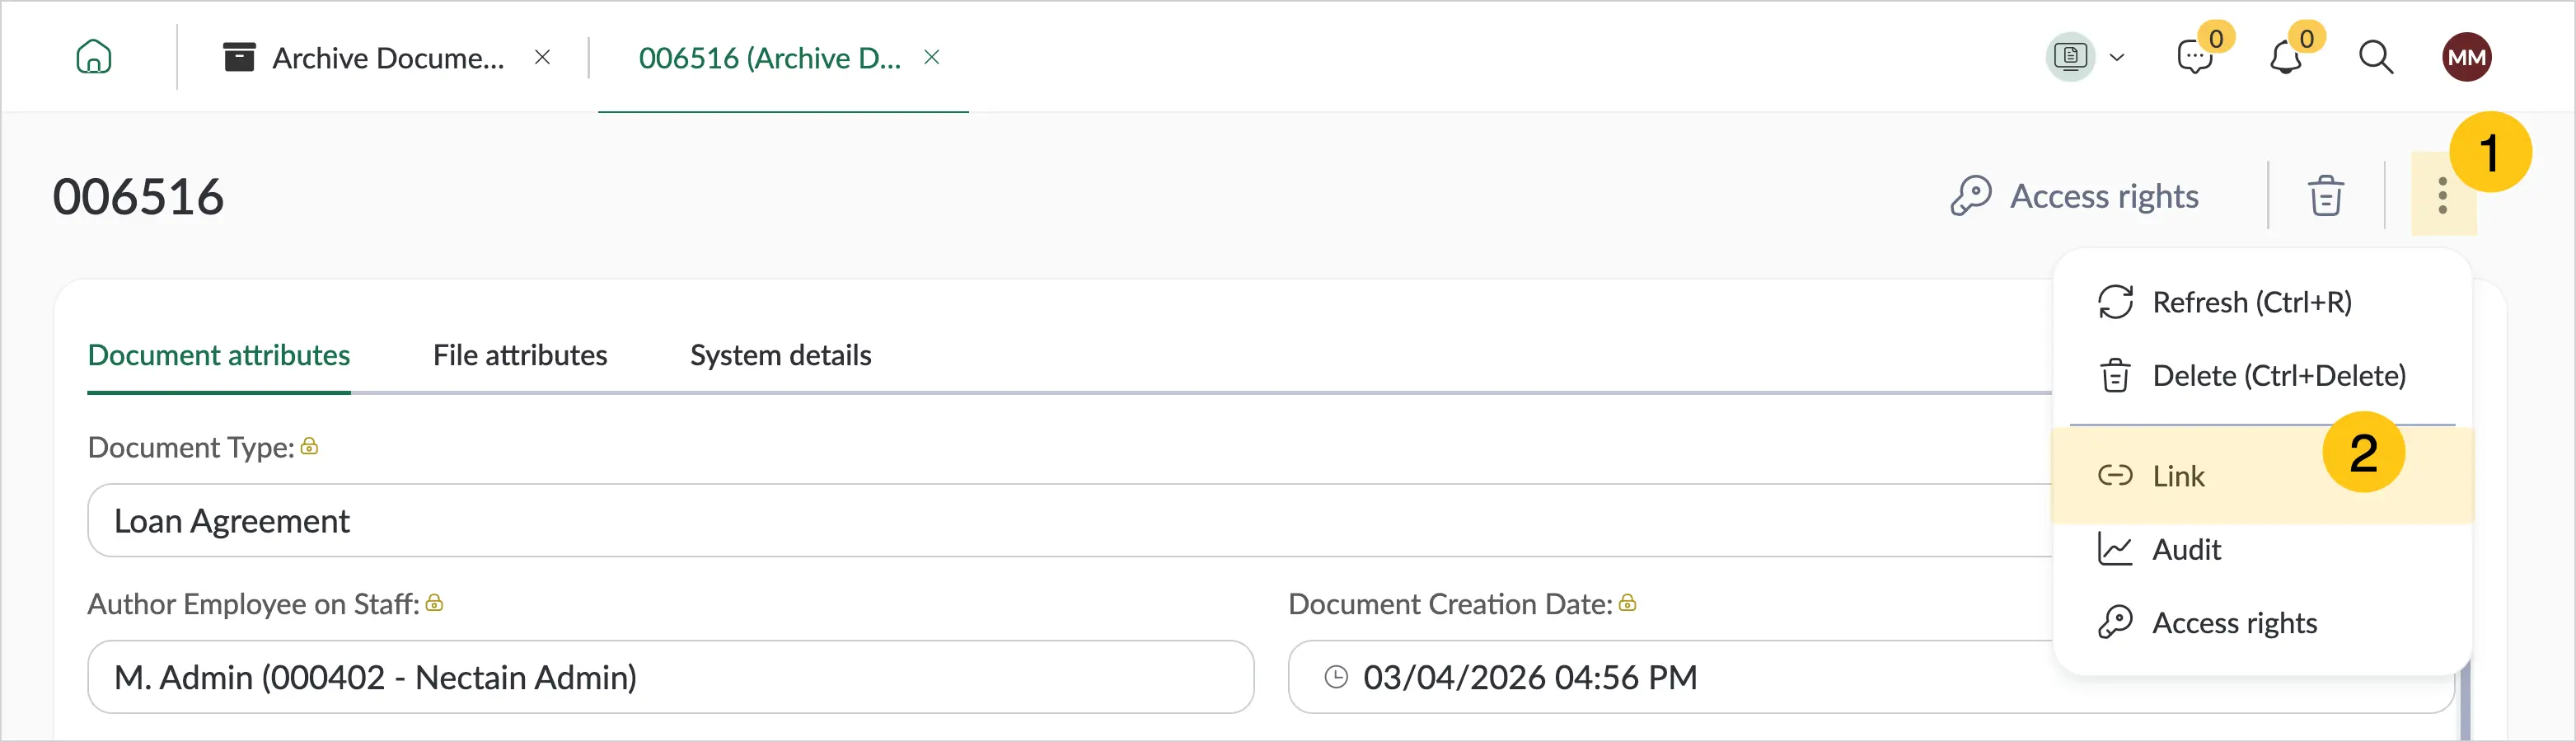
To share the document, select the 1 icon and select Link 2.
-
The link will be copied to the clipboard. Send it to the user or group you granted access to (for example, in a message or email).