2.8. User Dictionaries
2.8.1. Classifiers
Classifiers are special dictionaries that group elements for selection from a specific category. Their main purpose is to provide an organized data structure used for filtering, searching, selecting, or automating processes in documents or tasks within the system.
Example: Suppose your system contains documents related to different company departments (Marketing, Finance, IT, etc.). To create a structure for selecting departments, an administrator can configure a "Departments" classifier with the following entries: Finance Department, IT Department, Marketing Department.
2.8.1.1. Create a Classifier
-
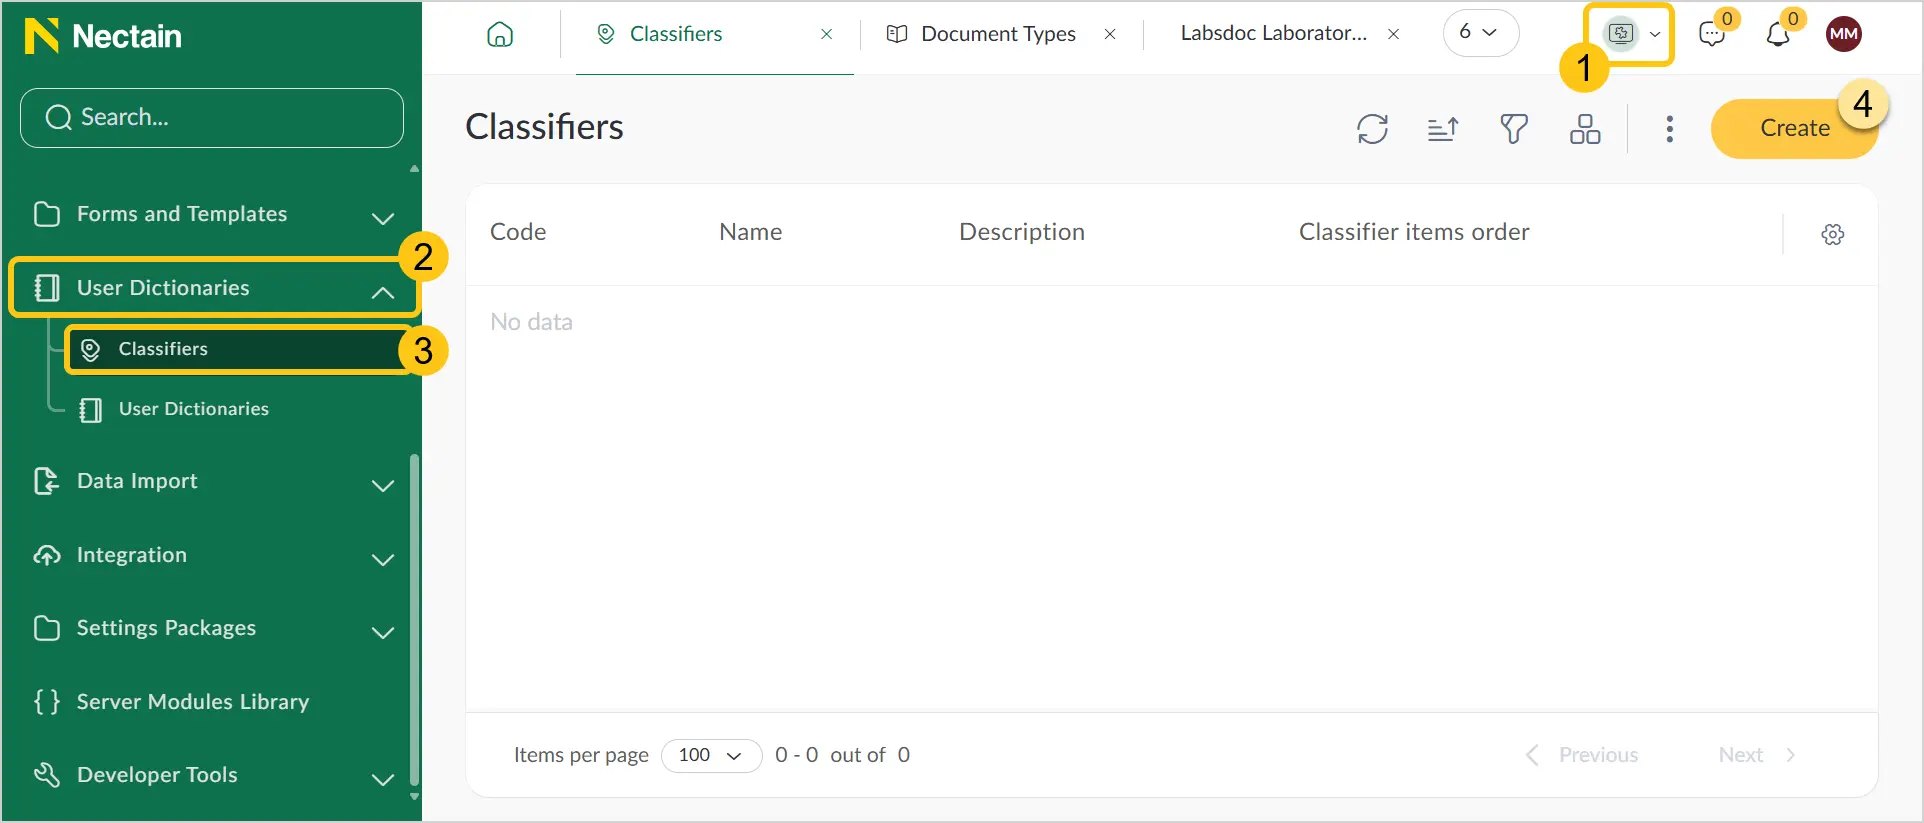
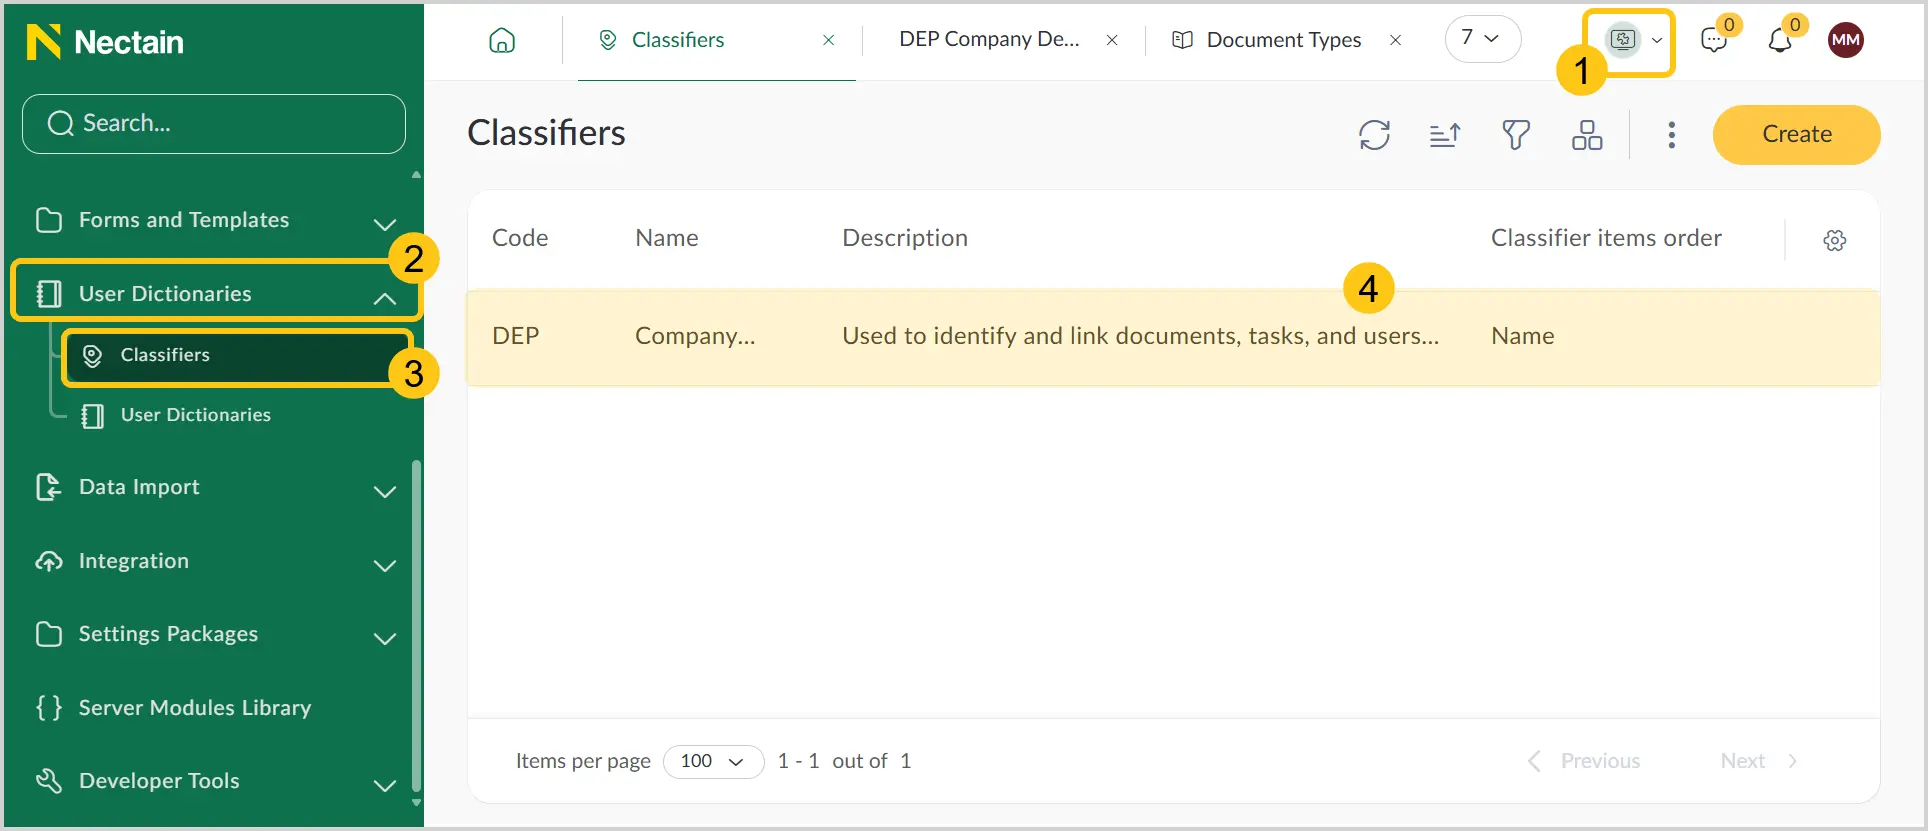
In the navigation panel, select the Studio 1 workspace.
-
Select the User Dictionaries 2 shortcut group, then select the Classifiers 3 shortcut.
-
In the toolbar, select Create 4.
-
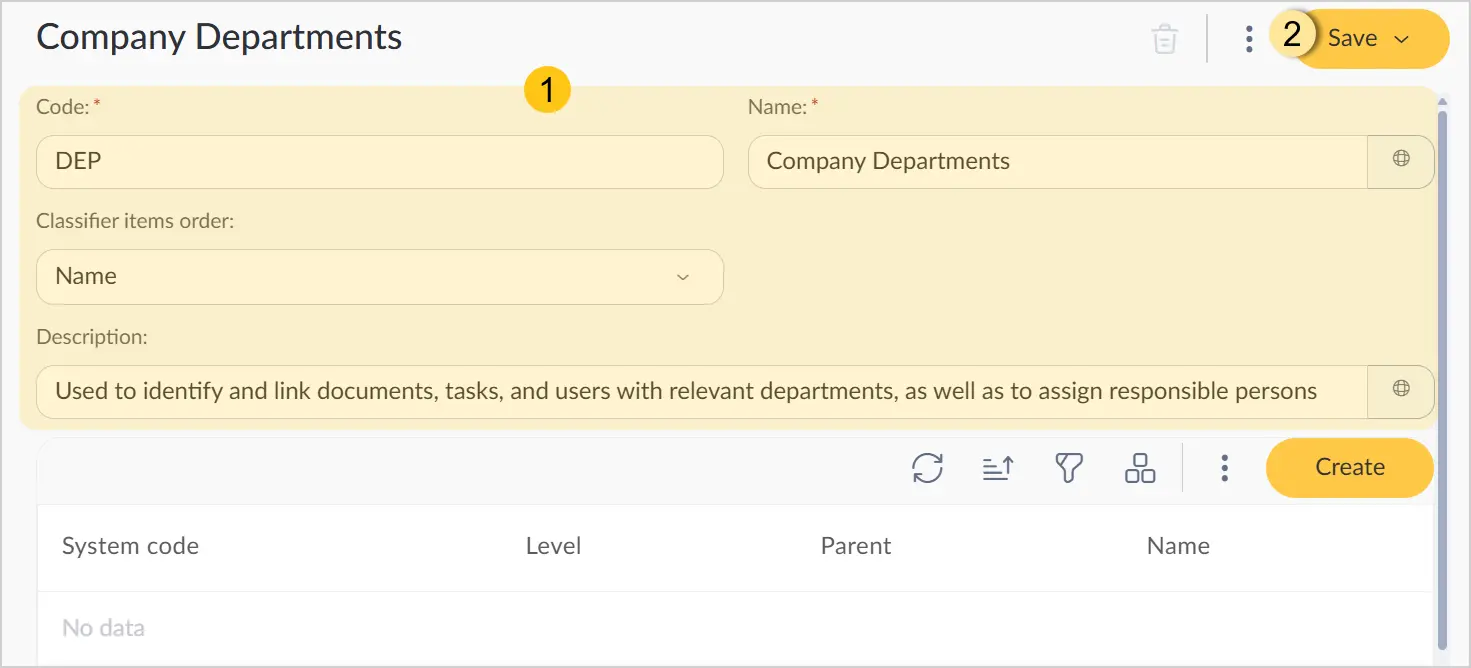
Fill in the fields 1 using the hints in the table below, then in the toolbar select Save 2.
| Field | Description |
|---|---|
| Code* |
|
| Name* | Name of the classifier. Example: "Company Departments" |
| Classifier element order | Defines how elements are sorted (by code or name). Possible values: • Code • Name. |
| Description | Brief information about the purpose of the classifier. Example: Used to identify and link documents, tasks, and users with their respective departments, as well as to assign responsible persons. |
Fields marked with * are required.
-
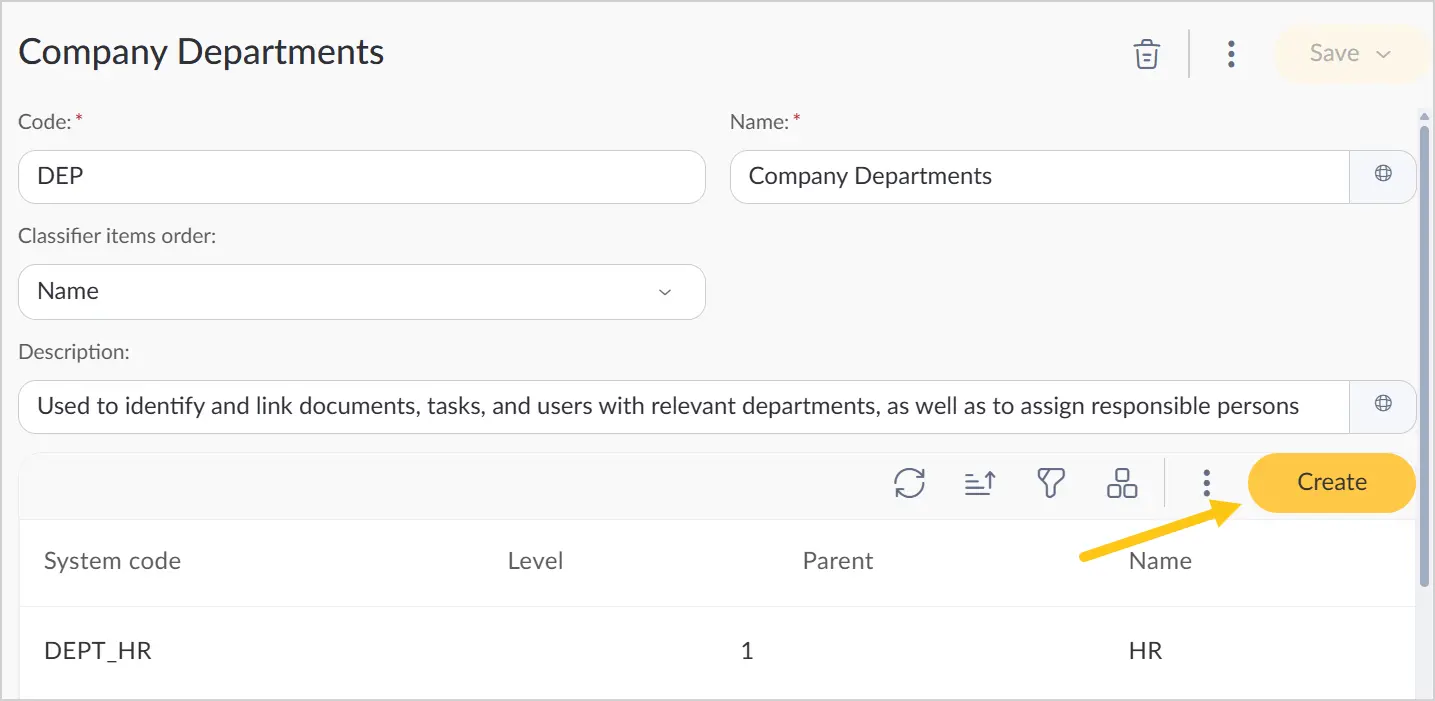
To add entries to the classifier, select the + button in the table.
-
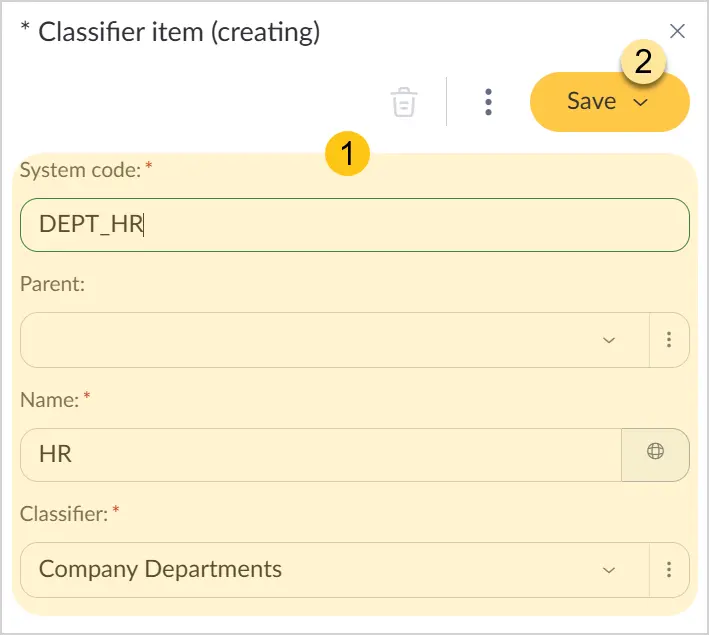
Fill in the fields 1 using the hints in the table below, then in the toolbar select Save 2.
| Field | Description |
|---|---|
| System code* | Identifier of the classifier entry.
|
| Parent | Specify another entry that you want to set as the parent of the current entry. Both the parent and child entries must belong to the same classifier. |
| Name* | Name of the classifier entry. Example: "IT Department" |
Fields marked with * are required.
2.8.1.2. Edit Classifiers
Users with the Developer and Data Manager roles can add and edit entries in classifiers.
To edit existing classifiers:
-
In the navigation panel, select the Studio 1 workspace.
-
Select the User Dictionaries 2 shortcut group, then select the Classifiers 3 shortcut.
-
See the Edit Record section.
-
Edit the docx template file by opening it in an external application.
You can edit the Code field only for templates that are not used in any existing document types.
2.8.1.3. Apply Classifiers
Classifiers are used on a document or task form via Reference and Multiple Reference attribute types.
-
Create a Reference or Multiple Reference attribute, depending on how many dictionaries or classifiers you want to activate. When creating the attribute, pay attention to the following fields:
1.1. In the Reference type field, select Classifier.
1.2. In the Dictionary field, select the required classifier from the dropdown list.
1.3. Fill in the remaining fields as needed. -
Open the required entity, then navigate to its form:
- Open the Document Type, then go to the Constructor tab.
or - Open the Task Form, then go to the Form tab.
- Open the Document Type, then go to the Constructor tab.
-
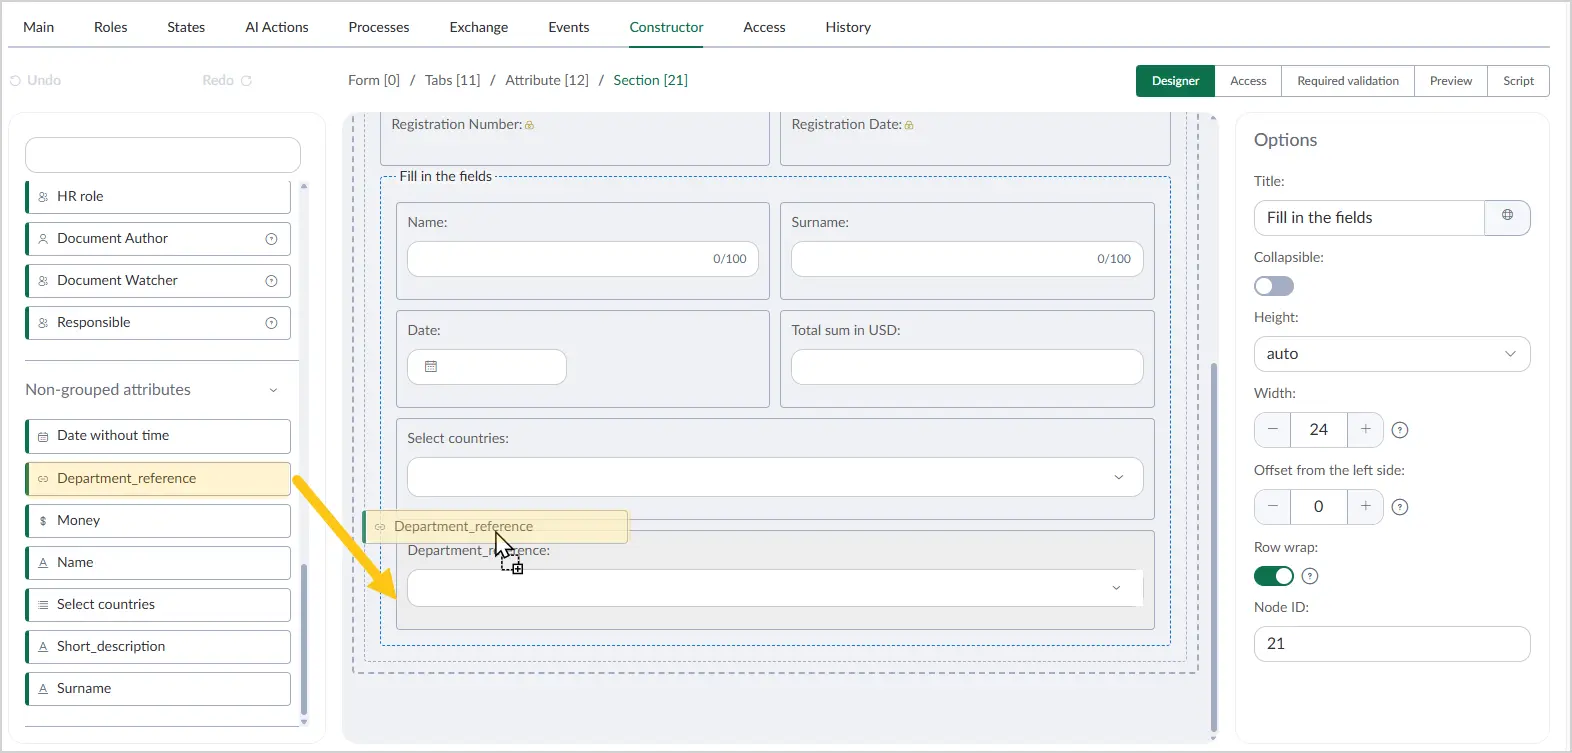
Drag the created attribute onto the form.
-
To configure a default value, select the added attribute 1, scroll down in the Settings menu, then in the Default value 2 field, select the required classifier entry.
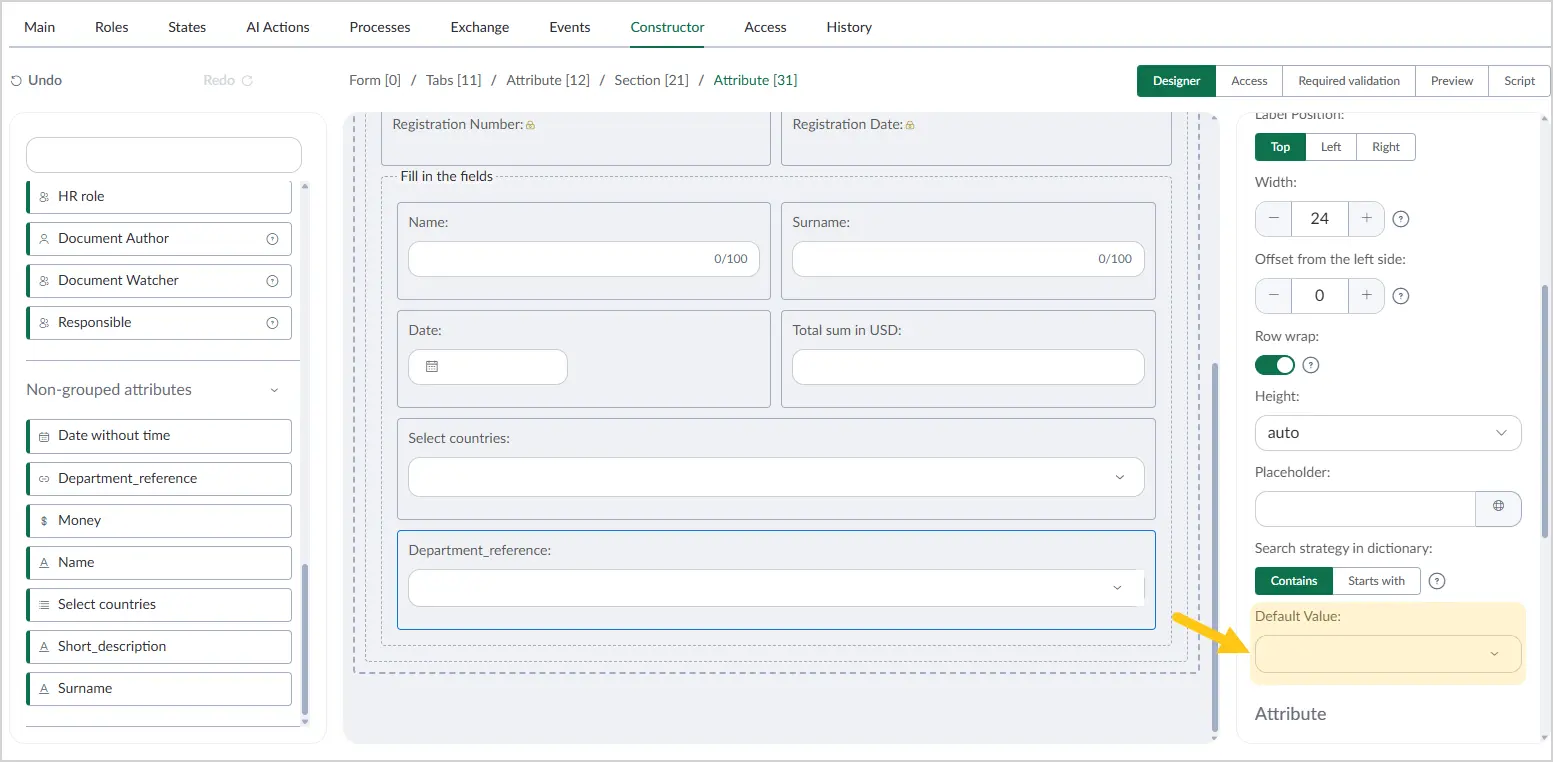
If you set a default value, all documents or tasks created from this form will automatically have the classifier entry assigned. If no default value is set, you must manually select a classifier entry for each new document or task generated from this form.
- In the toolbar, select Save.
2.8.2. User Dictionaries
Custom dictionaries are special registries with their own form for entering and displaying records. They allow you to create structured datasets that can be used in different parts of the platform.
Example: Your platform may have a user dictionary called "Suppliers" that contains information about all company suppliers, including their name, contact details, cooperation terms, etc.
2.8.2.1. Create a User Dictionary
-
In the navigation panel, select the Studio 1 workspace.
-
Select the User Dictionaries 2 shortcut group, then select the User Dictionaries 3 shortcut.
-
In the toolbar, select Create 4.
-
Fill in the fields 1 using the hints in the table below, then in the toolbar select Save 2.
| Field | Description |
|---|---|
| Code* | Unique identifier of the user dictionary.
|
| Name* | Name of the user dictionary. Example: "Suppliers". |
| Description | Brief description of the dictionary's purpose. Example: "Contains information about all company suppliers". |
| Title template* | Select the required title template from the dropdown list. It will be used to form the dictionary record title. |
| Organize elements into folders | Enable the toggle to organize records into folders. |
Fields marked with * are required.
-
Go to the Dictionary Record Form 1 tab.
-
From the attribute menu, drag the required attributes onto the form 2.
-
In the toolbar, select Save, then, if needed, proceed to fill in the following sections:
After completing the attribute settings, you can go to the Preview section to check how the form will be displayed.
-
To configure the dictionary table and record sorting, go to the Configure Dictionary Table section.
2.8.2.2. Configure the Dictionary Table
- In dictionary creation or edit mode, go to the Dictionary Call Table Settings tab.
- Configure the required table parameters:
2.8.2.2.1. Columns
-
To add columns, drag attributes from the attribute menu into the Columns section.
-
Configure the added columns. The following parameters are available for each column:
- a Column name — enter the desired column name. If left empty, the attribute names will be used as column names.
- b Display format — for Date and/or Time and Number attribute types, you can select the display format for their values.
- c Column width — enter a number corresponding to the width in pixels. If left empty, the default value will be applied.
- d Data alignment — select one of the following options: "Left", "Center", "Right".
- a Column name — enter the desired column name. If left empty, the attribute names will be used as column names.
Display formats by attribute type:
Integer
Currency
Floating point number
Date
Date and Time
2.8.2.2.2. Sorting
-
To add sorting parameters, drag attributes from the attribute menu into the Sorting 1 section.
-
Select the sort direction 2: Ascending or Descending.
2.8.2.2.3. Filters
Using filters, you can hide certain dictionary records. Records that do not meet the filter conditions will not be available for selection in the Reference attribute.
-
To add filter parameters, drag attributes from the attribute menu into the Filtering section.
Filtering is not available for Multiple Reference attribute types.
-
In the added attributes, specify the filter type 1 and the value 2.
-
For Date or Date and Time attribute types, add macros to specify values in the future or past relative to the current date:
3.1. In the Date or Date and Time attribute, select the filter type "From" or "To" 1.
3.2. Select the button 2.
3.3. Select the macro type "In the past" or "In the future" 3.3.4. Select the unit of measure 1 and the quantity 2.
Example: To filter records with a date in the current month, select: "From" + "In the past" + "Month" + "1".
2.8.2.2.4. Colors
To highlight dictionary records with a specific color:
-
To add color parameters, drag attributes from the attribute menu into the Colors section.
-
On the added attribute, select Add color.
-
In the Filter 1 field, select the filter type, then in the Value 2 field, enter the required value. When these conditions are met, the selected color will be applied.
-
Select one of the 16 available colors 3.
-
For Date or Date and Time attribute types, add macros to specify values in the future or past relative to the current date:
5.1. In the Date or Date and Time attribute, select the filter type "From" or "To" 1.
5.2. Select the button 2.
5.3. Select the macro type "In the past" or "In the future" 3.
5.4. Select the unit of measure 1 and the quantity 2.
Example: To filter records with a date in the current month, select: "From" + "In the past" + "Month" + "1".
2.8.2.3. Edit User Dictionary Records
Users with the Developer and Data Manager roles can add and edit records in custom dictionaries.
A Data Manager can edit records in a user dictionary only through the context menu of an attribute that references the dictionary, or via a User Dictionary shortcut.
There are several ways to work with user dictionary records:
Method 1: Editing records without creating a shortcut
Editing records without creating a shortcut or linking to an attribute. This method is available only to users with the Admin or Developer role.
-
In the navigation panel, select the Studio 1 workspace.
-
Select the User Dictionaries 2 shortcut group, then select the User Dictionaries 3 shortcut.
-
Right-click the required user dictionary 1, then in the context menu, select Edit dictionary records 2.
You will see all dictionary records, including those that do not meet any filter conditions you may have set when creating the dictionary.
Method 2: Using a User Dictionary shortcut
-
Create a shortcut of the User Dictionary type. When creating it, pay attention to the following parameters:
1.1. In the Typed 1 tab, in the Custom dictionary 2 field, select the required user dictionary.
1.2. In the toolbar, select Save 3.
In the created shortcut, you will see all dictionary records, including those that do not meet the filter conditions you may have set when creating the dictionary.
However, if you set additional filter conditions when creating the shortcut, those filters will be applied. Therefore, the filters set when creating the dictionary do not affect the records displayed in the shortcut, but the filters set when creating the shortcut do.
2.8.2.4. Use a Dictionary Record in an Entity
After creating a user dictionary and populating it with records, you can use those records in the required entities. To add a user dictionary record to an entity:
-
Create an attribute of the Reference or Multiple Reference type. When creating the attribute, pay attention to the following parameters:
1.1. In the Data type field, select Reference.
1.2. In the Reference type field, select Custom dictionary.
1.3. In the Dictionary field, select the required dictionary whose record you want to display on the entity form.
1.4. In the toolbar, select Save. -
Open the entity form to which you want to add the dictionary record.
- To add the attribute to a document type, go to the Document Types 2 shortcut > the desired document type > the Constructor 3 tab.
Or
- To add the attribute to a task form, go to the Forms and Templates 2 shortcut group > the Task Forms 3 shortcut > the Form 4 tab.
-
Drag the created attribute onto the entity form.
-
Select the added attribute 1, then in the Settings menu, in the Default value 2 field, select the required dictionary record to display in every document generated from this entity. Alternatively, you can leave the default value empty and manually specify the value for each new document generated from this entity.
When selecting a dictionary record in the Reference attribute, you will only see records that meet the filter conditions you may have set when creating the dictionary.
- In the toolbar, select Save.
2.8.2.5. Grant Access to a User Dictionary
Users with the Admin and Developer roles can grant editing access to a specific user dictionary for administration subjects and organizational units.
Access to edit records in all dictionaries remains available to users with the Admin, Developer, and Data Manager roles.
To configure access to a specific dictionary:
-
In the navigation panel, select the Studio 1 workspace.
-
From the User Dictionaries 2 shortcut group, select the User Dictionaries 3 shortcut.
-
From the dictionary registry, select the required dictionary 4.
-
Select one of the available methods:
Method 1: Using the button on the top panel
a. On the top panel of the form, select the Permissions button.
Method 2: Through the settings menu
a. To open the settings menu, select the icon in the top right corner of the form 1.
b. From the expanded menu, select Permissions 2.
-
In the access configuration window, select Add.
-
In the dropdown lists, configure the user categories to be granted access. These can be an individual user, user groups, system roles, organizations, departments, positions, or executor groups. For details, see the Access section.
-
Select Add to confirm the changes.
-
For users outside the Admin, Developer, and Data Manager roles to access records of the selected user dictionary after being granted permissions, you must configure a corresponding User Dictionary shortcut for them. See the Create Shortcut section.