2.7.5. Document Templates
Document templates allow automatically generating documents in .docx format with data substitution from a system document. During generation, the platform automatically replaces placeholders in the template with document attribute values, for example: a date, an employee's full name, or an organization name. Document templates are typically used for applications, contracts, invoices, memos, acts, questionnaires, and other standard documents that are frequently created using the same structure.
Example: a user can fill in a request form in the system, then automatically generate a ready-made .docx document where all the required data will already be substituted into the corresponding template fields.
2.7.5.1. Create a Document Template
A single document template can be used for multiple document types. If a particular attribute is absent in a specific document type, the corresponding value in the generated file will be left empty.
If needed, you can configure the template to not display blocks or fields with empty values.
-
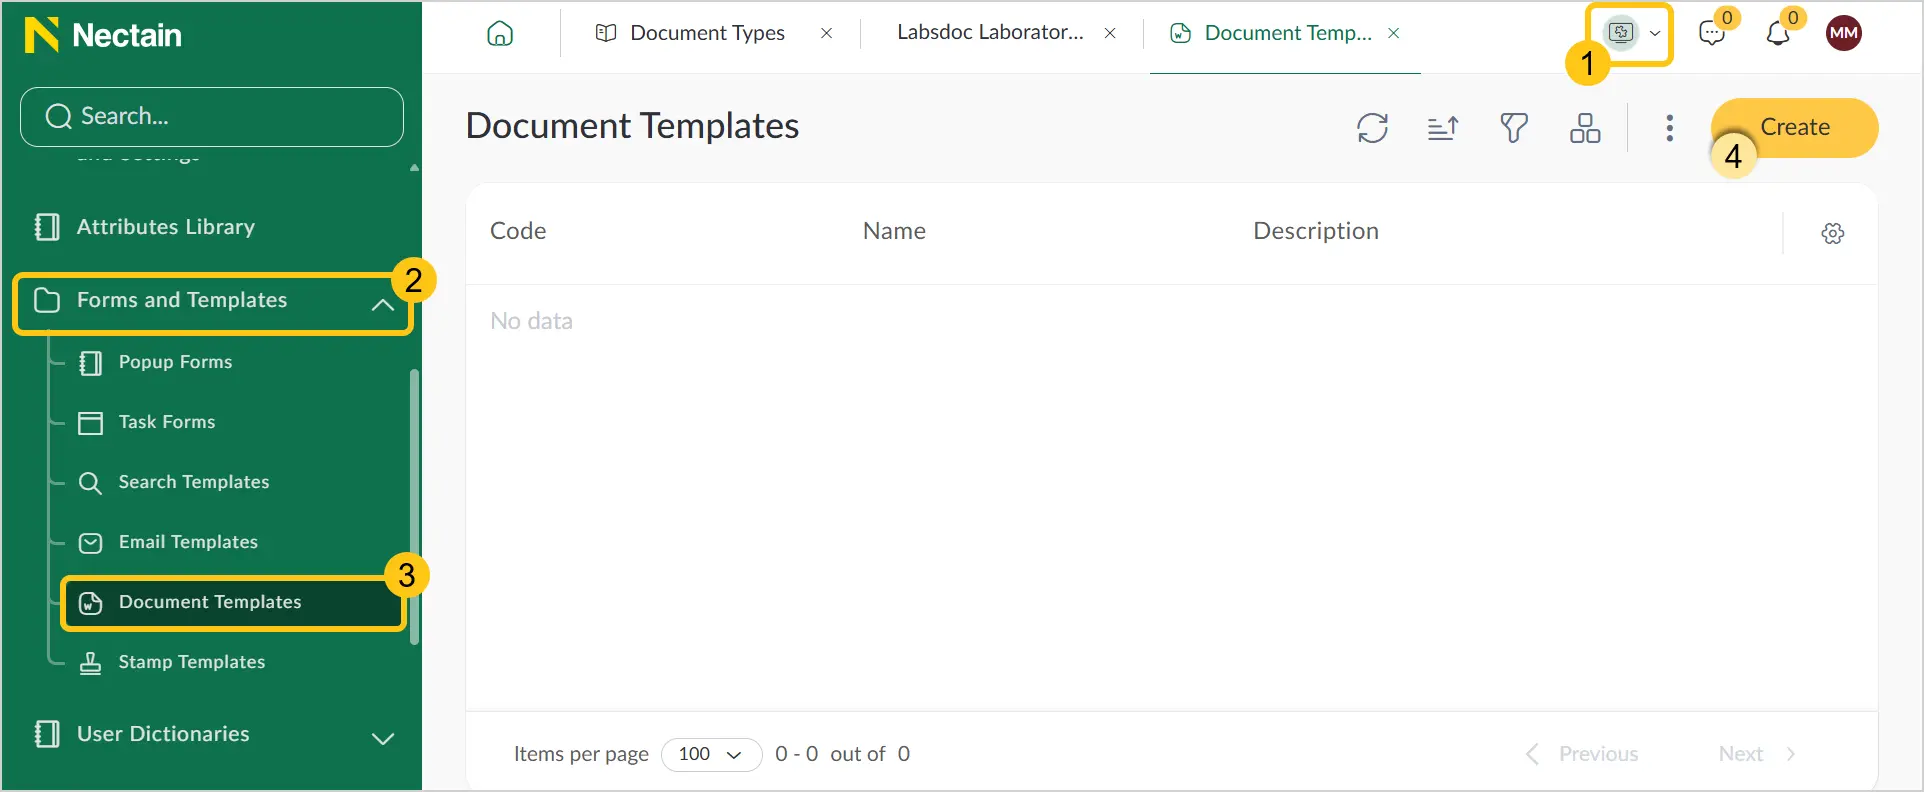
In the navigation panel, select the Studio 1 workspace.
-
Select the Forms and Templates 2 shortcut group, then select the Document Templates 3 shortcut.
-
In the toolbar, select Create 4.
-
Fill in the fields using the hints in the table below.
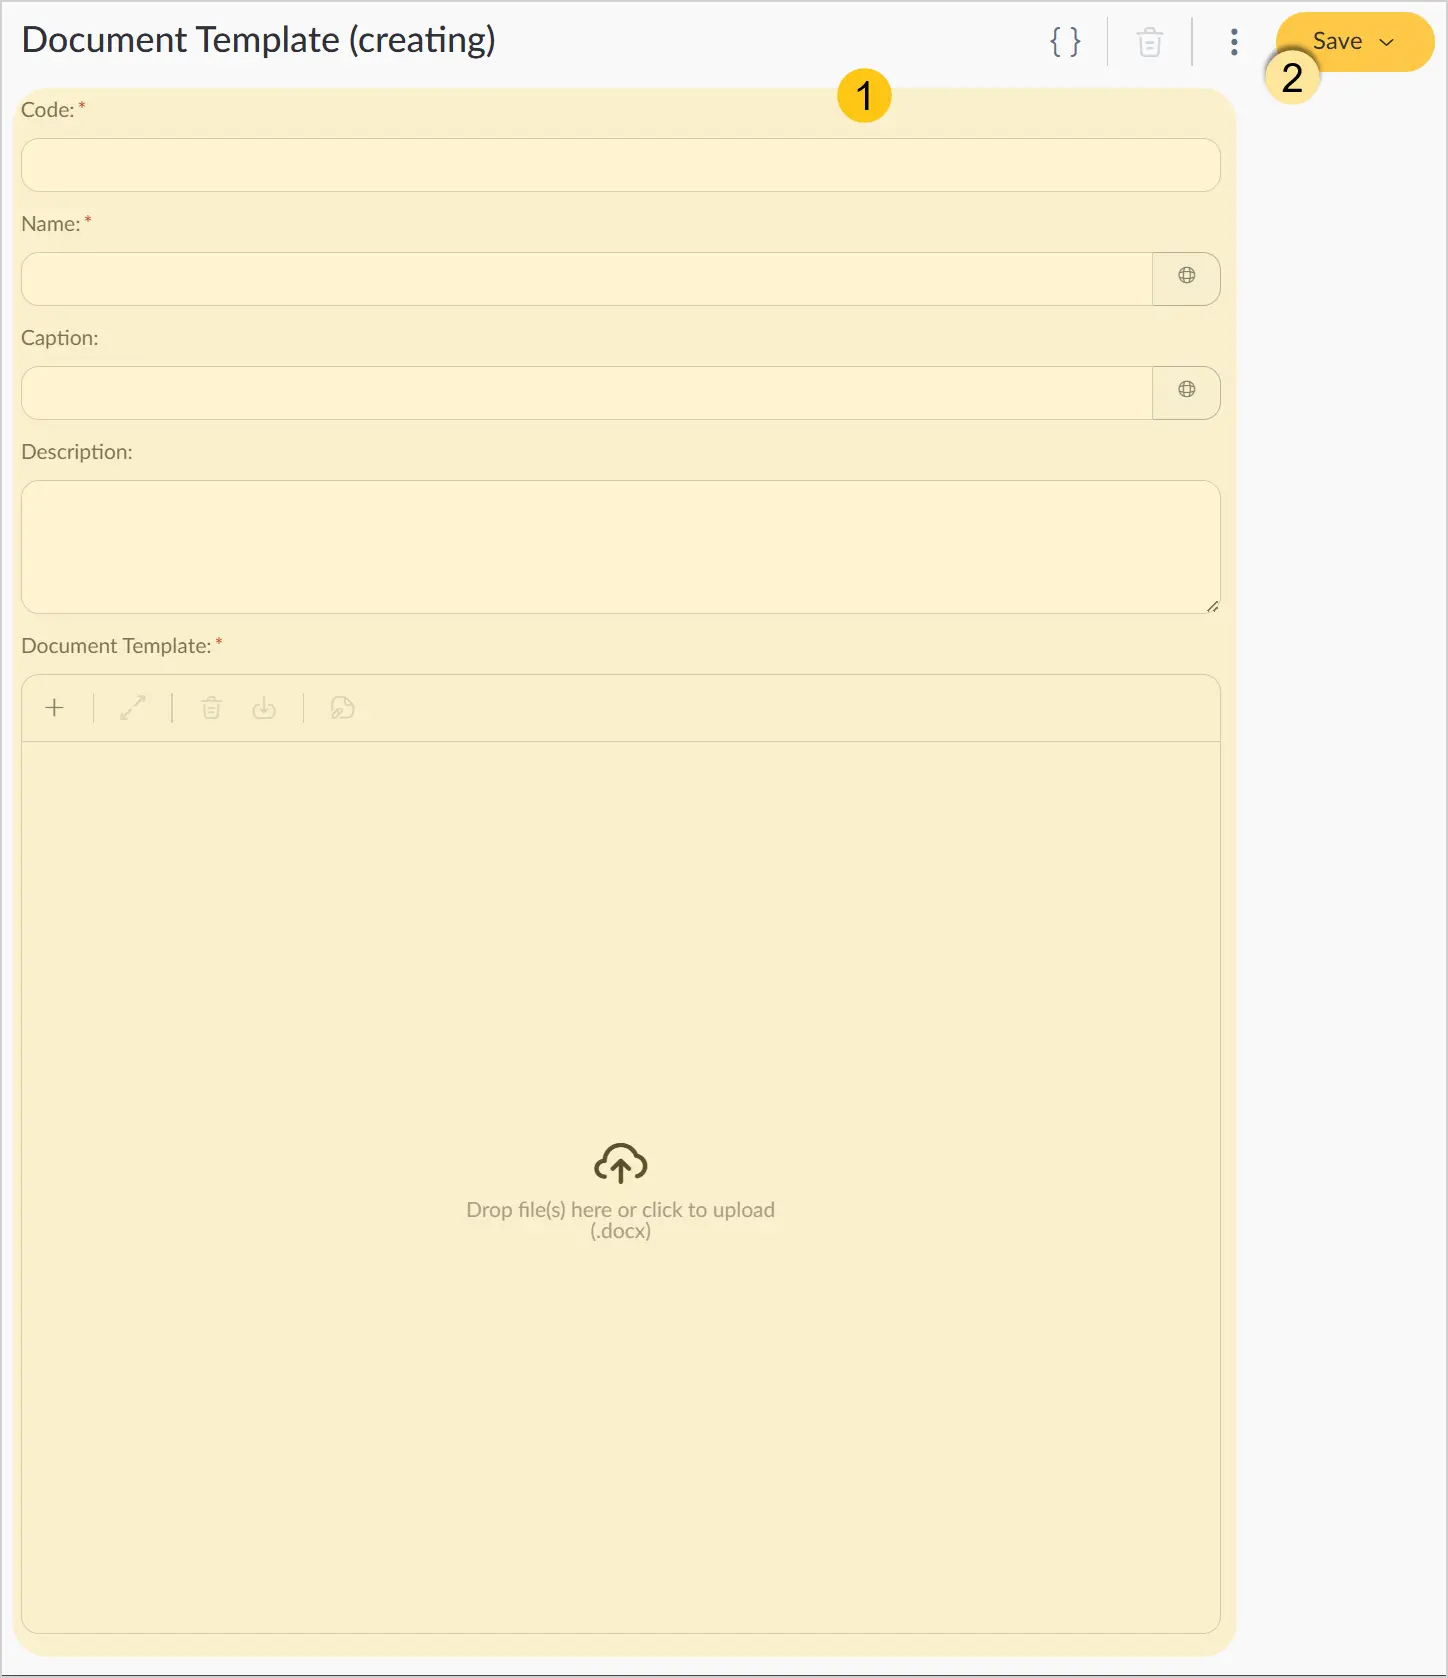
| Field | Description |
|---|---|
| Code* |
|
| Name* | Template name |
| Title | The title entered will be used in the dropdown list when selecting a document template for a file. The title is formed automatically by combining the Code and Name field values. If needed, you can enter a custom title value. |
| Description | Enter a description for the template. Specify the main purpose, features, or usage conditions of the template. Example: "Used for creating invoices with automatic filling of company and client details." |
| Document Template | Field for uploading the template file in .doc or .docx format. The template file must include placeholders that the system will replace with attribute values during document generation. For more details, see Create a Document Template File. |
Fields marked with "*" are required.
-
Optional: select the icon to open the Server Logic tab. This tab allows you to add additional logic using server scripts. For example, you can use a script to convert an attribute value to the required format, add new fields to the document template, or perform mathematical operations on numeric values. For more details, see Server Scripts.
-
In the toolbar, select Save.
2.7.5.1.1. Create a Document Template File
A template file is a document in .doc or .docx format in which the structure of the future document and the places for automatic data substitution are defined in advance.
To create a document template file, follow these steps:
-
Open any application that supports creating
.docor.docxfiles.Example: Microsoft Word, Pages, or Google Docs.
-
Use curly braces and the required attribute code to define placeholders for automatic data substitution.
Example:
{subject} -
Place the placeholders in the parts of the document where attribute values should appear.
-
Save the file in
.docor.docxformat, then upload it to the Document Template field.Depending on the attribute type, different placeholder syntax is used:
Data type Syntax Example Standard attribute {attributeID}{subject}Role-based attribute {mi_participants.roleCode}{mi_participants.author}Custom attribute {attrValues.attributeID}{attrValues.text}Nested value or dictionary {attrValues.attributeID.property}{attrValues.status.caption}For nested values (for example, dictionaries or other nested attributes such as Document Type), dot notation can be used:
{attrValues.attributeID} // To substitute the attribute code{attrValues.attributeID.caption} // To substitute the attribute caption{attrValues.attributeID.name} // To substitute the attribute name{attrValues.dictionary.name_uk^} // To substitute the name of a dictionary record in the Ukrainian locale
2.7.5.1.2. Advanced Template Features
For Toggle type attributes, conditional text display can be configured.
Example:
{^attrValues.toggle}Not approved{/attrValues.toggle}
{#attrValues.toggle}Approved{/attrValues.toggle}
In this example:
- if the toggle is off, the document will display
Not approved; - if the toggle is on, the document will display
Approved.
For table attributes, repeating blocks or table rows can be automatically generated.
Example:
{#attrValues.ms16}
{attrValues.ms01}
{attrValues.ms02}
{attrValues.ms03}
{/attrValues.ms16}
In this example, the system will retrieve the values of attributes ms01, ms02, and ms03 from the table attribute ms16.
For custom attributes of type Formatted Text, values can be transferred to the document with formatting preserved.
| Syntax | Description |
|---|---|
{~attrValues.attributeID} | Inserts formatted text as part of the current line. |
{~~attrValues.attributeID} | Inserts formatted text as a separate block with multi-line and formatting support. |
This syntax is available when the paid HTML module is installed. If the HTML module is not installed, the attribute value is transferred to the document as plain text. In that case, use the {attrValues.attributeID} syntax.
The platform uses Docxtemplater for generating documents from templates. The official Docxtemplater documentation may be useful if you need to use conditional logic, loops, tables, data arrays, formatted text, or advanced placeholder syntax.
2.7.5.2. Apply a Document Template
There are different ways to apply a document template depending on the level of automation you want. The following methods are available:
-
Method 1: File attribute action — the document template is applied directly to a file attribute. After configuring this way, users will be able to generate documents from a template manually by selecting the corresponding button in the attribute toolbar.
-
Method 2: Script — the document template is applied using a script. After configuring this way, you will be able to trigger document generation from a template, for example, using a custom button on the form.
-
Method 3: Event handler — the document template is applied using an event handler. After configuring this way, the document will be generated automatically when a certain event occurs, for example, when the document state changes.
-
Method 4: Process — the document template is applied using a process. After configuring this way, the document will be generated automatically during business process execution.
2.7.5.2.1. Method 1: File Attribute Action
-
Navigate to the required document type, task form, or custom dictionary form.
1.1. If you want to apply the template to a document type, select the Document Types 2 shortcut > the required document type > the Designer tab 3.
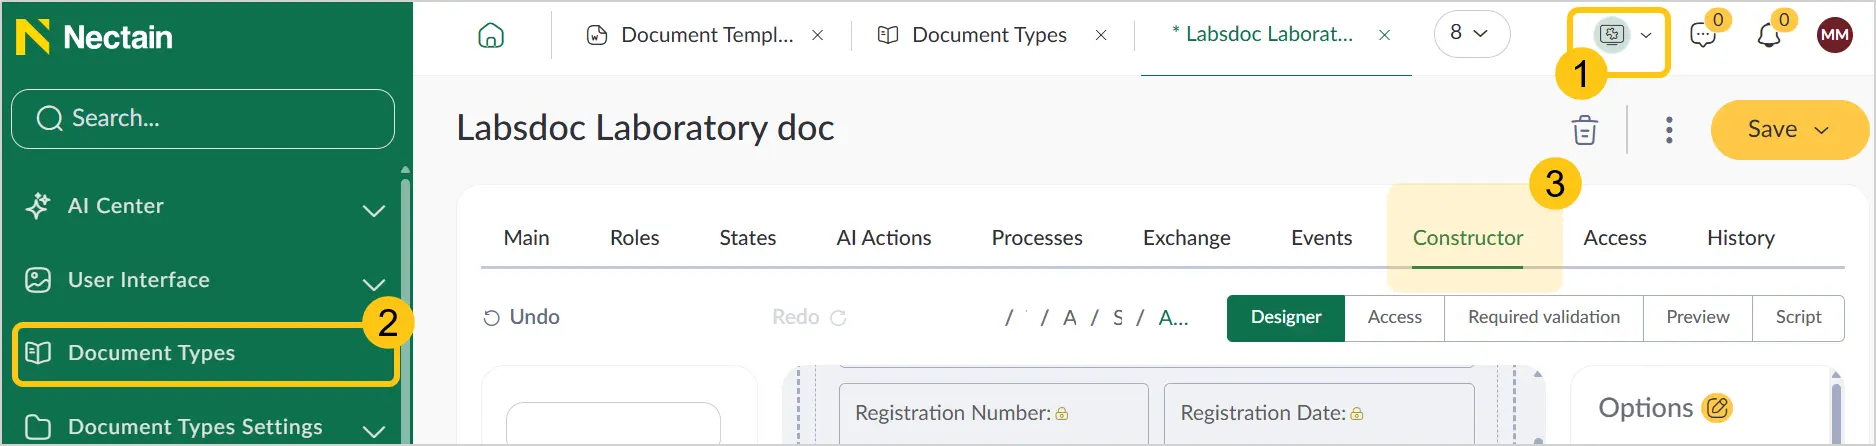
Or
1.2. If you want to apply the template to a task form, select the Forms and Templates 2 shortcut group > the Task Forms 3 shortcut > the Form 4 tab.
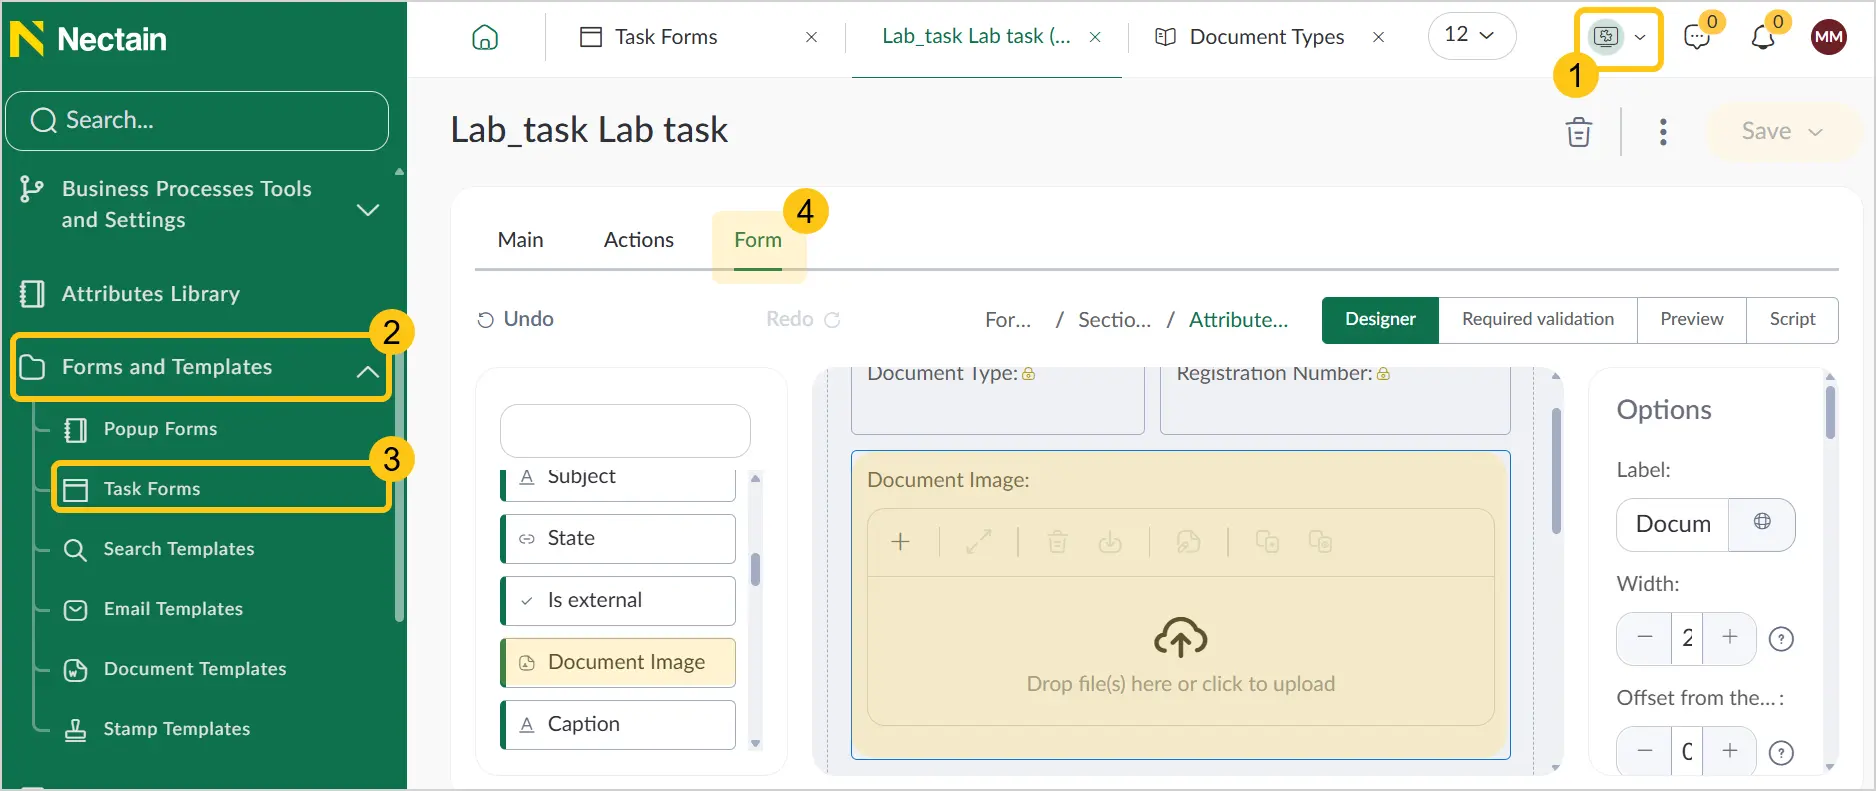 Note:
Note:You can also apply the template to a Table/Collection type attribute on a document or task form. In this case, add a Table/Collection type attribute to the form, then add a file attribute inside it and apply the document template to it, as described in the following steps.
-
On the form, select or add an attribute 1 of one of the following types:
- Standard attribute Document Image
- Standard attribute Document Attachments
- Custom attribute of type File
- Custom attribute of type File Collection
Note:If you want to apply the template to a file attribute nested inside a Table/Collection attribute, the standard Document Image and Document Attachments attributes will not be available. Only custom attributes of type File and File Collection will be available.
-
In the attribute Options menu, in the Document Template 2 field, select the required document template from the dropdown list.
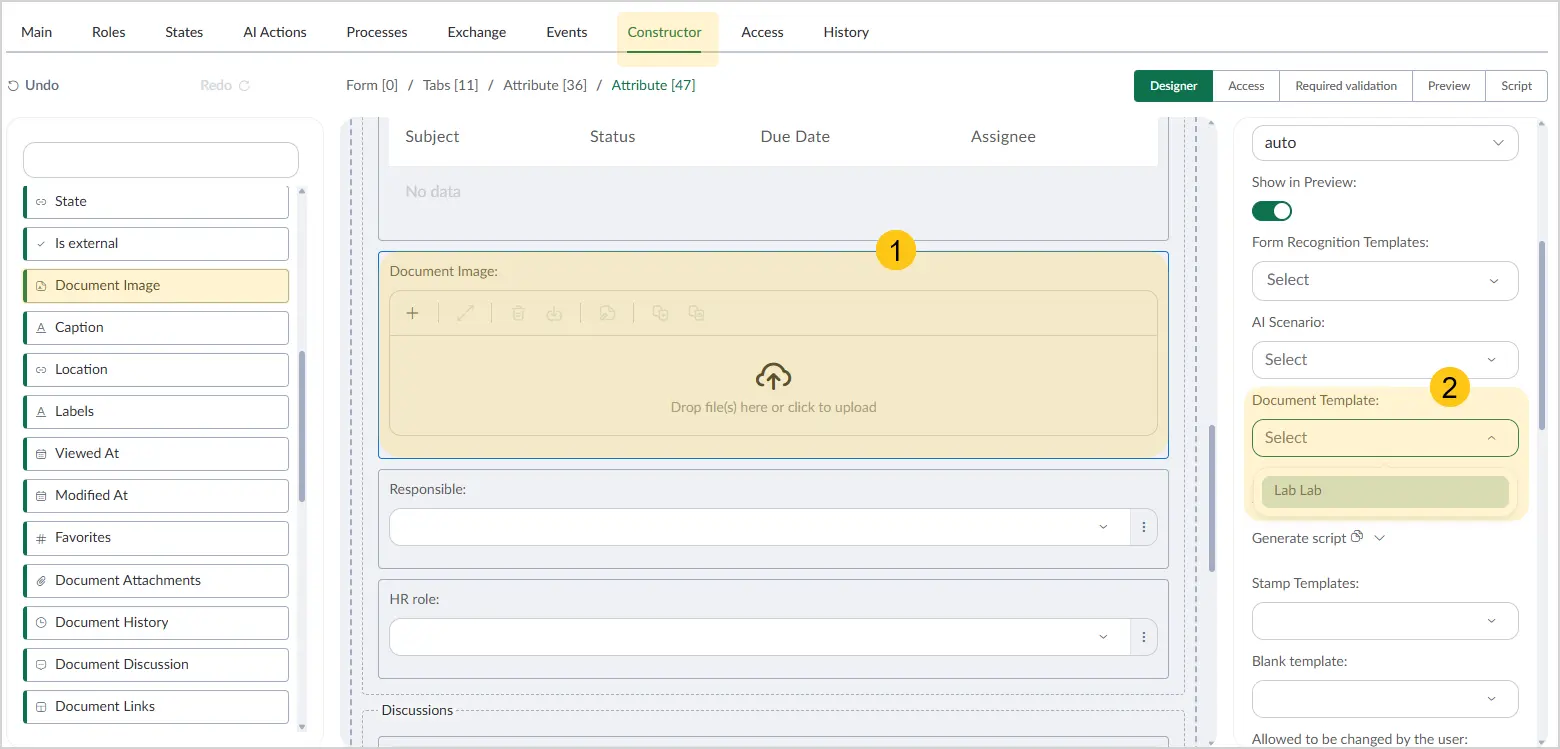 Note:
Note:For Document Attachments and File Collection attribute types, multiple templates can be set.
-
In the toolbar, select Save.
2.7.5.2.2. Method 2: Script
You can apply a document template using scripts to implement custom automation scenarios. This section describes how to configure a custom button that will generate a document from a template.
-
Follow the steps in the Method 1: File Attribute Action section.
-
On the form of the same document type, add a Button attribute.
-
In the Button attribute settings, in the Button Events and Handlers 1 section, select Generate Script 2.
-
Select Copy the click handler script to clipboard.
-
In the button settings, go to the Script 1 tab and paste the copied script into the text field 2.
-
Go back to the Designer 1 tab and select on the form the file attribute to which the document template is applied (step 1 of these instructions) 2.
-
In the attribute settings, select Generate Script 1.
-
Select Copy the script for setting the file content based on its configured template to clipboard 2.
-
Go to the Script 1 tab and paste the copied script inside the curly braces of the previous script (step 5) 2.
-
Wrap the code with the
module.exports = { }structure. -
In the toolbar, select Save.
To generate a document from a template:
-
Create a new document, task, or dictionary record depending on where you applied the document template.
-
On the form, find the button you added in step 2 and select it.
The document will be generated from the template and saved in the file attribute you used in the settings.
2.7.5.2.3. Method 3: Event Handler
-
Open the document type to which you want to apply the document template.
Note:The document type must contain a file attribute.
-
Go to the Events tab 1.
-
Select the Add Handler 2 button.
-
In the Event 1 field, select the event that will trigger the handler, for example, Exit from State.
-
In the Handler Type 2 field, select Generate Document from Template.
-
In the Document Template section, select how to define the document template:
- Template from the template directory — select the required document template from the dropdown list.
- Standard attribute — select one of the file attributes (Document Image or Document Attachments) from the list that is on the document type form. The template added to that attribute will be applied.
- Custom attribute — select one of the file attributes of type File or File Collection from the list that is on the document type form. The template added to that attribute will be applied.
-
In the Attribute section, select how to save the result:
- Standard attribute — select one of the attributes (Document Image or Document Attachments) from the list that is on the document type form. The generated document will be saved to that attribute.
- Custom attribute — select one of the attributes of type File or File Collection from the list that is on the document type form. The generated document will be saved to that attribute.
-
In the Save Conditions field, select one of the options for what happens when the attribute contains a signed file:
- If signed, save new version without warning — saves the generated document as a new version. The previous signed file will remain in the version history. The system will not issue a warning about the signed file or require user confirmation.
- If signed, return an error — the system will not save the generated document and will display an error message.
- If signed, do not save — the system will not save the generated document but will not display an error message.
-
In the Language 1 field, select the language to be used for formatting dates and reference attribute values in the generated document. If no language is selected, the user interface language will be used by default.
-
In the Time Zone 2 field, select the time zone to be used for date values in the generated document. If no time zone is selected, the current user time zone will be used by default.
-
Select Add 3.
-
In the toolbar, select Save.
To generate a document from a template, perform the action that triggers the handler, for example, move the document to the required state. The document will be generated from the template and saved in the selected file attribute.
2.7.5.2.4. Method 4: Process
-
Open the document type to which you want to apply the document template.
-
Go to the States tab 1, then select the required state 2.
-
In the Actions section, select Add 3.
-
In the Action Type 1 field, select Programmatic Action.
-
Fill in the remaining fields according to your needs, then select Add Action 2.
-
Go to the Events 1 tab, then select Add Handler 2.
-
In the Event 1 field, select Action Execution [the name of the action you created in step 4].
-
In the Handler Type 2 field, select Generate Document from Template.
-
Fill in the remaining fields according to your needs 1. You can find field descriptions in the Method 3: Event Handler section.
-
Select Add 2.
-
Go to the Processes 1 tab, then select Add Process 2.
-
In the Process Definition field, select the process that will trigger the action.
-
Navigate to the added process form using the button with its name.
-
In the process settings, expand the General section, then under the Related Entity field, select Set.
-
In the Additional Document Types field, add the document type in which you configured all the previous steps.
-
Add a service task 1 to the process form.
-
In the service task settings, in the Implementation 2 section, in the Template field, select Execute Document Action 3.
-
In the Document Action 4 field, select the action you created in step 4.
This way, during process execution, the action will be triggered, which in turn will invoke the handler that generates the document from the template.
2.7.5.3. Generate a Document from a Template (Manually)
This method is used when the document template was applied using Method 1: File Attribute Action.
To generate a document from a template, follow these steps:
-
Open the document, task, or table record in which the document template is applied.
-
On the form, find the file attribute to which the document template is applied.
-
In the attribute toolbar, select the icon.
The file attribute must be empty.
The system will generate the document from the template and save it in the selected file attribute.
2.7.5.4. Edit a Document Template
To edit an existing template, follow these steps:
-
In the navigation panel, select the Studio 1 workspace.
-
Select the Forms and Templates 2 shortcut group, then select the Document Templates 3 shortcut.
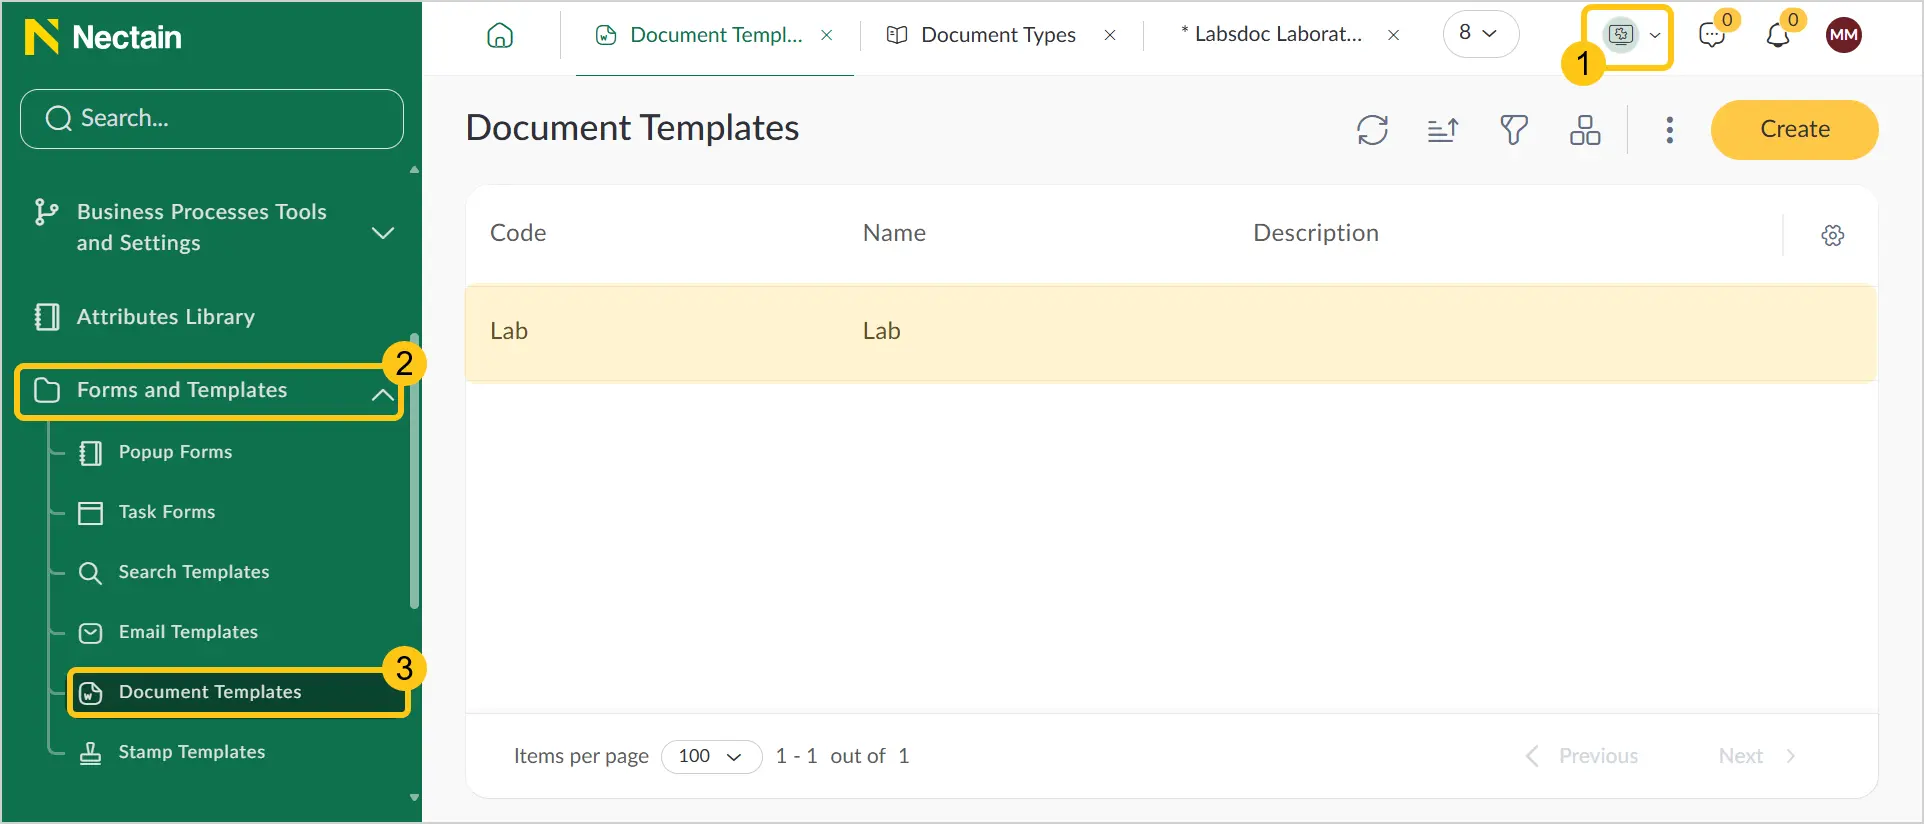
-
See the Edit Record section.
-
Edit the docx template file by opening it in an external application.
You can edit the Code field only for templates that are not used in any existing document types.
2.7.5.5. Copy a Document Template
To copy an existing template, follow these steps:
-
In the navigation panel, select the Studio 1 workspace.
-
Select the Forms and Templates 2 shortcut group, then select the Document Templates 3 shortcut.
-
See the Copy Record section.
2.7.5.6. Delete a Document Template
To delete an existing template, follow these steps:
-
In the navigation panel, select the Studio 1 workspace.
-
Select the Forms and Templates 2 shortcut group, then select the Document Templates 3 shortcut.
-
See the Delete Record section.
Deletion is available only for templates that are not used in any existing document types.
2.7.5.7. Open a Document Template in an Application
To edit a document template, you can open the file in an external application (MS Word or LibreOffice Writer). Follow these steps:
-
Make sure MS Word or LibreOffice Writer is installed on your device.
-
In the navigation panel, select the Studio 1 workspace.
-
Select the Forms and Templates 2 shortcut group, then select the Document Templates 3 shortcut.
-
Select the required template whose file you want to open in the application 4.
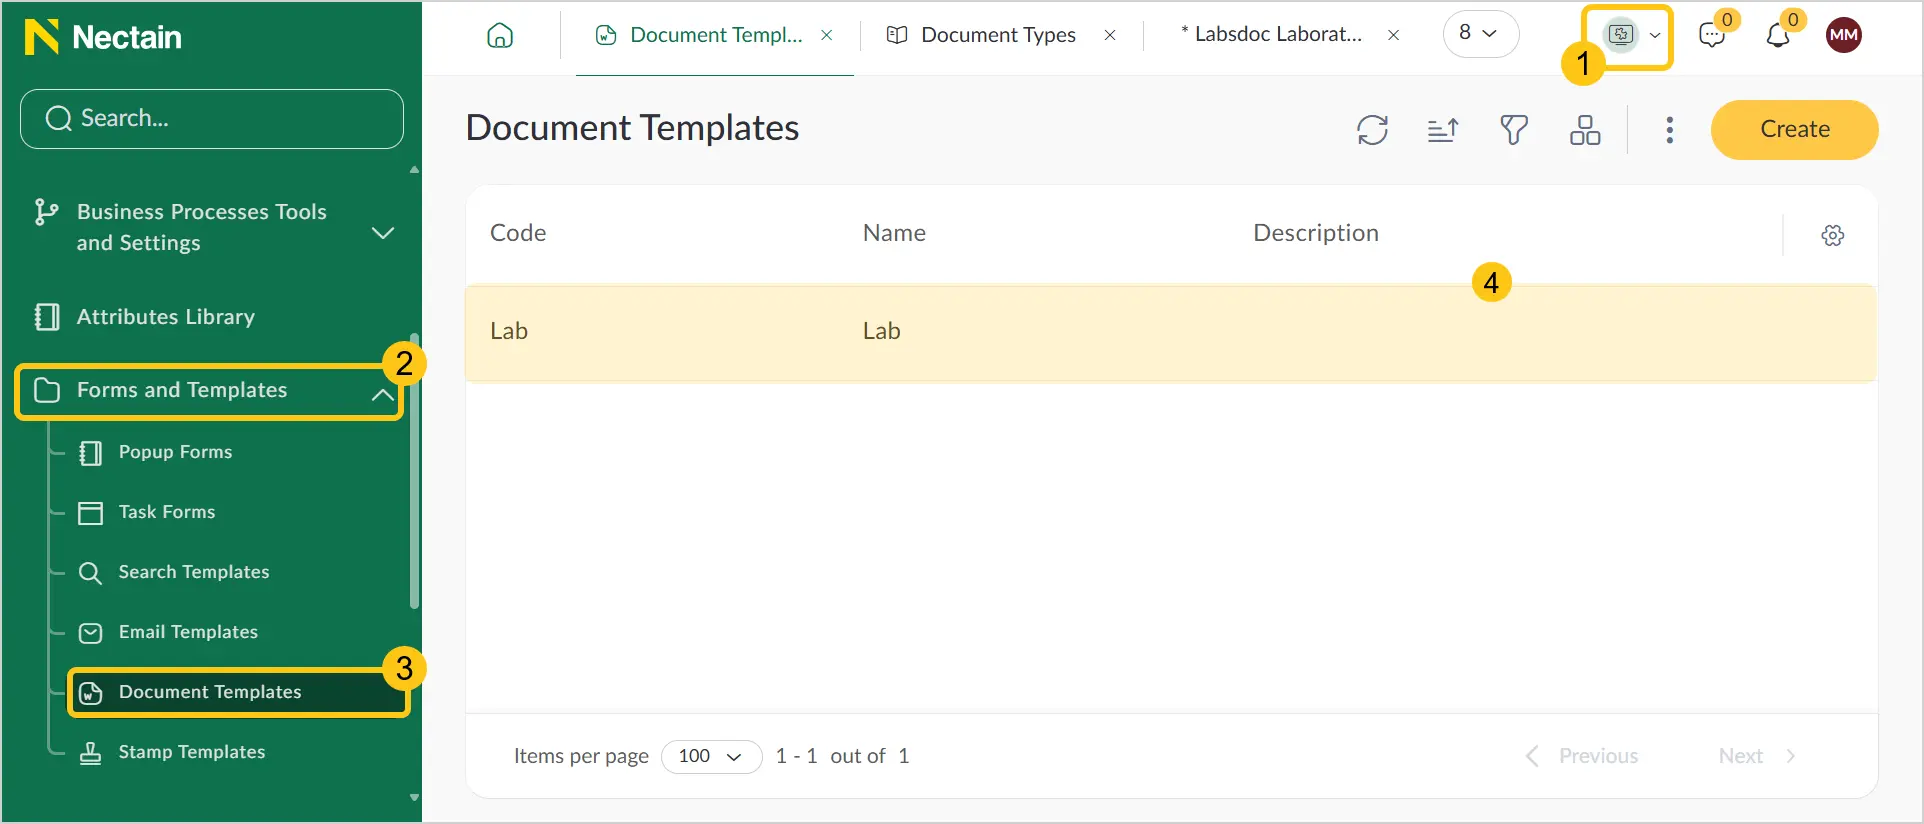
-
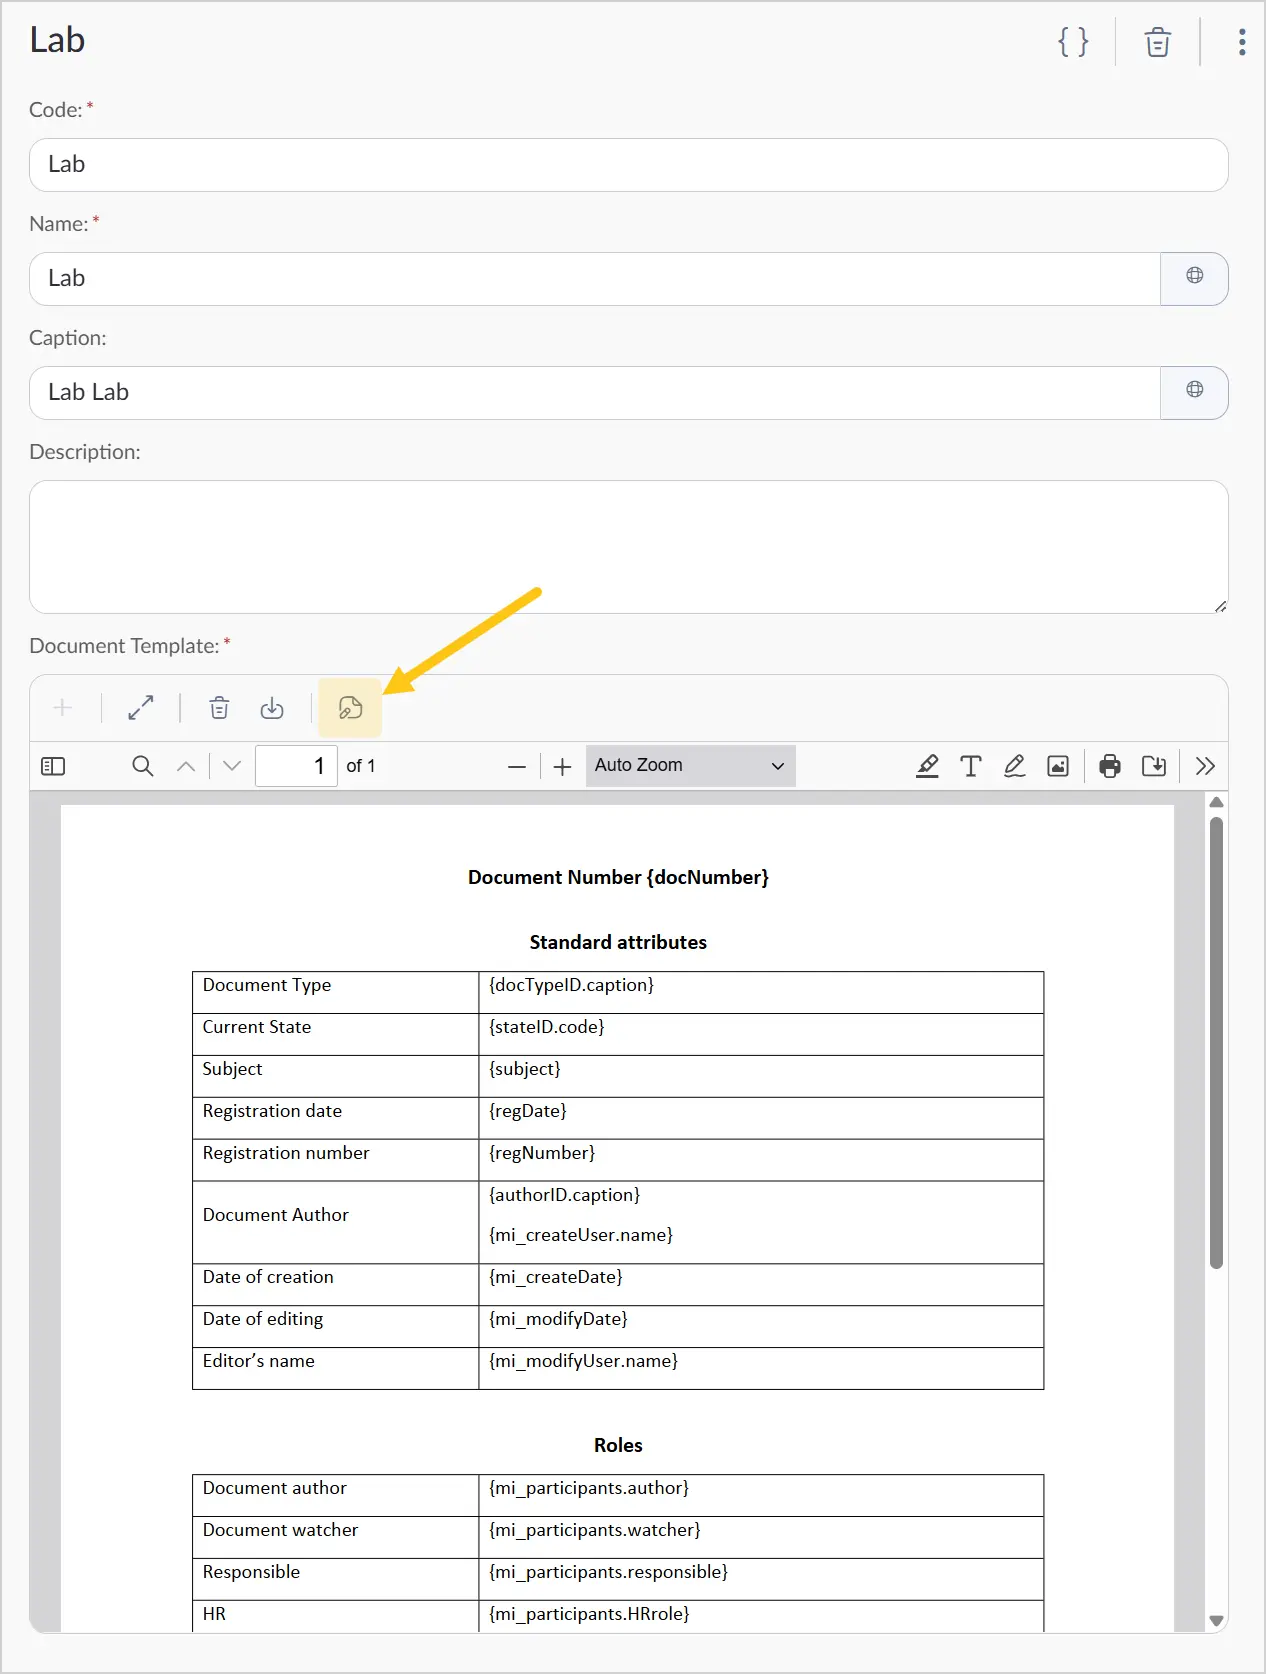
In the Document Template field, select the icon.