2.7.4. Email Templates
Email templates are a feature for configuring automated notifications in the system without programming. This feature replaces the legacy Report Templates mechanism and offers more flexible options for configuring communications.
2.7.4.1. Create an Email Template
-
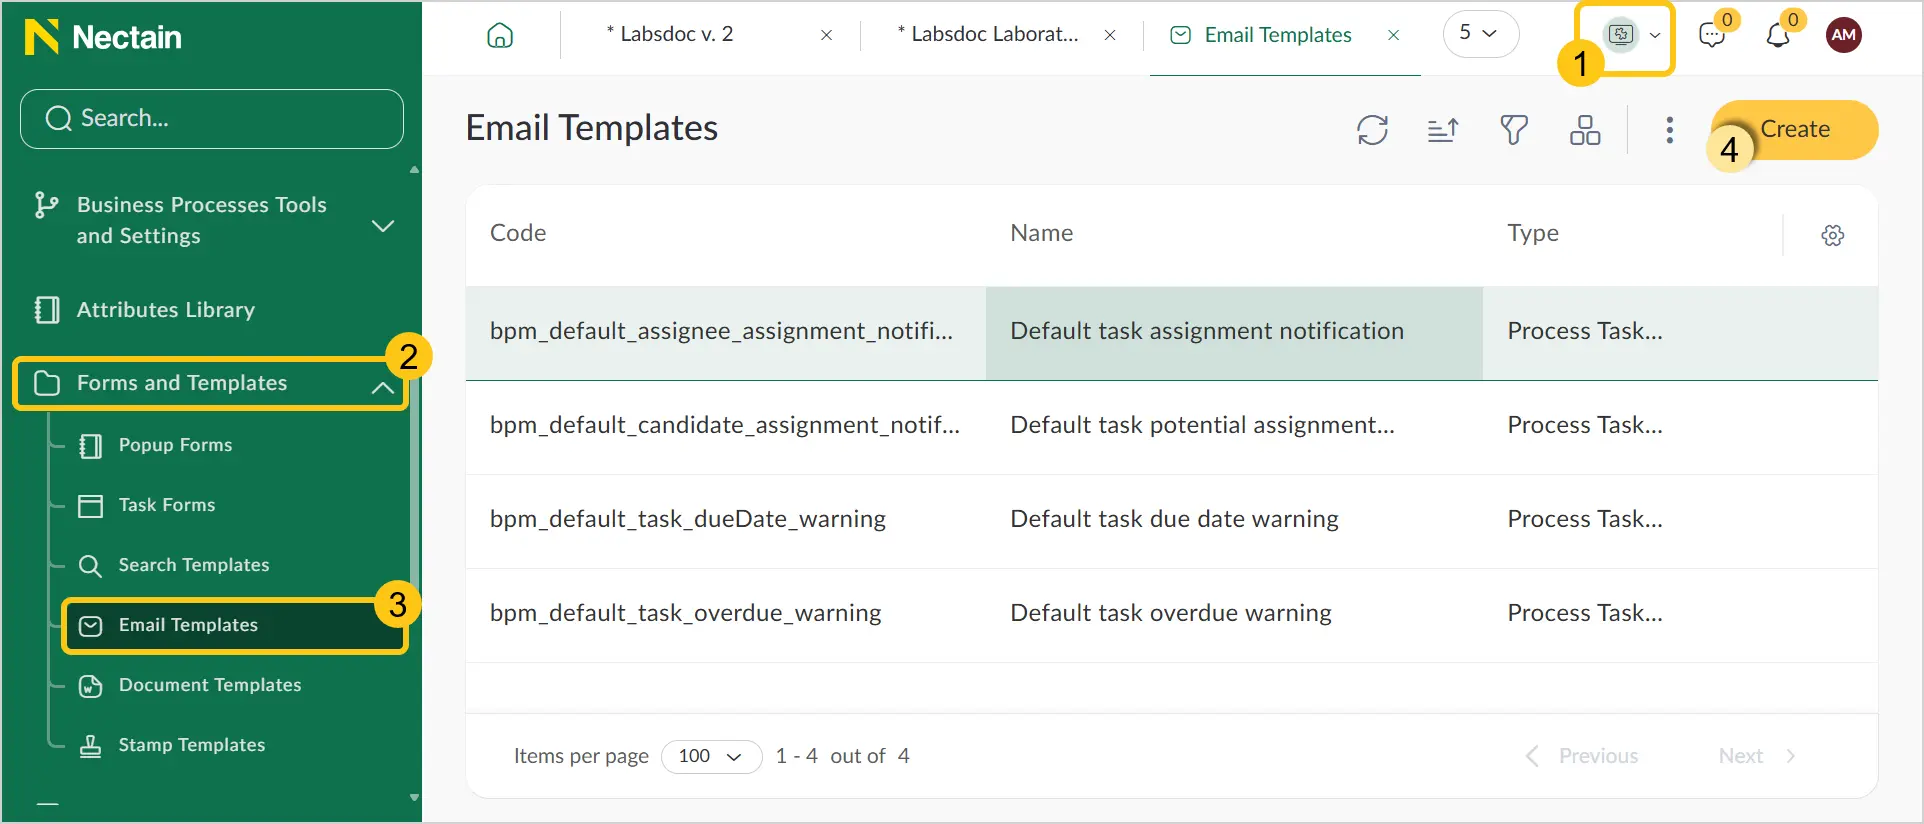
In the navigation panel, select the Studio 1.
-
Select the Forms and Templates 2 shortcut group, then select the Email Templates 3 shortcut.
-
In the toolbar, select Create 4.
 Note:
Note:The shortcut supports working with folders. You can create folders and store email templates in them. See Folders.
-
Fill in the fields 1 using the hints in the table below, then in the toolbar select Save 2.
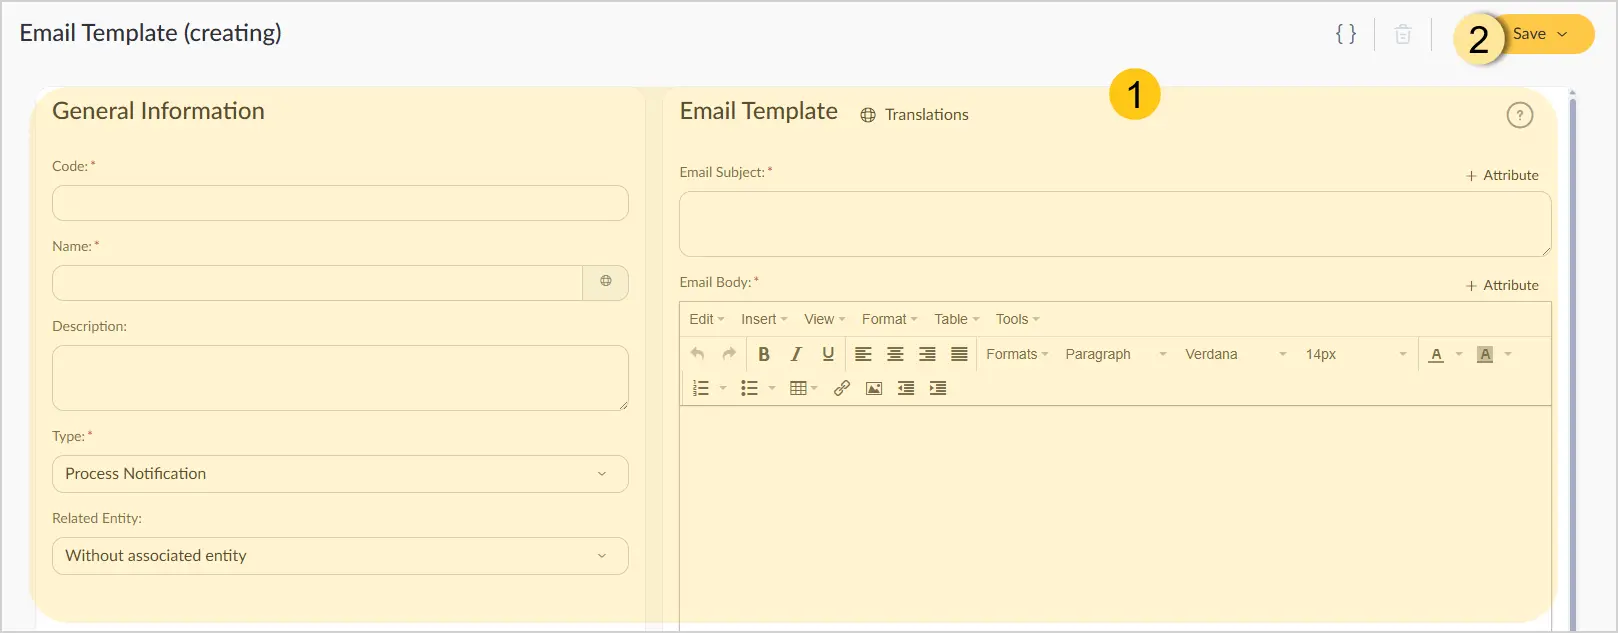
| Field | Description |
|---|---|
| Code* | Unique code of the email template.
|
| Name* | A clear name for the template, displayed in the interface. |
| Description | A short description of the template's purpose and usage specifics. |
| Type* | Select one of two values:
|
| Related entity | Select one of two values:
|
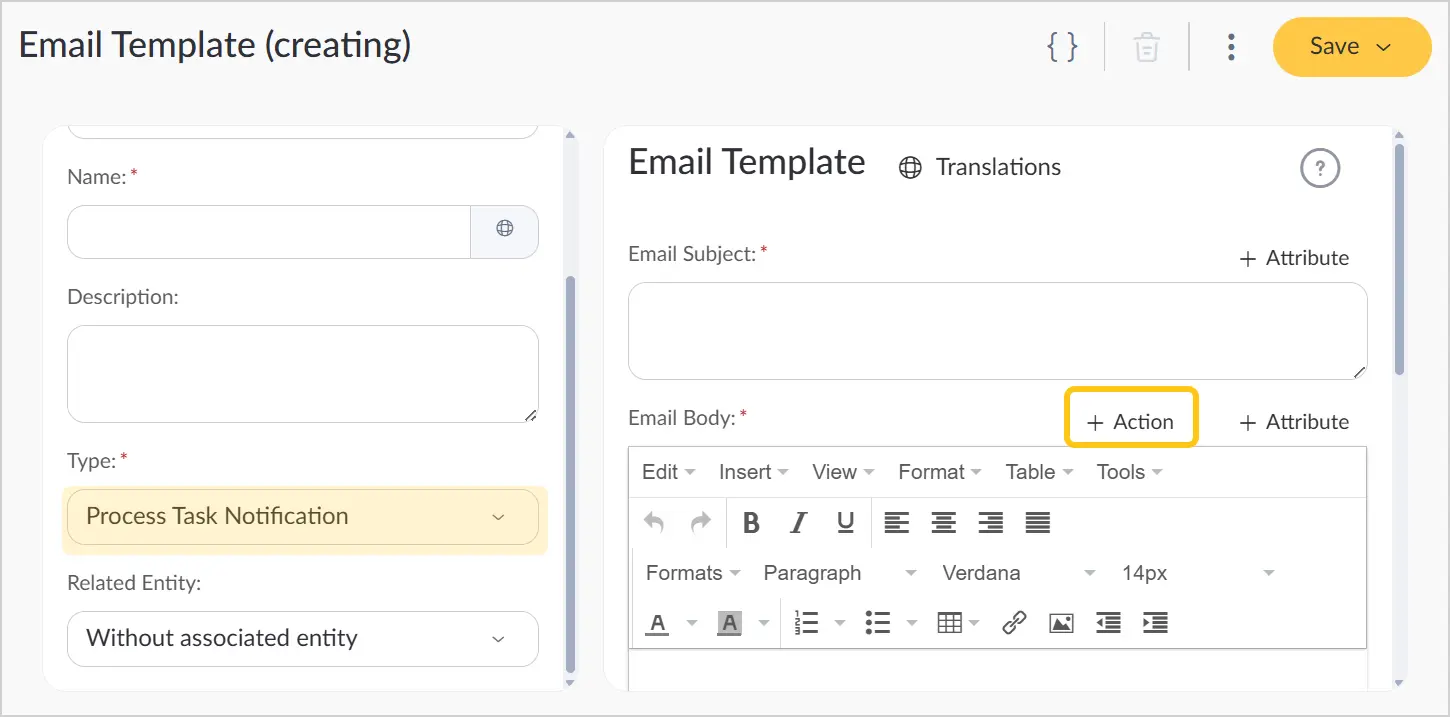
| Email subject* |
 ℹ️ Note: For attributes of types Date and/or Time and Number the value display formats are set directly in the email template. |
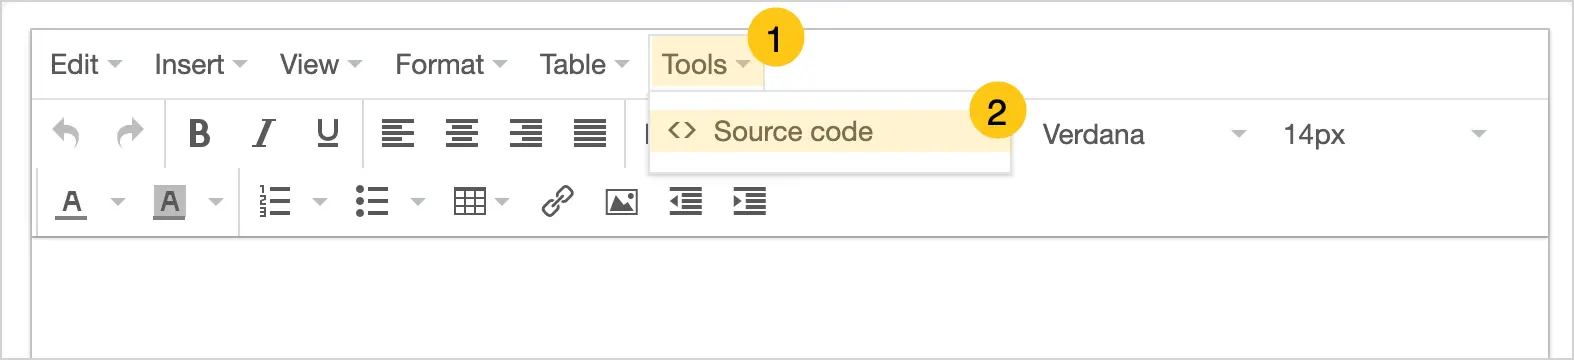
| Email body* |
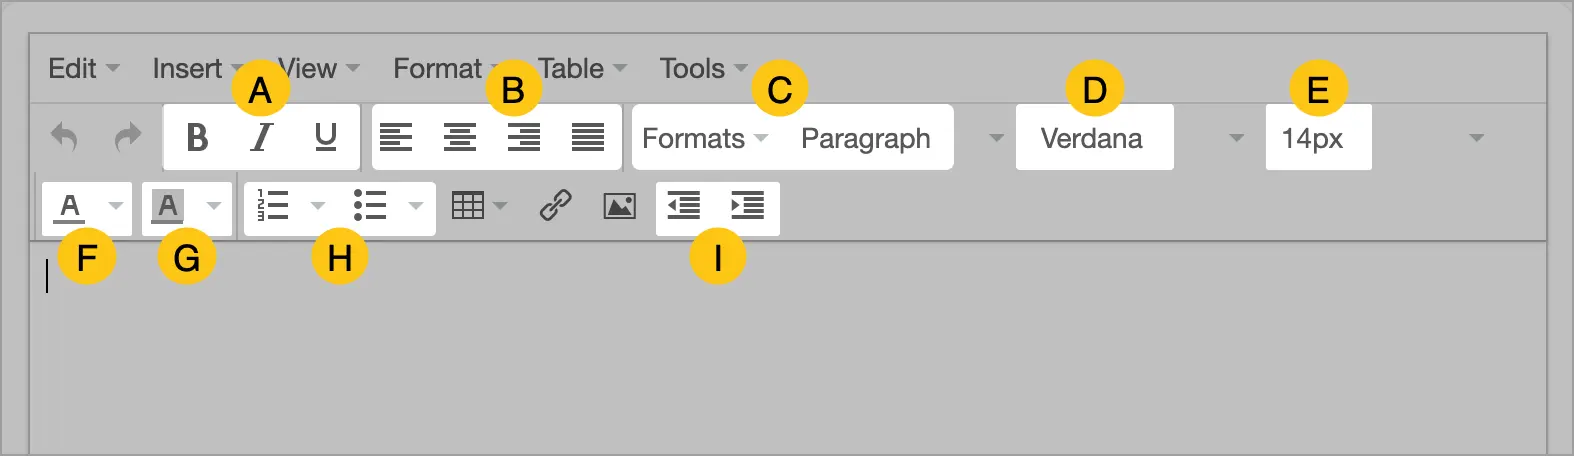
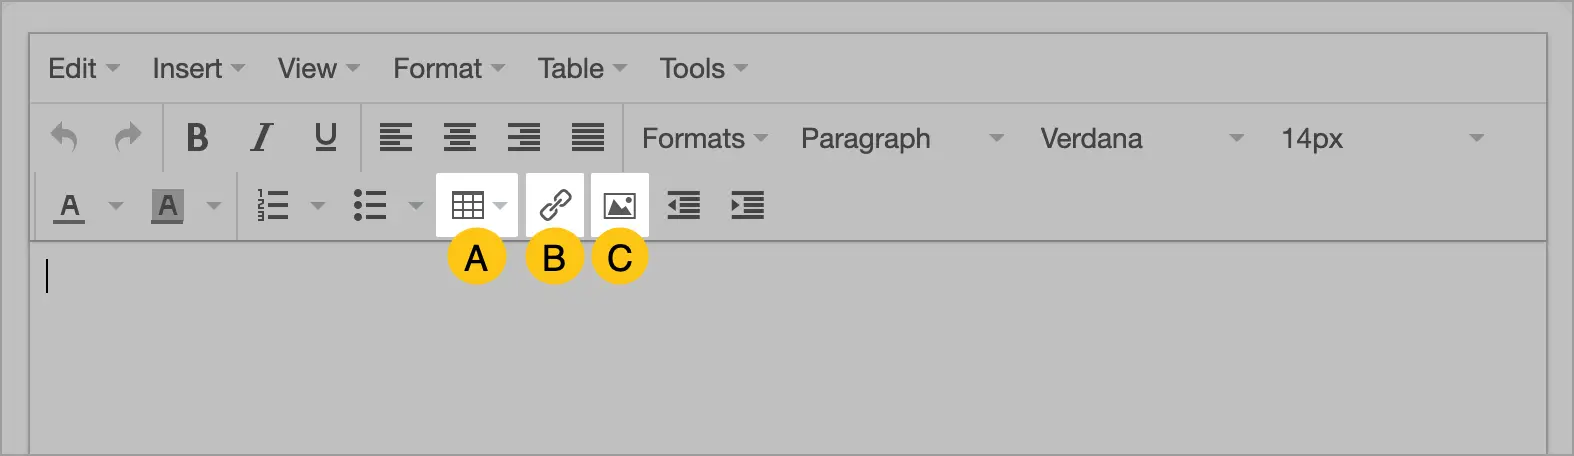
ℹ️ Note: For attributes of types Date and/or Time and Number the value display formats are set directly in the email template:
|
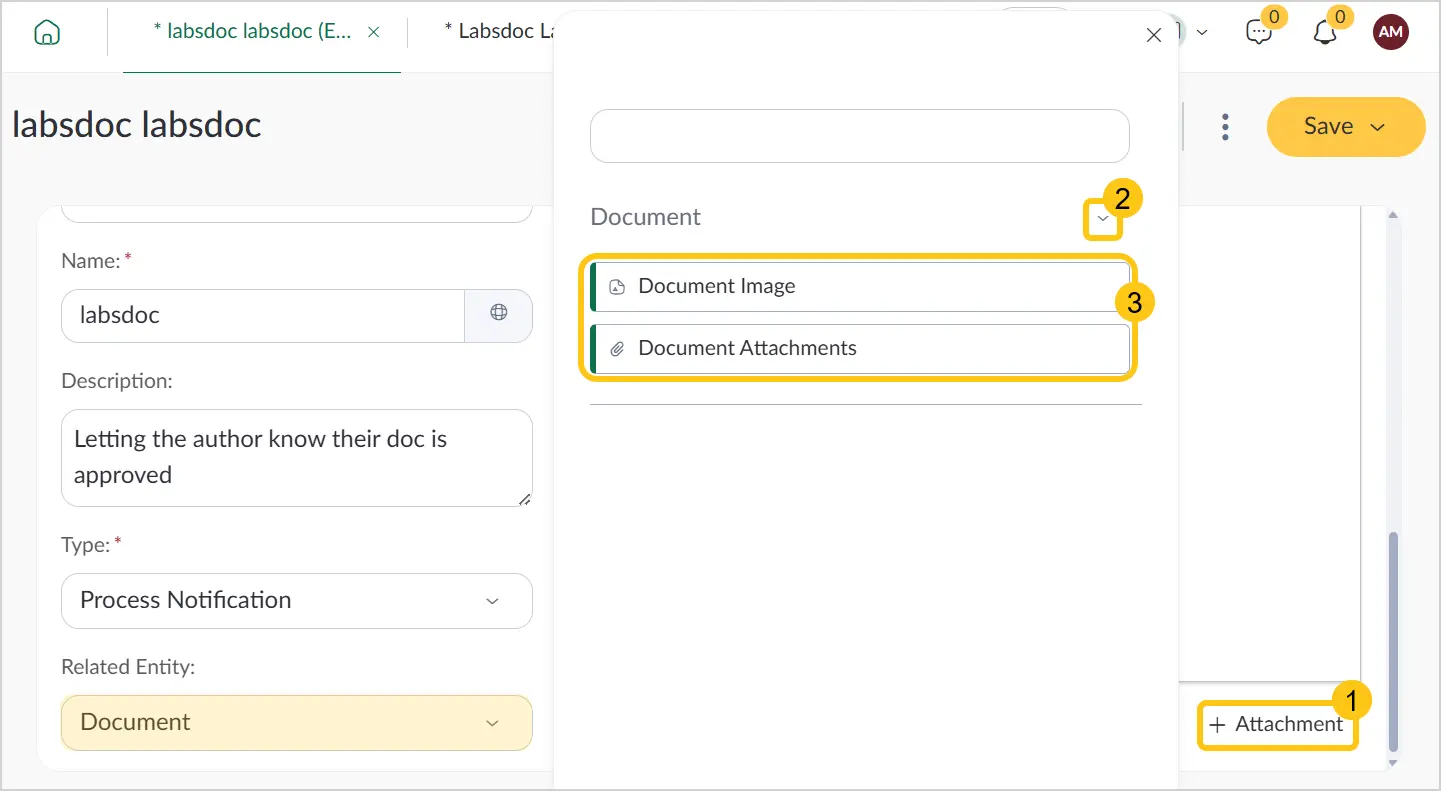
| Attachments this field is available if you selected Document in the Related entity field | If needed, you can add file attachments to the email:
|
 */}
*/} 

Fields marked with "*" are required.
2.7.4.2. Configure Email Template Translations
The system allows creating multilingual versions of email templates. This ensures that notifications are automatically sent in the language matching the recipient's platform locale.
Example: If a user has set German in their profile settings and a German translation of the email template exists, the system will automatically send the email to the user in German. However, if no German translation of the template exists, the system will send the email in the default language, which is typically English.
-
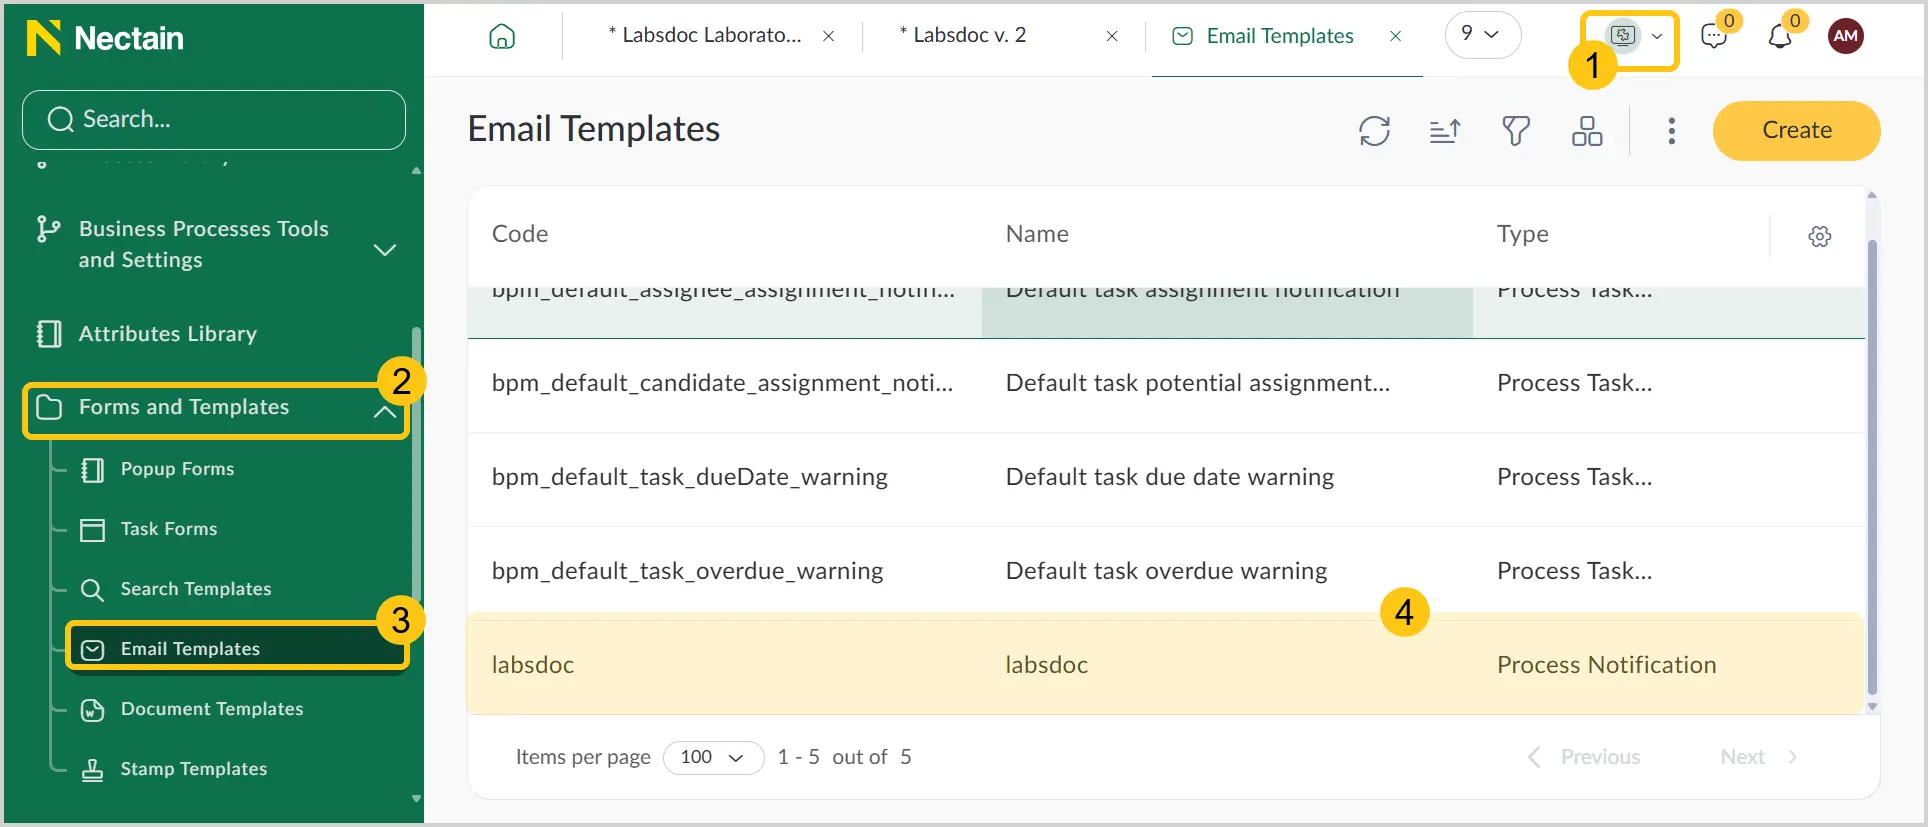
In the navigation panel, select the Studio 1 workspace.
-
Select the Forms and Templates 2 shortcut group, then select the Email Templates 3 shortcut.
-
Select the required template 4.
-
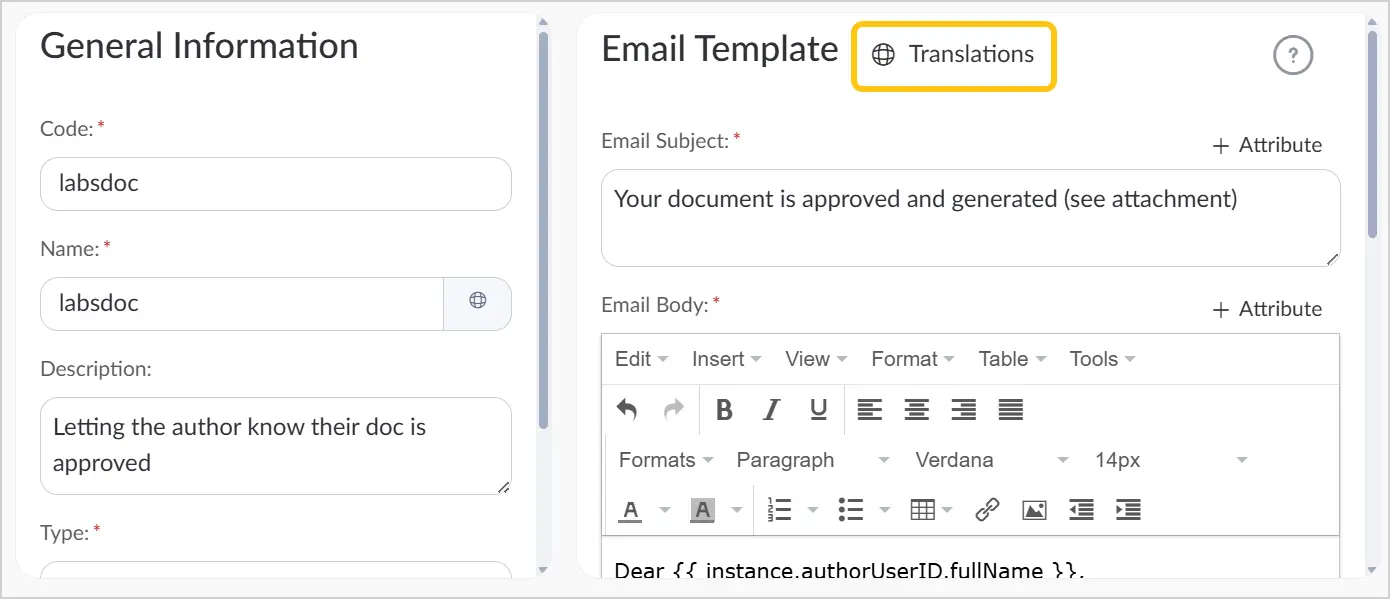
In the Email Template section, select the Translations button.
-
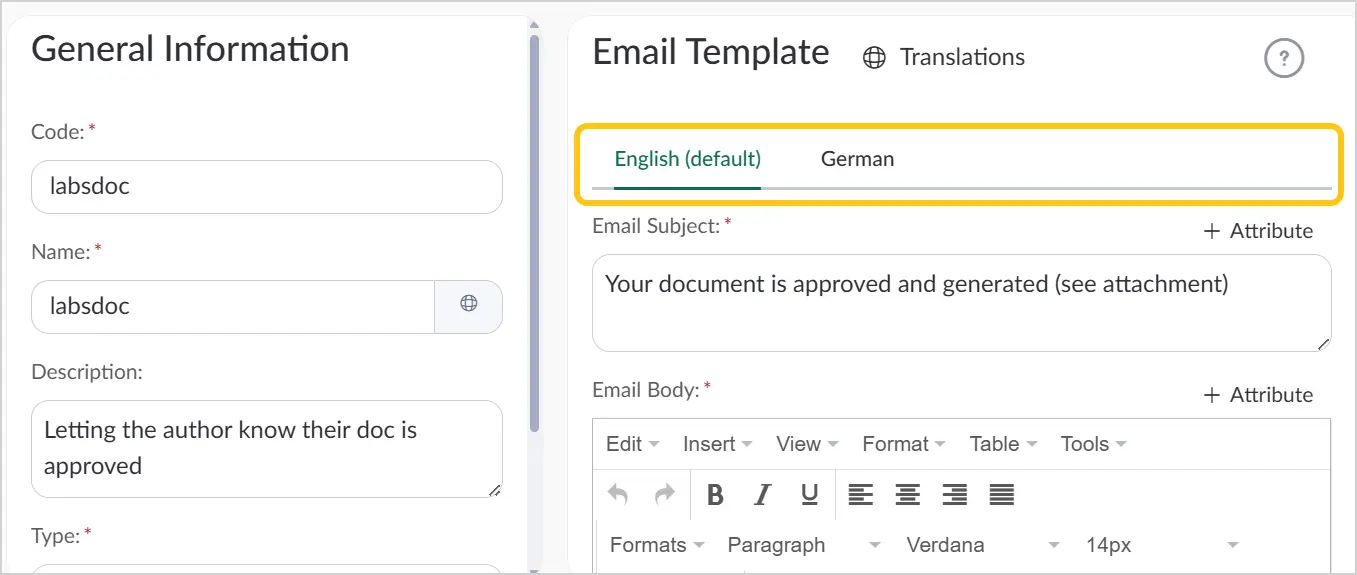
In the Languages 1 field, select the languages you want to create a translation for, then select the Set 2 button.
 Note:
Note:If this field is left unchanged, the email will only be translated into the language set as the default language in your platform.
After that, a separate tab will appear for each language you selected, in each of which you can write the email text in a different language.
2.7.4.3. Add a Server Script to an Email Template
-
In the navigation panel, select the Studio 1 workspace.
-
Select the Forms and Templates 2 shortcut group, then select the Email Templates 3 shortcut.
-
Select the required template.
-
In the toolbar, select the icon.
-
In the text field, insert one of the following functions:
transformData — extract information from an entity into the template.
transformData({
  data,
  context,
  lang
}) {
  if (lang == 'en') {
    data.values = JSON.stringify(context)
    data.test = 'test'
    data.allData = JSON.stringify(data)
  }
  // data.now = new Date()
  // if (context.instance.ID) {
  // const entityName = context.instance.$entity
  // data.instance.caption = UB.Repository(entityName)
  //  .attrs(UB.App.domainInfo.get(entityName).getDescriptionAttribute())
  // .where('ID', '=', context.instance.ID)
  // .selectScalar()
  // }
}
transformSubject — modify the email subject.
Example: In the email form, in the "Email subject" field, you can define a variable <currentYear> as a placeholder for the current year. Then, using this script, you can substitute the required year value into the variable.
/**
* Transform mail subject built by the subject template
*
* @param {object} params
* @param {string} params.subject Subject built by template
* @param {object} params.data Automatically loaded data by all used
expressions in subject/body templates
* @param {object} params.context Building email context
* @param {string} params.lang Language code in which email is building
* @returns {string}
*/
transformSubject({
  subject,
  data,
  context,
  lang
}) {
  // return subject.replace('<currentYear>', new Date().getFullYear())
  return subject.replace('<variable>', context.instance.attrValues.ms01)
}
transformBody — modify the email body, for example, change its design.
/**
* Transform mail body built by the subject template
*
* @param {object} params
* @param {string} params.body Body built by template
* @param {object} params.data Automatically loaded data by all used
expressions in subject/body templates
* @param {object} params.context Building email context
* @param {string} params.lang Language code in which email is building
* @returns {string}
*/
transformBody({
  body,
  data,
  context,
  lang
}) {
  // return `<p style="background-color: green">${body}</p>`
  return `<p><span style="background-color: #339966;">${body}</span></p>`
}
transformAttachments — work with attachments, for example, add file attributes, change attachment names, or set a file name in the email.
/**
* Transform mail attachments built by the attachments config
*
* @param {object} params
* @param {Array<MailAttachment>} params.attachments
* @param {Array<MailAttachmentConfig>} params.attachmentsConfig
* @param {object} params.data Automatically loaded data by all used
expressions in subject/body templates
* @param {object} params.context Building email context
* @param {string} params.lang Language code in which email is building
* @returns {string}
*/
transformAttachments({
  attachments,
  attachmentsConfig,
  data,
  context,
  lang
}) {
  attachments.push(
    ...emailAttachmentLoader.loadAttribute({
      documentID: context.instance.ID,
      attribute: 'ms17',
      signatures: 'container'
    }),
    {
      attachName: 'myAttachment.docx',
      data: 'content'
    })
  //attachments[0].attachName = 'Document from script.pdf'
  /*
  const ds = DataStore('dfx_Document')
  ds.run('update', {
    fieldList: [
      'attrValues',
      'mi_modifyDate',
      'mi_modifyUser'
    ],
    execParams: {
      ID: context.instance.ID,
      attrValues : JSON.stringify({
        "ms02":JSON.stringify(attachments)
      })
    },
    __skipRls: true,
    __skipOptimisticLock: true
  })
  */
})
- In the toolbar, select the Save or Save and Close icon.
2.7.4.4. Enable the Email Templates Feature
In older versions of the platform, the email templates feature is disabled by default. Instead, the legacy Report Templates mechanism is used for sending notifications.
However, you can activate the updated template functionality by completing the settings described below:
-
In the navigation panel, select the Administration 1 workspace.
-
Select the Settings 2 shortcut group, then select the System Settings 3 shortcut.
-
Open the "bpm.notification.useEmailTemplates" 4 record.
-
In the Value 1 field, enter "true", then in the toolbar select Save 2.
This setting will only apply to the current platform locale. To configure the same value for all locales, select the icon, then enter "true" in the fields for all languages.
2.7.4.4.1. Disable Default Notifications
To disable default notifications, you need to configure one of the following combinations of system settings:
Combination 1. By disabling the default template for task assignment
-
In the navigation panel, select the Administration 1 workspace.
-
Select the Settings 2 shortcut group, then select the System Settings 3 shortcut.
-
Open the "bpm.notification.useEmailTemplates" 4 record.
-
In the Value 1 field, enter "true", then in the toolbar select Save 2.
Note:This setting will only apply to the current platform locale. To configure the same value for all locales, select the icon, then enter "true" in the fields for all languages.
-
Open the "bpm.notification.assignee.assignment.defaultEmailTemplate" 5 record.
-
In the Value 1 field, clear the value, then in the toolbar select Save 2.
Note:This setting will only apply to the current platform locale. To configure the same value for other languages, change the platform language, then repeat all the same steps.
Combination 2. By disabling the default task assignment
-
In the navigation panel, select the Administration 1 workspace.
-
Select the Settings 2 shortcut group, then select the System Settings 3 shortcut.
-
Open the "bpm.notification.useEmailTemplates" 4 record.
-
In the Value 1 field, enter "false", then in the toolbar select Save 2.
Note:This setting will only apply to the current platform locale. To configure the same value for all locales, select the icon, then enter "false" in the fields for all languages.
-
Open the "bpm.notification.defaultAssignmentTask" 5 record.
-
In the Value 1 field, clear the value, then in the toolbar select Save 2.
Note:This setting will only apply to the current platform locale. To configure the same value for other languages, change the platform language, then repeat all the same steps.
2.7.4.5. Set a Template from a Process Variable
This may be needed if you have multiple tasks within a single process that send emails and you want to use different templates for them. Only new templates are supported; report templates are not supported.
-
Open the required business process definition.
a. In the navigation panel, select the Studio 1 workspace.
b. Select the Process Library 2 shortcut.
c. Select the required definition 3. -
Select the user task from which you want to send a notification.
-
In the task settings, expand the Notifications section, then select +.
-
In the Assign from field, select Process variable.
-
In the Process variable field, enter the code of the required email template.
-
In the toolbar, select Save.