2.7.2. Task Forms
Task forms are forms that you can add to user tasks in business processes. These forms allow users to fill in the required information when completing a specific task.
2.7.2.1. Create a Task Form
-
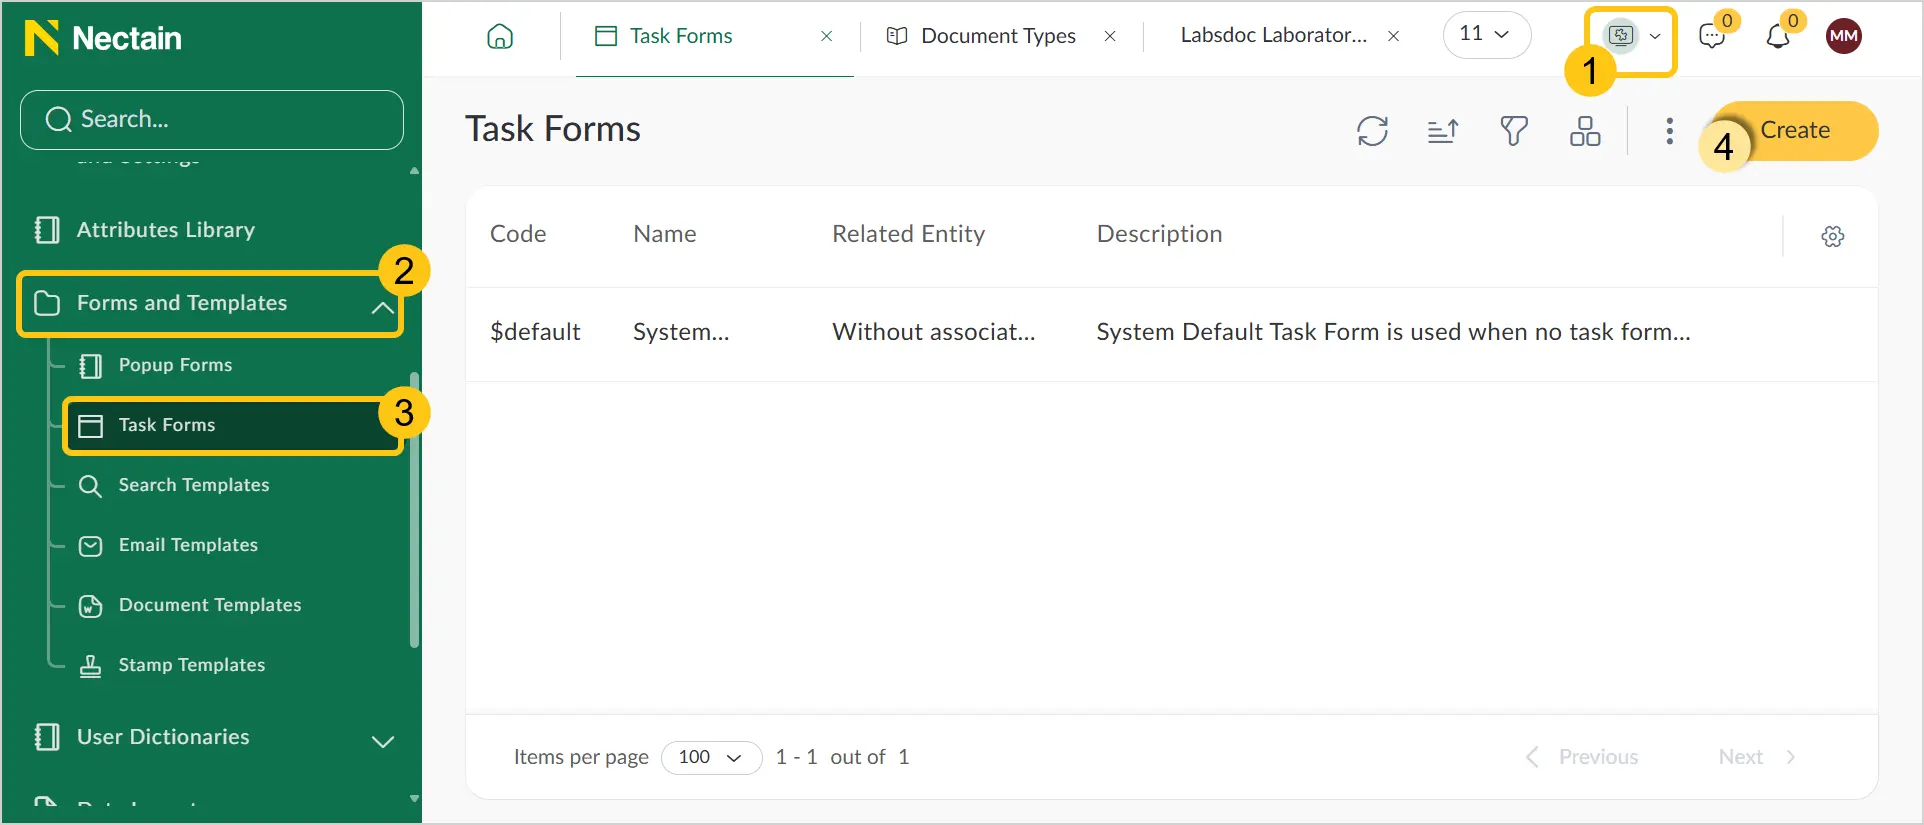
In the navigation panel, select the Studio 1 workspace.
-
Select the Forms and Templates 2 shortcut group, then select the Task Forms 3 shortcut.
-
In the toolbar, select Create 4.
-
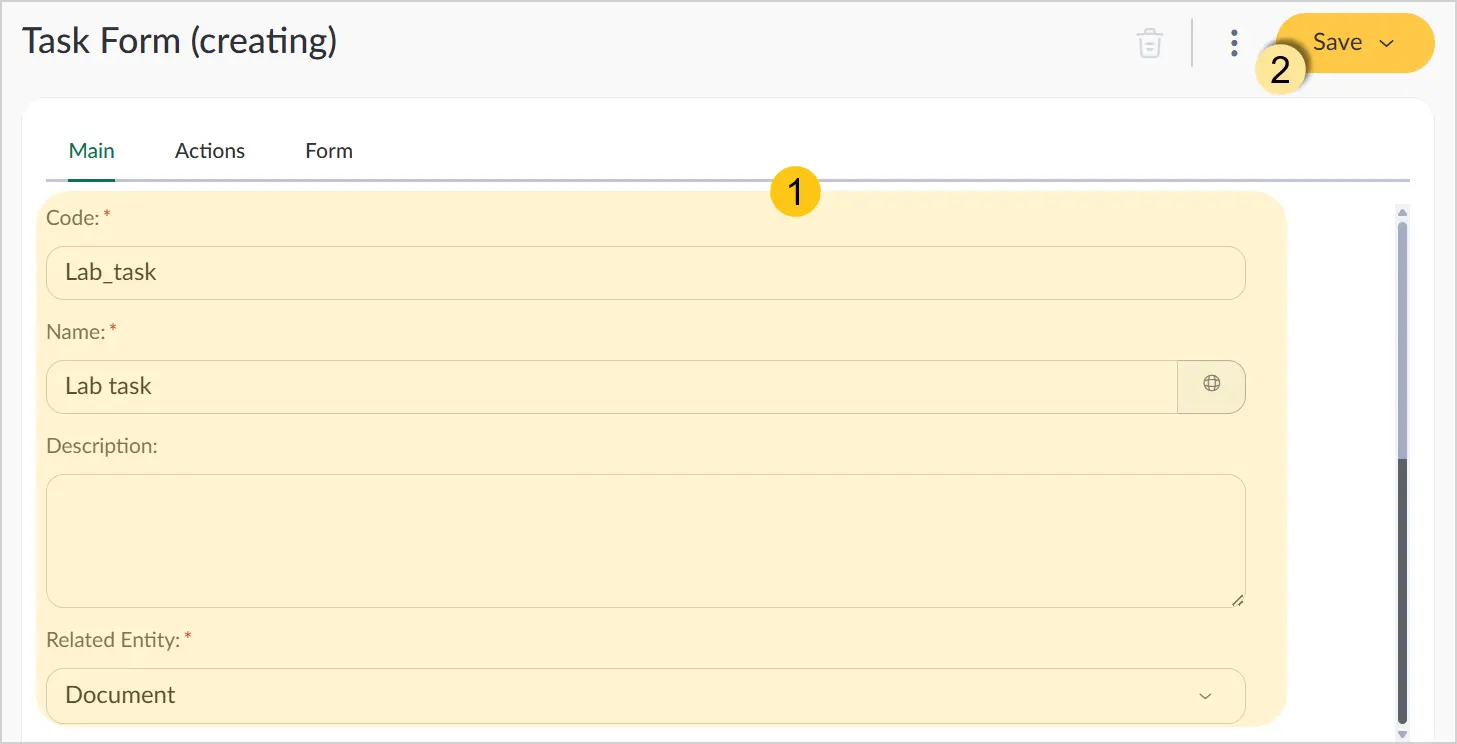
Fill in the fields 1 using the hints in the table below, then in the toolbar select Save 2.
| Field name | Description |
|---|---|
| Code* |
|
| Name* | The name of the task form. ℹ️ Note: You can set an alternative name for different languages. To do this, in the Name field, select the icon and fill in the fields for other languages. Then select the Apply button. |
| Description | A short description of the form. You can set different values for different localizations. |
| Related entity | Available entity binding options:
|
Fields marked with "*" are required.
-
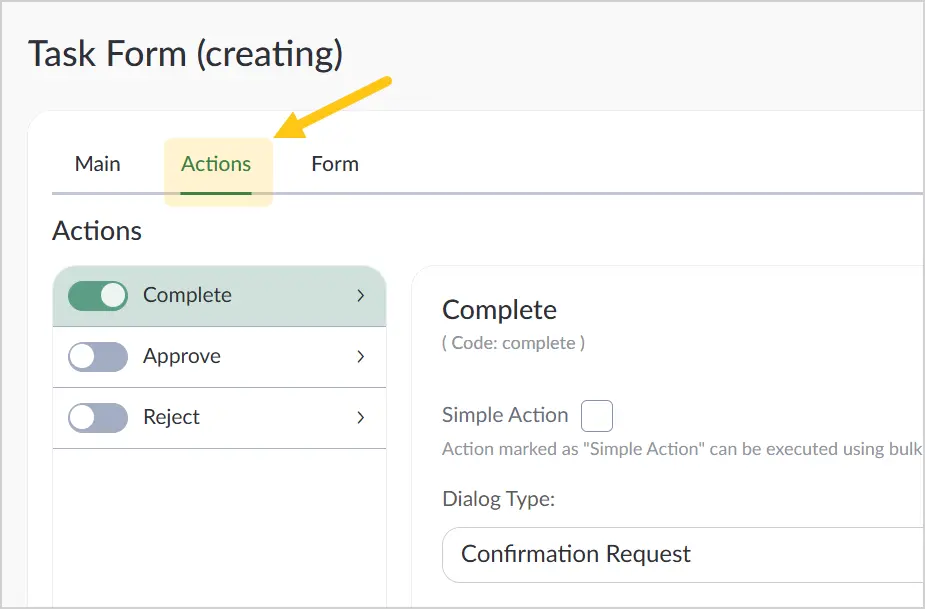
Go to the Actions tab to configure the actions that the user can perform when working with this task. Enabled actions will be displayed as buttons in the top panel of the task form.
 Note:
Note:If you have multiple actions with the same name, pay attention to their codes to avoid confusion when selecting an action on the task form. The action code is displayed below its name in grey text.
-
In the Dialog type field, define how the system will interact with the user during the selected action. Select one of the following types:
-
Confirmation request — the user sees a simple dialog box asking them to confirm the action.
Example: "Are you sure you want to reject the task?"
-
Confirmation and comment request — in addition to the confirmation request, the user will be prompted to enter a comment. This is useful when you need to record the reason for performing the action.
-
Pop-up form — when the action is selected, a separate pop-up form opens. It can contain additional input fields or more complex interaction logic. To create and configure a custom pop-up form, see the Pop-up Forms section.
-
-
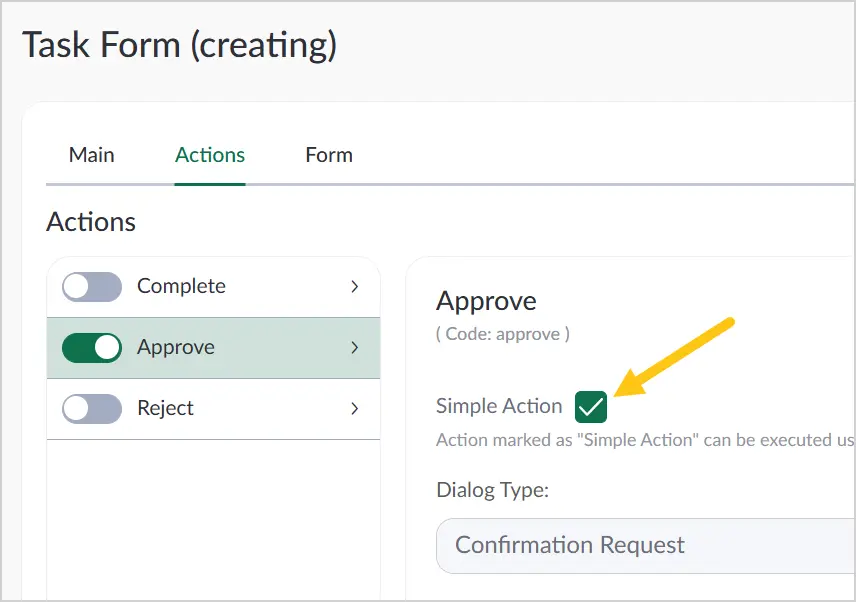
Select the Simple action checkbox if you want to display this action in the shortcut toolbar. The action will appear as a button in a Task type shortcut in multi-select mode.
-
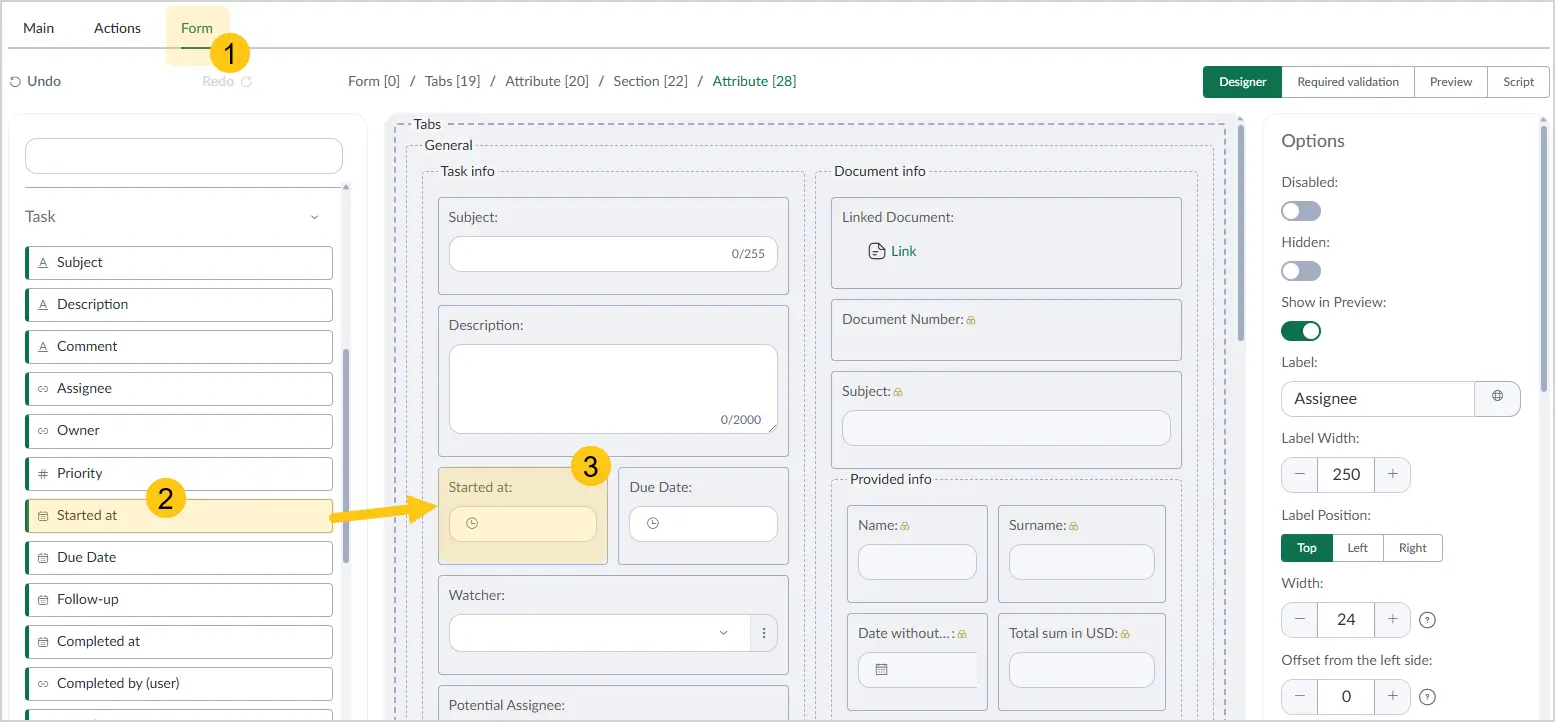
Go to the Form 1 tab.
-
From the attribute panel 2, drag the required attributes onto the form 3.
-
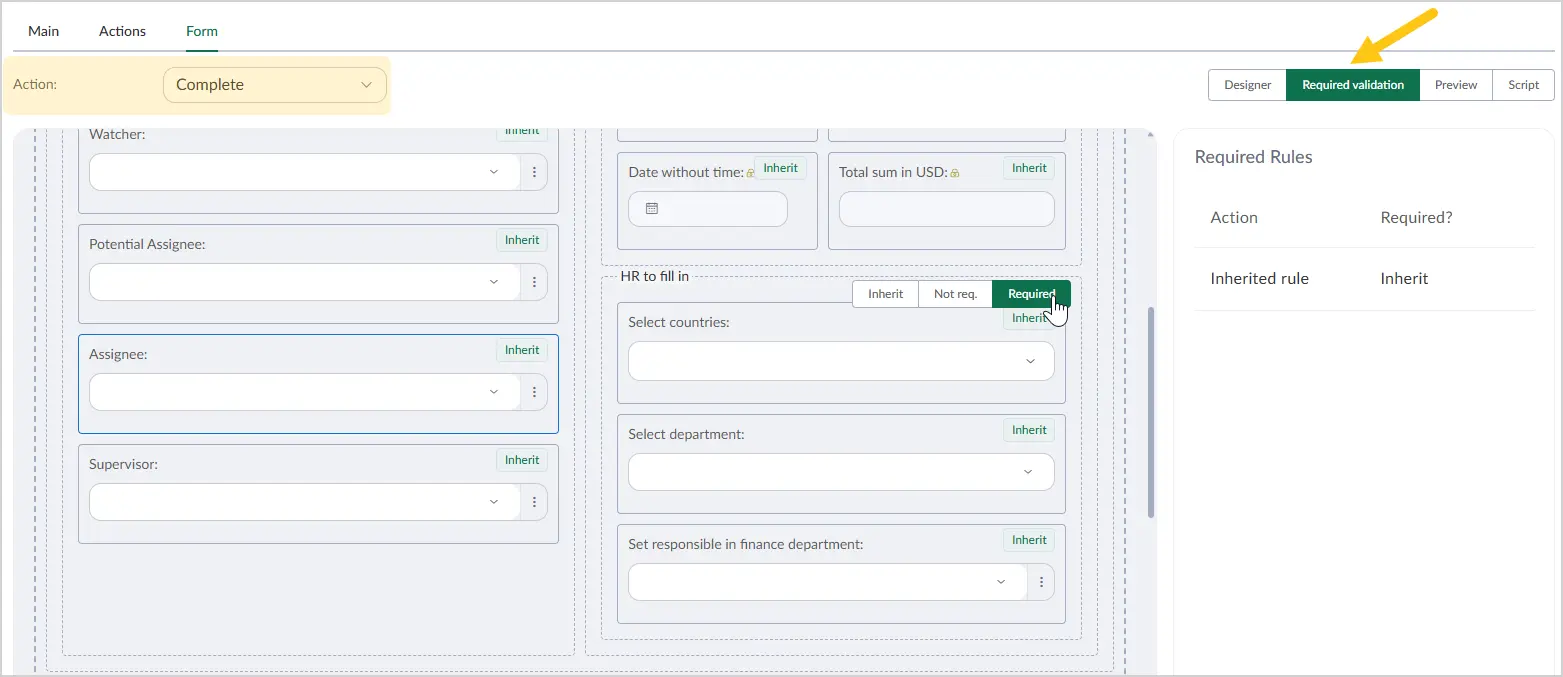
Go to the Required validation section to configure which of the added attributes are required.
-
In the Action field, select from the dropdown list the action for which you want to configure attribute mandatory settings. If you want the mandatory settings to be the same for all actions, select Any action in this field.
Note:If you have multiple actions with the same name, pay attention to their codes to avoid confusing one action with another. The action code is displayed in parentheses next to its name. You can also start typing the action code or name in the Action field to quickly find the required action in the dropdown list.
-
Hover over the attribute, section, or tab whose mandatory setting you want to configure, then select the required option (see option descriptions in the table below).
Button name Description Inherit Inherits the setting from the parent-level form attribute. Example: if several attributes are placed inside a Section, you can configure the mandatory setting for the section, and all attributes inside will inherit it. No The attribute is not required. Required The attribute is required. -
In the toolbar, select Save.
After completing the configuration, go to the Preview section to check how the task form will be displayed to the user.
2.7.2.2. Apply a Task Form
To apply a created task form, you need to attach it to a user task. To do this, follow these steps:
-
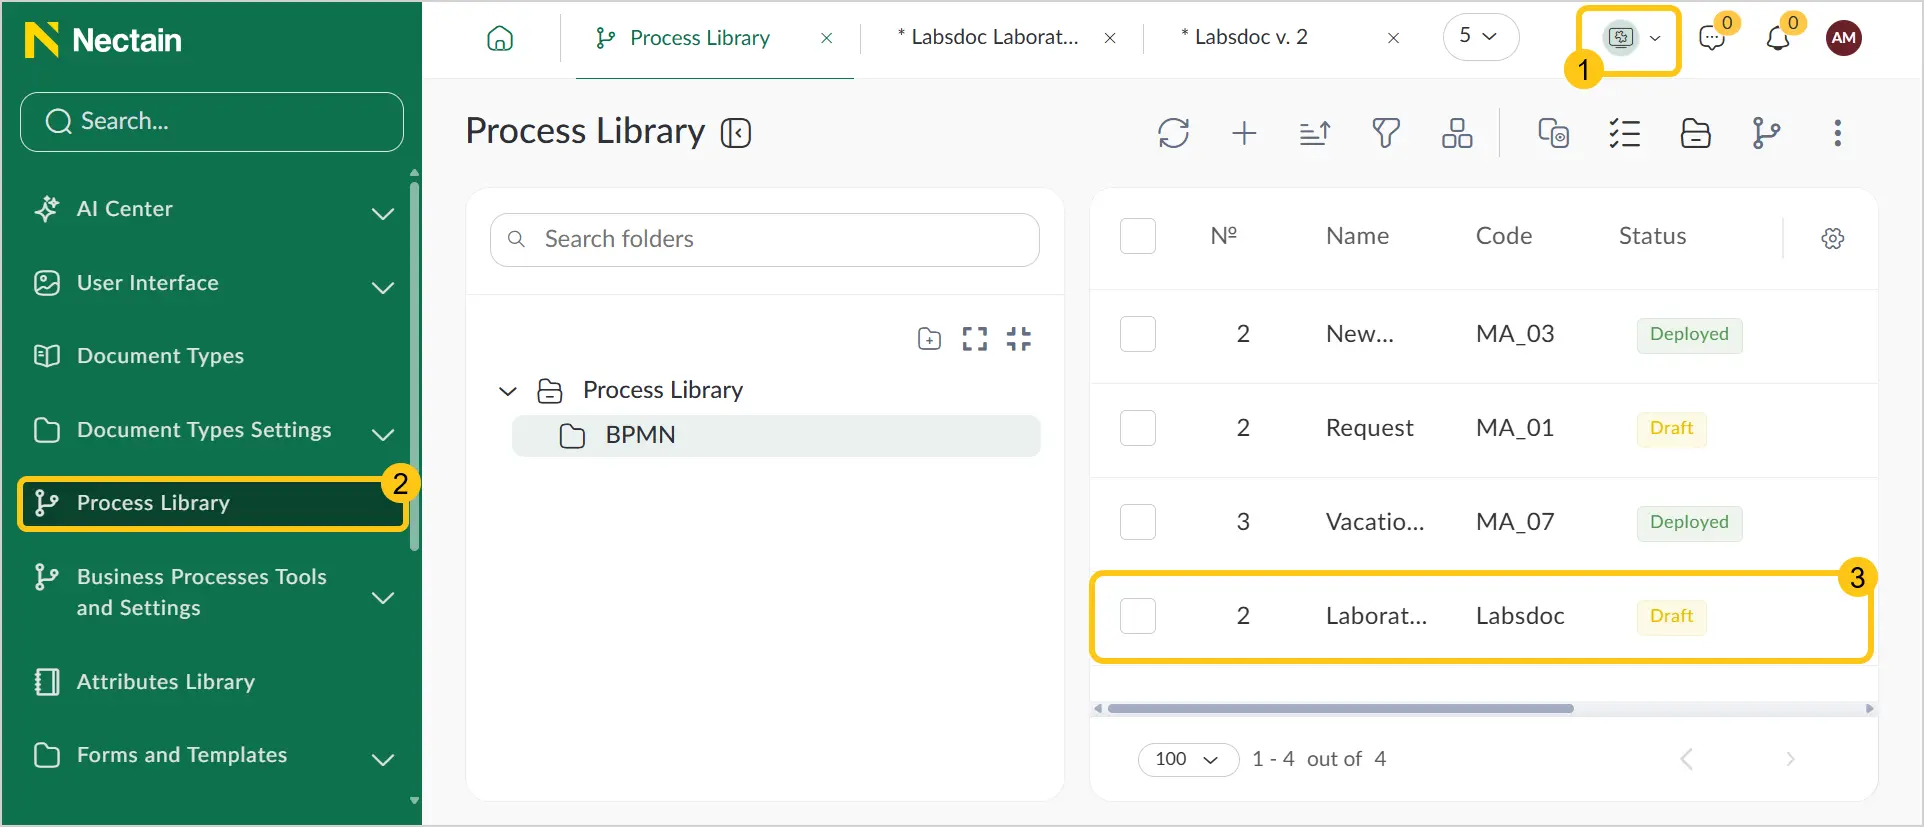
In the navigation panel, select the Studio 1 workspace.
-
Go to the Process Library 2 shortcut, then select the required business process definition 3.
-
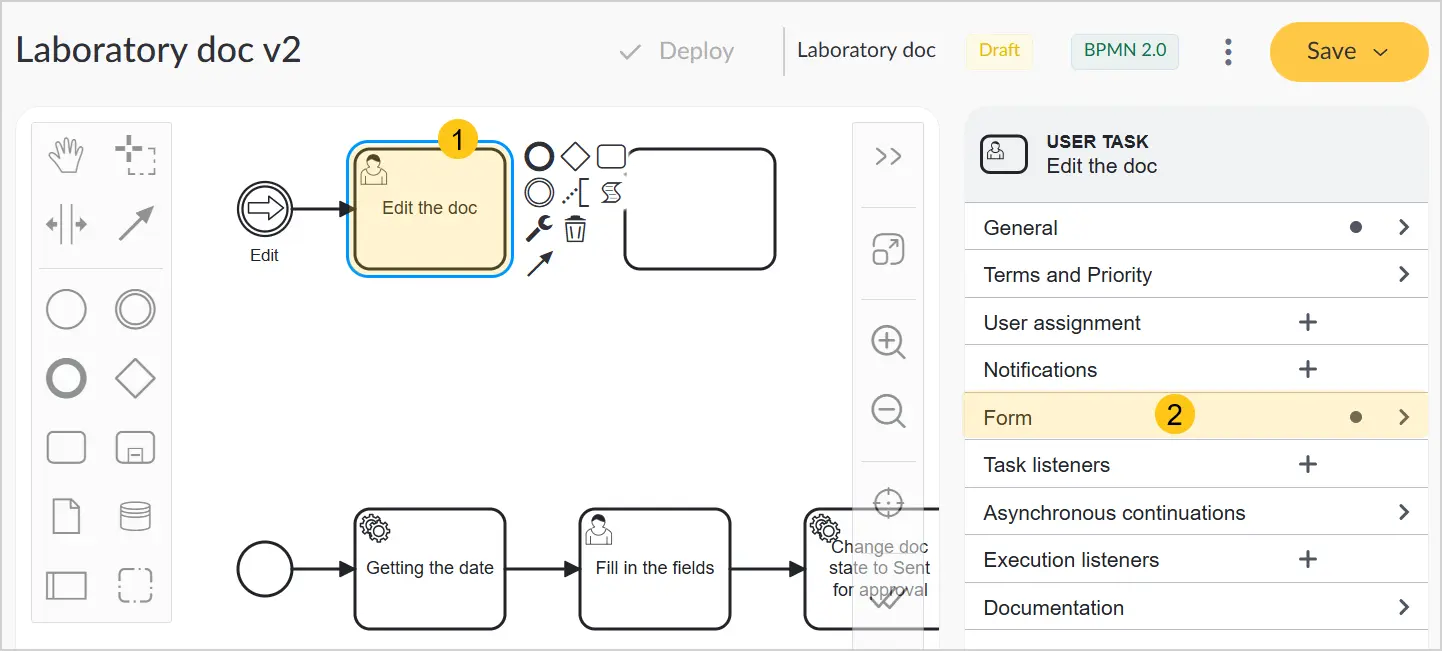
On the process diagram, select the user task 1, then in the Settings menu, expand the Form 2 section.
-
In the Form 1 field, select Task Form, then in the Task Form 2 field, select the required task form from the dropdown list.
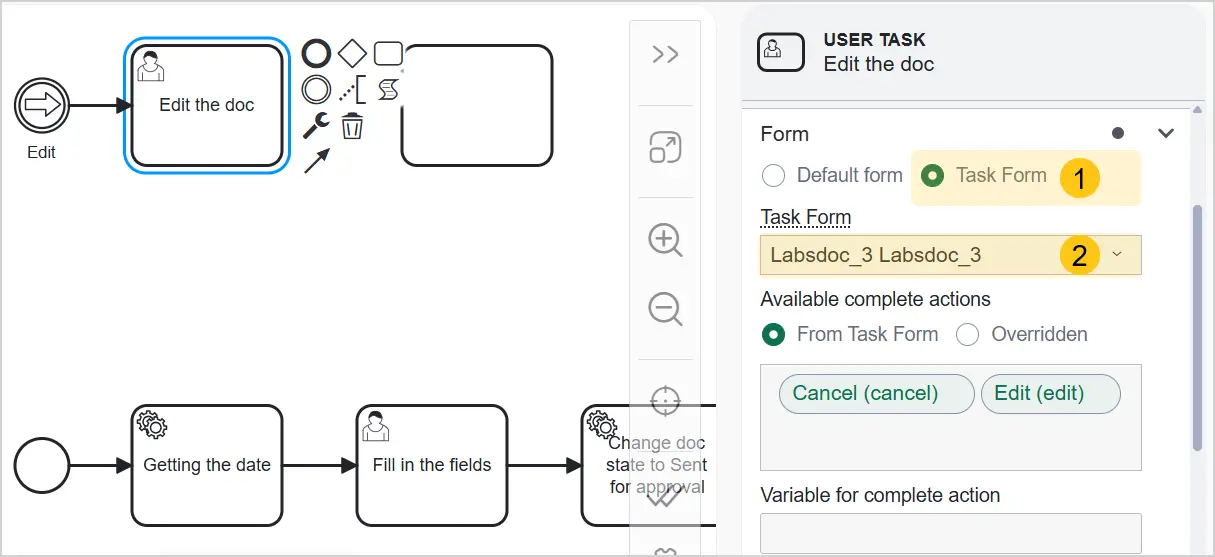
-
In the toolbar, select Save.
2.7.2.3. Task Form Preview
Enable the task form preview using one of the following methods:
Method for any design
In a Task type shortcut, open the grid settings menu 1 > Display mode 2 > Preview 3.
Method for nectain-ui design
When using the add-on package nectain-ui, to open the form preview, select in the top menu.
Now in a Task type shortcut, a single click on a record opens the task form preview.
The preview form contains the following tabs:
-
Task tab — always active and contains the native task form attributes (attributes located in the Task folder).
-
Image tab — displays the document image from the task form. The tab is active only under the following conditions:
- The task form is bound to the Document entity.
- The task form contains the Document image file attribute.
- The Show in preview form toggle is enabled for the Document image attribute.
-
Details tab — displays all other task form attributes (excluding native task attributes, which are shown on the Task tab). This tab is active under the following conditions:
- The task form is bound to the Document entity.
- The task form contains attributes of the following types: custom, role-based, or standard document attributes.
- The Show in preview form toggle is enabled for the attributes.
- A user viewing a task form in Preview mode is recorded in the audit log as a full view.
- The preview form is not available for tasks launched directly from a business process. It is only displayed when the process is started from a document (using the corresponding settings in the Events tab in the document type).
2.7.2.3.1. Configure Attribute Display
To configure which attributes are displayed in the preview form, follow these steps:
-
In the navigation panel, select the Studio 1 workspace.
-
Select the Forms and Templates 2 shortcut group, then select the Task Forms 3 shortcut.
-
Open the required form 4 or create a new one.
-
Go to the Form tab.
-
On the form, select the attribute you want to display in the preview form 1.
-
In the attribute settings, enable the Show in preview form 2 toggle.
Warning:If the task is linked to a document, the preview form will also display the attributes of that document.
To configure the display of attributes from the linked document form: Studio workspace > Document Types shortcut > the document type linked to the task > Constructor tab > steps 5–6 from the instructions above ⬆️.
2.7.2.3.2. Show Attributes with Empty Values
In preview mode, by default only attributes that meet both of the following criteria are displayed:
- The Show in preview form toggle is enabled in the attribute settings.
- The attribute has a value (is not empty).
However, you can disable the second criterion and show even attributes with empty values. To do this:
-
In the navigation panel, select the Studio 1 workspace.
-
Select the Forms and Templates 2 shortcut group, then select the Task Forms 3 shortcut.
-
Open the required form 4 or create a new one.
-
Go to the Form tab.
-
In the form settings, select the Show empty values checkbox.
2.7.2.3.3. Configure File Attribute Actions in the Preview Form
If a task has a linked document that contains a Document image attribute on its form, the image will also be displayed in the preview form as a separate Image tab. You can configure the actions that the user can perform on this file. To do this, follow these steps:
-
In the navigation panel, select the Studio 1 workspace.
-
Go to the Document Types 2 shortcut.
-
Open the required document type 3.
-
Go to the Constructor tab.
-
Hover over the Document image attribute, then select the icon.
-
Enable the action toggles 1 you want to activate for the user, then select the Save 2 button.
Warning:Only the following actions are available for the preview form:
- Expand to full screen
- Download
- View signatures
- Download file with signature
- Show file versions
- AI Summary
If you enable other actions not listed above, they will not be displayed on the preview form.
2.7.2.3.4. Open a Task in Preview Form
-
Go to a shortcut of one of the following types:
- Standard My Tasks shortcut
- Standard All Tasks shortcut
- Standard Task Archive shortcut
- Custom Task type shortcut
-
In the top right corner, select the icon.
-
Select View mode 1, then select Show preview 2.
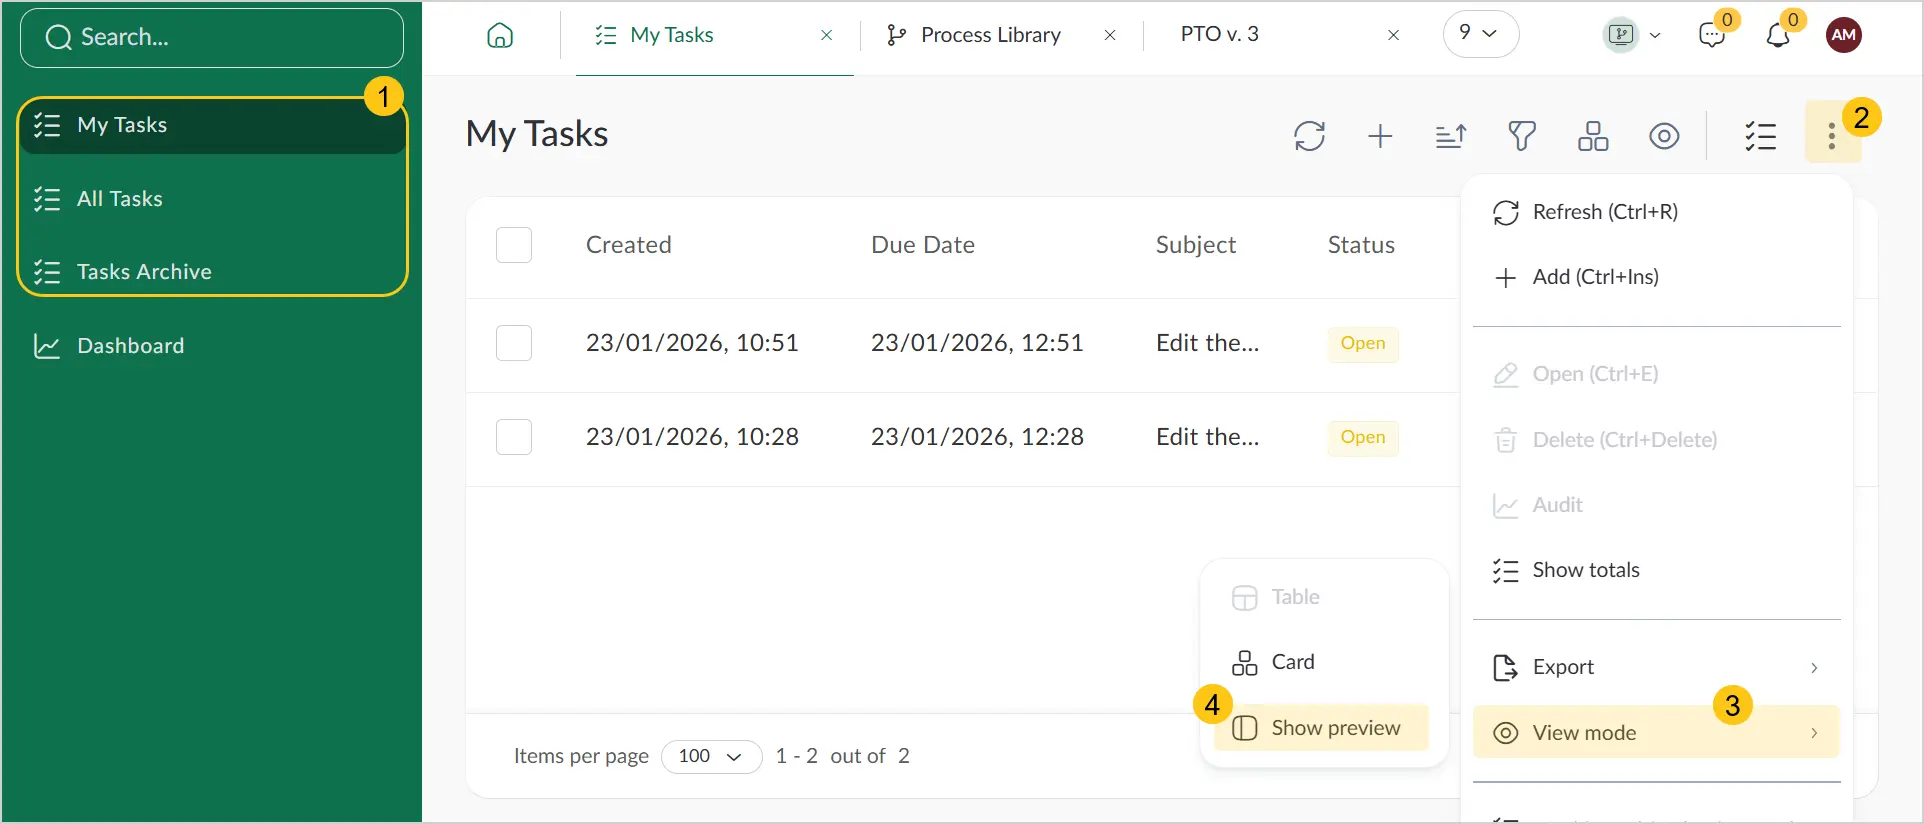
-
Click once on the required task record 1. The preview panel 2 will open on the right side of the screen.