2.6.1. Create an Attribute
The platform provides a set of standard attributes, but you can also create your own (custom) attribute.
To create an attribute, follow these steps:
-
In the top-left corner, select the Studio 1 workspace.
-
Select the Attribute Library 2 shortcut, then select the folder 3 where you want to place the attribute, or create a new folder if needed. (For working with folders, see the Folders section.)
-
In the toolbar, select Create 4.
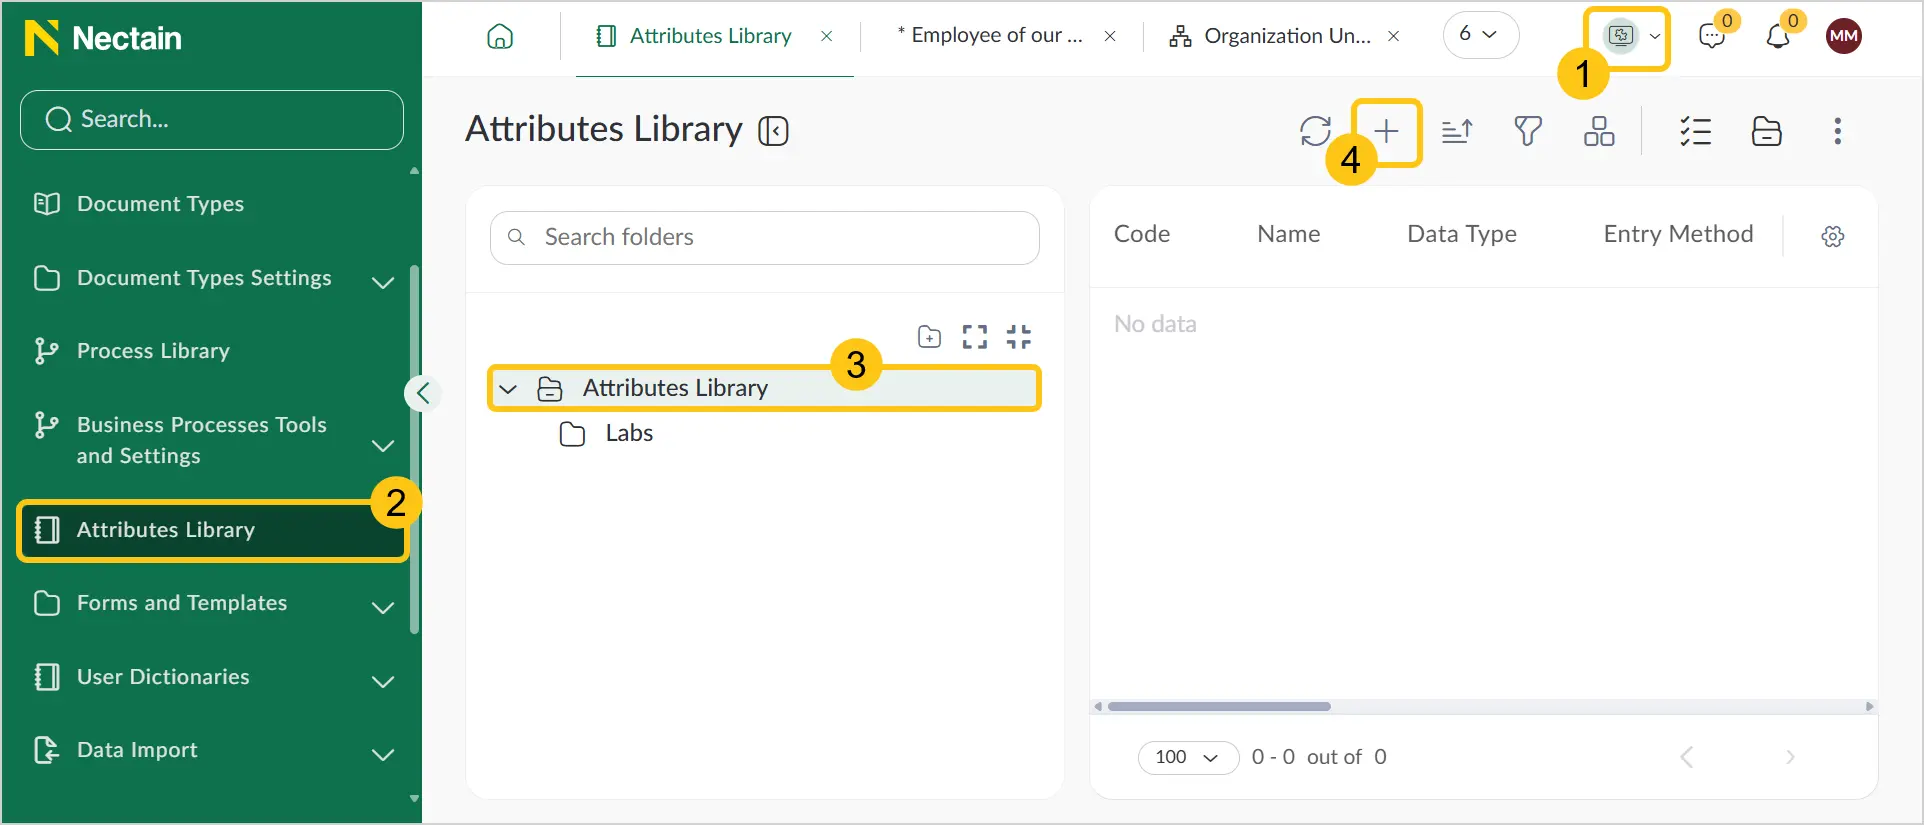
-
Fill in the fields using the hints from the table for your attribute type, which you can find in one of the following sections:
-
In the toolbar, select Save.
2.6.1.1. Text
Use the Text attribute type to add unformatted text to a document form. Attributes of this type can be used for both short texts and multi-line descriptions.
To create a Text attribute, follow these steps:
-
Complete all steps described in the Create an Attribute section.
-
Fill in the fields 1 using the hints in the table below, then in the toolbar select Save 2.
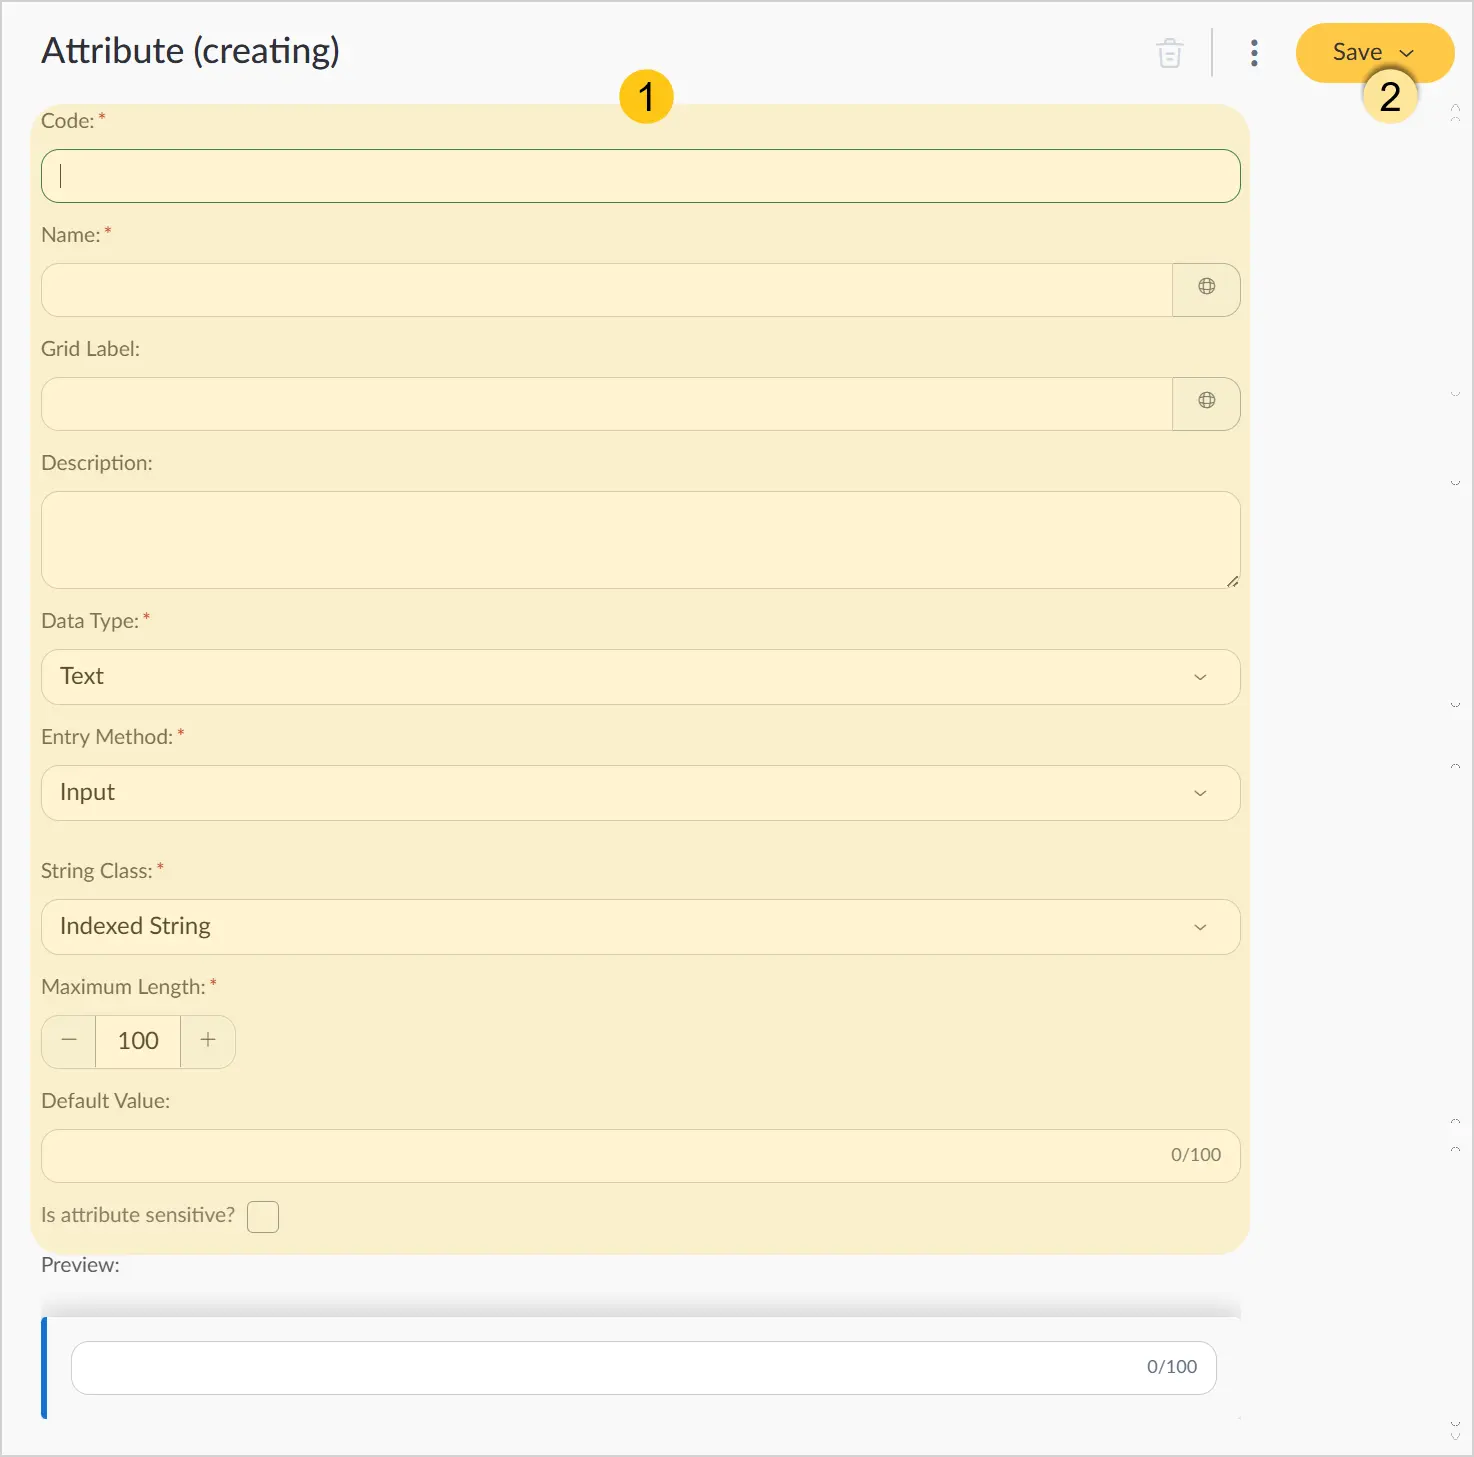
| Field name | Description |
|---|---|
| Code* | Unique identifier of the attribute.
The Code field can only be edited for attributes that are not yet used in the platform. |
| Name* | The name of the attribute. Example: "Unit price", "Project team", or "Product photo". |
| Grid Label | The name used for data registry columns. |
| Description | Additional information about the attribute explaining its purpose and usage. ℹ️ Note: If the attribute is used for AI recognition, it is recommended to fill in the Description field. Its content is passed to the LLM as additional context and improves recognition accuracy. See Configure document type attributes. |
| Data type* | In the dropdown list, select Text. |
| Entry method* | Select one of the following options:
|
| Number of rows* This field is displayed only if you selected Multi-line input field in the Entry method field. | Specify the number of text rows to display in the text field when entering or viewing the attribute value. This field controls the height of the text field and the ease of entering long texts. |
| Text value class* | Select one of the following options:
|
| Maximum length* | Maximum number of characters for this attribute (maximum length is 4000 characters for an extended string). |
| Default value | Enter the value to be set as the default for the attribute. You can manually change the attribute value when creating a document. |
| Preview | Allows previewing or testing the attribute before saving it, to ensure it meets requirements. |
Fields marked with "*" are required.
To configure the created attribute, see the Configure Attribute > Text section.
2.6.1.2. HTML Content
HTML Content attributes are used to store data in HTML format. Data is edited through the built-in editor, allowing you to add formatted text to the form.
To create a HTML Content attribute, follow these steps:
- Complete all steps described in the Create an Attribute section.
- Fill in the fields 1 using the hints in the table below, then in the toolbar select Save 2.
| Field name | Description |
|---|---|
| Code* | Unique identifier of the attribute.
The Code field can only be edited for attributes that are not yet used in the platform. |
| Name* | The name of the attribute. Example: "Unit price", "Project team", or "Product photo". |
| Grid Label | The name used for data registry columns. |
| Description | Additional information about the attribute explaining its purpose and usage. ℹ️ Note: If the attribute is used for AI recognition, it is recommended to fill in the Description field. Its content is passed to the LLM as additional context and improves recognition accuracy. See Configure document type attributes. |
| Data type* | In the dropdown list, select HTML Content. |
| Preview | Allows previewing or testing the attribute before saving it, to ensure it meets requirements. |
Fields marked with "*" are required.
To configure the created attribute, see the Configure Attribute > HTML Content section.
2.6.1.3. Number
Number attributes are used to store numbers in the following formats:
- integer — entering whole numbers.
- floating-point number — entering numbers with a decimal point, up to six decimal places.
- money — entering monetary amounts, up to two decimal places, with the option to specify a currency.
To create a Number attribute, follow these steps:
-
Complete all steps described in the Create an Attribute section.
-
Fill in the fields 1 using the hints in the table below, then in the toolbar select Save 2.
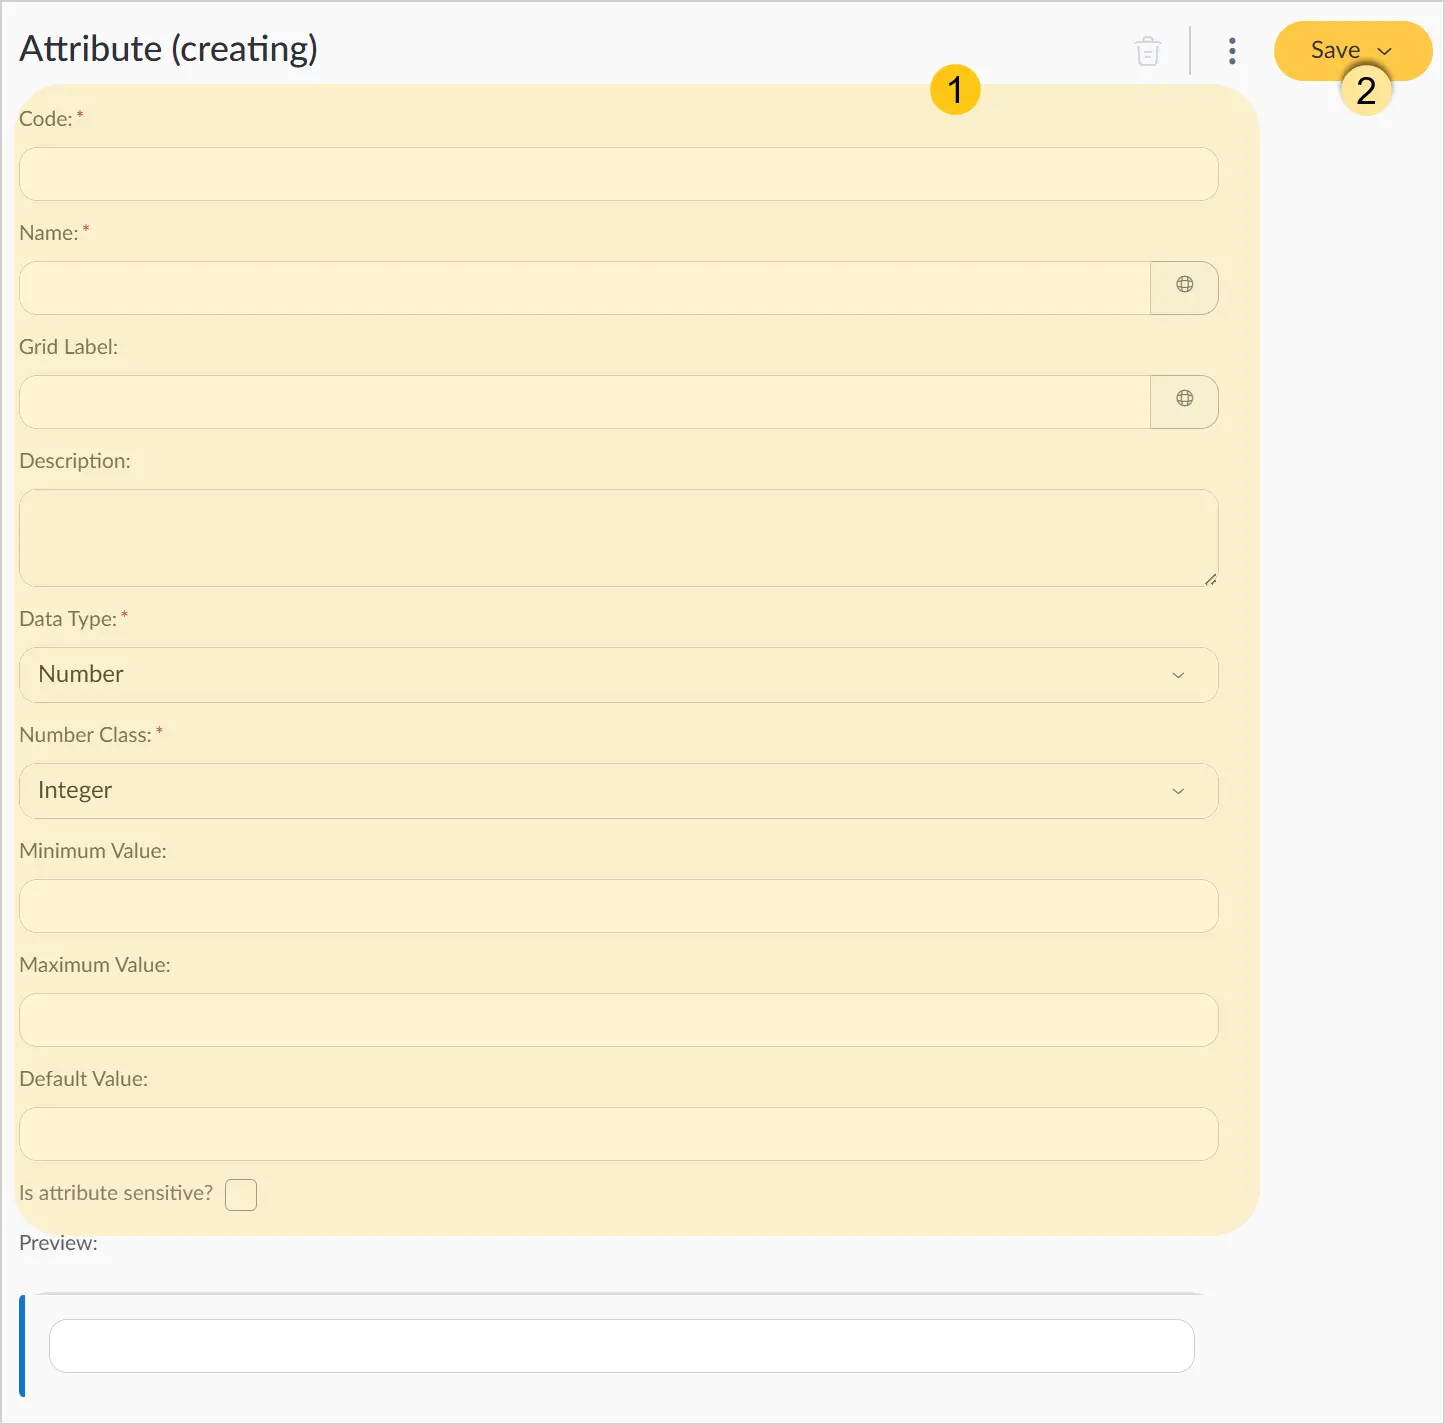
| Field name | Description |
|---|---|
| Code* | Unique identifier of the attribute.
The Code field can only be edited for attributes that are not yet used in the platform. |
| Name* | The name of the attribute. |
| Grid Label | The name used for data registry columns. |
| Description | Additional information about the attribute explaining its purpose and usage. ℹ️ Note: If the attribute is used for AI recognition, it is recommended to fill in the Description field. Its content is passed to the LLM as additional context and improves recognition accuracy. See Configure document type attributes. |
| Data type* | In the dropdown list, select Number. |
| Number class* | Select one of the following classes:
|
| Minimum value | Enter the minimum value the attribute can have. |
| Maximum value | Enter the maximum value the attribute can have. |
| Default value | Enter the value to be set as the default for the attribute. You can manually change the attribute value when creating a document. |
| Preview | Allows previewing or testing the attribute before saving it, to ensure it meets requirements. |
Fields marked with "*" are required.
To configure the created attribute, see the Configure Attribute > Number section.
2.6.1.4. Date and/or Time
Date and/or Time attributes are used to store a date, or a date and time. The attribute value can be used when creating calendar events (see the Calendars section).
To create a Date and/or Time attribute, follow these steps:
-
Complete all steps described in the Create an Attribute section.
-
Fill in the fields 1 using the hints in the table below, then in the toolbar select Save 2.
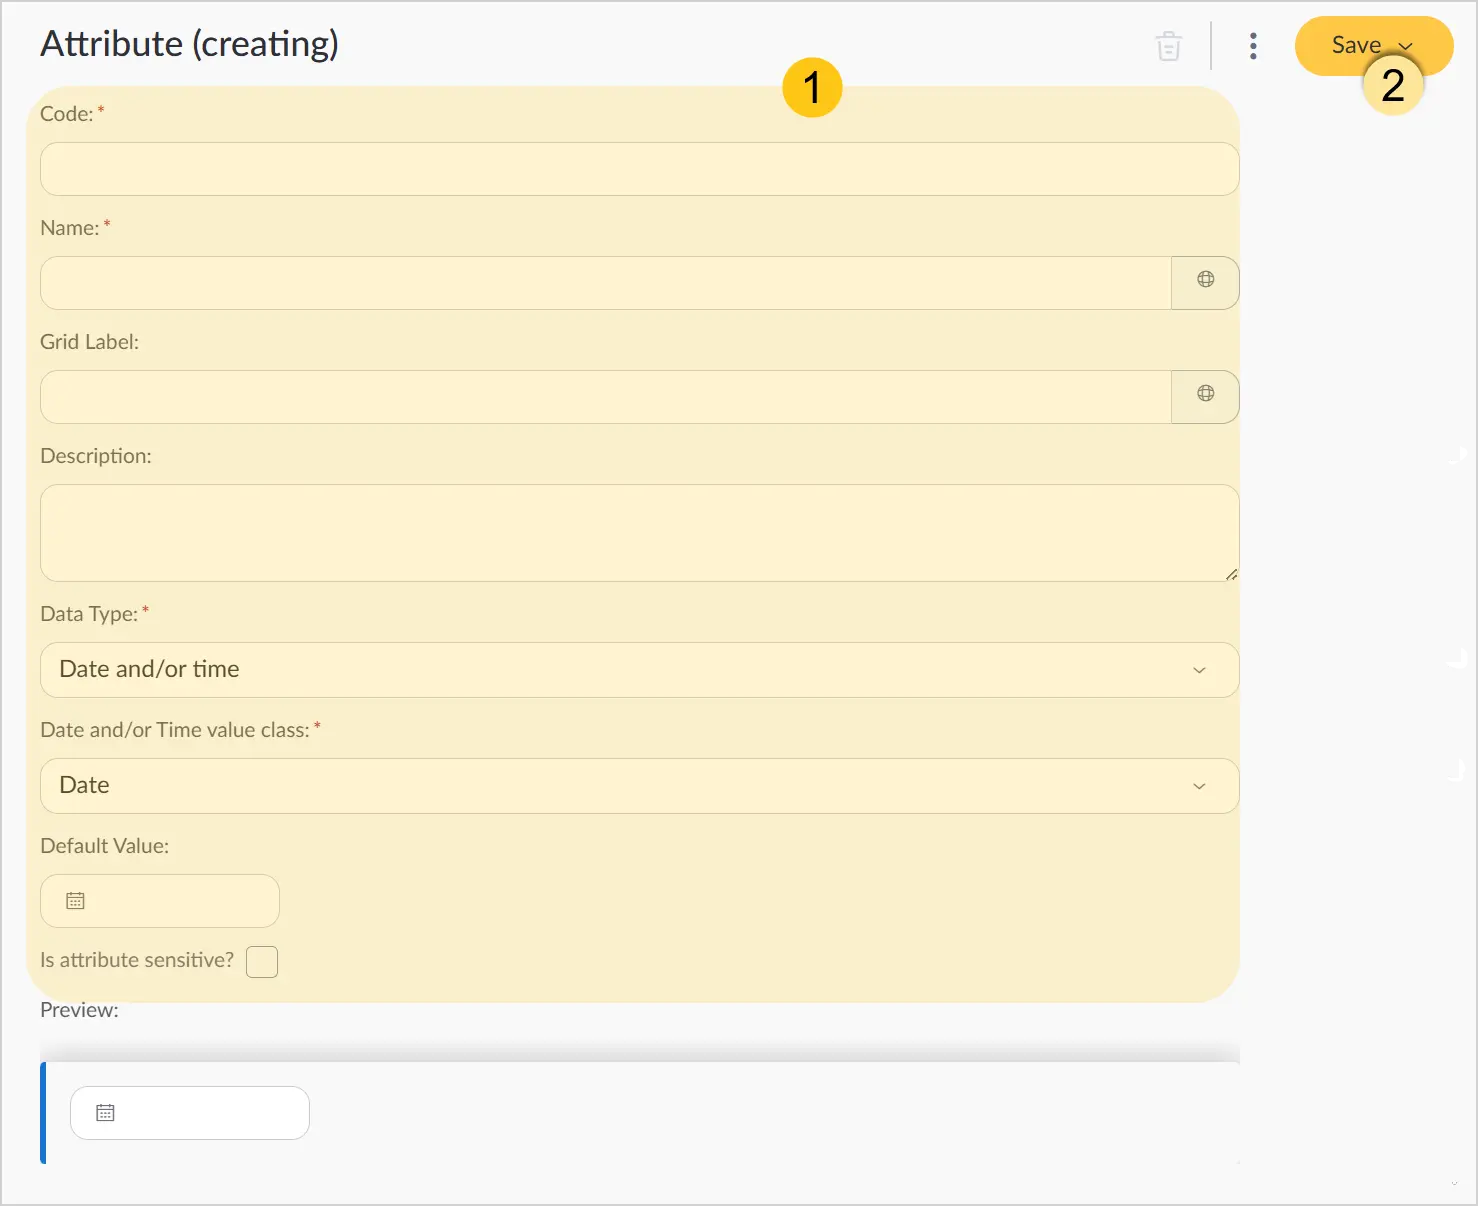
| Field name | Description |
|---|---|
| Code* | Unique identifier of the attribute.
The Code field can only be edited for attributes that are not yet used in the platform. |
| Name* | The name of the attribute. |
| Grid Label | The name used for data registry columns. |
| Description | Additional information about the attribute explaining its purpose and usage. ℹ️ Note: If the attribute is used for AI recognition, it is recommended to fill in the Description field. Its content is passed to the LLM as additional context and improves recognition accuracy. See Configure document type attributes. |
| Data type* | In the dropdown list, select Date and/or Time. |
| Date and/or Time Value Class* | Select one of the following classes:
|
| Default value | Enter the value to be set as the default for the attribute. You can manually change the attribute value when creating a document. |
| Preview | Allows previewing or testing the attribute before saving it, to ensure it meets requirements. |
Fields marked with "*" are required.
To configure the created attribute, see the Configure Attribute > Date and/or Time section.
2.6.1.5. Reference
Reference attributes are used to create a link to another object in the platform, such as a classifier, custom directory, or system directory.
To create a Reference attribute, follow these steps:
-
Complete all steps described in the Create an Attribute section.
-
Fill in the fields 1 using the hints in the table below, then in the toolbar select Save 2.
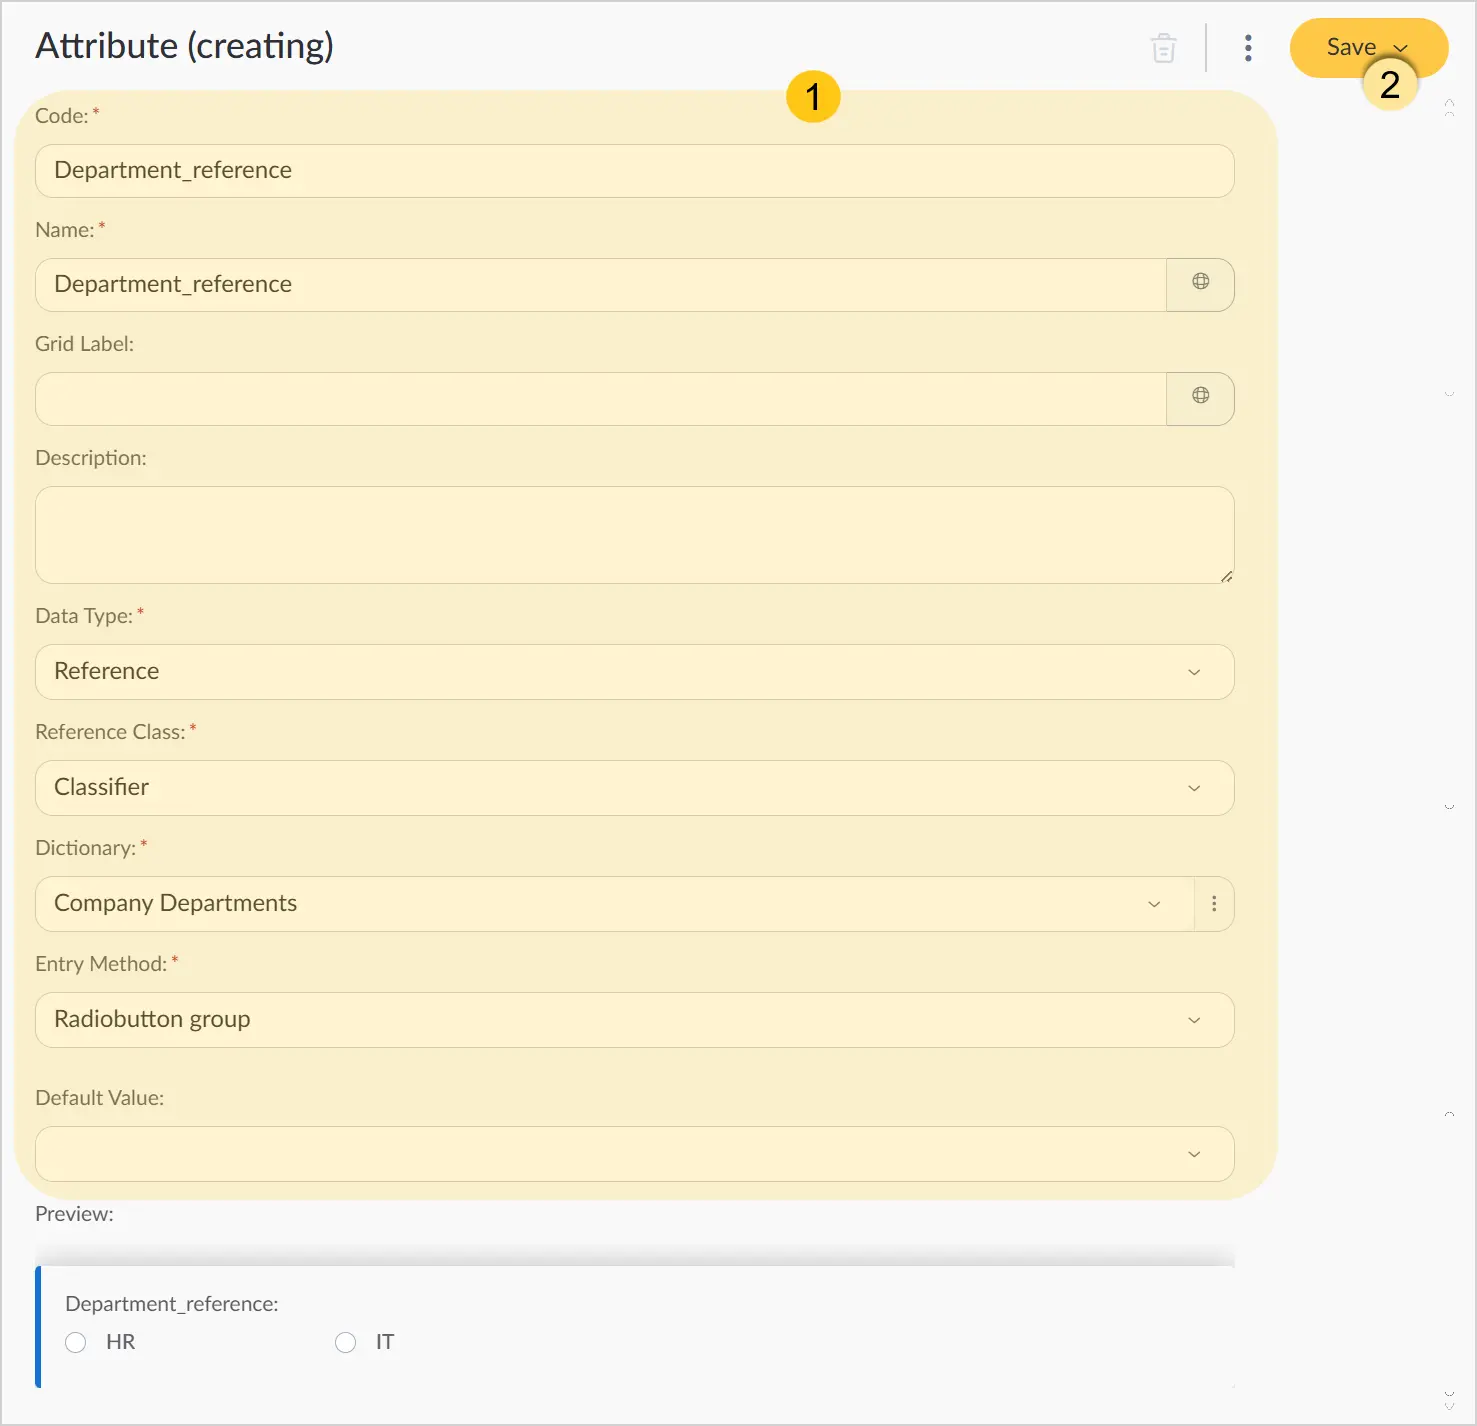
| Field name | Description |
|---|---|
| Code* | Unique identifier of the attribute.
The Code field can only be edited for attributes that are not yet used in the platform. |
| Name* | The name of the attribute. |
| Grid Label | The name used for data registry columns. |
| Description | Additional information about the attribute explaining its purpose and usage. ℹ️ Note: If the attribute is used for AI recognition, it is recommended to fill in the Description field. Its content is passed to the LLM as additional context and improves recognition accuracy. See Configure document type attributes. |
| Data type* | In the dropdown list, select Reference. |
| Reference Class* | Select the type of object the attribute will reference. Available options:
|
| Dictionary* | Select the directory from the dropdown list depending on the type selected in the Reference Class field. |
| Entry method* | Select one of the following value selection options:
|
| Linked to another attribute toggle This field is displayed only for the System directory reference type. | Use for the System directory reference type. Enable the toggle to configure a link to another attribute. |
| Reference attribute This field is displayed only for the System directory reference type when the Linked to another attribute toggle is enabled. | Select the attribute whose value must match the value of the parent attribute. |
| Parent attribute This field is displayed only for the System directory reference type when the Linked to another attribute toggle is enabled. | The attribute whose value is used to filter records. Example: the Country attribute can be used to filter records of the City attribute. |
| Default value | Enter the value to be set as the default for the attribute. You can manually change the attribute value when creating a document. |
| Preview | Allows previewing or testing the attribute before saving it, to ensure it meets requirements. |
Fields marked with "*" are required.
To configure the created attribute on a document or task form, see the Configure Attribute > Reference section.
After saving and applying the attribute on a document or task form, most fields on the attribute card will be locked for editing. In this mode, you can navigate to the linked object (classifier or directory) by following these steps:
-
Open the attribute card (see the first steps of this section).
-
In the Dictionary or Classifier field (depending on the reference type), select the 1 icon, then select Edit selected item 2.
The card of the linked object will open — a classifier, custom directory, or system directory — where you can view and edit its settings if needed.
2.6.1.6. Multiple Reference
Multiple Reference attributes are used to create multiple links to objects in the system, such as classifiers, custom directories, or system directories.
To create a Multiple Reference attribute, follow these steps:
-
Complete all steps described in the Create an Attribute section.
-
Fill in the fields 1 using the hints in the table below, then in the toolbar select Save 2.
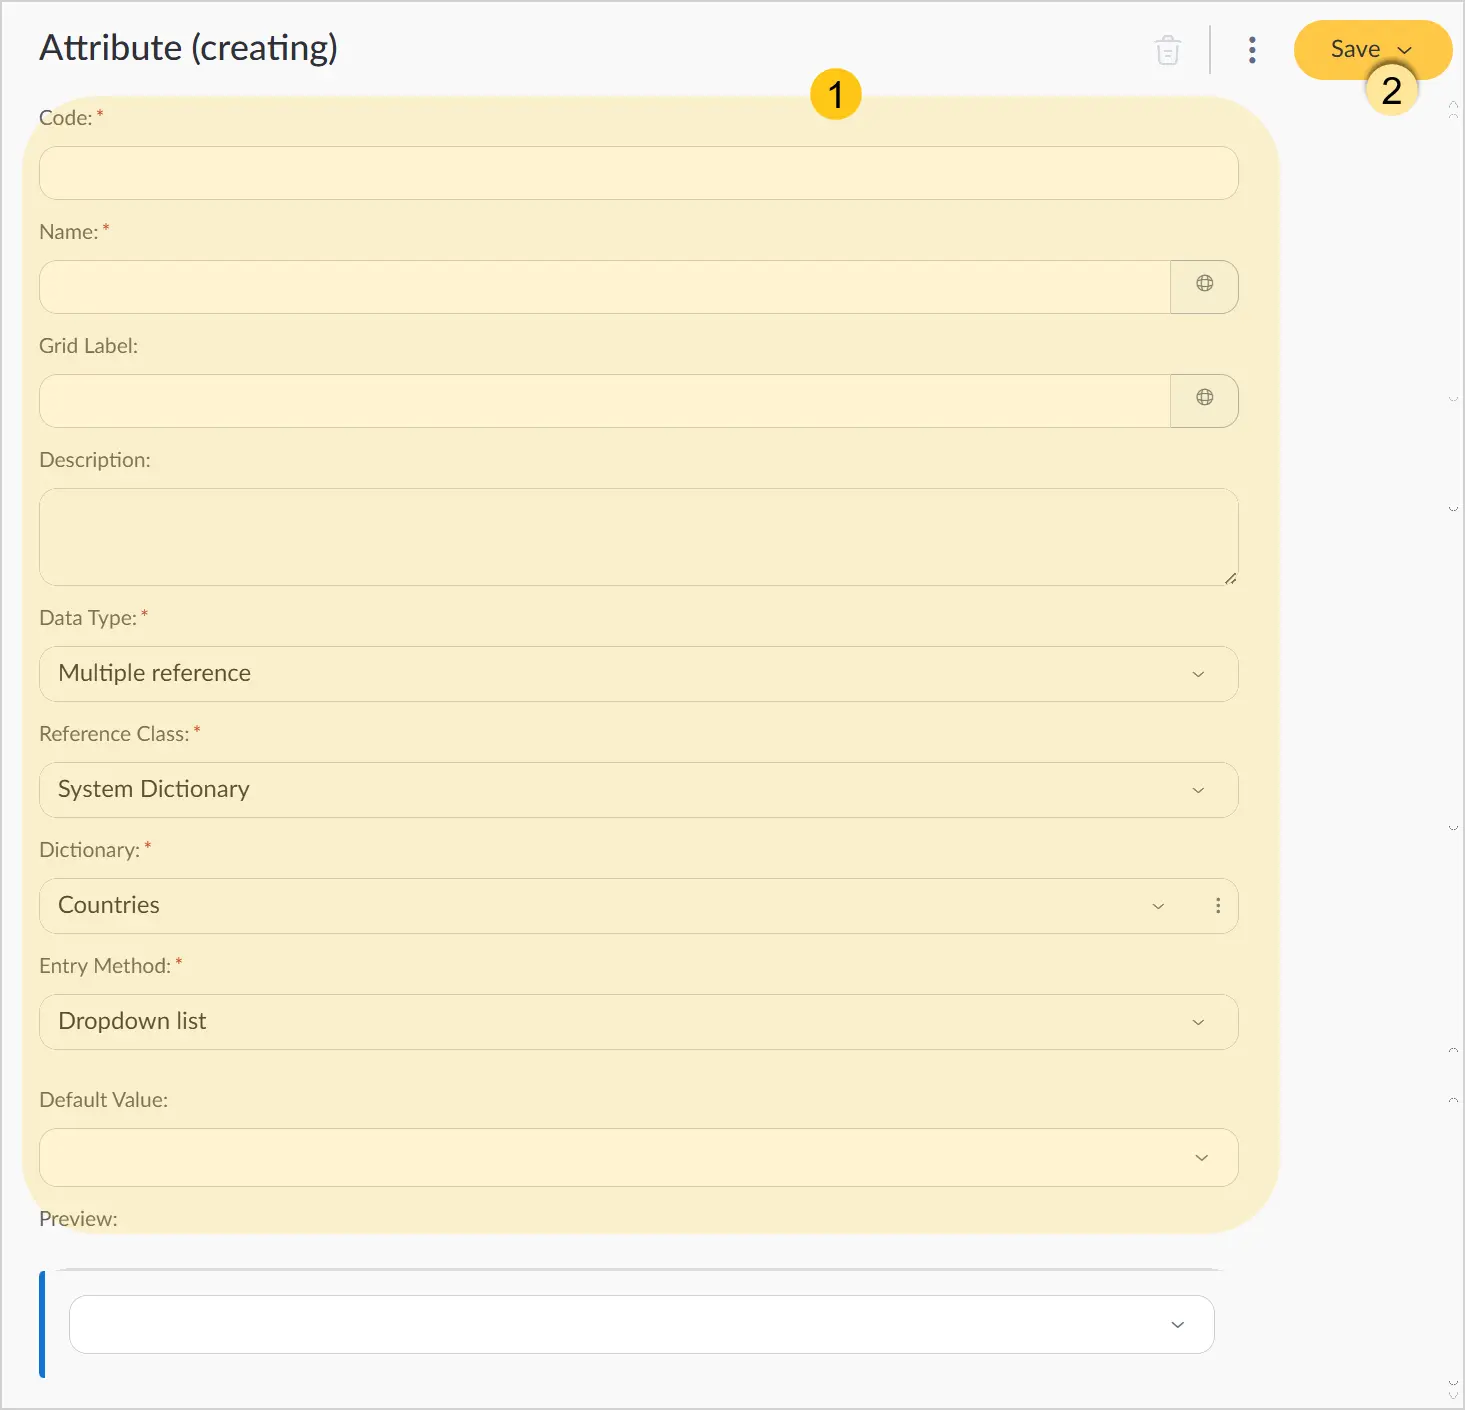
| Field name | Description |
|---|---|
| Code* | Unique identifier of the attribute.
The Code field can only be edited for attributes that are not yet used in the platform. |
| Name* | The name of the attribute. |
| Grid Label | The name used for data registry columns. |
| Description | Additional information about the attribute explaining its purpose and usage. ℹ️ Note: If the attribute is used for AI recognition, it is recommended to fill in the Description field. Its content is passed to the LLM as additional context and improves recognition accuracy. See Configure document type attributes. |
| Data type* | In the dropdown list, select Multiple Reference. |
| Reference Class* | Select the type of object the attribute will reference. Available options:
|
| Dictionary* | Select the directory from the dropdown list depending on the type selected in the Reference Class field. |
| Entry method* | Select one of the following value selection options:
|
| Default value | Enter the value to be set as the default for the attribute. You can manually change the attribute value when creating a document. |
| Preview | Allows previewing or testing the attribute before saving it, to ensure it meets requirements. |
Fields marked with "*" are required.
To configure the created attribute on a document or task form, see the Configure Attribute > Multiple Reference section.
After saving and applying the attribute on a document or task form, most fields on the attribute card will be locked for editing. In this mode, you can navigate to the linked object (classifier or directory) by following these steps:
-
Open the attribute card (see the first steps of this section).
-
In the Dictionary or Classifier field (depending on the reference type), select the 1 icon, then select Edit selected item 2.
The card of the linked object will open — a classifier, custom directory, or system directory — where you can view and edit its settings if needed.
2.6.1.7. Hyperlink
Hyperlink attributes are used to create links to external web pages. You can configure them to open only internal or only external links.
To create a Hyperlink attribute, follow these steps:
-
Complete all steps described in the Create an Attribute section.
-
Fill in the fields 1 using the hints in the table below, then in the toolbar select Save 2.
| Field name | Description |
|---|---|
| Code* | Unique identifier of the attribute.
The Code field can only be edited for attributes that are not yet used in the platform. |
| Name* | The name of the attribute. |
| Grid Label | The name used for data registry columns. |
| Description | Additional information about the attribute explaining its purpose and usage. ℹ️ Note: If the attribute is used for AI recognition, it is recommended to fill in the Description field. Its content is passed to the LLM as additional context and improves recognition accuracy. See Configure document type attributes. |
| Data type* | In the dropdown list, select Hyperlink. |
| Default value | Enter the value to be set as the default for the attribute. You can manually change the attribute value when creating a document. |
| Preview | Allows previewing or testing the attribute before saving it, to ensure it meets requirements. |
Fields marked with "*" are required.
To configure the created attribute, see the Configure Attribute > Hyperlink section.
2.6.1.8. Boolean
Boolean attributes are used to store logical values (True/False). For example, a flag indicating whether a task is completed.
To create a Boolean attribute, follow these steps:
-
Complete all steps described in the Create an Attribute section.
-
Fill in the fields 1 using the hints in the table below, then in the toolbar select Save 2.
| Field name | Description |
|---|---|
| Code* | Unique identifier of the attribute.
The Code field can only be edited for attributes that are not yet used in the platform. |
| Name* | The name of the attribute. Example: "Unit price", "Project team", or "Product photo". |
| Grid Label | The name used for data registry columns. |
| Description | Additional information about the attribute explaining its purpose and usage. ℹ️ Note: If the attribute is used for AI recognition, it is recommended to fill in the Description field. Its content is passed to the LLM as additional context and improves recognition accuracy. See Configure document type attributes. |
| Data type* | In the dropdown list, select Boolean. |
| Default value | Enter the value to be set as the default for the attribute. You can manually change the attribute value when creating a document. |
| Preview | Allows previewing or testing the attribute before saving it, to ensure it meets requirements. |
Fields marked with "*" are required.
To configure the created attribute, see the Configure Attribute > Boolean section.
2.6.1.9. Table/Collection
Table/Collection attributes are used to create tables that contain various attributes. For example, a table listing items in an order, or a table with employee contact information.
To create a Table/Collection attribute, follow these steps:
-
Complete all steps described in the Create an Attribute section.
-
Fill in the fields 1 using the hints in the table below, then in the toolbar select Save 2.
| Field name | Description |
|---|---|
| Code* | Unique identifier of the attribute.
The Code field can only be edited for attributes that are not yet used in the platform. |
| Name* | The name of the attribute. Example: "Unit price", "Project team", or "Product photo". |
| Grid Label | The name used for data registry columns. |
| Description | Additional information about the attribute explaining its purpose and usage. ℹ️ Note: If the attribute is used for AI recognition, it is recommended to fill in the Description field. Its content is passed to the LLM as additional context and improves recognition accuracy. See Configure document type attributes. |
| Data type* | In the dropdown list, select Table/Collection. |
| Detailed table settings | Enable this toggle 1 to activate the Table Settings tab 2, where you can select columns, add sorting, colors, and totals. |
| Detailed form settings* | Enable this toggle to activate the Collection item form tab, where you configure the form for entering records into the table/collection. Go to the Collection item form tab and configure the form by filling in the following sections: |
| Child attributes of the table/collection* This field is displayed only when the Detailed table settings toggle is disabled. | Select other attributes from the dropdown list to be used as columns or fields within this table or collection. This defines the structure of the table or collection by specifying which attributes (fields) will be included in each row or element. |
| Preview | Allows previewing or testing the attribute before saving it, to ensure it meets requirements. |
Fields marked with "*" are required.
To configure the created attribute, see the Configure Attribute > Table/Collection section.
2.6.1.10. File
File attributes are used to upload a file on a document form. They have similar functionality to the standard Document image attribute, except that in the attribute settings you can define the allowed file extensions and the maximum file size.
To create a File attribute, follow these steps:
-
Complete all steps described in the Create an Attribute section.
-
Fill in the fields 1 using the hints in the table below, then in the toolbar select Save 2.
| Field name | Description |
|---|---|
| Code* | Unique identifier of the attribute.
The Code field can only be edited for attributes that are not yet used in the platform. |
| Name* | The name of the attribute. Example: "Unit price", "Project team", or "Product photo". |
| Grid Label | The name used for data registry columns. |
| Description | Additional information about the attribute explaining its purpose and usage. ℹ️ Note: If the attribute is used for AI recognition, it is recommended to fill in the Description field. Its content is passed to the LLM as additional context and improves recognition accuracy. See Configure document type attributes. |
| Data type* | In the dropdown list, select File. |
| File extension | From the dropdown list, select one or more file formats to allow for the attribute. Available formats:
|
| Maximum size | Enter a numeric value for the maximum file size. The number defines the maximum size in megabytes (MB) that the file can occupy. |
| Preview | Allows previewing or testing the attribute before saving it, to ensure it meets requirements. |
Fields marked with "*" are required.
To configure the created attribute, see the Configure Attribute > File section.
2.6.1.11. File Collection
File Collection attributes are used to upload multiple files on a document form. Attributes of this type have similar functionality to the standard Document attachments attribute. Multiple files can be uploaded at once. However, File Collection attributes provide additional functionality, such as setting allowed file extensions and maximum file size.
To create a File Collection attribute, follow these steps:
-
Complete all steps described in the Create an Attribute section.
-
Fill in the fields 1 using the hints in the table below, then in the toolbar select Save 2.
| Field name | Description |
|---|---|
| Code* | Unique identifier of the attribute.
The Code field can only be edited for attributes that are not yet used in the platform. |
| Name* | The name of the attribute. Example: "Unit price", "Project team", or "Product photo". |
| Grid Label | The name used for data registry columns. |
| Description | Additional information about the attribute explaining its purpose and usage. ℹ️ Note: If the attribute is used for AI recognition, it is recommended to fill in the Description field. Its content is passed to the LLM as additional context and improves recognition accuracy. See Configure document type attributes. |
| Data type* | In the dropdown list, select File Collection. |
| File extension | From the dropdown list, select one or more file formats to allow for the attribute. Available formats:
|
| Maximum size | Enter a numeric value for the maximum file size. The number defines the maximum size in megabytes (MB) that the file or collection can occupy. |
| Preview | Allows previewing or testing the attribute before saving it, to ensure it meets requirements. |
Fields marked with "*" are required.
To configure the created attribute, see the Configure Attribute > File Collection section.
2.6.1.12. Nested Attributes
Nested attributes allow you to use attributes that are nested inside other attributes contained within custom directories. You can create a shortcut whose grid displays any attribute of a custom directory, or a child attribute of that attribute, at any nesting level.
This functionality is available only for custom attributes.
Places where nested attributes are supported:
- Passing variables to a process via the document type handler (the Document Types shortcut > required document type > Events tab).
- Creating or configuring a shortcut of type Documents, Custom directories, Tasks, Processes.
- Configuring a table on the attribute form (attributes of type Document links, Child documents).
- Configuring a table on the Custom directory form.
- Document templates
- Registration number masks
- Pop-up form
- Task and search template forms
You can also create a shortcut with nested directory attributes.