2.5. Business Process Settings and Tools
The Business Process Tools and Settings shortcut folder contains tools for configuring and testing created business processes.
2.5.1. Task Classes
Task classes are special categories that help organize and classify tasks in business process definitions. They allow you to navigate your tasks more easily and systematize your work.
Classes can be used to divide tasks into different categories, such as "Verification", "Approval", "Preparation", and so on.
Task classes are available only for user tasks (see section User Task).
2.5.1.1. Create a Task Class
-
In the navigation panel, select the Studio 1 workspace.
-
Select the Business Process Tools and Settings 2 shortcut group, then select the Task Classes 3 shortcut.
-
In the toolbar, select Create 4.
-
Fill in the fields 1 using the hints in the table below, then in the toolbar select Save.
| Field name | Description |
|---|---|
| Code* |
|
| Name* | The name must be short but informative enough for users to quickly understand what needs to be done. Avoid using special characters and punctuation marks that may be misinterpreted or cause errors. Example: "Document Verification", "Request Approval". ℹ️ Note: you can set alternative names for different languages. To do this, select the icon and fill in the fields for other languages. |
| Description | A short description of the task class. ℹ️ Note: you can set alternative descriptions for different languages. To do this, select the icon and fill in the fields for other languages. |
| Display Order* | Enter a number that defines the display order in the task class list. Example: "1". |
Fields marked with * are required.
2.5.1.2. Apply a Class to a Task
To apply a created class to a task in a business process definition, complete the following steps:
-
In the navigation panel, select the Studio 1 workspace, then select the Process Library 2 shortcut.
-
Select the required definition 3.
-
Select the user task element to which you want to apply the class 1.
-
In the settings menu, expand the General 2 tab, then in the Task Class 3 field, select the required class from the dropdown list.
-
In the toolbar, select Save.
2.5.1.3. Edit a Task Class
- In the navigation panel, select the Studio workspace, then select the Process Library shortcut.
- See section Edit a Record.
2.5.1.4. Copy a Task Class
- In the navigation panel, select the Studio workspace, then select the Process Library shortcut.
- See section Copy a Record.
2.5.1.5. Delete a Task Class
- In the navigation panel, select the Studio workspace, then select the Process Library shortcut.
- See section Delete a Record.
2.5.2. Task Completion Actions
You can create actions and use them when configuring task forms (see Task Forms).
2.5.2.1. Create a Task Completion Action
-
In the navigation panel, select the Studio 1 workspace.
-
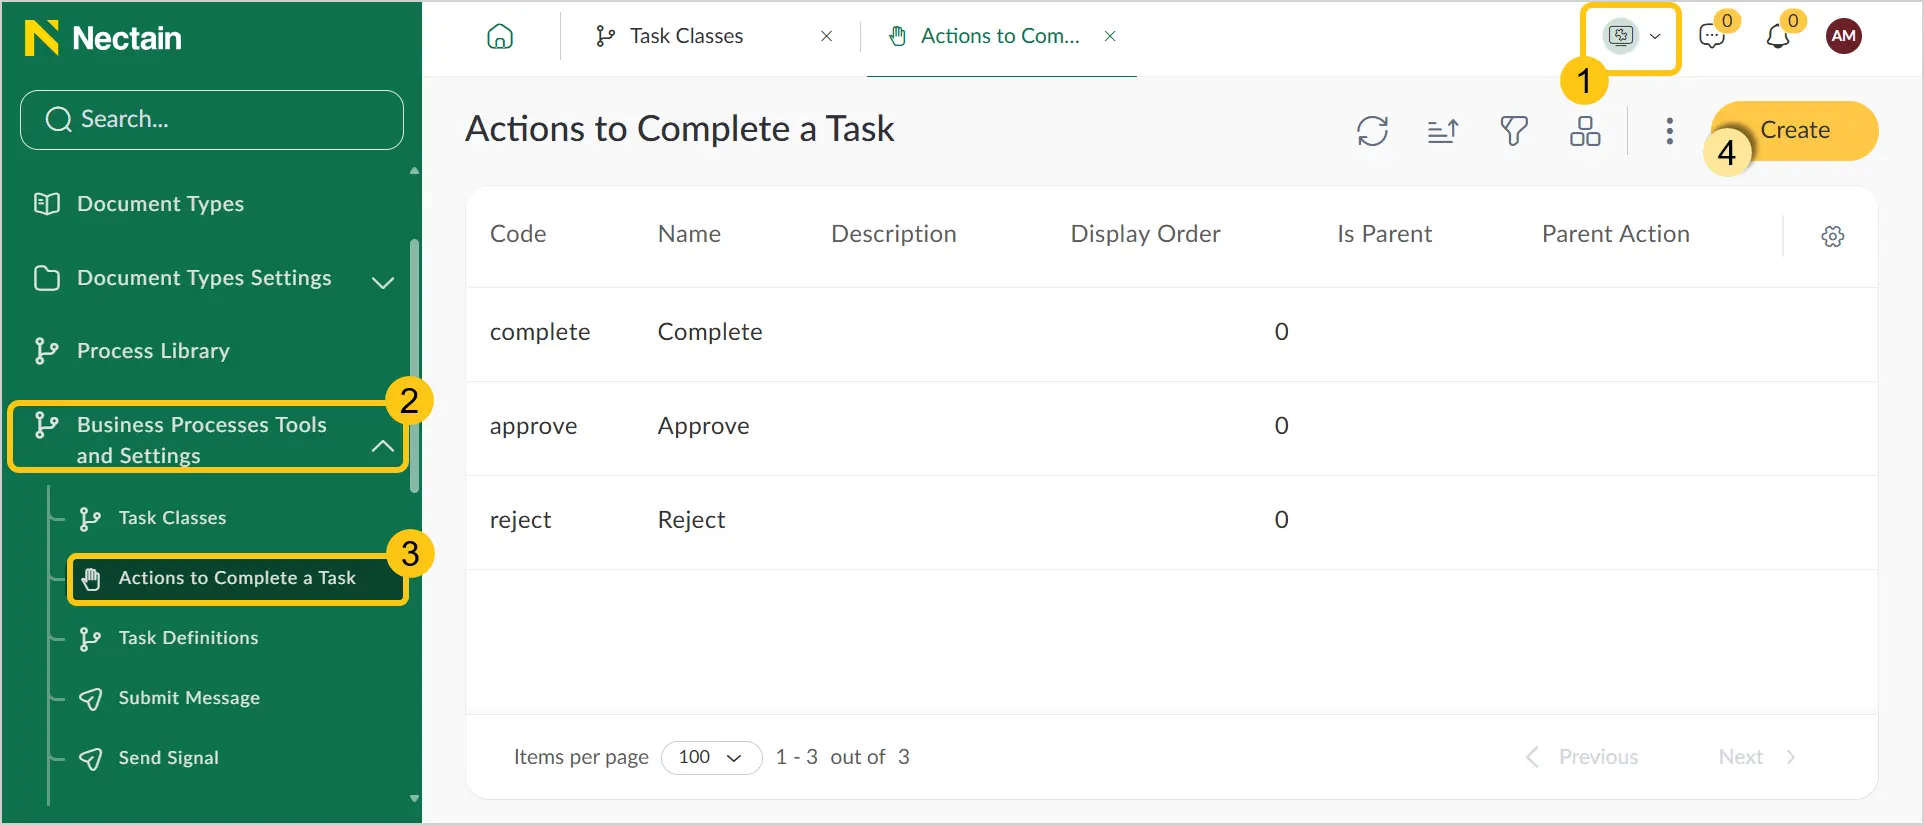
Select the Business Process Tools and Settings 2 shortcut group, then select the Actions to Complete a Task 3 shortcut.
-
In the toolbar, select Create 4.
-
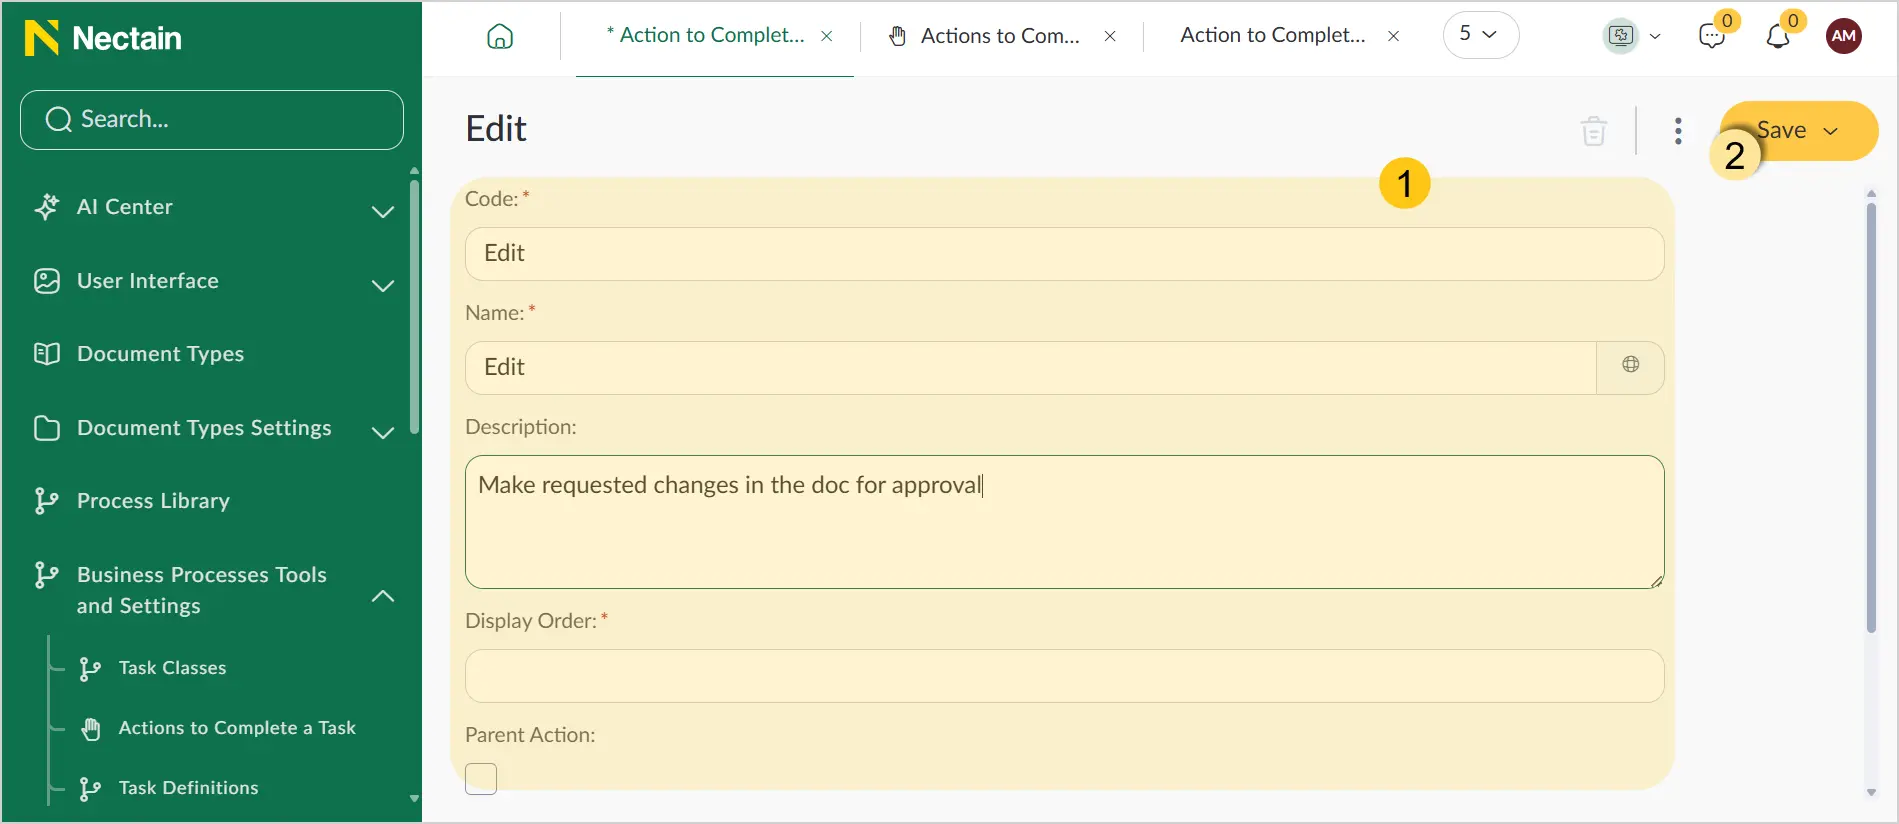
Fill in the fields 1 using the hints in the table below, then in the toolbar select Save.
| Field name | Description |
|---|---|
| Code* |
|
| Name* | The display name of the action. ℹ️ Note: you can set alternative names for different languages. To do this, select the icon and fill in the fields for other languages. |
| Description | A short description of the action. The description must explain what needs to be done within the action. Example: "This action involves verifying the accuracy and completeness of a document before its approval". ℹ️ Note: you can set alternative descriptions for different languages. To do this, select the icon and fill in the fields for other languages. |
| Display Order* | Enter a number that defines the display order in the task completion action list. Example: "1". |
Fields marked with * are required.
2.5.2.2. Edit an Action
- In the navigation panel, select the Studio workspace, then select the Process Library shortcut.
- See section Edit a Record.
2.5.2.3. Copy an Action
- In the navigation panel, select the Studio workspace, then select the Process Library shortcut.
- See section Copy a Record.
2.5.2.4. Delete an Action
- In the navigation panel, select the Studio workspace, then select the Process Library shortcut.
- See section Delete a Record.
Deletion is available only for actions not linked to any task form.
2.5.3. Task Definitions
A task definition is a formal specification of a task that includes all the necessary parameters and characteristics for its execution. In the Nectainium platform, task definitions are populated automatically when creating BPMN 2.0 business processes. This means that when you create a business process using BPMN 2.0, the system automatically generates all the required task definitions, simplifying the configuration process and reducing the likelihood of errors.
2.5.3.1. View Task Definitions
To view the list of all task definitions, complete the following steps:
-
In the upper-left corner, select the Studio 1 workspace.
-
Select the Business Process Tools and Settings 2 shortcut group, then select the Task Definitions 3 shortcut.
2.5.3.2. Edit a Task Definition
You can edit a task definition using one of the two available methods:
Method 1: for future business processes only
If you use this editing method, the changes will be applied only to tasks in new business processes. Tasks in processes you created earlier will not be updated.
- In the upper-left corner, select the Studio 1 workspace.
- Select the Business Process Tools and Settings 2 shortcut group, then select the Task Definitions 3 shortcut.
- See section Edit a Record.
Method 2: for existing and future business processes
If you use this editing method, the changes will be applied to tasks in all business processes, including those created earlier.
-
In the upper-left corner, select the Studio 1 workspace, then select the Process Definitions 2 shortcut.
-
Double-click the definition whose task you want to edit 3.
-
Select the required task in the diagram, then in the settings menu on the right, edit the required settings.
-
In the toolbar, select Save.
2.5.4. Send a Message
Some business processes can use messages to initiate or continue the execution of a process. Specifically, messages can:
- start a new process (if the Message Start Event is used)
- continue the execution of an already running process (for example, via an Intermediate Message Event)
- trigger the execution of an event subprocess, which can fire at any point during process execution
Unlike signals, which are broadcast to all processes, messages support correlation keys (additional filters) that allow you to specify which processes or process instances the message should be sent to.
This is useful in cases where multiple processes are waiting for the same message but are associated with different data (for example, different documents or requests).
The platform also supports automatically sending messages to a process in response to incoming emails using the Actions tab in mail processing rules.
To send a message, complete the following steps:
-
In the upper-left corner, select the Studio 1 workspace.
-
Select the Business Process Tools and Settings 2 shortcut group, then select the Send a Message 3 shortcut.
-
Fill in the fields using the hints in the table below, then select the Send button.
| Field name | Description |
|---|---|
| Business Key | Enter the business key of the process to which you want to send the message. To find the business key of the required process, navigate to Studio > Business Process Settings > Processes. Then find the desired process and copy the text from the "Business Key" column. |
| Instance ID | Enter the external ID of the business process to which you want to send the message. |
| Correlation Keys (JSON) | Specify the values of process variables, such as an ID. This allows you to send the message only to a specific process. |
| Local Correlation Keys (JSON) | Specify the values of local process variables, such as an ID. This allows you to send the message only to a specific process. A process can have both process variables and local process variables (for a specific process activity, such as a task). |
| Message Topic* | Enter the name of the message you want to send. ℹ️ Note: the topic must match the code configured in the business process. |
| Variables (JSON) | Enter the data transmitted along with the message. 💡 Tip: When using variables for message correlation, make sure the variable types match. A common issue occurs when trying to correlate by ID where in Camunda the variable is of type 'long' or 'json' instead of 'double', causing the message not to be matched with the corresponding process instance. |
| Local Variables (JSON) | Enter the local variables used in a specific business process context. 💡 Tip: This refers to the local execution start that is waiting for the message. In the case of an event subprocess, this will be the process itself, so setting local variables will work the same as global process variables. |
Fields marked with * are required.
2.5.5. Send a Signal
Signals in business processes are used to initiate certain actions or events. Unlike messages, which can be directed to specific processes, signals are broadcast to all active processes that are listening for that signal.
To send a signal, complete the following steps:
-
In the upper-left corner, select the Studio 1 workspace.
-
Select the Business Process Tools and Settings 2 shortcut group, then select the Send a Signal 3 shortcut.
-
Fill in the fields using the hints in the table below, then select the Send button.
| Field name | Description |
|---|---|
| External ID | Enter the external ID of the business process to which you want to send the signal. Leave this field empty if the signal should be directed to all matching processes. To find the external ID of the required process, navigate to Studio > Business Process Settings > Processes. Then find the desired process and copy the text from the "External ID" column. |
| Signal* | Specify the signal code used in the business processes. |
| Variables (JSON) | Enter the data transmitted along with the signal. |
Fields marked with * are required.
2.5.6. Execute DMN
Using the Execute DMN shortcut, you can test configured DMN processes. To do this, complete the following steps:
-
In the upper-left corner, select the Studio 1 workspace.
-
Select the Business Process Tools and Settings 2 shortcut group, then select the Execute DMN 3 shortcut.
-
In the DMN 1 field, select the required DMN process from the dropdown list.
-
In the Table 2 field, select the required table from the process using the dropdown list. If the process contains only one table, this field will be populated automatically.
-
Select the Execute 3 button.
-
In the Response field, you will see the result of the DMN table execution.
2.5.7. Processes
You can view all current and completed business processes in the Processes shortcut. Processes are added to this registry automatically after you select the Create Process button in the business process definition. See section Create a Process Based on a Business Process Definition.
2.5.7.1. View All Processes
To view all business processes, complete the following steps:
-
In the upper-left corner, select the Studio 1 workspace.
-
Select the Business Process Tools and Settings 2 shortcut group, then select the Processes 3 shortcut.
2.5.7.2. View Process Details
-
In the upper-left corner, select the Studio 1 workspace.
-
Select the Business Process Tools and Settings 2 shortcut group, then select the Processes 3 shortcut.
-
Double-click the desired process 4.
The process diagram opens. Stages in the diagram are marked with different colors depending on their status:
- Green — stages that have been successfully completed.
- White — stages that have not yet been executed.
- Red — stages during which an error occurred.
Additional information about the process is displayed below the diagram, grouped into tabs:
- A Variables — a list of process variables.
- B Tasks — a list of process tasks.
- C Child Processes — a list of child processes.
- D AI Executions — a list of AI scenarios being executed in the process. The tab is available only to users with the Admin and Developer roles. Users with these roles can also open the execution form by double-clicking the required record.
- E Incidents — a list of errors that occurred during process execution.
- F Properties — information about the process, including the process author, business key, start and end dates, and so on. Also, if the process has a related entity (for example, a document), the object ID and entity name will be displayed here.
If the process has a related entity, a link to that entity is displayed in the toolbar. Select the link to open the form of the related object (for example, a document form) in a new tab.
By default, the title of the related object is displayed as the link text. If no custom title is set, the document number or registration number is displayed for documents.
If the user does not have access to the related object, the link will not be displayed, even if the process has a related entity.
A related entity can be set automatically or manually. The association is created automatically if the process was started from another entity. For example:
-
Process started from a document — to start processes from a document, you need to create and deploy a business process definition and configure a document type. For more details, see section Preparing to Work with Processes.
-
Process started during document recognition — for example, during a document splitting process. In this case, the toolbar of the process (which performs the splitting) will display a link to the corresponding record in the Recognition Log shortcut. For more details, see section Configure File Splitting.
A related entity can also be set manually in the following cases:
-
When manually starting a process — in the Create Process window, enable the Link Process Instance to Object option, select the required object in the Entity Name field, then select the required entity in the corresponding field.
-
When starting a process using the Start Process action in mail processing rules — enable the Link Process Instance to Object option, select the required object in the Entity Name field, then in the Variable field select the variable that passes the object ID.
If the process is started in another way (for example, using scripts) with other entities, the process will contain a link to the related entity.
2.5.7.3. Suspend or Cancel a Process
Method 1: a single process
To suspend or cancel the execution of a process, complete the following steps:
-
Complete the steps from section View Process Details.
-
In the top menu, select the icon to suspend the process, or select the icon to cancel the process.
Method 2: multiple processes at once
You can cancel or suspend multiple processes at once using bulk actions in Processes-type shortcuts. These actions are available in Processes-type shortcuts — both user-defined and system (the Processes shortcut). They are available to users with the Admin or Developer roles.
-
Navigate to a Processes-type shortcut.
-
Enable Multiple Selection 1 mode.
-
Select the checkboxes next to the processes you want to suspend or cancel 2.
-
Right-click and select the required action from the context menu.
-
Select the Cancel or Suspend button (depending on the action selected in the previous step).
-
After confirming the action, you will see the action results A and the updated status of each process B.
2.5.7.3.1. Configure Bulk Process Actions in a Shortcut
By default, all Processes-type shortcuts have Suspend and Cancel actions in the toolbar when active processes are selected, as well as a Resume action for suspended processes. If needed, these actions can be disabled for specific shortcuts.
-
In the navigation panel, select the Studio 1 workspace.
-
Select the Interface 2 shortcut group, then select the Shortcuts 3 shortcut.
-
Select the Processes-type shortcut for which you want to configure bulk actions 4.
-
Go to the Typed 1 tab, then select Action Settings 2.
-
Select the checkboxes next to the Suspend, Resume, Cancel actions to enable them for the shortcut 1. Or clear the checkboxes next to the corresponding actions to disable them.
-
Select Save 2.
-
In the toolbar, select Save.
2.5.8. Process Migration
When a new version of a process definition is deployed, it is applied only to future processes and does not affect existing ones. To be able to apply an updated version of a process definition to both new and existing processes, the Process Migration feature was created, which can be used by users with the Administrator and Developer roles.
Process migration allows you to transfer existing running business processes from one version to another without losing data or execution state. Migration is supported by the Camunda business process automation platform. Refer to the documentation at this resource for a deeper understanding.
Process migration may be relevant when it is necessary to fix errors in the current version of a process, change the process logic (add, remove, or modify tasks), update parameters or settings, or revert to a previous version. All previous versions are stored in history and are available for viewing; for details, see Show/Hide Old Process Versions.
2.5.8.1. Preparing for Migration
Before migrating processes, you must ensure that your processes meet the migration conditions. Preparing for migration consists of two stages: verifying the availability of active processes and creating new process versions if needed.
2.5.8.1.1. Verifying Active Processes
Only processes created based on process definitions with the status Current or Old Version (see Business Process Definition Statuses), and which themselves have the status Running, can be migrated.
To verify the status of the required process definition:
Method 1: Via the Process Library shortcut
-
In the navigation panel, select the Studio 1 workspace.
-
Select the Process Library 2 shortcut, select the required process group 3. Verify your definition's status in the corresponding grid column 4.
-
If the status does not meet the migration conditions, configure your definition or create a new one. To do this, see Process Library.
Method 2: Via the document type to which the definition is linked
-
In the navigation panel, select the Studio 1 workspace.
-
Select the Document Types 2 shortcut. Select the required type from the registry 3.
-
Go to the Processes 1 tab, select the required one from the list 2, and verify its status in the editor 3.
-
If the status does not meet the migration conditions, configure the process or create a new one. To do this, see Working with Processes.
To verify the status of the required process:
-
In the navigation panel, select the Studio 1 workspace.
-
Select the Process Library 2 shortcut group and select the Processes 3 shortcut. Verify your process status in the corresponding grid column 4.
-
If the status does not meet the migration conditions, configure the process or create a new one. To do this, see Working with Processes.
2.5.8.1.2. Preparing a New Process Version
Create a new version of the process with all the changes you want to apply during migration. To correctly create and launch a new active process, see Create a Business Process Definition and Deploy a Business Process Definition.
When you create and deploy a new version for an already active definition, you will receive a system notification about the existence of processes running on an older version, and a prompt to migrate them to the most current version.
-
Enable the There are processes running on the previous definition version. Migrate them to the new version? checkbox so that the system remembers your choice for future deployments.
-
Select Yes to migrate the outdated versions to the current version you just created.
In this case, the Source field will automatically be populated with the oldest version that has active processes, and the Target field with the current (latest) version.
2.5.8.2. Executing Process Migration
You can select multiple processes of one version from all running in the system for migration, or migrate all processes of that version at once.
2.5.8.2.1. Migrate All Available Processes of One Version
-
In the navigation panel, select the Studio 1 workspace.
-
Select the Business Process Tools and Settings 2 shortcut group, then select the Migrate Processes 3 shortcut.
-
In the Process Definition field:
- From the Source dropdown list, select the name of the process you want to change, then specify its current (outdated) version 1.
- In the Target 2 field, after selecting the source, the corresponding definition is automatically populated if one exists. If not, specify the name of the process to which you will migrate. Specify its (updated) version.
-
Select Next 3.
-
If you have already moved forward but need to go back to the version settings, select Change.
-
In the Migration Plan tab, verify the correspondence of events between the Source and Target versions of the processes.
-
You can make changes, add triggers, or remove certain events. To edit events, select one of the two options:
Method 1. Table editor
a. To add an event, select +.
b. To delete an event, select .
c. To configure event triggers, toggle the corresponding switches.
For a detailed overview of event configuration, see BPMN Notation Description.
Method 2. In raw JSON format
The migration plan is generated by Camunda automatically.
You can view the plan in JSON format and configure it manually. To do this:
a. Select .
b. In the editing window, make changes and select Change.
-
Make the necessary edits in the Variables 1 tab, if required. For a detailed overview, see Process Variables.
-
To add a new variable, select + in the upper-left corner of the form 2, or go to the additional options menu 3 in the upper-right corner and select Add 4.
-
To edit a variable, select it 1. Then from the additional options menu select the required action 2.
-
-
Enable Additional Migration Parameters if required.
-
If you are satisfied with all the changes and are ready to migrate the process, select Migrate in the lower-right corner.
2.5.8.2.2. Migrate Individual Processes
If you have multiple Old Versions of Active processes running, and a current updated version is available, you can migrate definitions to the most current version individually, or as a separate group within one version.
2.5.8.2.2.1. Migrate Each Process Individually
-
In the navigation panel, select the Studio 1 workspace.
-
Expand the Business Process Tools and Settings 2 shortcut group, then select the Processes 3 shortcut.
-
Select the required process from the process registry.
-
In the upper-right menu, select the 1 icon and select the Migrate Processes to New Version 2 option.
Note:The Migrate Processes to New Version option is available only for previous versions of a process definition. This option is not available for the current version.
-
The system will automatically populate the Source field with the current version of the process, and the Target field with the current (latest) version.
-
If needed, configure the conditions and execute the migration as described in section Migrate All Available Processes of One Version, starting from step 3.
2.5.8.2.2.2. Migrate a Group of Processes Within One Version
This method allows you to migrate only processes within one version. For processes from different versions, this feature is not available.
-
In the navigation panel, select the Studio 1 workspace.
-
Expand the Business Process Tools and Settings 2 shortcut group, then select the Processes 3 shortcut.
-
Use the filter to sort processes with the status Running 4, since only those can be migrated.
-
Select the checkboxes next to the processes you want to migrate 5.
-
Select the additional options menu icon in the right corner of the top panel 1. Select Process Migration 2.
-
If needed, configure the conditions and execute the migration as described in section Migrate All Available Processes of One Version, starting from step 3.
2.5.9. Additional Tools for Working with Processes
The platform includes additional tools that can be used to debug business processes, such as:
With these tools, you can effectively administer and monitor business processes, identify and fix errors, and synchronize data.
2.5.9.1. Process and Task Synchronization
The Process and Task Synchronization tool allows you to track the synchronization status of Camunda entities, such as tasks, process definitions, and process instances, and to identify and fix synchronization errors.
Usage example: Imagine you have started a business process, but one of its tasks was not synchronized with the Camunda database due to an error. Using the Process and Task Synchronization tool, you can find this entity in the registry and see the error. After fixing the error, you can restore synchronization.
To check the synchronization status and, in case of errors, restore synchronization, complete the following steps:
-
In the upper-left corner, select the Administration 1 workspace.
-
Select the Maintenance Tools 2 shortcut group, then select the Process and Task Synchronization 3 shortcut.
-
In the table, find the required entity whose synchronization you want to check, then in the Bad ID column you can see the type of error, if any.
-
Fix the specified error in the business process.
-
Select the checkboxes next to the entities 1 whose synchronization you want to restore, then in the toolbar select Mark for Synchronization 2.
After this, the status of the entities will be changed to Pending, meaning that you have added the entities to the list of entities that will be updated during the next synchronization.
-
To initiate synchronization, in the toolbar select Synchronize Now.
2.5.9.2. Process Incidents
This tool allows you to track and analyze errors that occur in running business processes.
The Process Incidents shortcut displays incidents of active processes only. To view incidents of cancelled or completed processes, see section Process Incident Archive.
To view errors in a process, complete the following steps:
-
In the upper-left corner, select the Administration 1 workspace.
-
Select the Maintenance Tools 2 shortcut group, then select the Process Incidents 3 shortcut.
-
Double-click the required error record to open the business process diagram. The stage of the process where the incident occurred will be highlighted in red.
In the bottom menu, you can go to the Incidents tab to find out more details about the incident.
2.5.9.3. Process Incident Archive
This tool allows you to track and analyze errors that occurred in cancelled or completed business processes. To view incidents of active processes, see section Process Incidents.
To view incidents in cancelled or completed processes, complete the following steps:
-
In the upper-left corner, select the Administration 1 workspace.
-
Select the Maintenance Tools 2 shortcut group, then select the Process Incident Archive 3 shortcut.
-
Filter the records to display incidents related to the required process.