Tasks in Processes
This section describes how to create and configure tasks of the main types:
The section also covers modeler settings and Mustache syntax, which are useful when working with tasks.
When working with roles in business processes (for example, when assigning performers, sending notifications, or extracting role members), the system takes into account not only direct members of the document role or position, but also delegated document role members and delegated position members. Delegated members are processed in the same way as regular members.
2.4.4.4. User Task
A user task in the BPMN system is a type of task performed by a user within a business process. A user task typically represents a specific piece of work that needs to be completed using the system. Within user tasks, you can configure task roles, select a form for the user to work with attributes, set up notifications, and define task deadlines.
To create a user task:
-
In the navigation panel, select the Studio workspace, then select the Process Library shortcut.
-
Double-click the business process to which you want to add a user task.
-
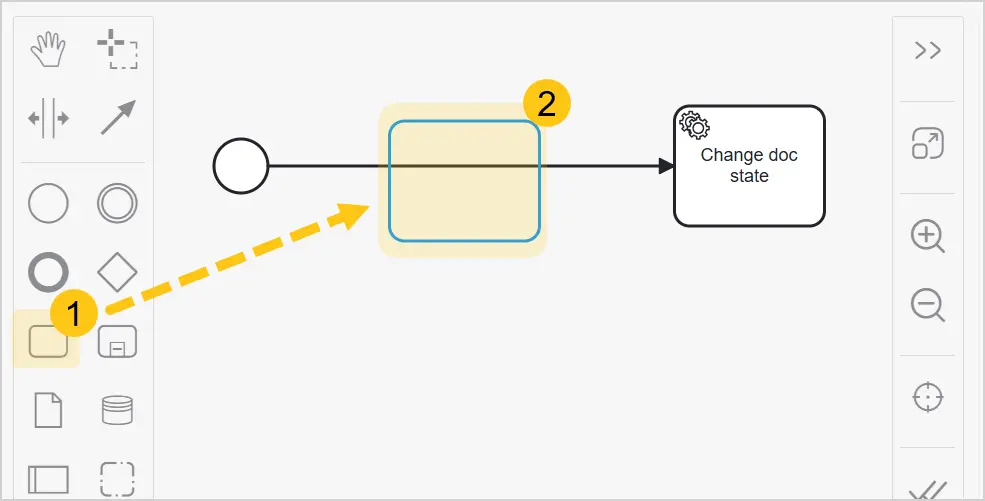
In the toolbar, select the 1 icon, and insert the element at the required location in the process diagram 2.
-
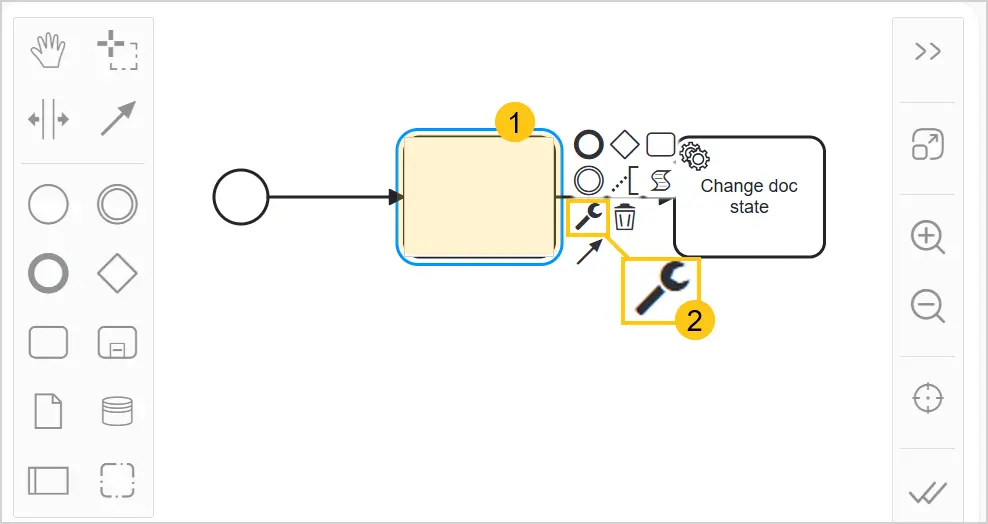
Select the added element 1, then in the context menu select the 2 icon.
-
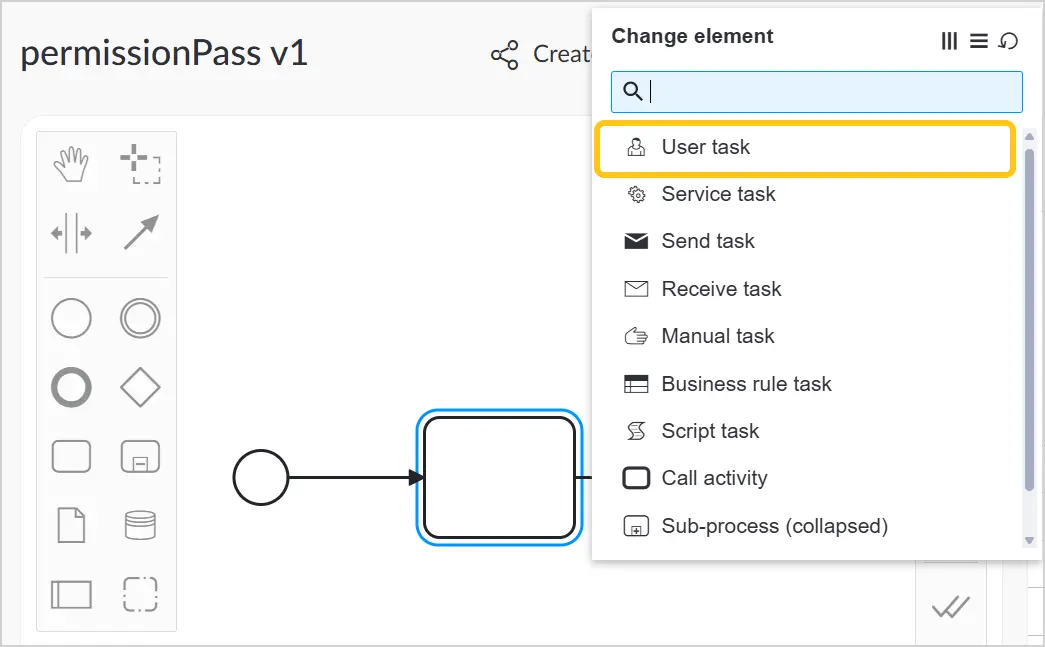
In the context menu, select User Task.
-
Select the added user task.
-
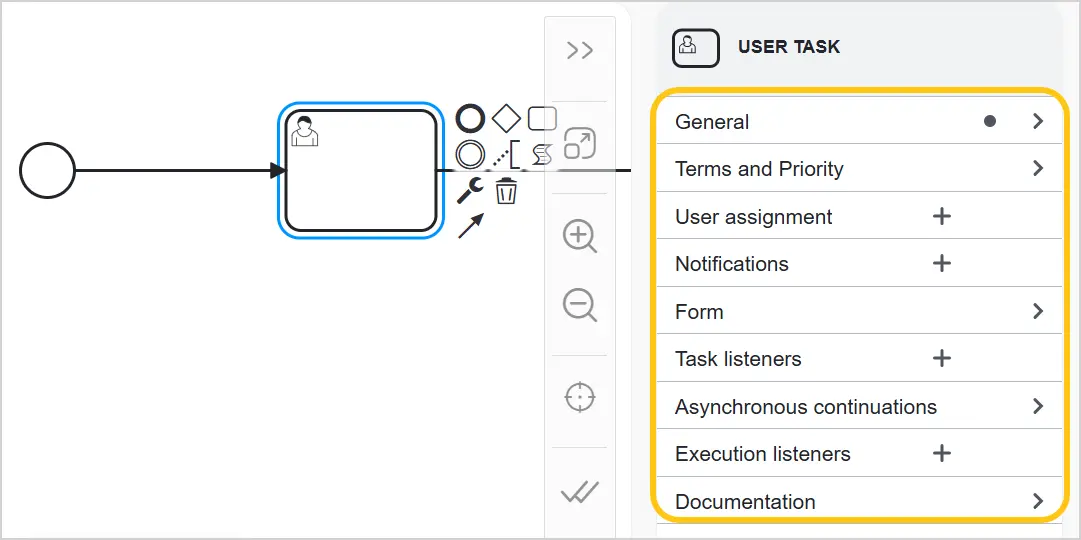
Go to the settings menu and fill in the required information about the user task. Use the hints from the sections below to fill in each tab:
- General
- Terms and Priorities
- User Assignment
- Notifications
- Form
- Task Listeners
- Asynchronous Continuations
- Execution Listeners
- Documentation
-
In the toolbar, select the Save button.
2.4.4.4.1. Working with User Task Settings
Settings in the modeler of business process definitions are grouped into sections that can be expanded and collapsed.
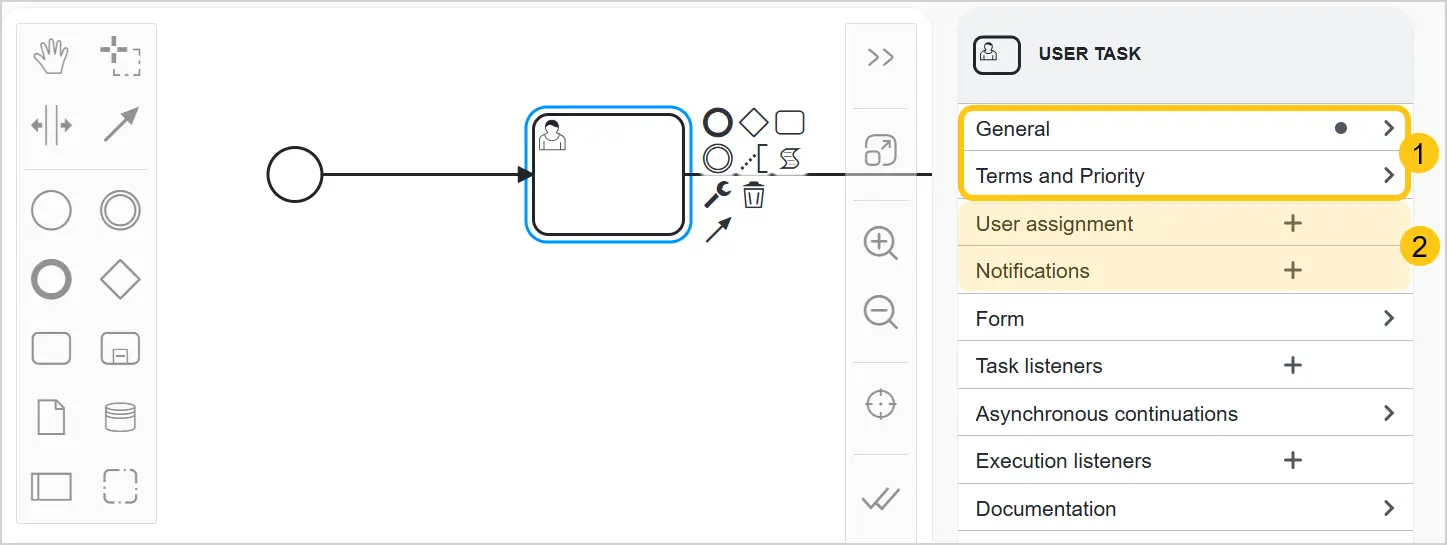
Sections are divided into two types:
-
Without the ability to add additional elements 1.
-
With the ability to add additional elements 2. Such sections have a icon that allows you to add an element. For example, in the User Assignment section, you can add multiple assignments — for instance, assign both a performer and a observer to the task.
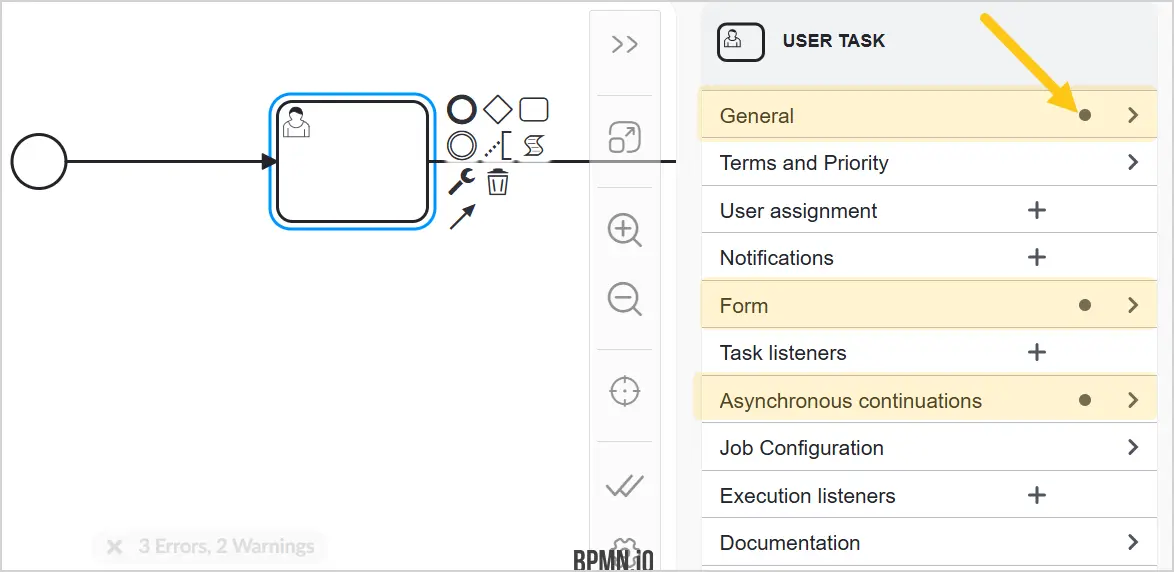
If the icon is displayed in a section header, it means the section contains data.
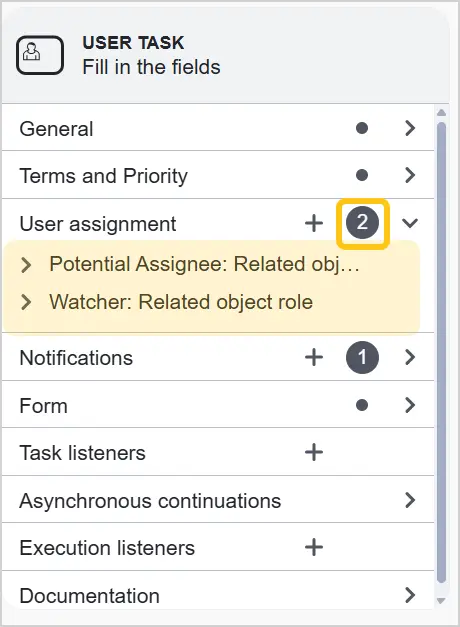
For sections with the ability to add elements, the number of added elements is displayed. In the screenshot below, four user assignments are shown.
2.4.4.4.2. General
Expand the General section and fill in the fields using the hints in the table below.
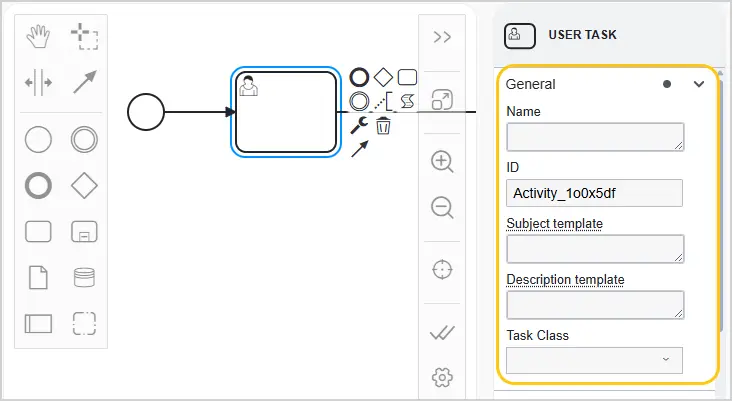
| Field | Description |
|---|---|
| Name | The task name, displayed on the process diagram. |
| Id | A unique task identifier, generated automatically. |
| Subject Template | The title template. The text from this setting will be displayed in the standard task attribute Name on the task form. Supports Mustache syntax, for example: "Complete task by: {{task.dueDate}}" or "Approve order {{formParams.orderNo}}".Syntax for retrieving attributes:
|
| Description Template | The description template. The text from this setting will be displayed in the standard task attribute Description on the task form. Supports Mustache syntax. |
| Task Class | Allows you to select a task class from a dictionary. |
2.4.4.4.3. Terms and Priorities
In the Deadlines and Priority section, you can define the task due date, set a control deadline, and specify the task priority.
Expand the Terms and Priorities section and fill in the fields using the hints in the table below.
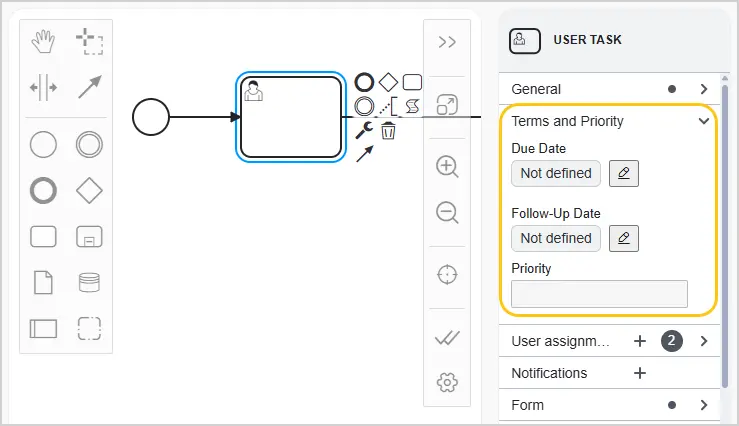
| Field | Description |
|---|---|
| Due Date | Sets the task due date. You can set the current date with an offset (in minutes, hours, days), a date from a process variable, or a date with an offset based on a working hours schedule. |
| Follow-Up Date | Sets the task control deadline. You can set the current date with an offset (in minutes, hours, days), a date from a process variable, or a date with an offset based on a working hours schedule. |
| Priority | Sets the task priority. A numeric value that will be displayed in the standard task attribute Priority. |
2.4.4.4.4. User Assignment
In the User Assignment section, you can specify the task performer, candidate performers, observers, and supervisors.
Expand the User Assignment section and fill in the fields using the hints in the table below.
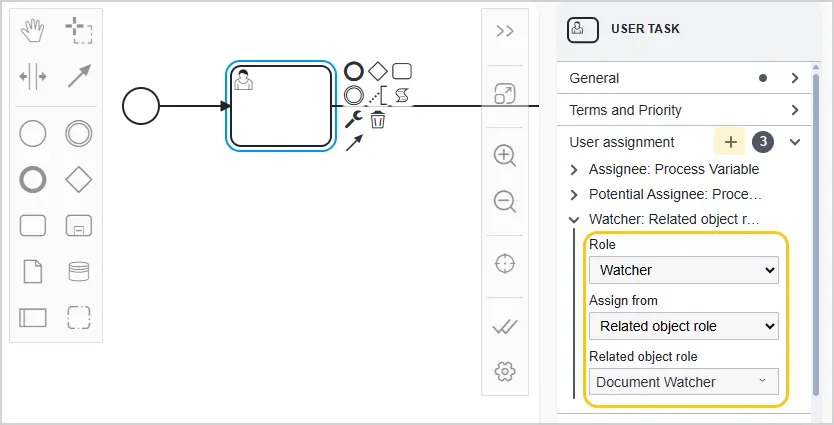
| Field | Description |
|---|---|
| Role | Select the role of the user you want to assign. You can choose one of the following roles:
|
| Assign From | Select the source from which the platform should substitute the user for the given role. Choose one of the following options:
|
2.4.4.4.5. Notifications
The Notifications section in the user task settings allows you to configure automatic notifications sent to task performers or candidate performers in certain situations. This helps ensure that users are notified in a timely manner about important events related to the task.
To configure automatic notifications, expand the Notifications section and fill in the fields using the hints in the table below.
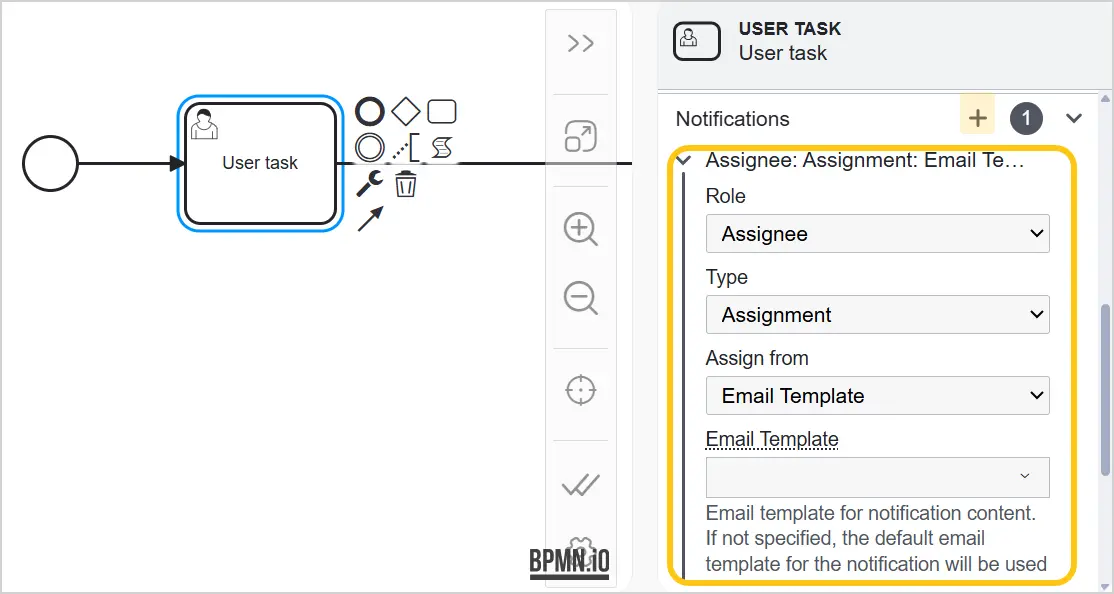
| Field | Description |
|---|---|
| Role | Select the role of the user to send the notification to. Choose one of the following options:
|
| Type | Select the notification type:
|
| Assign From | Select the entity from which you want to generate the email.
|
| Email Template field available only if Email Template is selected in the Assign From field | Select the required email template. ℹ️ Note: You can also create a new email template. To do this, hover over the Email Template field header 1, then in the menu select Create new email template 2. 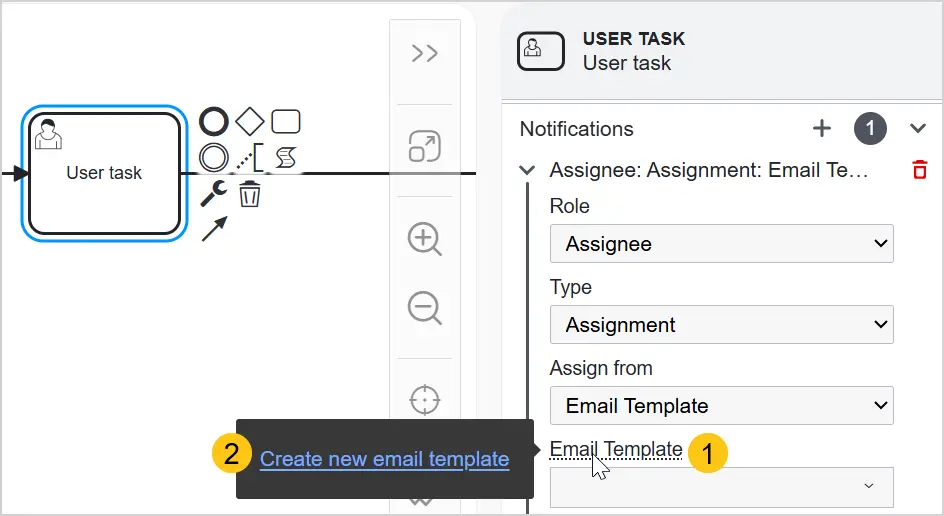 |
| Process Variable field available only if Process Variable is selected in the Assign From field | Enter the required process variable. The variable value must be a string and contain the email template code. |
| Report field available only if Report Template is selected in the Assign From field | The report code used to build the notification text according to its type. Select the report template. If no value is specified, the default report will be used. ℹ️ Note: You can also create a new report. To do this, hover over the Report field header, then in the menu select Create new report. |
| Subject field available only if Report Template is selected in the Assign From field | The notification subject according to its type. If no subject is specified, the default email subject will be used. Supports Mustache syntax, for example: "You have been assigned to approve a document by {{task.dueDate}}". |
2.4.4.4.6. Form
A form is an interface that allows users to interact with a task in the process. It is used to enter, view, and edit data required to complete the task. Forms can be simple or complex, and may include various input fields, buttons, and other interface elements.
There are two ways to add a form to a task:
-
Select the default task form. See details in the table.
-
Select a form from the form dictionary (or create a custom one). See details in the table.
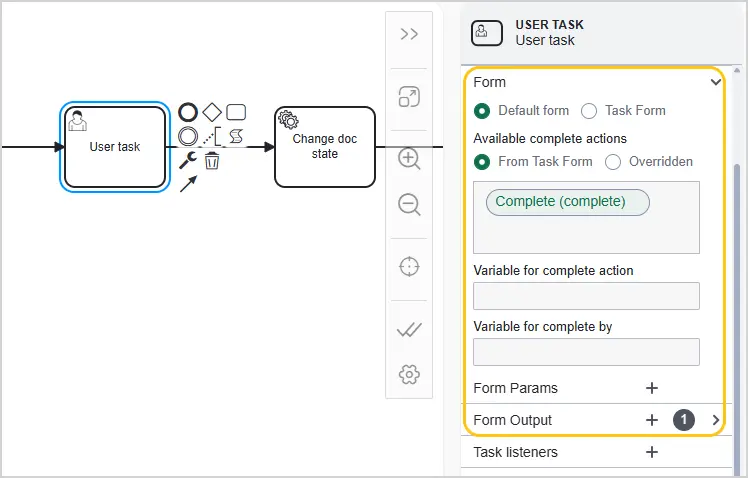
Add default form
| Field | Description |
|---|---|
| Form | Select Default Form — an automatically generated form based on the process variables associated with this task. It does not require additional configuration and is used when no custom form is selected or available. |
| Available Task Actions | Allows you to specify action codes that will be available in the user task. Not used if actions are selected in the task form settings. |
| Variable for Storing Action Code | Allows you to specify the variable code in which the action code executed in the task will be saved. Used, for example, to build operator conditions. |
| Variable for Storing the User Who Completed the Task | Allows you to specify the variable code in which the ID of the user who completed the task will be saved. |
| Form Input Parameters | Allows you to specify form input parameters — form attribute values that will be set when the task is created. |
| Form Output Parameters | Allows you to specify form output parameters — form attribute values that will be set when the task is completed. Example: saving a task comment to a variable: taskComment=$comment |
Add Task Form from Dictionary
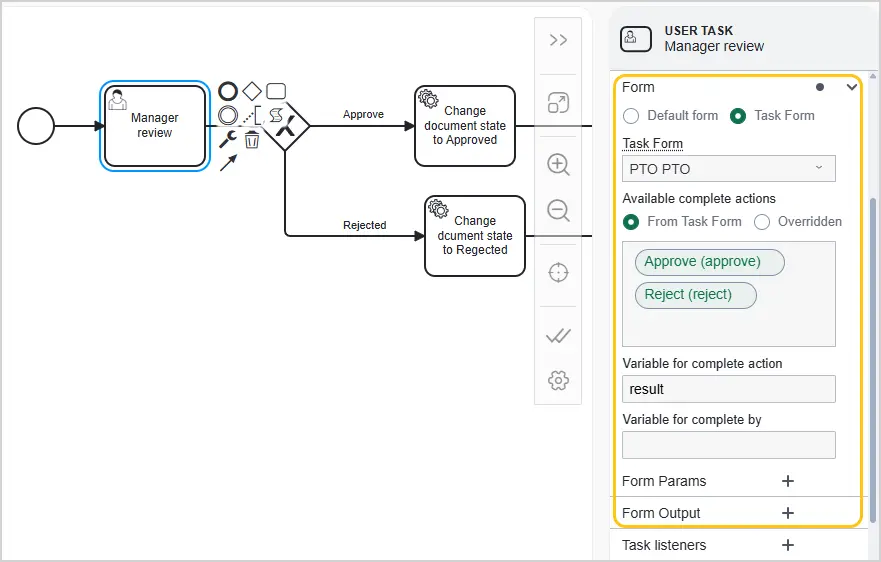
| Field | Description |
|---|---|
| Form | Select Task Form — select a form from the form dictionary. |
| Task Form | In the Task Form field, select the required form from the drop-down list. ℹ️ Note: You can edit an existing task form or create a custom one. To do this, select the Task Form option 1, then hover over the Task Form section header 2. In the window that appears, select the required option 3. 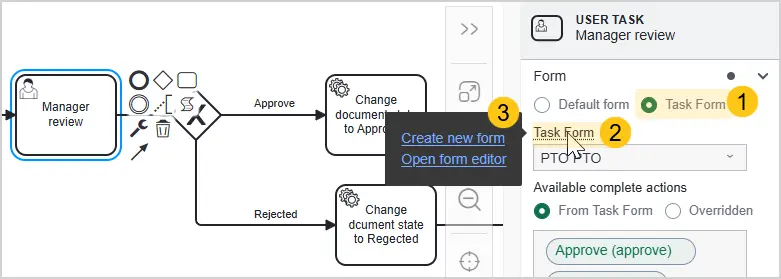 |
| Available Complete Actions | Define which actions users can perform when working with the user task. Choose one of the following options:
|
| Variable for Storing Action Code | Allows you to specify the variable code in which the action code executed in the task will be saved. Used, for example, to build operator conditions. |
| Form Input Parameters | Allows you to specify form input parameters — form attribute values that will be set when the task is created. |
| Form Output Parameters | Allows you to specify form output parameters — form attribute values that will be set when the task is completed. Example: saving a task comment to a variable: taskComment=$comment  |
2.4.4.4.7. Task Listeners
In the Task Listeners section, you can configure listeners that begin executing an action in response to various events. This enables automation and allows additional actions to be performed in response to those events.
Example: Using a listener, you can configure the system so that when a user deletes a task, their manager automatically receives a notification about this action.
To configure user task listeners, expand the Task Listeners section and fill in the fields using the hints in the table below.
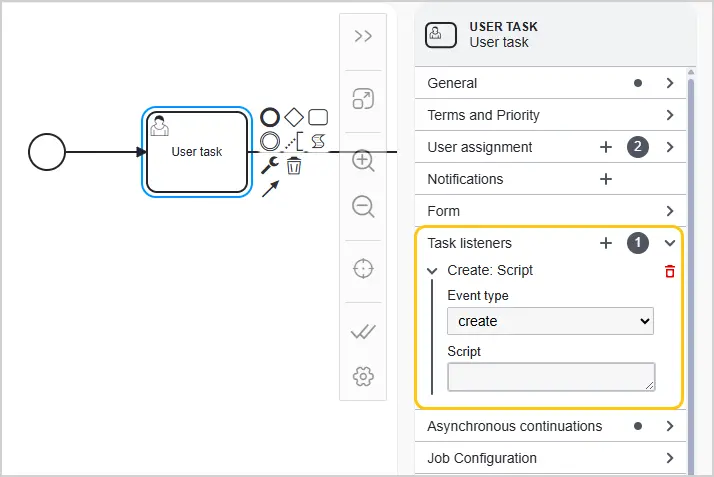
| Field | Description |
|---|---|
| Event Type | This field allows you to select the event for which you want to configure the listener. Available event types include:
|
| Script | Specify a JavaScript script that will be executed in response to the event selected above. The Script is the action that will be performed when the event you chose in the previous step occurs. |
2.4.4.4.8. Asynchronous Continuations
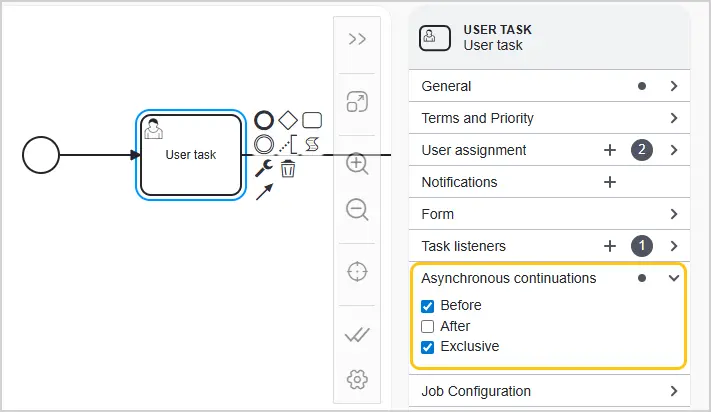
In the Asynchronous Continuations section, you can configure asynchronous execution of user tasks. "Asynchronous" means that a task can be executed in the background without waiting for it to finish before continuing with other tasks or processes.
To configure asynchronous task execution, expand the Asynchronous Continuations section and fill in the fields using the hints in the table below.
| Option | Description |
|---|---|
| Before | The task will be deferred and will not be executed immediately after the previous step completes. It will be queued for execution separately from the main process flow. This allows other actions to continue without waiting for this task to finish. Example: You have a task that requires additional preparation before it starts. Using the Before option ensures this task is executed independently of the main flow. |
| After | The process will continue immediately after this task is handed off for execution. The task will be executed independently of the main process, allowing it to continue without delays. Example: The task involves large volumes of data to be processed. Using the After option ensures that the main process continues without waiting for this data to be processed. |
| Exclusive | Only one task or operation is executed at a given moment within a specific context. This is important for avoiding conflicts or ensuring that actions are performed sequentially. Example: If you have operations that may conflict with each other or must be executed in sequence, this option ensures they are performed one at a time. |
2.4.4.4.9. Job Configuration
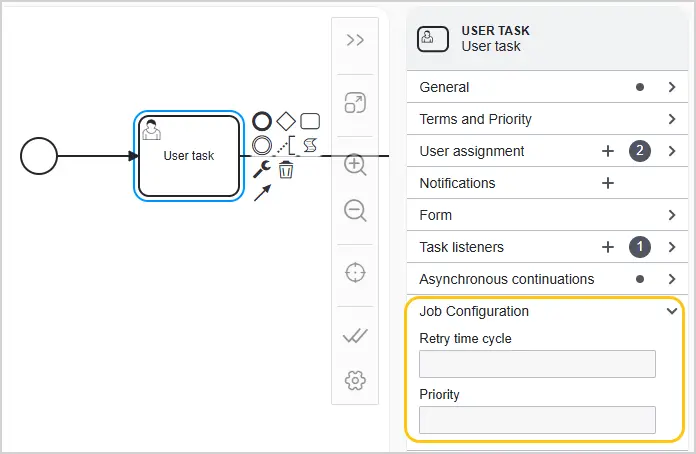
In the Job Configuration section, you can configure the behavior of user tasks, which helps control their execution and prioritization.
To configure job settings, expand the Job Configuration section and fill in the fields using the hints in the table below.
| Option | Description |
|---|---|
| Retry Time Cycle | This field allows you to specify how often the system should retry executing the task in case of failure or error. Specify the interval after which the task will be retried — for example, every 5 minutes, every hour, etc. Enter a numeric value in Temporal.Duration format. Example: If a task may fail due to temporary issues (for example, network problems), you can specify a retry time cycle so the system automatically retries at set intervals. |
| Priority | This field defines the execution priority of the task in the platform. Tasks with a higher priority are executed before tasks with a lower priority. Priority can be set as a numeric value, where lower numbers represent higher priority. |
2.4.4.4.10. Execution Listeners
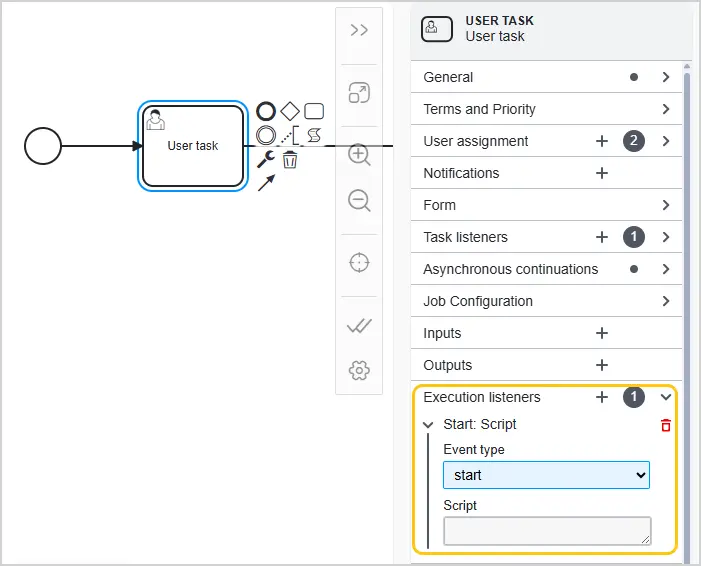
The Execution Listeners section allows you to configure custom actions that will be executed when the task starts or completes.
To configure execution listeners, expand the Execution Listeners section and fill in the fields using the hints in the table below.
| Field | Description |
|---|---|
| Event Type | This field allows you to select the type of event upon which the specified script will be executed. Available options include:
|
| Script | Specify a JavaScript script that will be executed in response to the event selected above. The Script is the action that will be performed when the event you chose in the previous step occurs (task start or task completion). |
2.4.4.4.11. Documentation
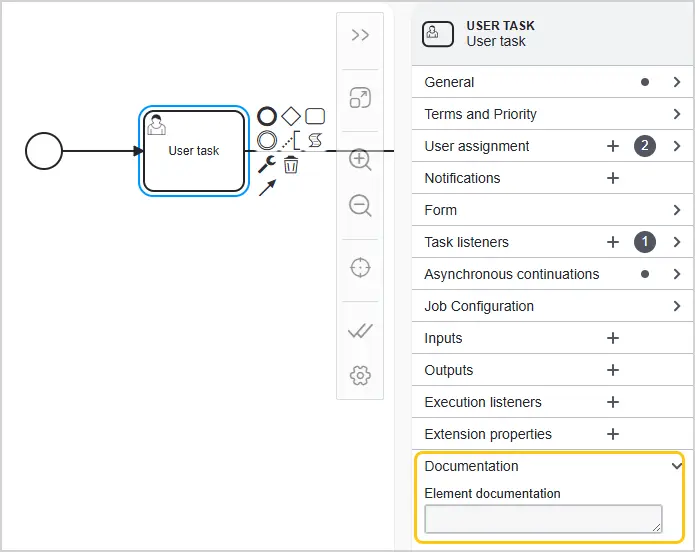
The Element Documentation field in the Documentation section is used to enter text information that may include descriptions, instructions, notes, or links related to the task. This helps ensure understanding and correct task execution.
Expand the Documentation section, then in the Element Documentation field, enter the required description or notes for the task.
2.4.4.5. Service Task
Service tasks allow you to integrate processes with external systems, call web services, update data, or perform any other automated operations required for business process execution.
There are two ways to create a service task:
-
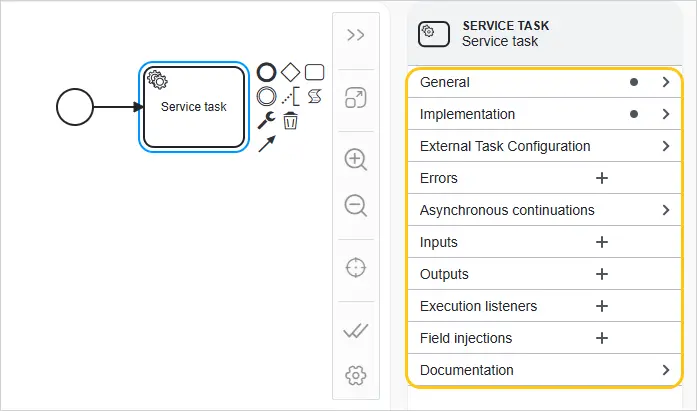
Create a task manually by filling in all standard configuration sections. This approach is rarely used because the most common settings can be selected from templates.
-
Create a task based on a template. In this case, the fields to fill in will differ depending on the selected template.
To create a service task based on a template:
-
In the navigation panel, select the Studio workspace, then select the Process Library shortcut.
-
Double-click the business process to which you want to add a service task.
-
In the toolbar, select the 1 icon, and insert the element at the required location in the process diagram 2.

-
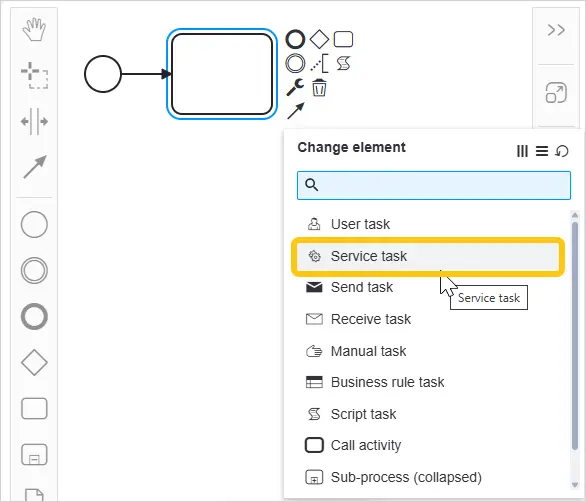
Select the added element 1, then in the context menu select the 2 icon.

-
In the context menu, select Service Task.
-
Select the added service task.
-
Go to the settings menu and expand the General section.
-
In the Name field, enter the desired task name, for example, Update Date.
-
In the ID field, enter the task code, which must be unique and not duplicate any other task IDs.
-
Expand the Implementation tab.
-
In the Template field, select the required template:
- Call Entity Method — performs data operations such as updating attributes, retrieving information, and other actions without manual intervention. (See definitions of Entity and Method).
- Call External API Method — integrates business processes with external systems and services.
- Call Server Module — calls specific methods on the server that perform certain operations, such as data processing, database interactions, or other server-side functions.
- Execute Document Action — used to automatically execute actions on documents within a business process.
- Select Entity Attributes — used to retrieve attribute values from a specific entity and save them to a business process variable.
- Extract Role Members — allows you to retrieve members of a specific document role and save them to a business process variable.
- Send Email — automates the process of sending email messages in your business processes.
- Update Entity — passes entity attribute values (documents, tasks, etc.) to business process variable values. (See definition of Entity).
The fields to fill in will differ depending on the selected template. To learn how to fill in the fields for each template, go to the relevant template section using the links in the list above.
2.4.4.5.1. Call Entity Method
The Call Entity Method template activates entity methods, enabling various data operations such as updating attributes, retrieving information, and other actions without manual intervention.
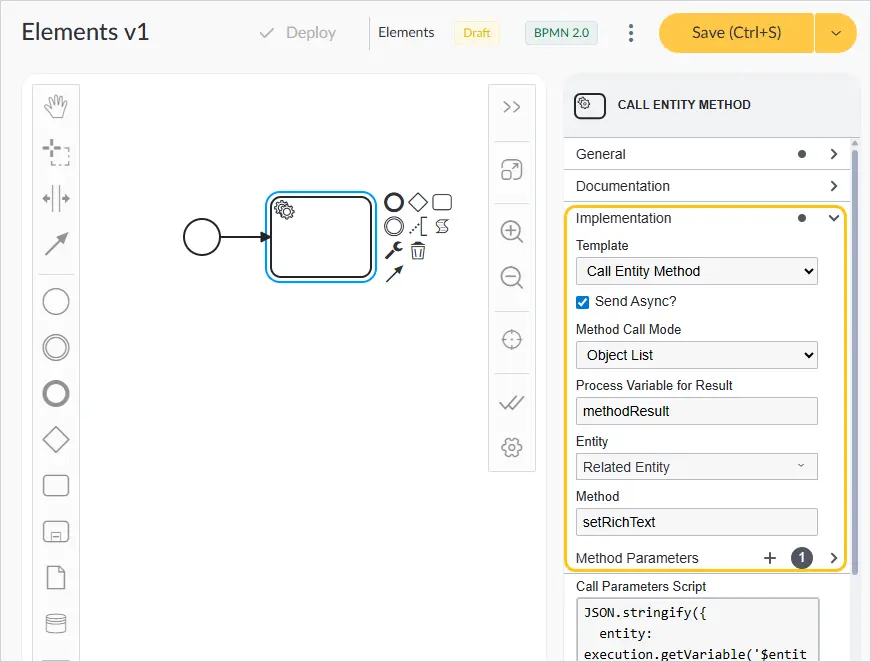
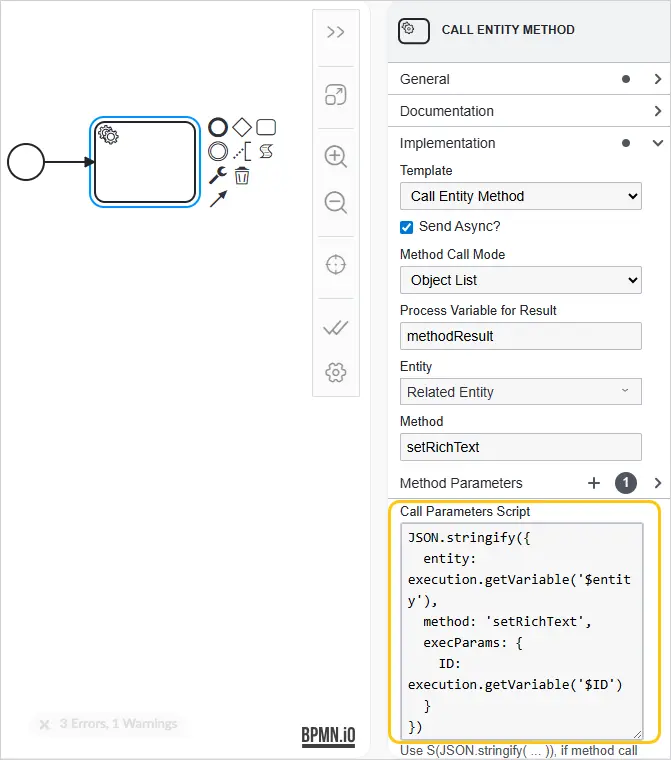
Example: You can call the setRichText method of the dfx_Document entity to set a value in a Rich Text attribute on the document form. This way, the template automatically passes data from the dfx_Document document to the Rich Text attribute on the document form.
To call an entity method:
-
In the navigation panel, select the Studio 1 workspace.
-
Select the Process Library 2 shortcut.
-
In the toolbar, select + 3 to create a new process definition, or select an existing definition.
-
Add a service task to the form: in the toolbar, select the icon and drag it onto the process form. (See the Service Task section).
-
Expand the Implementation section, then in the Template field select Call Entity Method.
-
Fill in the template parameters using the hints in the table below.
| Field | Description |
|---|---|
| Send Async? | Asynchronous sending allows the process to continue executing subsequent tasks without waiting for the entity method call to complete. |
| Method Call Mode | Select one of the following options:
|
| Process Variable for Result | If needed, specify the name of the process variable in which the method call result will be stored. |
| Entity | Select the required entity from the list, or if your process contains a related entity, you can select the Related Entity option (see the Add Related Entity section). Most commonly used entities:
|
| Method | Select a method from the drop-down list. The list will display methods available for each individual entity. Descriptions of the most popular methods can be found in the following tables: |
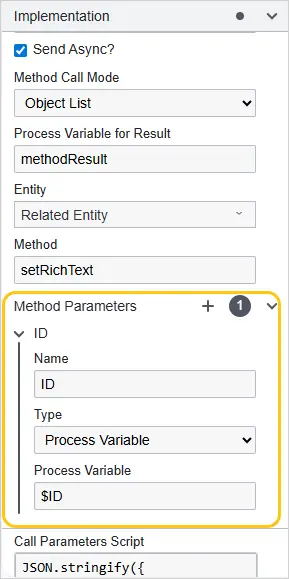
| Method Parameters | 1. Select + to add a new parameter. 2. Add the method parameters, specifying them according to what you defined when configuring methods during external API creation:
 |
After filling in the fields listed in the table, the Call Parameters Script field will be populated automatically.
You can also set the template value manually. To do this, paste the required script into the Call Parameters Script field — for example, by copying it from another process.
dfx_Document Entity Methods
| Method and Description | Method Parameters | Example |
|---|---|---|
| Method: addParticipant Description: Add a document role member | execParams: {ID: $ID,role: 'rolecode',subjectID: ID,unitID: ID}ID — document ID, role — role code, subjectID — org unit ID, value in INT format unitID — administration subject ID, value in INT format | JSON.stringify({entity: 'dfx_Document',method: 'addParticipant',execParams: {ID: $ID,role: 'watcher',subjectID: JSON.parse(execution.getVariable("code")),unitID: JSON.parse(execution.getVariable("code"))}}) |
| Method: removeParticipant Description: Remove a member from a document role | execParams: {ID: $ID,subjectID: ID,role: 'rolecode'}ID — document ID, role — role code, subjectID — org unit ID, value in INT format | JSON.stringify({entity: 'dfx_Document',method: 'removeParticipant',execParams: {ID: $ID,role: 'watcher',subjectID: JSON.parse(execution.getVariable("atr")),}}) |
| Method: update Description: Update a document — set attribute values | execParams: {ID: $ID,subject: "DocSubject",attrValues : JSON.stringify({"ms01": "mytext","ms02": 342})},ID — document ID; subject — code of the standard attribute Short Description ms01 — code of a custom attribute of type Text to set the value ms02 — code of a custom attribute of type Number to set the value | JSON.stringify({entity: 'dfx_Document',method: 'update',execParams: {ID: $ID,subject: "DocSubject",attrValues : JSON.stringify({"ms01": execution.getVariable("Text"),"ms02": 342})},__skipOptimisticLock: true}) |
| Method: execAction Description: Execute a document type action | execParams: {ID: $ID,actionCode: 'code'},ID — document ID actionCode — document type action code | JSON.stringify({entity: 'dfx_Document',method: 'execAction',execParams: {ID: $ID,actionCode: 'approve'},__skipOptimisticLock: true}) |
| Method: setRichText Description: Set the value of a Rich Text attribute | execParams: {documentID: $ID,attrCode: 'richText',documentItemID: ID,value: Text'},ID — document ID attrCode — code of the rich text attribute documentItemID — ID of the table attribute record, if the rich text is in a table value — the value to set. String format only | JSON.stringify({entity: 'dfx_Document',method: 'setRichText',execParams: {documentID:$ID,attrCode: 'ms19',documentItemID: execution.getVariable("ItemID"),value: execution.getVariable("rich").toString()}}) |
| Method: selectRichText Description: Get the value of a Rich Text attribute | execParams: {documentID: $ID,attrCode: 'richText',documentItemID: ID,},ID — document ID attrCode — code of the rich text attribute documentItemID — ID of the table attribute record, if the rich text is in a table | JSON.stringify({entity: 'dfx_Document',method: 'selectRichText',execParams: {documentID: $ID,documentItemID: parseInt(execution.getVariable("table")),attrCode: 'ms19'}}) |
| Method: select Description: Get document attribute values | fieldList: ['attrValues.ms01'],whereList: {c01: {expression: '[ID]',condition: 'equal',value: $ID}},fieldList — list of fields whose values will be retrieved, whereList — selection conditions | JSON.stringify({entity: 'dfx_Document',method: 'select',fieldList: ['attrValues.ms01'],whereList: {c01: {expression: '[ID]',condition: 'equal',value: $ID}}}) |
bpm_ExtTaskService Entity Methods
| Method and Description | Method Parameters | Example |
|---|---|---|
| Method: getEmails Description: Get email addresses | execParams: {type: ID or ub:id:}type — object type, available options:
| JSON.stringify({entity: 'bpm_ExtTaskService',method: "getEmails",execParams: {employeesOnStaff: JSON.parse(${user}.toString())}}) |
| Method: callServerModule Description: Call a server module from the library | execParams: {code: 'documentUtils',method: 'deleteDocumentLinks',params: {docID: $ID}},code — server module code from the library method — function code inside the module params — parameters accepted by the method | JSON.stringify({entity: 'bpm_ExtTaskService',method: 'callServerModule',execParams: {code: 'documentUtils',method: 'deleteDocumentLinks',params: {docID: $ID}}}) |
dfx_Document_ppt Entity Methods
| Method and Description | Parameters | Example |
|---|---|---|
| Method: select Description: Get document role members | fieldList: ['subjectID'],whereList: {c01: {expression: '[role]',condition: 'equal',value: 'watcher'},c02: {expression: '[objectID]',condition: 'equal',value: execution.getVariable("ms03")}},fieldList — list of fields whose values will be retrieved, whereList — selection conditions | JSON.stringify({entity: 'dfx_Document_ppt',method: 'select',fieldList: ['subjectID'],whereList: {c01: {expression: '[role]',condition: 'equal',value: 'watcher'},c02: {expression: '[objectID]',condition: 'equal',value: execution.getVariable("ms03")}}}) |
2.4.4.5.2. Call External API Method
The Call External API Method template allows you to integrate business processes with external systems and services. Using this template, you can configure calls to API methods of external services directly from a business process, pass parameters, and receive the results of those calls.
Example: You need to retrieve the current exchange rate from the National Bank of Ukraine (NBU) service and then save it to a business process for further use. To do this:
- Create an external API. (See the External APIs section).
- In the settings of the created API, go to the Methods tab.
- Select Add Method, then in the created method parameters specify the "currency code" and "date" parameters.
- In the business process, create a service task based on the Call External API Method template.
- In the task settings, in the Implementation section, in the Method and Method Parameters fields, specify the same values as in the created external API.
Using the API call, you will be able to retrieve the current exchange rate. You can then automatically display the exchange rate in the required document using attributes on the document form.
To call an external API method:
-
Create a service task (see the Service Task section).
-
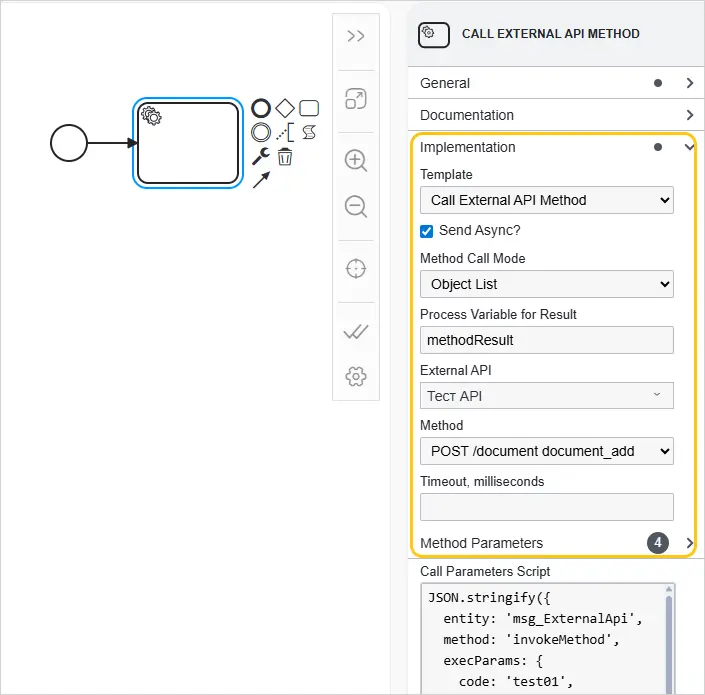
Expand the Implementation section, then in the Template field select Call External API Method.
-
Fill in the template parameters using the hints in the table below.
| Field | Description |
|---|---|
| Send Asynchronously | Asynchronous sending allows the process to continue executing subsequent tasks without waiting for the API call to complete. |
| Method Invocation Mode | Select one of the following options:
|
| Variable for Method Result | If needed, specify the name of the process variable in which the method call result will be stored. |
| External API | Select the required external API from the drop-down list. This can be a previously configured API you want to call. (See the External APIs section.) |
| Server | Select the server configured for the selected external API. This determines which server the call will be made from. |
| Method | Select the method configured in the selected external API. This determines the specific operation to be performed during the call. |
| Method Parameters | The parameters of the method configured in the external API method will be displayed. For each parameter, specify:
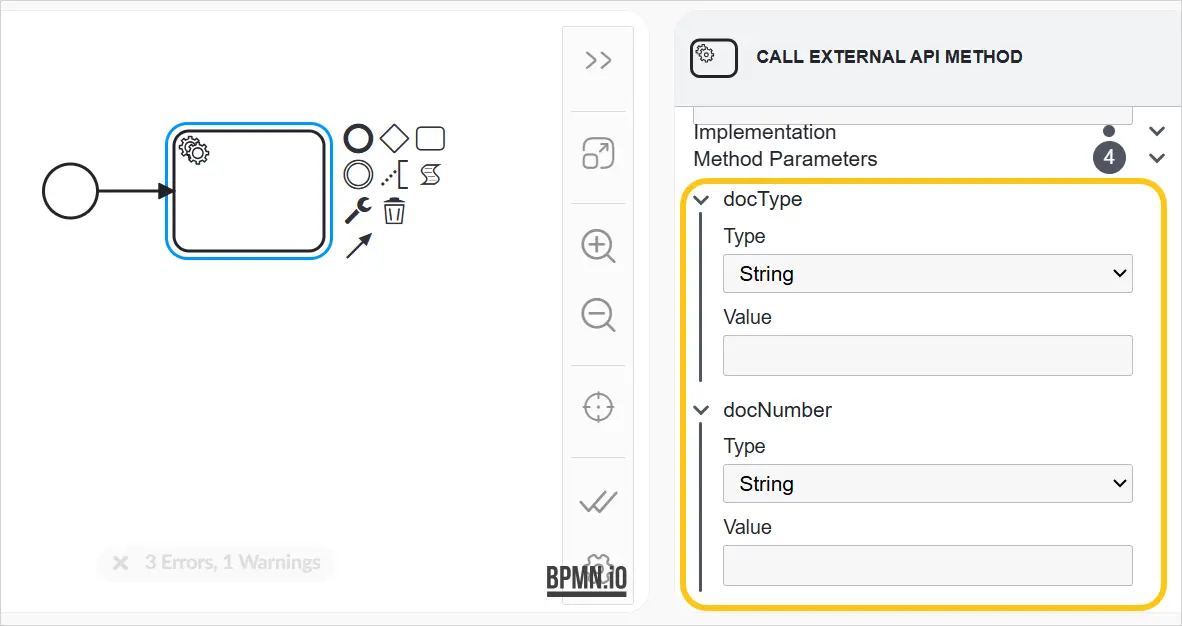 This allows you to pass the required data to the API request. |
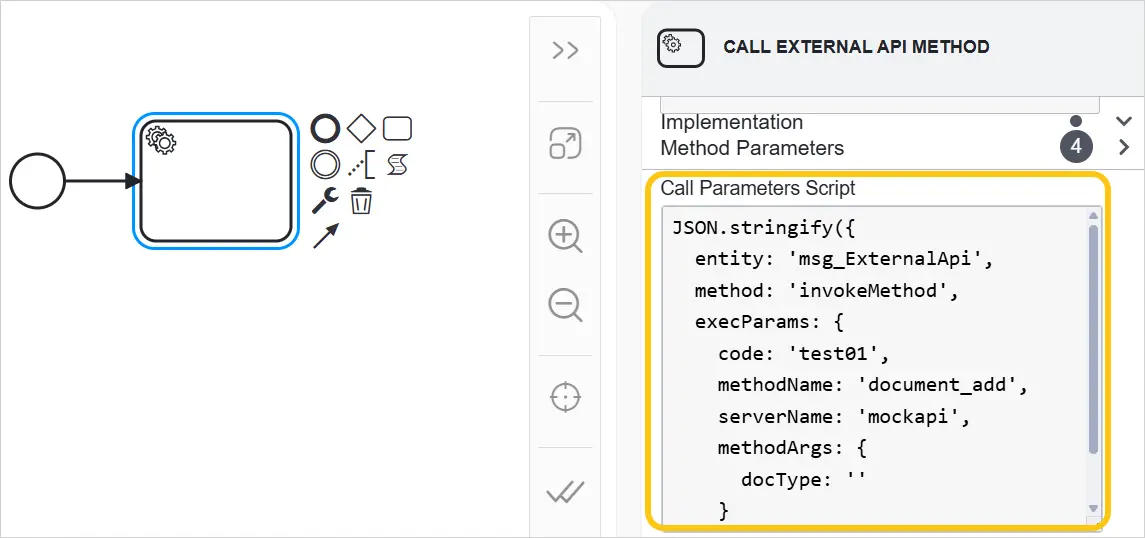
After filling in the fields listed in the table, the Call Parameters Script field will be populated automatically.
You can also set the template value manually. To do this, paste the required script into the Call Parameters Script field — for example, by copying it from another process.
2.4.4.5.3. Call Server Module
The Call Server Module template is used to interact with server modules located in the server module library. It allows you to call specific methods on the server that perform certain operations, such as data processing, database interactions, or other server-side functions.
Example: You want to call a server module to update user data in an internal system.
-
Create a service task (see the Service Task section).
-
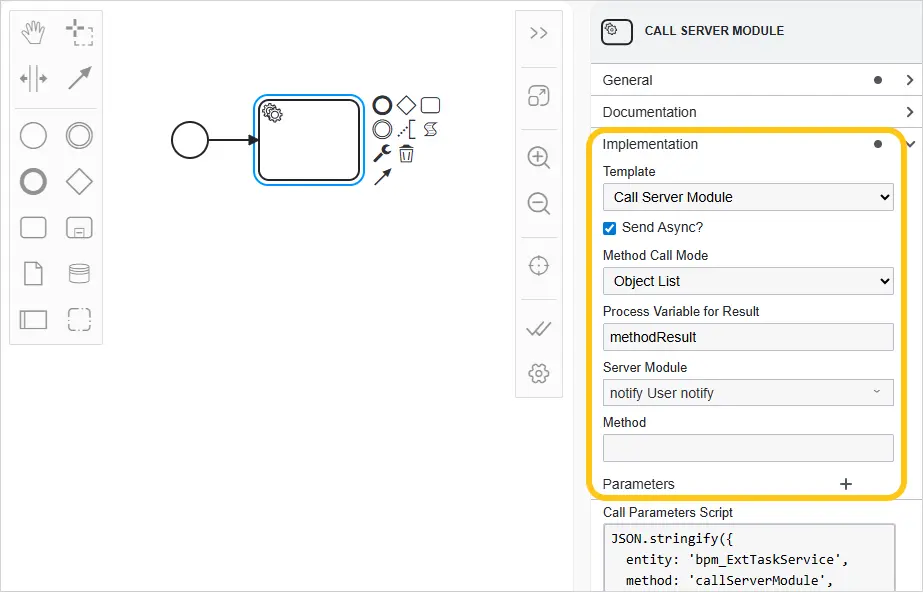
Expand the Implementation section, then in the Template field select Call Server Module.
-
Fill in the template parameters using the hints in the table below.
| Field | Description |
|---|---|
| Send Async? | Asynchronous sending allows the process to continue executing subsequent tasks without waiting for the server module call to complete. |
| Method Call Mode | Select one of the following options:
|
| Variable for Method Result | If needed, specify the name of the process variable in which the method call result will be stored. |
| Server Module | Select a server module from the drop-down list. The list will display all server modules from the server module library. A server module contains a set of methods that can be called. |
| Method | Methods can perform various server-side operations such as storing data, processing information, etc. Specify the method code to call from the selected server module. To find the method code, go to the server module library and open the server module you added in the previous step. In the script field, you will find the method name on the second line. 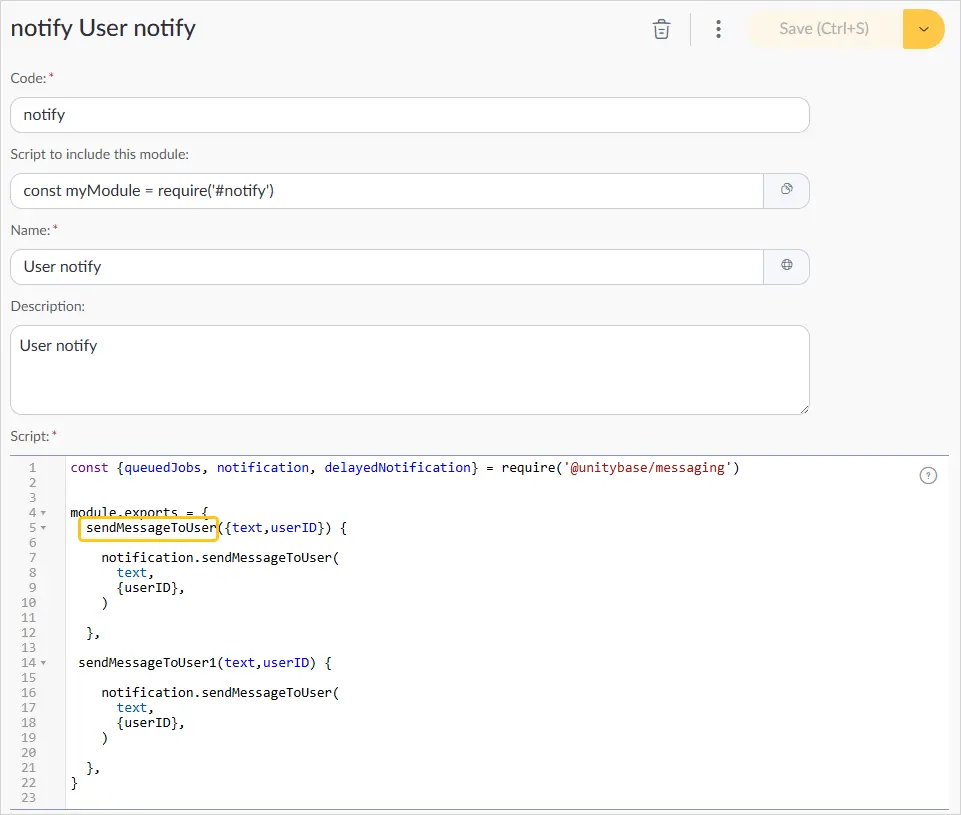 |
| Parameters | Add the parameters expected by the server module method. For each parameter, specify:
 |
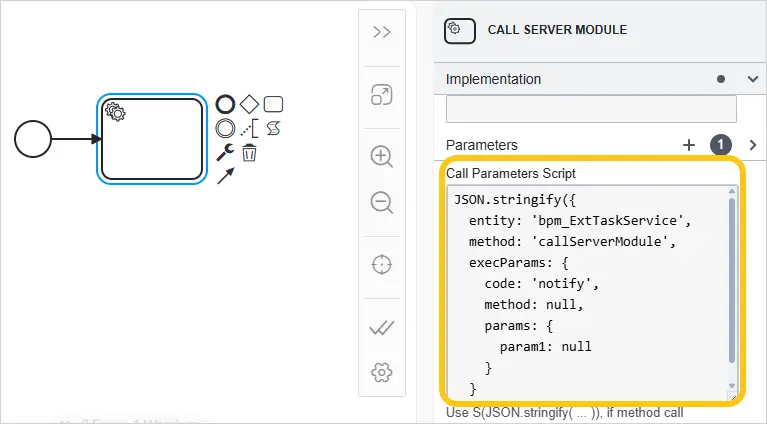
After filling in the fields listed in the table, the Call Parameters Script field will be populated automatically.
You can also set the template value manually. To do this, paste the required script into the Call Parameters Script field — for example, by copying it from another process.
2.4.4.5.4. Execute Document Action
The Execute Document Action template is used to automatically execute actions on documents within a business process. This can include actions such as approval, rejection, status updates, or other actions defined for documents in the platform.
To create a service task based on the Execute Document Action template:
- Create a service task (see the Service Task section).
- Expand the Implementation section, then in the Template field select Execute Document Action.
- Fill in the template parameters using the hints in the table below.
| Field | Description |
|---|---|
| Send Asynchronously | Asynchronous sending allows the process to continue executing subsequent tasks without waiting for the document action to complete. |
| Document Action | Specify the document action code. Actions may differ depending on the document type and its status. If the document is linked to another entity, the action can be selected from a drop-down list. The list will display available actions from all linked document types. If action names differ across document types, the drop-down list will display the code and names separated by "/". If the required document action is not in the list, create it and add it to the document type linked to the business process (see the Statuses section). |
After filling in the fields listed in the table, the Call Parameters Script field will be populated automatically.
You can also set the template value manually. To do this, paste the required script into the Call Parameters Script field — for example, by copying it from another process.
2.4.4.5.5. Select Entity Attributes
The Extract Entity Attributes template is used to retrieve attribute values from a specific entity and save them to a business process variable. This allows you to automate the retrieval and use of entity data in business processes.
Example: Using this template, you can automatically extract document attribute values (for example, Document Author and Title) and save them to process variables for further use.
To create a service task based on the Select Entity Attributes template:
- Create a service task (see the Service Task section).
- Expand the Implementation section, then in the Template field select Select Entity Attributes.
- Fill in the template parameters using the hints in the table below.
| Field | Description |
|---|---|
| Send Asynchronously | Asynchronous sending allows the process to continue executing subsequent tasks without waiting for the entity attribute extraction to complete. |
| Method Invocation Mode | Select one of the following options:
|
| Variable for Method Result | If needed, specify the name of the process variable in which the method call result will be stored. |
| Entity | Select the required entity from the list, or if your process contains a related entity, you can select the Related Entity option (see the Add Related Entity section). |
| Entity Attributes | Select entity attributes from the drop-down list. If this field is left empty, no entity attributes will be updated. |
| Custom Attributes | Available only for entities that have custom attributes, such as:
|
| Custom Attributes | Available only for entities that have custom attributes, such as:
|
| Custom Attributes | Available only for entities that have custom attributes, such as:
|
After filling in the fields listed in the table, the Call Parameters Script field will be populated automatically.
You can also set the template value manually. To do this, paste the required script into the Call Parameters Script field — for example, by copying it from another process.
2.4.4.5.6. Extract Role Members
This template allows you to retrieve members of a specific document role and save them to a business process variable. This is useful for automating workflows where specific roles are needed for subsequent actions.
To create a service task based on the Extract Role Members template:
-
Create a service task (see the Service Task section).
-
Expand the Implementation section, then in the Template field select Extract Role Members.
-
Fill in the template parameters using the hints in the table below.
| Field | Description |
|---|---|
| Send Asynchronously | Asynchronous sending allows the process to continue executing subsequent tasks without waiting for the role member extraction to complete. |
| Method Invocation Mode | Select one of the following options:
|
| Variable for Method Result | If needed, specify the name of the process variable in which the method call result will be stored. |
| Role | Select a role from the drop-down list. If a related entity is present, the drop-down list will display only the roles available in the linked document types. To learn about standard role values or create a custom role, see the Roles section. ℹ️ Note: The system returns not only direct document role members but also delegated members. |
After filling in the fields listed in the table, the Call Parameters Script field will be populated automatically.
You can also set the template value manually. To do this, paste the required script into the Call Parameters Script field — for example, by copying it from another process.
2.4.4.5.7. Send Email
The Send Email template allows you to automate sending emails within a business process — for example, after a document has been approved or a task has been completed.
Before using the Send Email template, ensure that you have configured an email template or a report template to be used for generating the email content.
To create a service task based on the Send Email template:
-
Select or add a service task to the form 1.
-
In the task settings, expand the Implementation tab 2.
-
In the Template field, select Send Email 3.
-
Fill in the template parameters using the hints in the table below.
| Field | Description |
|---|---|
| Type | Select one of the following message types:
|
| Email Template available only for the Email Template type | Select the required email template. |
| Subject available only for the Report Template type | Enter the email subject. ℹ️ Note: You can additionally format the subject text using Mustache syntax. |
| Report available only for the Report Template type | Select a report template from the drop-down list. Reports are used as email templates. You can choose one of the standard reports or create your own — see the Report Templates section. ℹ️ Note: For convenience, you can create a new report template or edit an existing one directly in the template settings. To do this, hover over the Report field name 1, then select the required option from the menu 2. |
-
Expand the To section 1 to configure the email recipients.
-
Expand the Email Address section 2.
-
In the Type field, select the recipient type:
- Email Address — specify a specific recipient email address.
- Process Variable — select a process variable that contains the recipient's email address, the organizational unit code (for example, a position), or a record ID (the number displayed at the end of a link).
- Reference — select the reference from which you want to choose an organizational unit or a specific user. Available references: User, Position, Executor Group, Department, Our Organization, Organization Employee.
- Related Object Role — select the role of the related document whose members will be the email recipients.
- Related Object Attribute — select a standard attribute of the related document that contains the recipient's email address or organizational unit code (for example, a position).
- Custom Attribute of Related Object — select a custom attribute of the related document that contains the recipient's email address or organizational unit code (for example, a position).
Note:The Related Object Role, Related Object Attribute, and Custom Attribute of Related Object types are only available if your process contains a related entity (see the Add Related Entity section).
-
Depending on the selected type, fill in the corresponding fields:
- Email Address
- Process Variable
- Reference
- Related Object Role
- Related Object Attribute
- Custom Attribute of Related Object
-
In the Email Address field, enter the specific email address of the email recipient. For example, example@example.com.
-
In the Process Variable field 1, enter the process variable that contains the recipient's email address, organizational unit code (for example, a position), or record ID (the number displayed at the end of a link).
-
In the Value Type field 2, select one of the following options:
- Email Address — if the process variable contains a specific email address.
- Org Unit — if the process variable contains an organizational unit code, for example, a position. The system will automatically retrieve all users holding those positions and send them the email.
Note:-
If the variable contains an organization or department code, the system will not retrieve the emails of all users belonging to them. Instead, it will use the contact email address specified when the organization or department was created. For example, if a process variable contains the code for the Accounting department, the system will send the email to the contact email address of that department, not to all users belonging to it.
-
If the variable contains a position code, the system will retrieve the email of the primary user holding that position, as well as the email addresses of all delegated users of that position, and send the email to all of them.
-
If the variable contains an executor group code, the system will retrieve the email addresses of all users belonging to that group and send the email to all of them.
-
In the Reference field 1, select the required reference. Available references: User, Position, Executor Group, Department, Our Organization, Organization Employee.
-
In the Value(s) field 2, select a value from the list. For example, if you selected Position in the Reference field, you can select a specific position in the Value(s) field, such as "Chief Accountant". You can select one or more values by checking the box next to the required value or values.
Note:-
If the value contains an organization or department, the system will not retrieve the emails of all users belonging to them. Instead, it will use the contact email address specified when the organization or department was created. For example, if the value contains the Accounting department, the system will send the email to the contact email address of that department, not to all users belonging to it.
-
If the value contains a position code, the system will retrieve the email of the primary user holding that position, as well as the email addresses of all delegated users of that position, and send the email to all of them.
-
If the value contains an executor group code, the system will retrieve the email addresses of all users belonging to that group and send the email to all of them.
-
In the Role field, select from the list the role of the related document whose members will be the email recipients.
-
In the Related Object Attribute field, select from the list the standard attribute of the related document that contains the recipient's email address or organizational unit code (for example, a position).
Note:-
If the attribute contains an organization or department code, the system will not retrieve the emails of all users belonging to them. Instead, it will use the contact email address specified when the organization or department was created. For example, if an attribute contains the code for the Accounting department, the system will send the email to the contact email address of that department, not to all users belonging to it.
-
If the attribute contains a position code, the system will retrieve the email of the primary user holding that position, as well as the email addresses of all delegated users of that position, and send the email to all of them.
-
If the attribute contains an executor group code, the system will retrieve the email addresses of all users belonging to that group and send the email to all of them.
-
In the Custom Attribute of Related Object field, select from the list the custom attribute of the related document that contains the recipient's email address or organizational unit code (for example, a position).
Note:-
If the attribute contains an organization or department code, the system will not retrieve the emails of all users belonging to them. Instead, it will use the contact email address specified when the organization or department was created. For example, if an attribute contains the code for the Accounting department, the system will send the email to the contact email address of that department, not to all users belonging to it.
-
If the attribute contains a position code, the system will retrieve the email of the primary user holding that position, as well as the email addresses of all delegated users of that position, and send the email to all of them.
-
If the attribute contains an executor group code, the system will retrieve the email addresses of all users belonging to that group and send the email to all of them.
-
If needed, you can add multiple email recipients. To do this, select + next to the To section header and repeat steps 7–8 for each recipient.
-
Optionally, you can also configure the CC and BCC fields. To do this, select + next to the required section header, then fill in the remaining fields following the same steps as for the To section.
-
In the toolbar, select Save.
2.4.4.5.8. Update Entity Attributes
The Update Entity Attributes template allows you to update attribute values of entities using business process variable values.
-
Create a service task (see the Service Task section).
-
Expand the Implementation section, then in the Template field select Update Entity Attributes.
-
Fill in the template parameters using the hints in the table below.
| Field | Description |
|---|---|
| Send Asynchronously | Asynchronous sending allows the process to continue executing subsequent tasks without waiting for the entity update to complete. |
| Entity | From the drop-down menu, select the entity you want to update using this task. ℹ️ Note: You can also select the Related Entity option if you previously added a related entity to the current process (see Add Related Entity to Process). |
| Entity Attributes | In this field, you can specify the entity attributes whose values you want to update. If this field is left empty, no entity attributes will be updated. To specify the entity attributes to update: 1. Next to the Attributes section header, select the + icon to add entity attributes. 2. In the Attribute field, select the desired entity attributes from the drop-down list. 3. In the Type field, select the attribute value type from the drop-down list — either a fixed value or a process variable. 4. Depending on the selected type, enter the required value in the Value field, or if you selected a variable, enter the variable name in the Process Variable field. If you selected the Related Entity option in the Entity field, the entity attribute ID (ID) of type Process Variable with the value $ID will be added automatically. This is required for updating the document from which the process was launched. If no Related Entity is defined, you must add the ID entity attribute manually and set its type to "Process Variable" with the value $ID. |
| Custom Attributes | In this field, you can specify the custom attributes of the entity whose values you want to update. If this field is left empty, no custom attributes will be updated. To specify the custom attributes to update: 1. Next to the Custom Attributes section header, select the + icon to add custom entity attributes. 2. In the Attribute field, select the desired entity attributes from the drop-down list. 3. In the Type field, select the attribute value type from the drop-down list — either a fixed value or a process variable. 4. Depending on the selected type, enter the required value in the Value field, or if you selected a variable, enter the variable name in the Process Variable field. |
After filling in the fields, the Call Parameters Script will be generated automatically.
You can also set the template value manually. To do this, paste the required script into the Call Parameters Script field — for example, by copying it from another process.
You can also use additional request parameters. Their names and possible values are described in the table below.
| Parameter | Value | Description |
|---|---|---|
__skipOptimisticLock | true / false | Use true to prevent optimistic locking when updating entities from a business process. |
__executeAsUser | user ID or a variable containing a user ID | This parameter allows you to execute an action under another user's profile. Used for the execAction method. The user under whom the action is executed must have access to perform it. |
Additional Parameter Usage Examples
Example 1:
Running a document action with the code approve under the user admin (user ID = 10).
Example 2:
Updating a custom attribute of a document. Writing the value of the process variable ID into the attribute with the code sd01.
2.4.4.5.9. AI Execution
The AI Execution template allows you to interact with an AI scenario directly from a business process. The template supports various actions: create an execution session, launch it immediately, interrupt a running session, and others. Using scenario variables, you can pass AI results to subsequent process steps — for example, write retrieved data into document attributes, generate emails, or pass them to any other platform elements.
To apply the AI Execution template:
-
Create a service task (see the Service Task section).
-
Select the created task 1.
-
Expand the Implementation section 2, then in the Template field select AI Execution 3.
-
Fill in the template parameters using the hints in the table below.
| Field | Description |
|---|---|
| AI Execution Action | Select one of the following actions:
|
| Process Variable with Execution ID this field is only available for the Run Existing and Interrupt actions | Enter the name of the process variable from which the execution ID of the scenario you want to run will be retrieved. |
| Process Variable for Saving New AI Execution ID | You can leave this field unchanged. This field contains the name of the variable in which the unique AI scenario execution ID will be stored. |
| AI Scenario | Select how to add the scenario:
|
| Content this field is only available for the Add Message and Run action | Select how to compose the message for the LLM model:
|
| Input Parameters | Use this section to configure how data is passed to the scenario variables.
|
| Output Parameters this section is not available for the Create New action. | Use this section to configure where the data returned by the AI scenario will be passed.
|
| Message | If you want to use the execution result in subsequent process steps, you need to configure an intermediate message in this section. It allows the business process to "wait" for the scenario to complete and receive its result. To create an intermediate message:
|
-
In the toolbar, select Save.
2.4.4.6. Script Task
You can use script tasks to process or transform data — process variables. Within a script task, you can write a script to interact with process variables.
Script tasks are used for internal data processing and writing lightweight scripts, while service tasks are suitable for more complex operations that require interaction with external systems or services.
2.4.4.6.1. Create a Script Task
-
In the navigation panel, select the Studio workspace, then select the Process Library shortcut.
-
Double-click the business process to which you want to add a script task.
-
In the toolbar, select the 1 icon and place the element at the required location in the process diagram 2.
-
Select the added element 1, then in the context menu select the 2 icon.
-
In the context menu, select Script Task.
-
Select the added script task 1.
-
Go to the settings panel, then expand the General section 2.
-
In the Name field, enter the desired task name so it reflects the task content. Example: "Process Input Data".
-
In the task context menu, select the icon.
-
Select + 1, then Inline Script 2.
-
In the text field 1, enter the required functions for the script. You can use the main functions from the table below.
At the bottom of the window 2, you can find a link to the scripting documentation.
| Function Name | Description |
|---|---|
execution.getVariable('variableName') | Get a variable value |
execution.setVariable('variableName', value) | Set a variable value |
print('Write this line to Camunda Log') | Used to write text to the Camunda log. Useful for debugging and monitoring processes, as it allows developers and administrators to see what is happening during script execution. |
S('{"key": "value"}') | Get a Spin constant |
json.prop("key").value() | Get a JSON constant |
JSON.parse(spinObj) | Convert SPIN to a JS object |
S(JSON.stringify(jsObj)) | Convert a JS object to SPIN |
spinObj.toString() | Convert SPIN to JSON |
S(jsonStr) | Convert JSON to SPIN |
JSON.stringify(jsObj) | Convert a JS object to JSON |
JSON.parse(jsonStr) | Convert JSON to a JS object |
2.4.4.6.2. Script Examples
-
Example 1: Processing a JSON array — retrieving parameters from it and writing them to process variables.
-
Example 2: Transforming a JSON array — extracting a list of email addresses from the array and saving them to a process variable as a JSON array field.
2.4.4.7. Configure the Modeler
The business process modeler has a number of settings that are rarely used when working with business processes, such as:
- Additional process/task properties
- Input and output parameters of a process/task
- Related entity of the task form
- Additional implementation options for service tasks
You can hide these settings. To do this:
-
In the navigation panel, select the Studio 1 workspace.
-
Select the Process Library 2 shortcut.
-
Double-click the business process definition for which you want to configure the modeler 3.
-
Select the settings icon.
-
In the Modeler Settings window, check the parameters you do not want to display 1, then select Apply 2.
2.4.4.8. Mustache Syntax
Mustache is a templating library that uses a simple double-brace {{ }} syntax to insert values from context objects. In Nectain, this syntax is widely used for dynamically displaying task, object, and process attributes.
2.4.4.8.1. Key Concepts
-
Task Attributes: The
taskprefix is used to access task attributes.Example:
{{ task.subject }}{{ task.description }}{{ task.assigneeID.fullName }} -
Object Attributes: The
instanceprefix is used for attributes of objects linked to the task.Example:
{{ instance.docNumber }}{{ instance.organizationID.code }} -
Custom Attributes: The
instance.attrValuesprefix is used to access custom attributes of the document.Example:
{{ instance.attrValues.ms01 }}{{ instance.attrValues.ms07 }} -
Process Attributes: The
processprefix is used for process attributes linked to the task.Example:
{{ process.businessKey }} -
Conditional Display: Use
{{#}}and{{/}}to display a value only when it is present.Example:
{{#task.dueDate}}Task deadline:{{#$f}}"task.dueDate","dateTime"{{/$f}}{{/task.dueDate}}
Note:In this case, Task deadline will only be displayed when a
task.dueDatevalue is present.
2.4.4.8.2. Where It Applies
Starting from version 48 and above, Mustache formatting macros are supported in the following elements:
User Task
- General section:
- Task Title Template field
- Task Description Template field
- Notifications section:
- Subject field
Service Task (based on the Send Email template):
- Implementation section:
- Report field
- In older versions: Compatibility Mode → UB Report
2.4.4.8.3. Macro Formatting
Inside a macro, you can specify parameters in quotes or without them, separated by a comma or a space — the platform supports any of the following formats:
{{#$f}}task.dueDate date{{/$f}}
{{#$f}} task.dueDate dateTimeFull {{/$f}}
{{#$f}}task.dueDate,dateTimeFull{{/$f}}
{{#$f}}"task.dueDate", "dateTimeFull"{{/$f}}
{{#$f}}"task.dueDate" "dateTimeFull"{{/$f}}
{{#$f}}"task.dueDate" "dateTimeFull" "lang=uk"{{/$f}}
{{#$f}}task.dueDate, dateTimeFull, lang=uk{{/$f}}
{{#$f}}task.dueDate dateTimeFull lang=uk{{/$f}}
2.4.4.8.4. Format Types and Examples
General Formatting Function
$f / $format
The $$f alias is not supported.
The table below shows three formats:
Default format (for example,
dateTimeFull) — the output of this format depends on the default localization set in your platform.- If your default localization is English, the output will use the
dateTimeFull lang=enformat, meaning the date will be displayed as9/06/2024, 09:32:59. - If your default localization is Ukrainian, the output will use the
dateTimeFull lang=ukformat, meaning the date will be displayed as09.06.2024, 09:32:59.
- If your default localization is English, the output will use the
- English localization format (for example,
dateTimeFull lang=en) — the date will be displayed as9/06/2024, 09:32:59. - Ukrainian localization format (for example,
dateTimeFull lang=uk) — the date will be displayed as09.06.2024, 09:32:59.
* The Output column shows how the result will look when the default language in your platform is English. If a different default language is set in your platform, the output may differ and will use the format corresponding to the selected localization.
| Format Type | Syntax | Output* |
|---|---|---|
| dateTimeFull | {{#$f}}task.dueDate dateTimeFull{{/$f}} | 9/06/2024, 09:32:59 |
| dateTimeFull lang=uk | {{#$f}}task.dueDate dateTimeFull lang=uk{{/$f}} | 09.06.2024, 09:32:59 |
| dateTimeFull lang=en | {{#$f}}task.dueDate dateTimeFull lang=en{{/$f}} | 9/06/2024, 09:32:59 |
| date | {{#$format}}"task.dueDate" "date"{{/$format}} | 09/06/2024 |
| date lang=uk | {{#$format}}task.dueDate, date, lang=uk {{/$format}} | 09.06.2024 |
| date lang=en | {{#$format}}task.dueDate, date, lang=en{{/$format}} | 09/06/2024 |
| dateFull | {{#$format}}"task.dueDate" "dateFull"{{/$format}} | 09/06/24 |
| dateFull lang=uk | {{#$format}}task.dueDate dateFull lang=uk{{/$format}} | 09.06.24 |
| dateFull lang=en | {{#$format}}task.dueDate dateFull lang=en{{/$format}} | 09/06/24 |
| dateShort | {{#$f}}"task.dueDate" "dateShort"{{/$f}} | 06/24 |
| dateShort lang=uk | {{#$f}}task.dueDate dateShort lang=uk{{/$f}} | 06.24 |
| dateShort lang=en | {{#$f}}task.dueDate dateShort lang=en{{/$f}} | 06/24 |
| dateFullLong | {{#$f}}instance.attrValues.ms07 dateFullLong{{/$f}} | 06 June 2024 |
| dateFullLong lang=uk | {{#$f}}instance.attrValues.ms07 dateFullLong lang=uk{{/$f}} | 06 червня 2024 р. |
| dateFullLong lang=en | {{#$f}}instance.attrValues.ms07 dateFullLong lang=en{{/$f}} | 06 June 2024 |
| dateMYY | {{#$f}}"instance.attrValues.ms06" "dateMYY"{{/$f}} | 06/2024 |
| dateMYY lang=uk | {{#$f}}instance.attrValues.ms06, dateMYY, lang=uk:{{/$f}} | 06.2024 |
| dateMYY lang=en | {{#$f}}instance.attrValues.ms06, dateMYY, lang=en:{{/$f}} | 06/2024 |
| dateMYLong | {{#$f}}"instance.attrValues.ms07" "dateMYLong"{{/$f}} | June 2024 |
| dateMYLong lang=uk | {{#$f}}instance.attrValues.ms07, dateMYLong, lang=uk{{/$f}} | червень 2024 |
| dateMYLong lang=en | {{#$f}}instance.attrValues.ms07, dateMYLong, lang=en{{/$f}} | June 2024 |
| time | {{#$f}}"instance.attrValues.ms07" "time"{{/$f}} | 09:32 |
| time lang=uk | {{#$f}}instance.attrValues.ms07, time, lang=uk{{/$f}} | 09:32 |
| time lang=en | {{#$f}}instance.attrValues.ms07, time, lang=en{{/$f}} | 09:32 |
| timeFull | {{#$f}}"instance.attrValues.ms07" "timeFull"{{/$f}} | 09:32:22 |
| timeFull lang=uk | {{#$f}}instance.attrValues.ms07, timeFull, lang=uk{{/$f}} | 09:32:22 |
| timeFull lang=en | {{#$f}}instance.attrValues.ms07, timeFull, lang=en{{/$f}} | 09:32:22 |
| dateTime | {{#$f}}"instance.attrValues.ms07" "dateTime"{{/$f}} | 6/06/2024, 09:32 |
| dateTime lang=uk | {{#$f}}instance.attrValues.ms07, dateTime, lang=uk{{/$f}} | 06.06.2024, 09:32 |
| dateTime lang=en | {{#$f}}instance.attrValues.ms07, dateTime, lang=en{{/$f}} | 6/06/2024, 09:32 |
| dateTimeFullWithTz | {{#$f}}"instance.attrValues.ms07" "dateTimeFullWithTz"{{/$f}} | 6/06/2024, 09:32:22 GMT |
| dateTimeFullWithTz lang=uk | {{#$f}}instance.attrValues.ms07, dateTimeFullWithTz, lang=uk{{/$f}} | 06.06.2024, 09:32:22 GMT |
| dateTimeFullWithTz lang=en | {{#$f}}instance.attrValues.ms07, dateTimeFullWithTz, lang=en{{/$f}} | 6/06/2024, 09:32:22 GMT |
| numberGroup | {{#$f}}"instance.attrValues.ms04" "numberGroup"{{/$f}} | 323 |
| numberGroup lang=uk | {{#$f}}instance.attrValues.ms04, numberGroup, lang=uk{{/$f}} | 323 |
| numberGroup lang=en | {{#$f}}instance.attrValues.ms04, numberGroup, lang=en{{/$f}} | 323 |
| number | {{#$f}}"instance.attrValues.ms04" "number"{{/$f}} | 323 |
| number lang=uk | {{#$f}}instance.attrValues.ms04, number, lang=uk{{/$f}} | 323 |
| number lang=en | {{#$f}}instance.attrValues.ms04, number, lang=en{{/$f}} | 323 |
| sum | {{#$f}}"instance.attrValues.ms04" "sum"{{/$f}} | 323.22 |
| sum lang=uk | {{#$f}}instance.attrValues.ms04, sum, lang=uk:{{/$f}} | 323,22 |
| sum lang=en | {{#$f}}instance.attrValues.ms04, sum, lang=en:{{/$f}} | 323.22 |
| sumDelim | {{#$f}}"instance.attrValues.ms04" "sumDelim"{{/$f}} | 323.22 |
| sumDelim lang=uk | {{#$f}}instance.attrValues.ms04, sumDelim, lang=uk{{/$f}} | 323,22 |
| sumDelim lang=en | {{#$f}}instance.attrValues.ms04, sumDelim, lang=en{{/$f}} | 323.22 |
| decimal1 | {{#$f}}"instance.attrValues.ms05" "decimal1"{{/$f}} | 4,433.2 |
| decimal1 lang=uk | {{#$f}}instance.attrValues.ms05, decimal1, lang=uk:{{/$f}} | 4 433,2 |
| decimal1 lang=en | {{#$f}}instance.attrValues.ms05, decimal1, lang=en:{{/$f}} | 4,433.2 |
| decimal2 | {{#$f}}"instance.attrValues.ms05" "decimal2"{{/$f}} | 4,433.23 |
| decimal2 lang=uk | {{#$f}}instance.attrValues.ms05, decimal2, lang=uk:{{/$f}} | 4 433,23 |
| decimal2 lang=en | {{#$f}}instance.attrValues.ms05, decimal2, lang=en:{{/$f}} | 4,433.23 |
| decimal3 | {{#$f}}"instance.attrValues.ms05" "decimal3"{{/$f}} | 4,433.232 |
| decimal3 lang=uk | {{#$f}}instance.attrValues.ms05, decimal3, lang=uk:{{/$f}} | 4 433,232 |
| decimal3 lang=en | {{#$f}}instance.attrValues.ms05, decimal3, lang=en:{{/$f}} | 4,433.232 |
| decimal4 | {{#$f}}"instance.attrValues.ms05" "decimal4"{{/$f}} | 4,433.2322 |
| decimal4 lang=uk | {{#$f}}instance.attrValues.ms05, decimal4, lang=uk:{{/$f}} | 4 433,2322 |
| decimal4 lang=en | {{#$f}}instance.attrValues.ms05, decimal4, lang=en:{{/$f}} | 4,433.2322 |
| decimal5 | {{#$f}}"instance.attrValues.ms05" "decimal5"{{/$f}} | 4,433.23223 |
| decimal5 lang=uk | {{#$f}}instance.attrValues.ms05, decimal5, lang=uk:{{/$f}} | 4 433,23223 |
| decimal5 lang=en | {{#$f}}instance.attrValues.ms05, decimal5, lang=en:{{/$f}} | 4,433.23223 |
| decimal6 | {{#$f}}"instance.attrValues.ms05" "decimal6"{{/$f}} | 4,433.232230 |
| decimal6 lang=uk | {{#$f}}instance.attrValues.ms05, decimal6, lang=uk:{{/$f}} | 4 433,232230 |
| decimal6 lang=en | {{#$f}}instance.attrValues.ms05, decimal6, lang=en:{{/$f}} | 4,433.232230 |
Format Number
$number / $fn
The $$fn alias is not supported.
* The Output column shows how the result will look when the default language in your platform is English. If a different default language is set in your platform, the output may differ and will use the format corresponding to the selected localization.
| Syntax | Output* |
|---|---|
{{#$number}}instance.attrValues.ms05{{/$number}} | 4433 |
{{#$number}}instance.attrValues.ms05 decimal1{{/$number}} | 4,433.2 |
{{#$fn}}instance.attrValues.ms05{{/$fn}} | 4433 |
{{#$fn}}instance.attrValues.ms05 decimal1{{/$fn}} | 4,433.2 |
{{#$fn}}instance.attrValues.ms05 decimal1 lang=uk{{/$fn}} | 4 433,2 |
Format Sum
$sum / $fs
The $$fs alias is not supported.
* The Output column shows how the result will look when the default language in your platform is English. If a different default language is set in your platform, the output may differ and will use the format corresponding to the selected localization.
| Syntax | Output* |
|---|---|
{{#$sum}}instance.attrValues.ms05{{/$sum}} | 4,433.23 |
{{#$sum}}instance.attrValues.ms05 decimal1{{/$sum}} | 4,433.23 |
{{#$fs}}instance.attrValues.ms05{{/$fs}} | 4,433.23 |
{{#$fs}}instance.attrValues.ms05 decimal1{{/$fs}} | 4,433.23 |
{{#$fs}}instance.attrValues.ms05 decimal1 lang=uk{{/$fs}} | 4 433,23 |
Format Date
$date / $fd
The $$fd alias is not supported.
* The Output column shows how the result will look when the default language in your platform is English. If a different default language is set in your platform, the output may differ and will use the format corresponding to the selected localization.
| Syntax | Output* |
|---|---|
{{#$date}}instance.attrValues.ms06{{/$date}} | 06/06/2024 |
{{#$date}}instance.attrValues.ms06 dateFull{{/$date}} | 06/06/2024 |
{{#$fd}}instance.attrValues.ms06{{/$fd}} | 06/06/2024 |
{{#$fd}}instance.attrValues.ms06 dateMYY{{/$fd}} | 06/06/2024 |
{{#$fd}}instance.attrValues.ms06 dateShort lang=uk{{/$fd}} | 06.06.2024 |
Format Time
$time / $f
The $$ft alias is not supported.
* The Output column shows how the result will look when the default language in your platform is English. If a different default language is set in your platform, the output may differ and will use the format corresponding to the selected localization.
| Syntax | Output* |
|---|---|
{{#$time}}instance.attrValues.ms07{{/$time}} | 09:32 |
{{#$time}}instance.attrValues.ms07 timeFull{{/$time}} | 09:32 |
{{#$ft}}instance.attrValues.ms07{{/$ft}} | 09:32 |
{{#$ft}}instance.attrValues.ms07 timeFull{{/$ft}} | 09:32 |
{{#$ft}}instance.attrValues.ms07 lang=uk{{/$ft}} | 09:32 |
Format Date and Time
$dateTime / $fdt
The $$fdt alias is not supported.
* The Output column shows how the result will look when the default language in your platform is English. If a different default language is set in your platform, the output may differ and will use the format corresponding to the selected localization.
| Syntax | Output* |
|---|---|
{{#$dateTime}}instance.attrValues.ms07{{/$dateTime}} | 6/06/2024, 09:32 |
{{#$dateTime}}instance.attrValues.ms07 dateTimeFull{{/$dateTime}} | 6/06/2024, 09:32 |
{{#$fdt}}instance.attrValues.ms07{{/$fdt}} | 6/06/2024, 09:32 |
{{#$fdt}}instance.attrValues.ms07 dateTimeFullWithTz{{/$fdt}} | 6/06/2024, 09:32 |
{{#$fdt}}instance.attrValues.ms07 lang=uk{{/$fdt}} | 06.06.2024, 09:32 |
Format Date and Time (with Seconds)
$dateTime / $fdt
The $fdts and $$fdts aliases are not supported.
* The Output column shows how the result will look when the default language in your platform is English. If a different default language is set in your platform, the output may differ and will use the format corresponding to the selected localization.
| Syntax | Output* |
|---|---|
{{#$dateTimeFull}}instance.attrValues.ms07{{/$dateTimeFull}} | 6/06/2024, 09:32:22 |
{{#$fdtf}}instance.attrValues.ms07{{/$fdtf}} | 6/06/2024, 09:32:22 |
{{#$fdtf}}instance.attrValues.ms07 lang=uk{{/$fdtf}} | 06.06.2024, 09:32:22 |