Working in the Process Library
This page describes the main actions available in the process library: creating and configuring business process definitions, managing their versions, and launching processes based on existing definitions. This information is intended for administrators responsible for modeling and maintaining business processes in the system.
2.4.3.1. Create a Business Process Definition
A business process definition is a template based on which processes will subsequently be created. Example: You can create a business process definition called "Leave Request Approval". Later, based on this definition, you can create a process for a specific employee: "Leave Request Approval for Ivan Shpak" (see Create a Process Based on a Definition).
-
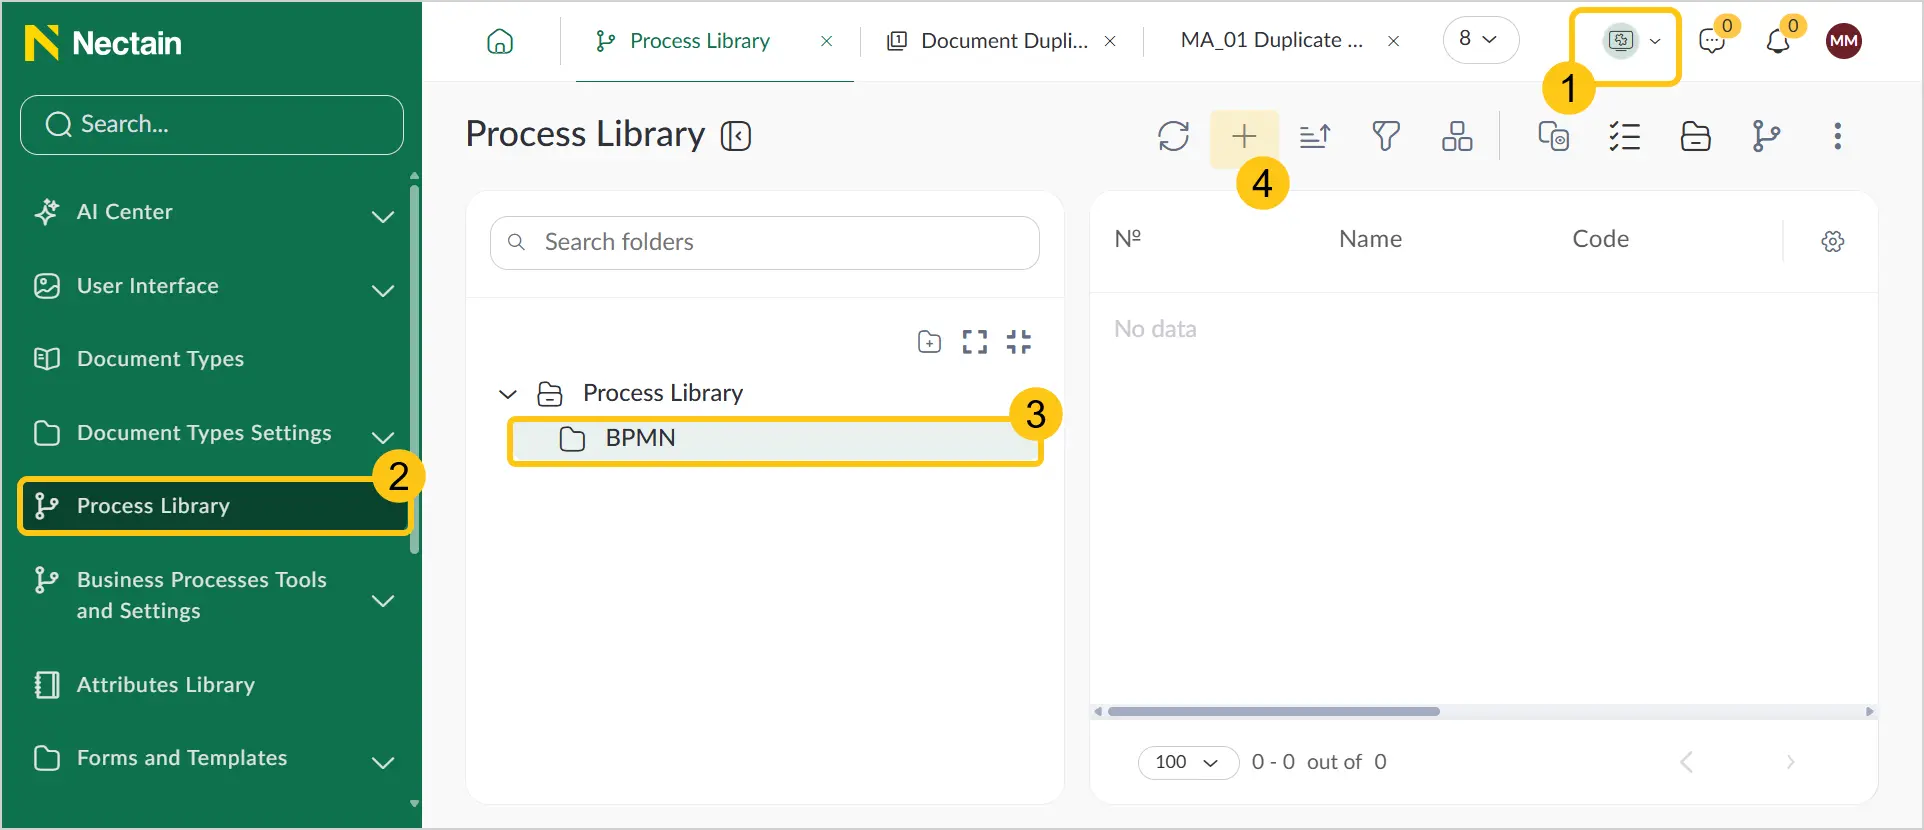
In the navigation panel, select the Studio 1 workspace.
-
Select the Process Library 2 shortcut, then choose the folder 3 where the process will be located.
Note:If the folder list is not displayed, enable folder view (see the section Enable/Disable Folder View). If needed, you can also create a new folder (see the section Create a Folder).
-
In the toolbar, select + 4.
-
Fill in the required fields 1 using the hints from the table below, then select the Create 2 button.

| Field | Description |
|---|---|
| Code* |
|
| Name* | The display name of the process definition. |
| Definition Type | Select the definition type. Available values:
|
Fields marked with * are required.
-
Add the required process elements. Depending on the definition type, you will have different elements available. Learn more about the elements for the required definition type:
-
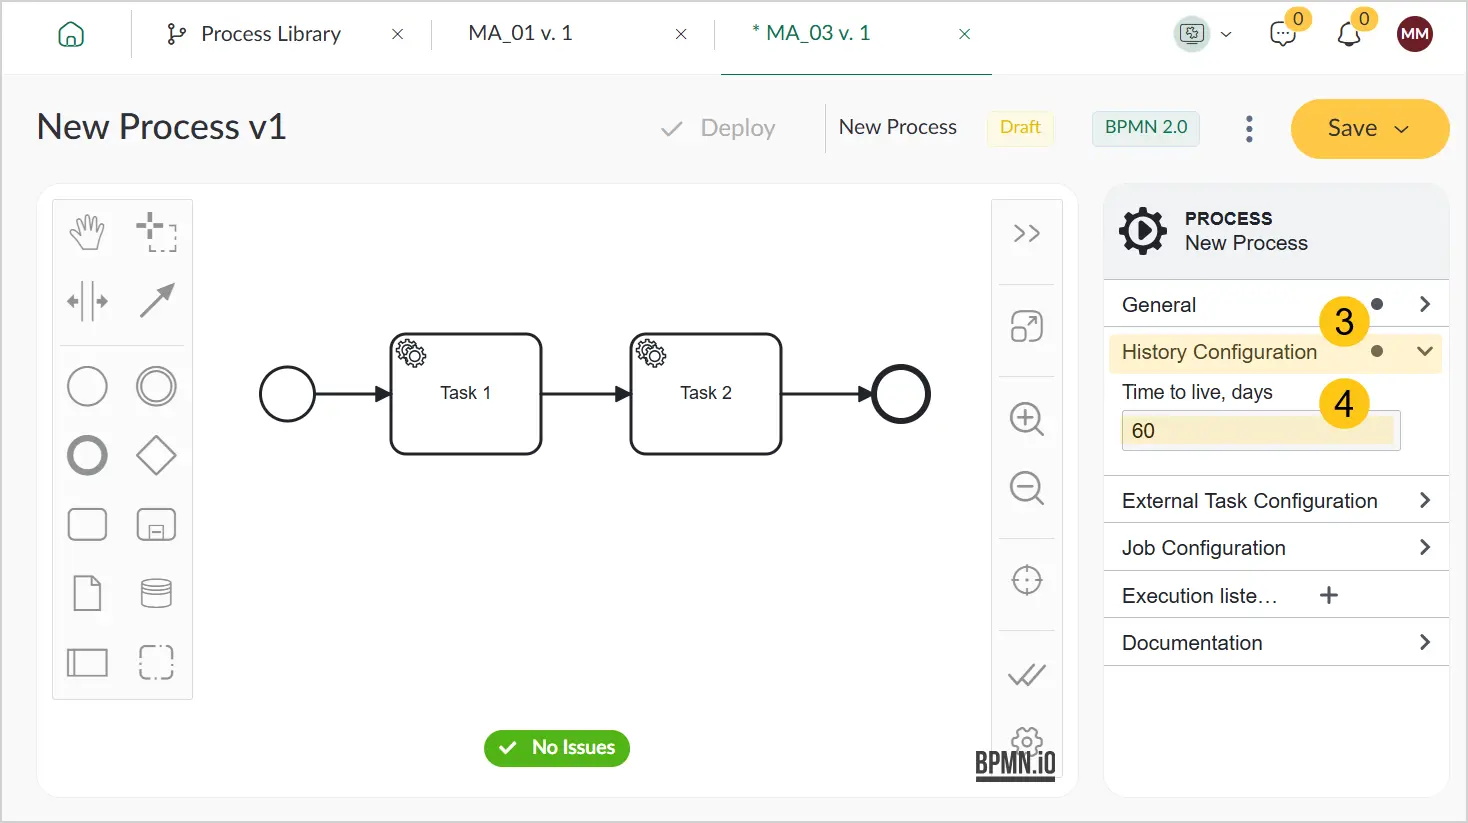
In the settings menu, expand the History Configuration 3 tab.
-
In the Time to Live, days 4 field, enter the number of days after which data in the process will be cleared.
History cleanup is a feature that removes old data about completed processes and related information. This helps keep the system efficient and prevents excessive data accumulation.
Data types that will be cleared in processes:
- Completed processes — all data about processes that were created based on this definition and have already finished. This includes details about how the process was executed, which variables were used, which tasks were completed, who had access to the process, as well as all comments and attachments associated with it.
- Executed decisions — information about decisions made during process execution. This includes the data used to make decisions and the outcomes of those decisions.
- Completed cases — data about cases that have been processed in the system, including information about the variables used and tasks completed within those cases.
- Executed batch operations — information about groups of tasks or operations processed together, including any issues that occurred during their execution and records of their processing.
By default, the platform is configured to clear process data every 900 days for all process definitions. However, specifying a new value will apply only to the specific process definition. If you want to change the default value at the platform level, contact the Nectainium support engineer.
-
In the toolbar, select the Save button.
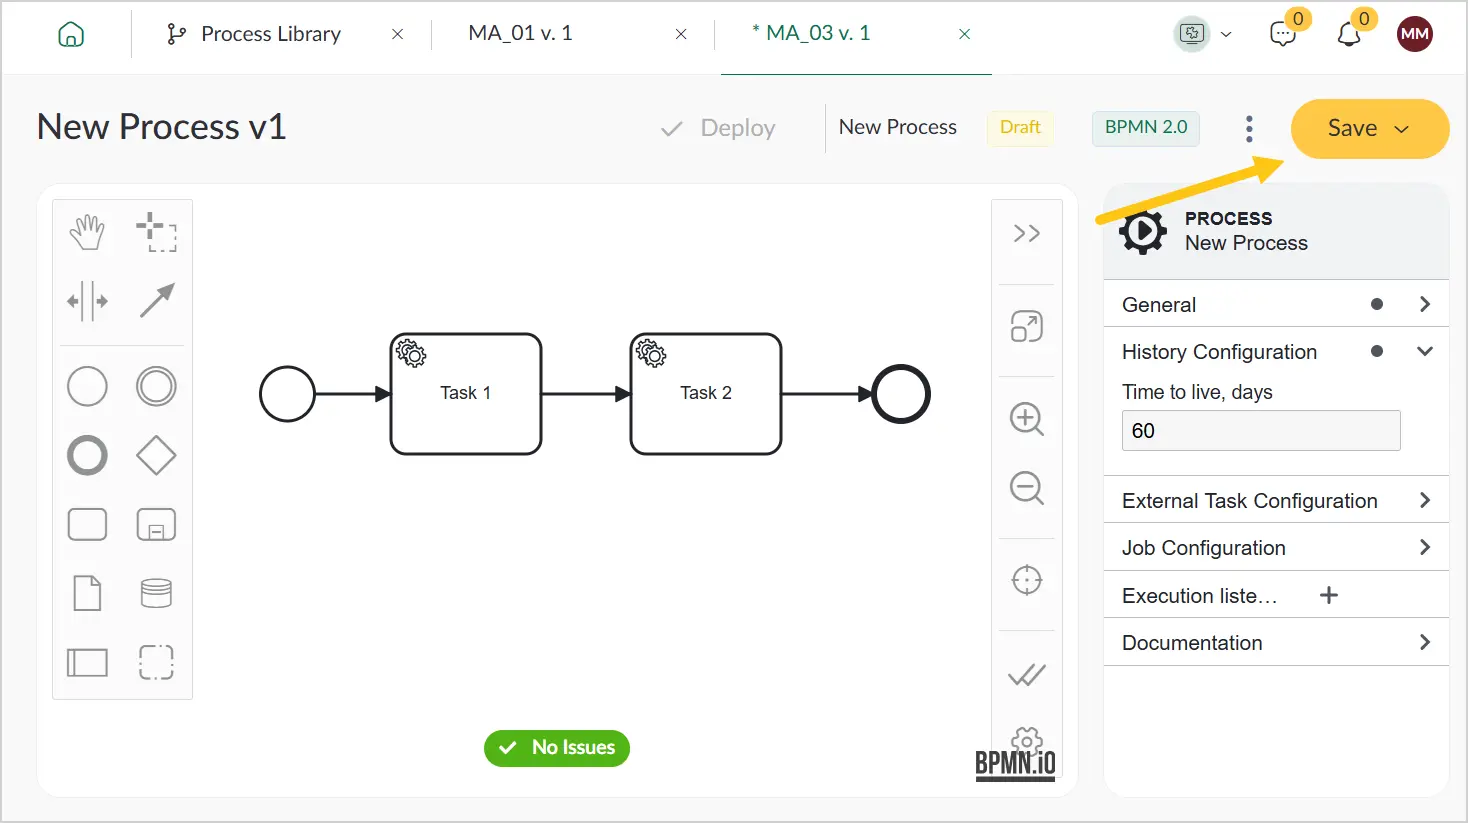
After saving, the definition receives the Draft status. To activate it and create processes based on it — deploy the definition (see Deploy a Definition).
2.4.3.2. Deploy a Business Process Definition
If you need to activate a saved definition, deploy it. After deployment, the business process definition will transition to the Active status and become available for creating processes based on it.
-
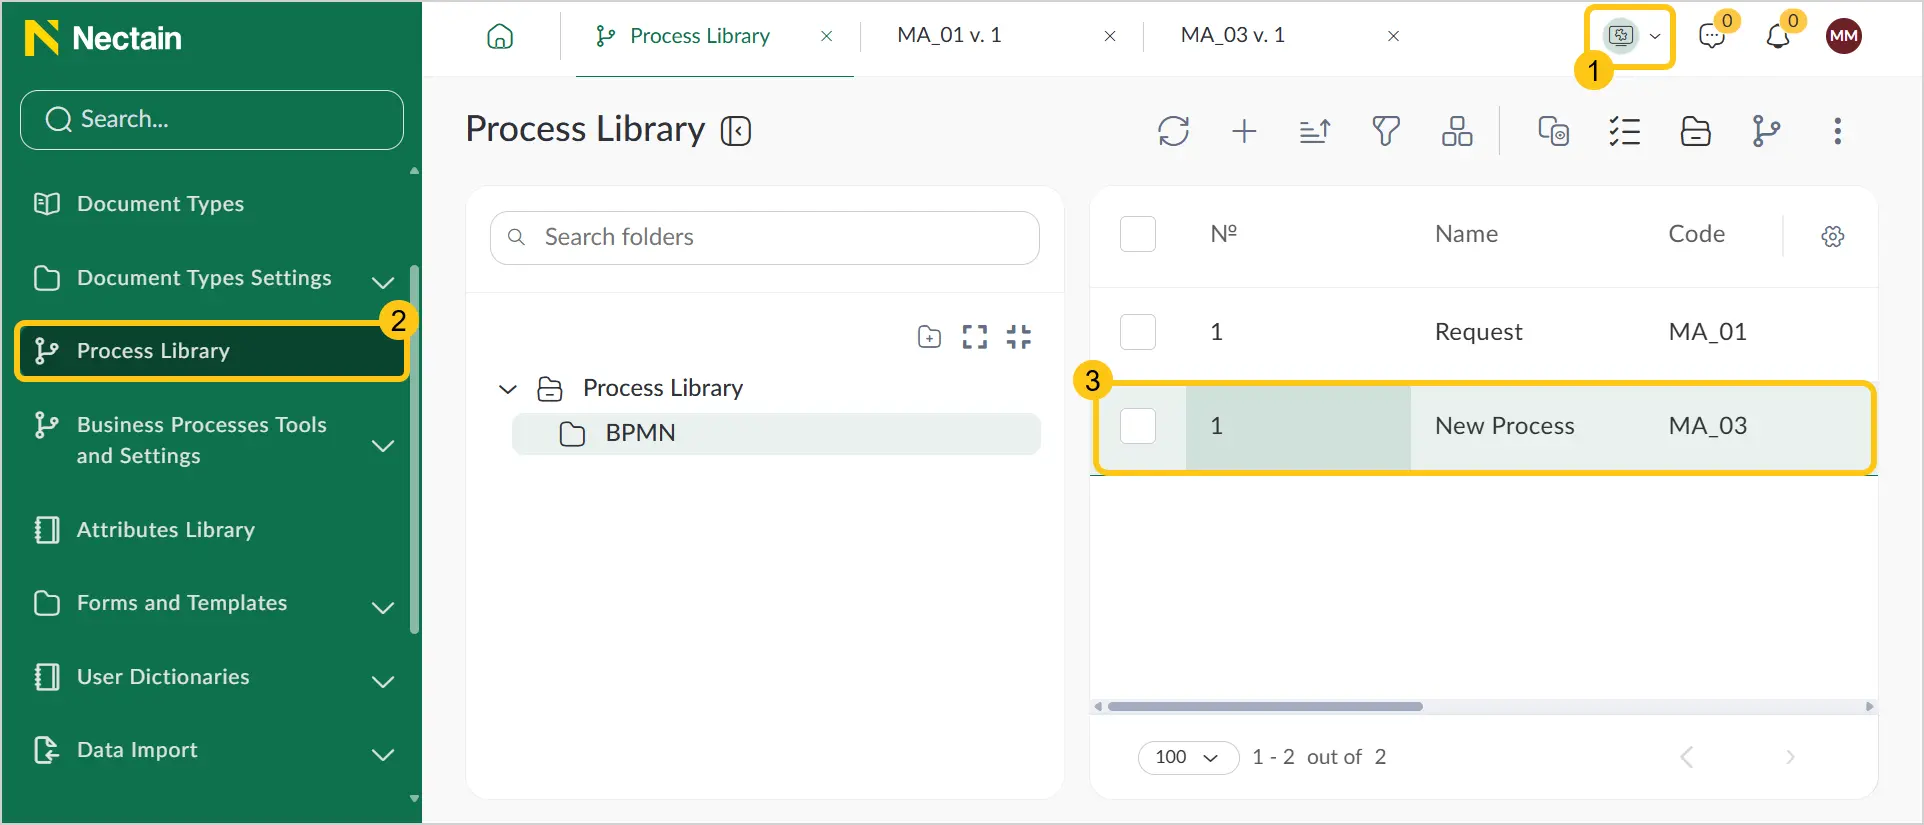
In the navigation panel, select the Studio workspace.
-
Select the Process Library shortcut.
-
Double-click the definition record you want to deploy.
-
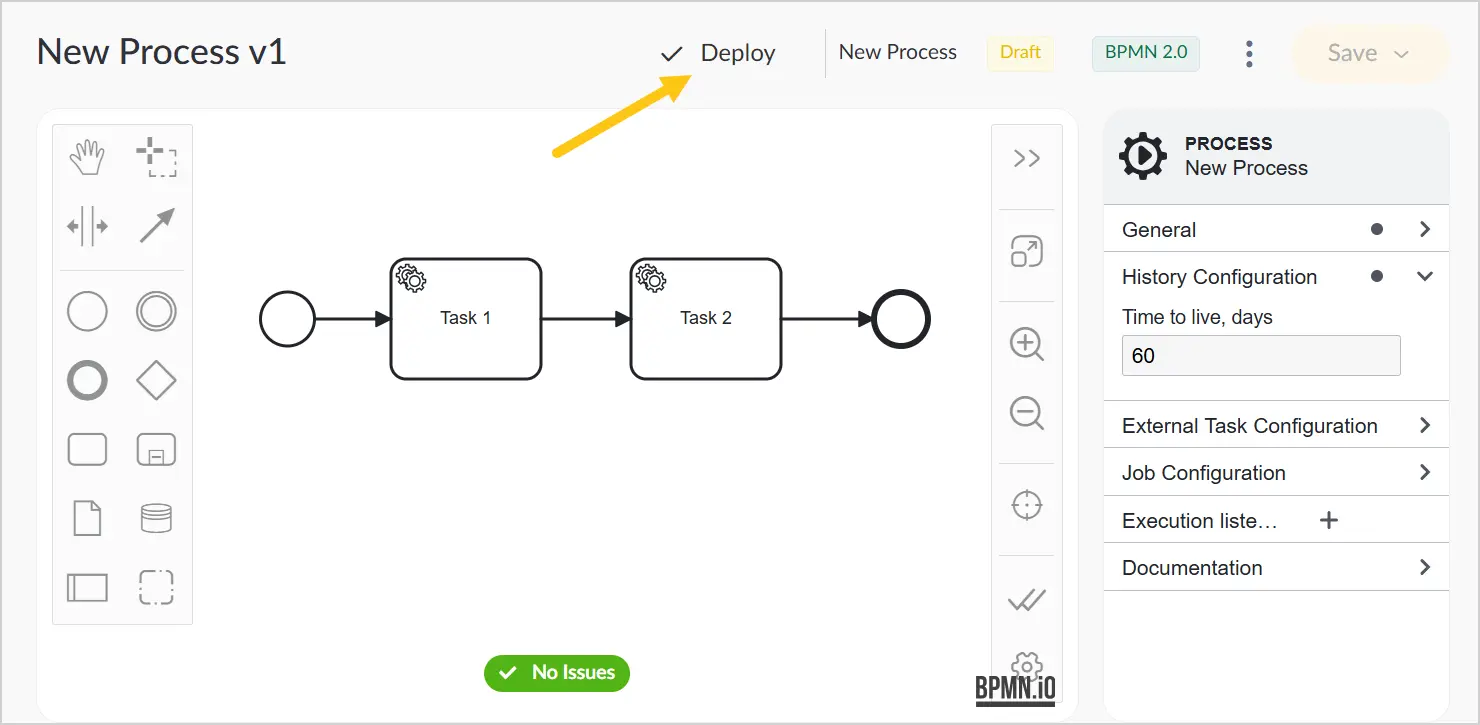
In the toolbar, select Deploy.
-
Select the Yes button to confirm the deployment.

2.4.3.3. Suspend a Business Process Definition
If a definition has become irrelevant and you want platform users to stop creating processes based on it — suspend it. After suspension, the definition will return to the Draft status. If needed, you can re-deploy the definition.
To suspend a definition:
-
In the navigation panel, select the Studio workspace.
-
Select the Process Library shortcut.
-
Double-click the definition record you want to suspend.
-
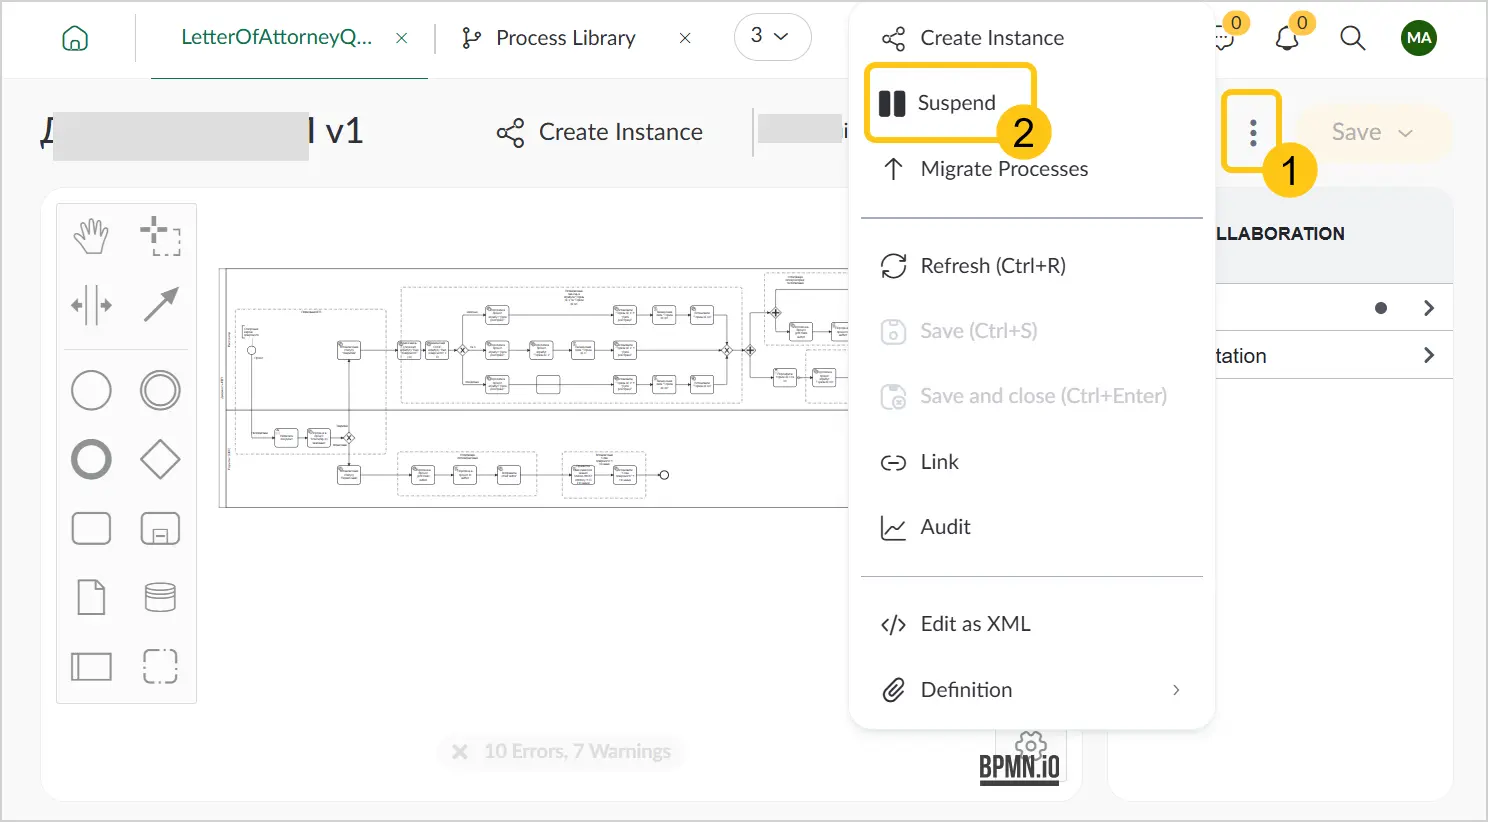
In the upper-right corner, select the 1 icon, then select Suspend 2.
2.4.3.4. Edit a Business Process Definition
Method 1: Edit using the interface
You can edit existing business process definitions:
-
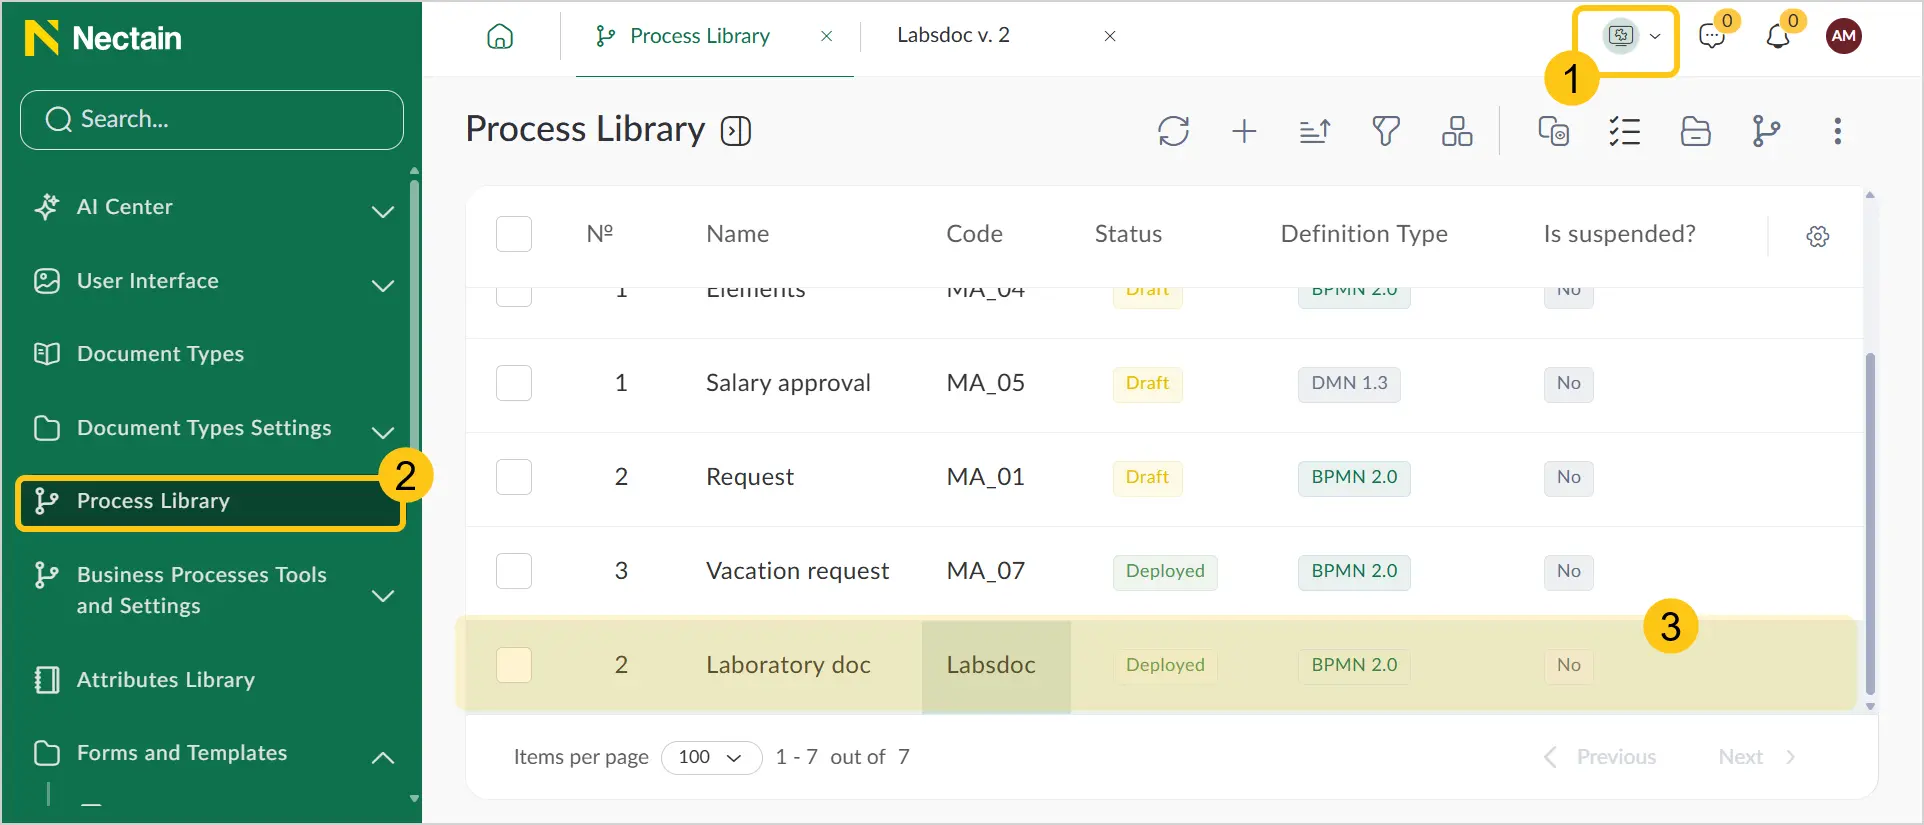
In the navigation panel, select the Studio workspace.
-
Select the Process Library shortcut.
-
Double-click the definition record you want to edit.
-
See Edit Record.
Method 2: Edit as XML
You can edit the process definition in its raw form — directly in XML code. This method provides extended editing capabilities. For example, if your definition contains subprocesses, you can modify the context of their attributes, which is not available when editing through the standard editor interface.
Changes made via XML may break the process. Use this method only if you are confident in your actions.
To edit a definition as XML:
-
In the navigation panel, select the Studio 1 workspace.
-
Select the Process Library 2 shortcut.
-
Double-click the definition record you want to edit 3.
-
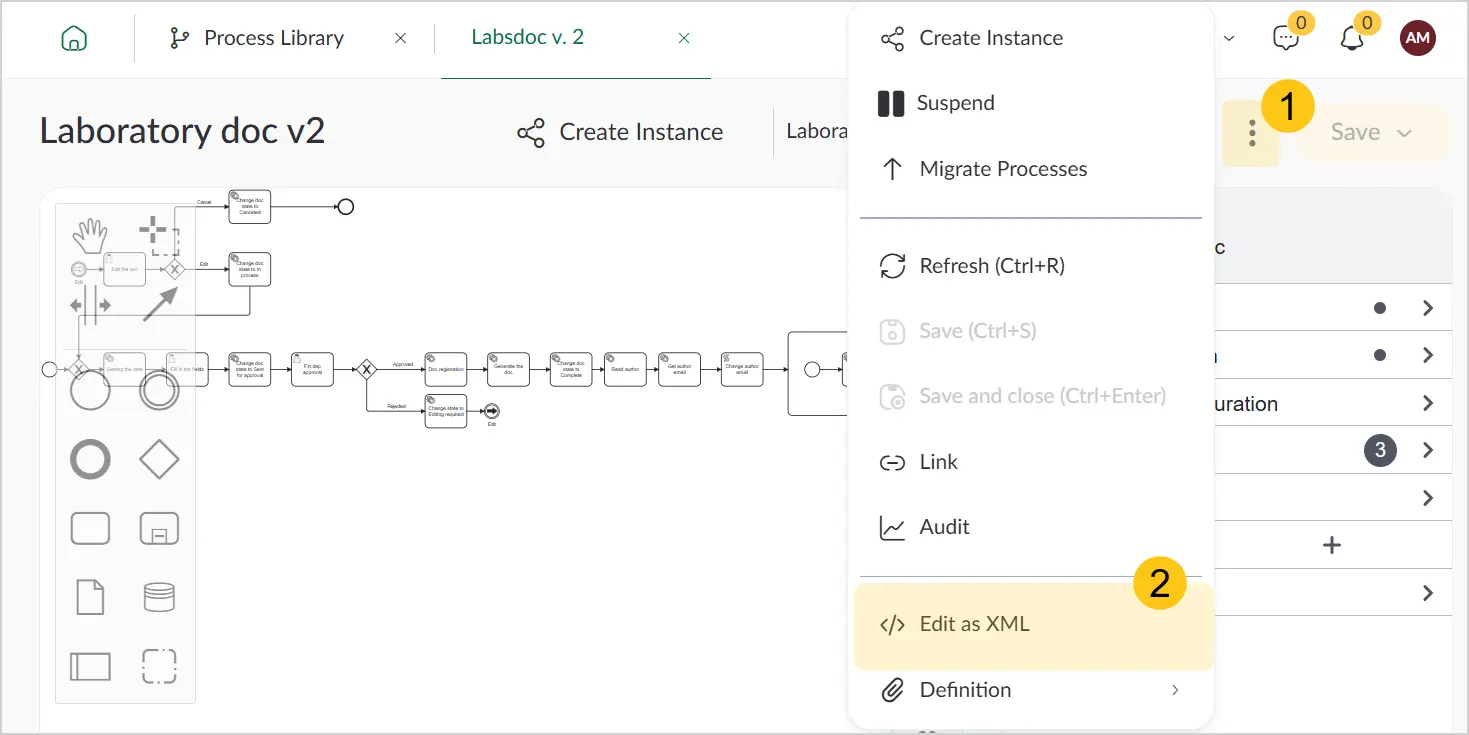
In the upper-right corner, select the 1 icon, then select Edit as XML 2.
-
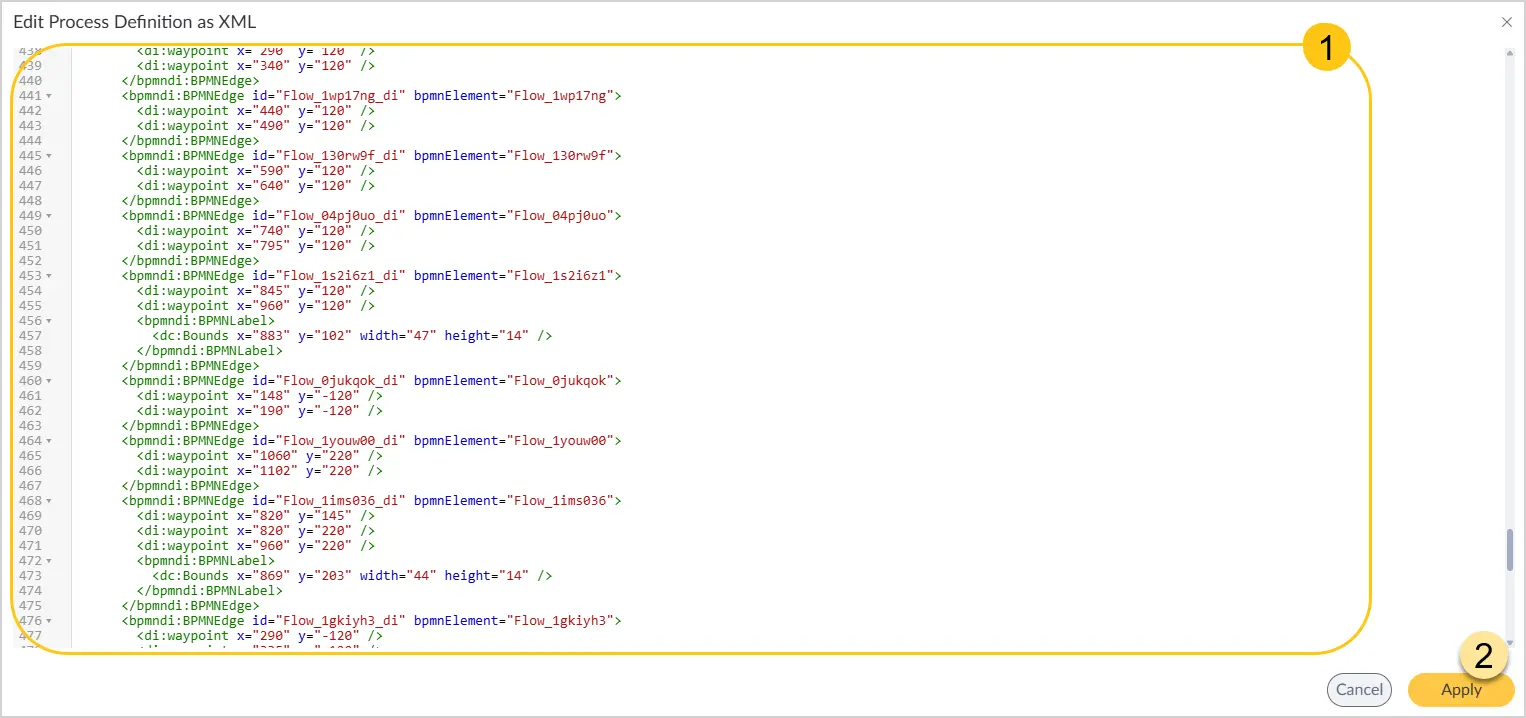
In the Edit process definition as XML window, make the required changes 1, then select Apply 2.
2.4.3.5. Copy a Business Process Definition
You can copy existing business process definitions:
- In the navigation panel, select the Studio workspace.
- Select the Process Library shortcut.
- See Copy Record.
2.4.3.6. Delete a Business Process Definition
You can delete existing business process definitions:
- In the navigation panel, select the Studio workspace.
- Select the Process Library shortcut.
- See Delete Record.
2.4.3.7. Preview a Business Process Definition Diagram
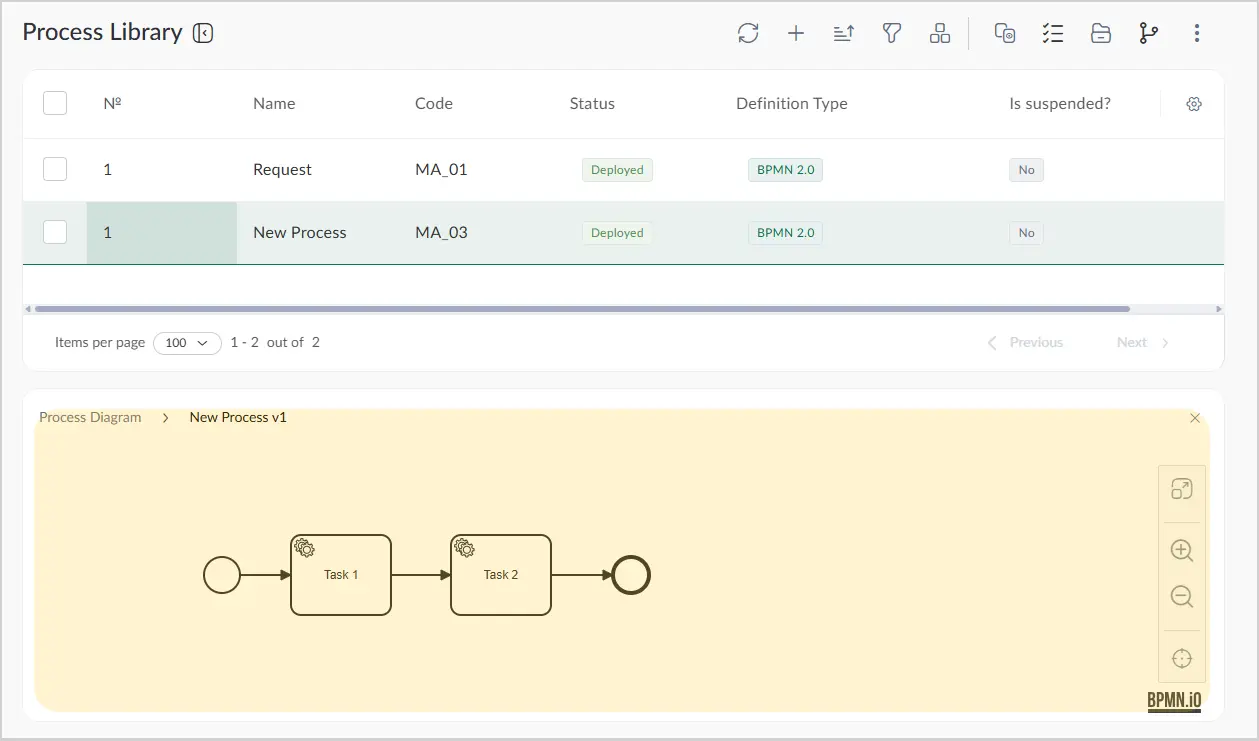
You can preview a definition diagram without opening the record:
-
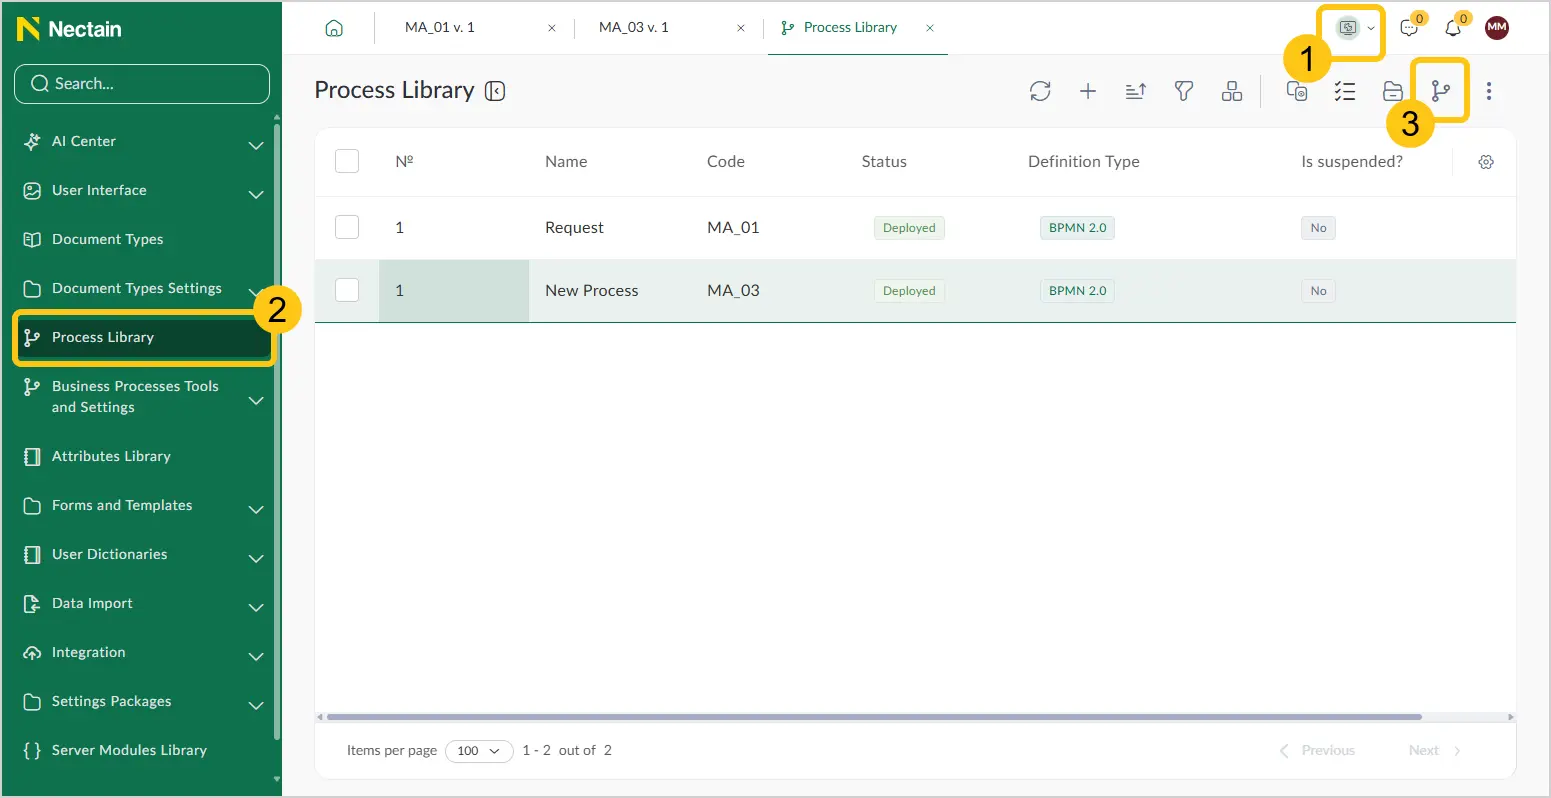
In the navigation panel, select the Studio 1 workspace.
-
Select the Process Library 2 shortcut.
-
Select the business process definition whose diagram you want to preview.
-
In the toolbar, select the 3 icon.
A window with the definition diagram will open at the bottom of the screen.
2.4.3.8. Create a Process Instance Based on a Business Process Definition
You can create business processes based on business process definitions. In this case, the definition acts as a template from which you can create new processes.
To create a process based on a definition:
-
In the navigation panel, select the Studio 1 workspace.
-
Select the Process Library 2 shortcut.
-
Double-click the required definition 3.
-
In the toolbar, select Create Instance.
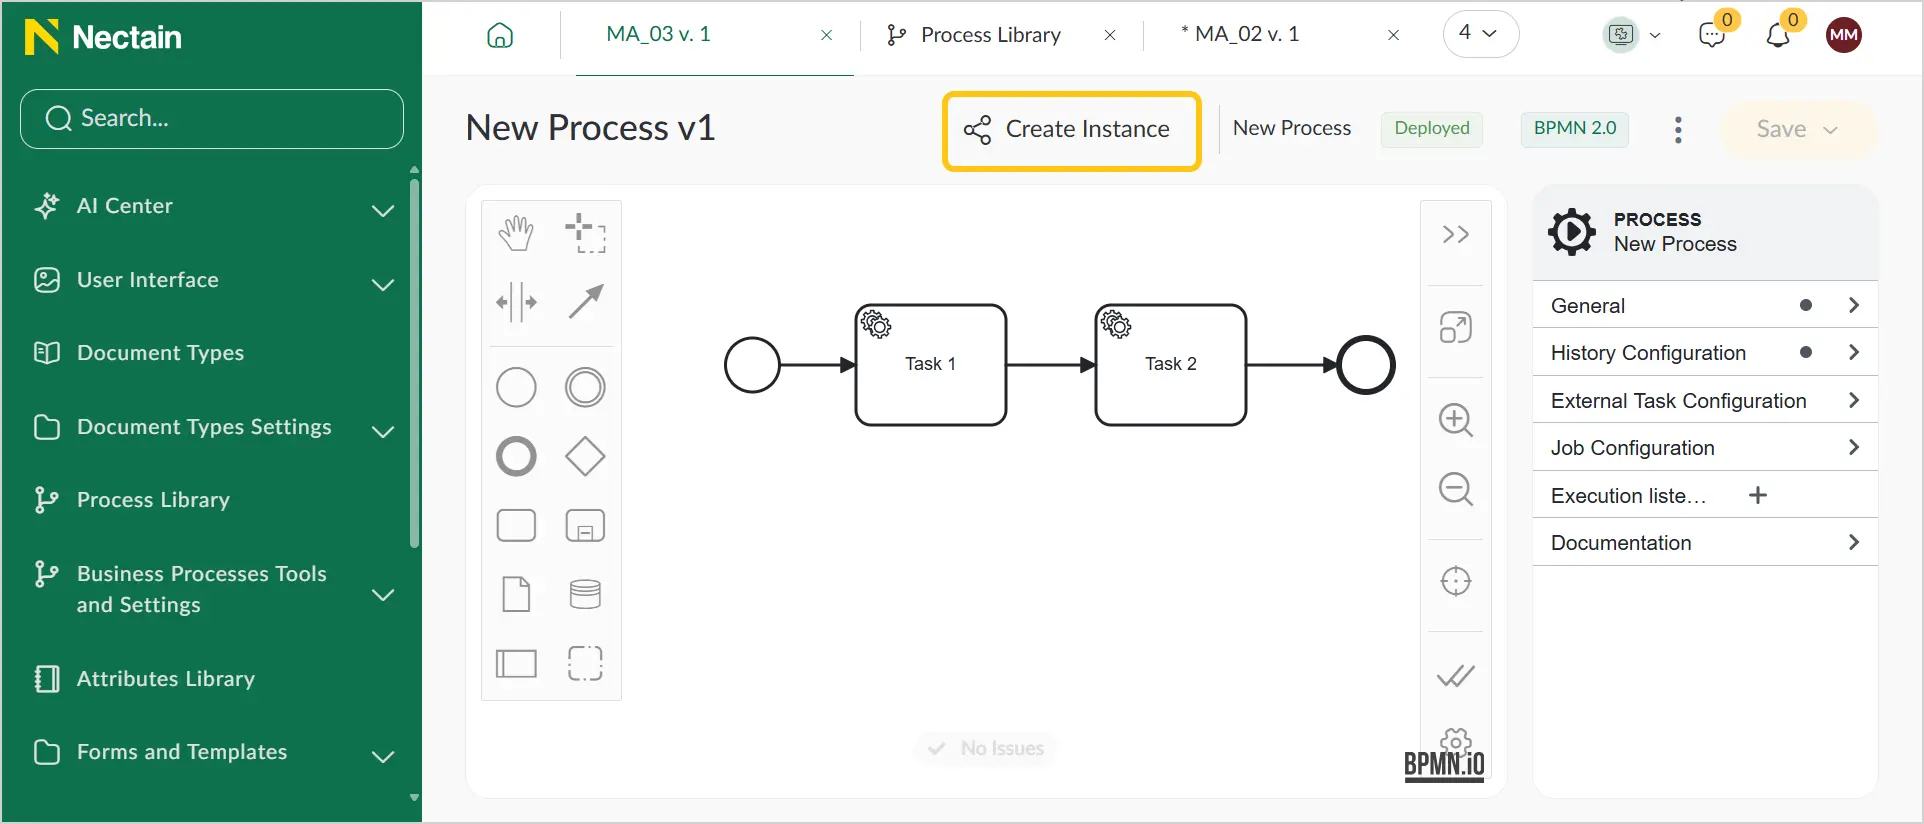 Note:
Note:If the Create Instance action is not available in the definition toolbar, make sure you have deployed the definition (see Deploy a Definition).
-
Fill in the required fields 1 using the hints in the table below, then select the Create Instance 2 button.
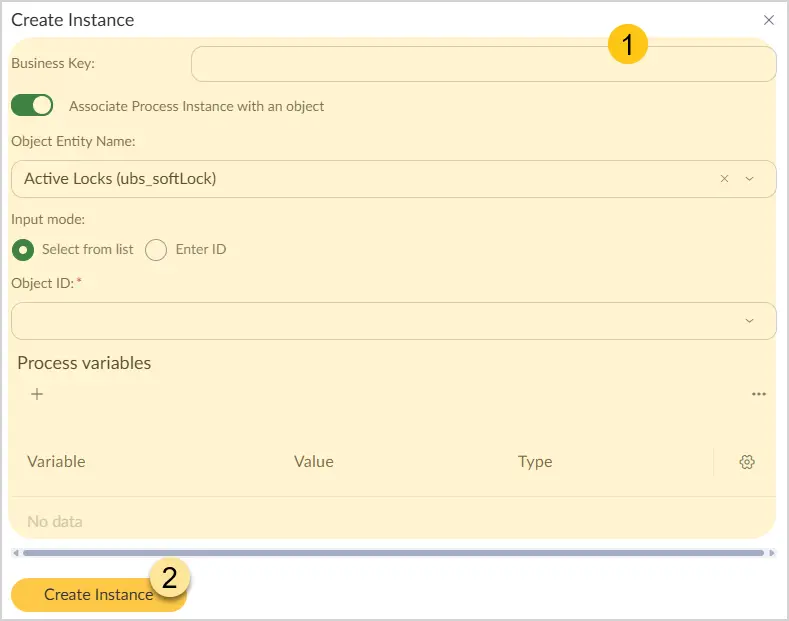
| Field | Description |
|---|---|
| Business Key | Can be any text string that uniquely identifies this process among others. Example: "order_processing_2024" or "customer_onboarding". |
| Associate process instance with an object | If this toggle is enabled, the process will be bound to a specific object (for example, a document or a reference record). |
| Object Entity Name (Available when the Associate process instance with an object toggle is enabled) | From the drop-down list, select the entity the object belongs to. |
| Input Method (Available when the Associate process instance with an object toggle is enabled) | Select one of the following methods for entering the object ID:
|
| Object ID (Available when the Associate process instance with an object toggle is enabled) | Depending on the selected input method, enter the object ID or select the required ID from the drop-down list. |
| Variable | Add variables to be used in the process. For each variable, fill in the following fields:
|
2.4.3.9. Business Process Definition Statuses
Business process definitions have the following statuses:
-
Deployed — a saved and deployed business process.
-
Draft — a business process definition that has been saved but not yet deployed. Such a definition is not available for creating processes based on it. To activate the definition, deploy it (see Deploy a Definition).
-
Old Version — a previous version of a deployed business process definition that has since been modified.
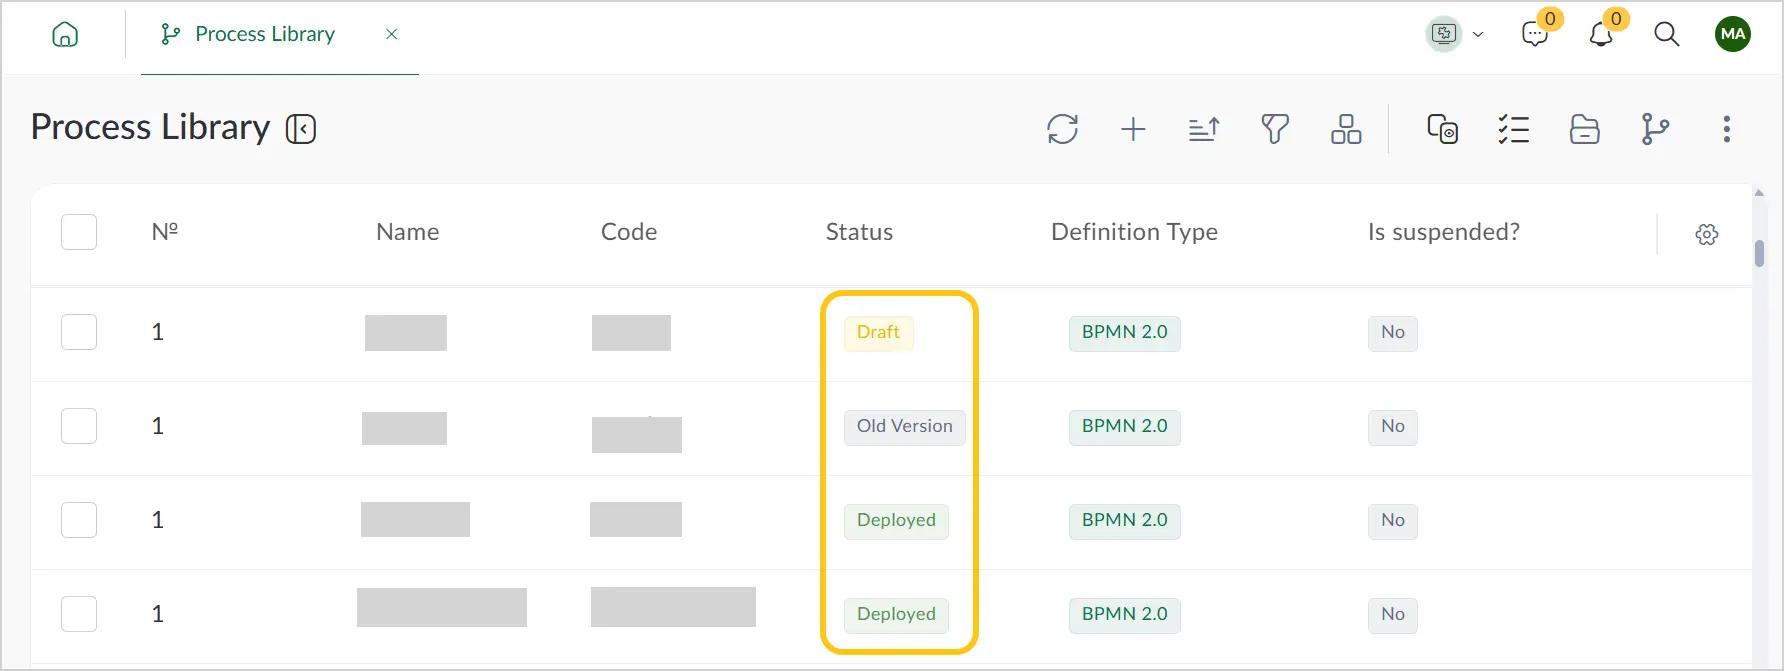
The definition status changes automatically based on actions performed in the definition. It is not possible to change the status manually.
2.4.3.10. Show/Hide Old Process Versions
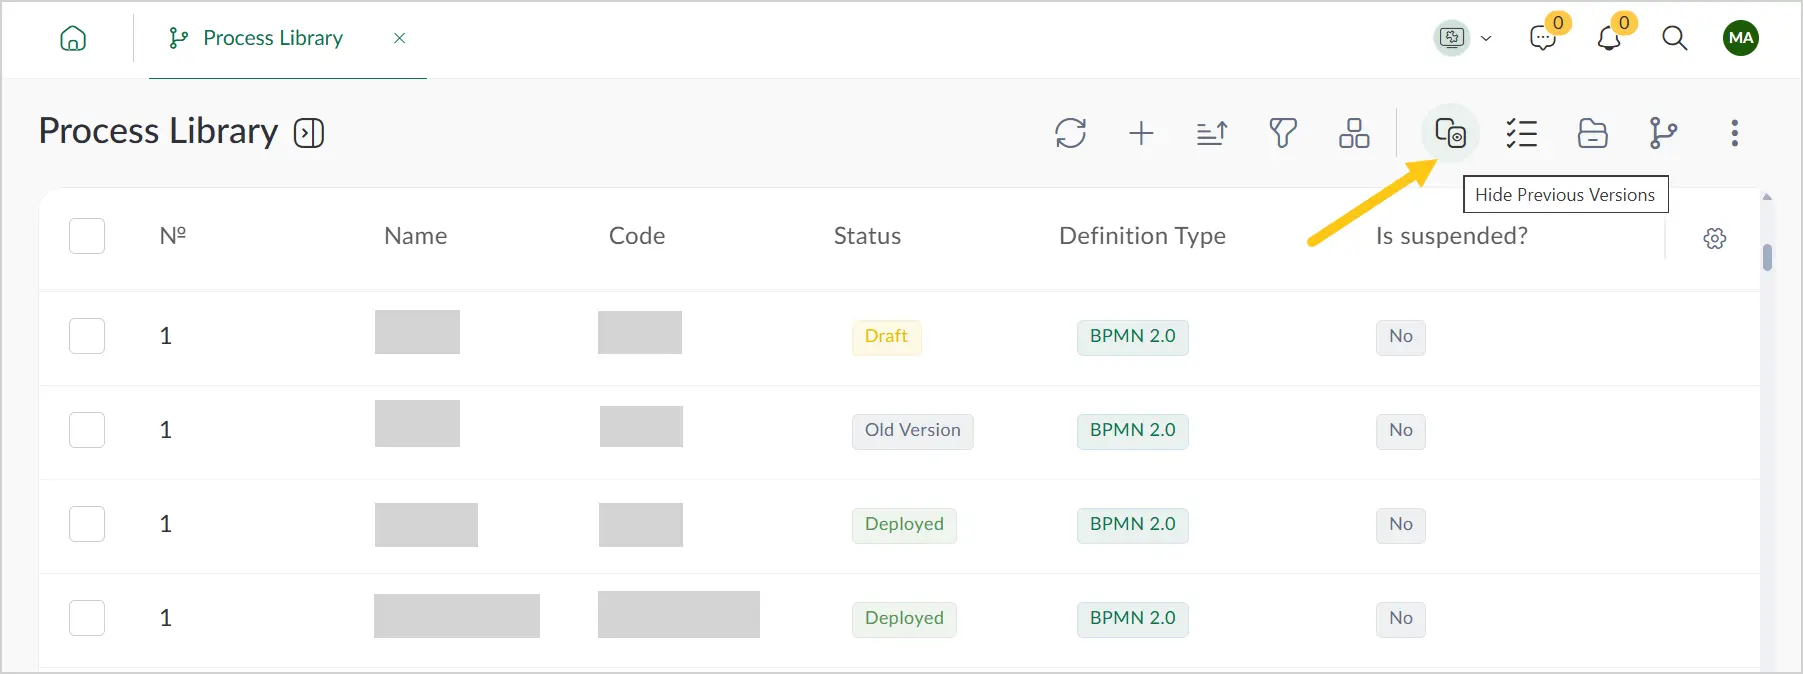
Every time you make and save changes to a deployed definition, the platform creates a new version of the definition. You can view all versions or hide them using the icon in the toolbar.
2.4.3.11. Manage Business Process Definition Folders
In the Process Library shortcut, you can create folders to conveniently organize business process definitions. The following actions are available:
- Enable/Disable Folder View
- Create a Definition in a Folder
- Move a Definition to a Folder
- Find a Folder
- Create a Folder
- Expand/Collapse Folders
2.4.3.12. Hide Certain Modeler Settings
The modeler contains a number of parameters that are rarely used when configuring business processes, such as:
- Additional process / task properties
- Input and output parameters of the process / task
- Related entity of the task form
- Additional implementation options for service tasks
- Legacy reporting functionality for creating notifications
You can hide these settings:
-
Open the required business process definition (see Edit a Business Process Definition).
-
Select the icon.
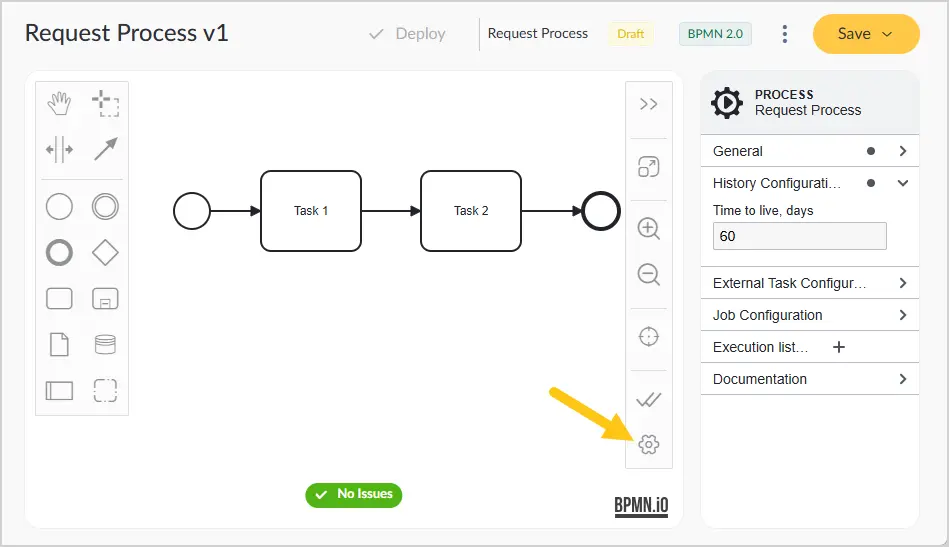
-
Enable the relevant options.
-
Select the Apply button.
Using the JavaScript everywhere option, you can hide all options except JavaScript scripts. After activating this setting, only the Script option will be available in the Condition Type field for handlers, scripts, conditions, and scenarios. The platform will hide fields such as Script Format and Script Type, which are rarely used. This means you no longer need to separately specify the script format and script type. Instead, in the Script field, you can immediately enter the script code in JavaScript.
2.4.3.13. Modeler Keyboard Shortcuts
When creating a business process definition, you can use keyboard shortcuts to speed up your work in the modeler. The modeler supports the following keyboard shortcuts:
-
Ctrl + A — select all elements
-
Ctrl + F — enable shortcut search
-
S — enable the Create/Remove Space tool
-
H — enable the Hand tool
-
L — enable the Lasso tool
-
C — enable the Global Connection tool
-
E — activate element editing. First select the diagram element you want to edit, then press E on the keyboard.
Note:For keyboard shortcuts to work, make sure your device has English selected as the text input language.

2.4.4. Working with Processes
2.4.4.1. Preparing to Work with Processes
Typically, working with processes goes hand in hand with document types. This means processes are usually launched from documents of a certain type and also use the attributes of those documents in their logic. Therefore, to work effectively with processes, they need to be configured in the context of document types.
Complete the following steps to prepare for working with processes:
- Create a business process definition, then deploy the created definition.
- In the document type, on the Processes tab, add the deployed process definition.
- In the document type, on the States tab, add a state, then add actions to it that will launch the process.
- In the document type, on the Events tab, add a handler, for example of the Start Process type.
2.4.4.2. Add a Related Entity to a Process
Adding an entity (in this case, the entity is a document type) to a business process definition allows you to use the attributes of that entity in user task and service task settings.
There are several scenarios for adding a related entity:
-
Scenario 1: Process Definition Added to a Document Type — a deployed business process definition is added to a document type. In this case, that document type can be set as the related entity.
-
Scenario 2: Process Definition Not Added to a Document Type — in this case, the list of related document types must be specified manually.
-
Scenario 3: Add Additional Entities to a Process Definition That Is Added to a Document Type — this is a combination of the two scenarios above, where you already have an automatically linked entity (as in Scenario 1) but also want to add additional entities manually (as in Scenario 2).
2.4.4.2.1. Scenario 1: Process Definition Added to a Document Type
-
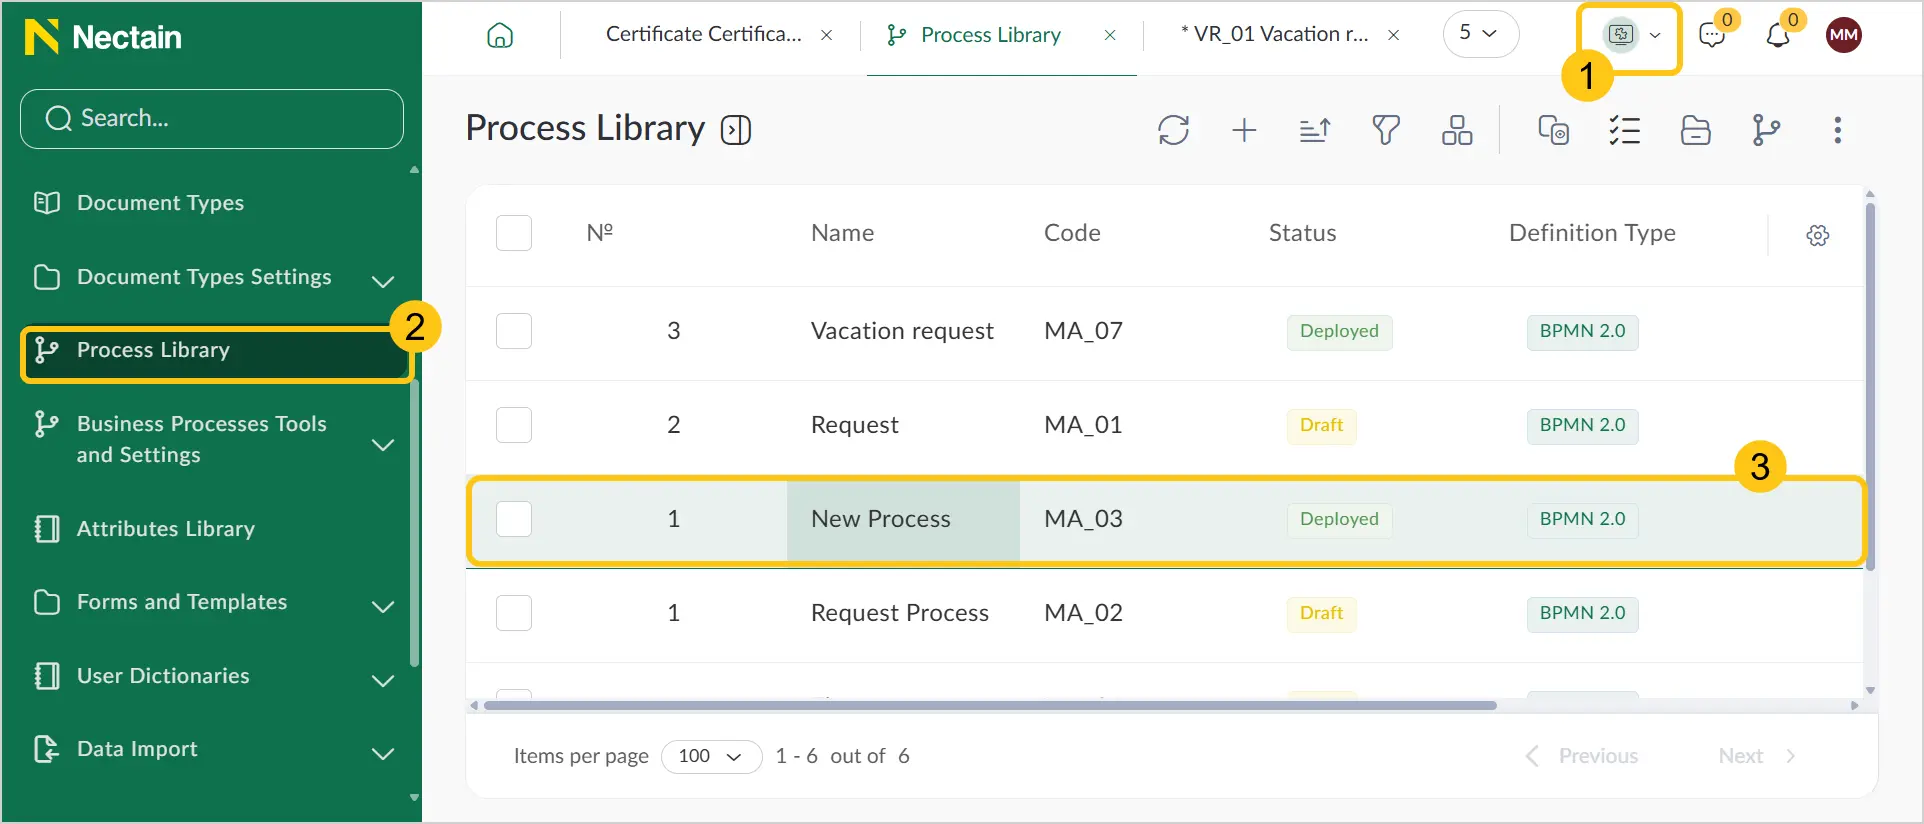
Make sure the business process definition is deployed (see Deploy a Business Process Definition) and added to a document type (see Processes).
-
In the navigation panel, select the Studio 1 workspace.
-
Select the Process Library 2 shortcut.
-
Double-click the business process definition you want to link an entity to 3.
-
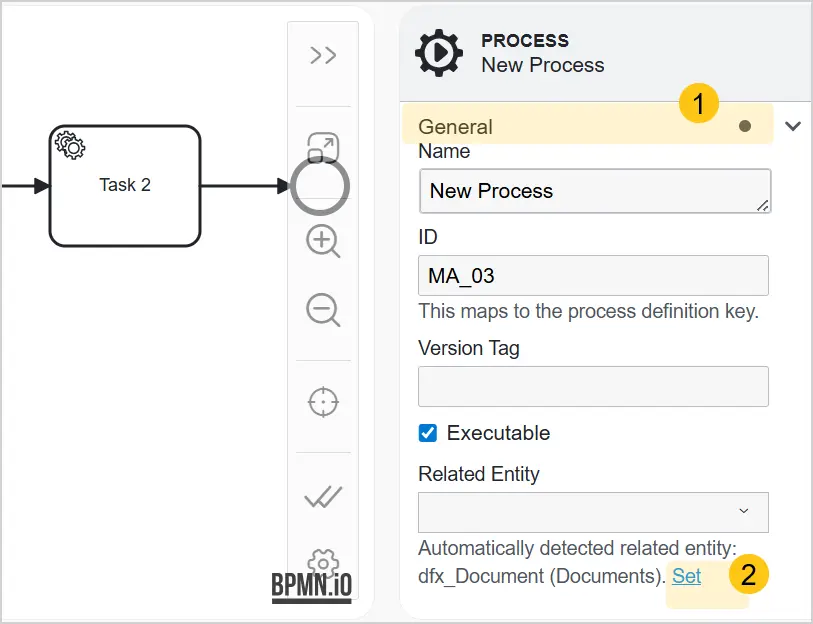
In the process settings, expand the General 1 section.
-
Under the Entity field, select Set 2.
-
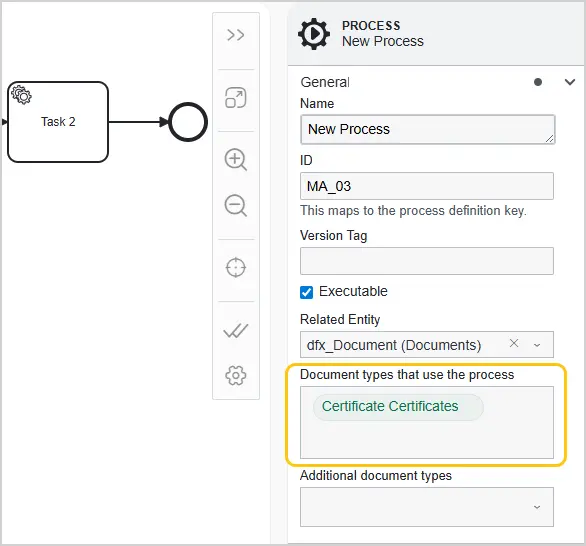
The Document Types Using This Process field will display the code and name of the document types to which the deployed process definition has been added.
 Note:
Note:This field value is updated every time the process definition is opened, and is not stored in the definition.
-
In the toolbar, select the Save button.
2.4.4.2.2. Scenario 2: Process Definition Not Added to a Document Type
-
In the navigation panel, select the Studio 1 workspace.
-
Select the Process Library 2 shortcut.
-
Double-click the business process definition you want to link an entity to 3.
-
In the process settings, expand the General 1 section.
-
In the Related Entity 2 field, select dfx_Document (Documents) from the drop-down list.
-
In the Additional Document Types 3 field, select the required document type (or multiple types).
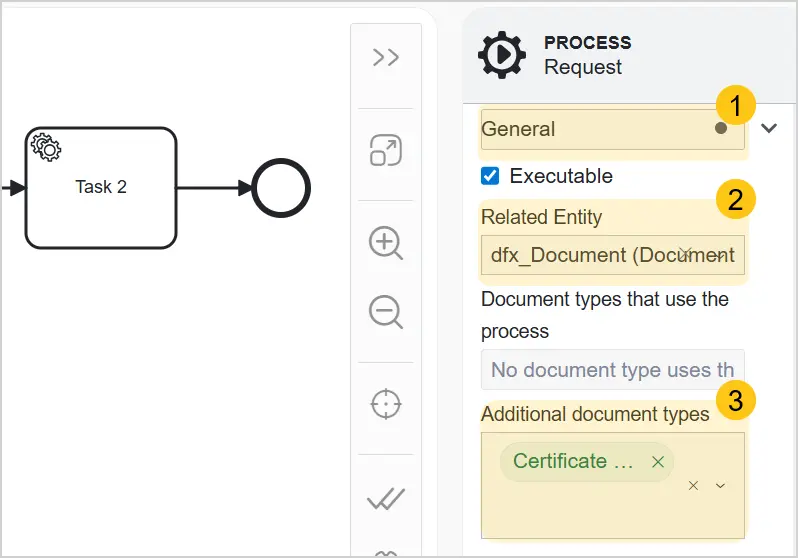
-
In the toolbar, select the Save button.
After saving the definition, the codes of the added document types will be stored in the process definition. If the definition is later added to a document type that was set as an Additional Document Type, when the definition is opened that document type will be moved from the Additional Document Types field to the Document Types Using This Process field.
2.4.4.2.3. Scenario 3: Add Additional Entities to a Process Definition That Is Added to a Document Type
-
In the navigation panel, select the Studio 1 workspace.
-
Select the Process Library 2 shortcut.
-
Double-click the business process definition you want to link a document type to 3.
-
In the process settings, expand the General 1 section.
-
In the Additional Document Types 2 field, select the required document types from the drop-down list.
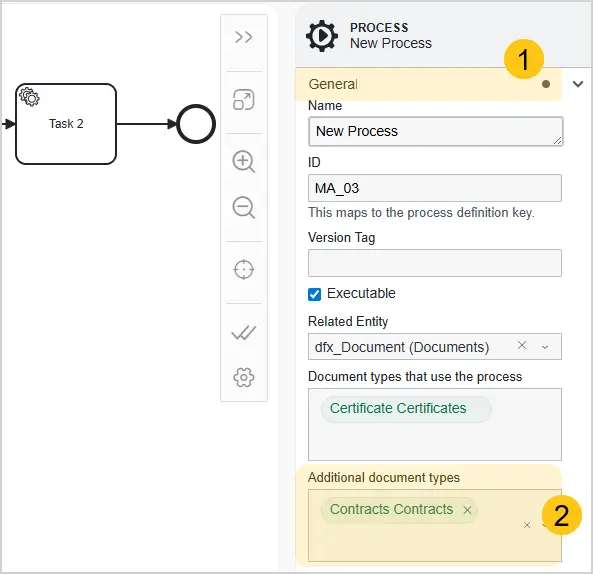
This way, the document types specified in the Document Types Using This Process and Additional Document Types fields will be added as related entities.
-
In the toolbar, select the Save button.
2.4.4.3. Process Variables
Business process variables are data stored inside a business process during its execution. Variables pass information between different stages of the process, store the execution state and context, and allow you to configure process behavior depending on variable values. Variables are commonly used to assign task performers or to write operator conditions.
Example: You are creating a universal business process for travel request approvals. During this process, a request must be automatically generated with the employee's name in the title — for example, Travel Request (Ivan Franko) — along with a task for the manager titled Approve Travel Request: Ivan Franko.
⬇️
To make the process universal, you use a variable in the request title:
Travel Request (${employeeName}), as well as in the future task title: Approve Travel Request: ${employeeName}.
⬇️
After the process starts, at the first stage you write the actual employee name — Ivan Franko — into the variable ${employeeName}.
⬇️
At the next step, the system creates a request with the substituted value: Travel Request (Ivan Franko). Accordingly, the task created at the third stage will also use this variable: Approve Travel Request: Ivan Franko.
➡️ This way, variables make the process flexible and suitable for any employee: you model the process once, and the data is substituted dynamically at each launch.
You can use variables in the following operations:
- Pass Variables to a Process
- Update Process Variable Values
- Set Document or Custom Reference Attribute Values Using Process Variables.
2.4.4.3.1. Pass Variables to a Process
Method 1: Via an Event Handler
You can pass variables to a process when the process starts. You can do this using the Start Process event handler. From the document form, you can pass the values of standard, role-based, or custom attributes.
Attributes of type Hyperlink, Table/Collection, and file attributes cannot be used to pass their values to a business process.
To configure variable passing to a process, complete the following steps:
-
Make sure you have completed all actions described in the Preparing to Work with Processes section.
-
In the navigation panel, select the Studio 1 workspace, then select the Document Types 2 shortcut.
-
Double-click the document type 3 to which you added the deployed definition.
-
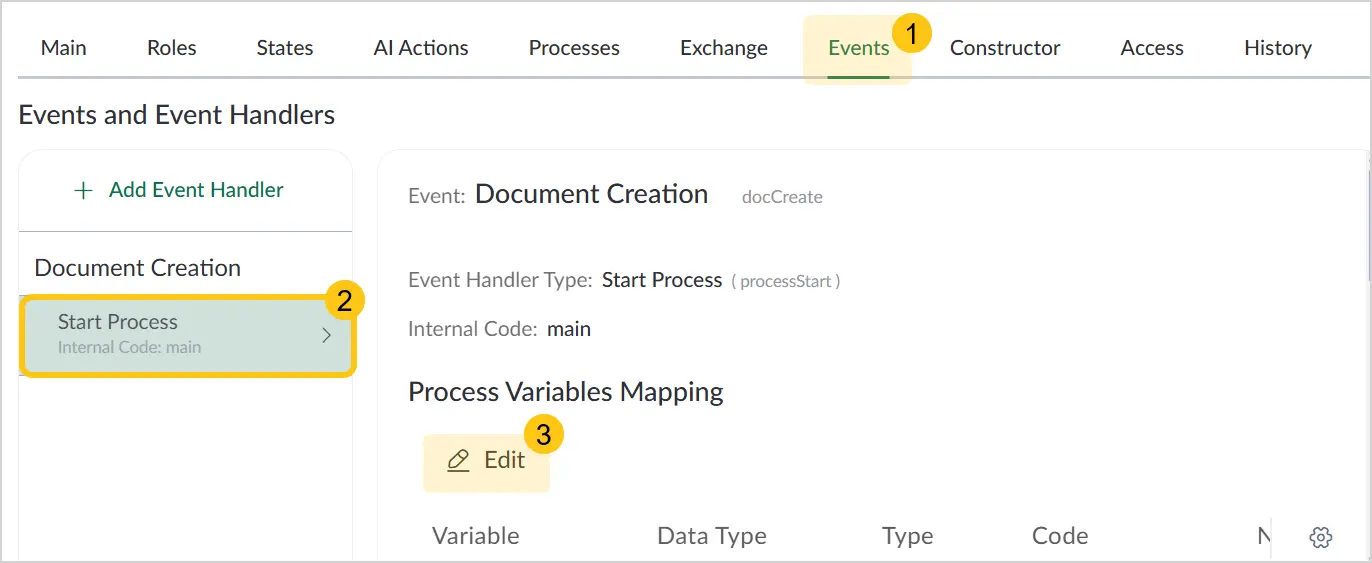
Go to the Events 1 tab.
-
Select the added handler 2, then in the Process Variable Mapping table, select Edit 3.
-
From the attributes menu, drag the required attributes into the Process Variables Mapping 1 field, then select the Apply 2 button.
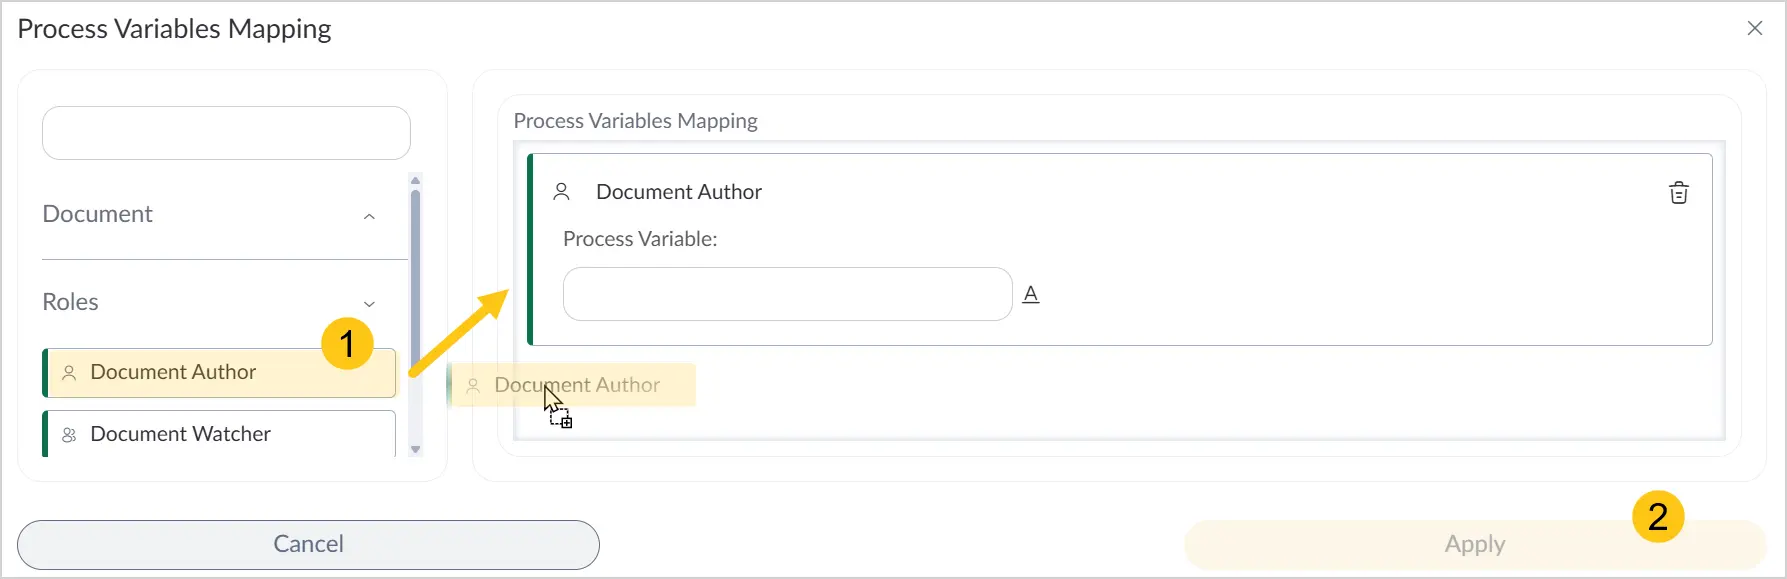
When attribute values change on the document or task form, process variables are not updated automatically. To update them, see Update Process Variable Values.
Method 2: When Creating a Process from a Definition
Create a process based on a business process definition. During creation, pay attention to the following steps:
-
In the Create Process window, select + in the Process Variables table to add a variable.
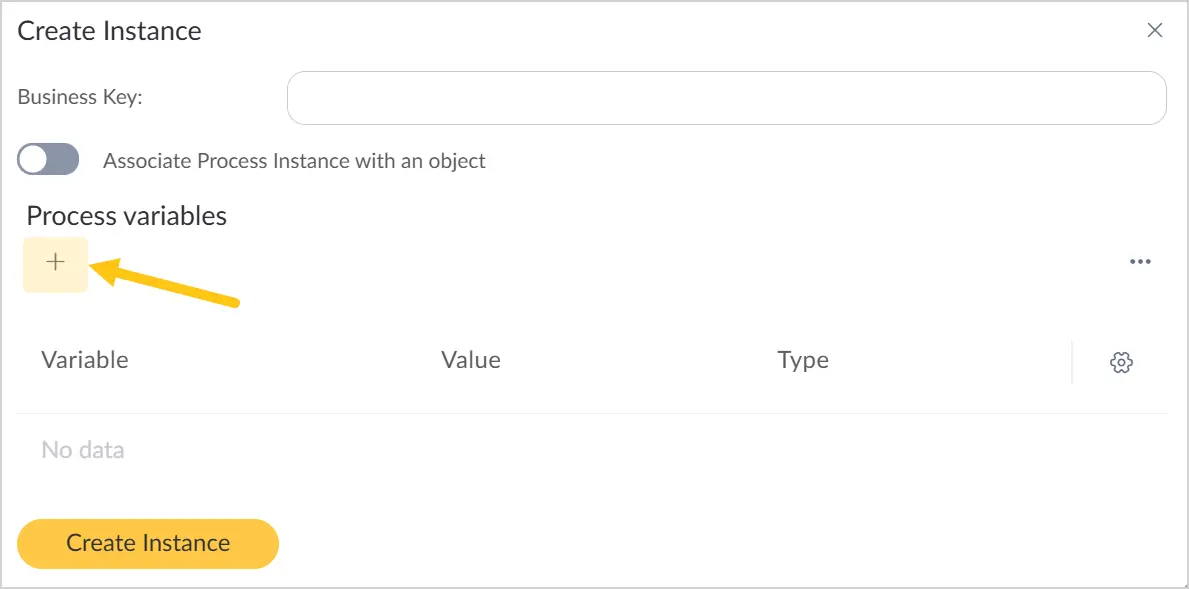
-
Fill in the fields 1 following the instructions in the Create a Process Based on a Business Process Definition section, then select Save 2.

-
After adding all required variables, select Create Instance.
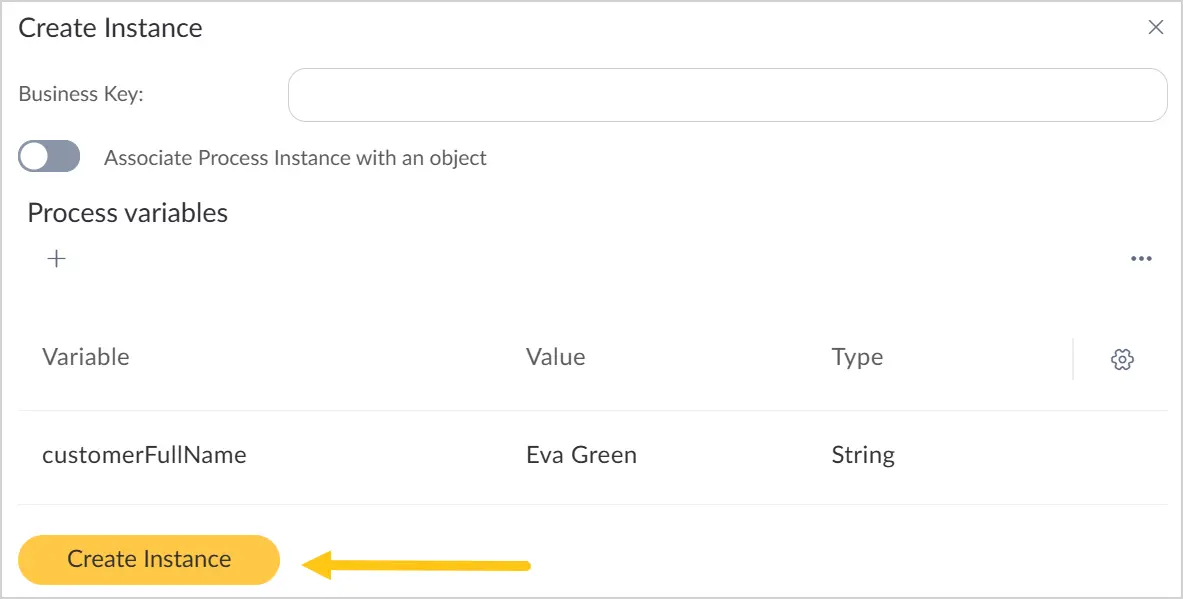
2.4.4.3.2. Update Process Variable Values
When attribute values change on the document or task form, process variables are not updated automatically. To update variable values, complete the following steps:
-
Add a Service Task to the process diagram where needed.
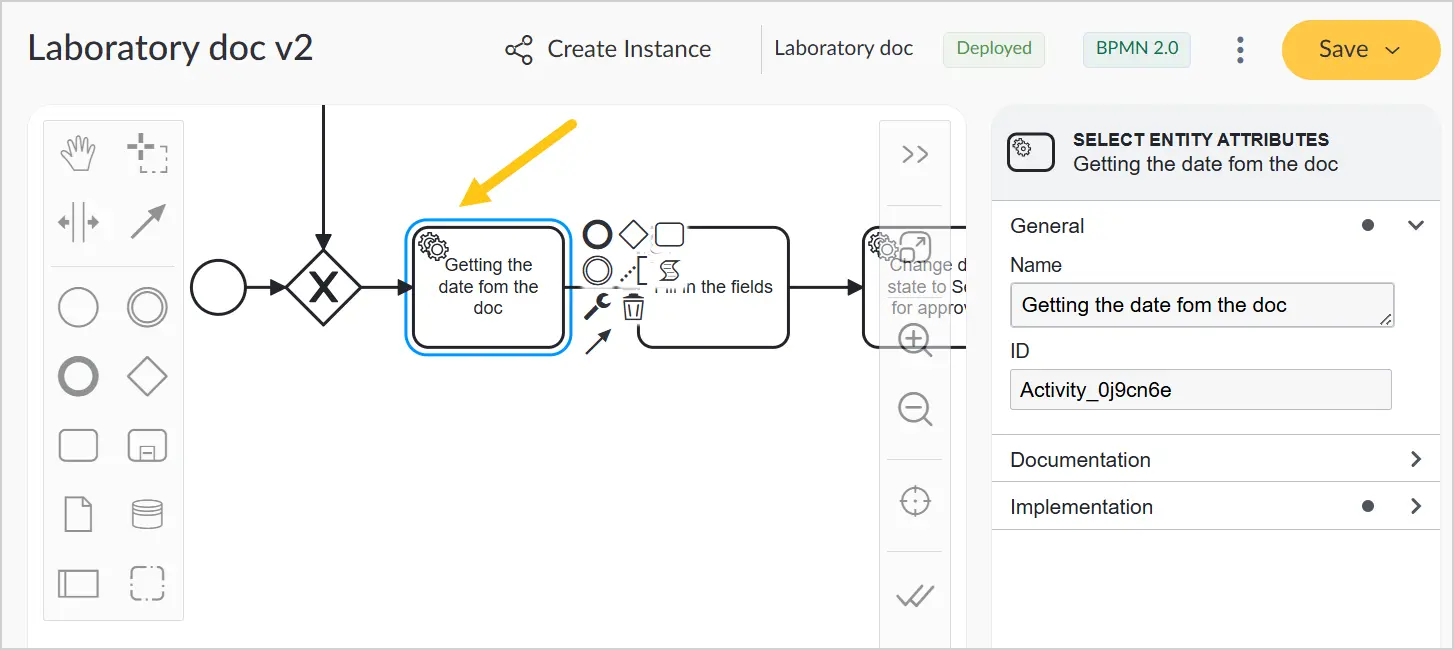
-
In the settings menu on the right, expand the Implementation 1 section, then in the Template field, select Extract Entity Attributes 2.
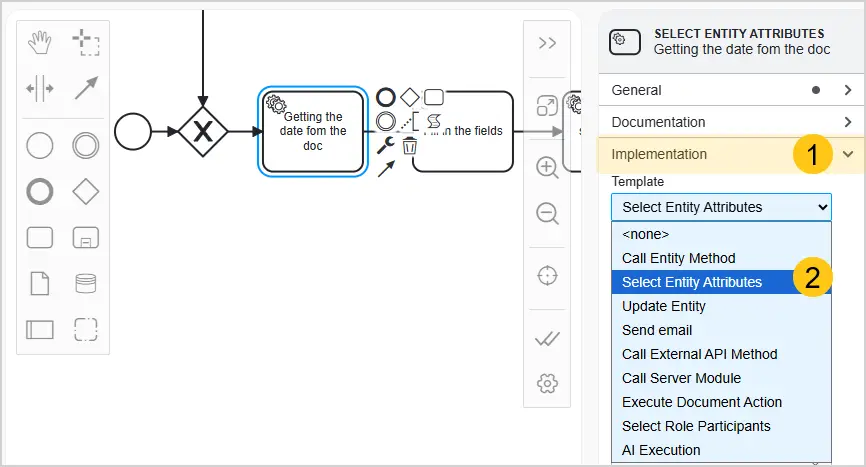
-
Configure the task according to your needs. You can find detailed configuration instructions in the Select Entity Attributes section.
This way, the added diagram element will extract the updated attribute values and use them in the subsequent flow of the process.
2.4.4.3.3. Set Attribute Values Using Process Variables
You can set the values of document or custom reference attributes using process variables via a service task.
To do this, complete the following steps:
-
Add a Service Task to the process diagram where needed.
-
In the settings menu on the right, expand the Implementation 1 section, then in the Template field, select Update Entity 2.
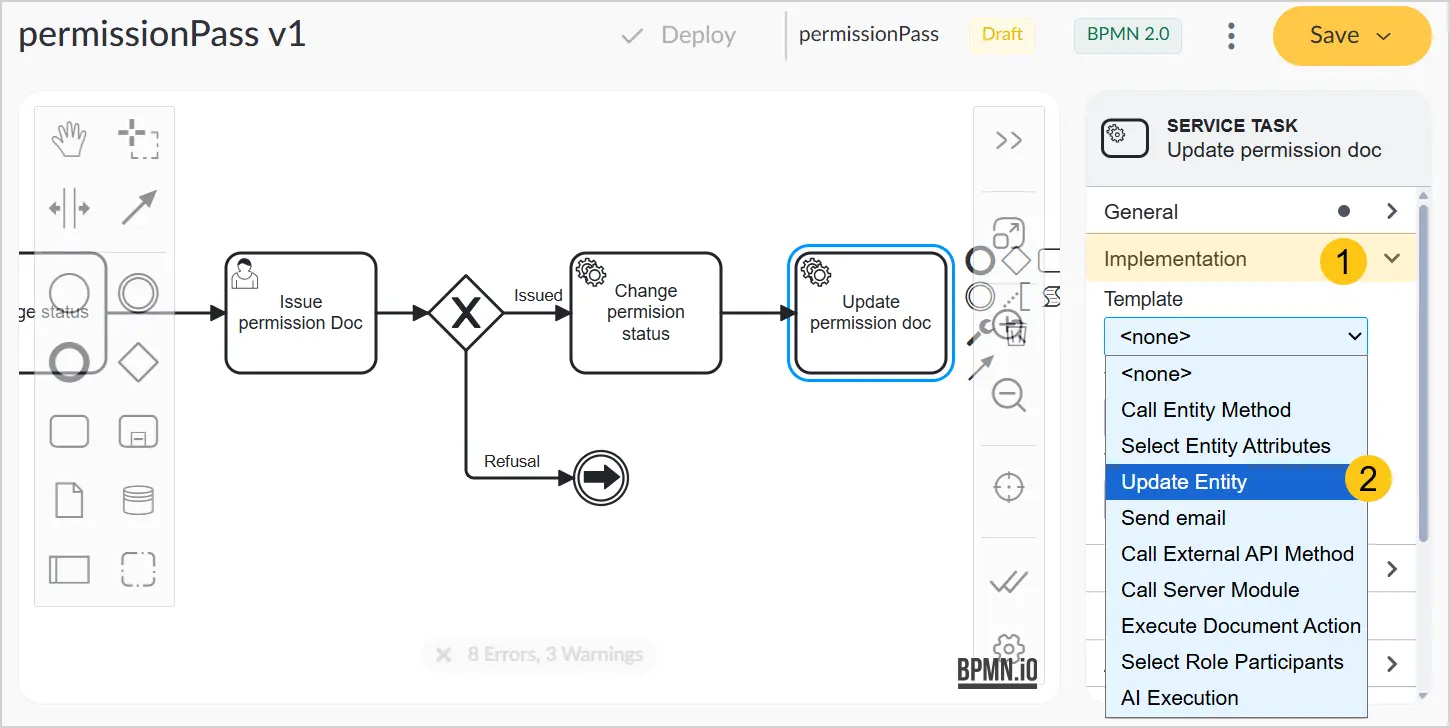
-
In the Entity field, select the required entity 3.
a. If it is a document type, select dfx_Documents.
b. If the process is already added to a document type, select Related Entity.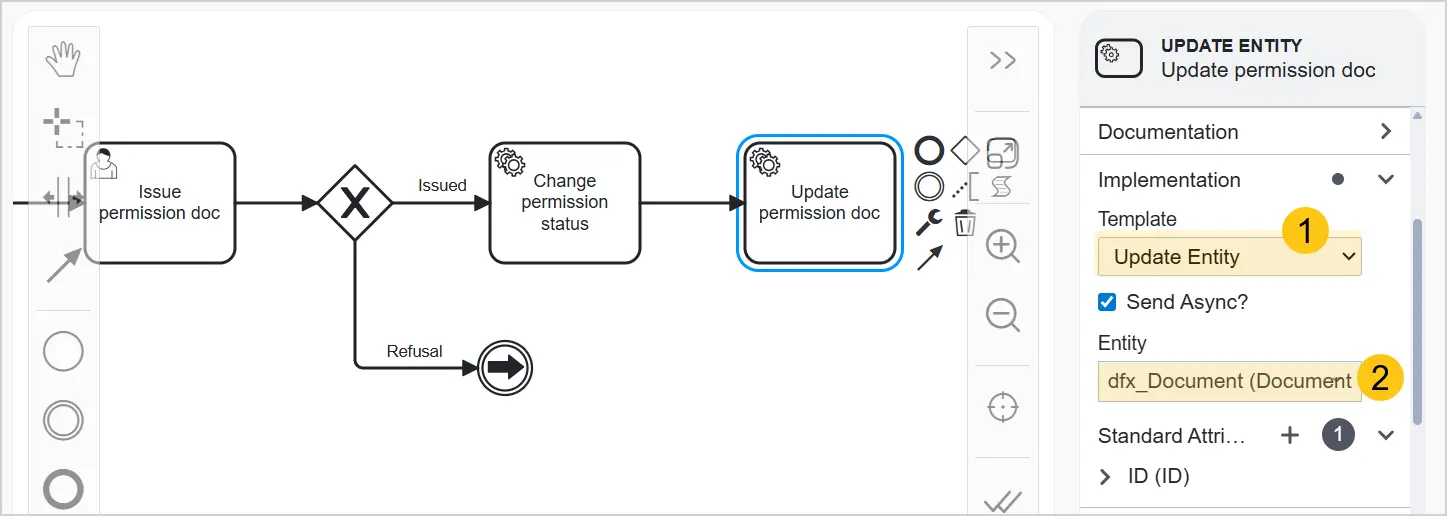
-
In the Entity Attributes section, select +, then in the Attribute field, select the attributes whose values you want to update. These are the attributes of the document type to which you added this business process.
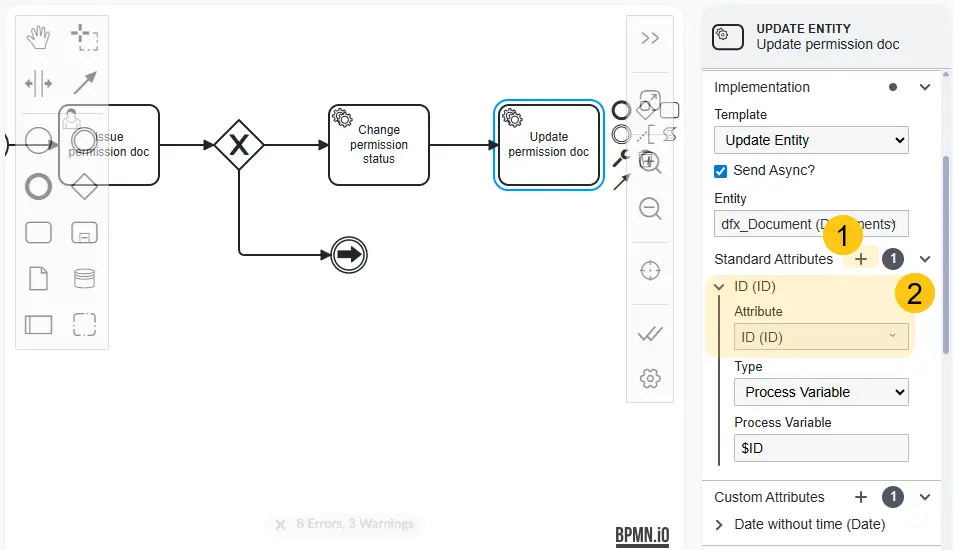
-
In the Type field, select one of the following values:
a. Fixed Value — a value set manually in the process.
b. Process Variable — a dynamic value that will be applied automatically based on the variable's conditions. -
In the Value field, specify one of the following:
a. If you selected Fixed Value in the previous step, select the required value from the drop-down list.
b. If you selected Process Variable in the previous step, select the name of the required variable from the drop-down list.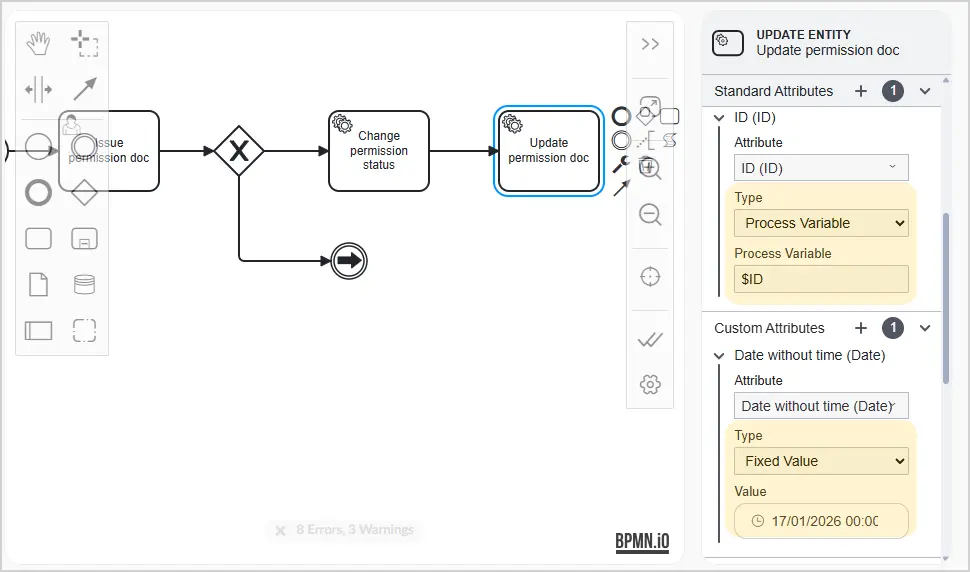
-
In the toolbar, select the Save button.
2.4.4.3.4. Variable Syntax
When working with variables, use the following syntax:
-
${variableName}— retrieves the variable value in business process parameters. For example, when configuring a task performer.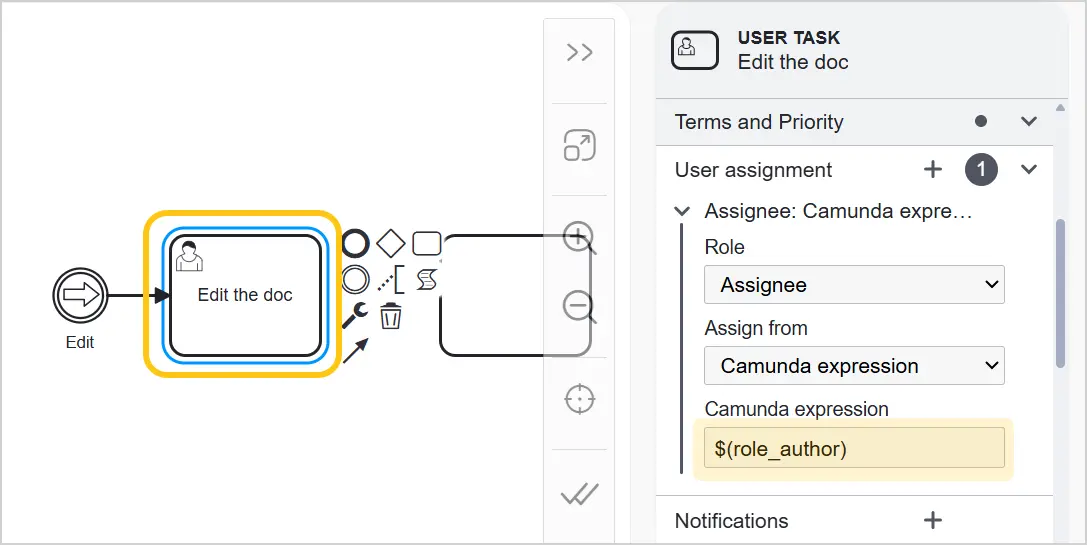
-
execution.getVariable('variableName')— retrieves the variable value in business process scripts.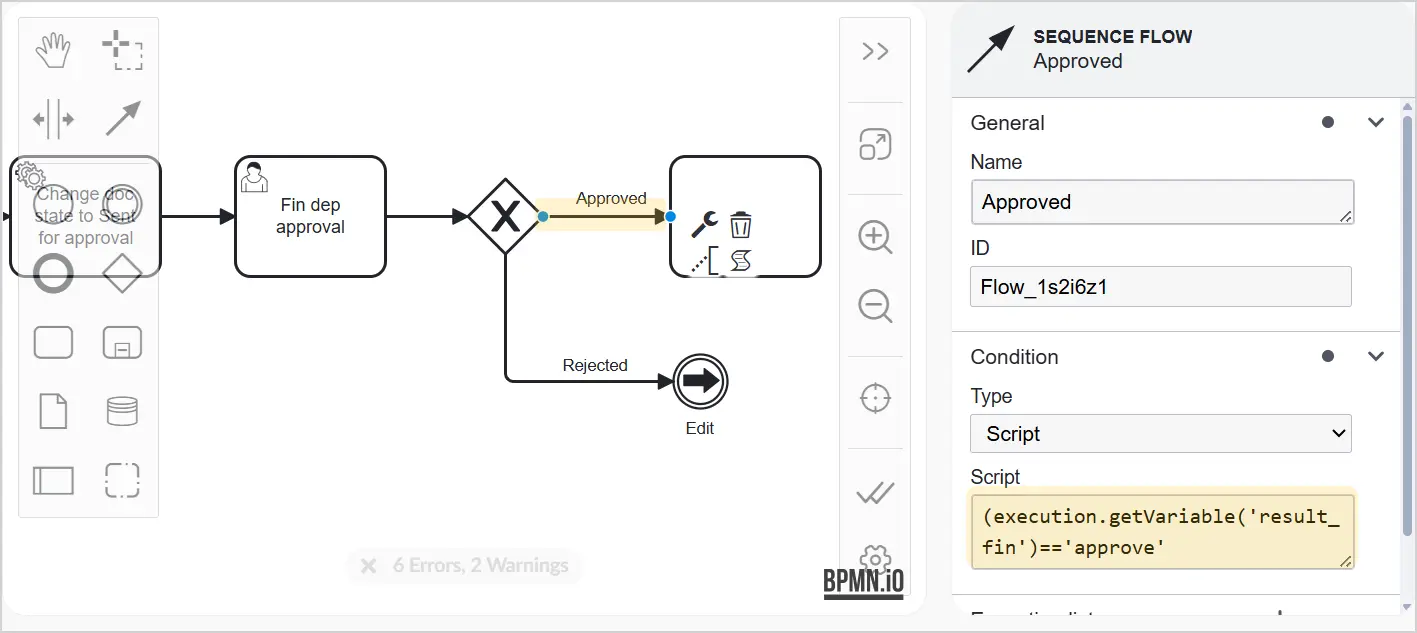
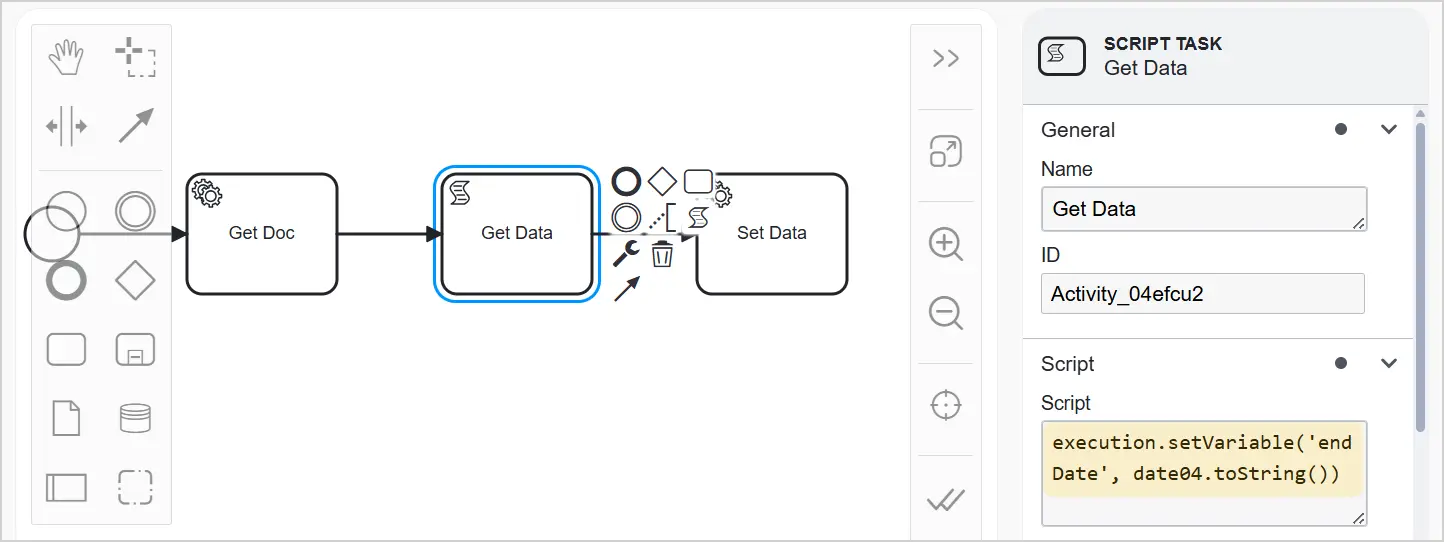
-
execution.setVariable('variableName', value)— sets the variable value in business process scripts.