2.3. Document Type Settings
In this section, you will learn how to work with the Document Type Settings shortcut group, which allows you to configure parameters for document types. This group contains the following shortcuts:
- Role Dictionary
- State Dictionary
- Document Registration Logs
- Registration Number Masks
- Link Type Dictionary
- Smart Folders
- Duplicate Document Check Rules
2.3.1. Role Dictionary for Document Type
Role Dictionary — is a list of roles granted to users on the platform for working with a specific document type. Users with a specific role can participate in the document processing workflow for the defined document type. To configure access for a specific role to a document type, see Roles.
You can use a role only once for one document type.
2.3.1.1. Create a Role in a Document Type
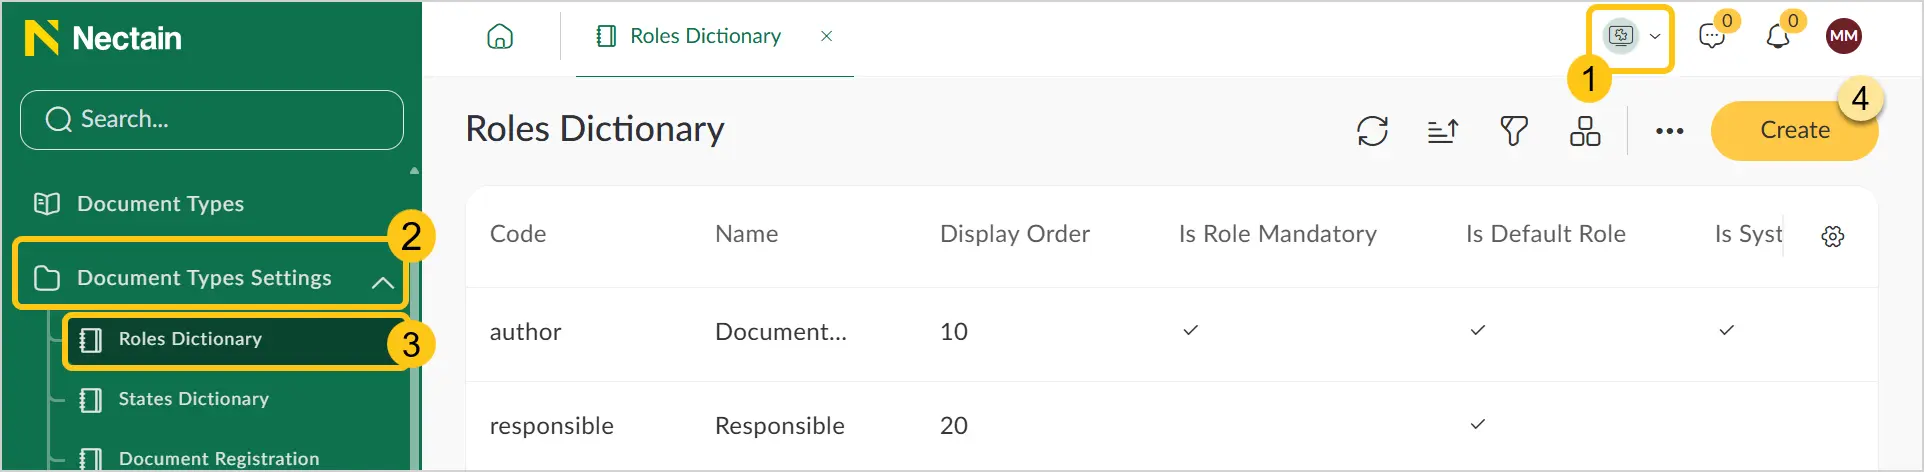
For each document type, you can assign one of the standard roles or create custom roles. To create a new role for a document type, follow these steps:
-
In the navigation panel, select the Studio 1 workspace.
-
Select the Document Type Settings 2 shortcut group, then select the Role Dictionary 3 shortcut.
-
In the toolbar, select Create 4.
 Note:
Note:The shortcut also has folders available for convenient role organization. You can enable folder view mode, and then create a record in the required folder.
-
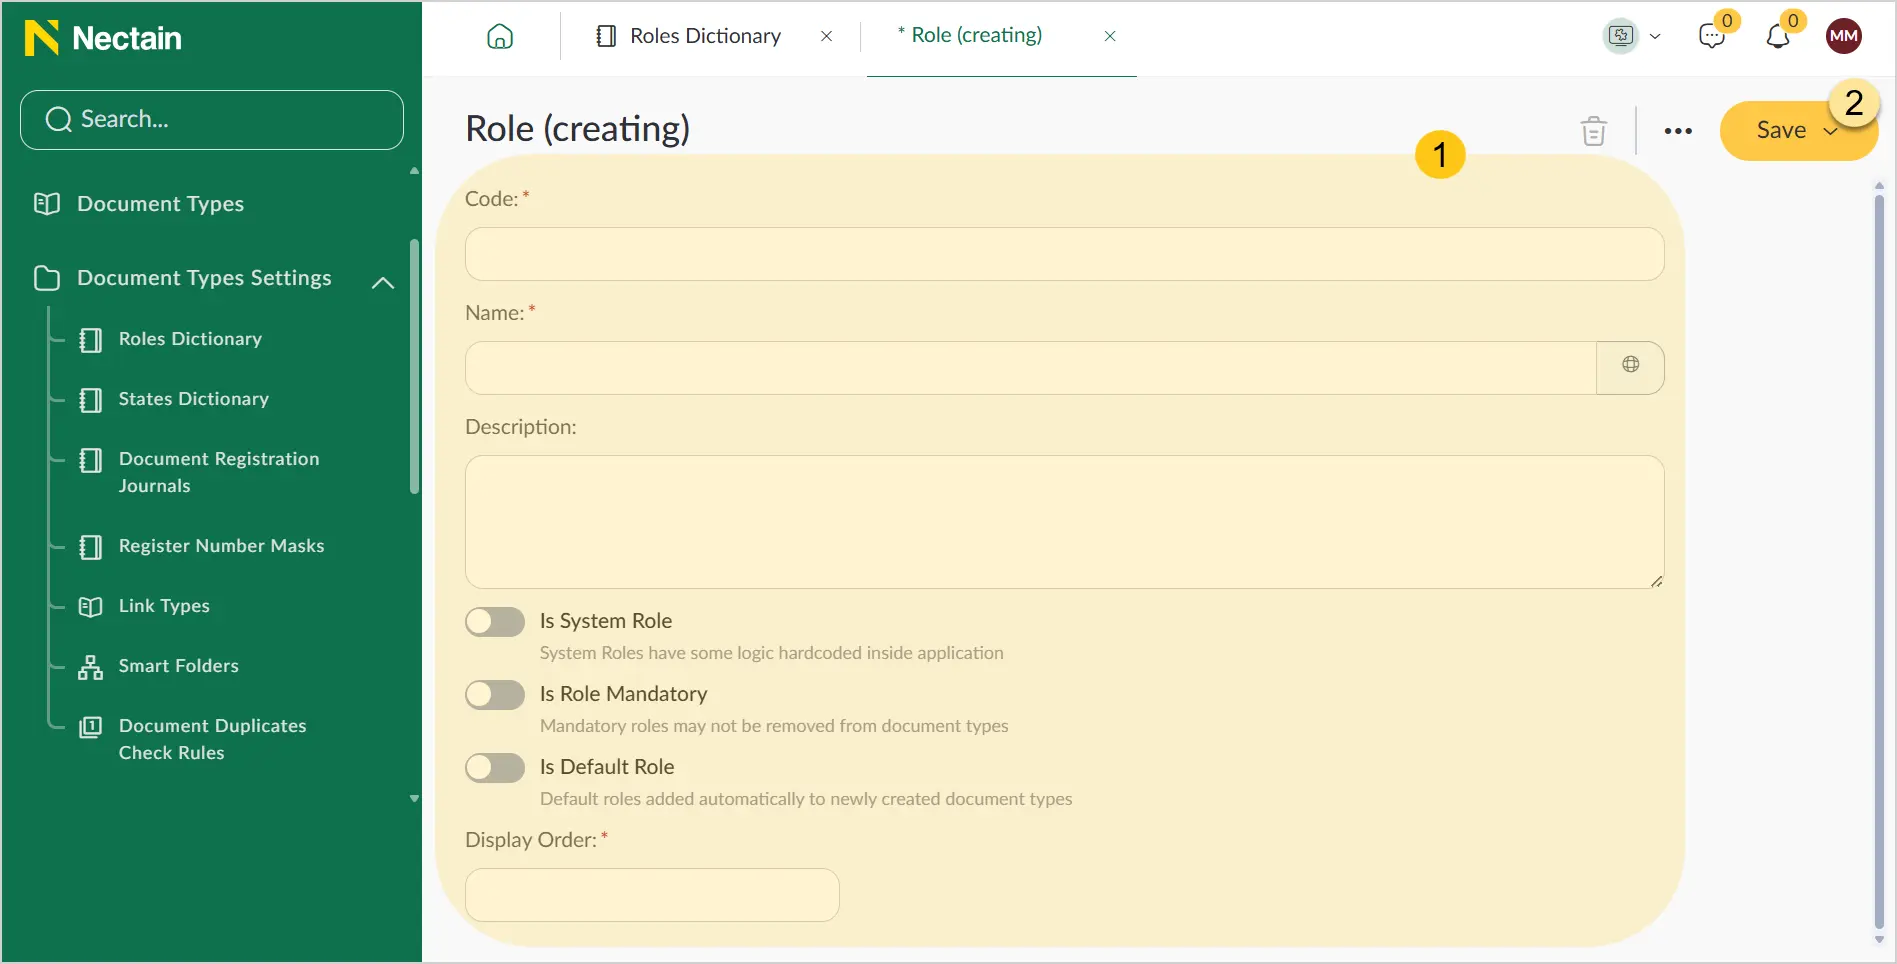
Fill in the fields 1 using the hints from the table below.
-
In the toolbar, select Save 2.
| Field Name | Description |
|---|---|
| Code* |
|
| Name* | The name of this role. ℹ️ Note: You can set an alternative name for different languages. To do this, in the Name field, select the icon and fill in the fields for other languages. Then select the Apply button. |
| Description | A brief description of this role |
| Is System Role | If this toggle is enabled, the role becomes a system role and cannot be disabled in the document type. |
| Is Role Mandatory | Enable this toggle to make this role mandatory. Mandatory roles cannot be removed from document types. |
| Is Default Role | The default role will be displayed in all new document types |
| Display Order* | Enter a number that will determine the display order in the task class list. For example: "1". |
Fields marked with "*" are required.
2.3.1.2. Edit a Role in a Document Type
You can edit existing roles by following these steps:
- In the navigation panel, select the Studio workspace.
- Select the Document Type Settings shortcut group, then select the Role Dictionary shortcut.
- See Edit Record.
You can edit the Code field only for roles that are not used in any existing document types.
2.3.1.3. Delete a Role in a Document Type
You can delete existing roles by following these steps:
- In the navigation panel, select the Studio workspace.
- Select the Document Type Settings shortcut group, then select the Role Dictionary shortcut.
- See Delete Record.
You can only delete a role that is not used in any existing document types.
2.3.1.4. Copy a Role in a Document Type
You can copy existing roles by following these steps:
- In the navigation panel, select the Studio workspace.
- Select the Document Type Settings shortcut group, then select the Role Dictionary shortcut.
- See Copy Record.
2.3.2. States Dictionary for Document Type
State Dictionary – is a list of states that documents of certain types can be in. To configure the states available for a specific document type, see the States section.
You can use a state only once for one document type.
2.3.2.1. Create a State
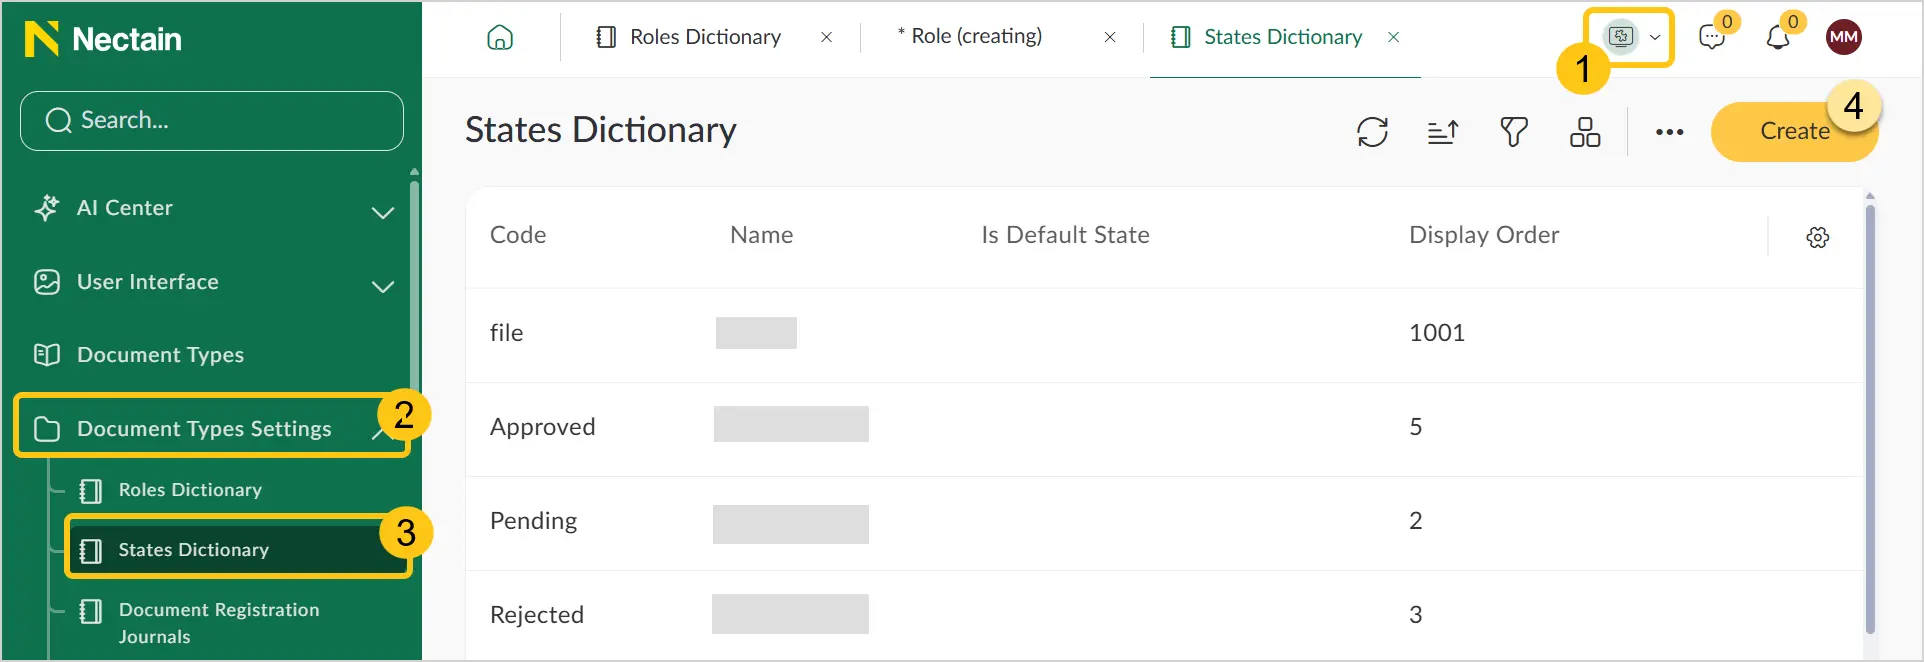
For each document type, you can activate one of the standard states or create custom states.
To create a new state for a document type, follow these steps:
-
In the navigation panel, select the Studio 1 workspace.
-
Select the Document Type Settings 2 shortcut group, then select the State Dictionary 3 shortcut.
-
In the toolbar, select Create 4.
 Note:
Note:The shortcut also has folders available for convenient state organization. You can enable folder view mode, and then create a record in the required folder.
-
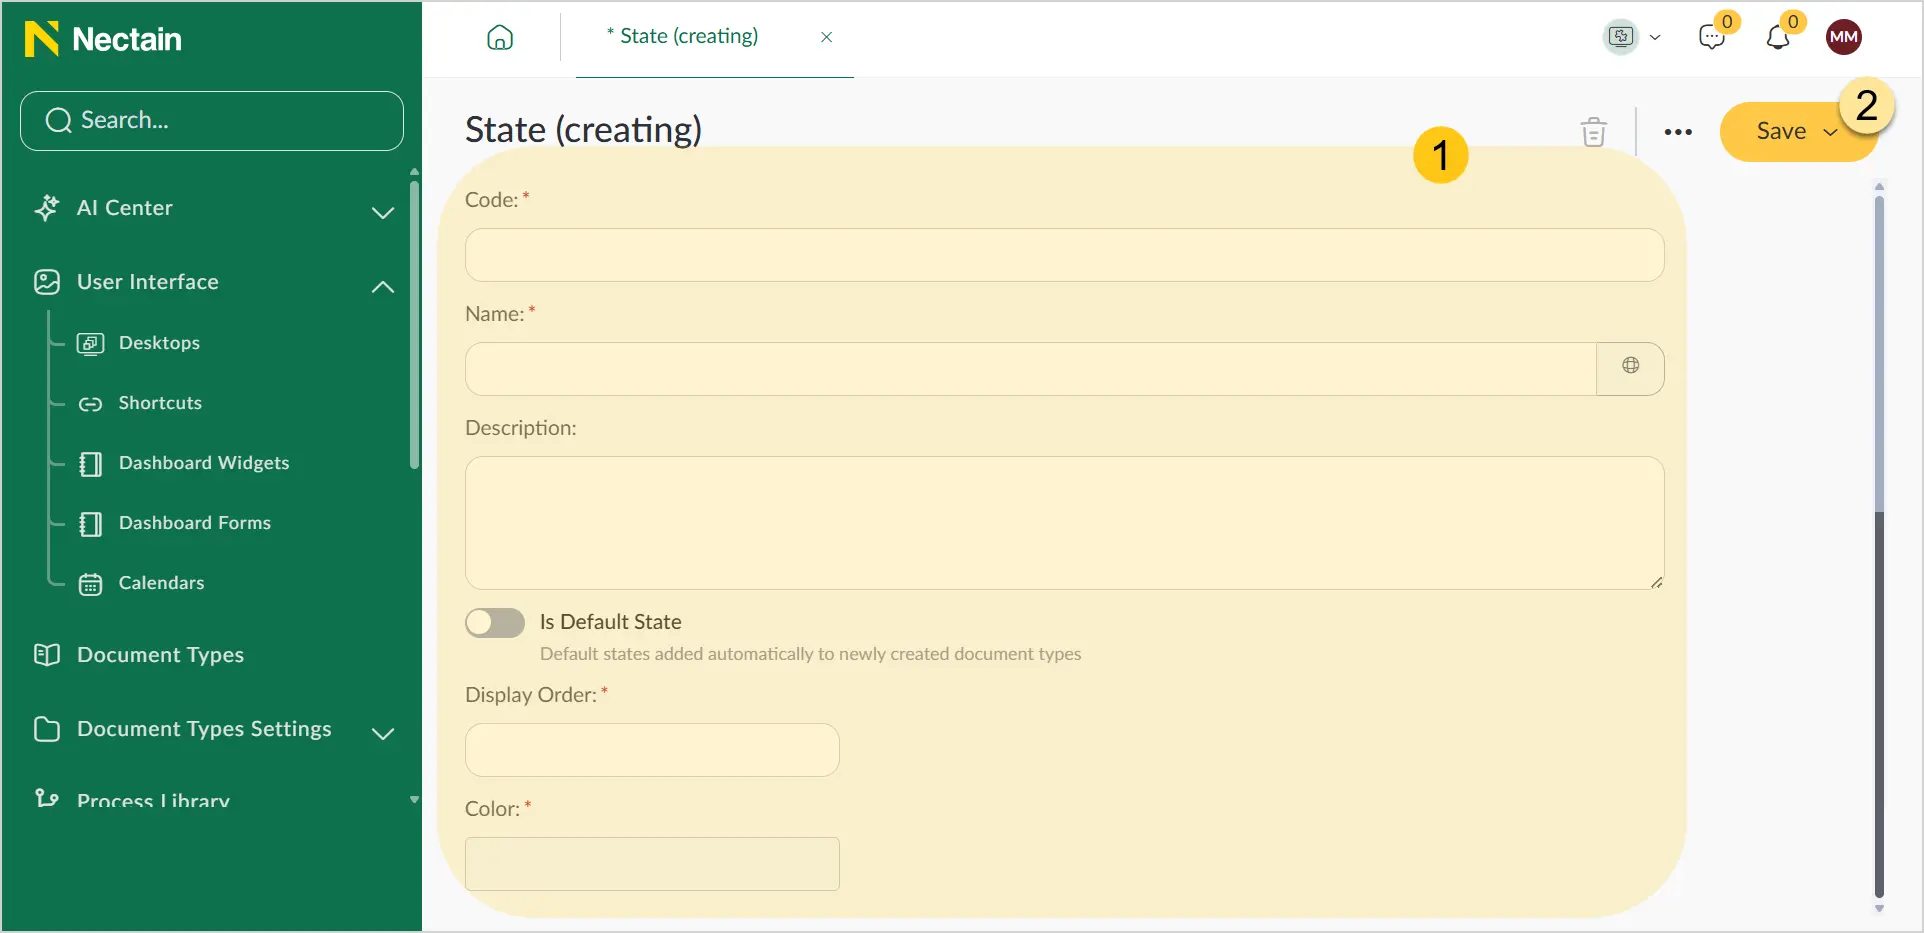
Fill in the fields 1 using the hints from the table below.
-
In the toolbar, select Save 2.
| Field Name | Description |
|---|---|
| Code* |
|
| Name* | The display name of this state. ℹ️ Note: You can set an alternative name for different languages. To do this, in the Name field, select the icon and fill in the fields for other languages. Then select the Apply button. |
| Description | A brief description of this state |
| Is State Default | The default state will be displayed in all new document types |
| Display Order* | Enter a number that will determine the display order in the task class list. For example: "1". |
| Color* | Select one of six available colors. The corresponding state color will be displayed in all document lists (grids) in the system. |
Fields marked with "*" are required.
2.3.2.2. Edit a State
You can edit existing states by following these steps:
- In the navigation panel, select the Studio workspace.
- Select the Document Type Settings shortcut group, then select the State Dictionary shortcut.
- See the Edit Record section.
You can edit the Code field only for states that are not used in any existing document types.
2.3.2.3. Copy a State
You can copy existing states by following these steps:
- In the navigation panel, select the Studio workspace.
- Select the Document Type Settings shortcut group, then select the State Dictionary shortcut.
- See the Copy Record section.
2.3.2.4. Delete a State
You can delete existing states by following these steps:
- In the navigation panel, select the Studio workspace.
- Select the Document Type Settings shortcut group, then select the State Dictionary shortcut.
- See the Delete Record section.
You can only delete a state that is not used in any existing document types.
2.3.3. Document Registration Logs
The platform registers a document in the corresponding log during manual or automatic registration. Two tools are used for this: Document Registration Log and Registration Number Masks.
Document Registration Log defines the general rules for document registration, including the registration mask used when registering documents in the log.
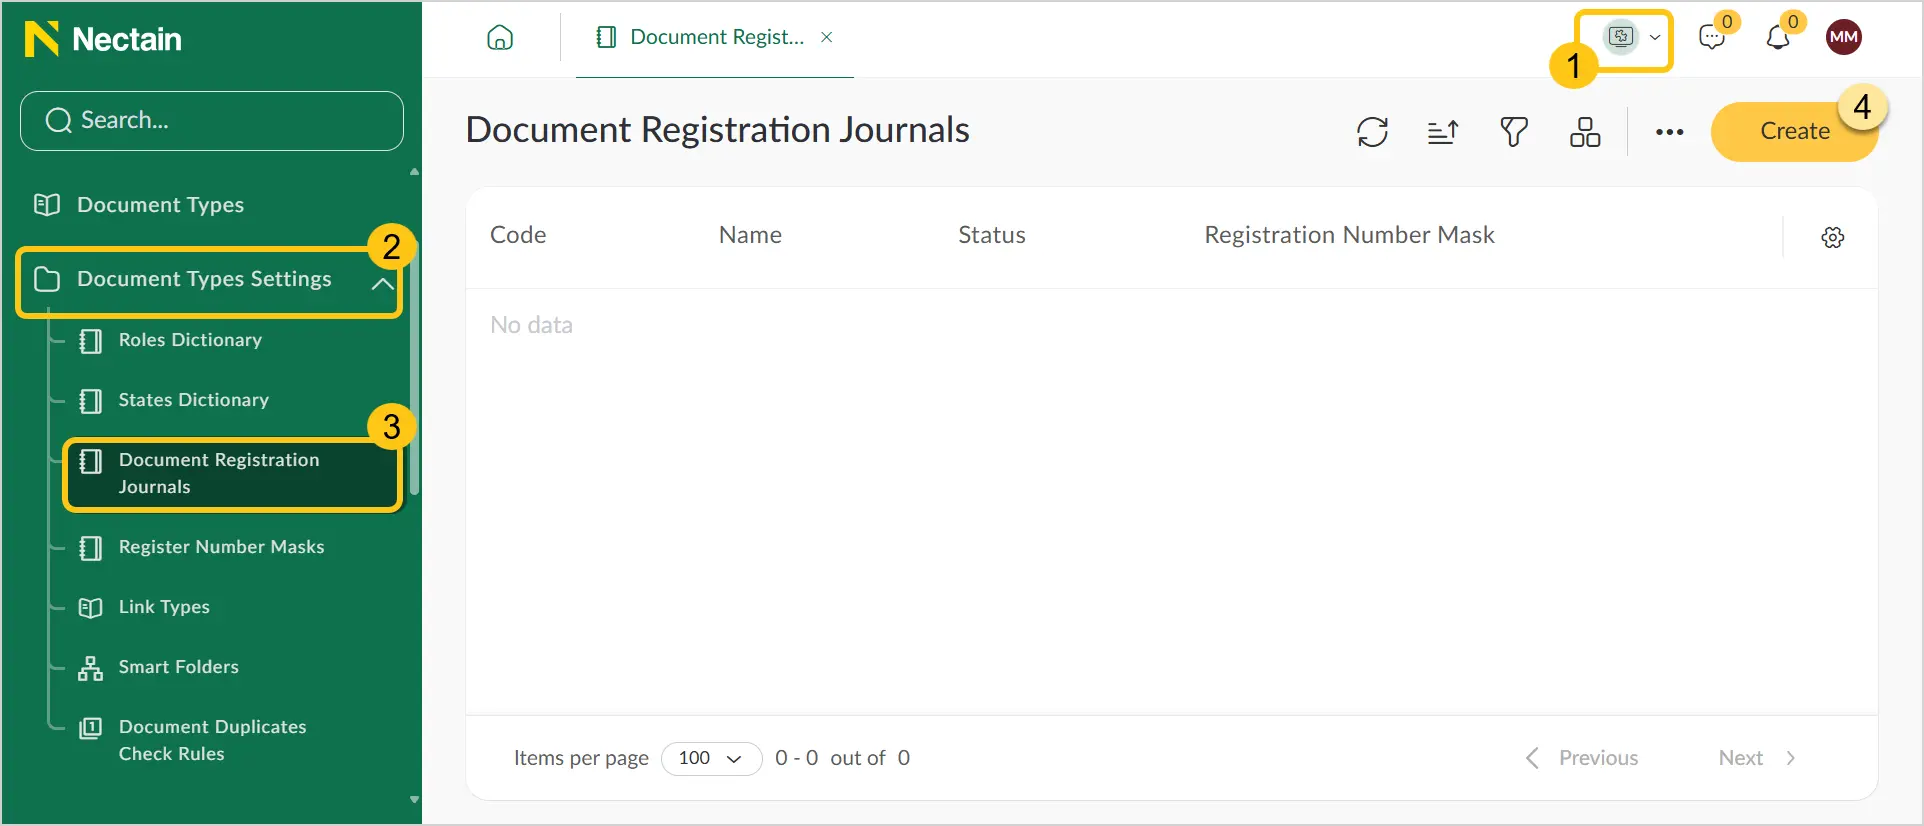
2.3.3.1. Create a Document Registration Log
-
In the navigation panel, select the Studio 1 workspace.
-
Select the Document Type Settings 2 shortcut group, then select the Document Registration Journals 3 shortcut.
-
In the toolbar, select Create 4.
-
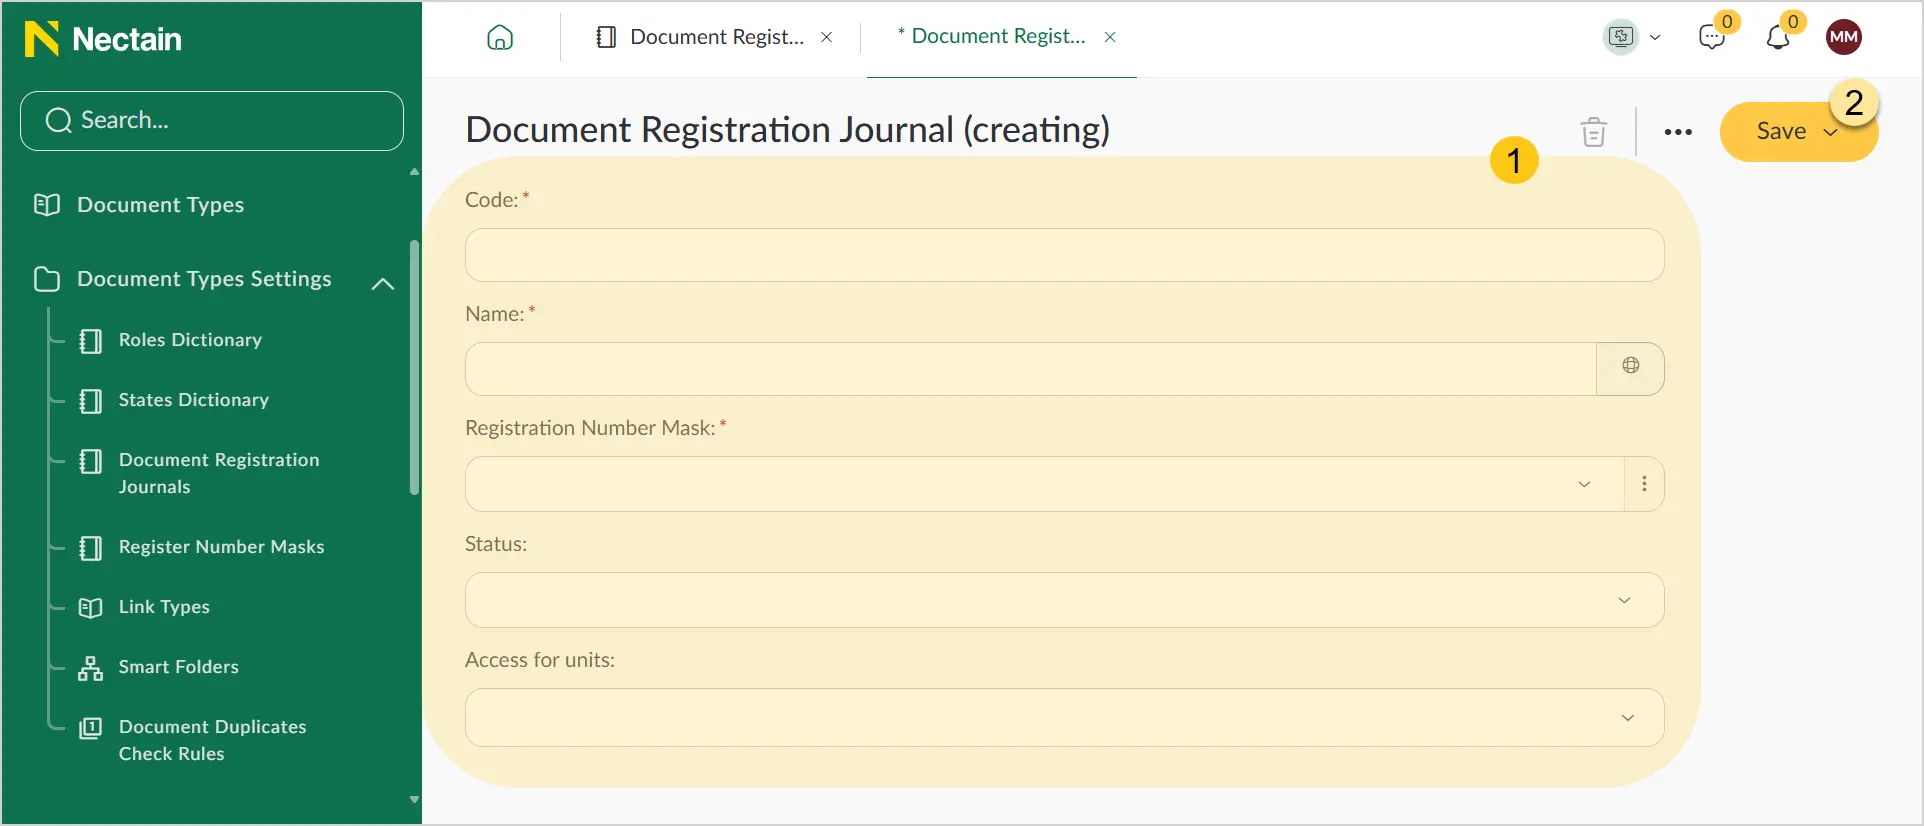
Fill in the fields 1 using the hints from the table below.
-
In the toolbar, select Save 2.
| Field Name | Description |
|---|---|
| Code* |
|
| Name* | The display name of the log. ℹ️ Note: You can set an alternative name for different languages. To do this, in the Name field, select the icon and fill in the fields for other languages. Then select the Apply button. |
| Registration Number Mask* | Stores the formulas used to generate the registration number for documents registered in the logs (see Masks) |
| Status | The log status. Possible values:
|
| Access for Units | A list of organizational units that have access to the registration log. |
Fields marked with "*" are required.
2.3.3.2. Edit a Log
You can edit existing logs by following these steps:
- In the navigation panel, select the Studio workspace.
- Select the Document Type Settings shortcut group, then select the Document Registration Log shortcut.
- See the Edit Record section.
You can edit the Code field only for logs that are not used in any existing document types.
2.3.3.3. Copy a Log
You can copy existing logs by following these steps:
- In the navigation panel, select the Studio workspace.
- Select the Document Type Settings shortcut group, then select the Document Registration Log shortcut.
- See the Copy Record section.
2.3.3.4. Delete a Log
You can delete existing logs by following these steps:
- In the navigation panel, select the Studio workspace.
- Select the Document Type Settings shortcut group, then select the Document Registration Log shortcut.
- See the Delete Record section.
You can only delete a log that is not used in any existing document types.
2.3.3.5. Register Documents in a Log
To assign a registration number to a document, it must be registered in a log. Follow these steps:
-
Add an existing registration log to the document type. This can be done in two ways:
Method 1: Via the Main tab of the document type
-
In the Main 1 tab, in the Default Registration Log 2 field, select the required log from the dropdown list.
Method 2: By adding the Registration Log attribute to the document form
- Open the required document type.
- Add the attribute Registration Log to the document form and configure it. (For more details on configuration, see the Designer section).
Unlike the first method, the Registration Log attribute can be used to allow the user to select a log when creating or editing a document.
Note:You can select a registration log only under the following conditions:
- You or your organizational unit have access to this log.
- The registration log has the Active status.
-
Add the attributes Registration Number and Registration Date to the document type form and save the changes.
-
Configure an action and/or event in the document lifecycle that will trigger document registration in the log.
Action example: In a certain document state, the user clicks the "Register" button.
Event example: When the document transitions to the "Approved" state, the platform registers the document.
Action and event example: When the document transitions to the "Approved" state, a service task in the linked process definition performs a programmatic document action "Register".For configuration, use the action type Register Document and/or the event handler type Register Document.
Configuring the Register Document action type
- Open the required document type.
- Select the States tab.
- Select and configure the required state. For more details, see the States section.
- In the selected state, under the Actions section, select + Add action.
- In the Add Action form:
- Fill in the required fields. For more details, see the States section.
- In the Action Type field, select Register Document.
- Select the Add Action button.
- Save the changes in the document type.
Configuring the Register Document event handler type
- Open the required document type.
- Select the Events tab.
- Select and configure the required event. For more details, see the Events section.
- In the event, select + Add Handler.
- In the Add Handler form:
- Fill in the required fields. They will vary depending on the event and handler you selected. For more details, see the Events section.
- In the Handler Type field, select Register Document.
- Select the Add button.
- Save the changes in the document type.
-
Create a document of this type. The document will be registered when the action type Register Document and/or the event with handler type Register Document occurs in the document lifecycle, according to your configuration.
As a result, during the registration process, the platform fills in the following document attributes:
- Registration Number: A According to the mask of the registration number of the log.
- Registration Date: B Current date and time.
2.3.4. Registration Number Masks
Registration Number Mask is used to store the formulas used to generate registration numbers for documents registered in logs. They are used to standardize data entry and define which characters (letters, digits, or special characters) can be entered in each position of the number and how these characters should be arranged.
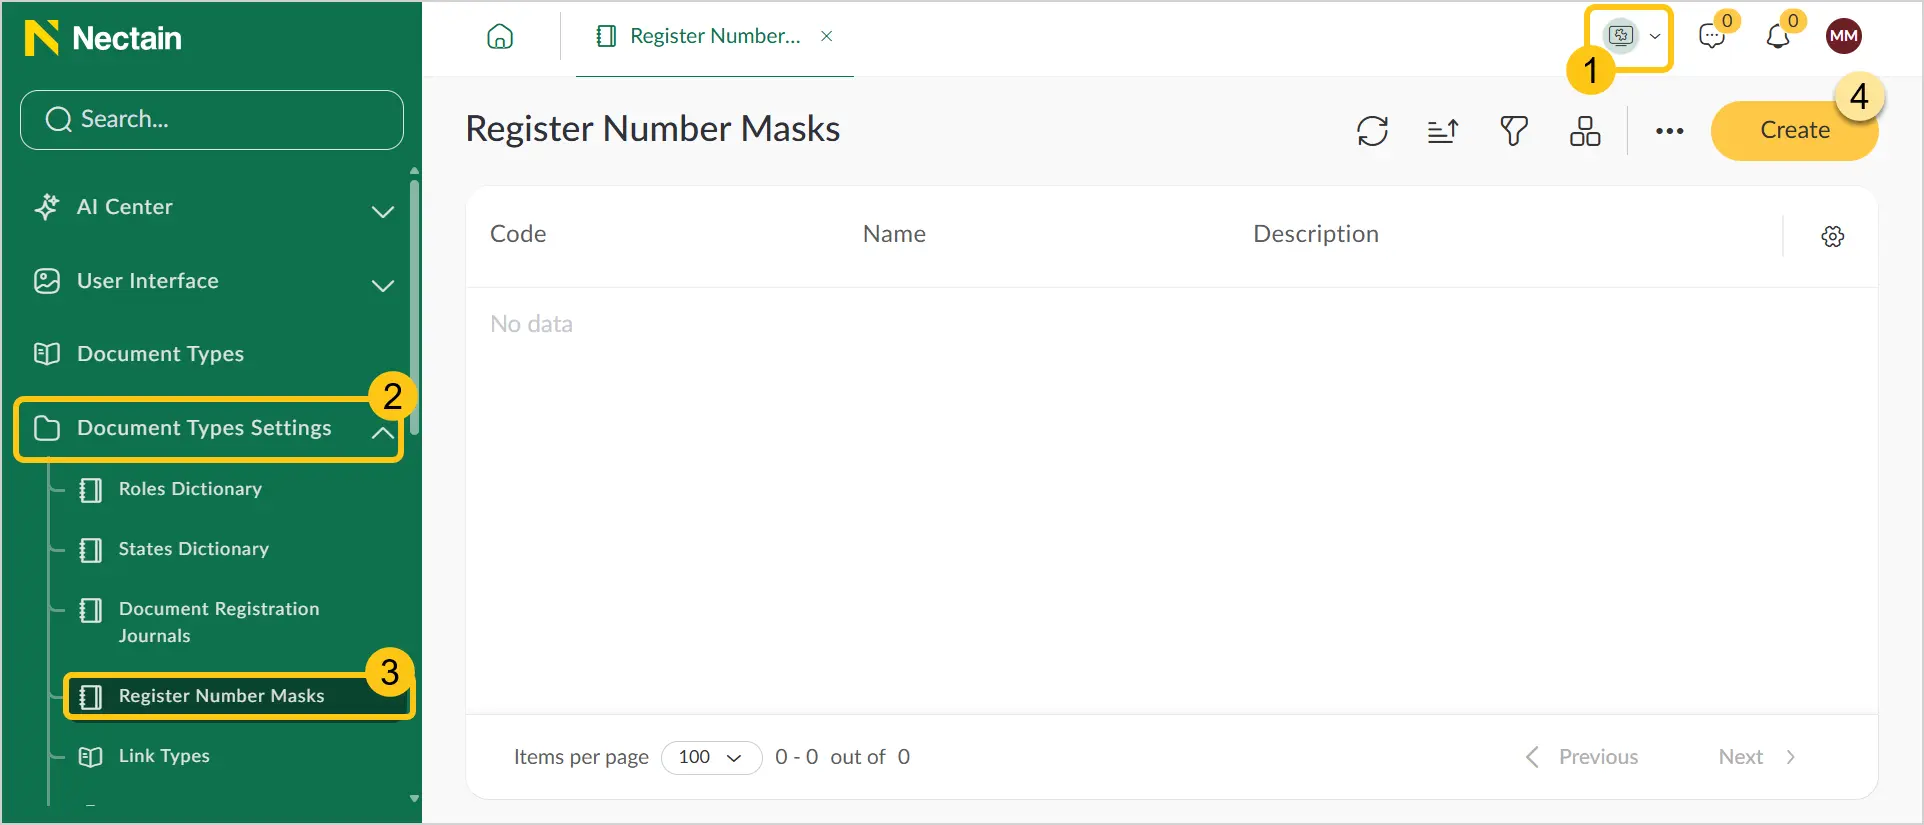
2.3.4.1. Create a Registration Number Mask
-
In the navigation panel, select the Studio 1 workspace.
-
Select the Document Type Settings 2 shortcut group, then select the Registration Number Masks 3 shortcut.
-
In the toolbar, select Create 4.
-
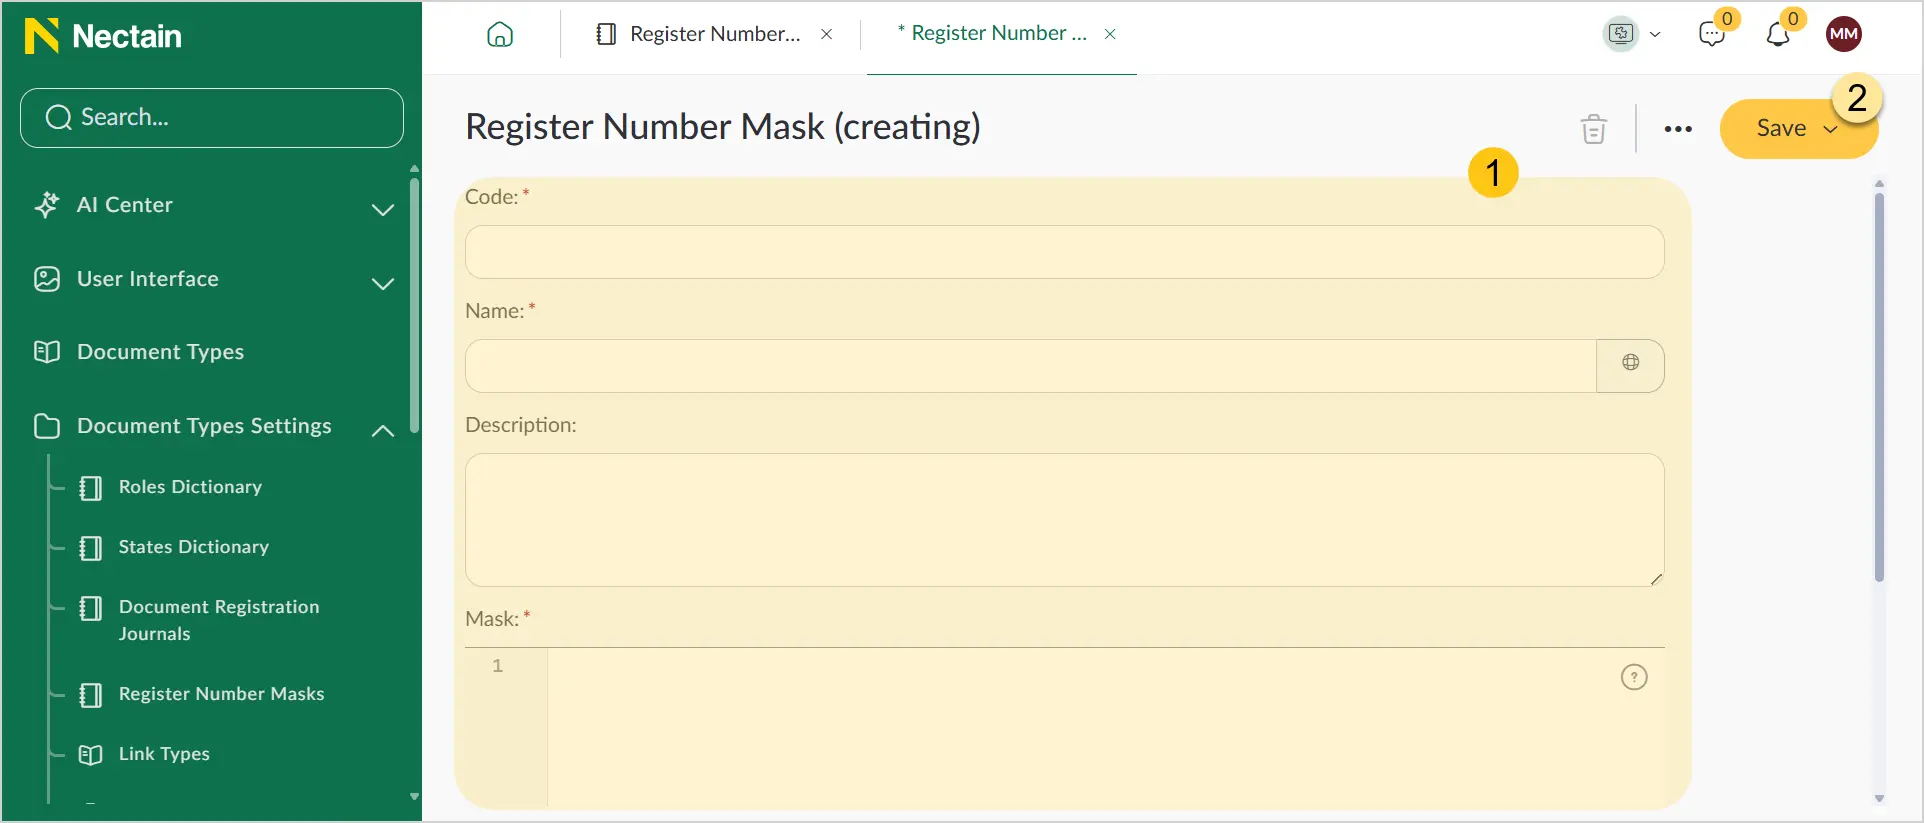
Fill in the fields 1 using the hints from the table below.
-
In the toolbar, select Save 2.
| Field Name | Description |
|---|---|
| Code* |
|
| Name | The display name of this mask. ℹ️ Note: You can set an alternative name for different languages. To do this, in the Name field, select the icon and fill in the fields for other languages. Then select the Apply button. |
| Description | A brief description of this mask |
| Mask* | The mask formula, which can contain the following elements:
$counter, which is a sequential counter, or the COUNTER function, which accepts an argument — the counter code.For example: COUNTER(STR($now, 'YYYY')) — this is a function that returns the next number from the counter whose code equals the current year. This means that every January 1st, the counter resets and starts counting from one.You can use any attribute as the counter key. |
Fields marked with "*" are required.
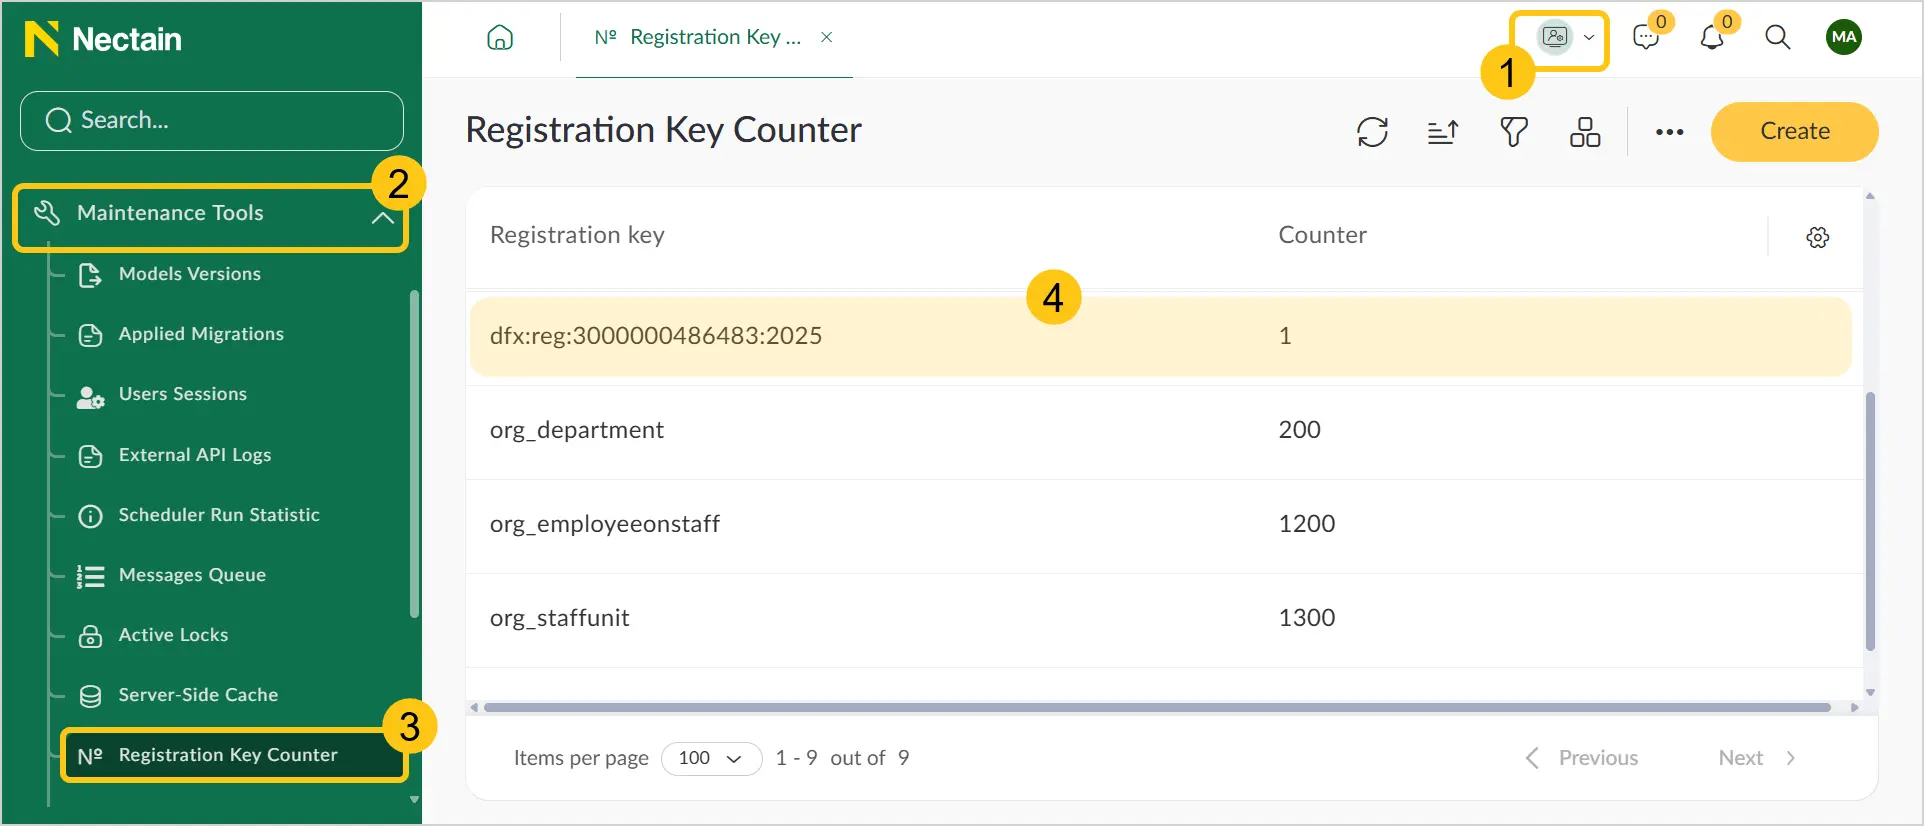
2.3.4.2. Reset Registration Number Counters
-
In the navigation panel, select the Administration 1 workspace.
-
Select the Maintenance Tools 2 shortcut group, then select the Registration Key Counters 3 shortcut.
-
Double-click the counter record you want to reset 4.
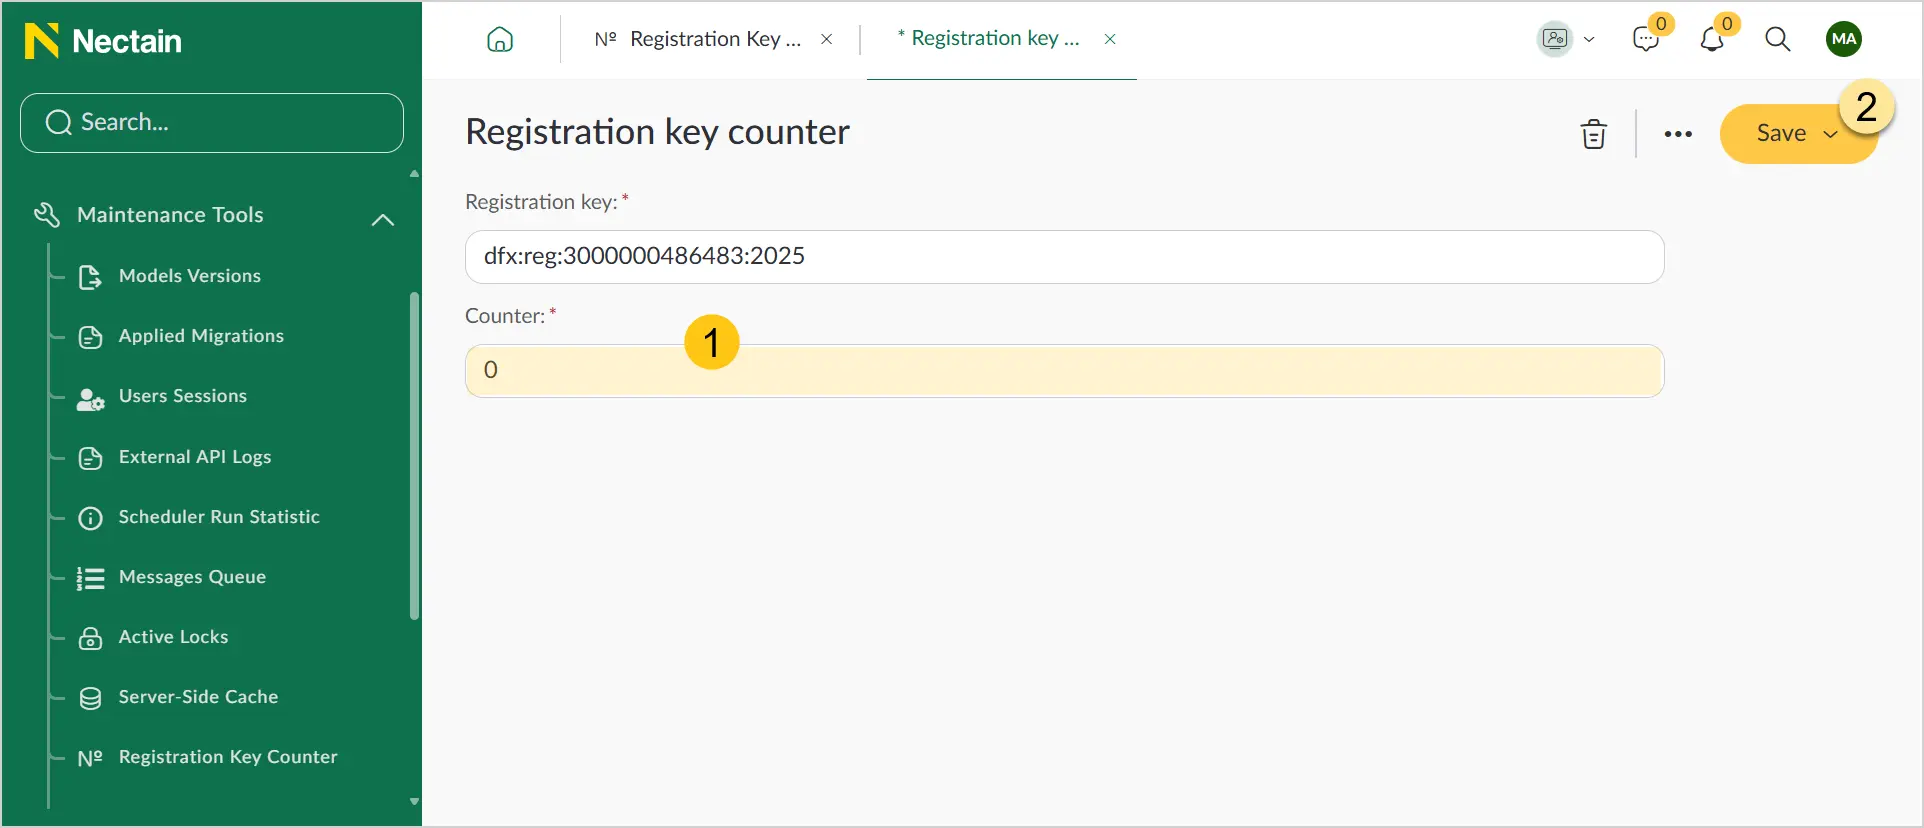
-
In the Counter 1 field, enter "0", then in the toolbar, select Save 2.
2.3.4.3. Edit a Registration Number Mask
You can edit existing masks by following these steps:
- In the navigation panel, select the Studio workspace.
- Select the Document Type Settings shortcut group, then select the Registration Number Masks shortcut.
- See the Edit Record section.
You can edit the Code field only for masks that are not linked to any existing logs.
2.3.4.4. Copy a Registration Number Mask
You can copy existing masks by following these steps:
- In the navigation panel, select the Studio workspace.
- Select the Document Type Settings shortcut group, then select the Registration Number Masks shortcut.
- See the Copy Record section.
2.3.4.5. Delete a Registration Number Mask
You can delete existing masks by following these steps:
- In the navigation panel, select the Studio workspace.
- Select the Document Type Settings shortcut group, then select the Registration Number Masks shortcut.
- See the Delete Record section.
You can only delete a mask that is not linked to any log.
2.3.5. Link Type Dictionary
You can create links between documents that have a specific type and direction (Incoming/Outgoing).
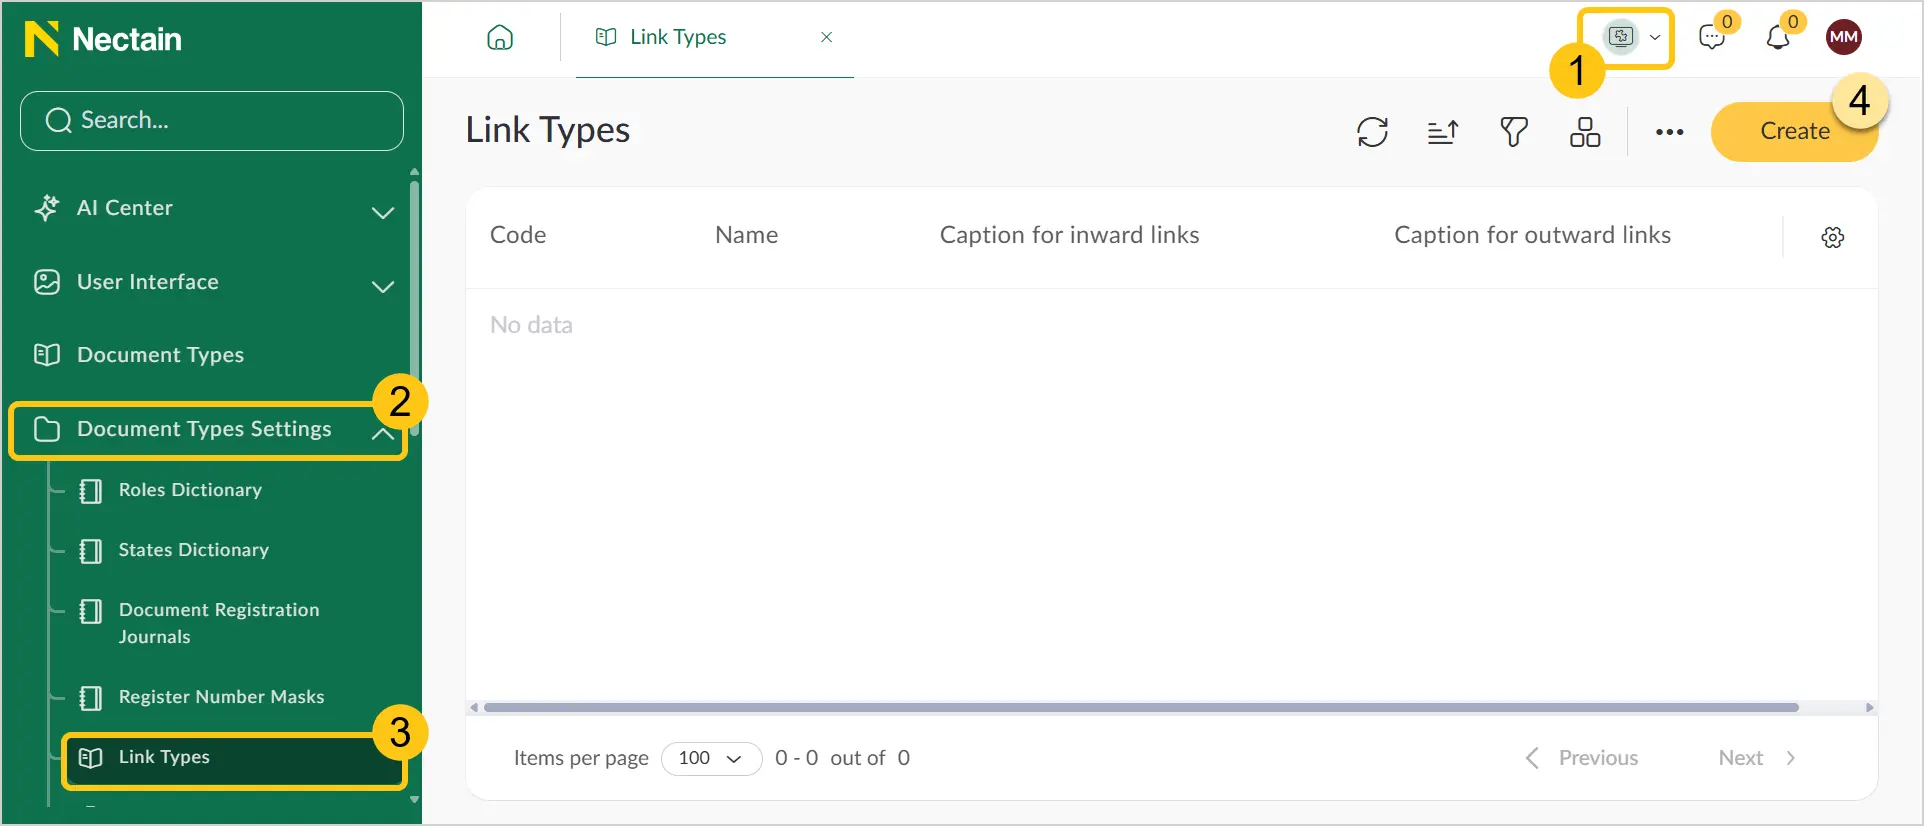
2.3.5.1. Create a Link Type
-
In the navigation panel, select the Studio 1 workspace.
-
Select the Document Type Settings 2 shortcut group, then select the Link Types 3 shortcut.
-
In the toolbar, select Create 4.
-
Fill in the fields 1 using the hints from the table below.
-
In the toolbar, select Save 2.
| Field Name | Description |
|---|---|
| Code* |
|
| Name* | The display name of the link type. ℹ️ Note: You can set an alternative name for different languages. To do this, in the Name field, select the icon and fill in the fields for other languages. Then select the Apply button. |
| Caption for inward links | The name of the incoming link. ℹ️ Note: You can set an alternative name for different languages. To do this, in the Incoming Link Name field, select the icon and fill in the fields for other languages. Then select the Apply button. |
| Caption for outward links | The name of the outgoing link. ℹ️ Note: You can set an alternative name for different languages. To do this, in the Outgoing Link Name field, select the icon and fill in the fields for other languages. Then select the Apply button. |
Fields marked with "*" are required.
2.3.5.2. Edit a Link Type
You can edit existing link types by following these steps:
- In the navigation panel, select the Studio workspace.
- Select the Document Type Settings shortcut group, then select the Link Type Dictionary shortcut.
- See the Edit Record section.
You can edit the Code field only for link types that are not linked to any document type.
2.3.5.3. Copy a Link Type
You can copy existing link types by following these steps:
- In the navigation panel, select the Studio workspace.
- Select the Document Type Settings shortcut group, then select the Link Type Dictionary shortcut.
- See the Copy Record section.
2.3.5.4. Delete a Link Type
You can delete existing link types by following these steps:
- In the navigation panel, select the Studio workspace.
- Select the Document Type Settings shortcut group, then select the Link Type Dictionary shortcut.
- See the Delete Record section.
You can only delete link types that are not linked to any document type.
2.3.6. Smart Folders
Smart Folders is used to organize documents into folders according to specific rules. The hierarchy can contain from one to three levels.
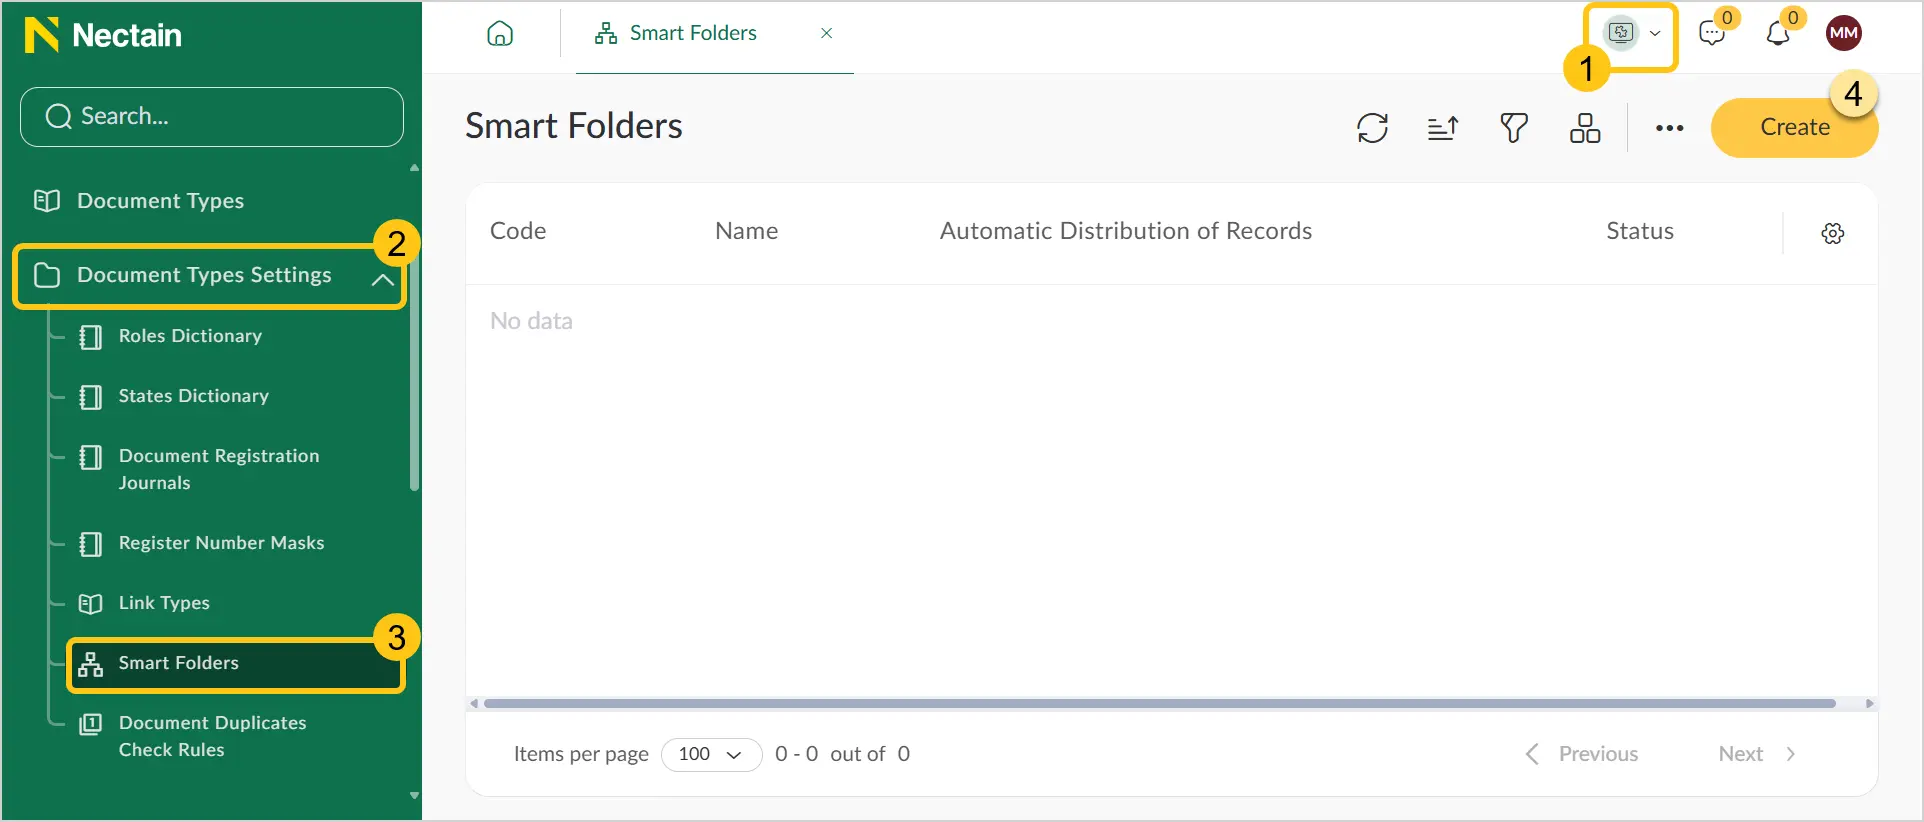
2.3.6.1. Create a Smart Folder Rule
-
In the navigation panel, select the Studio 1 workspace.
-
Select the Document Type Settings 2 shortcut group, then select the Smart Folders 3 shortcut.
-
In the toolbar, select Create 4.
-
Fill in the fields using the hints from the table below.
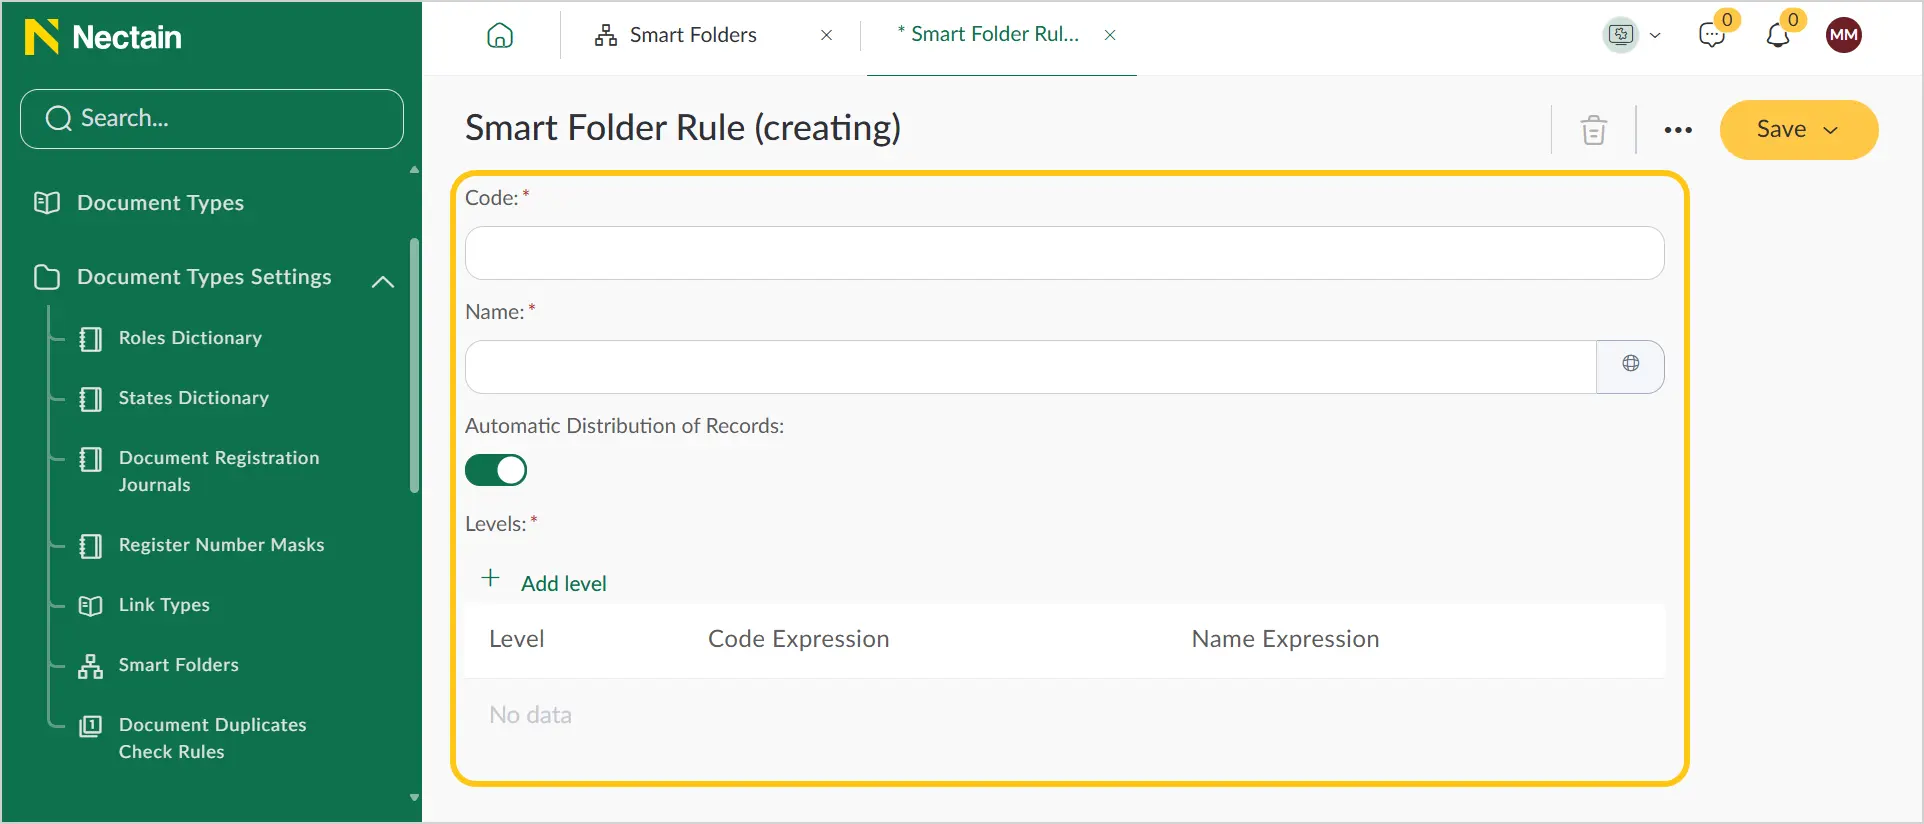
| Field Name | Description |
|---|---|
| Code* |
|
| Name* | The display name of the smart folder rule. ℹ️ Note: You can set an alternative name for different languages. To do this, in the Name field, select the icon and fill in the fields for other languages. Then select the Apply button. |
| Automatic Distribution of Records | A toggle to activate automatic record distribution. Disabled by default. In this state, it allows the user to create folders and move documents to them directly in the shortcut. |
| Levels* | Available when the Automatic Record Distribution toggle is enabled. Smart folder levels, from one to three. 1. Select the Add Level button. 2. Fill in the following fields:
The expression for building the code or name supports only two variables: $doc and $attrs.3. Select the Save 3 button. 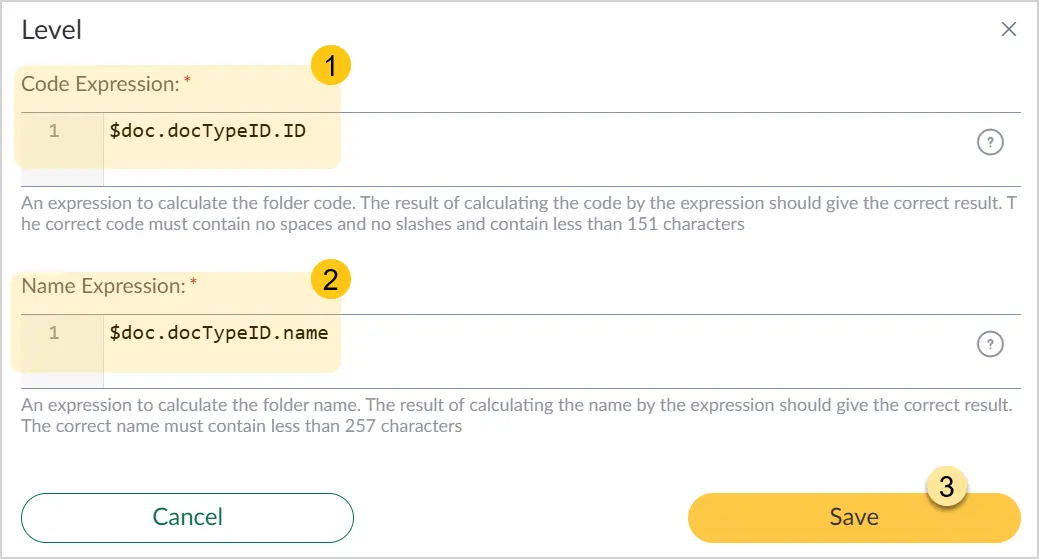 4. To view detailed instructions for building the expression, hover over the icon. Also see the Level Configuration Examples section. 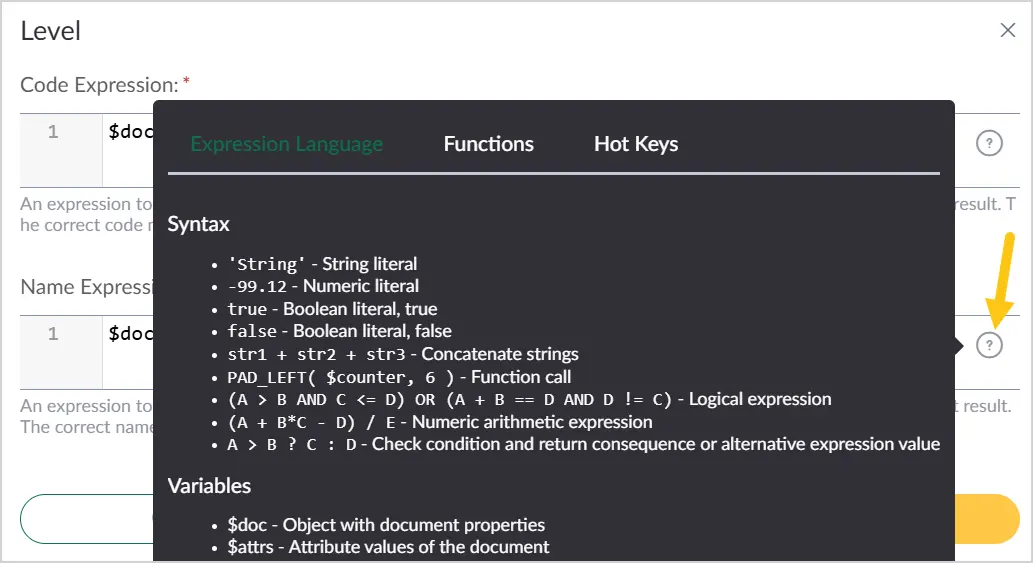 |
Fields marked with "*" are required.
-
In the toolbar, select Save.
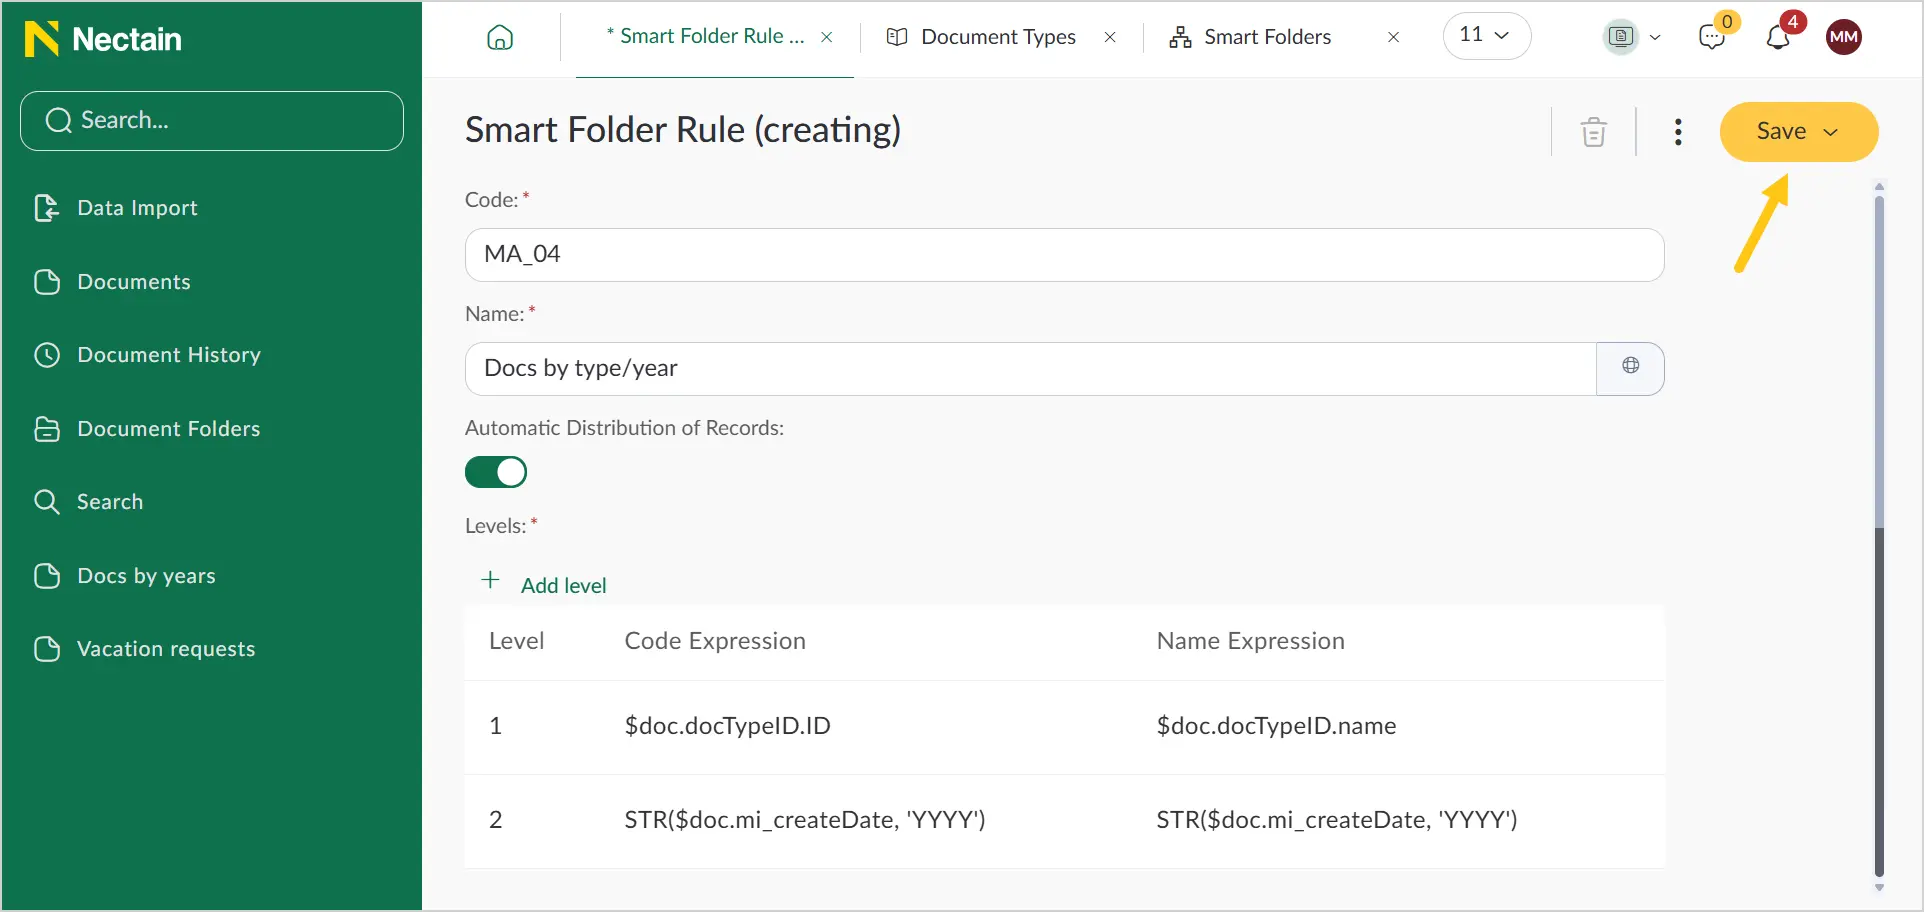
-
In the top menu, select the Activate button.
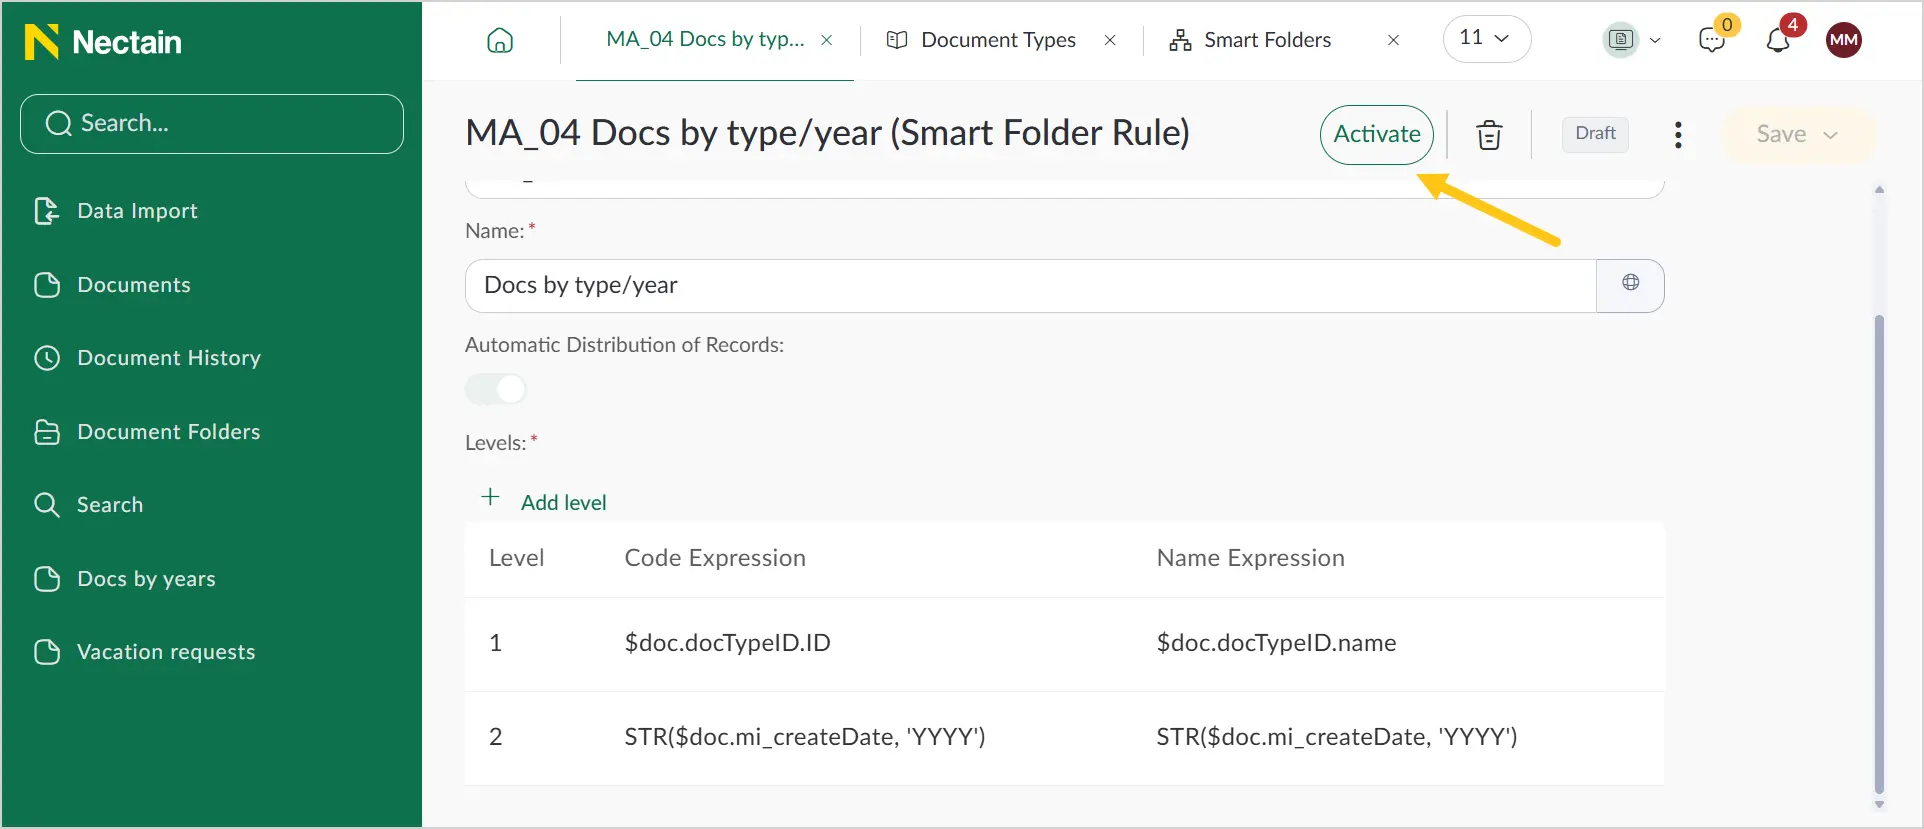 Note:
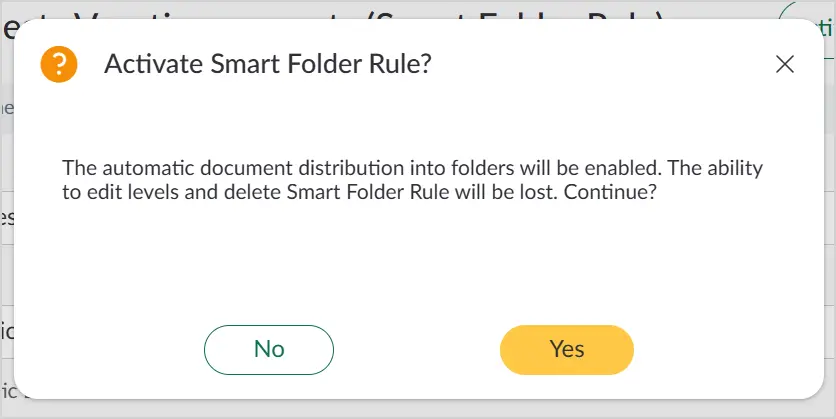
Note:If there are many documents in the system, the distribution operation may take a long time and put a load on the server. Confirm the distribution by selecting the Yes button.
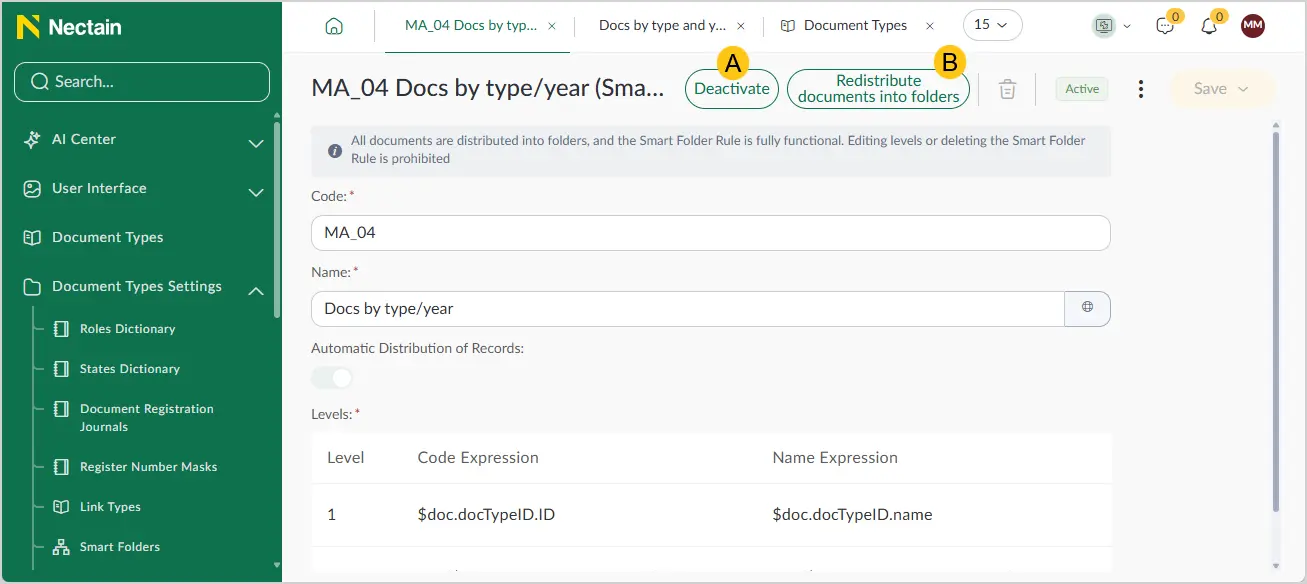
You can deactivate A created rules. You can also edit rules and redistribute documents into folders B taking into account the changes in the rule.
2.3.6.1.1. Level Configuration Examples:
-
Level 1 — folder name based on the document type code:
- Code Expression:
$doc.docTypeID.ID - Name Expression:
$doc.docTypeID.name
- Code Expression:
-
Level 2 — folder name based on the document creation year:
- Code Expression:
STR($doc.mi_createDate, 'YYYY') - Name Expression:
STR($doc.mi_createDate, 'YYYY')
- Code Expression:
-
Level 3 — folder name based on the value of the Contractor attribute (code: Contractors):
- Code Expression:
$attrs.Contractors.ID - Name Expression:
$attrs.Contractors.name
- Code Expression:
When creating expressions, you can use the following built-in functions:
| Function | Description | Usage Examples |
|---|---|---|
| CASE | Select one value from a list based on the input value | CASE($attrs.category, ['cat01', 'A'], ['cat02', 'B'])CASE($attrs.color, ['red', 'R'], ['blue', 'B'], 'X') |
| COALESCE | Return the first non-empty value from the list of arguments | COALESCE($attrs.incomingNo, $attrs.contractNo, $attrs.relatedDocNo, 'xxx')COALESCE($attrs.someCode, '000') |
| COUNTER | Generate a sequential number. Can accept a string parameter — the key of a subordinate sequence | PAD_LEFT(STR( COUNTER() ), 8)STR($now, 'YYYY') + '/' + COUNTER(STR($now, 'YYYY'))$organization.code + '/' + COUNTER($organization.code) |
| LEFT | Return the first N characters of a string | LEFT($author.firstName, 1) |
| PAD_LEFT | Pad a string on the left with a space or specified character to the required length | PAD_LEFT($counter, 6, '0') |
| PAD_RIGHT | Pad a string on the right with a space or specified character to the required length | PAD_RIGHT($counter, 6, '_') |
| RIGHT | Return the last N characters of a string | RIGHT($doc.docNumber, 3) |
| STR | Convert to a string | STR($counter)STR($now, 'YYYY')STR($now, 'YY')STR($now, 'MM')STR($now, 'M')STR($now, 'DD')STR($now, 'D')STR($now, 'HH')STR($now, 'H')STR($now, 'mm')STR($now, 'm') |
| SUBSTR | Return M characters from the middle of a string, starting at position N | SUBSTR($organization.number, 4, 2) |
| TO_LOWER | Convert a string to lowercase | TO_LOWER($author.firstName) |
| TO_UPPER | Convert a string to uppercase | TO_UPPER($author.firstName) |
2.3.6.2. Edit a Smart Folder Rule
You can edit existing smart folders by following these steps:
- In the navigation panel, select the Studio workspace.
- Select the Document Type Settings shortcut group, then select the Folder Hierarchy shortcut.
- See the Edit Record section.
2.3.6.3. Copy a Smart Folder Rule
You can copy existing smart folders by following these steps:
- In the navigation panel, select the Studio workspace.
- Select the Document Type Settings shortcut group, then select the Folder Hierarchy shortcut.
- See the Copy Record section.
2.3.6.4. Delete a Smart Folder Rule
You can delete existing smart folders by following these steps:
- In the navigation panel, select the Studio workspace.
- Select the Document Type Settings shortcut group, then select the Folder Hierarchy shortcut.
- See the Delete Record section.
2.3.6.5. Apply a Smart Folder Rule
The created hierarchies can be used in the following cases:
- In Documents type shortcuts (see Apply a Folder Hierarchy to a "Documents" Type Shortcut).
- In search templates (see Apply a Smart Folder Rule to a Search Template).
2.3.6.5.1. Apply a Folder Hierarchy to a "Documents" Type Shortcut
-
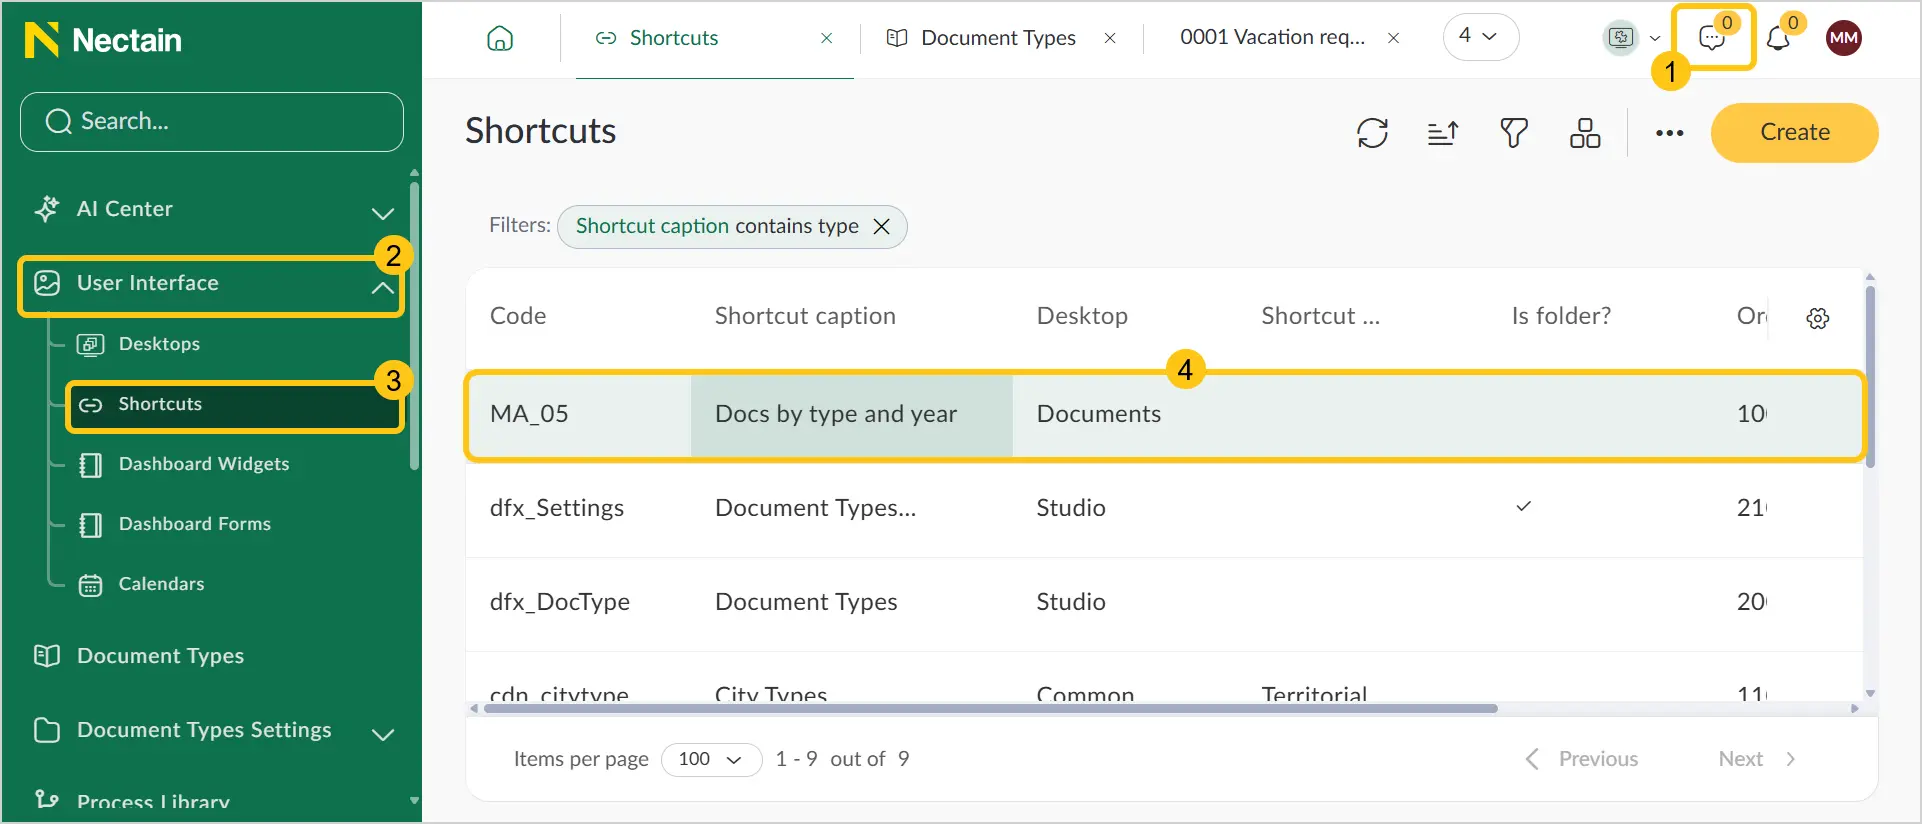
In the navigation panel, select the Studio 1 workspace.
-
Select the Interface 2 shortcut group, then select the Shortcuts 3 shortcut.
-
Open the required shortcut record 4.
 Note:
Note:The shortcut must be of the Documents type. To check the shortcut type, open it and make sure the Type field is set to Documents.
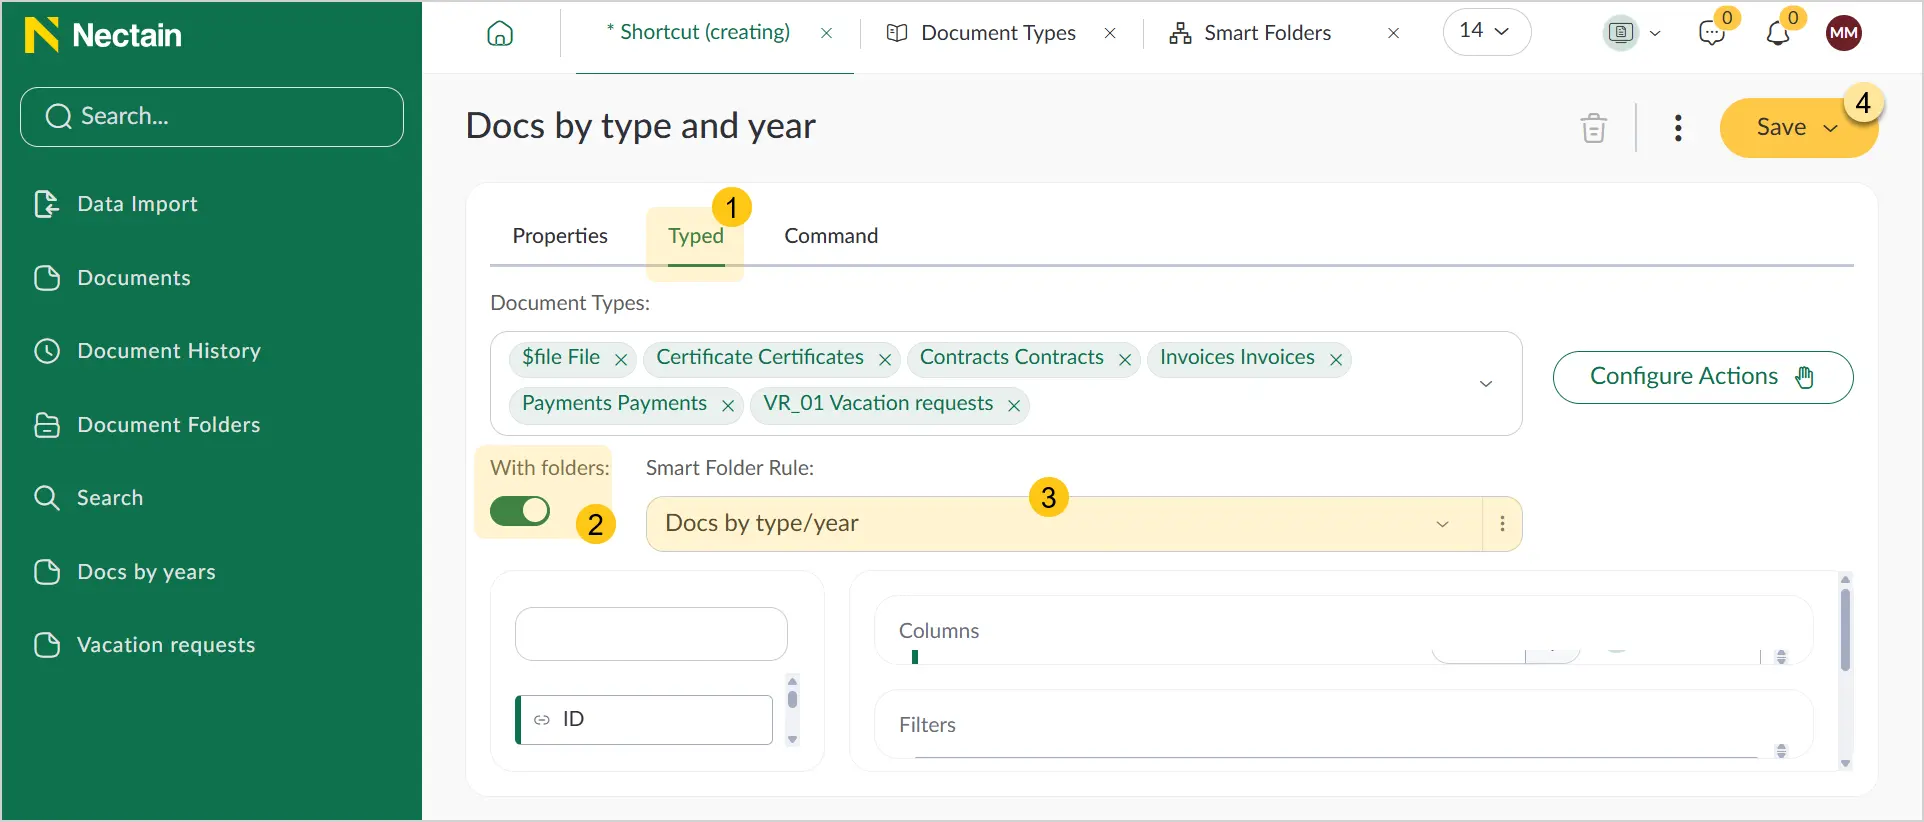
-
Select the Typed 1 tab.
-
Enable the With Folders 2 toggle, then in the Smart Folder Rule 3 field, select the required folder hierarchy from the dropdown list.
-
In the toolbar, select Save 4.
In the navigation menu, find and open the shortcut to which you applied the smart folder rule. A folder section will now appear in it.
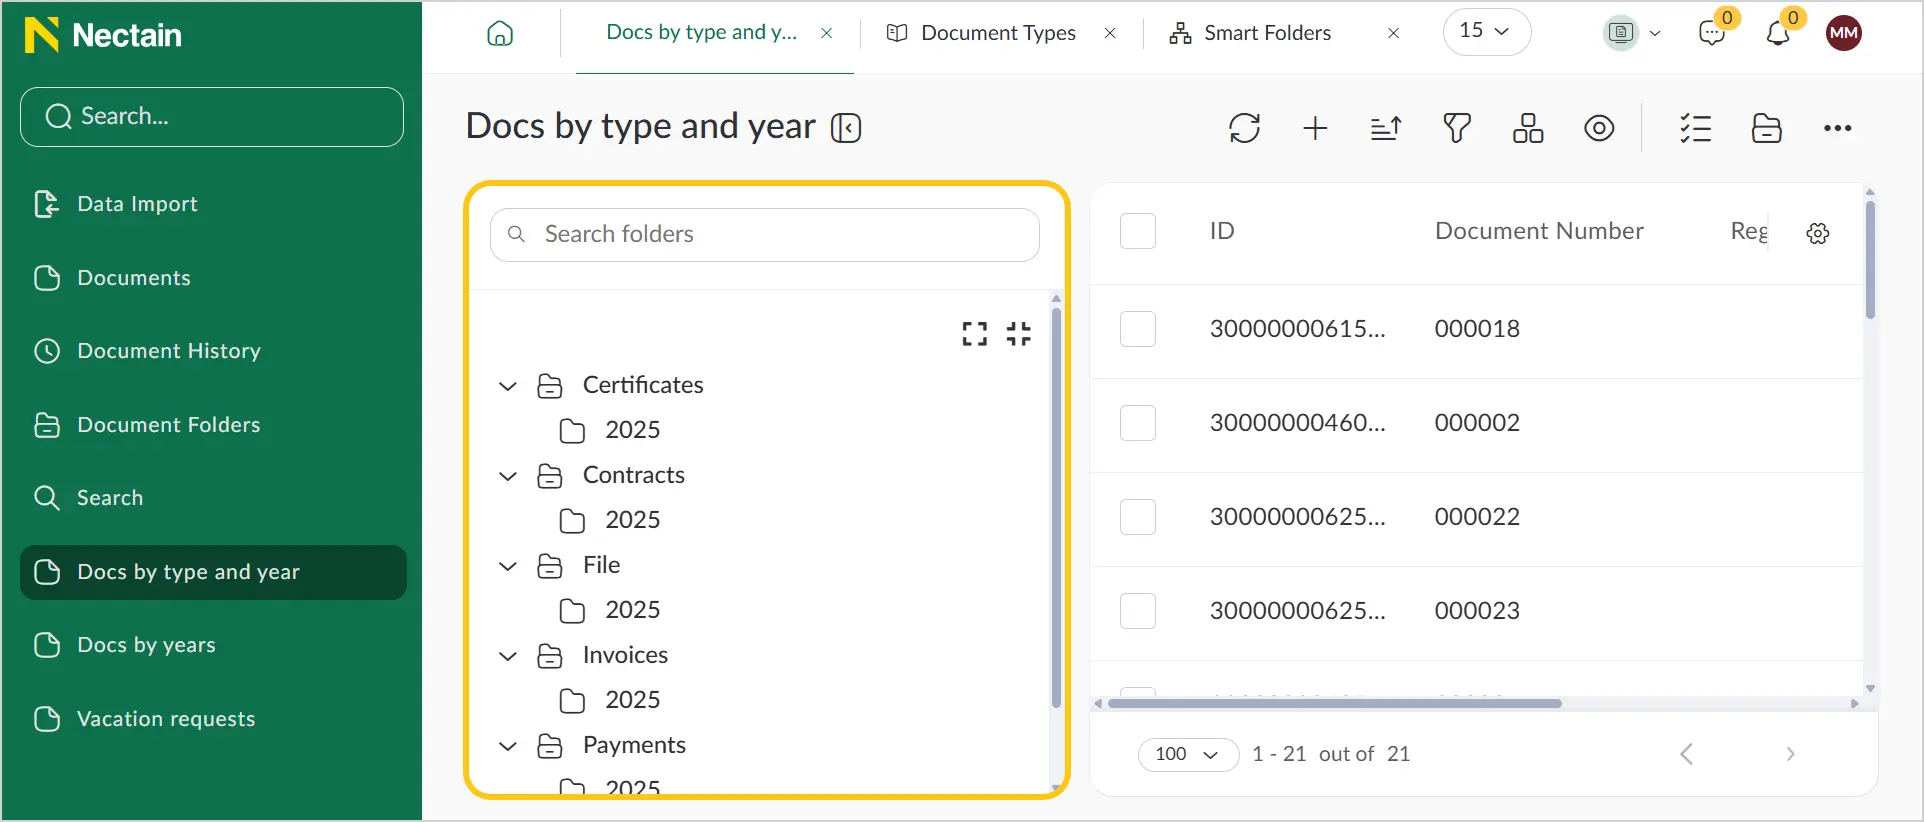
When working with shortcuts, there is a limit on the number of folders displayed — the system shows a maximum of 1000 folders. If the number of folders exceeds this limit, a message will appear at the top:
"The request returned too many folders, only the first 1000 folders are shown. Please specify stricter selection criteria to limit the number of documents."
In this case, it is recommended to:
- Configure additional filters in the shortcut parameters
- Use search templates for the shortcut
2.3.6.5.2. Apply a Smart Folder Rule to a Search Template
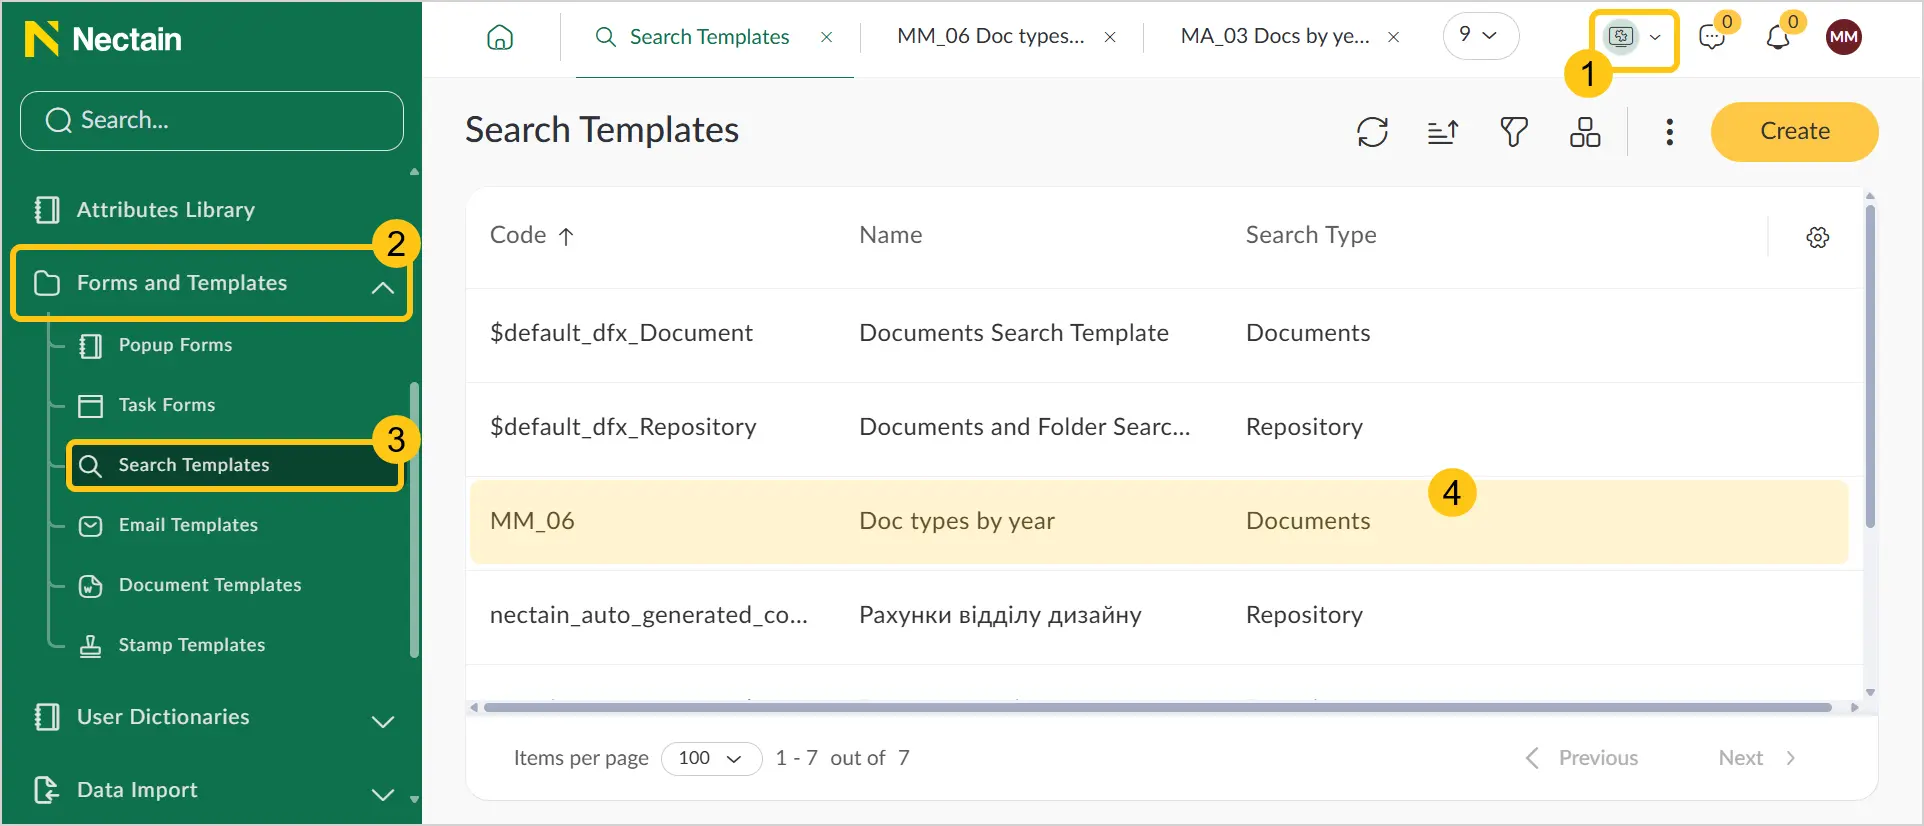
-
In the navigation panel, select the Studio 1 workspace.
-
Select the Forms and Templates 2 shortcut group, then select the Search Templates 3 shortcut.
-
Select the required search template record 4.
-
Select the Search Result Configuration 1 tab.
-
Enable the With Folders 2 toggle, then in the Smart Folder Rule 3 field, select the required folder hierarchy from the dropdown list.
-
In the toolbar, select Save 4.
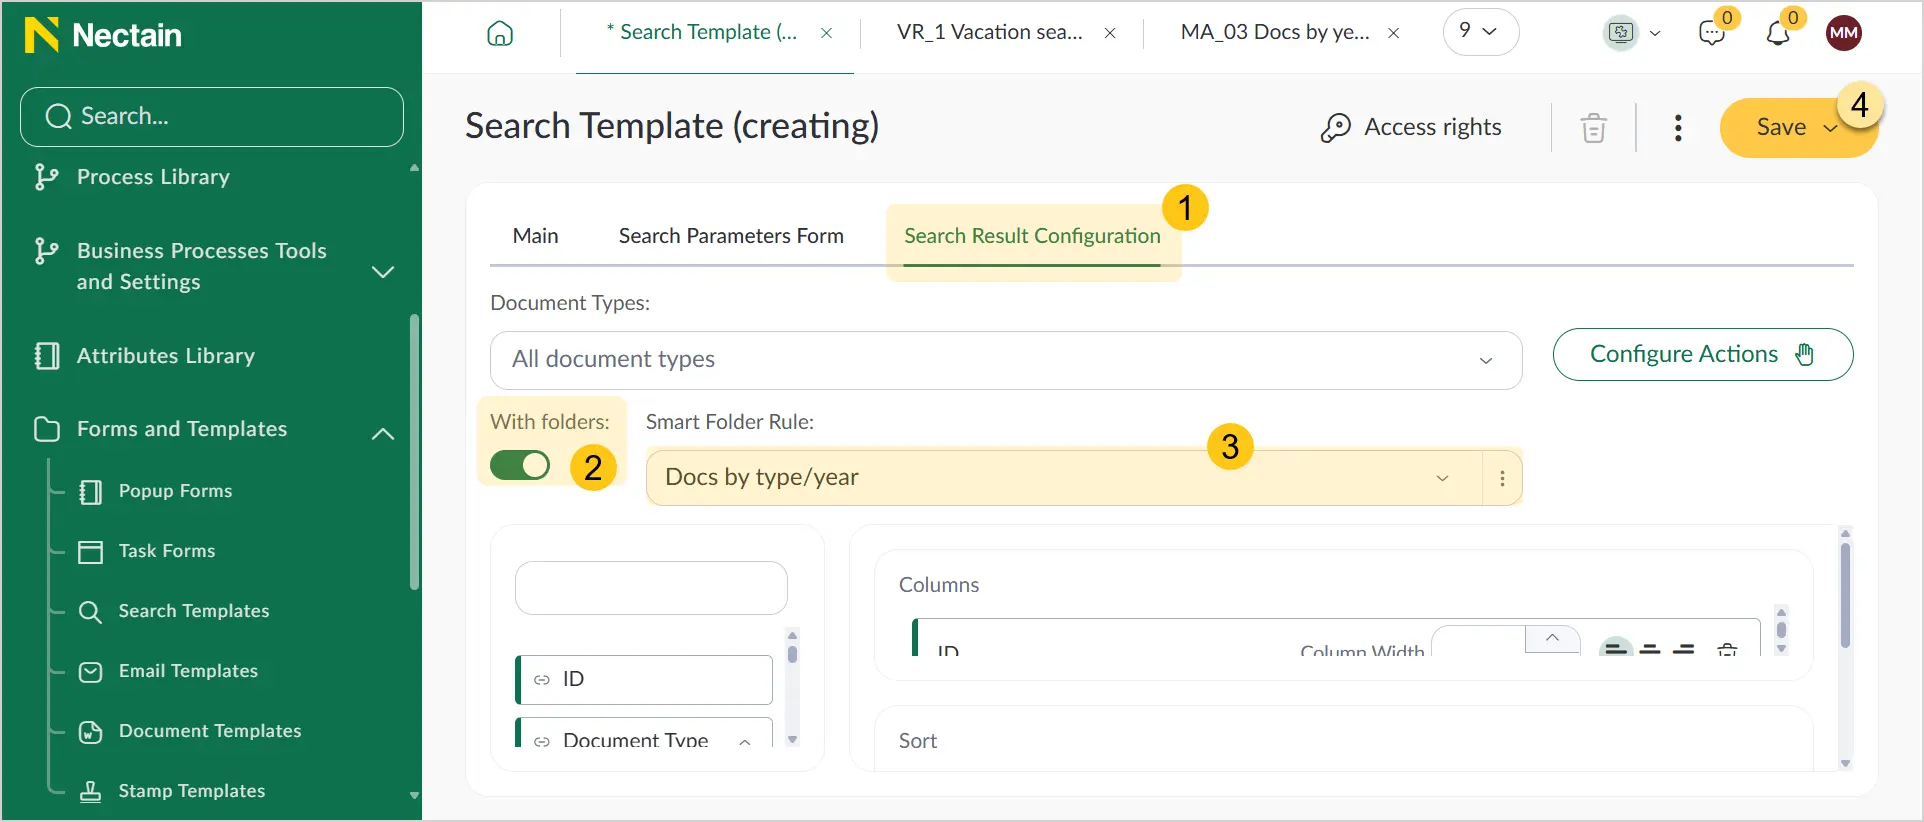
As a result, when opening grids, the smart folder hierarchy will be displayed.
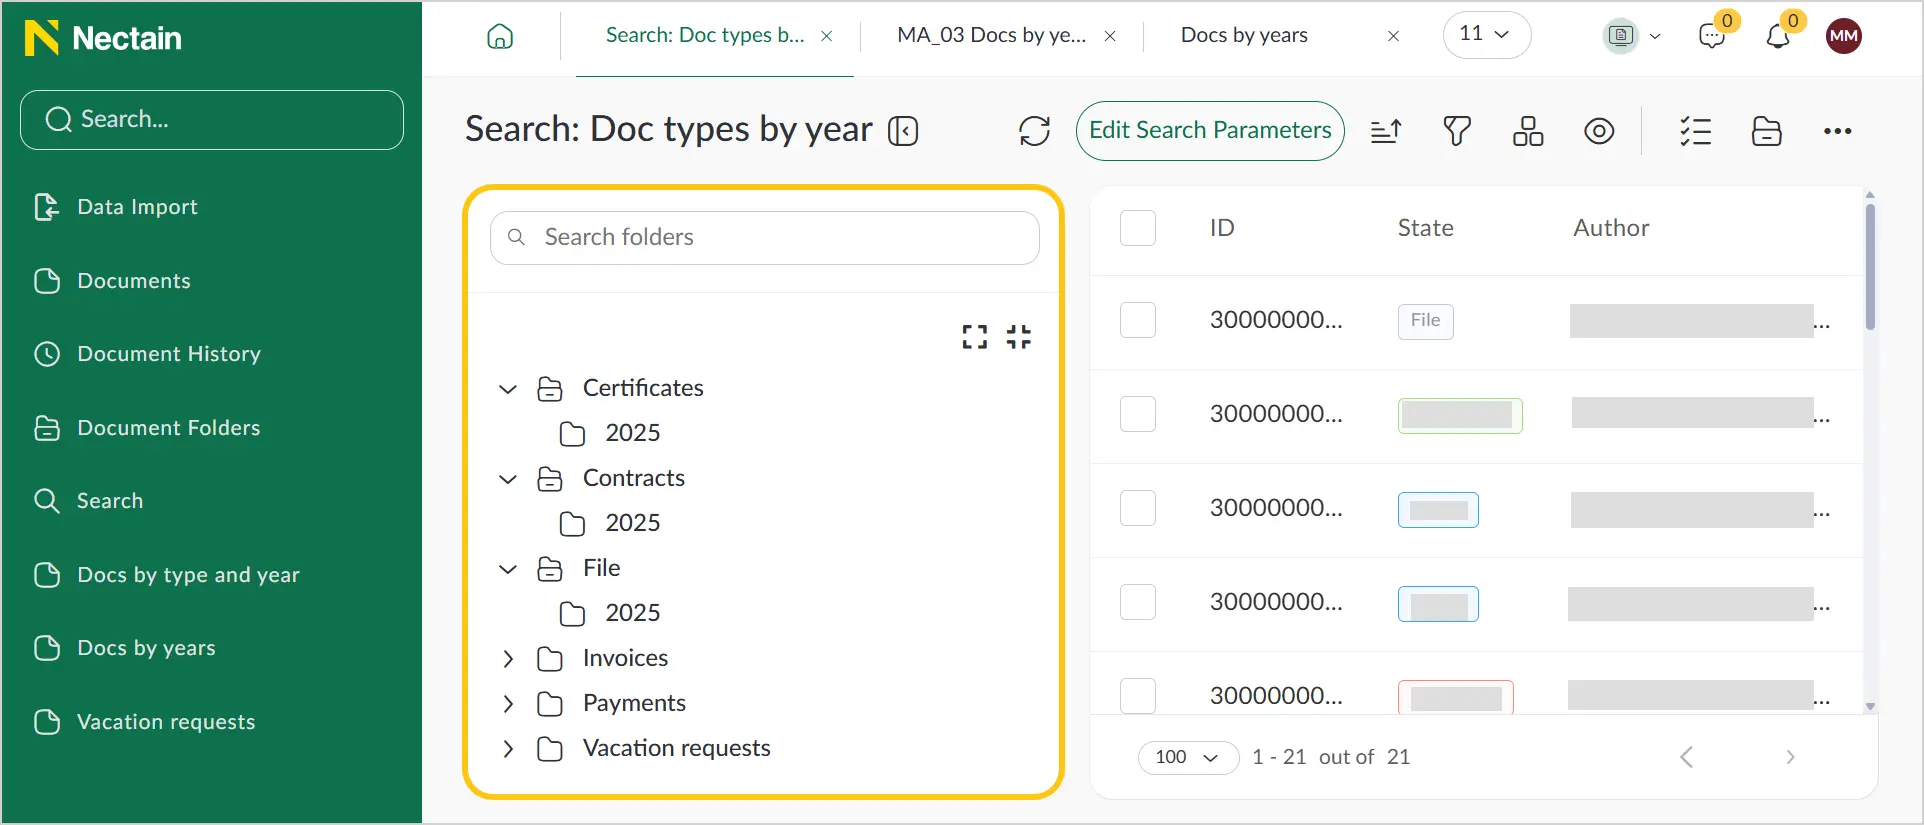
2.3.6.6. View All Document Folders in the Platform
-
In the navigation panel, select the Documents 1 workspace.
-
Select the Document Folders 2 shortcut.
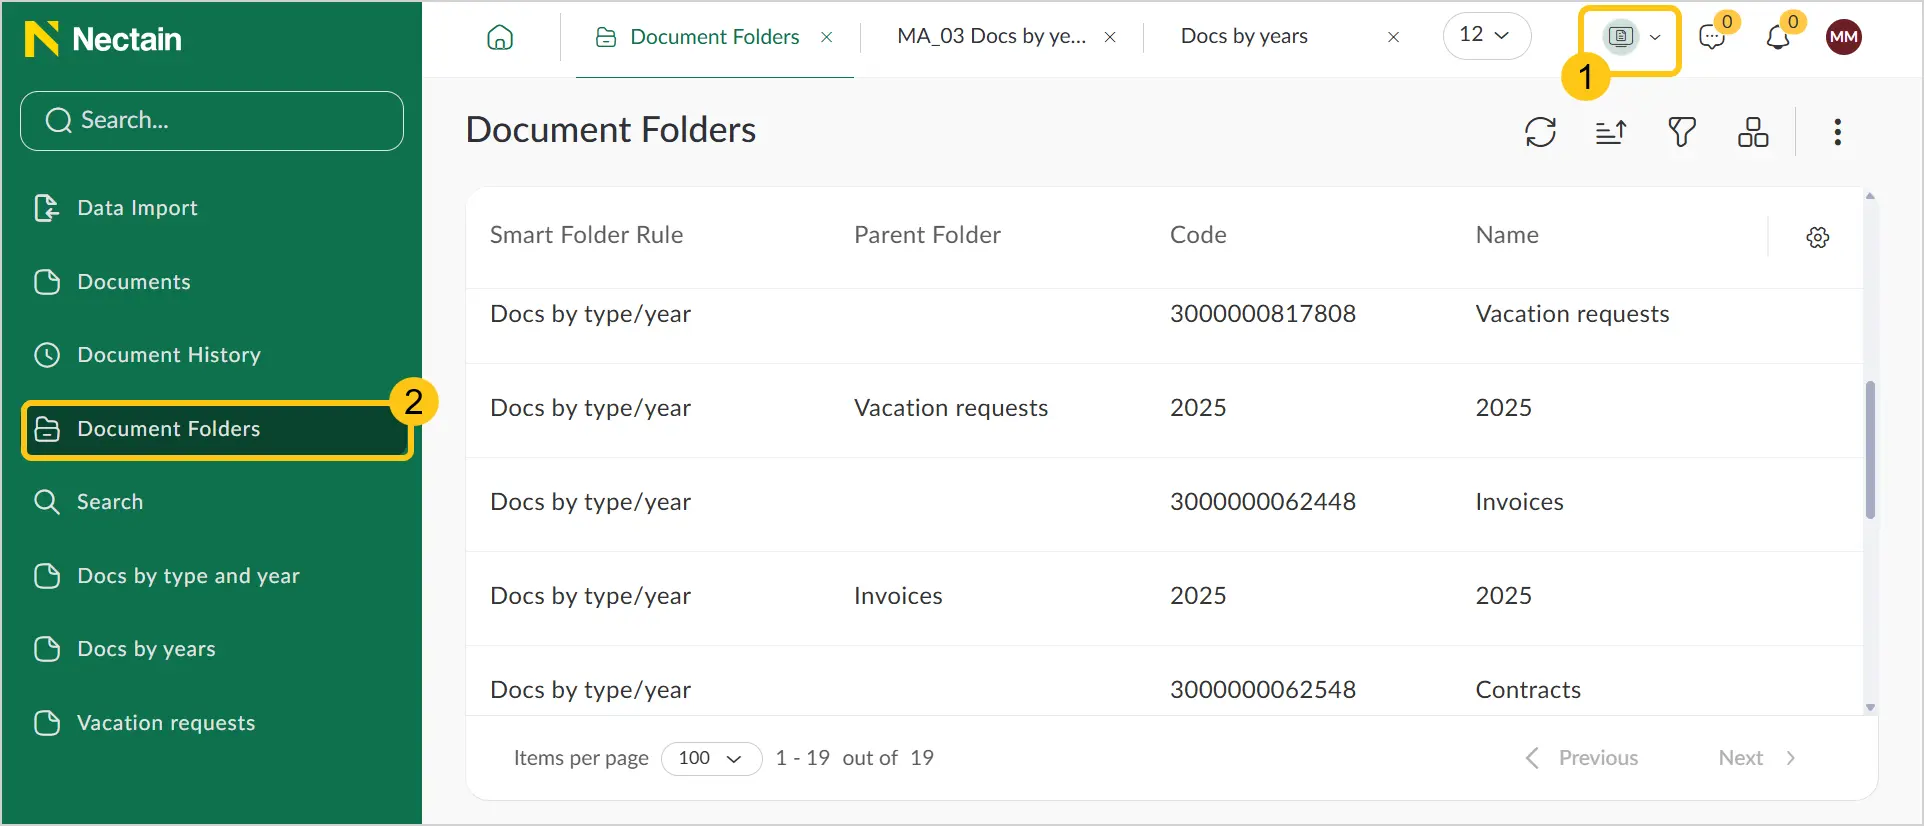
You will see the document folders registry, which contains the following information: the name of the smart folder rule the folder belongs to, the name of the parent folder (if any), the folder code and name.
2.3.7. Duplicate Document Check Rules
You can find duplicate documents by defining rules (criteria) by which the platform will search for duplicates.
2.3.7.1. Create a Duplicate Check Rule
-
In the navigation panel, select the Studio 1 workspace.
-
Select the Document Type Settings 2 shortcut group, then select the Duplicate Document Check Rules 3 shortcut.
-
In the toolbar, select Create 4.
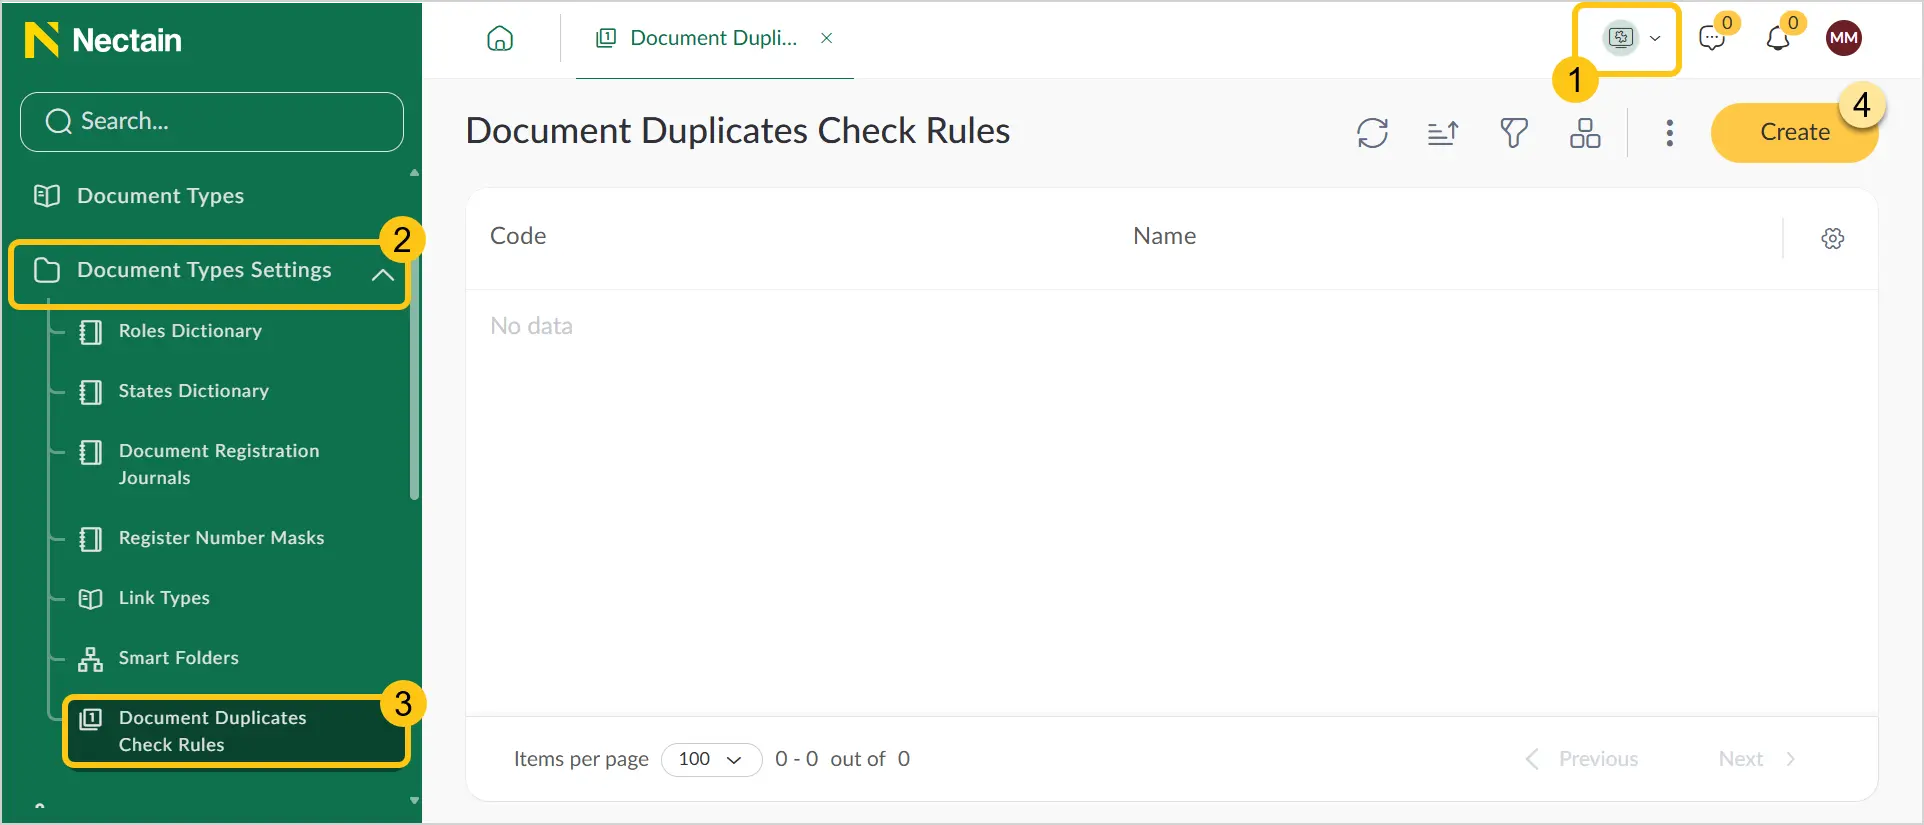
-
Fill in the fields 1 using the hints from the table below, then in the toolbar, select Save 2.
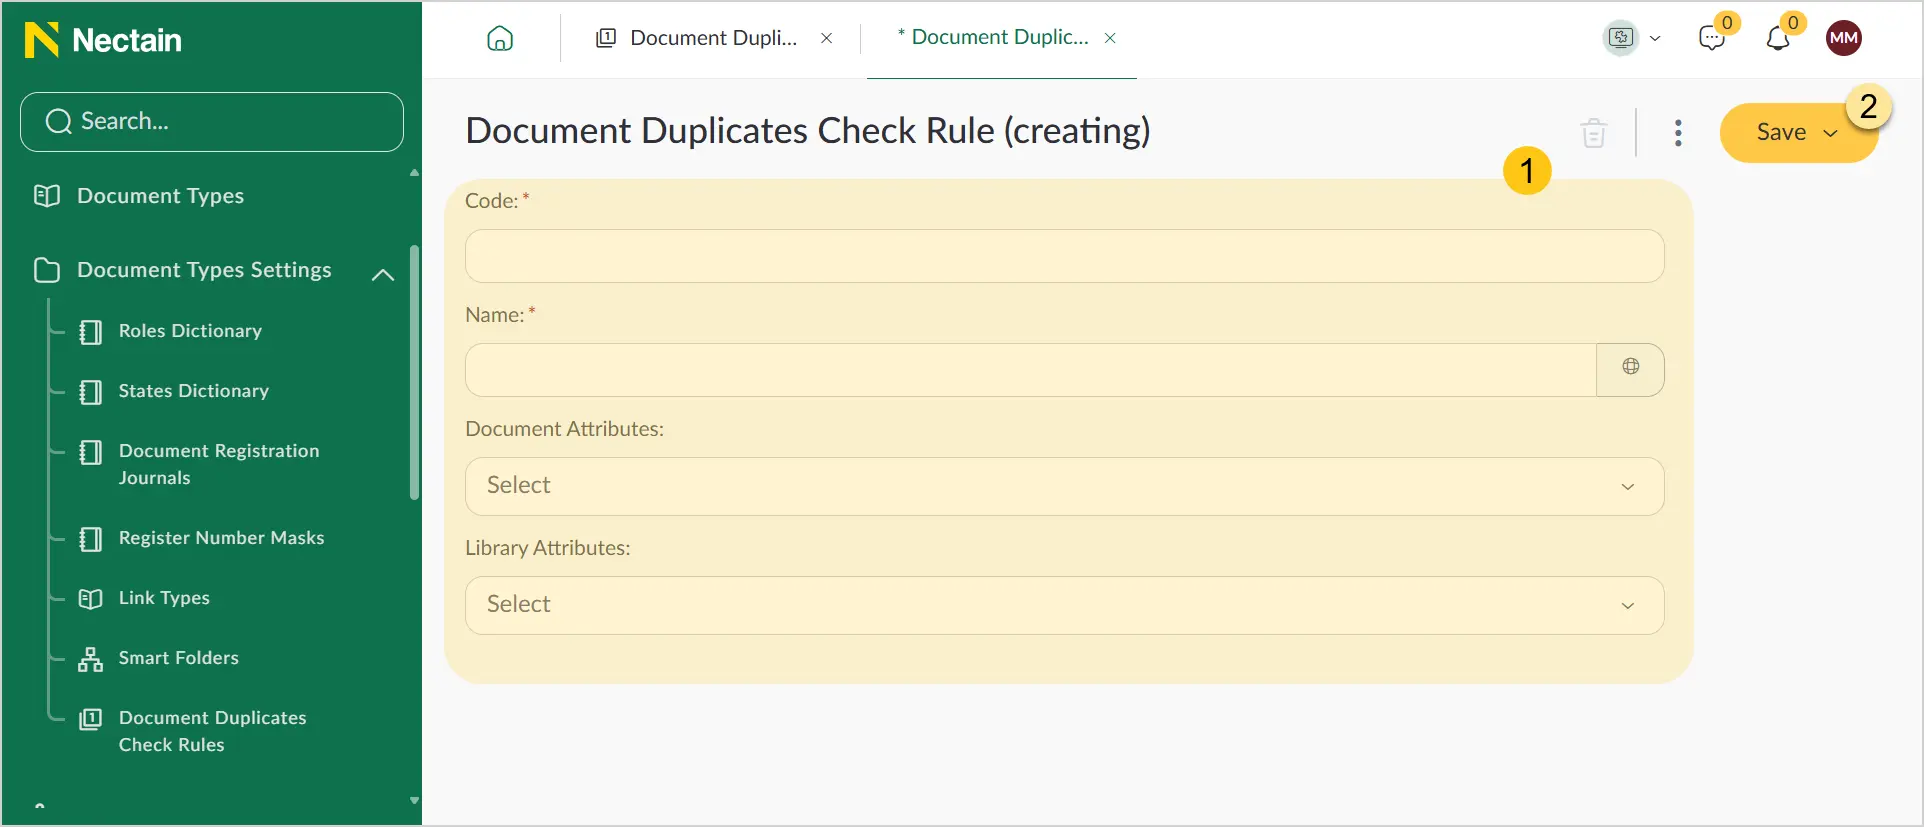 Note:
Note:Select at least one attribute before saving.
| Field Name | Description |
|---|---|
| Code* |
|
| Name* | The display name of the duplicate check rule. ℹ️ Note: You can set alternative names for different languages. To do this, select the icon and fill in the fields for other languages. |
| Document Attributes | The available list of standard attributes available for use in rules. |
| Library Attributes | The available list of custom attributes available for use in rules. ℹ️ Note: The following attribute types cannot be used in rules:
|
Fields marked with "*" are required.
2.3.7.2. View Found Duplicates
The duplicate check rule triggers when you save a new document or edit an existing one. The platform searches for a document with identical attribute values, taking into account all attributes you specified in the rule. If the rule contains multiple attributes, it triggers only when all of those attributes have the same values.
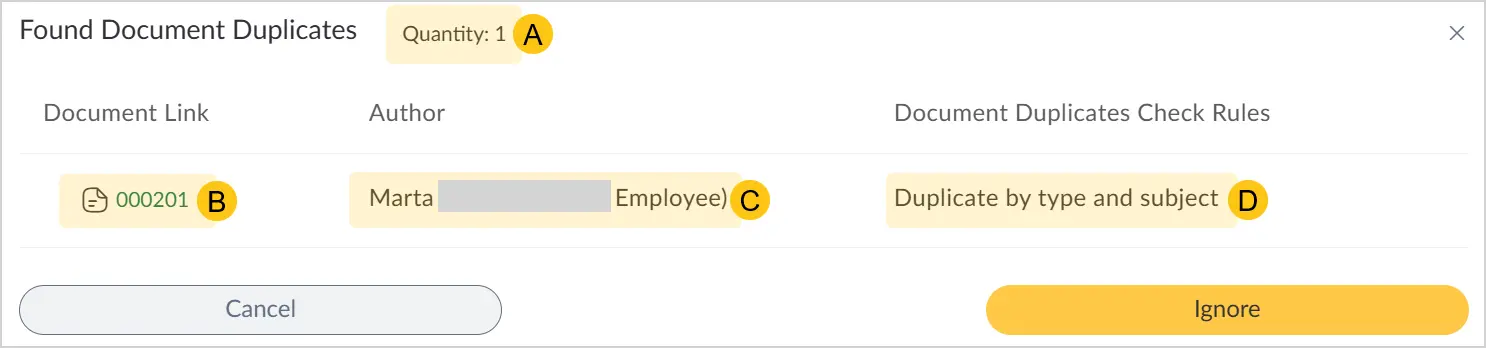
Example: In the duplicate check rule, you specified two attributes: "Document Type" and "Country". Later, you created a document with the "Document Type" attribute set to "Completion Act" and the "Country" attribute set to "Ukraine". Then you created another document containing the same attributes ("Document Type" and "Country") with identical values ("Completion Act" and "Ukraine"). In this case, the rule will trigger, and after saving the second document, you will see the "Document Duplicates Found" window, which contains the following elements:
-
A The quantity of found document duplicates.
-
B Links to duplicate documents — if the user has access to the document, they can follow the link and make changes to the duplicate.
-
C Author — the author of the duplicate document.
-
D Document Duplicate Check Rule — the name of the rule that the found documents match.
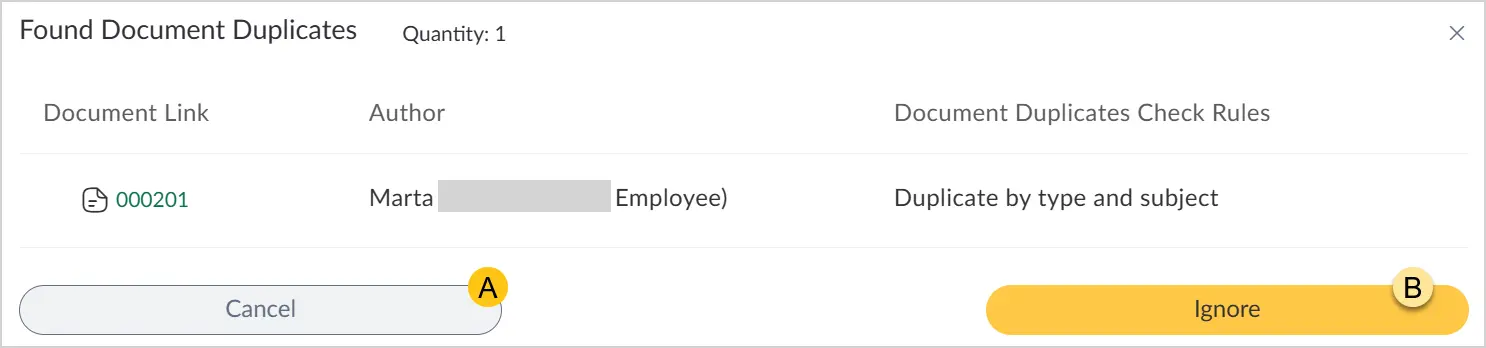
If you want to edit the document to avoid duplication, select the Cancel A button, make the necessary changes, and save the document.
If you want to save the duplicate document, select the Ignore B button.
2.3.7.3. Edit a Duplicate Check Rule
You can edit existing duplicate check rules by following these steps:
- In the navigation panel, select the Studio workspace.
- Select the Document Type Settings shortcut group, then select the Duplicate Document Check Rules shortcut.
- See the Edit Record section.
2.3.7.4. Copy a Duplicate Check Rule
You can copy existing duplicate check rules by following these steps:
- In the navigation panel, select the Studio workspace.
- Select the Document Type Settings shortcut group, then select the Duplicate Document Check Rules shortcut.
- See the Copy Record section.
2.3.7.5. Delete a Duplicate Check Rule
You can delete existing duplicate check rules by following these steps:
- In the navigation panel, select the Studio workspace.
- Select the Document Type Settings shortcut group, then select the Duplicate Document Check Rules shortcut.
- See the Delete Record section.