2.2.0. Basic Actions with Document Type
2.2.1. Create a Document Type
-
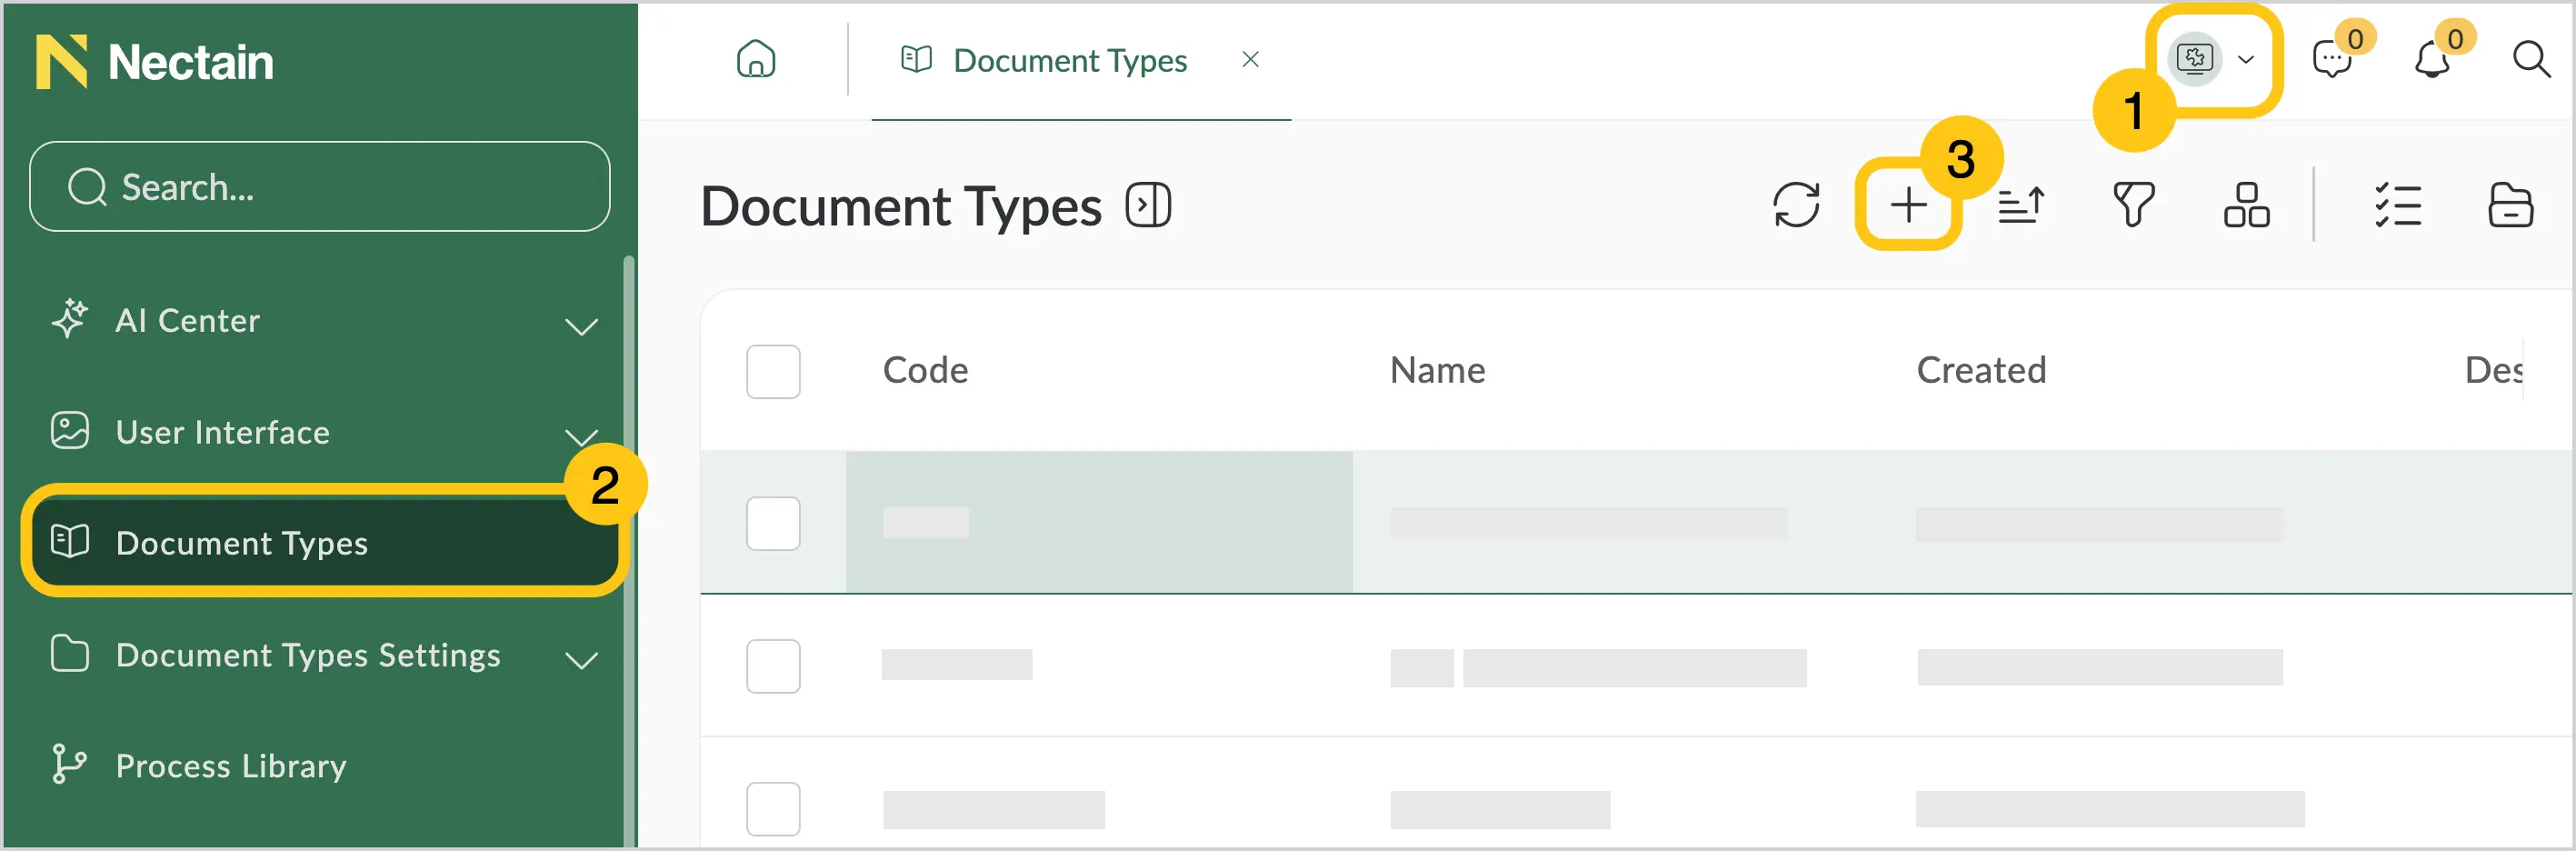
In the navigation panel, select the Studio desktop 1.
-
Select the Document Types shortcut 2, then in the toolbar, select Create 3.
To configure the created document type, go to the following sections:
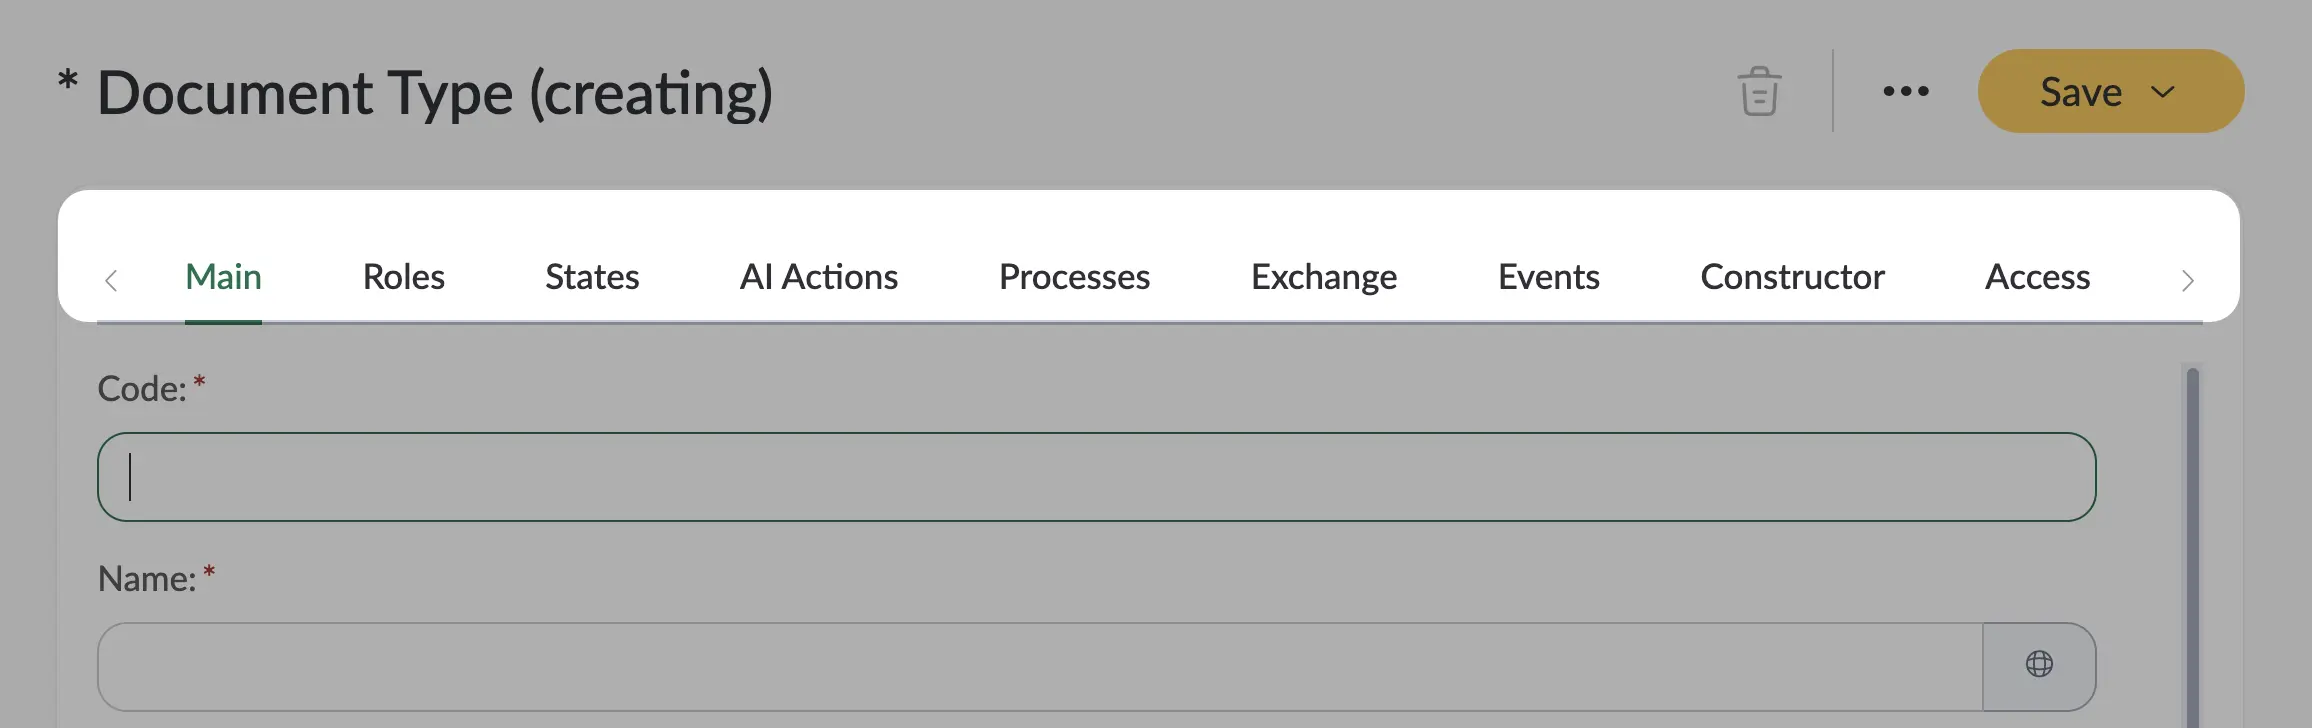
2.2.1.1. Main
-
In the Main tab, fill in the general information about the document using the hints from the table below.
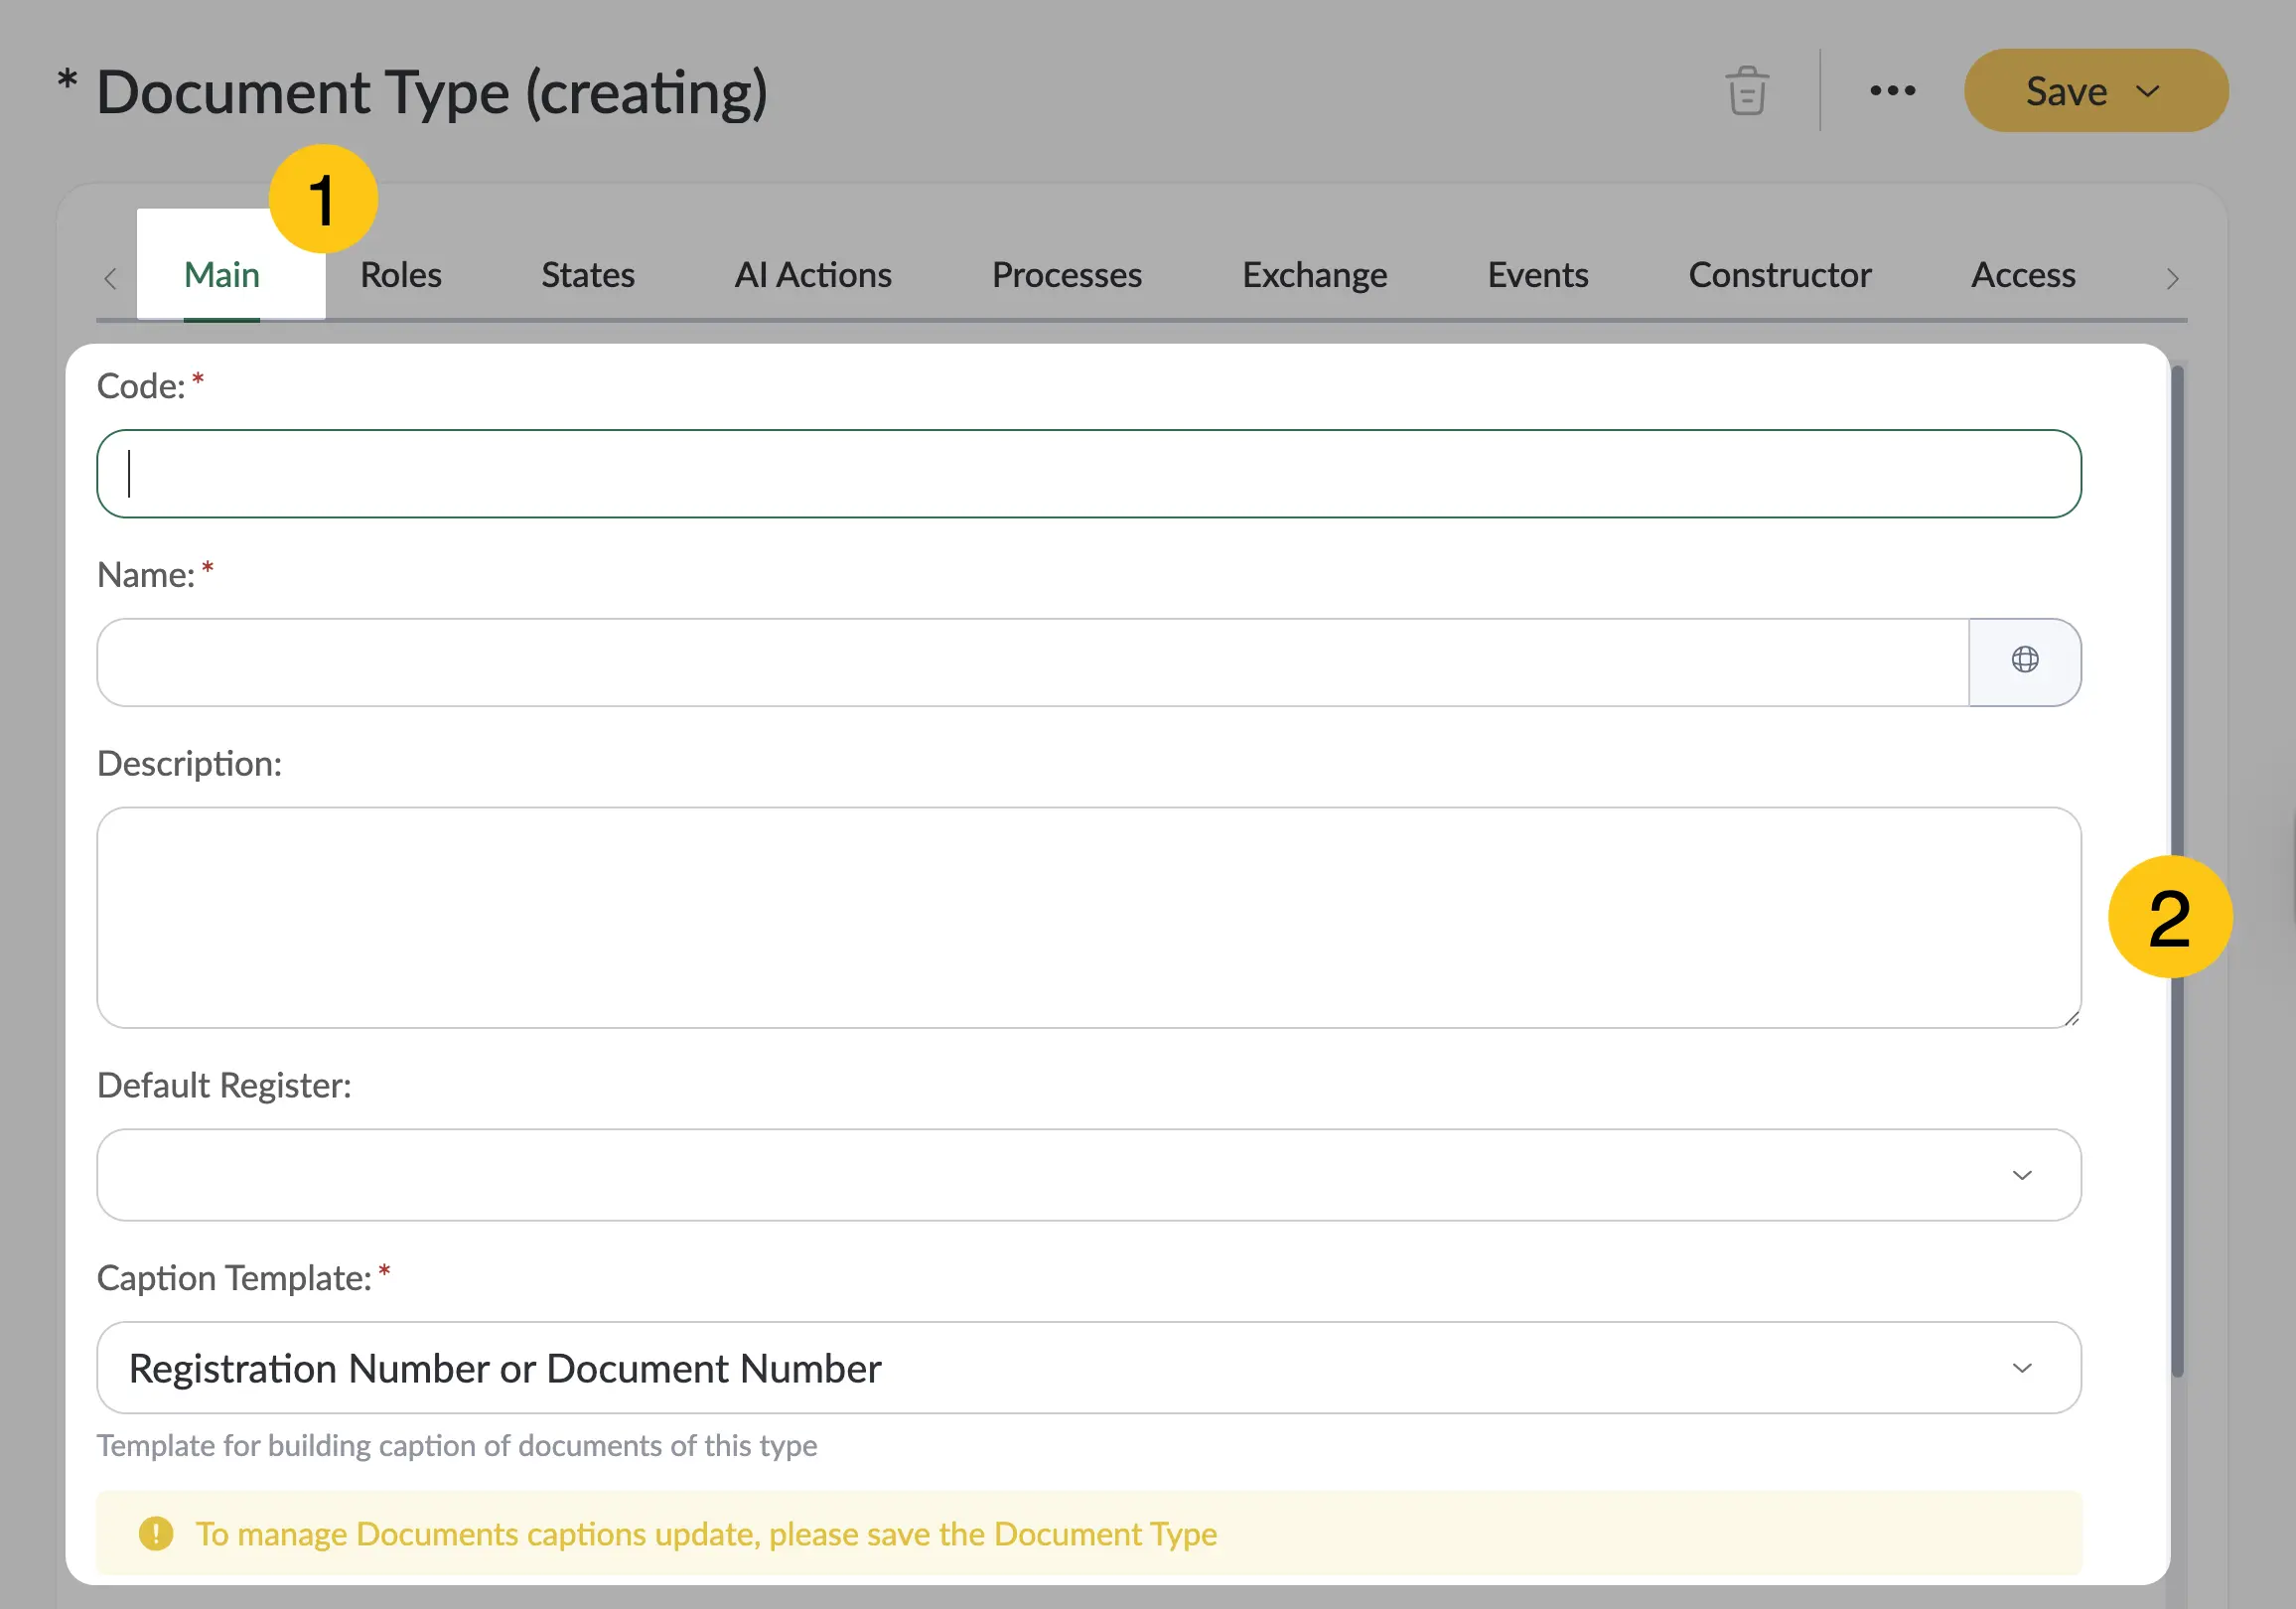
| Field name | Description |
|---|---|
| Code* |
|
| Name* | The name of the document type. ℹ️ Note: you can set an alternative name for different languages. To do this, in the Name field, select the icon and fill in the fields for other languages. Then select the Apply button. |
| Description | A brief description of this document type. |
| Default register | From the list, select the registration log to be used for registering documents. The log specified in this field will be selected automatically when creating documents of this type. |
| Caption template | From the list, select the template to be used for generating the document caption. |
| Allow copying documents of this type | Check this box if you want users to be able to copy documents generated based on this document type. To control copying, you can configure event handlers in the Events tab. For example, you can configure the state in which the future document will be created. See section Copying Documents. |
For each document type, you can create a separate registration log (see section Registration Log).
-
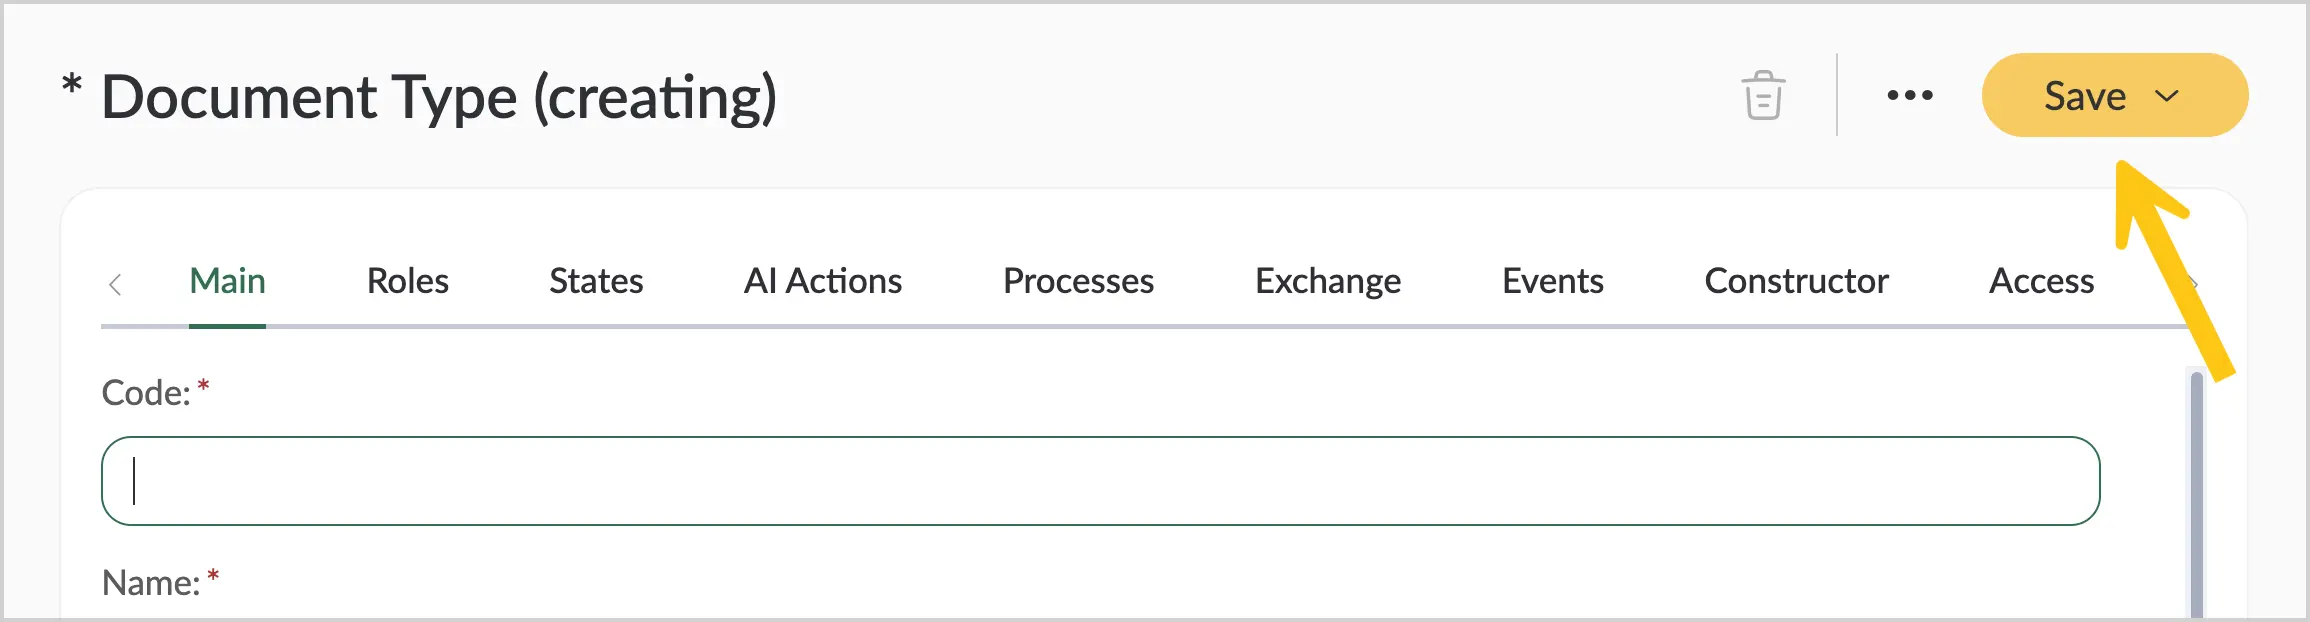
In the toolbar, select Save , then continue the configuration in the Roles tab (see section Roles).
2.2.1.2. Roles
A user with the Admin role can create new roles and use them when configuring a document type. To learn more about creating roles, see section Create a Role in a Document Type.
All available roles from the roles directory can be added to the document. To do this, follow these steps:
-
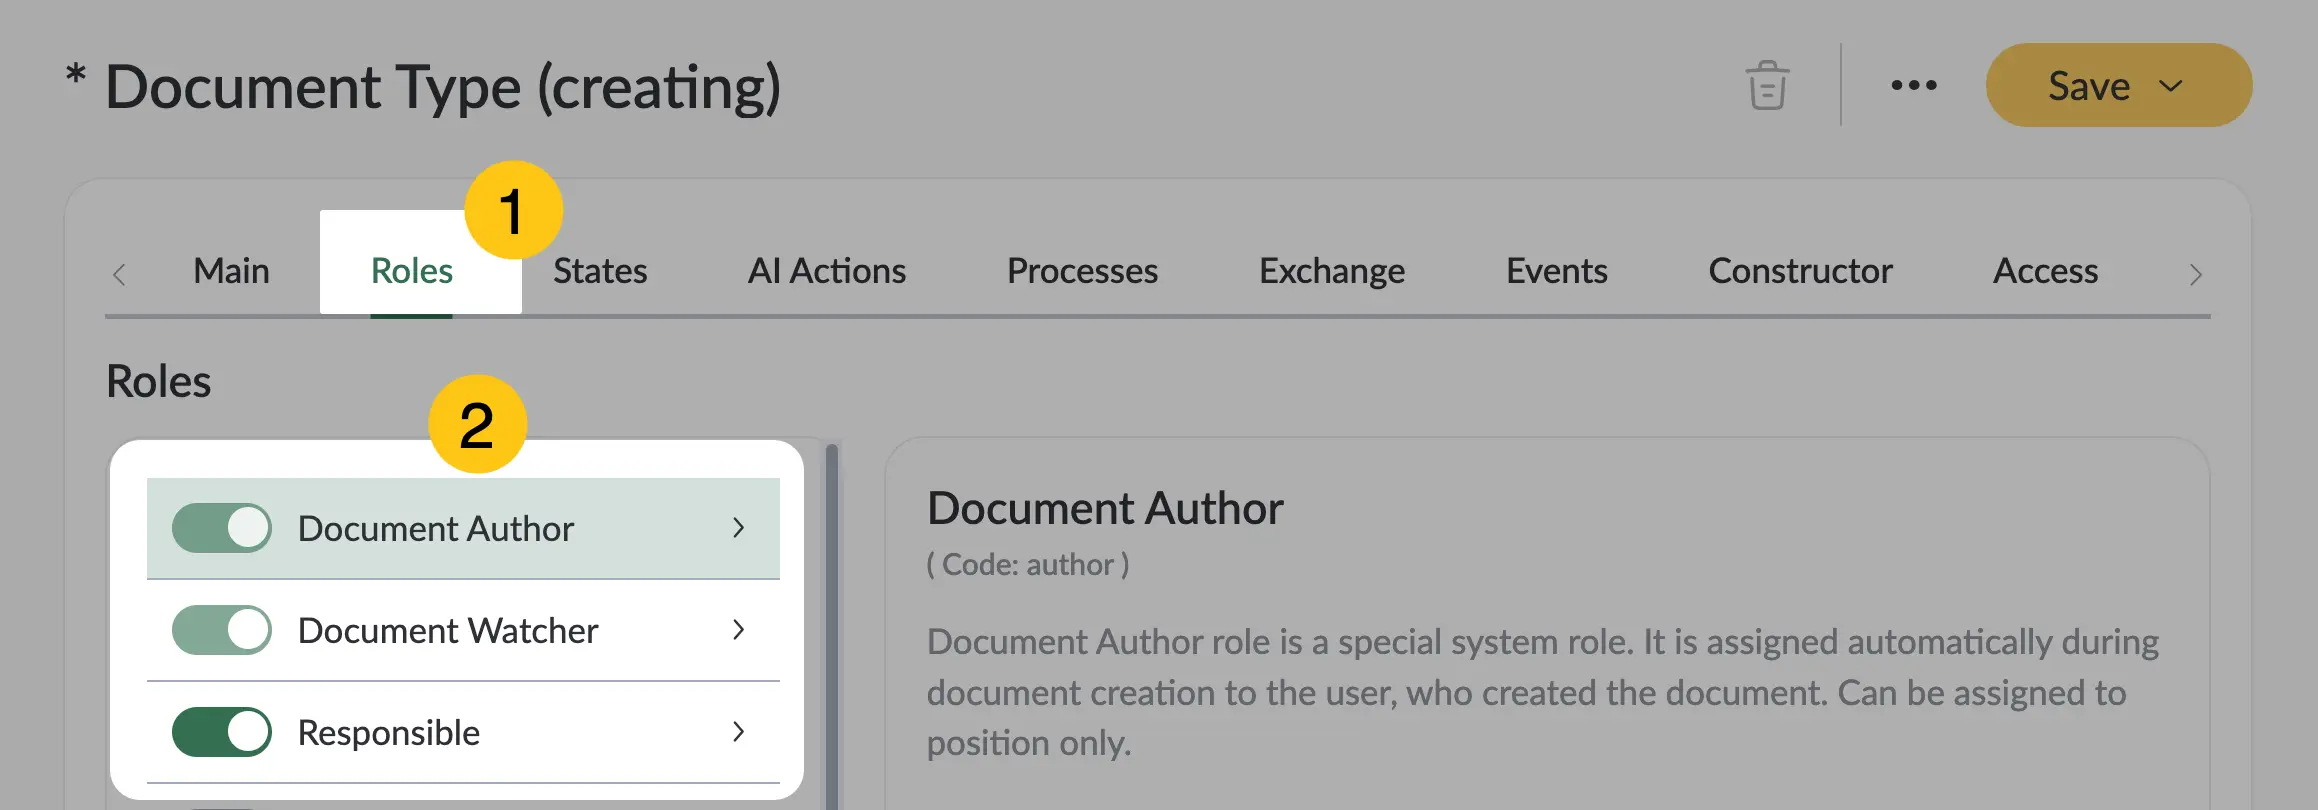
Go to the Roles tab 1.
-
Enable the required toggles 2 using the hints in the table below.
 Note:
Note:If you have multiple roles with the same name, pay attention to their codes to avoid confusion. The role code is displayed below its name as grey text.
| Toggle name | Description |
|---|---|
| Document author | This is a mandatory role that is automatically assigned to the position of the user who created the document. This role cannot be changed during document processing. |
| Responsible executor | This role is automatically included in the document, but is not mandatory if it has not been disabled in the roles directory. |
| Document observer | This is a system role. It is automatically assigned to users who receive tasks for the document. It grants the right to view document attributes. |
-
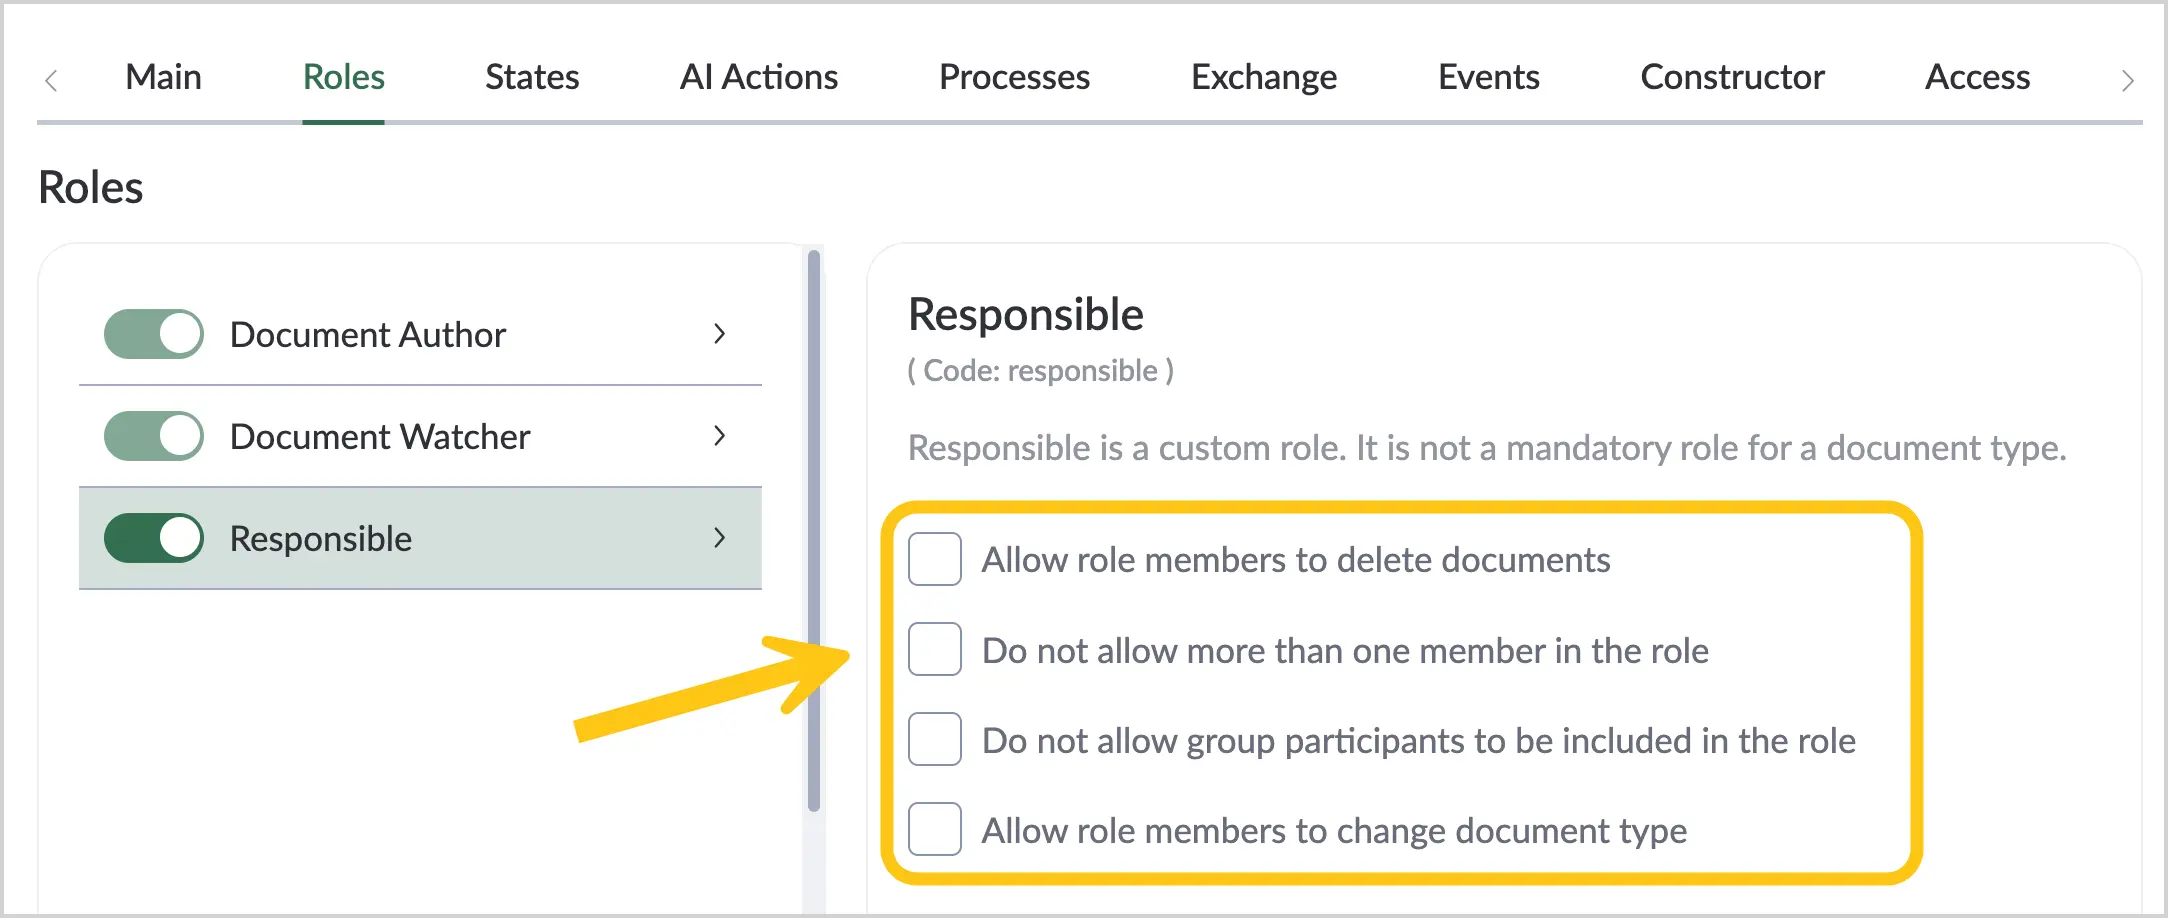
To add settings to each role, check the corresponding boxes:
-
Allow role members to delete documents — grants all role members the right to delete documents in the corresponding states.
Note:You can configure a document so that it can only be deleted in a specific state. See step 3 in the States section.
-
Do not allow more than one role member — no more than one representative of this role can be added for this document type.
-
Do not allow group participants to be included in the role — for this document type, the role can only be granted to specific users, not to user groups.
-
Allow role members to change the document type — see Change Document Type.
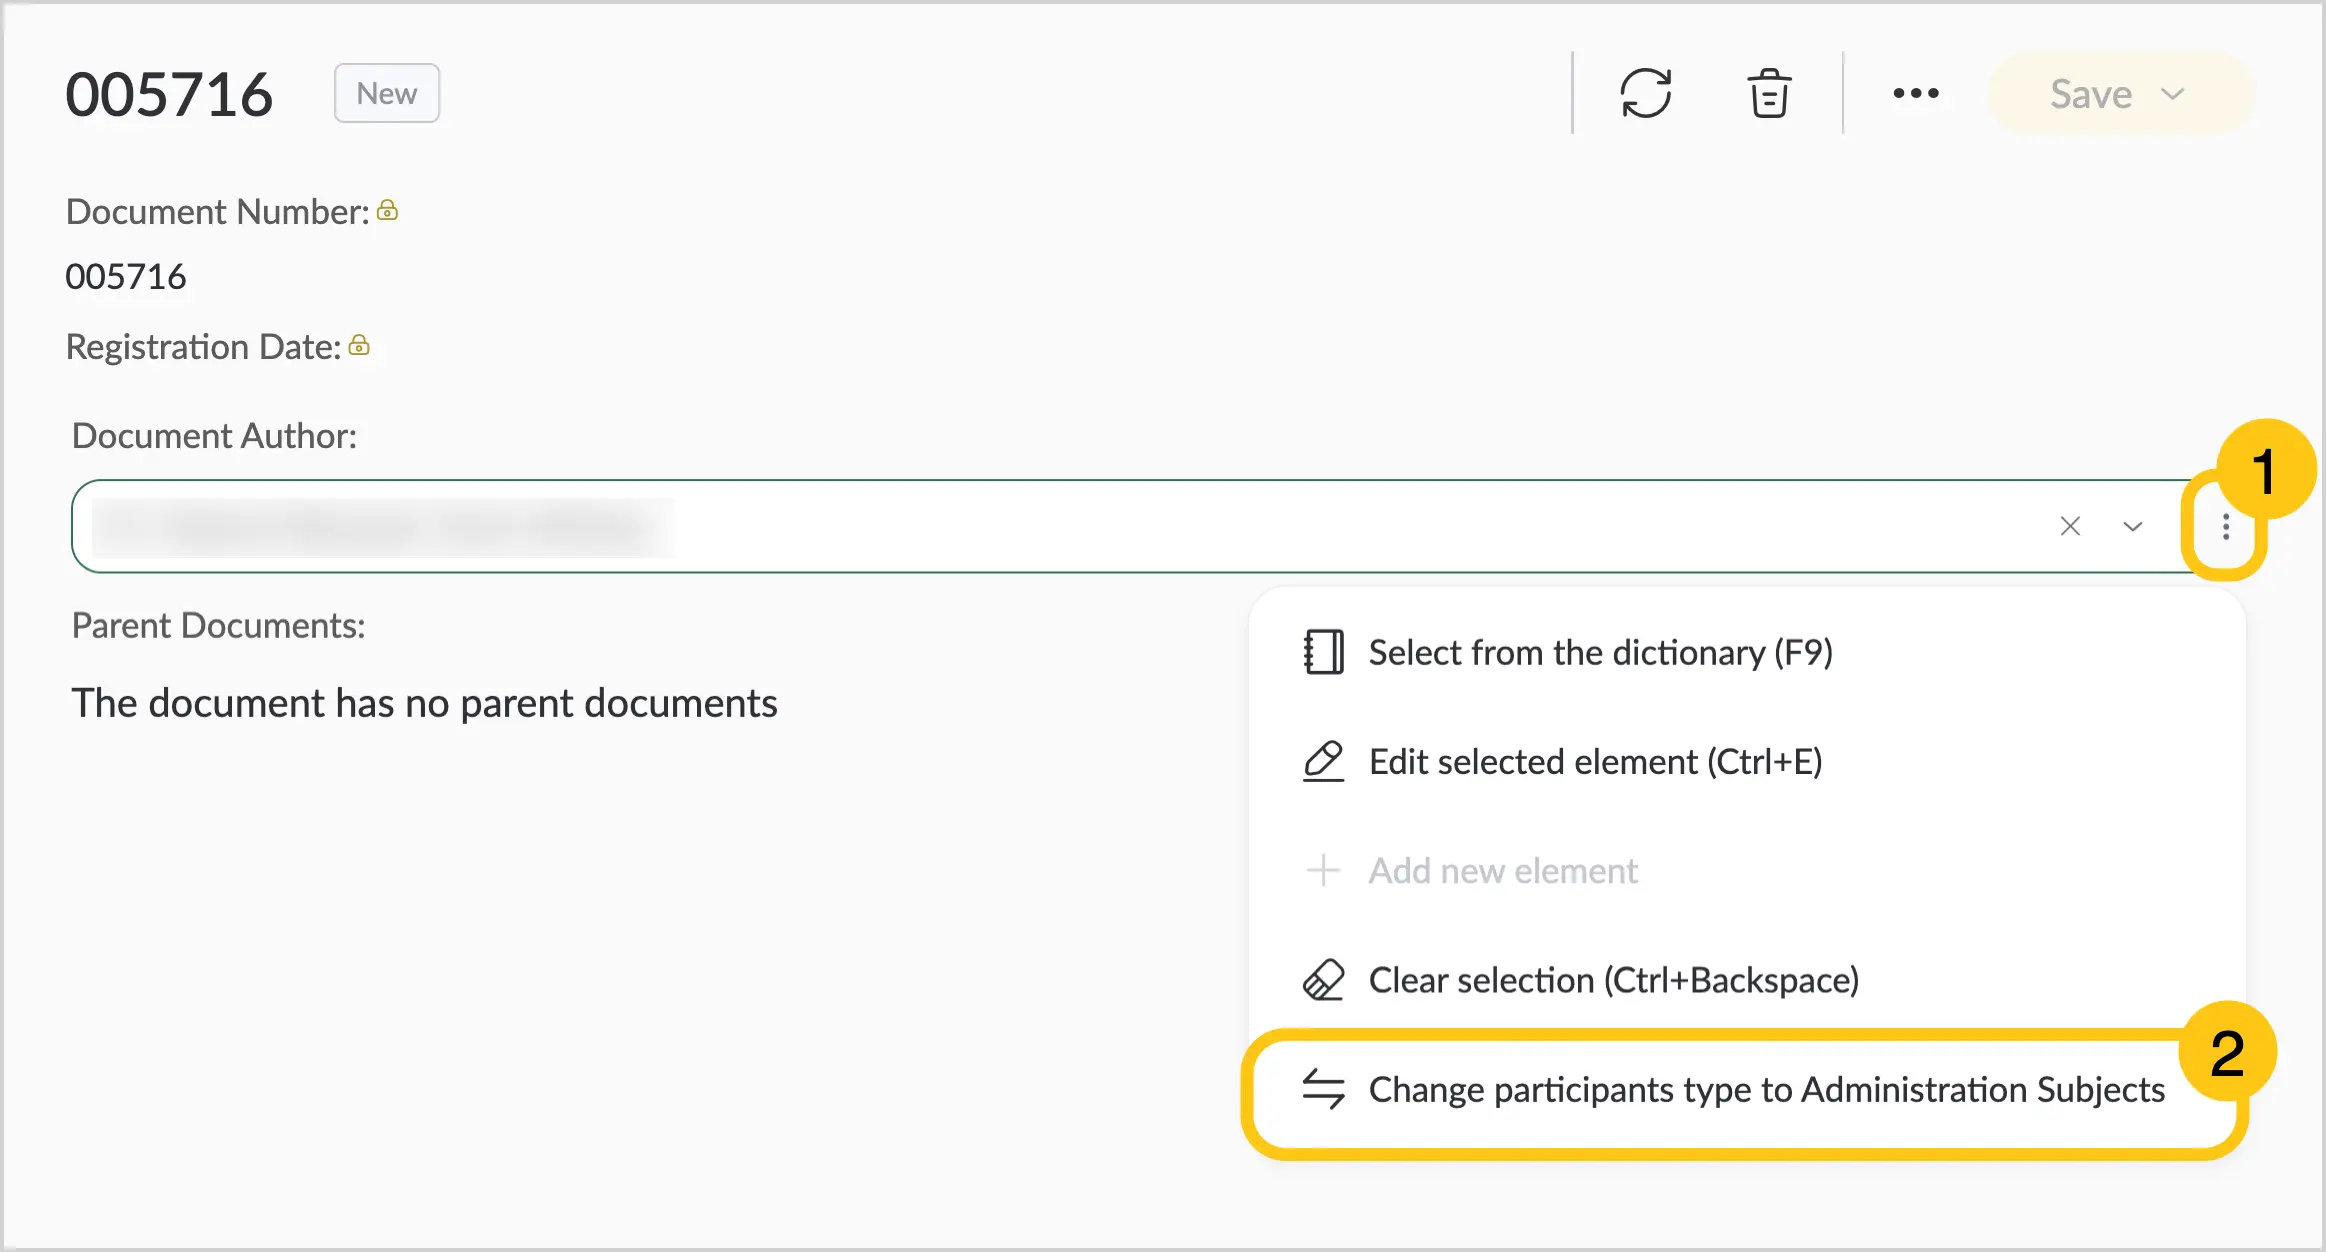
Note:After enabling the Do not allow more than one role member option, you will be able to change the directory type to Administration subjects or Organizational units on the document form. To do this, open the required document, then in the required role attribute, select 1. Then select Change participants type to Administration Subjects 2.
-
-
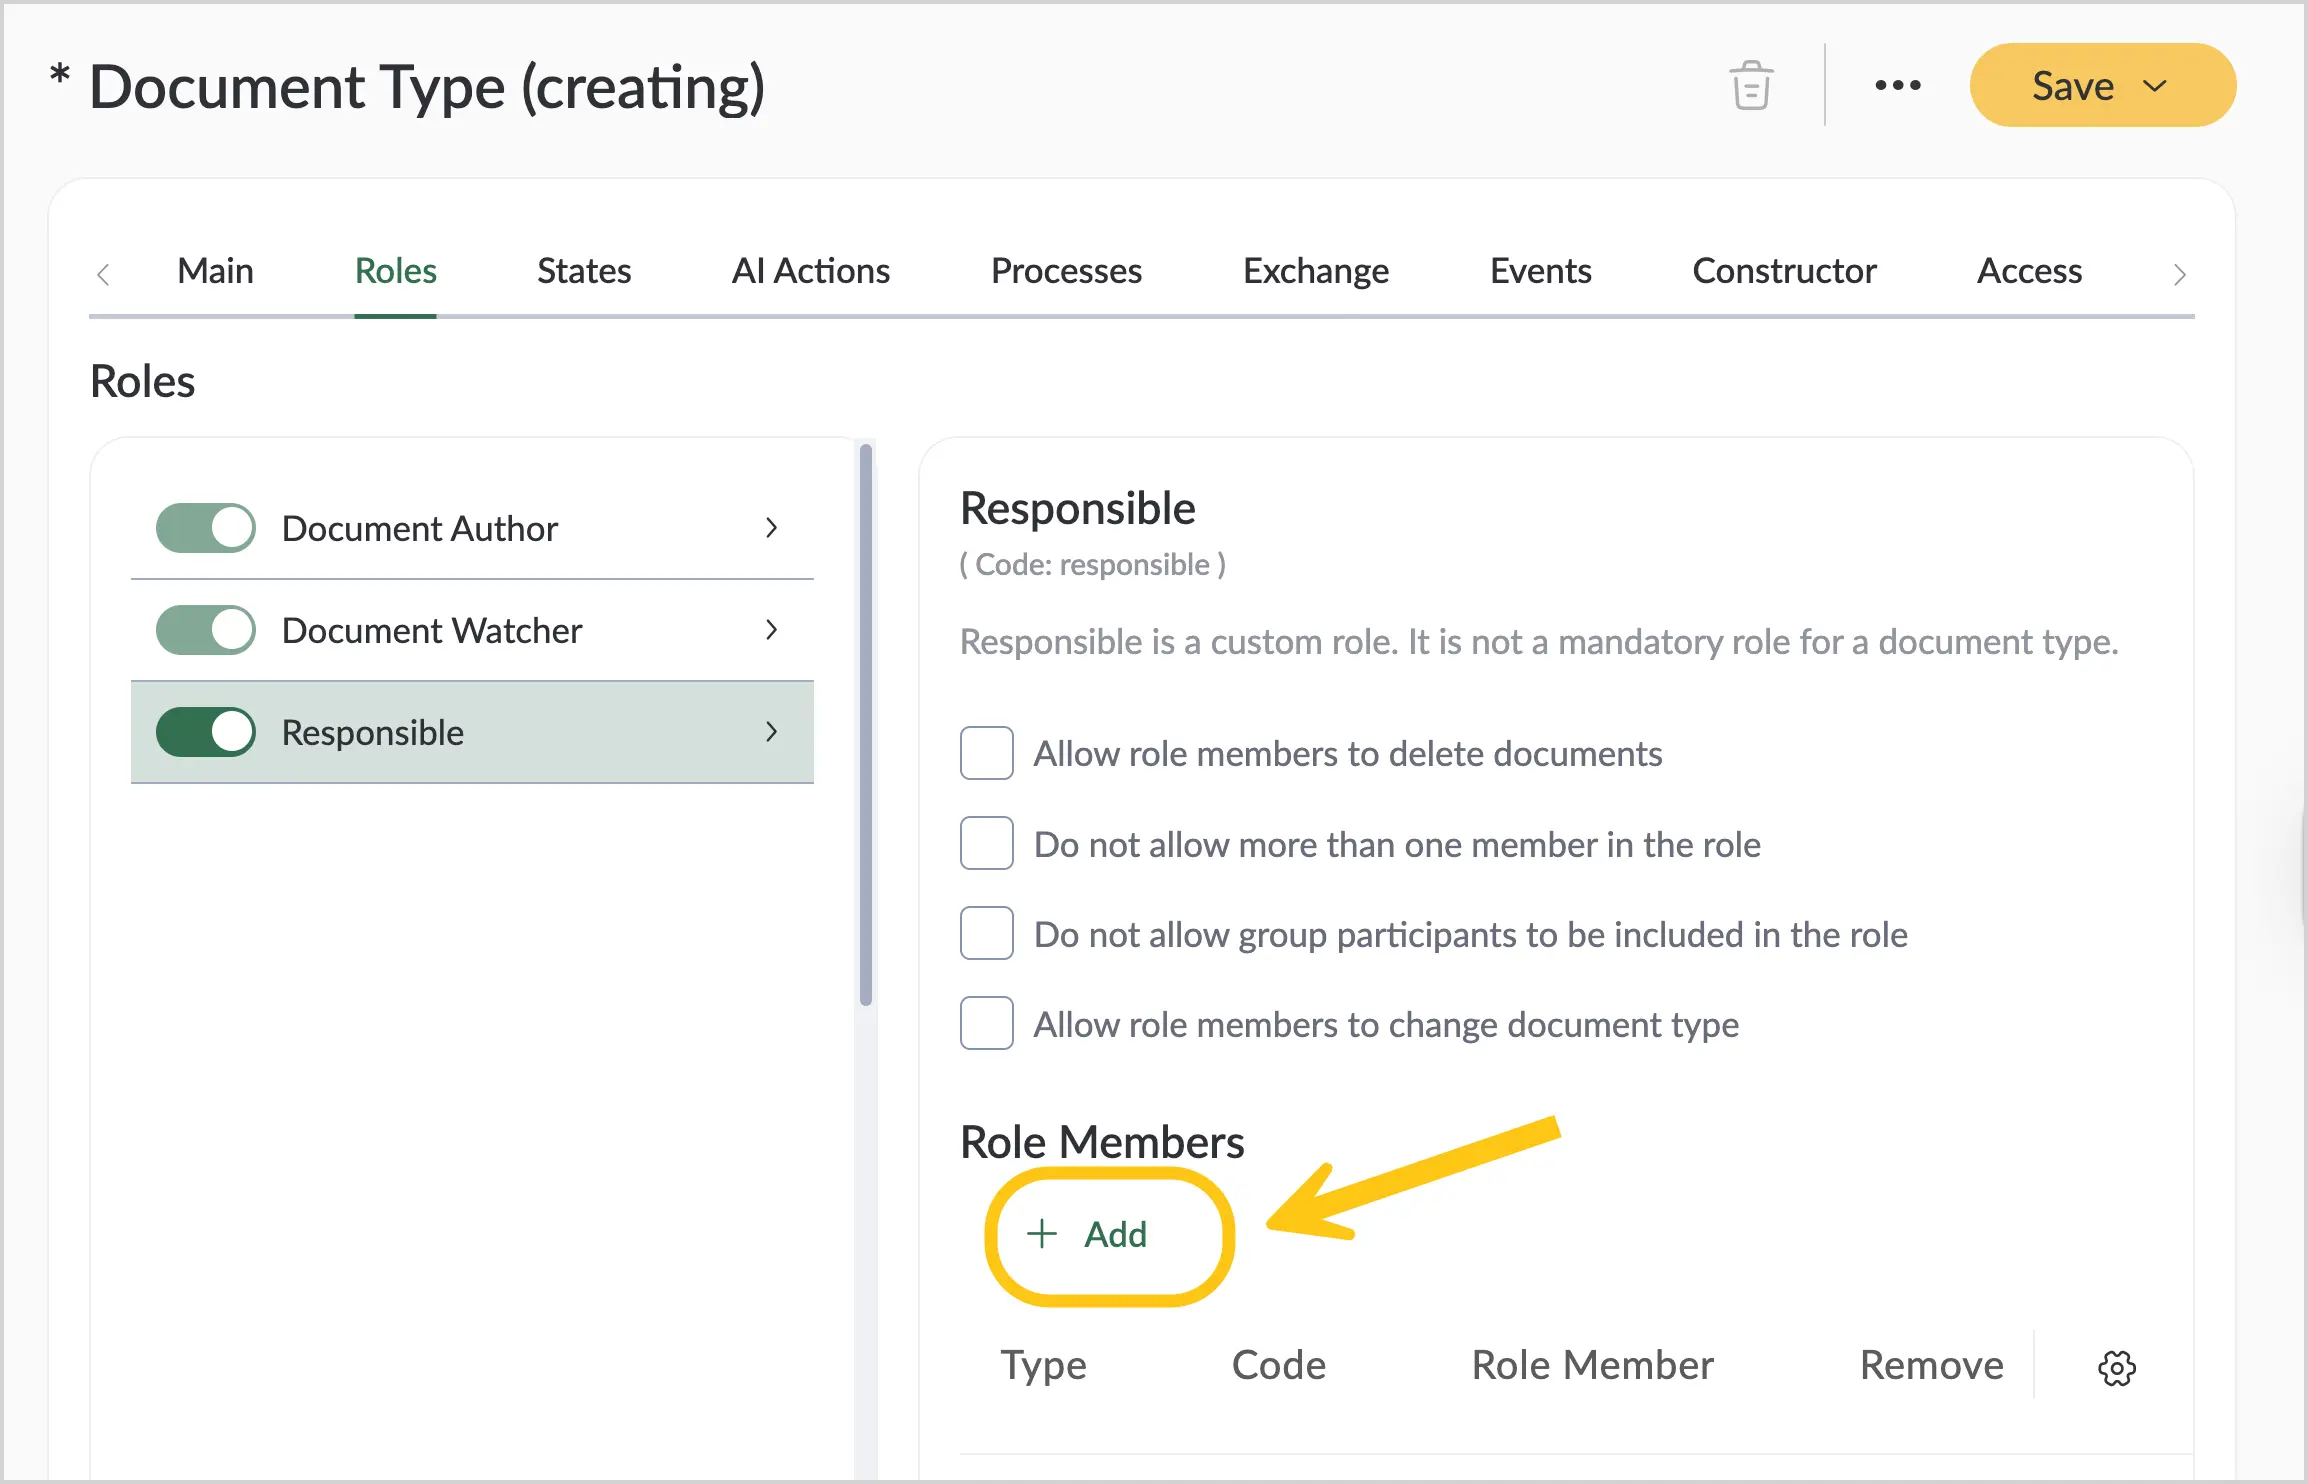
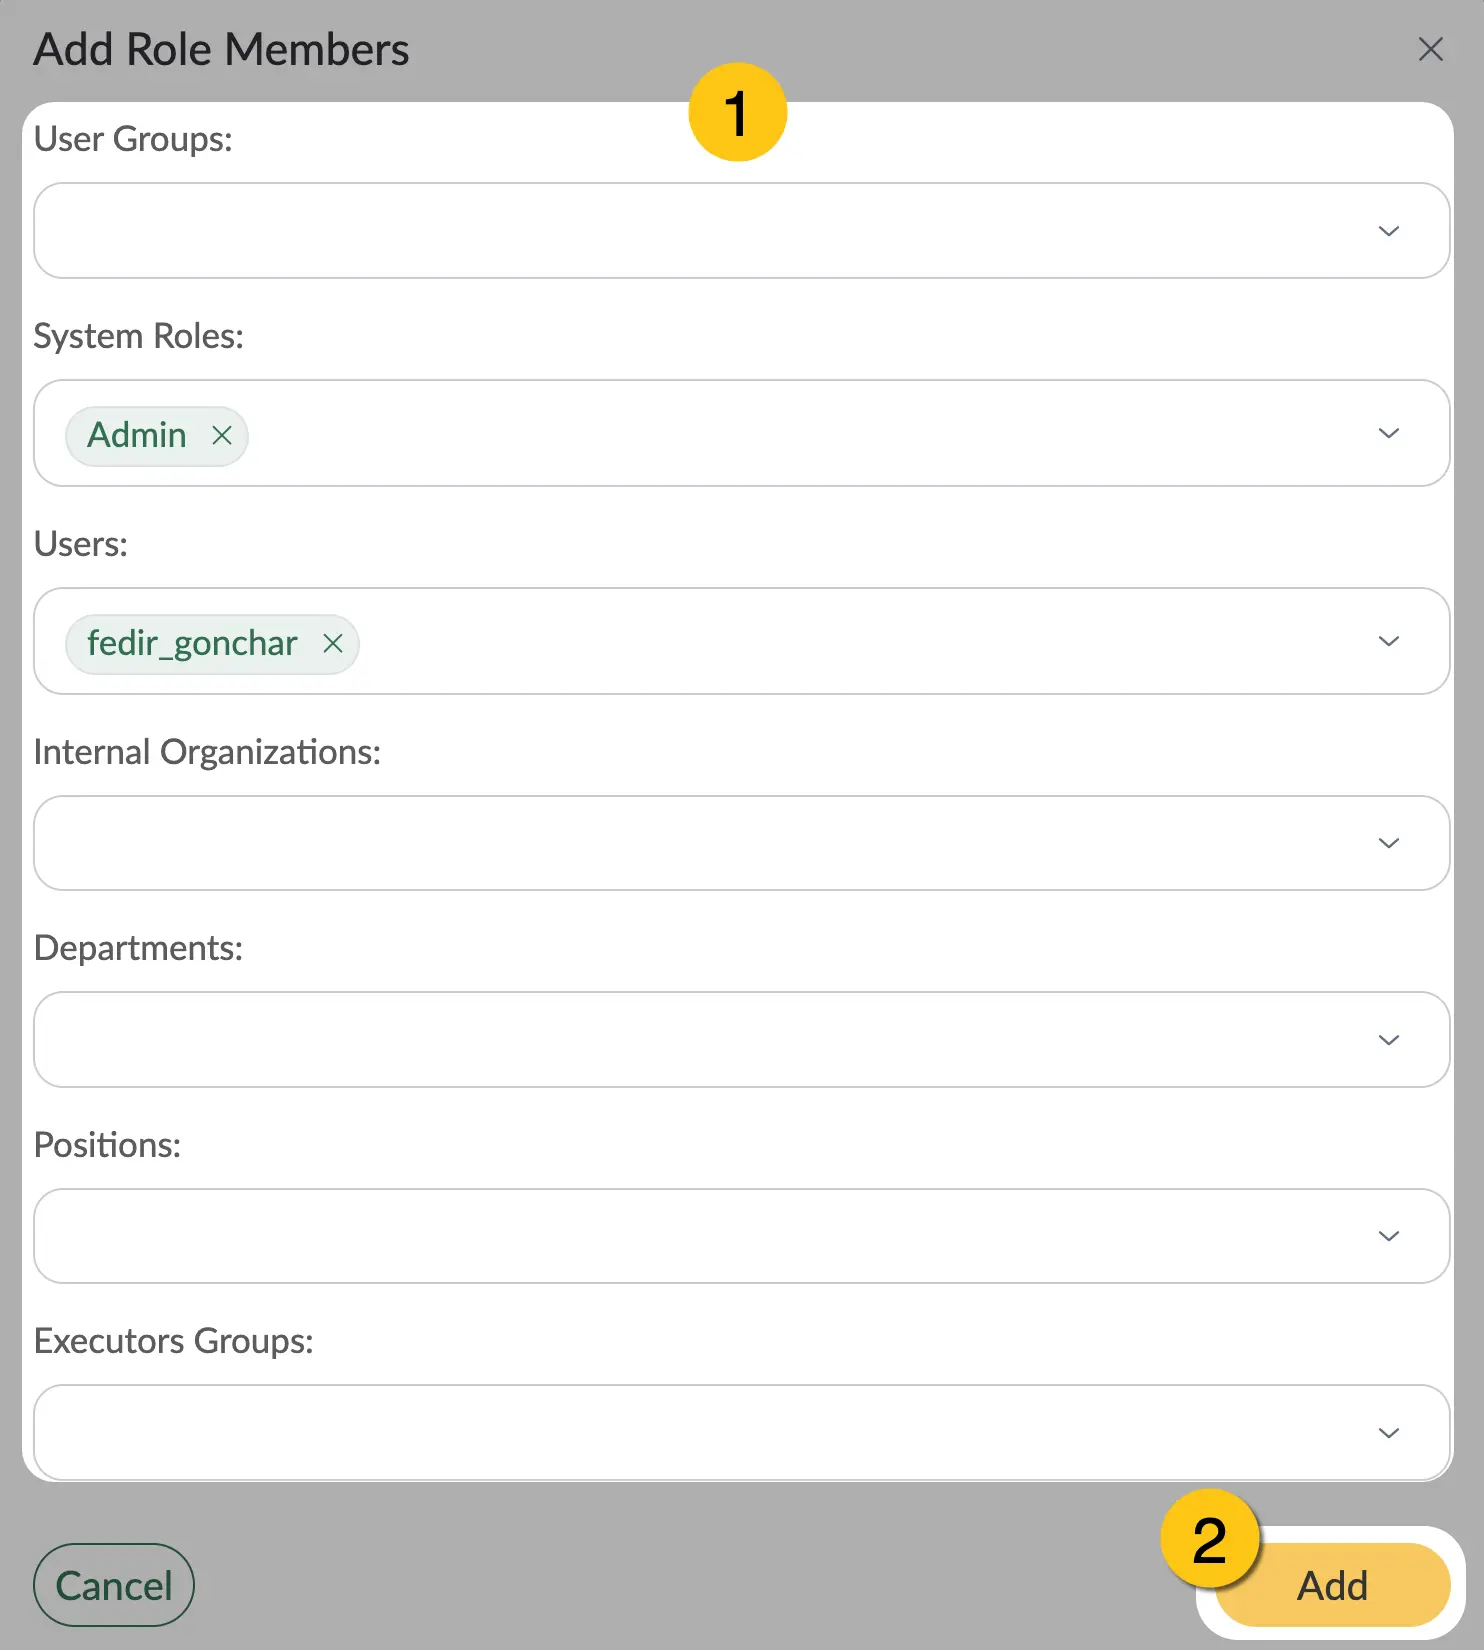
In the Role members section, select the Add button to add users who will have all the rights and capabilities of the corresponding role.
-
Fill in the required fields 1, then select the Add button 2.
Note:You can assign individual users as role members: positions, system roles, users. You can also assign user groups: our organizations, departments, executor groups. If you want to add user groups, make sure you have not enabled the Do not allow group participants to be included in the role toggle (step 3).
-
In the toolbar, select Save , then continue the configuration in the States tab (see section States).
2.2.1.3. States
You can add all available states from the states directory to the document.
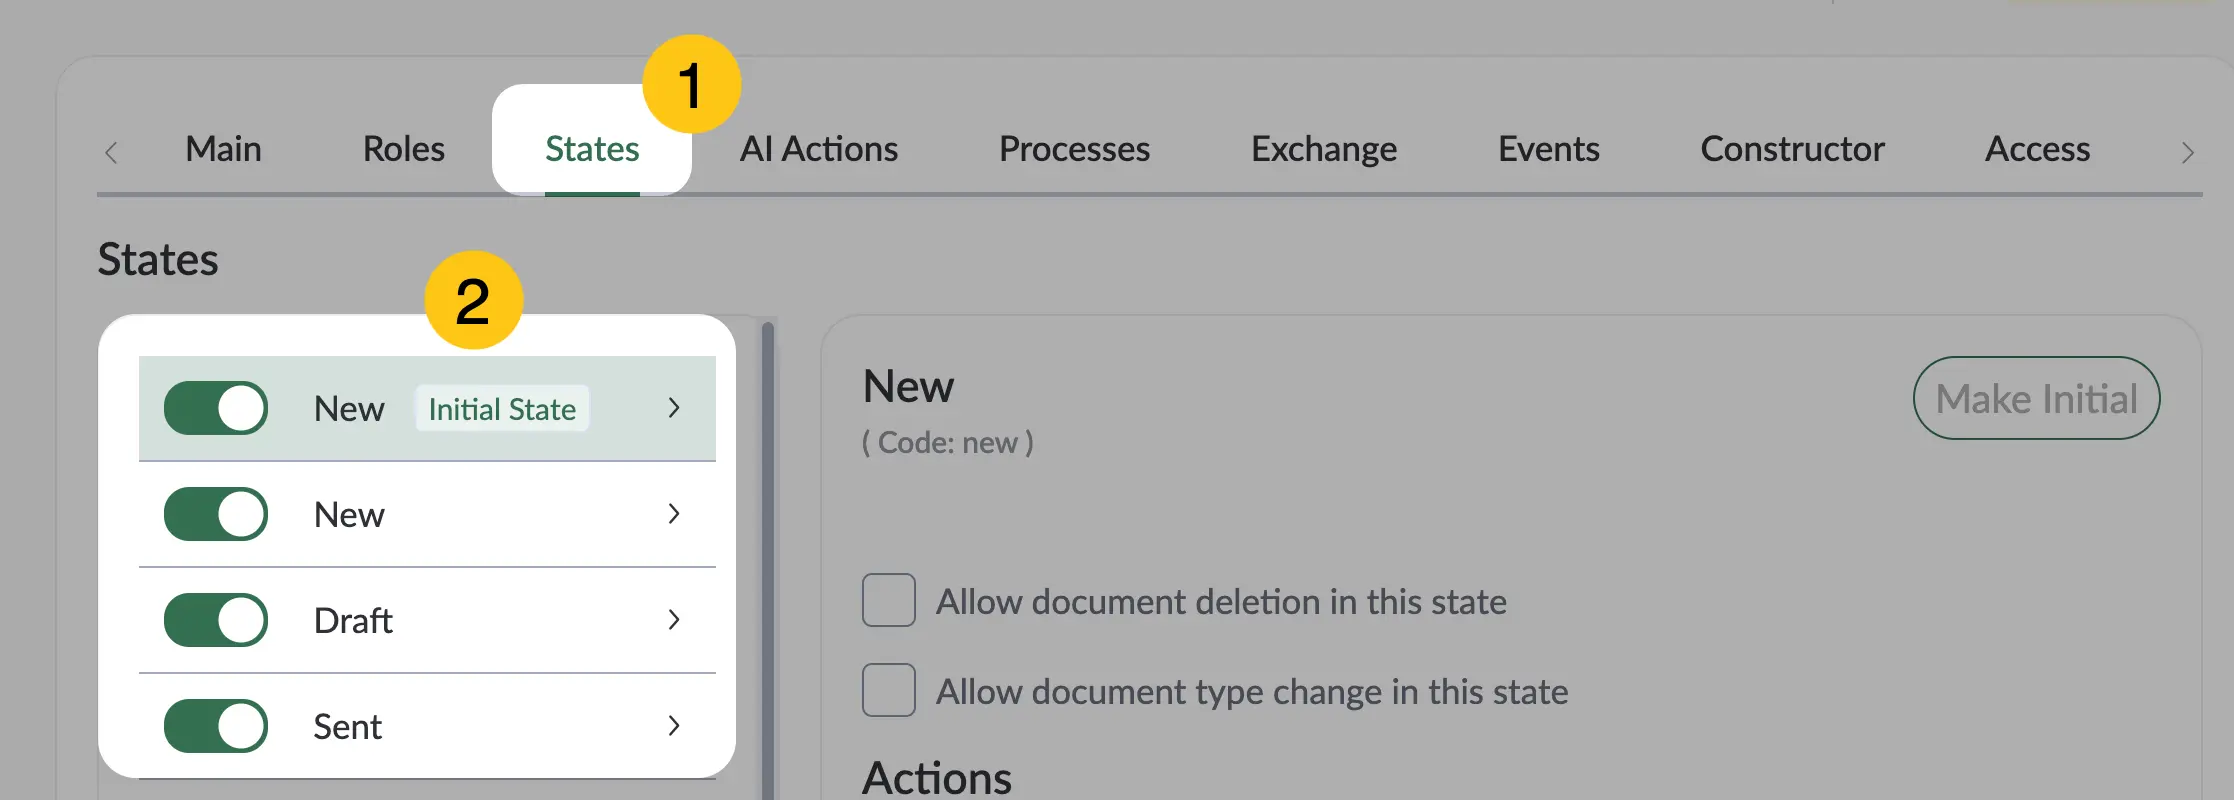
State is a characteristic that reflects the result of a document passing through a specific stage. You can configure the conditions under which the document state will change automatically. To do this, follow these steps:
-
Go to the States tab 1, then in the States panel, enable the state toggles 2 that you want to use for the document type.
 Notes:
- It is not possible to disable all states. At least one state must be enabled.
- If a state is used in a handler (on the Events tab), the system will display a warning when you attempt to disable it.
- If you have multiple states with the same name, pay attention to their codes to avoid confusion. The state code is displayed below its name as grey text.
-
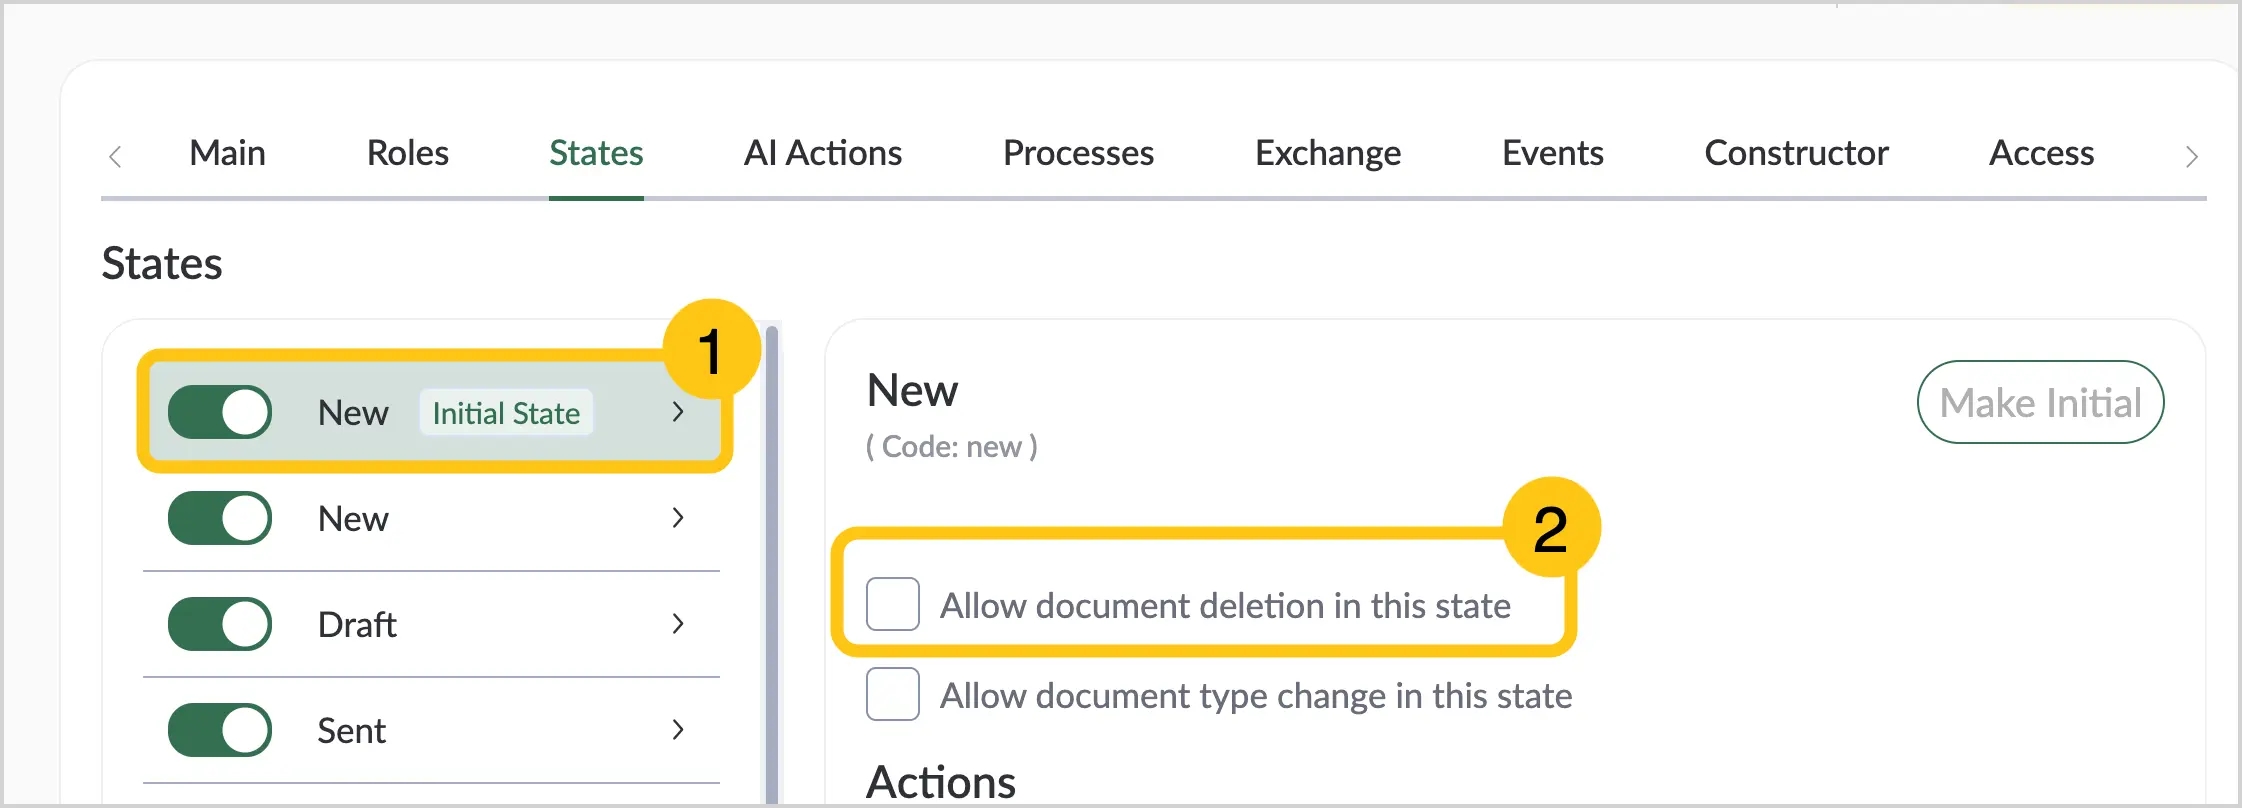
Select one of the enabled states 1. Additional settings for that state will open.
-
Enable the option Allow deletion of documents in this state 2. This option will allow users to delete a document when it is in the specified state.
-
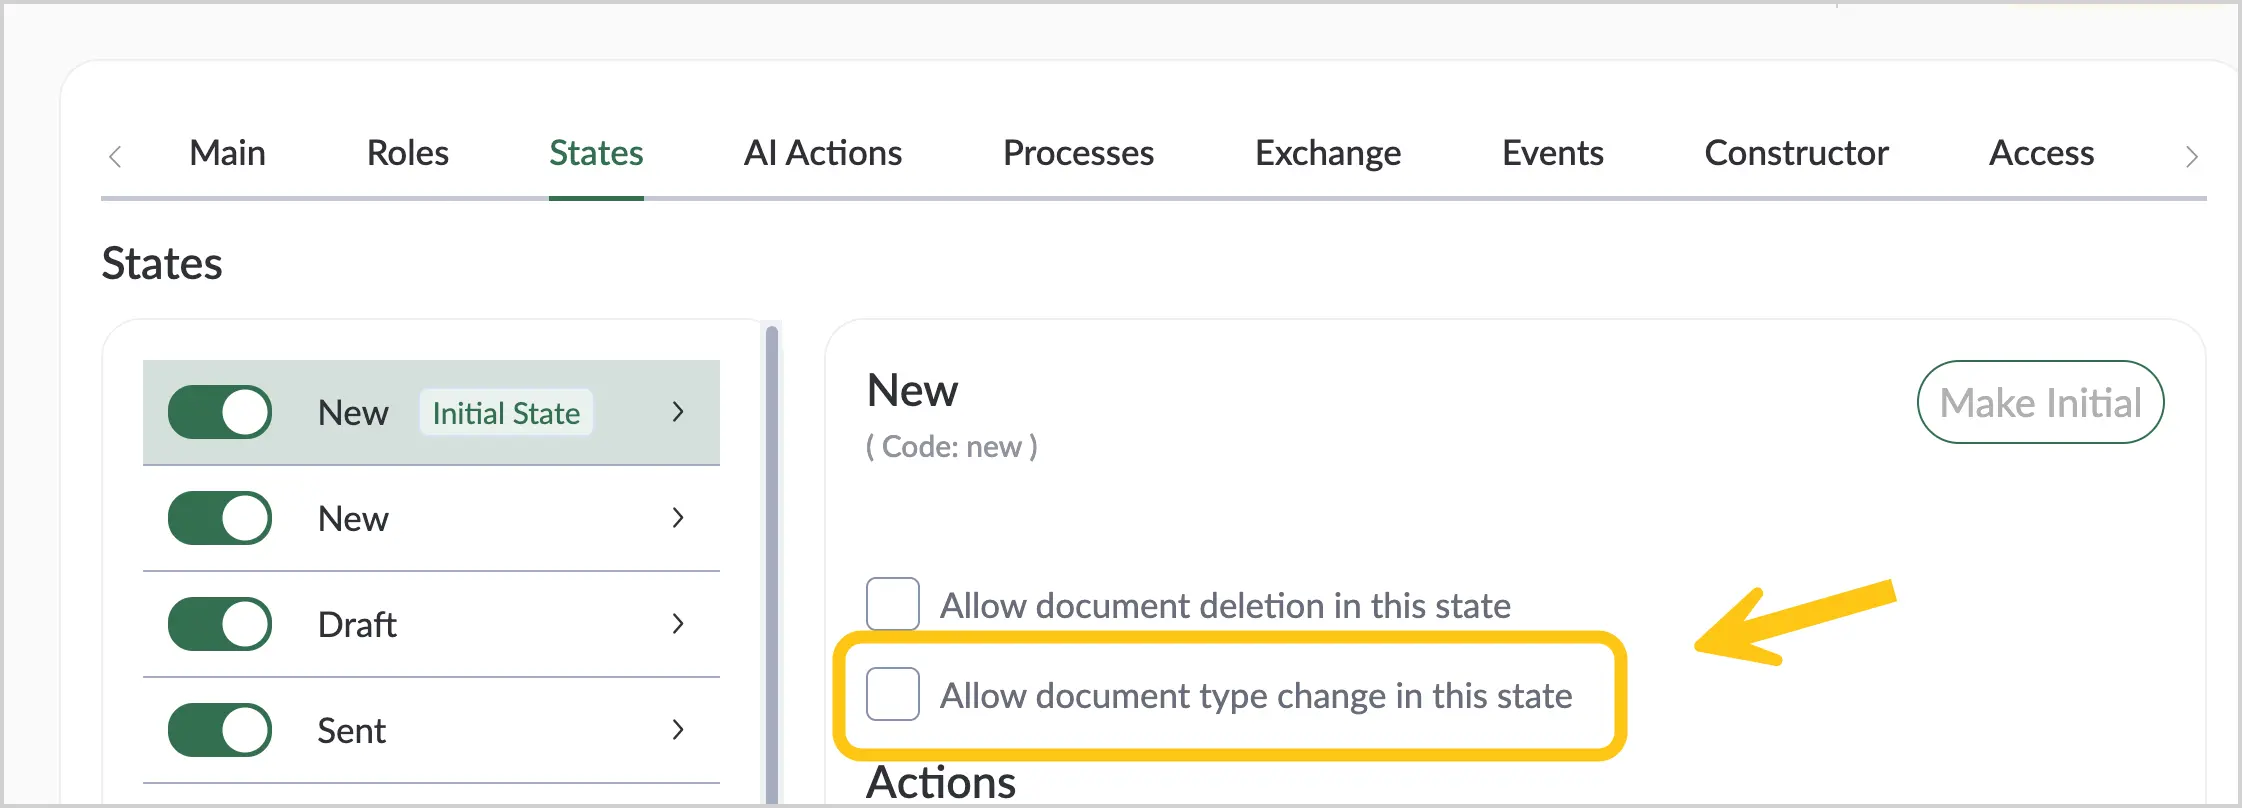
Enable the option Allow changing the document type in this state. See section Change Document Type.
-
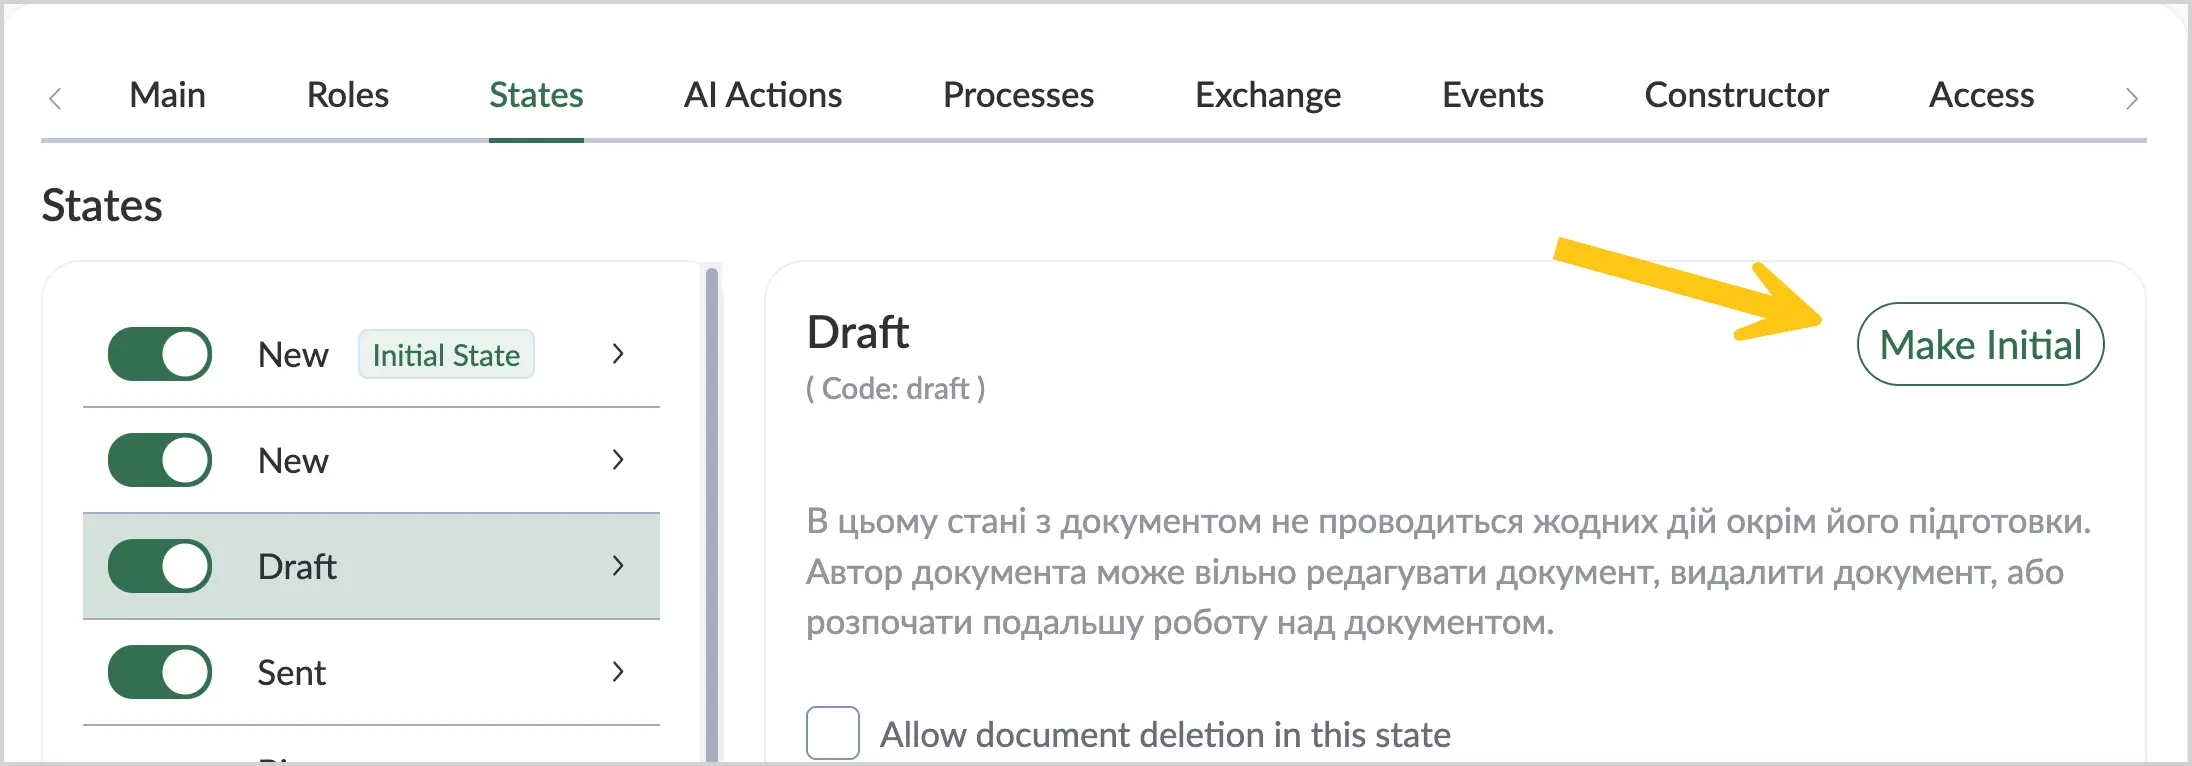
Select the Set as initial button. This means that all documents of this type created in the future will have the state you set as the initial one. Only one state can be initial, so if you select another state as initial, the previous initial state will be cancelled.
 Note:
Note:By default, the New state is the initial state for all new documents.
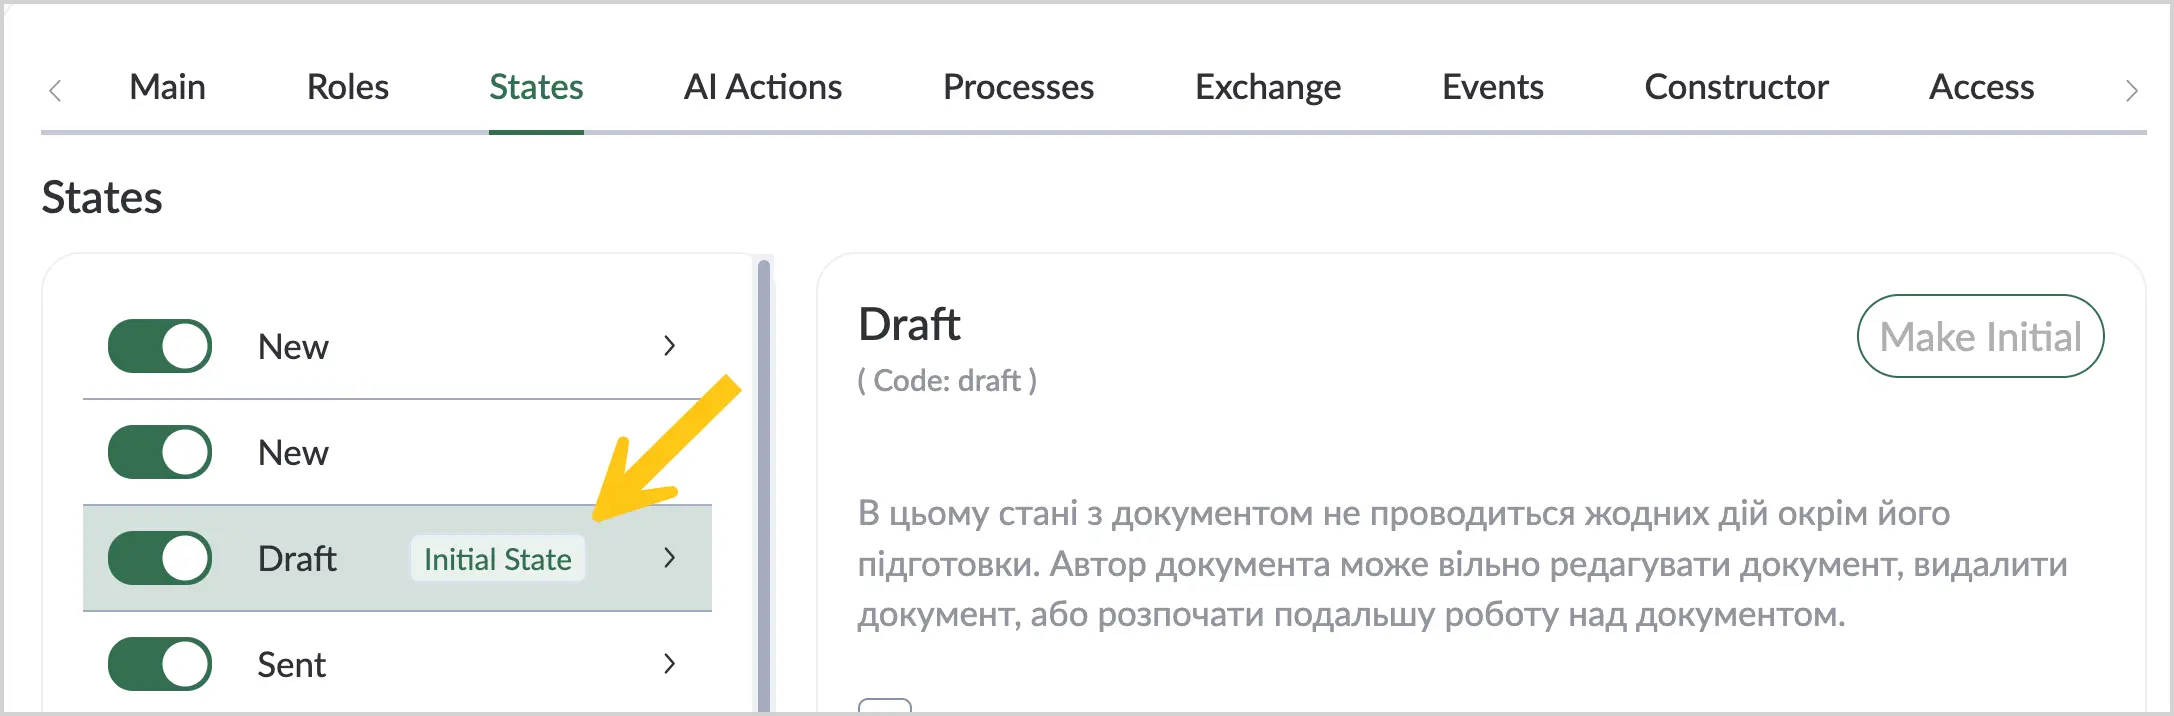
After this, the Initial state label will be displayed next to that state.
-
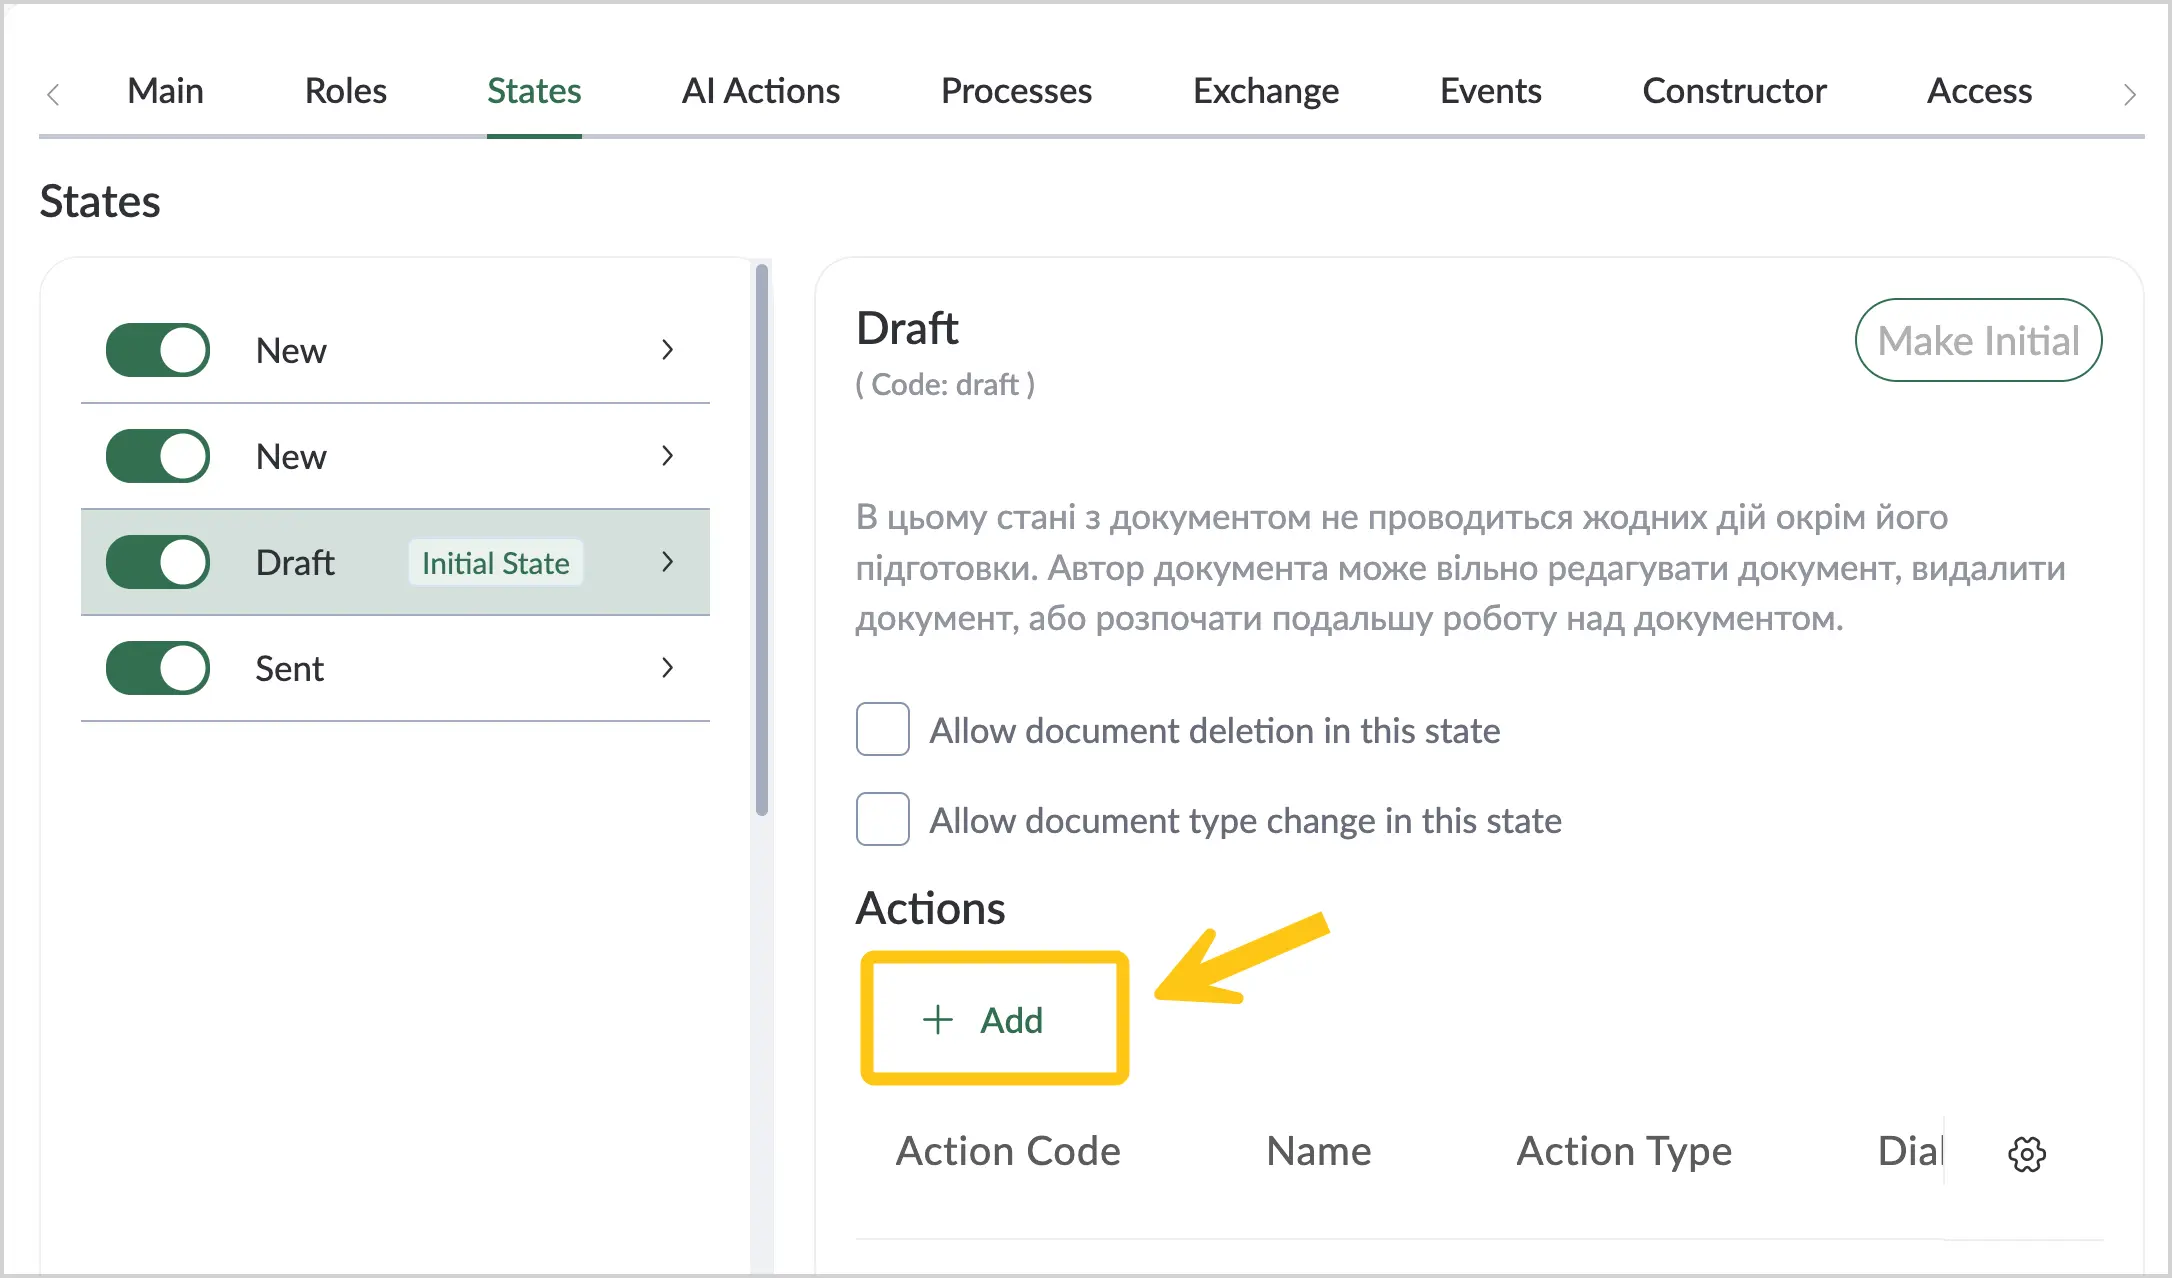
To configure the conditions under which the state will change, in the Actions section, select Add.
-
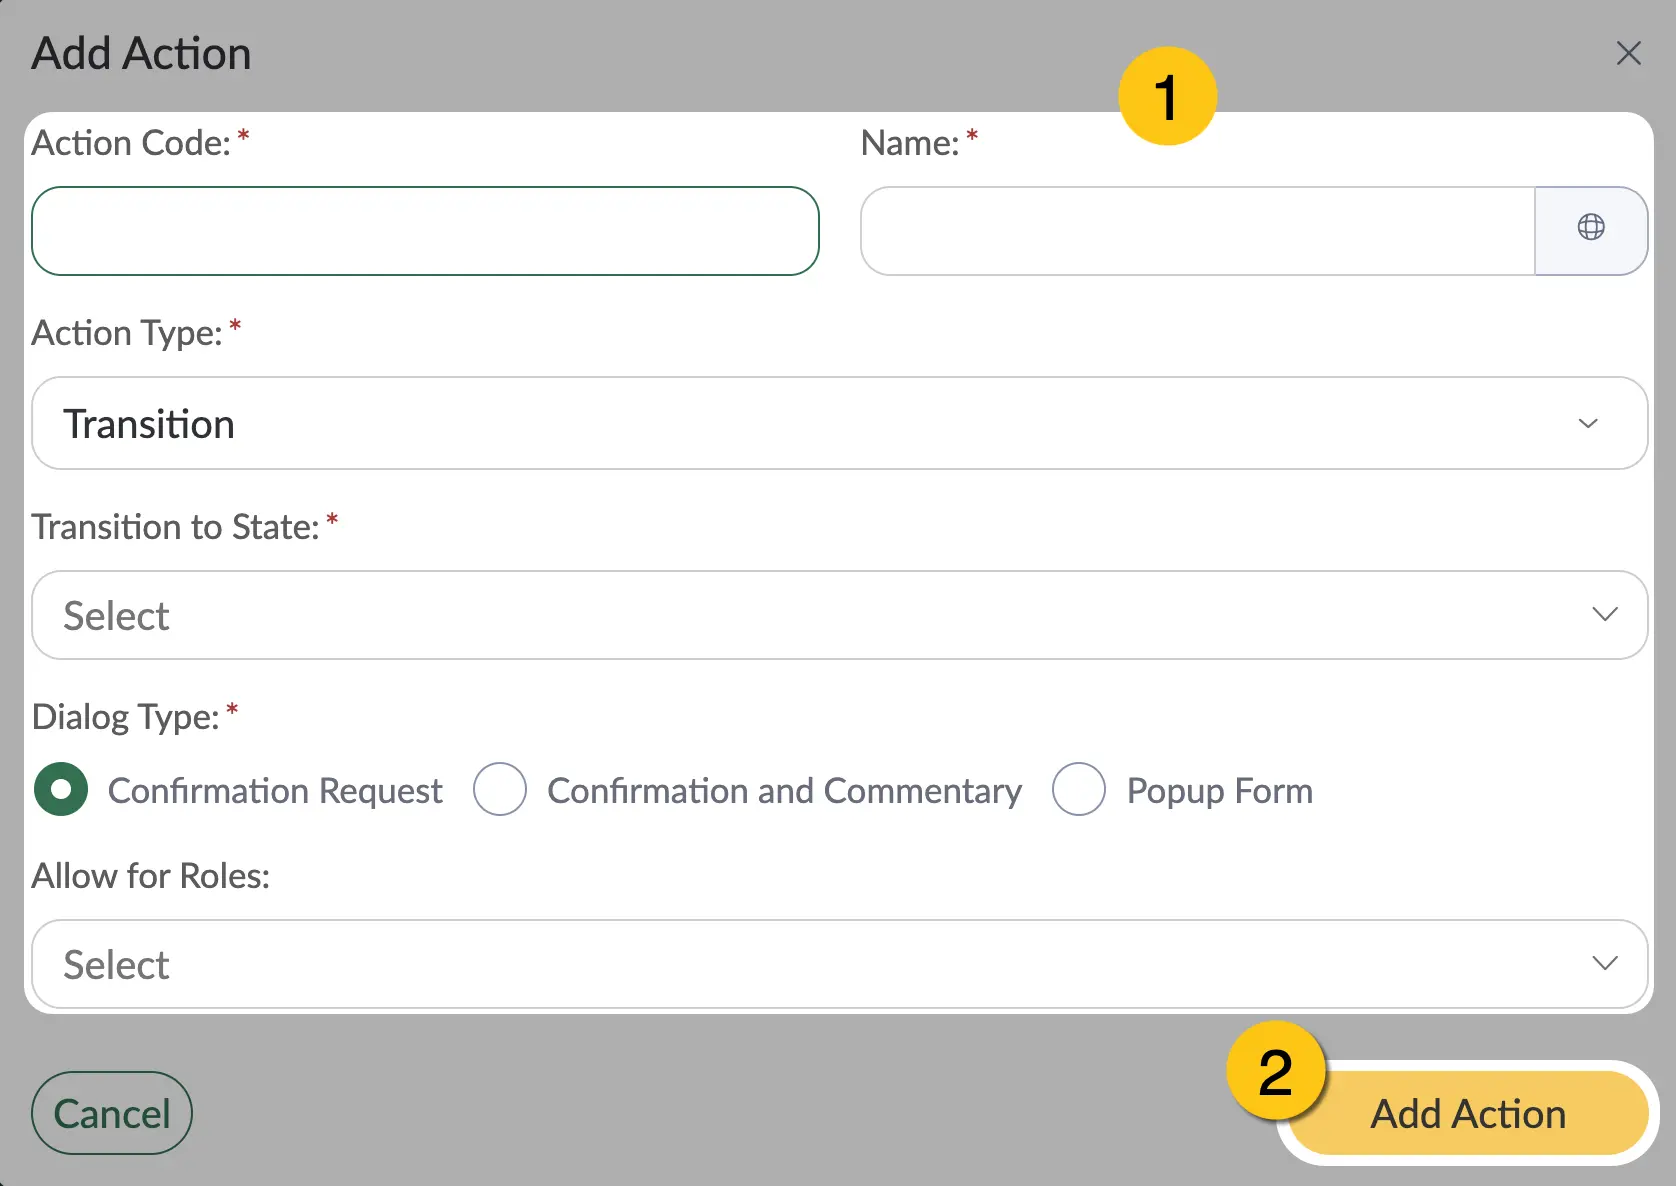
Fill in the fields 1 using the hints in the table below, then select the Add action button 2.
| Field name | Description |
|---|---|
| Action code* | Unique identifier of this action. Cannot be repeated within the same state. |
| Name* | The name of this action. ℹ️ Note: you can set an alternative name for different languages. To do this, in the Name field, select the icon and fill in the fields for other languages. Then select the Apply button. |
| Action type* | Select one of the available action types:
|
| Transition to state* This field is available only if you selected Transition in the Action type field. | Select from the dropdown list the state the document should transition to when this action is performed. To create or edit existing states, see section Document Type States Directory. |
| Dialog type* | In the Dialog type field, you can define how the system will interact with the user when the selected action is executed. You can choose one of the following types:
|
| Allow for roles | Grant permission to perform this action to the roles activated in the document type (see section Roles). |
Fields marked with "*" are required.
To edit created actions, delete them, or change their order, select the corresponding buttons in the Actions column.
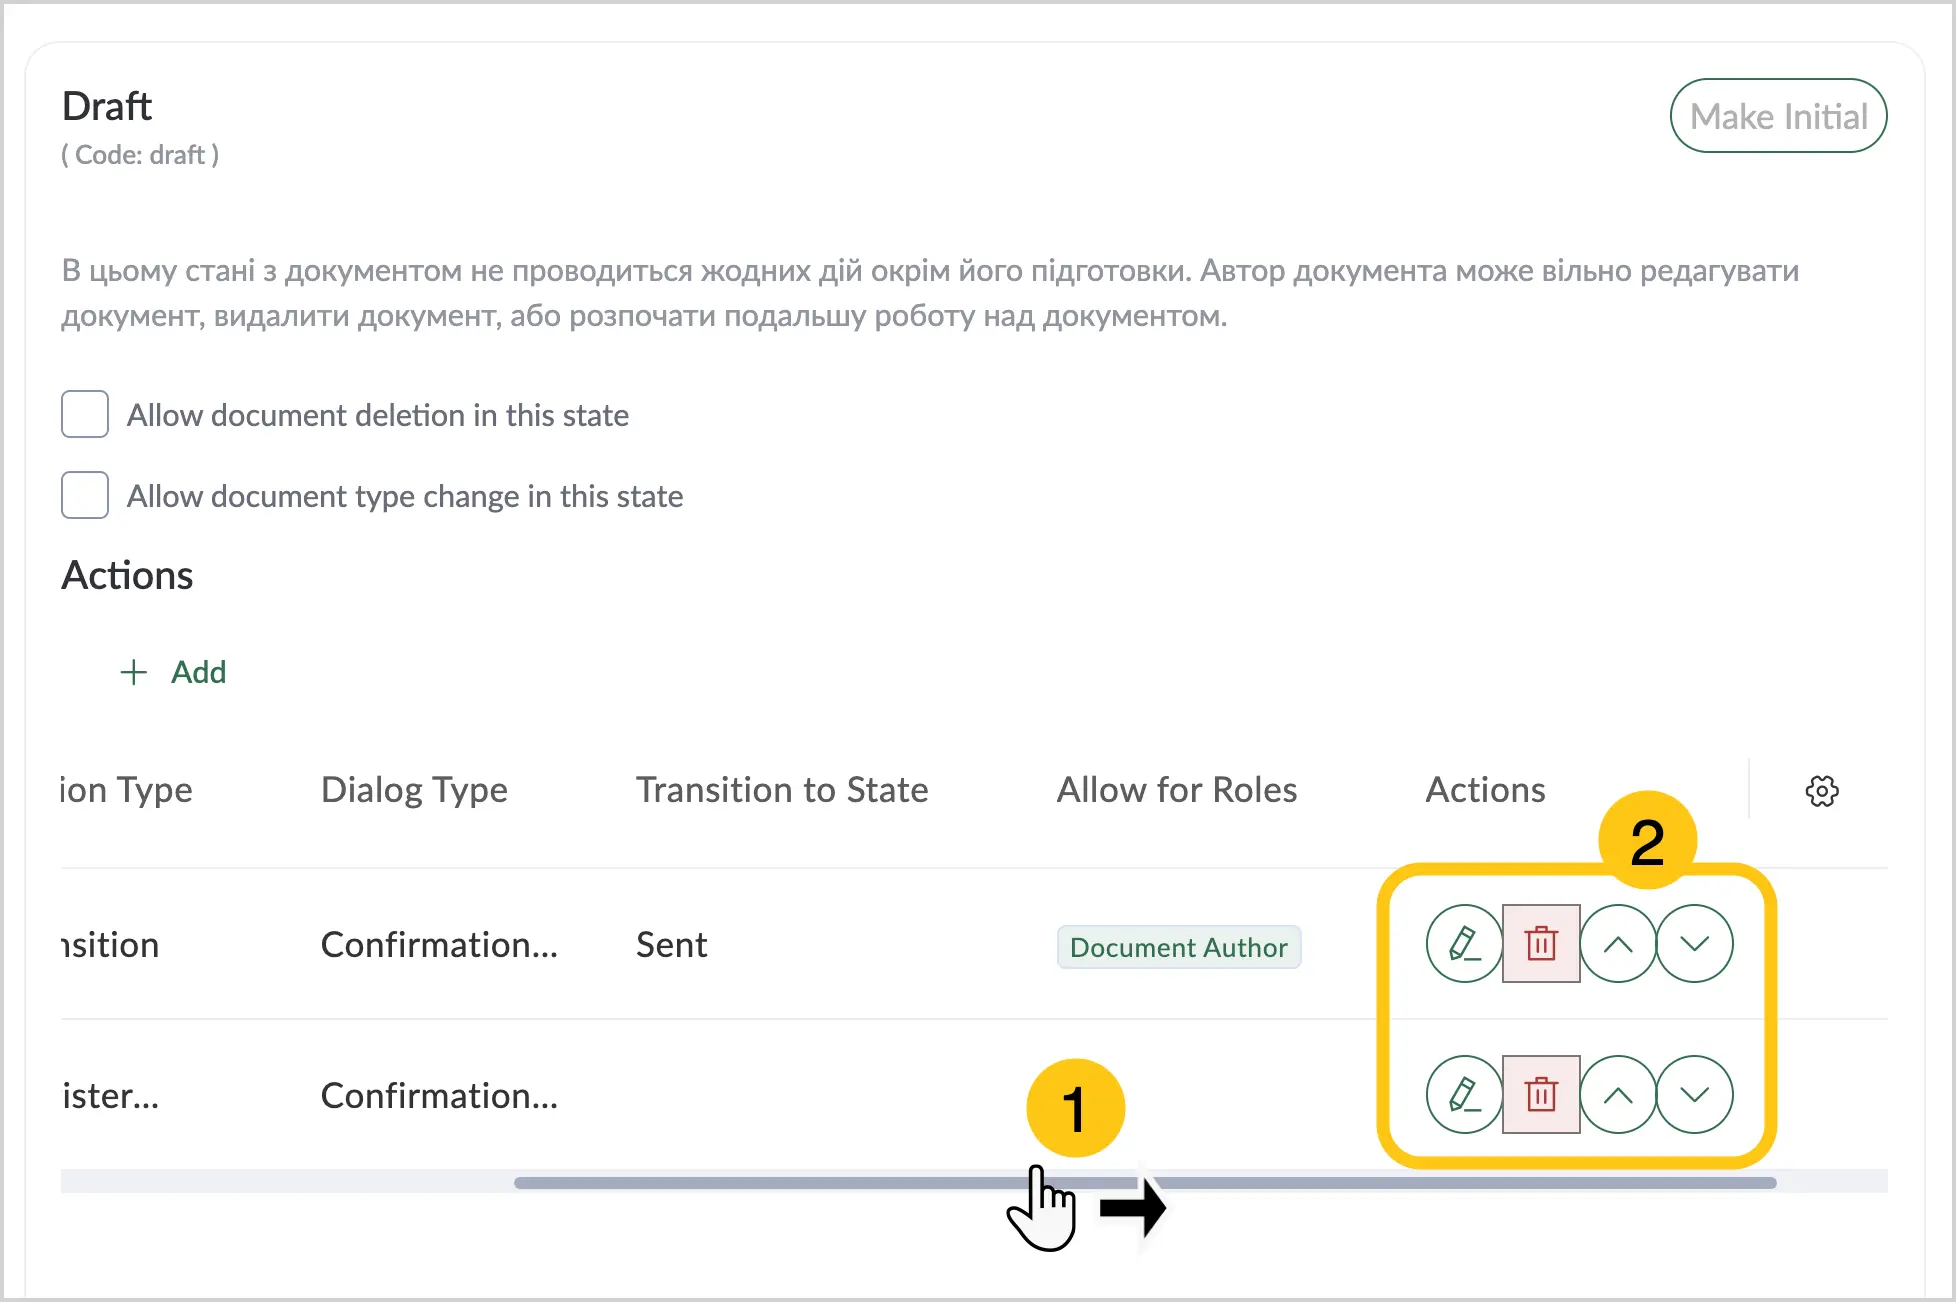
-
In the toolbar, select Save , then continue the configuration in the AI Actions tab (see section AI Actions).
2.2.1.4. AI Actions
Before working in the AI Actions tab, create an AI Scenario of the Document action type.
-
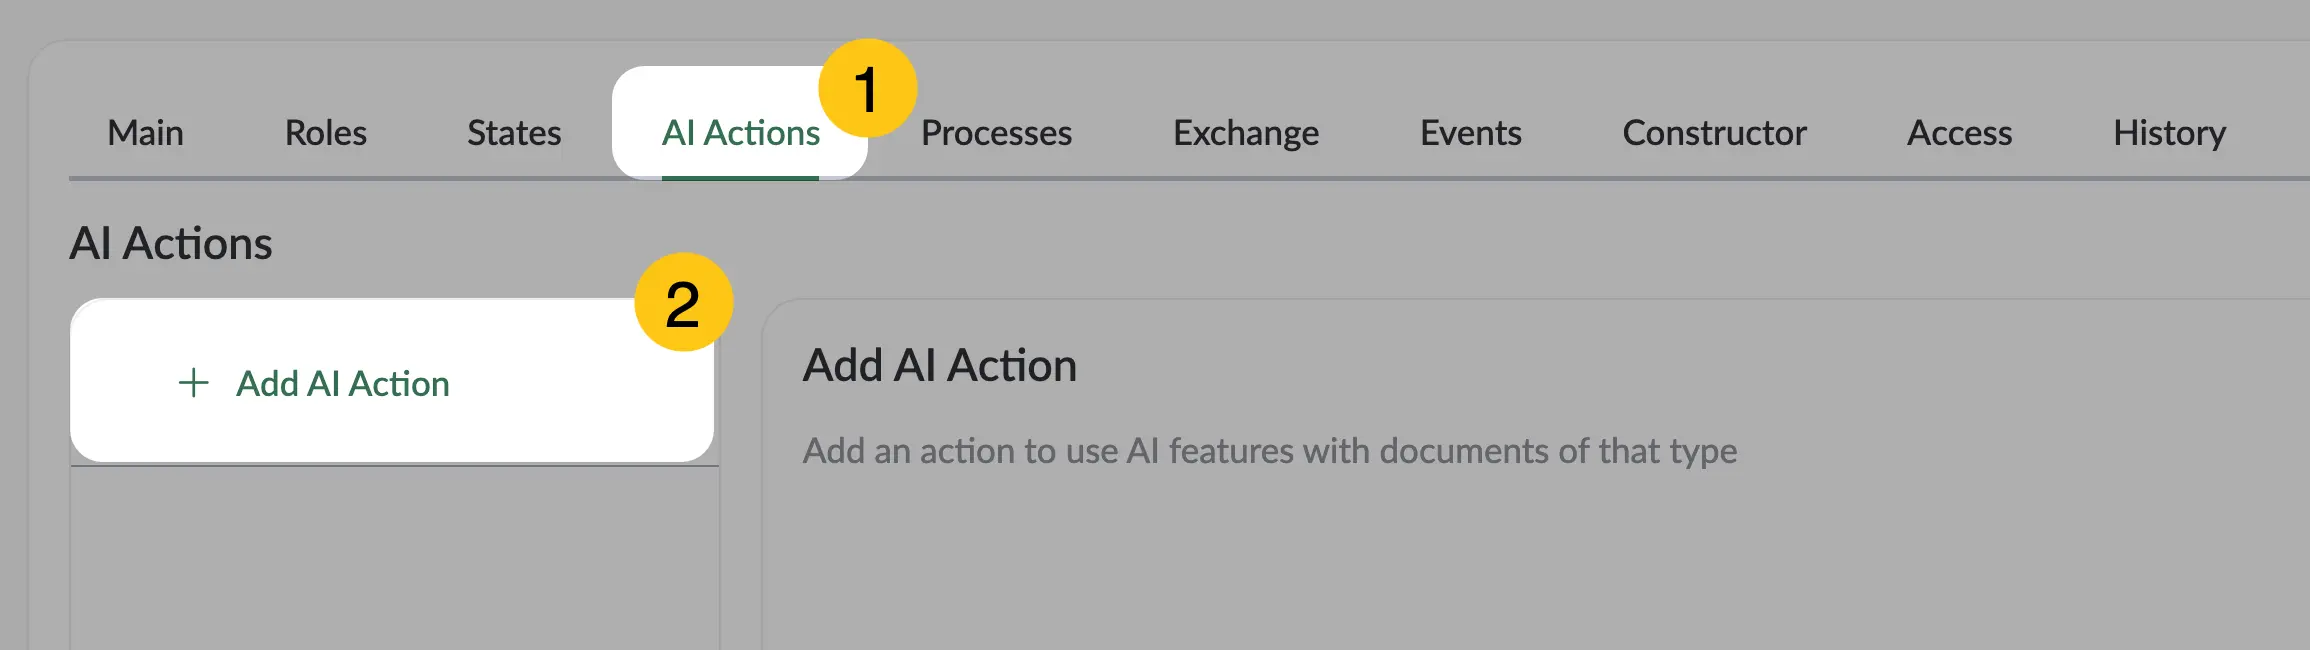
Go to the AI Actions tab 1, then select + Add AI action 2.
-
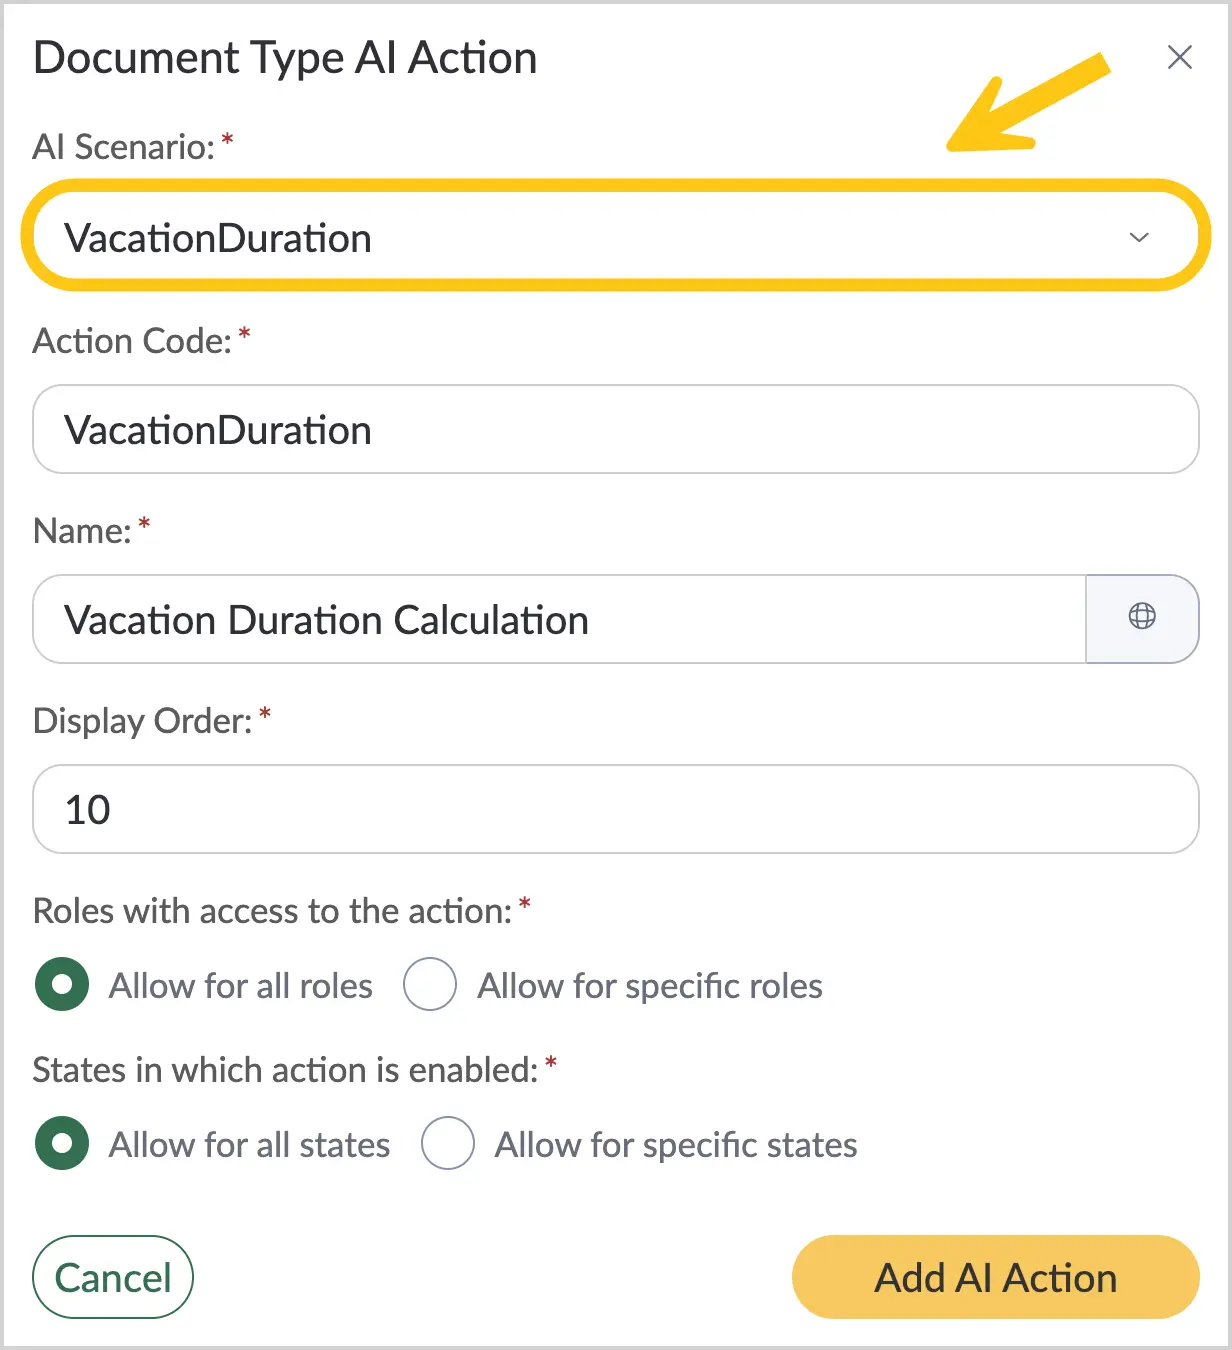
In the AI Scenarios field, select the required scenario. Only scenarios of the Document action type will be displayed in the list.
-
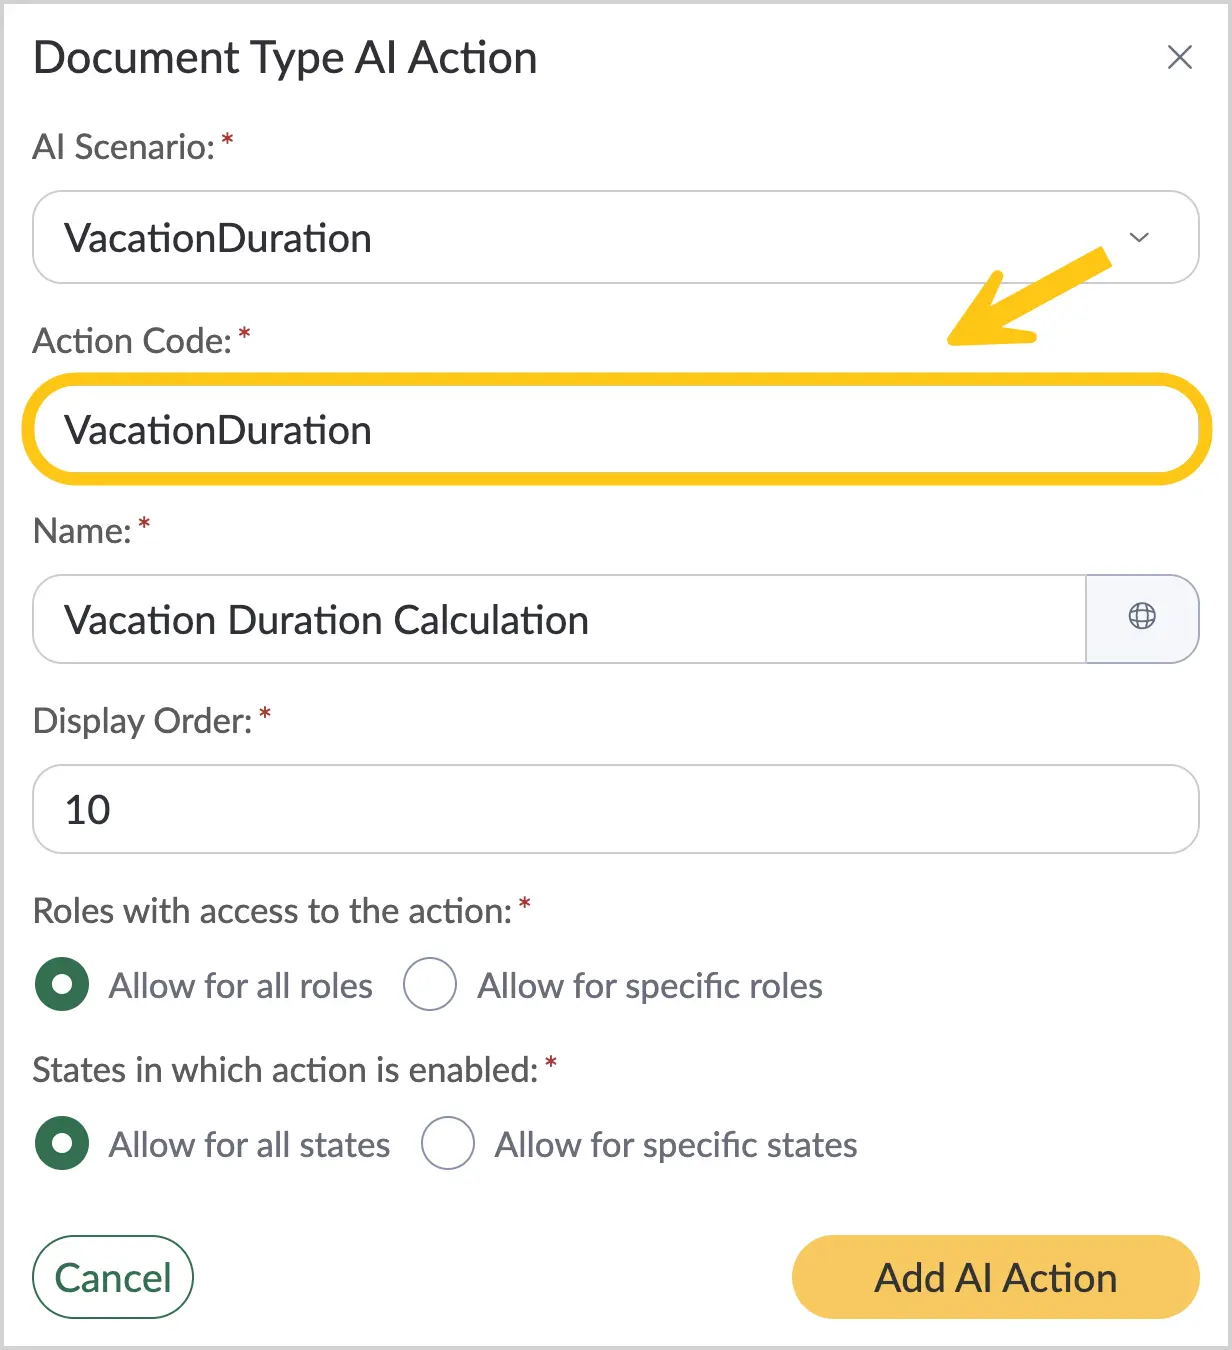
The Action code field will be automatically populated with the same code as in the selected AI scenario. Modify if needed.
-
The Name field will be automatically populated with a value identical to the code of the selected AI scenario. Modify if needed. This name will be displayed in the document toolbar as a button.
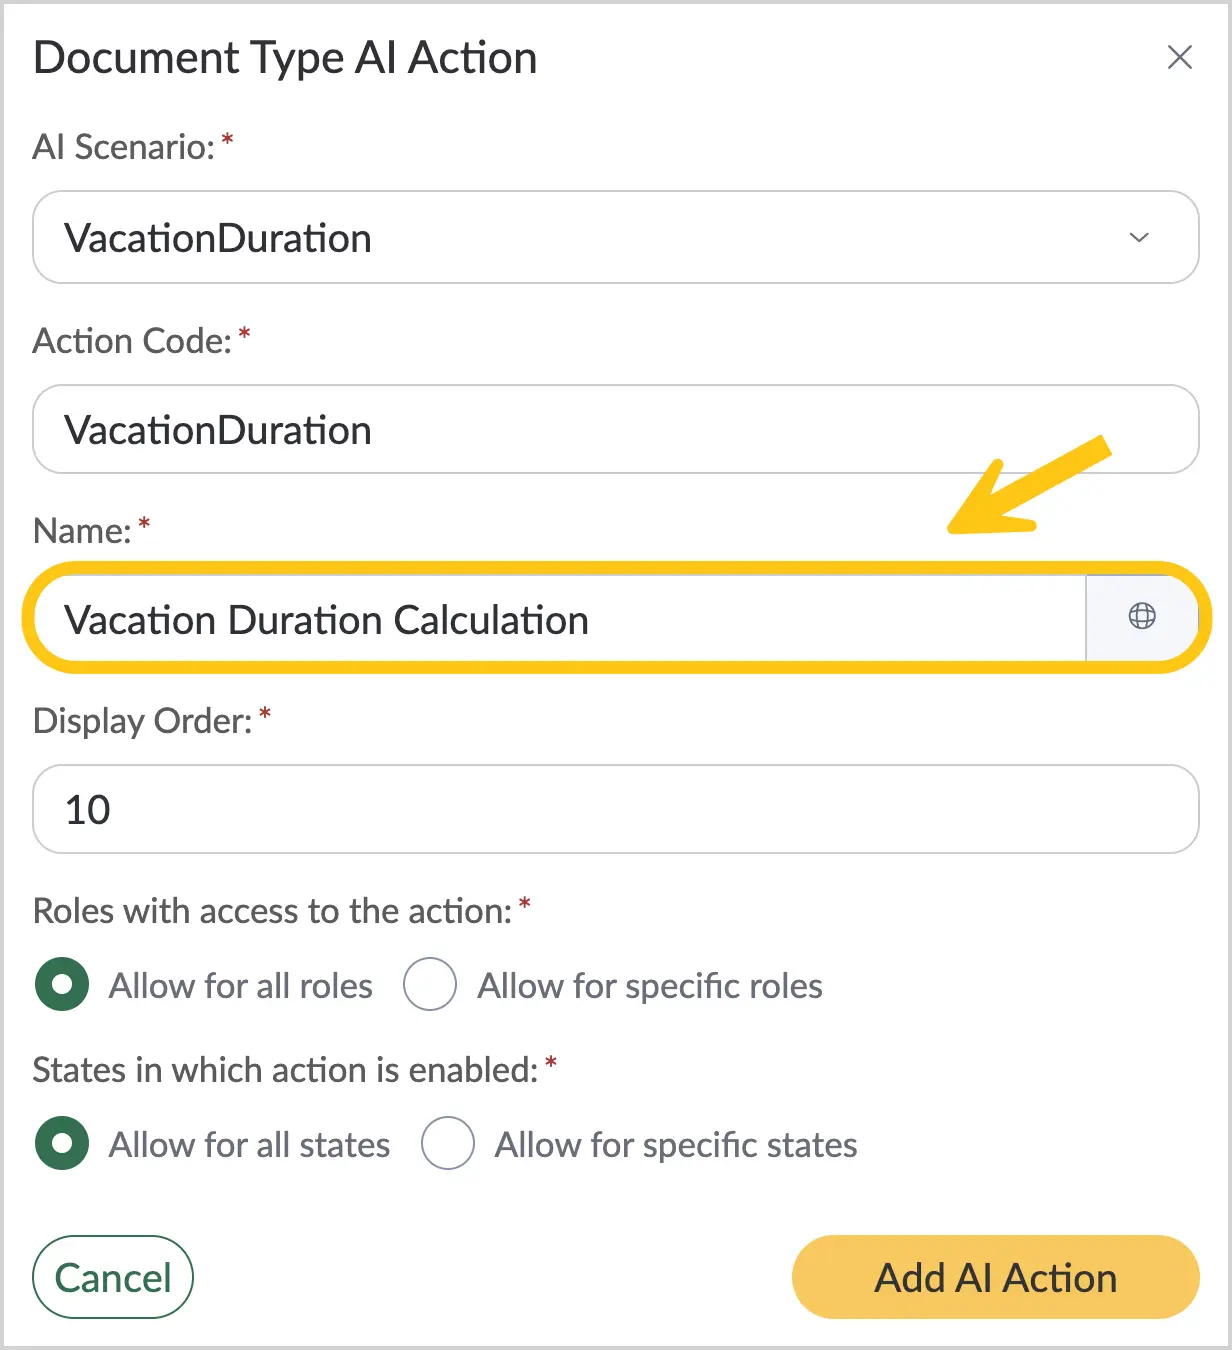 Note:
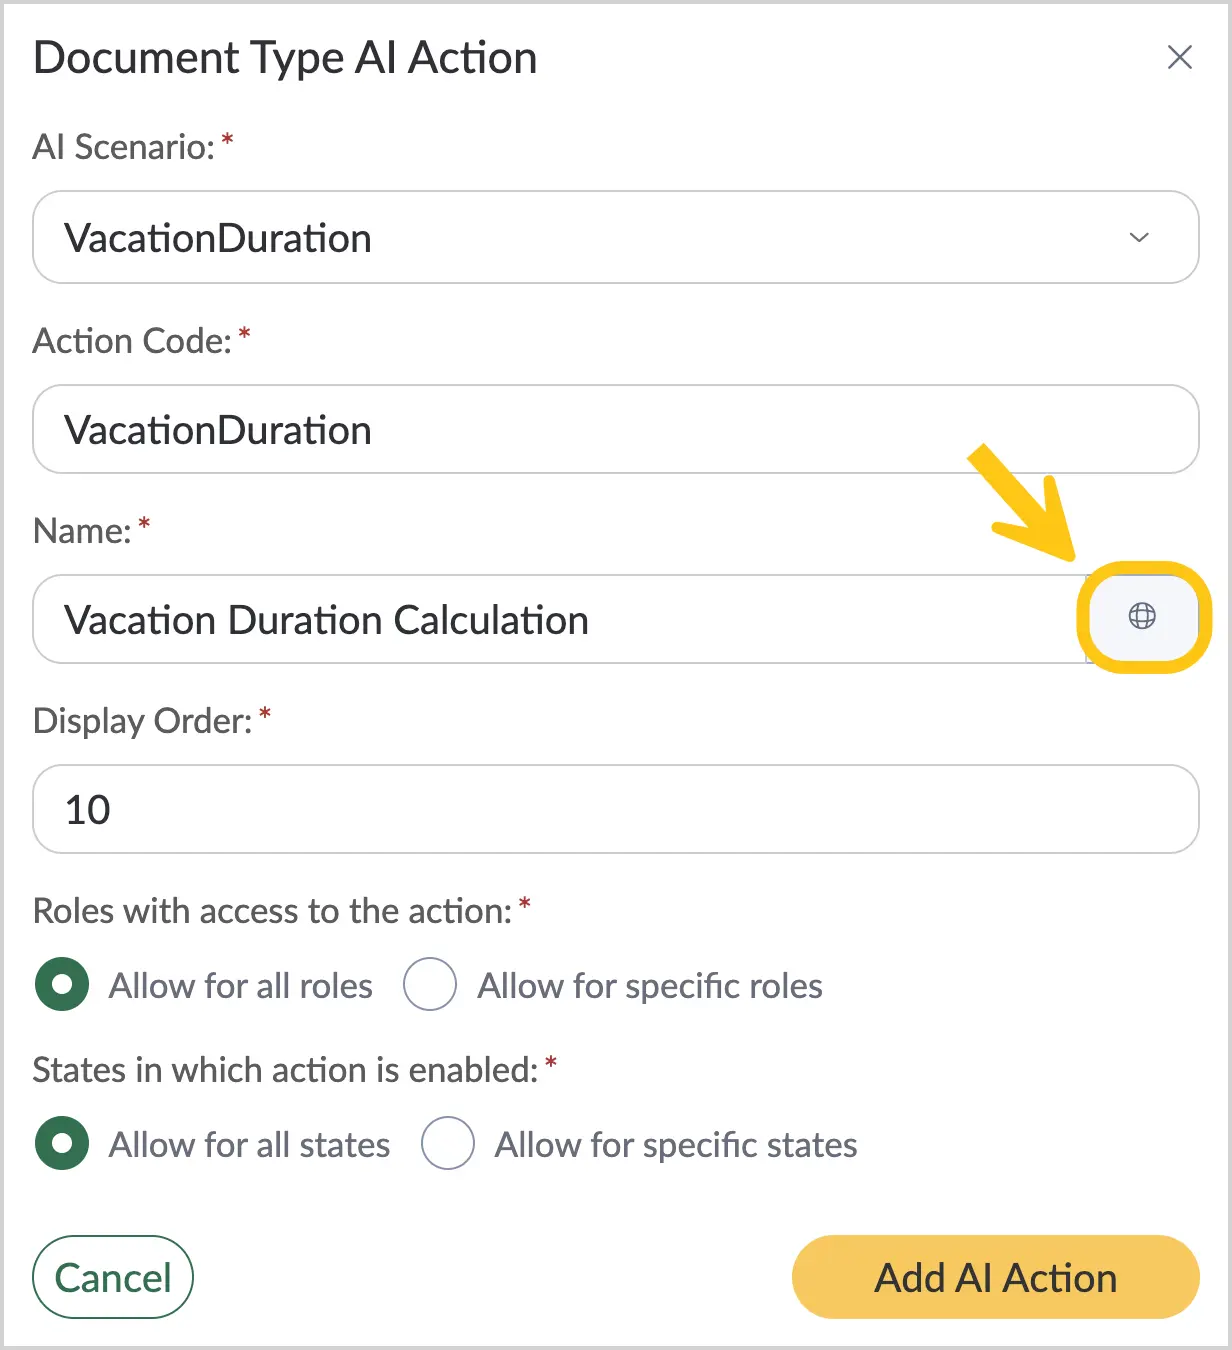
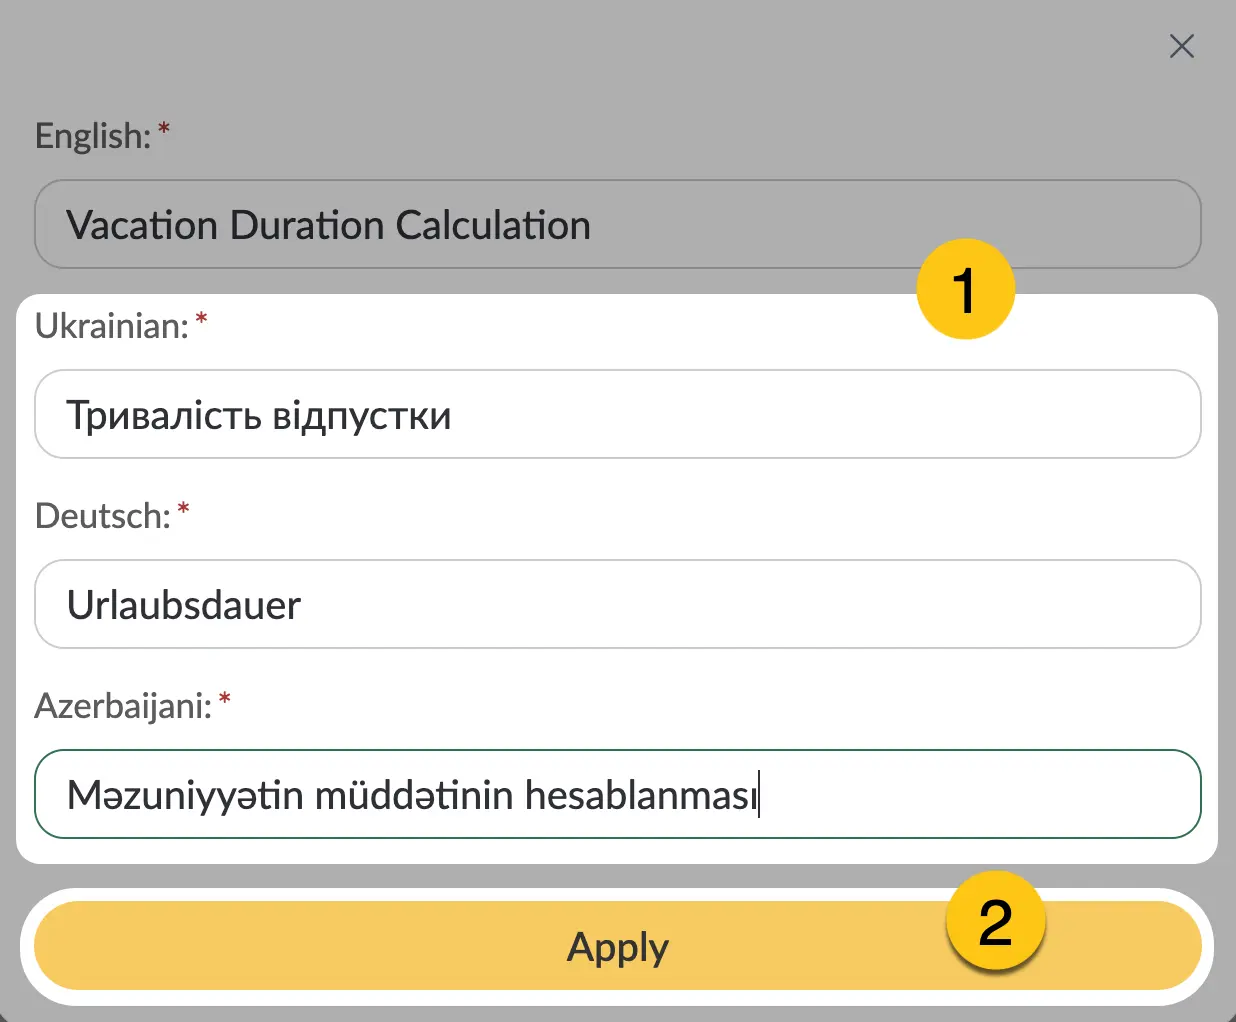
Note:You can set an alternative name for different languages. To do this, in the Name field, select the icon.
Fill in the fields for other languages 1, then select the Apply button 2.
-
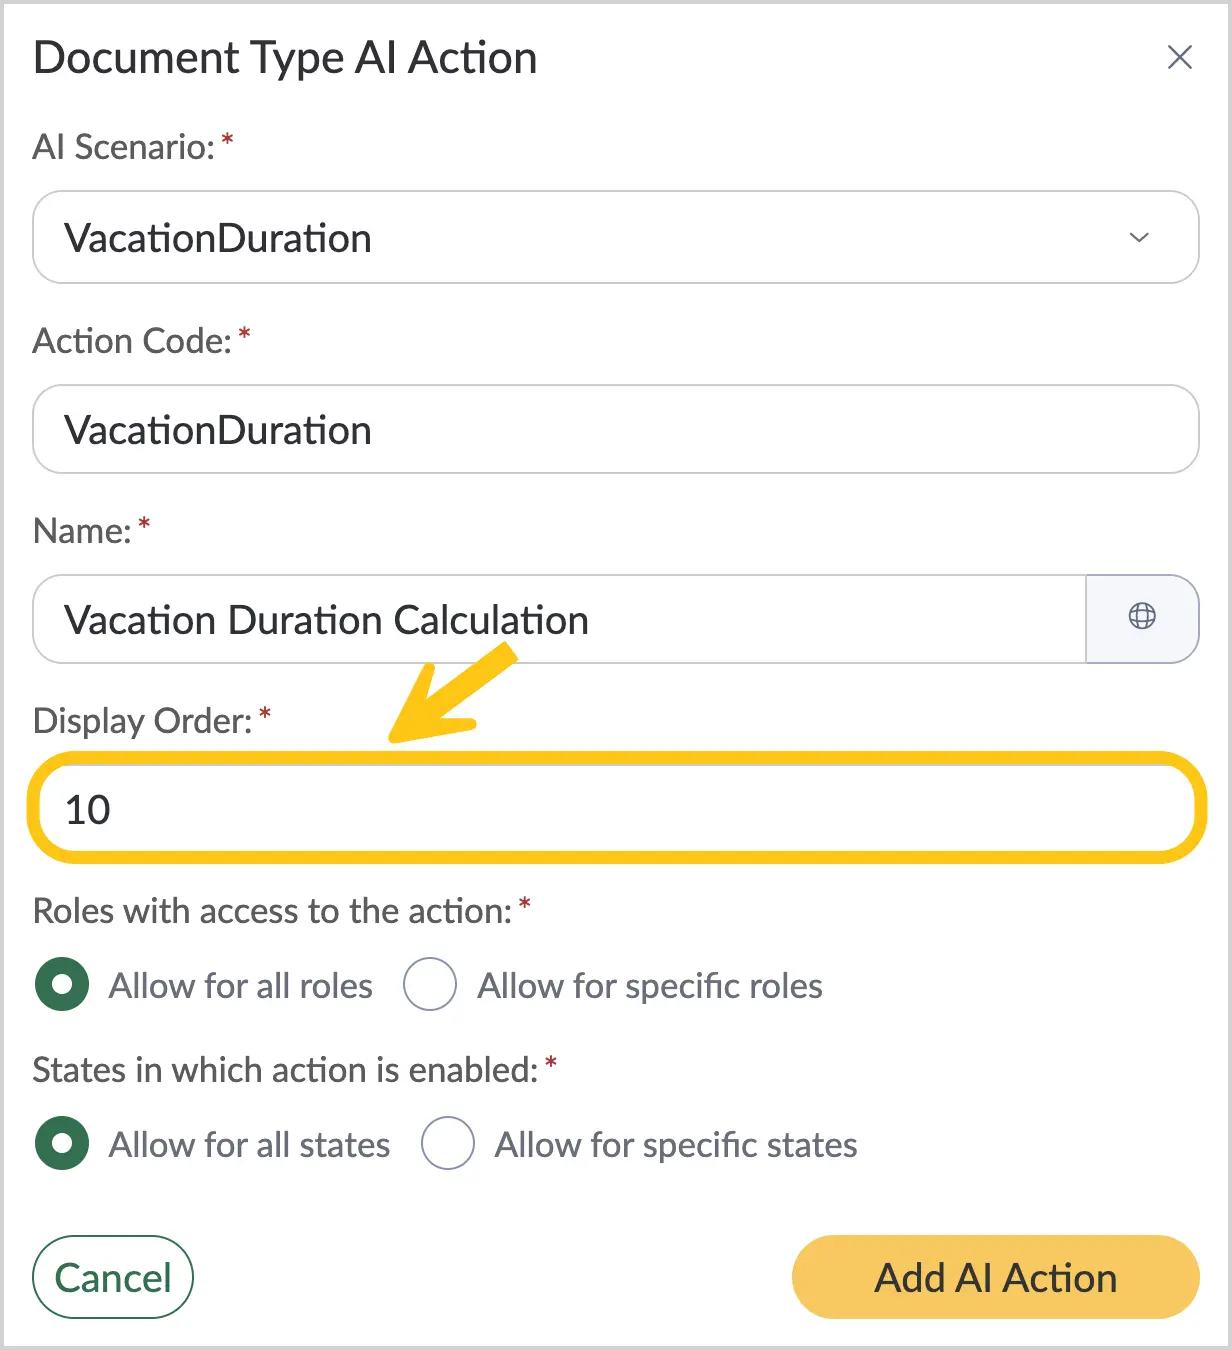
In the Display order field, enter the sequence number of the step. This is useful if you have multiple actions added in the AI Actions tab.
-
You can choose which users and document states these actions will be available for:
-
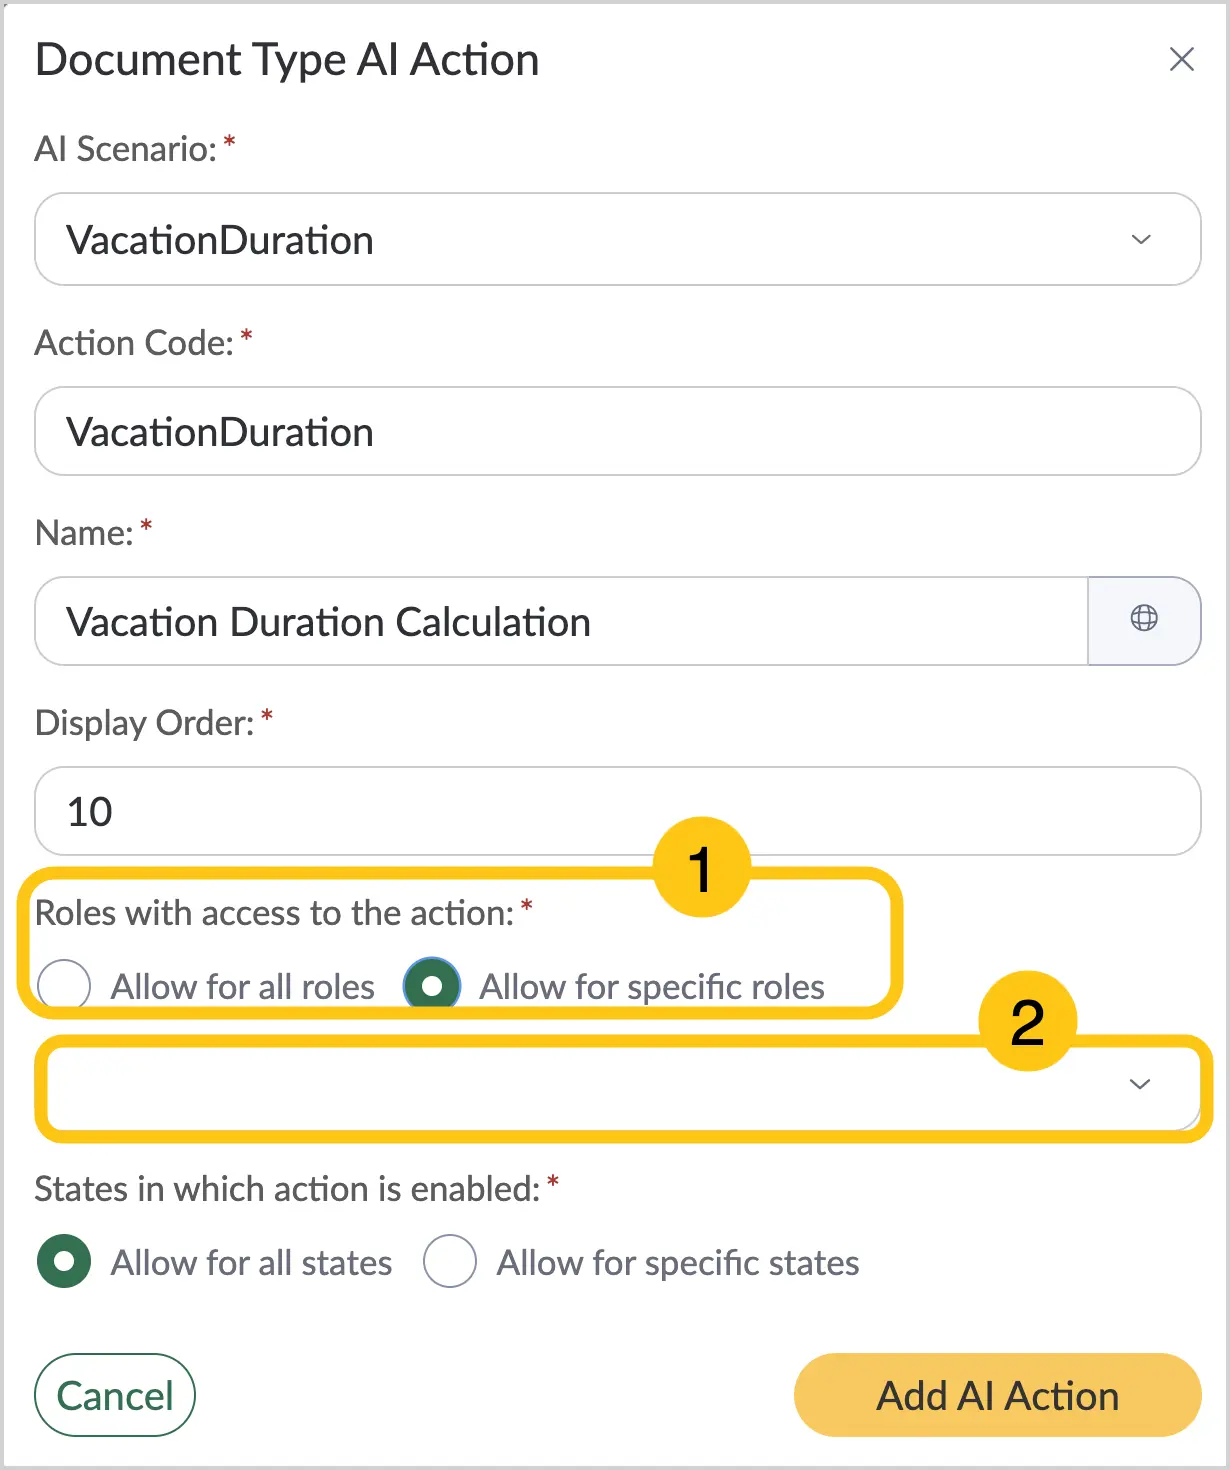
In the Roles with access to the action section 1, select one of the following access options:
-
Allow for all roles
-
Allow for specific roles — when this option is selected, choose the required user roles in the field below 2 to grant them access to this action.
-
-
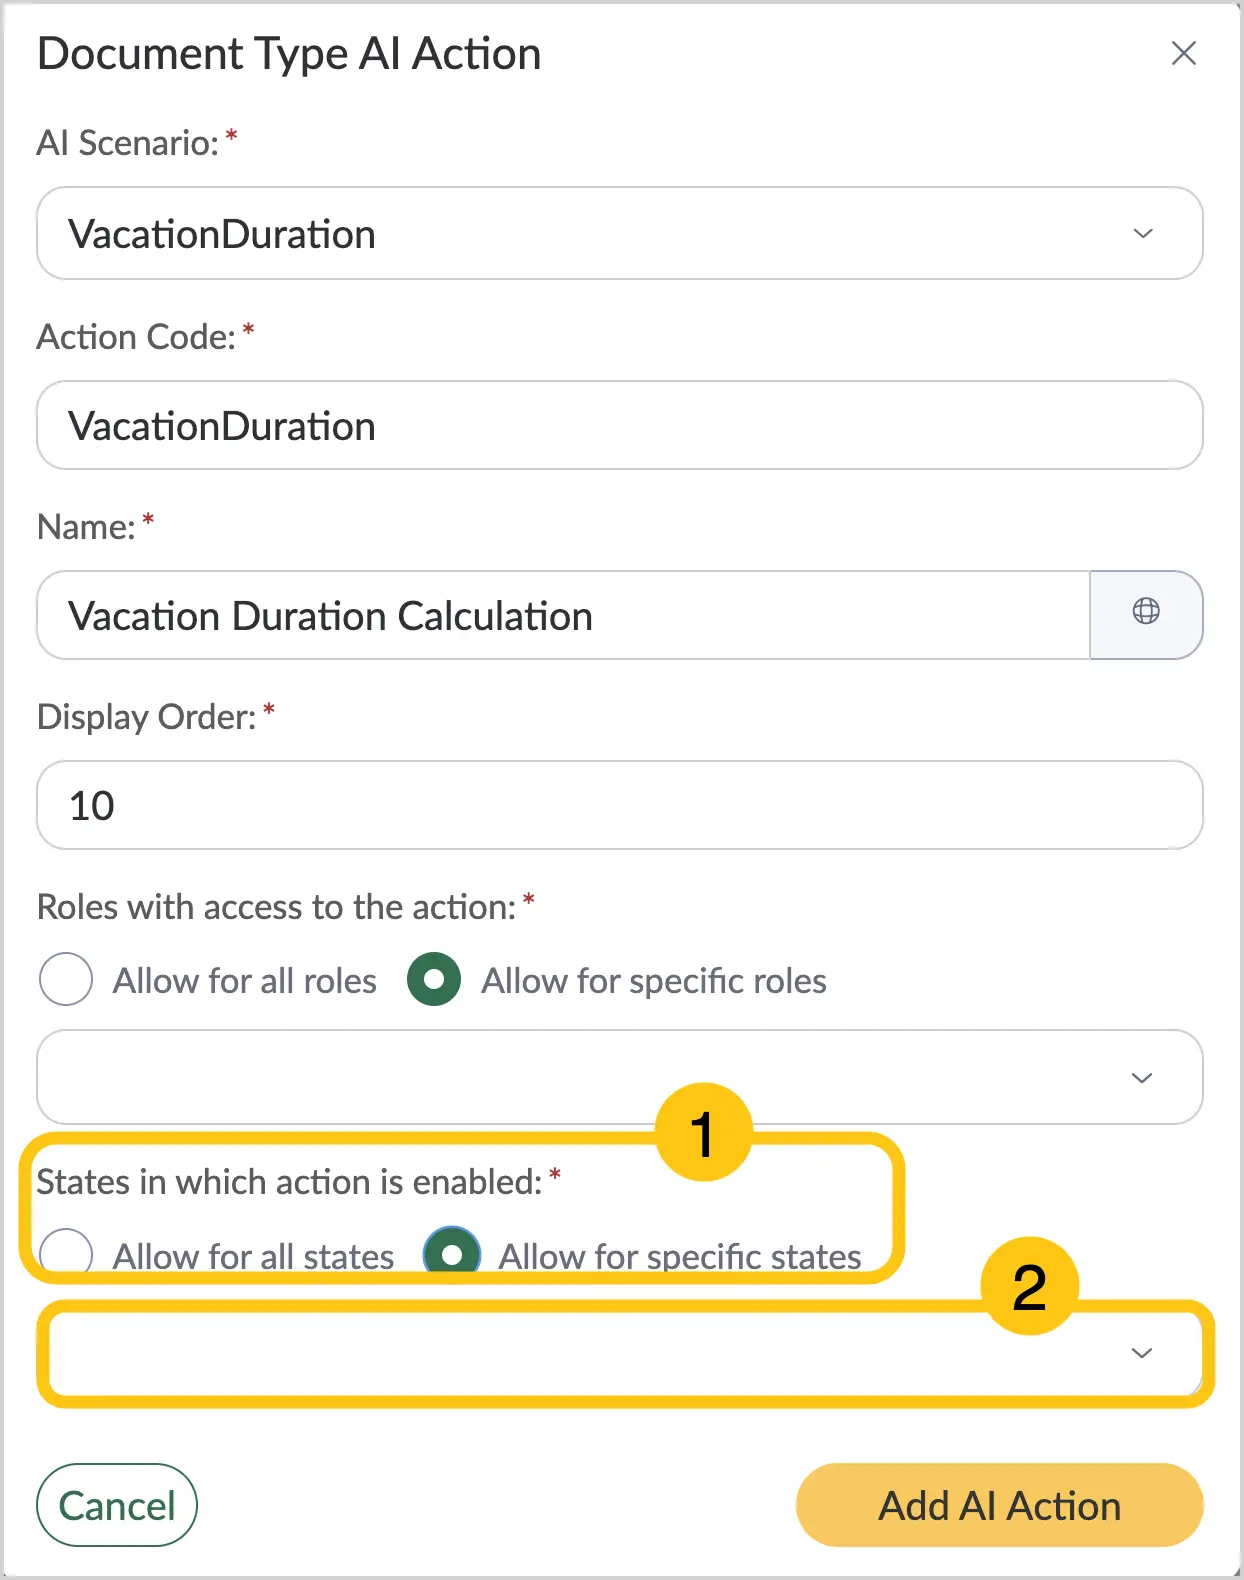
In the States in which the action is enabled section 1, select one of the following access options:
-
Allow for all states
-
Allow for specific states — when this option is selected, choose the document states in the field below 2 in which the action button will be displayed.
-
-
-
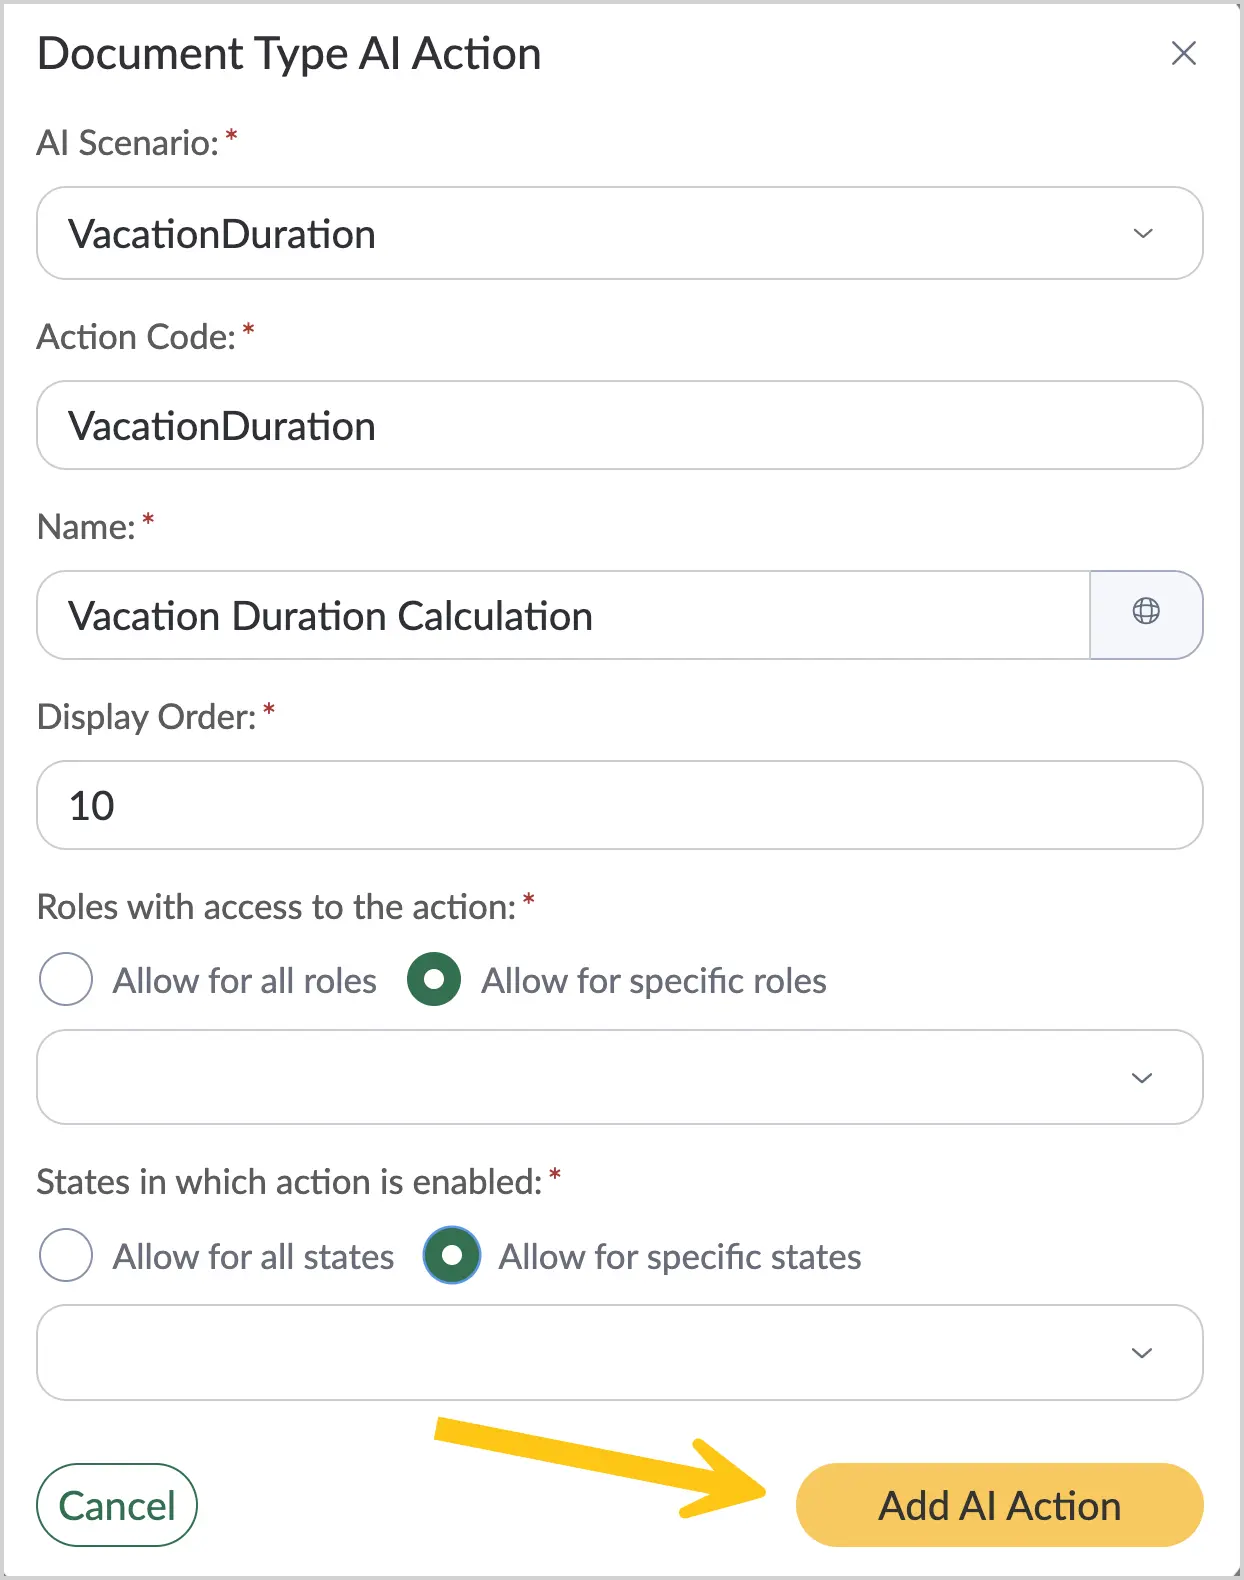
Select the Add AI action button.
-
Configure the mapping between document attributes and scenario variables. This is required to pass data from attributes to the AI via variables.
-
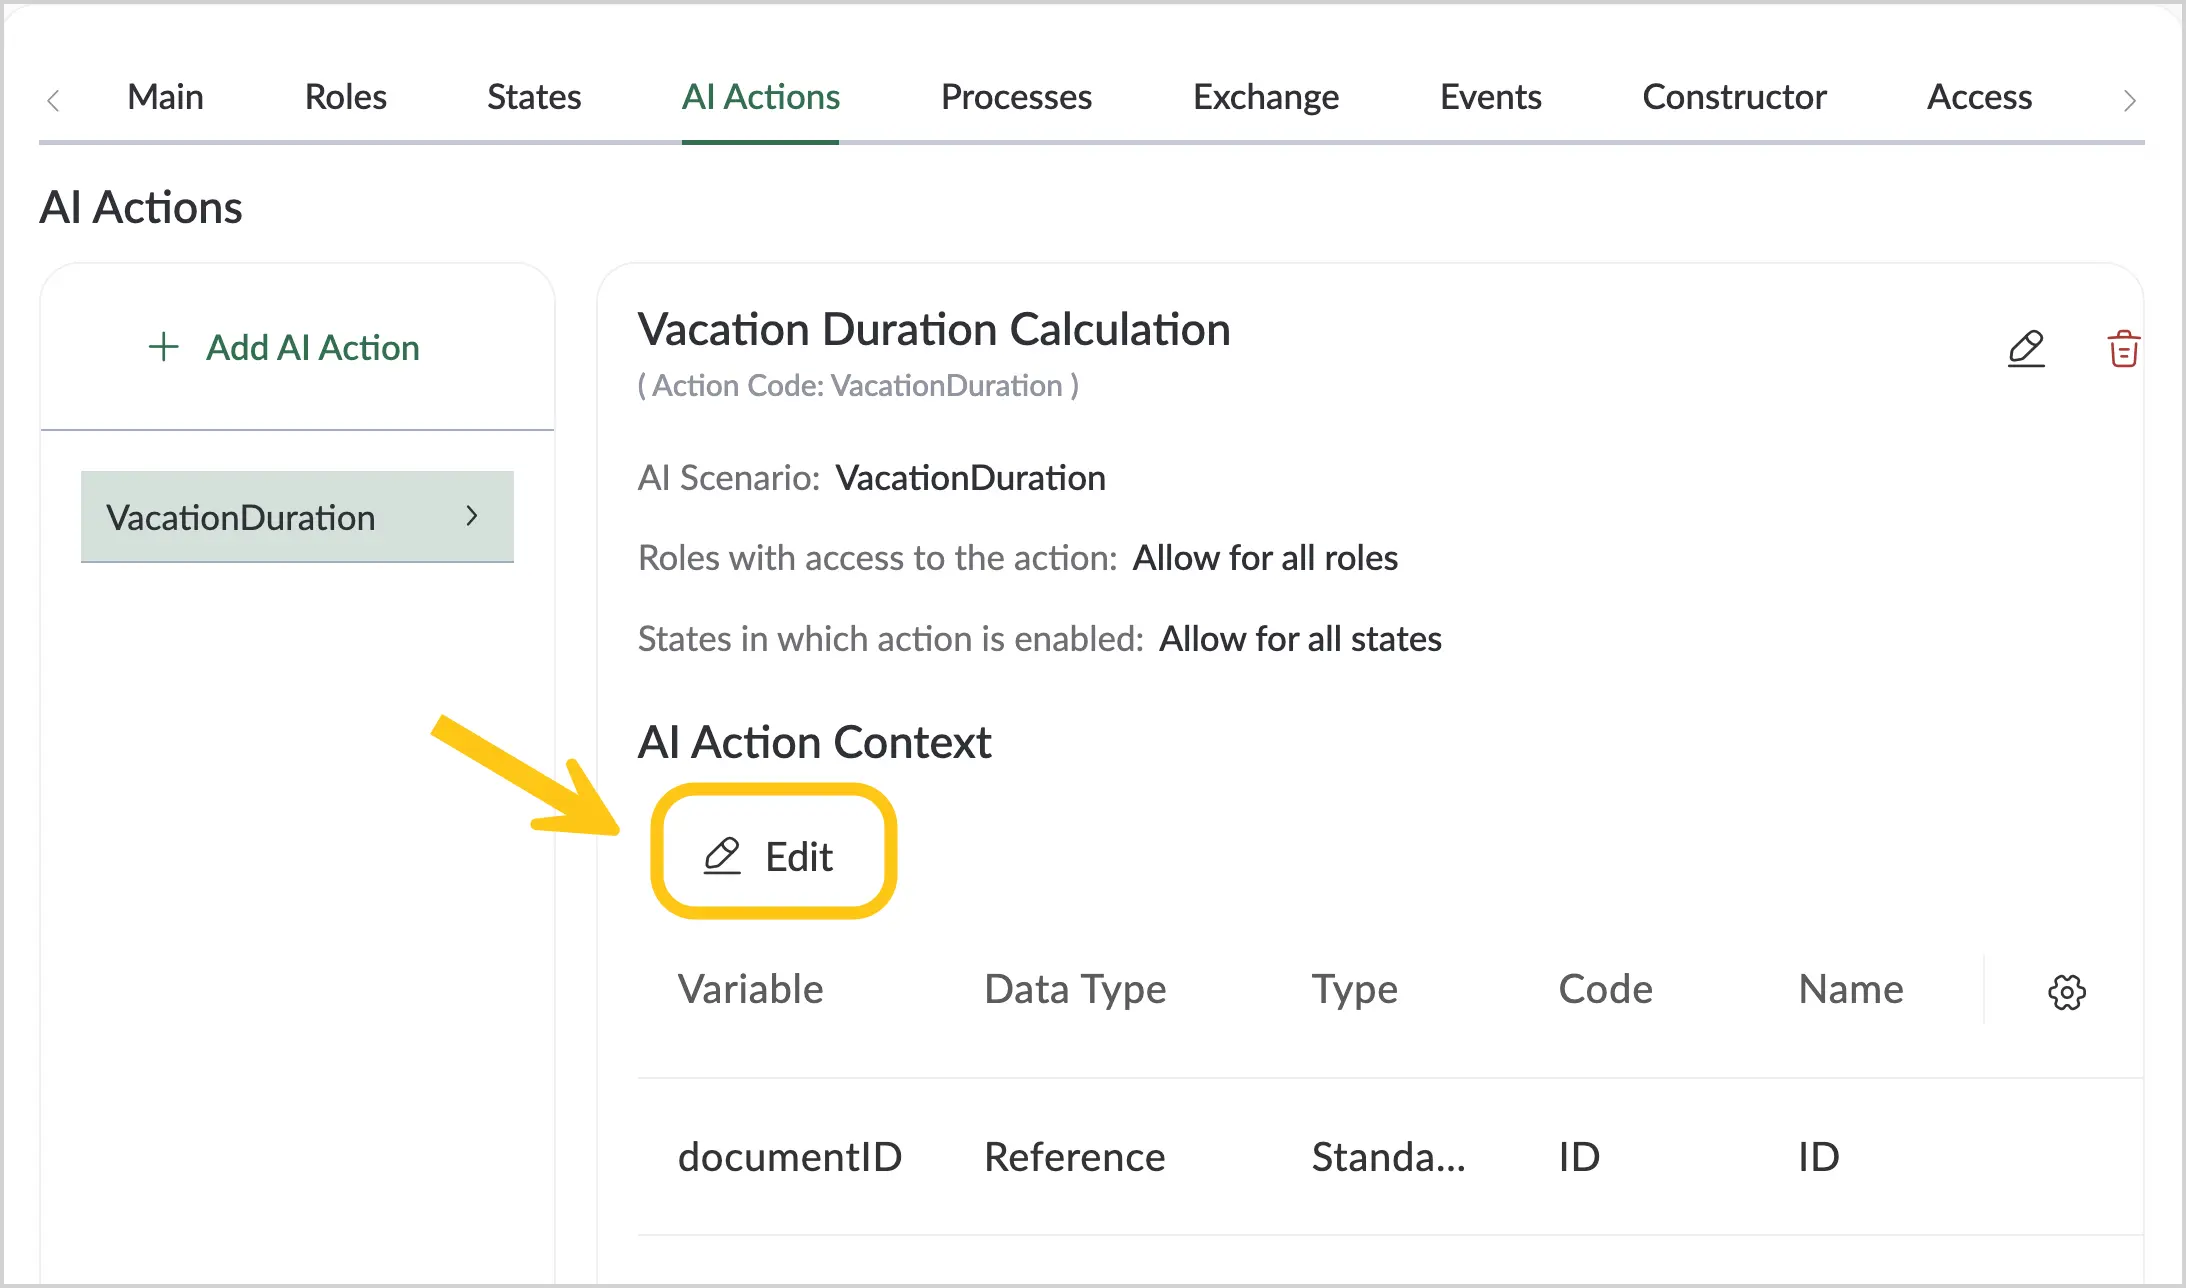
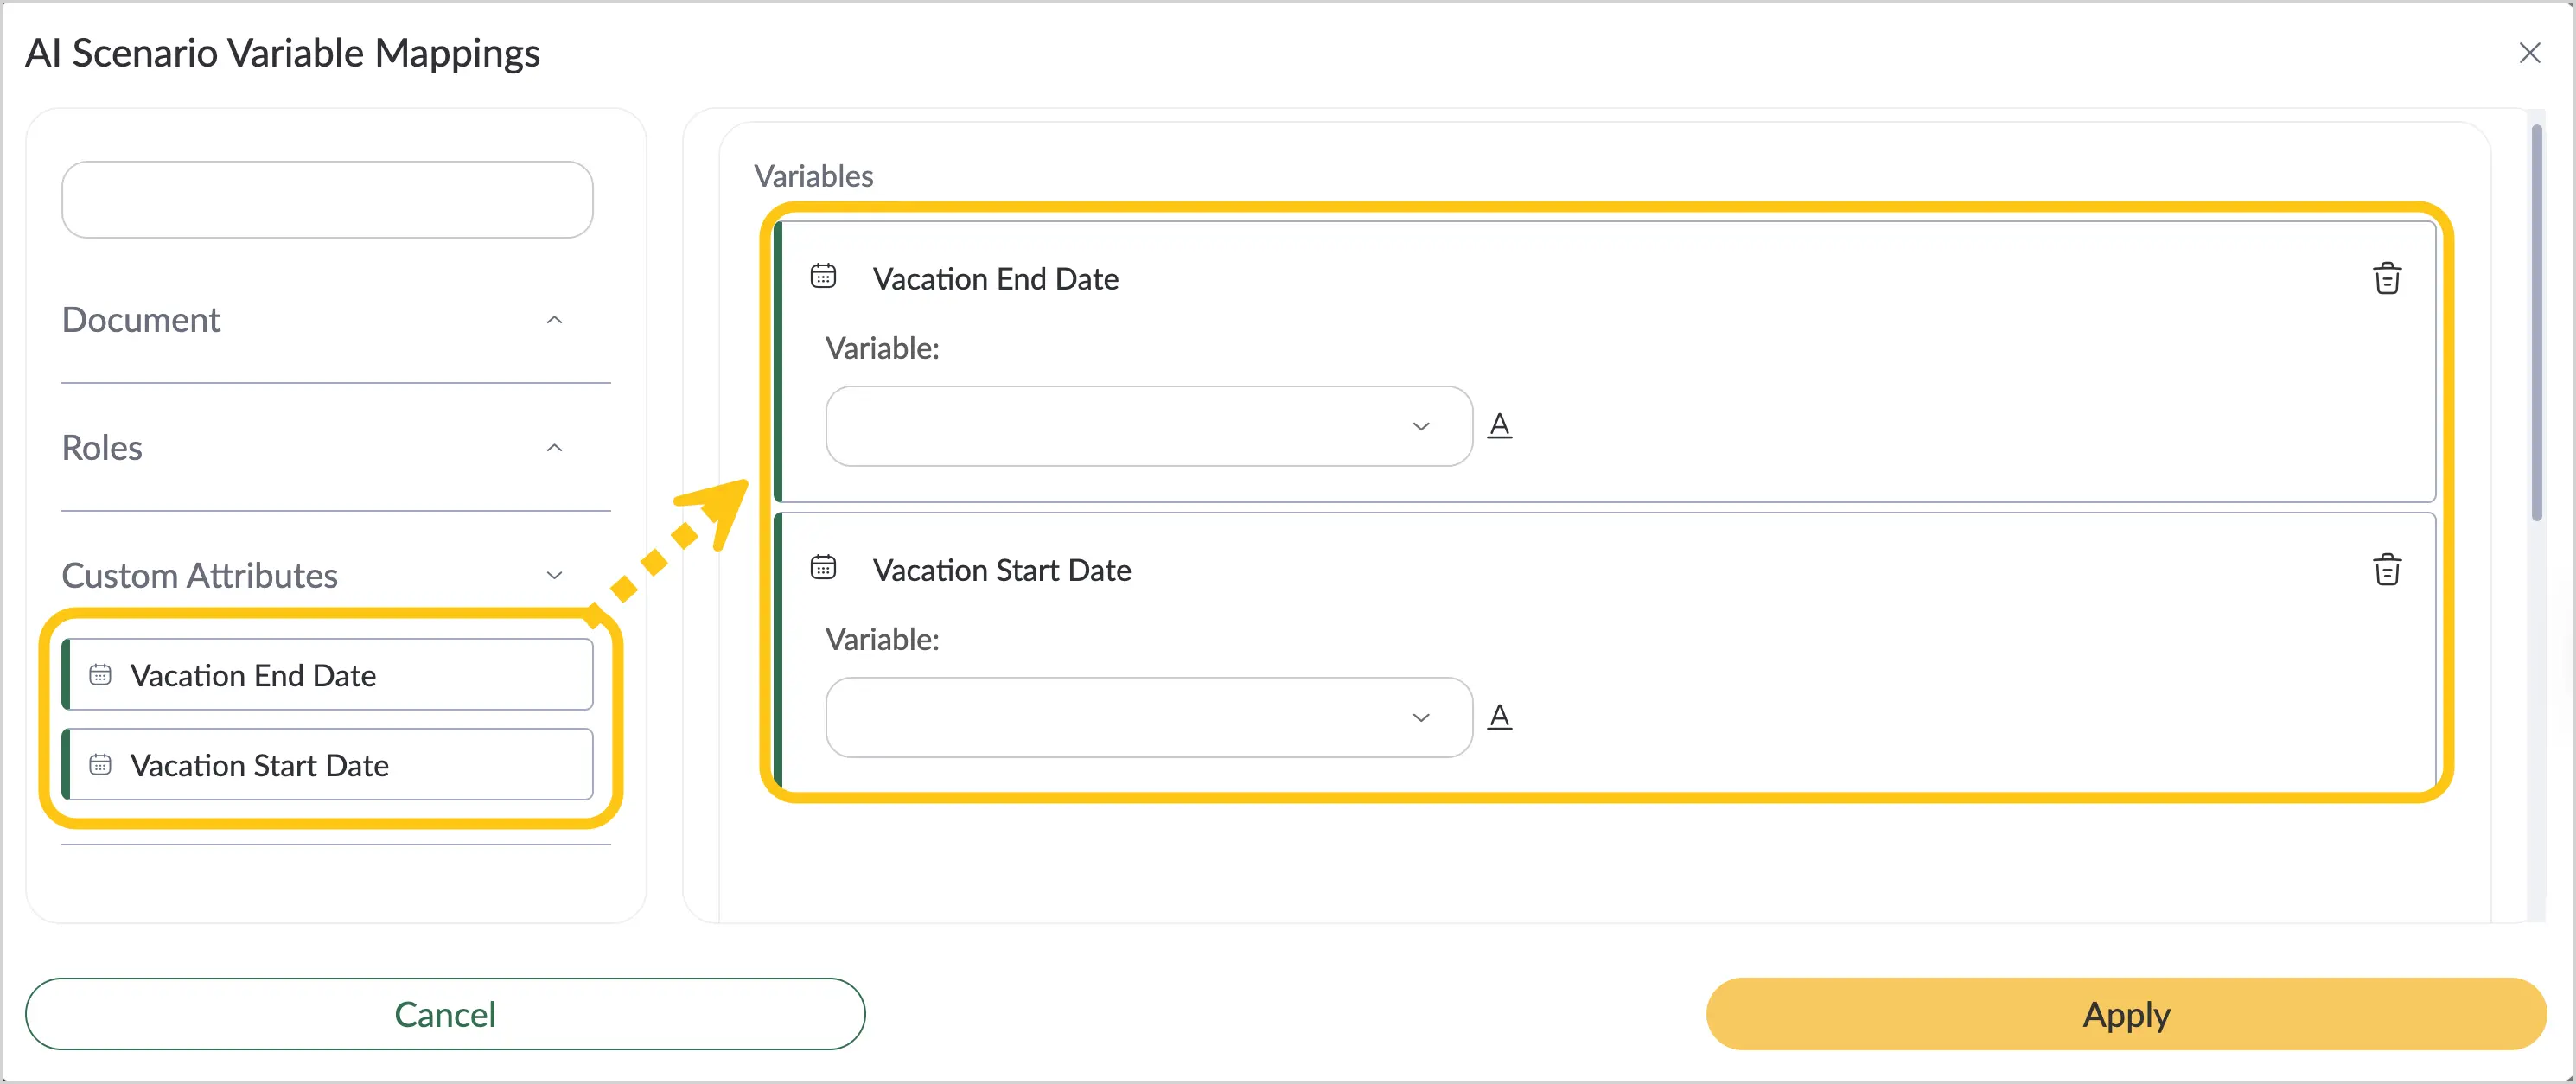
In the settings of the required action, select Edit.
-
From the left panel, drag the required attributes into the Variables form.
-
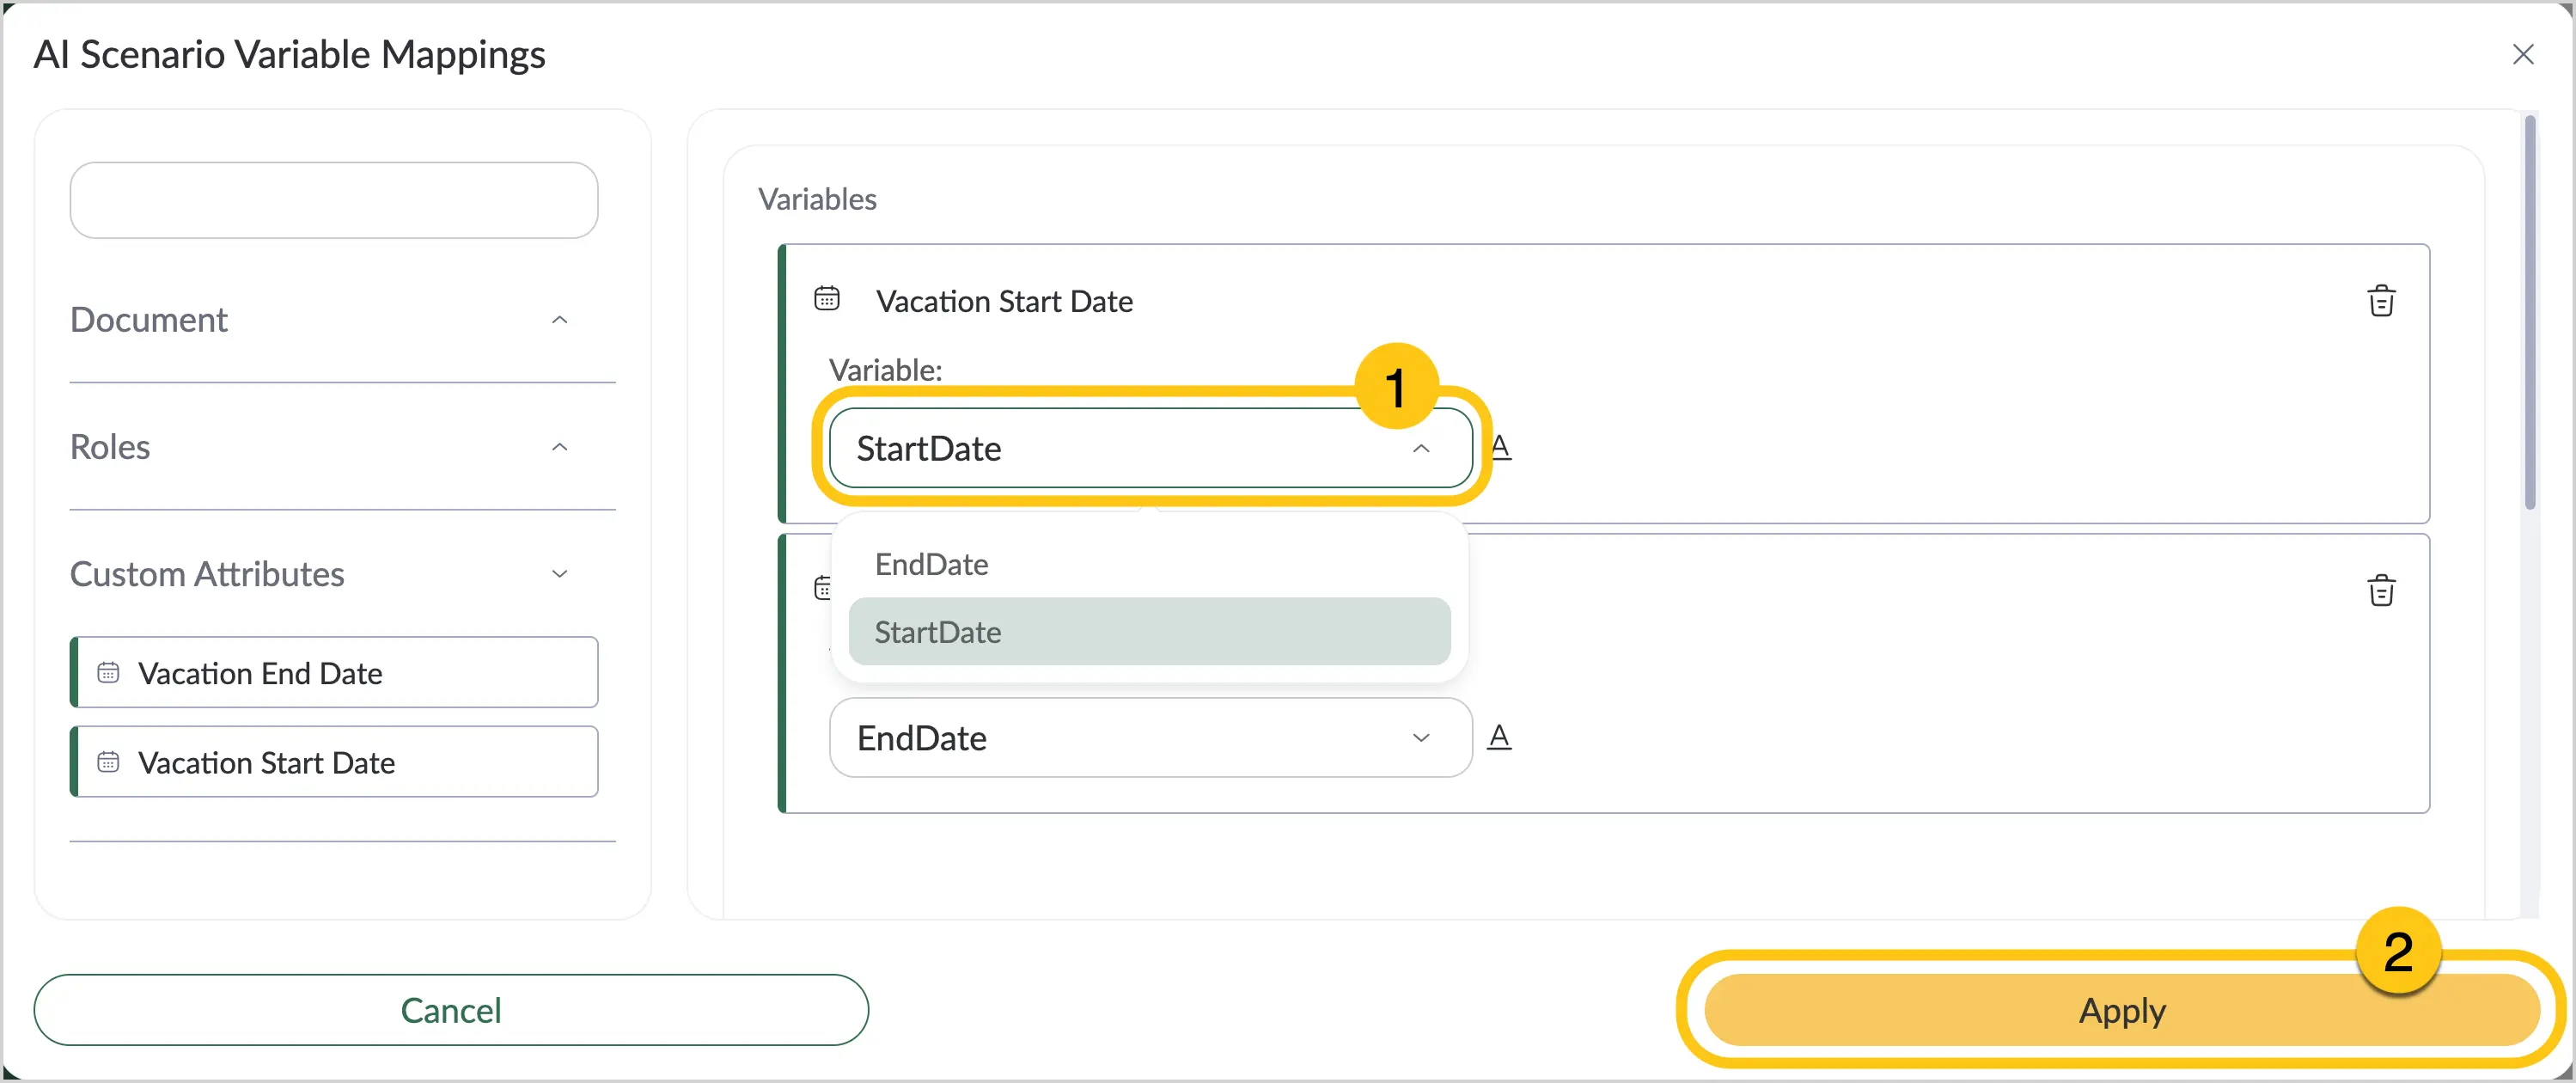
In the added attributes, in the Variable field 1, select the variable you want to link to this attribute (only the variables you previously created in the specified AI scenario will be shown in the list), then select the Apply button 2.
-
-
In the toolbar, select Save. After saving, you can apply AI actions in the document.
-
Continue the configuration in the Processes tab.
2.2.1.5. Processes
For each document type, you can configure a list of executable processes, which are elements of Business Process Modeling Notation (BPMN) and Case Management Model and Notation (CMMN). To add processes to a document type, follow these steps:
-
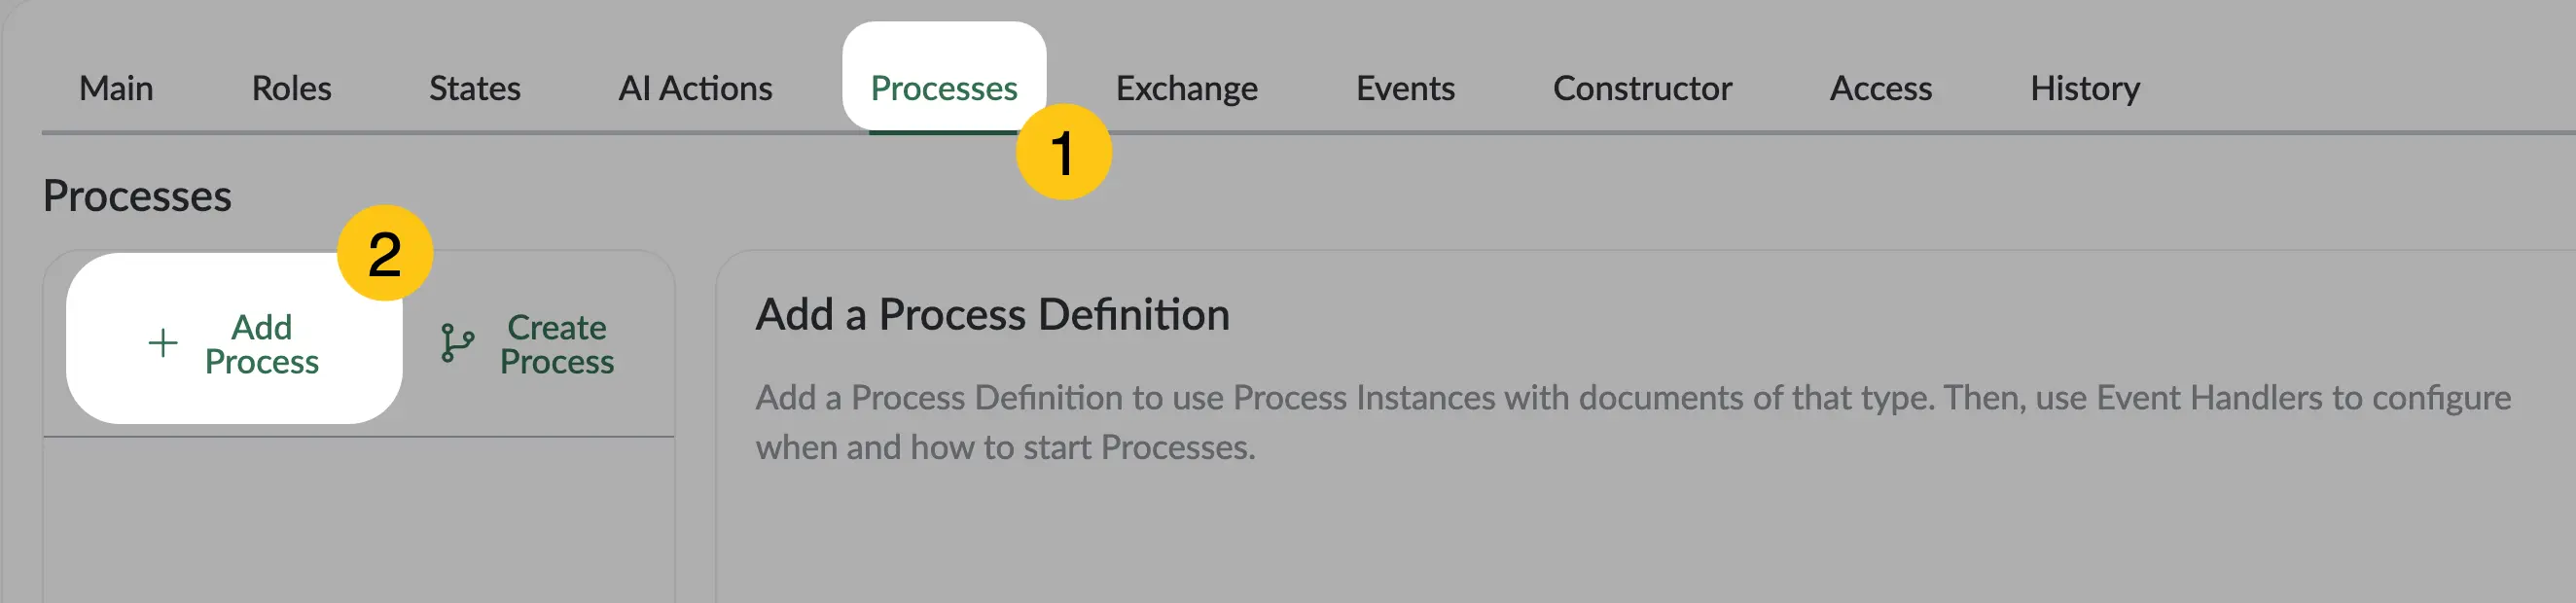
Go to the Processes tab 1, then select Add process 2.
-
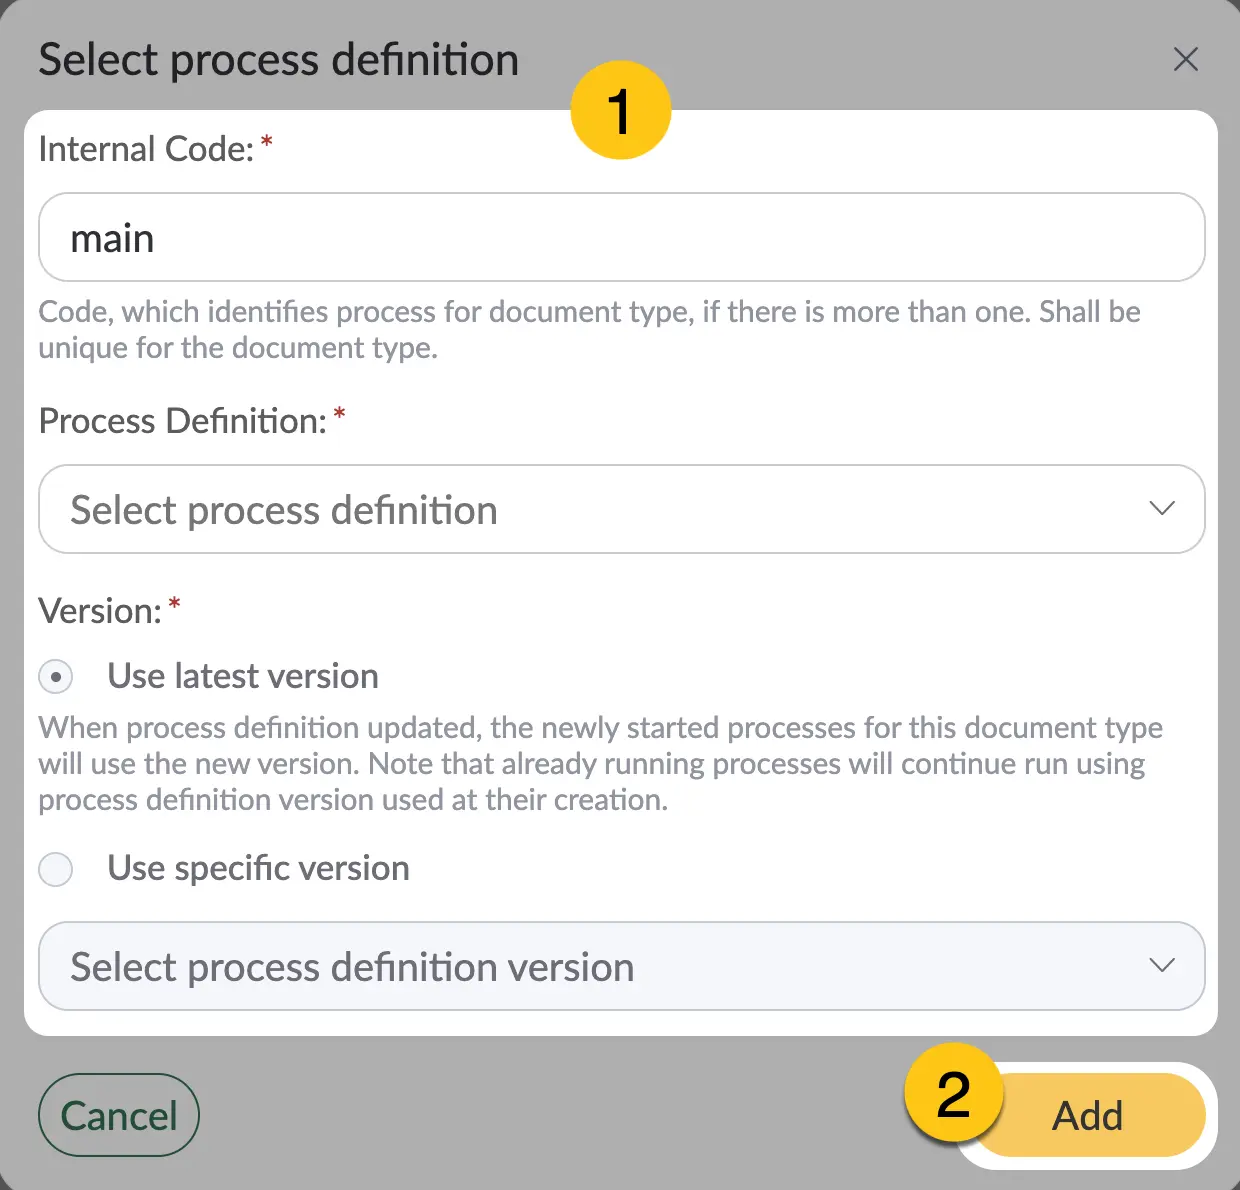
Fill in the fields 1 using the hints in the table below, then select the Add button 2.
| Field name | Description |
|---|---|
| Internal code* | Unique identifier of the process, used to identify the process start. |
| Process definition* | Select the required process definitions from the list. If the list is empty, create the required process definition. See section Create a Business Process Definition. |
| Version* | Option to automatically use the latest version or lock a specific version of this process. |
Fields marked with "*" are required.
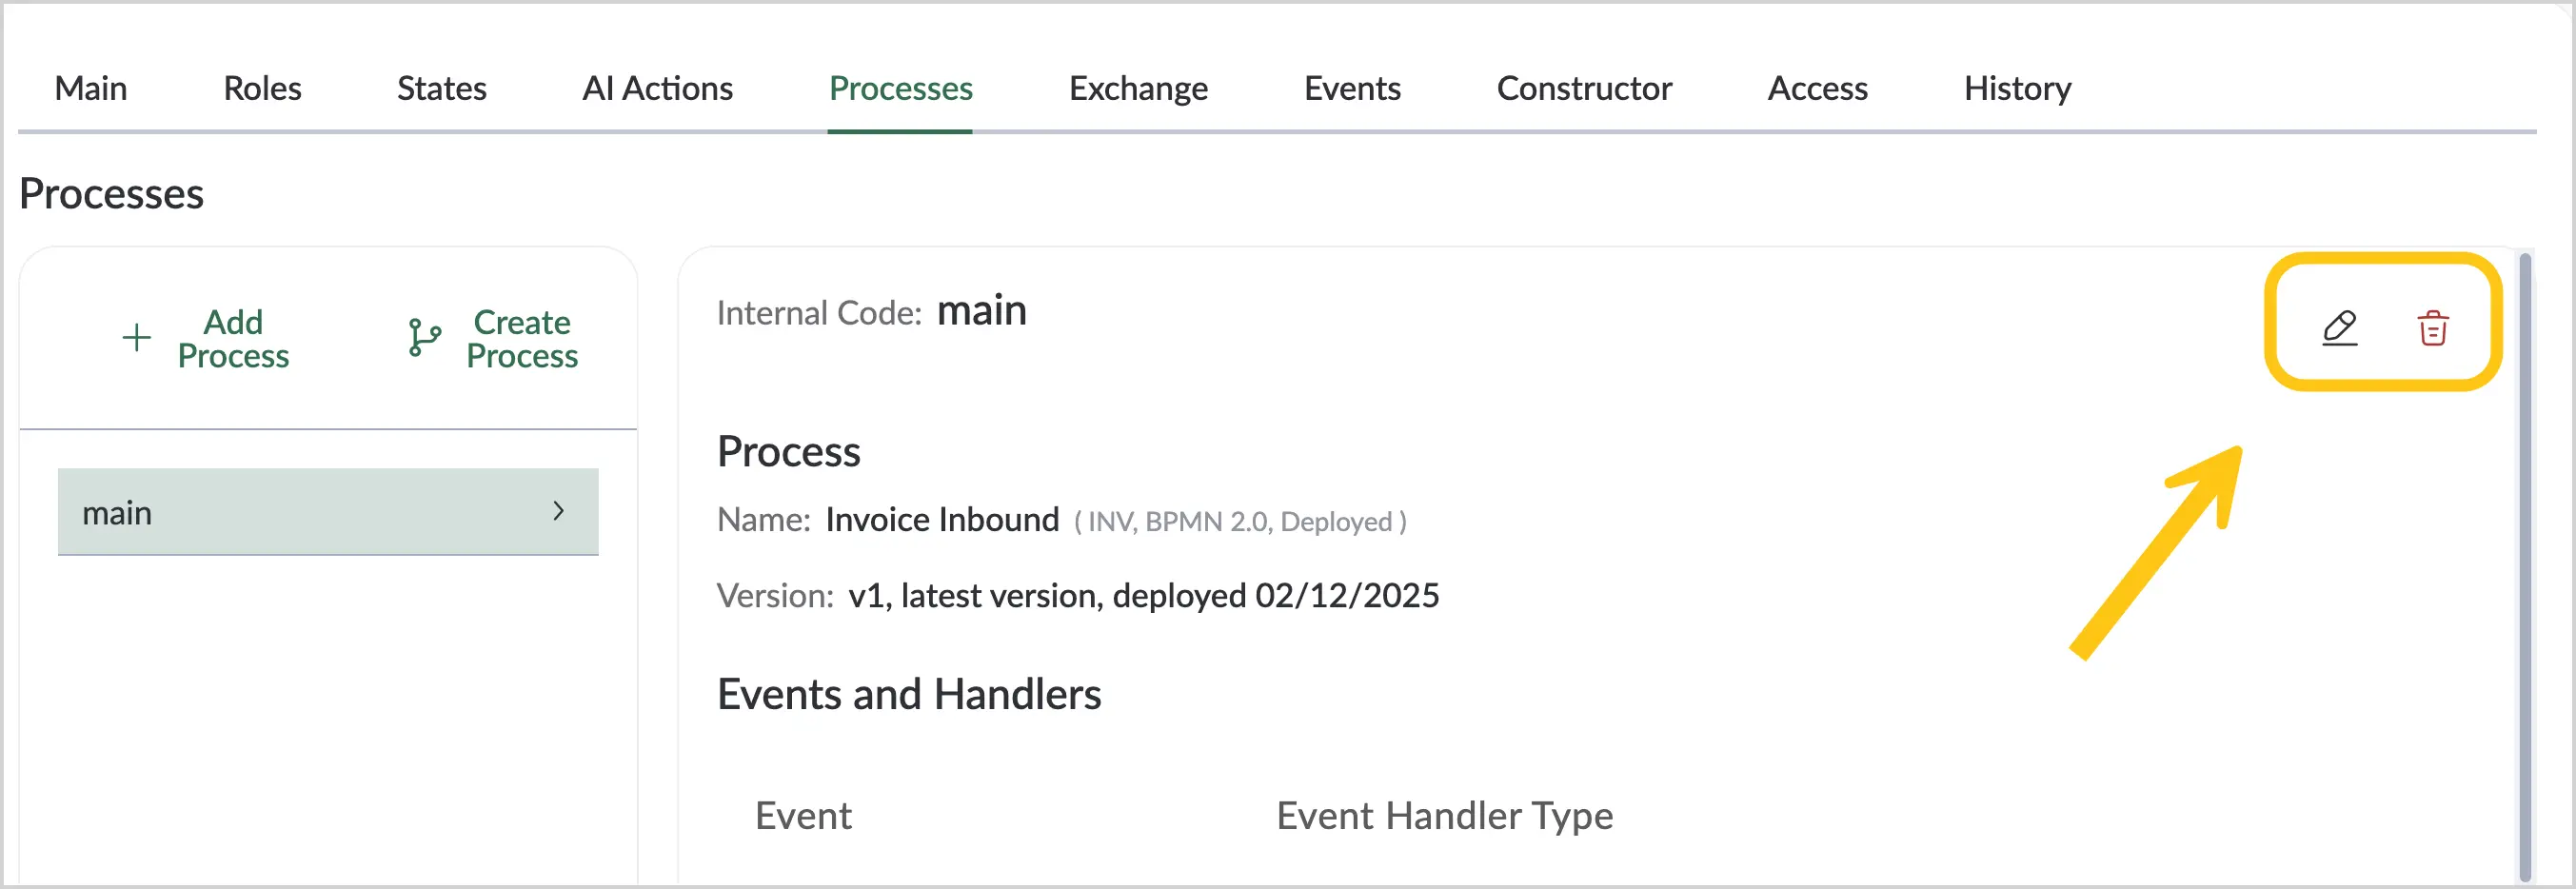
To edit or delete a process, select the corresponding icons in the upper right corner of the Processes window.
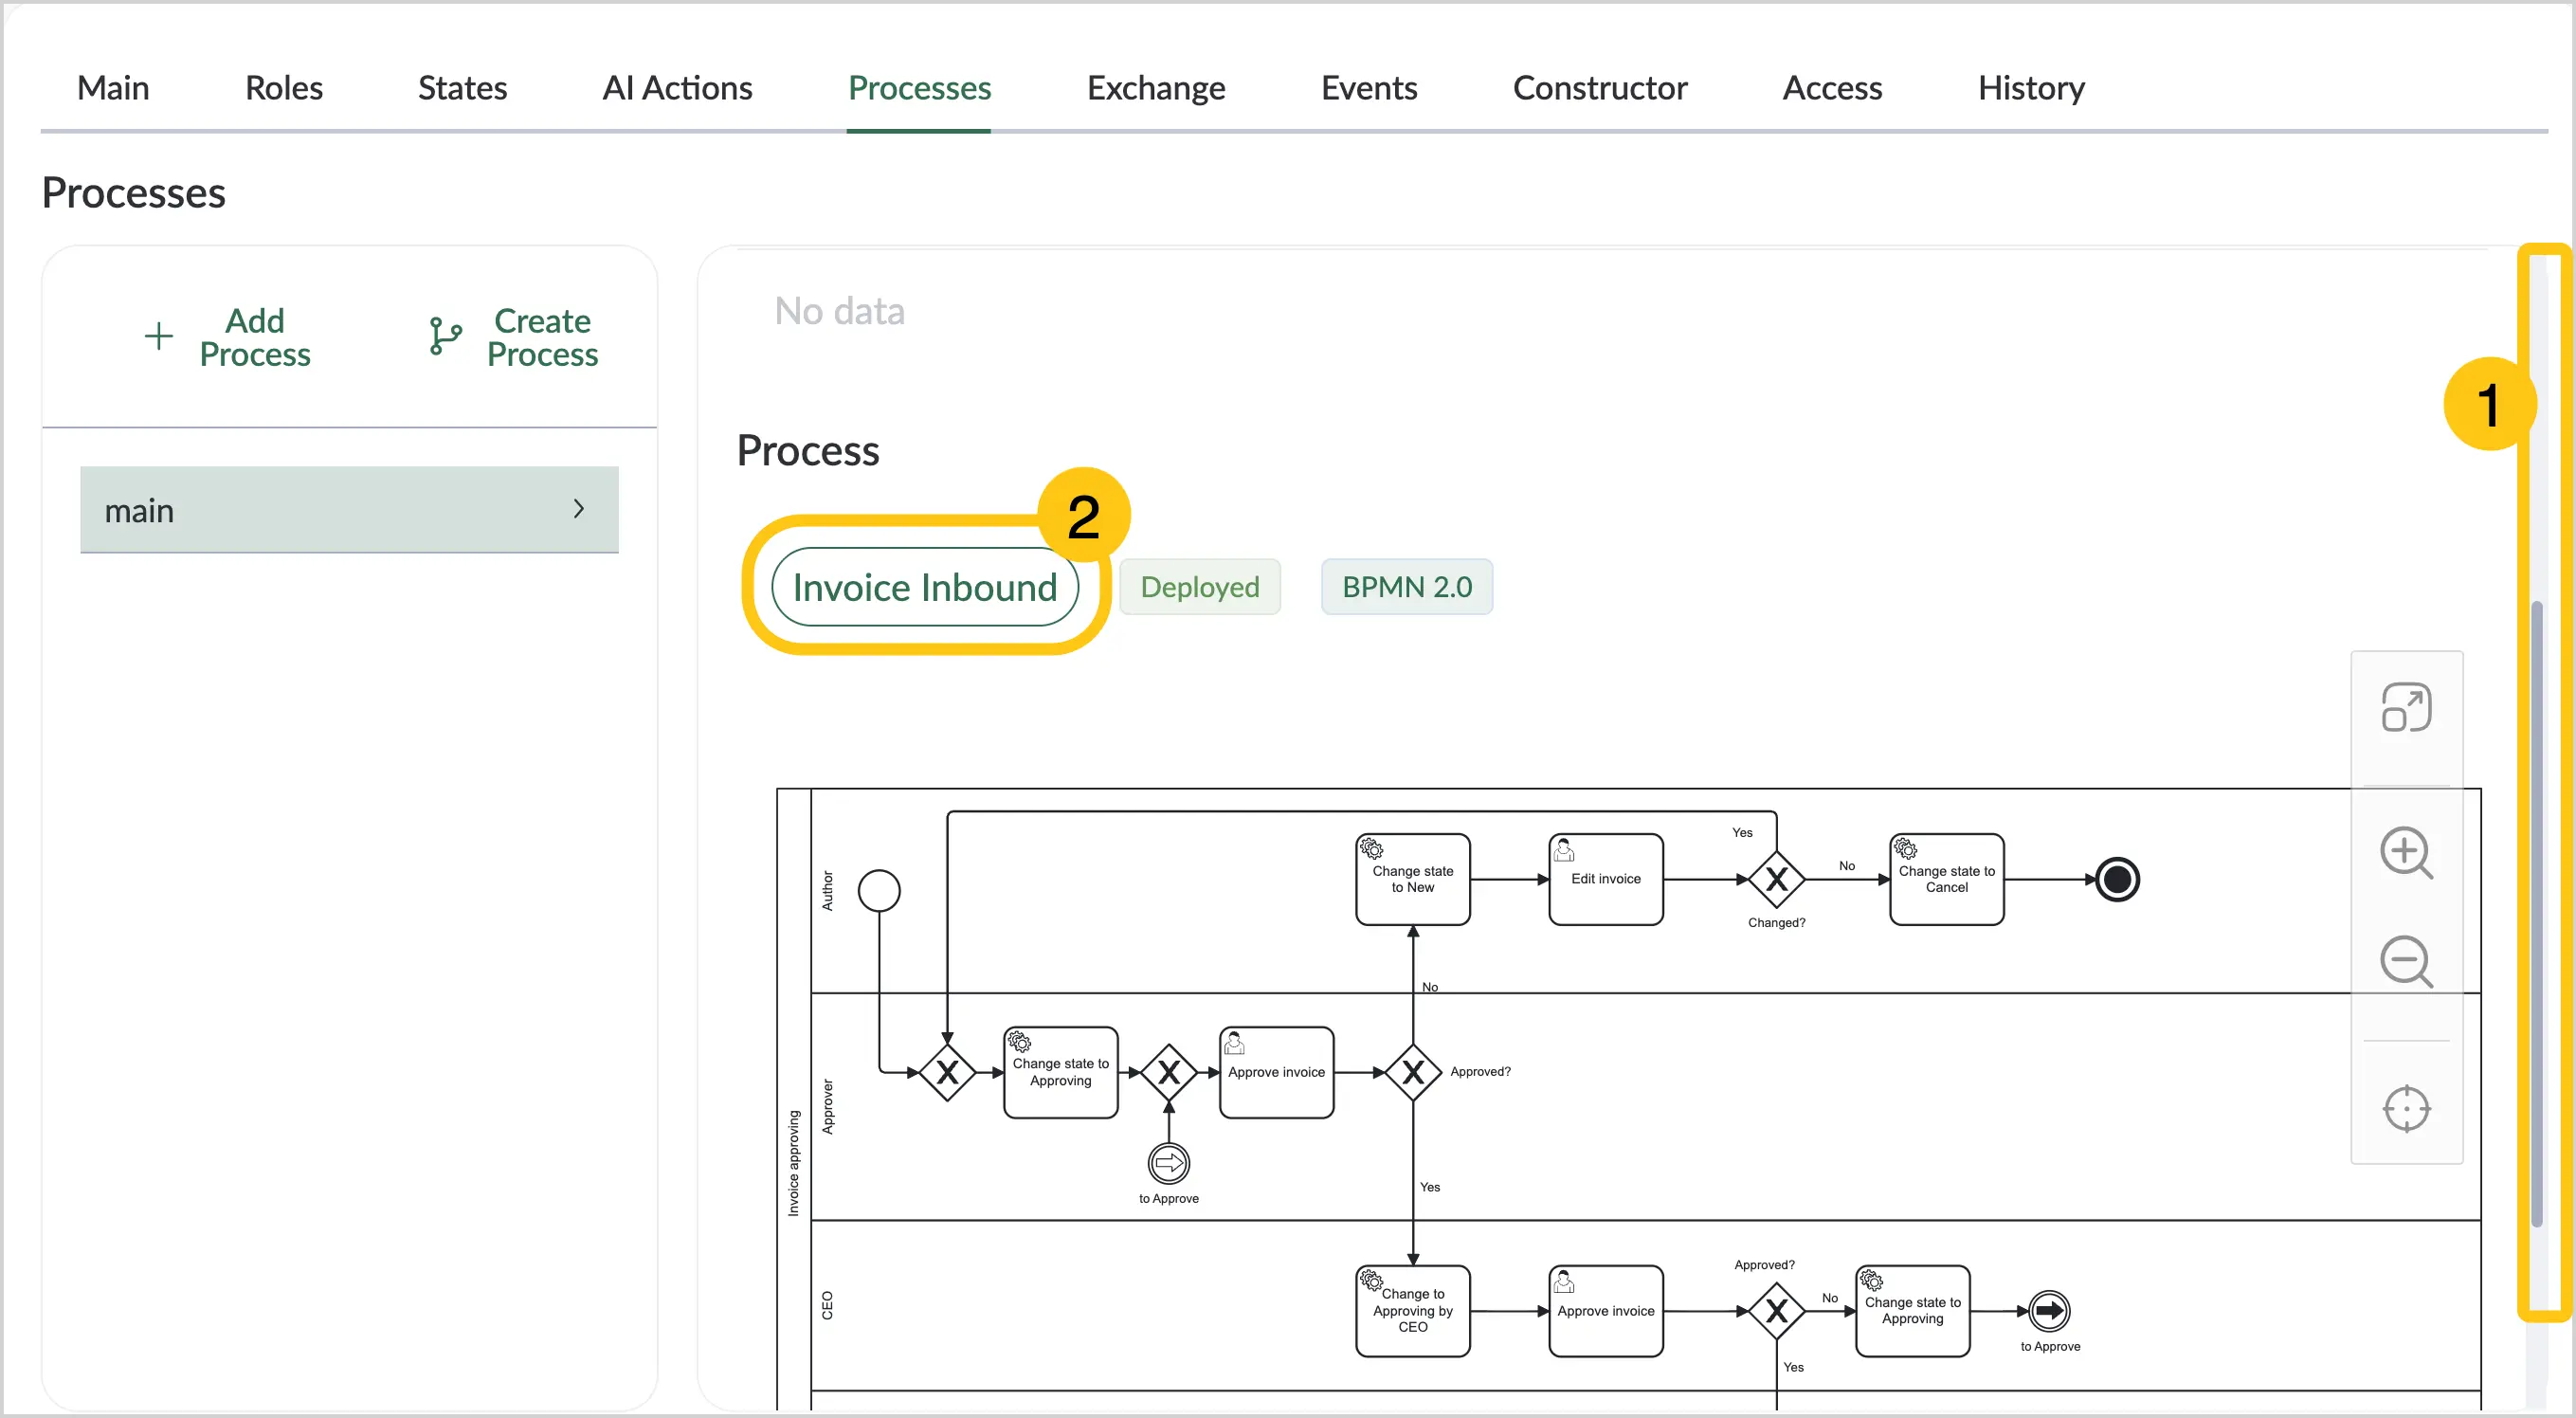
To view the details of a process, select the button with the process name.
- In the toolbar, select Save , then continue the configuration in the Exchange tab (see section Exchange).
2.2.1.6. Exchange
In the Exchange tab, you can configure messages for exchange with external systems (other Scriptum environments available for exchange).
For example: one environment can be deployed on a company's local network and another with external access, with messaging configured between them.
Before proceeding to exchange configuration, complete the following steps:
-
Add a connection to the external system. This step is required to establish a basic connection between your system and the external one. Here you specify the main connection parameters and the unique system code, which will be used in all subsequent exchange configurations.
-
Create an external system message type. At this stage, you define the data structure for exchange and the rules for processing it. This allows the system to understand what data needs to be transmitted and how to process it when received from the external system.
To configure message exchange, follow these steps:
-
Go to the Exchange tab 1.
-
To activate message exchange with an external system, enable the message toggles you want to activate 2.
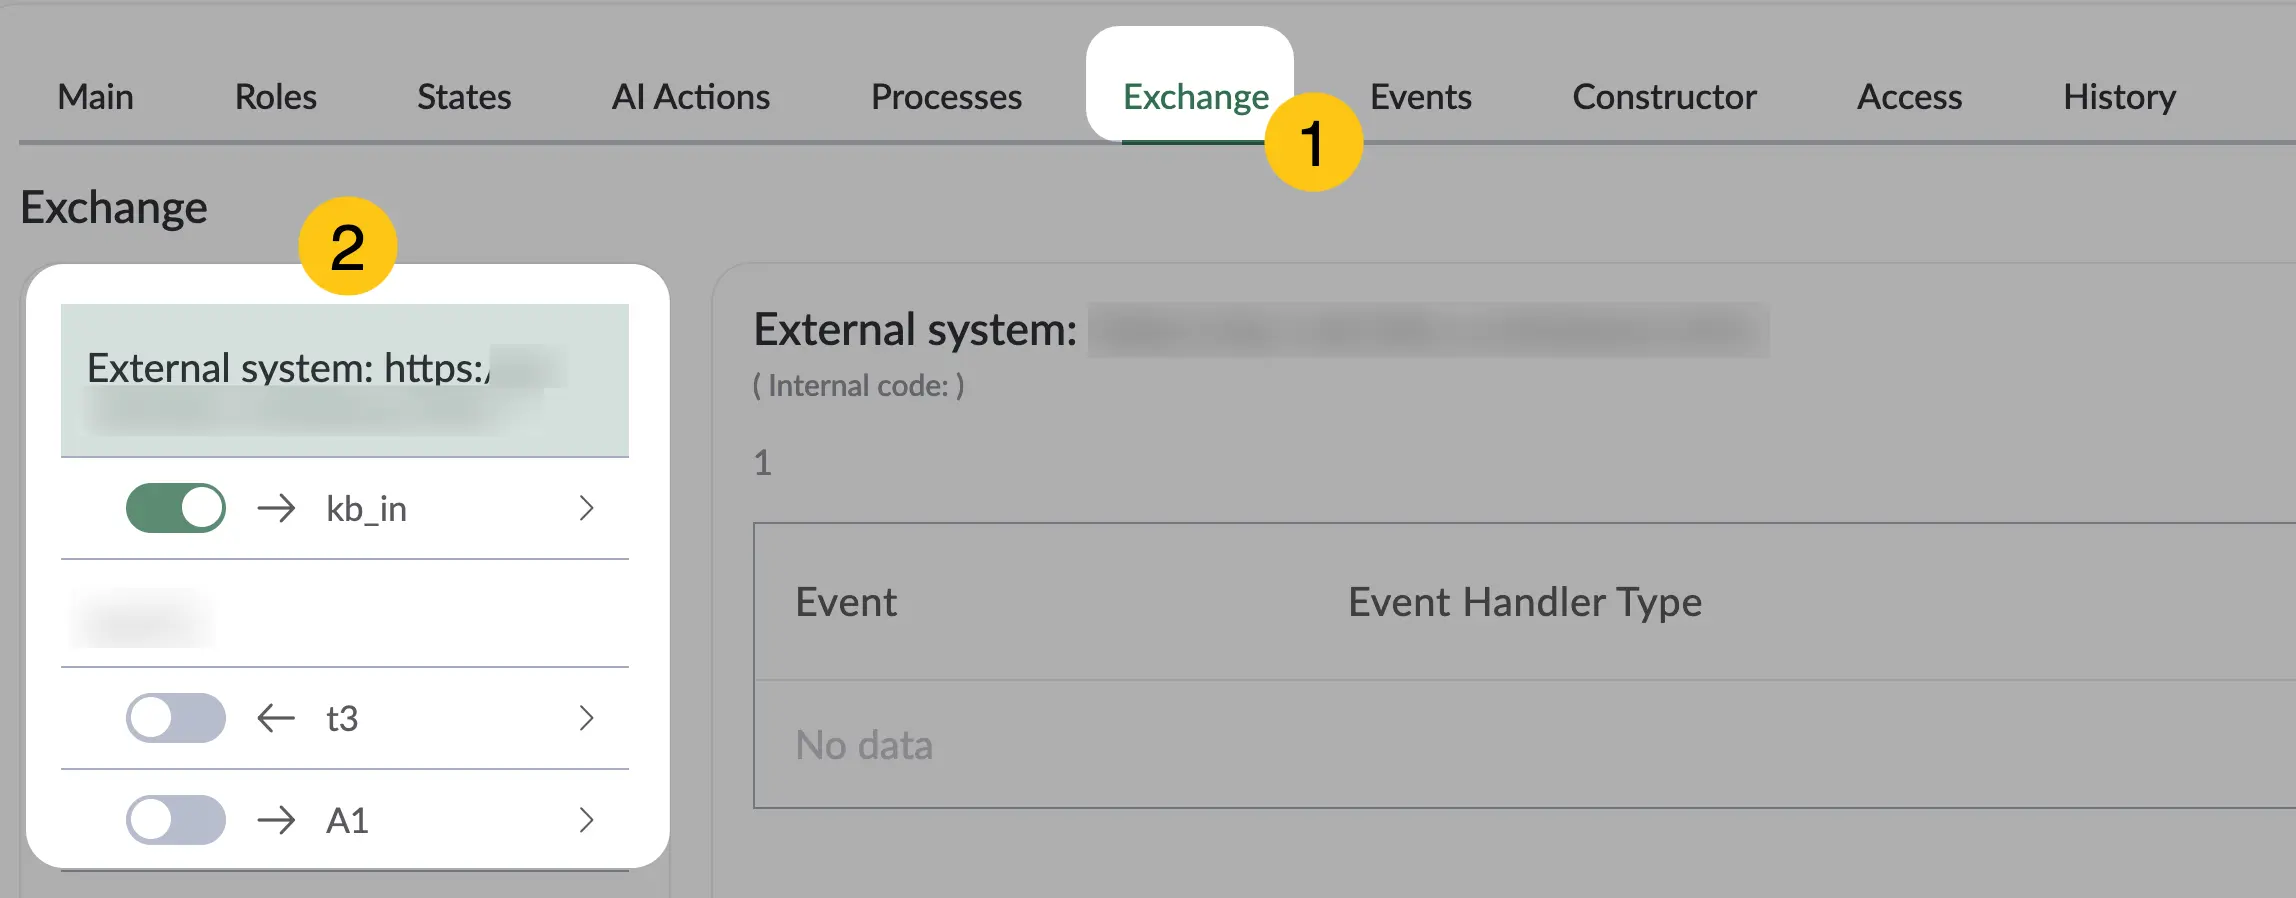
The direction of the arrow on the records indicates the direction of the message:
- → outgoing message to the external system
- ← incoming message from the external system
- In the toolbar, select Save , then continue the configuration in the Events tab (see section Events).
2.2.1.7. Events
The Events tab allows you to manage the system's response to specific events, including receiving messages from external systems. You can select the actions to be performed when the specified event occurs, for example, starting a business process, sending a message, or creating a new document.
To configure events, follow these steps:
-
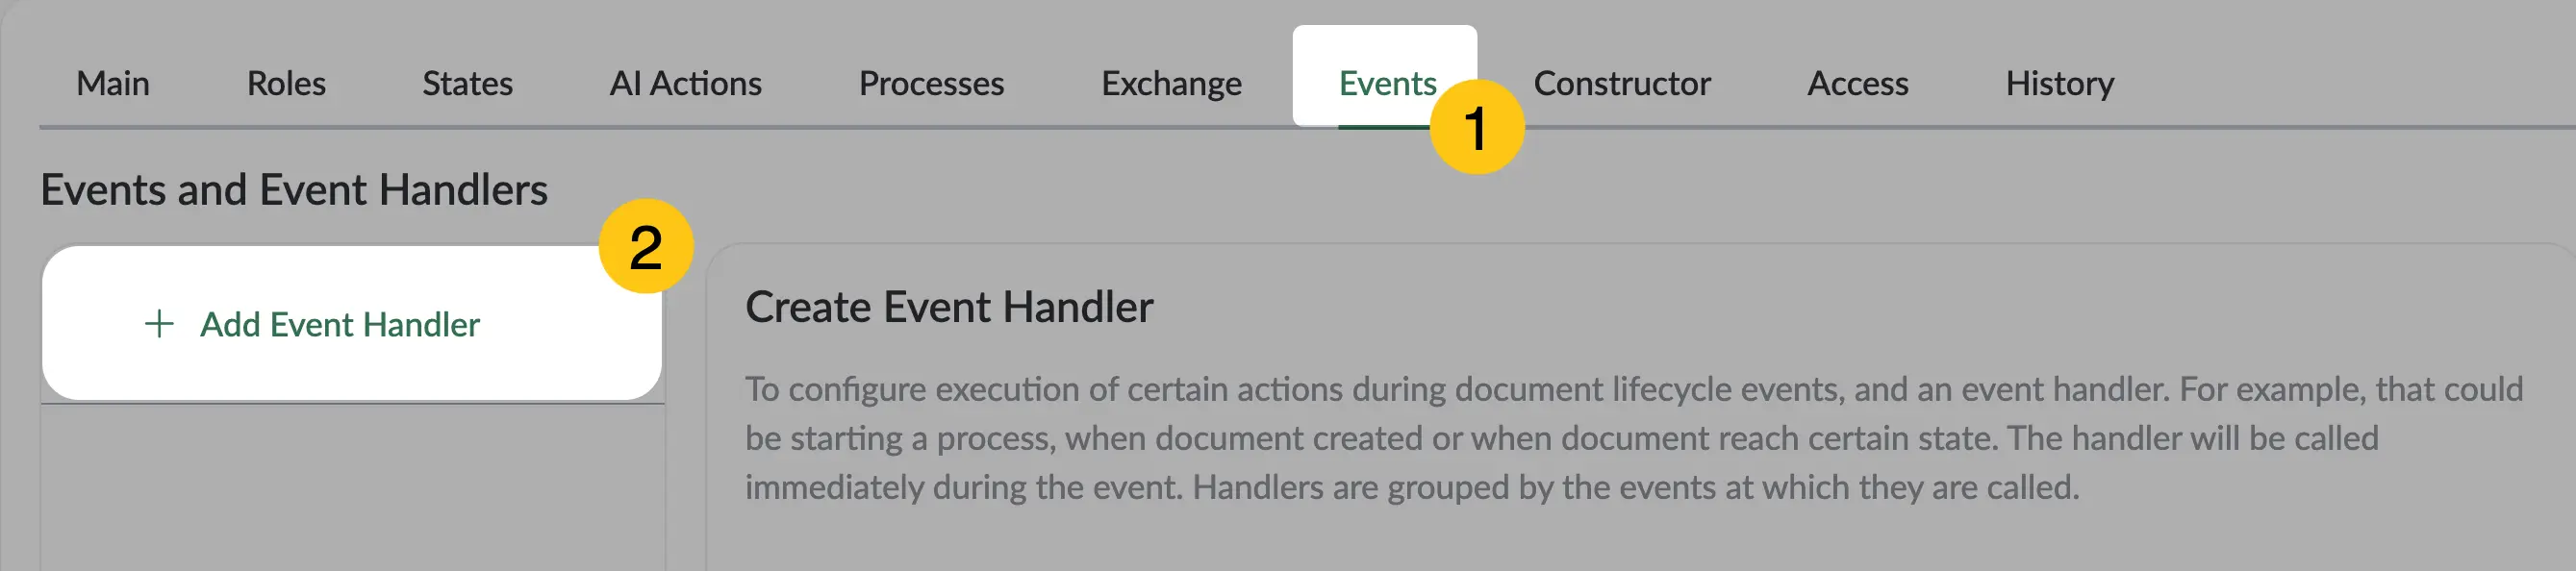
Go to the Events tab 1, then select Add handler 2. A handler is an event activator.
-
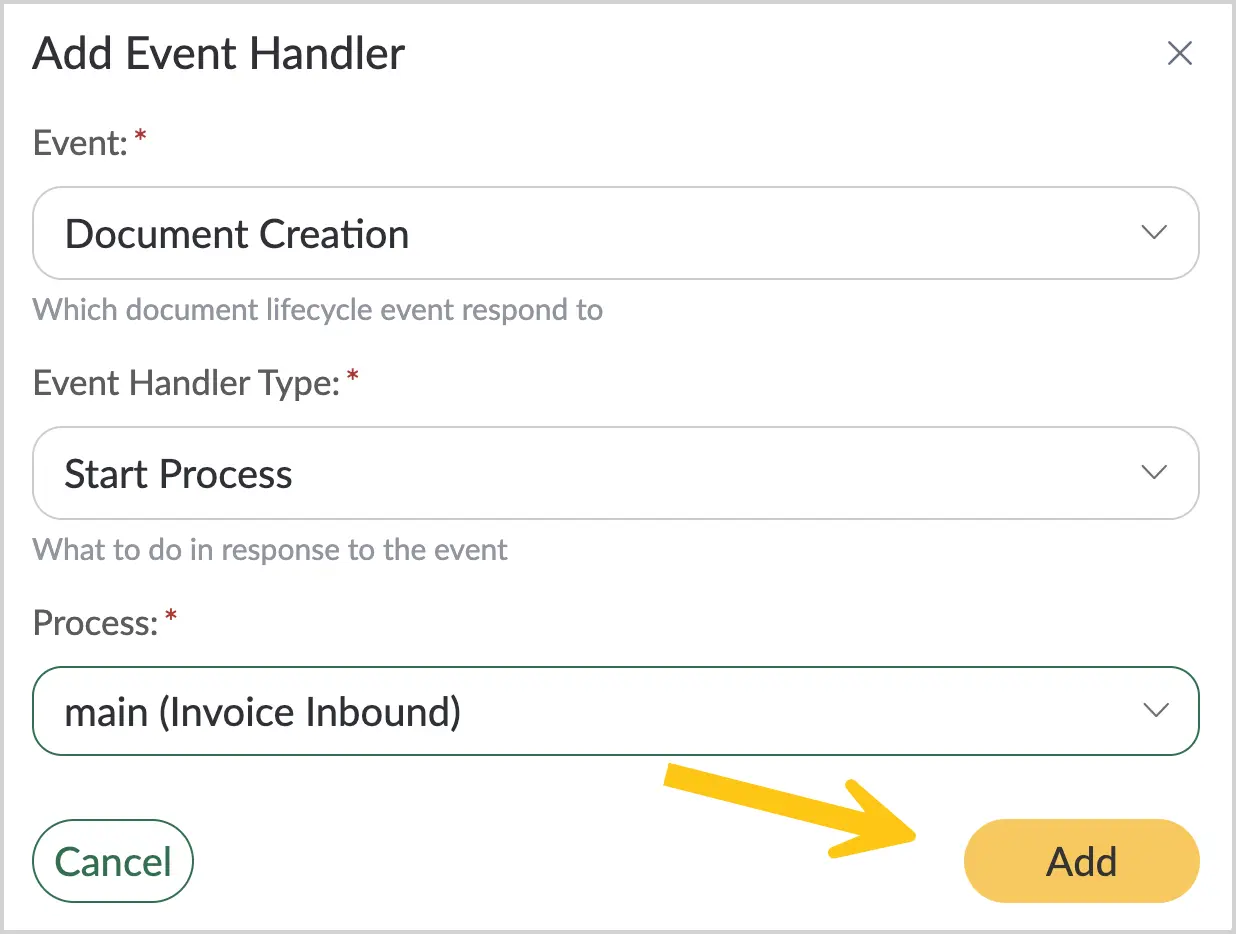
Fill in the fields using the hints in the table below, then in the toolbar,
| Field name | Description |
|---|---|
| Event* | Select the event for which the handler is set:
|
| Event handler type* | In the Handler type field, select the action to be performed when the specified event occurs:
|
| Process* This field is available only for the "Start process" handler type. | Select the process you want to start when the specified event occurs. |
Fields marked with "*" are required.
-
Select the Add button.
-
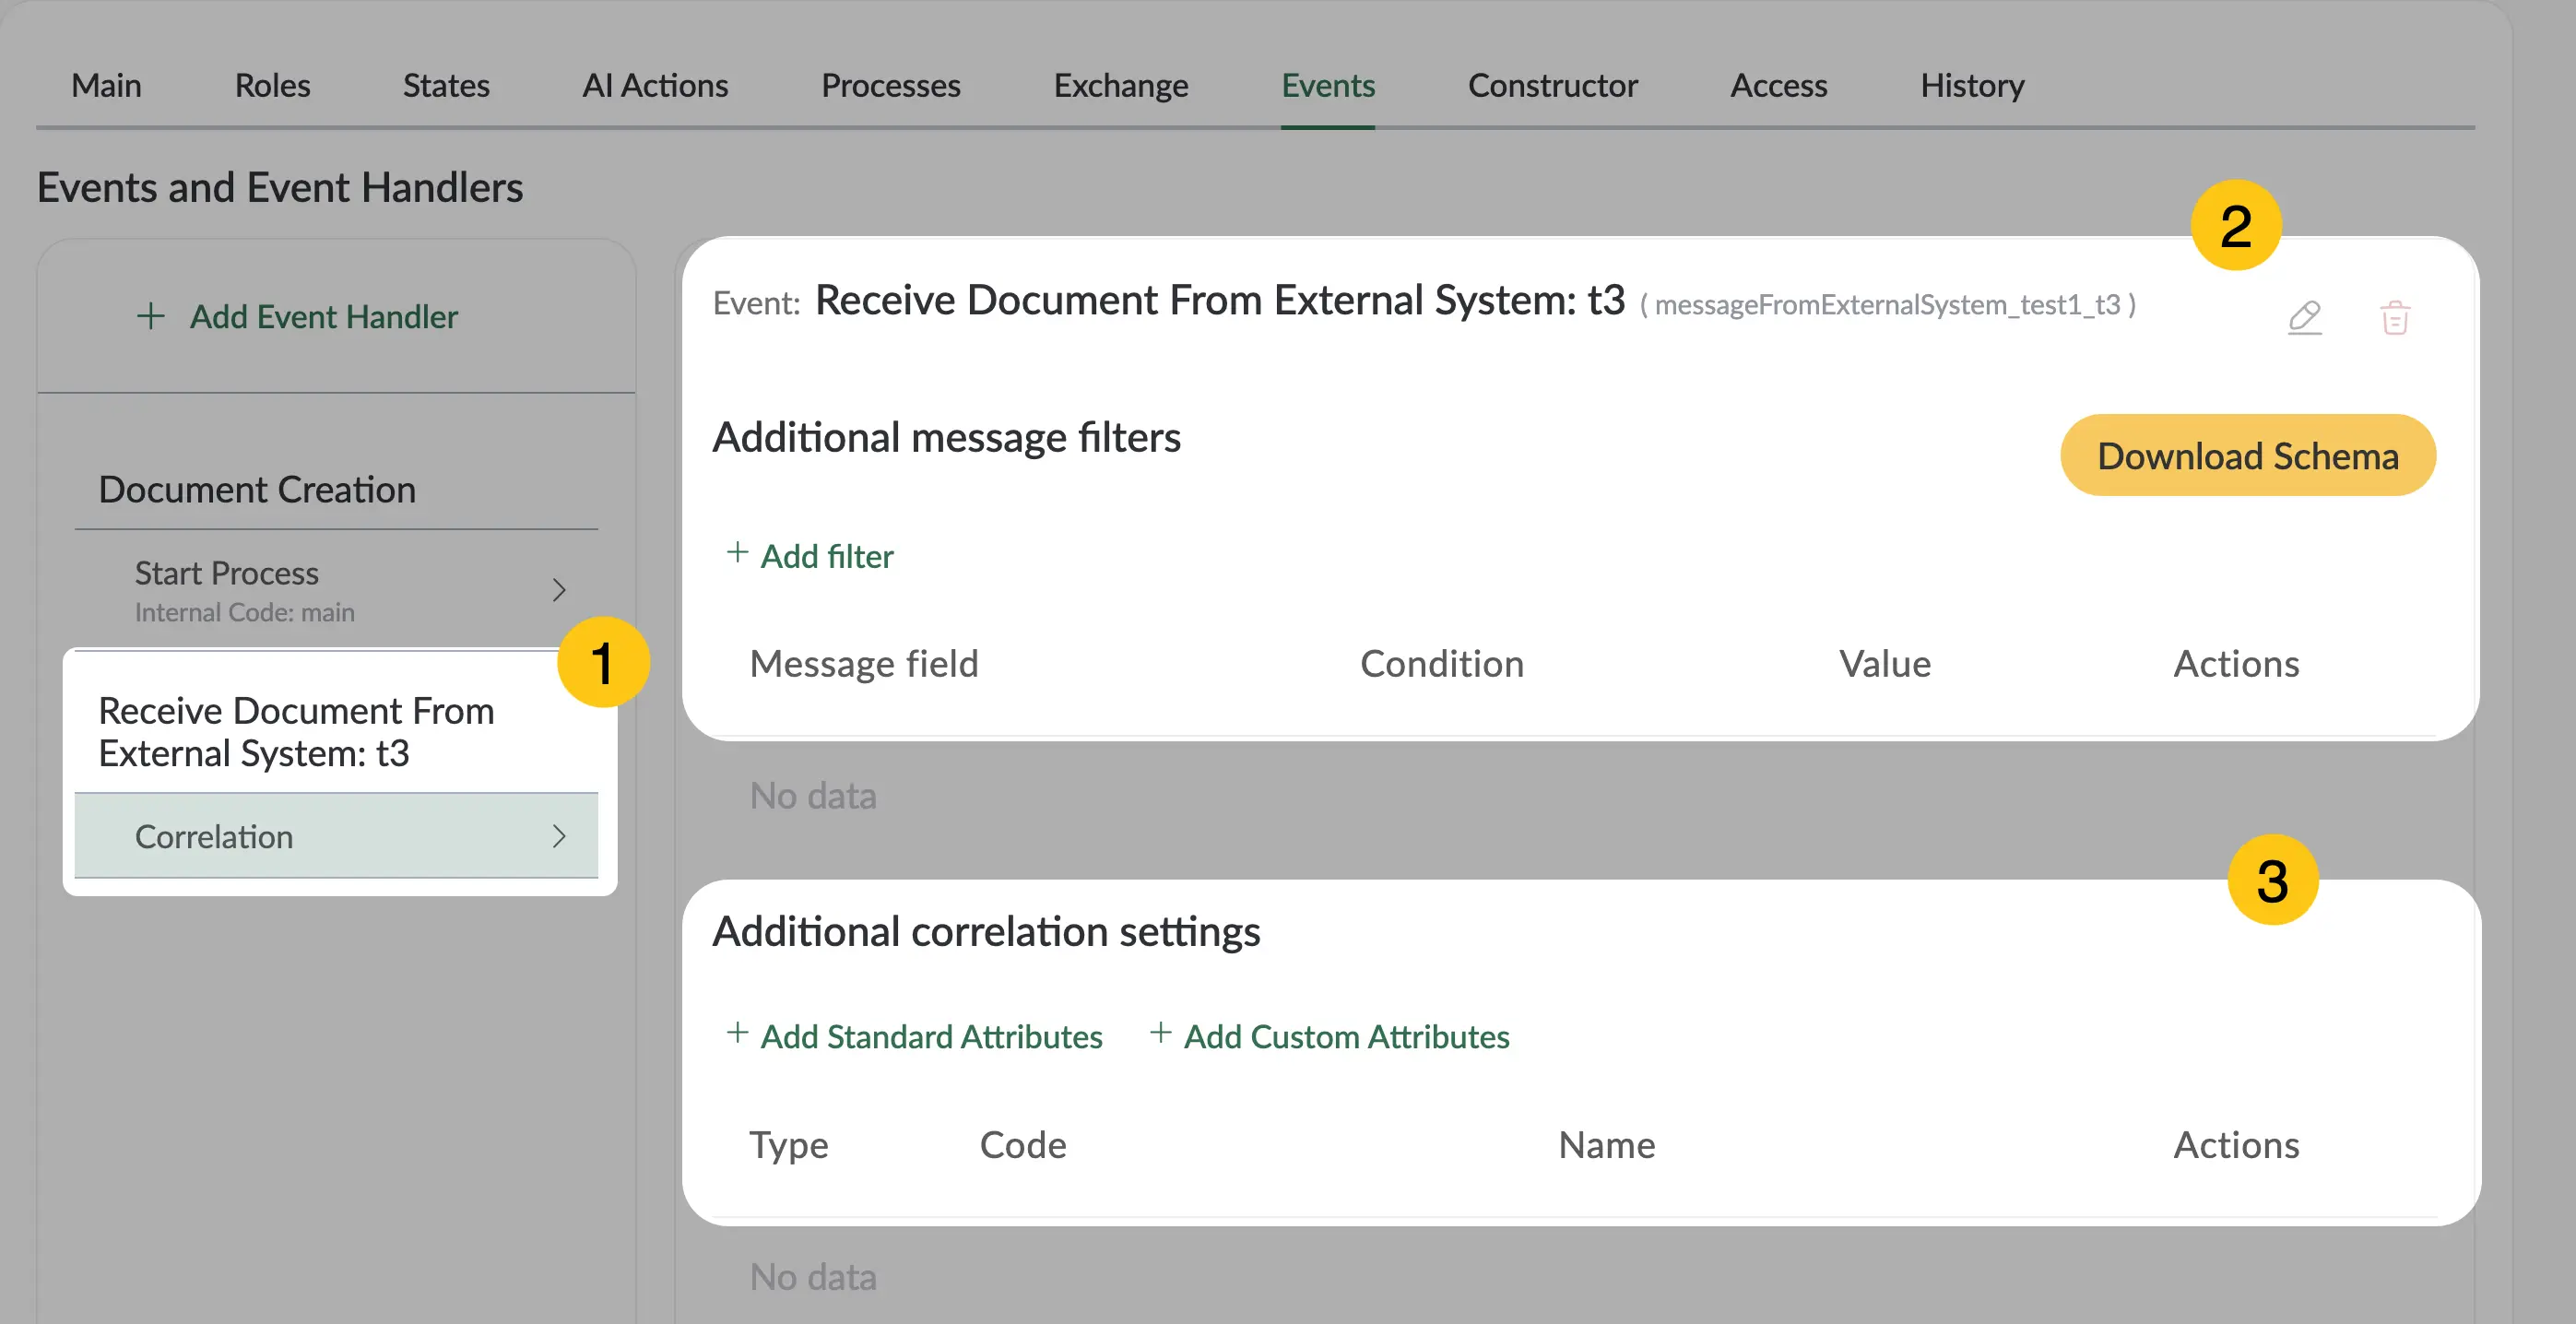
If in the Exchange tab you enabled a message toggle from an external system (marked with ←), then on the Events tab you will see an automatically created Receive document from external system handler 1. You will also see additional settings for this handler: Additional message filters 2 and Additional correlation settings 3.
-
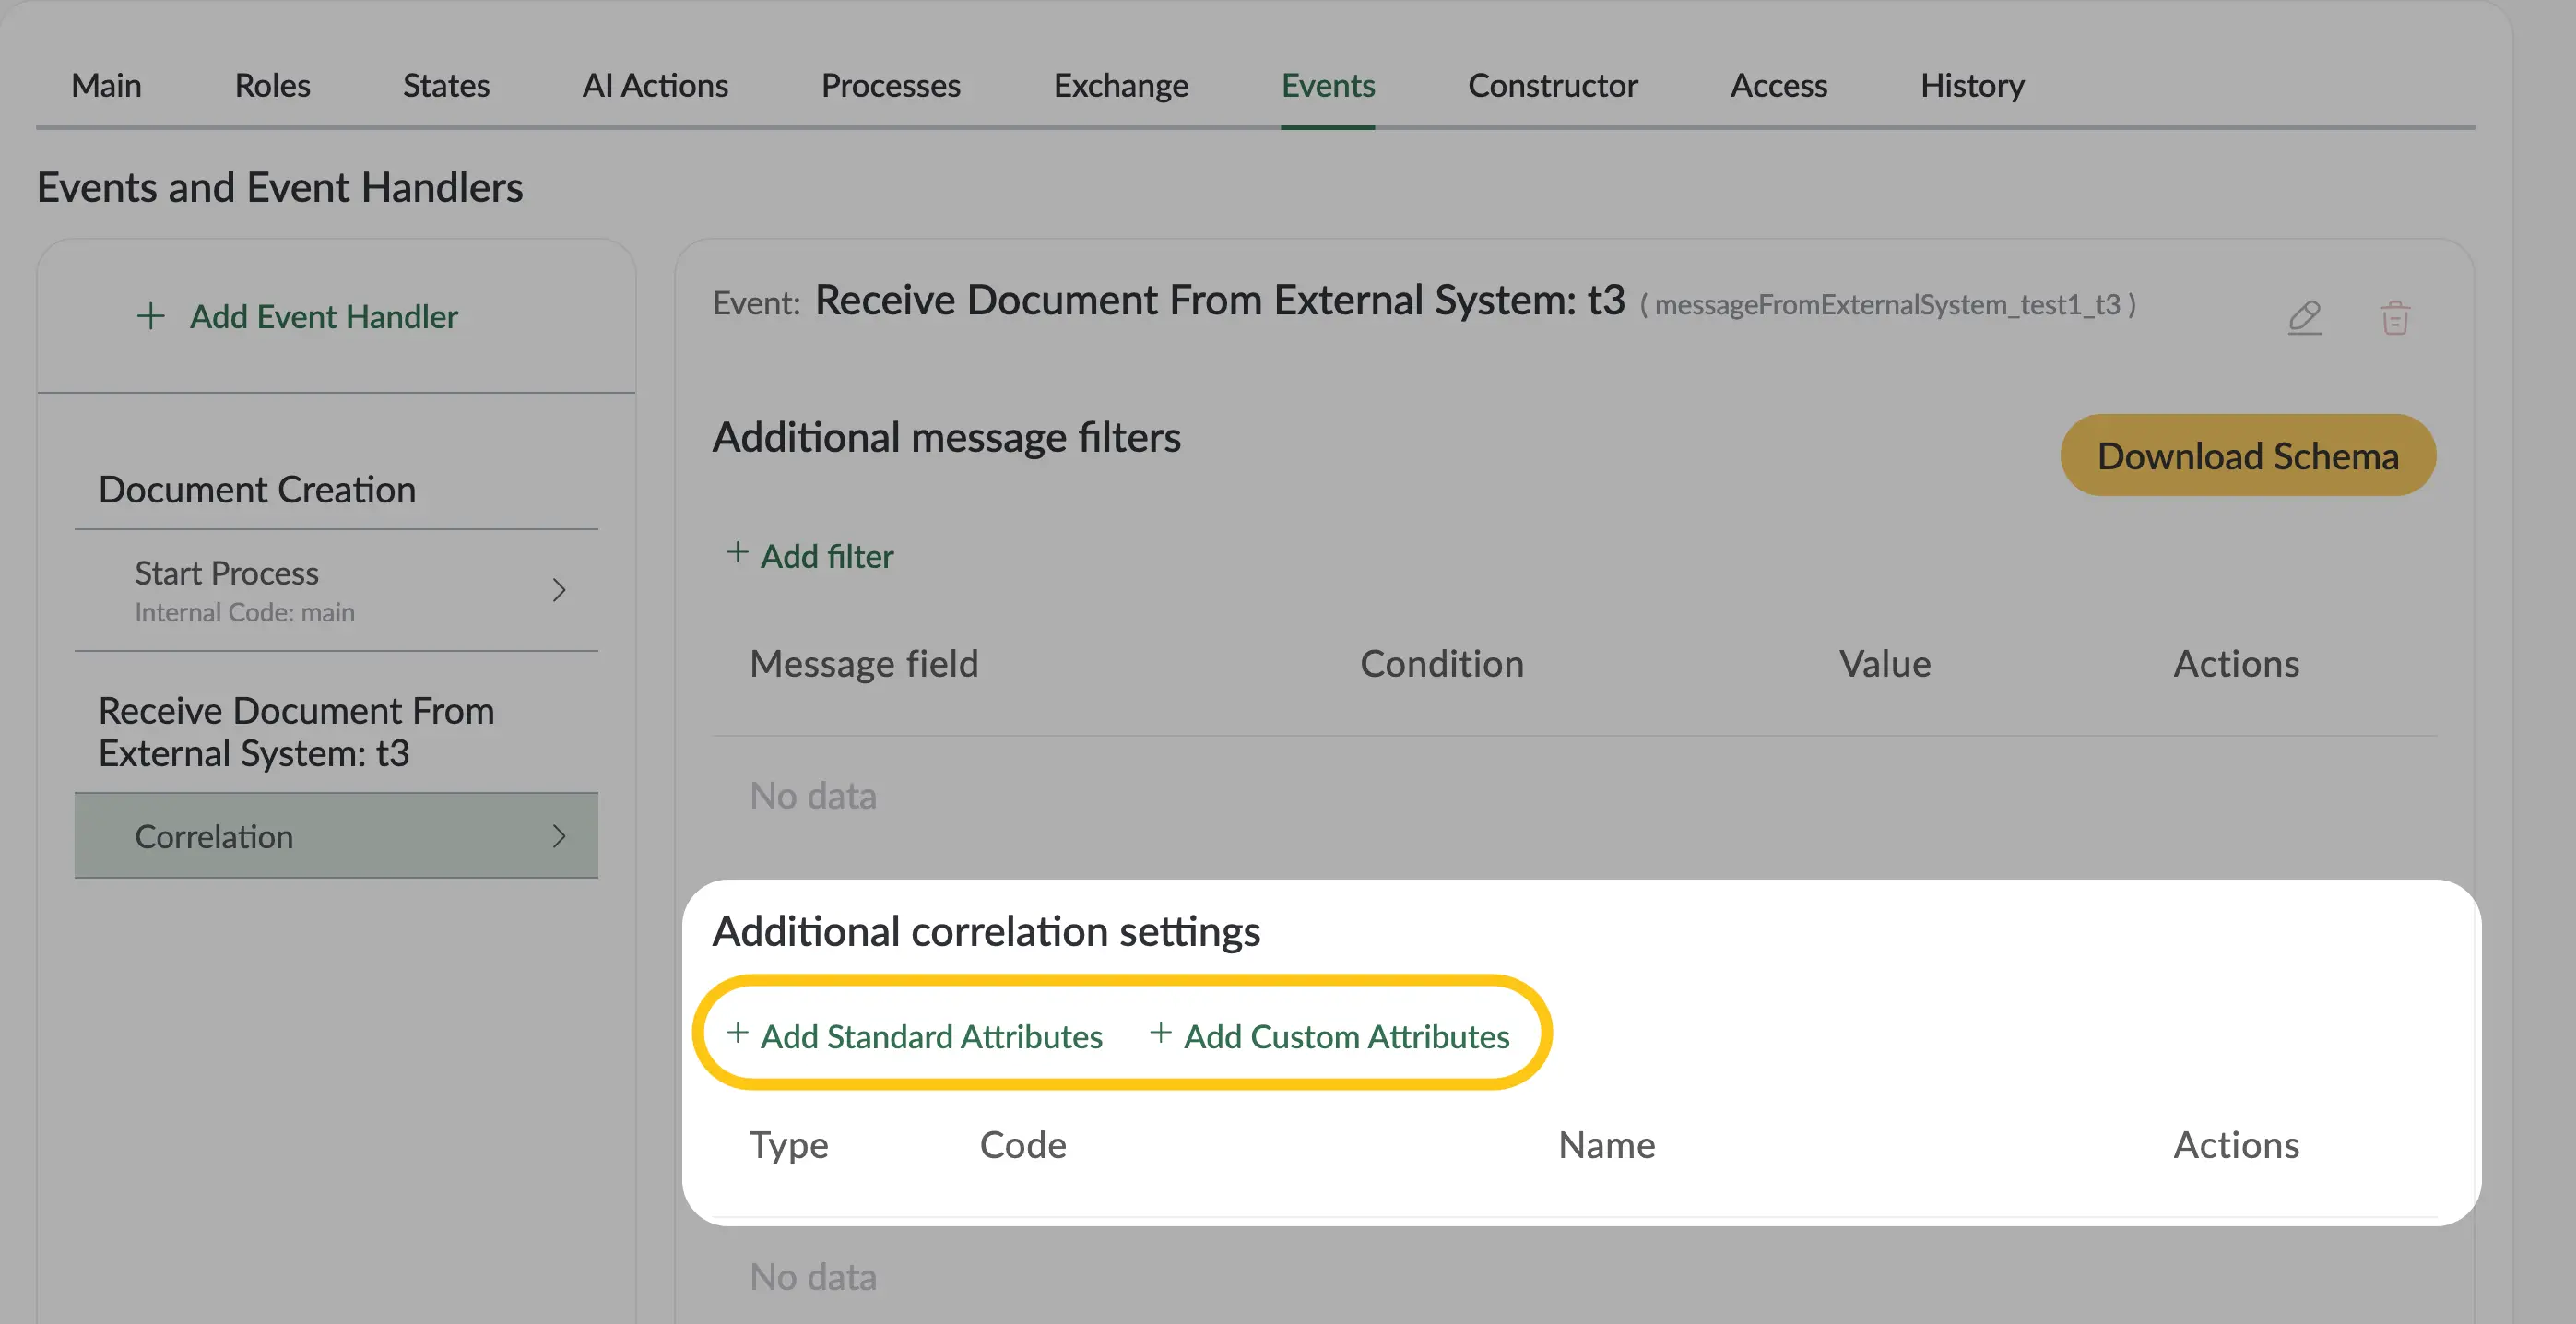
In the Additional correlation settings field, configure the correlation by adding the required attributes.
Correlation is the process of matching a document from an external system with existing documents based on specified attributes. If one or more attributes are specified in the correlation, the platform will search for a document with the same attribute value(s). If a matching document is found, it will be updated. If no document is found, a new document will be added. If no attributes are specified, a new document will always be added.
-
In the toolbar, select Save , then continue the configuration in the Constructor tab (see section Constructor).
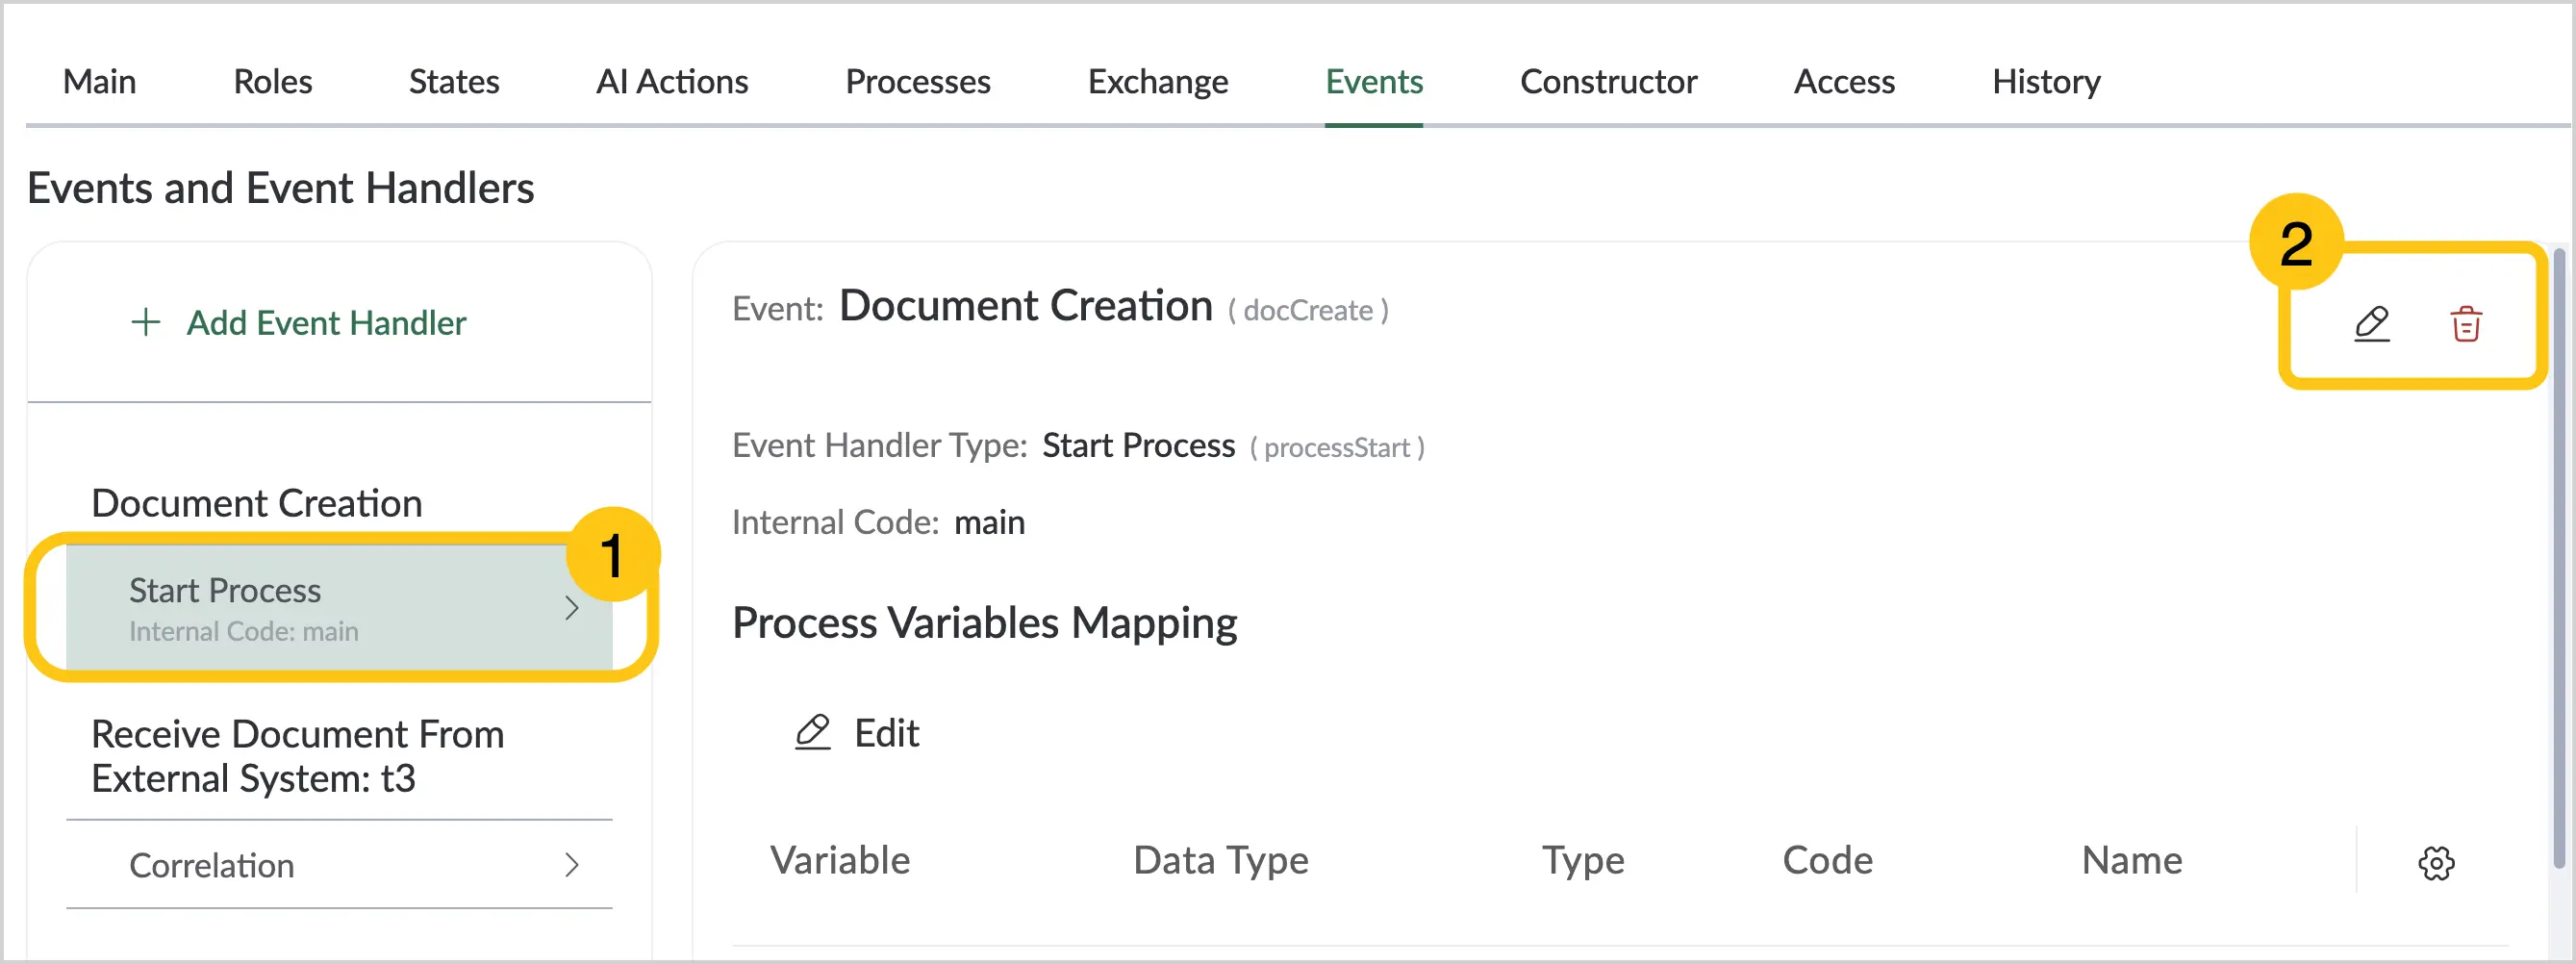
You can also edit or delete created events — select the required record in the Events tab 1, then select the corresponding Edit or Delete icons 2.
2.2.1.7.1. Configure Attribute Binding in the "Create Document" Event Handler
You can add any attributes to the "Create Document" handler, even those not present in the associated document type. If you selected attributes that are not on the document type form, you can configure the binding logic between the document type attributes and your selected attributes.
-
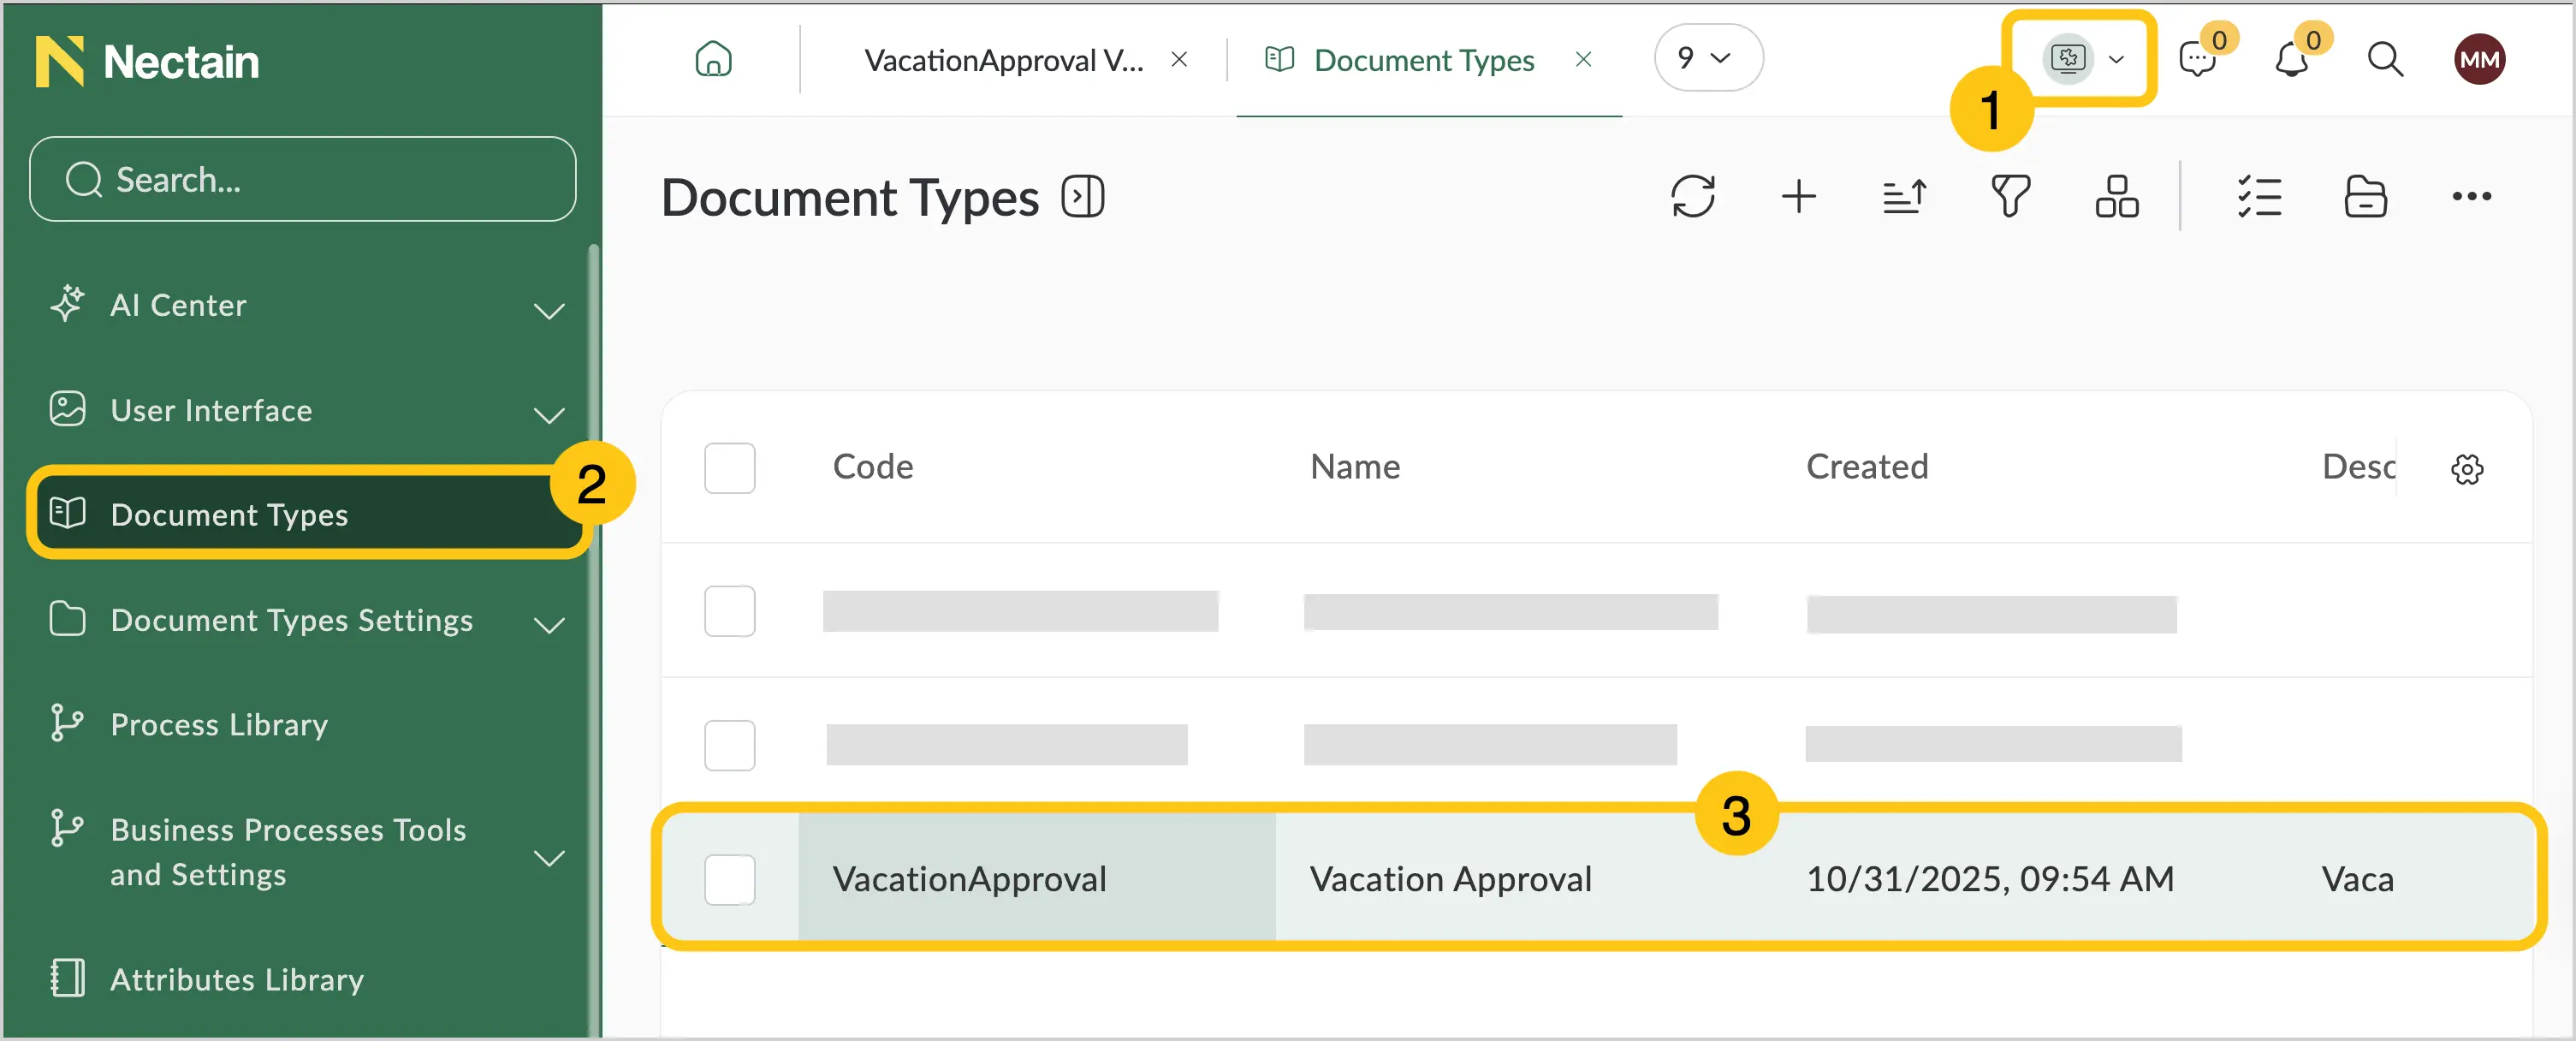
In the navigation panel, select the Studio desktop 1.
-
Select the Document Types shortcut 2.
-
Select the required document type 3.
-
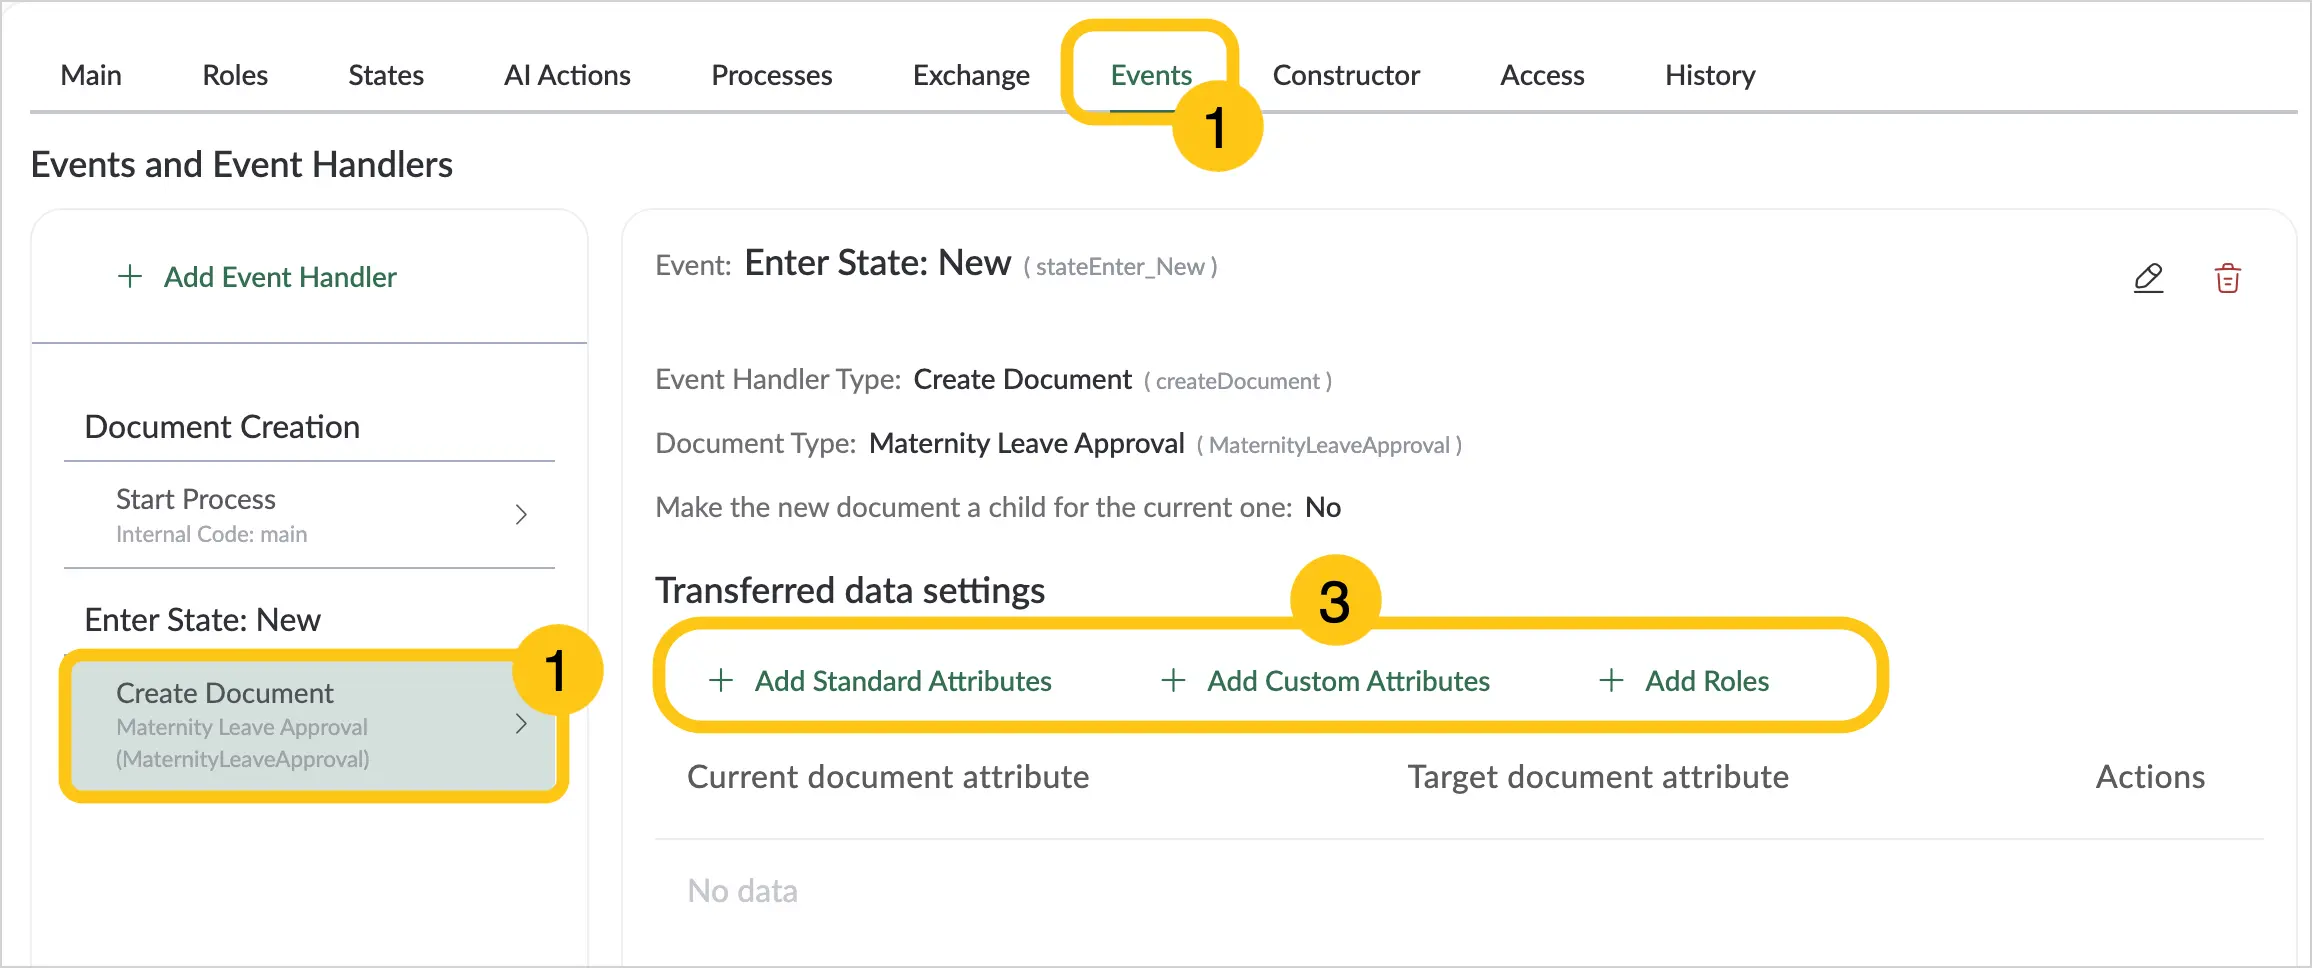
Go to the Events tab 1.
-
In the list of added handlers, select Create document 2.
-
Select the appropriate attribute-adding button 3, according to the type of attribute you want to add.
-
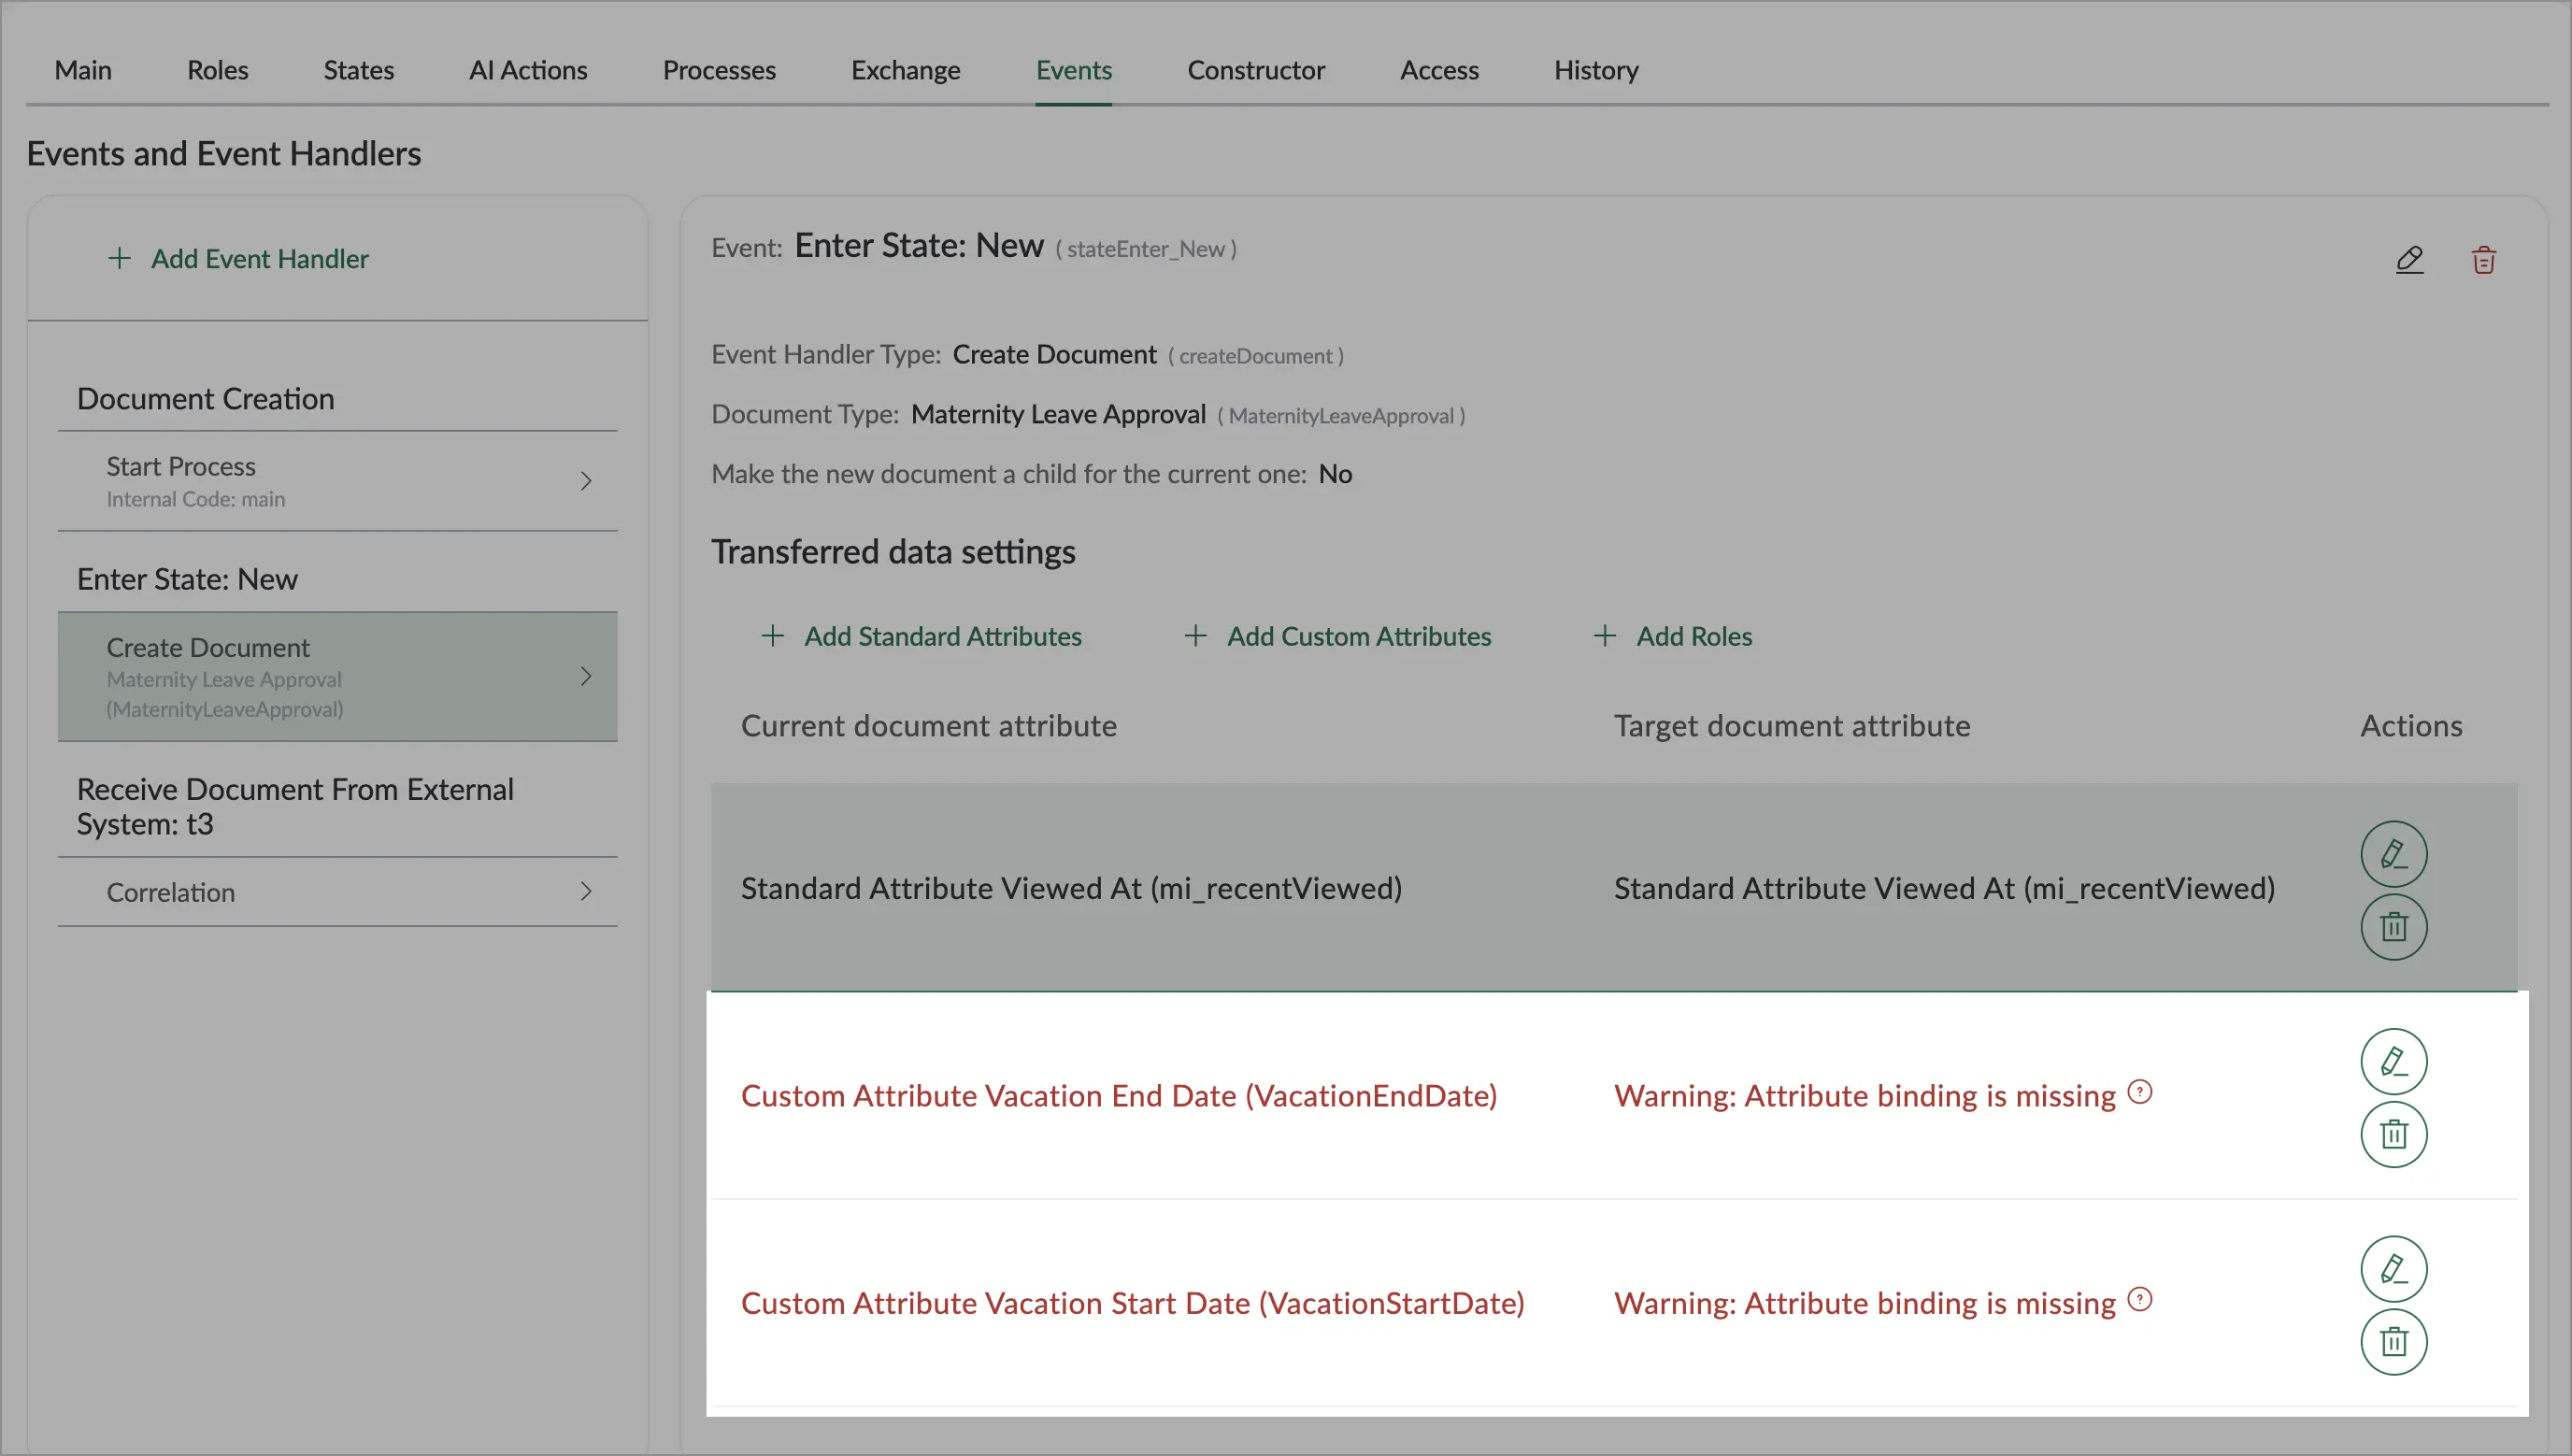
If you added an attribute that is not on the form of this document type, it will be highlighted in red with the note "Warning: attribute binding is missing".
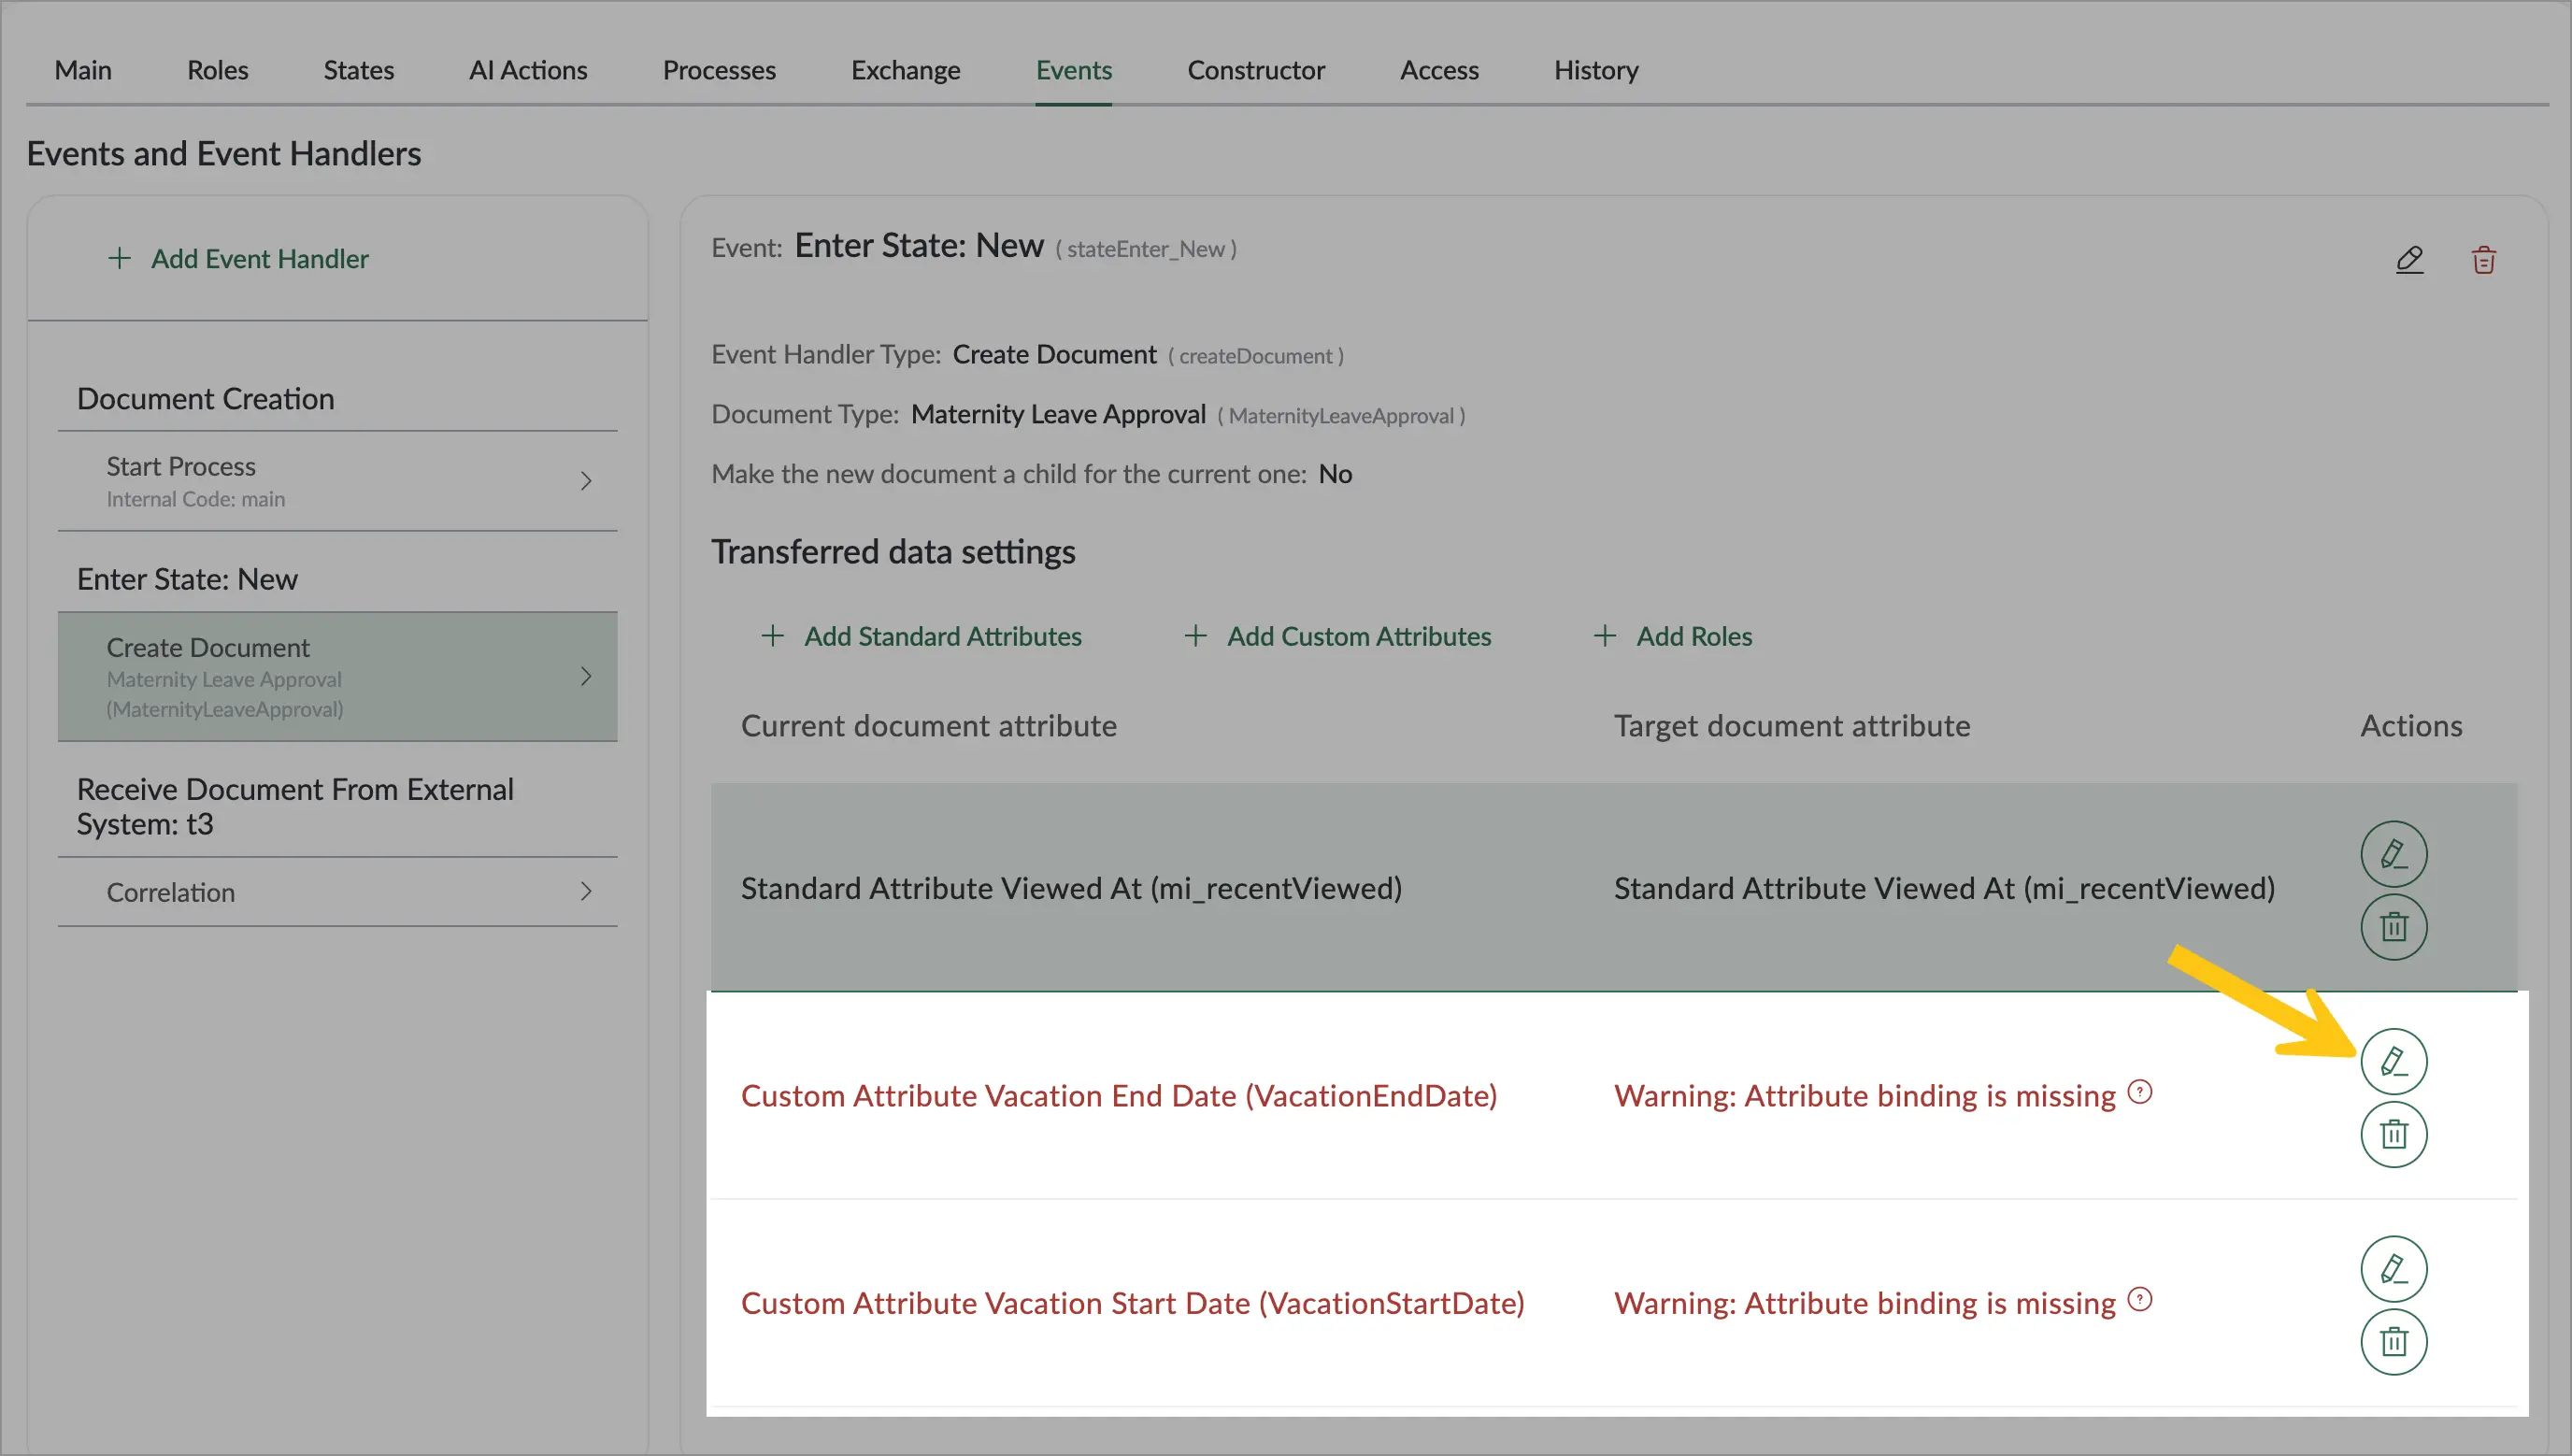
To configure the binding manually, follow these steps:
7.1. On the attribute, select the button.
7.2. In the Target attribute field 1, select the attribute to write data into. The list contains only attributes of the same type as the one you selected.
7.3. Select the Save button 2.
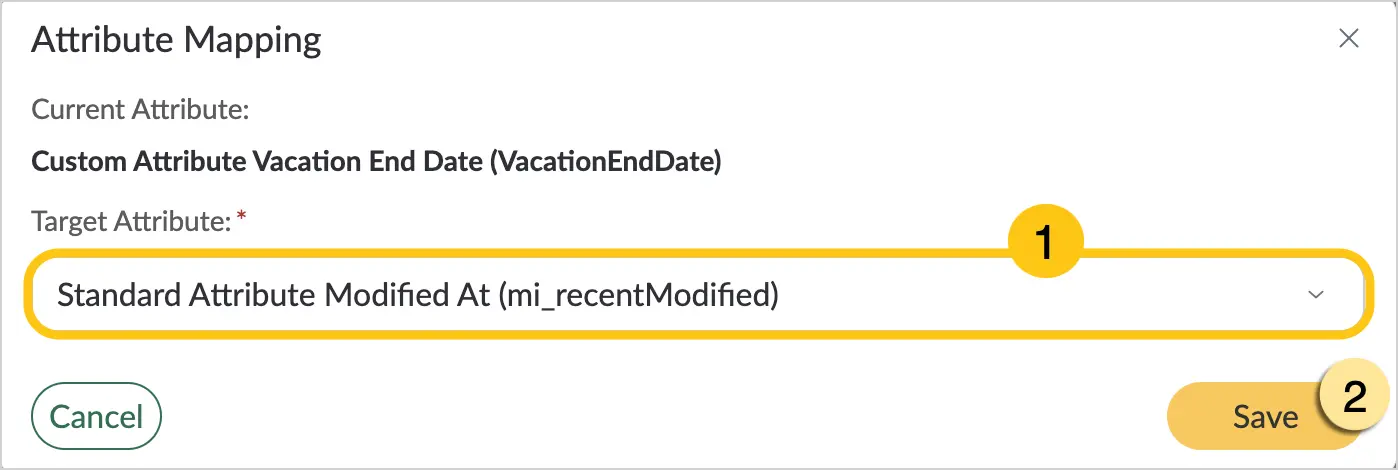
7.4. Repeat these steps for each attribute that requires binding (highlighted in red).
Note:If binding for such attributes (highlighted in red) was not configured, they will be automatically removed when the form is saved, to avoid errors when creating the document.
-
You can also perform manual binding for table attributes, for example, if the columns in the current and target attributes differ.
8.1. On the required table attribute, select the button.
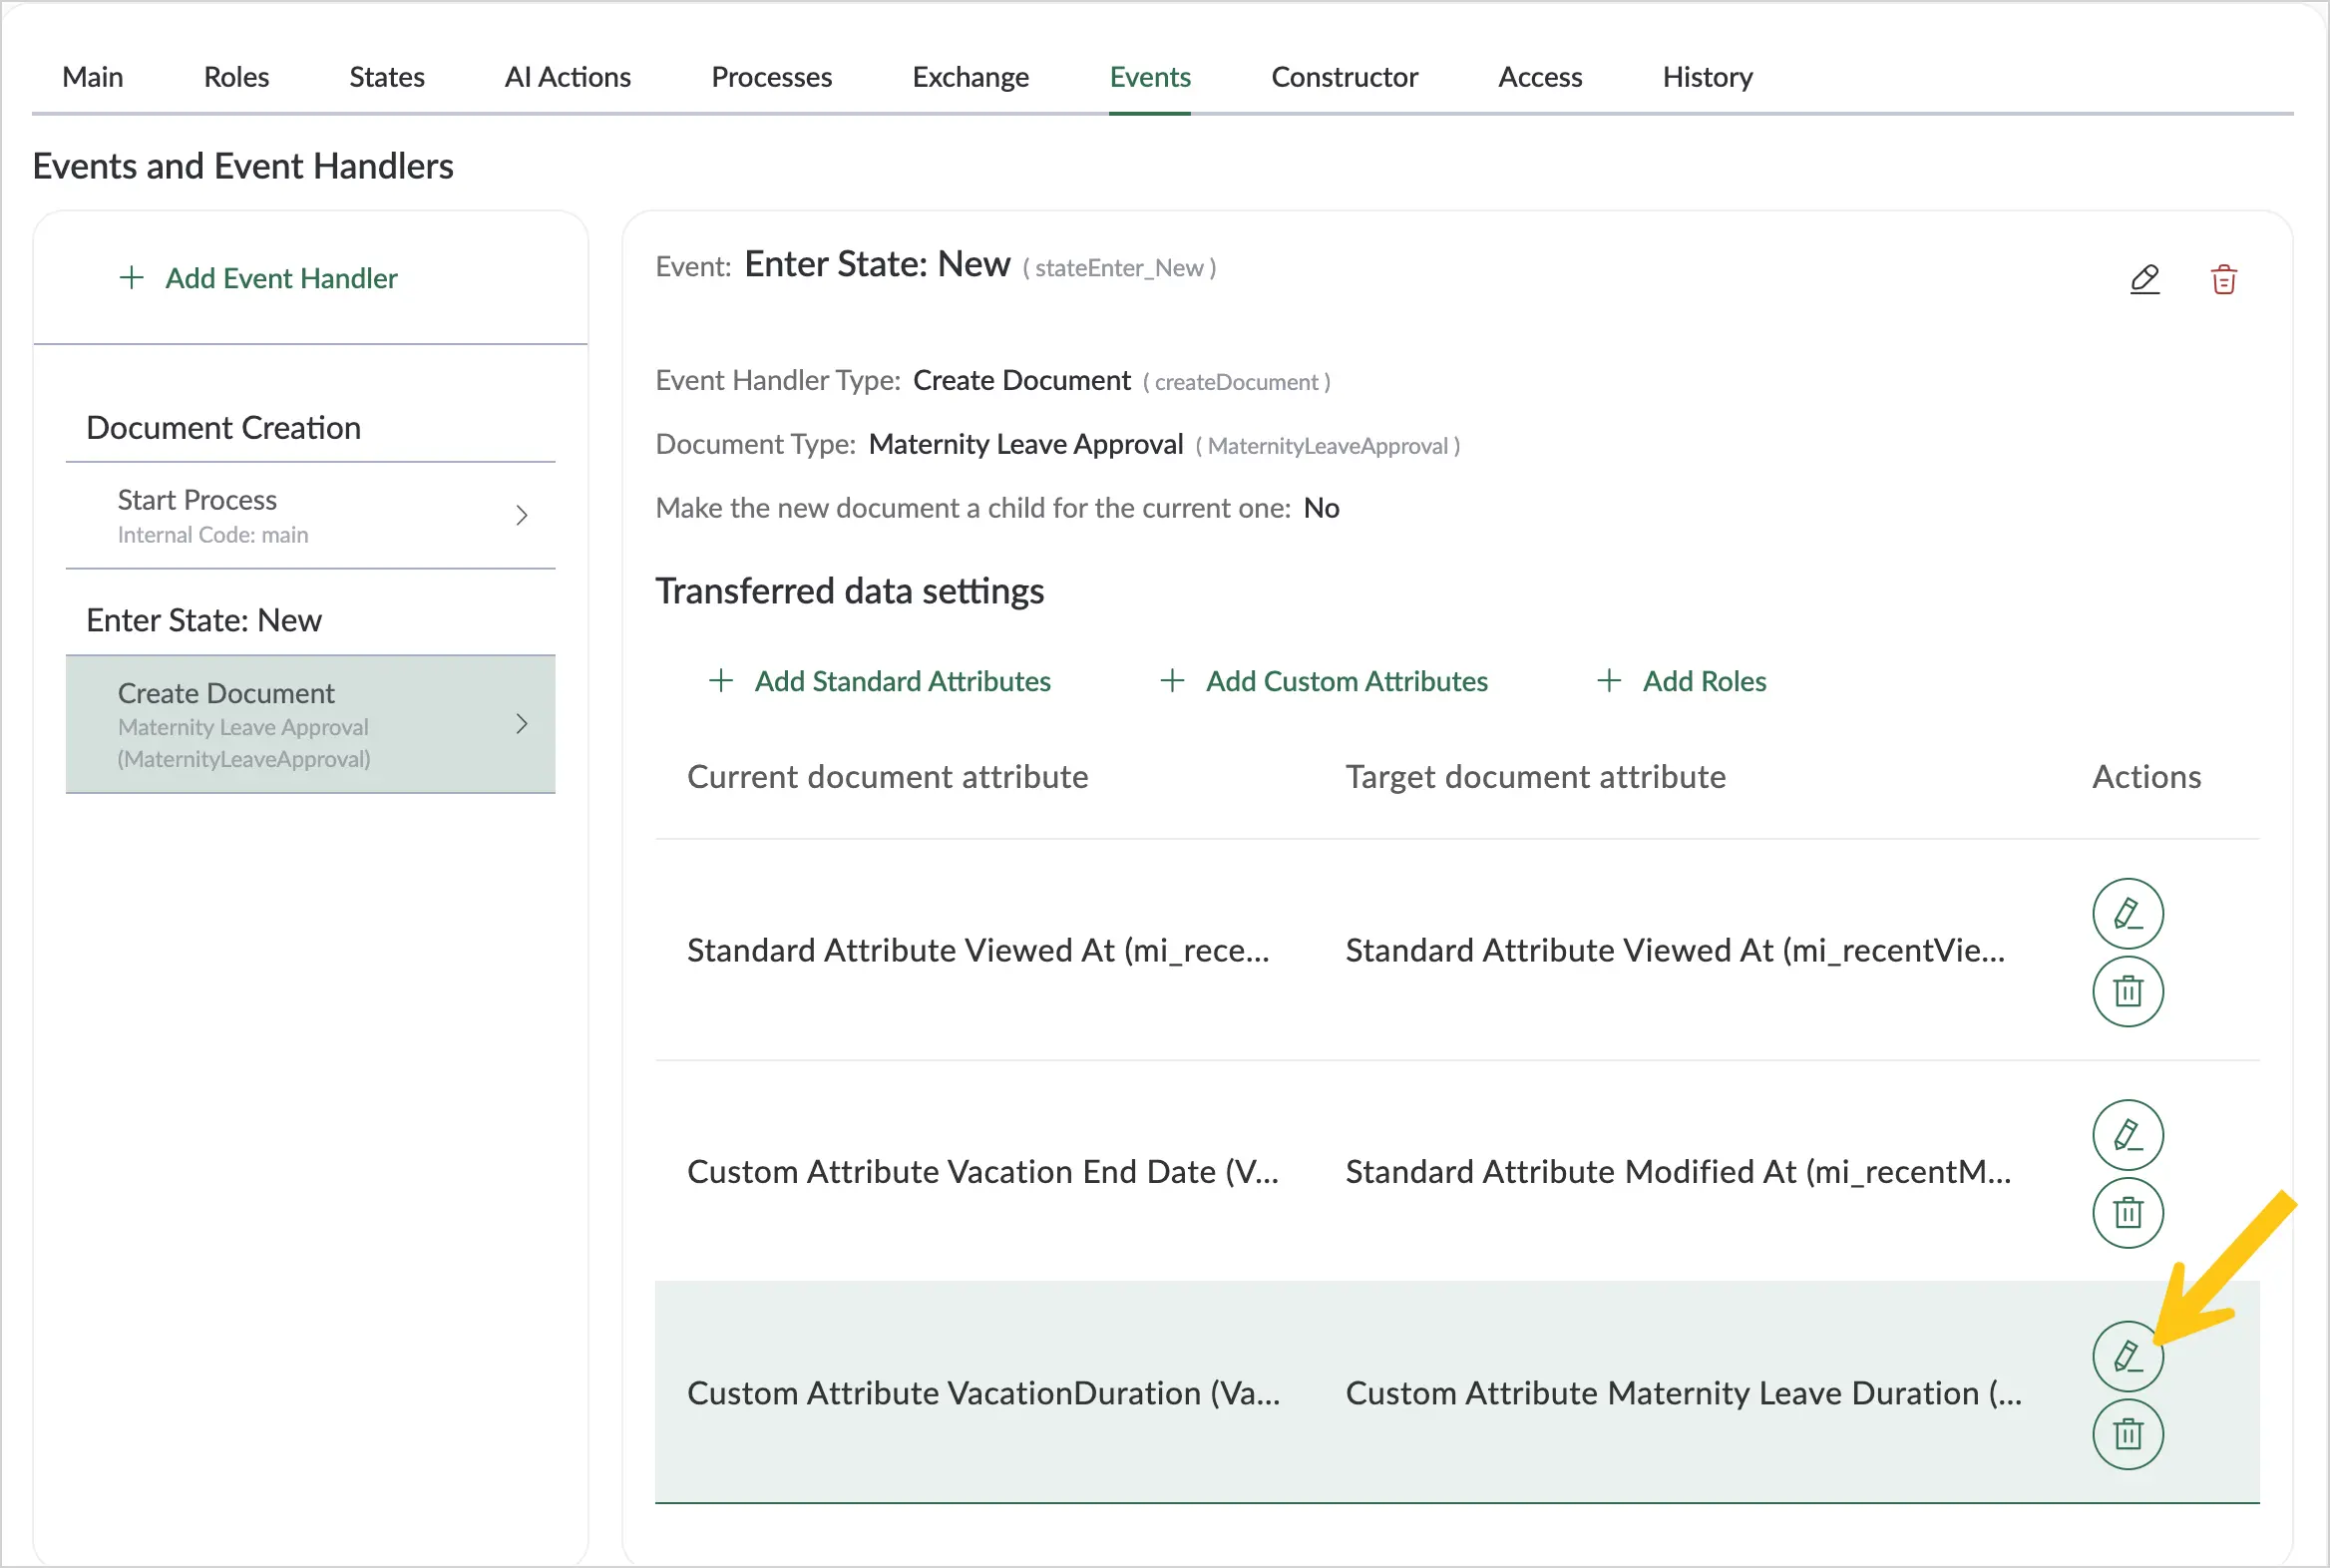
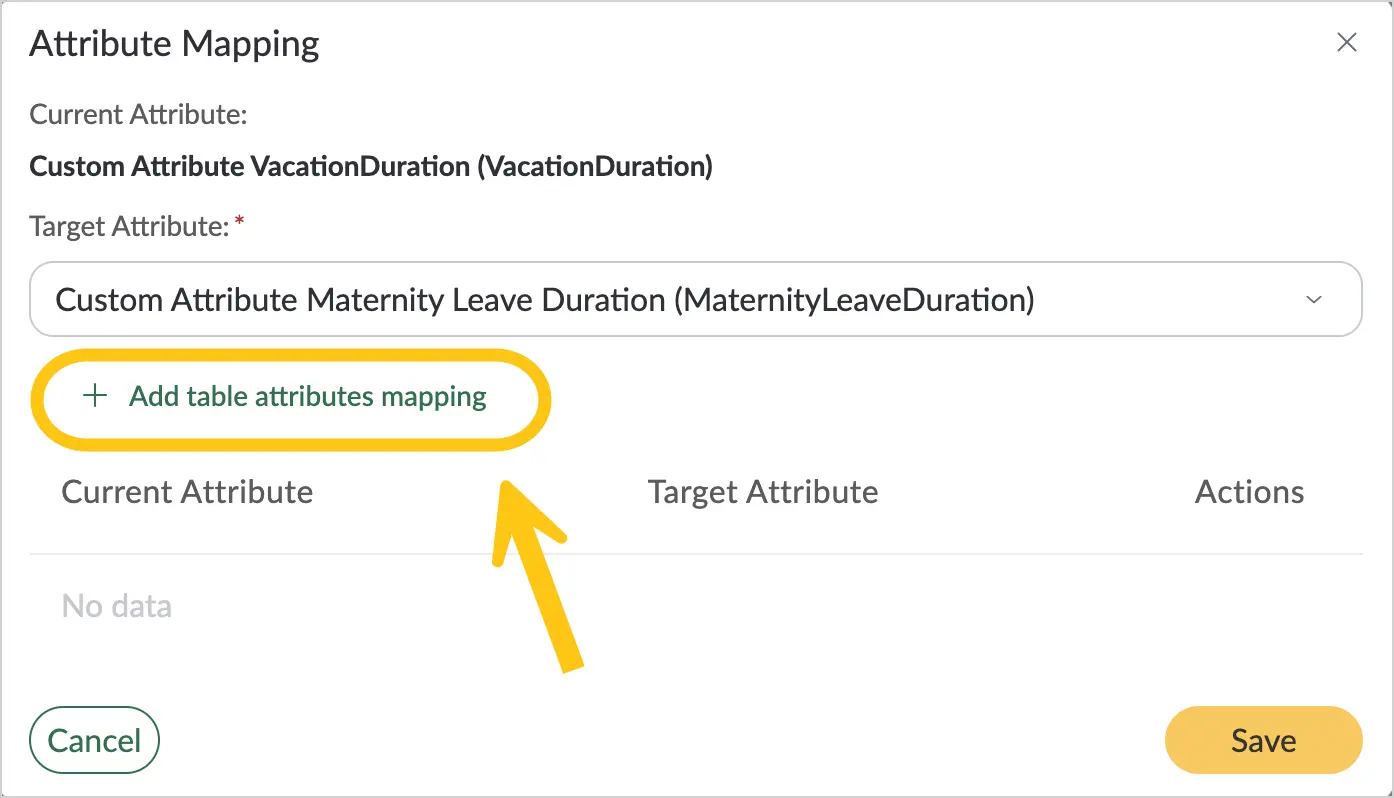
8.2. Select the + Add table attribute binding button.
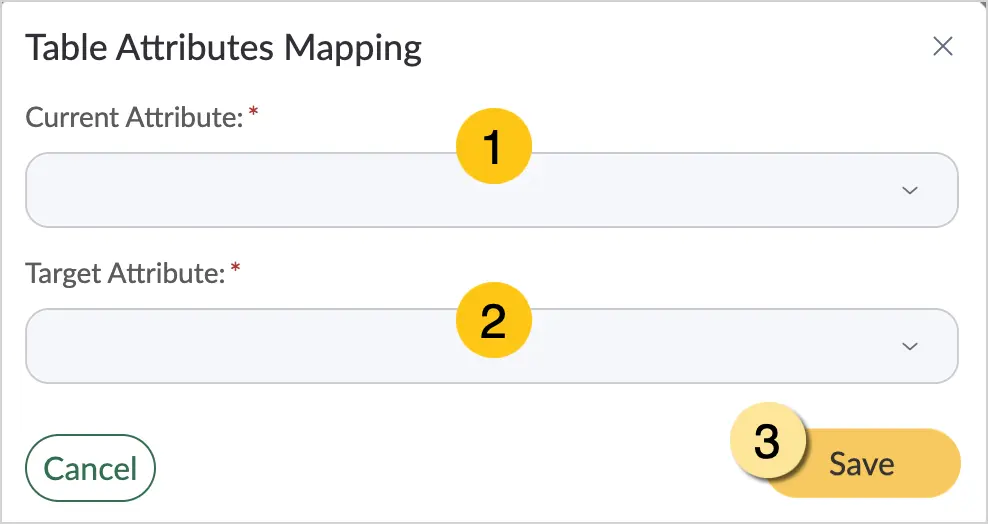
8.3. In the Current attribute field 1, select from the list the attribute of the current document type whose data you want to pass to the new document.
8.4. In the Target attribute field 2, select from the list the attribute into which the data from your selected attribute will be written. Only attributes of the same type as the attribute you selected will be displayed in the list.
8.5. Select the Save button 3.
8.6. In the Attribute binding window, select the Save button.
-
In the toolbar, select Save.
2.2.1.8. Constructor
The Constructor tab allows you to configure the document form: add attributes, define field appearance, and manage their access and visibility depending on roles.
The Constructor tab consists of several modes that allow you to configure custom forms using a graphical interface:
2.2.1.8.1. Designer
In the Designer constructor mode, you can create the layout of the future document form using attributes. You can also configure the columns for the "Preview" mode.
To compose and configure the document form layout, follow these steps:
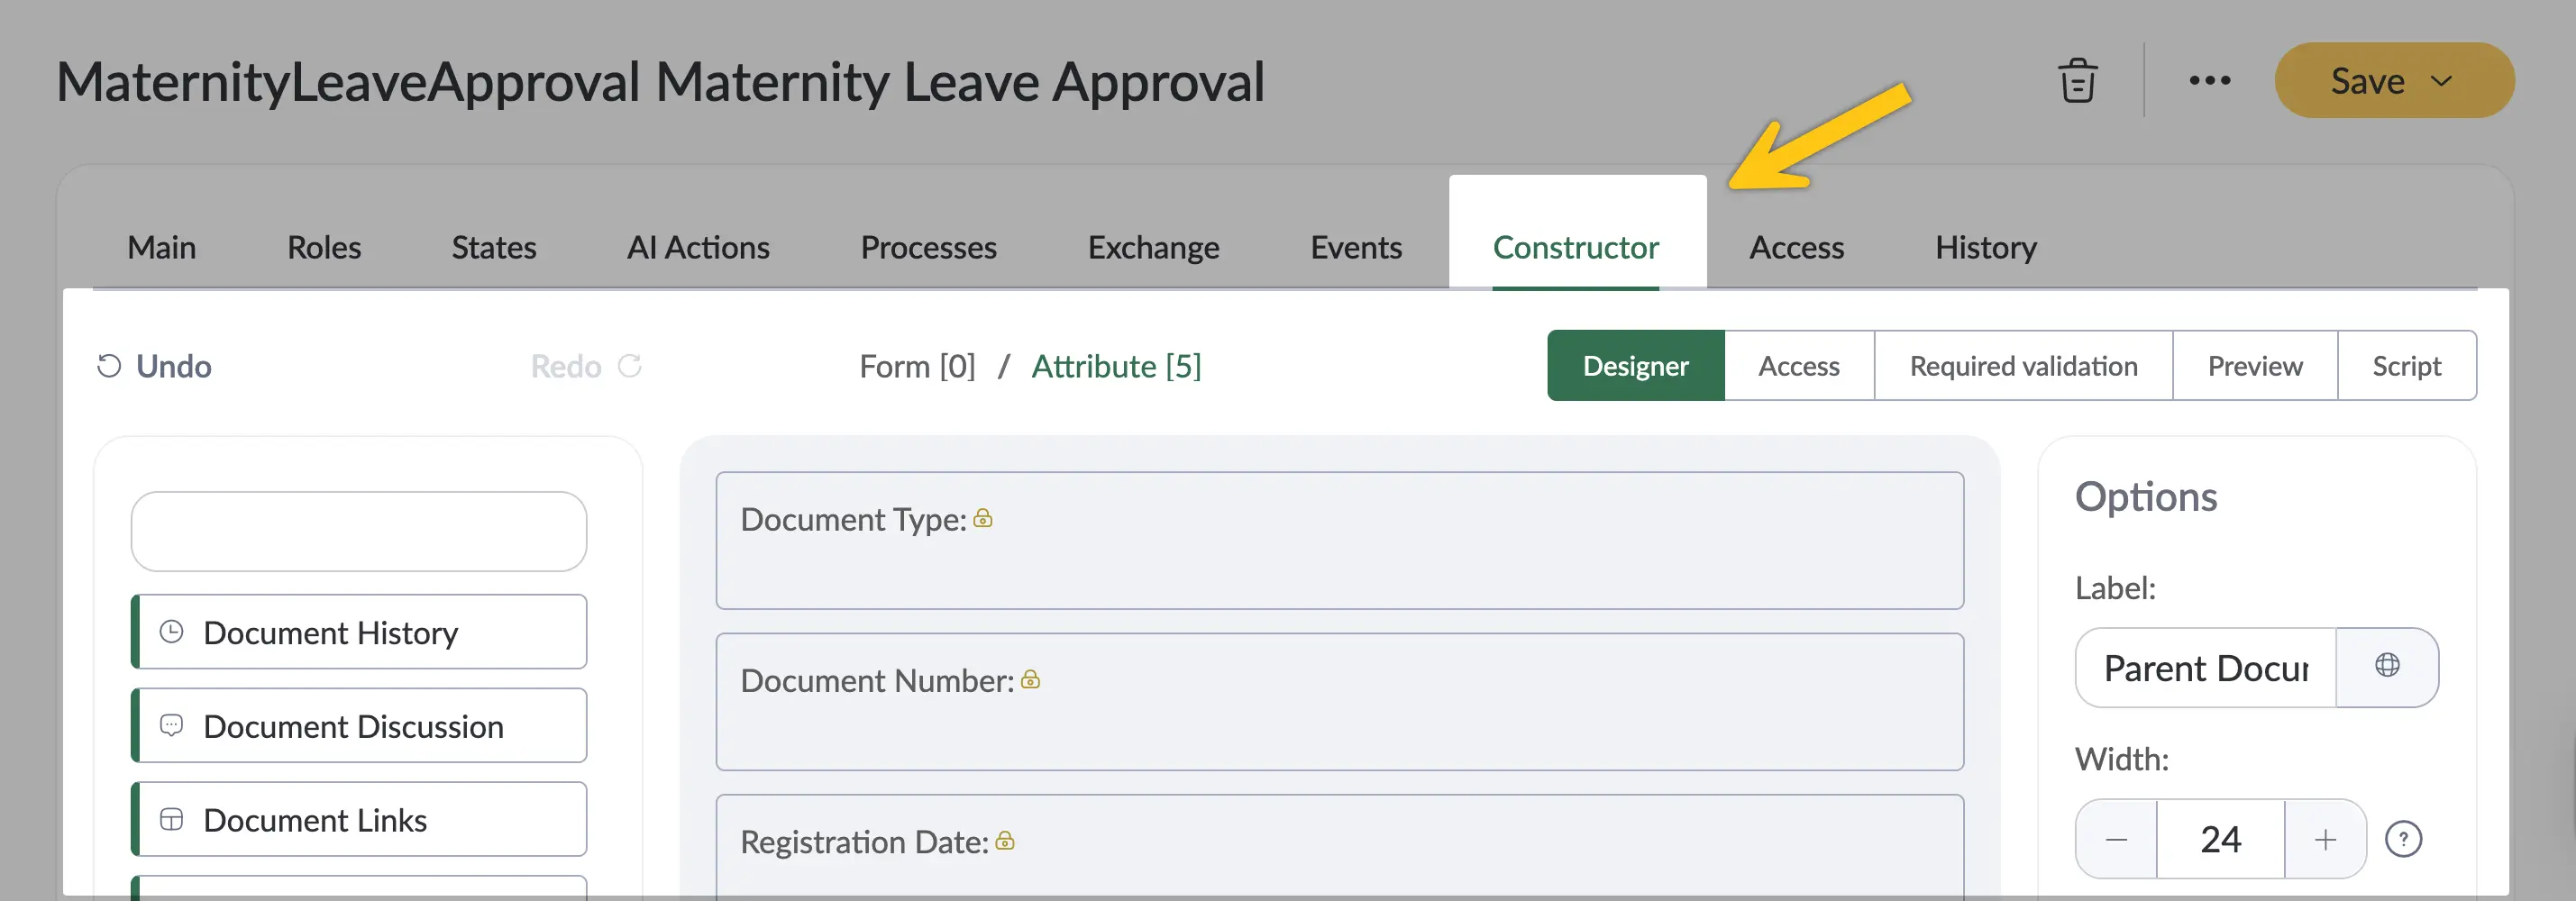
-
Go to the Constructor tab.
-
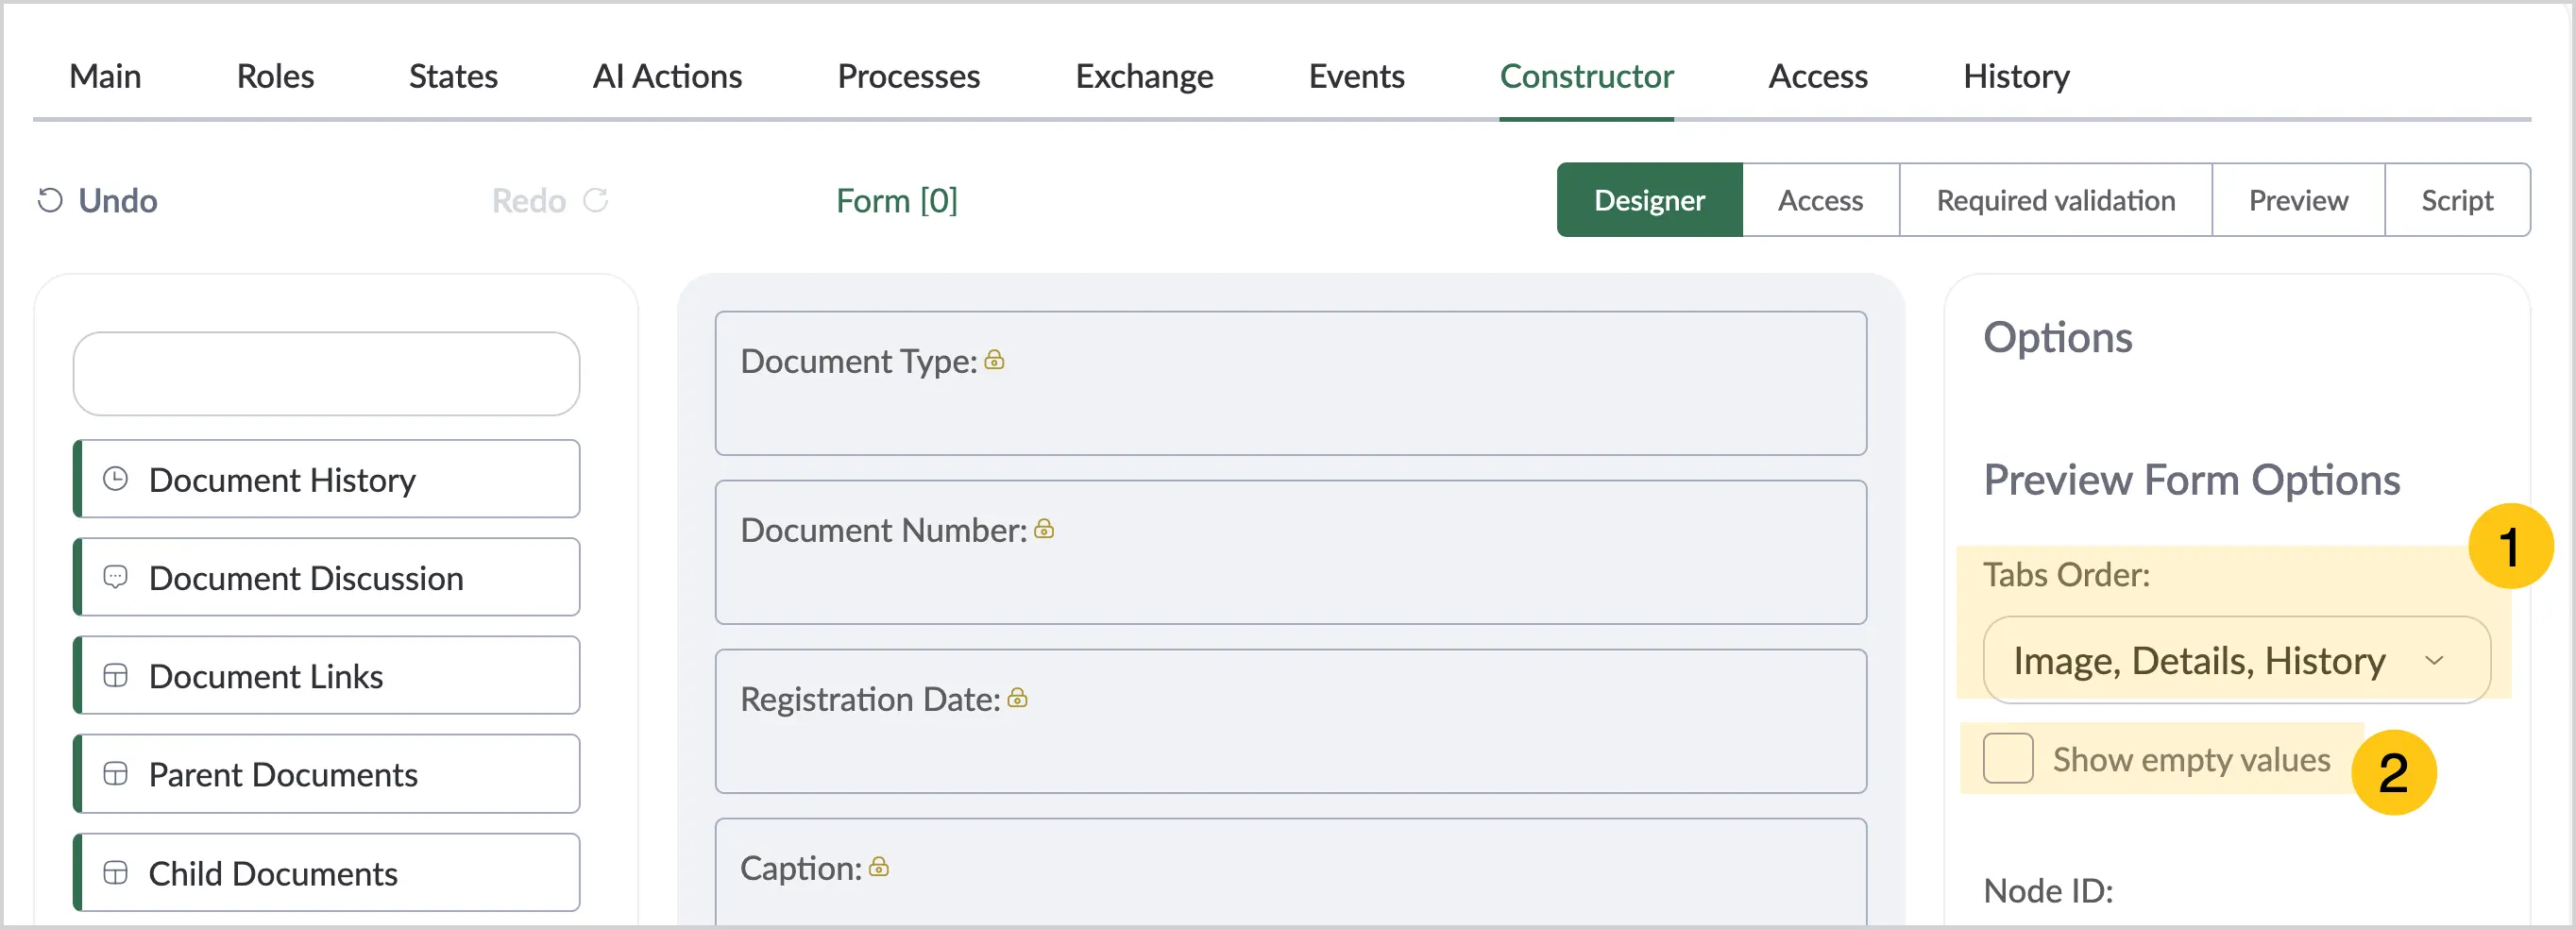
In the Options menu, in the Tab order field 1, select the desired tab order to be displayed in the viewer in quick preview mode.
-
Check the Show empty values checkbox 2 if you want to display attributes with empty values.
-
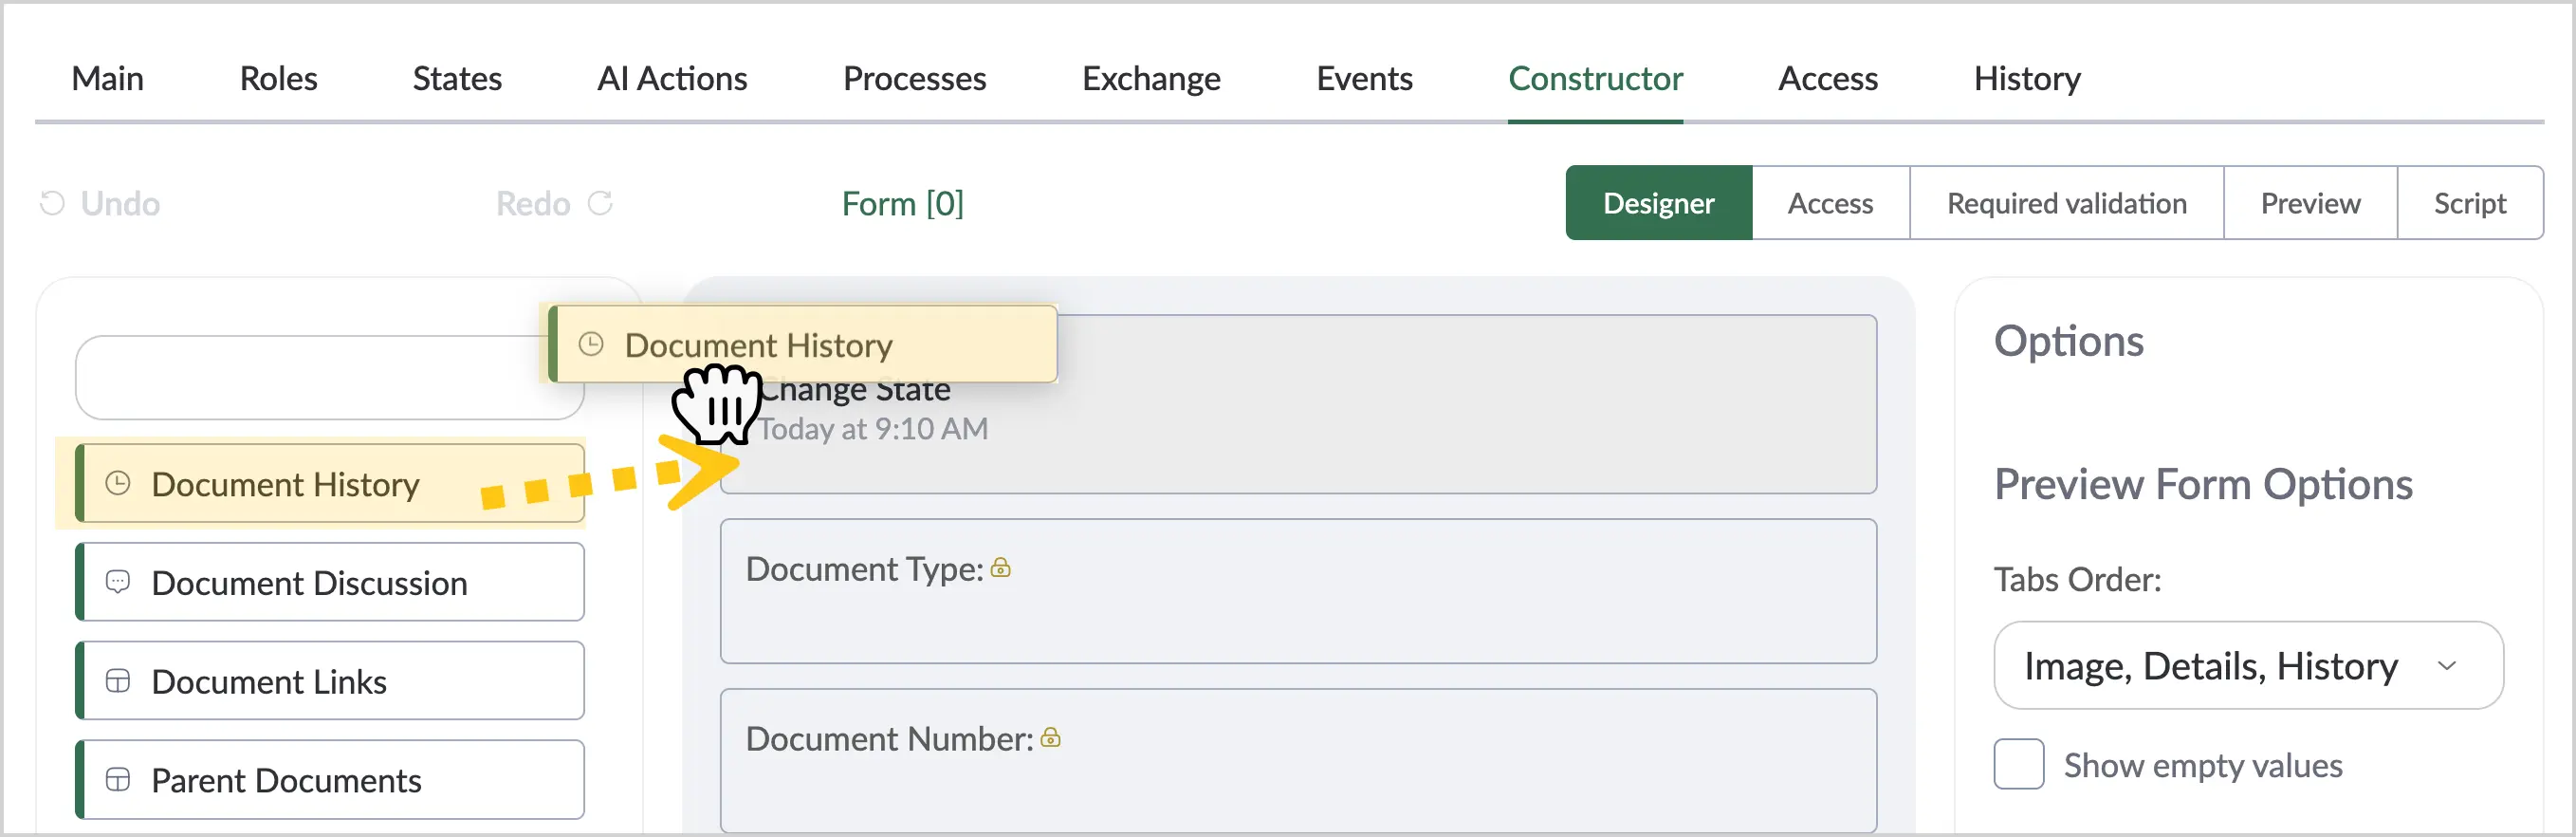
From the attribute panel on the left 2, drag the required attributes onto the document form.
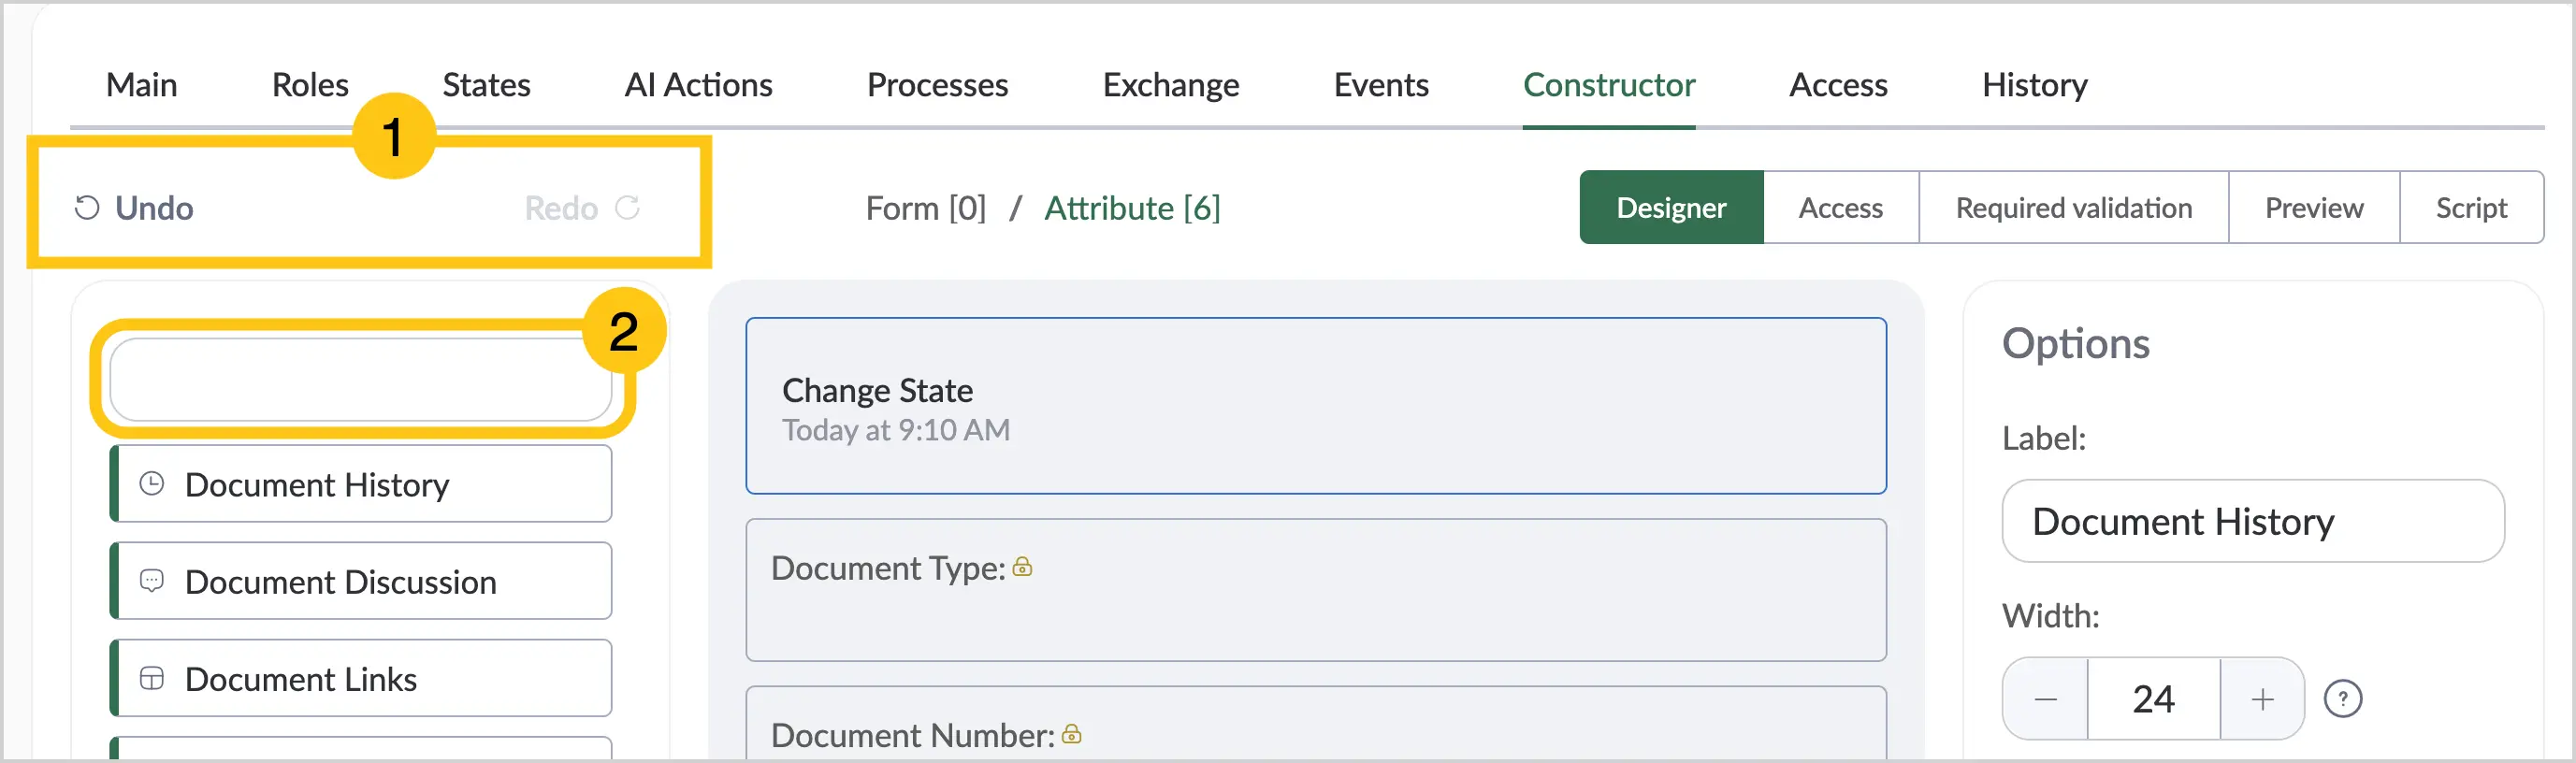
 Tip:
Tip:To undo or redo an action, select the corresponding Undo or Redo buttons 1. For convenient attribute search, use the search field 2.
-
To use additional layout composition features, go to the Layout folder 1 and use the Tabs and Section functions 2.
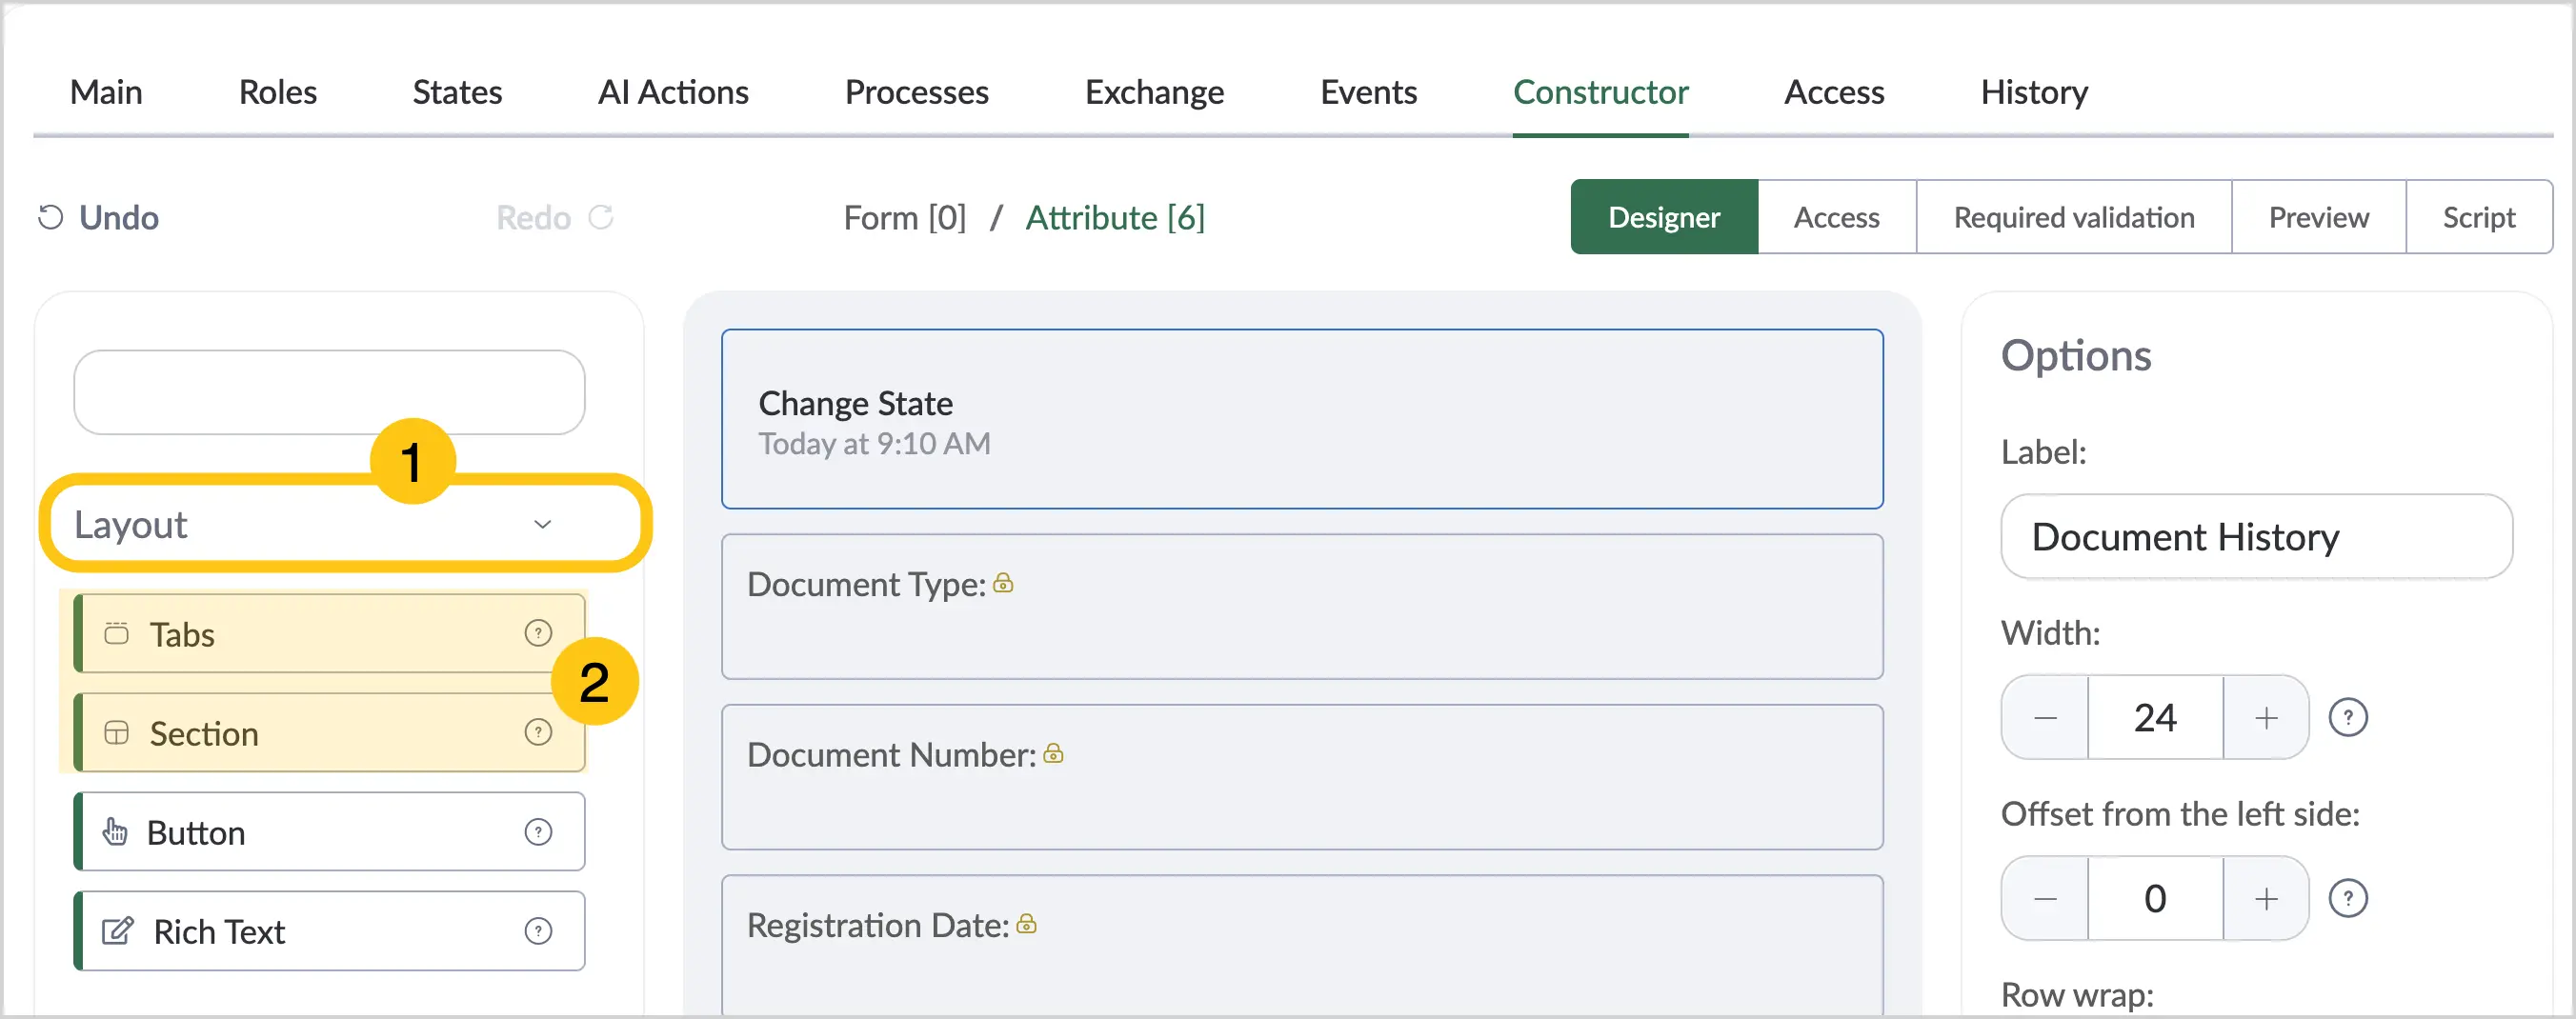
- The Tab function allows you to organize attributes on the document form as tabs. You can create additional tabs inside which you can place attributes and rename the tabs. One tab is created by default.
- The Section function allows you to group elements into sections. You can place attributes inside a section. When the section width is changed, the width of all attributes inside the section changes accordingly.
-
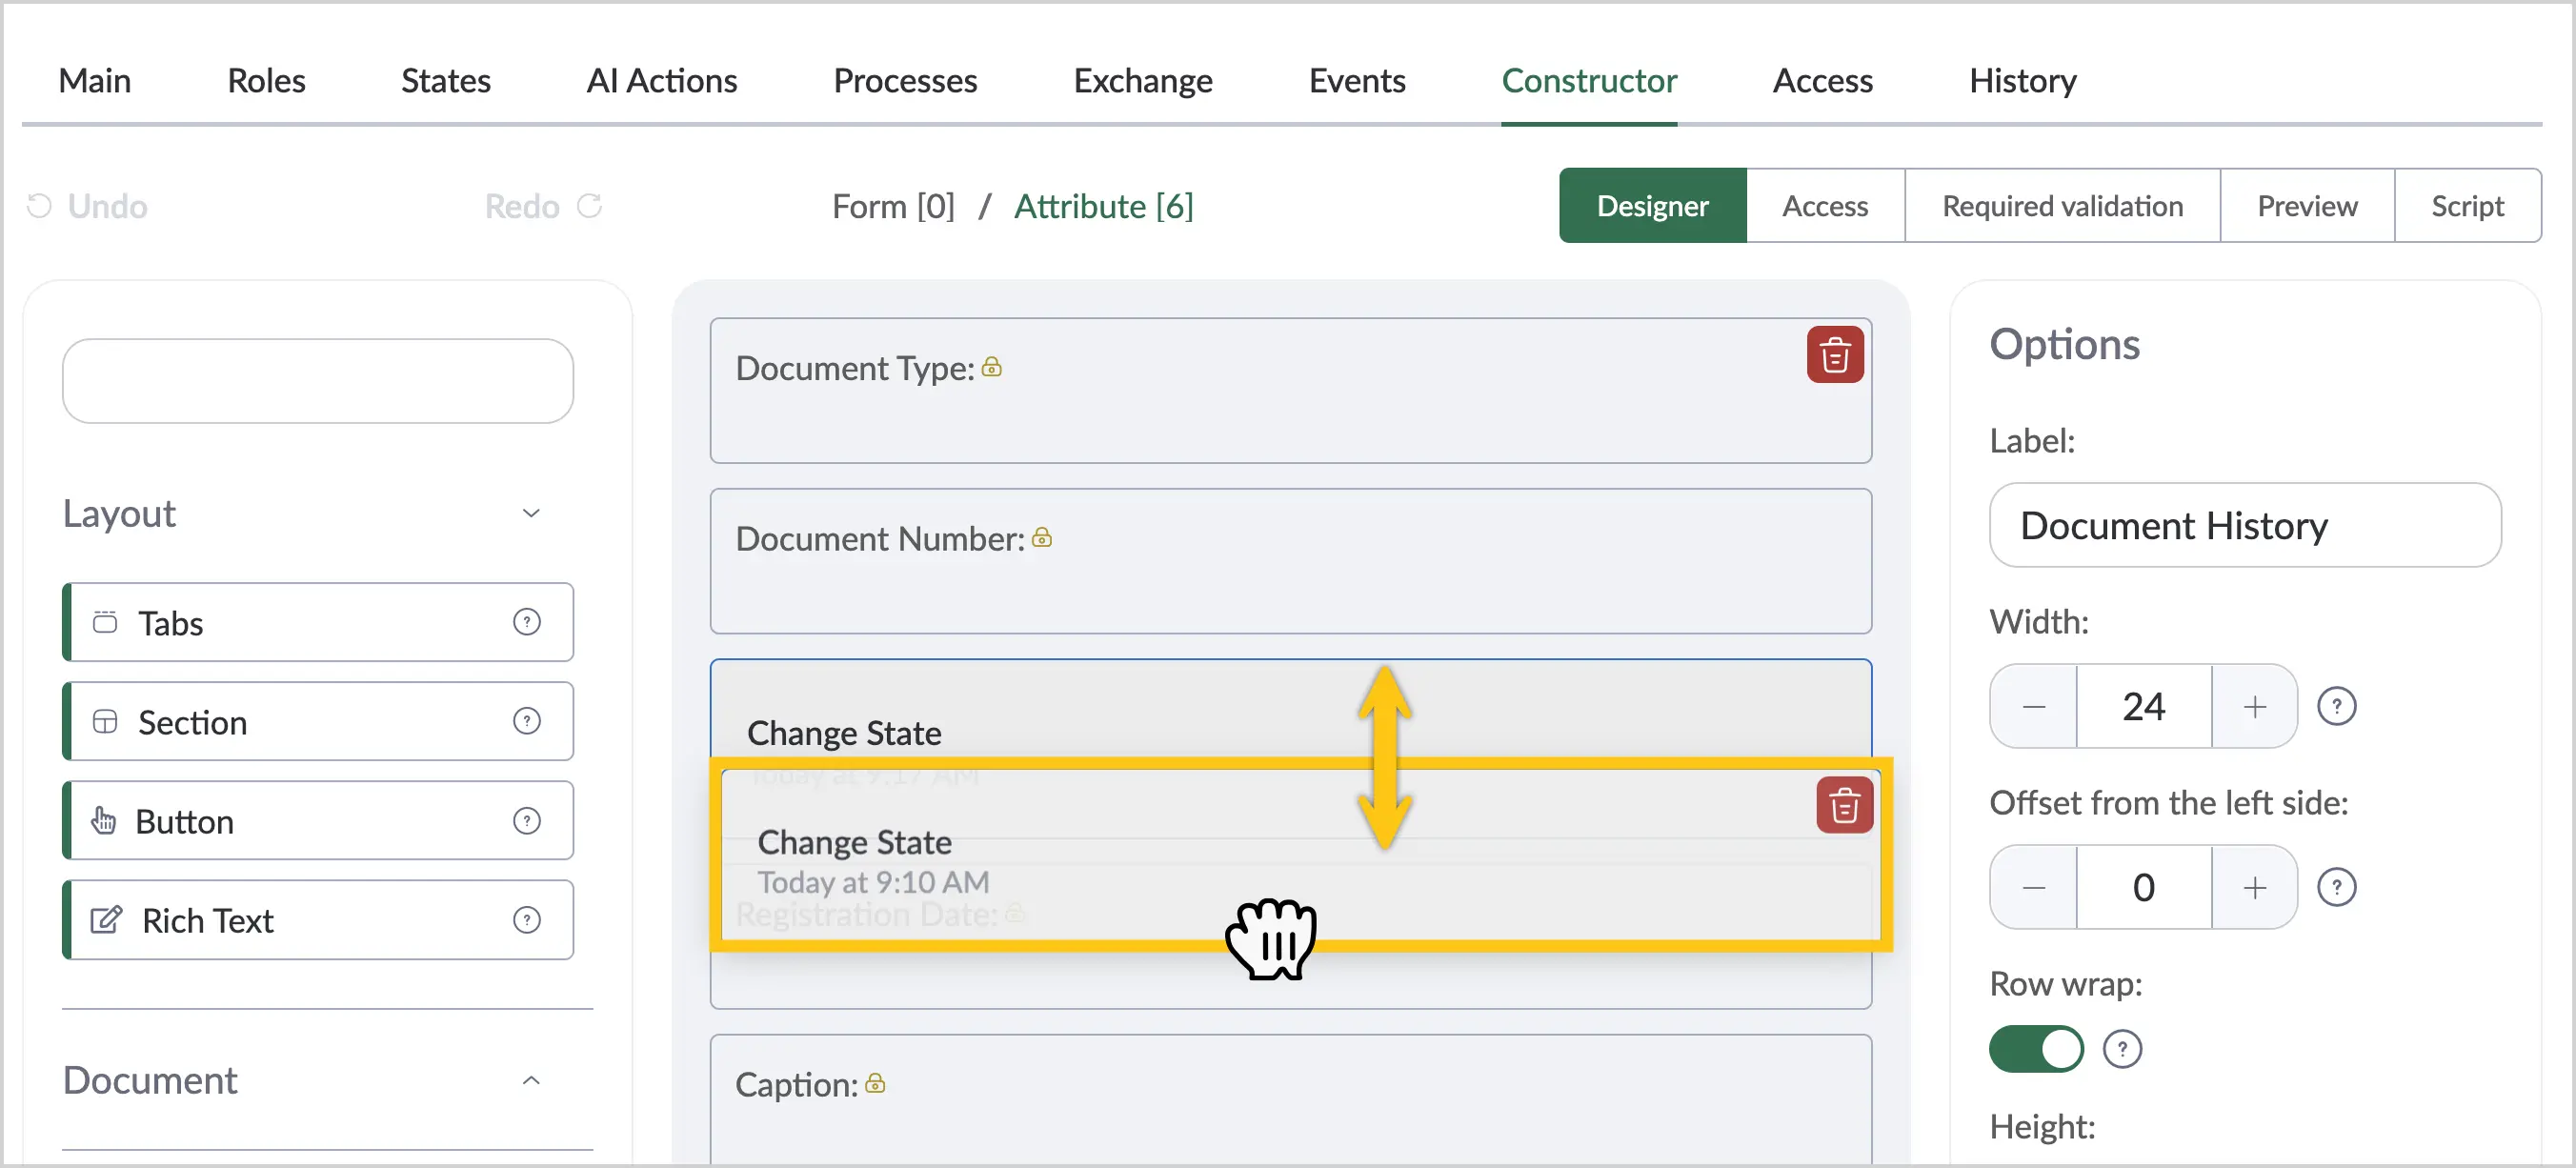
To change the position of an attribute, click the required attribute and, holding the left mouse button, drag it to the desired location.
-
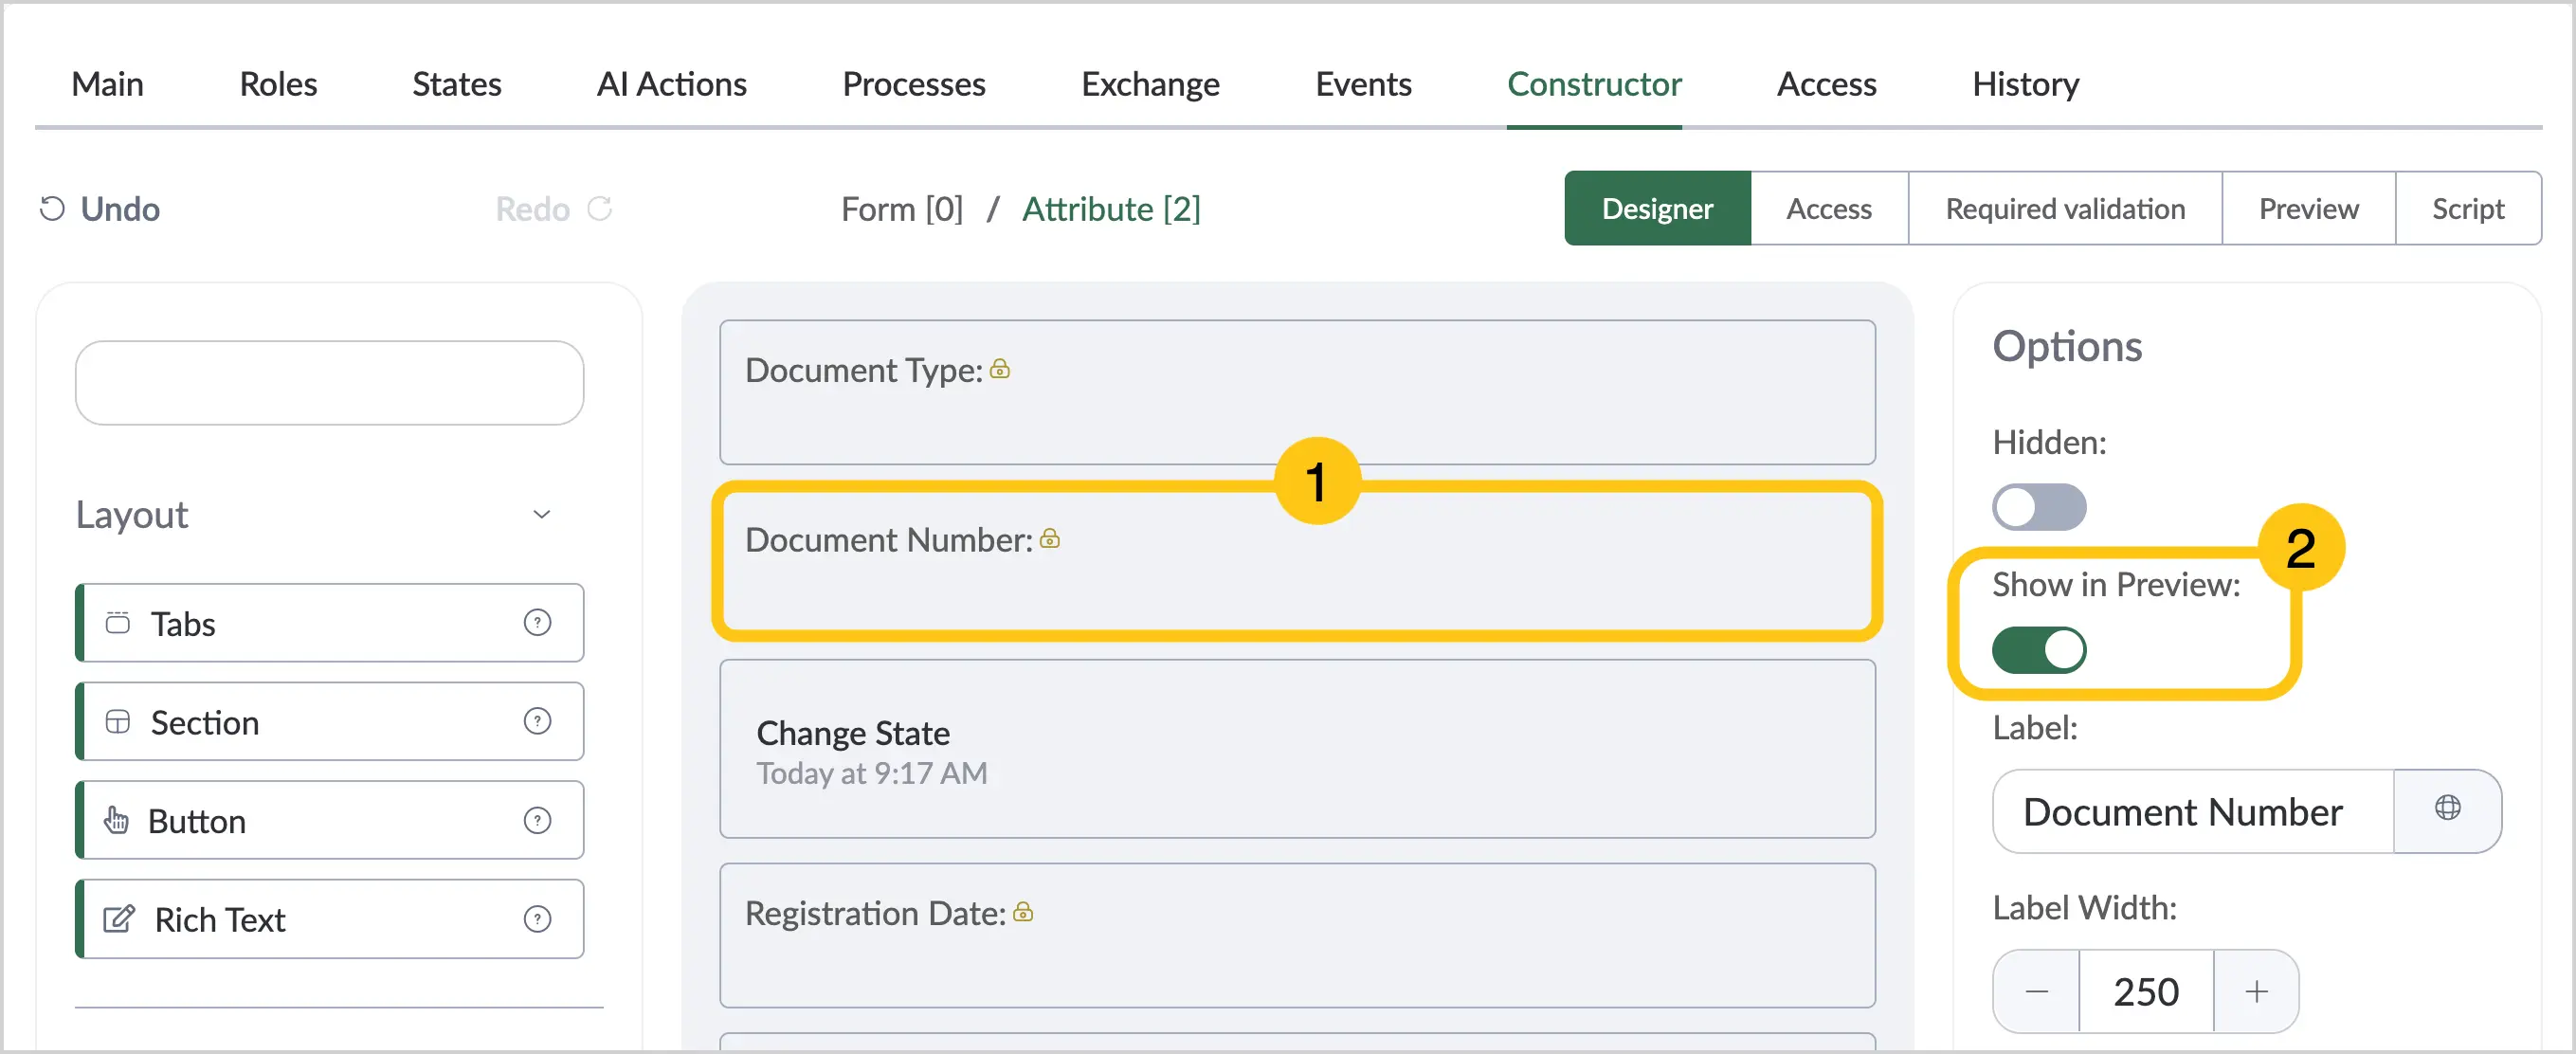
You can also configure which attributes will be displayed in the preview in the Details tab:
- 1 Select the attribute on the form that you want to display in the viewer.
- 2 In the Settings menu, enable the Display in preview form toggle.
When constructing a document, you can use attributes from different groups to avoid duplicating attributes.
Note:When the same attribute is added to the form, it is duplicated, and subsequently, when filling in the document, its values are duplicated as well.
-
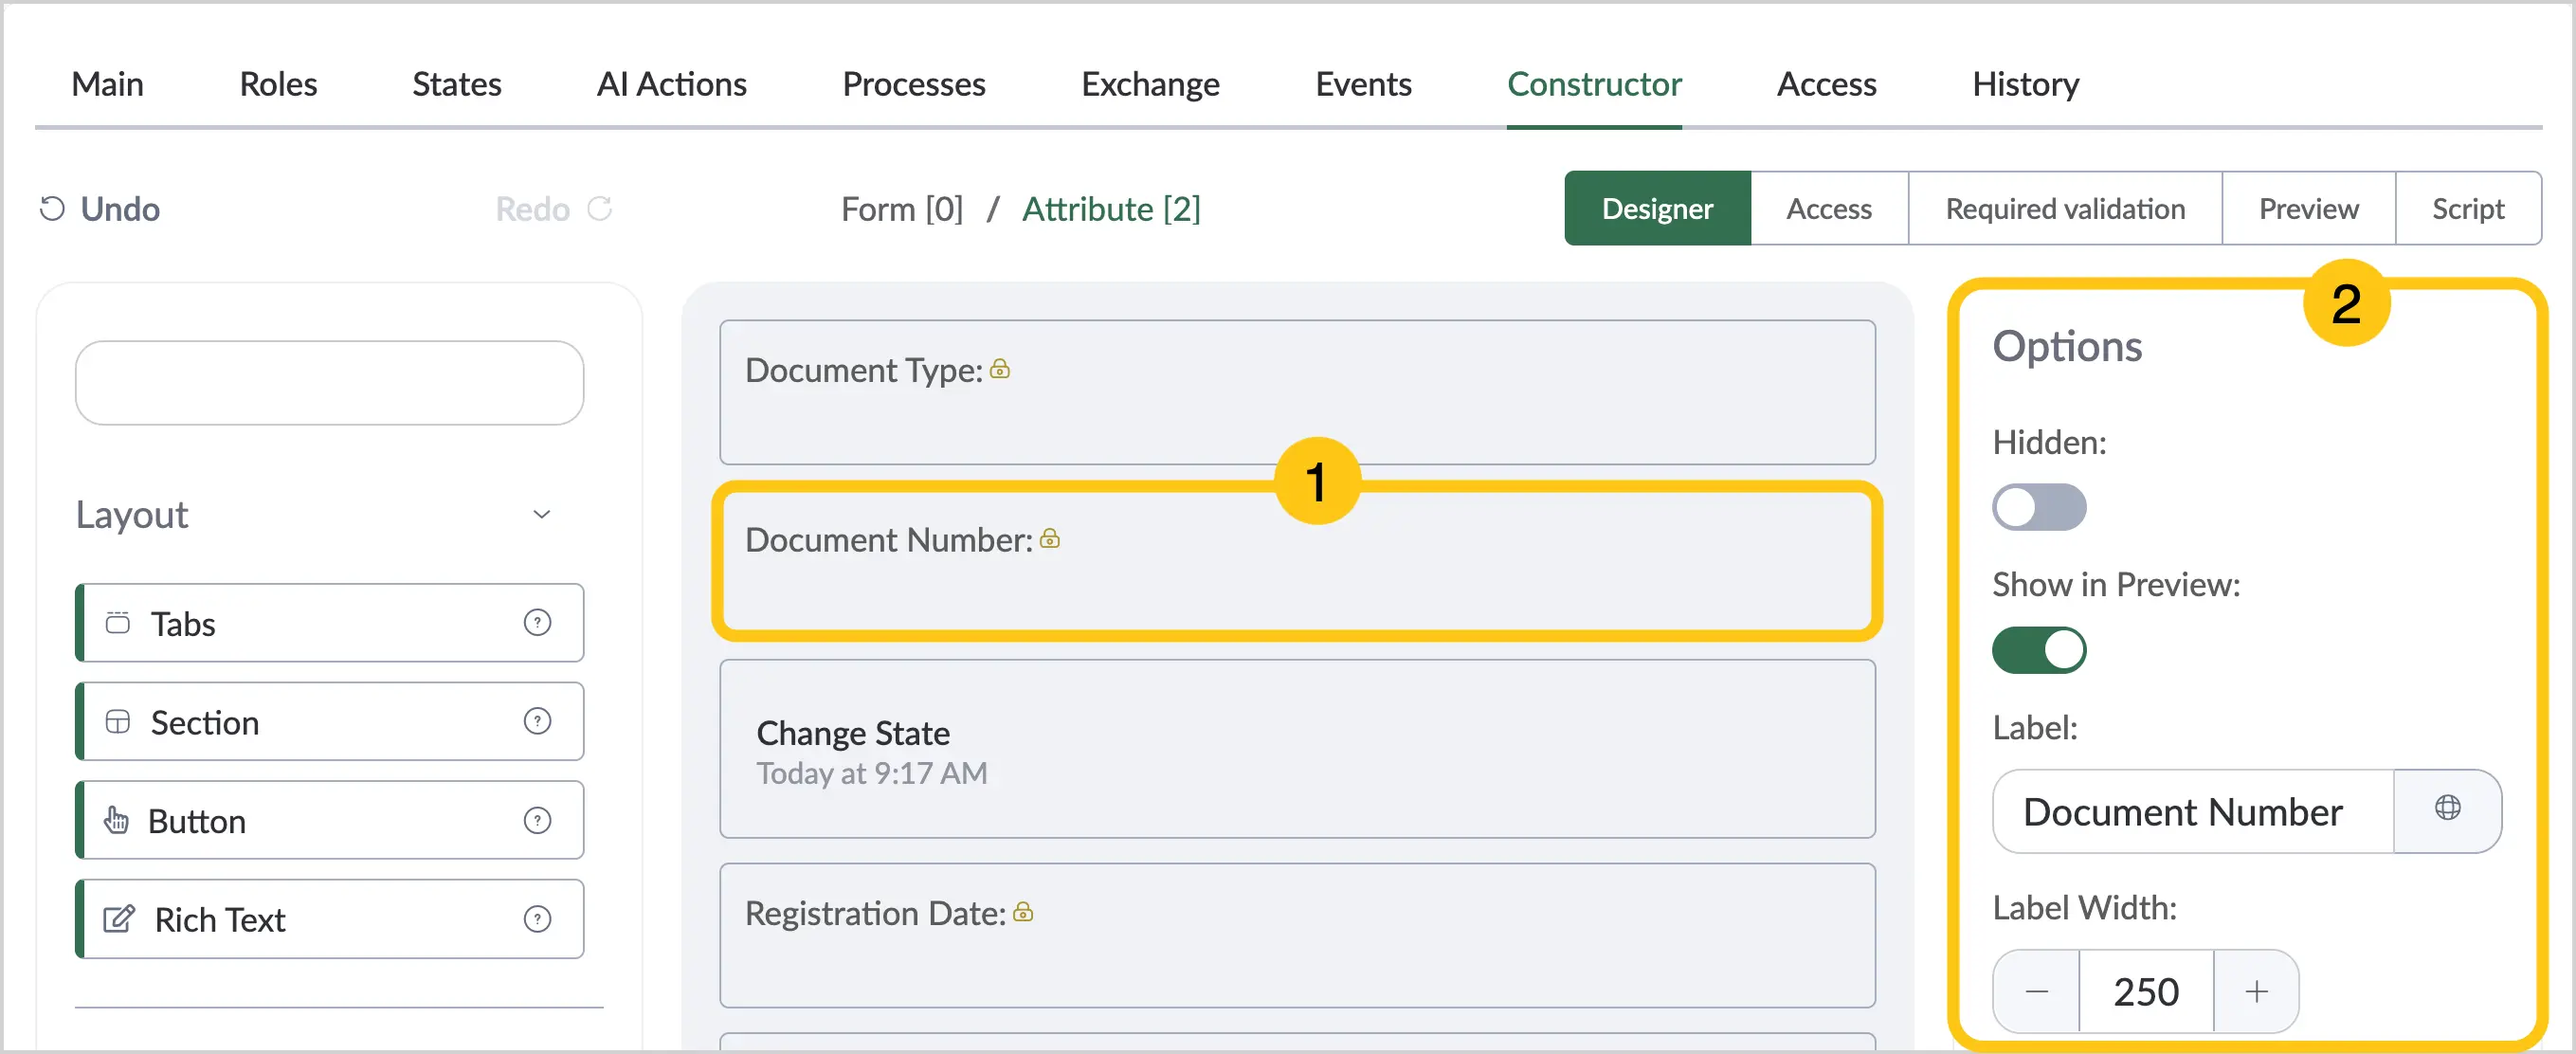
To configure each of the added attributes, go to the Settings menu to the right of the document form. To do this:
- Click the required attribute 1.
- Select the desired settings in the Settings panel 2.
- Use the hints from the section corresponding to the type of the added attribute:
 Tip:
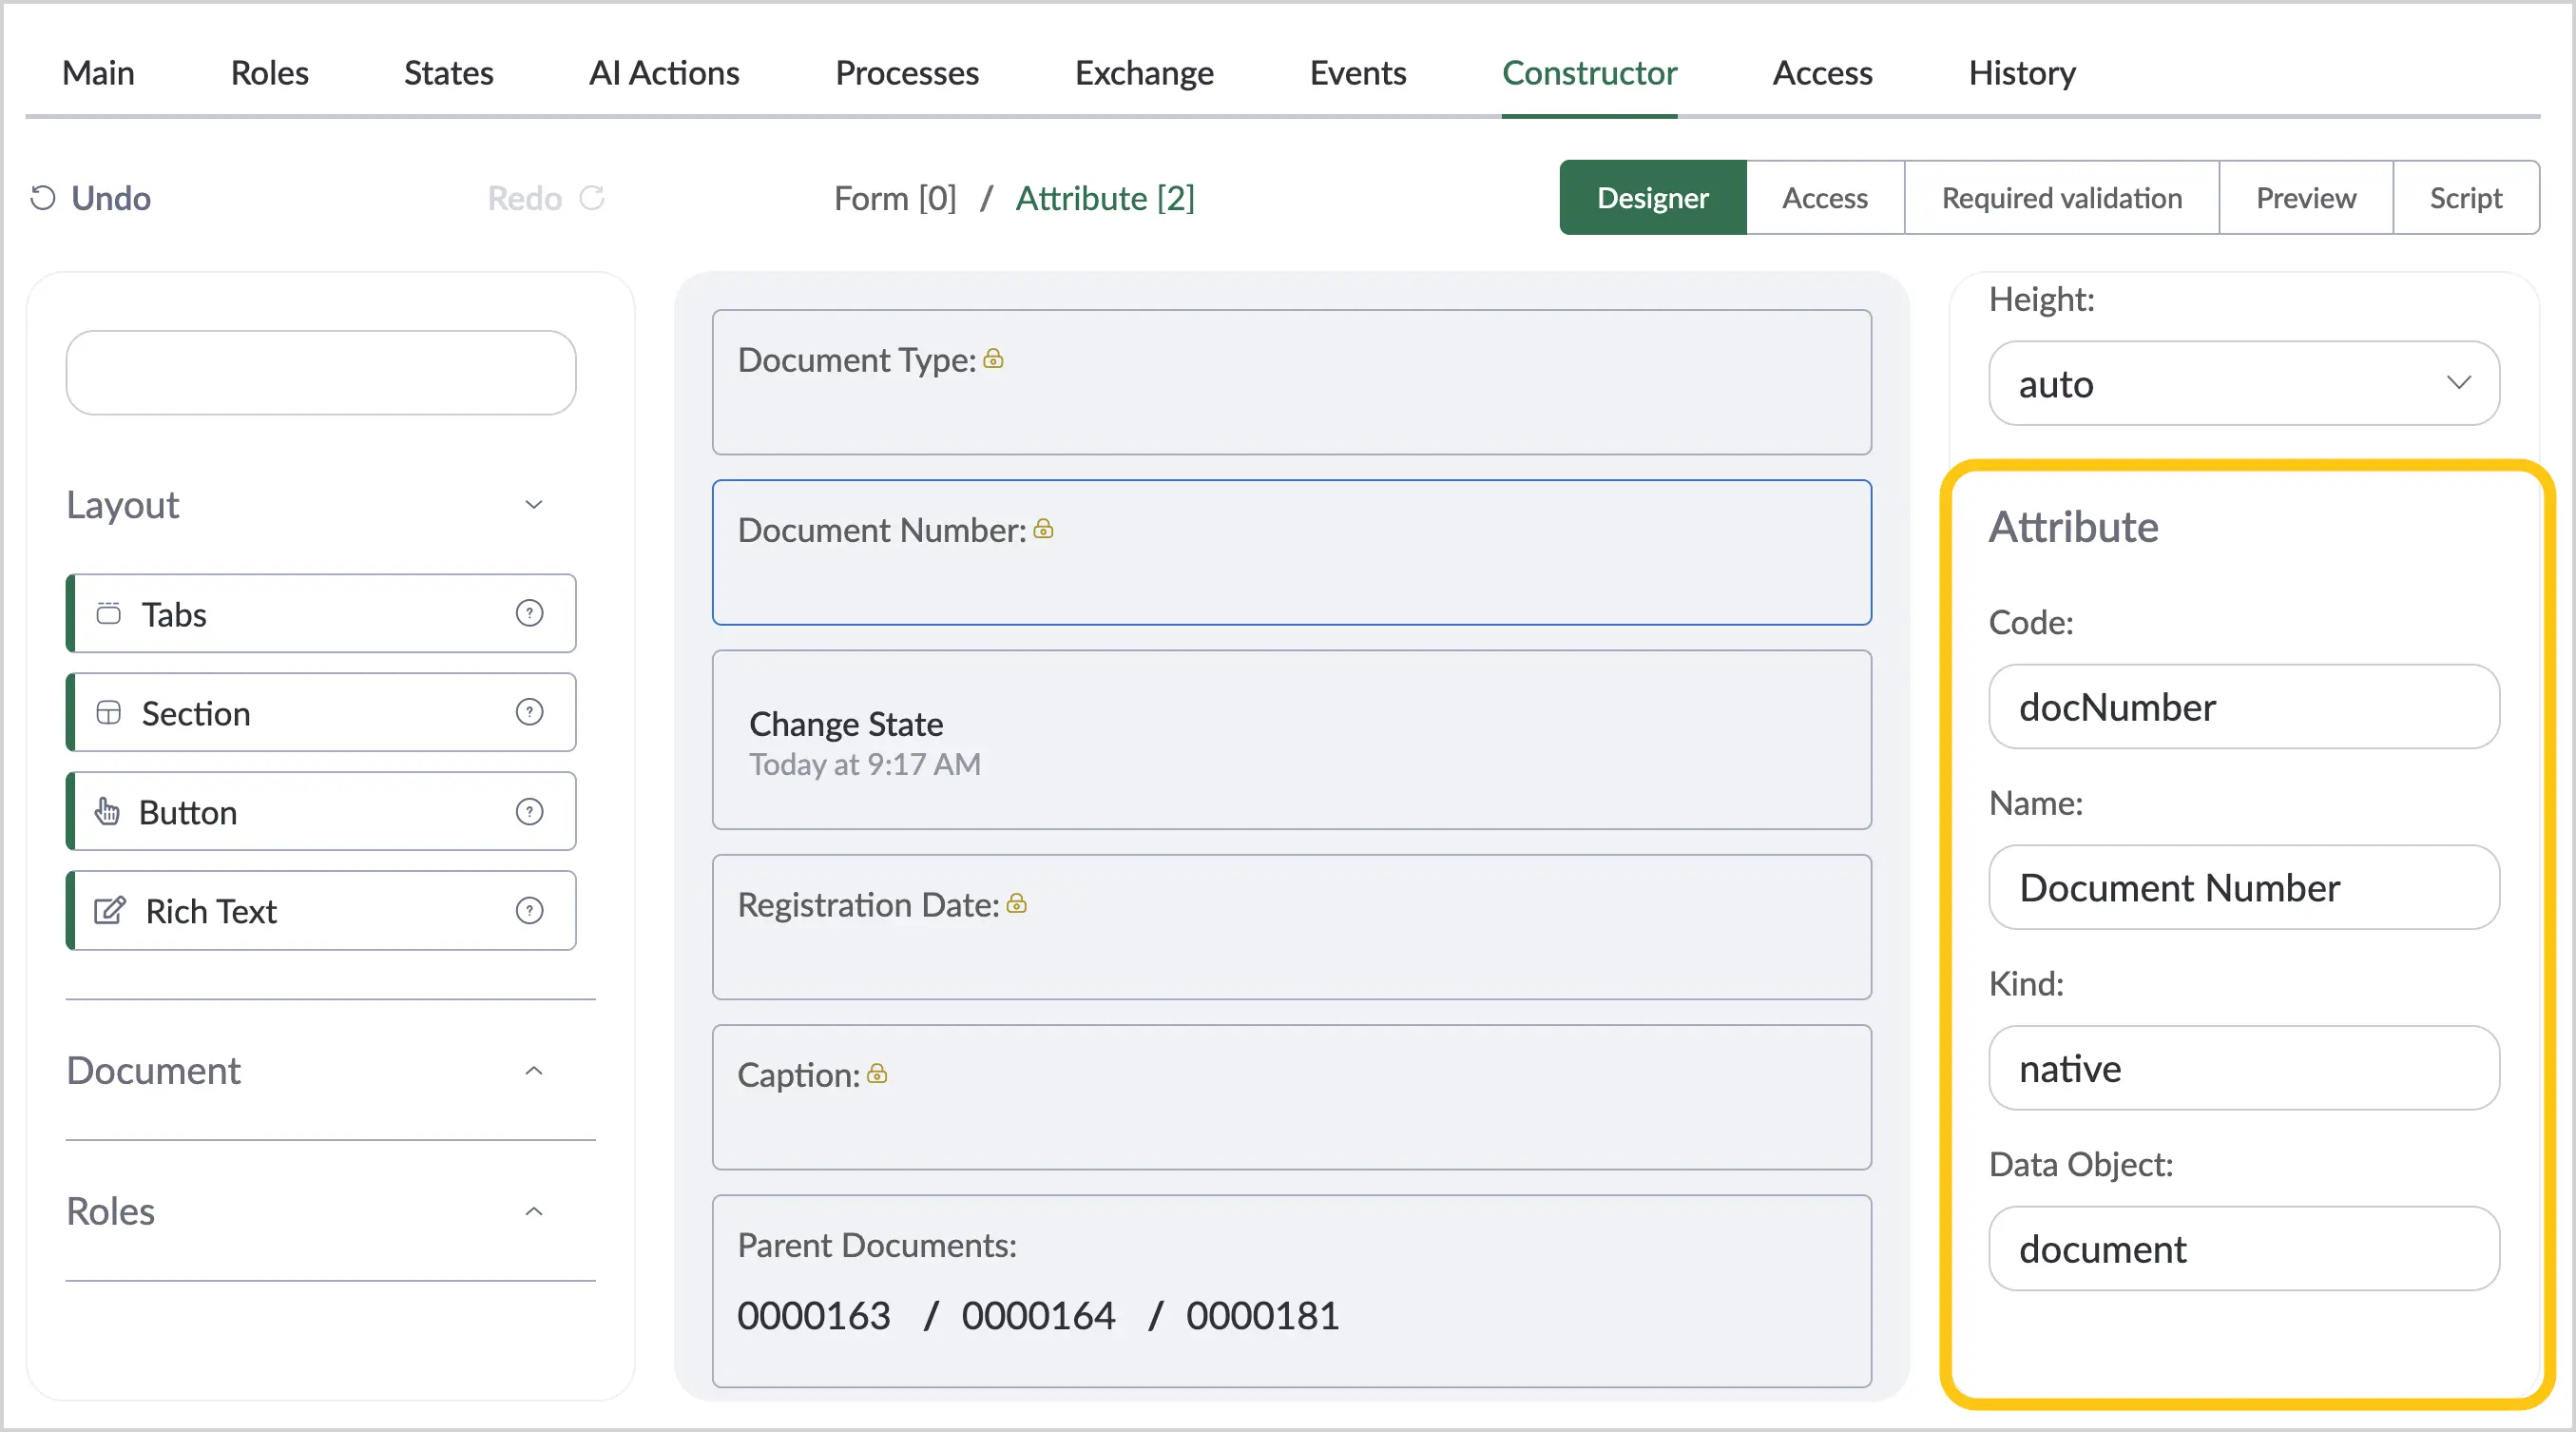
Tip:Also pay attention to the Attribute section in the settings panel. It contains the following attribute parameters:
- Code
- Name
- View
- Data object
- Generate script
- Element ID
-
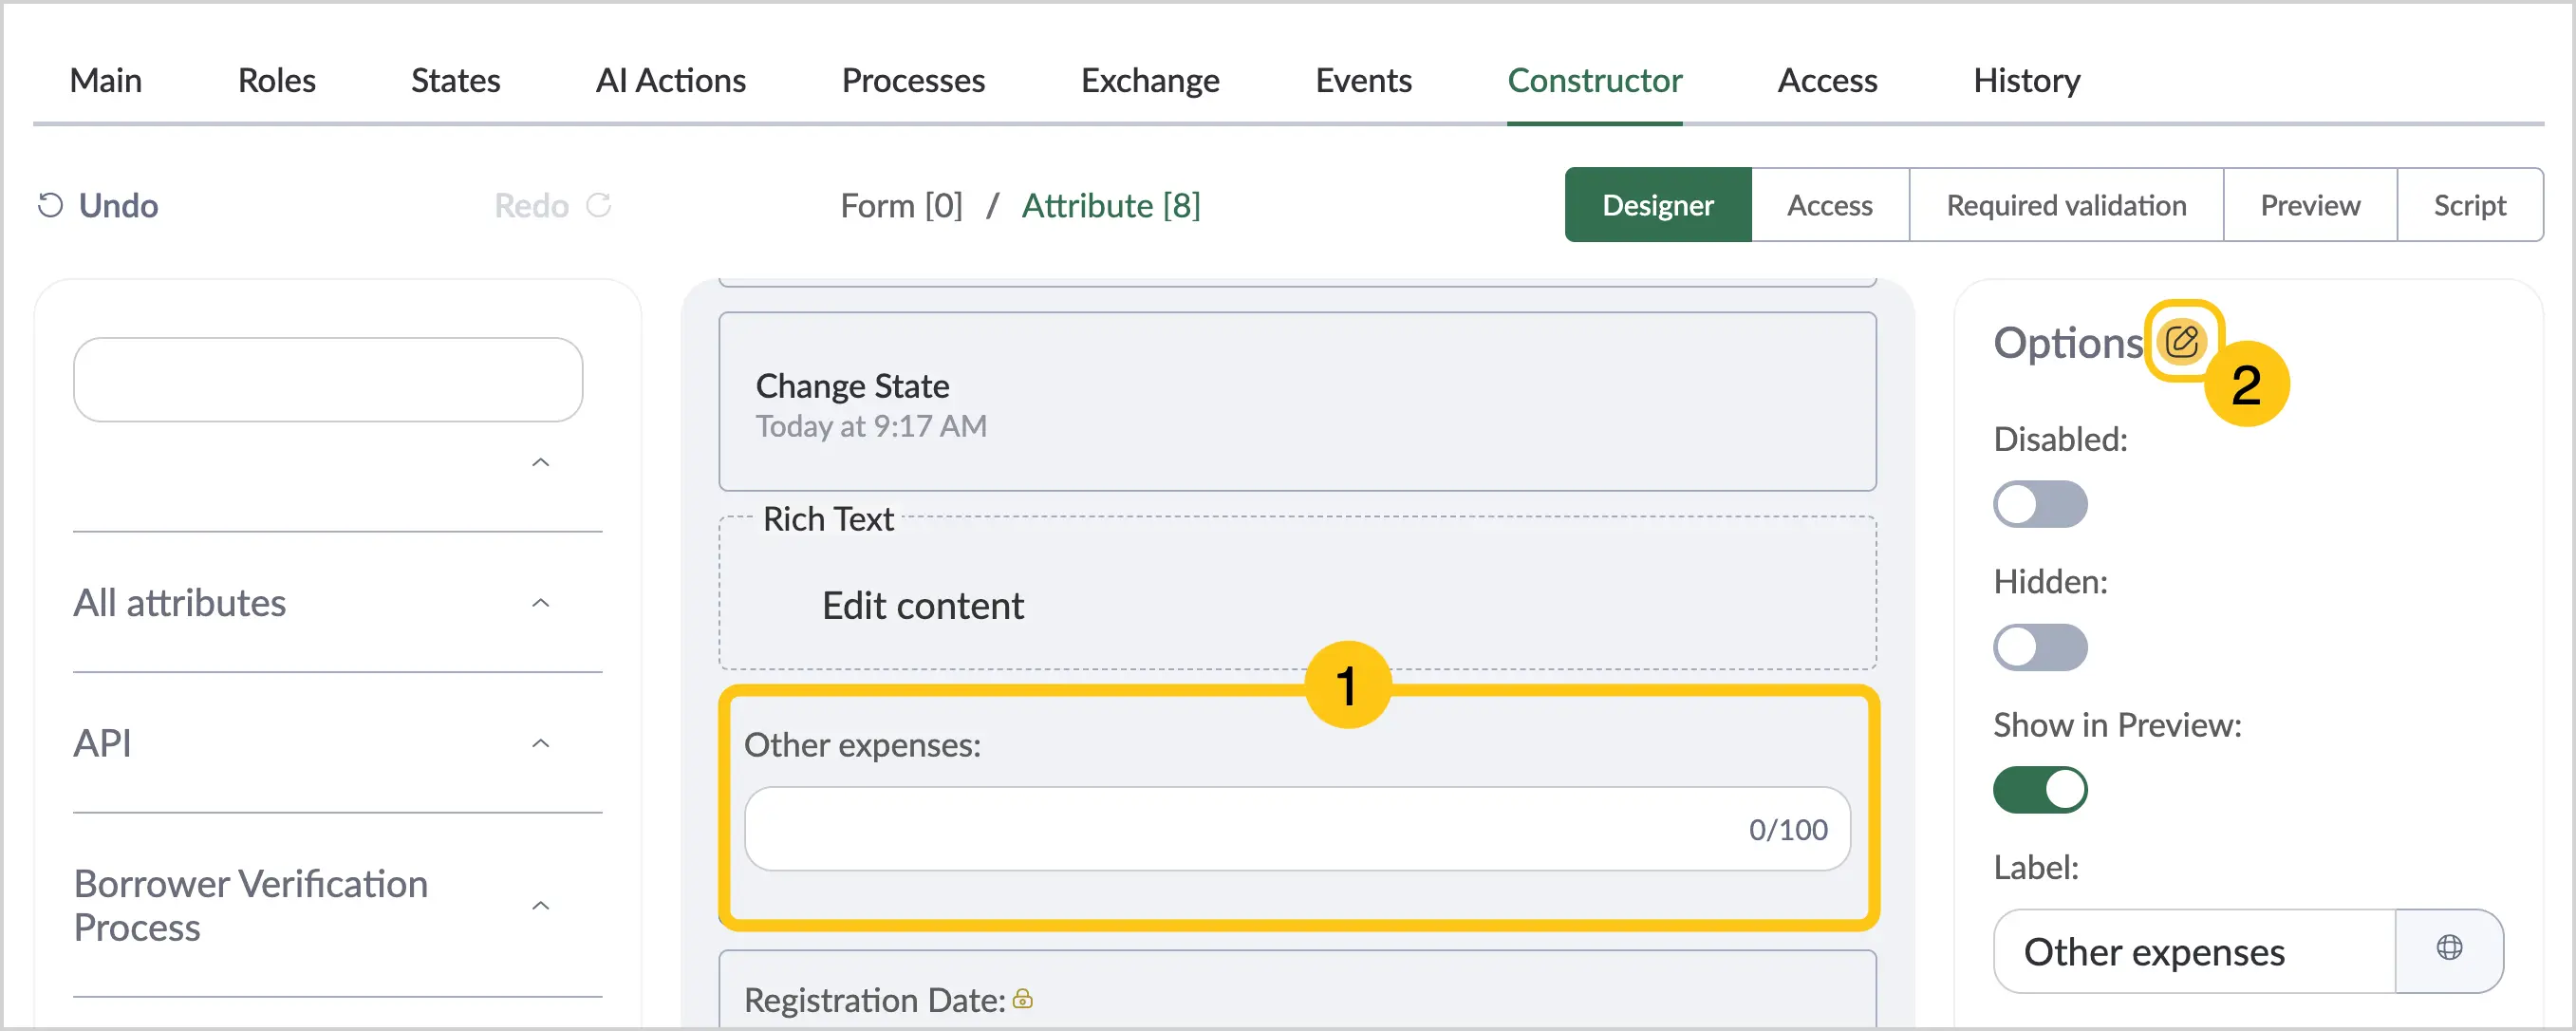
To edit the settings in the Attribute section, select the required attribute 1, then in the Settings panel, select the icon 2.
 Note:
Note:Settings can only be changed for custom attributes. This is not available for standard ones.
-
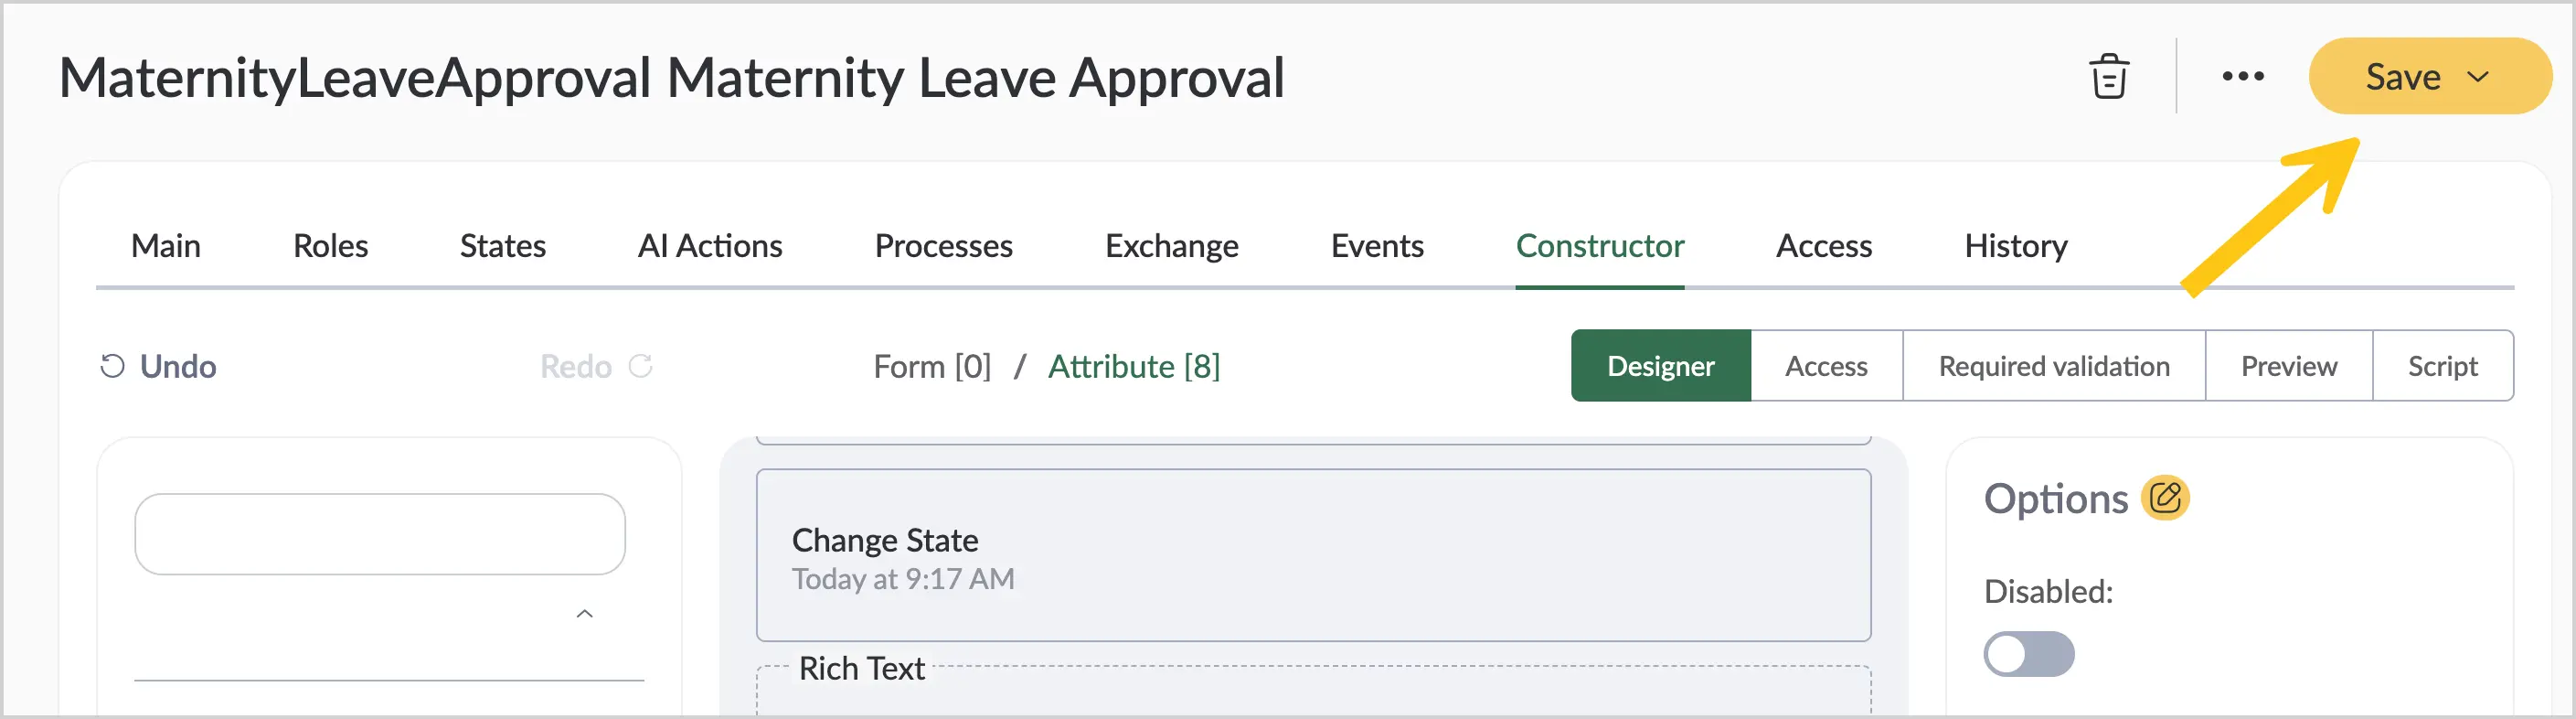
In the toolbar, select Save , then continue the configuration in the Access mode (see section Access).
2.2.1.8.2. Access
For each attribute you can configure the access level depending on the user's role or the document state. To do this, follow these steps:
-
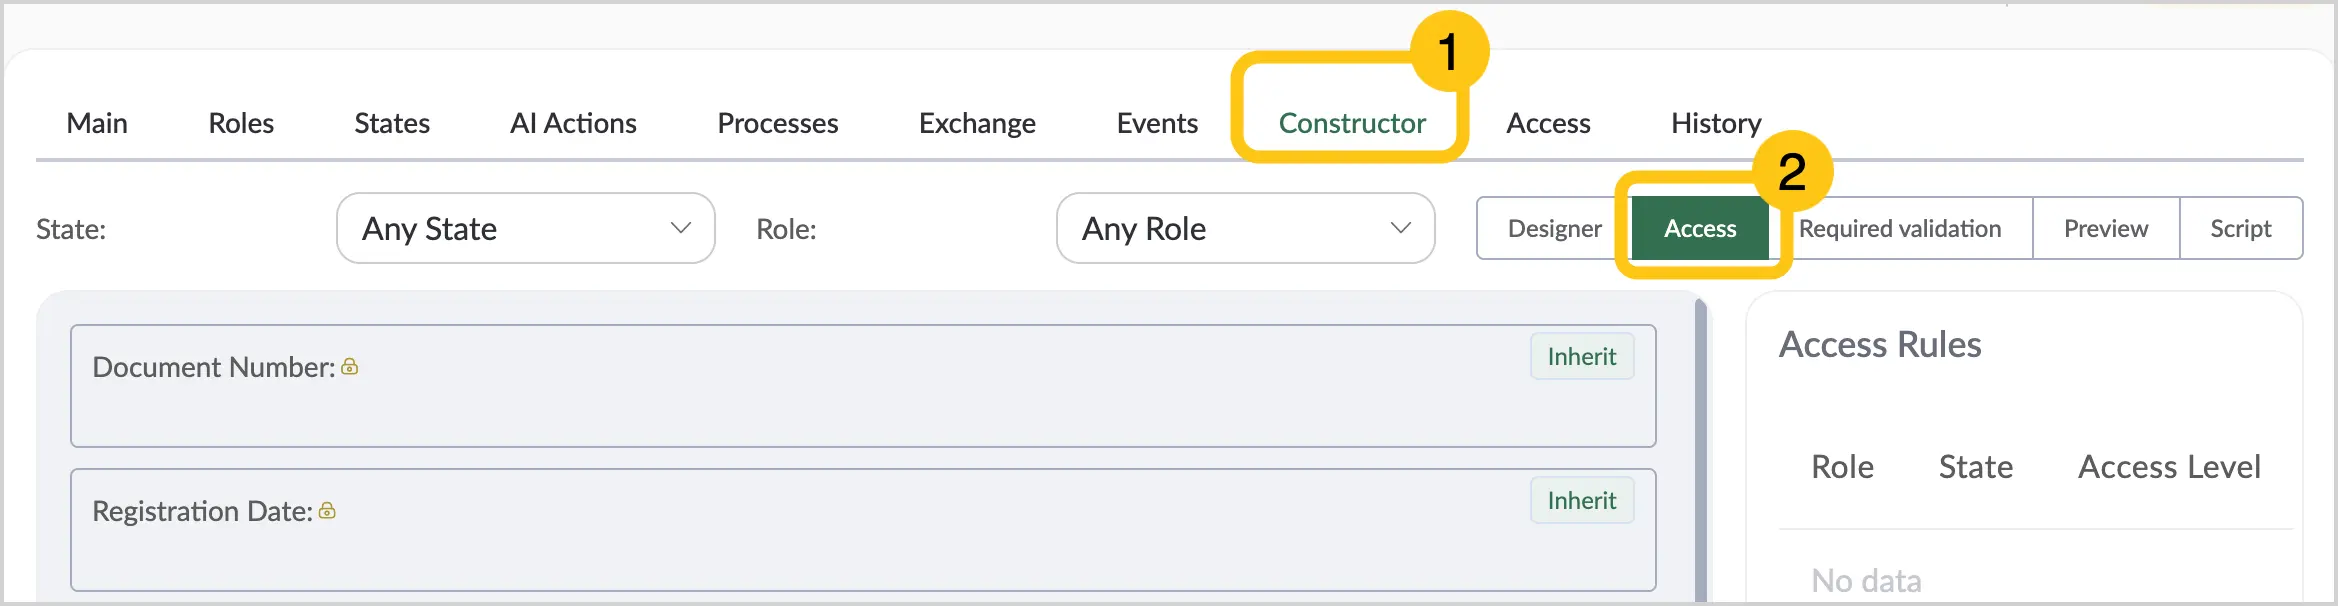
In the Constructor tab 1, go to the Access mode 2.
-
In the top panel, in the State field 1, select the required document state for which you need to configure access, then in the Role field 2, select the required role for which you need to configure access.
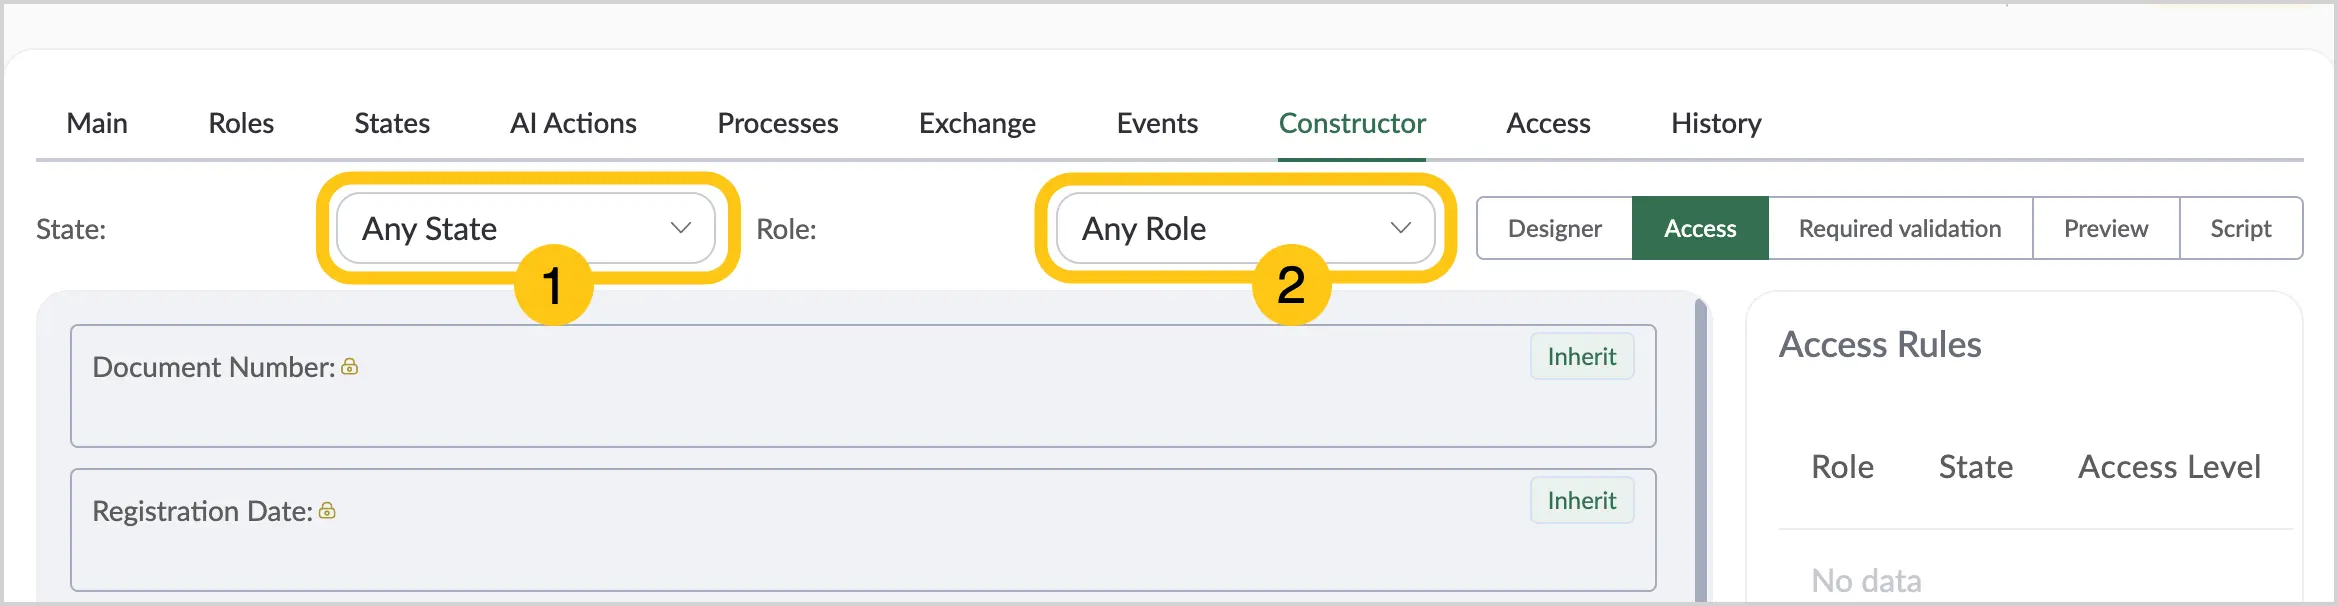 Note:
Note:If you have multiple roles or states with the same names, you can distinguish them by the code displayed in brackets next to the role or state name. You can also start typing the required role or state by its name or description to narrow the search results.
-
Hover over the attribute, section, or tab whose access you want to configure, then select the required setting option. (see the option descriptions in the table below)
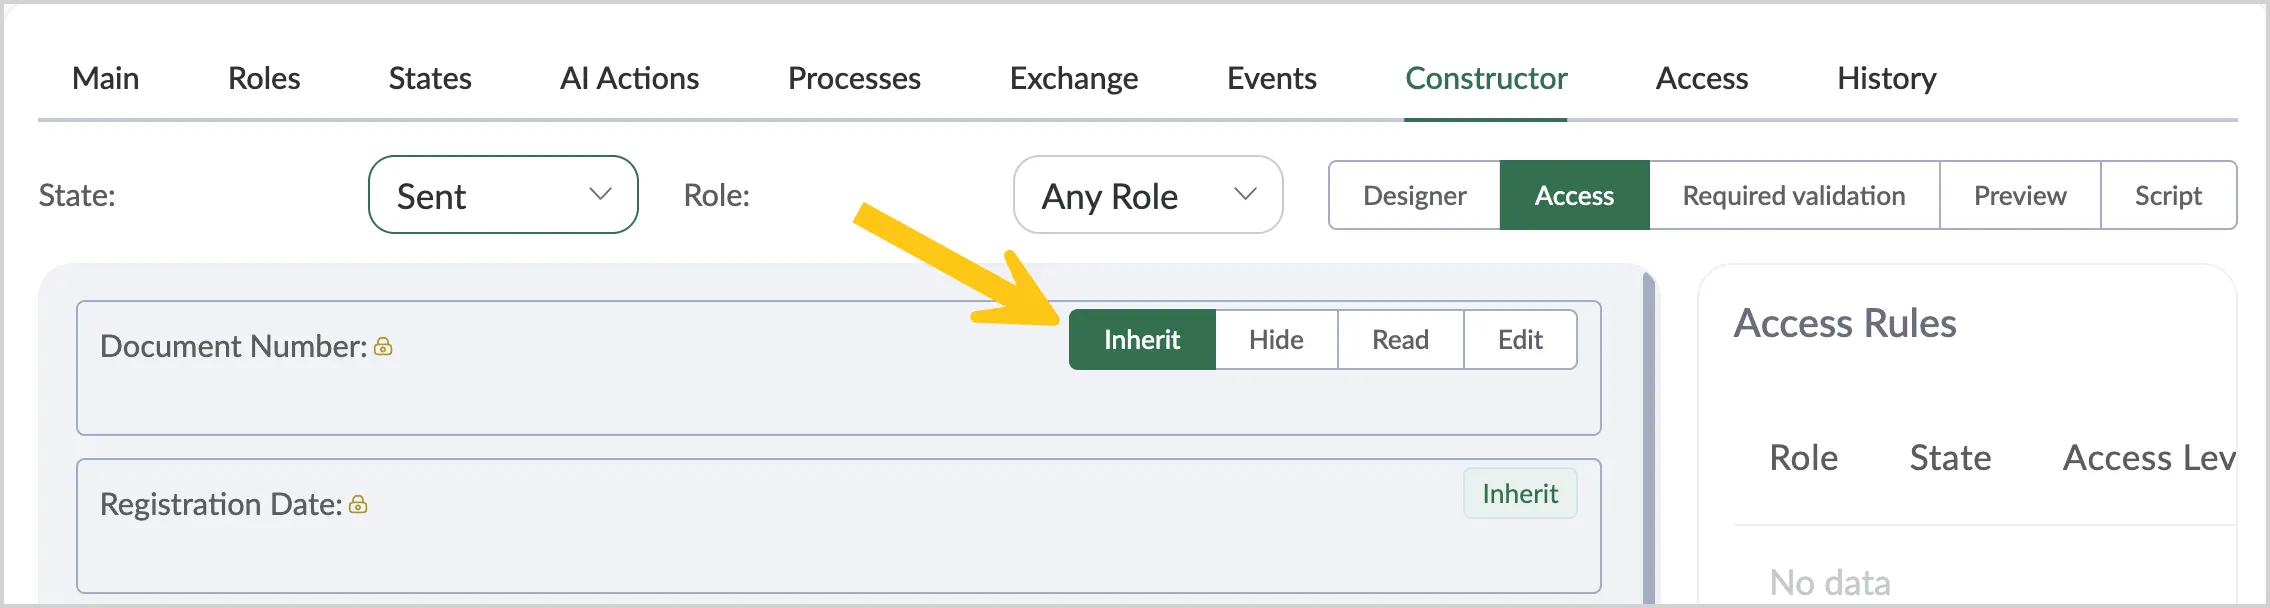
| Button name | Description |
|---|---|
| Inherit | Access is inherited from the top-level form attribute. For example: if several attributes are placed inside a Section, you can configure the section's access, which all attributes inside will inherit. |
| Hide | Allows hiding the field from users — depending on the role or document state. |
| View | The field is displayed for viewing without the ability to edit. |
| Edit | The field is available for editing. |
- In the toolbar, select Save , then continue the configuration in the Required validation mode (see section Required validation).
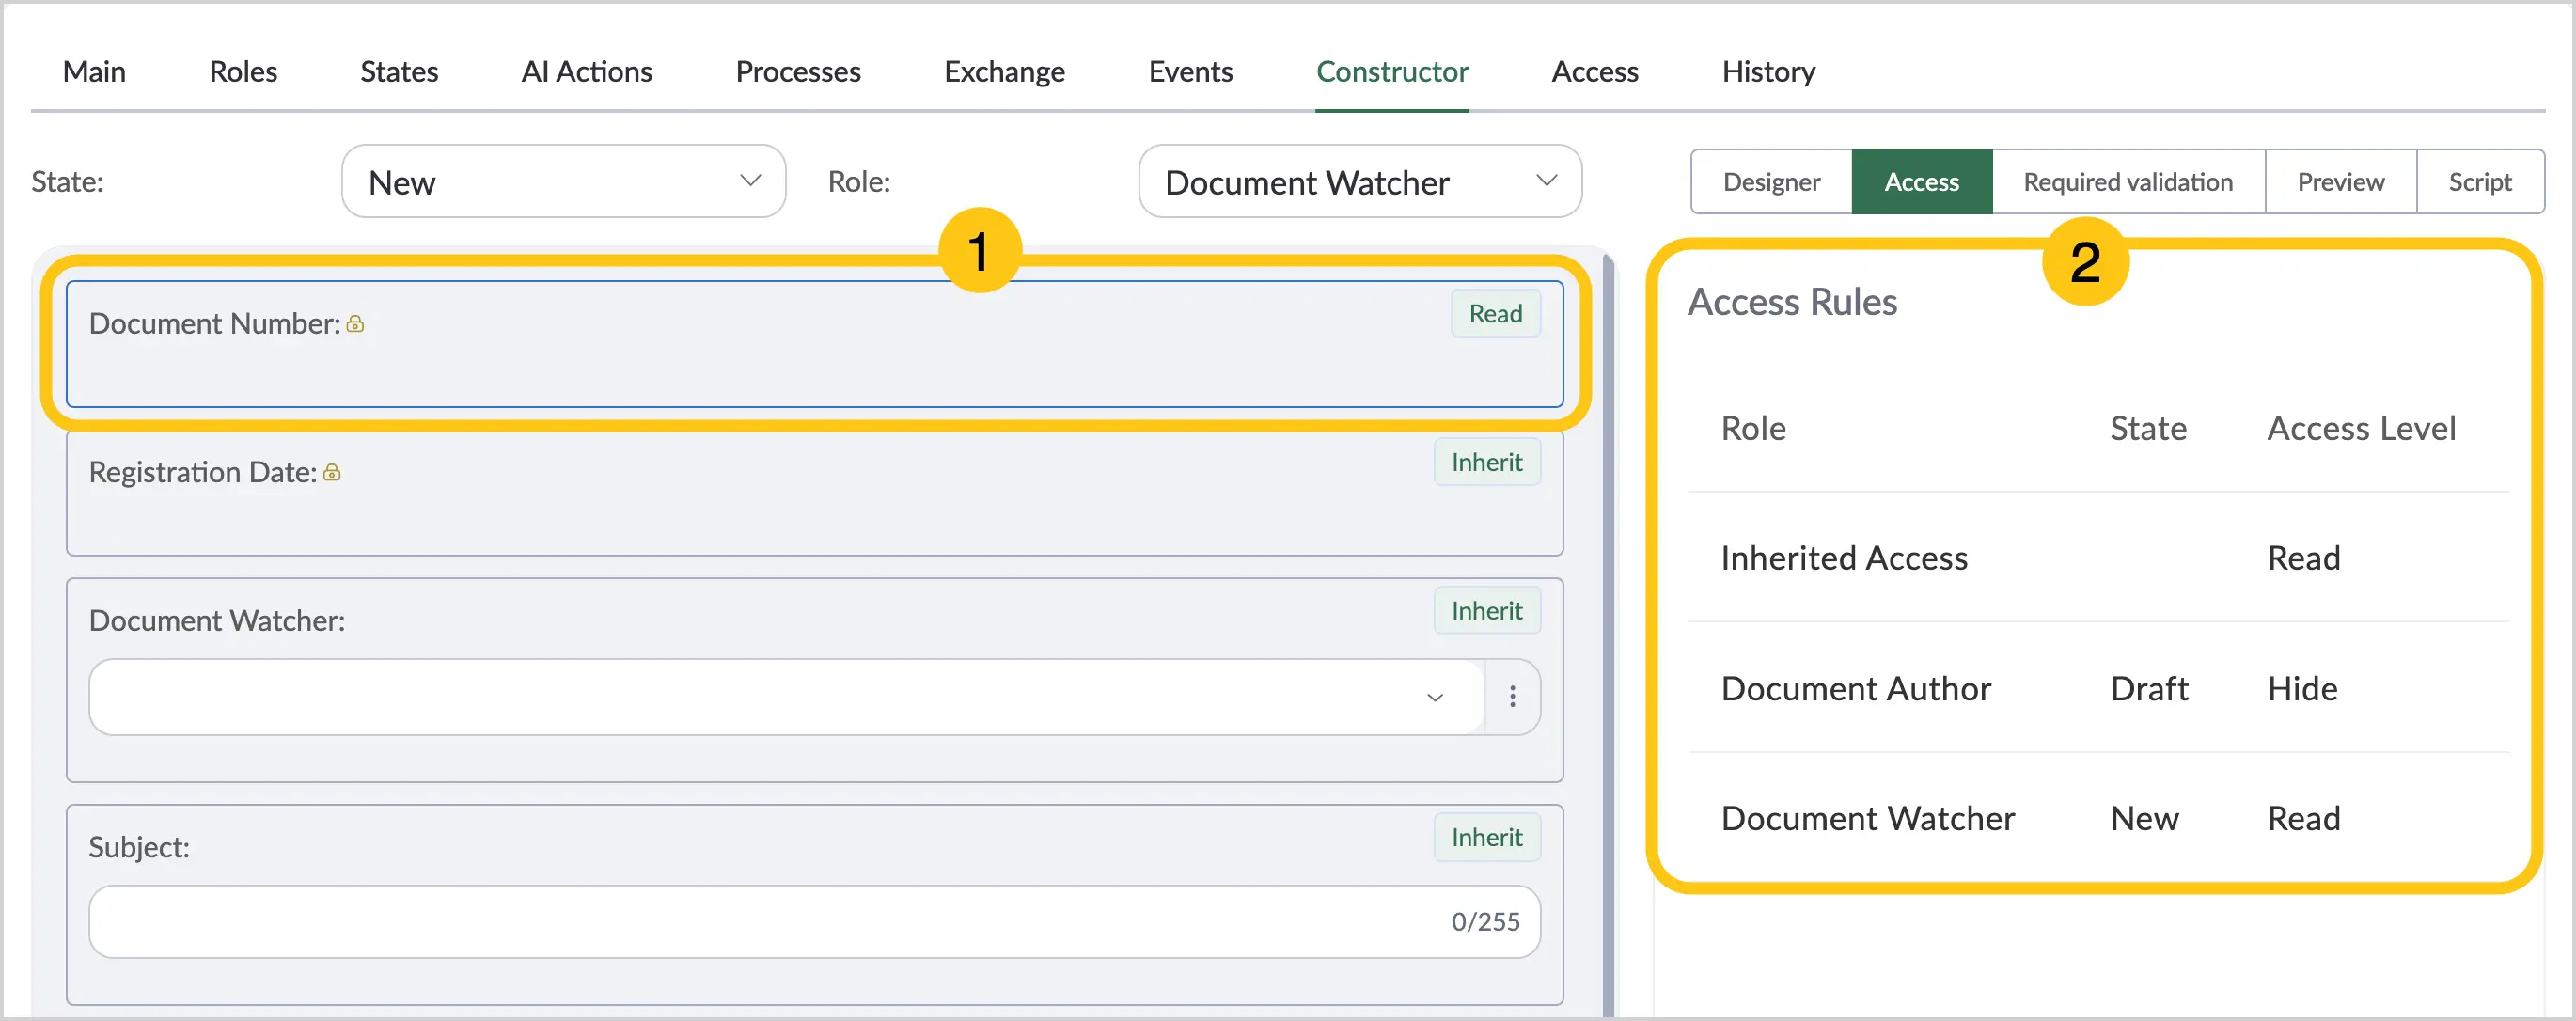
To view all access permissions granted to an attribute, select the attribute and then review the Access rules panel. The panel contains all information about the access levels for this attribute for all roles and document states.
2.2.1.8.3. Required validation
For each attribute you can configure mandatory fill rules depending on the document state or action. To do this, follow these steps:
-
In the Constructor tab 1, go to the Required validation mode 2.
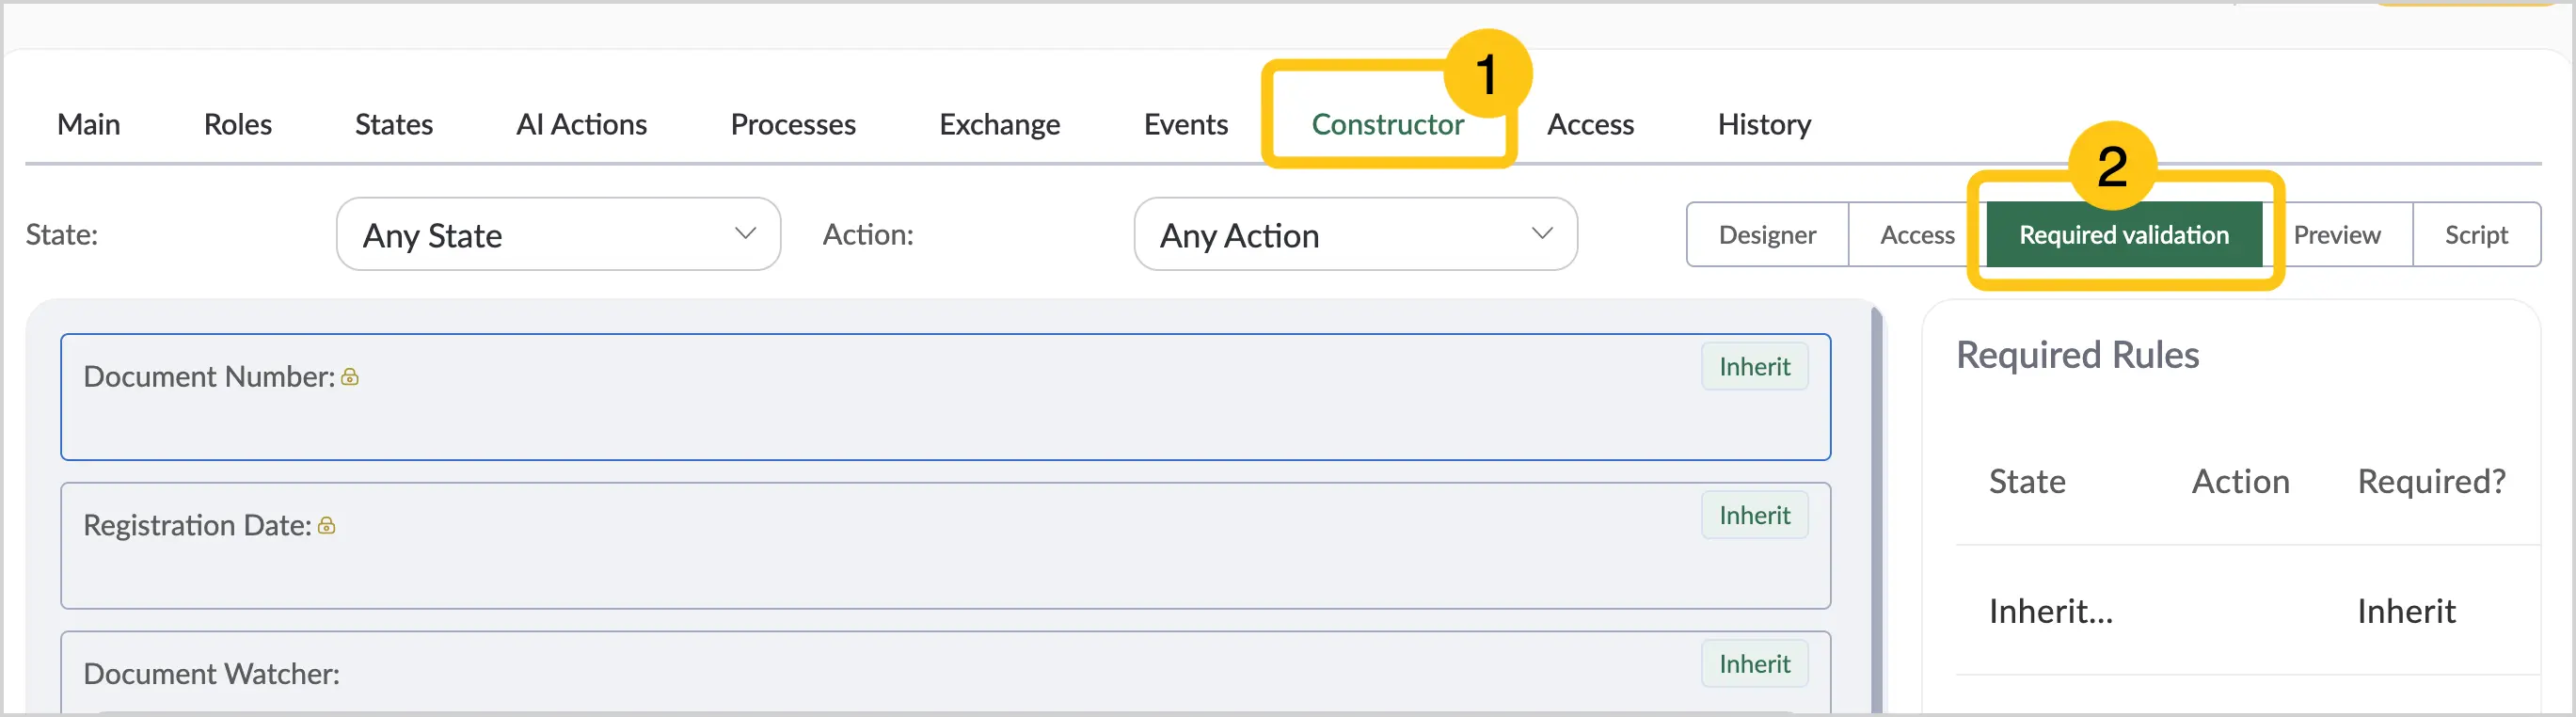
-
In the top panel, in the State field 1, select the required document state for which you need to configure mandatory filling, then in the Action field 2, select the required action.
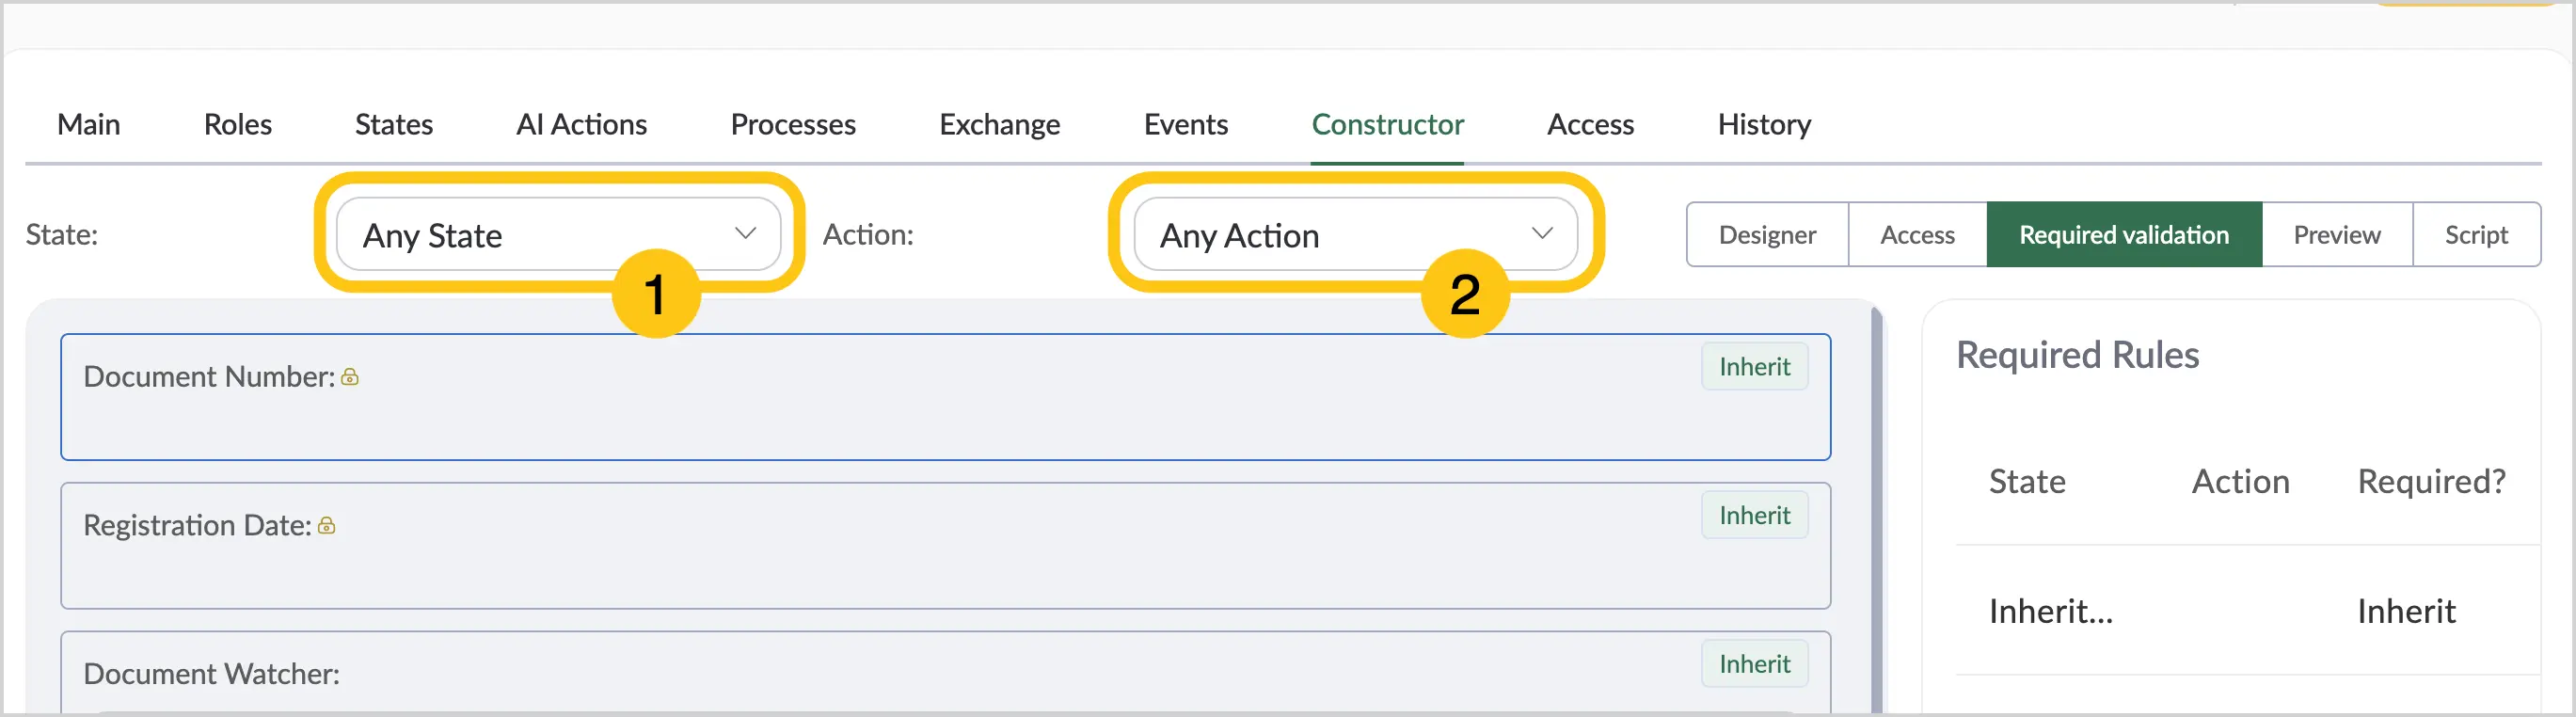 Note:
Note:If you have multiple states or actions with the same names, you can distinguish them by the code displayed in brackets next to the state or action name. You can also start typing the required state or action by its name or description in the corresponding field to narrow the search results.
-
Hover over the attribute, section, or tab whose mandatory setting you want to configure, then select the required setting option. (see the option descriptions in the table below)
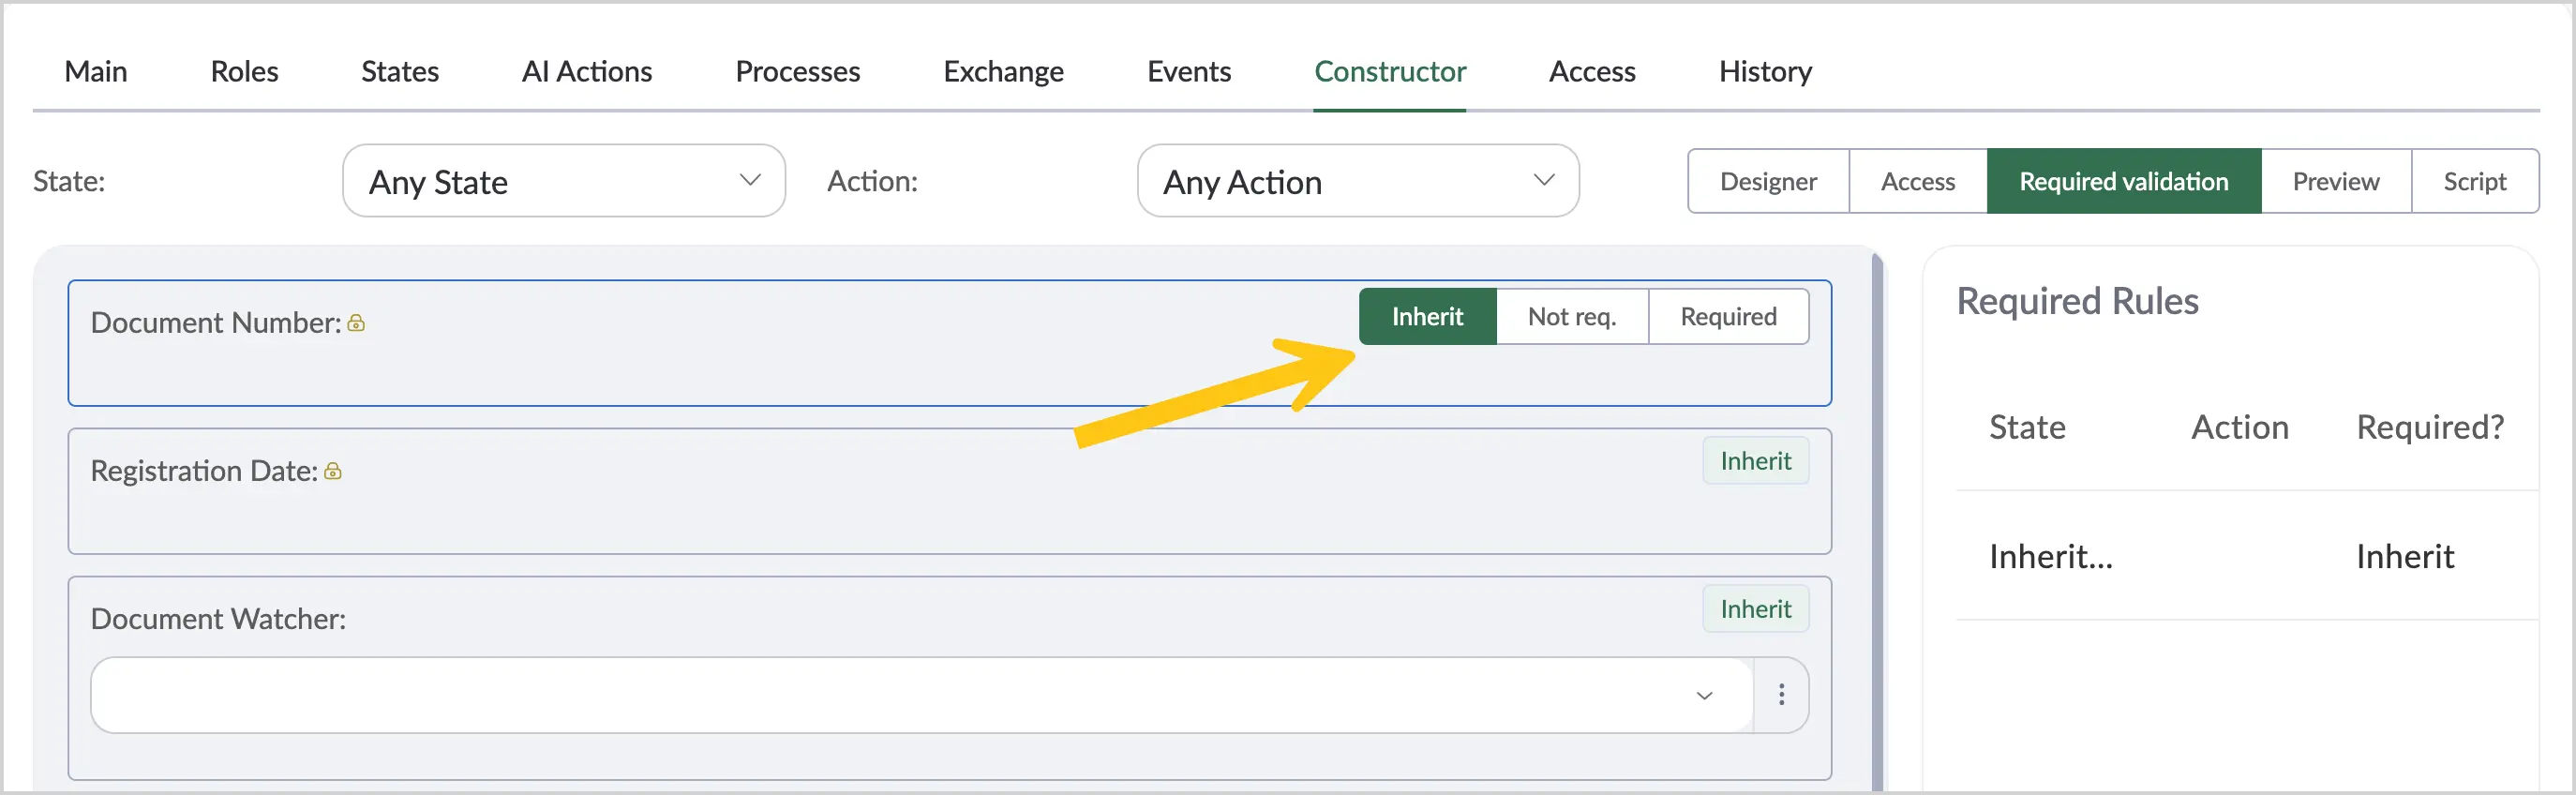
| Button name | Description |
|---|---|
| Inherit | The setting is inherited from the top-level form attribute. For example: if several attributes are placed inside a Section, you can configure the section's mandatory setting, which all attributes inside will inherit. |
| Not req. | The attribute is not required to be filled in. |
| Required | The attribute is required to be filled in. |
- In the toolbar, select Save , then continue the configuration in the Preview mode (see section Preview).
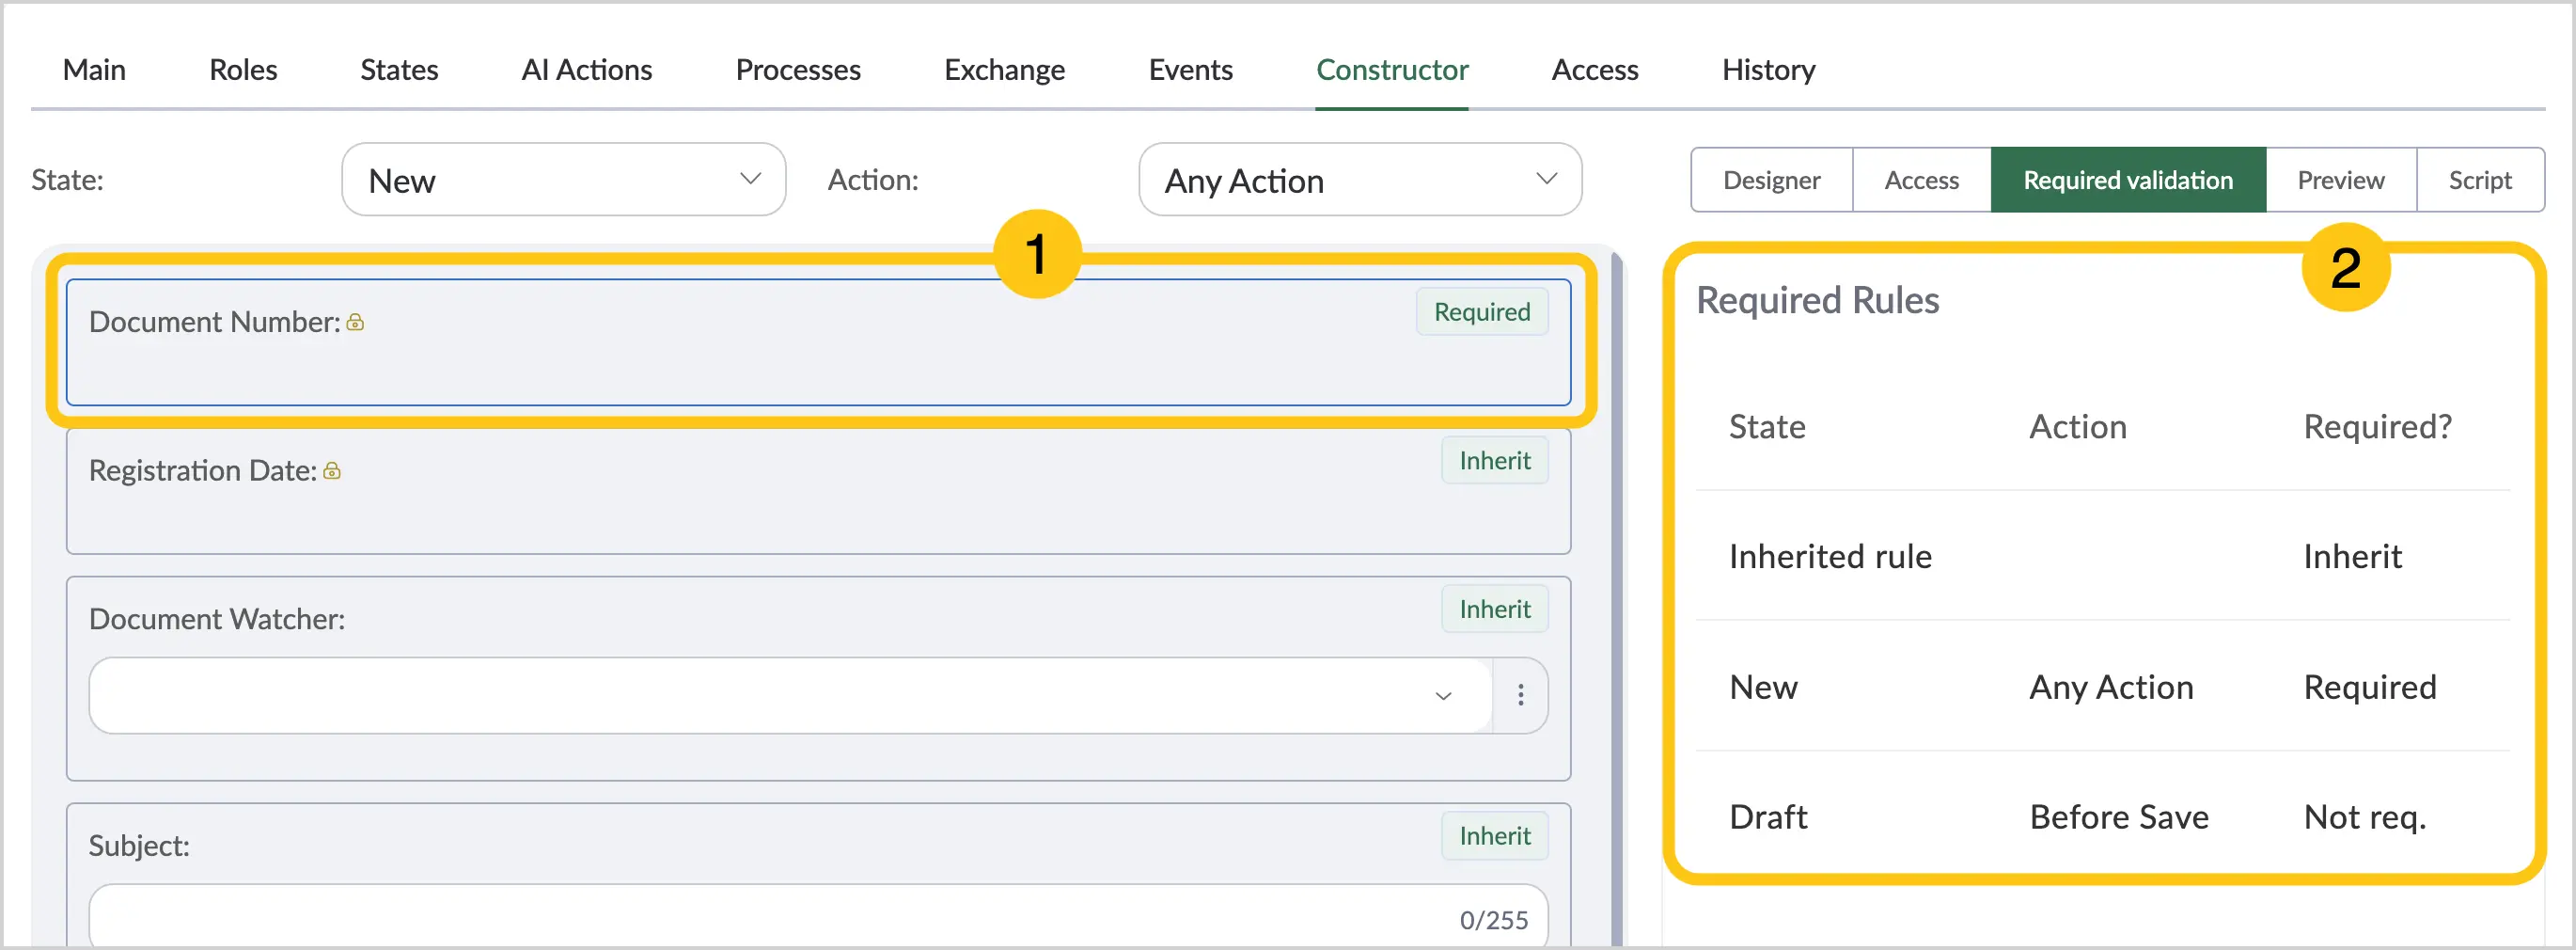
To view all mandatory rules assigned to attributes, select the required attribute 1, then review the Required rules panel 2 — it displays all requirement configurations for this attribute across document states and actions.
2.2.1.8.4. Preview
You can preview the created document form and its capabilities under defined states and roles. To do this, follow these steps:
-
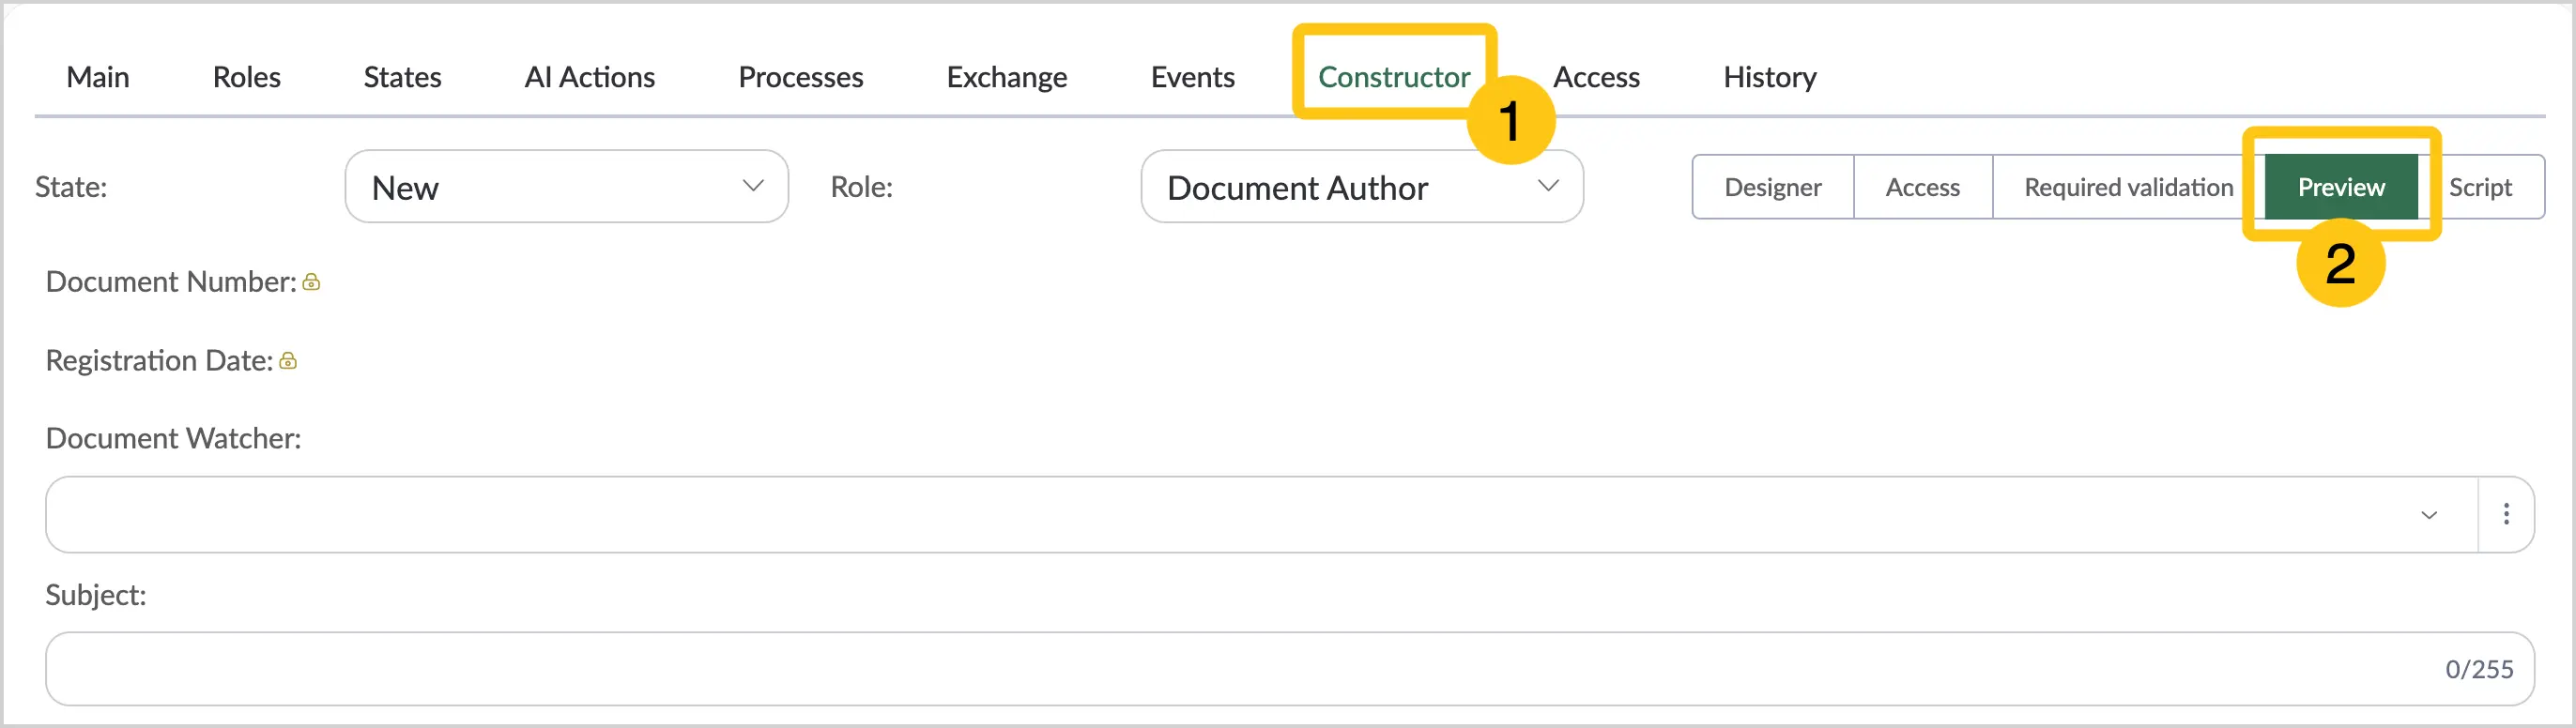
In the Constructor tab 1, go to the Preview mode 2.
-
In the top panel, in the State field 1, select the required document state whose appearance you want to preview.
-
In the top panel, in the Role field 2, select the role to preview the document appearance for the selected role.
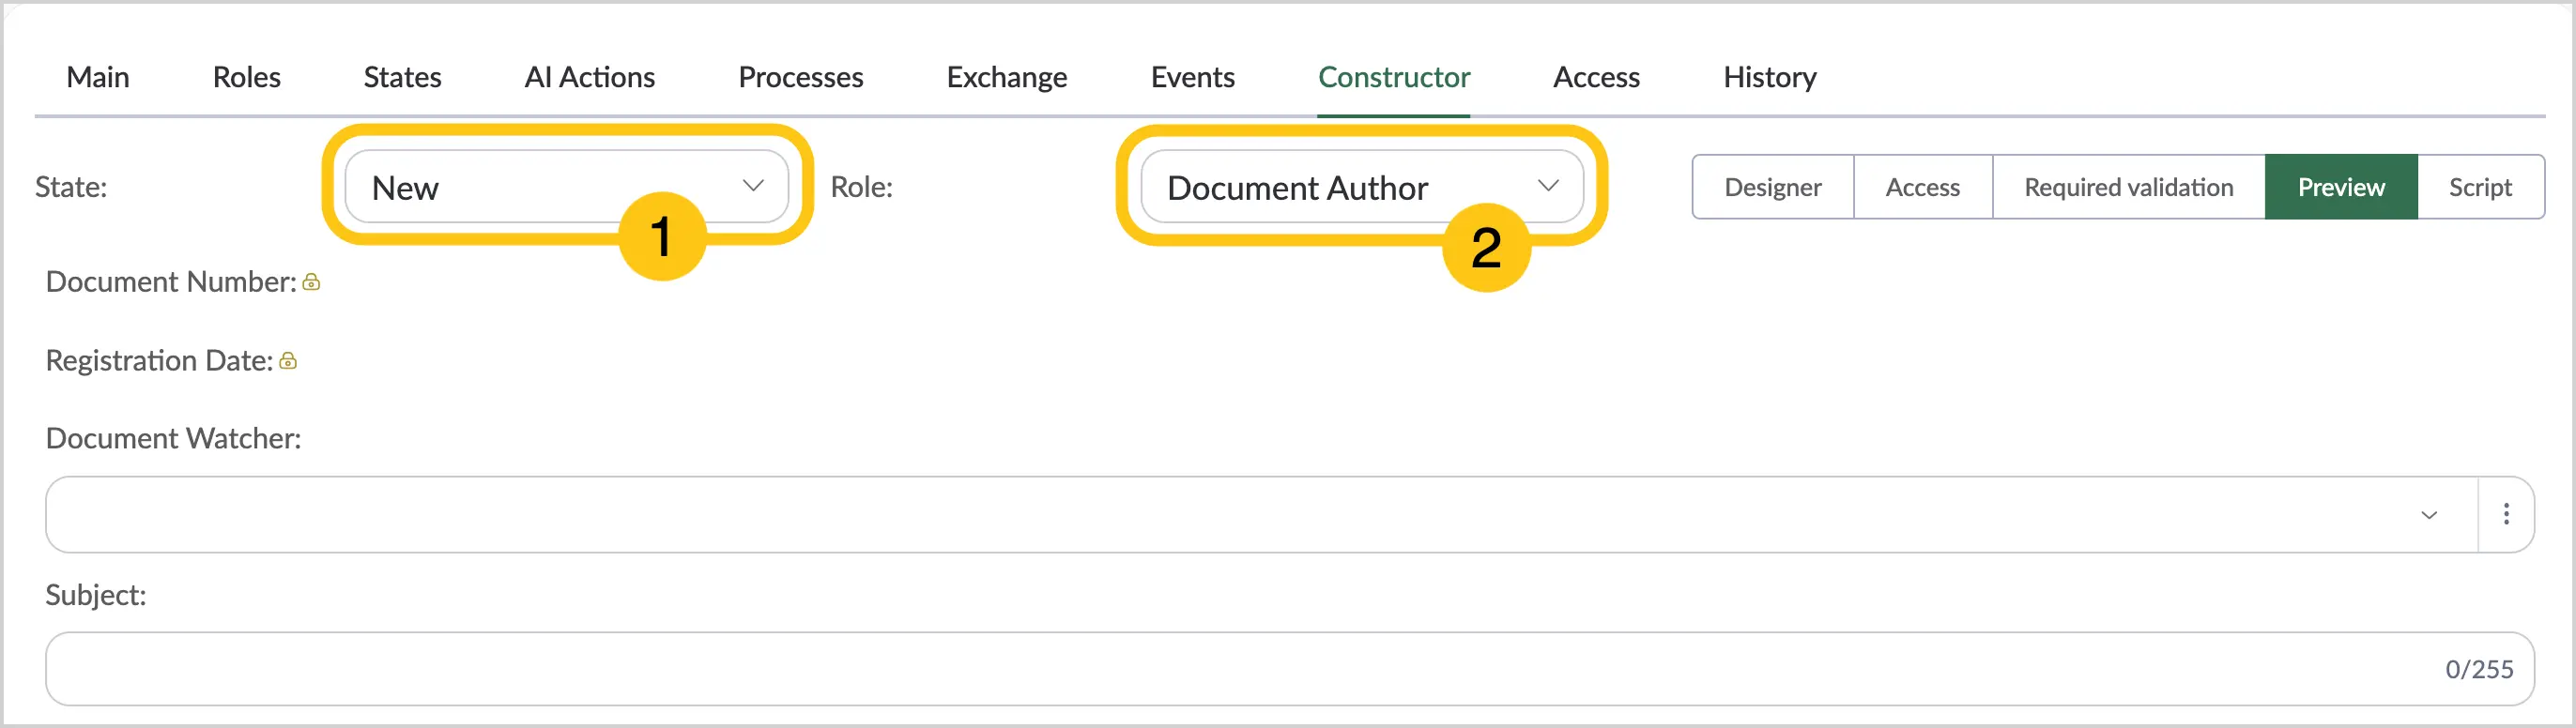
By changing the values of the State and Role fields, you can observe how the document appearance changes for each state and role.
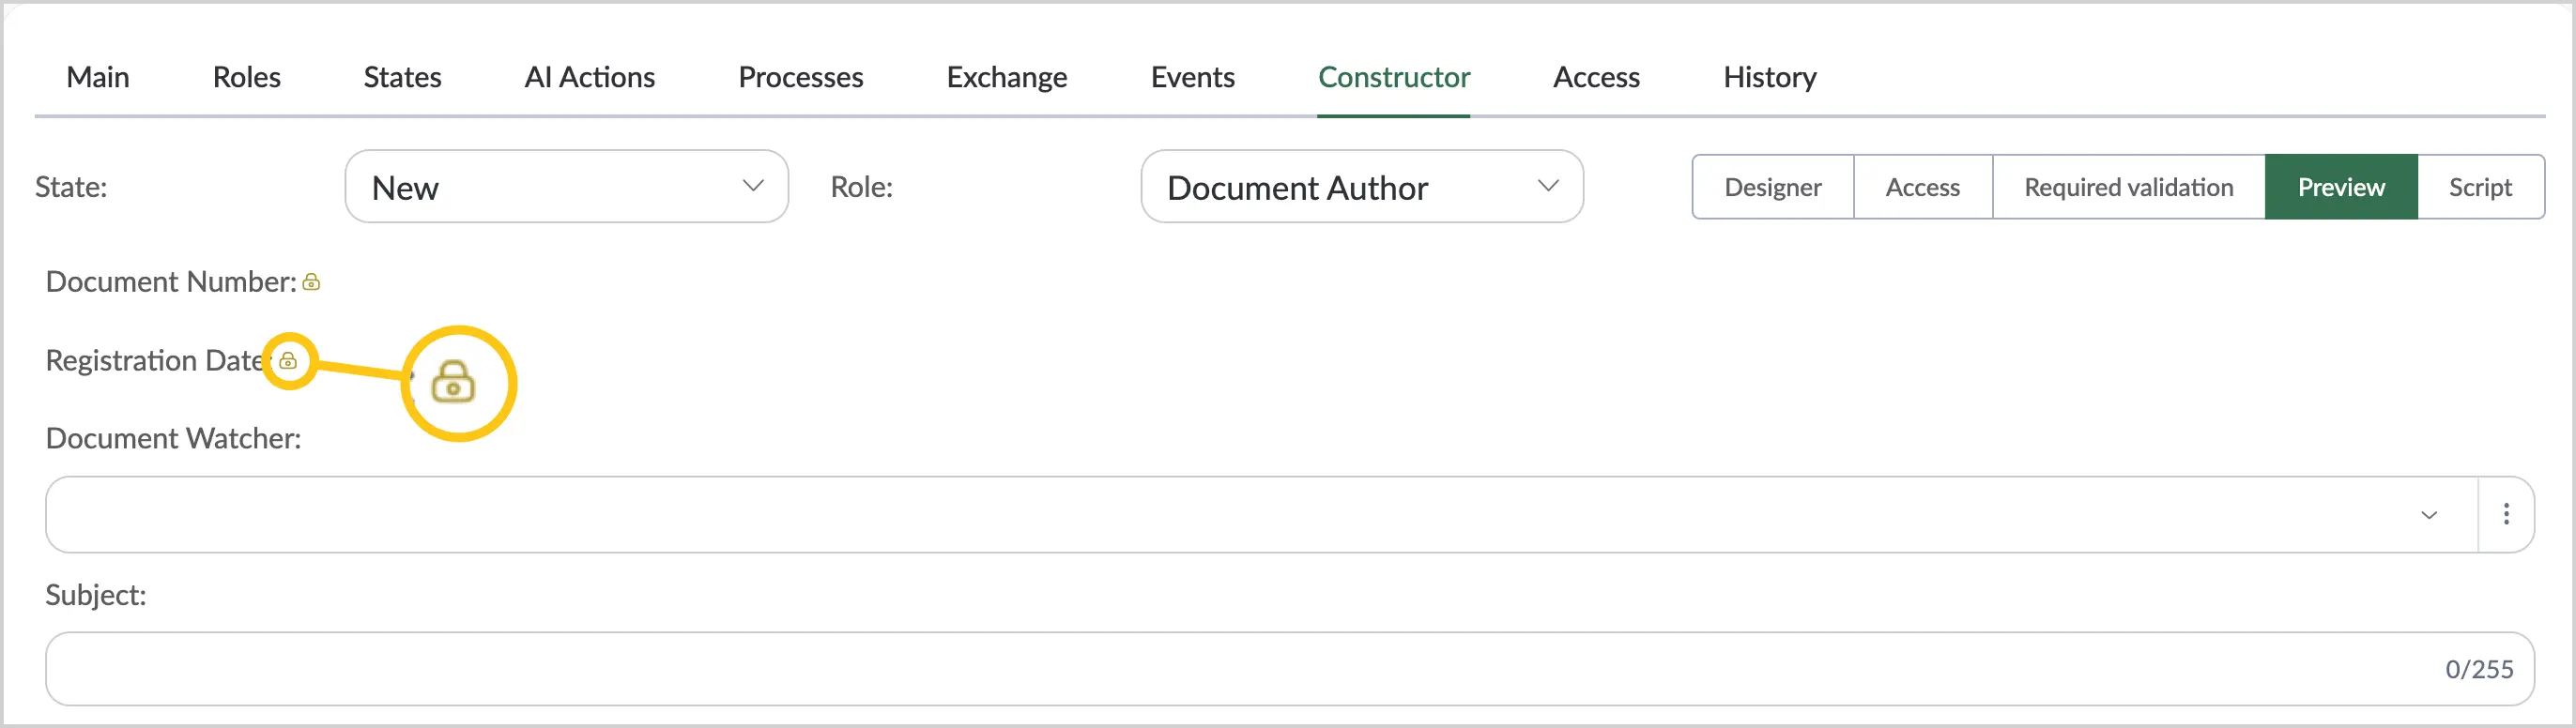
Note:Attributes marked with the icon are locked for editing.
-
In the toolbar, select Save , then continue the configuration in the Script mode (see section Script).
2.2.1.8.5. Script
You can add new functionality to the form by creating custom logic. This is done using scripts written in JavaScript, which are executed in the browser alongside the main application code.
JavaScript Knowledge Requirements
The following basic JavaScript knowledge is required to create scripts:
- Language basics (expressions, statements, functions, variables, etc.)
- JavaScript modules
- Asynchronous functions
To make requests to the server, refer to the UnityBase documentation, especially the @unitybase/ub-pub module, the Connection object, and the ClientRepository class.
Add a Script
To add a script, follow these steps:
-
In the Constructor tab 1, go to the Script mode 2.

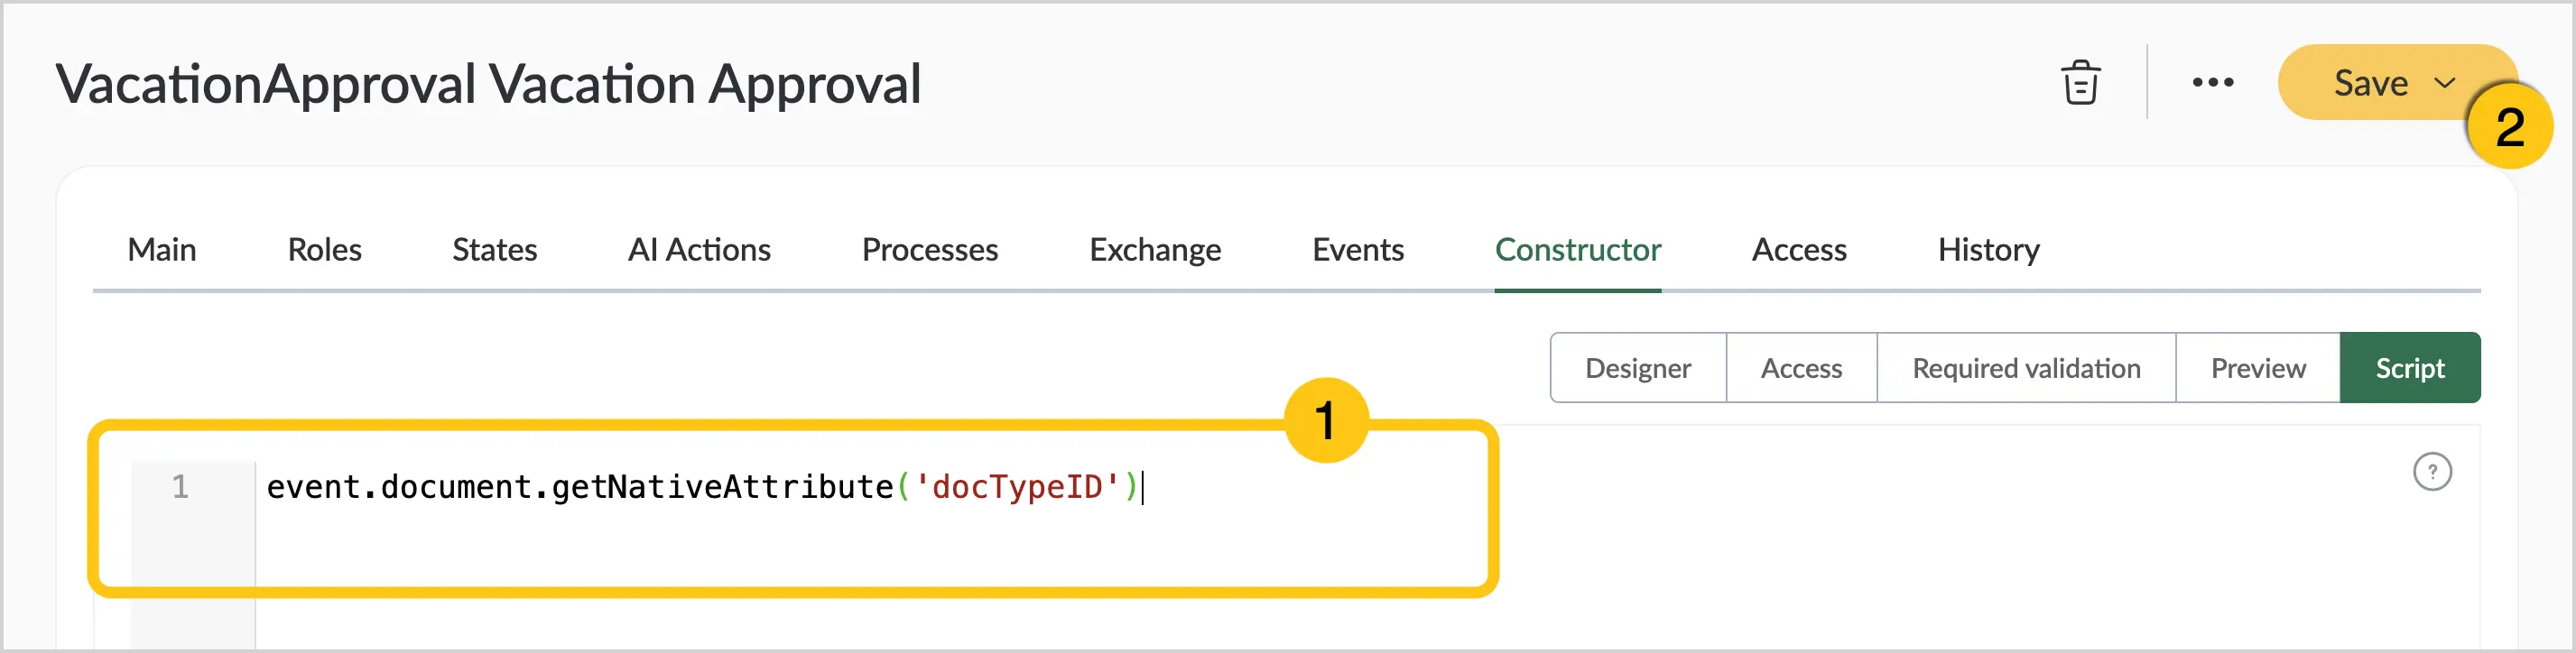
-
In the text field, enter the required script 1.
Tip:You can choose one of the available script templates in the Script Templates section.
-
In the toolbar, select Save 2.
Script Templates
The system provides templates for certain attribute actions. To use them, follow these steps:
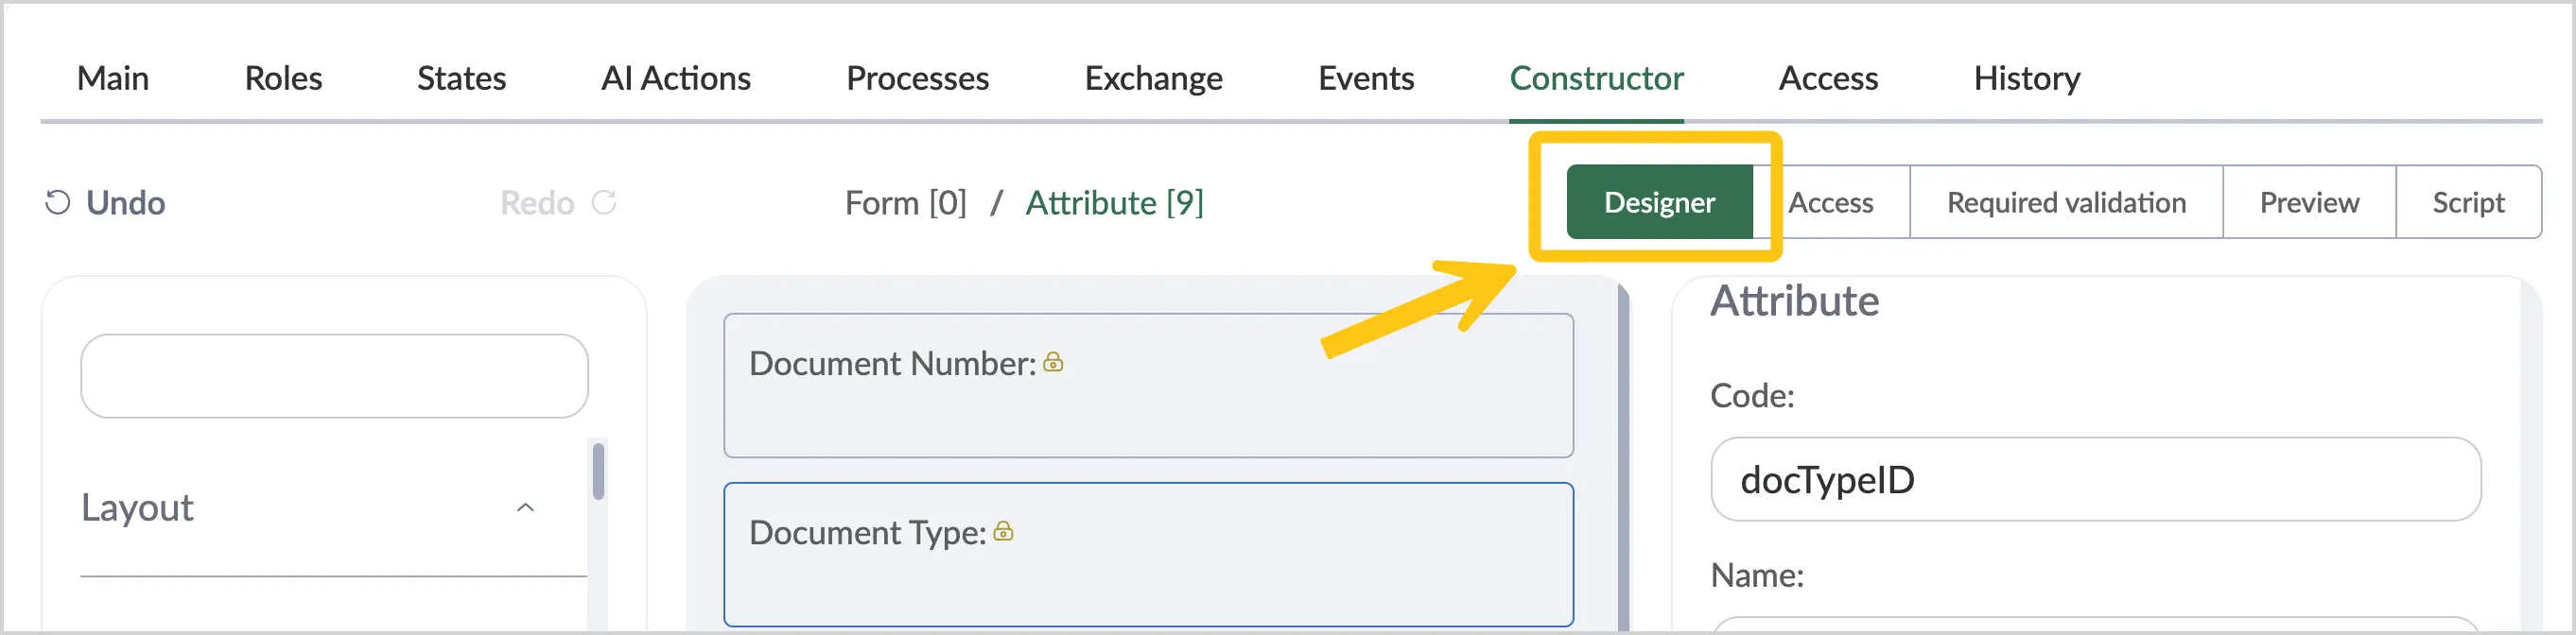
-
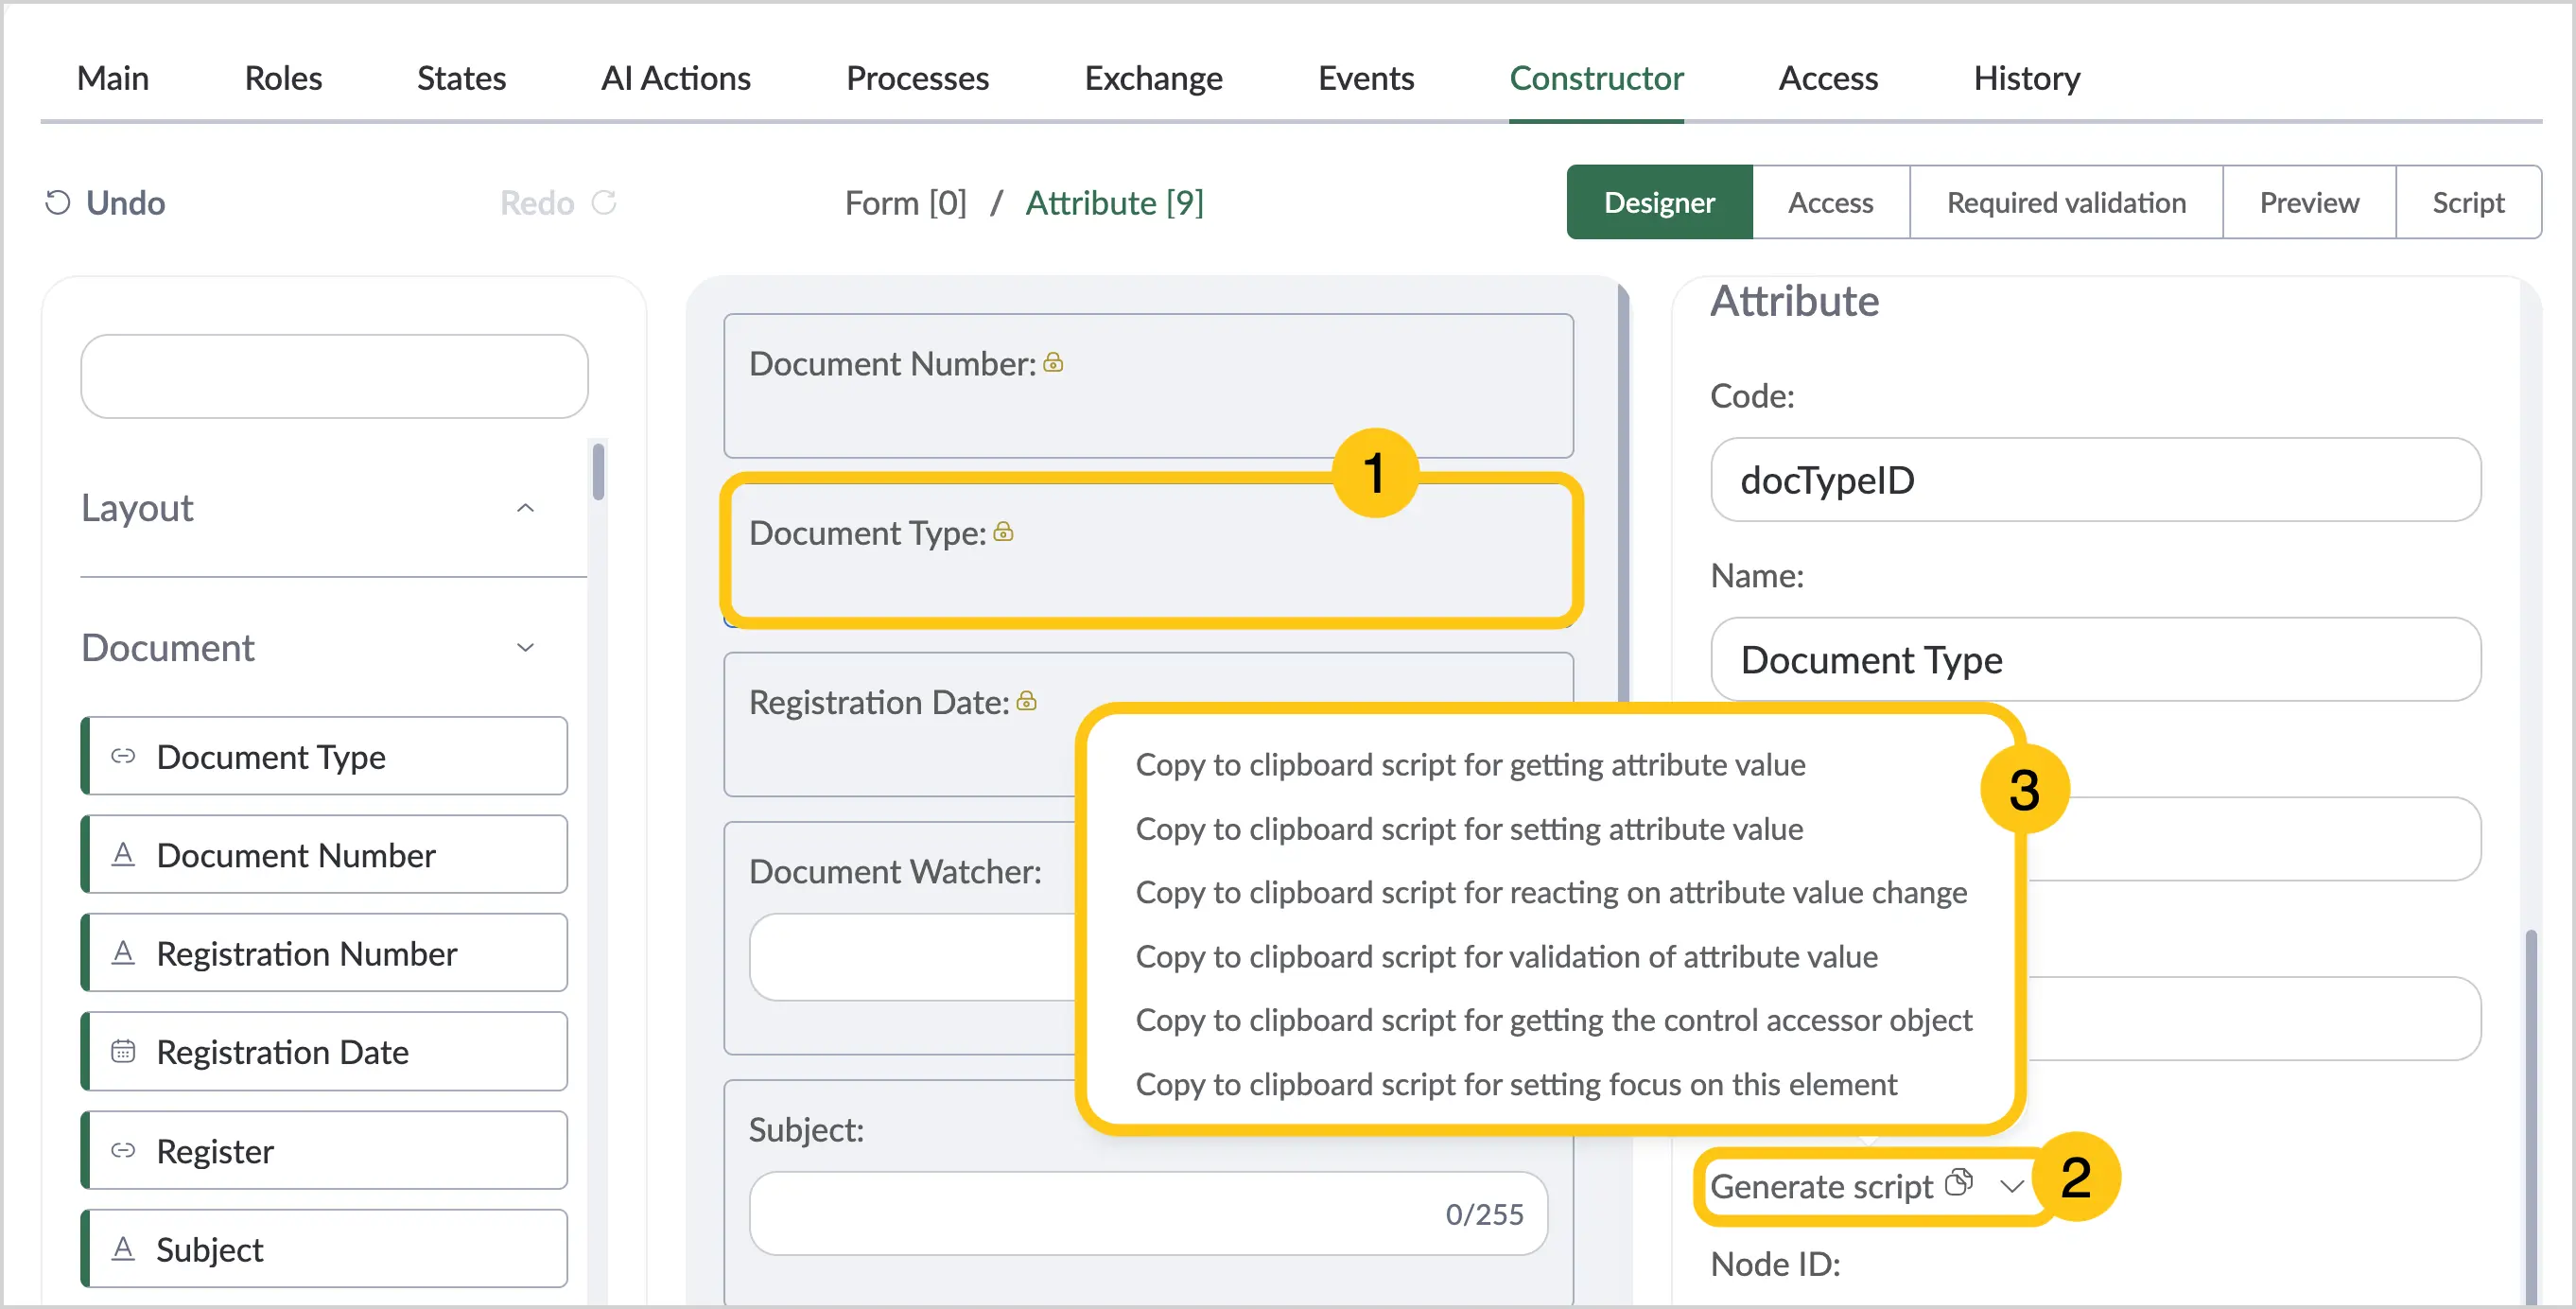
In the Constructor tab 1, go to the Designer mode 2.
-
Select the attribute 1 (of a document type, task form, etc.).
-
In the Settings panel, select Generate script 2.
-
Select the required action 3.
-
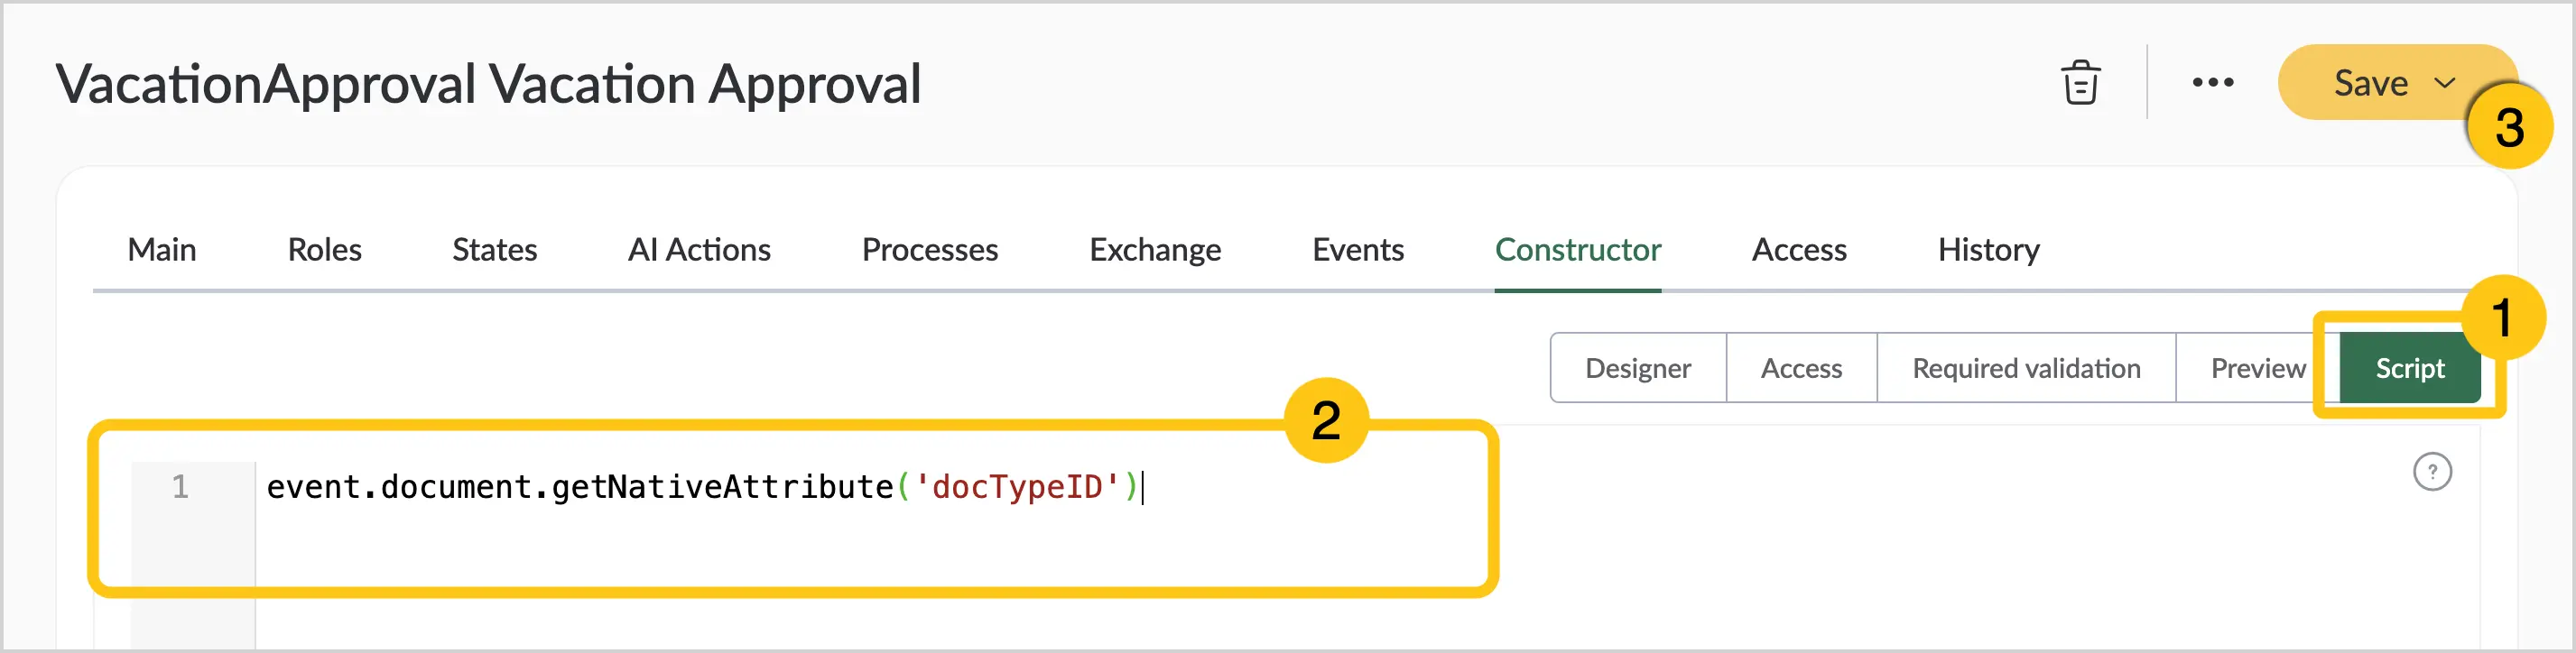
Go to the Script mode 1, then paste the copied script into the text field 2.
-
In the toolbar, select Save 3.
Create a Module
Each form script must be a CommonJS module, meaning it must contain a line like:
module.exports = {
  // ...
}
Any script is written inside the following construct:
module.exports = {
}
Interacting with the Form
Scripts have an event-driven structure. The object exported by the module must contain event handlers as properties. For example:
module.exports = {
  loaded() {
    console.log('Inside "loaded" event handler for the form!')
  }
}
A script can only have one module.exports. If you need to handle multiple events, all of them must be listed inside a single module.exports, separated by commas.
Events
The key name in the exported object (not to be confused with the function name) determines which event the function will respond to. The binding of an event to a function is based on a naming convention.
Each event handler can be asynchronous or return a promise (not required, but possible if needed — in that case the code will wait for the event processing to complete).
Sometimes the same event is handled by multiple handlers.
For example: there can be a specific action event handler action_beforeExecute_action1 and a general event handler action_beforeExecute. This is not a common situation, but if it occurs, the general event handler will be executed before the specific one.
Event Argument
Each event handler accepts exactly one argument. By convention, if the handler does not use this parameter, it can be omitted. If the handler does use the event argument, name it event.
module.exports = {
  loaded(event) {
    console.log(
      'Inside "loaded" event handler for the form for document: %s',
      event.document.getNativeAttribute('docNumber')
    )
  }
}
You can "require" utility scripts, just as in any UB client module.
const UB = require('@unitybase/ub-pub')
module.exports = {
  // ...
}
If you use external scripts, you are responsible for maintaining the form script when the external module changes (and sometimes they may have breaking changes) — use it accordingly.
The capabilities of the event argument depend on the object's form. For example: for a BPM task form, the event will contain a task property, while for a Scriptum document it will contain a document property. Tasks associated with a Scriptum Document will have both task and document properties.
This is also a customization point: for large integrations, you can develop an additional data object accessor in your custom model and make it visible inside form scripts.
Each such property is called a data object accessor, as it provides means to get or set values for attributes of the corresponding object.
Data object accessor API:
-
getAttribute— returns the value of a custom attribute (from the attribute library, not an entity attribute).event.document.getAttribute('color') -
getNativeAttribute— returns the value of a configurable attribute. "Native" refers to an entity attribute, not an attribute from the attribute library.event.document.getNativeAttribute('docNumber') -
setAttribute— changes the value of a custom attribute. To clear the value, setnull.event.document.setAttribute('fullName',event.document.getAttribute('firstName') + ' ' +event.document.getAttribute('lastName')) -
setNativeAttribute— changes the value of a native attribute. To clear the value, setnull. "Native" refers to an entity attribute.
Some attributes belong to dictionaries. Their values are numbers — IDs of the records they point to. If you need a value from a dictionary in a script, you need to write additional code, for example:
module.exports = {
async document_attributeChanged_organization(event) {
if (event.value) {
const orgCode = await UB.Repository('org_organization')
.attrs('code')
.where('ID', '=', event.value)
.selectScalar()
console.log('Selected organization with ID=%d, code=%s', event.value, orgCode)
} else {
console.log('Cleaned up "organization" attribute!')
}
}
}
Notes on the example:
UB.Repositoryis part of the UnityBase API. For more details, see the UnityBase documentation.- All
UB.Repositoryselection methods are asynchronous, so the event handler must also be asynchronous, and we "await" the "selectScalar" call. - This example shows how to query a dictionary. The syntax
event.document.getAttribute('organization.code')is incorrect and does not return the desired value.
Some data object accessors may provide additional methods. For example: the Scriptum Document data object accessor provides the following methods:
-
The
stateproperty returns the code of the current document state.if (event.document.state === 'draft') {// It's a draft!} -
userHasRole— a function that checks whether the document user has a role (not a UB role) by its code.if (event.document.userHasRole('author')) {// It's the document author!} -
getParticipants— a function that returns information about the roles of the document's participants. The return value is an array of objects with the following structure:{ID: 3000012,unitType: 'ORG',code: '0123123',name: 'organization1',isFixed: true}
Usage:
const participantsOfResponsibleRole = event.document.getParticipants('responsible')
-
removeParticipant— a function that removes any participant from a document role. The first argument is the role code, and the second must be an orgUnitID, for example: staffUnitID.event.document.removeParticipant('responsible', participantID) -
addParticipant— a function that adds a participant to a document role. The first argument is the role code, and the second must be an orgUnitID, for example: staffUnitID.event.document.addParticipant('responsible', participantID) -
getCurrentUserRoles— a function that returns the current user's roles in the document as an array of strings. Returns an array of strings, for example:['author', 'manager']const userRoles = event.document.getCurrentUserRoles()
Global Form Events
Form initialization events:
initedloaded
These are two similar events. The only difference is that inited is called only on the first load of the form data, while loaded is called every time the form is loaded (the user can use the Refresh toolbar button to reload the form).
Form save events:
beforeSavesaved
Inside beforeSave, the save can be cancelled:
module.exports = {
beforeSave(event) {
if (!!event.document.getAttribute('hasCategory') &&
!event.document.getAttribute('categoryID')) {
// "categoryID" must be specified, if "hasCategory" toggle is toggled
event.cancelSave()
}
}
}
Action Events
For "before" and "after" events:
action_beforeExecuteaction_beforeExecute_<actionCode>action_executedaction_executed_<actionCode>
An event without an action code suffix will be triggered for any action, while events with an action code suffix will only be triggered for the specified actions.
All events have an additional property — actionCode — which is used for general action event handlers (those without an action code in the event name).
"Before" handlers also have the following additional methods:
cancelAction— prevents the action from being executed. Used for validation.skipStandardConfirmDialog— calling this method means "Do not show any confirmation before the action". Used when a custom UI is invoked inside the handler and the standard one needs to be overridden. You will need to use an async event handler that returns the confirmation after the user confirms the action in the UI. Add theasynckeyword:
const customUI = require('path_to_my_custom_ui_module')
module.exports = {
async action_beforeExecute_approve(event) {
const confirmResult = await customUI.approveActionDialog()
if (!confirmResult) {
event.cancelAction()
}
}
}
Attribute Events
Attribute events are variations of the most general attributeChanged event:
<dataObject>_attributeChanged<dataObject>_nativeAttributeChanged<dataObject>_attributeChanged_<attributeCode><dataObject>_nativeAttributeChanged_<attributeCode>
As can be seen from the event name pattern, each variant filters events by the data object (for example: task or document), attribute type (configurable — from the attribute library, or native — an entity attribute), and attribute code.
The event object itself contains the following properties that are specific to attributeChange events:
dataObjectattributeCodeattributeKindvalueoldValue— the previous value
Usage Examples
Method 1: Using a single event handler for all document attribute changes:
module.exports = {
document_attributeChanged(event) {
if (event.attributeCode === 'firstName' || event.attributeCode === 'lastName') {
event.document.setAttribute(
'fullName',
event.document.getAttribute('firstName') + ' ' +
event.document.getAttribute('lastName')
)
}
}
}
Method 2 (recommended): Using separate event handlers for each attribute:
module.exports = {
  document_attributeChanged_firstName(event) {
    event.document.setAttribute(
      'fullName',
      event.value + ' ' + event.document.getAttribute('lastName')
    )
  },
  document_attributeChanged_lastName(event) {
    event.document.setAttribute(
      'fullName',
      event.document.getAttribute('firstName') + ' ' + event.value
    )
  }
}
Changing Form Element Properties
Form scripts allow you to modify the form layout at runtime:
- change a property of a form element (node)
- change the required rules of a form element (node) that supports them (document and task execution forms)
- change the accessRules of form elements (nodes) for forms that support it (for example: document forms)
The event object has a special form property that contains a special object with the following methods:
setNodePropertysetNodeRequiredRulesetNodeAccessRule
All of the above methods accept a numeric nodeId as the first argument, key as the second, and value as the third.
module.exports = {
  document_attributeChanged_country(event) {
    // Do not allow changing 'city' (nodeId = 10), unless country value is set
    event.form.setNodeProperty(10, 'disabled', !event.value)
  }
}
Debugging Scripts
Use console.log to view messages in the browser console (F12 → Console).
There are several ways to debug form scripts. All of them require creating a document and testing it:
-
Place a
debuggerstatement in scripts — it will open DevTools in the browser (press F12) and try:module.exports = {document_attributeChanged_firstName(event) {debuggerevent.document.setAttribute('fullName',event.value + ' ' + event.document.getAttribute('lastName'))}} -
Use
console.debug:module.exports = {document_attributeChanged_firstName(event) {console.debug('document_attributeChanged_firstName event: %j', event)event.document.setAttribute('fullName',event.value + ' ' + event.document.getAttribute('lastName'))}} -
Use breakpoints: open DevTools in the browser, find the script — look under
clientRequire/models/cust/public/designedForms; depending on the environment, the model name may not be "cust".
When working with dictionaries, dictionary value IDs are passed and returned. For multiple-selection dictionary values, use square brackets (for example: [3000000001781, 3000000001748]).
For script examples, see the Scripts section.
2.2.1.9. Access
In the Access tab, you can grant access to this document type to a user group, system role, user, organizations, departments, positions, or executor group.
To grant access to a document type, follow these steps:
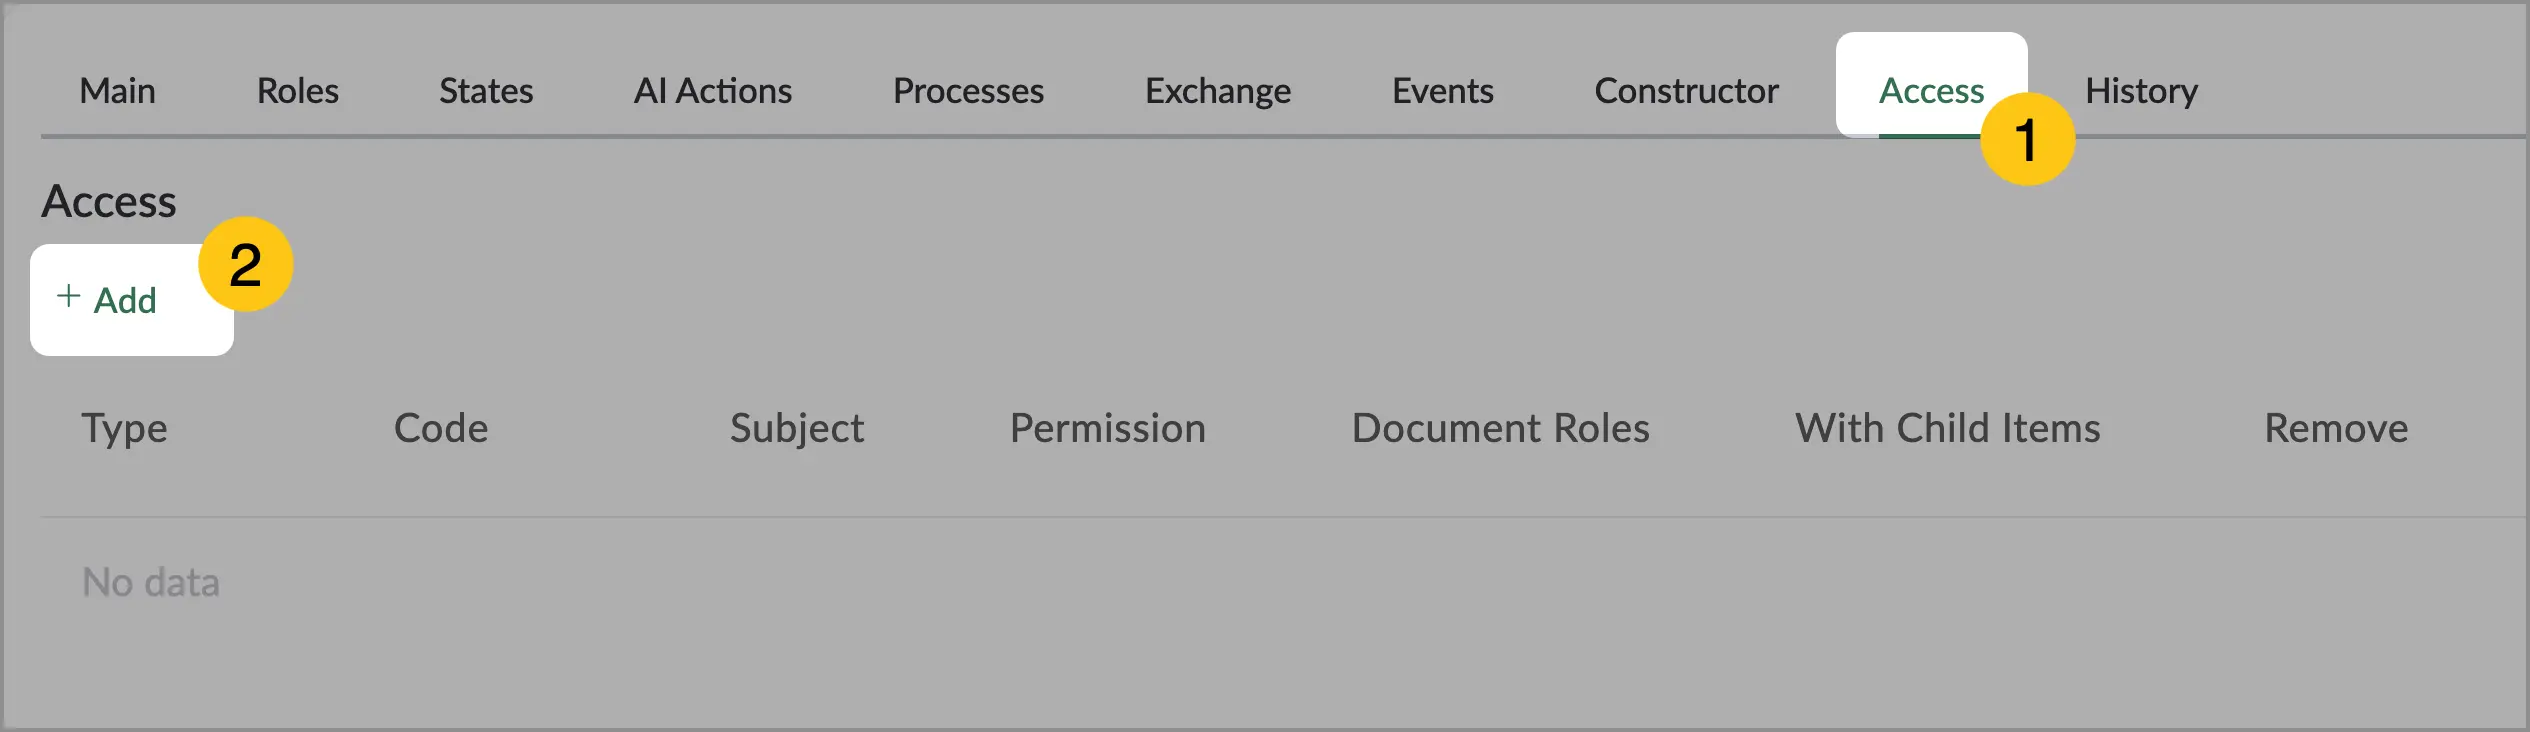
-
Go to the Access tab 1, then select the Add button 2.
-
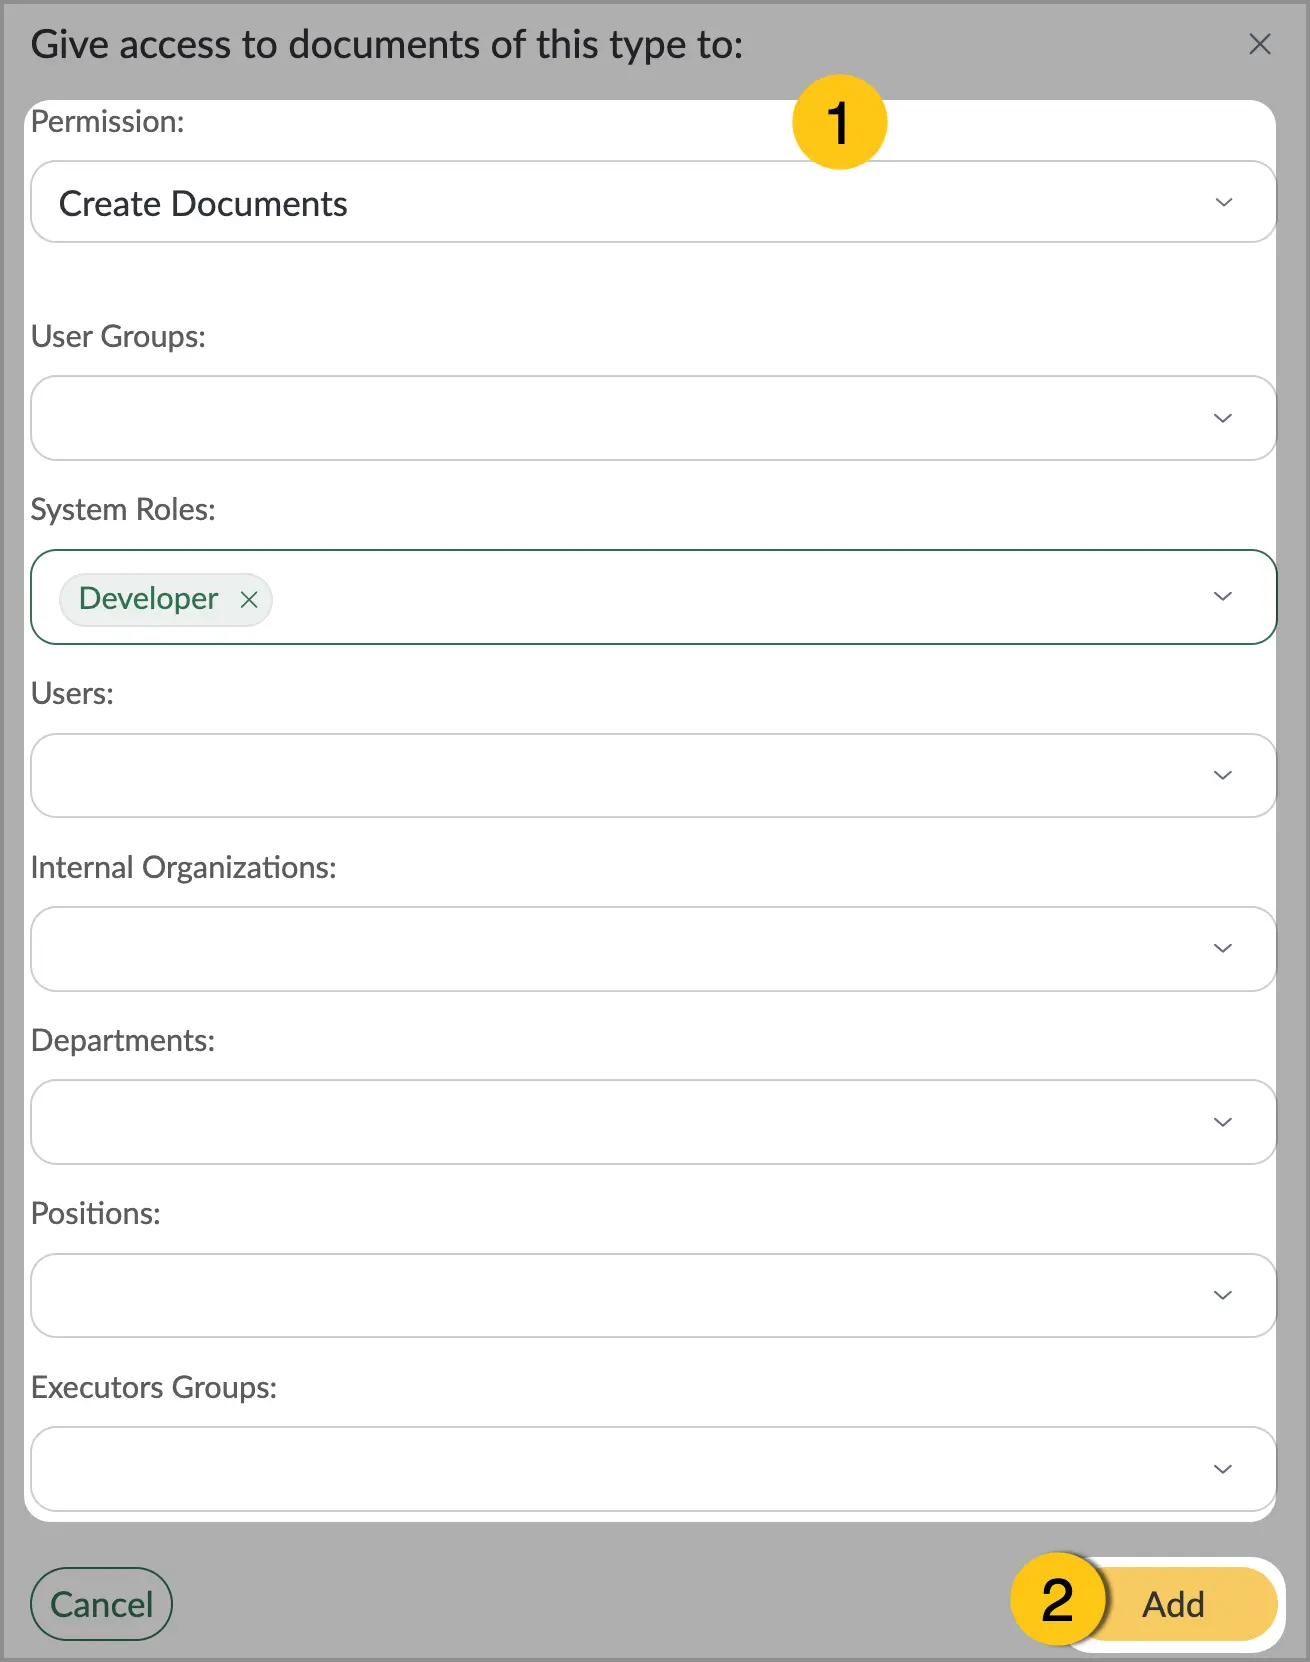
Fill in the fields 1 using the hints in the table below, then select the Add button 2.
| Field name | Description |
|---|---|
| Permission | Select the access type:
|
| User groups | User groups that will be granted access to the document. |
| System roles | System roles that will be granted access to the document. |
| Users | Users that will be granted access to the document. |
| Internal organizations | Internal organizations that will be granted access to the document. |
| Departments | Departments that will be granted access to the document. |
| Positions | Positions that will be granted access to the document. |
| Executor groups | Executor groups that will be granted access to the document. |
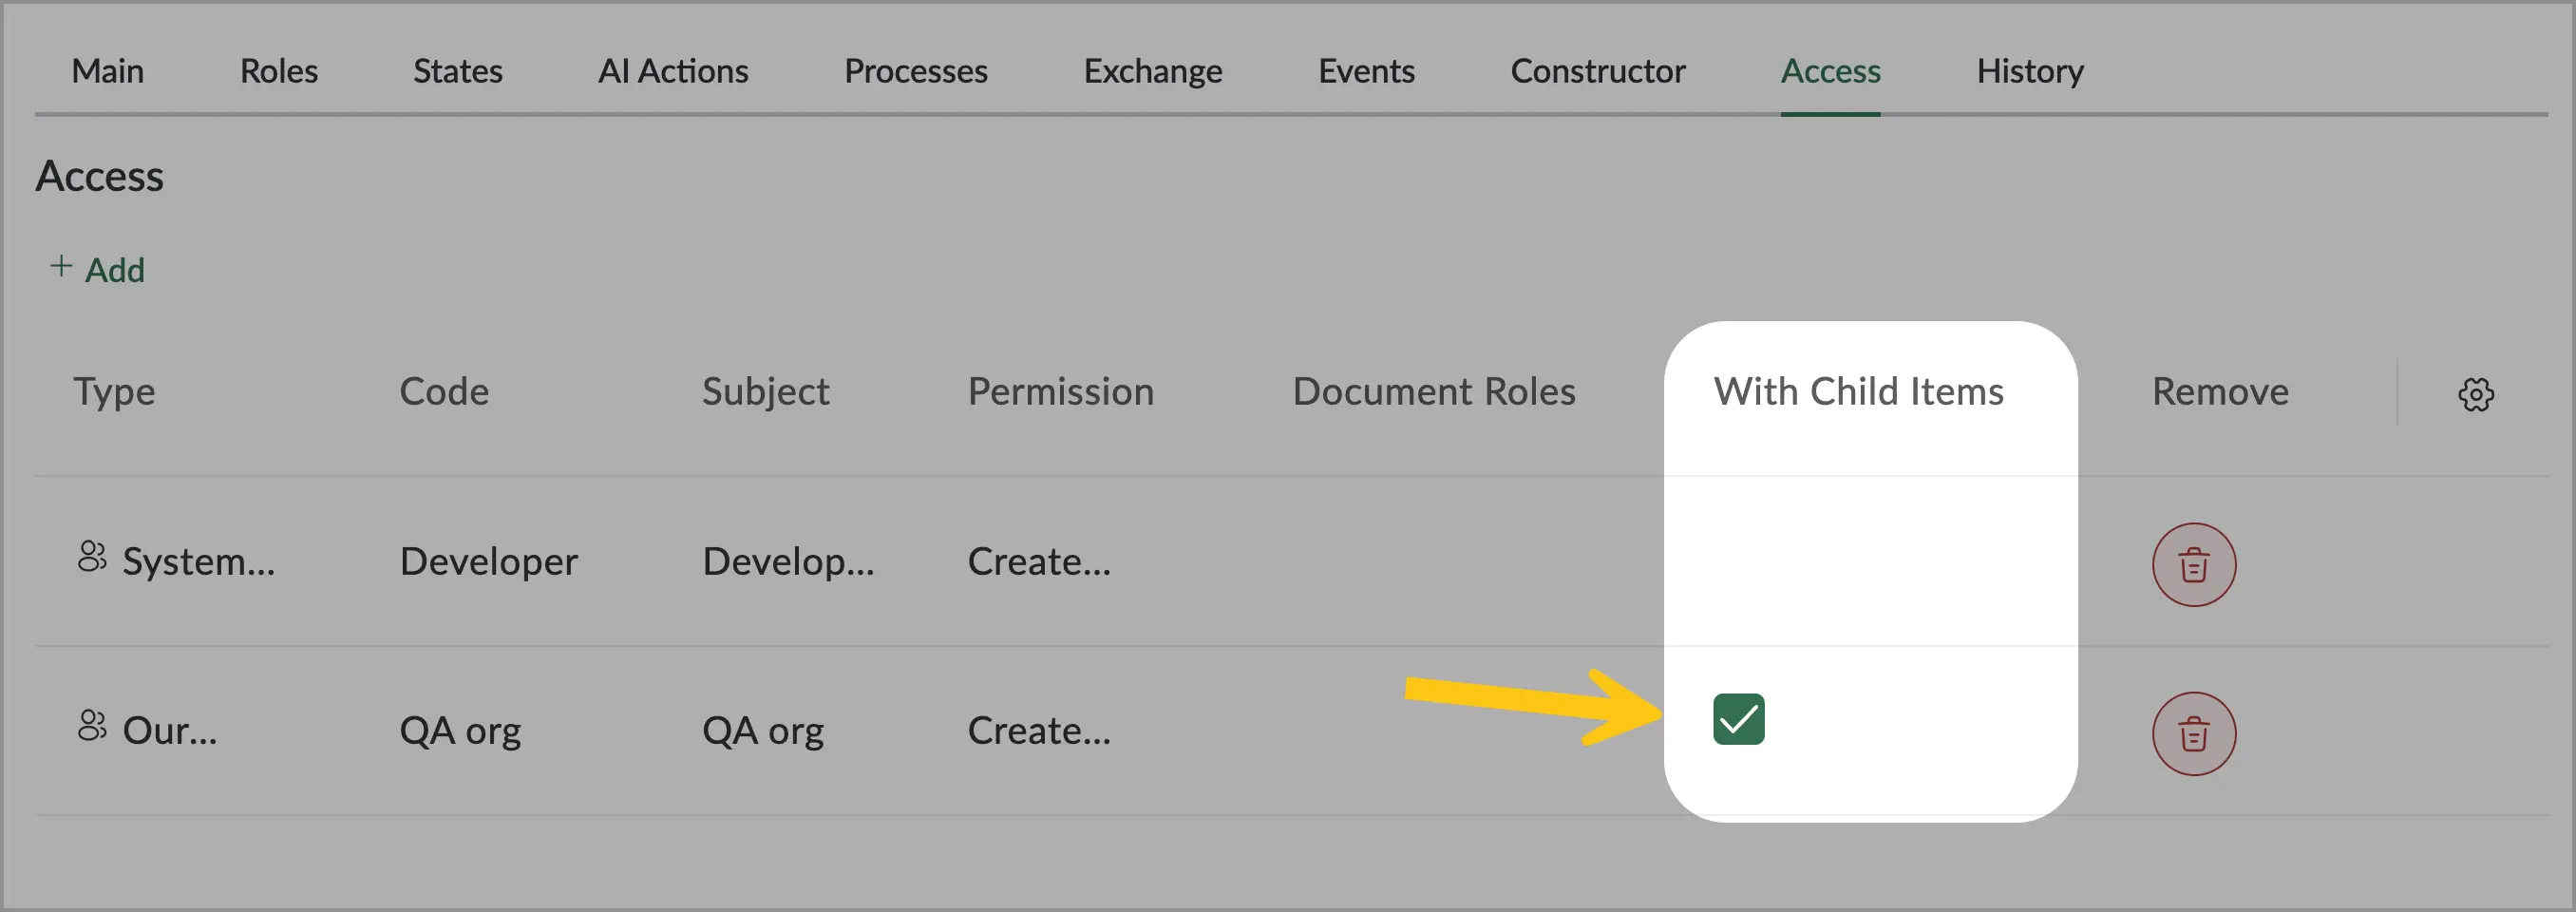
If you grant access to an organization or department, all their child elements will automatically have access as well. To prevent child elements from gaining access, uncheck the corresponding checkbox in the With child items column.
- In the toolbar, select Save , then continue the configuration in the History tab (see section History).
2.2.1.10. History
The platform records events that occur with a document throughout its lifecycle.
2.2.1.10.1. Configure Events for History
You can configure which events the platform should record in the history.
-
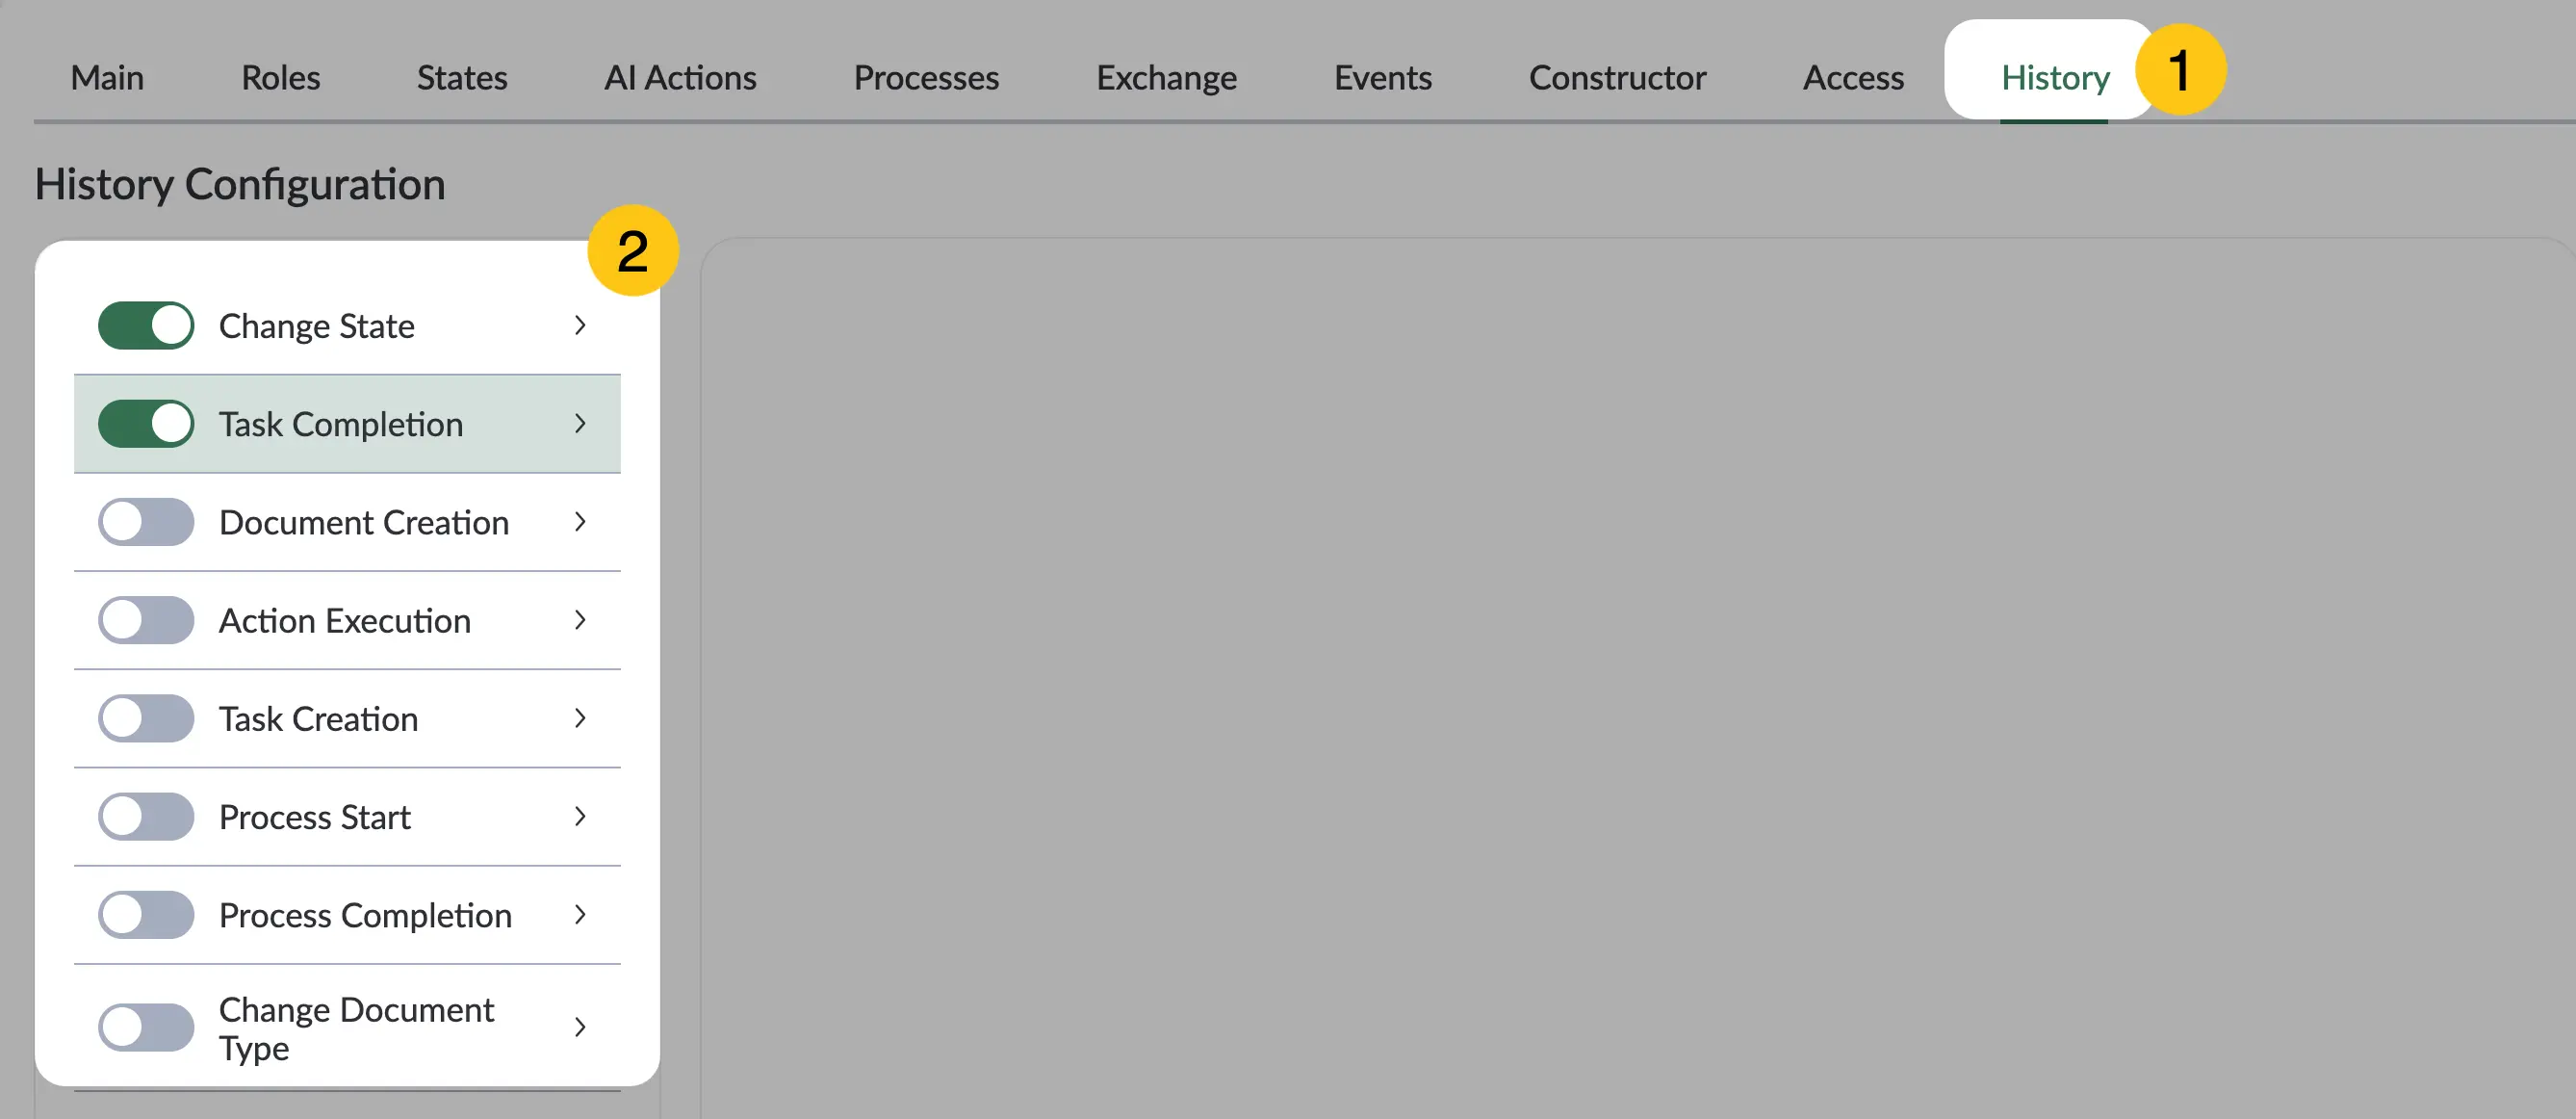
Go to the History tab 1, then enable the toggles 2 for the events you want the platform to record in the history.
-
In the toolbar, select Save.
2.2.1.10.2. View Document History
To view the event history for a specific document type, follow these steps:
-
In the navigation panel, select the Documents desktop 1, then select the Document History shortcut 2.
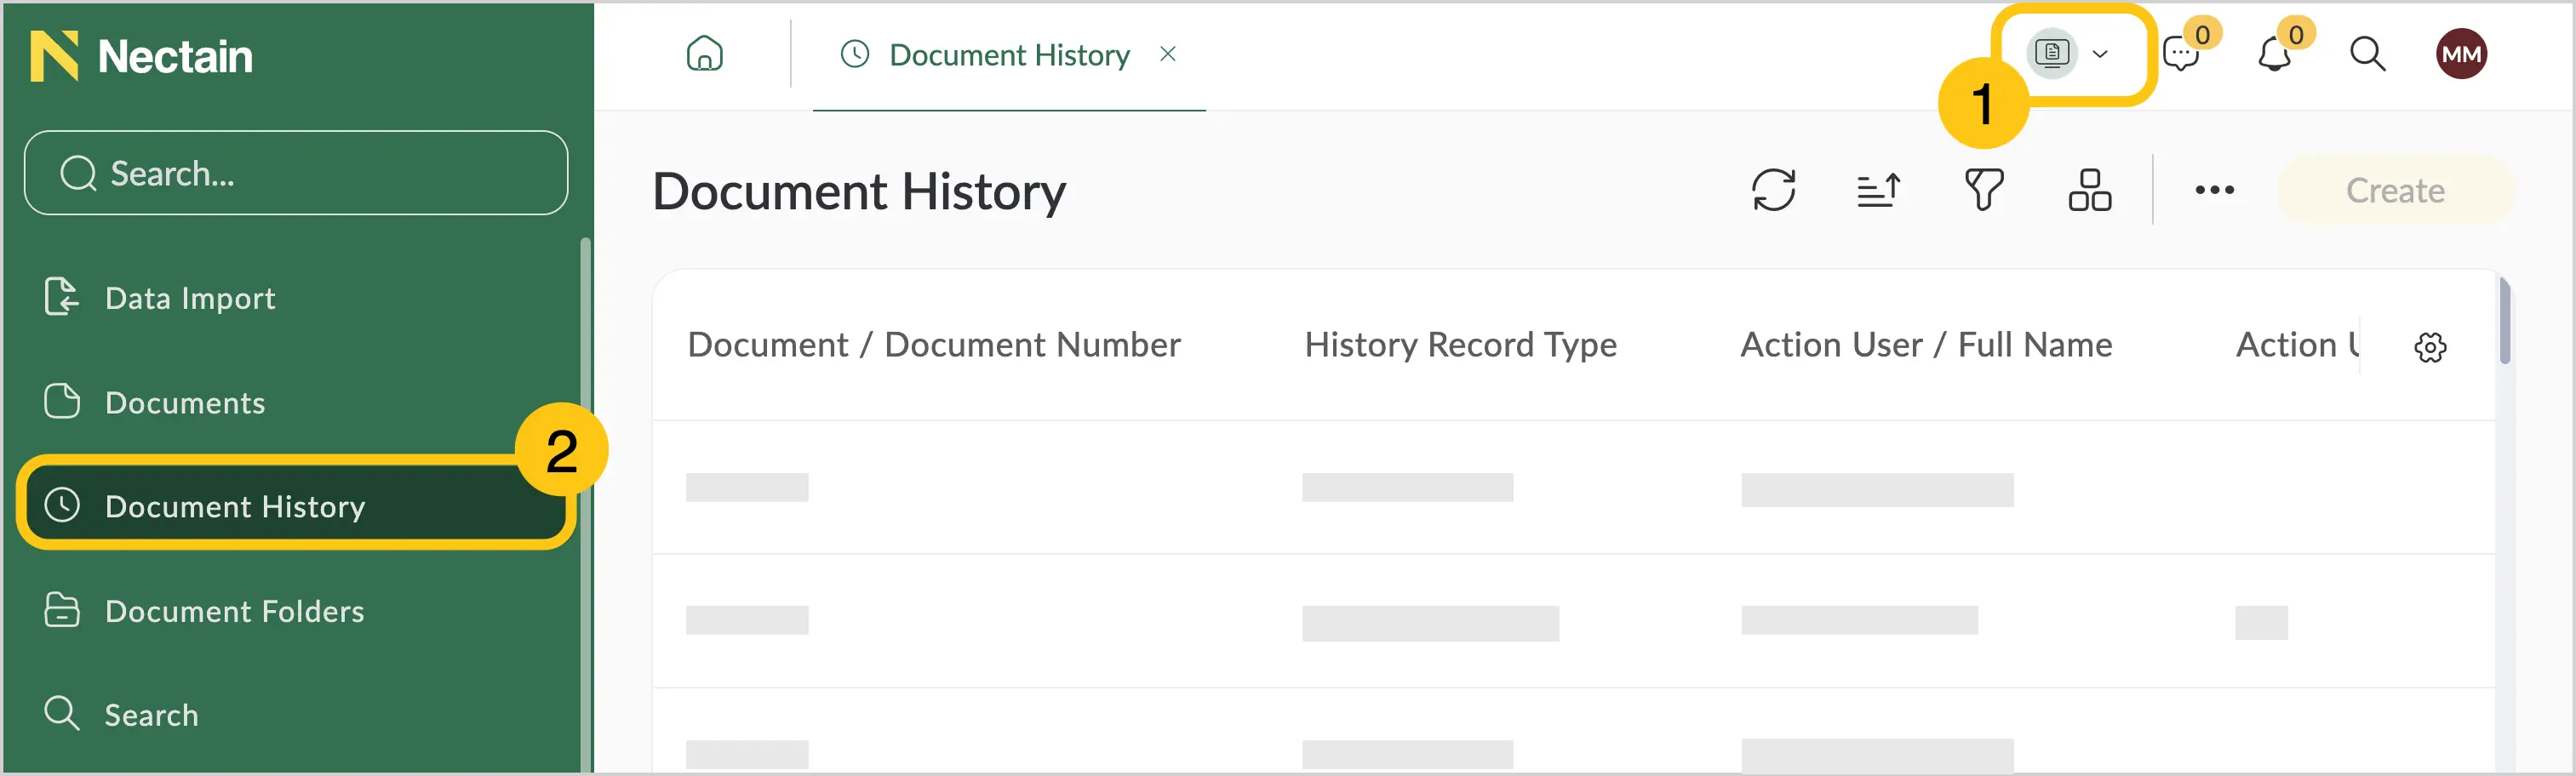
The history of all document types to which you have been granted access will open. The registry contains information about the document, the history record type, data about the user who performed the action, the date and time of the action, and information about the process and task if the action was performed from a process.
2.2.1.10.3. Display Document History on Its Form
-
Open the document type on whose form you want to display its history.
-
Add the attribute Document History to the document form.
The attribute will display the events A from those you enabled when configuring history events. It will also display the date B and the user who performed the action C.
2.2.1.11. Archiving
This tab is available when the additional package dfx-archive is installed.
The Archiving tab allows you to configure automatic archiving of documents for the selected document type based on defined rules. Before configuring this tab, make sure you have created an archiving rule.
-
Go to the Archiving tab 1.
-
Enable the toggles 2 for the archiving rules you want to apply to this document type.
Note:You can activate multiple rules simultaneously. In that case, archiving will be performed for all documents that match at least one of the rules.
-
In the toolbar, select Save 3.
After saving, the system adds documents matching the conditions of the selected rules to the archiving queue. Archiving is performed by the dfxArc.moveToArchiveByDocType scheduler, which runs on a schedule (by default — at night). The execution schedule can be changed by DevOps at the environment level. The scheduler checks documents according to the configured rules and moves them to the archive.
Note:Execution status and possible errors are available to users with the Admin and SysOps roles in the Administration desktop → Maintenance Tools shortcut group → Scheduler Execution Statistics shortcut.
- To start archiving immediately, select the Start moving documents to archive immediately button A.
- To cancel scheduled archiving, select the Cancel scheduled document archiving button B.
Archiving is performed in the background. During this process, the system moves the document along with all related data (for example, attachments, history, tasks, and other entities) to the archive. For more details about the archiving mechanism, see section Document Archiving.
After archiving is complete, you can view the result in the Archived Documents shortcut.
2.2.2. Edit a Document Type
-
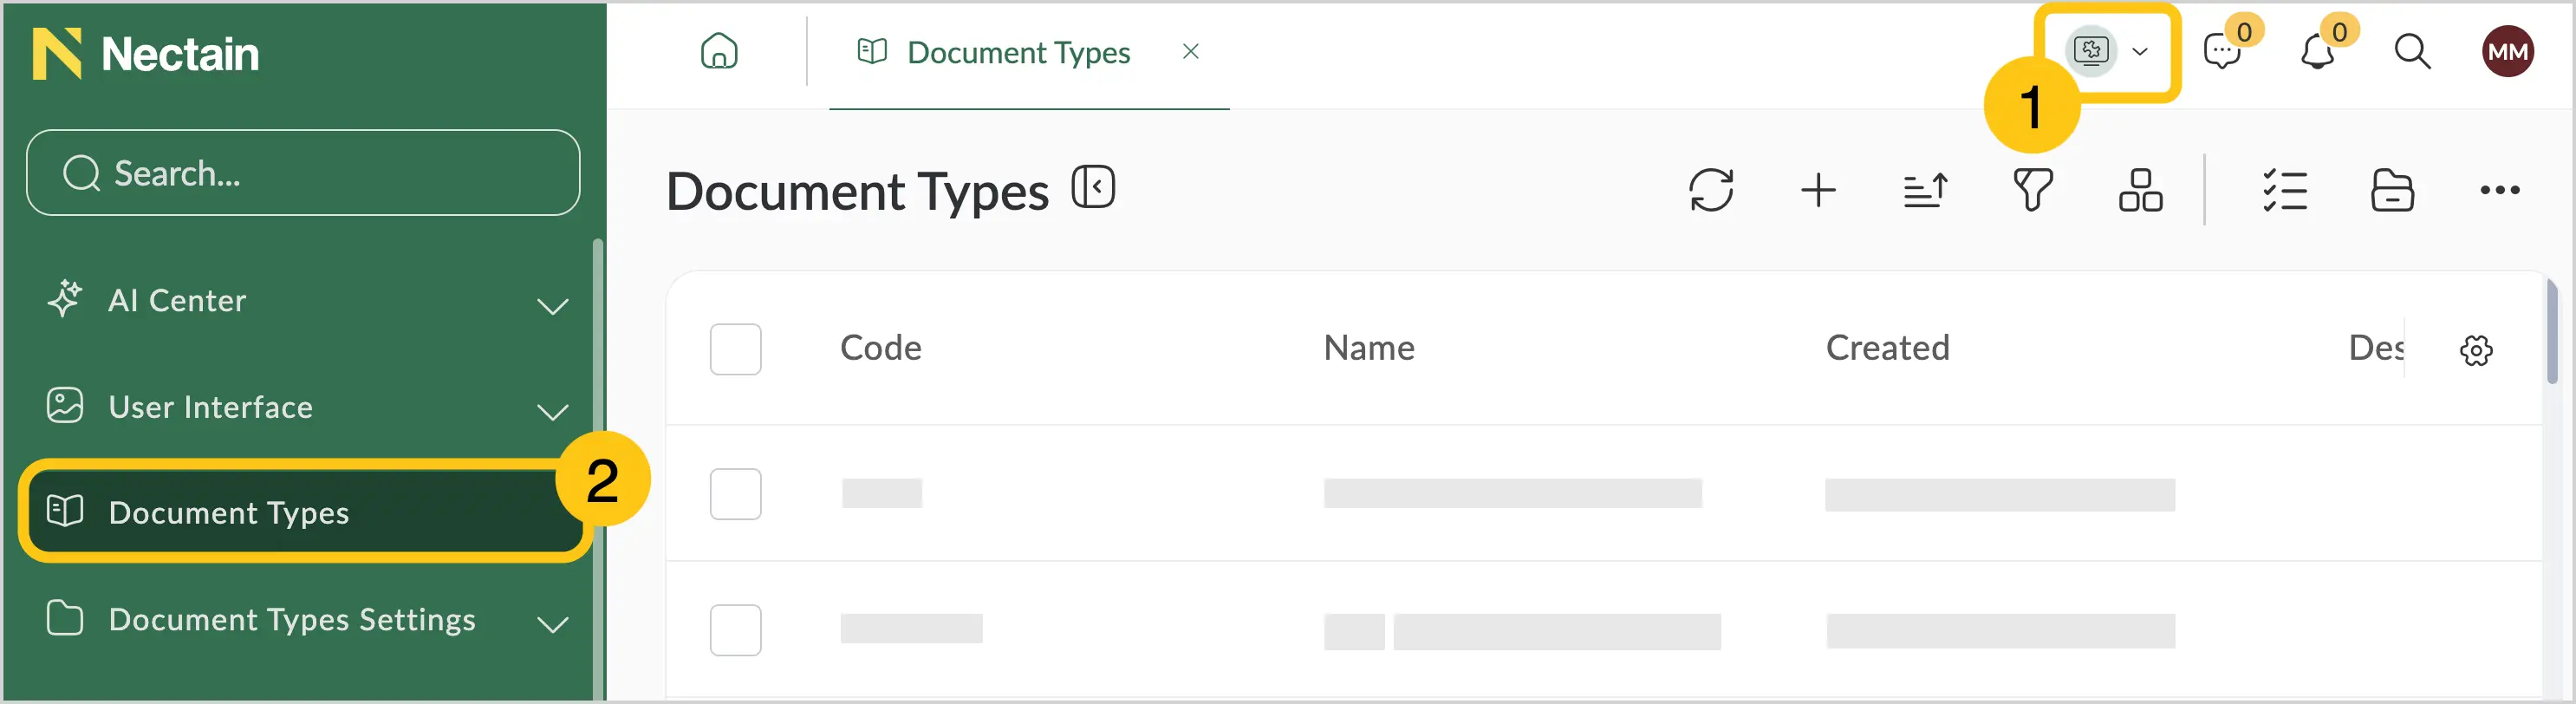
In the navigation panel, select the Studio desktop 1.
-
Select the Document Types shortcut 2.
-
Find the document type record you want to edit in the table.
-
See section Edit a Record.
2.2.3. Copy a Document Type
-
In the navigation panel, select the Studio desktop.
-
Select the Document Types shortcut.
-
Find the document type record you want to copy in the table.
-
See section Copy a Record.
2.2.4. Delete a Document Type
-
In the navigation panel, select the Studio desktop.
-
Select the Document Types shortcut.
-
Find the document type record you want to delete in the table.
-
See section Delete a Record.
2.2.5. Change Document Type
You can change the type of an already created document.
Use case example: You have a document type Contractor Card with over 20 attributes, whose data is retrieved through integration with external systems (banking systems, state registries). Based on this data, you need to generate several smaller and more specialized documents: Invoice, Work Completion Act, etc. With this feature, you can generate a document based on Contractor Card, and then change its type to Invoice to display only the required attributes while keeping all values from the original document.
2.2.5.1. Configure Document Type Change
To configure the ability to change the document type, complete the following steps:
- Enable document type change for a specific document state.
- Grant the appropriate access to the user who will perform the change. Make sure the user meets one of the following criteria:
2.2.5.1.1. Enable Change for Document State
-
In the navigation panel, select the Studio desktop 1.
-
Go to the Document Types shortcut 2.
-
Open the desired document type 3.
-
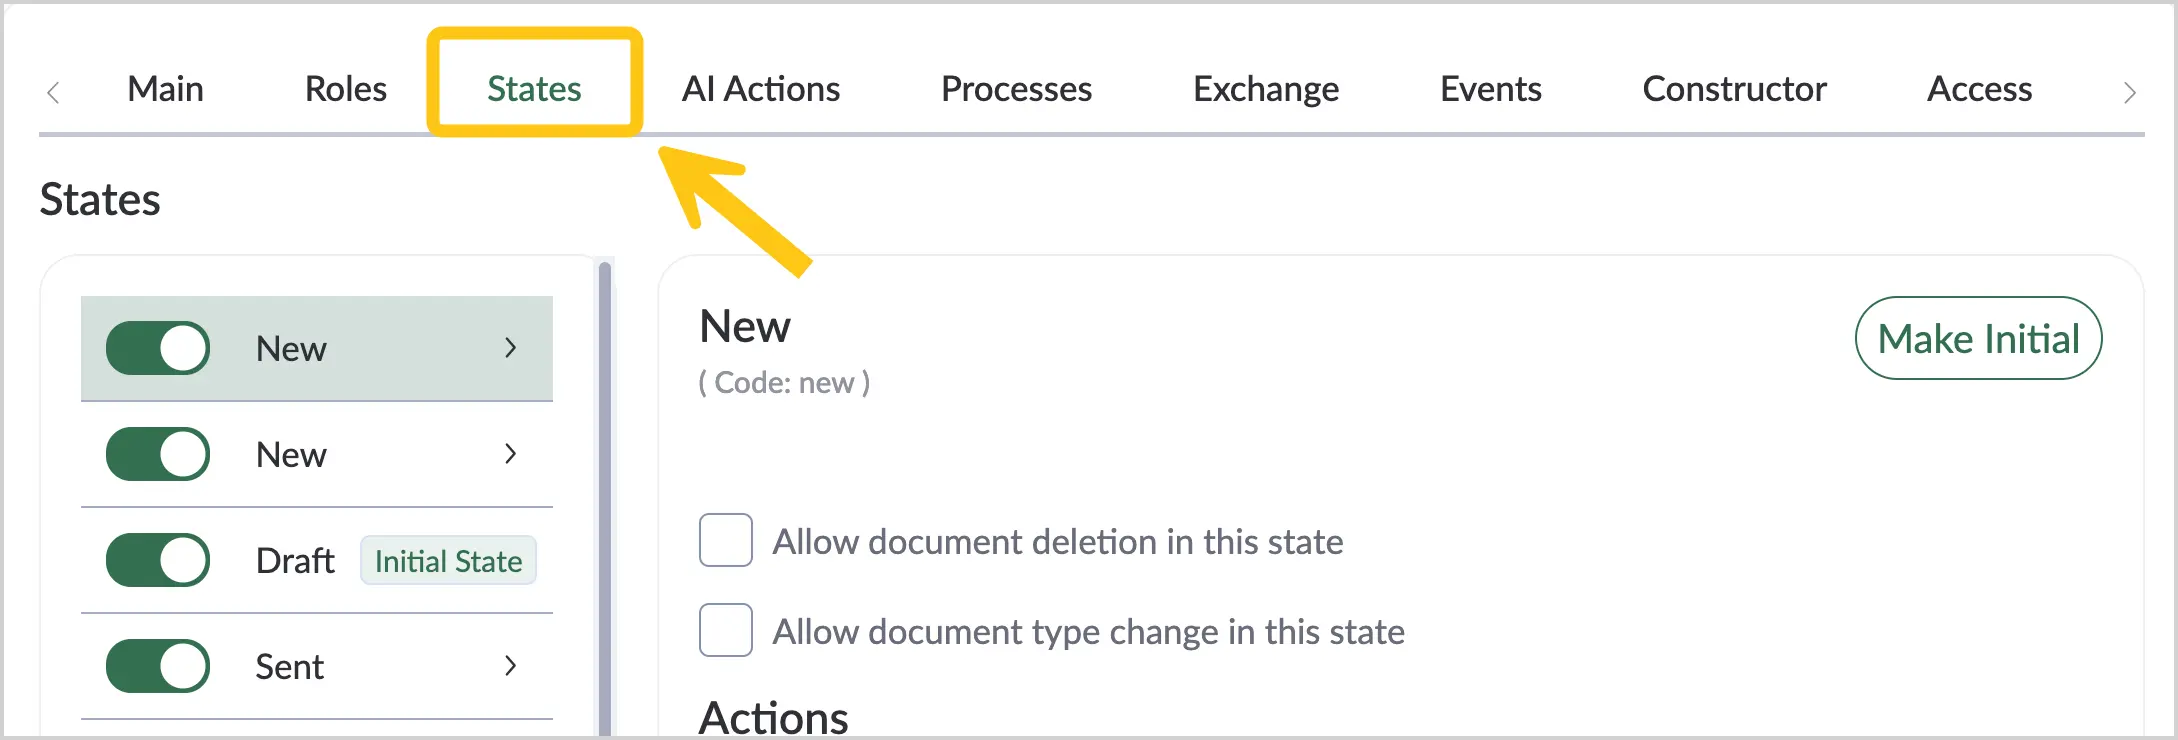
Go to the States tab.
-
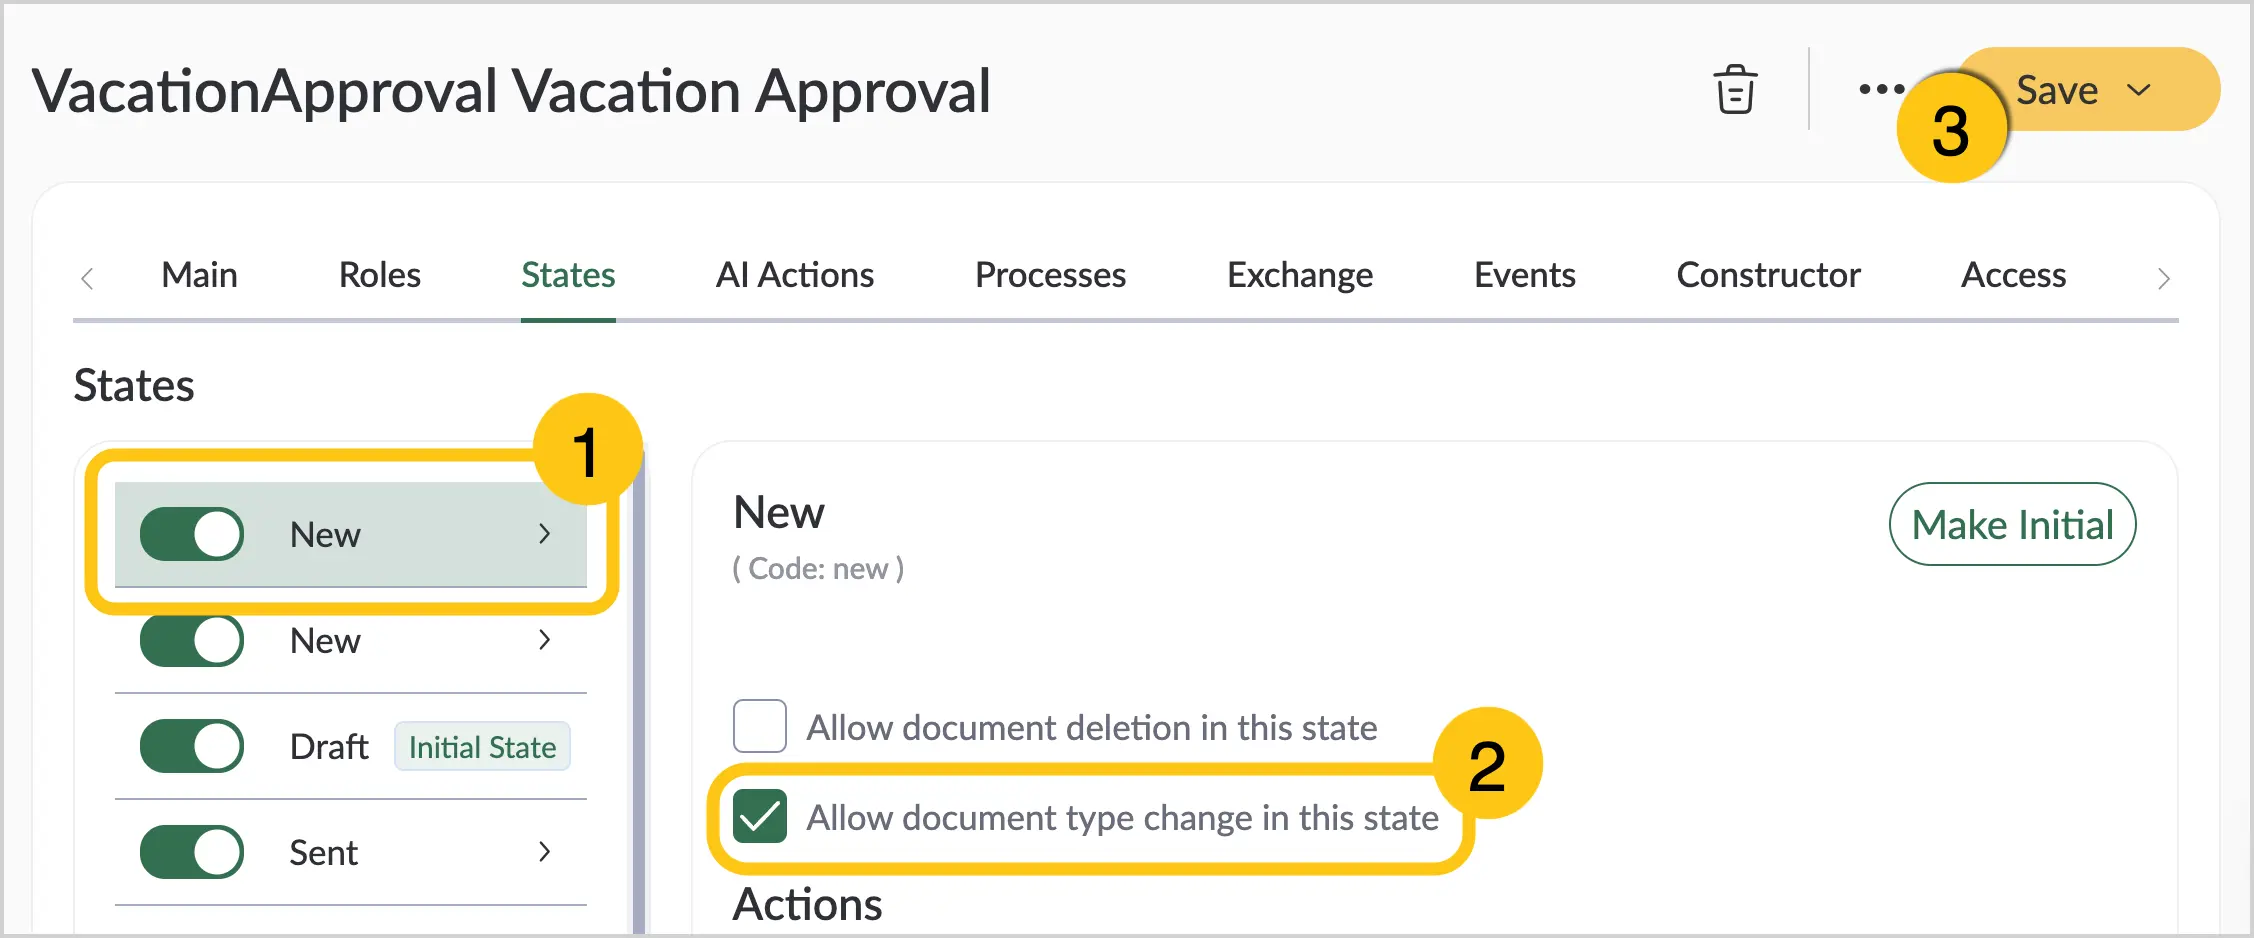
Enable the state toggle 1 in which the user will be able to change the document type.
-
In the state settings, check the Allow changing the document type in this state checkbox 2.
-
Select Save 3 to save the changes.
2.2.5.1.2. Enable Change for Document Role
-
In the navigation panel, select the Studio desktop 1.
-
Go to the Document Types shortcut 2.
-
Open the desired document type 3.
-
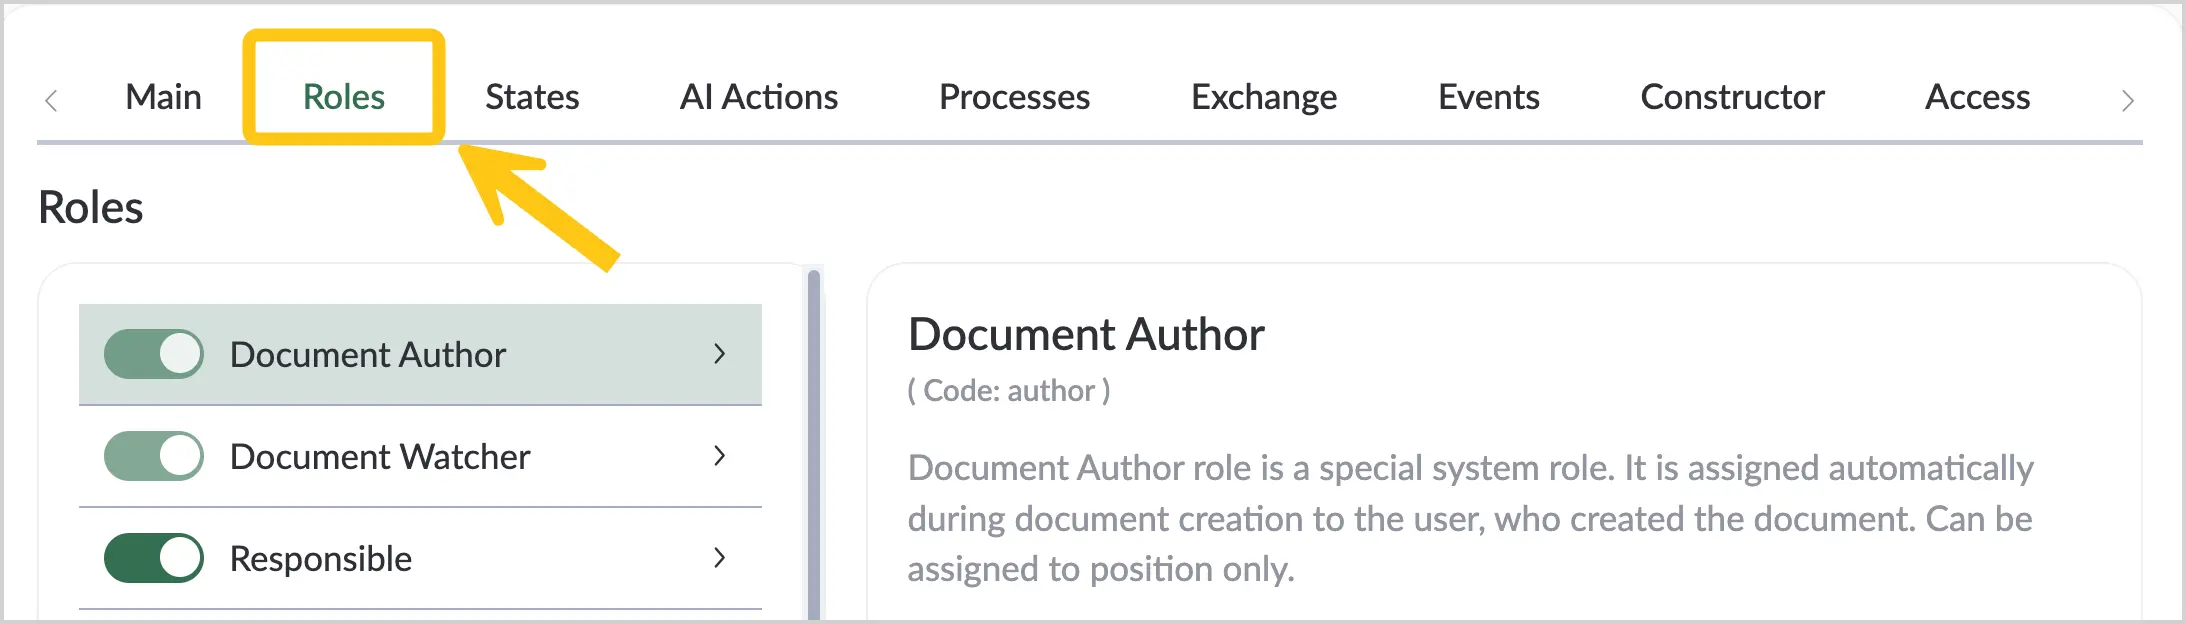
Go to the Roles tab.
-
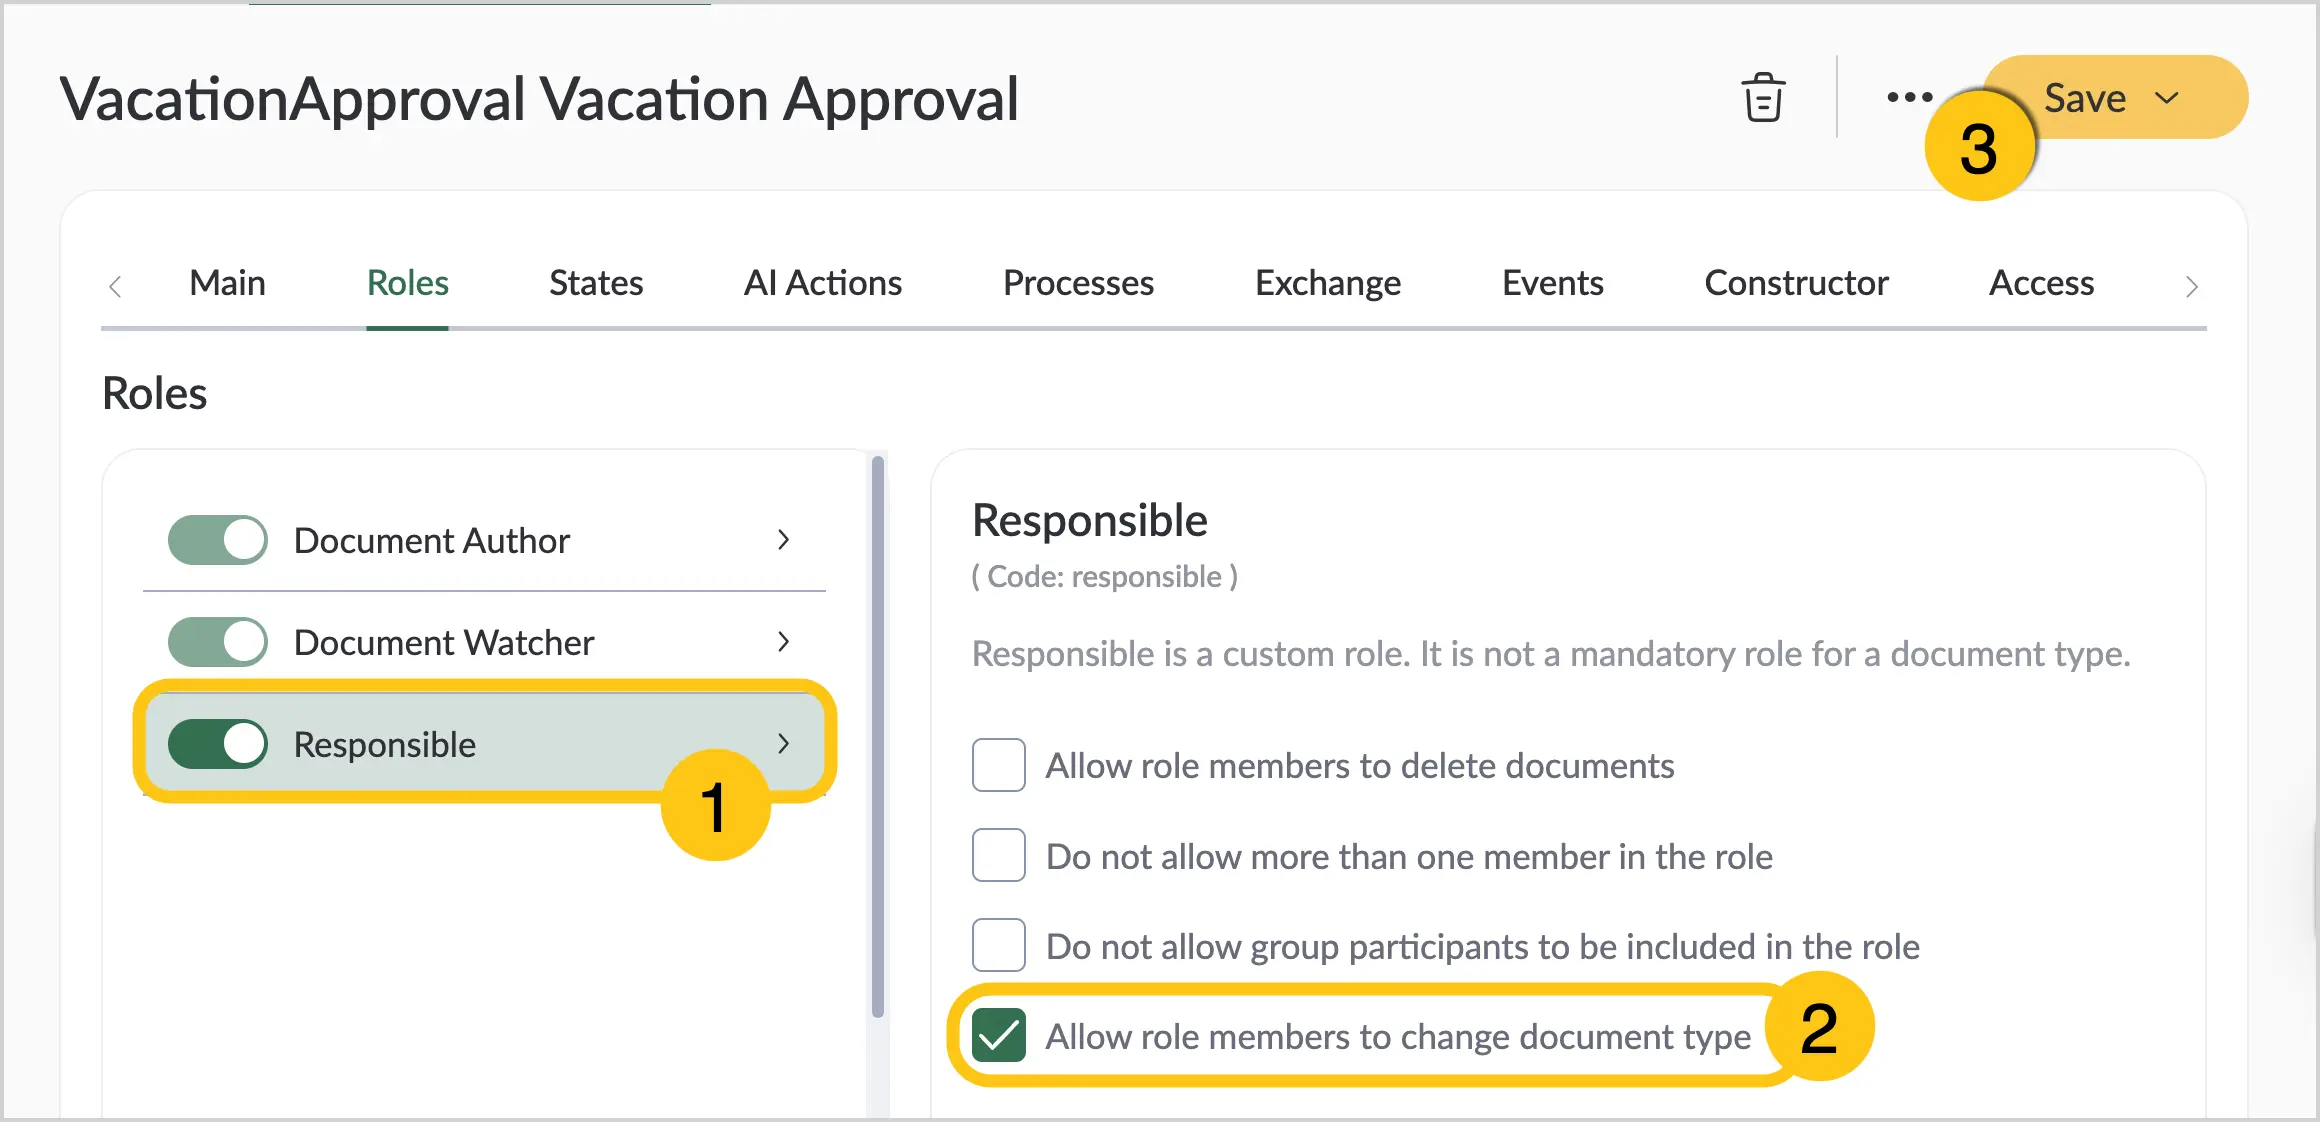
Enable the role toggle 1 for the role whose members will be able to change the document type.
-
In the role settings, check the Allow role members to change the document type checkbox 2.
-
Select Save 3 to save the changes.
2.2.5.1.3. Grant User Access to Change
-
In the navigation panel, select the Studio desktop 1.
-
Go to the Document Types shortcut 2.
-
Open the desired document type 3.
-
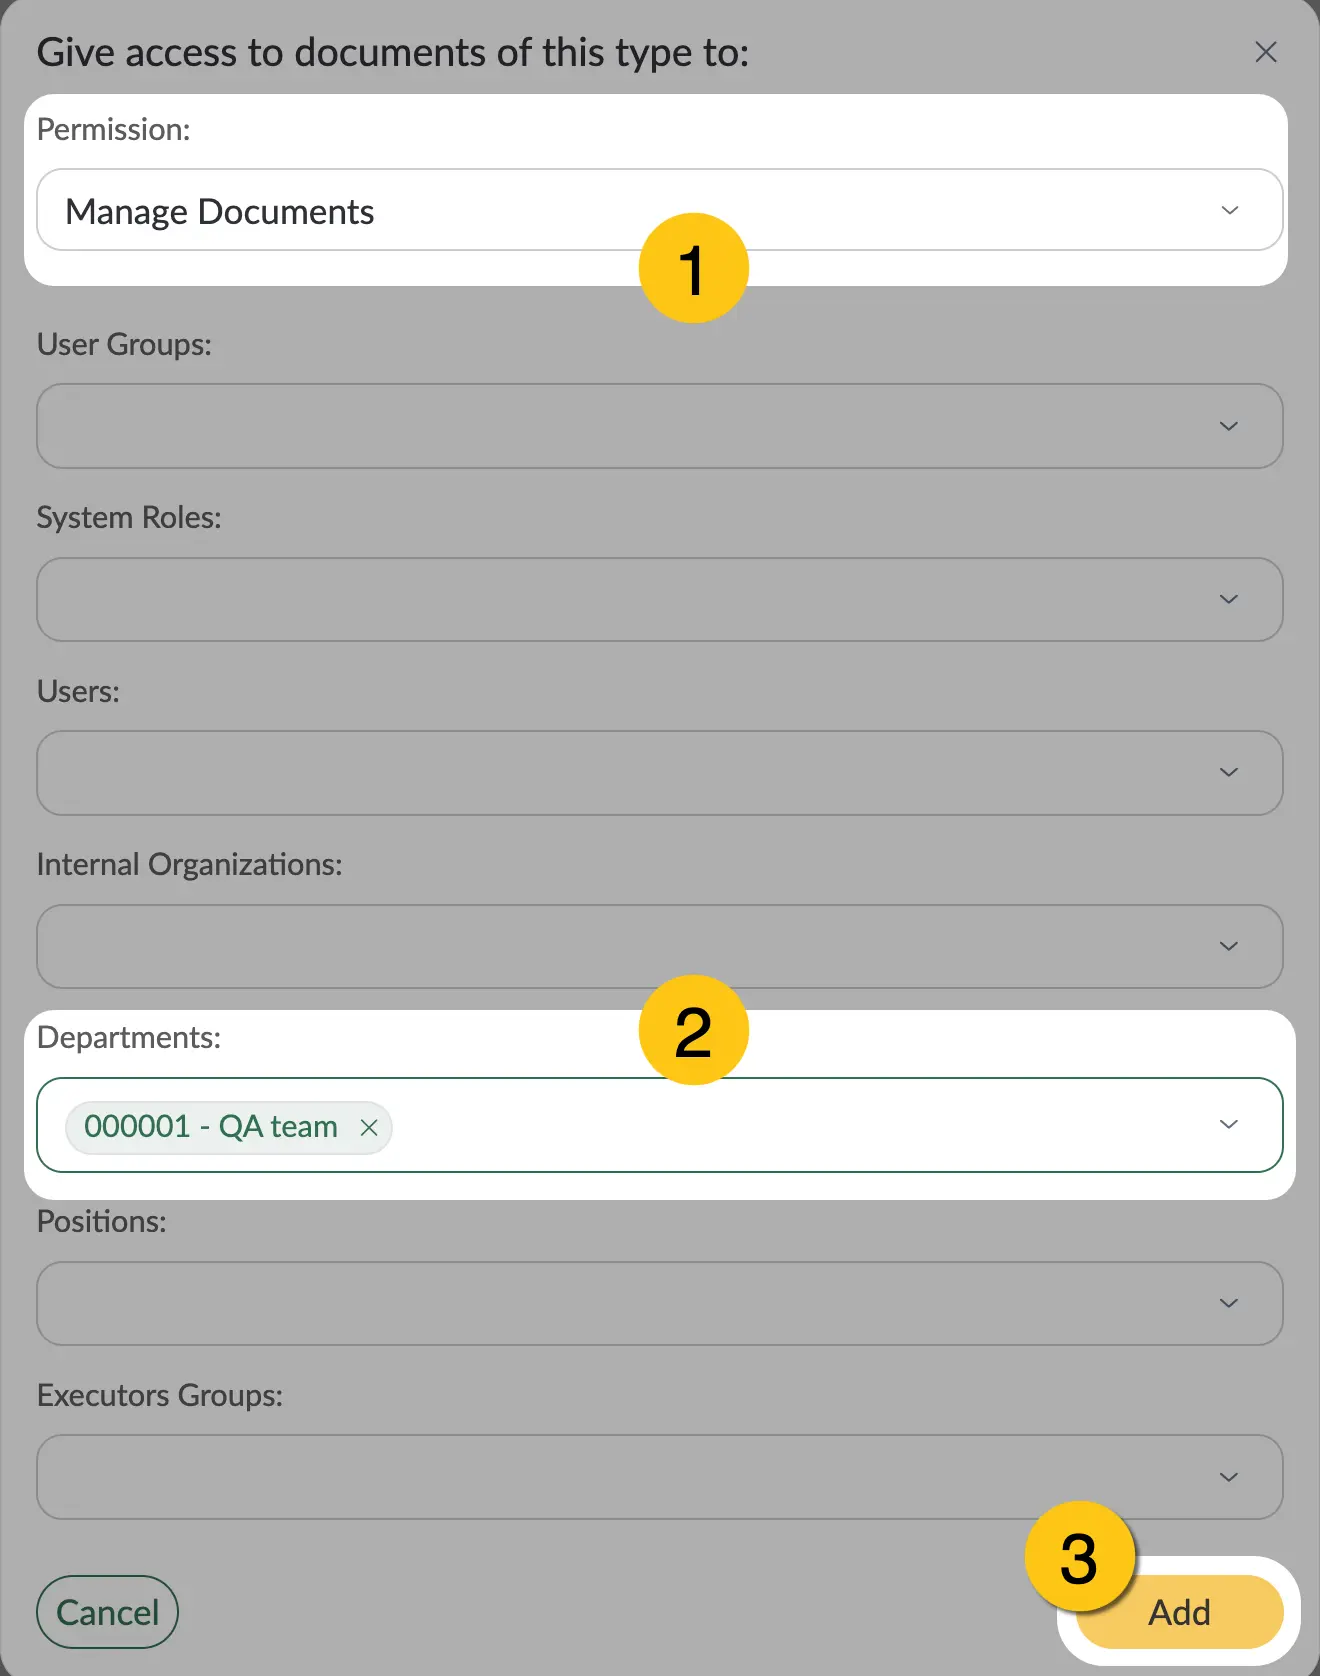
Go to the Access tab 1, then select + Add 2.
-
In the Permission field 1, select one of the following access options:
- Manage documents
- View documents
- Create documents
- Delegate document roles
-
In the corresponding field, specify the unit you want to grant access to 2.
-
Select the Add button 3.
2.2.5.2. Perform Document Type Change
Before changing the document type, pay attention to the following:
-
If an active business process is attached to the current document type, verify its health after the change.
-
If the target document type does not have the user's role, the user will automatically receive the observer status.
-
Document links are preserved after the type change.
-
Open the required document whose type you want to change.
-
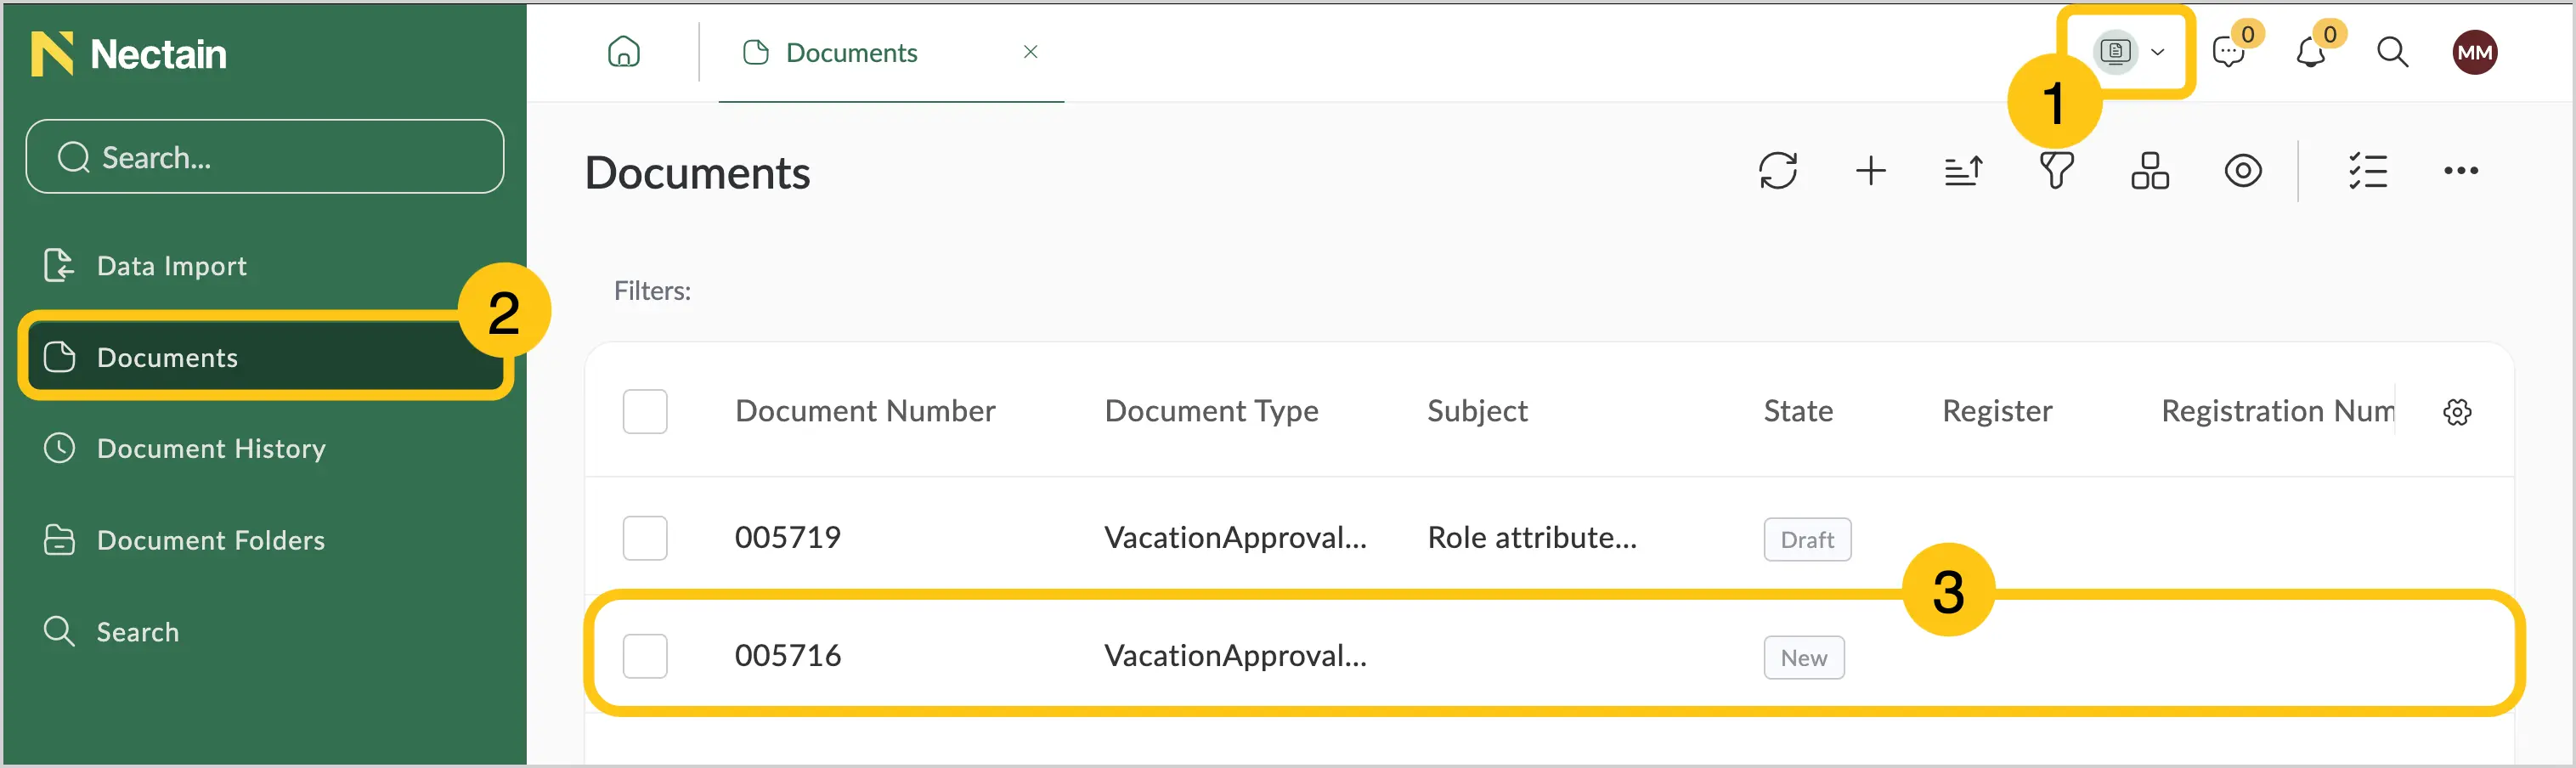
In the navigation panel, select the Documents desktop 1.
-
Go to the Documents shortcut 2.
-
Open the required document 3.
-
-
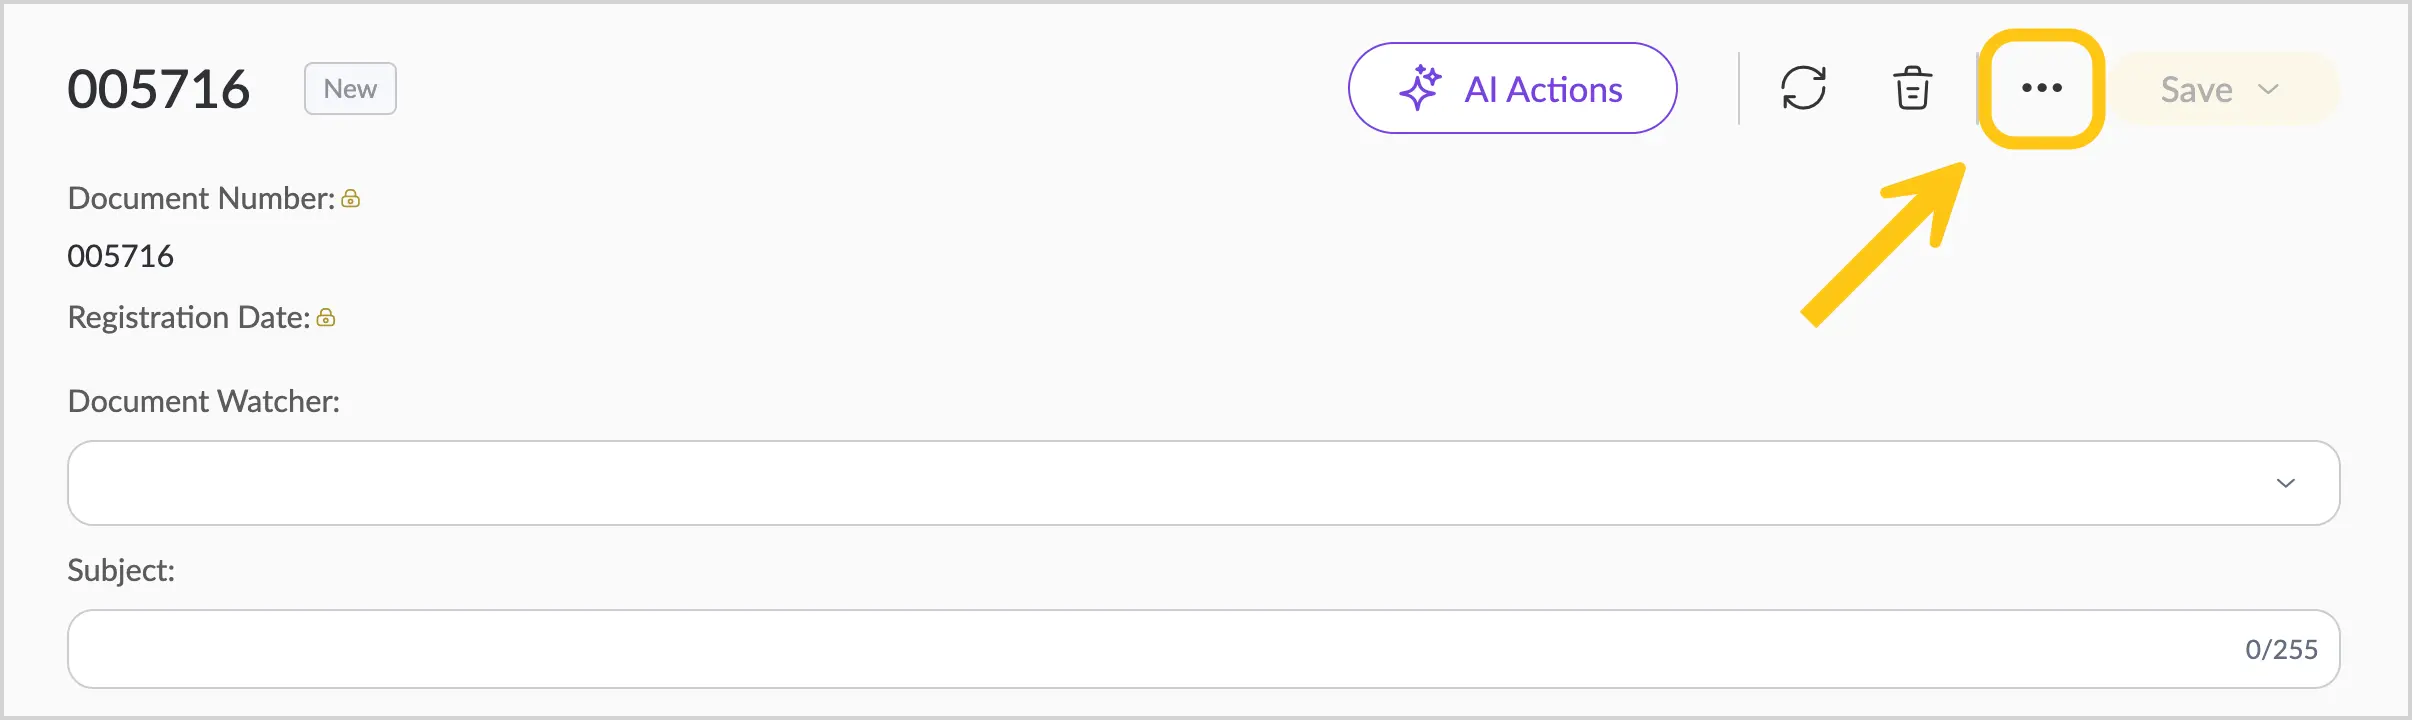
In the upper-right menu, select the icon.
-
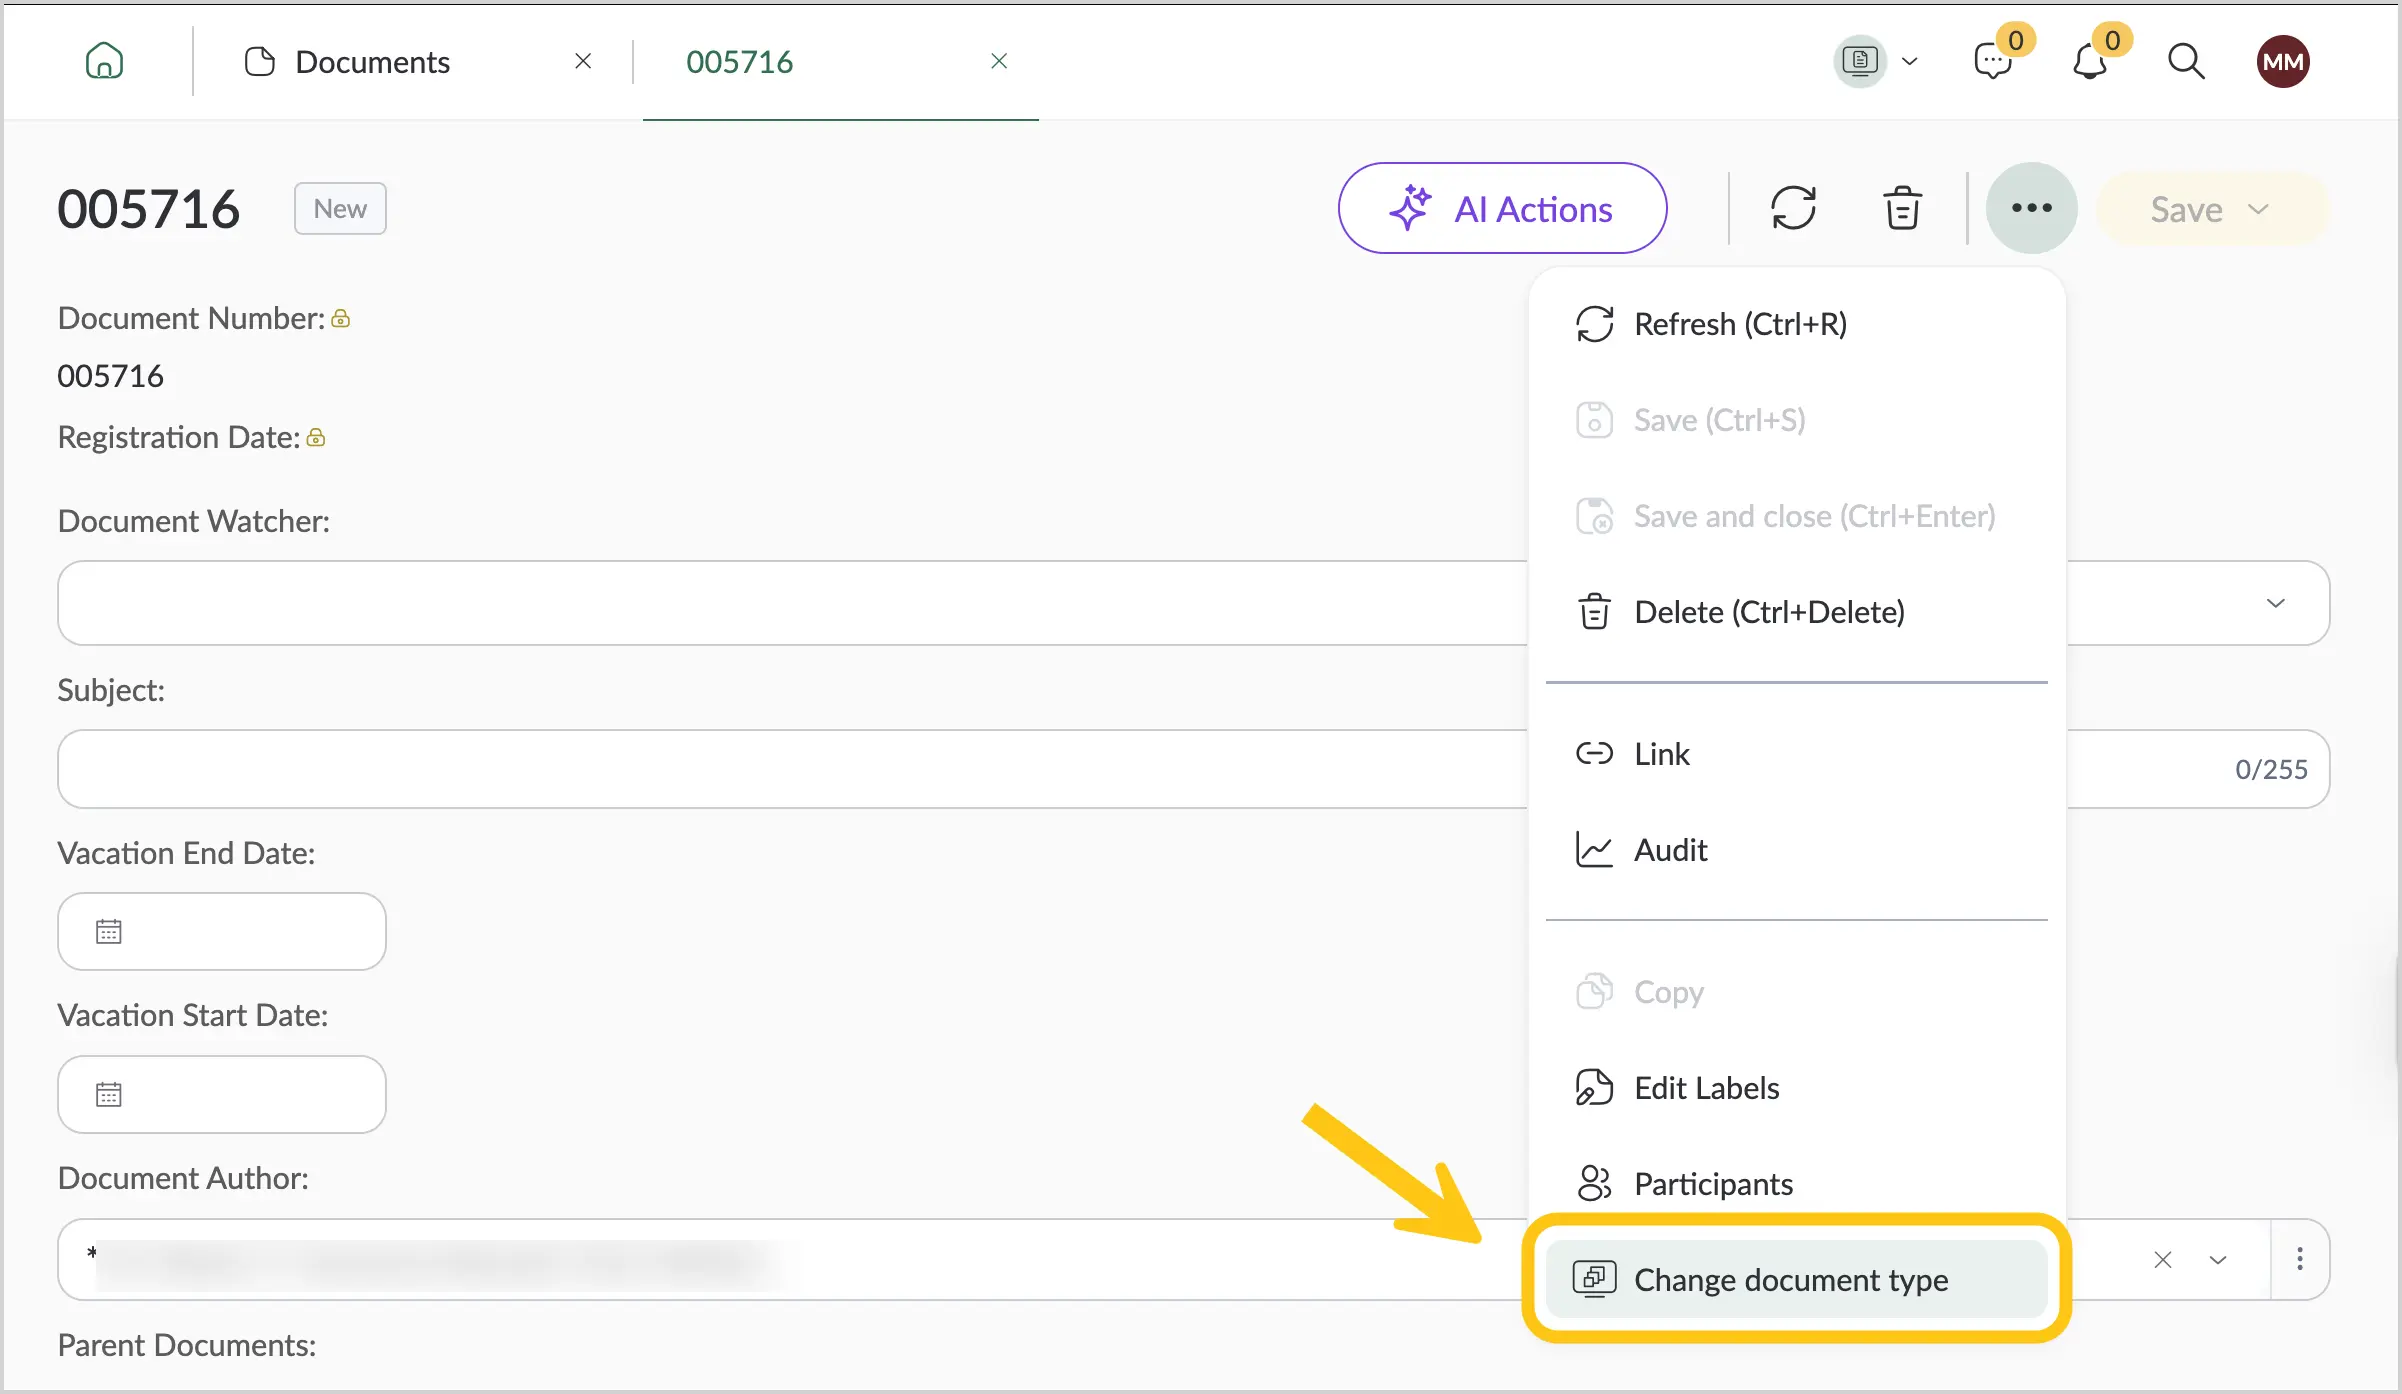
Select Change Document Type.
-
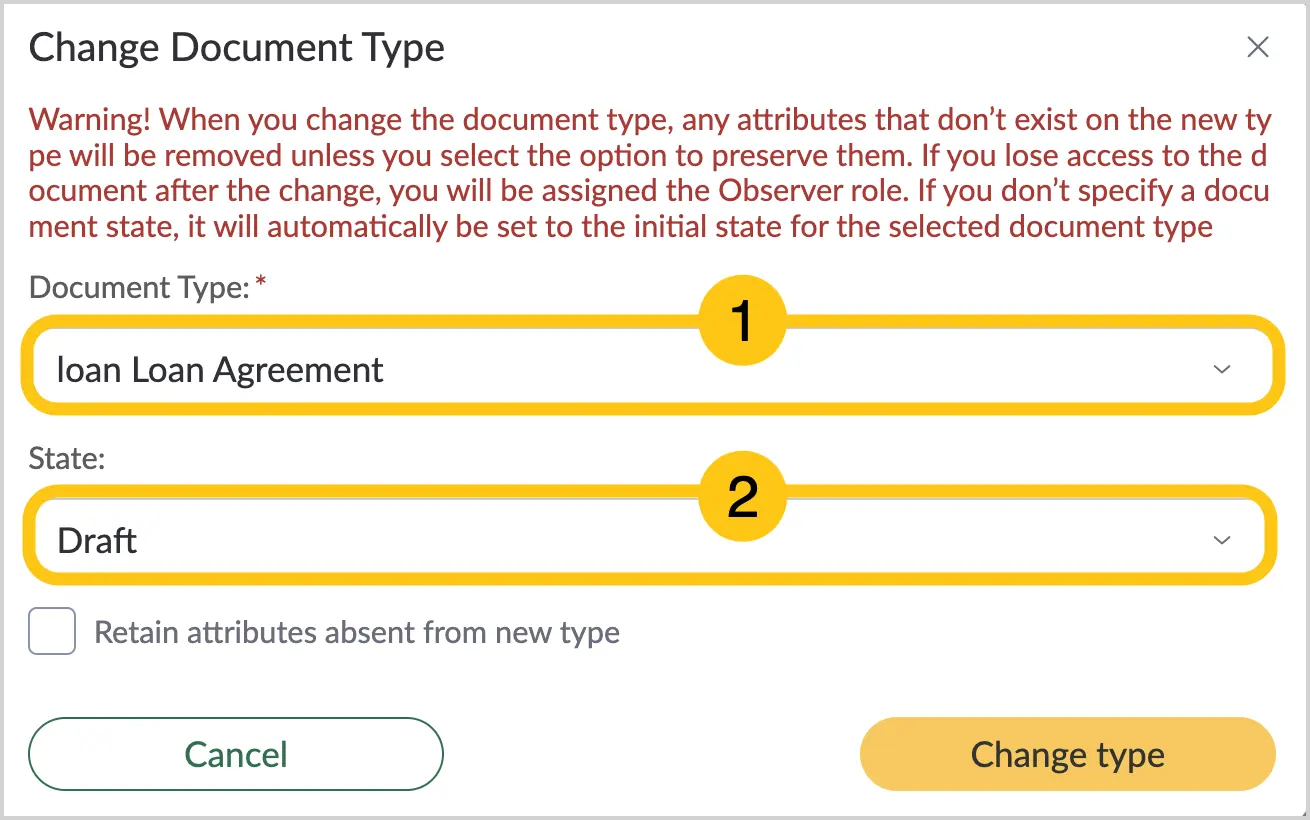
In the Document type field 1, select the target document type.
Note:If you do not see the required document type in the list, make sure you have configured the appropriate access in the Access tab in the document type settings.
-
In the State field 2, select the state the document will have after changing its type. If you do not specify a state, the document will be assigned the state of the selected document type that is marked as initial.
-
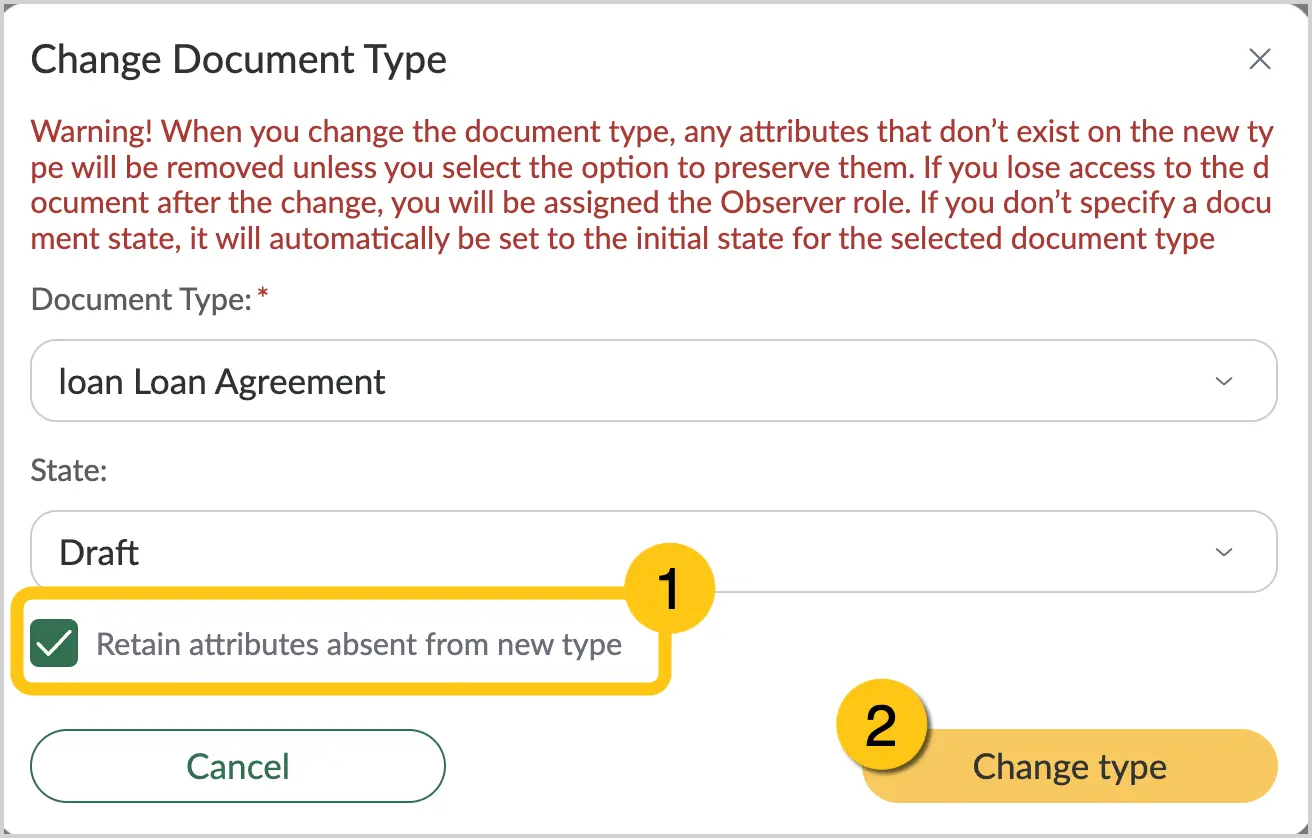
To preserve all attribute data in the database, check the Retain attributes absent from new type checkbox 1. If the new document type does not contain some attributes, their values are not displayed in the document. However, they remain in the database and become available after adding the attributes to the form.
-
Select the Change type button 2.
2.2.5.3. Display Document Type Change in the Audit
By default, a document type change is not displayed in the document audit. However, you can change this via settings. To do so, perform the following steps in both document types — the current and the target:
-
In the navigation panel, select the Studio desktop 1.
-
Go to the Document Types shortcut 2.
-
Open the desired document type 3.
-
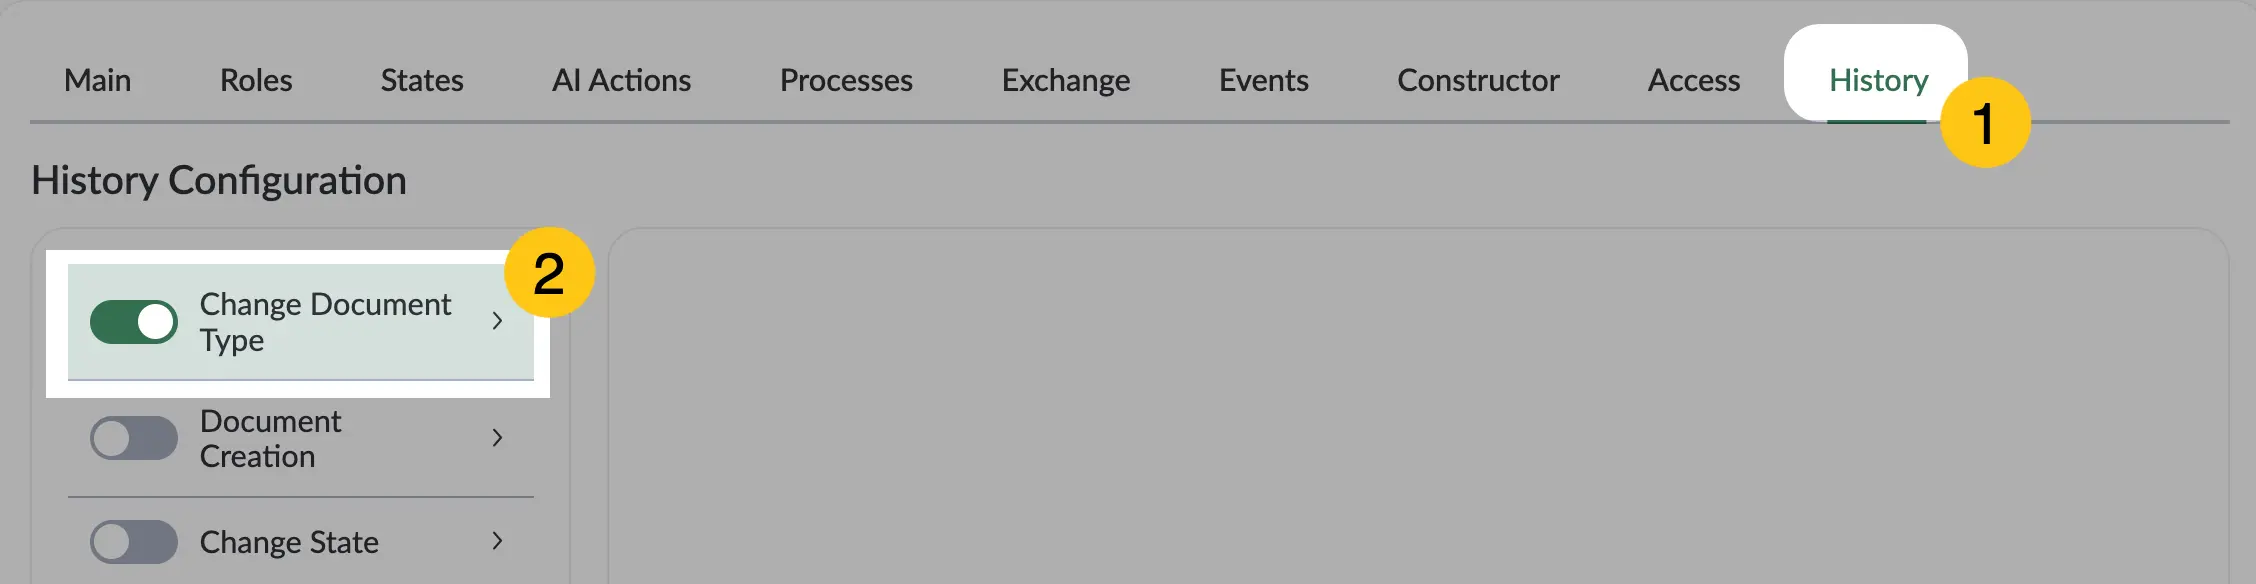
Go to the History tab 1.
-
Enable the Change Document Type toggle 2.
-
Select Save to save the changes.
In the Document History attribute, the document type change will be displayed as a change to the current document, not as a new document creation.
2.2.6. Open a Document Type
-
In the navigation panel, select the Studio desktop 1.
-
Select the Document Types shortcut 2.
-
In the table, double-click the document type record you want to open 3.