2.14.2. IDP Recognition
The IDP Recognition feature is only available with the installation of the additional package dfx-idp.
Document recognition using IDP technology is an existing feature of the Nectainium platform. The functionality works without changes; however, the shortcuts used for configuring IDP recognition have been renamed and relocated.
2.14.2.1. Configure IDP Recognition
Configuring IDP recognition consists of the following steps:
-
Select the Azure or Google provider and create an account to obtain a key:
-
Create an IDP entity — define what data needs to be recognized in documents and how it should be structured. Alternatively, you can use the default entities already available in the system:
a. Prebuilt-invoice (for the Azure provider)
b. Prebuilt-receipt (for the Azure provider)
c. INVOICE_PROCESSOR (for the Google provider)
-
Add a model — connect the created Azure or Google profile to the Nectainium platform using the key.
-
Create a recognition template — configure how documents will be recognized and where the recognized data will be stored.
2.14.2.1.1. Create a Provider Account
Azure
Instructions for creating an Azure subscription for using the IDP feature in the Nectainium system with the Azure Form Recognizer provider.
-
Create a new Azure account or sign in if you already have one.
-
Go to the Azure Portal home page.
-
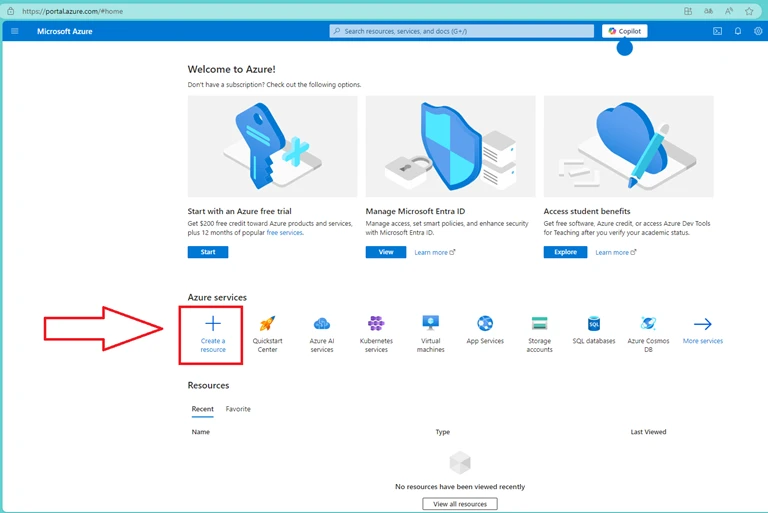
Select Create a resource.
-
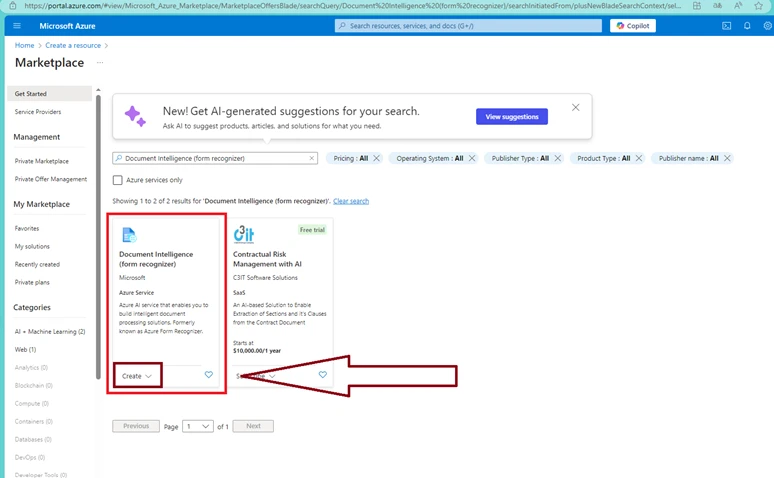
Select the resource type Document Intelligence (form recognizer), then select Create.
-
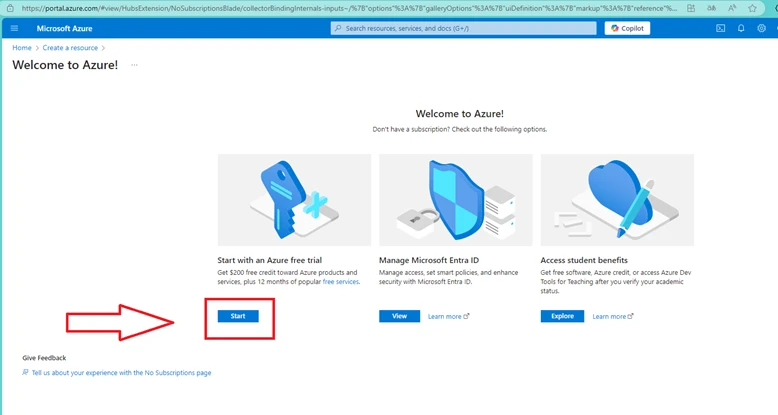
In the new window, select Start.
-
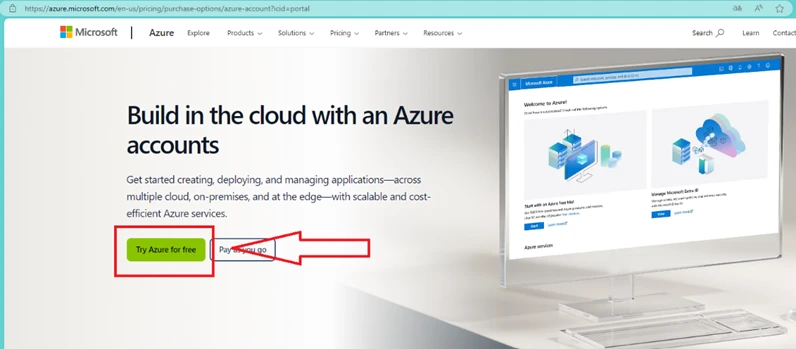
In the new window, select Try Azure for free.
-
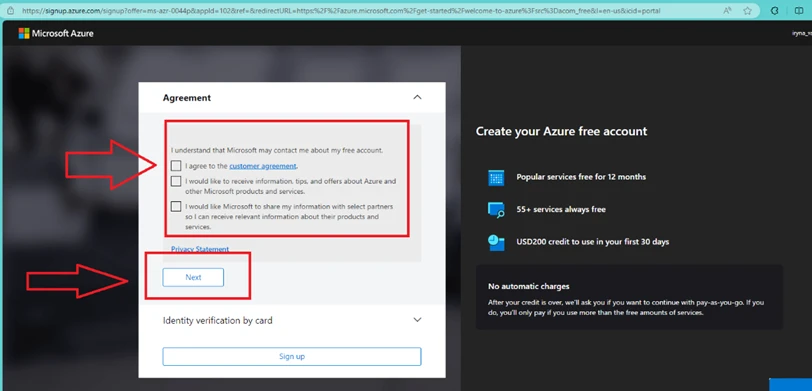
In the new window, agree to the customer agreement and select Next.
-
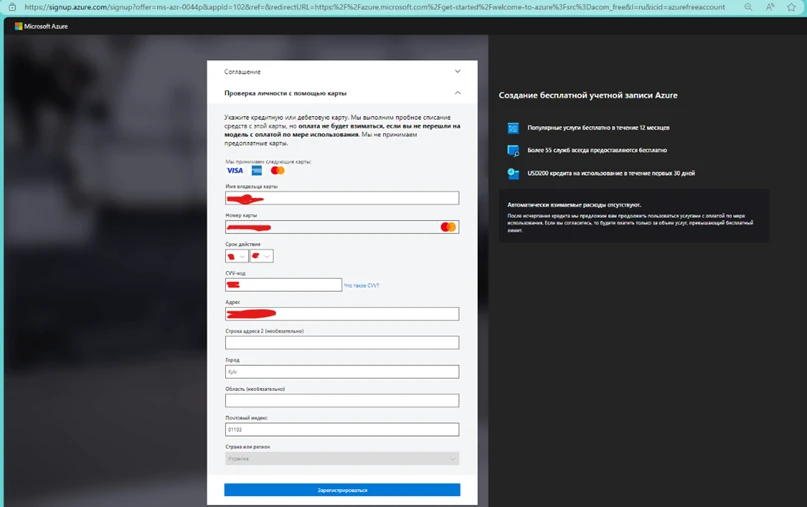
Enter your card details.
-
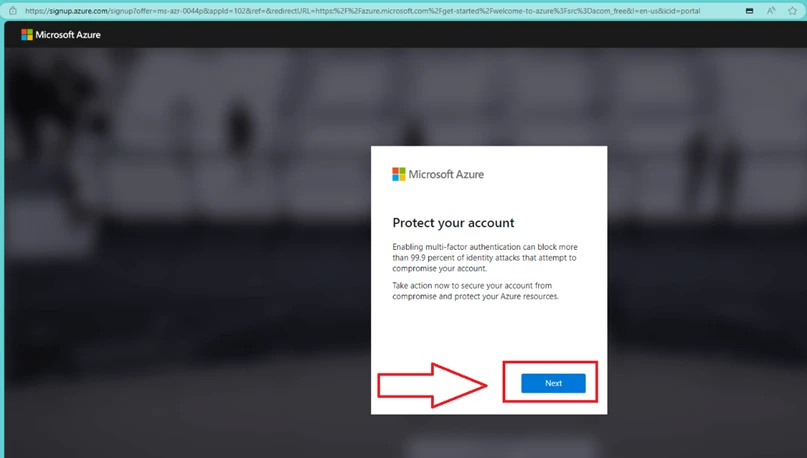
In the next window, confirm the security check by selecting Next.
-
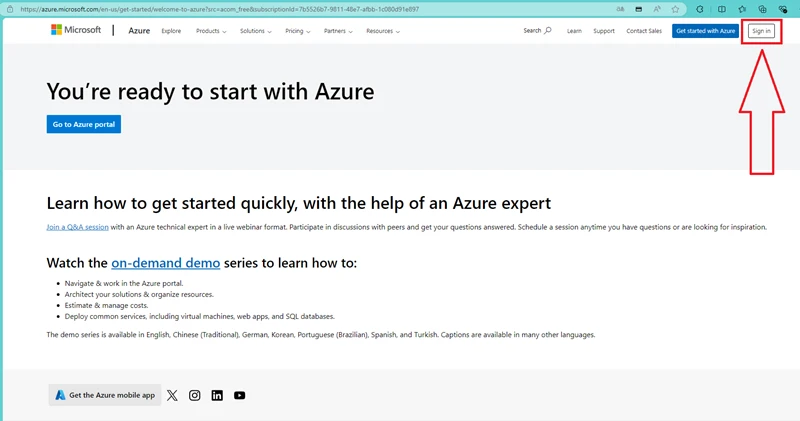
In the new window, sign in to your account using the Sign In button.
-
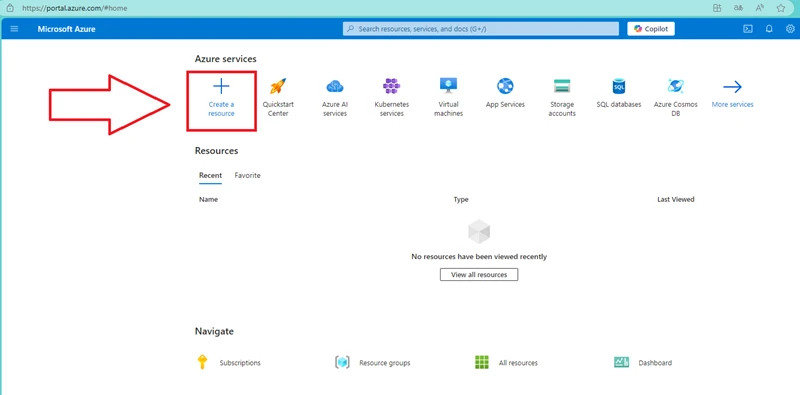
In the next window, select Create a resource.
-
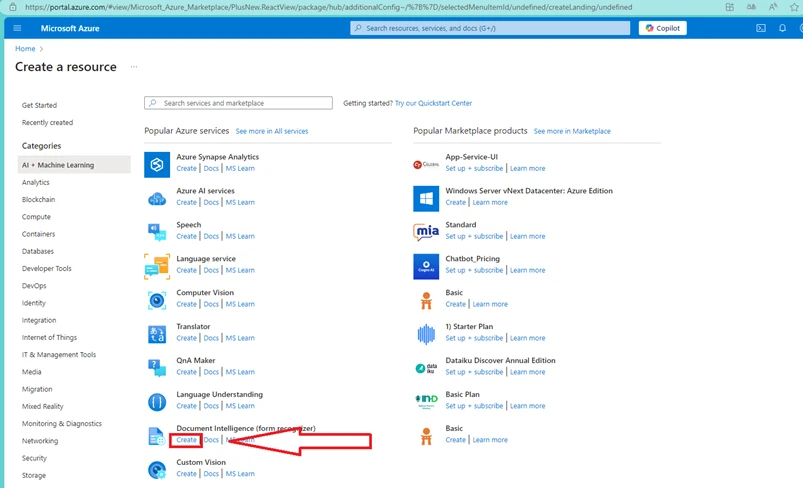
Find Document Intelligence (form recognizer) and select Create.
-
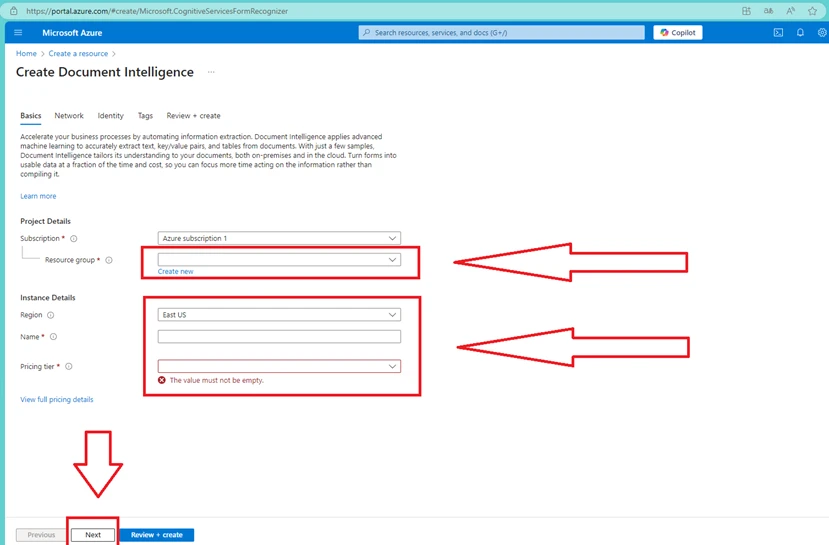
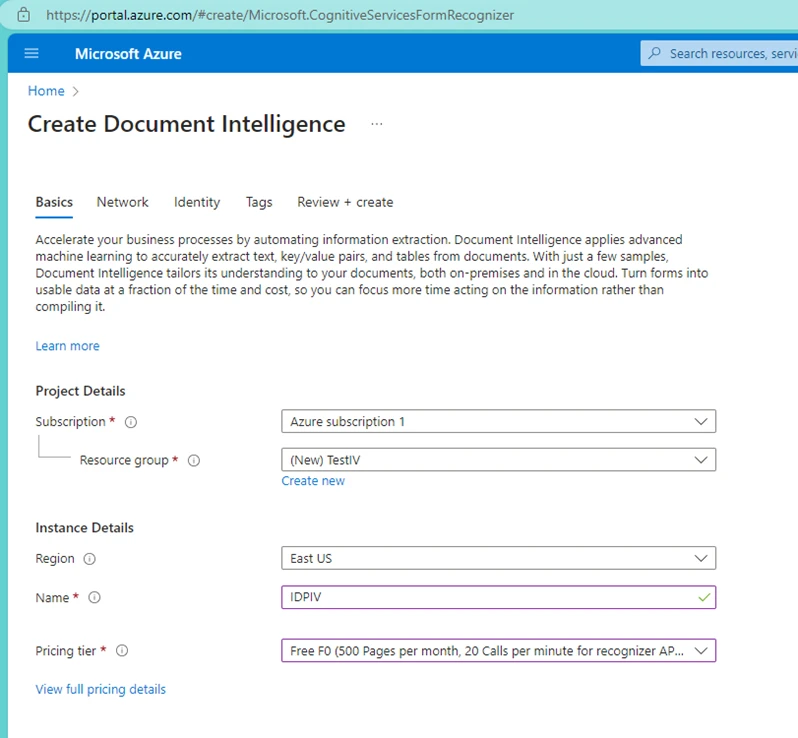
Fill in the required fields, select Price Tier = Free F0 for a free trial. Select Next.
Example:
-
If needed, configure the network access settings for the resource. Select Next.
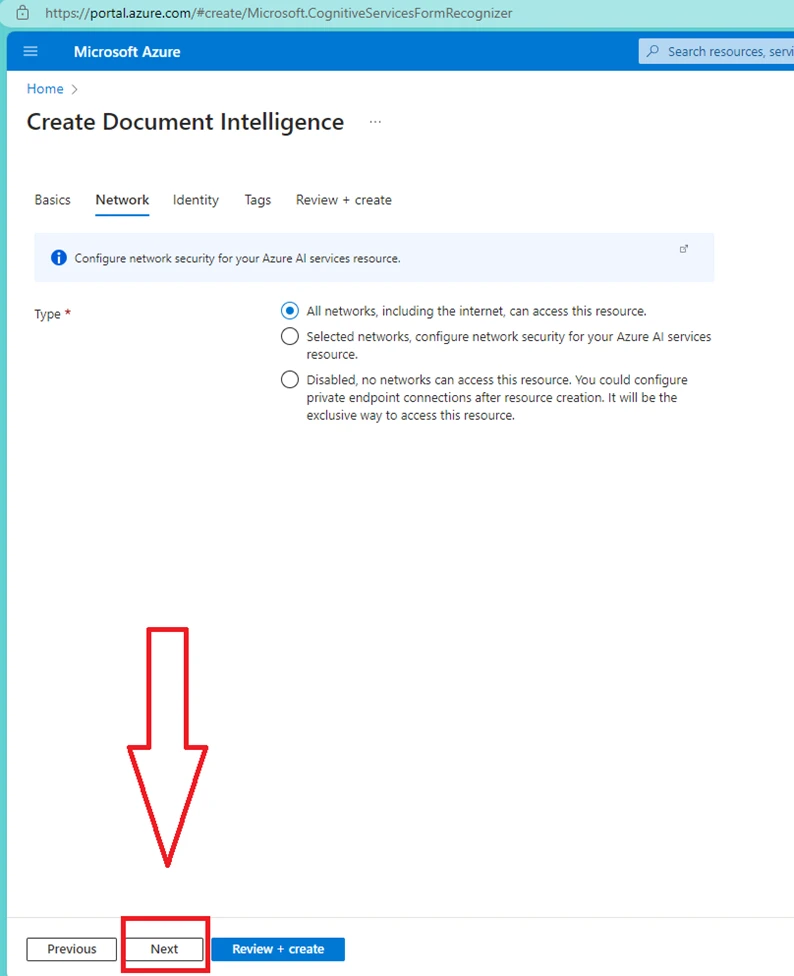
-
Select Next.
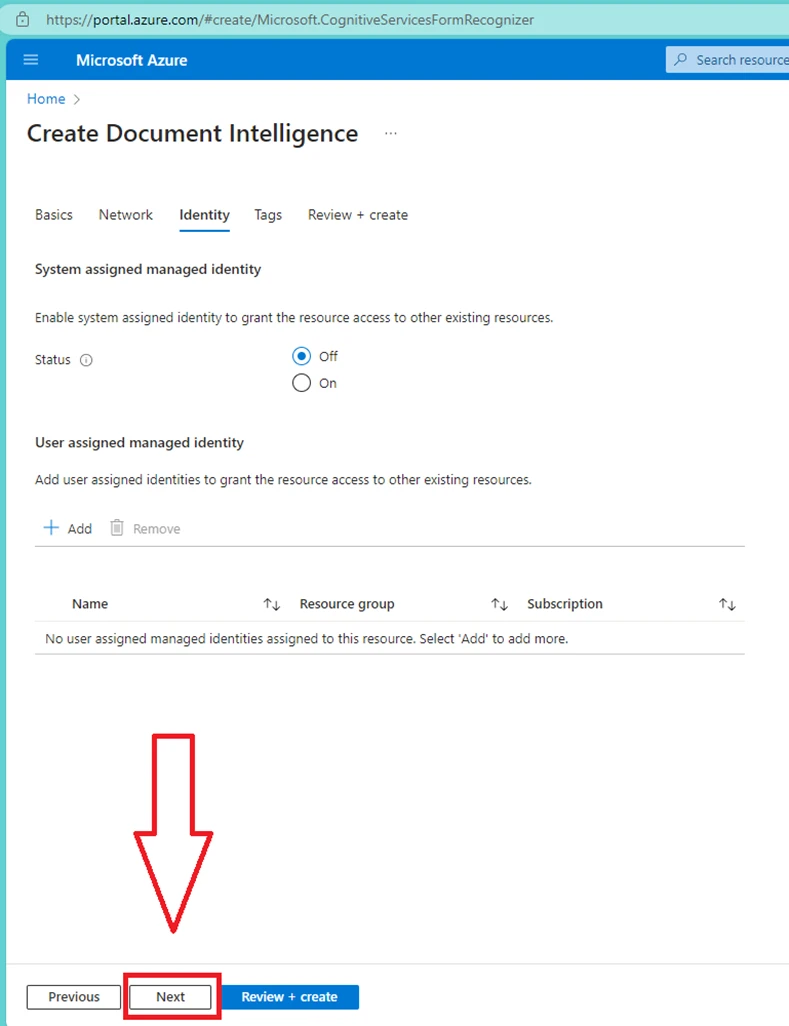
-
If needed, configure the resource tags. Select Next.
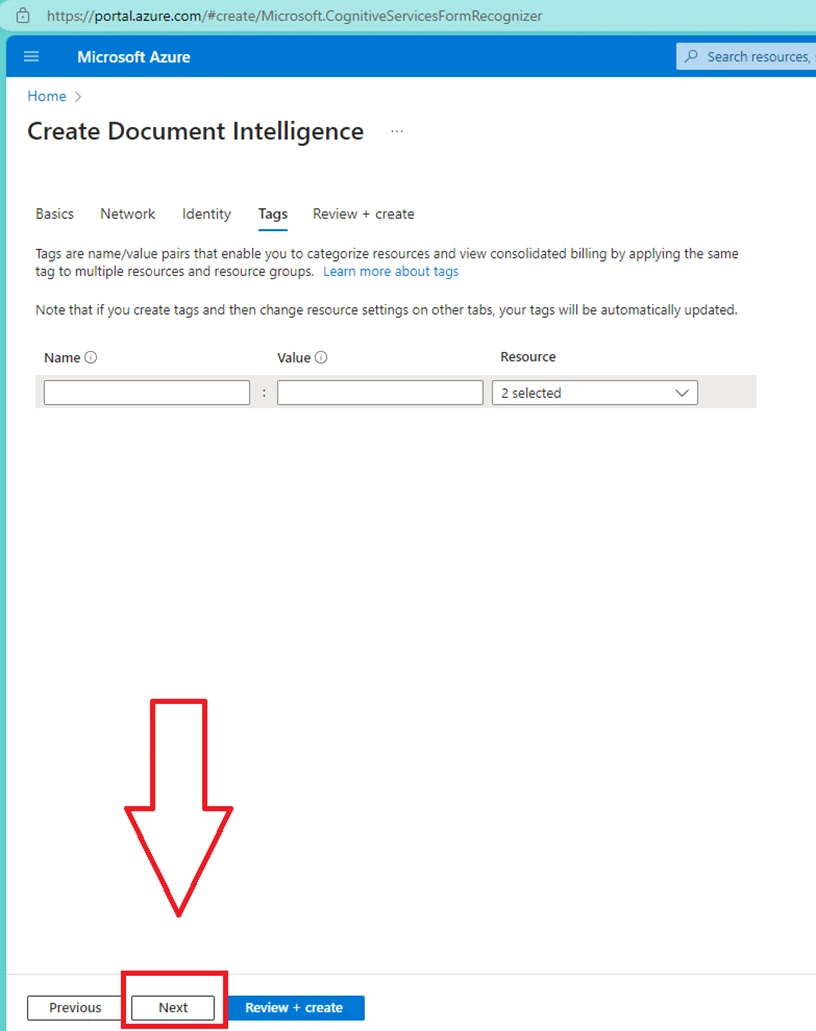
-
Select Create.
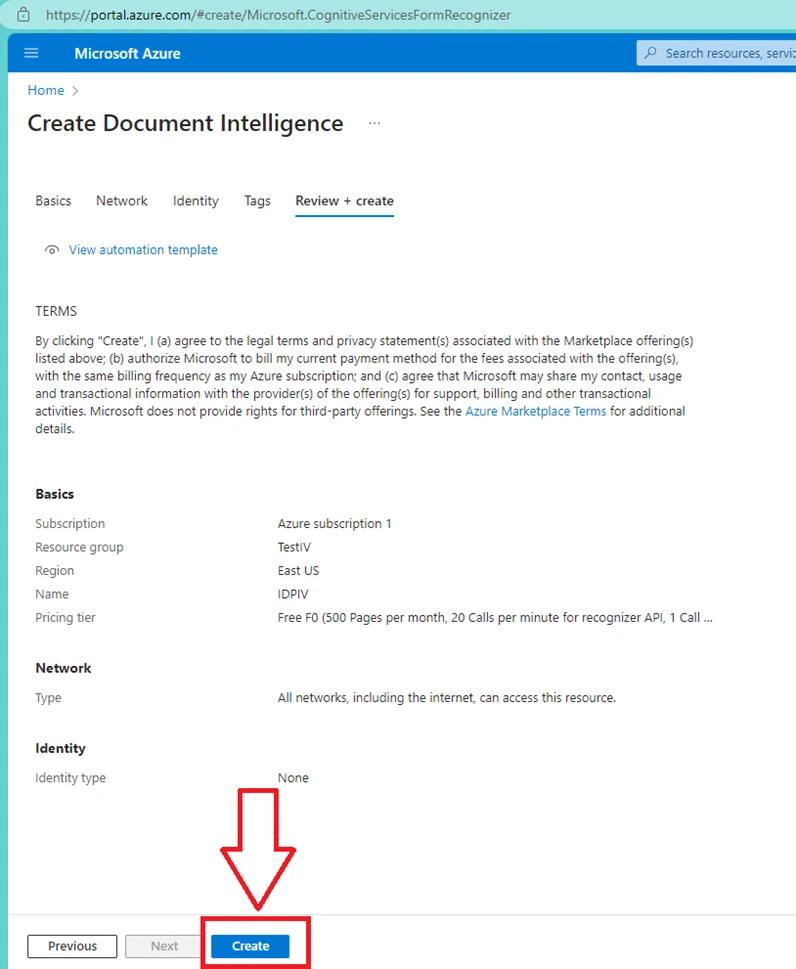
-
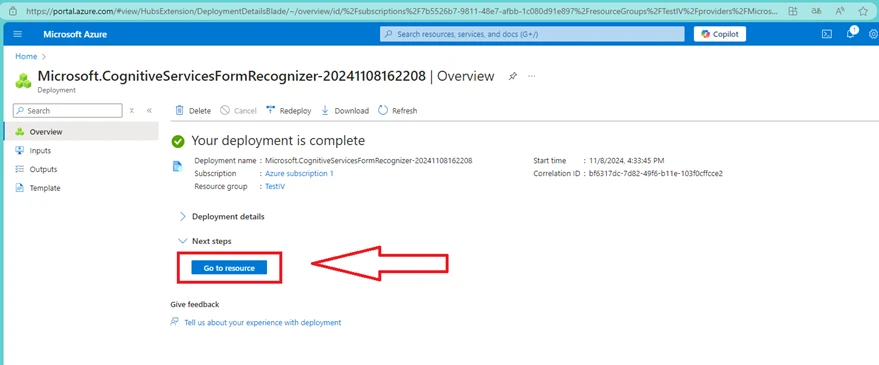
Wait for the resource to deploy. When complete, select Go to resource.
-
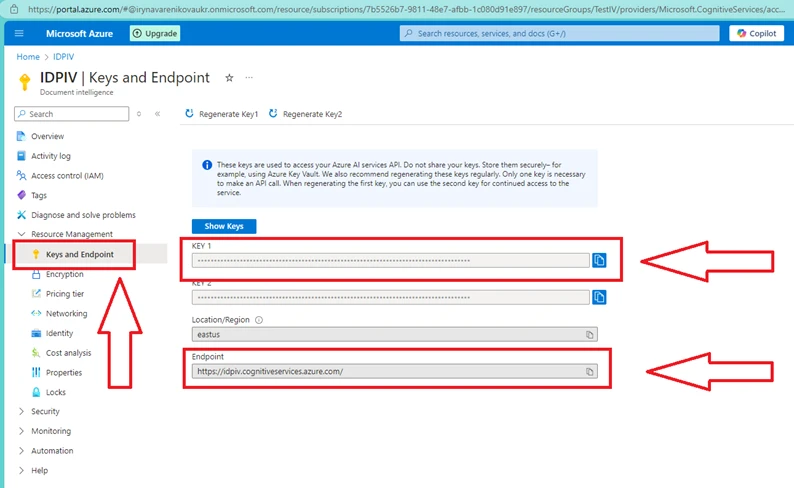
In the Keys and Endpoint section, copy the KEY1 and Endpoint values.
-
In the system, create an IDP profile for the AZURE provider using the KEY1 and Endpoint values. Also add the default IDP entities included with the system: Invoice for invoice recognition and Receipt for receipt recognition. To create the profile, log in to the system with Developer permissions and go to Administration — Settings — IDP Provider Profiles.
Google Cloud
Instructions for creating a Google Cloud subscription for using the IDP feature in the Nectainium system with the Google Form Recognizer provider.
Sign in to Google Cloud with an existing Google account (or create a new one if you don't have one).
-
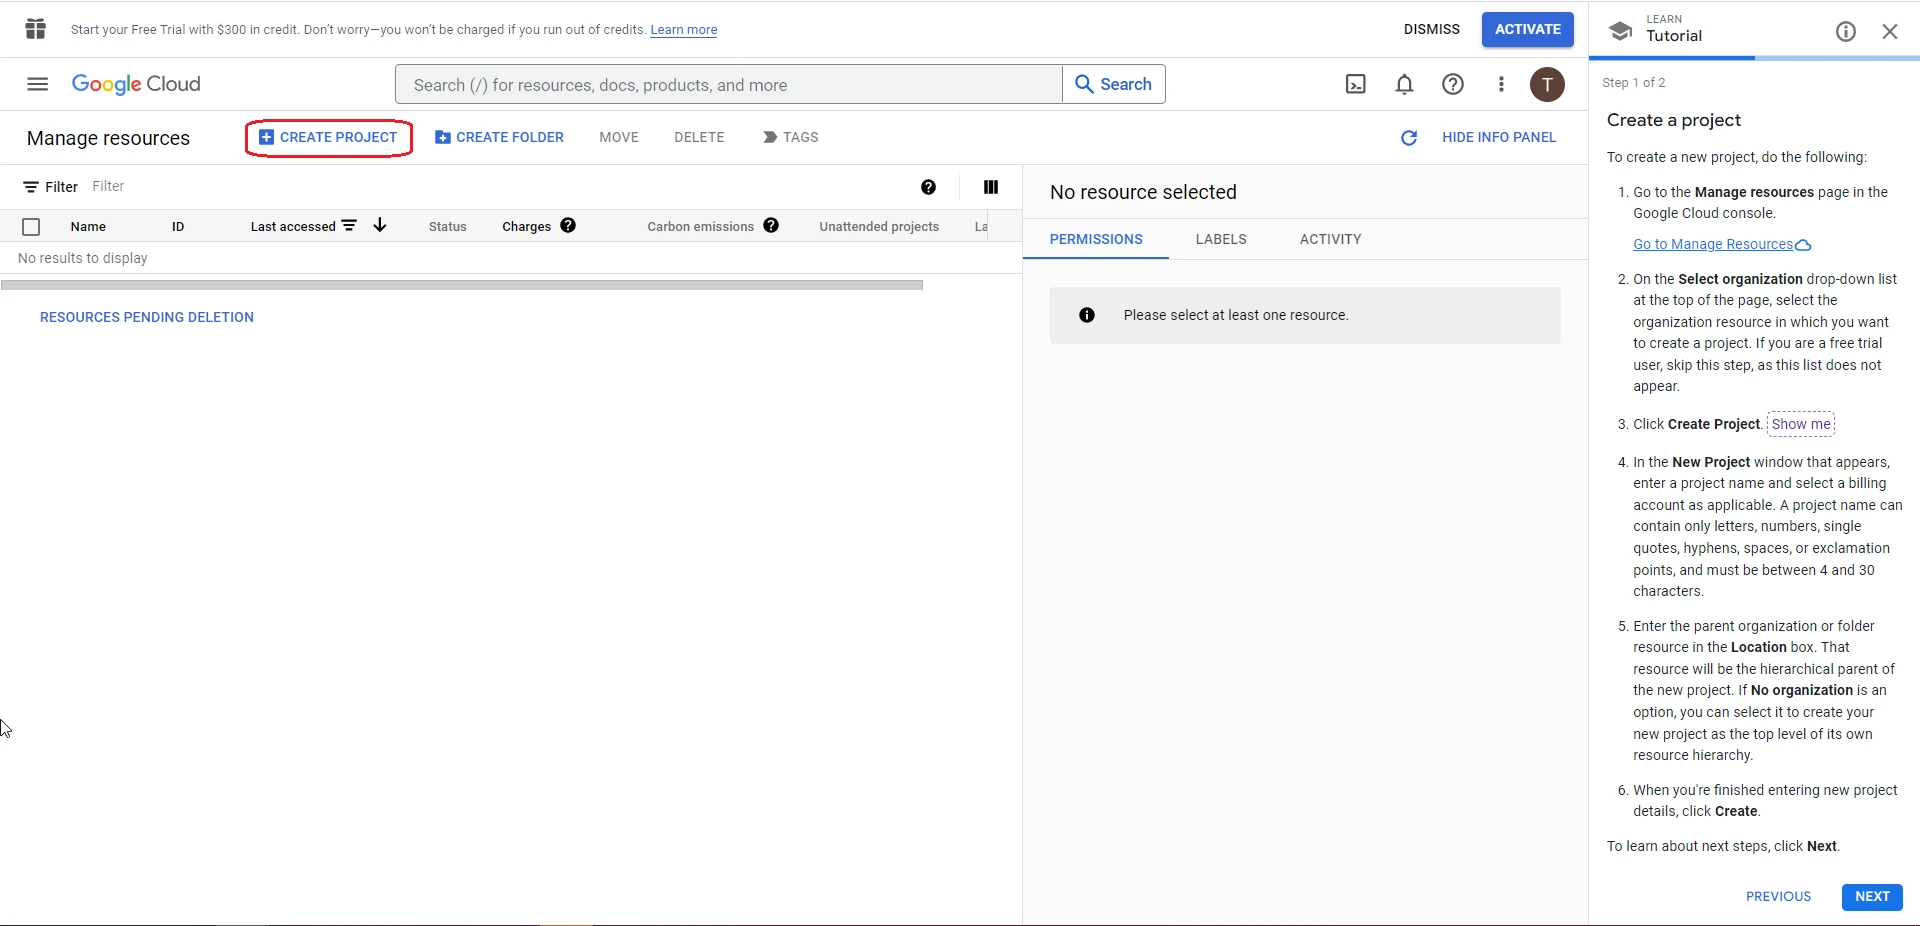
Select Create Project.
-
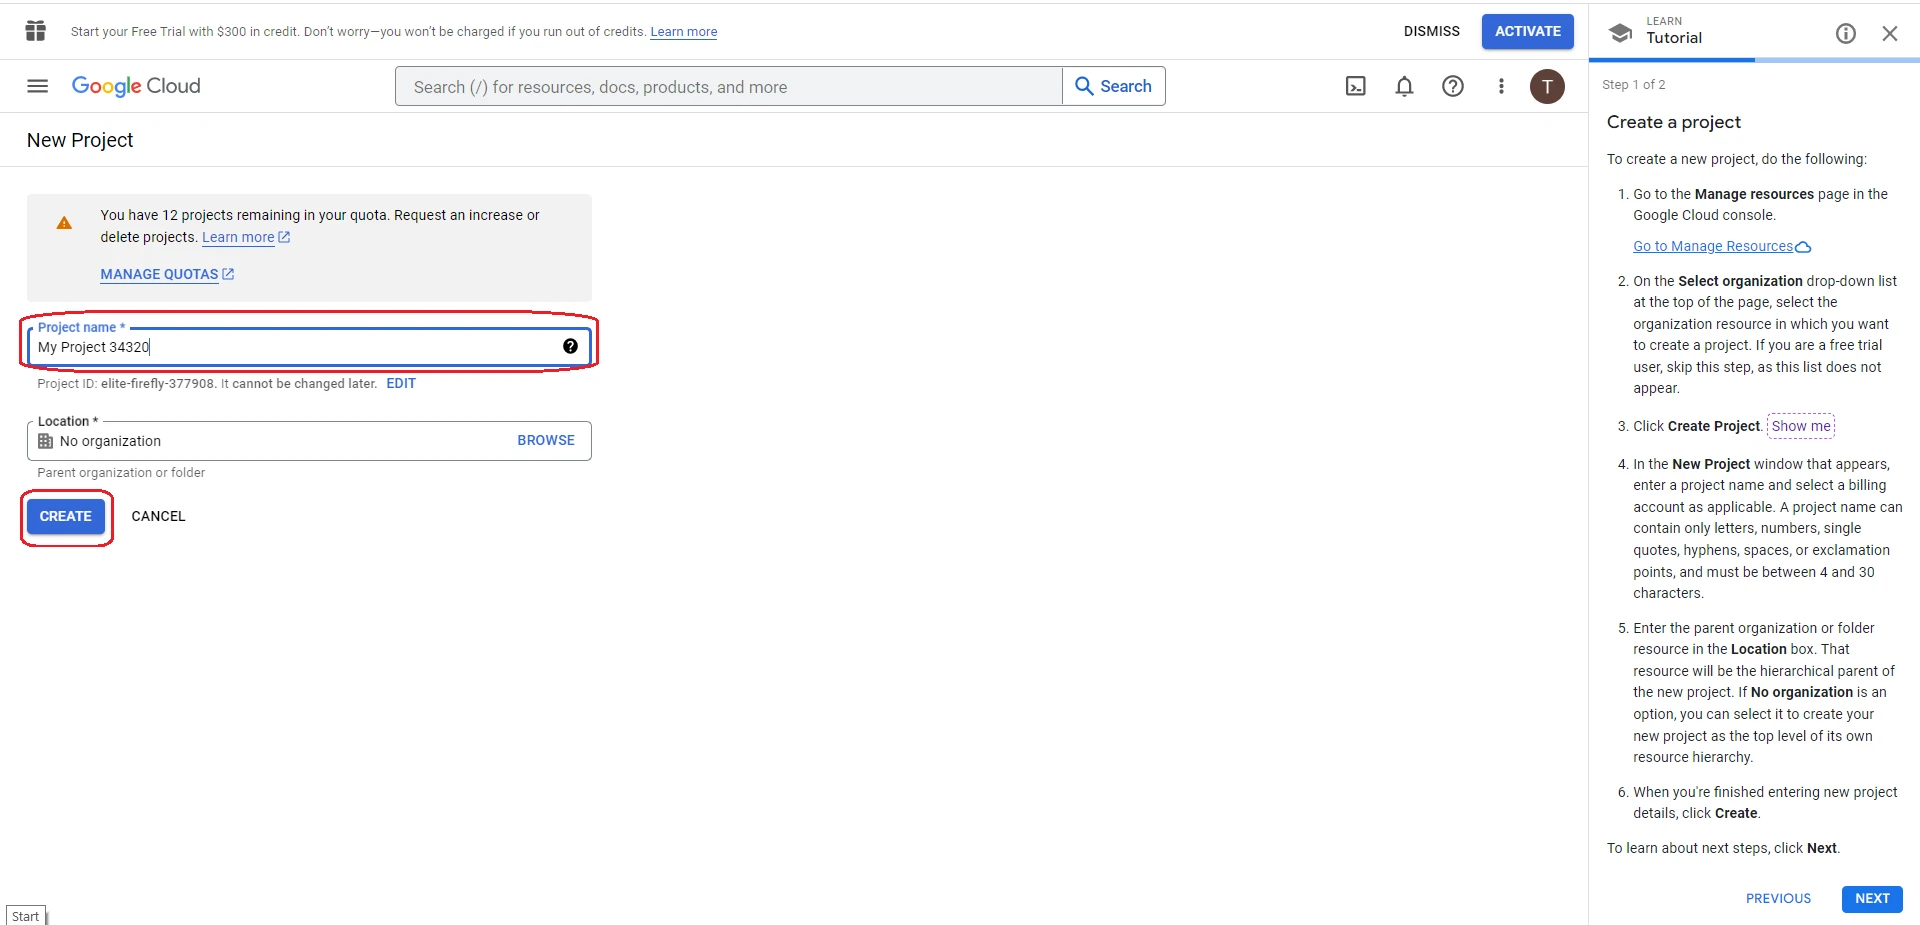
Enter a project name (or leave the auto-generated name) and select Create.
-
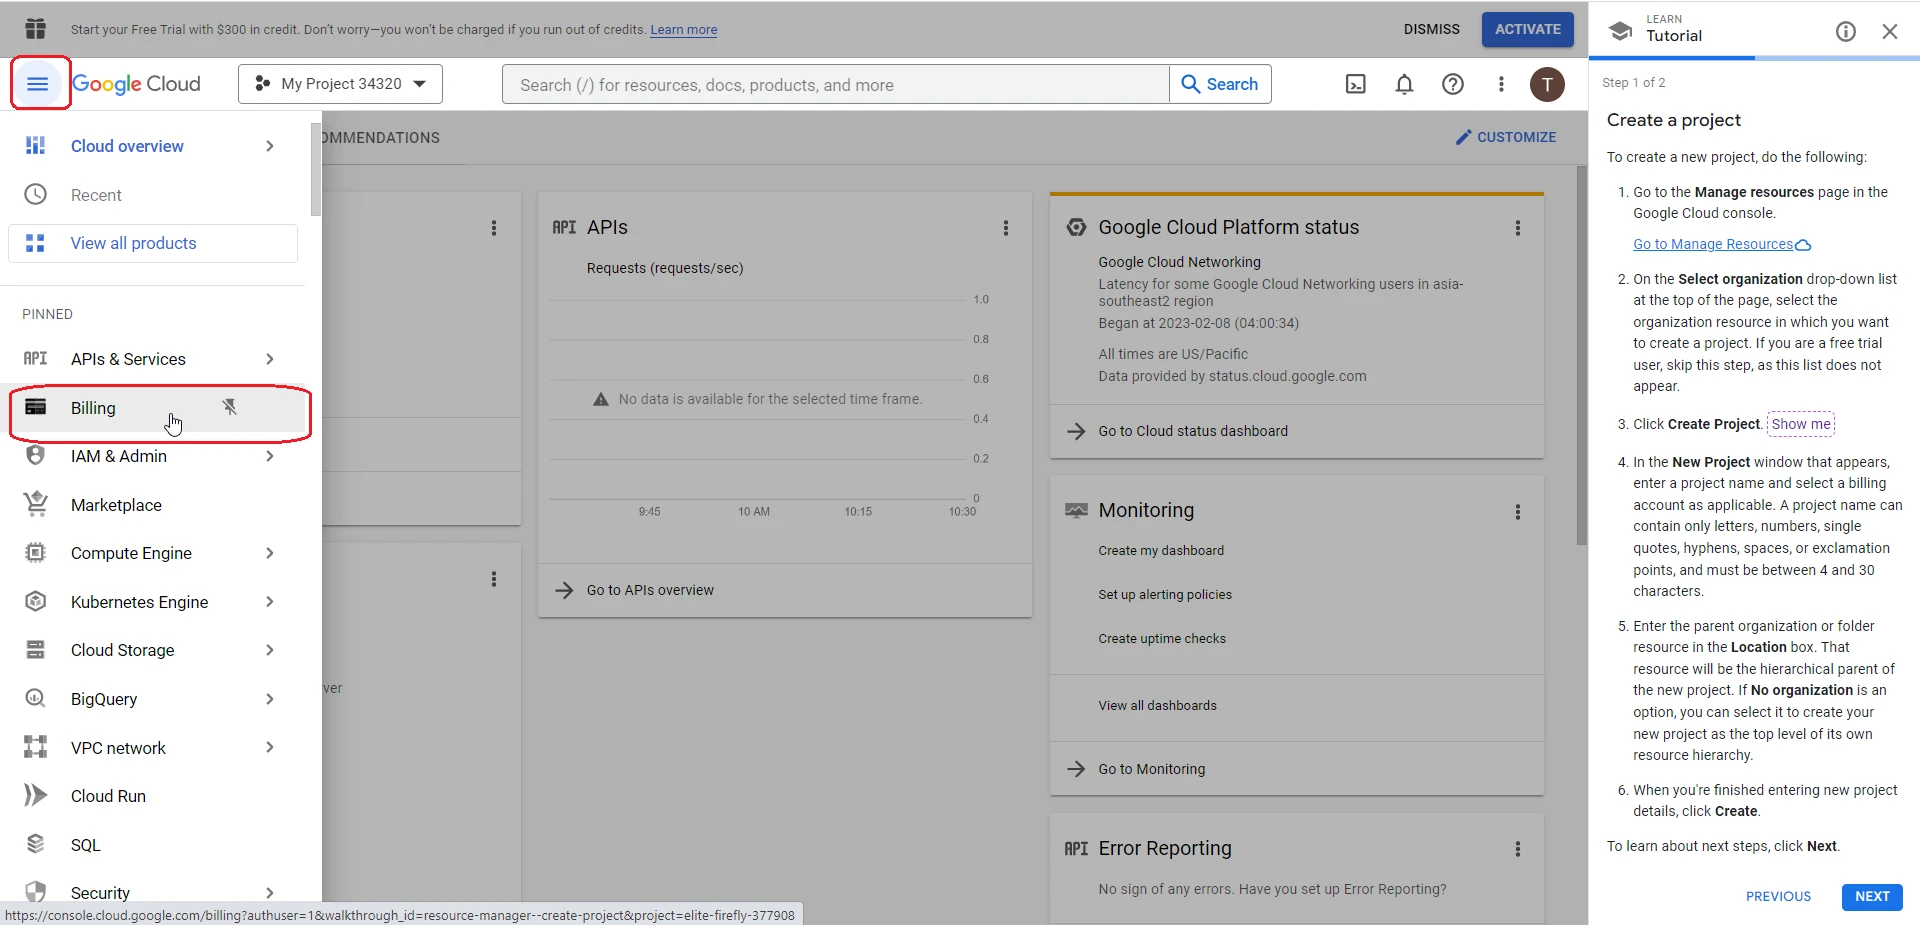
Next, you need to activate billing — create a trial subscription or select a paid one. Open the menu and select Billing.
-
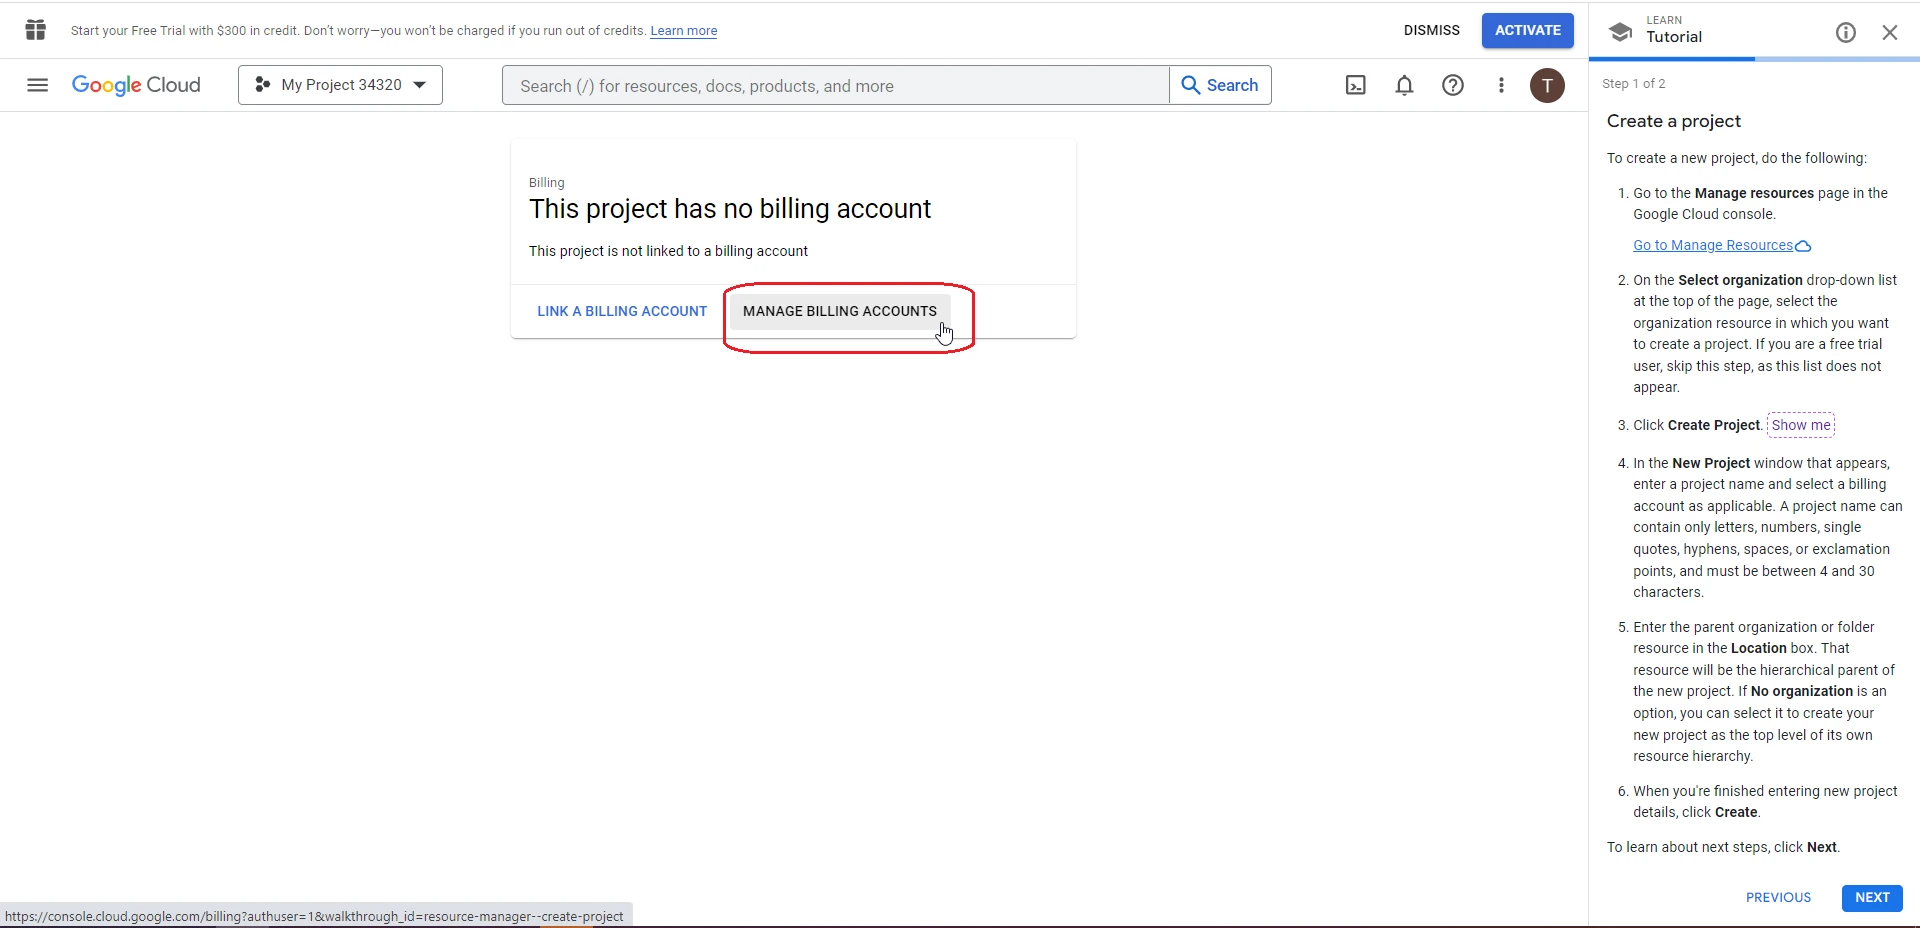
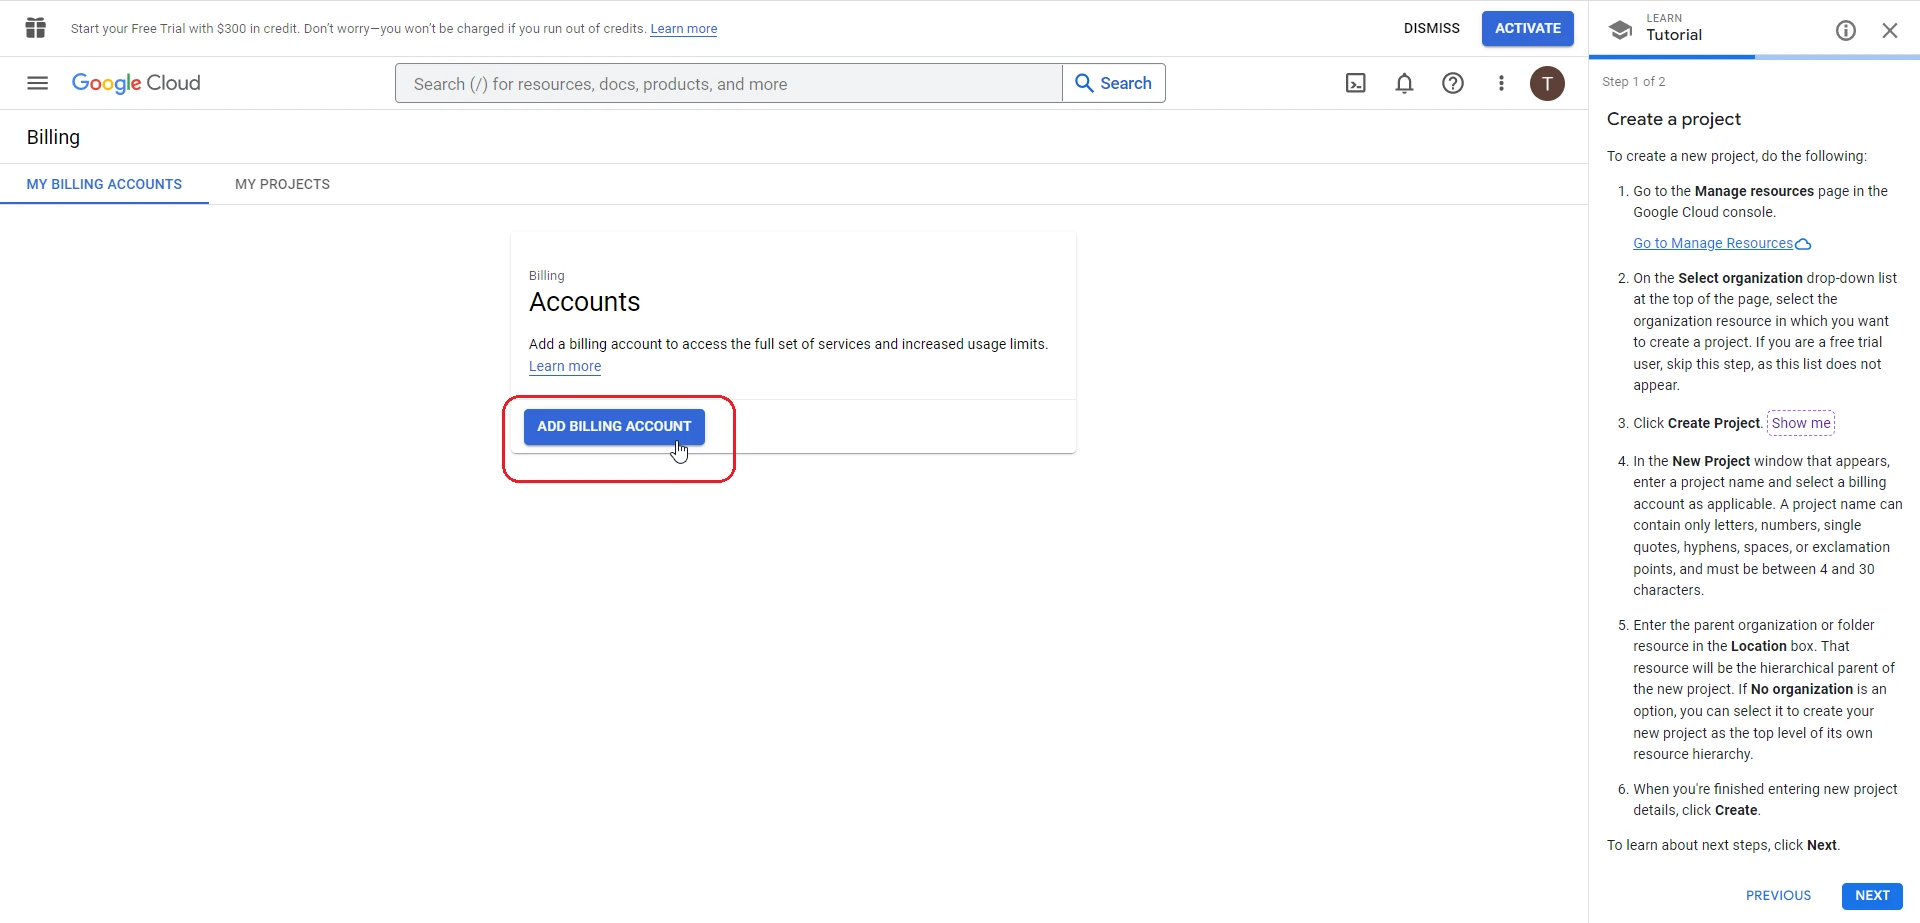
Select MANAGE BILLING ACCOUNT, then ADD BILLING ACCOUNT.
-
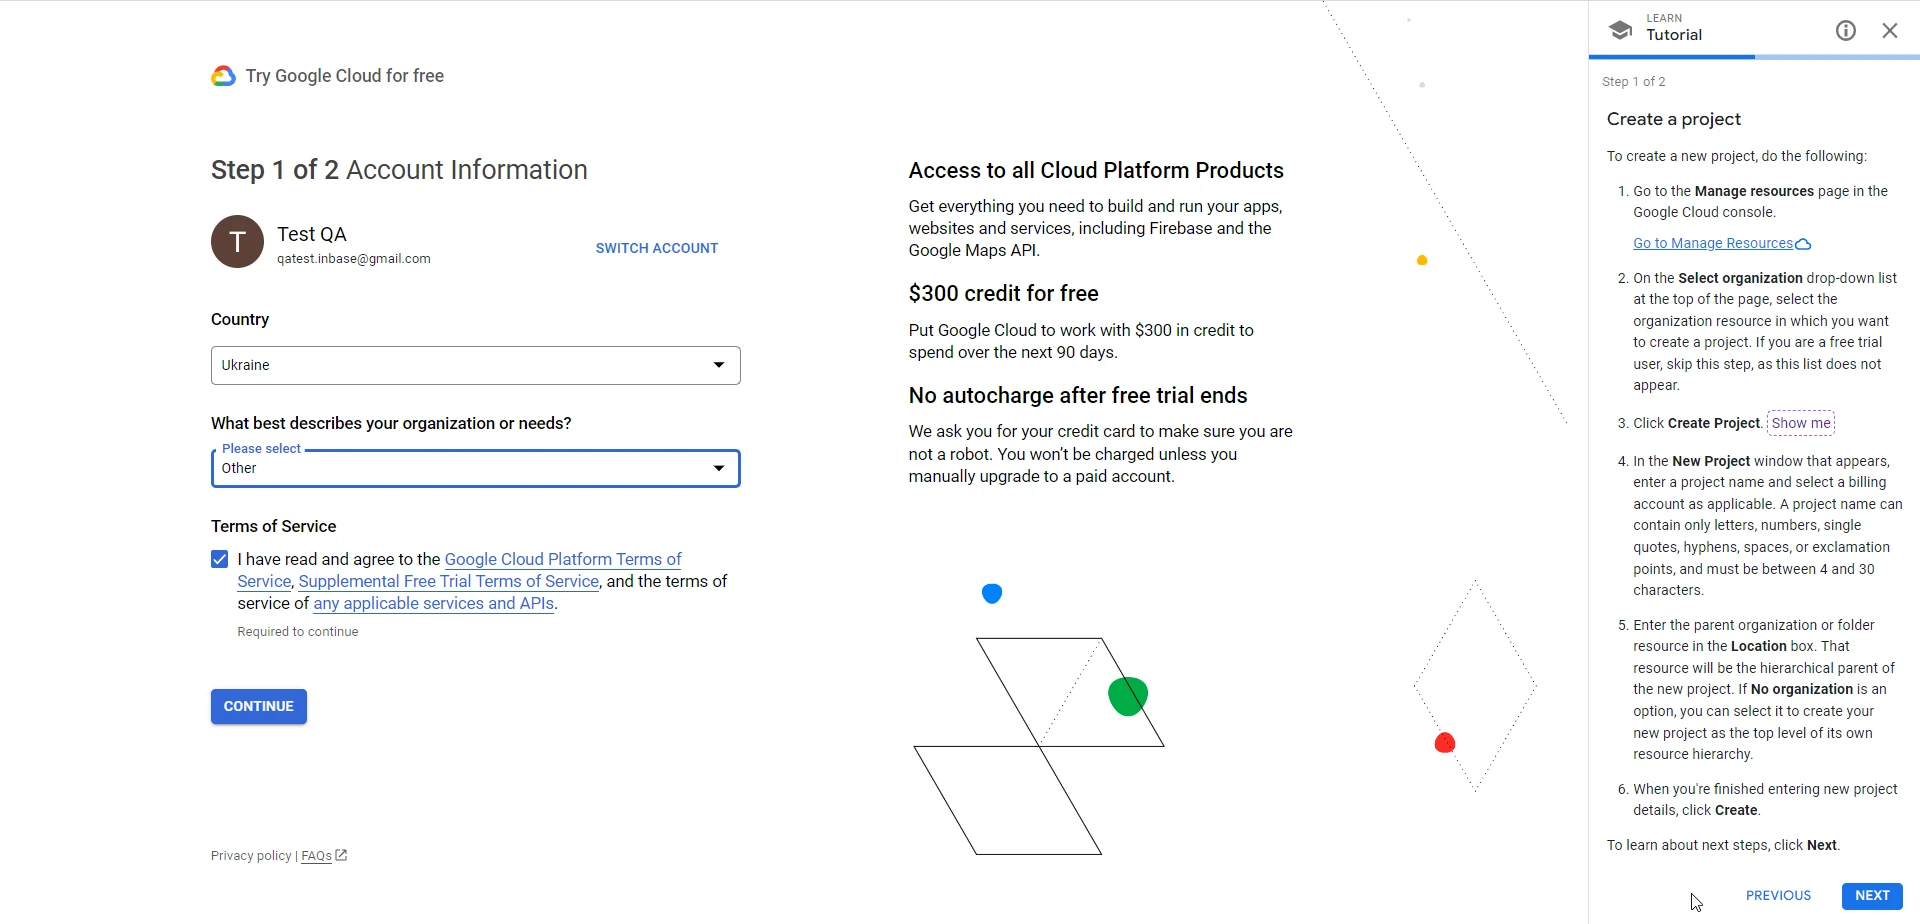
Enter company information and bank card details. Start the free trial.
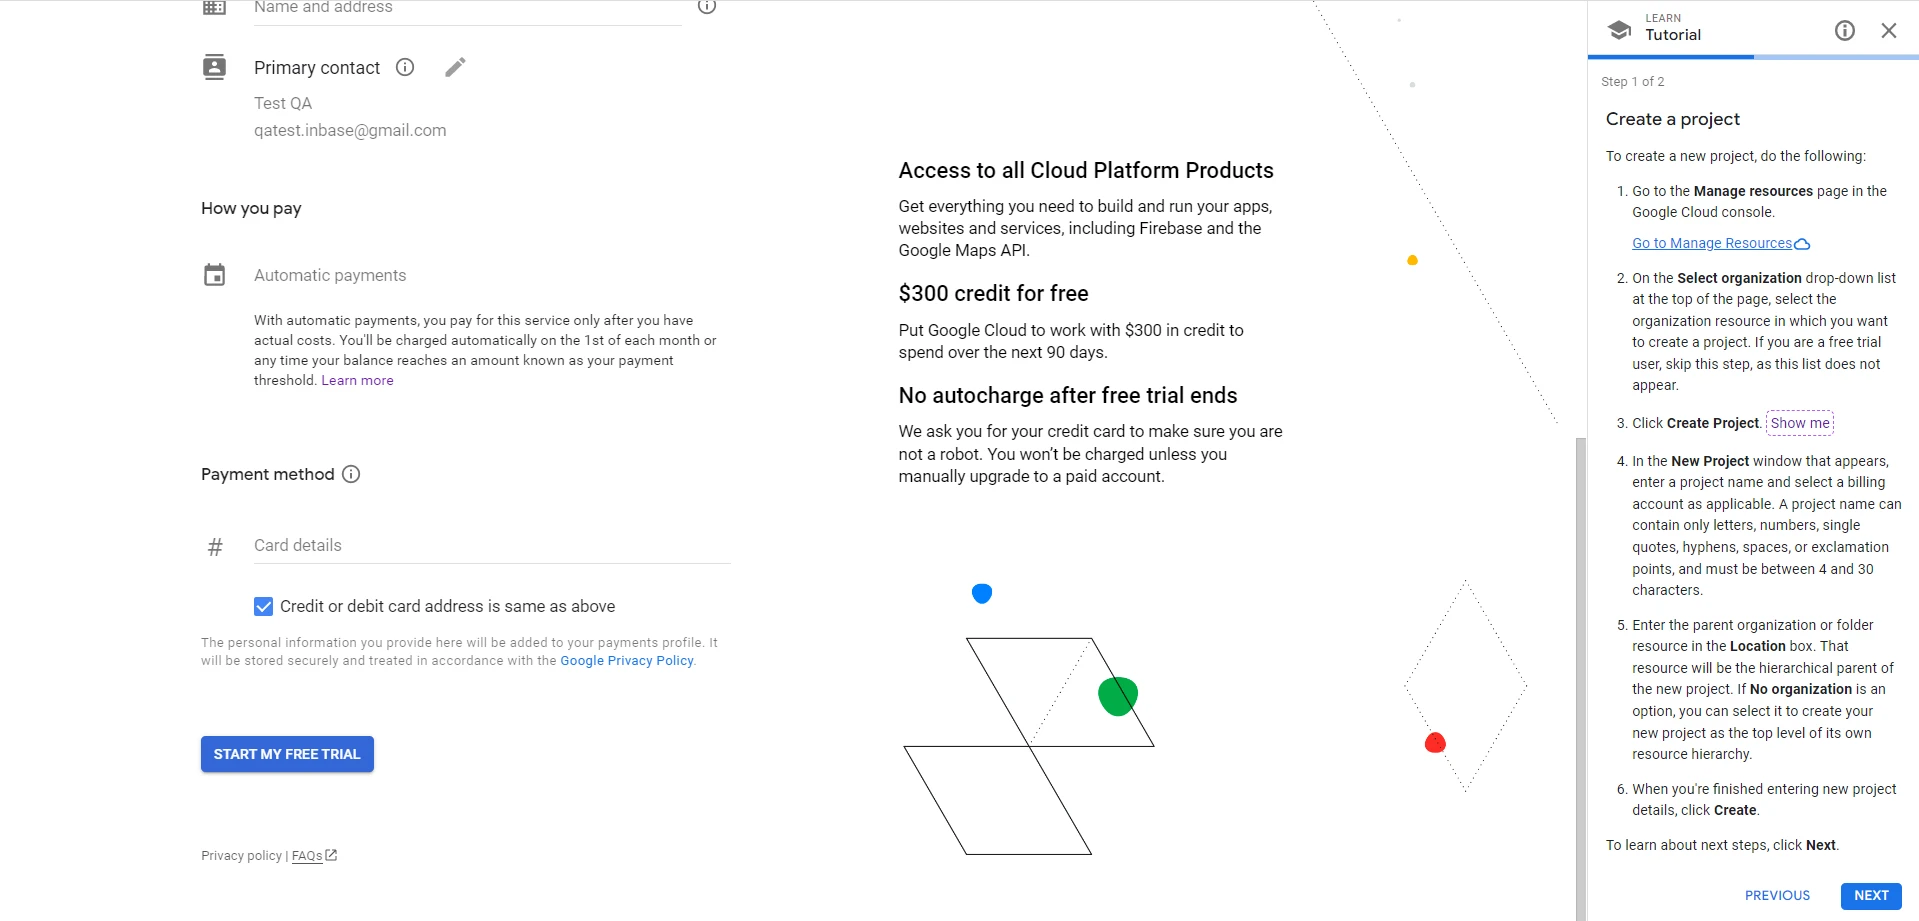
-
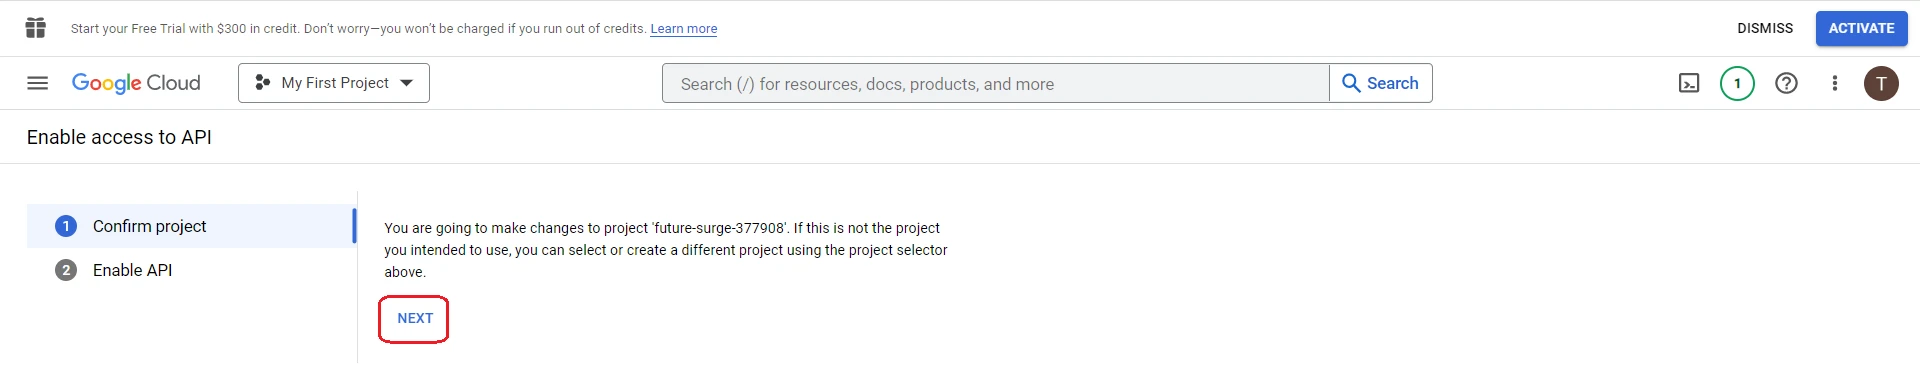
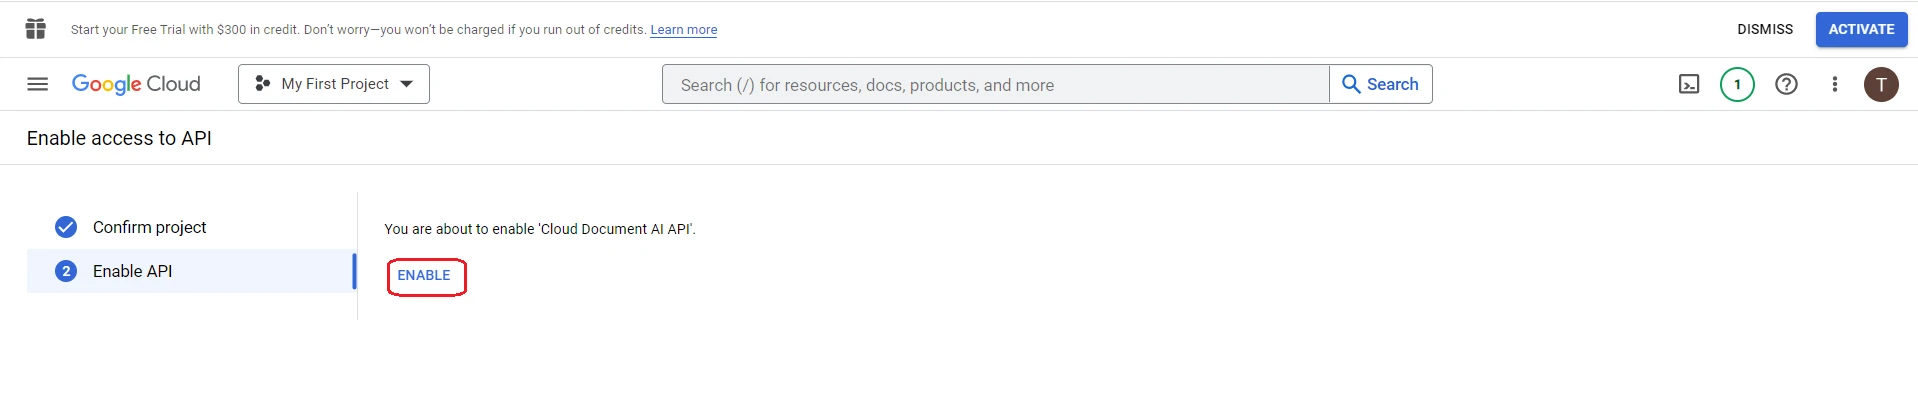
Next, enable access to the Document AI API. Select Next, then Enable.
-
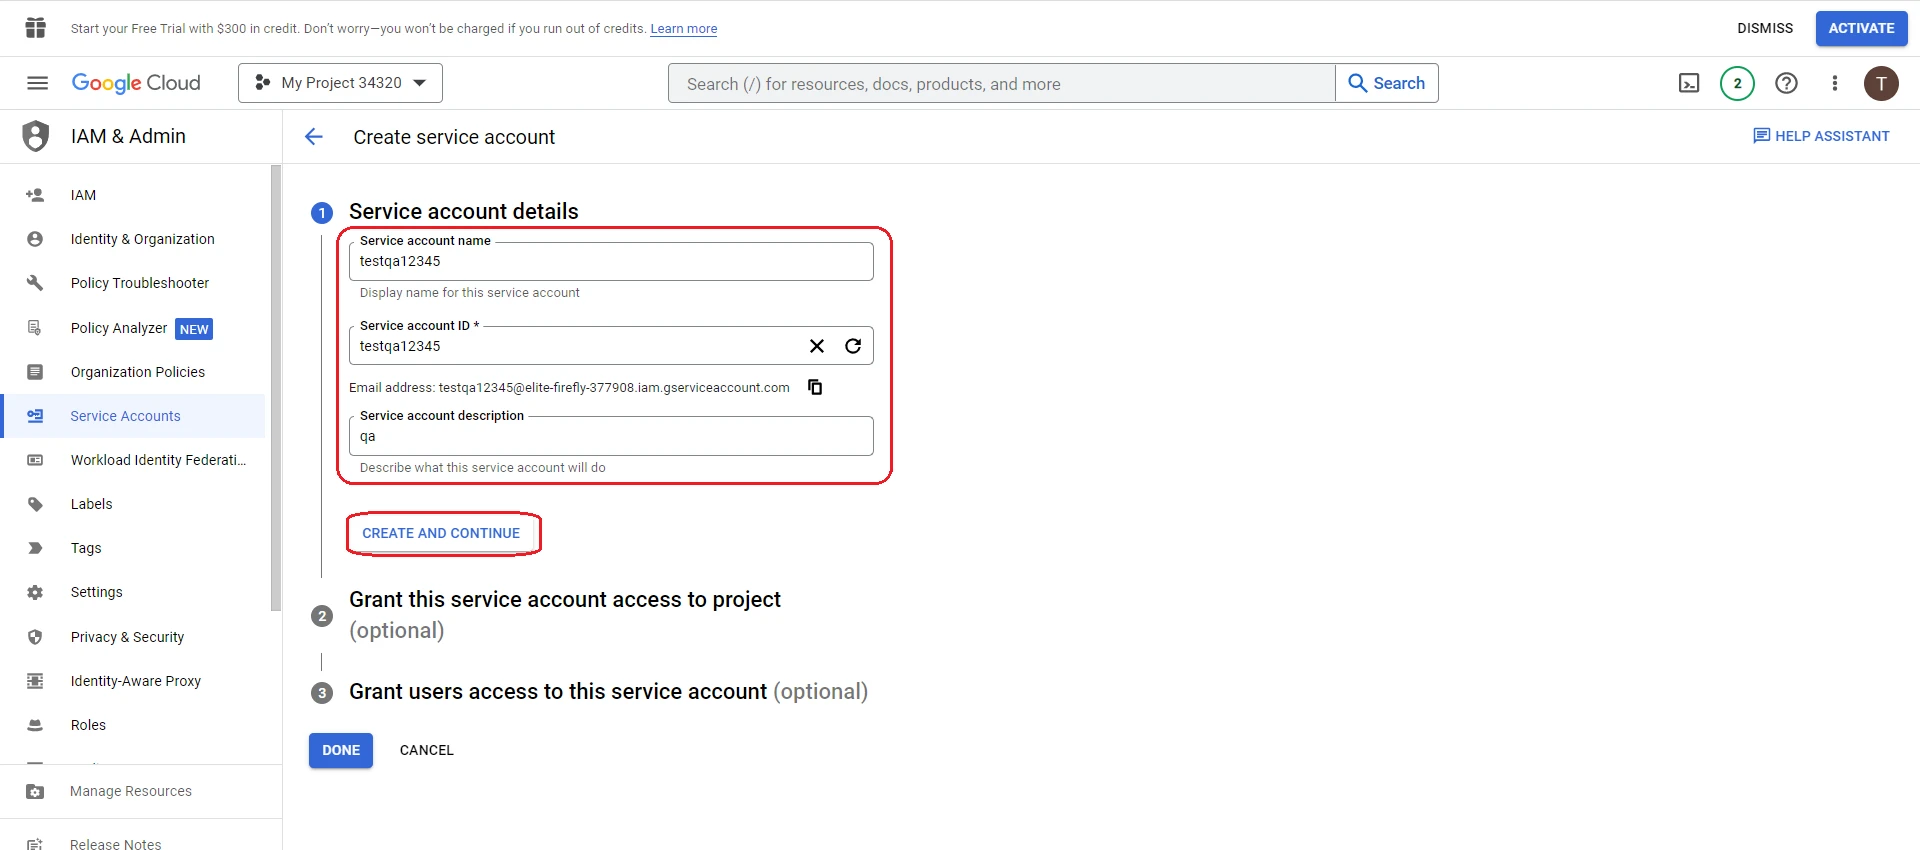
Next, create a service account and obtain API keys. Go to create a Service Account in Google Cloud Console. Enter the account information, select CREATE AND COMPLETE, then CONTINUE, then DONE.
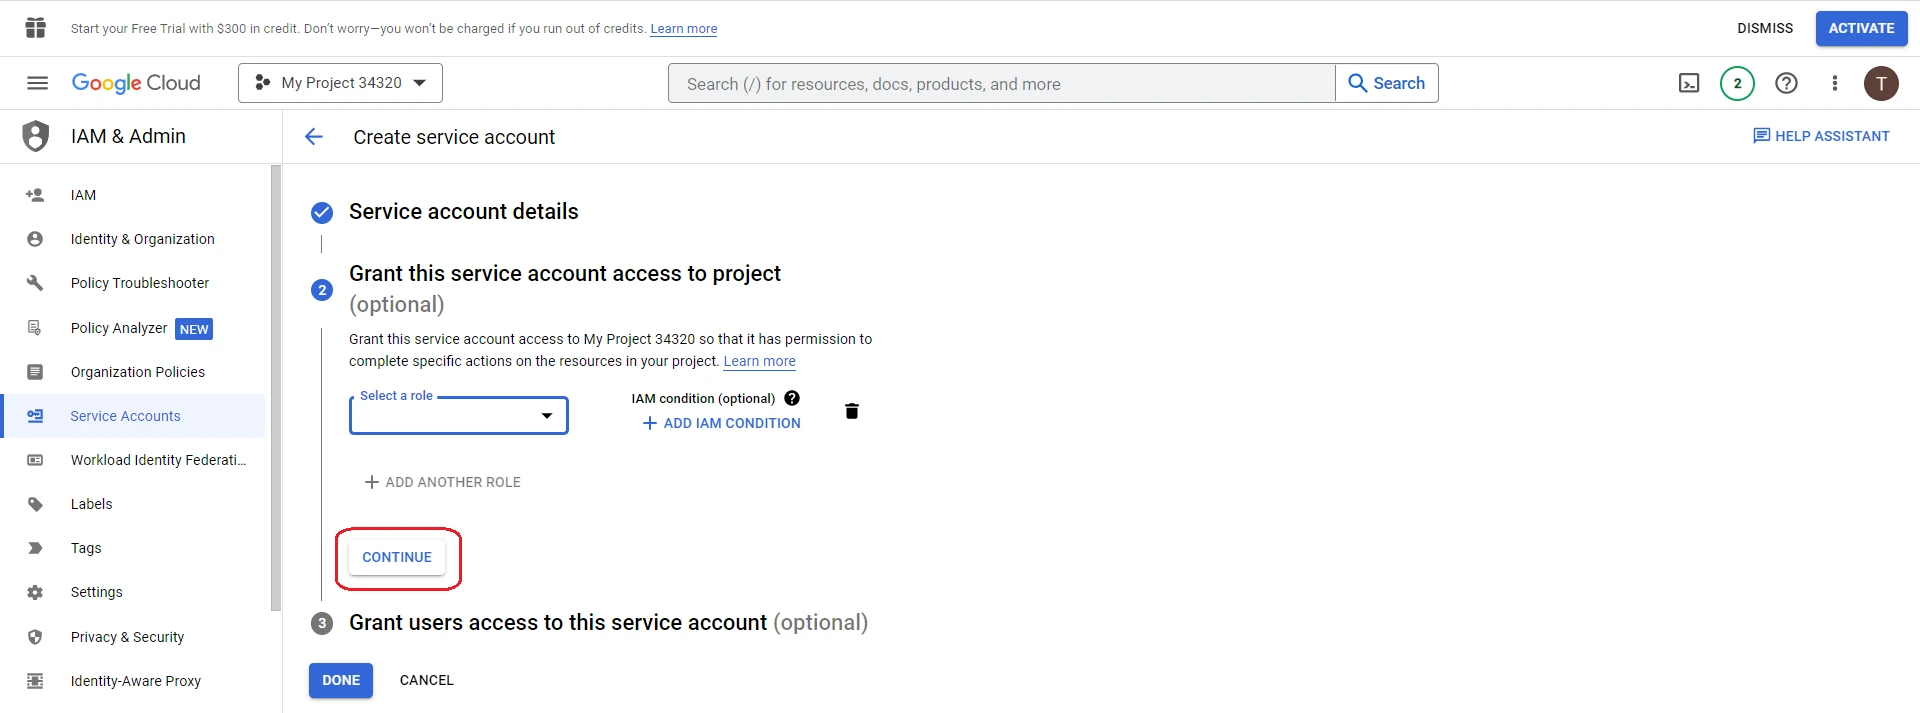
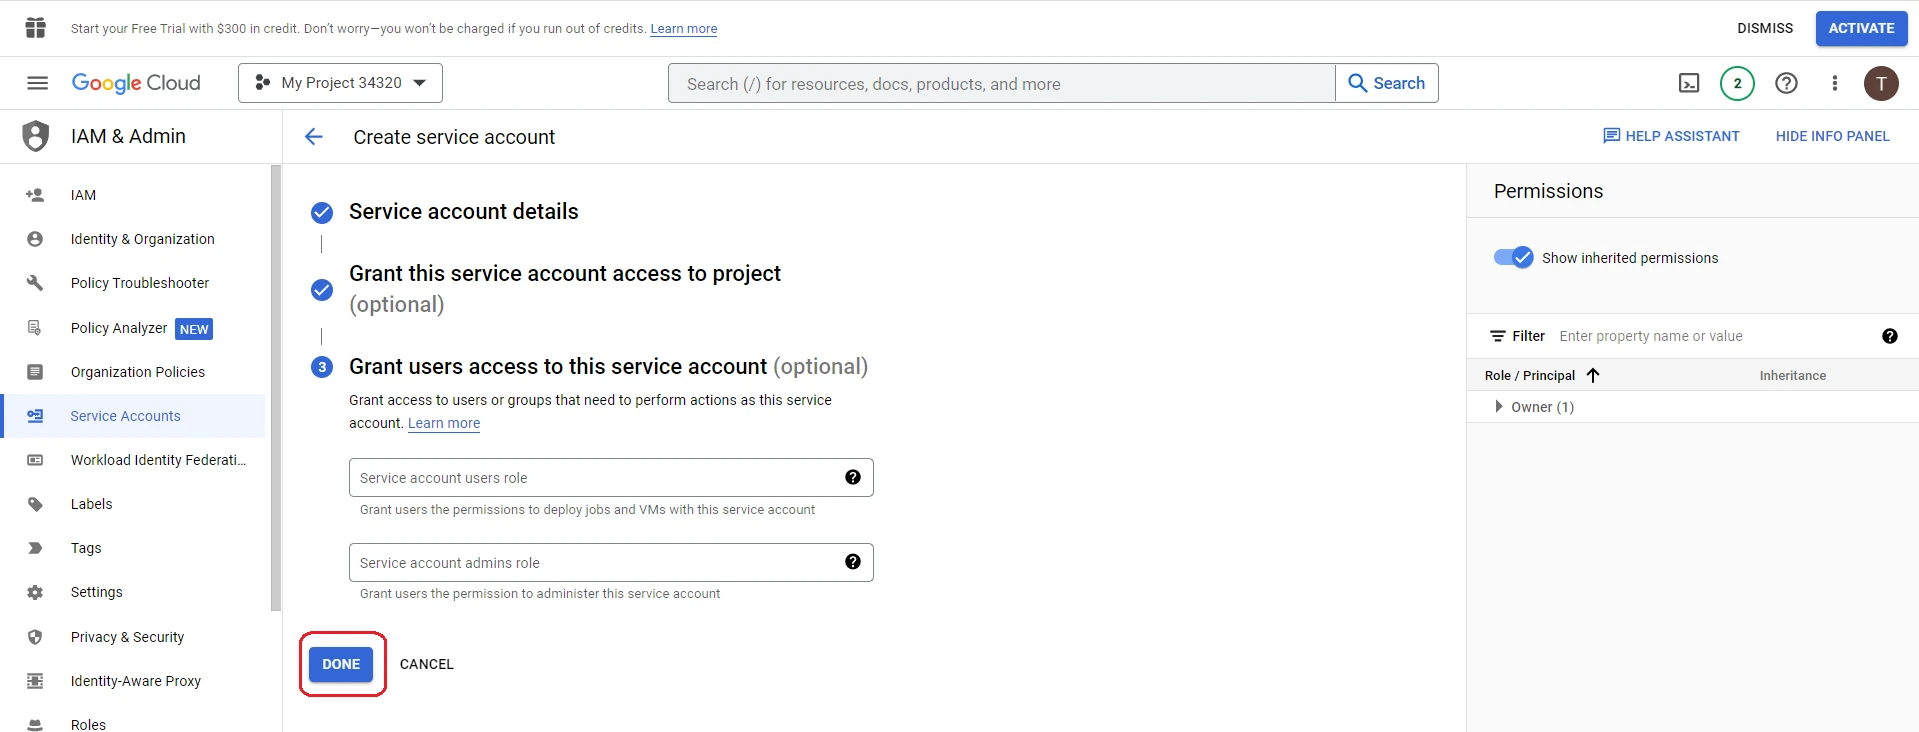
-
Now create the keys. Open the Actions menu, then select Manage keys.
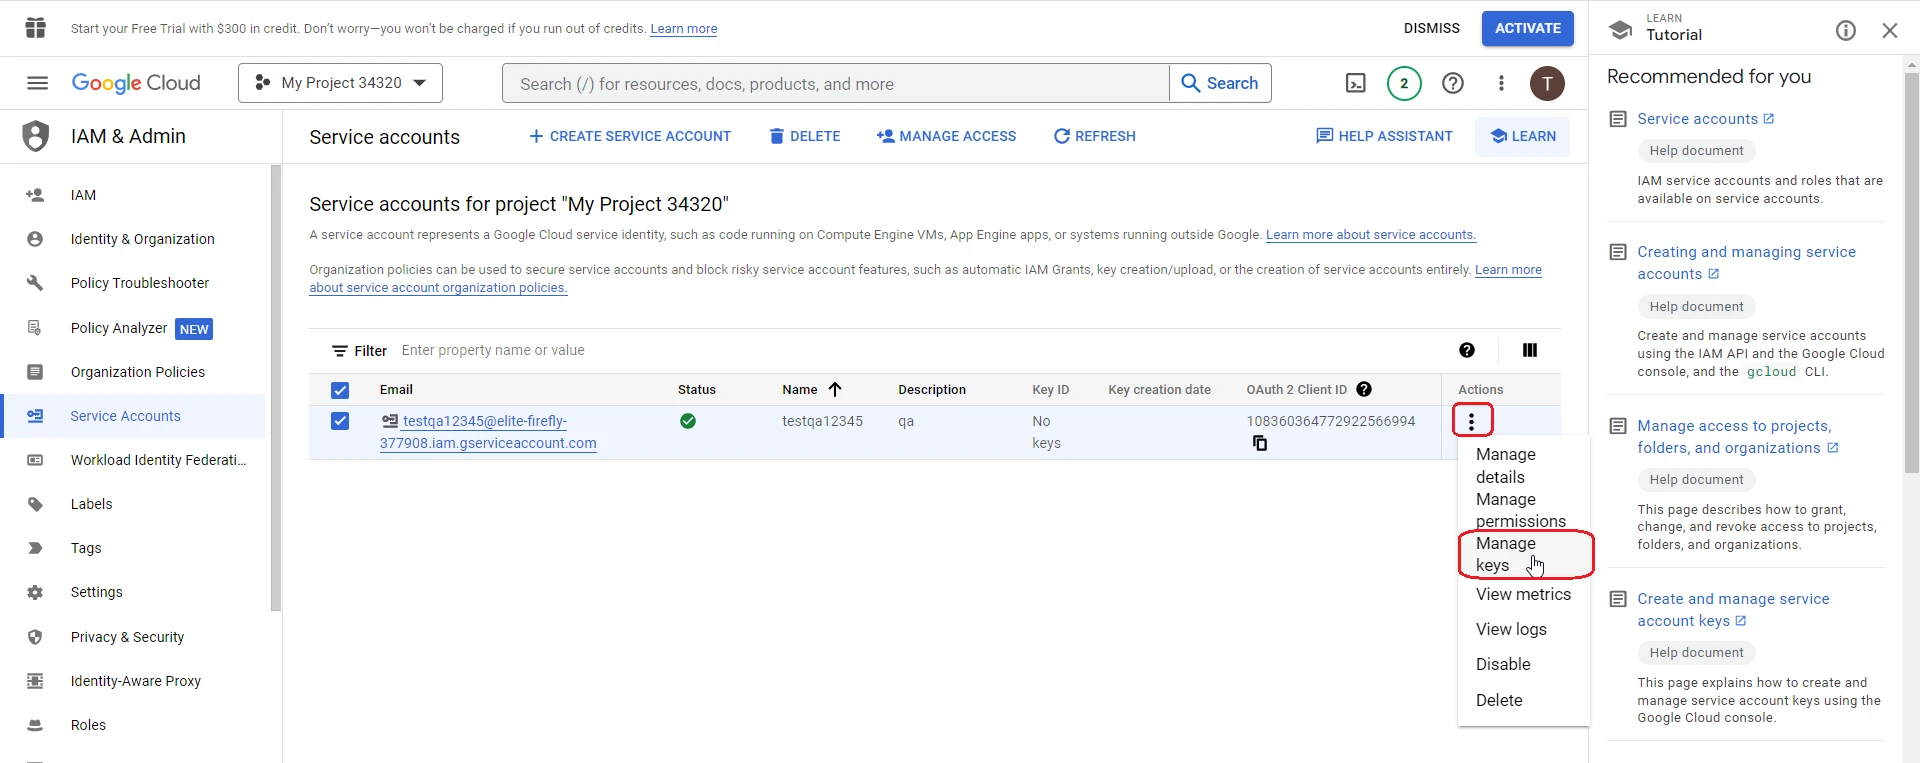
Select ADD KEY, then Create new key.
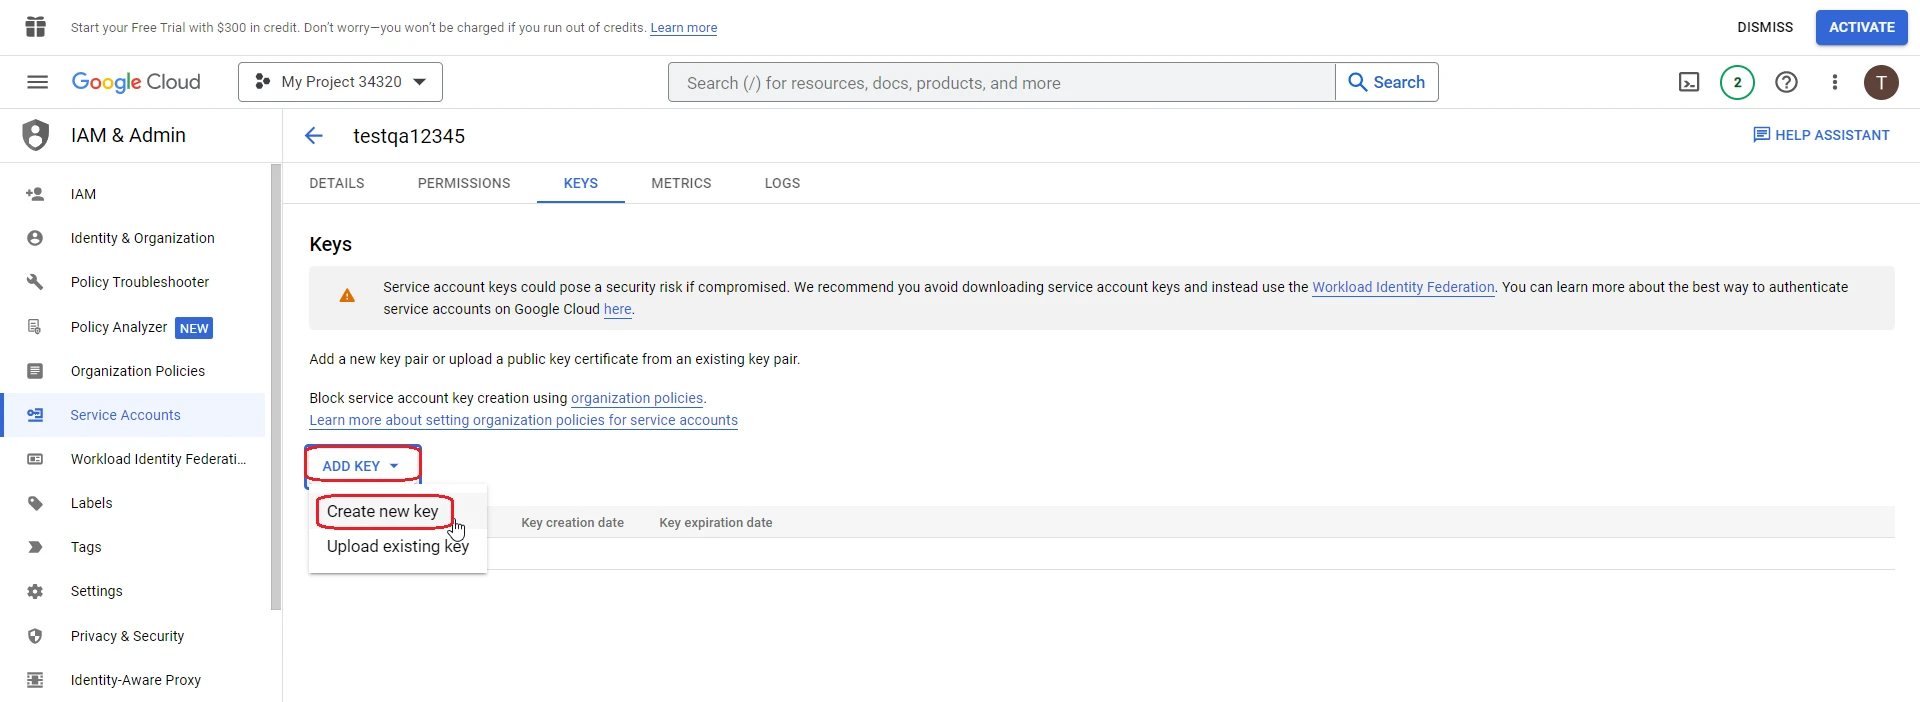
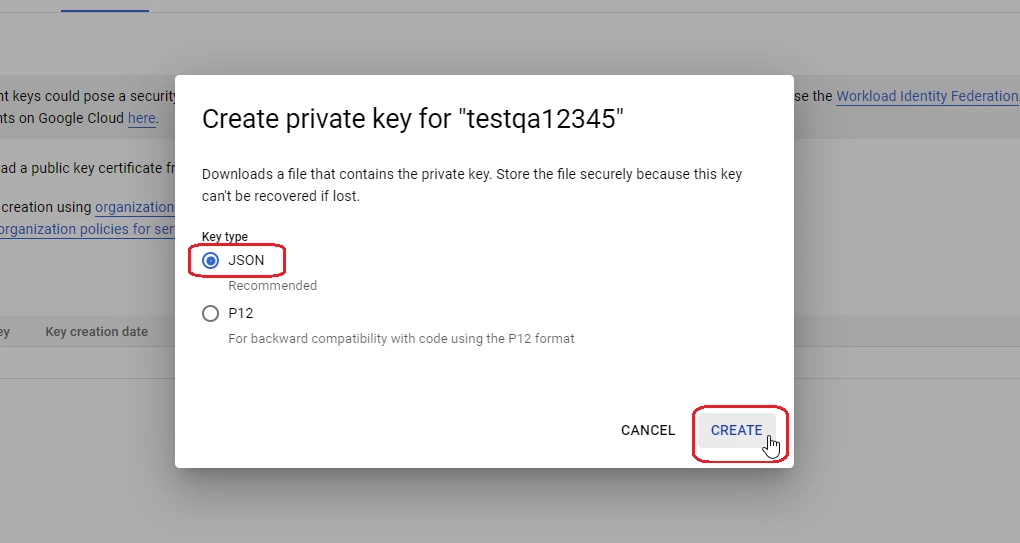
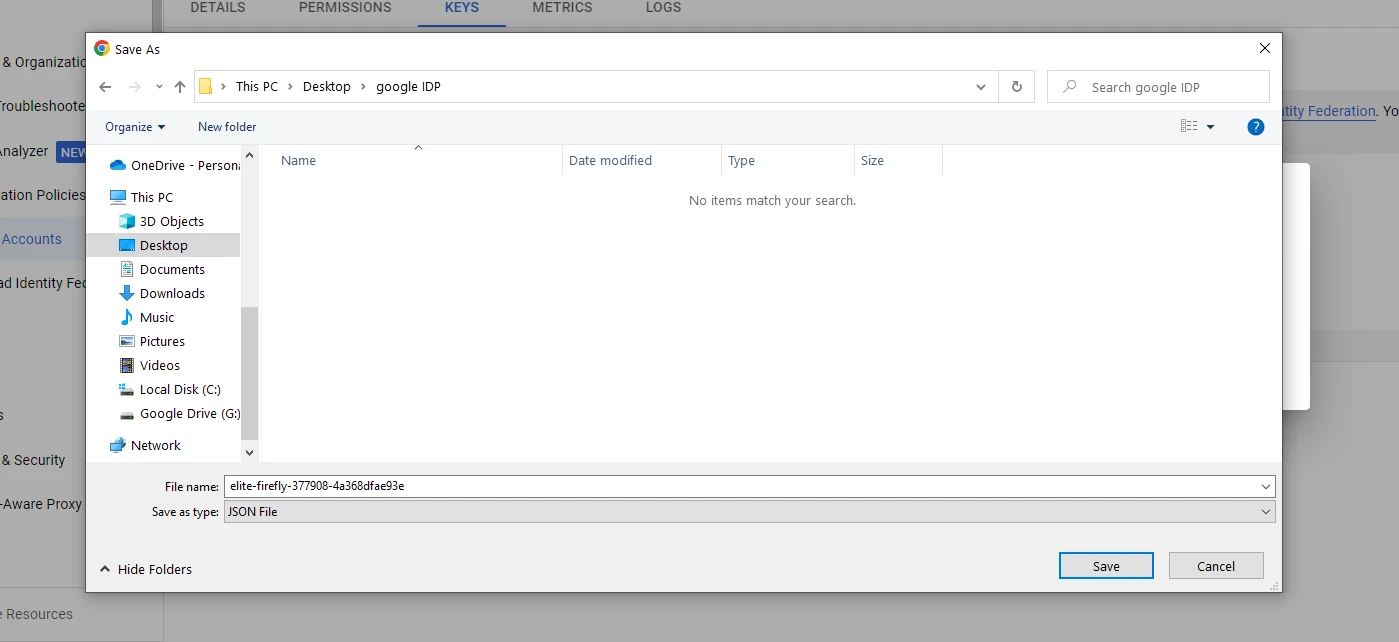
Select Key type = JSON and select CREATE. Save the key to your computer.
-
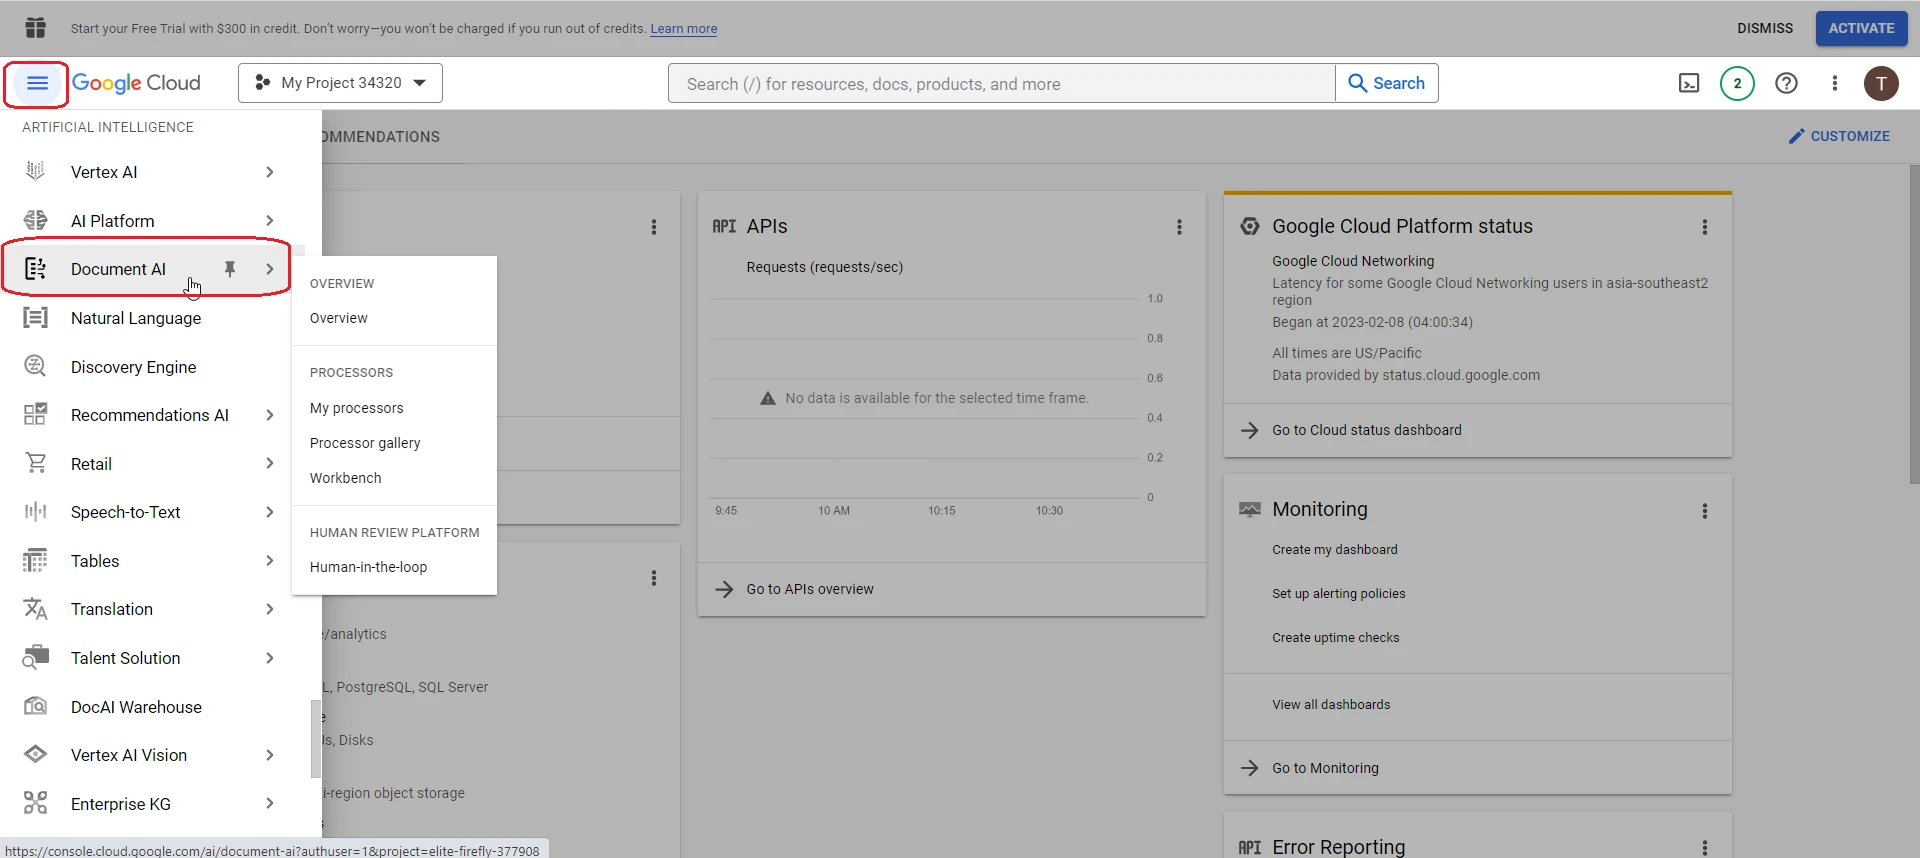
Now create a processor. In the Google Cloud menu, search for Document AI and select it.
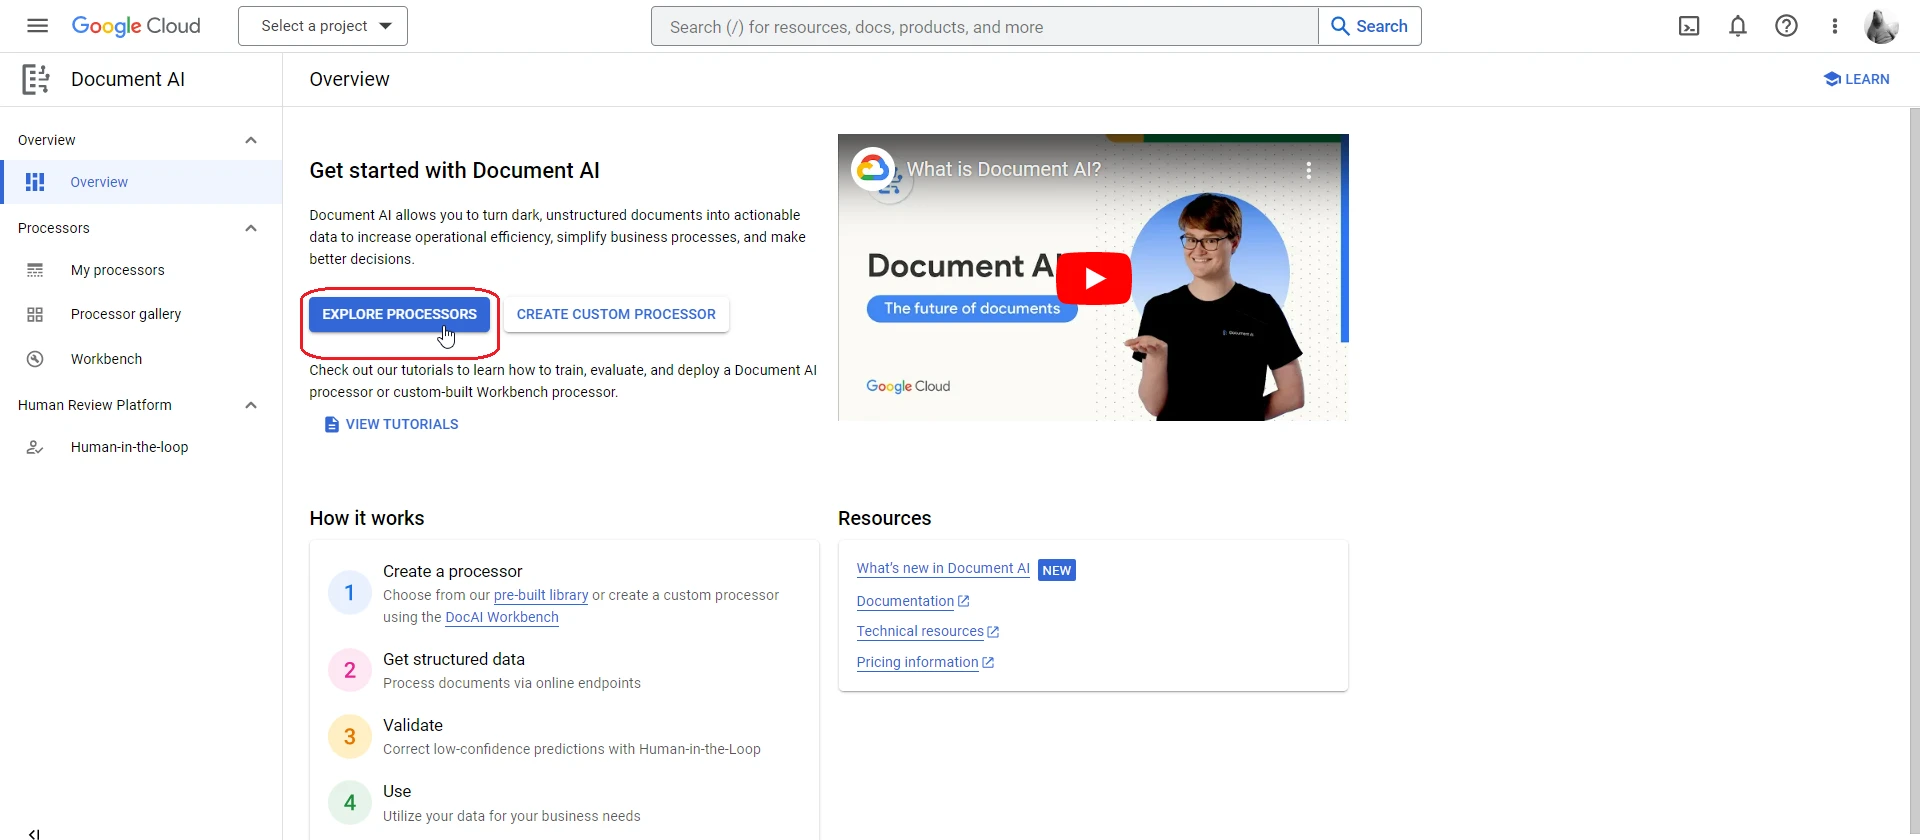
Select EXPLORE PROCESSORS.
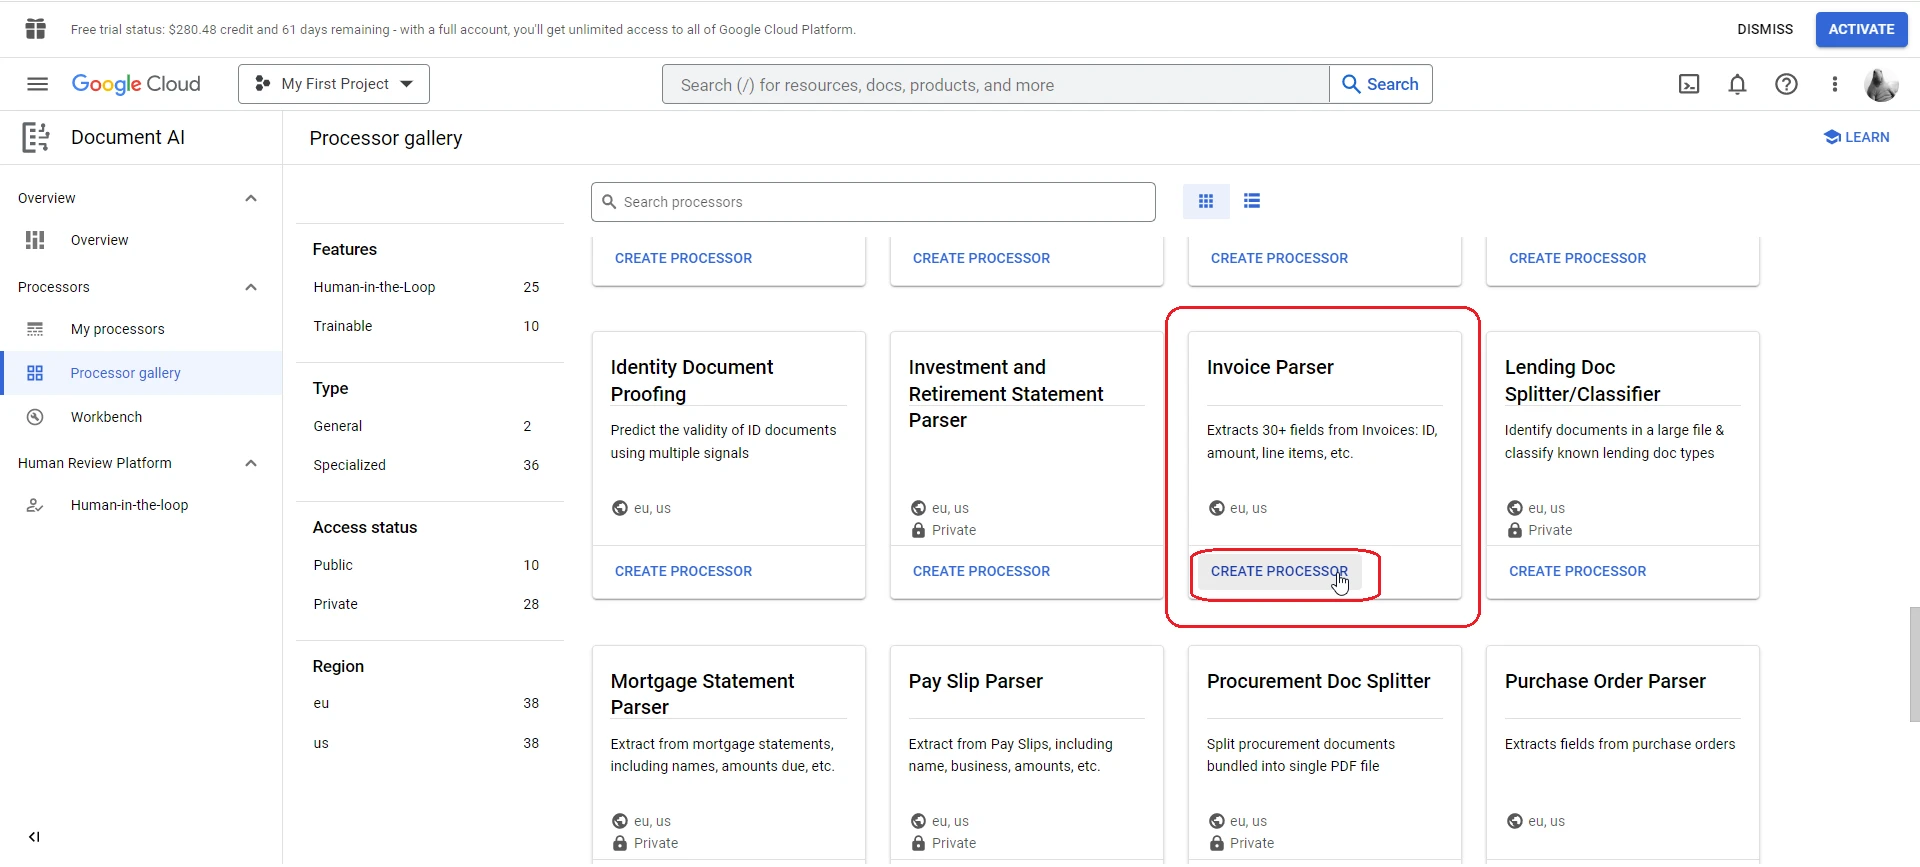
Select Invoice Parser and select CREATE PROCESSOR.
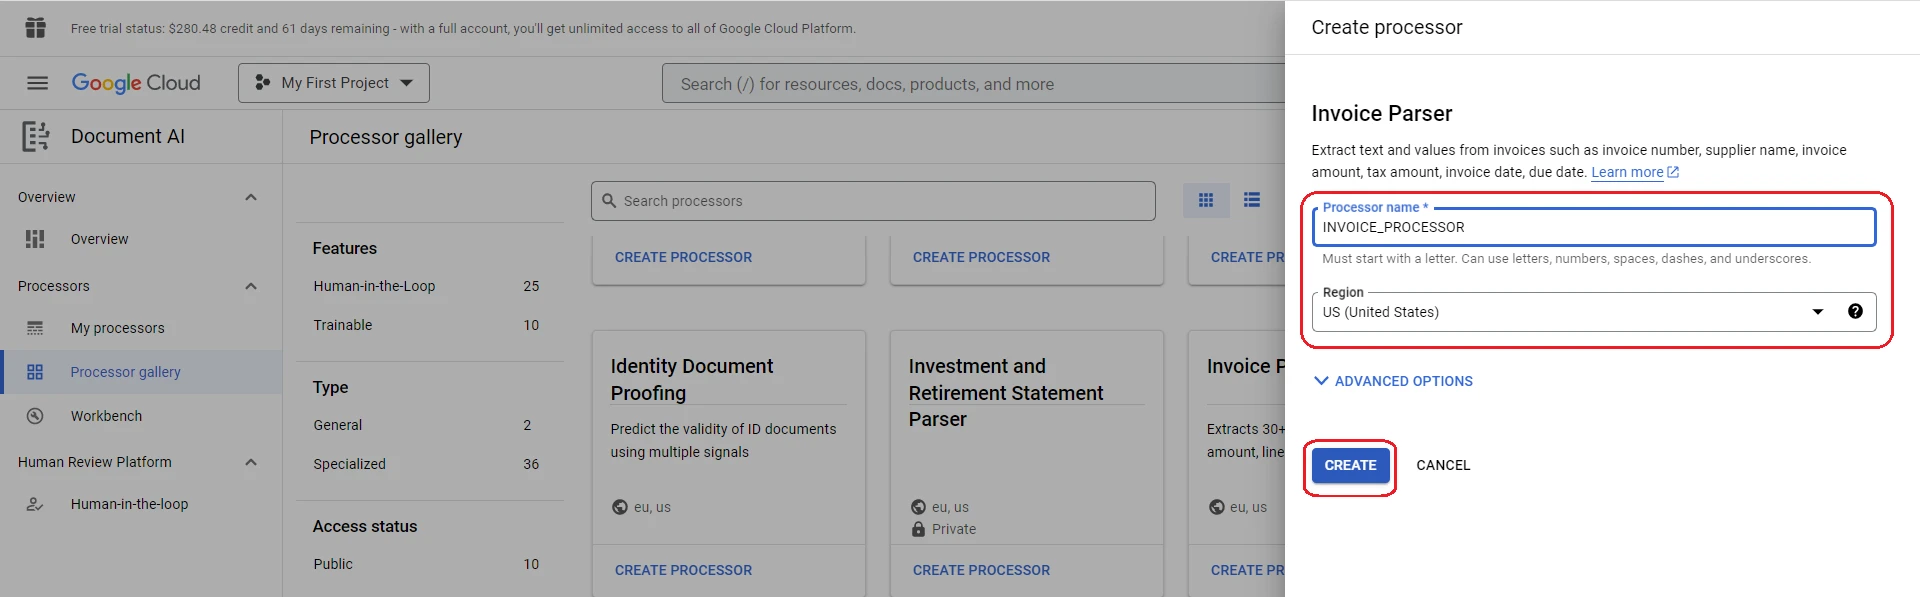
Enter the processor name INVOICE_PROCESSOR and select CREATE.
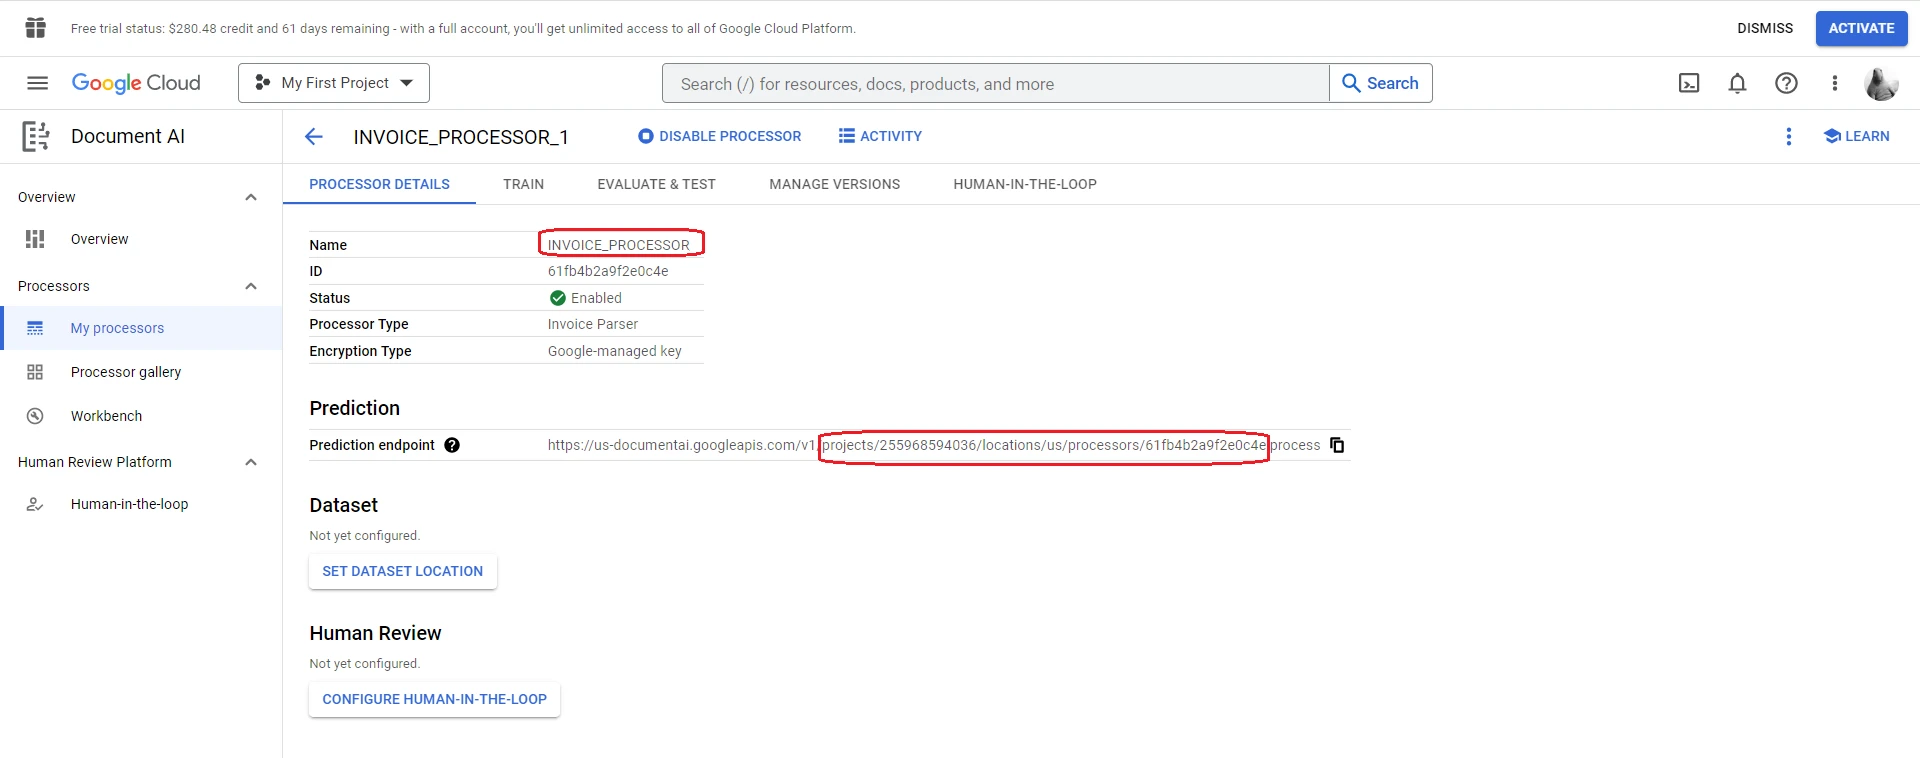
As a result, you will receive the processor information, which you will need when creating the IDP profile in the system.
-
Log in to the system with Developer permissions and go to Administration — Settings — IDP Provider Profiles. Select Add profile.
Select Provider = Google Form Recognizer, enter a name, and paste the credentials in JSON format (the keys saved to your computer). Select + Add to add a model.
Select the IDP entity available in the system = INVOICE_PROCESSOR Invoice, enter the model ID matching the processor name in Google Cloud, and the URL address — copy it from the Prediction endpoint in Google Cloud, but not in full, only starting from the word projects. Select Add.
Select Add again to create the IDP Google provider profile.
2.14.2.1.2. Create an IDP Entity
The IDP Entities feature is only available with the installation of the additional package dfx-idp. This feature is used for intelligent scanning of paper documents and their subsequent conversion to electronic format.
An IDP entity is a set of document recognition attributes provided by the recognition provider (Azure or Google). The entity attributes are then used to create form recognition templates. Using these templates, the system maps (links) the recognized data to the corresponding document type attributes.
-
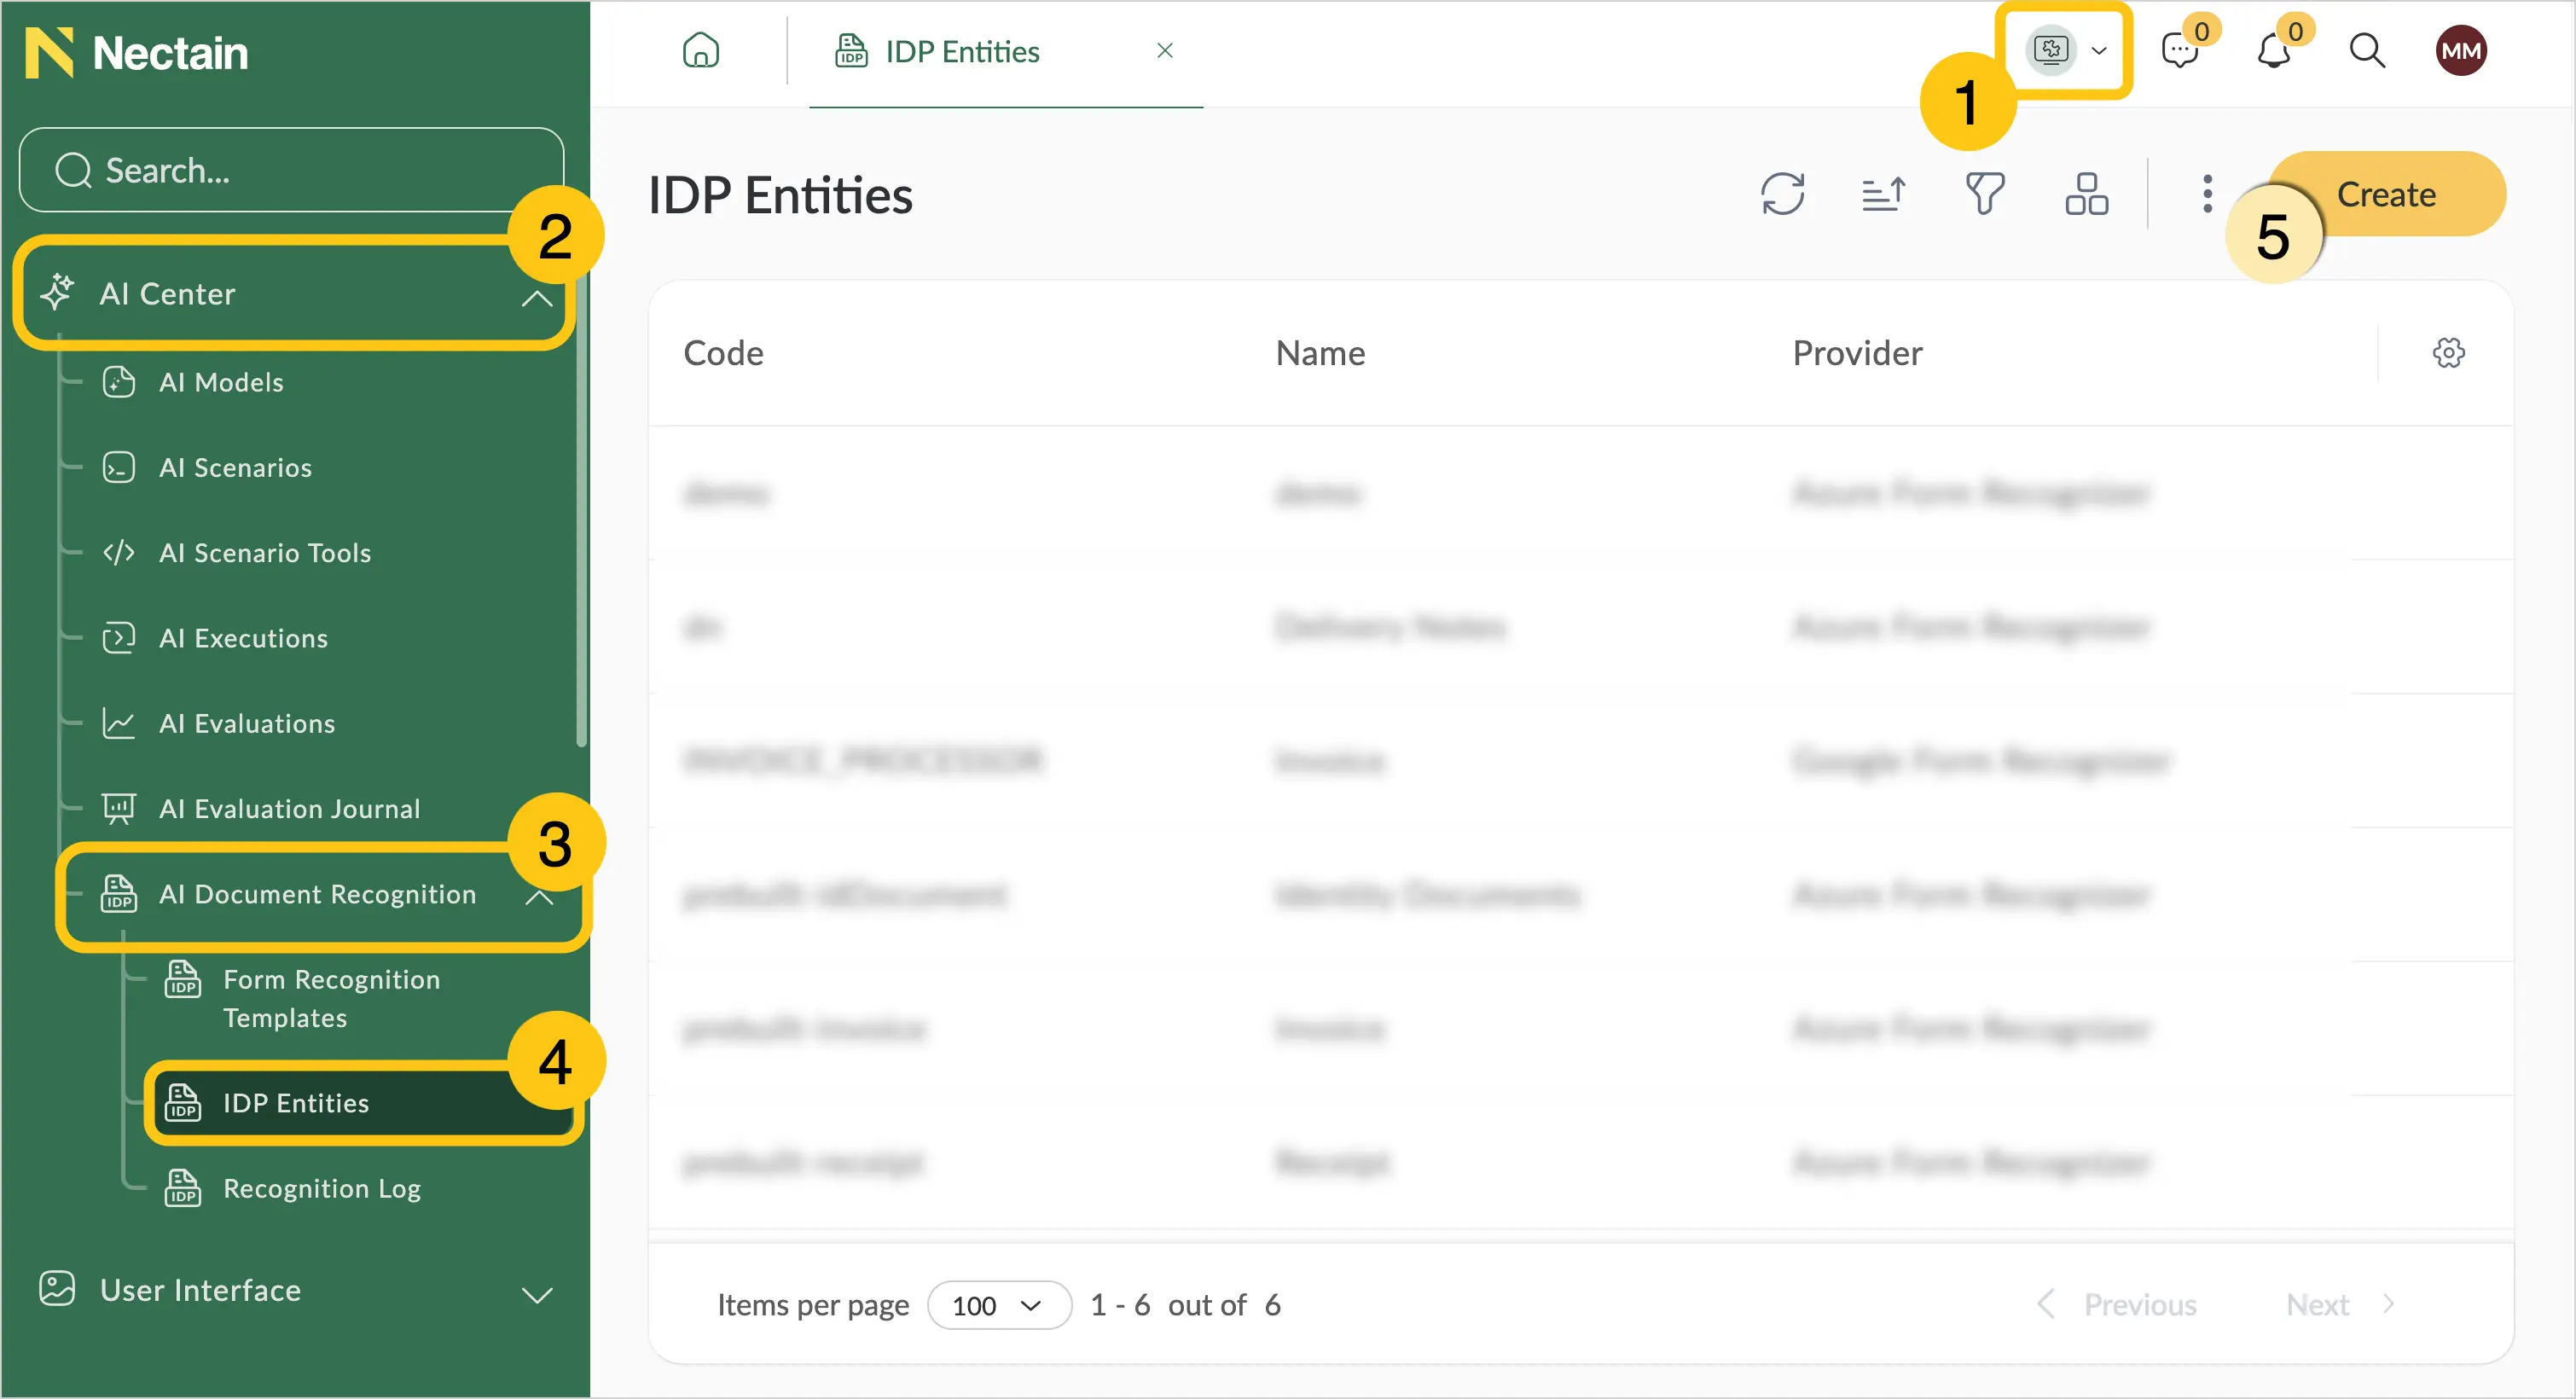
In the navigation panel, select the Studio 1 workspace.
-
Select the AI Center 2 shortcut group, then select the AI Document Recognition 3 shortcut group.
-
Select the IDP Entities 4 shortcut.
-
In the toolbar, select Create 5.
-
Fill in the fields using the guidance in the table below.
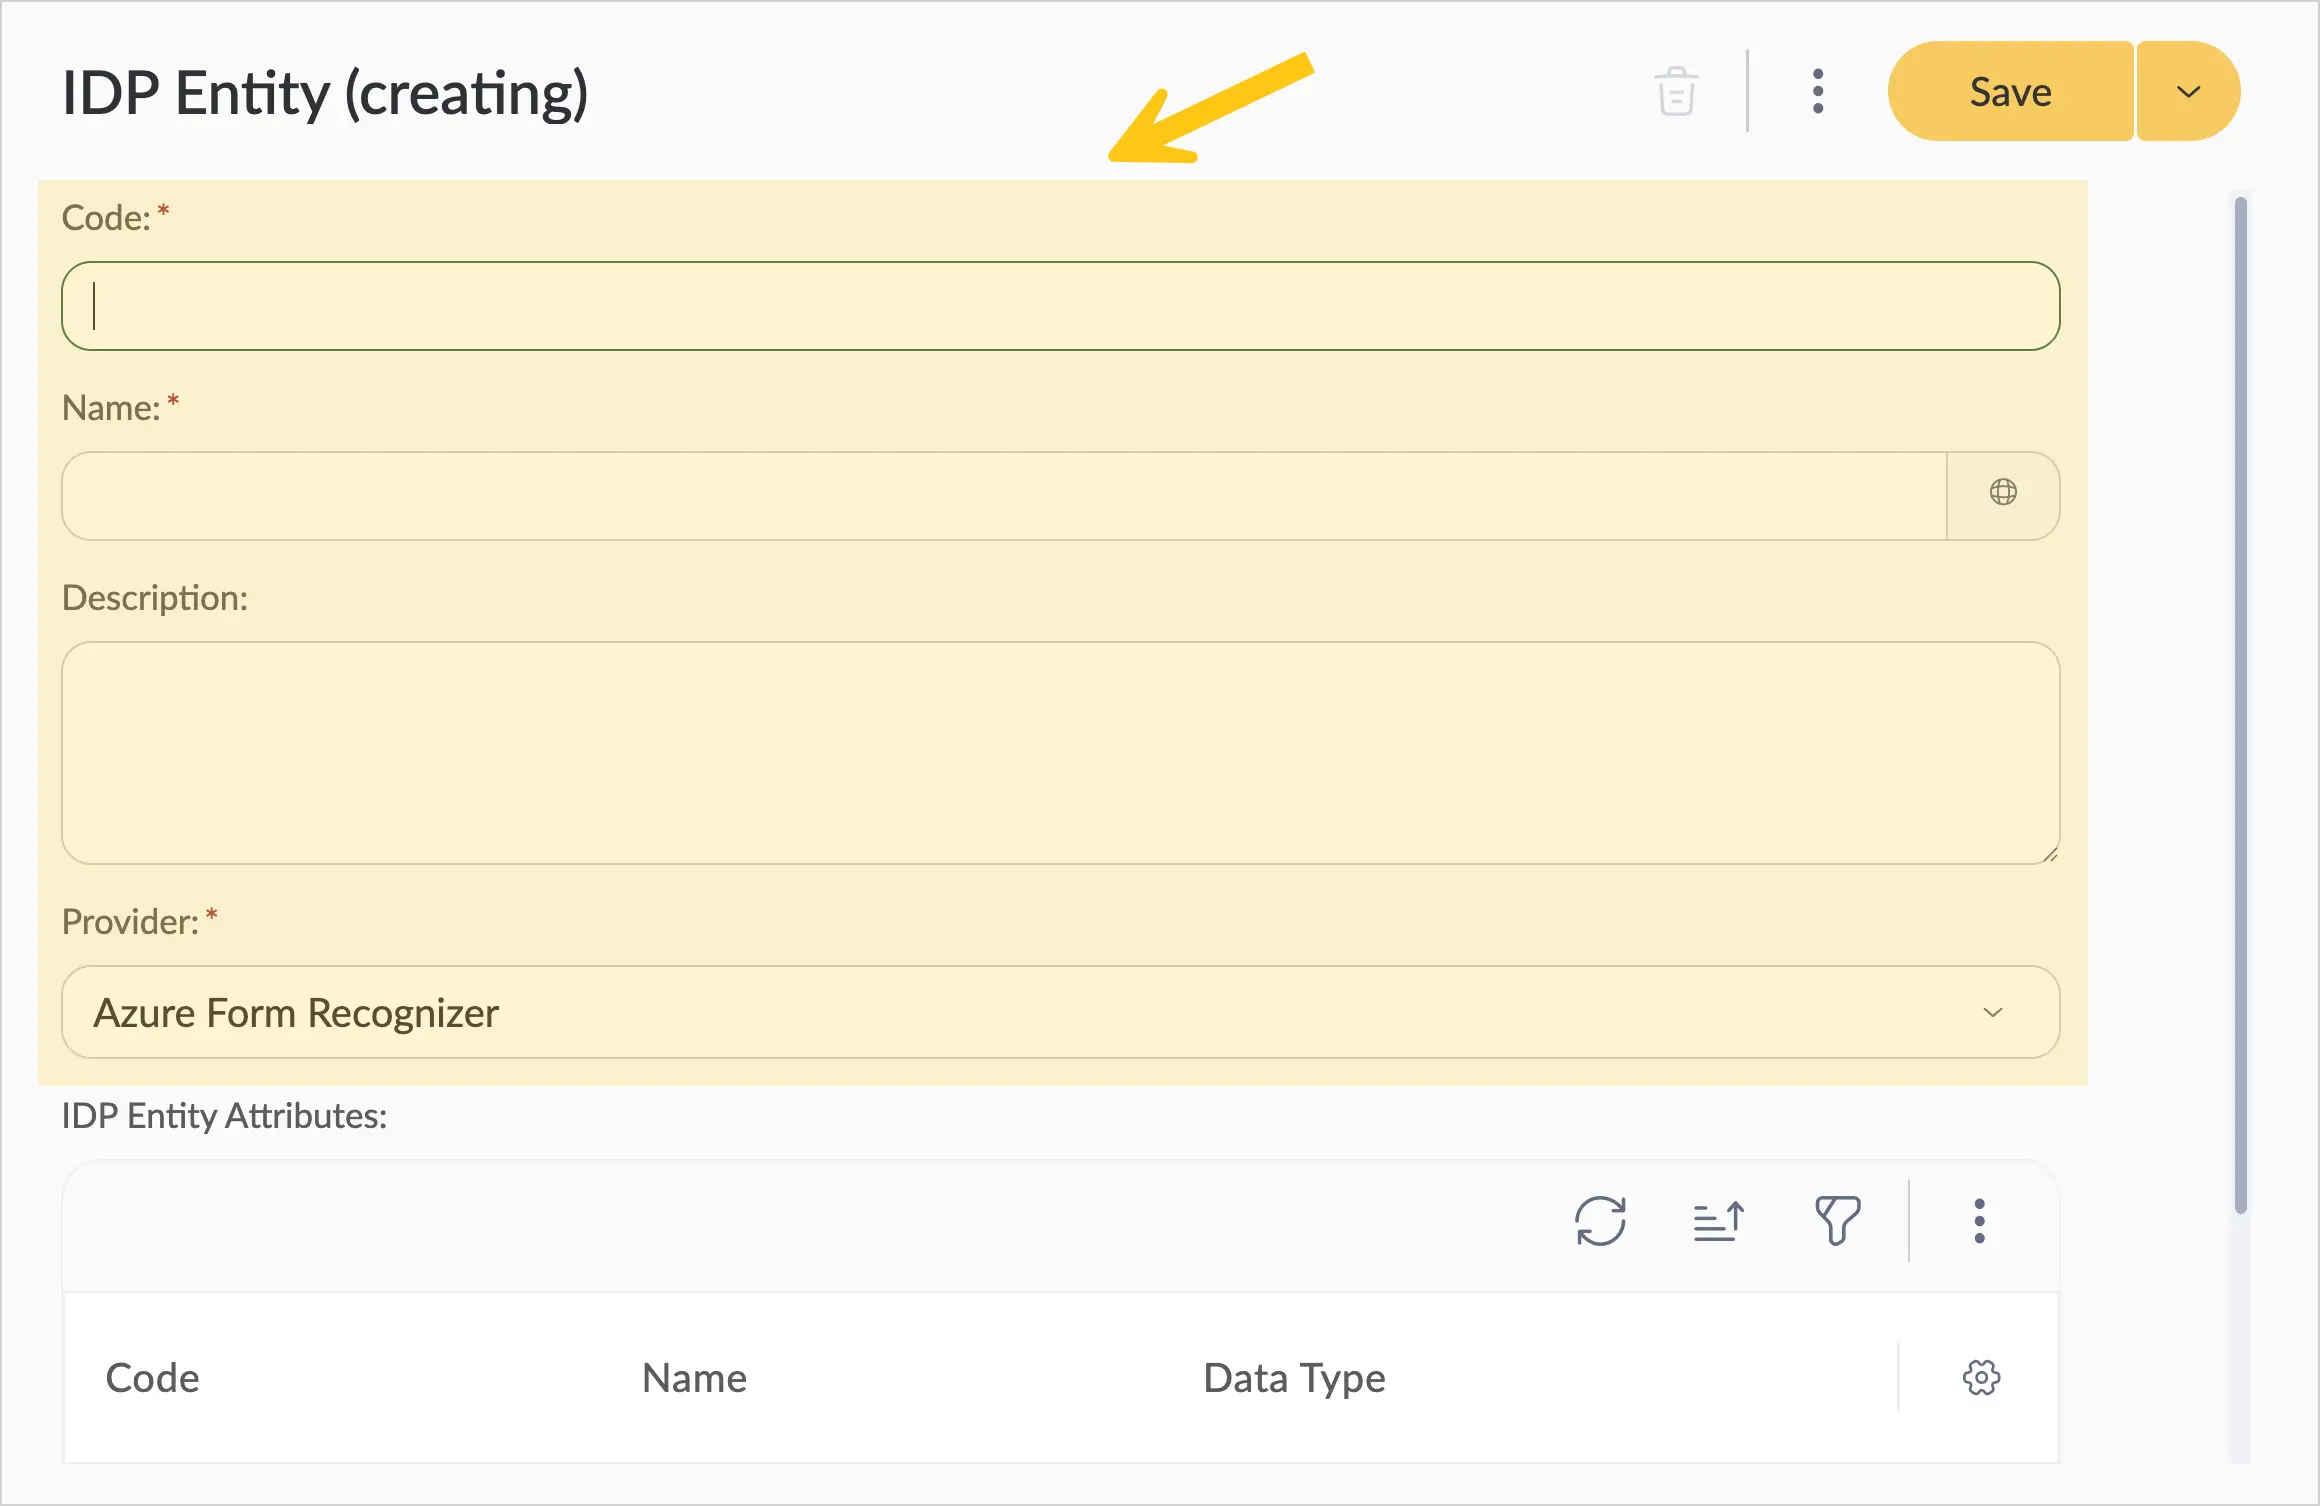
| Field | Description |
|---|---|
| Code* | A unique identifier for the entity. The code must match the model code deployed with the Azure or Google provider.
|
| Name* | Enter the desired name for the IDP entity. Example: Passport Data Recognition ℹ️ Note: You can set the entity name for different languages. To do so, in the Name field, select the icon and fill in the fields for other languages. Then select the Apply button. |
| Description | A brief description of the entity's purpose. Example: Entity for passport data recognition |
| Provider* | Select one of the following form recognition providers:
|
Fields marked with * are required.
-
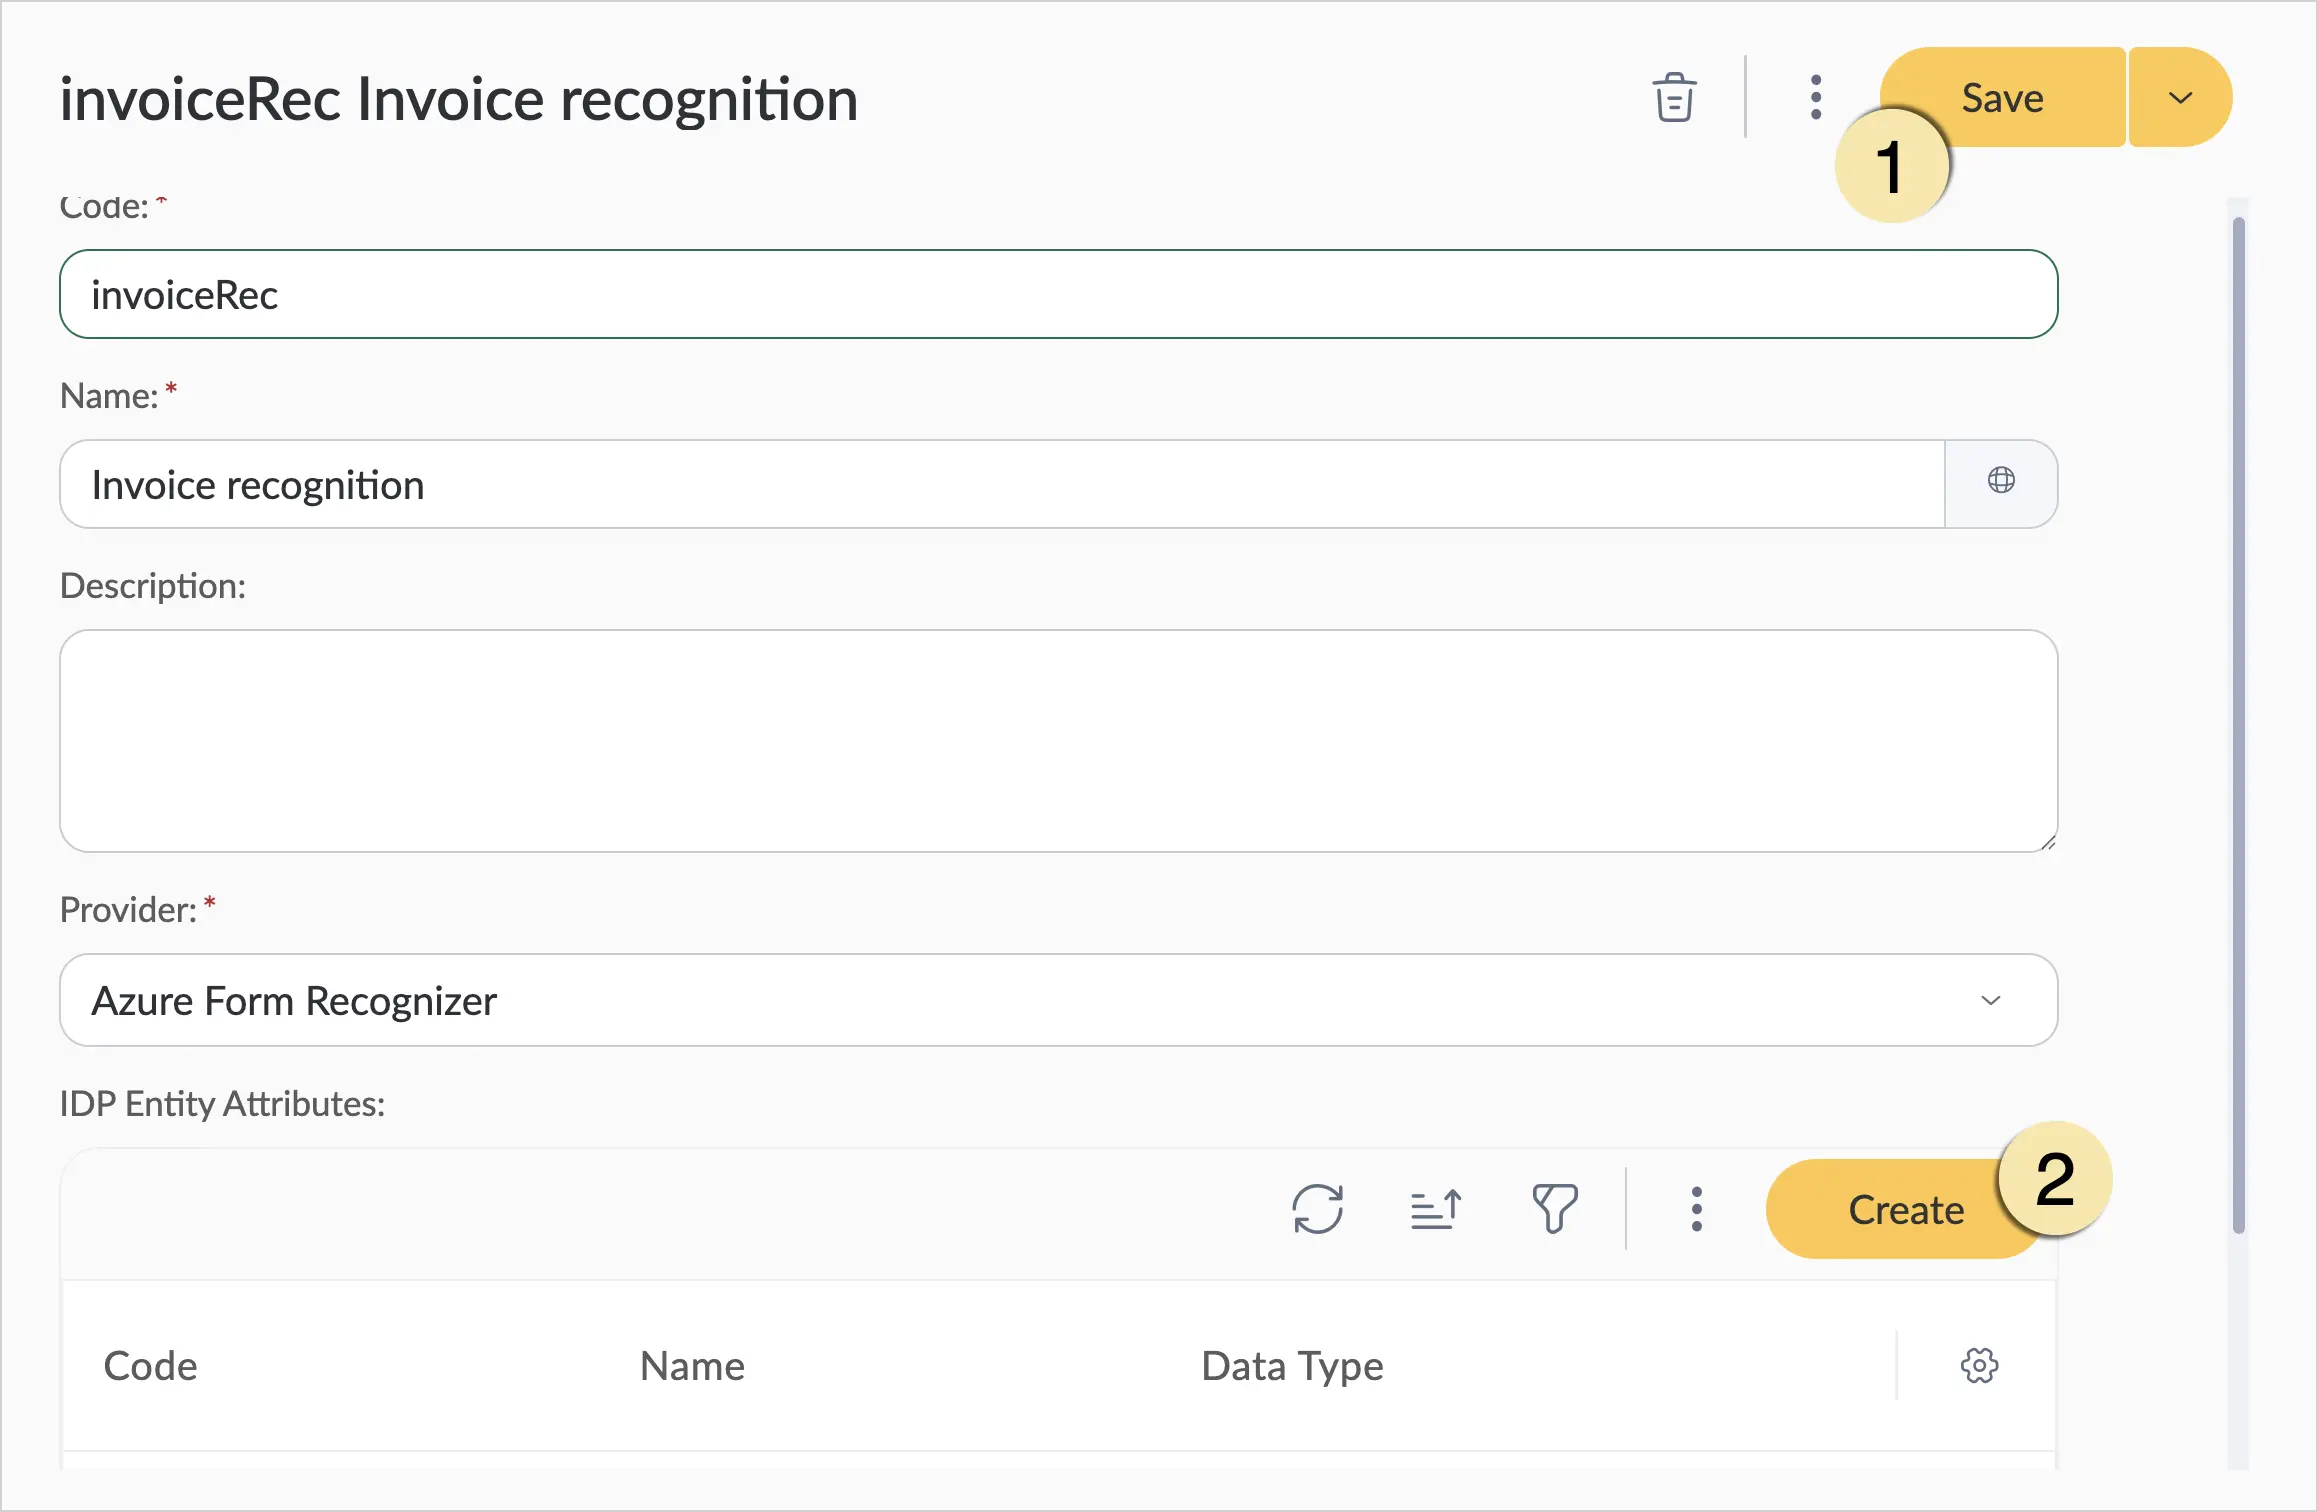
In the toolbar, select Save 1.
-
In the IDP Entity Attributes table, select Create 2.
-
Fill in the fields using the guidance in the table below.
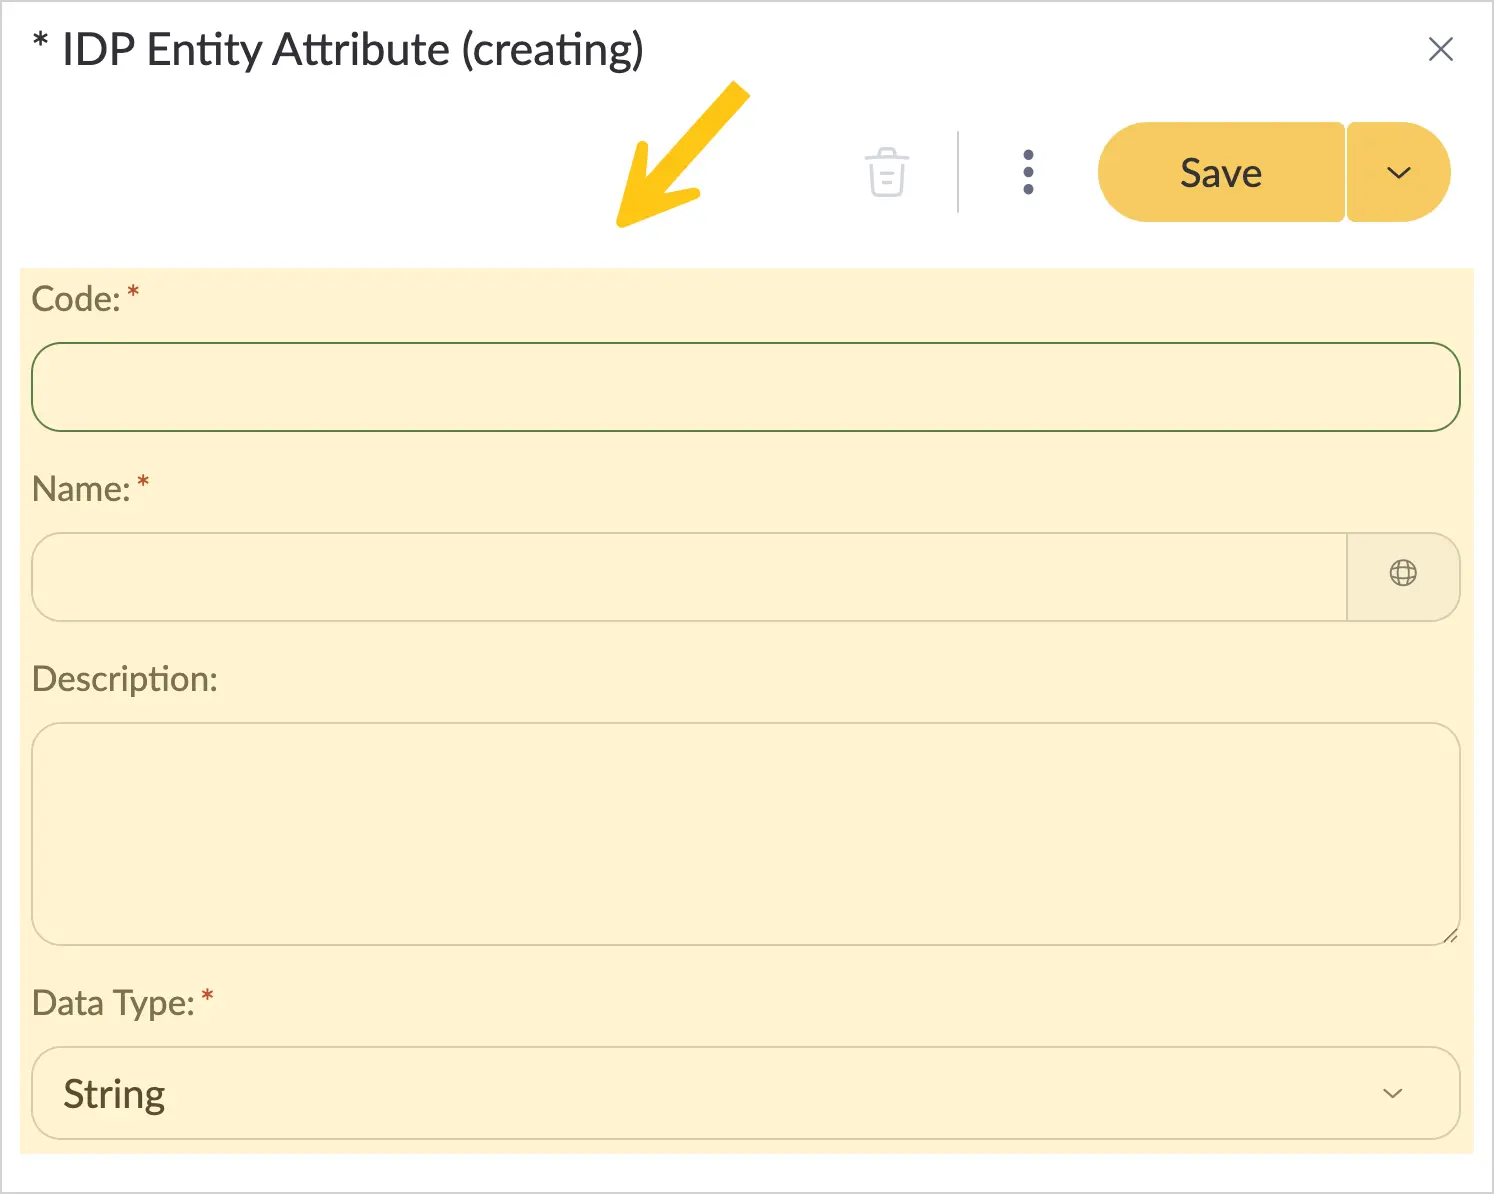
| Field | Description |
|---|---|
| Code* | A unique identifier for the IDP entity attribute — must match the code provided by the provider. |
| Name* | Enter the desired name for the IDP entity attribute. ℹ️ Note: You can set the attribute name for different languages. To do so, in the Name field, select the icon and fill in the fields for other languages. Then select the Apply button. |
| Description | A description of the IDP entity attribute. |
| Data Type* | Select the data type for the attribute:
To do so, select Save 1, then in the Array Element Attributes field, select the Create 2 icon. 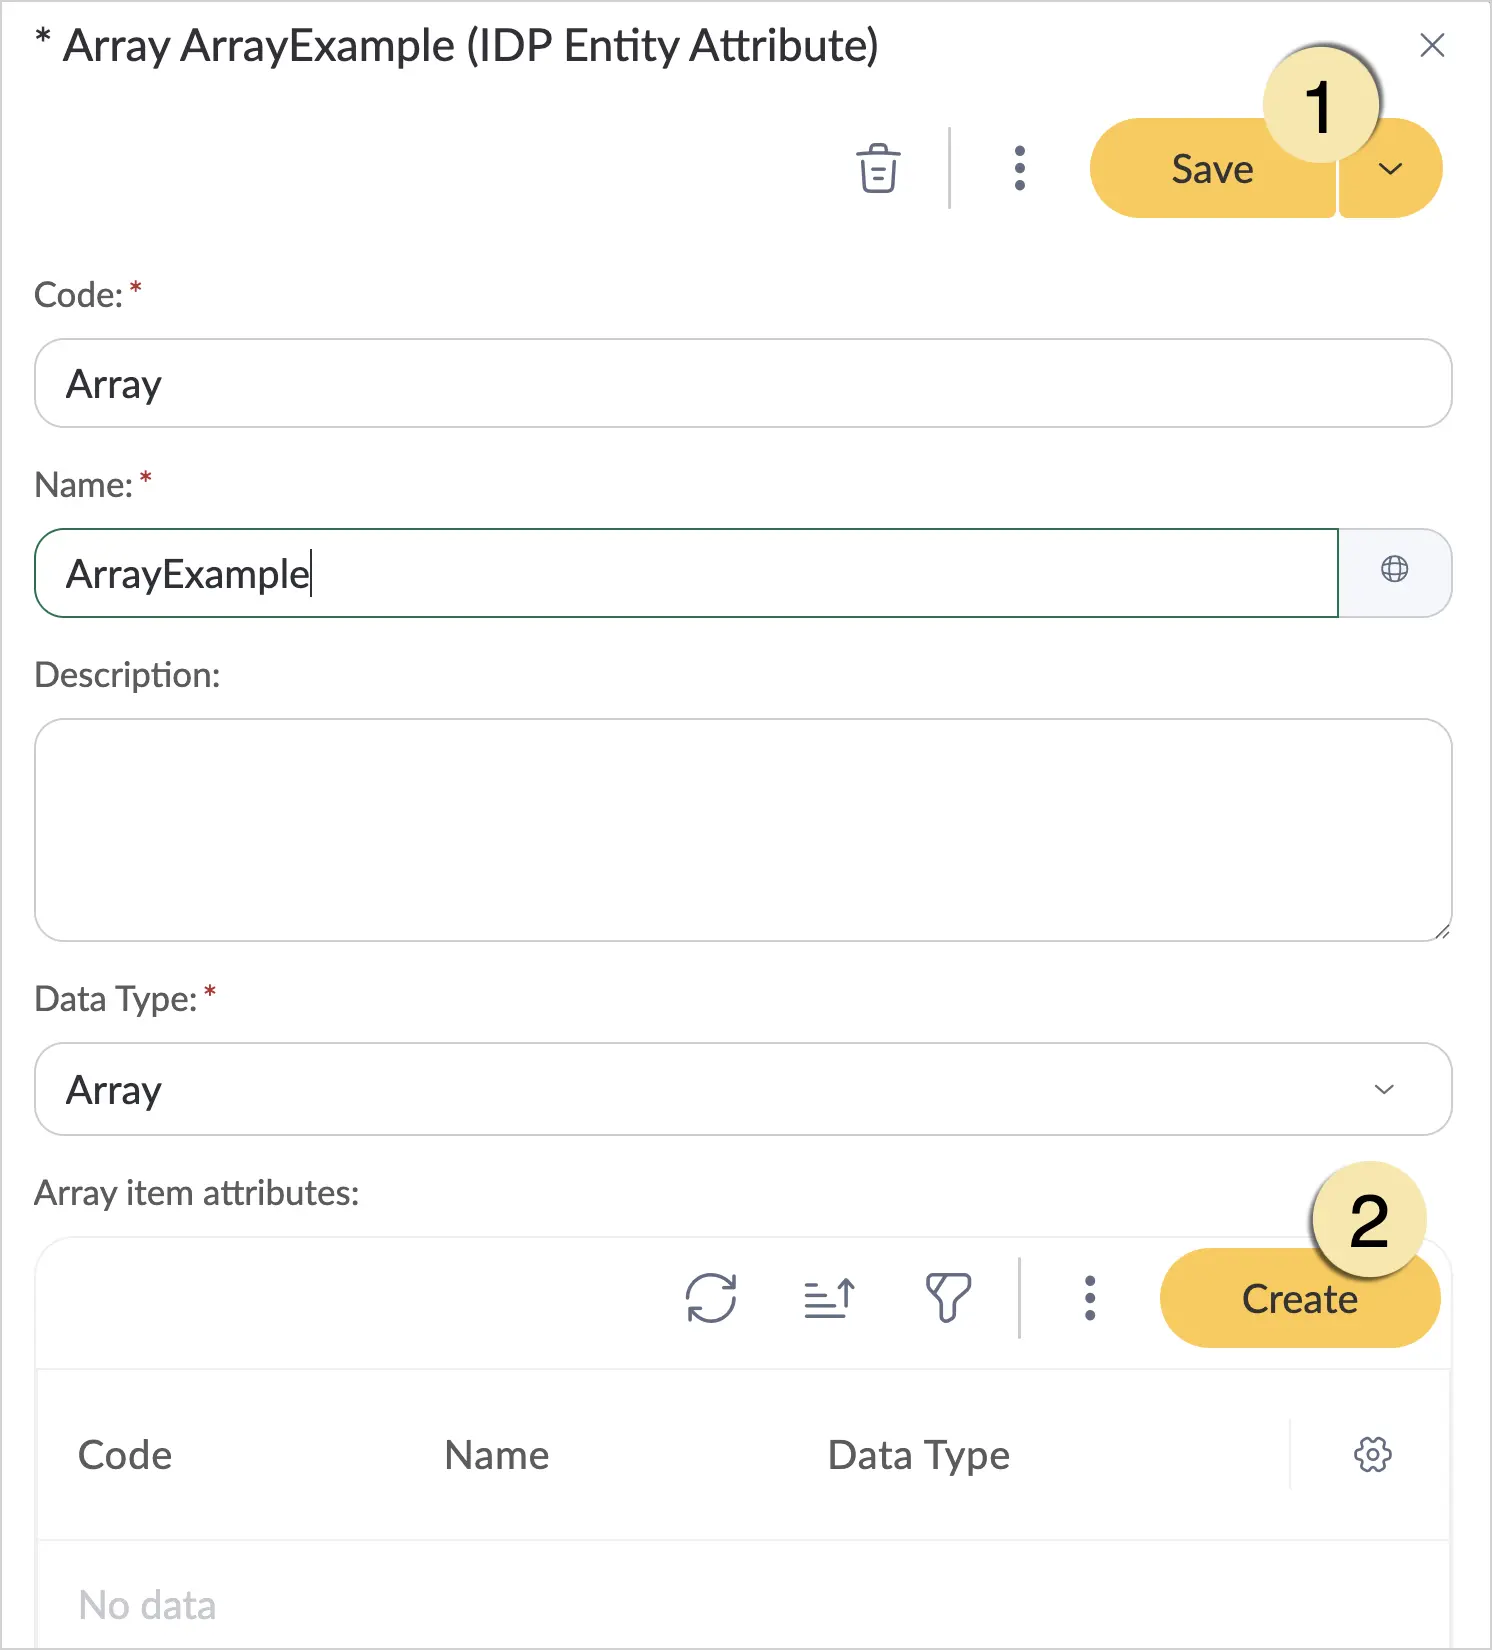 |
Fields marked with * are required.
- In the toolbar, select Save.
2.14.2.1.3. Add a Model
-
In the navigation panel, select the Studio 1 workspace.
-
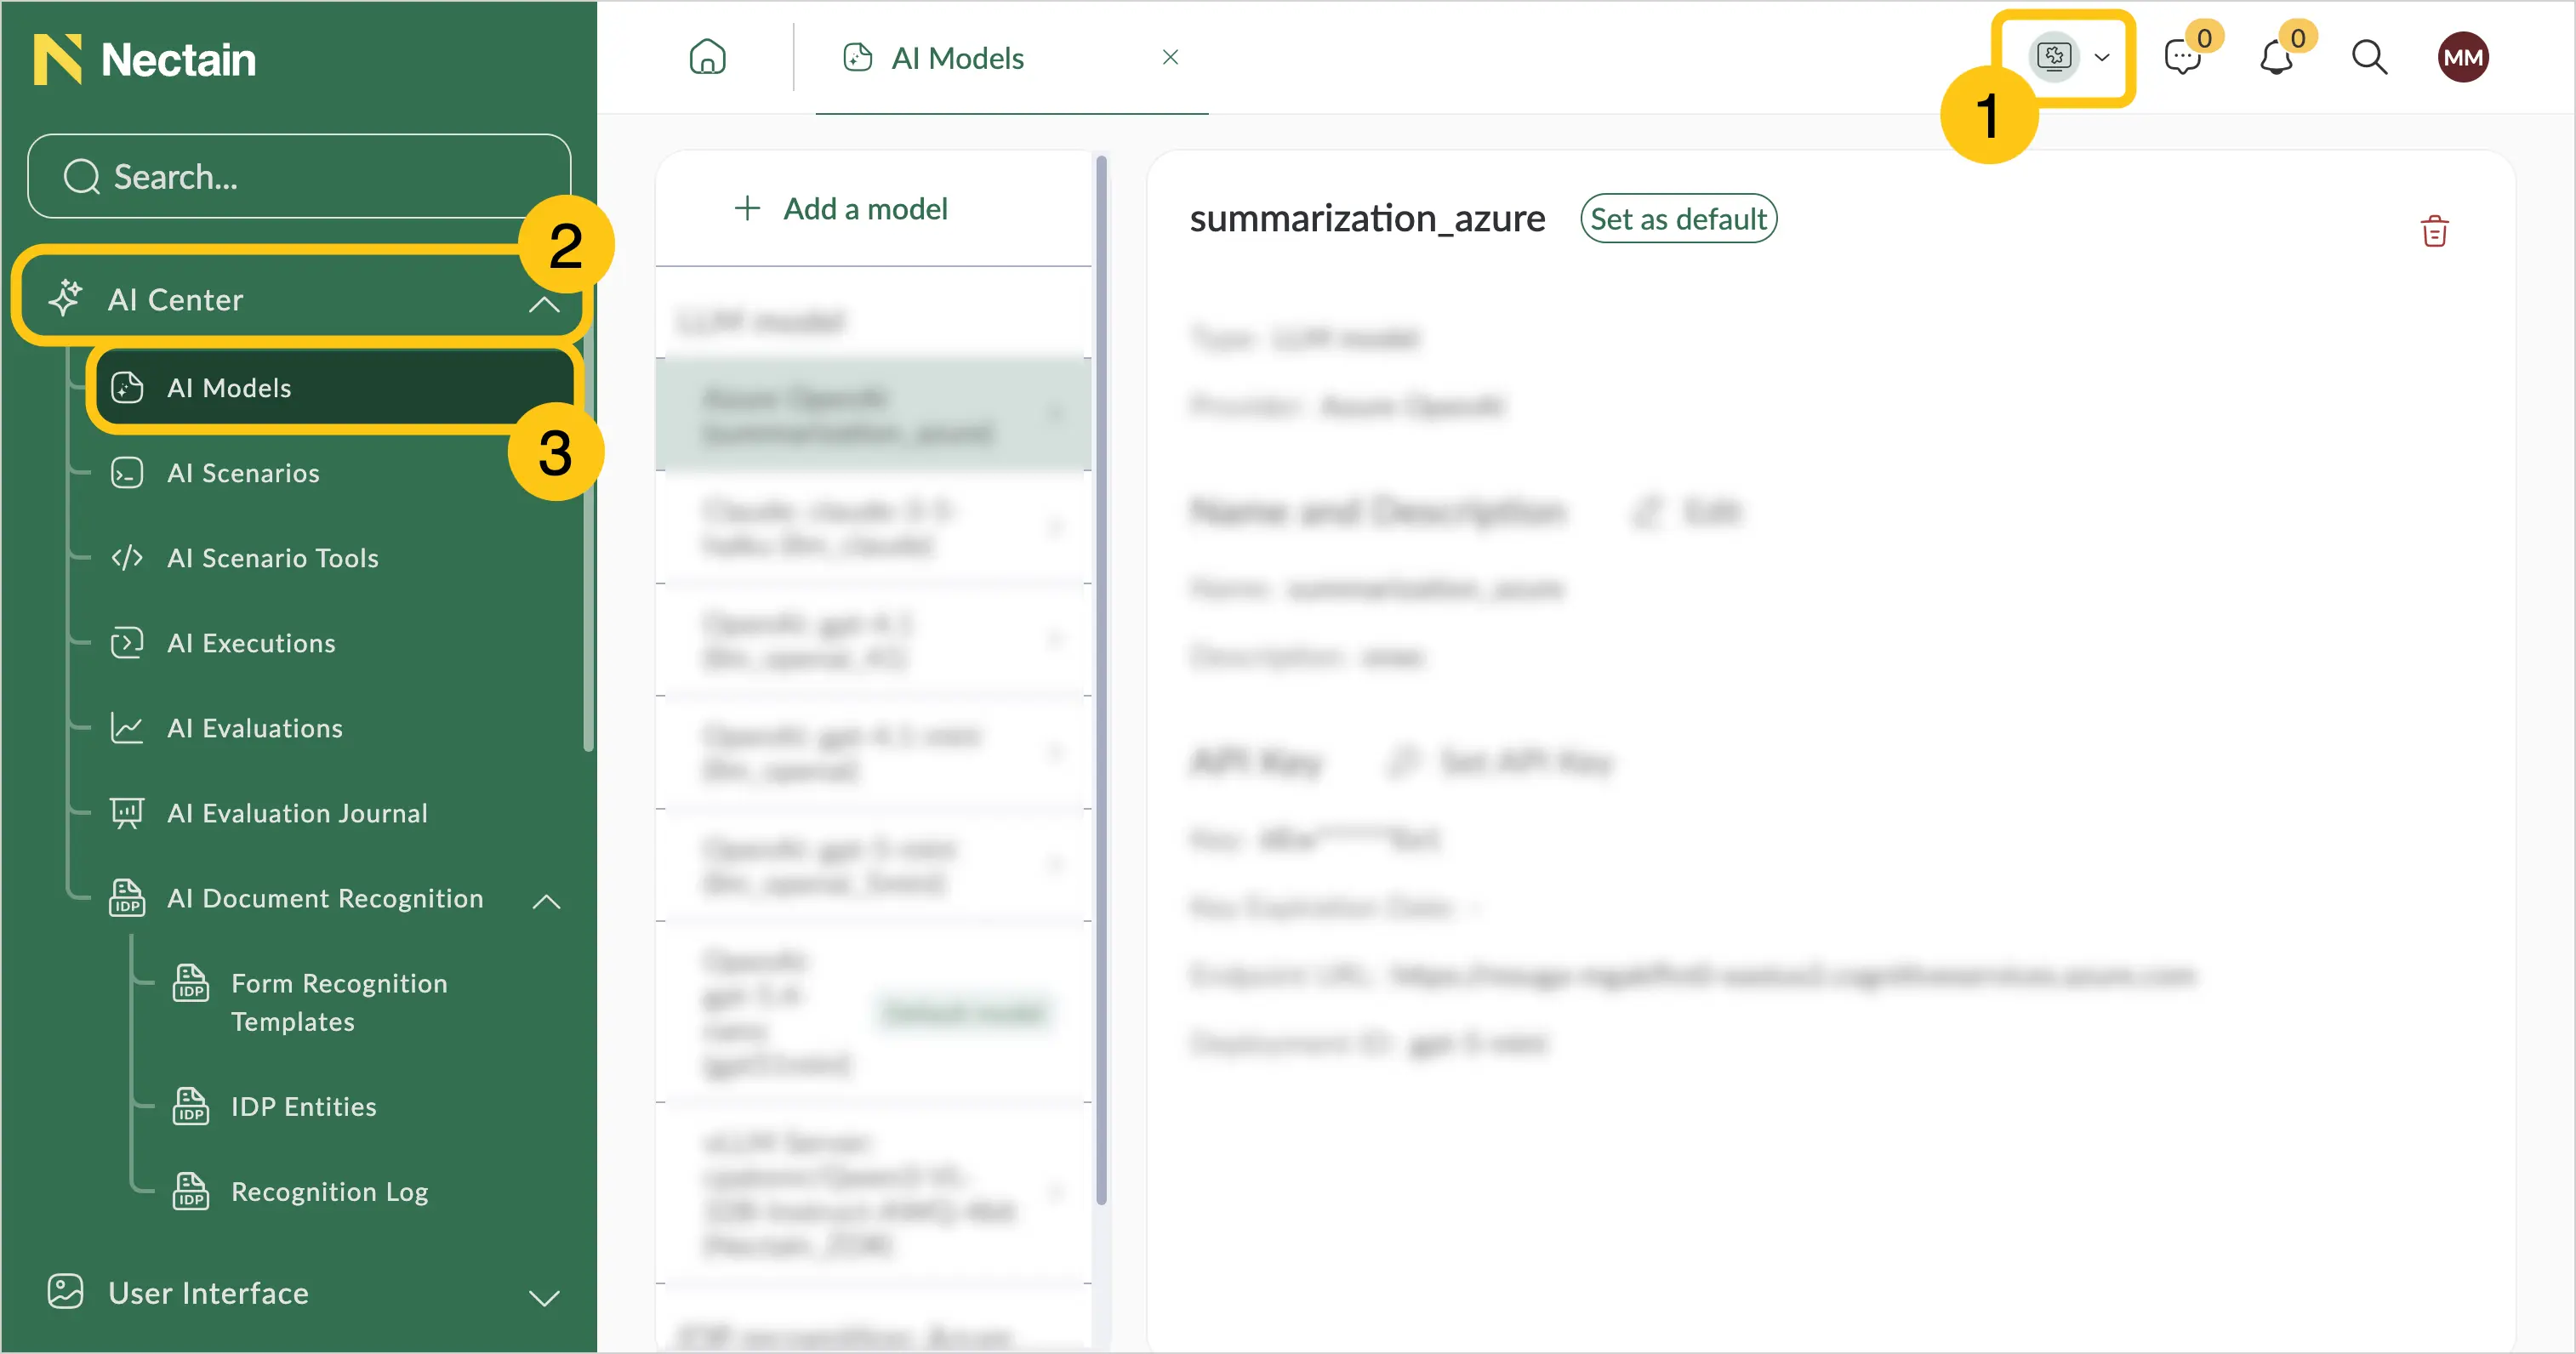
Select the AI Center 2 shortcut group, then select the AI Models 3 shortcut.
-
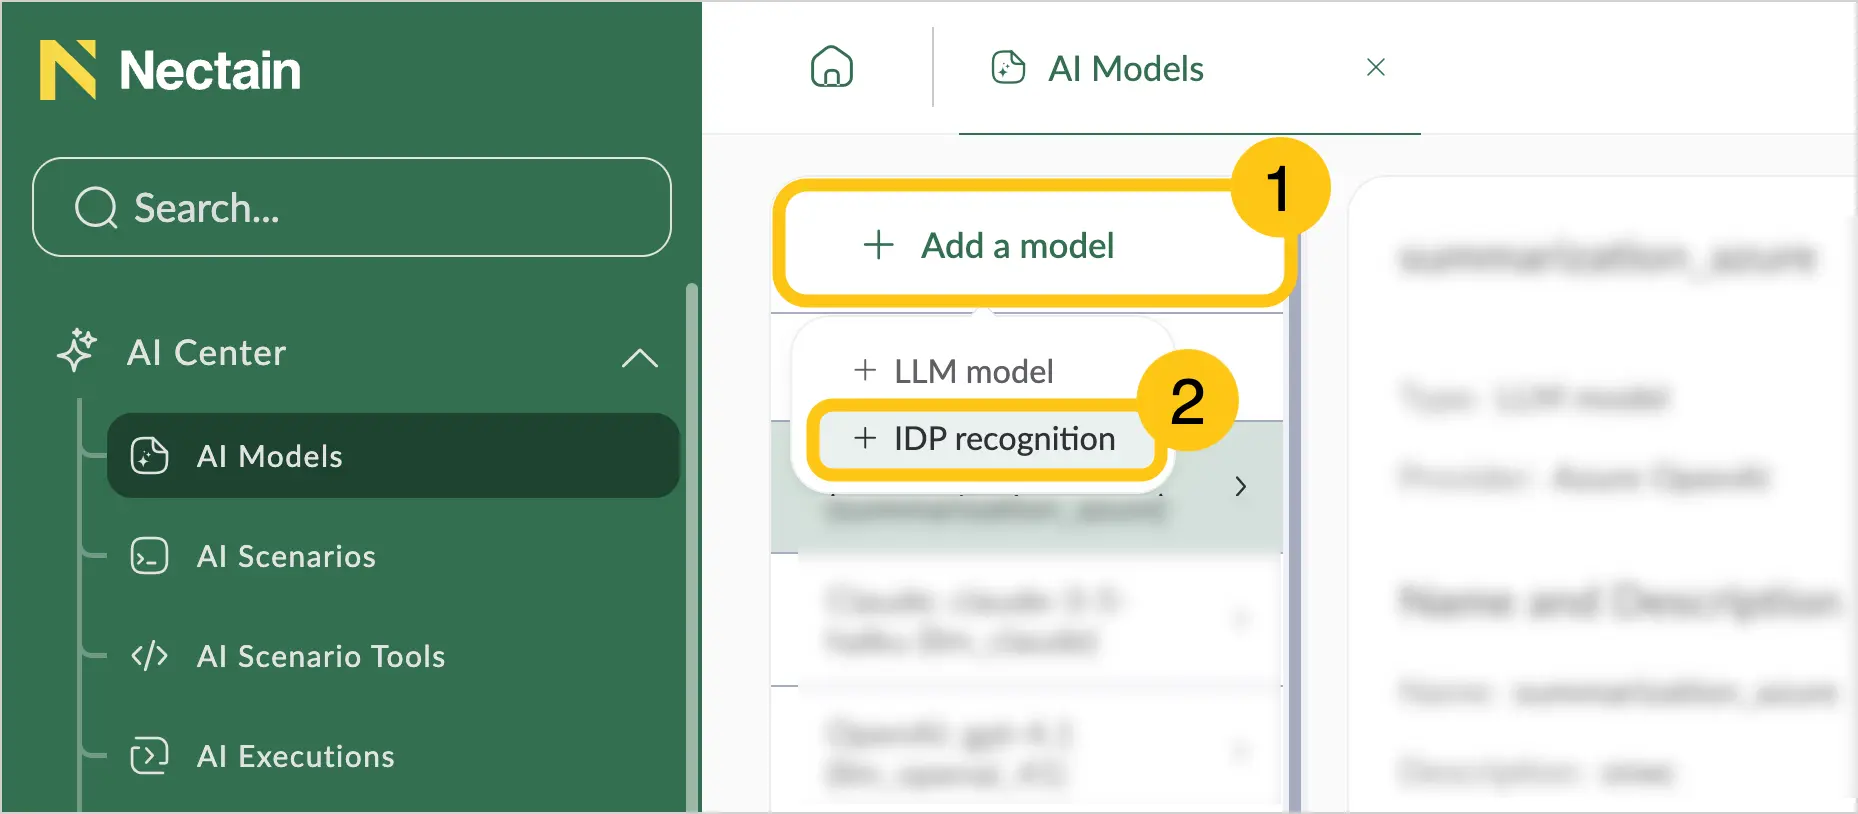
In the toolbar, select Add a model 1.
-
In the dropdown list, select IDP Recognition 2.
-
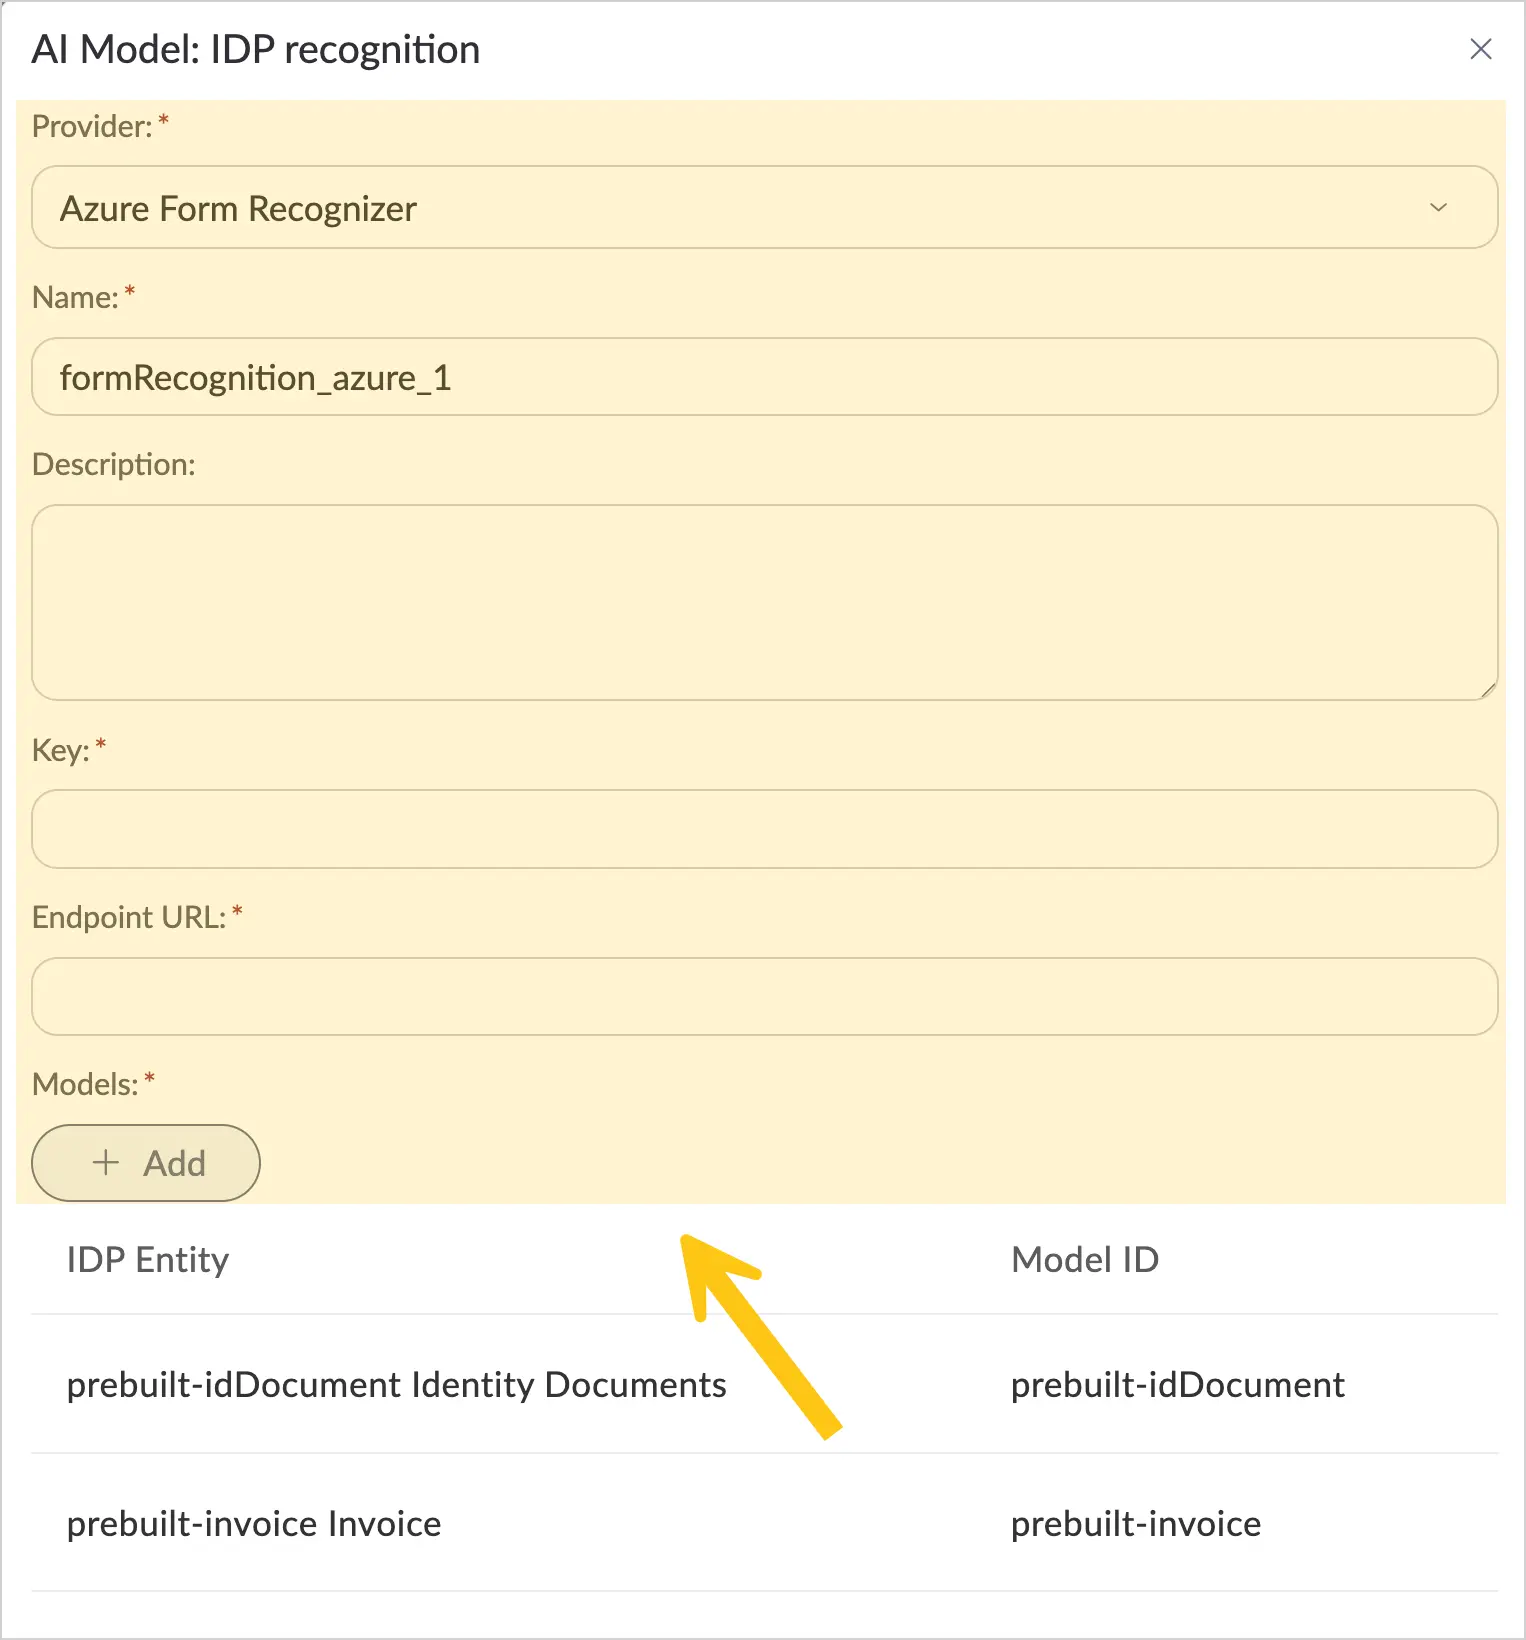
Fill in the fields using the guidance in the table below.
| Field | Description |
|---|---|
| Provider* | Select one of the available options:
|
| Name* | Enter a short and descriptive name. |
| Description | Add additional information about the configuration. |
For Azure
| Field | Description |
|---|---|
| Key* | Enter your API key obtained from Azure when registering the provider account. To find your key, follow these steps:
|
| URL Address* | Enter the endpoint URL for accessing the recognition service, obtained from Azure when registering the provider account. To find your URL, follow these steps:
|
| Models* | You can use the already added prebuilt models or add your own. To add your own, select the Add button.
|
For Google
| Field | Description |
|---|---|
| Credentials* | Upload the JSON file with the service account credentials for Google, which you downloaded when creating the Google Cloud account. |
| Models* |
|
Fields marked with * are required.
- After filling in all the fields, select the Add button.
2.14.2.1.4. Create a Recognition Template
-
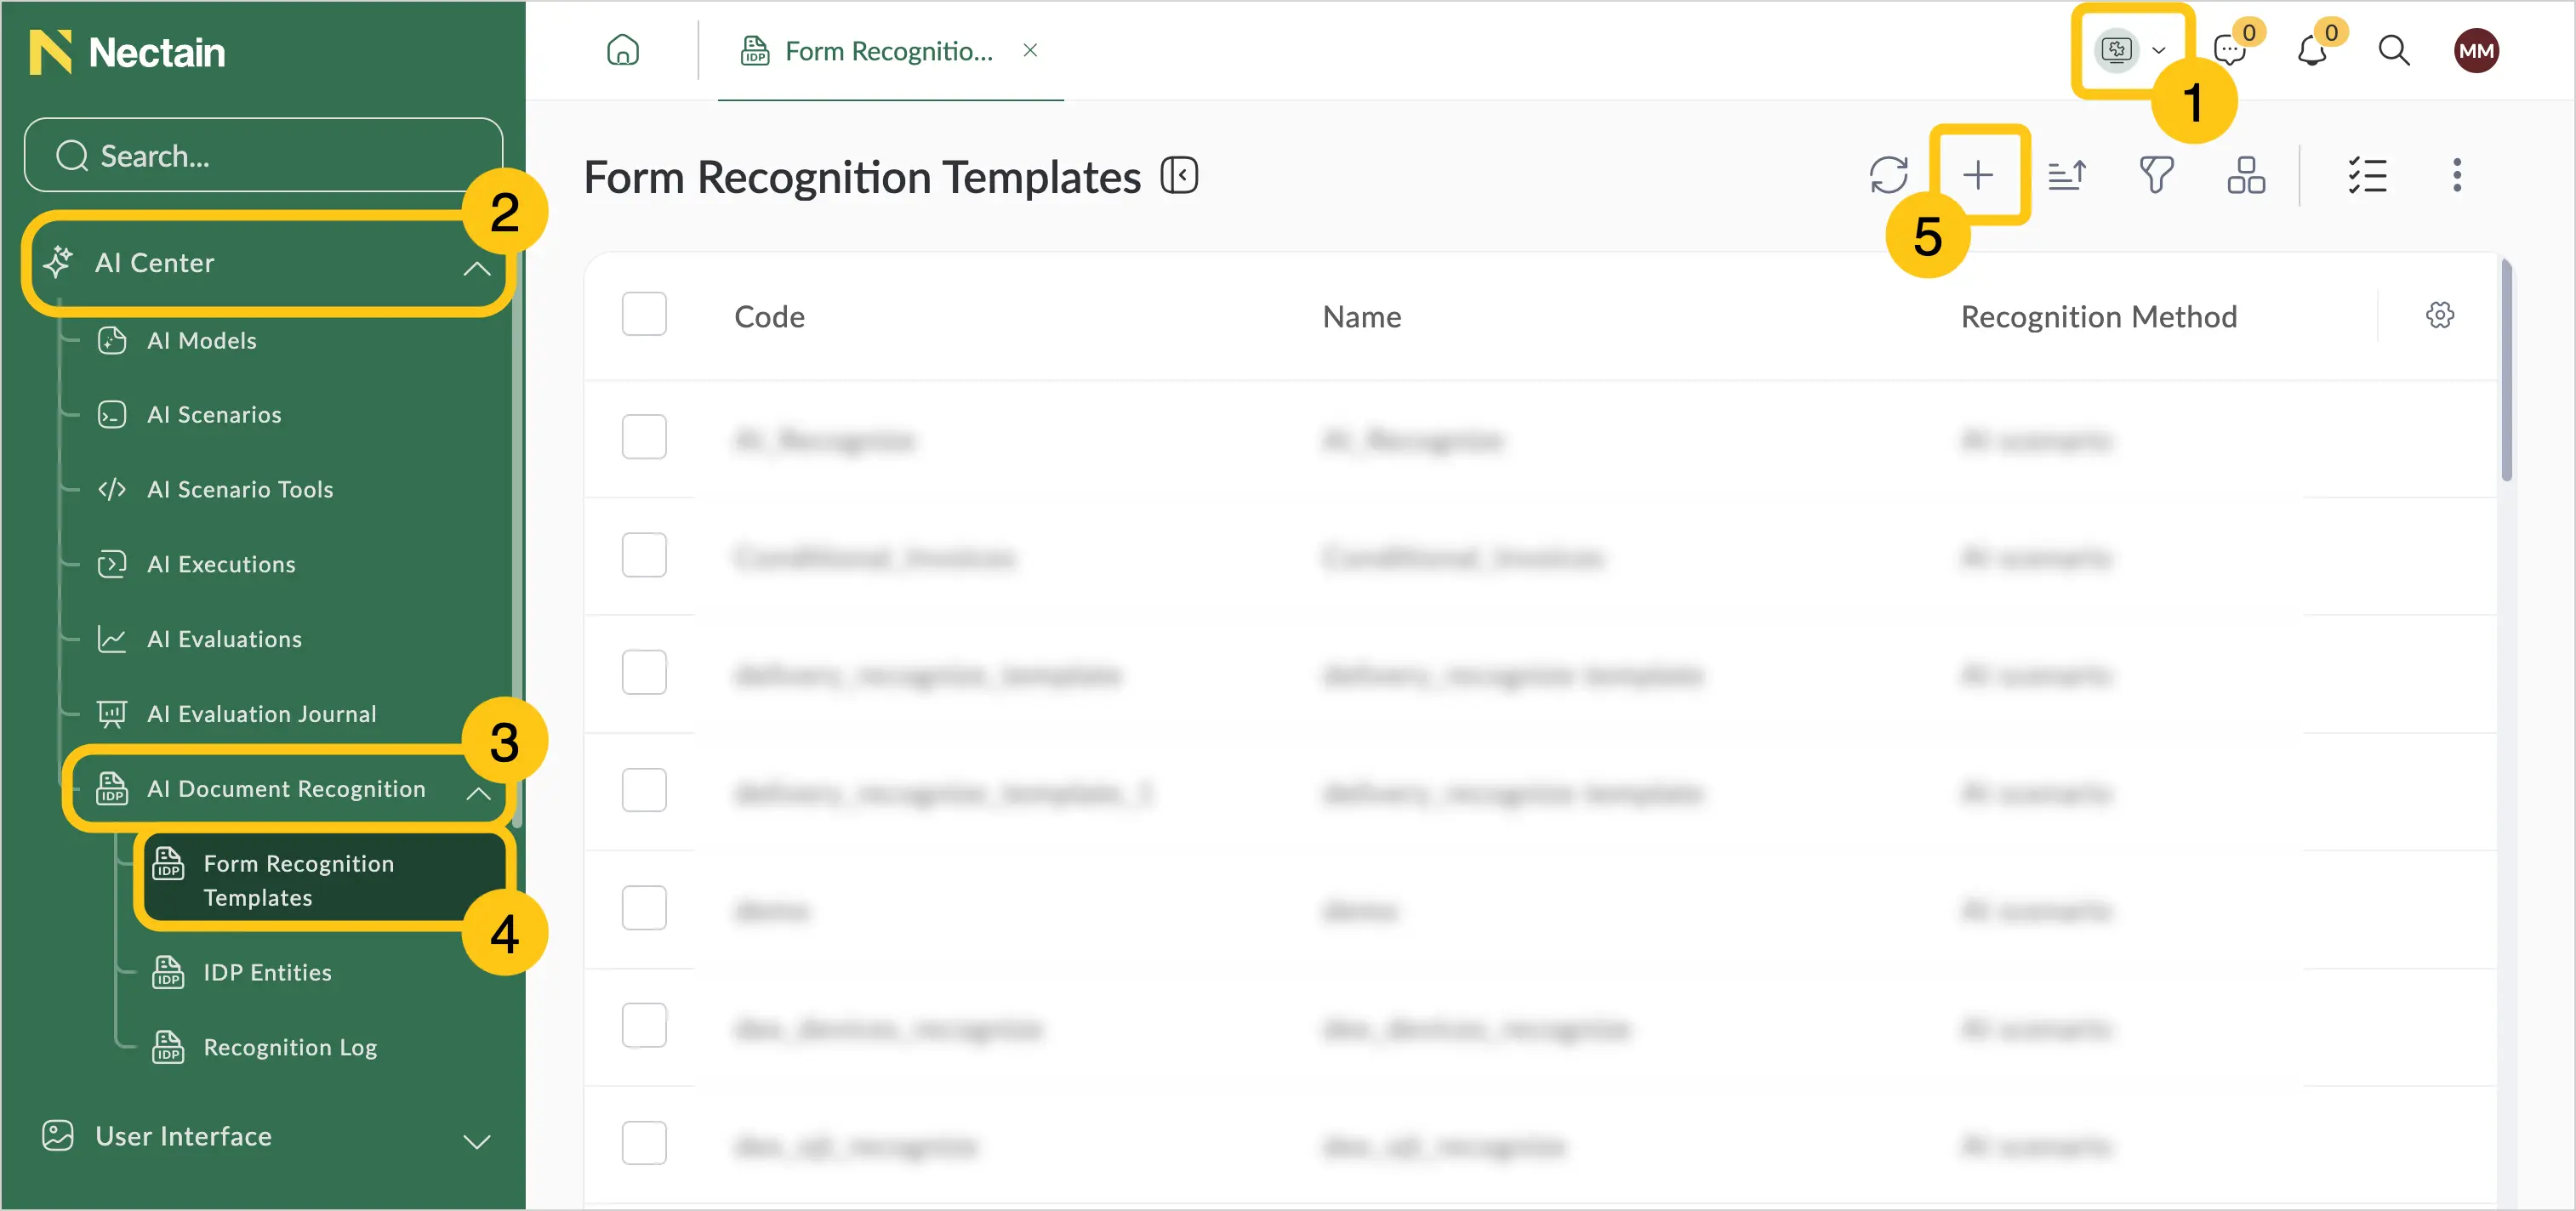
In the navigation panel, select the Studio 1 workspace.
-
Select the AI Center 2 shortcut group, then select the AI Document Recognition 3 shortcut group.
-
Select the Form Recognition Templates 4 shortcut.
-
In the toolbar, select + 5.
-
Fill in the fields 1 using the guidance in the table below, then in the toolbar select Save 2.
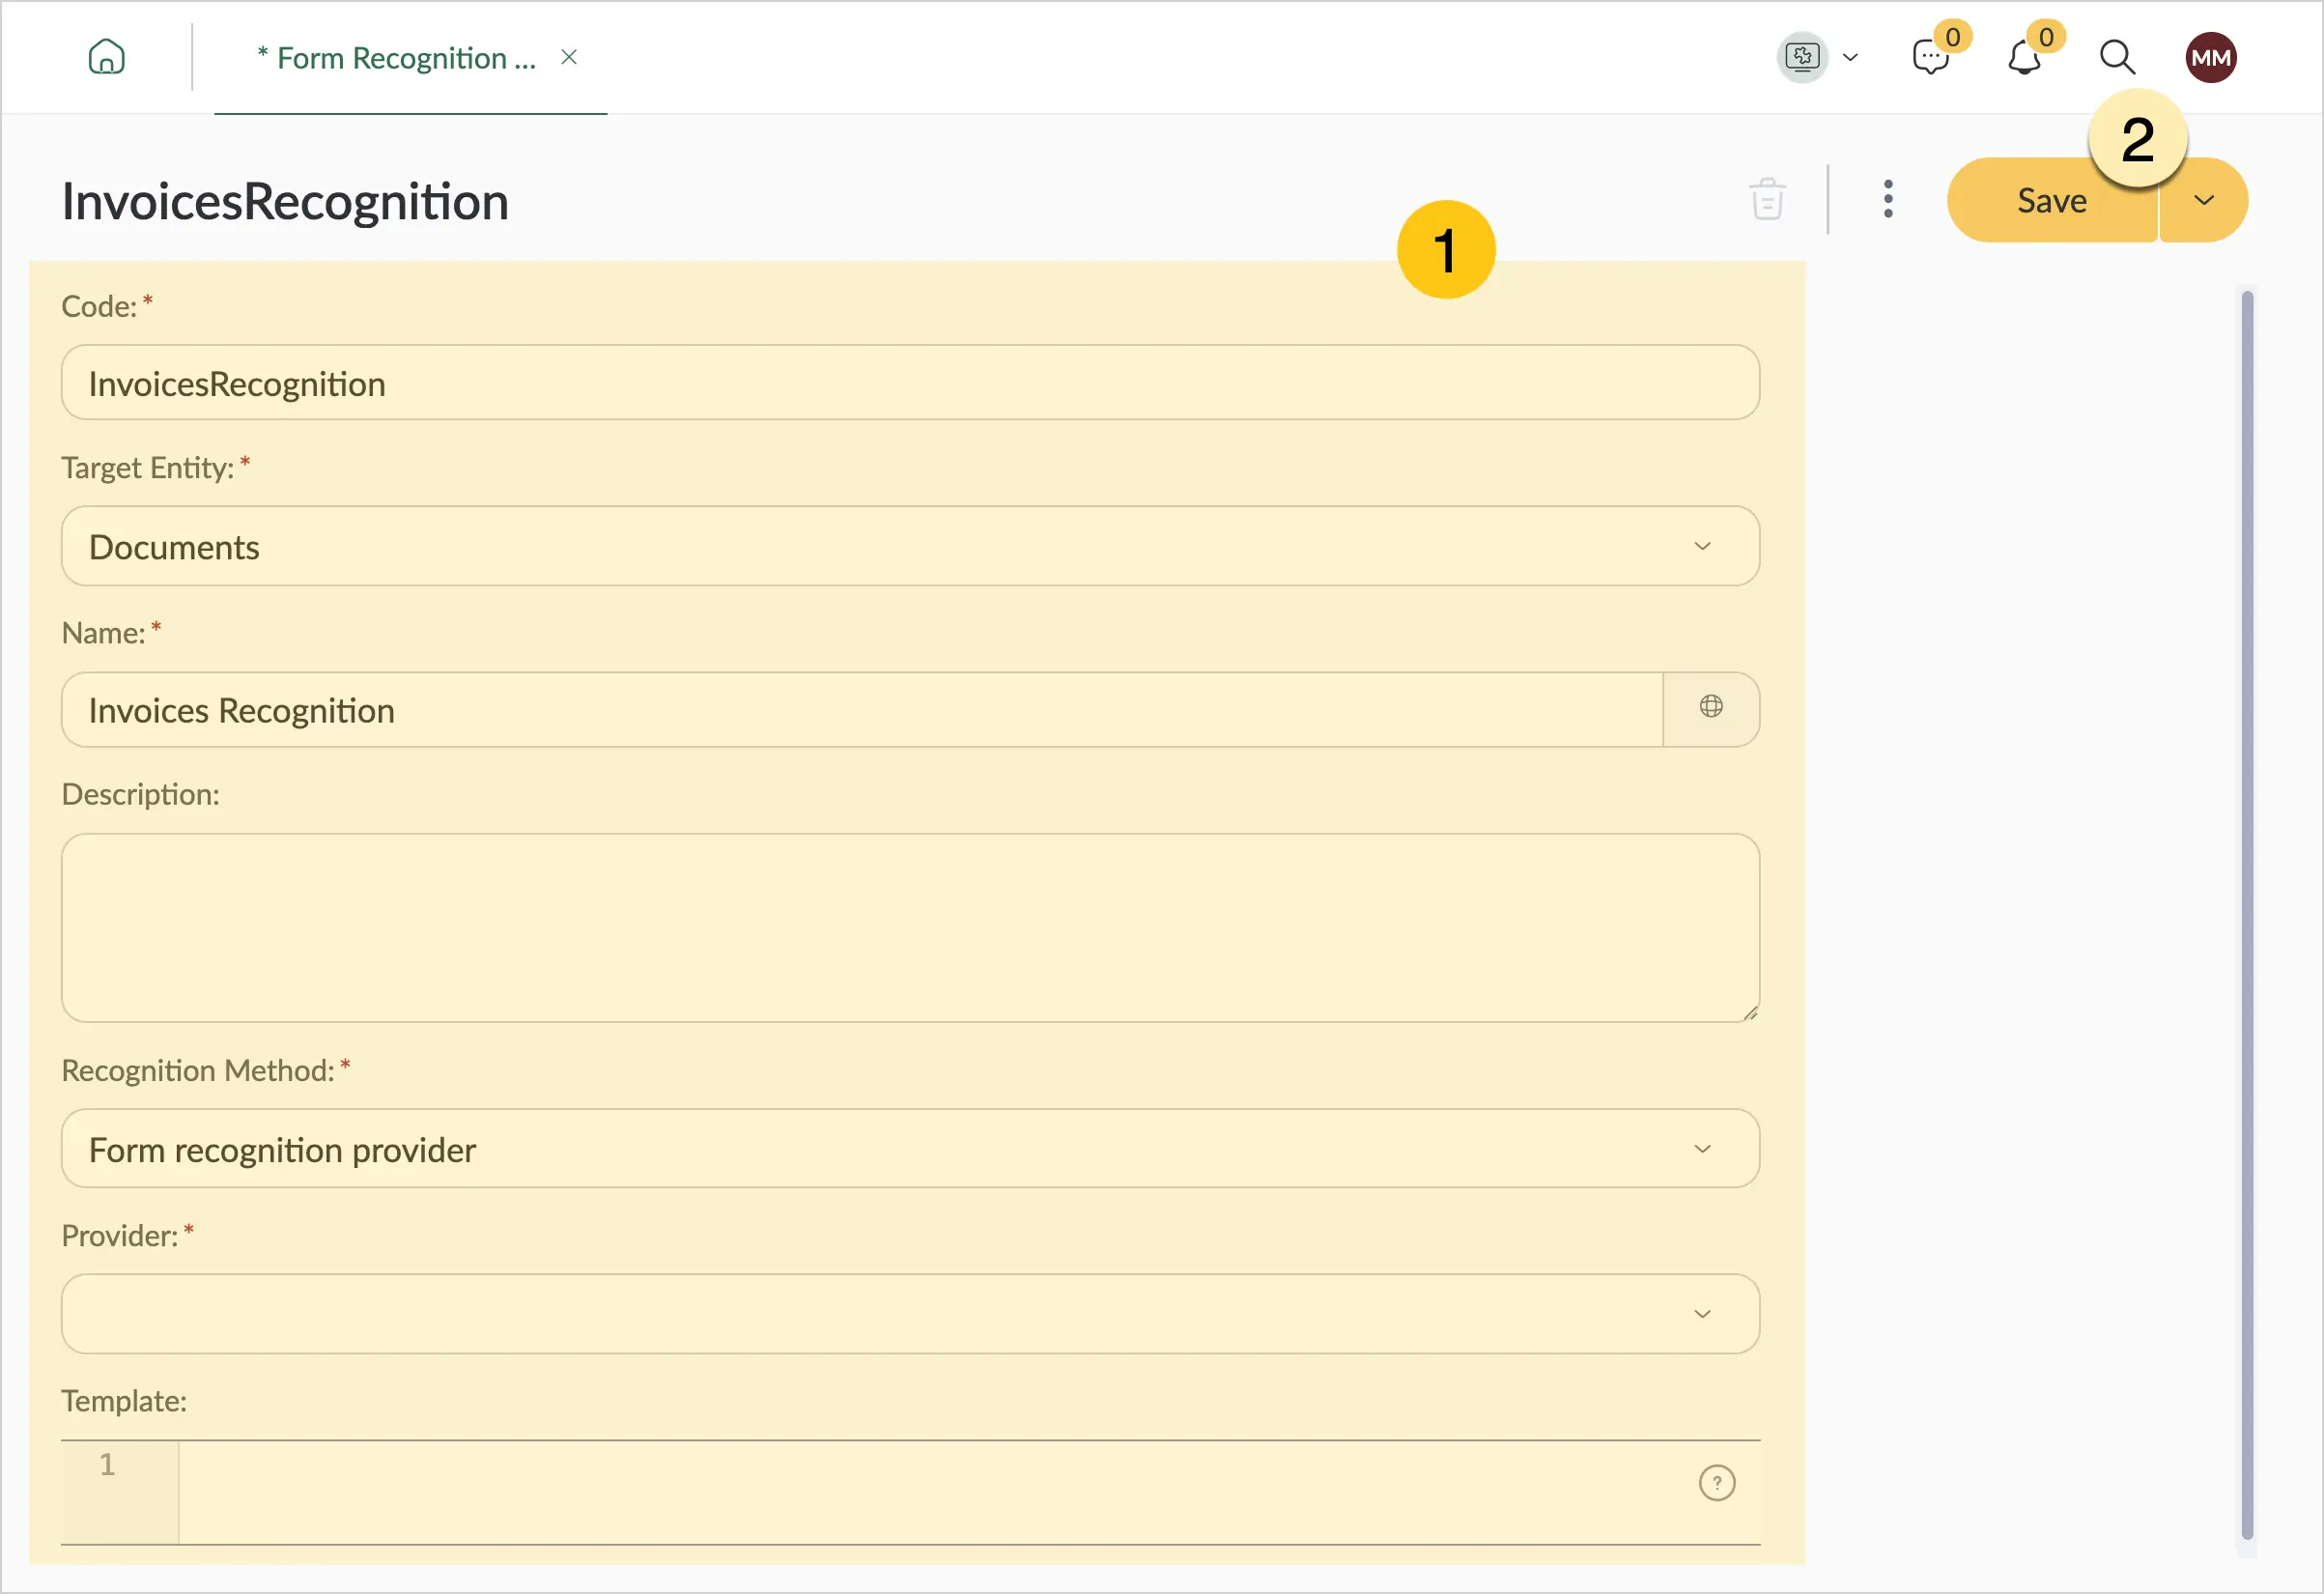
| Field | Description |
|---|---|
| Code* | A unique identifier for the template.
|
| Name* | Enter a clear name for the template that will be displayed in the system interface. For example: "Invoice Recognition" or "Passport Template". ℹ️ Note: You can set the template name for different languages. To do so, in the Name field, select the icon and fill in the fields for other languages. Then select the Apply button. |
| Description | Add a brief description of the template's purpose and usage specifics. |
| Recognition Method* | Select the Form Recognition Provider option. |
| Provider* | Select one of the available recognition providers:
|
Settings for the "Tesseract" Provider
Template — Enter the template settings as a JSON array, where each object contains the following parameters:
[
  {
    "attribute": "",                    // The attribute code where you want to write the extracted results
    "top": null,                        // The X coordinate of the top-left corner of the recognition area
    "left": null,                       // The Y coordinate of the top-left corner of the recognition area
    "width": null,                      // The width of the recognition area
    "height": null,                     // The height of the recognition area
  }
]
If you specify an empty JSON array [] in the Template field, the system will only perform text recognition on the scanned file and add a text layer to it. In this case, the extracted text values will not be written to any document attribute.
For example, to recognize the document date from the first page, in an area of 200x40 pixels located 100 pixels from the top and 50 pixels from the left:
[
  {
    "attribute": "documentDate",
    "top": 100,
    "left": 50,
    "width": 200,
    "height": 40,
  }
]
Settings for the "Google" and "Azure" Providers
| Field | Description |
|---|---|
| Entity* | Select the required IDP entity from the list. |
| Document Type* | Select the document type for which the recognition template is being created. This determines which attributes will be available for mapping. |
| "Add Mapping" Button | Select the Add Mapping button to create a link between the data to be recognized in the document and the location where this data will be stored in the system. You can create multiple such links within one template. |
| Recognition Result Layer | Select one of the following options:
|
Settings for the "Entity" Result Layer Type
| Field | Description |
|---|---|
| Recognition Result Field* | Select the required model field from the list that contains the recognized text. For example: "Due Date" for the payment date. Below the field you will see a hint in English explaining the purpose of this field. |
| Recognition Result Subfield | This field appears when the field selected above is complex and contains subfields. For example: addresses consisting of street, city, and region. Select the required subfield from the list. |
| Document Attribute Type* | Select one of the following attribute types to configure mapping for:
|
| Document Attribute* | Select the specific attribute from the list where the recognized value will be stored. |
Settings for the "Key-Value Pairs" Result Layer Type
| Field | Description |
|---|---|
| Token Key* | Enter the keyword by which the required text will be found. |
| Token Regular Expression* | Enter a regular expression — a pattern used to define the structure of the text to be recognized. Examples:
See Regular Expression Syntax. |
| Document Attribute Type* | Select one of the following attribute types to configure mapping for:
|
| Document Attribute* | Select the specific attribute from the list where the recognized value will be stored. |
-
Fields marked with * are required.
-
For table recognition, the array mapping feature is supported. To use it, a pre-trained model (pre-built model) must be used.
2.14.2.2. Apply the Tesseract Recognition Template
Since the Tesseract form recognition template is created as a universal template and is not tied to a specific document type, you can apply it to any document types. To do so, follow these steps:
-
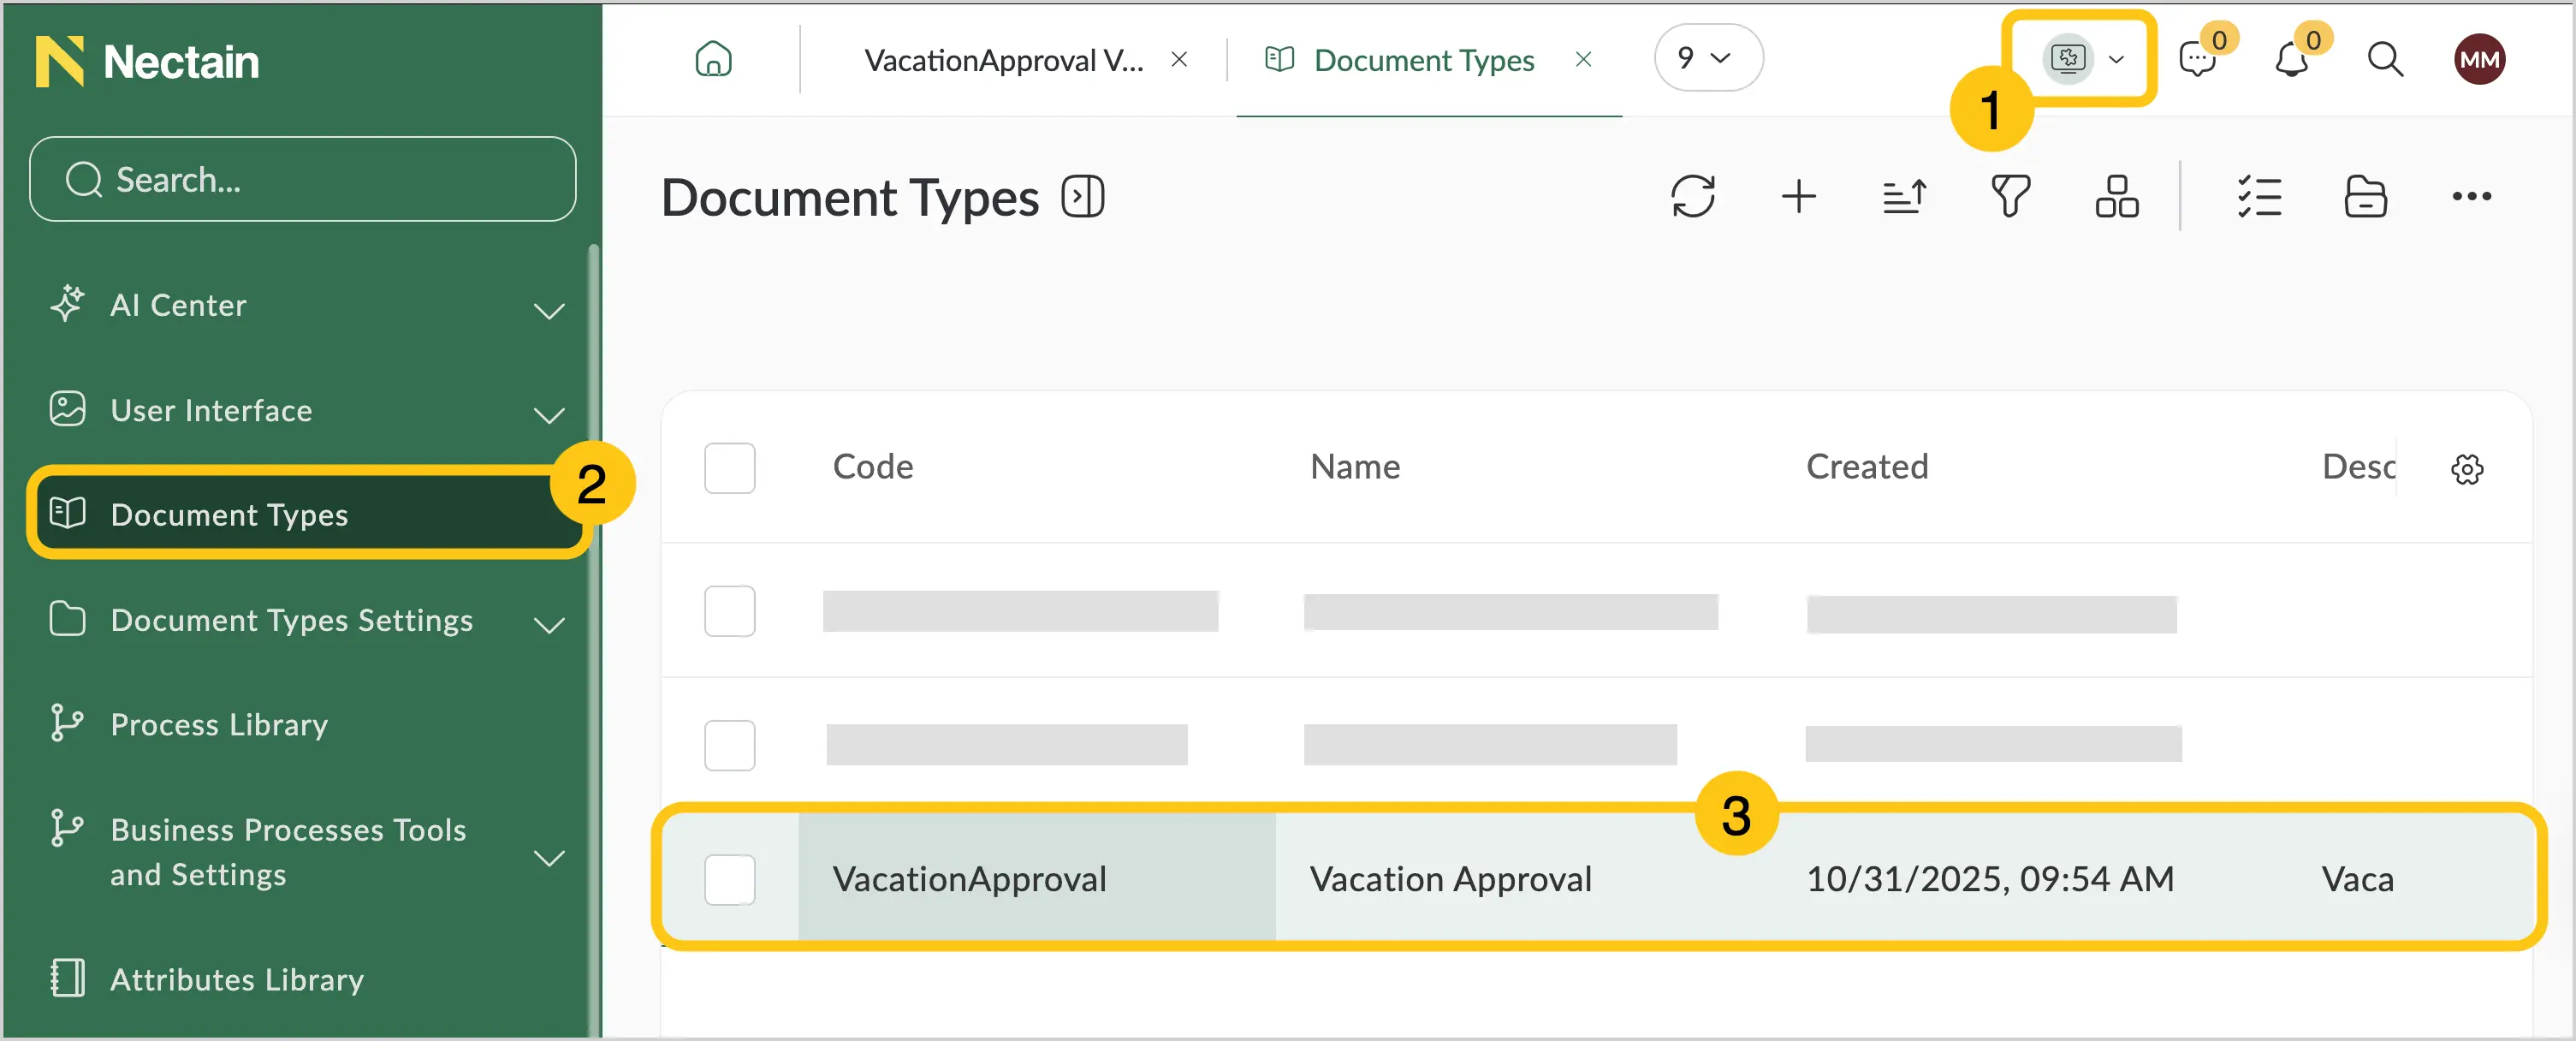
In the navigation panel, select the Studio 1 workspace.
-
Select the Document Types 2 shortcut.
-
Open the document type to which you want to apply the template 3.
-
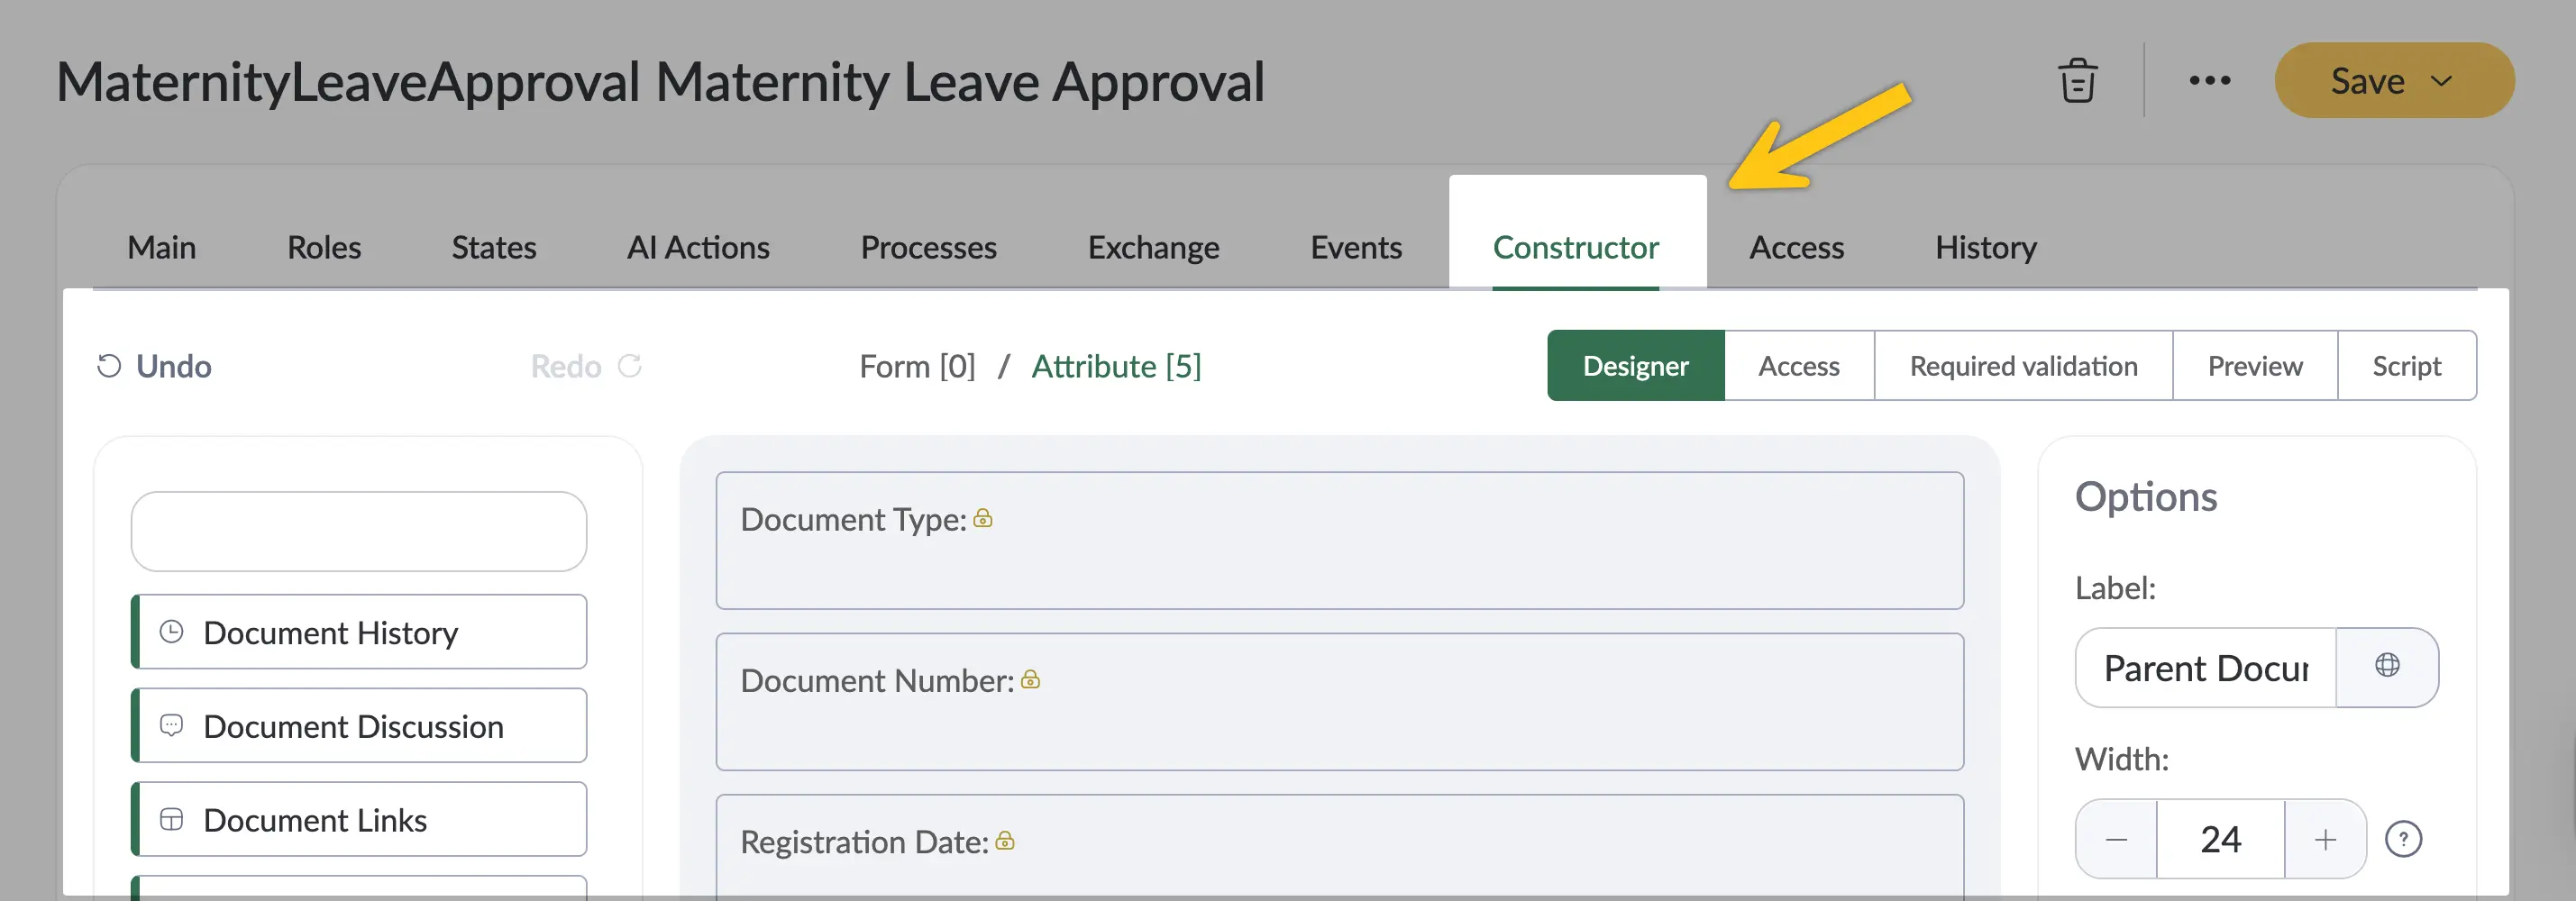
Go to the Constructor tab.
-
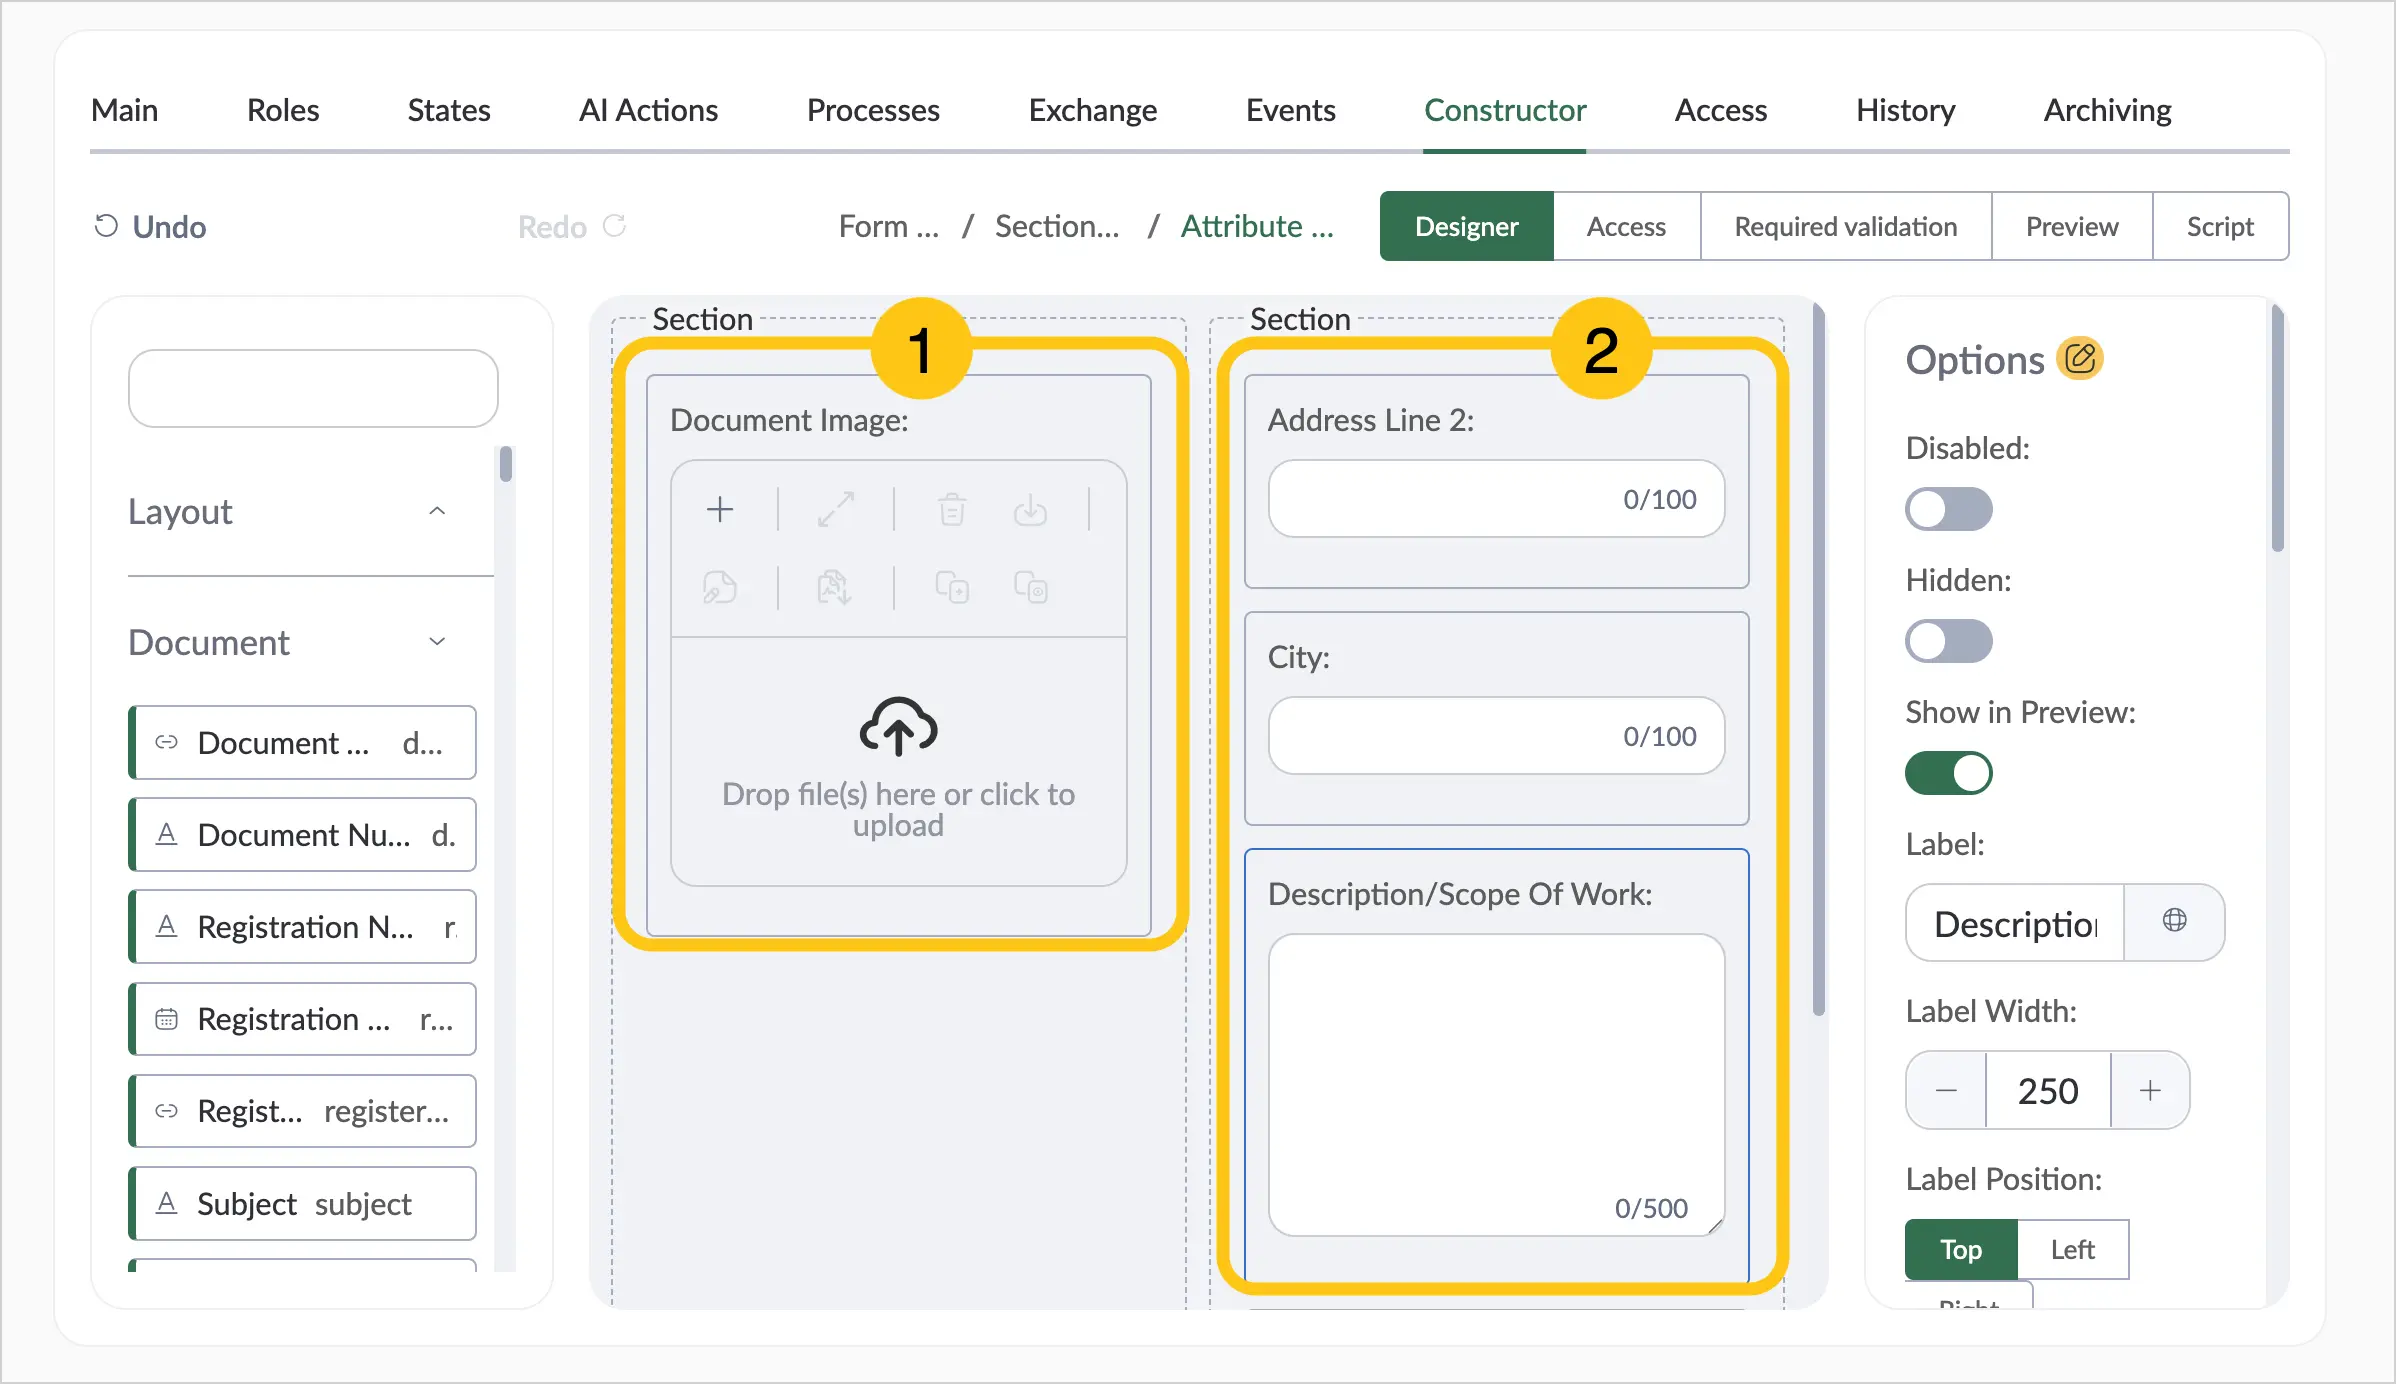
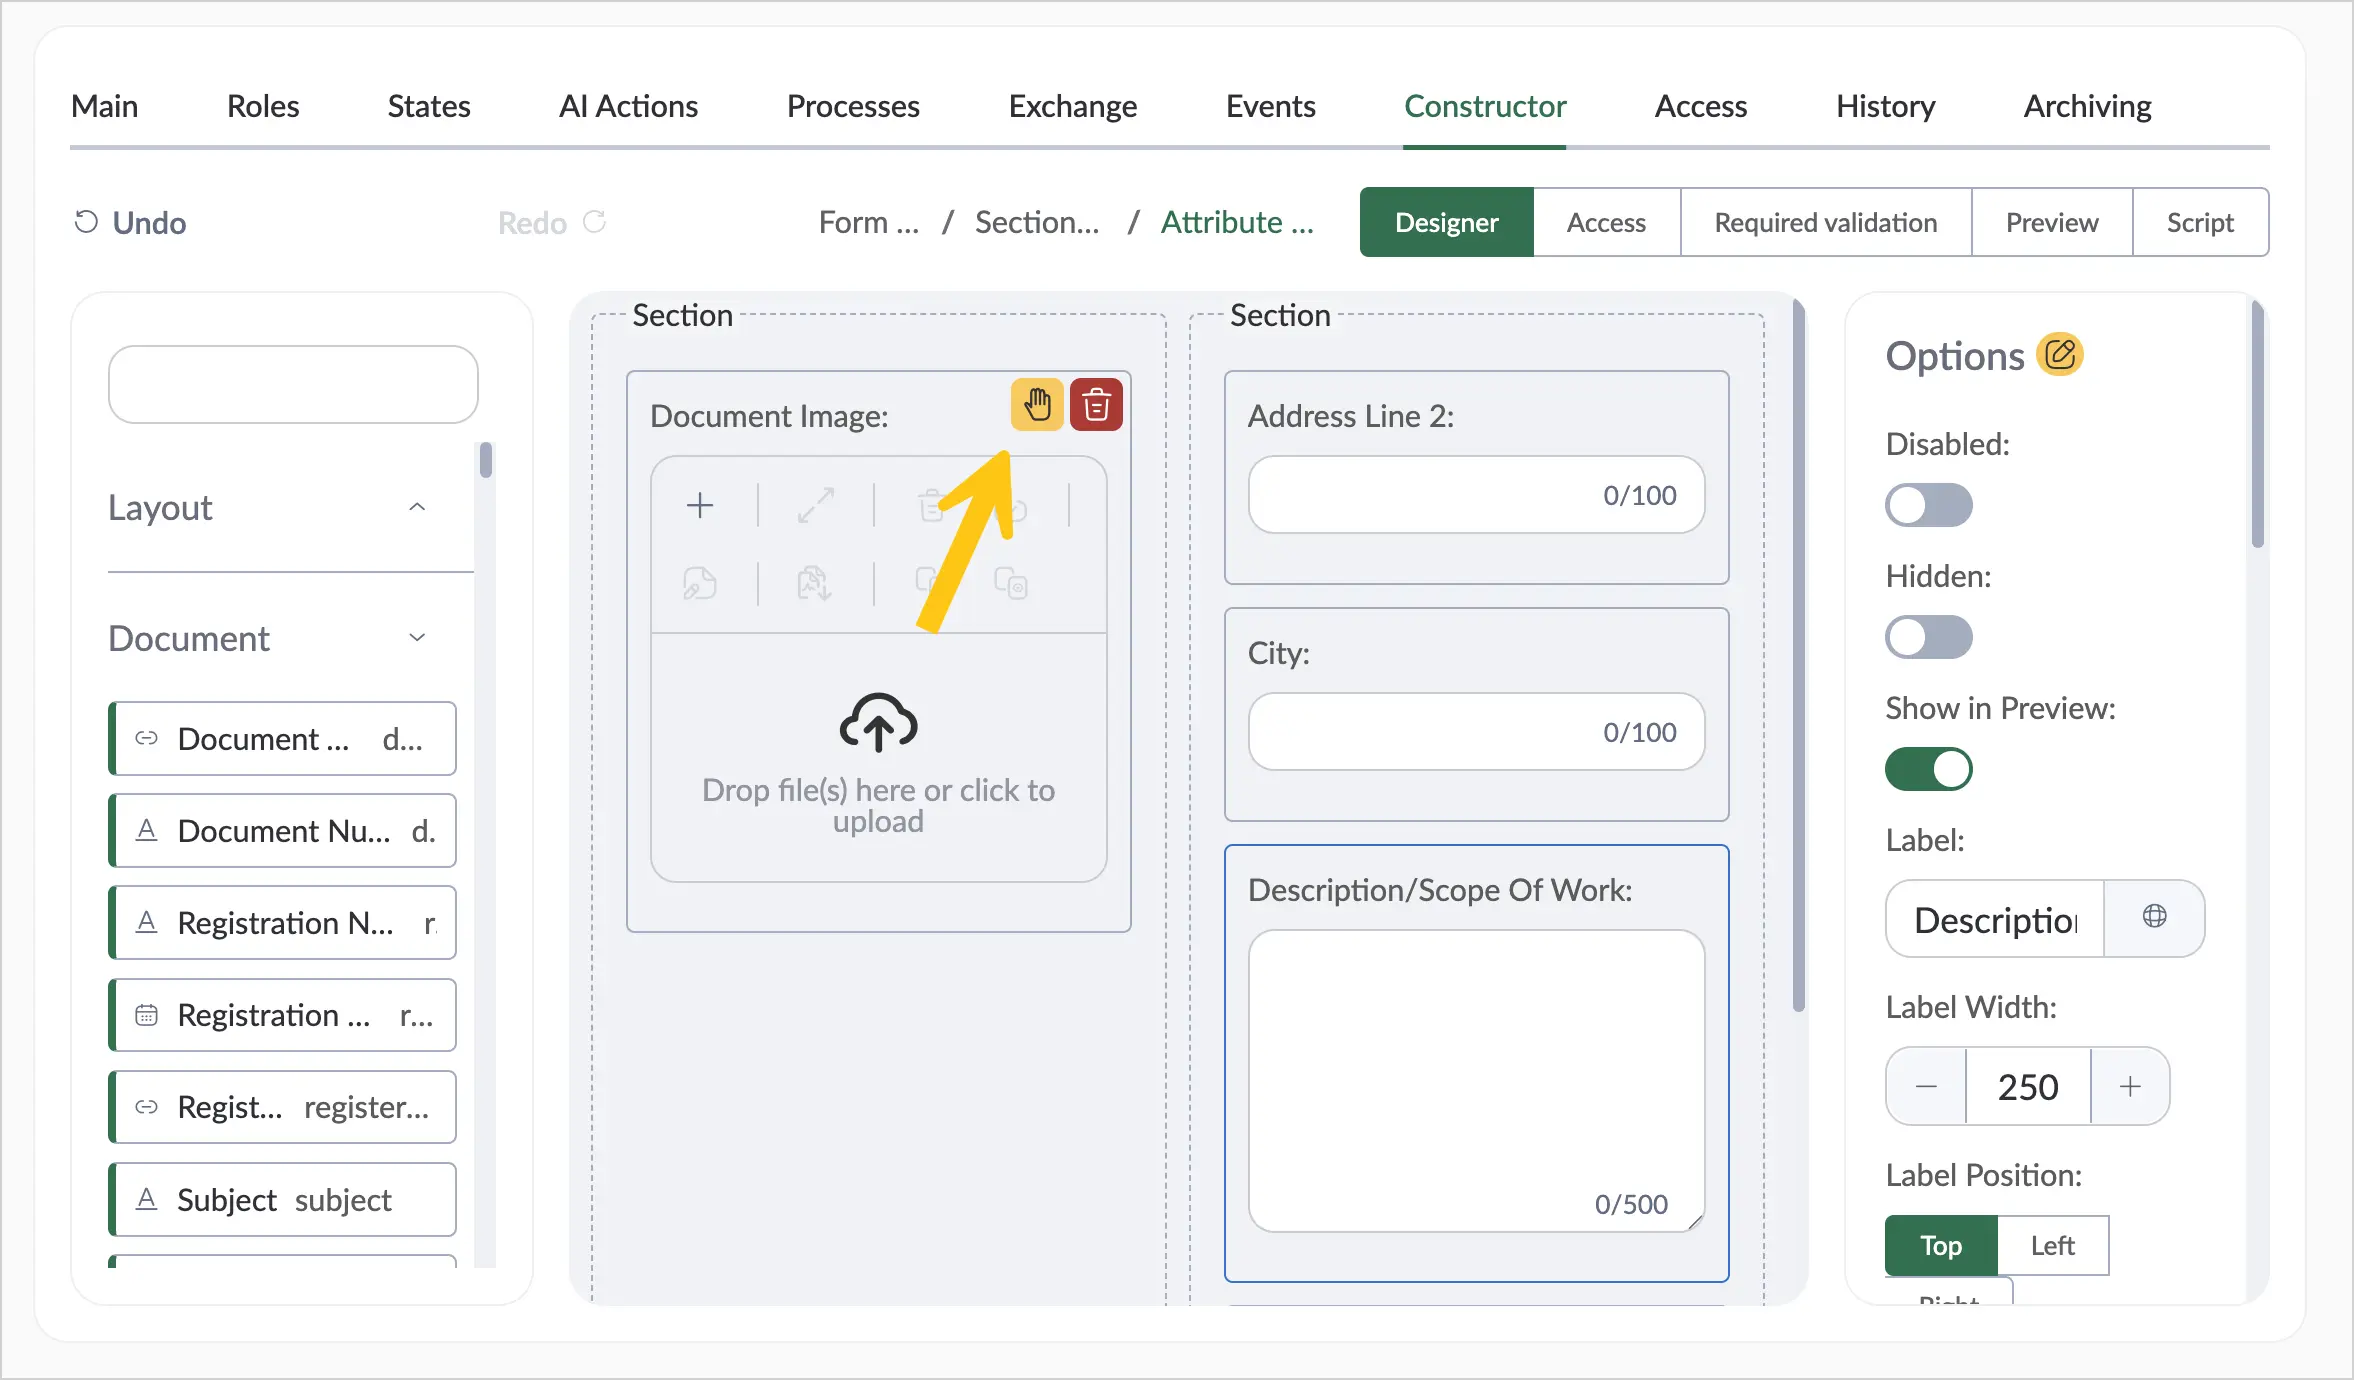
Add a Document Image or File 1 attribute to the form, into which the scanned and recognized file will be uploaded.
-
Add Text 2 attributes to the form, into which the text fragments defined by coordinates will be written according to the recognition template settings.
-
Hover over the file attribute, then select the icon to configure actions.
-
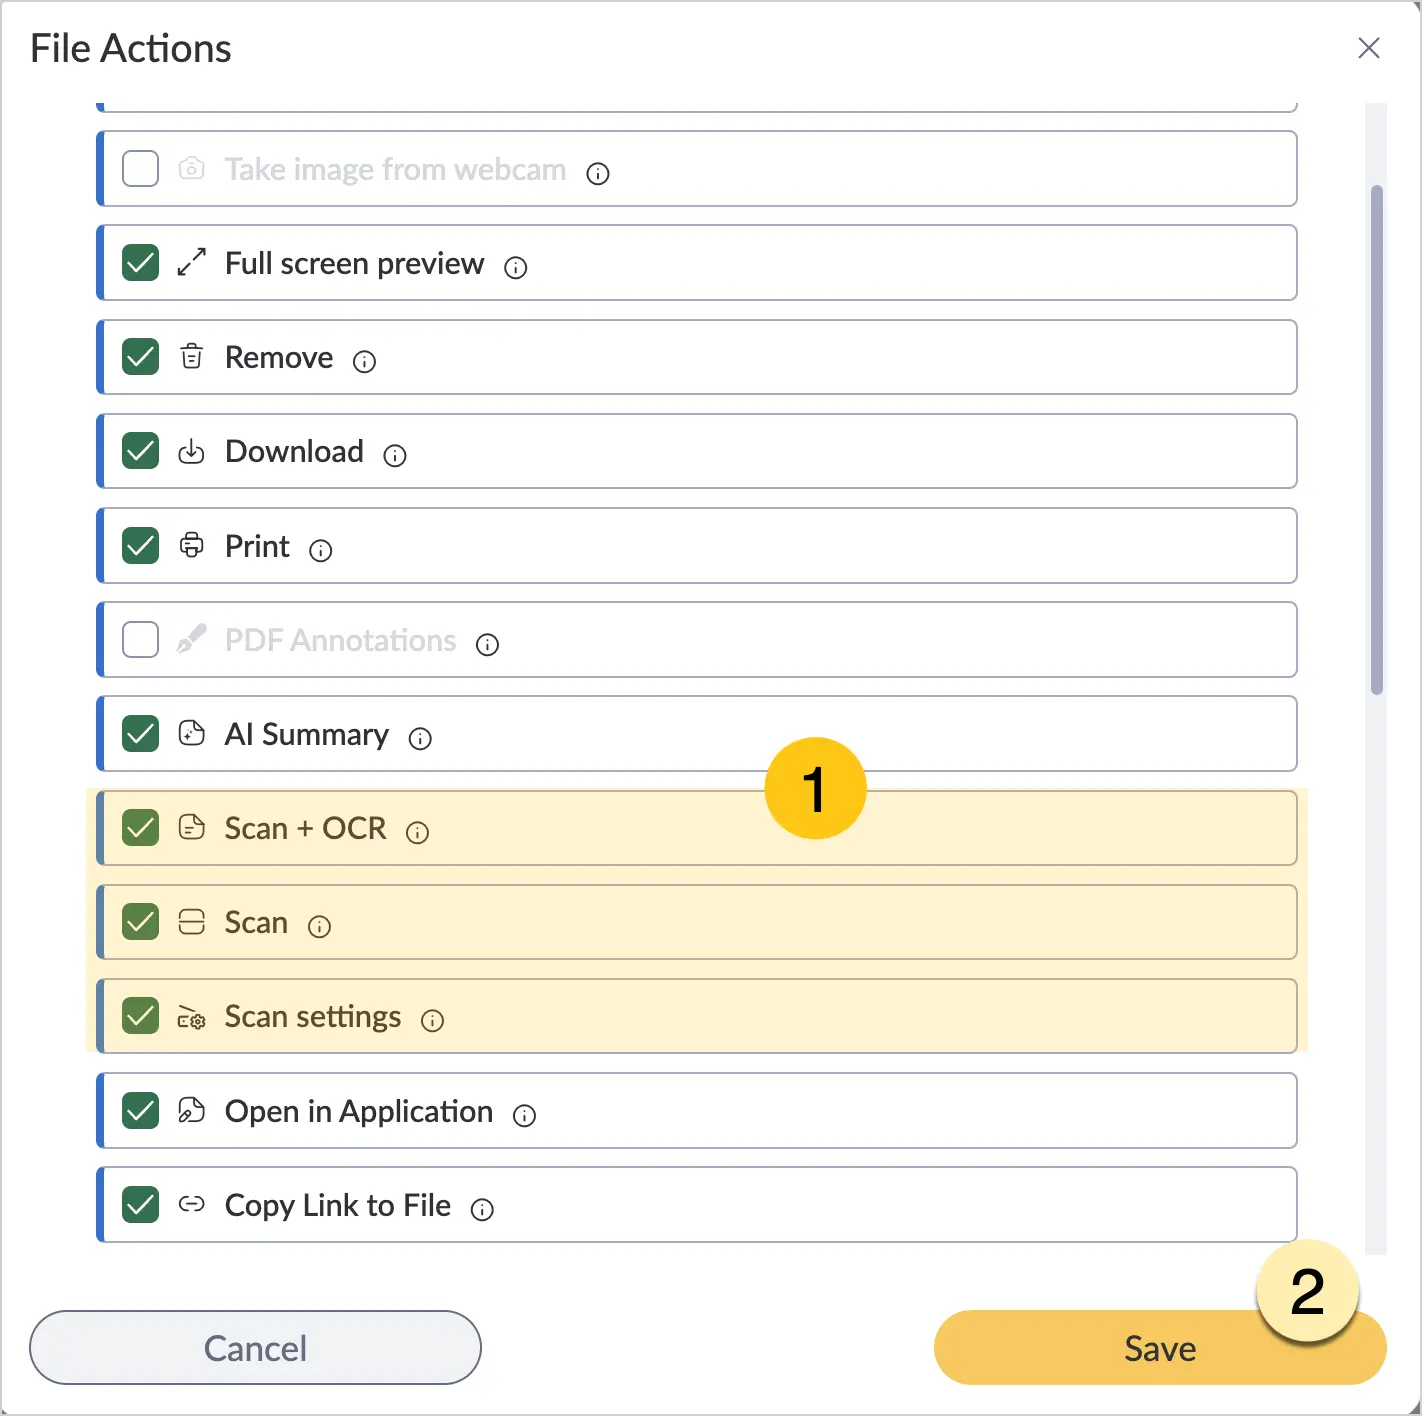
Select the checkboxes next to the following actions 1:
- Scan + OCR
- Scan
- Scan Settings
-
Select Save 2.
-
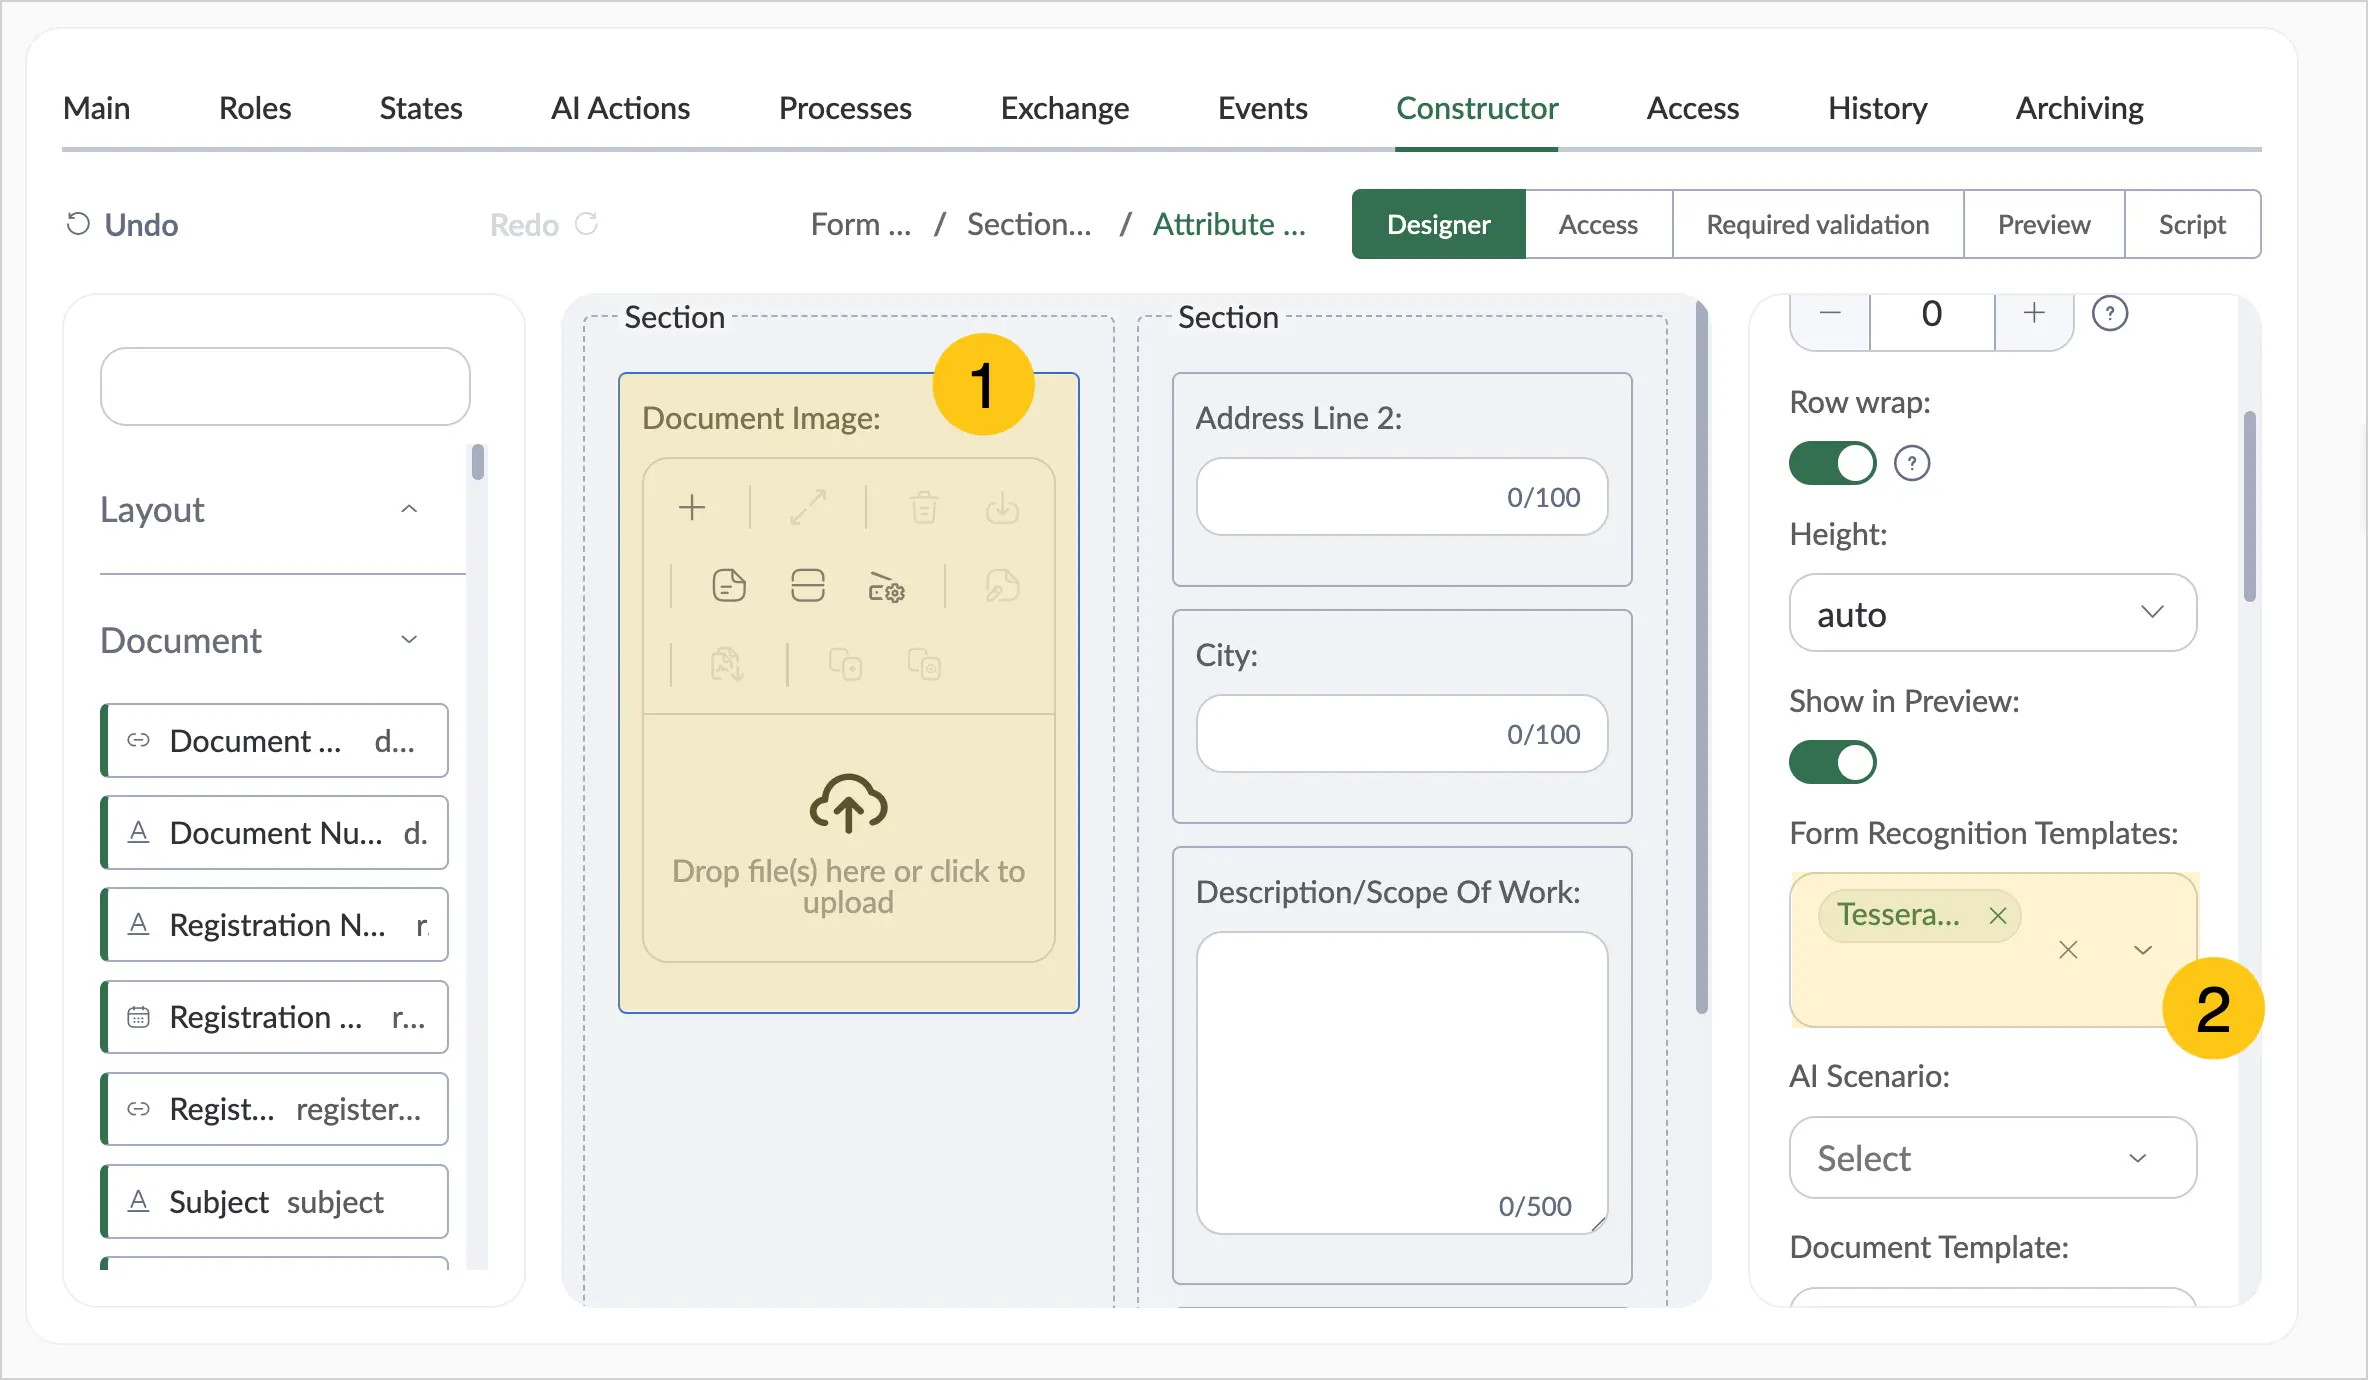
Select the file attribute 1, then in the attribute Settings menu find the Form Recognition Templates 2 field and select the required template from the list.
-
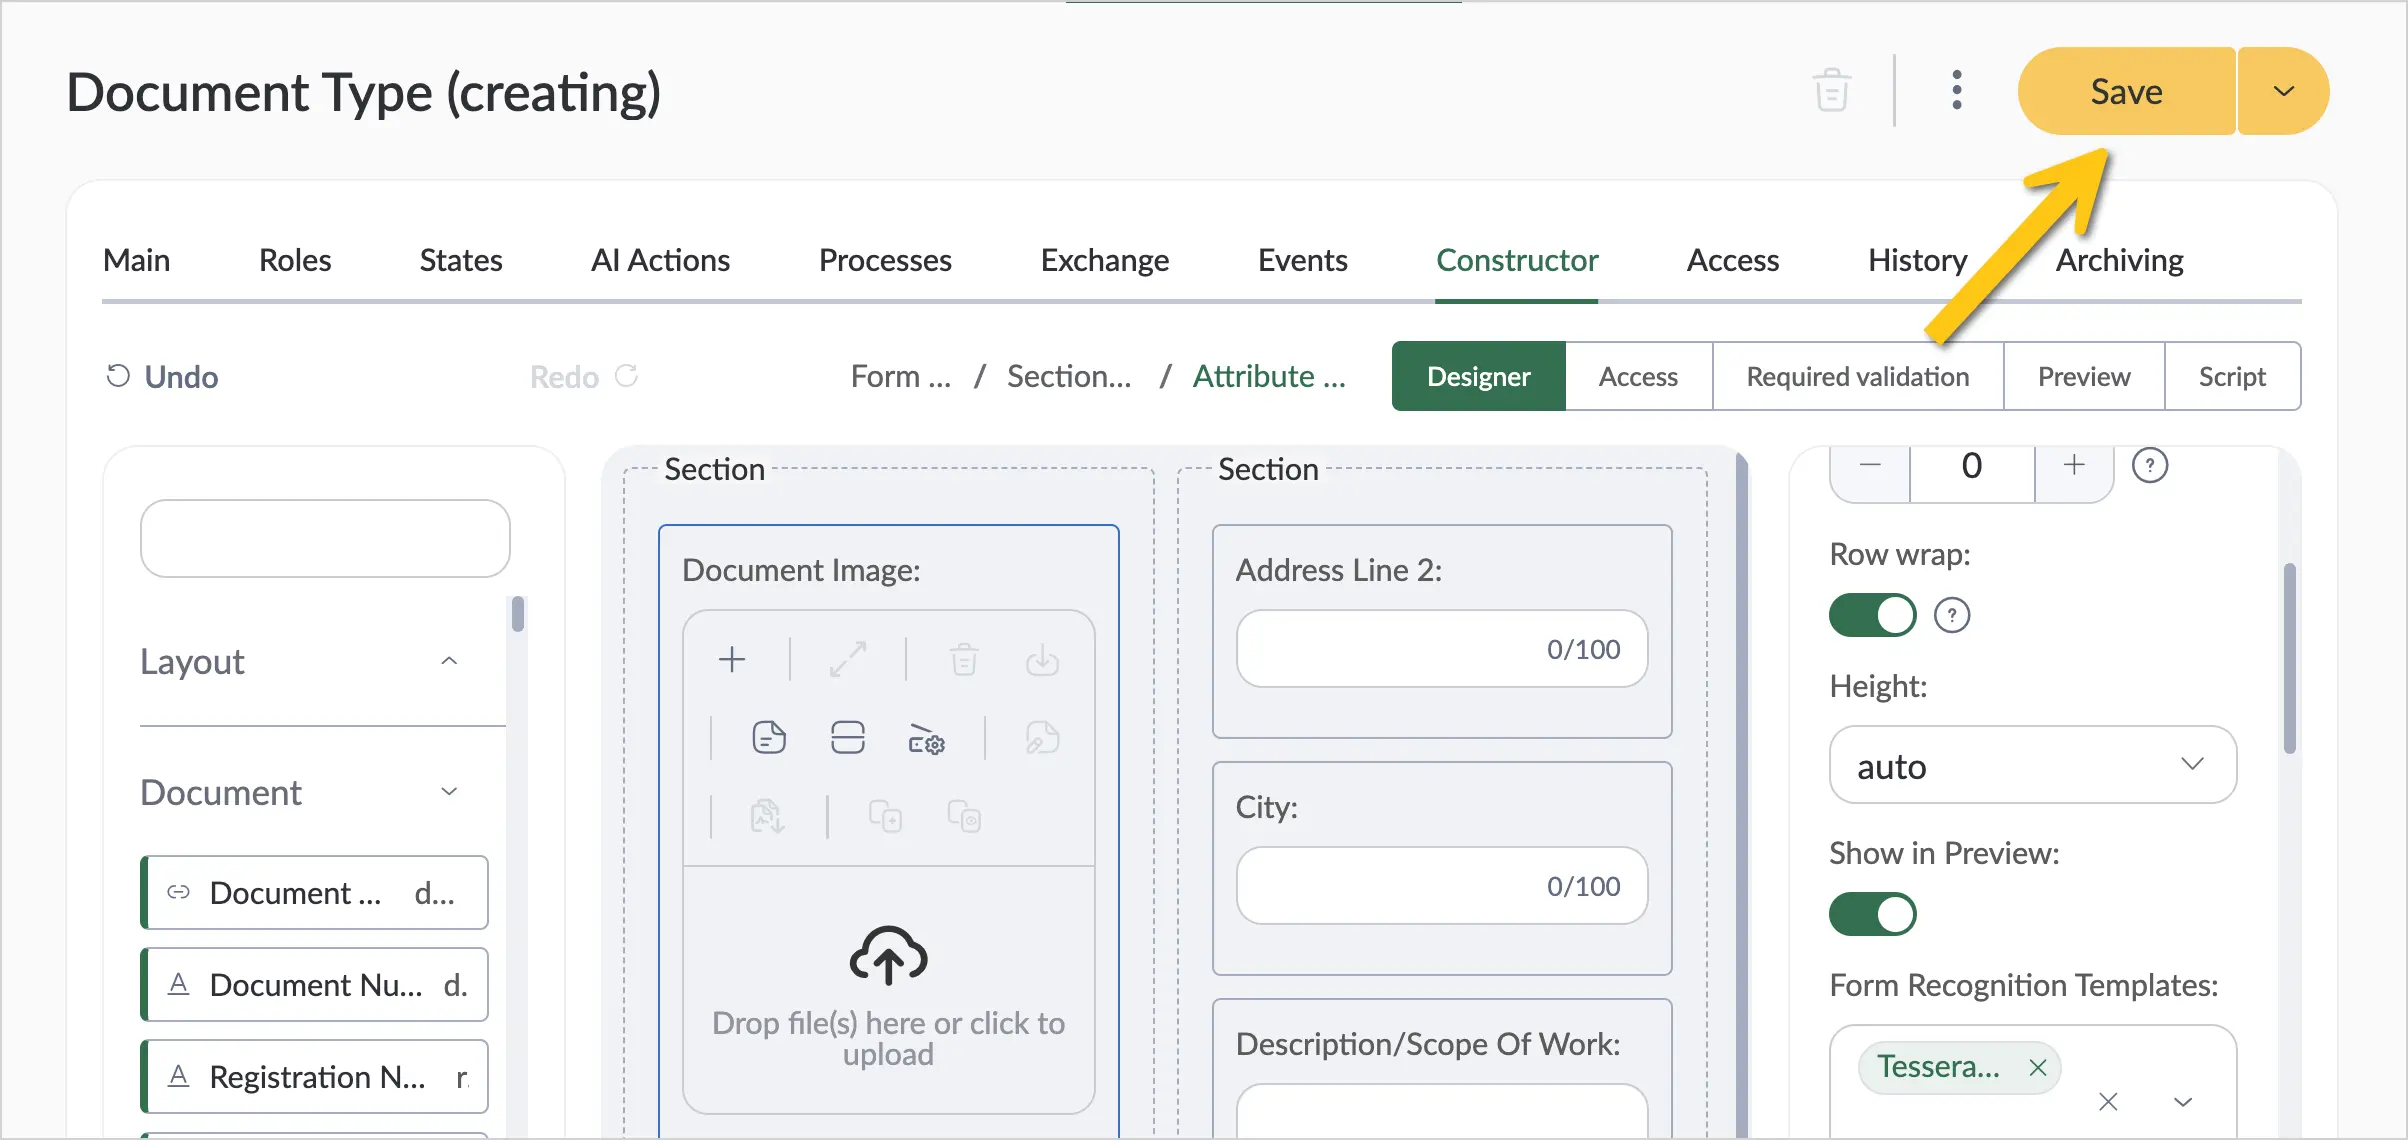
In the toolbar, select Save.
-
Create a document of this type.
-
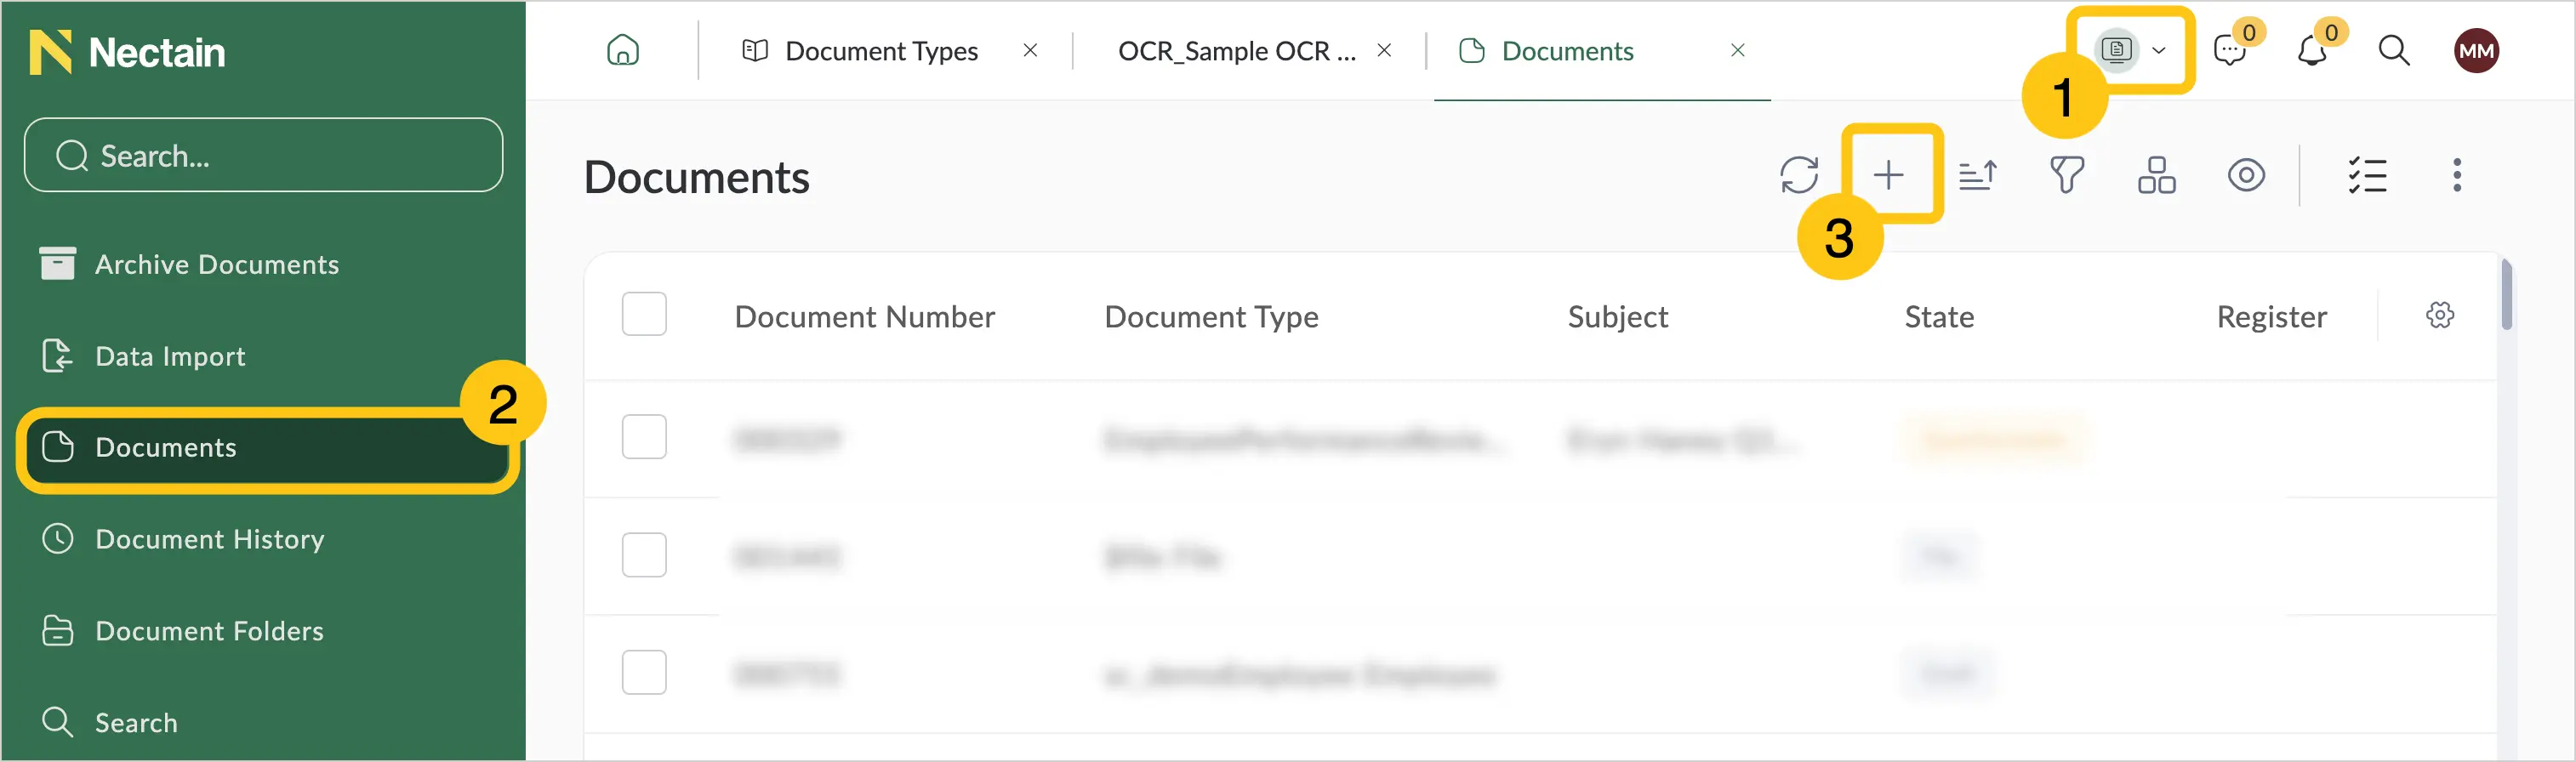
In the navigation panel, select the Documents 1 workspace.
-
Select the Documents 2 shortcut, then in the toolbar select + 3.
-
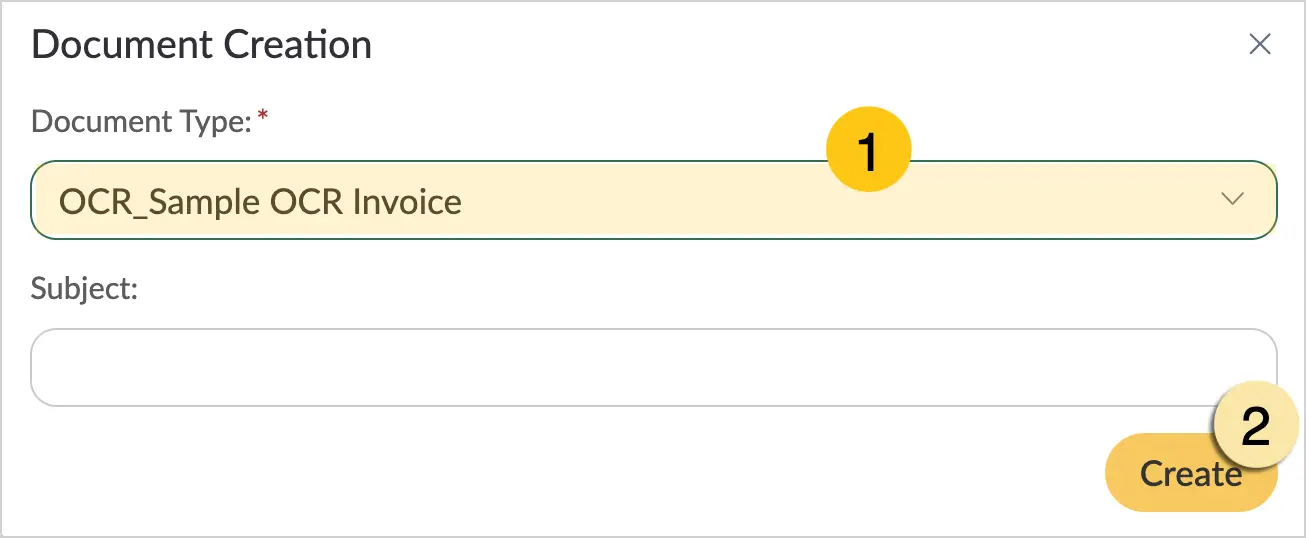
In the Document Type 1 field, select the required type, then select Create 2.
-
-
After you create the document, its form will open. In the file attribute (which you configured in the previous steps), select the
 icon to configure the scanner.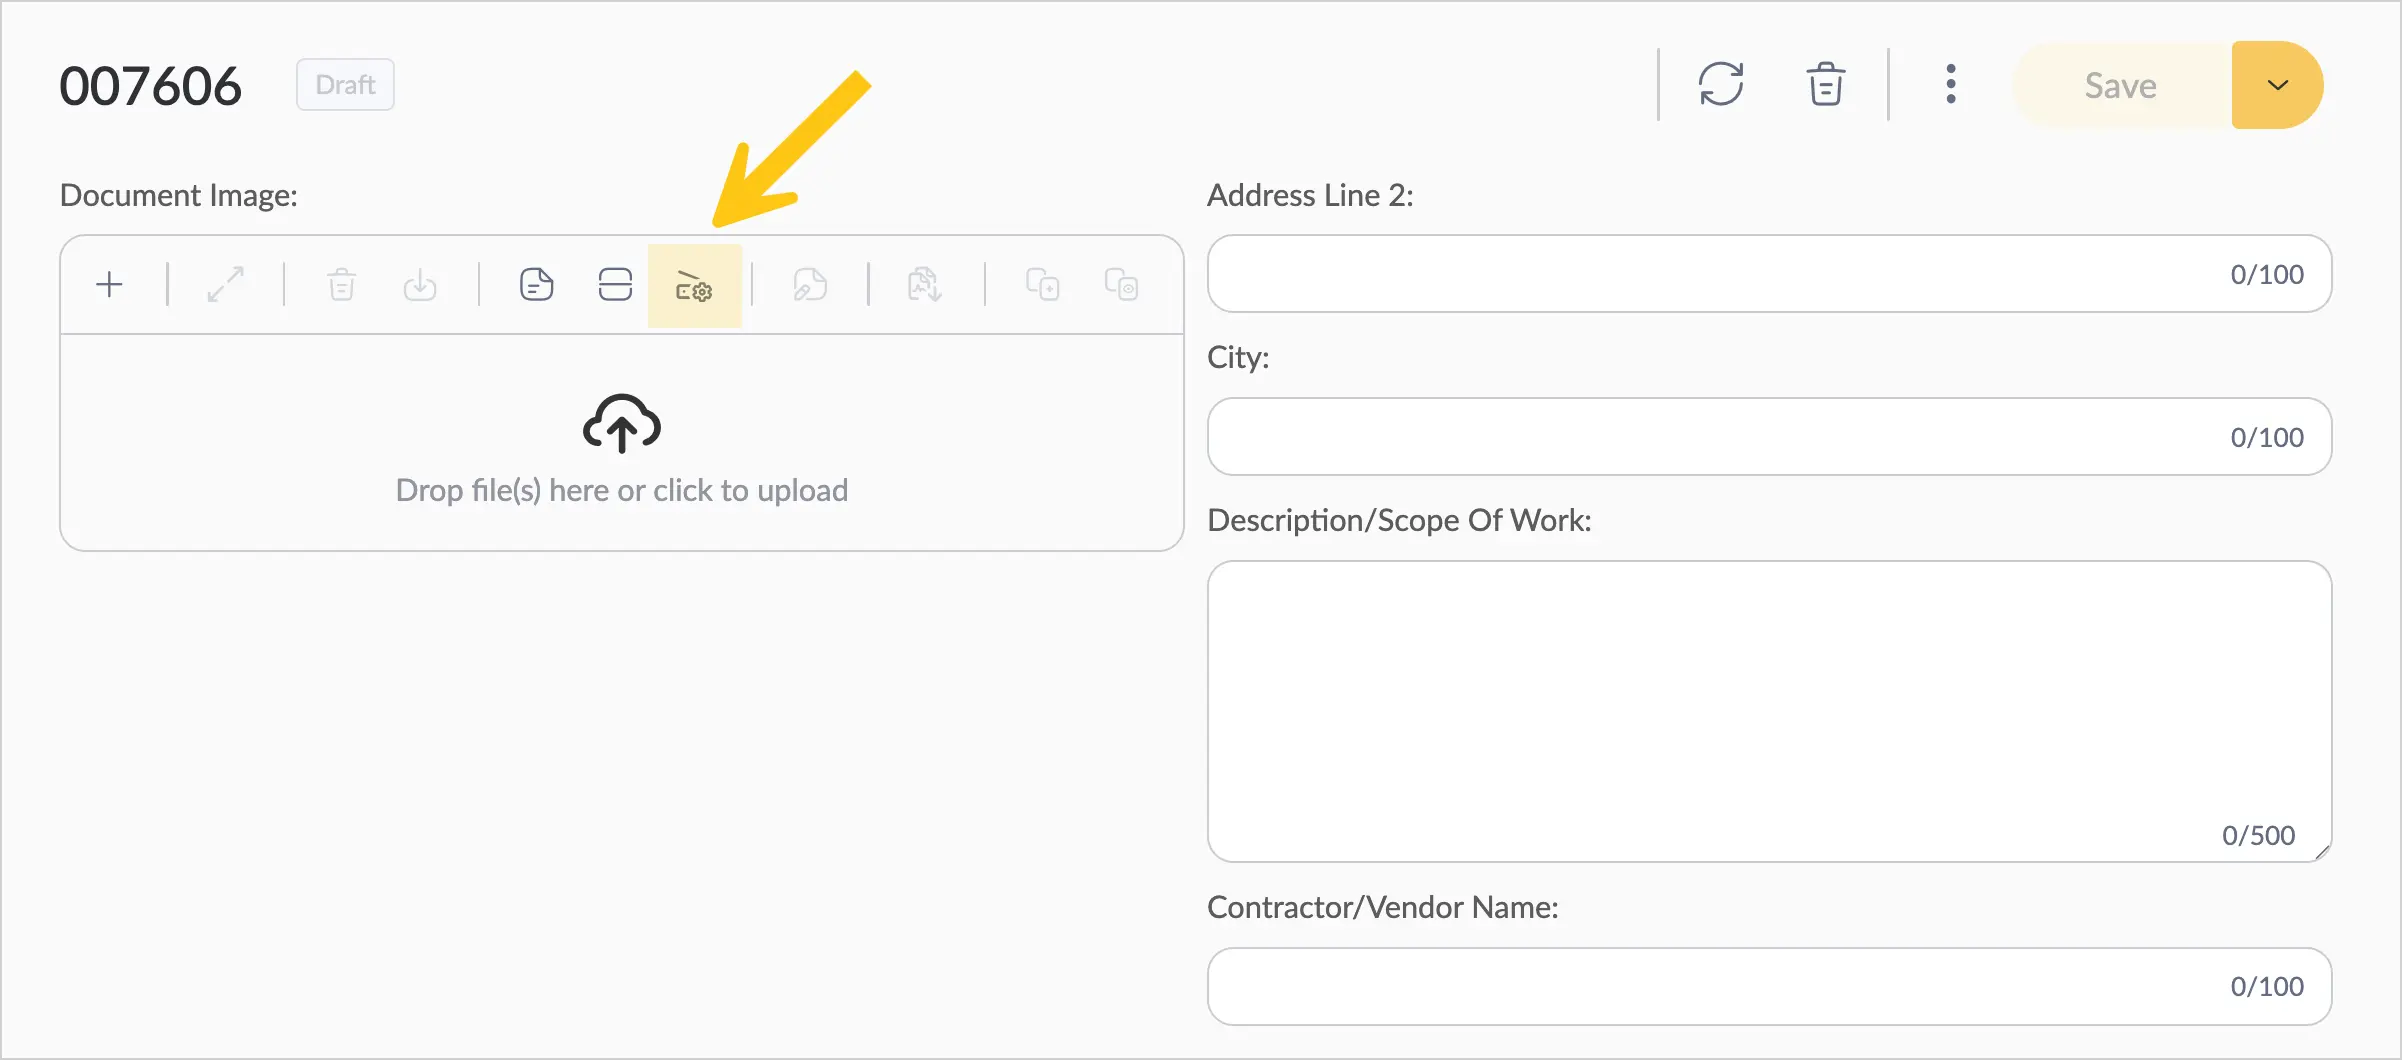
-
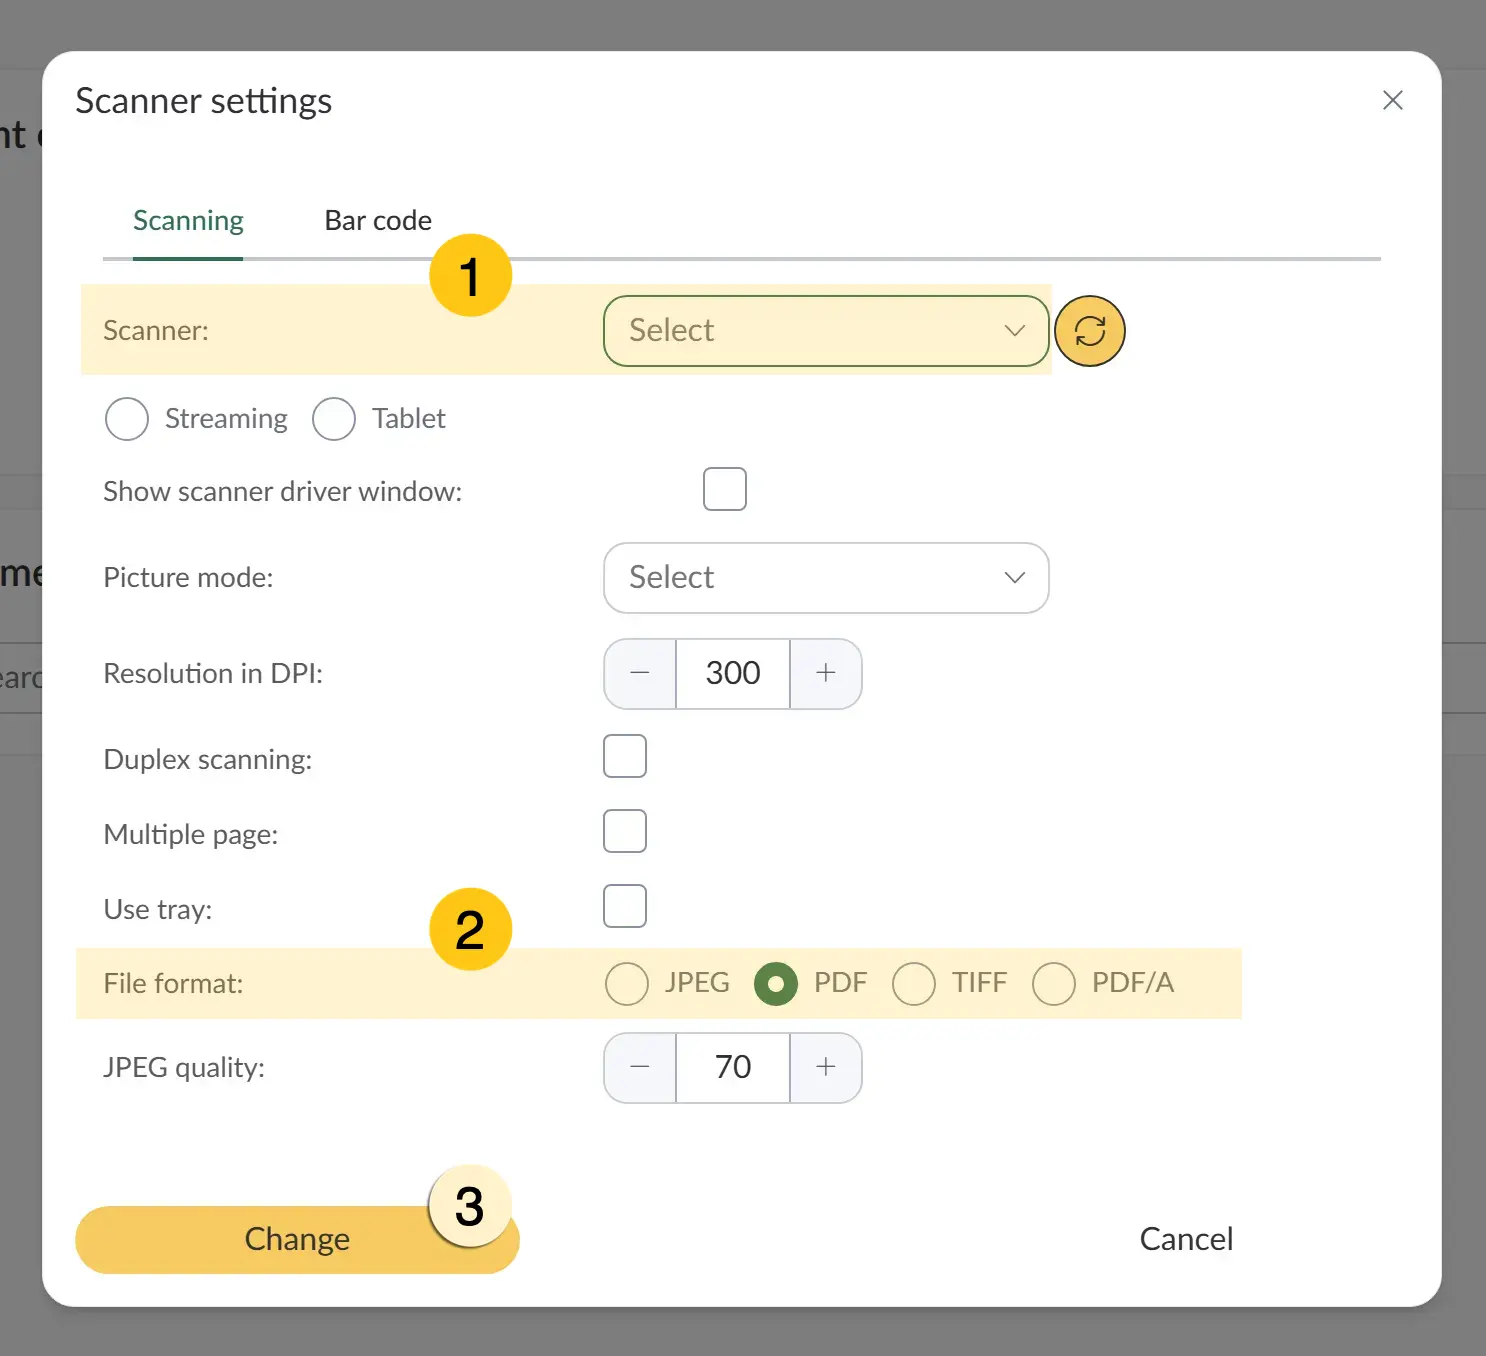
In the Scanner 1 section, select the connected scanner from the list. If you have not yet connected a scanner, see Scanner Settings.
-
In the File Format 2 section, select JPEG or TIFF. Other formats are not supported for recognition using Tesseract.
-
Select Change 3 to save the changes.
-
In the file attribute, select the
 icon to scan the document and recognize it.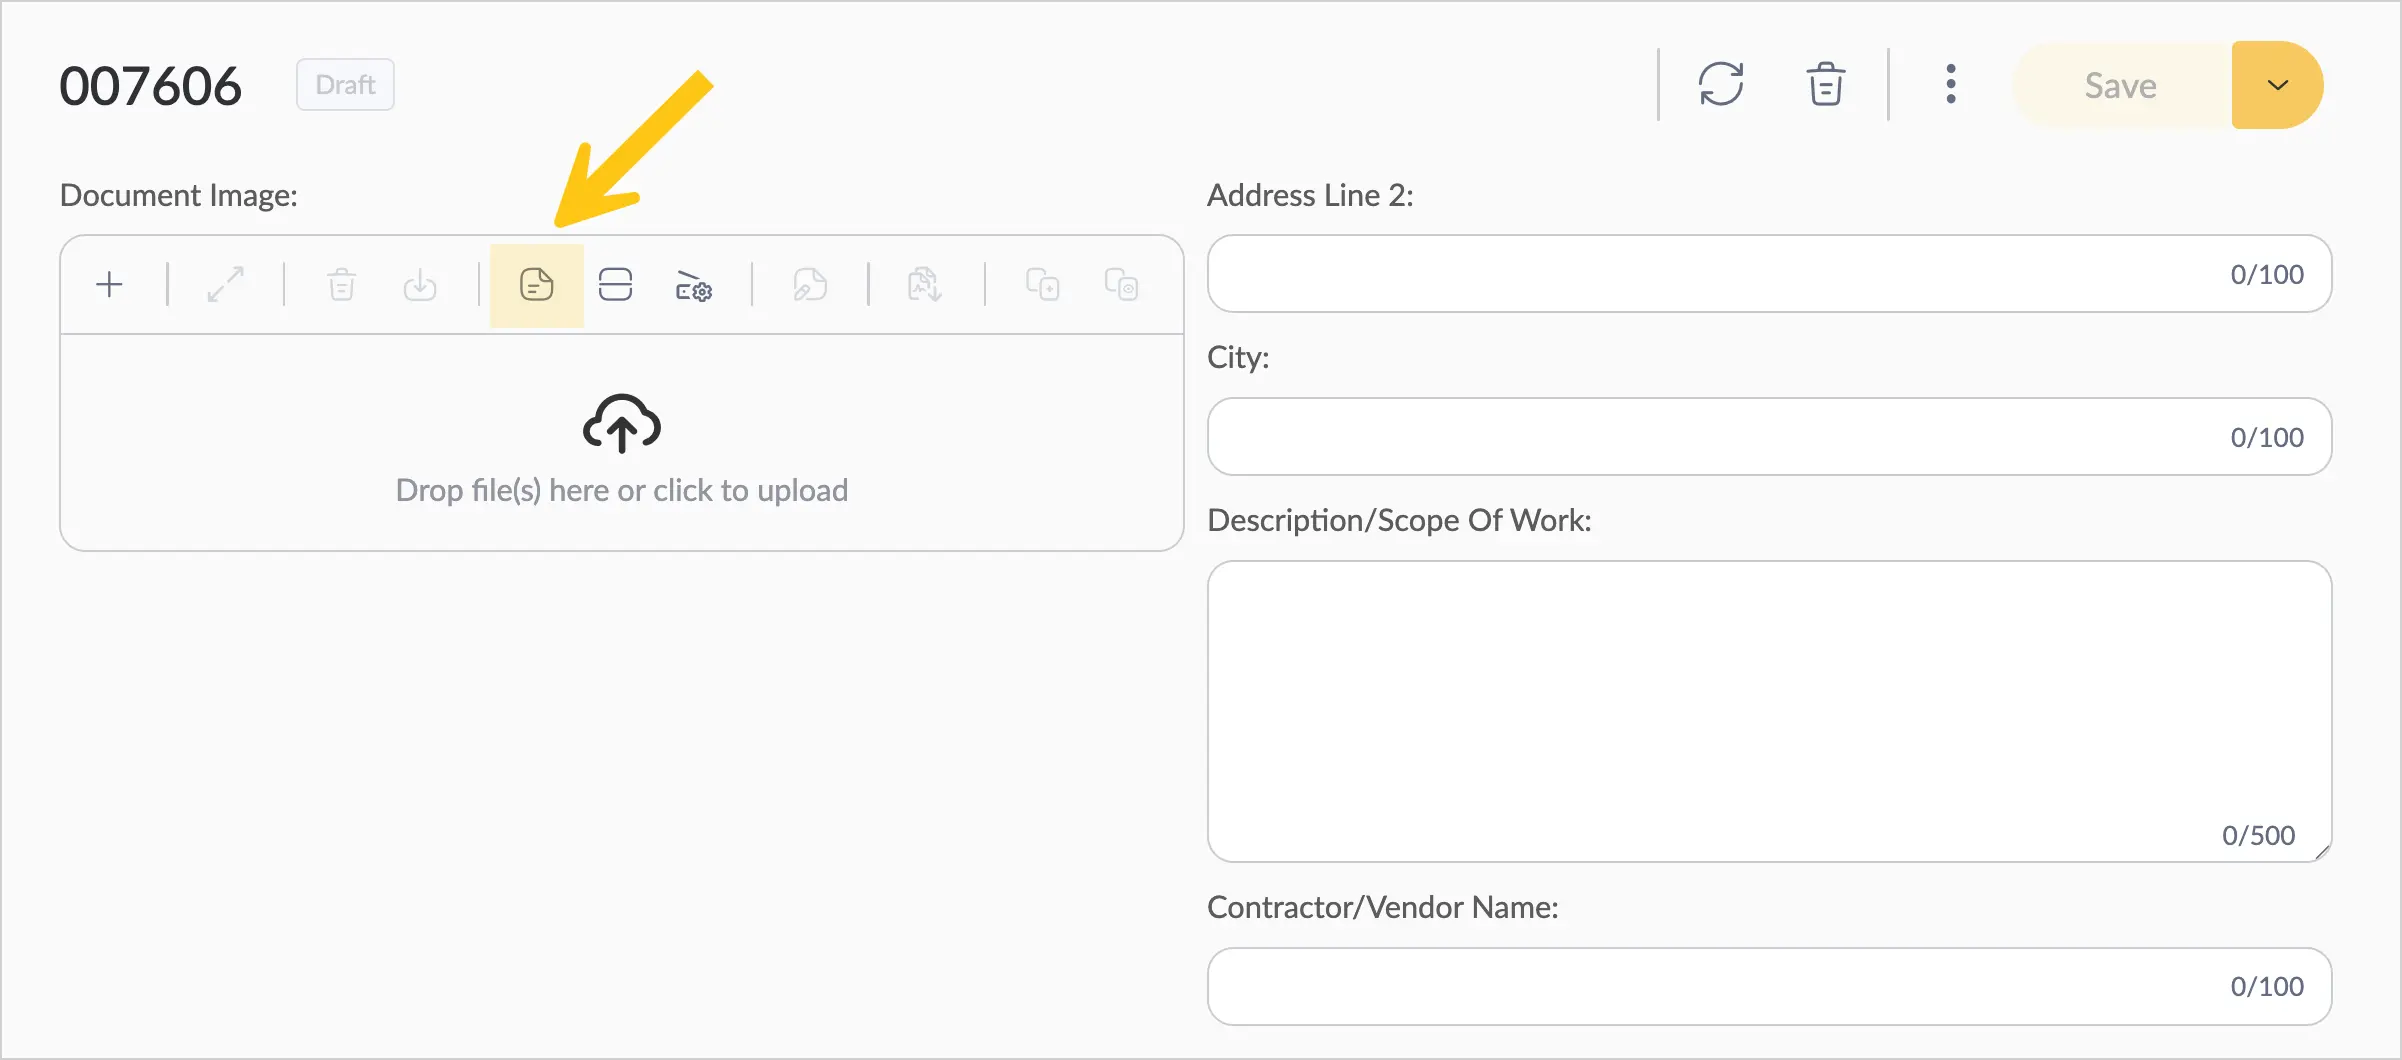
-
After scanning is complete, the file attribute will contain the file with a text layer (you will be able to select text in the file and use it anywhere as needed). The required text fragments will also be written to the attribute values according to the recognition template settings.
2.14.2.3. Apply an Azure or Google Recognition Template
Before applying the template, make sure you have configured IDP recognition.
There are two ways to apply the Azure or Google provider recognition template:
-
Method 1: via a system shortcut.
In this method, recognition can only be performed by a platform administrator. The recognition instructions are identical to the AI recognition instructions — Method 1: via a system shortcut. -
Method 2: via a custom shortcut.
In this method, recognition can be performed by any platform users to whom the administrator grants access to the shortcut. The recognition instructions are identical to the AI recognition instructions — Method 2: via a custom shortcut.
Unlike AI recognition, IDP recognition supports processing only one document at a time.
After you recognize a document using IDP, you can highlight the content you need in the scanned document to quickly find the required information. To do so, select the attribute whose content you want to see in the document 1, and the required fragment of the document will be highlighted in green 2.