2.14.1. AI Recognition
The AI recognition feature allows you to automatically analyze the content of documents or images. The AI processes the document text, identifies key data, and maps it to the defined attributes of the system.
How does AI recognition differ from IDP?
The platform also supports recognition using IDP (Intelligent Document Processing) technology, which has been available in the system long before AI recognition was introduced. You can review the main differences between these two recognition types in the table below:
| Criterion | AI Recognition | IDP Recognition |
|---|---|---|
| How it works | Analyzes the document as a single text with understanding of context and semantics | Focuses on document structure, recognizing zones and their content |
| Document types | Works with unstructured documents of various formats | Optimized for specific document types |
| Training required | Does not require additional training on document samples | Requires prior training on specific templates |
| Providers | • OpenAI • Azure OpenAI • DeepSeek • Grok • Gemini • Claude | • Azure Form Recognizer |
2.14.1.1. Configure AI Recognition
To configure document recognition using artificial intelligence, complete the following steps:
-
Create an AI model subscription and generate a key — create an account with your preferred AI provider and generate an API key to configure the provider integration with the Nectainium platform.
-
Add an AI model — configure the provider integration with the Nectainium platform.
-
Create an AI scenario — the platform includes a System scenario for document recognition —
sys_doc_recognize. This scenario is suitable for most standard documents and requires no additional configuration.When should you create a custom AI scenario?
For non-standard cases, you can create your own custom scenario for more accurate recognition. We recommend creating a custom scenario based on a duplicate of the system scenario
sys_doc_recognize, as it already contains the required system variables. For example, thedocTypesvariable passes information about the platform's document types to the scenario. Reproducing this functionality by manually creating variables is complex and not recommended. -
Create a recognition template — within the template, you can define which document types you want to recognize.
-
Configure or create a shortcut for recognition — connect the created recognition template to the shortcut.
-
Configure document type attributes — add descriptions to attributes to improve recognition results.
2.14.1.1.1. Create an AI Model Subscription and Generate a Key
You can choose one of the following providers:
OpenAI platform
-
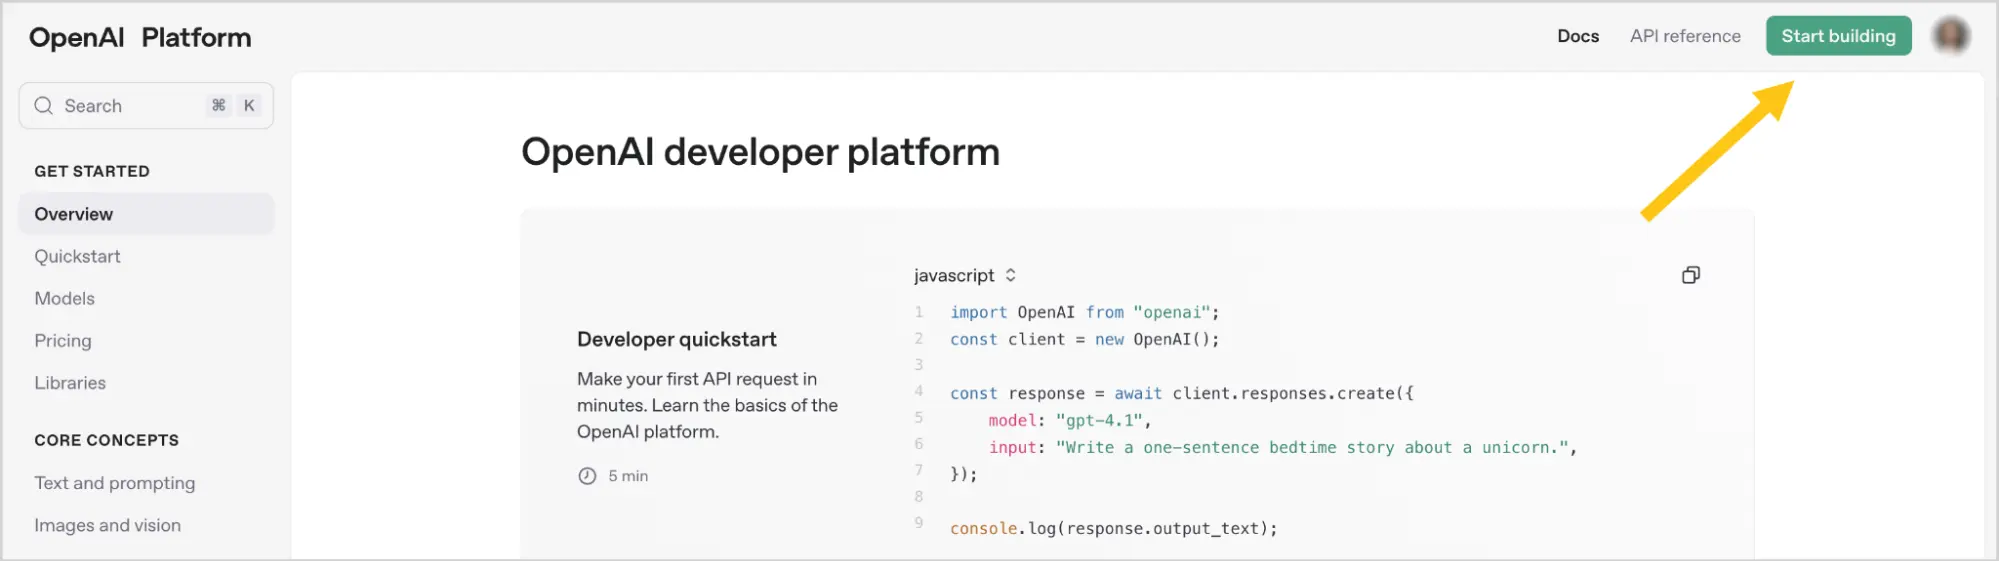
Go to the OpenAI platform website.
-
Select the Start building button.
-
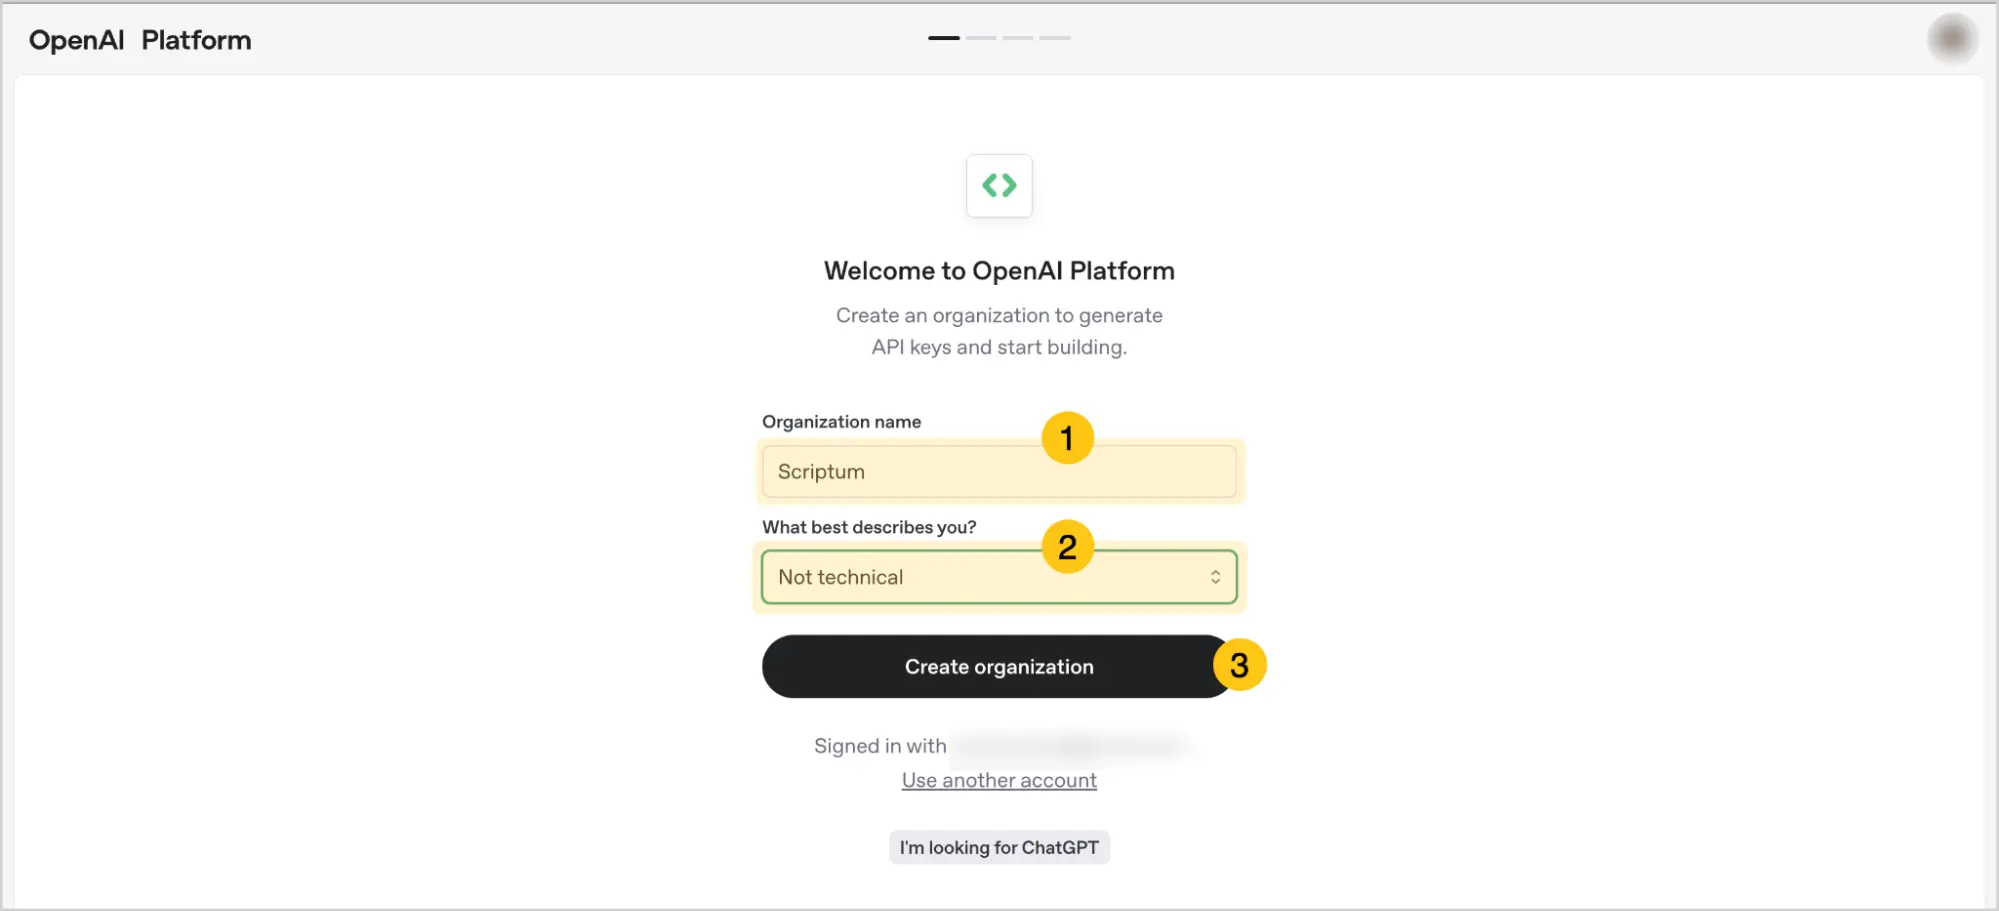
In the Organization name 1 field, enter any organization name, then in the What best describes you 2 field, select Not technical.
-
Select the Create organization 3 button.
-
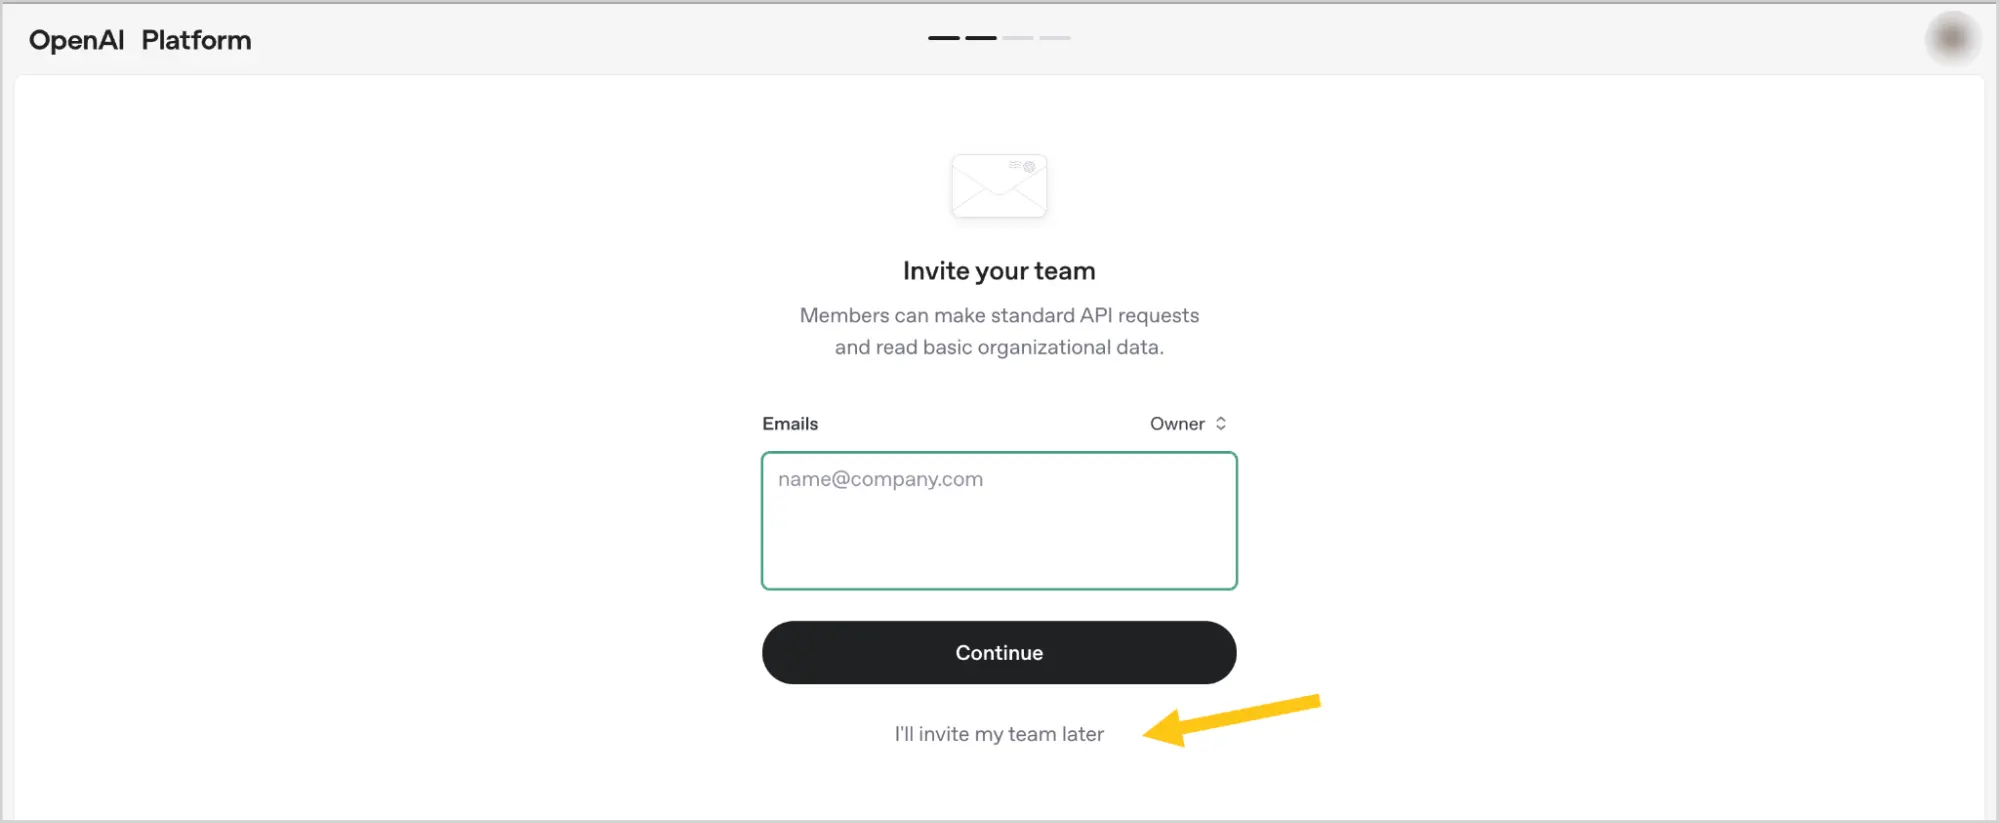
Select I'll invite my team later.
-
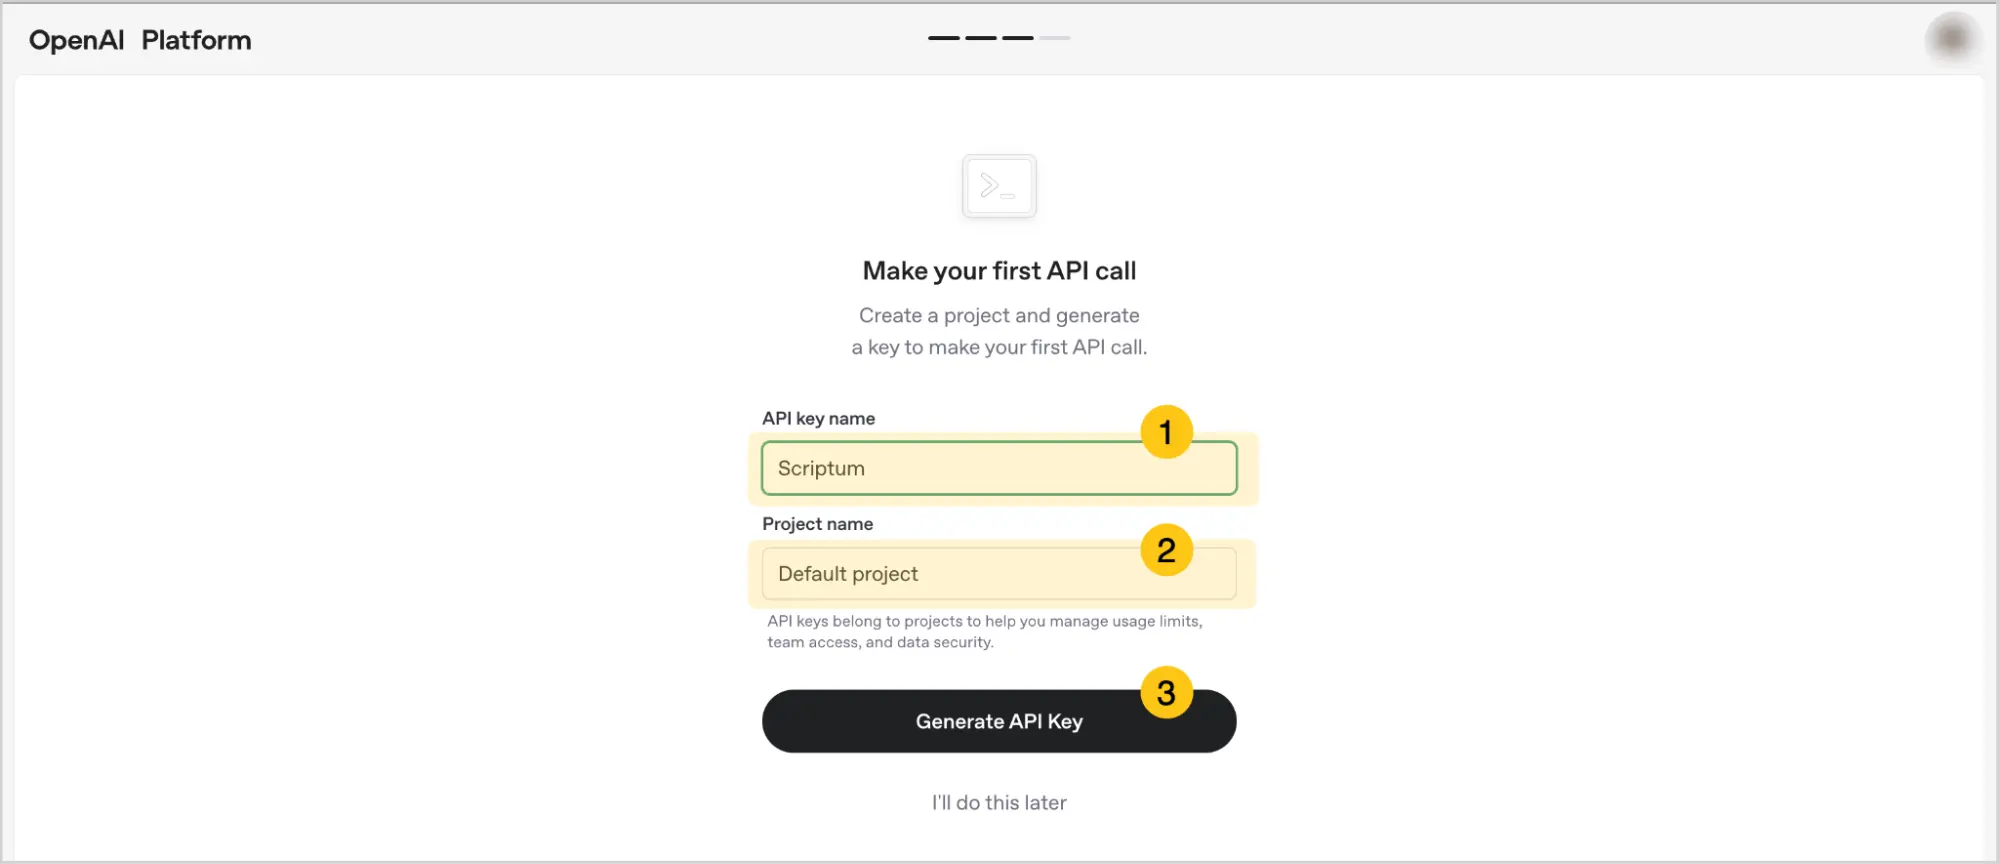
In the API key name 1 field, enter any name for the key.
-
Leave the Project name 2 field unchanged.
-
Select the Generate API Key 3 button.
-
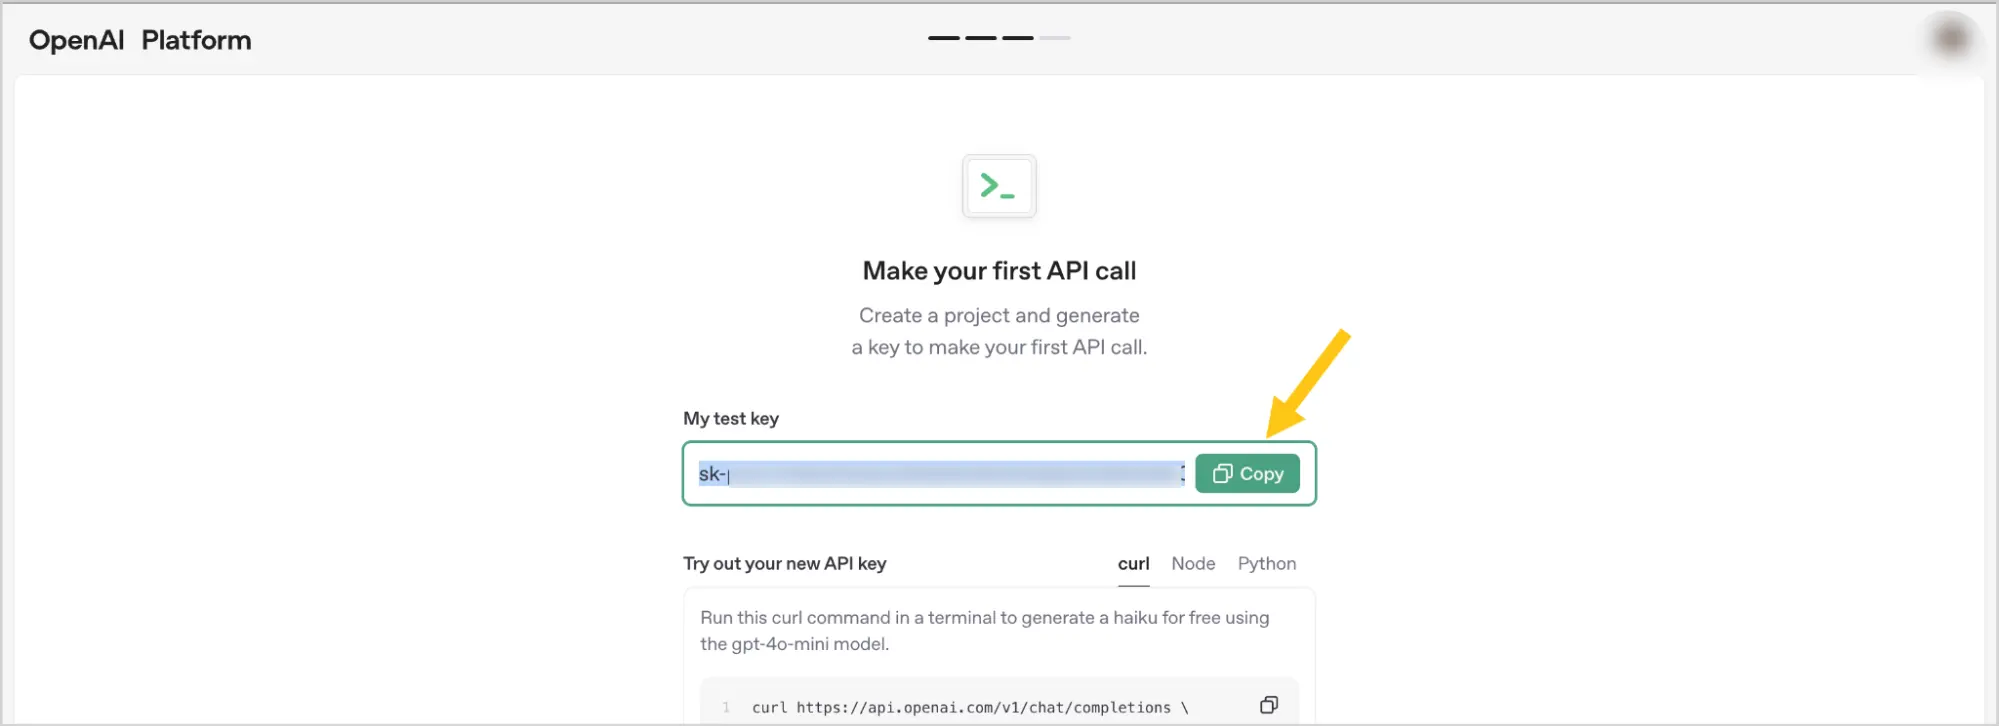
Select the Copy button to copy the generated key.
-
Paste this key using Ctrl+V into a safe location, such as a notes app. You will need this key in the subsequent configuration steps.
Warning:After closing this window, for security reasons, you will no longer be able to see this key in the OpenAI platform. If you do not save the key, you will need to generate a new one.
-
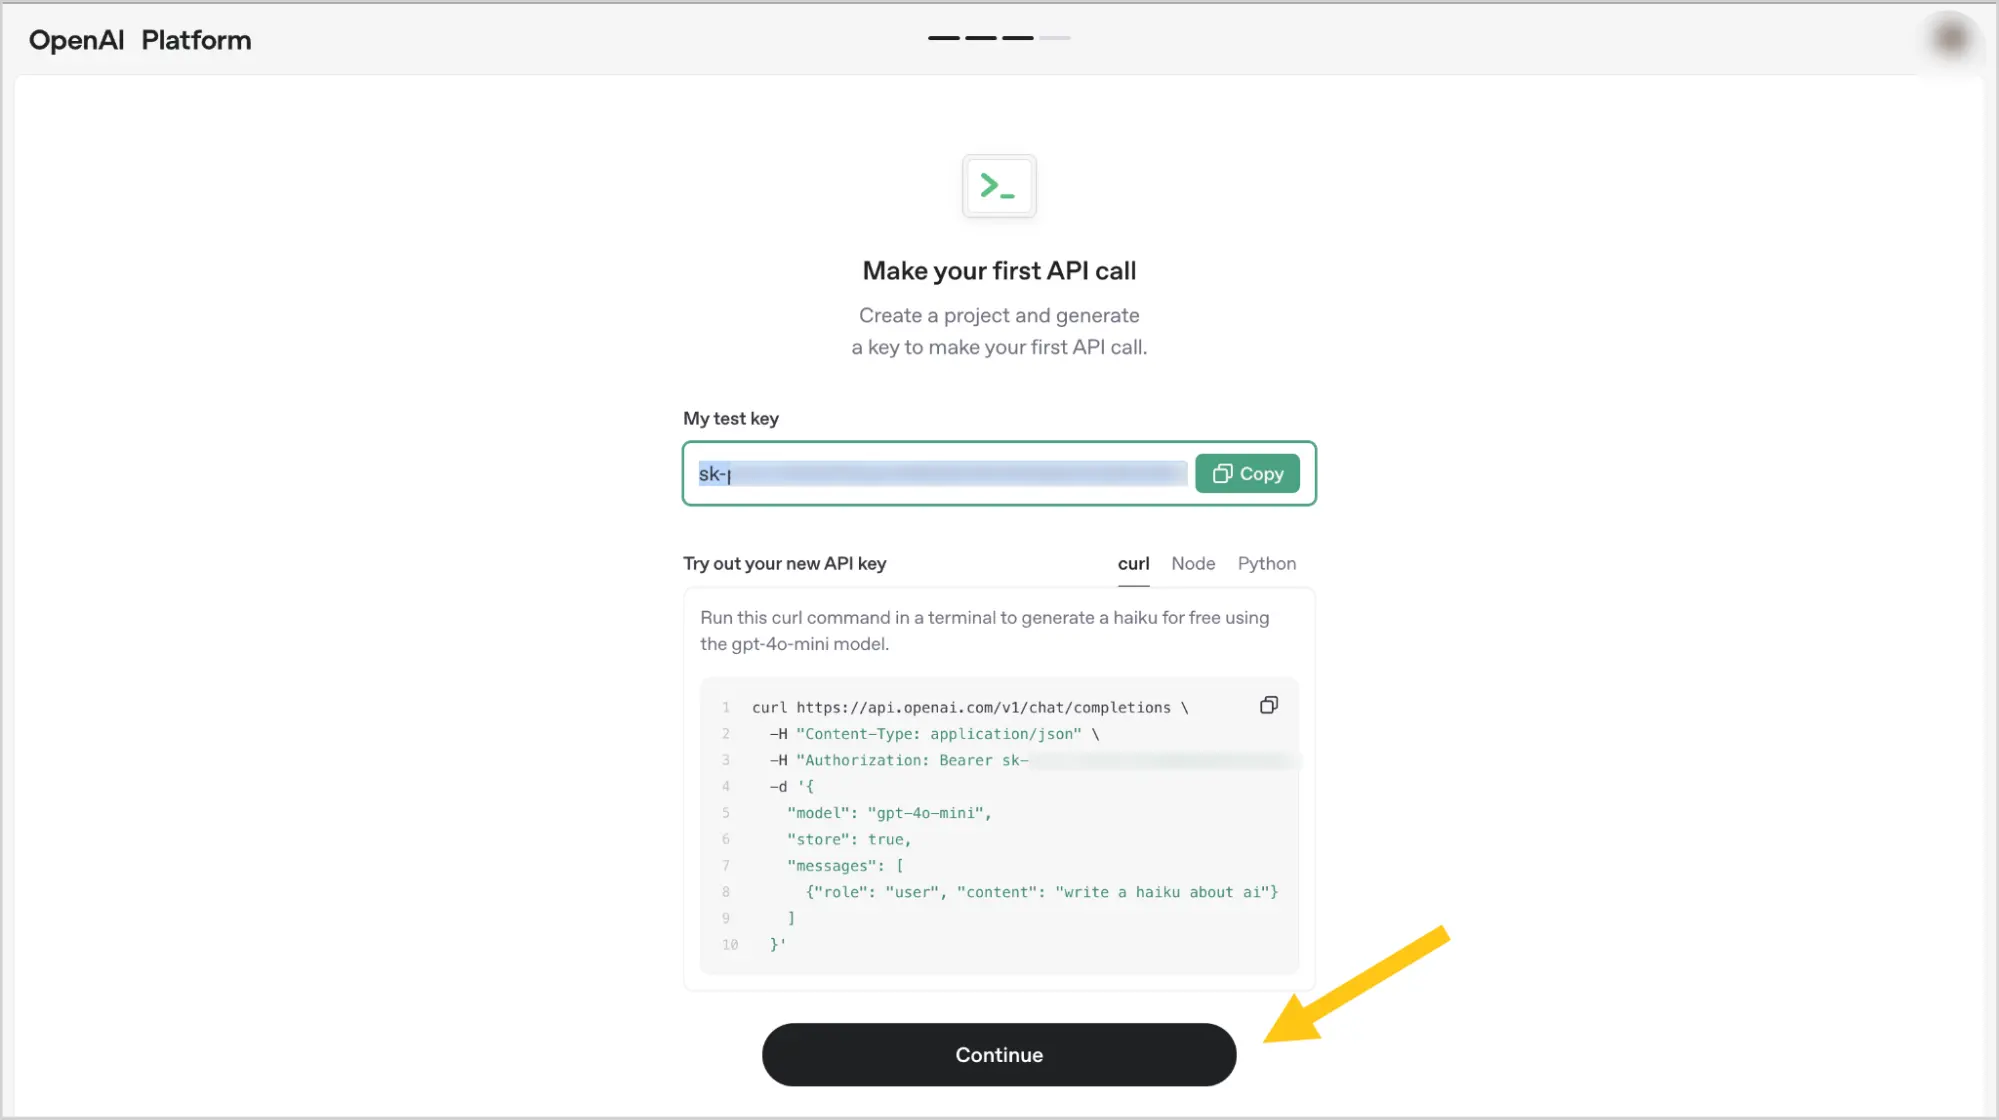
Select the Continue button.
-
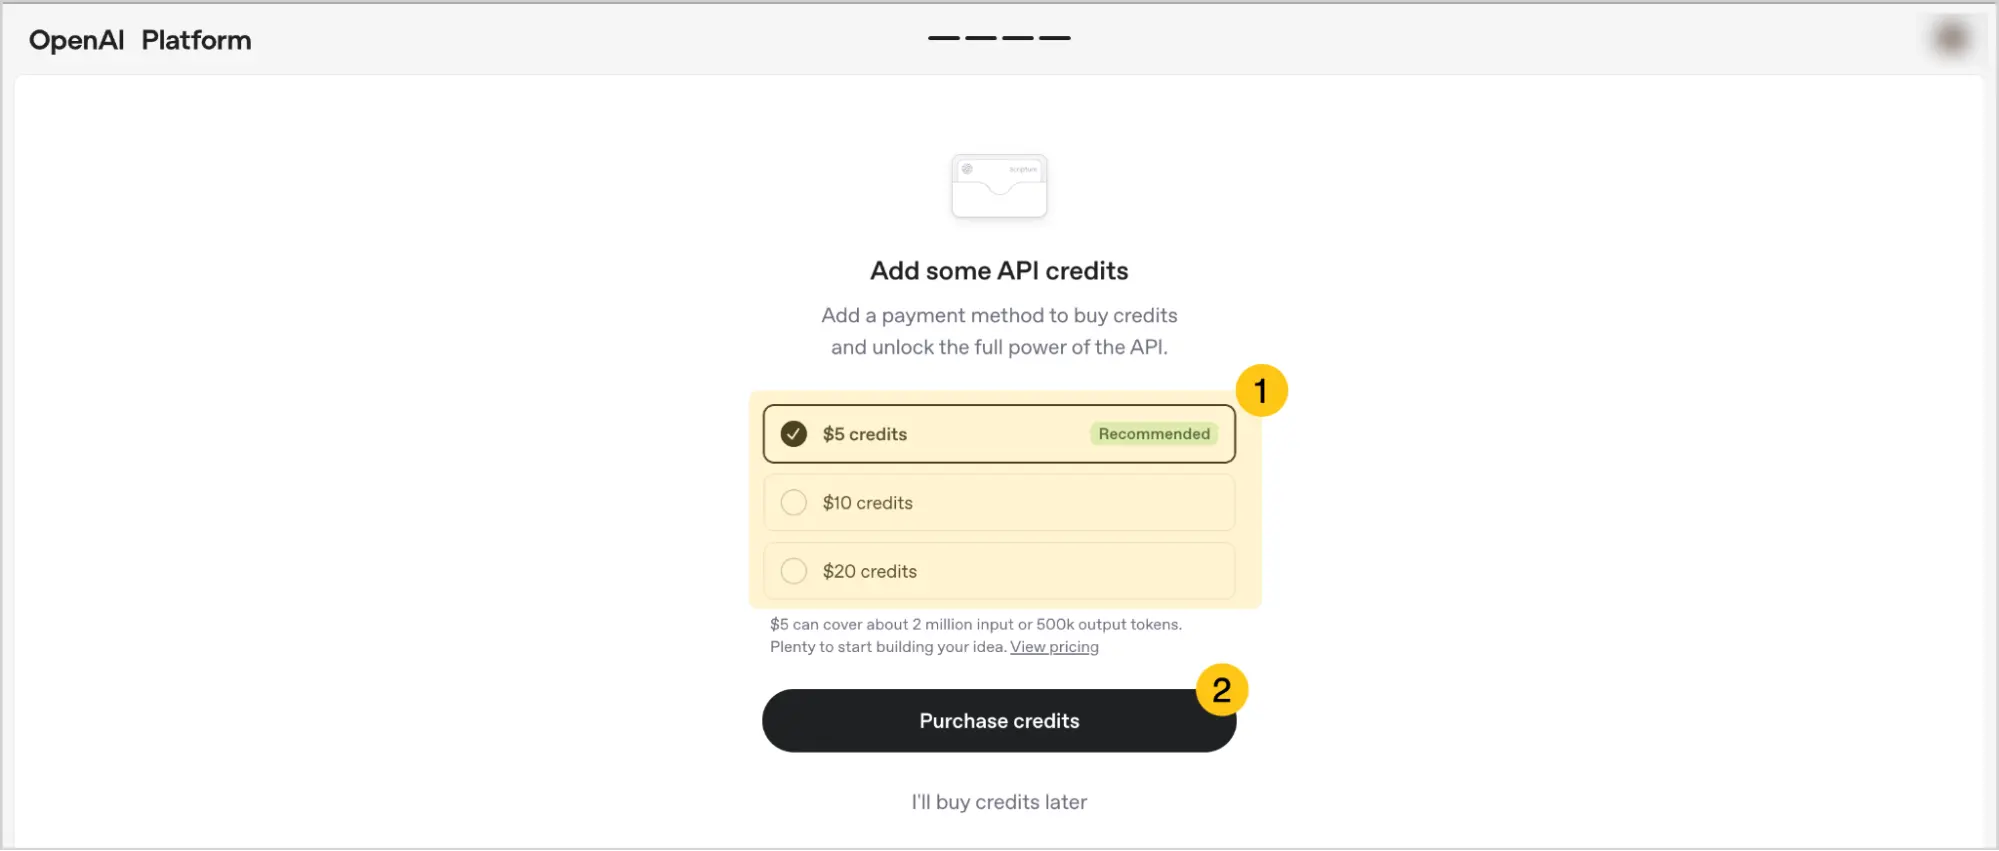
Select the amount you want to add to your balance 1, then select the Purchase credits 2 button.
-
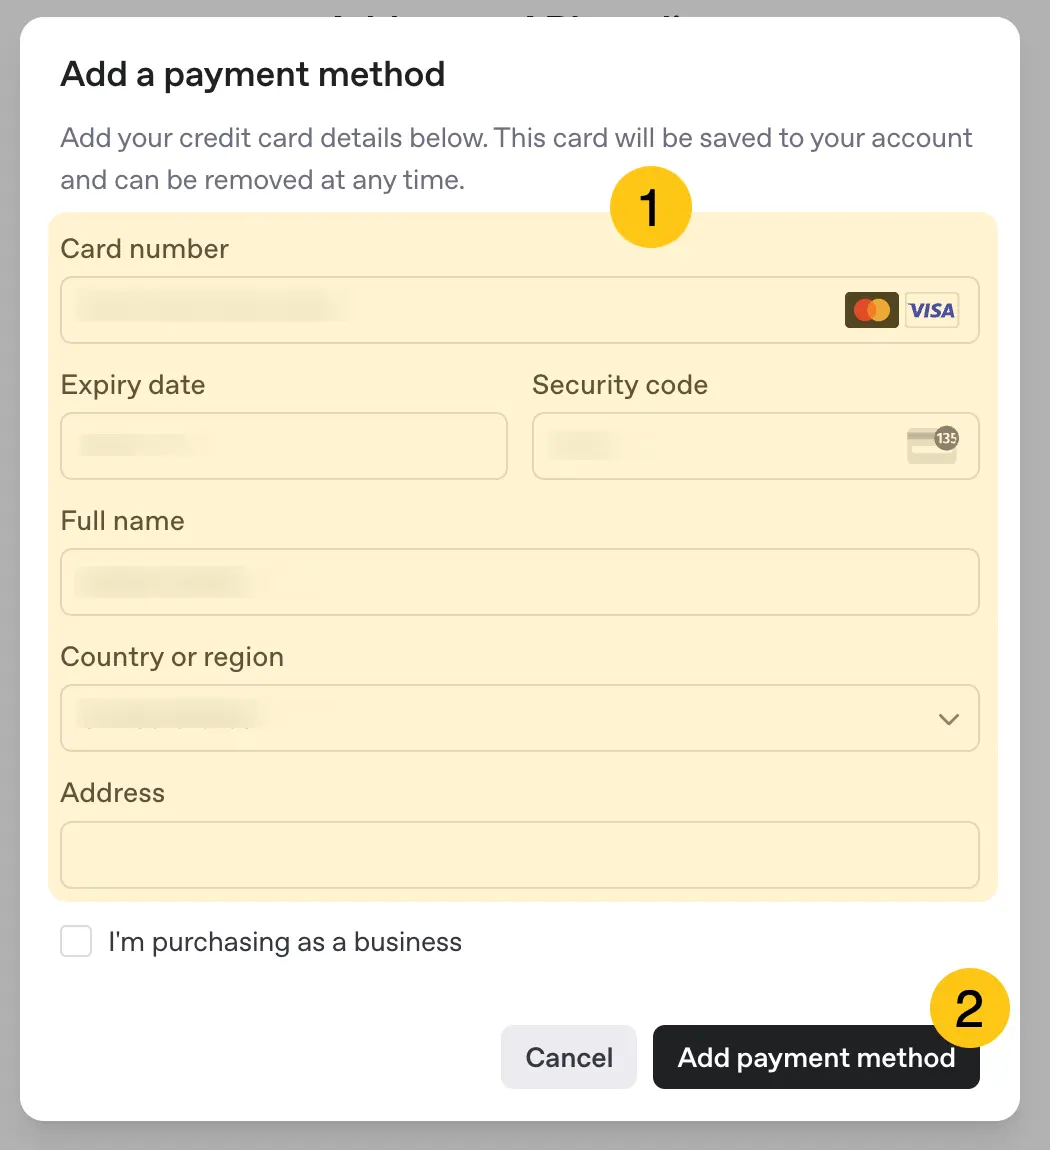
Enter your payment details 1, then select the Add payment method 2 button.
-
Proceed to the next configuration step: Add an AI Model.
Azure OpenAI service
-
Go to the Azure OpenAI Service website.
-
Select the Create with Azure AI Foundry button.
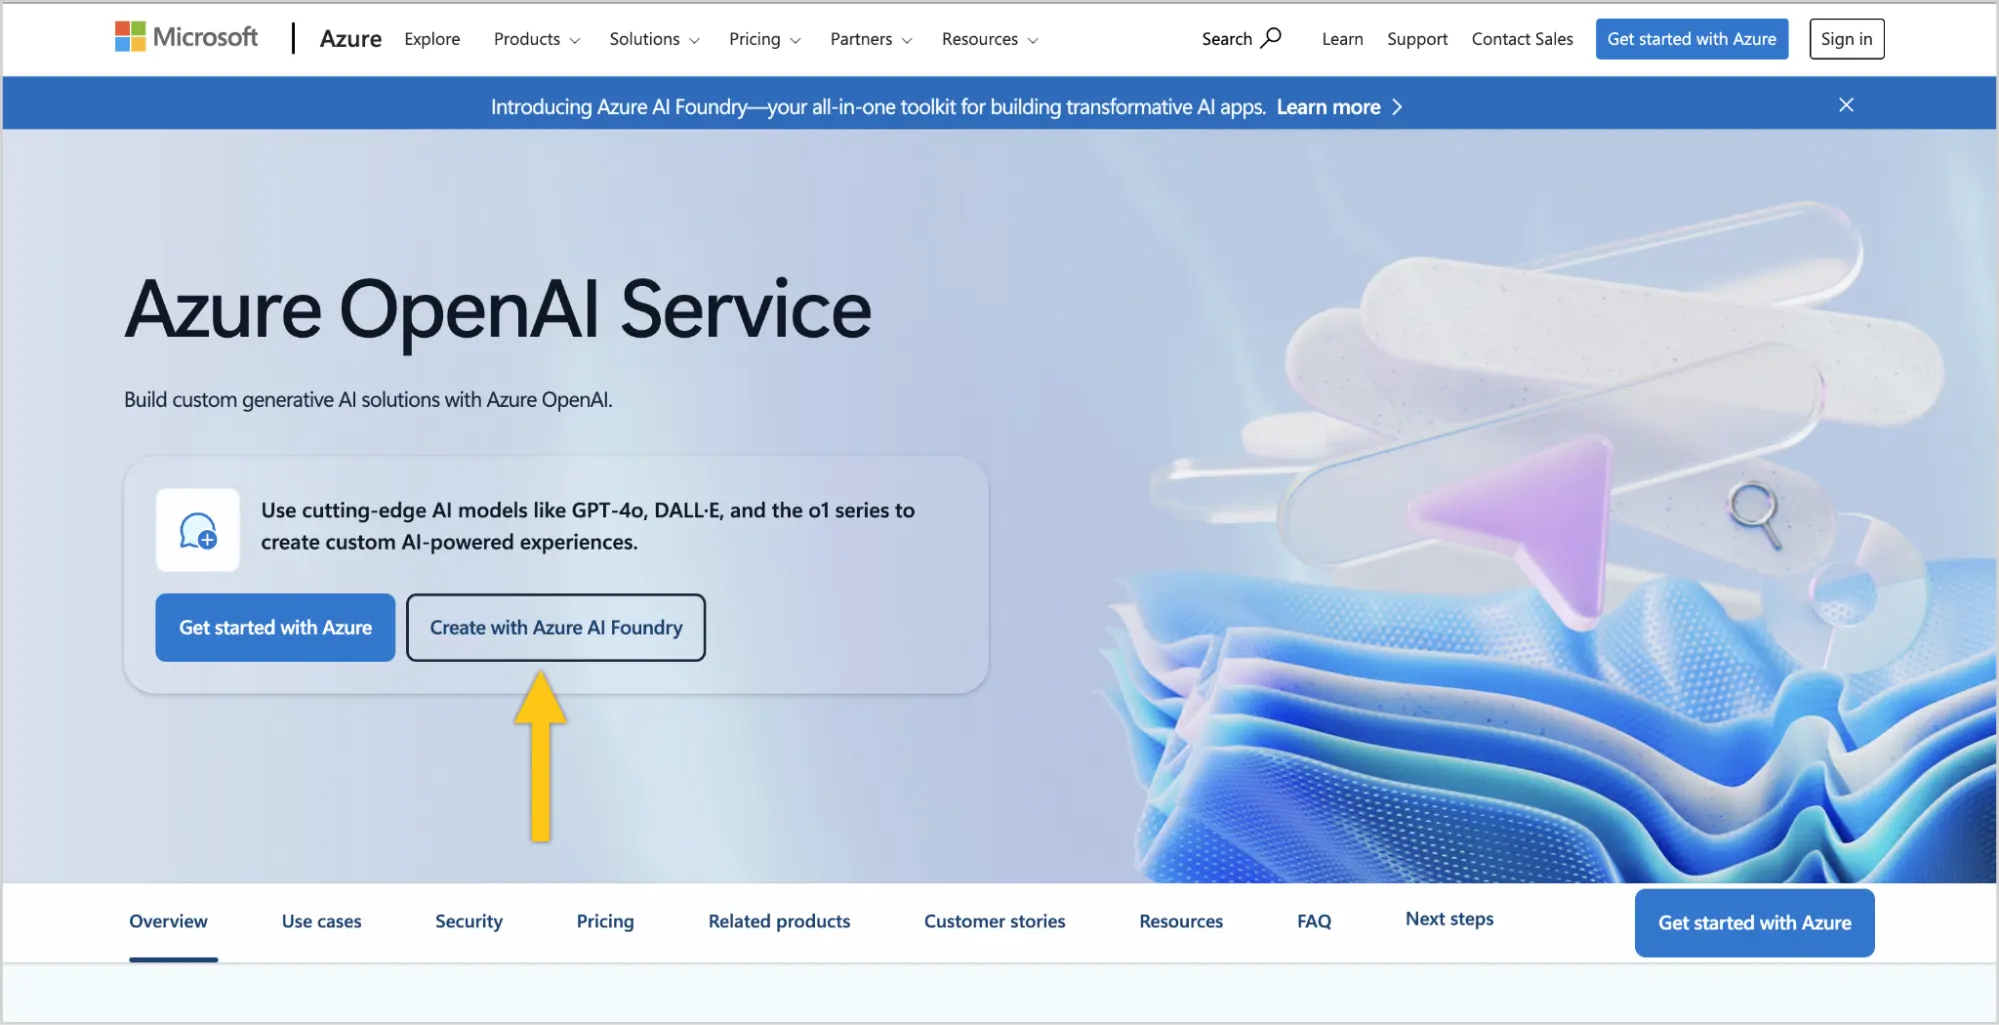
-
Select the Sign in to get started button.
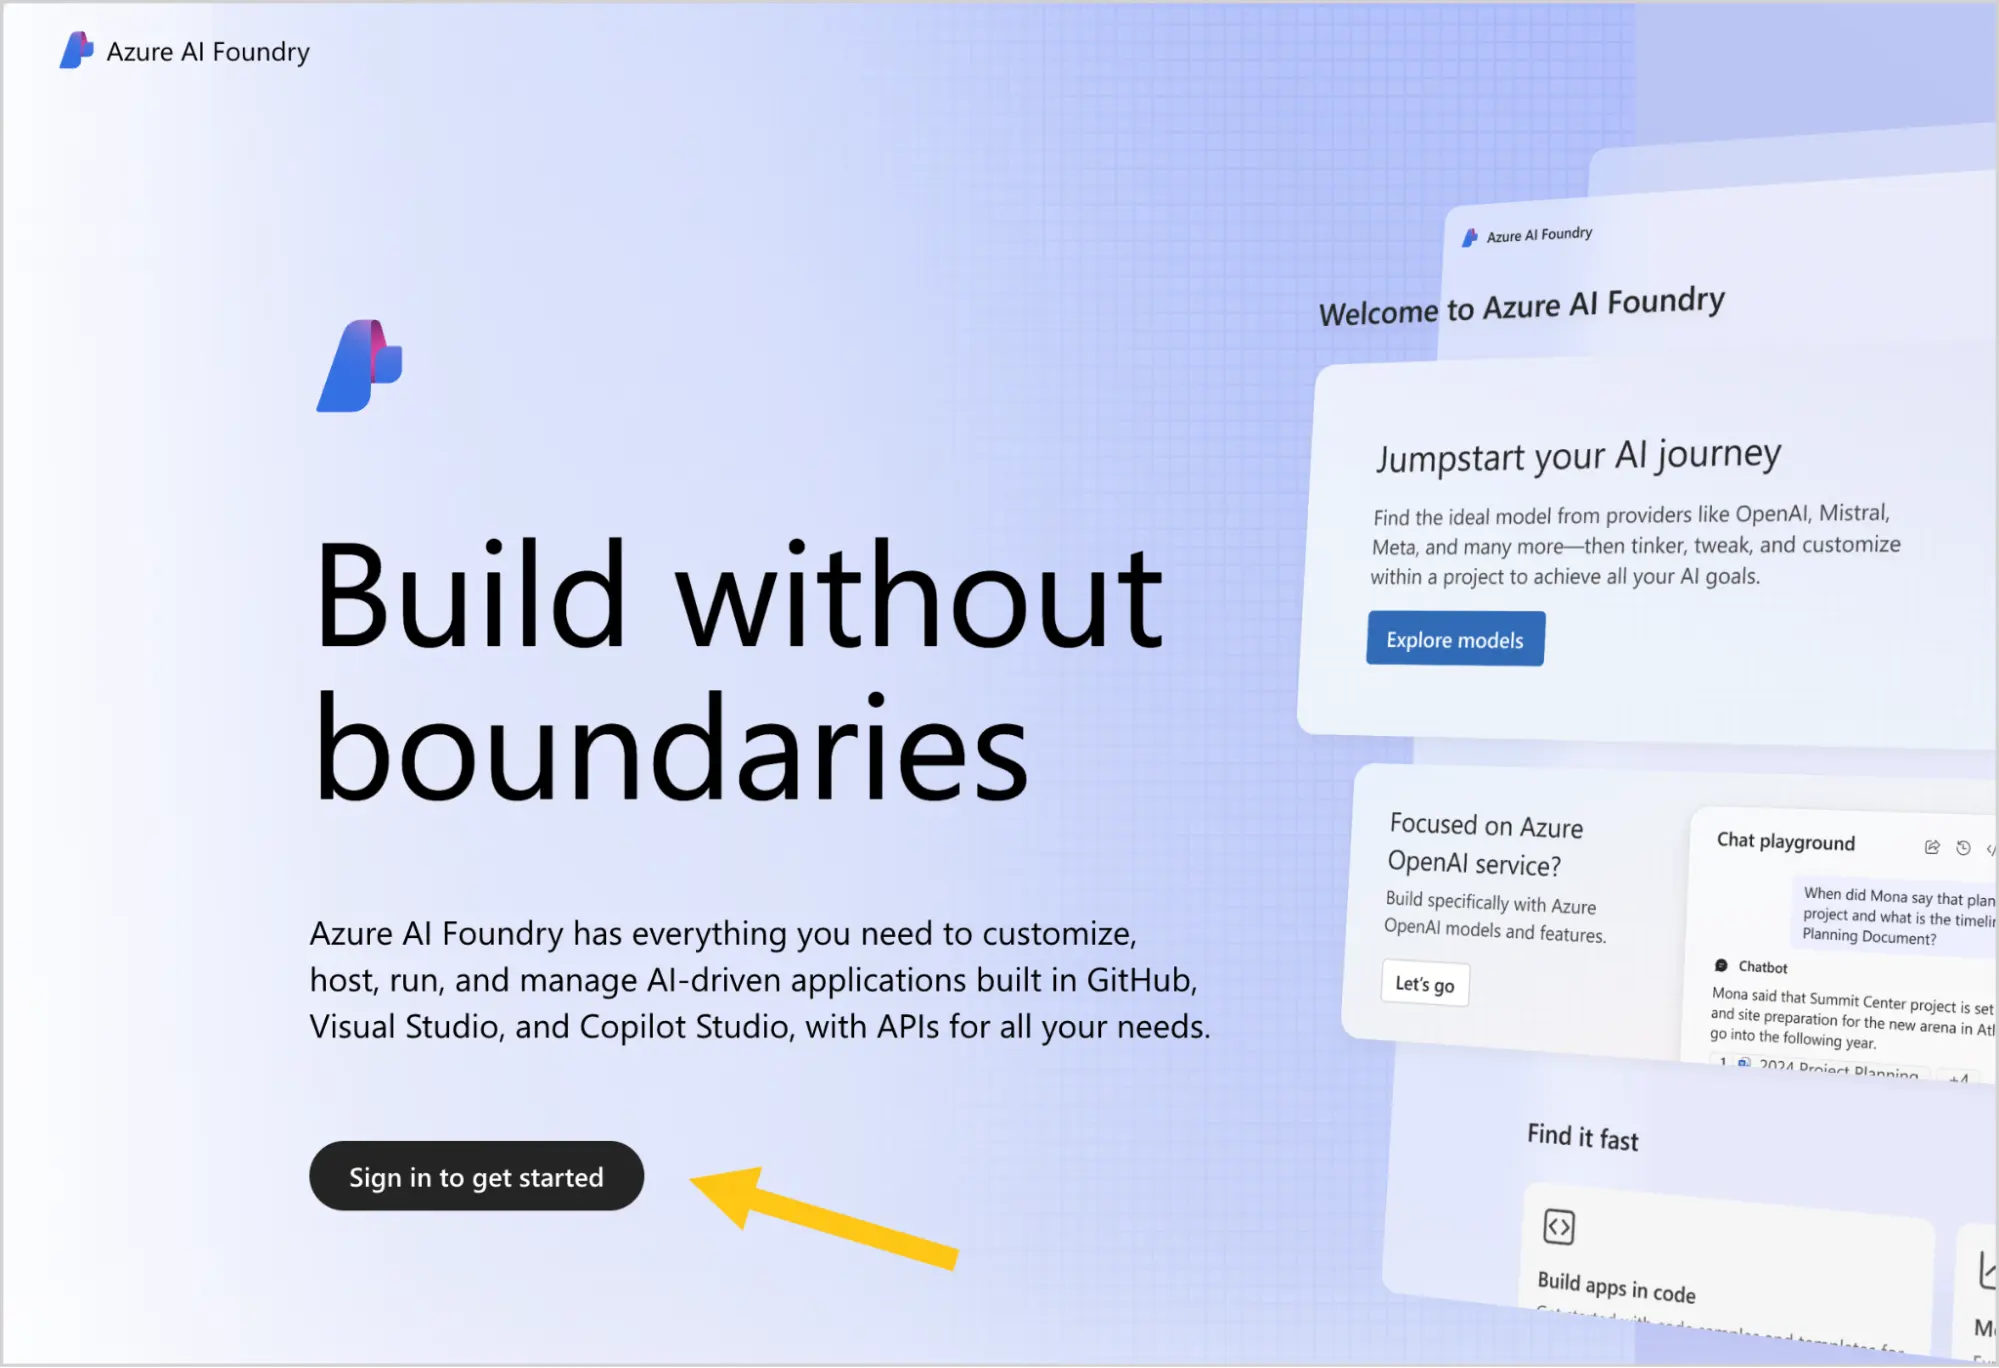
-
In the Email 1 field, enter the email address you want to register the account with, then select the Next 2 button.
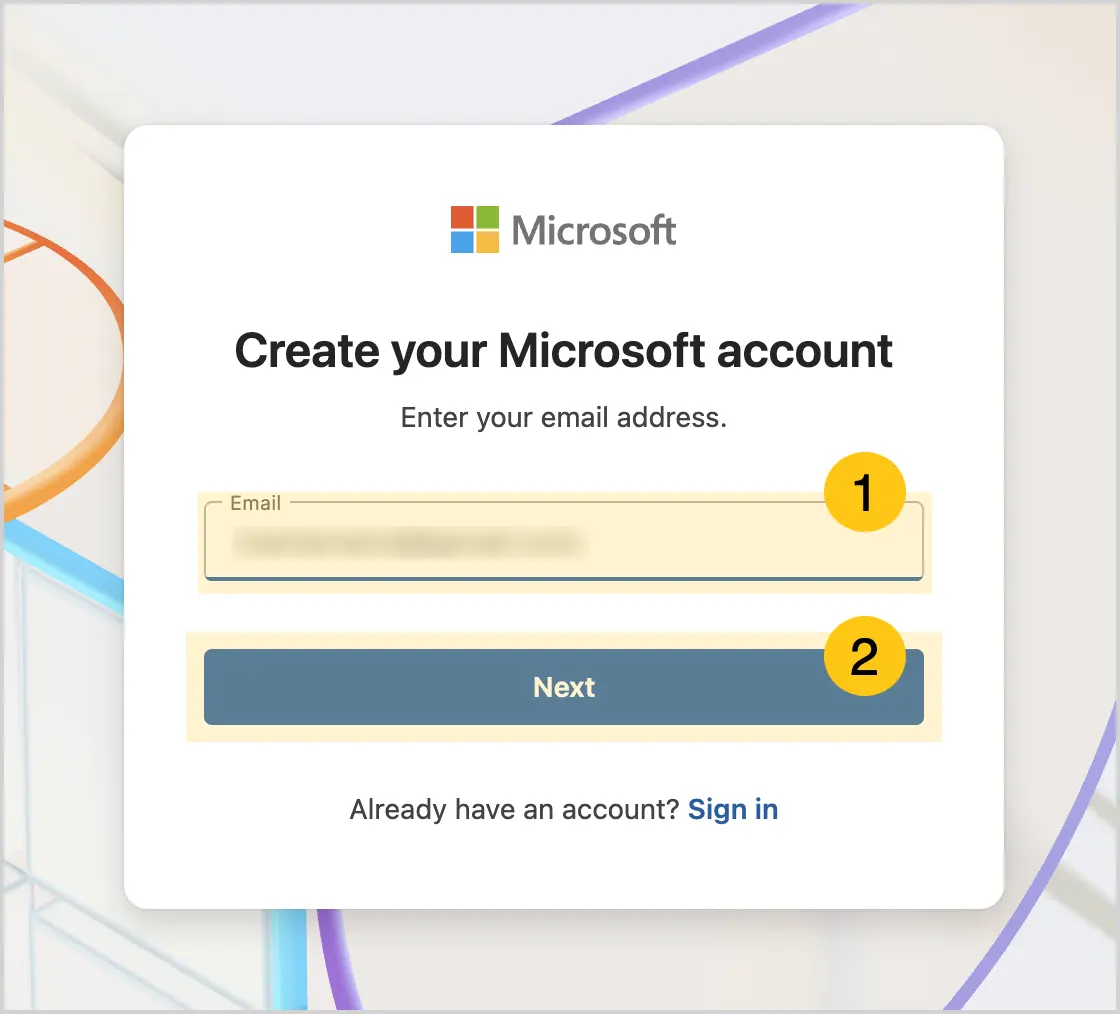
-
Go to your email inbox, open the letter from Microsoft, and copy the confirmation code to verify your email address.
-
In the Enter code 1 field, paste the code you copied from the email, then select the Next 2 button.
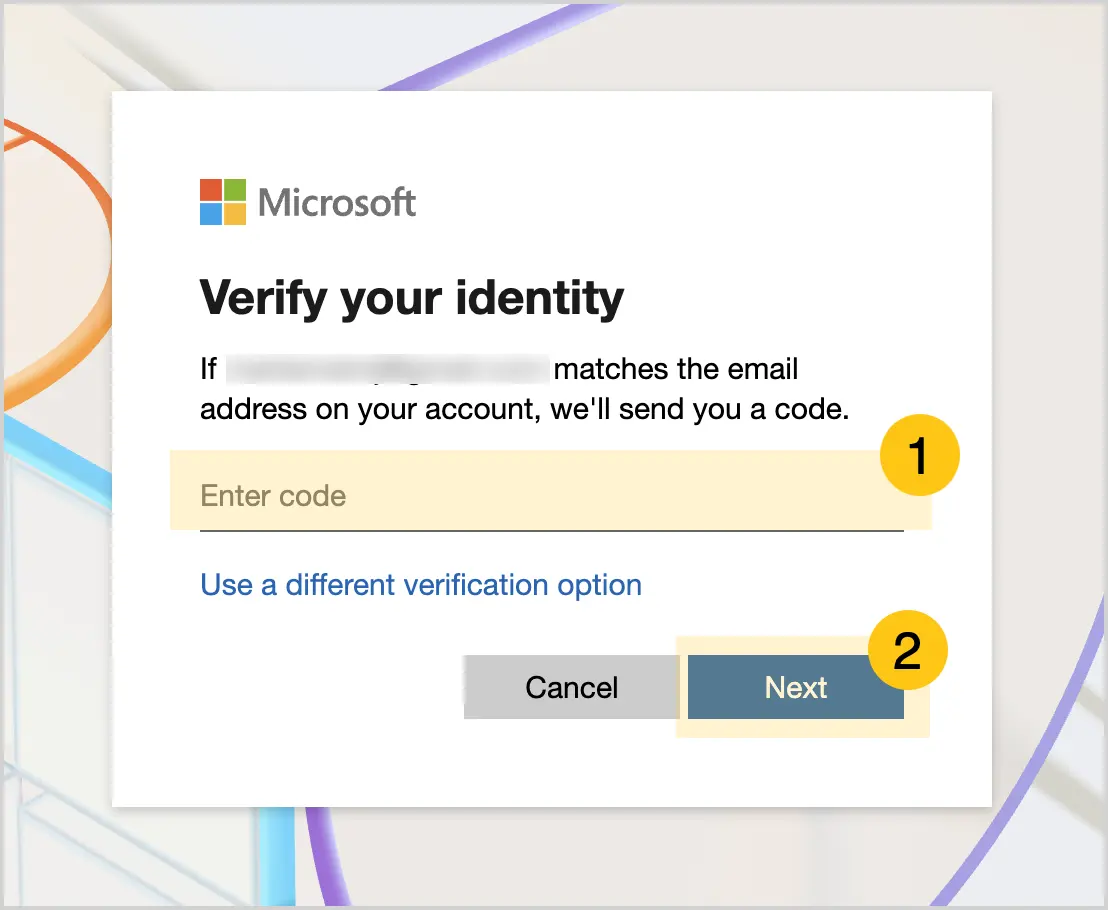
-
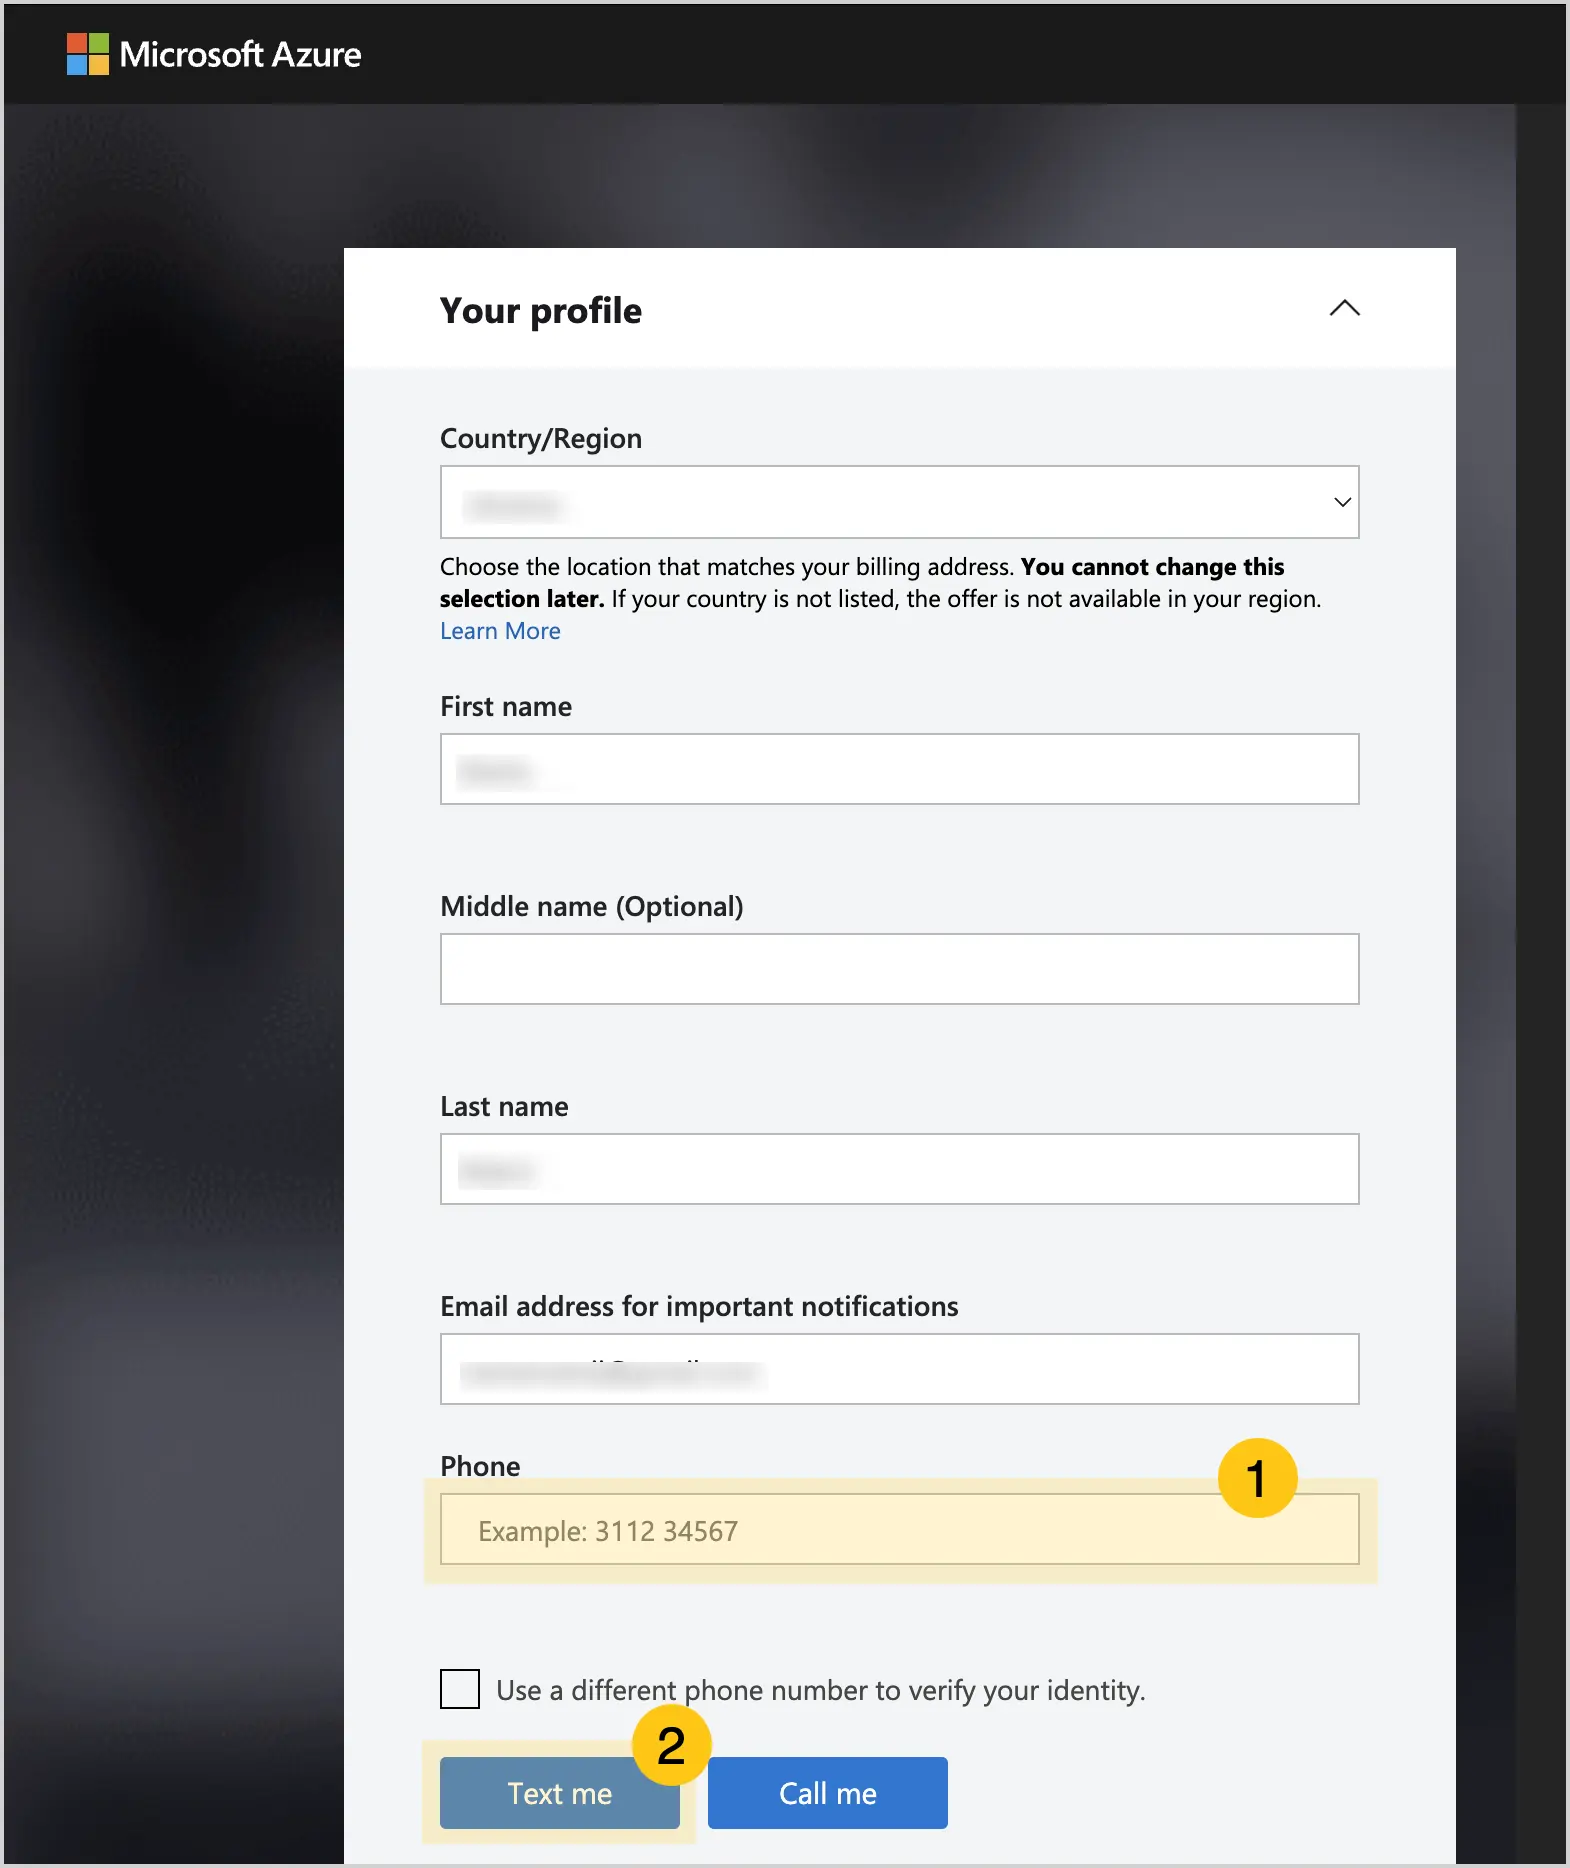
In the Phone field, enter your phone number 1, then select the Text me 2 button to receive an SMS confirmation.
-
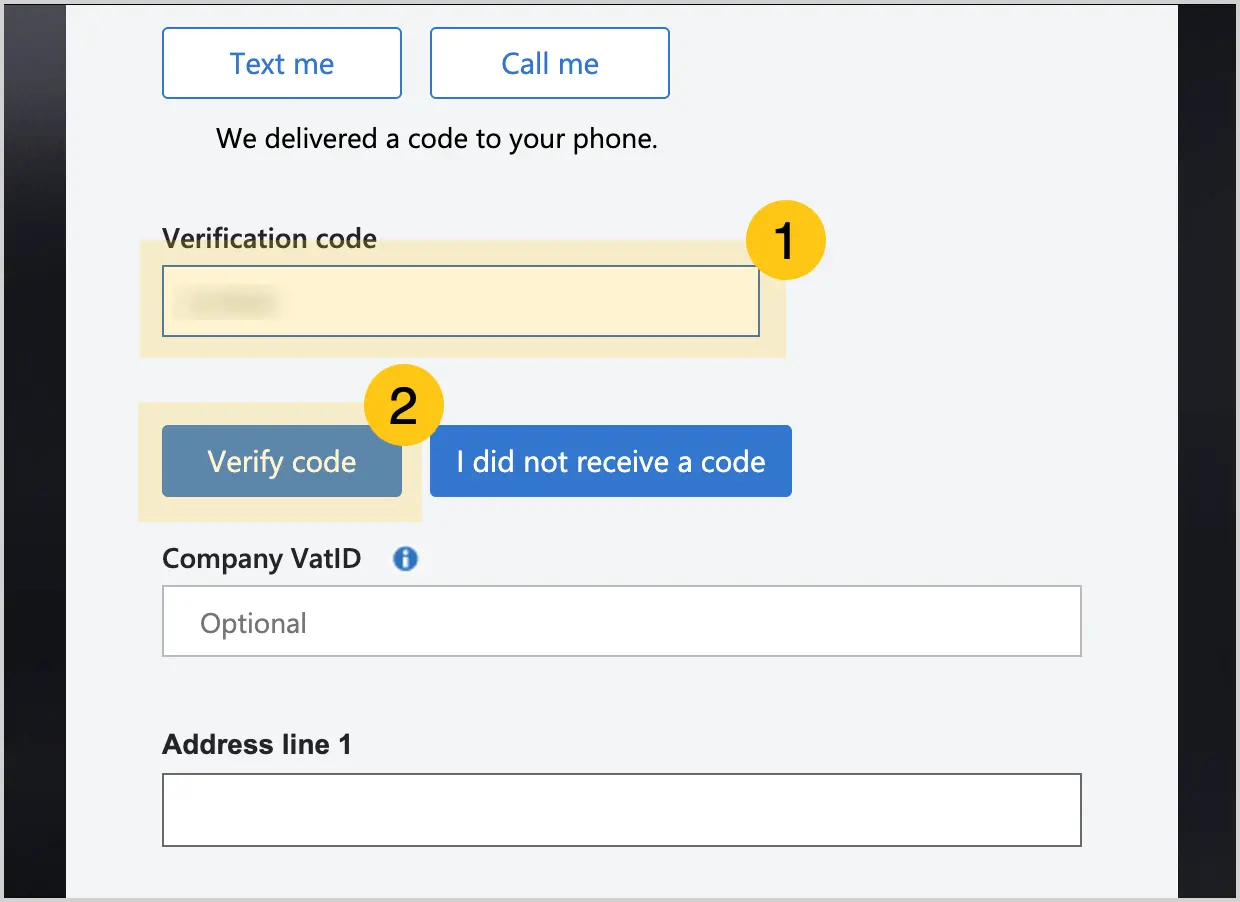
In the Verification code 1 field, enter the code from the SMS, then select the Verify code 2 button.
-
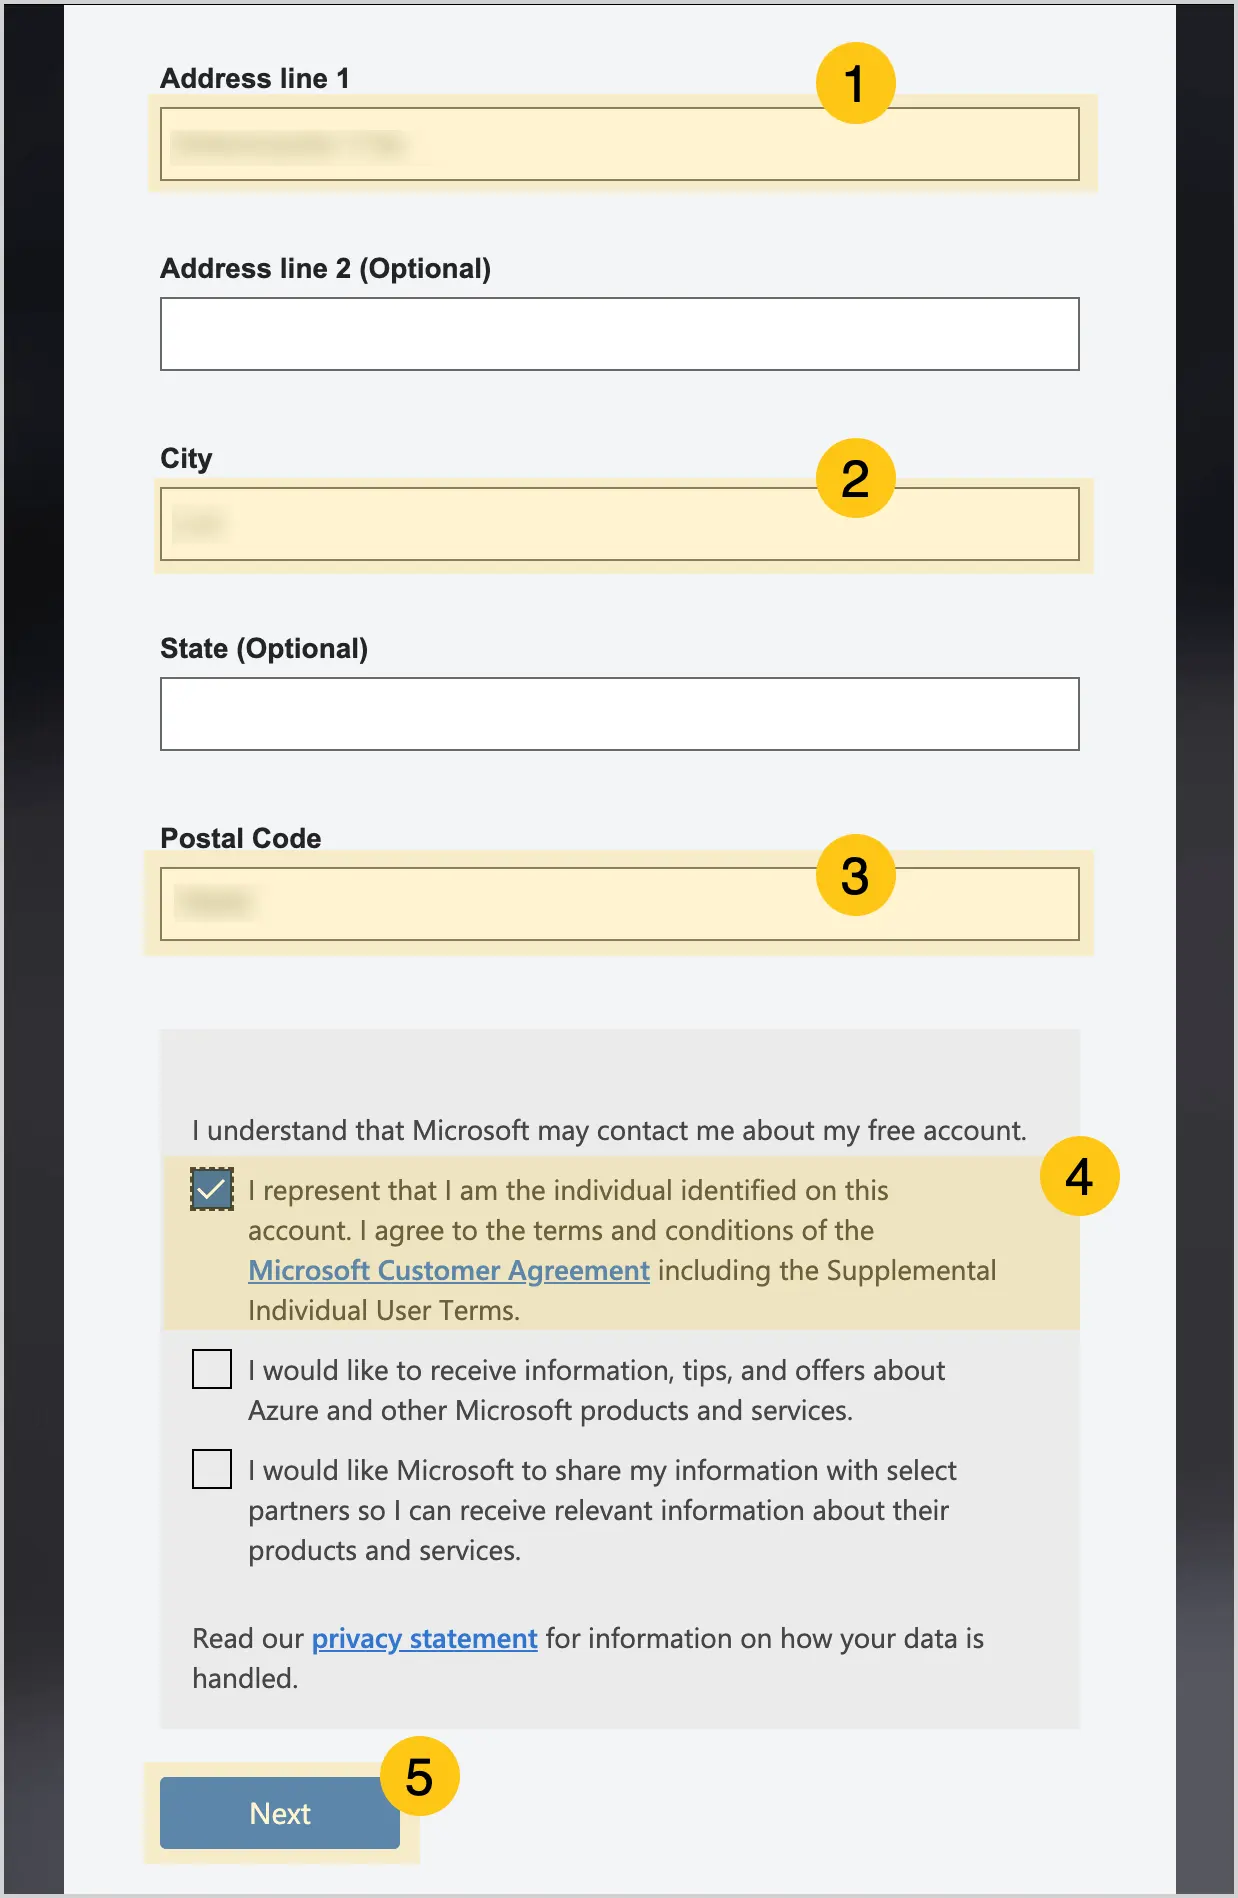
In the Address line 1 1 field, enter your address, then in the City 2 field, enter the city that will appear on your invoice.
-
In the Postal code 3 field, enter your postal code that will appear on the invoice.
-
Select the I represent that I am… 4 checkbox to agree to the terms of service, then select the Next 5 button.
-
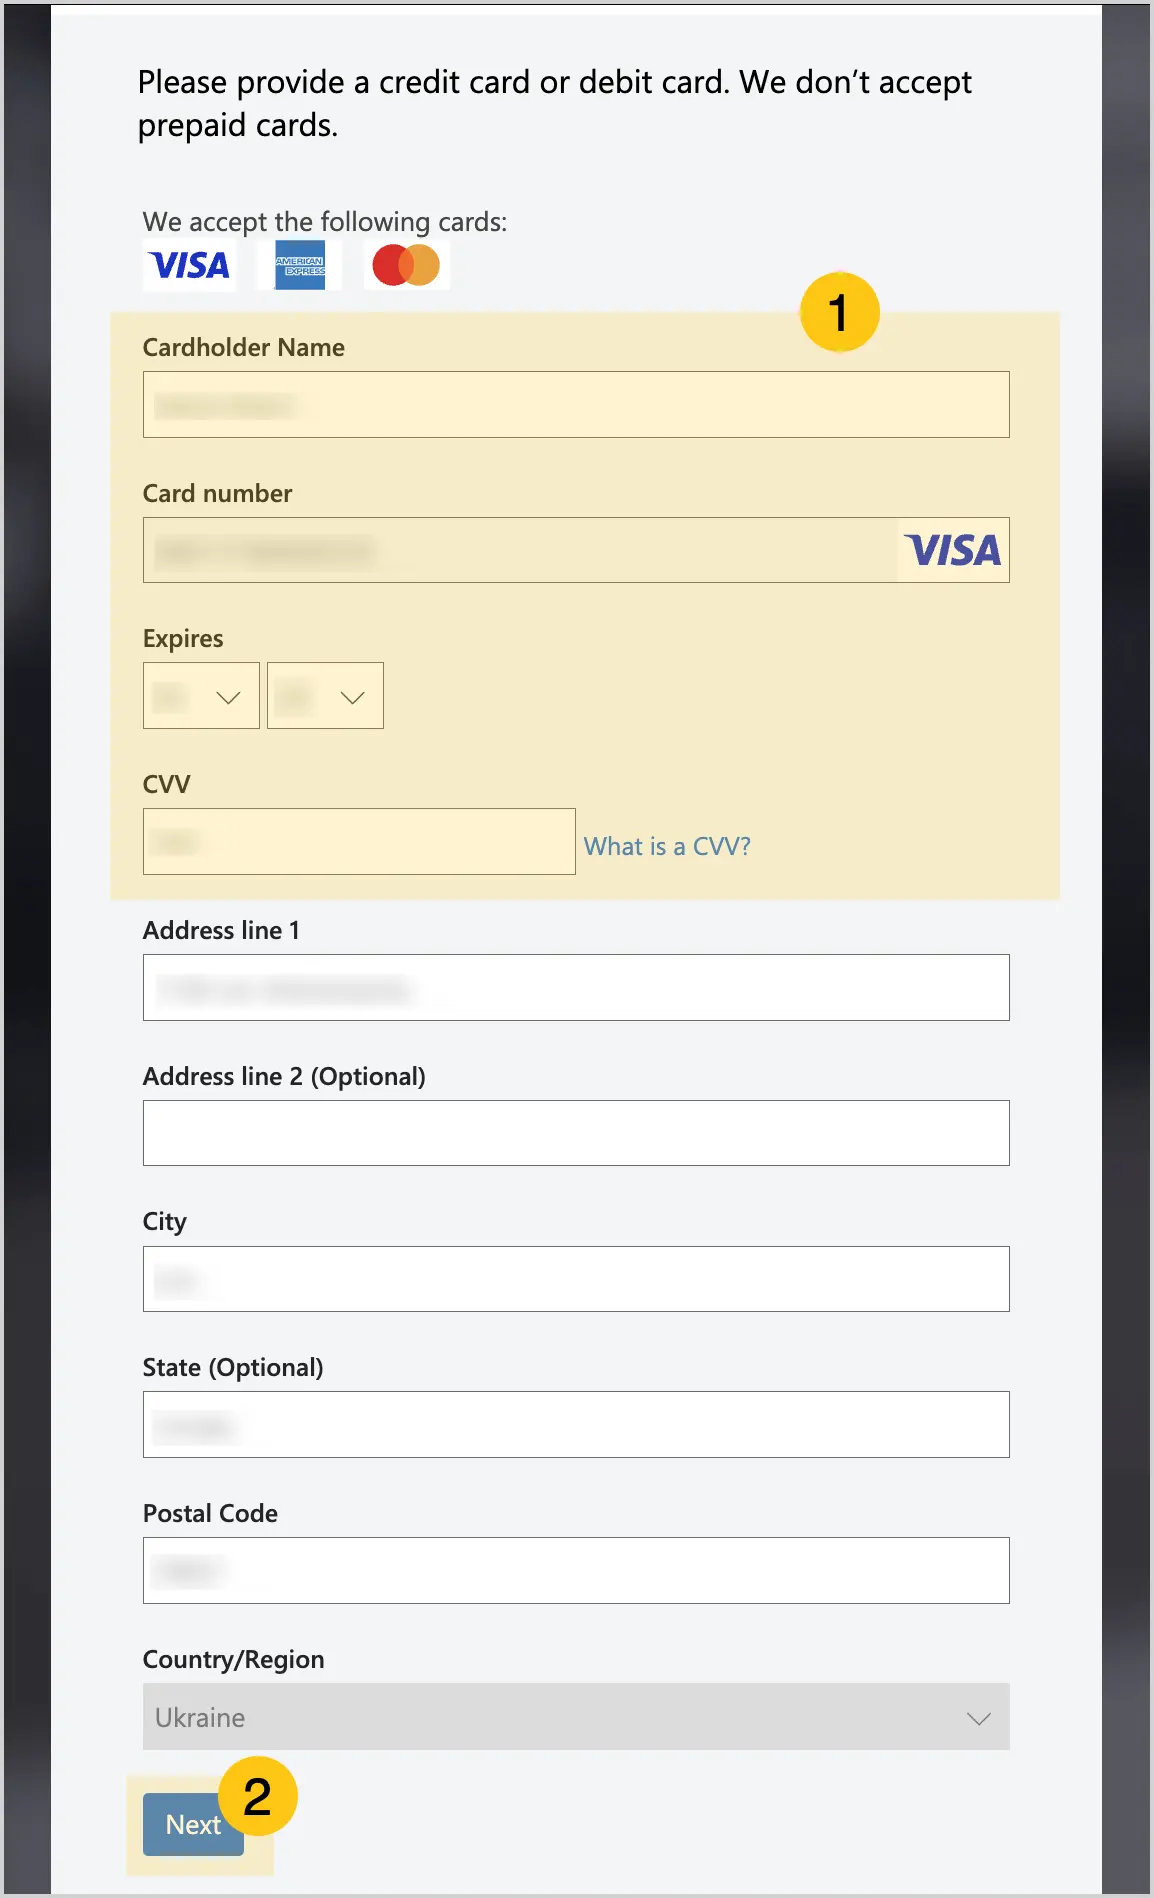
Enter your bank card details 1 that will be used for future transactions, then select the Next 2 button.
-
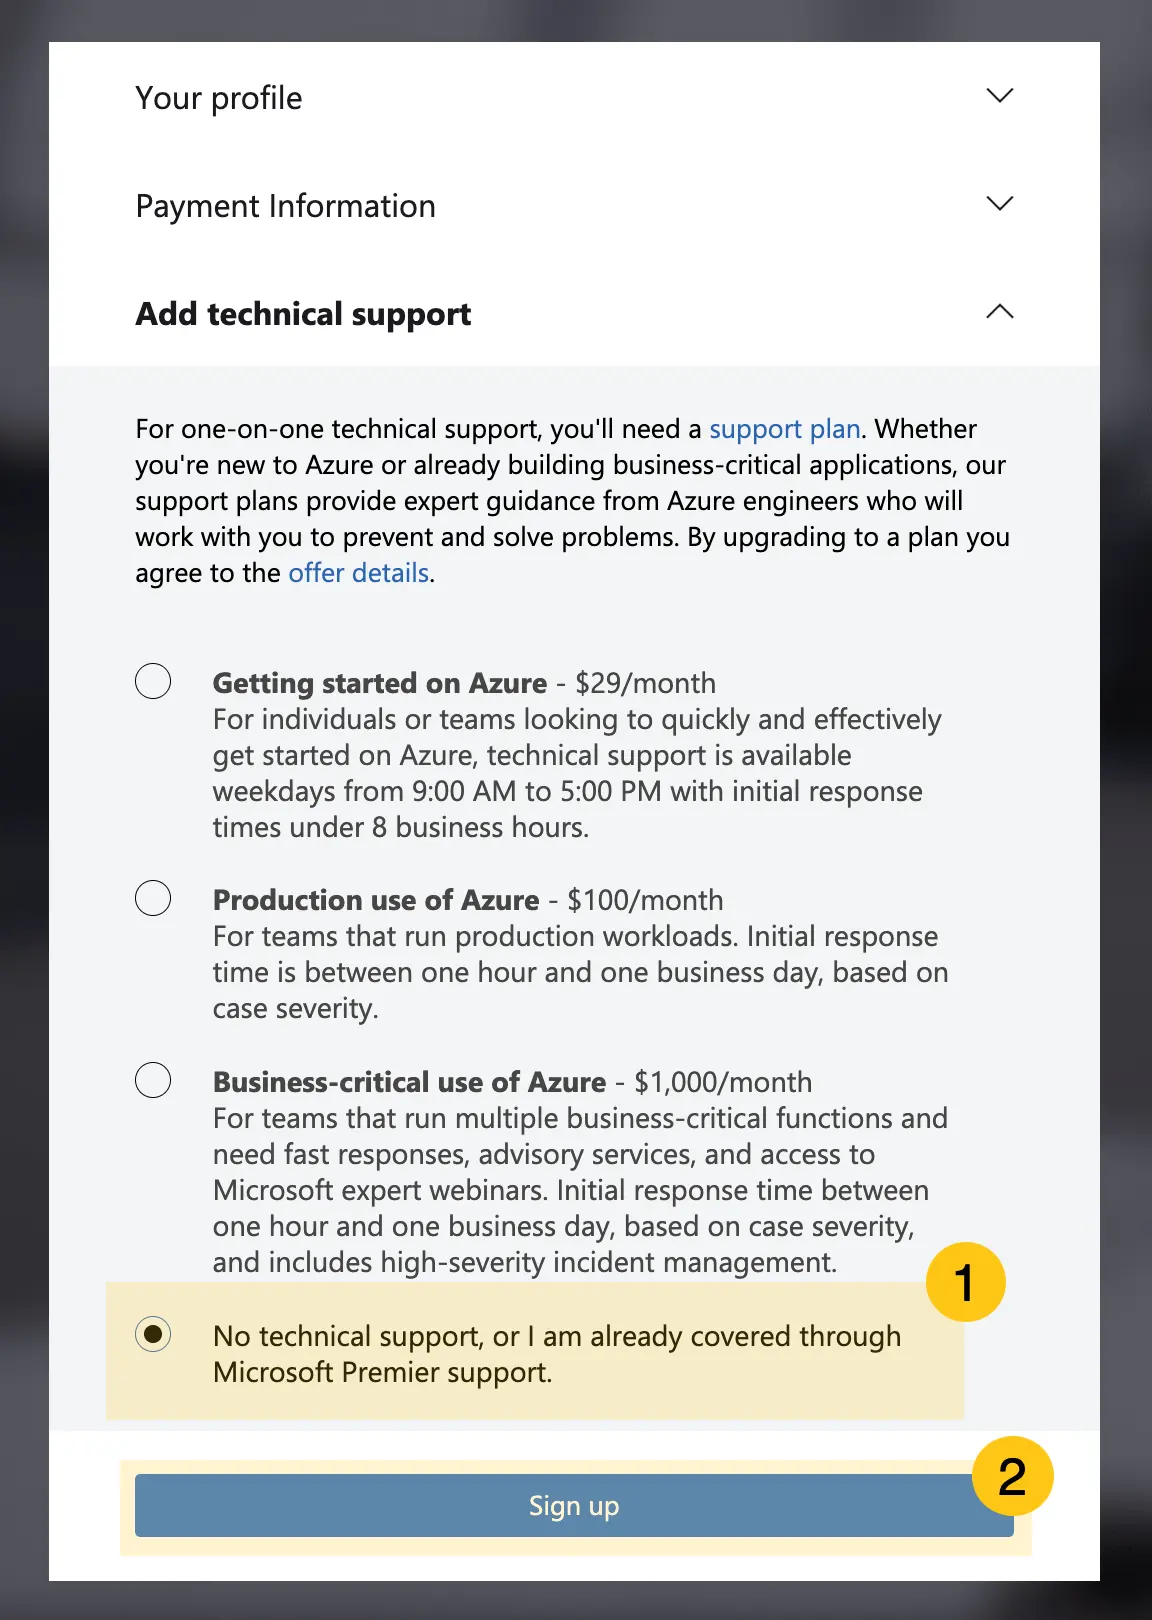
Select the No technical support… 1 checkbox to decline paid account support services, then select the Sign up 2 button to complete registration.
-
Go to the Azure OpenAI Studio website.
-
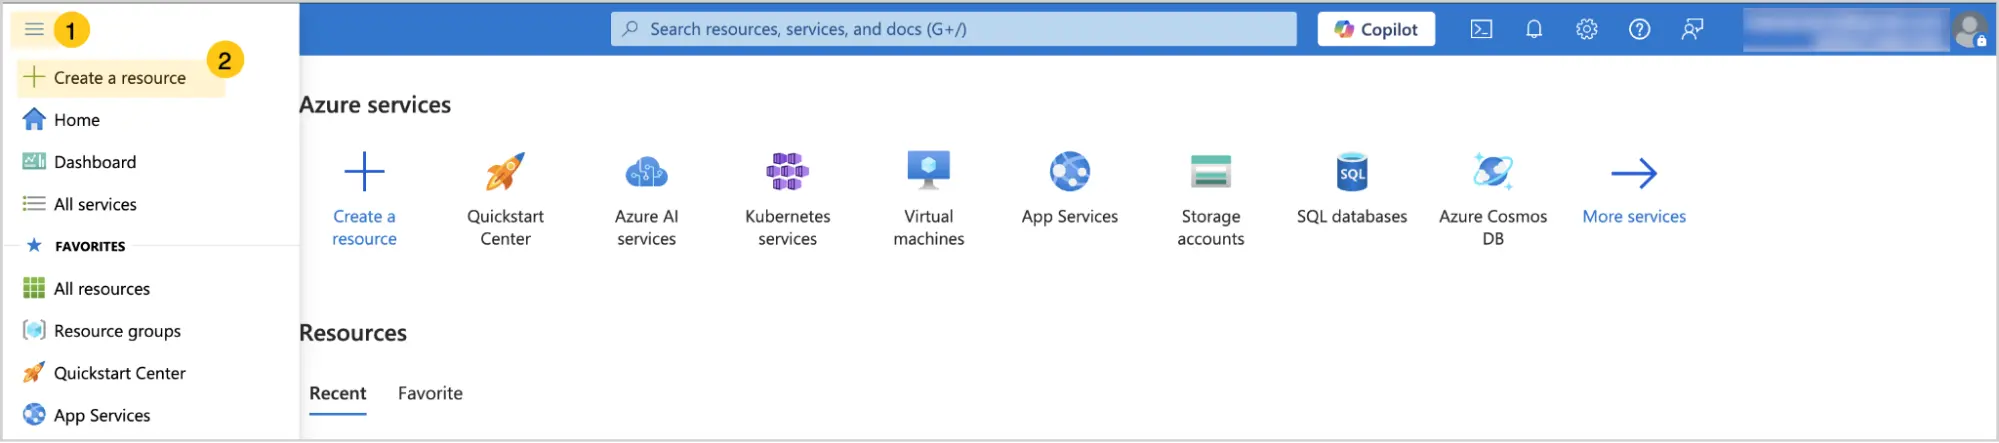
In the upper-left corner, select the icon 1, then select Create a resource 2.
-
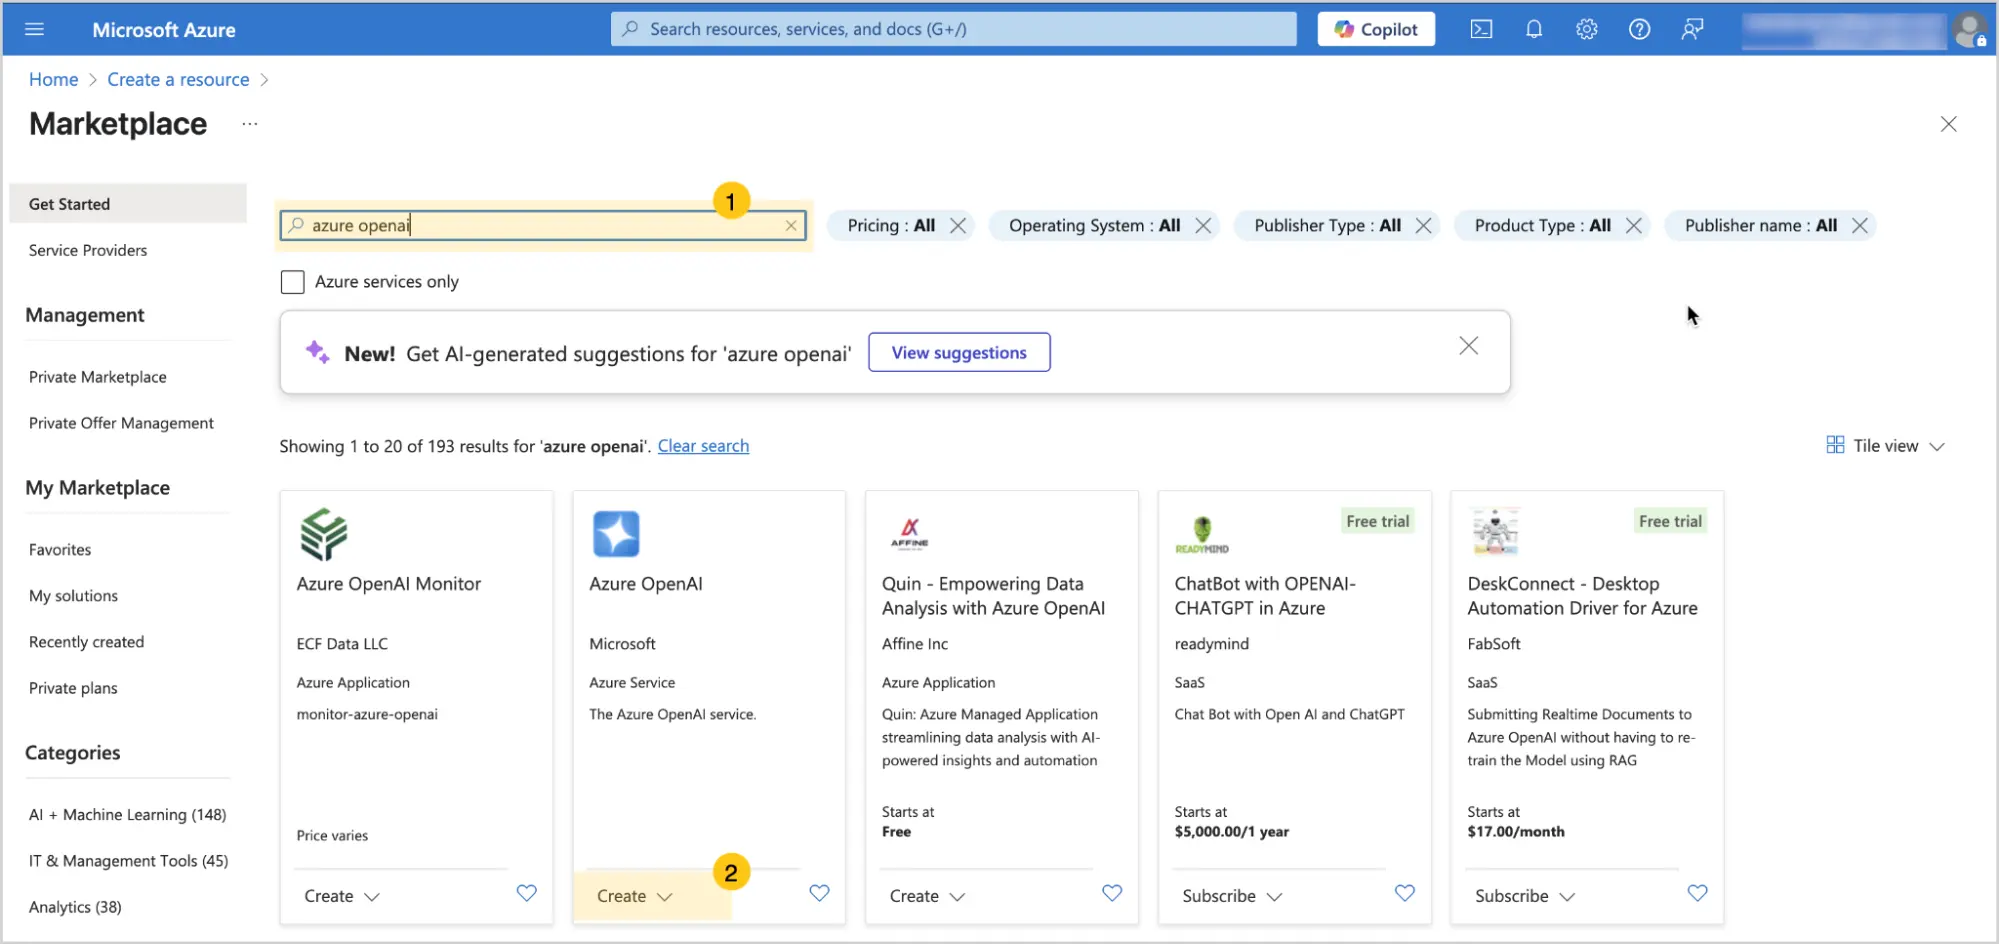
In the search field 1, type Azure openAI, then find the Azure openAI service in the search results and select the Create 2 button.
-
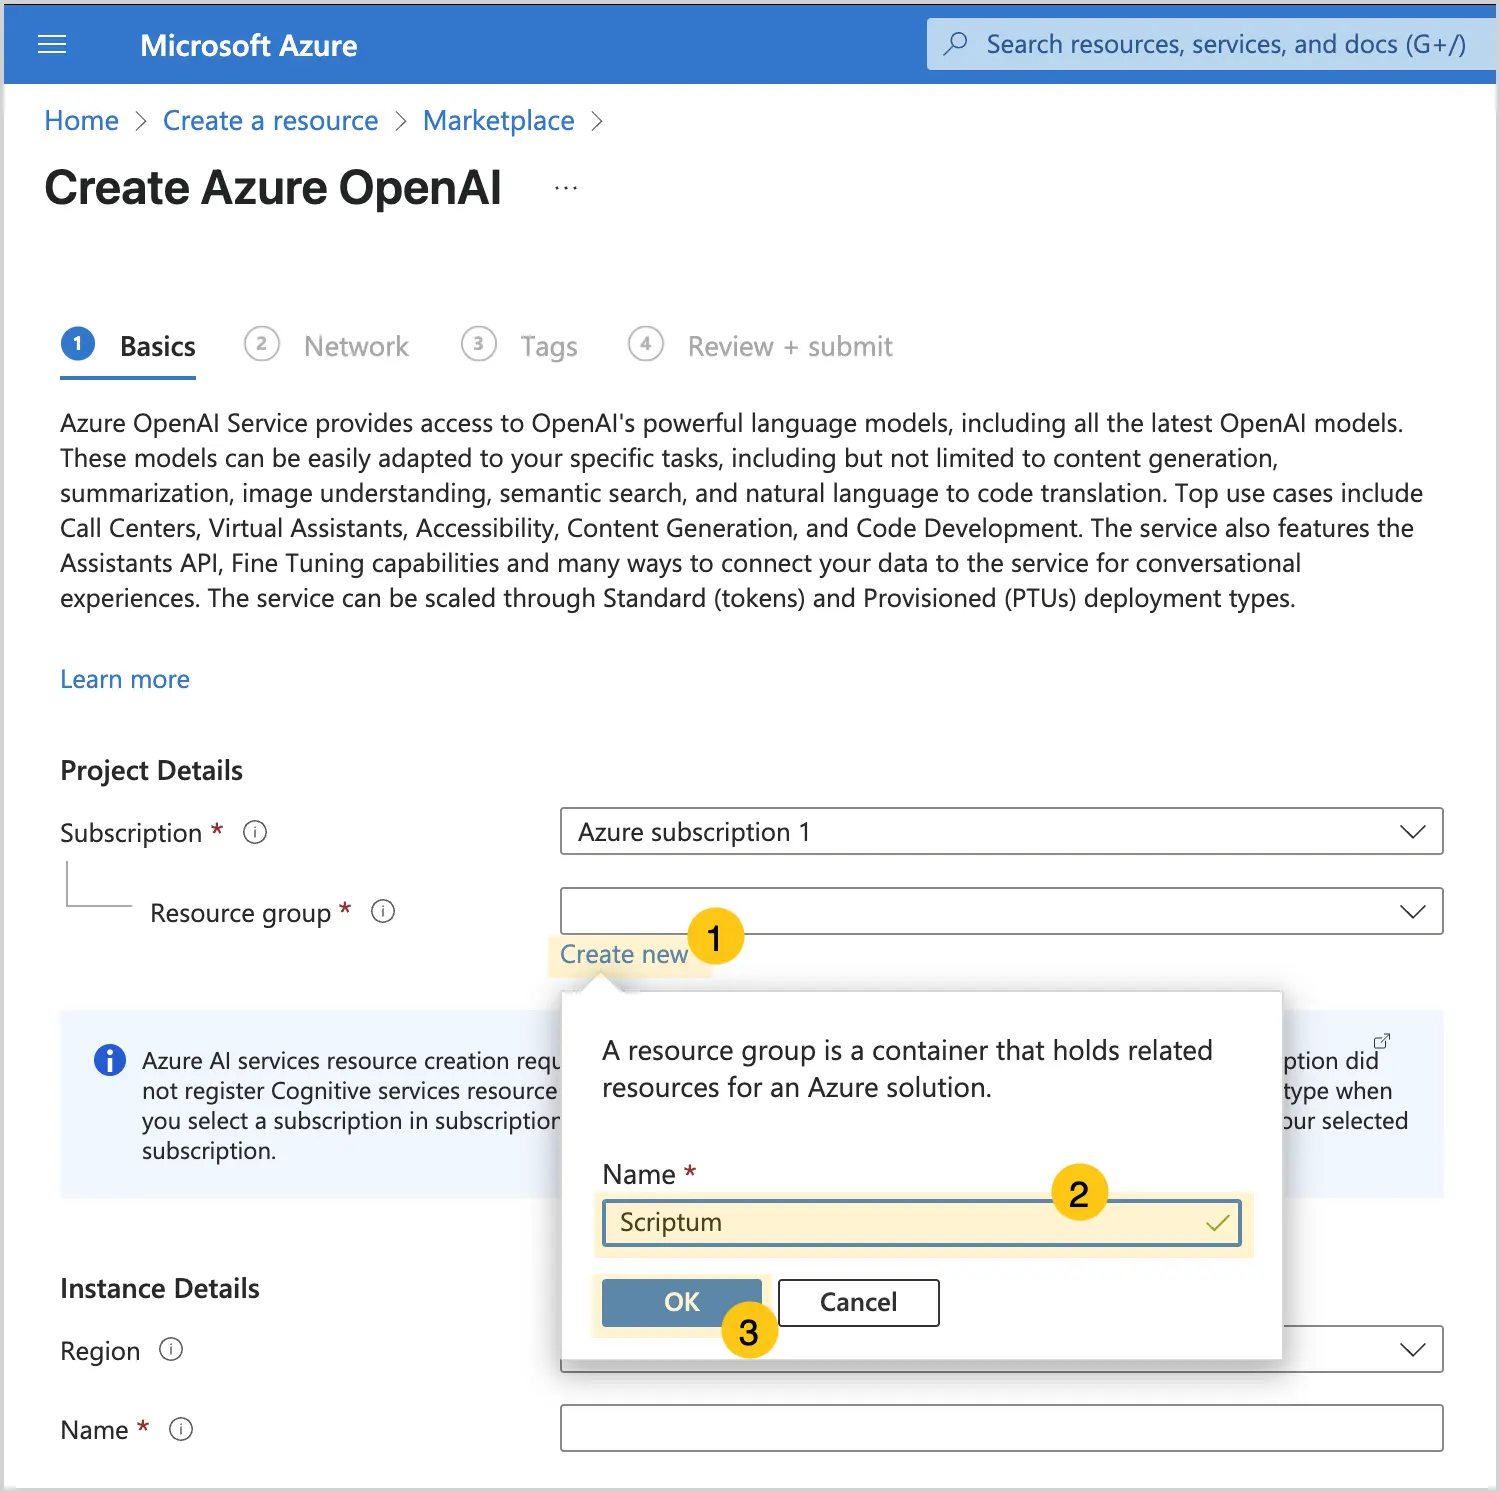
Under the Resource group field, select Create new 1.
-
In the Name 2 field, enter any name, then select the OK 3 button.
-
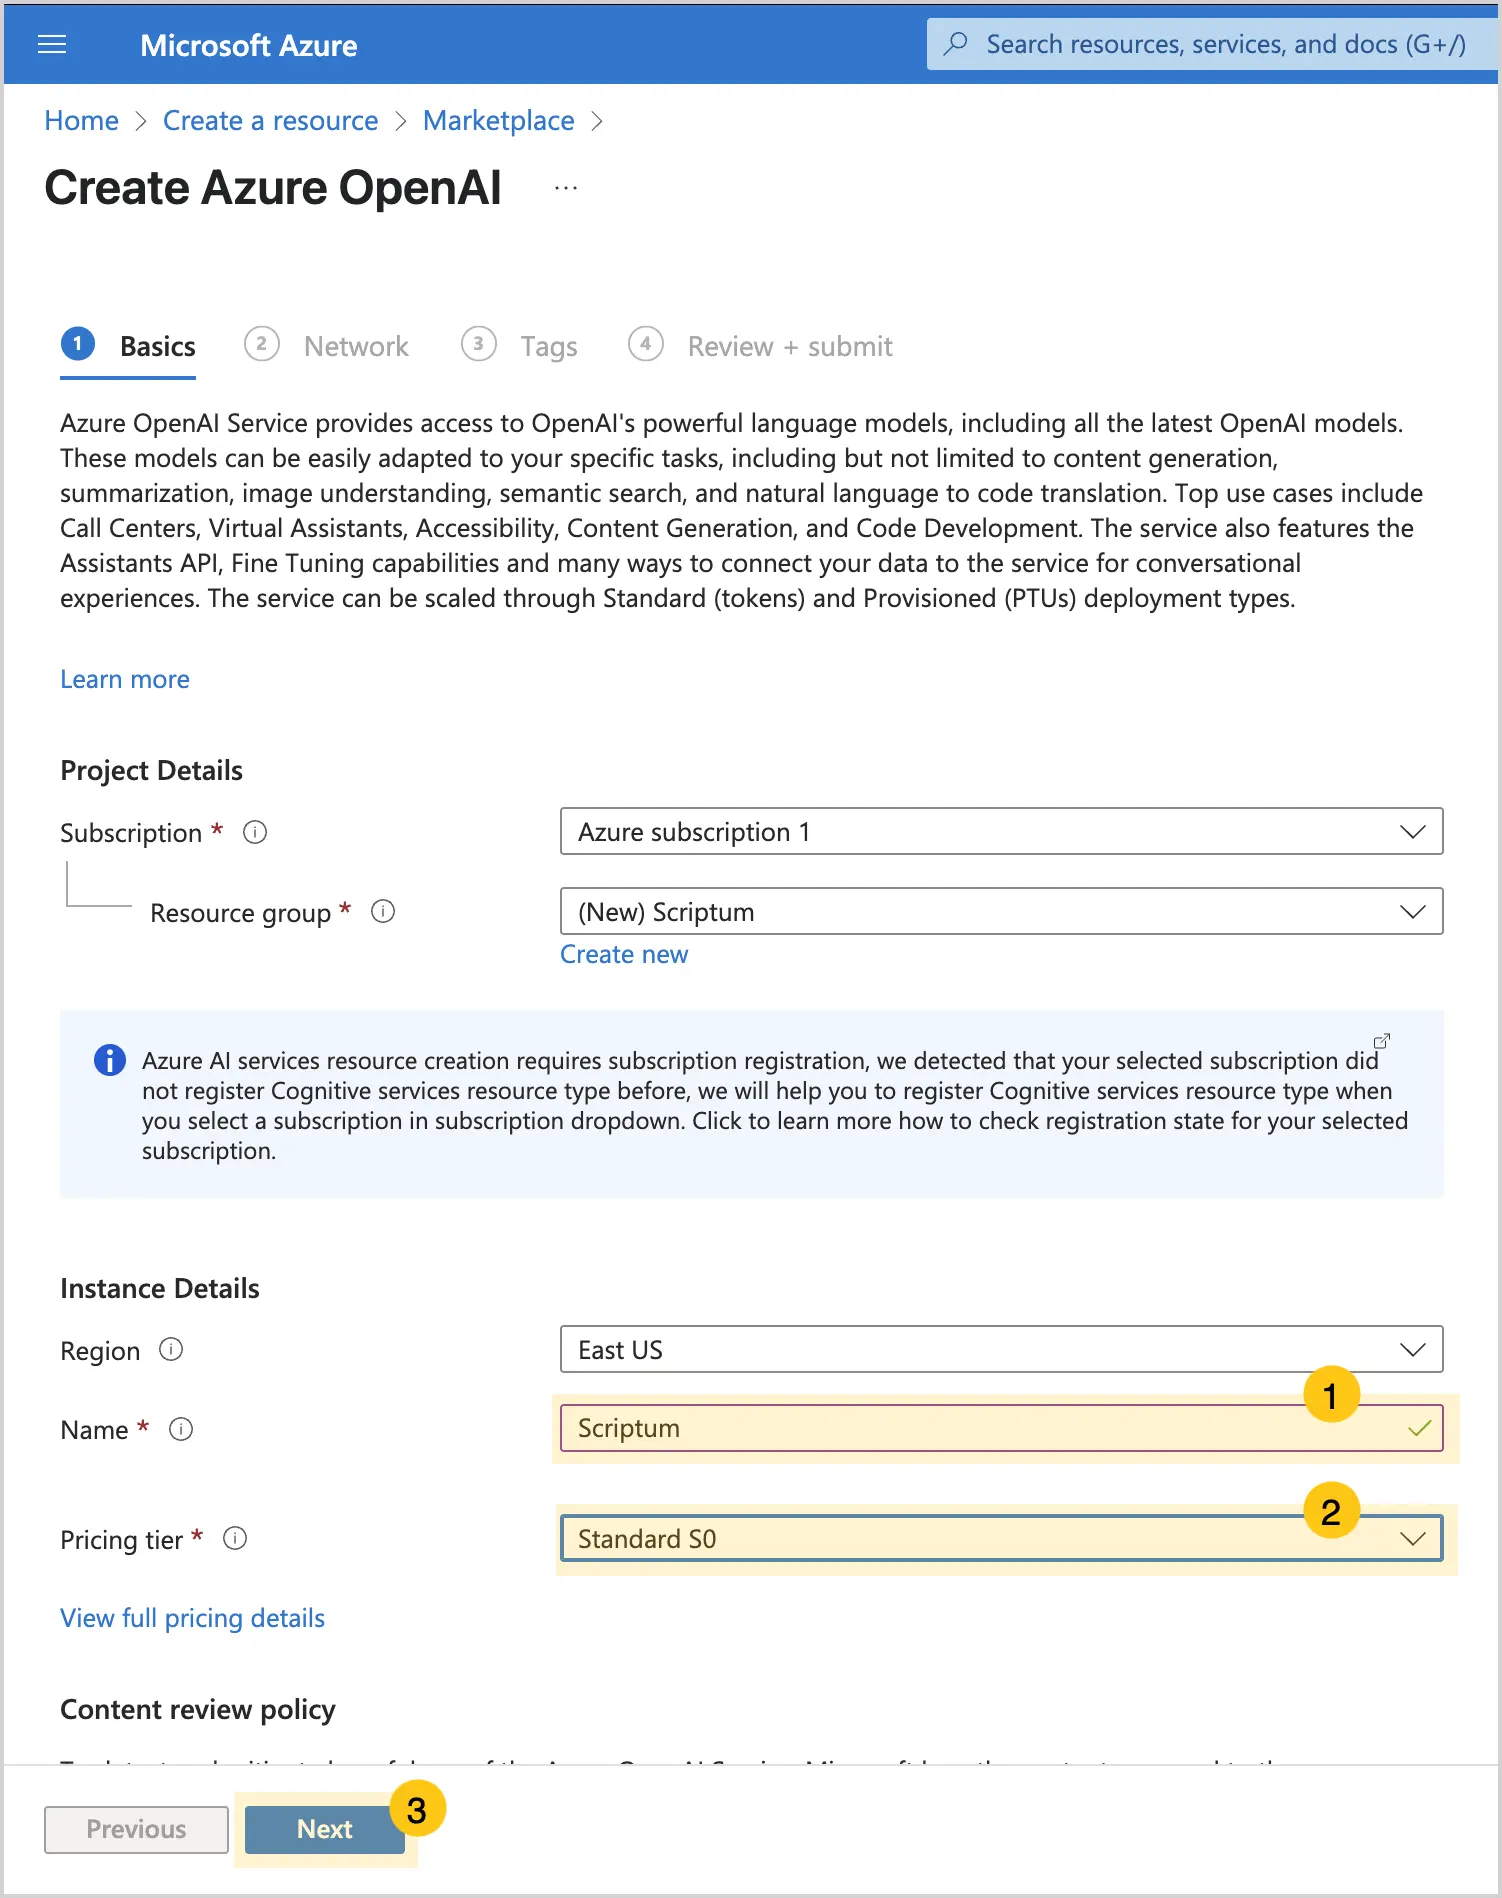
In the Name 1 field, enter any name, then in the Pricing tier 2 field, select Standard S0.
-
Select the Next 3 button.
-
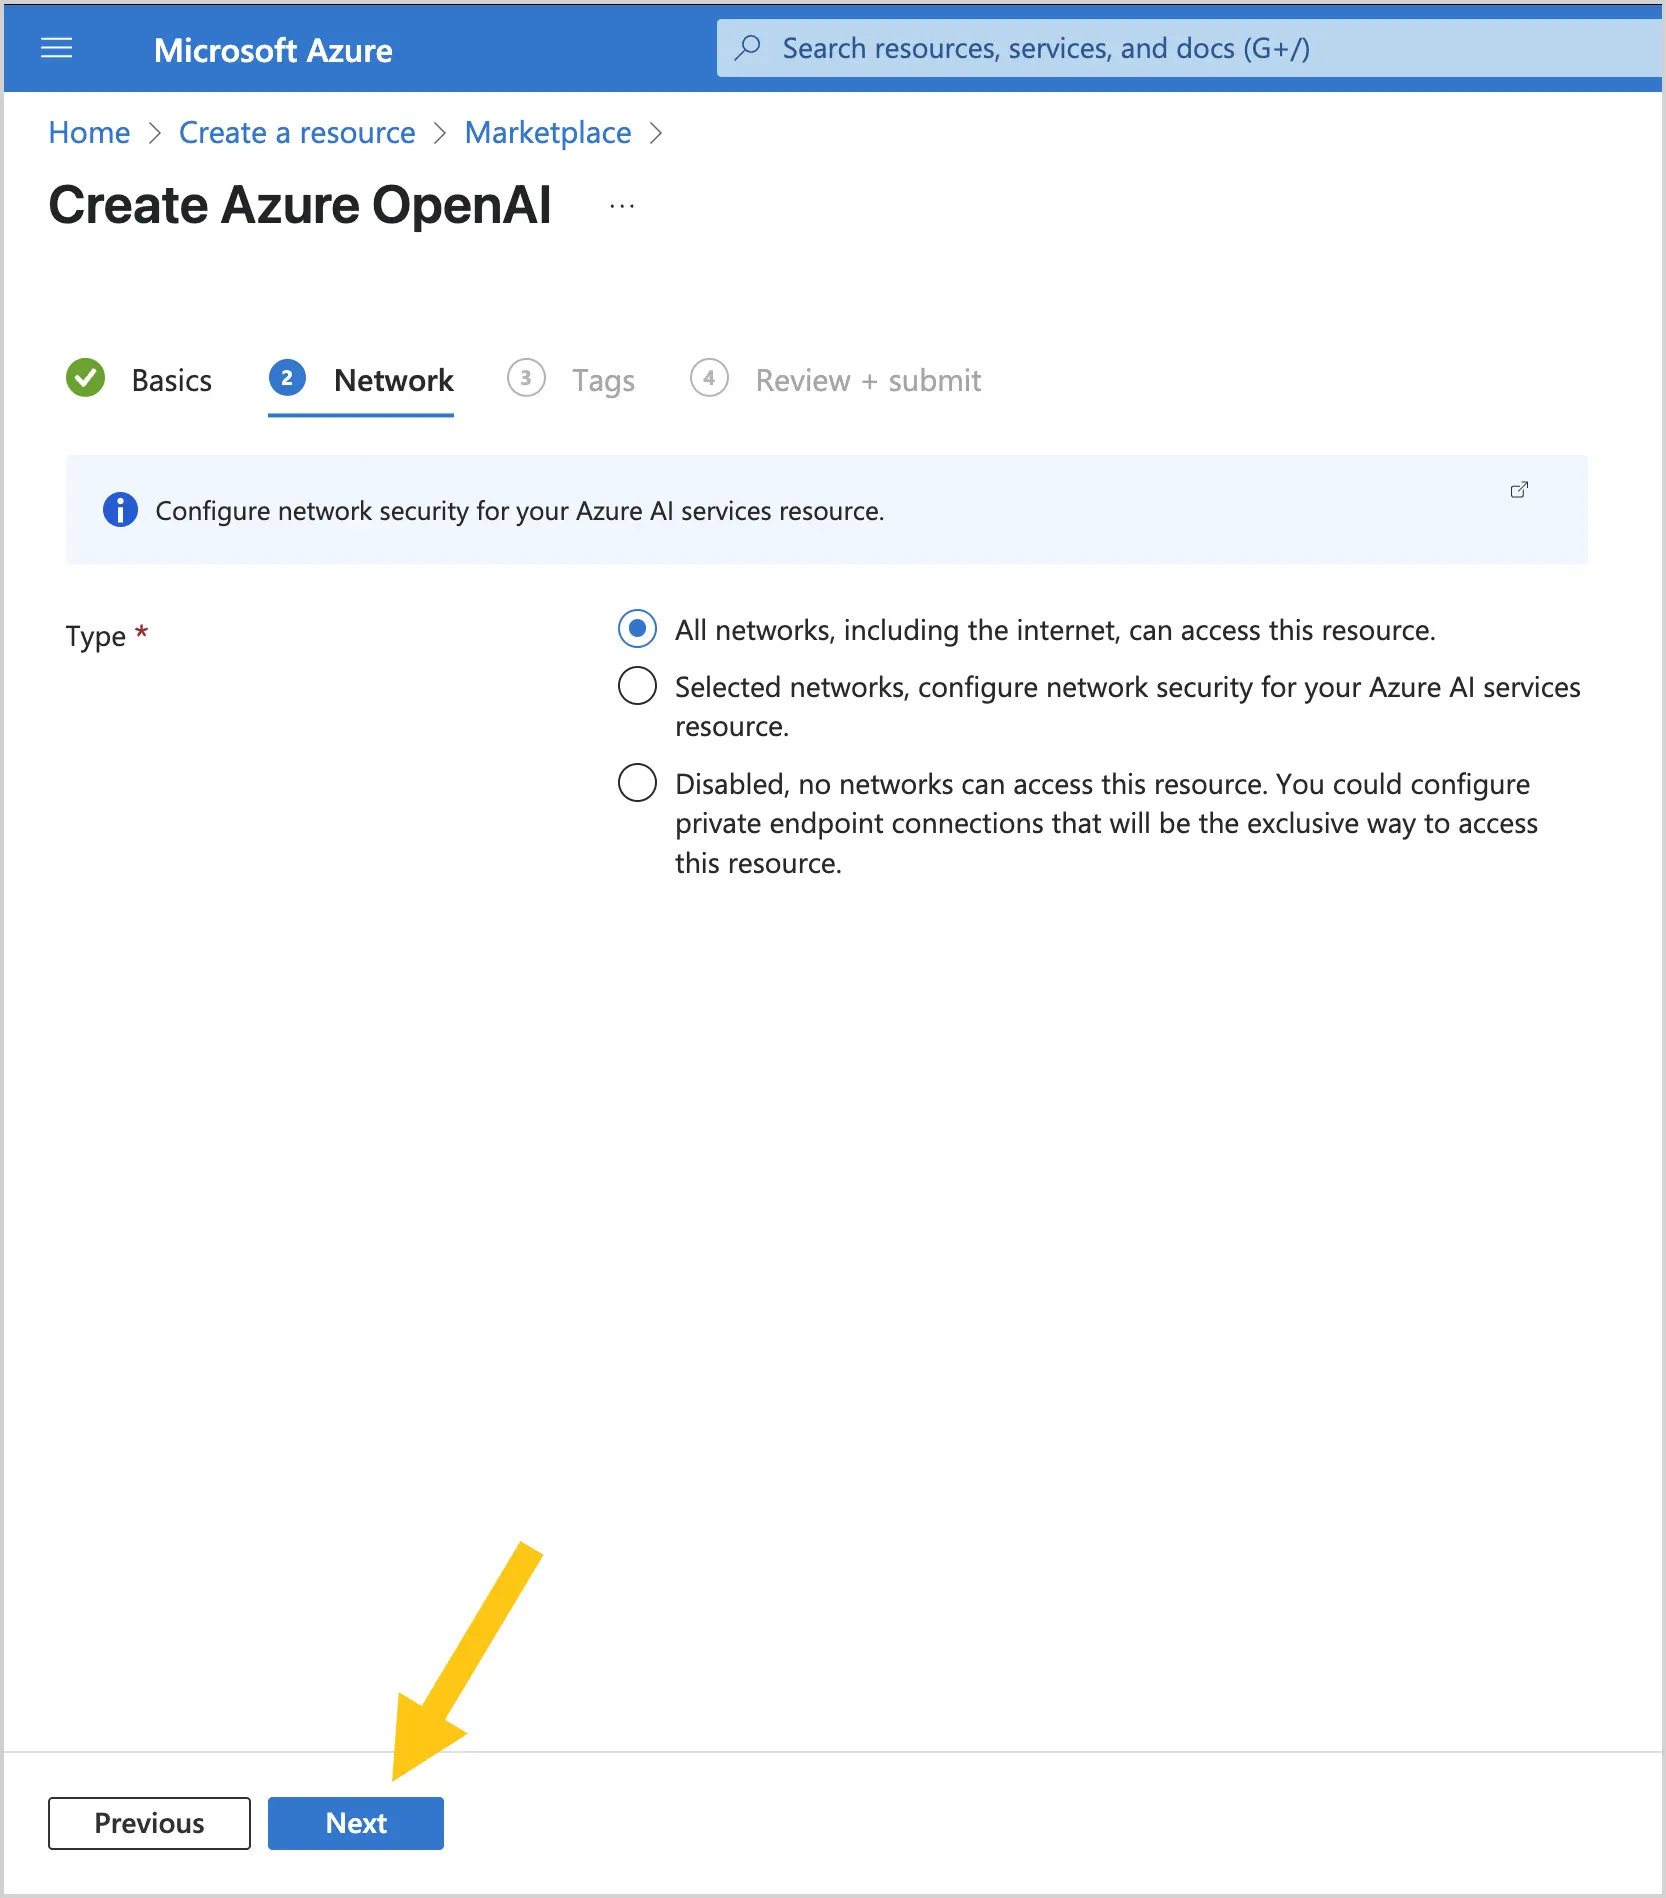
Select the Next button.
-
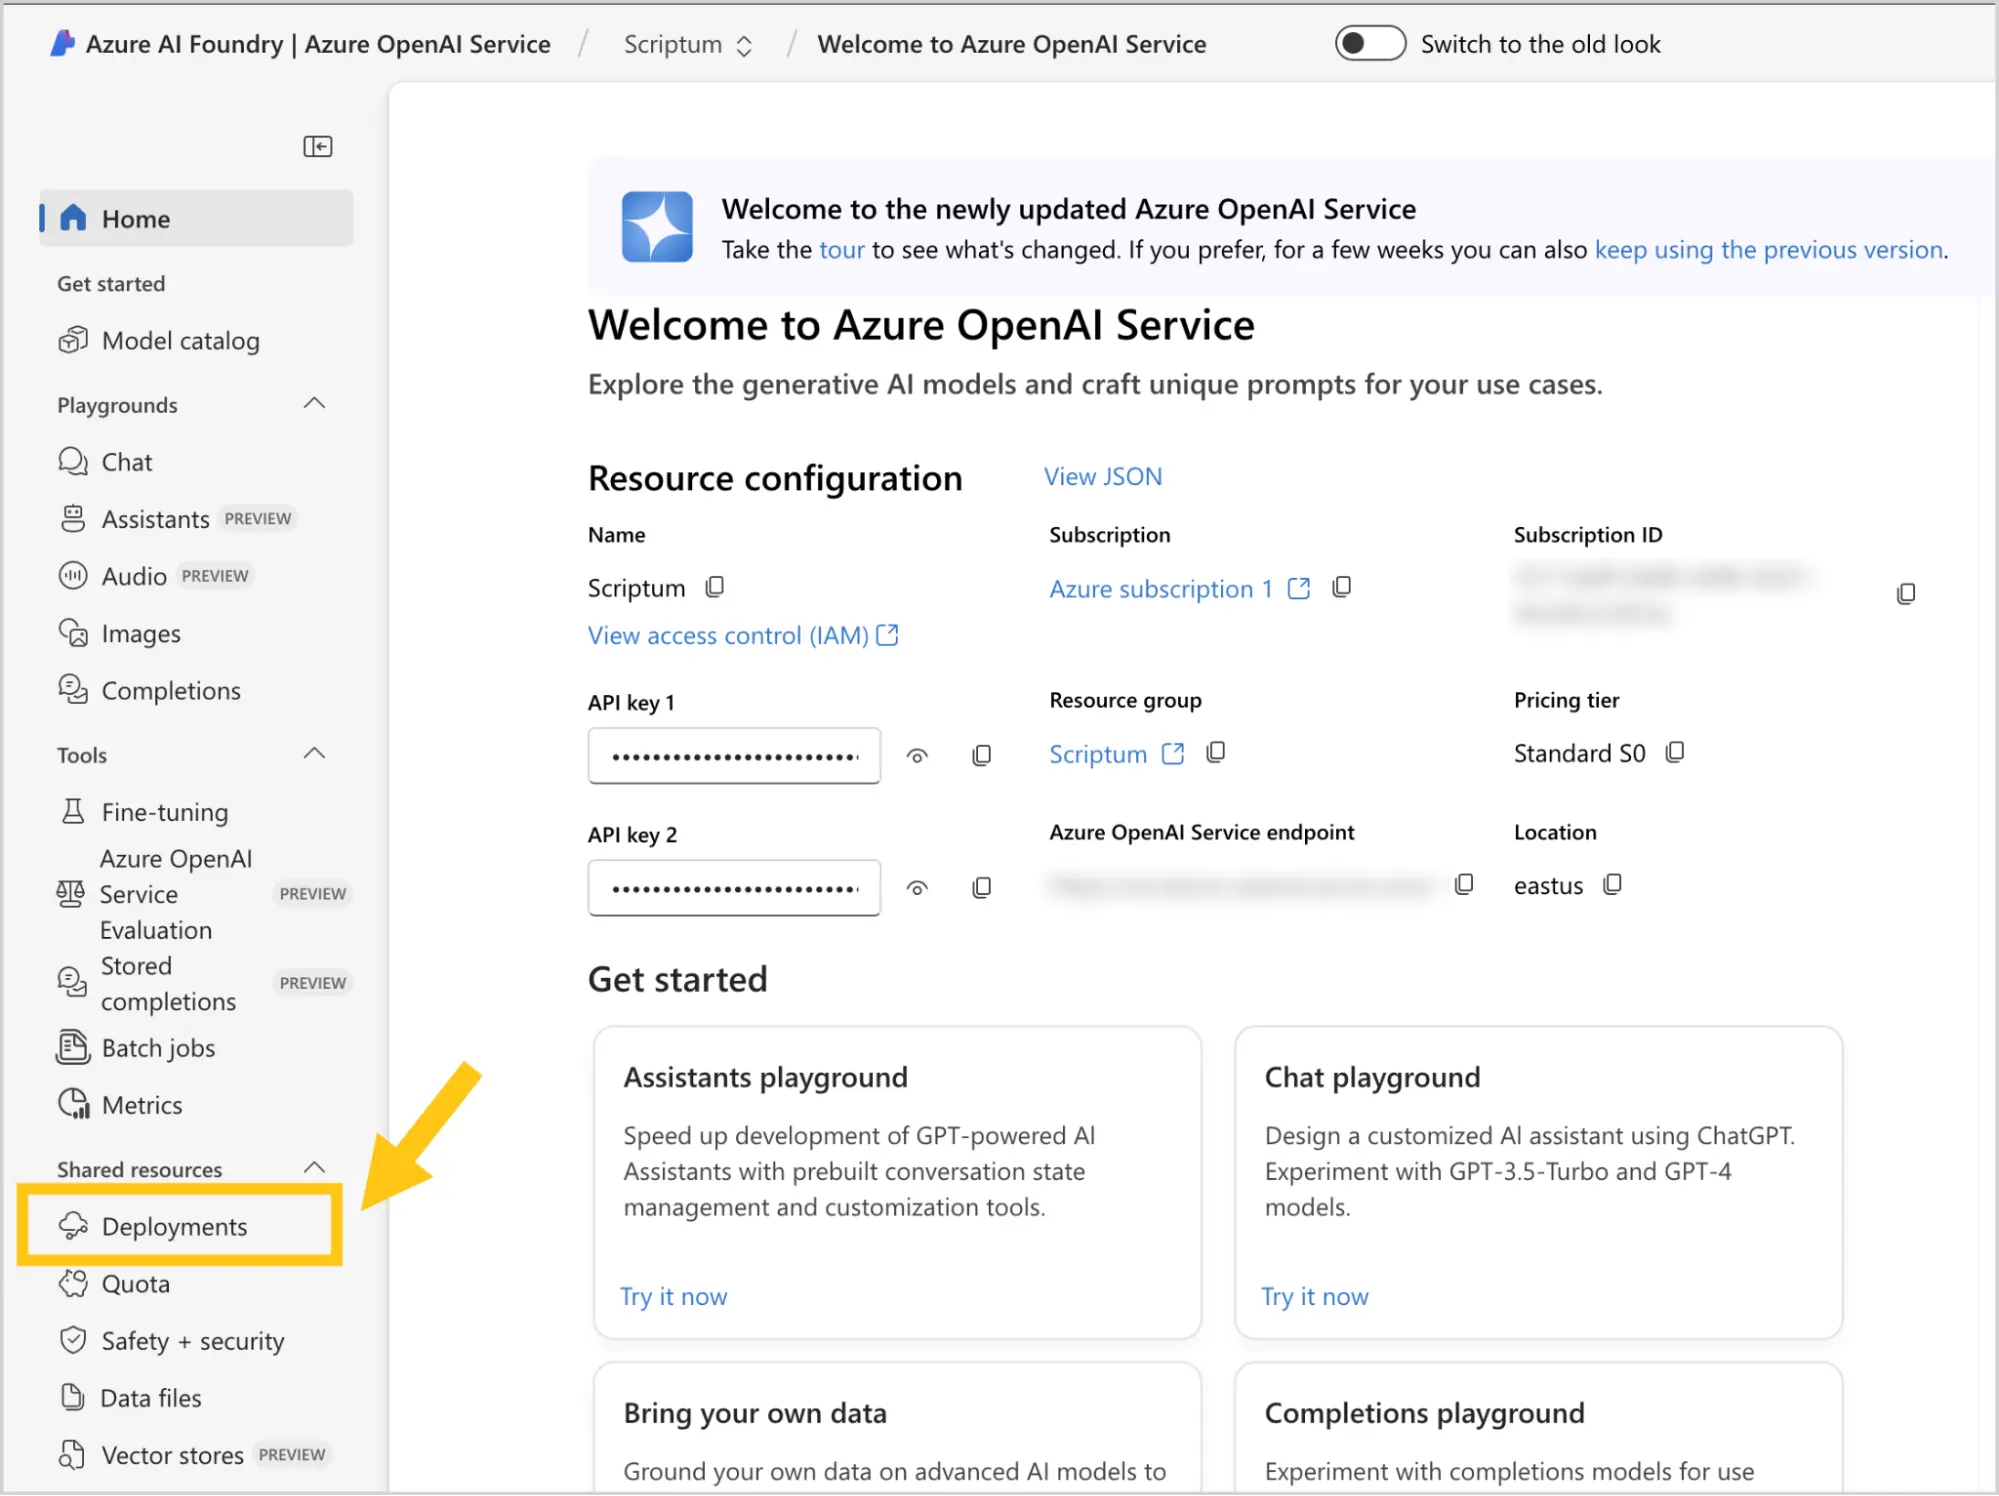
Select the Deployments tab.
-
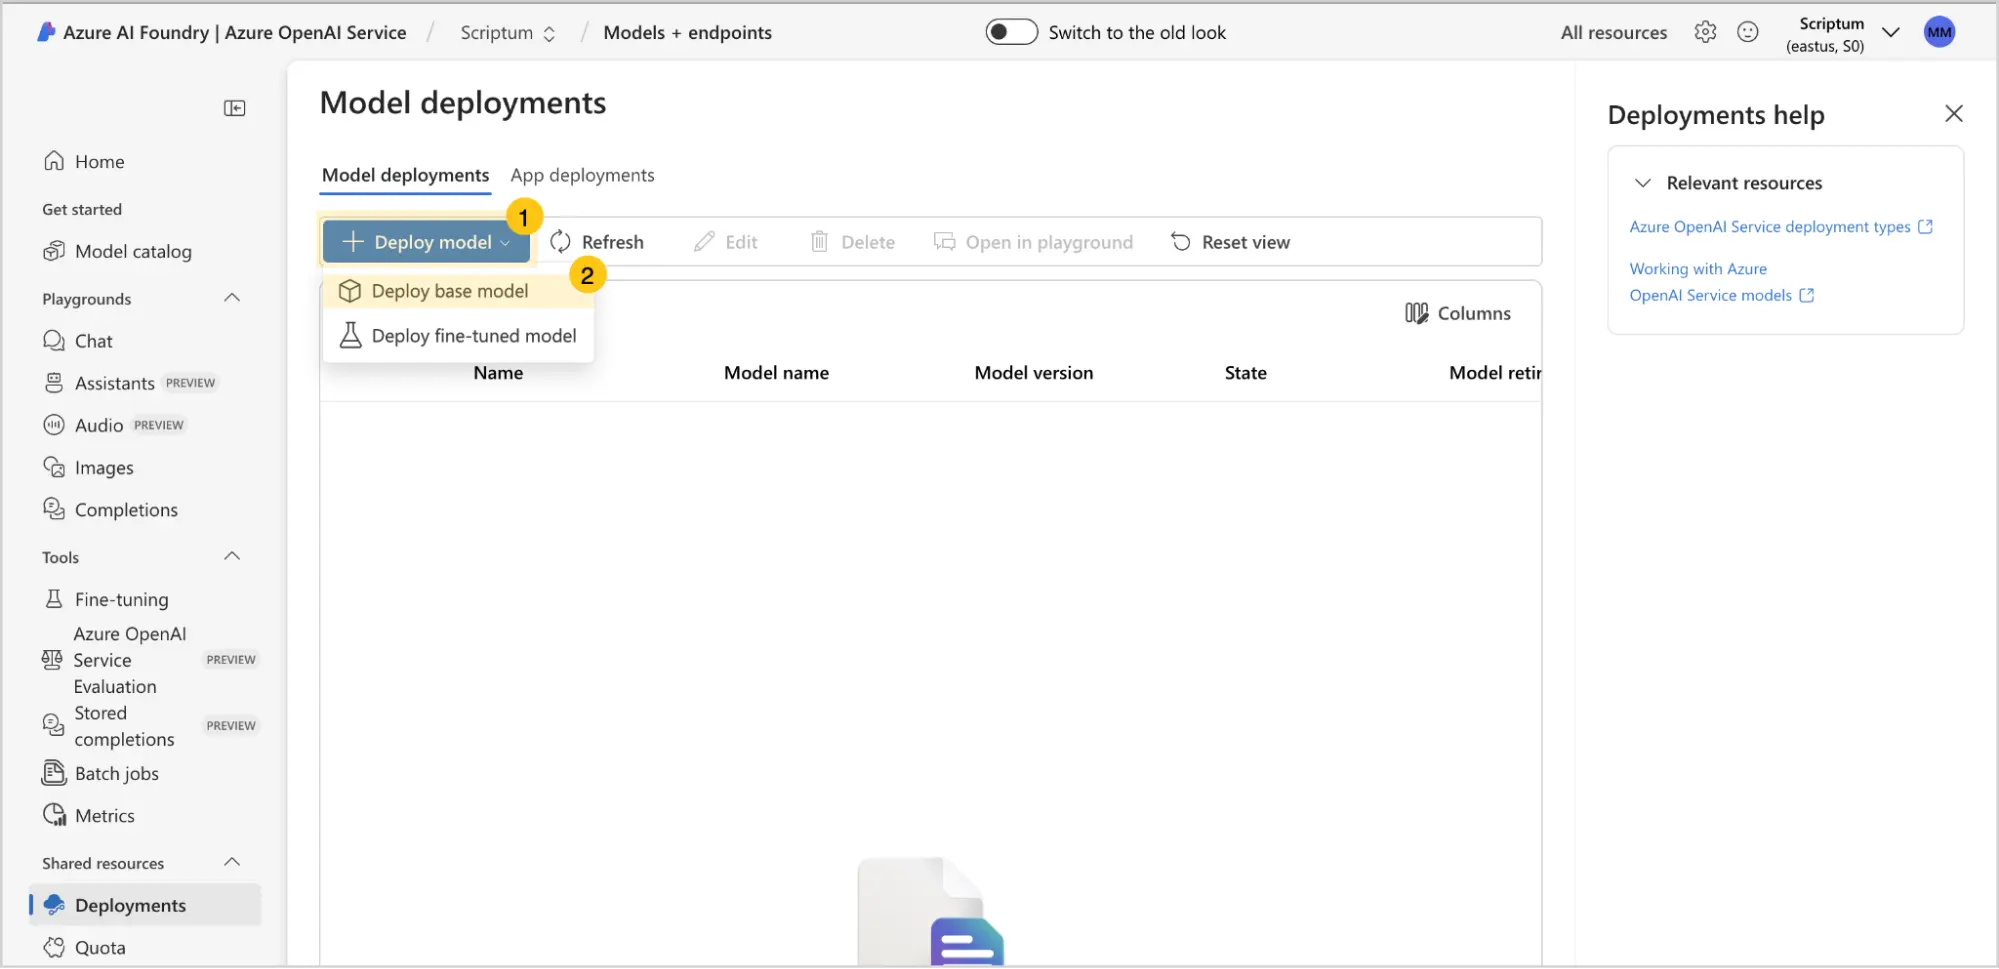
Select the Deploy model 1 button, then select Deploy base model 2.
-
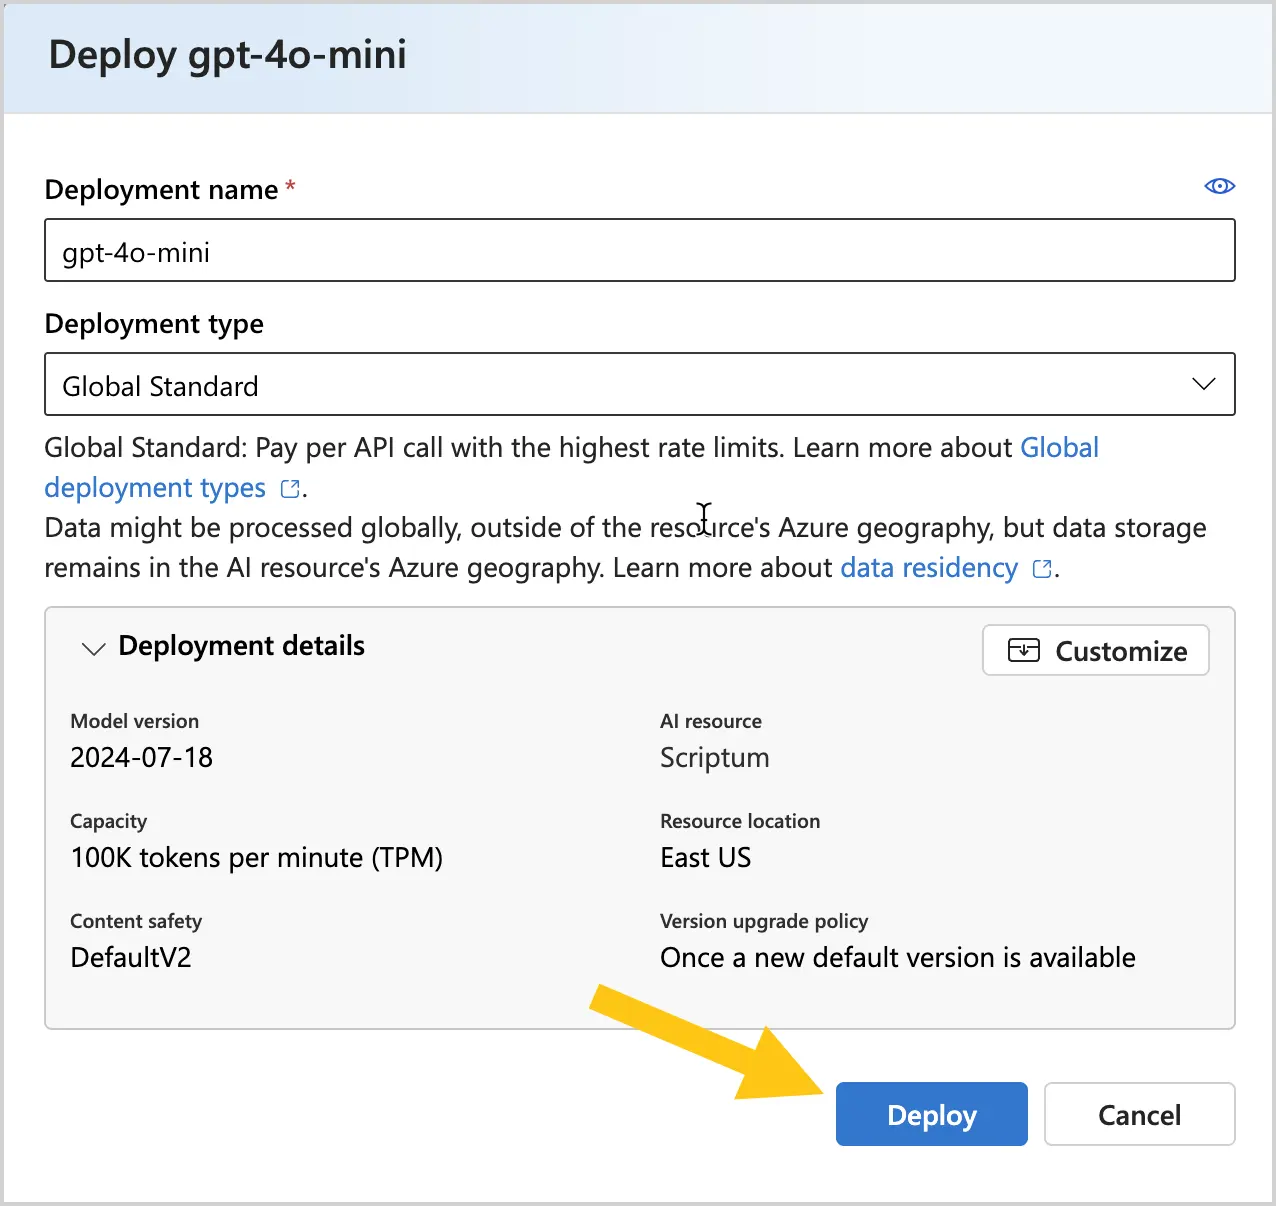
Select the Deploy button.
-
Select the
 icon to copy the key.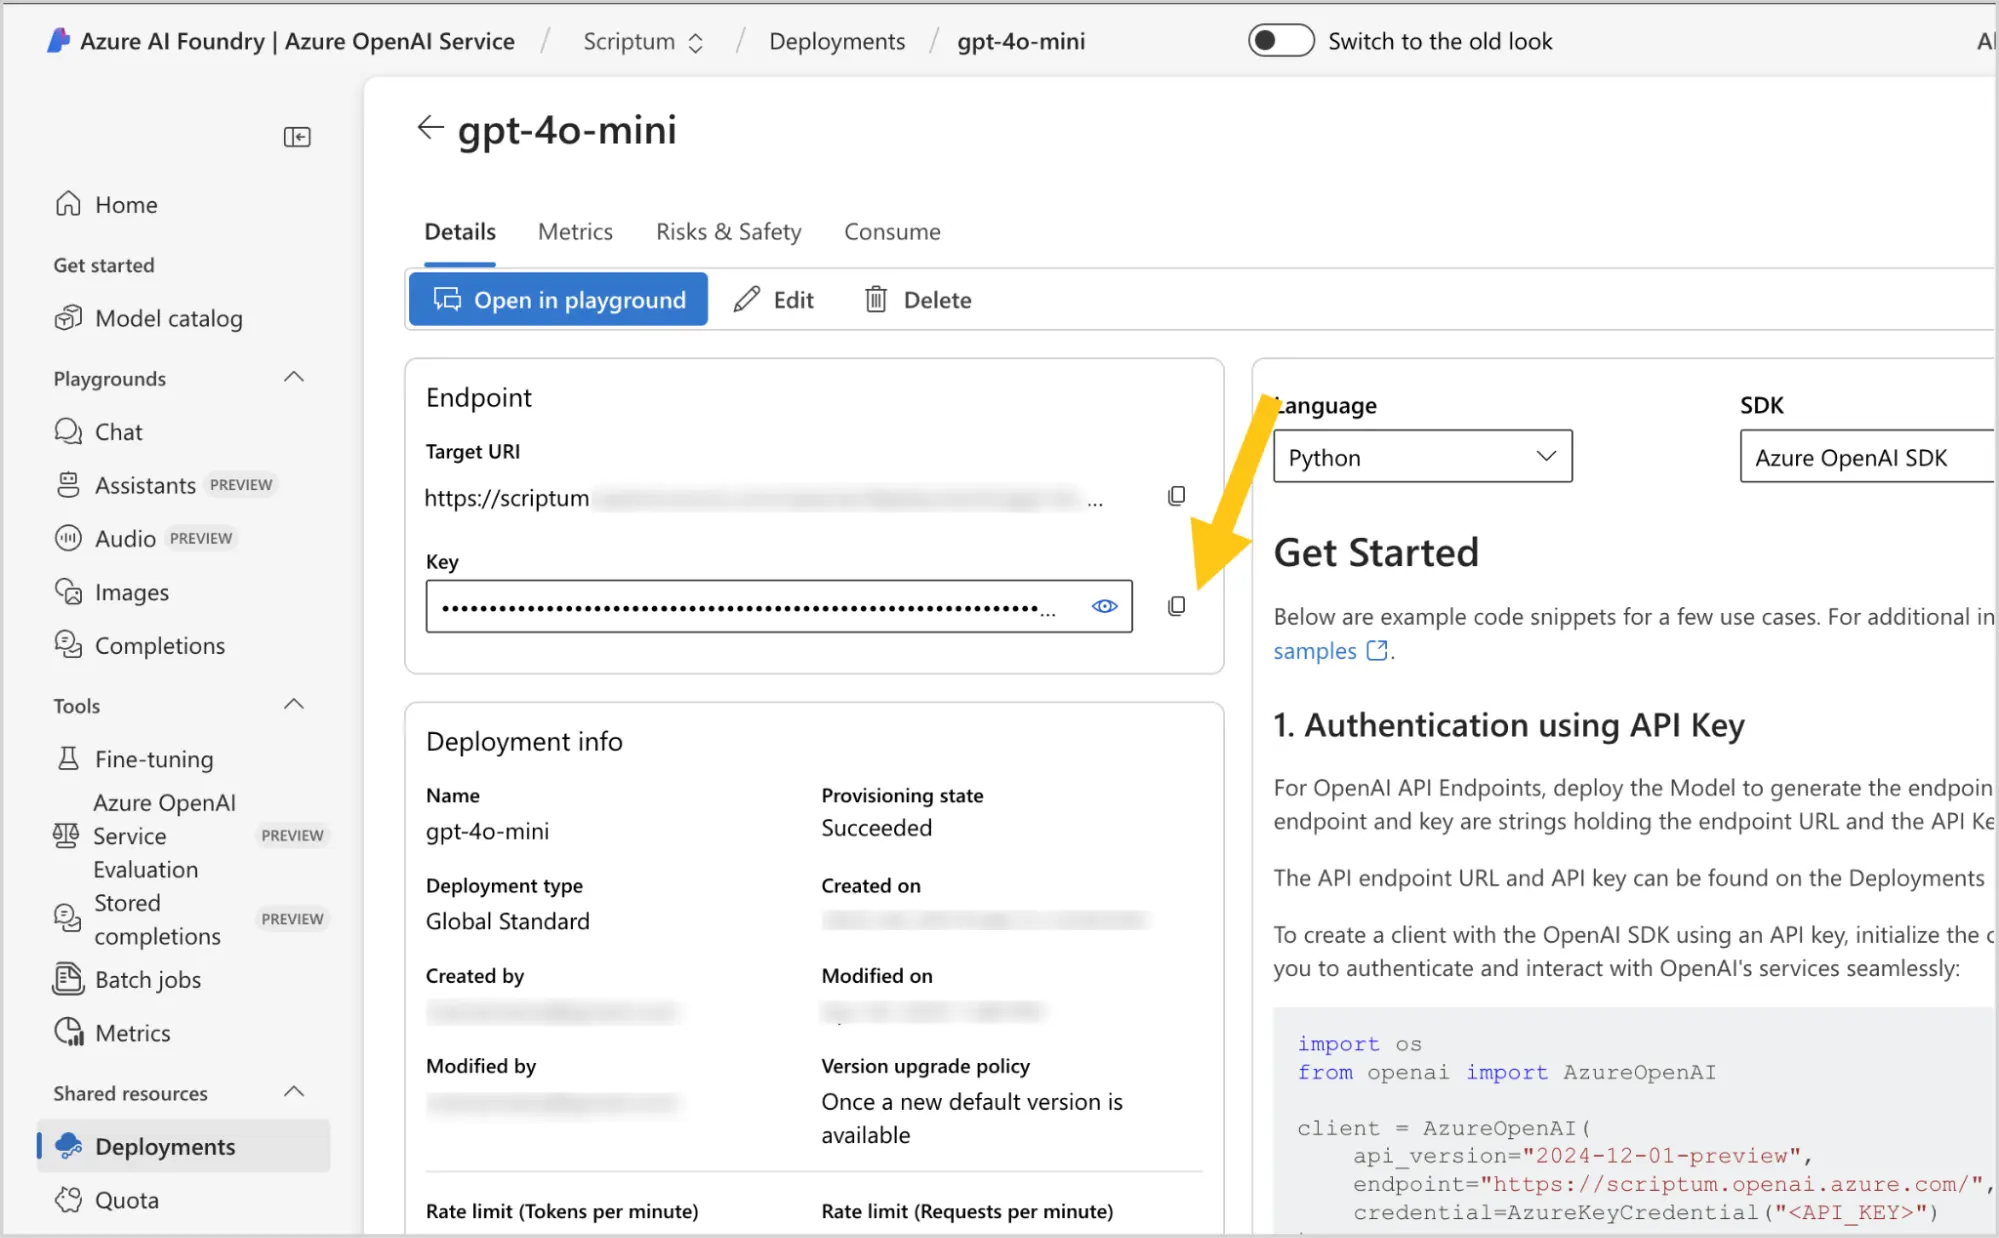
-
Paste this key using Ctrl+V into a safe location, such as a notes app. You will need this key in the subsequent configuration steps.
-
Proceed to the next configuration step: Add an AI Model.
DeepSeek platform
-
Go to the DeepSeek platform website.
-
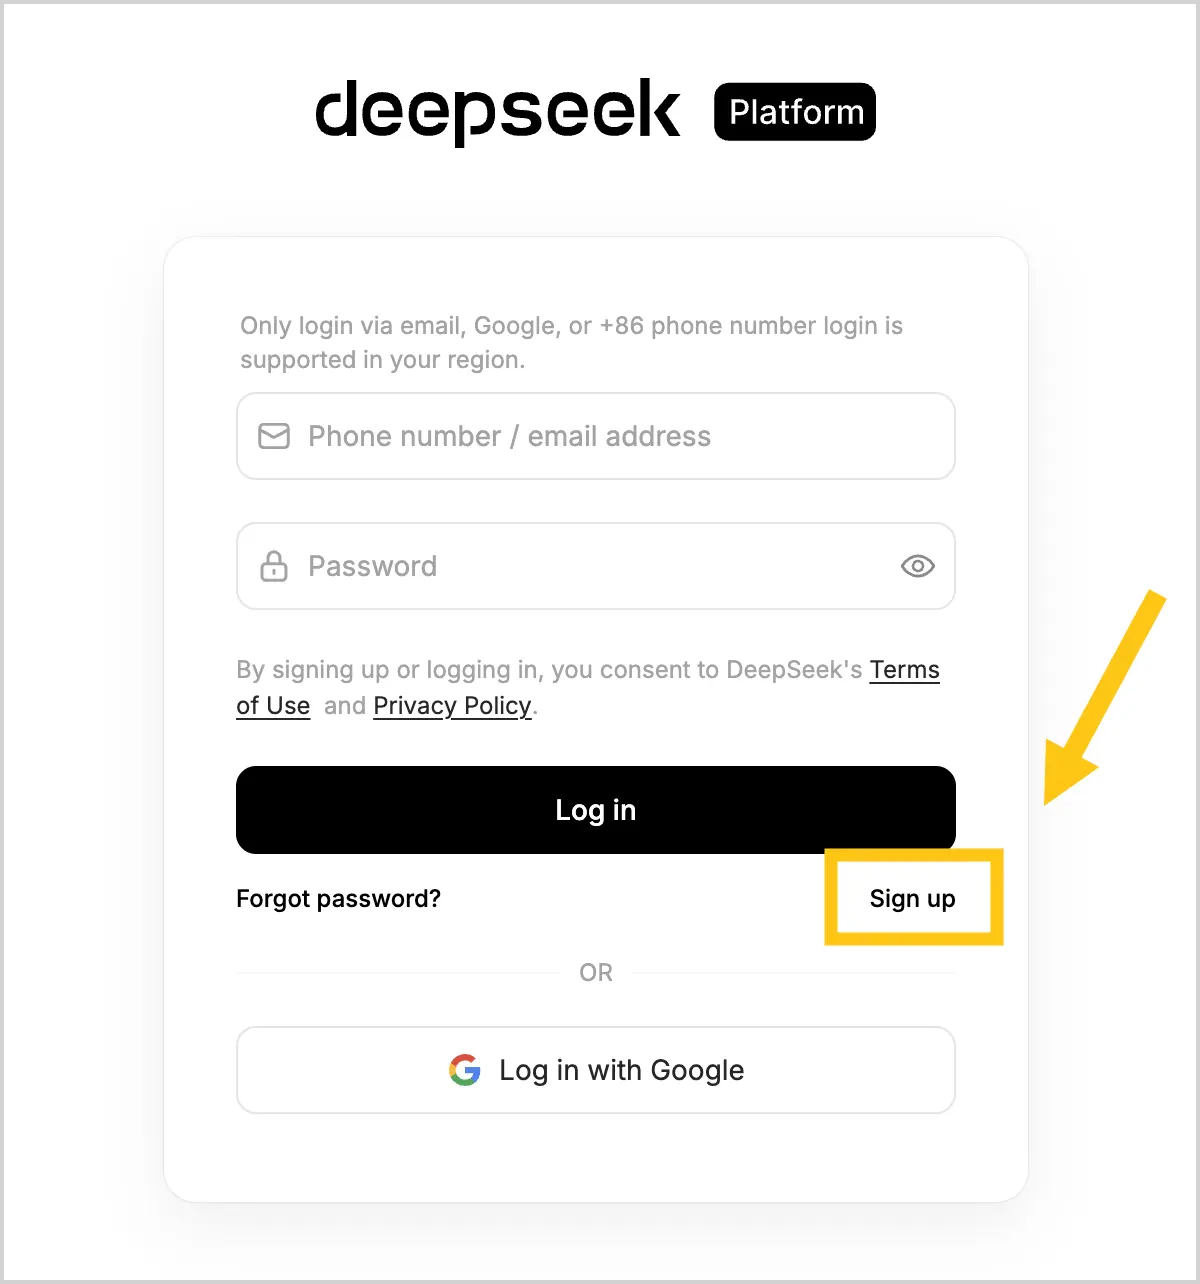
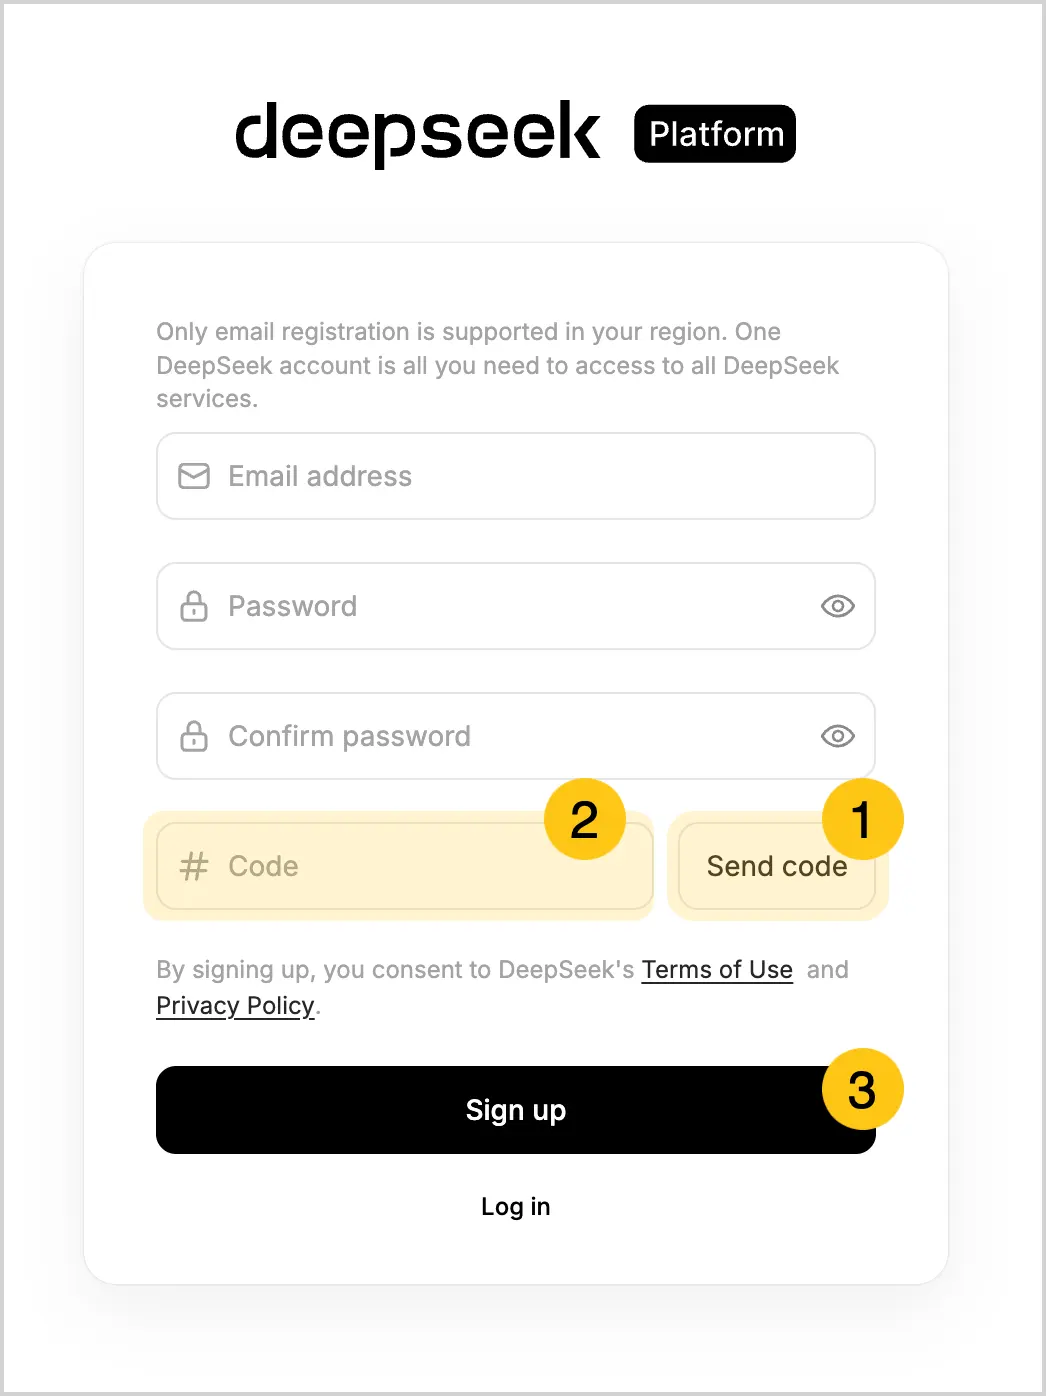
Select the Sign up button to register.
-
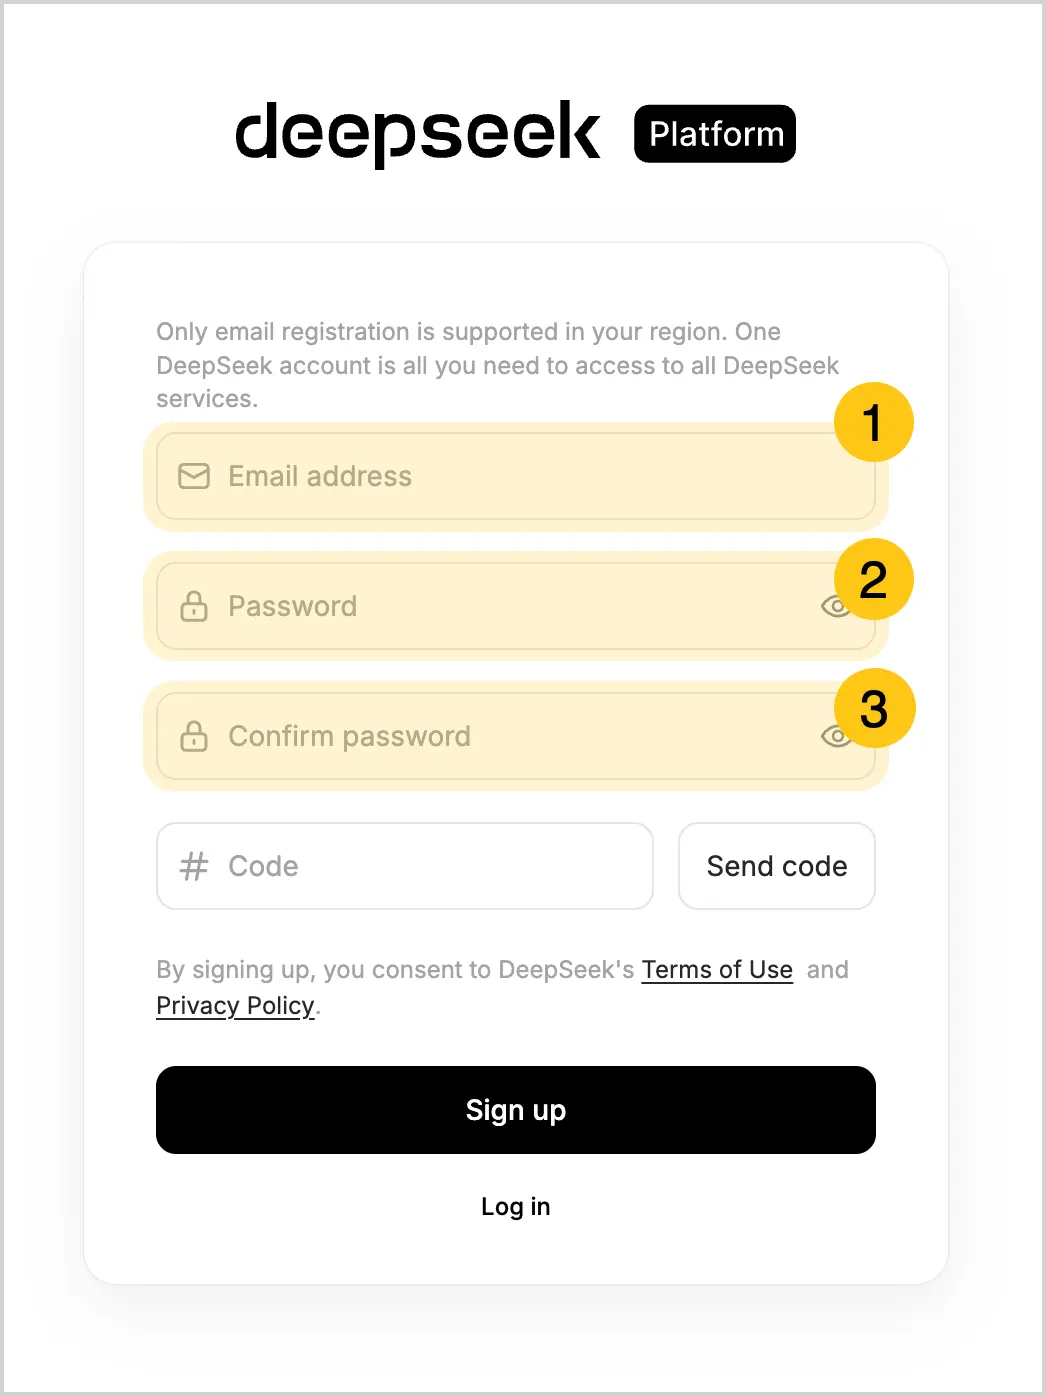
In the Email address 1 field, enter your email address.
-
In the Password 2 field, enter your desired password, then in the Confirm password 3 field, enter your password again.
-
Select the Send code 1 button to verify your email address. A six-digit code will be sent to the email address you provided.
-
In the Code 2 field, enter the code sent to your email, then select the Sign up 3 button to complete registration.
-
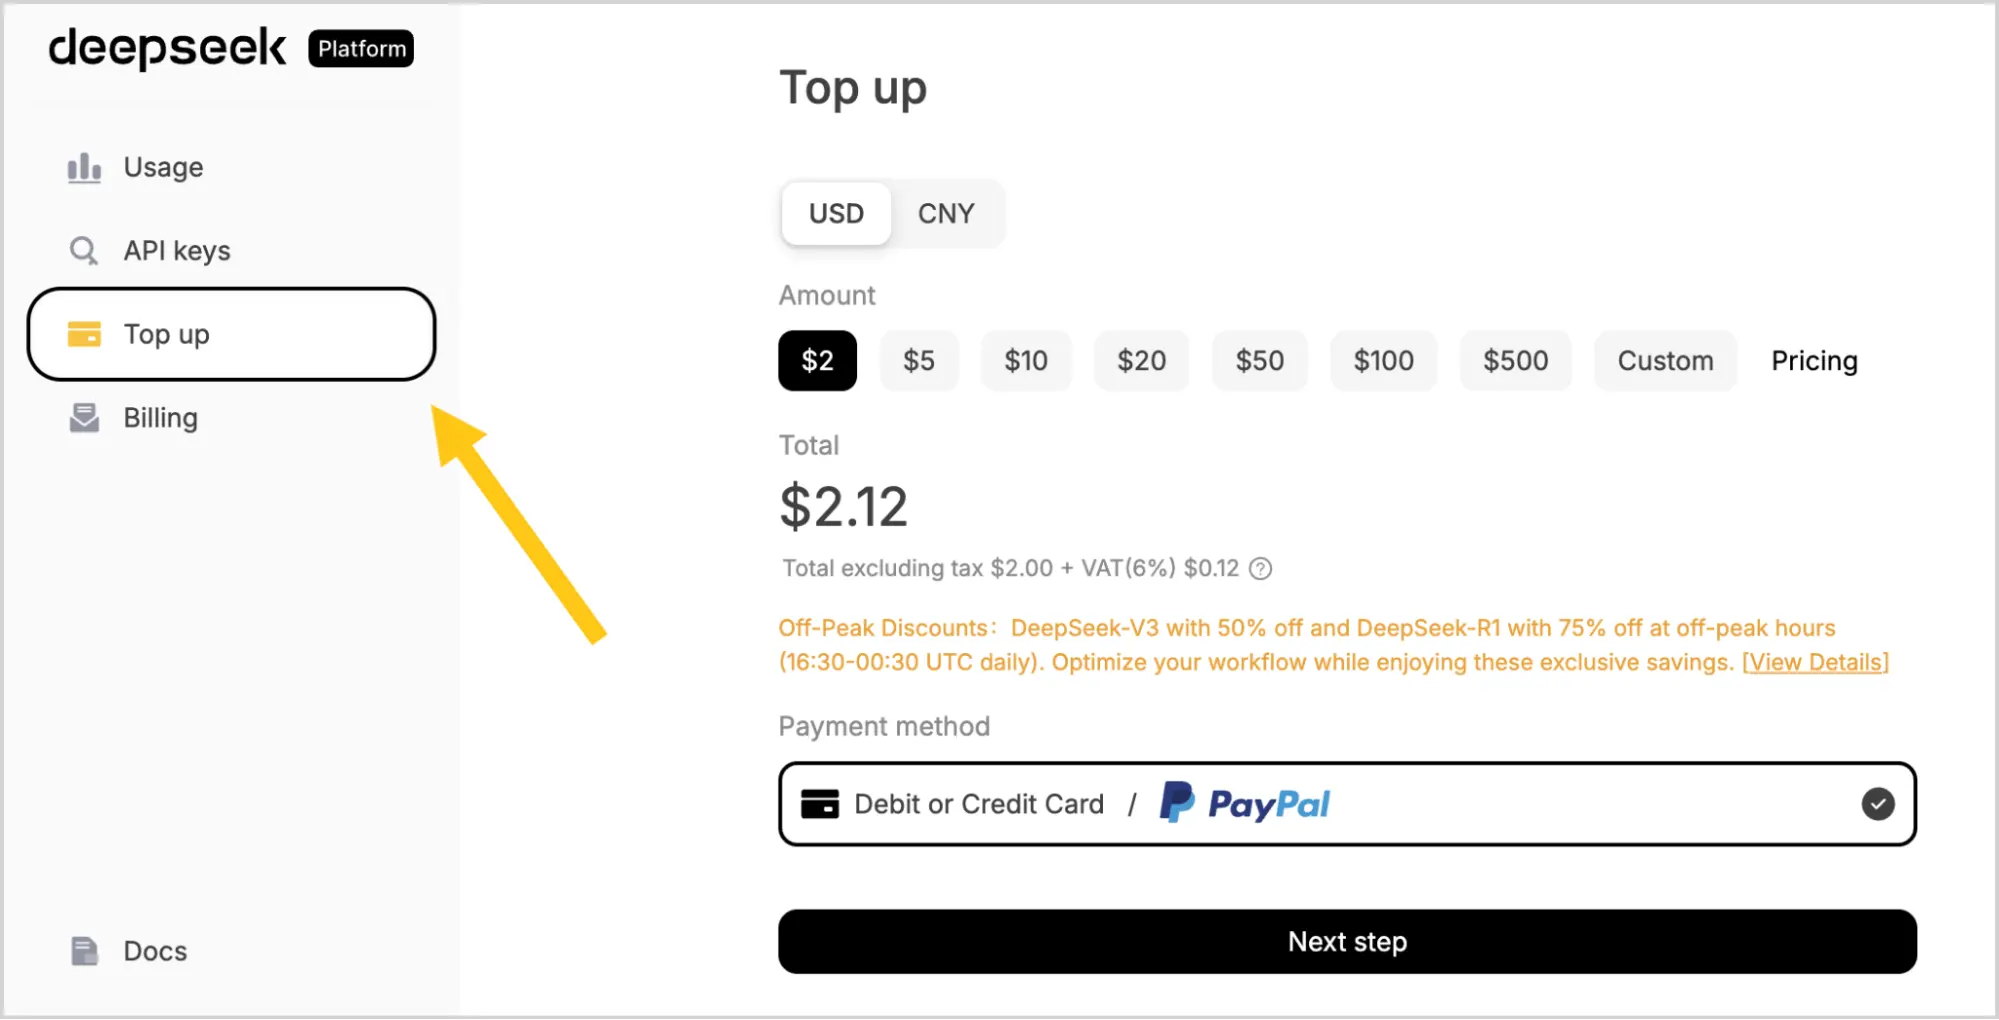
Go to the Top up section.
-
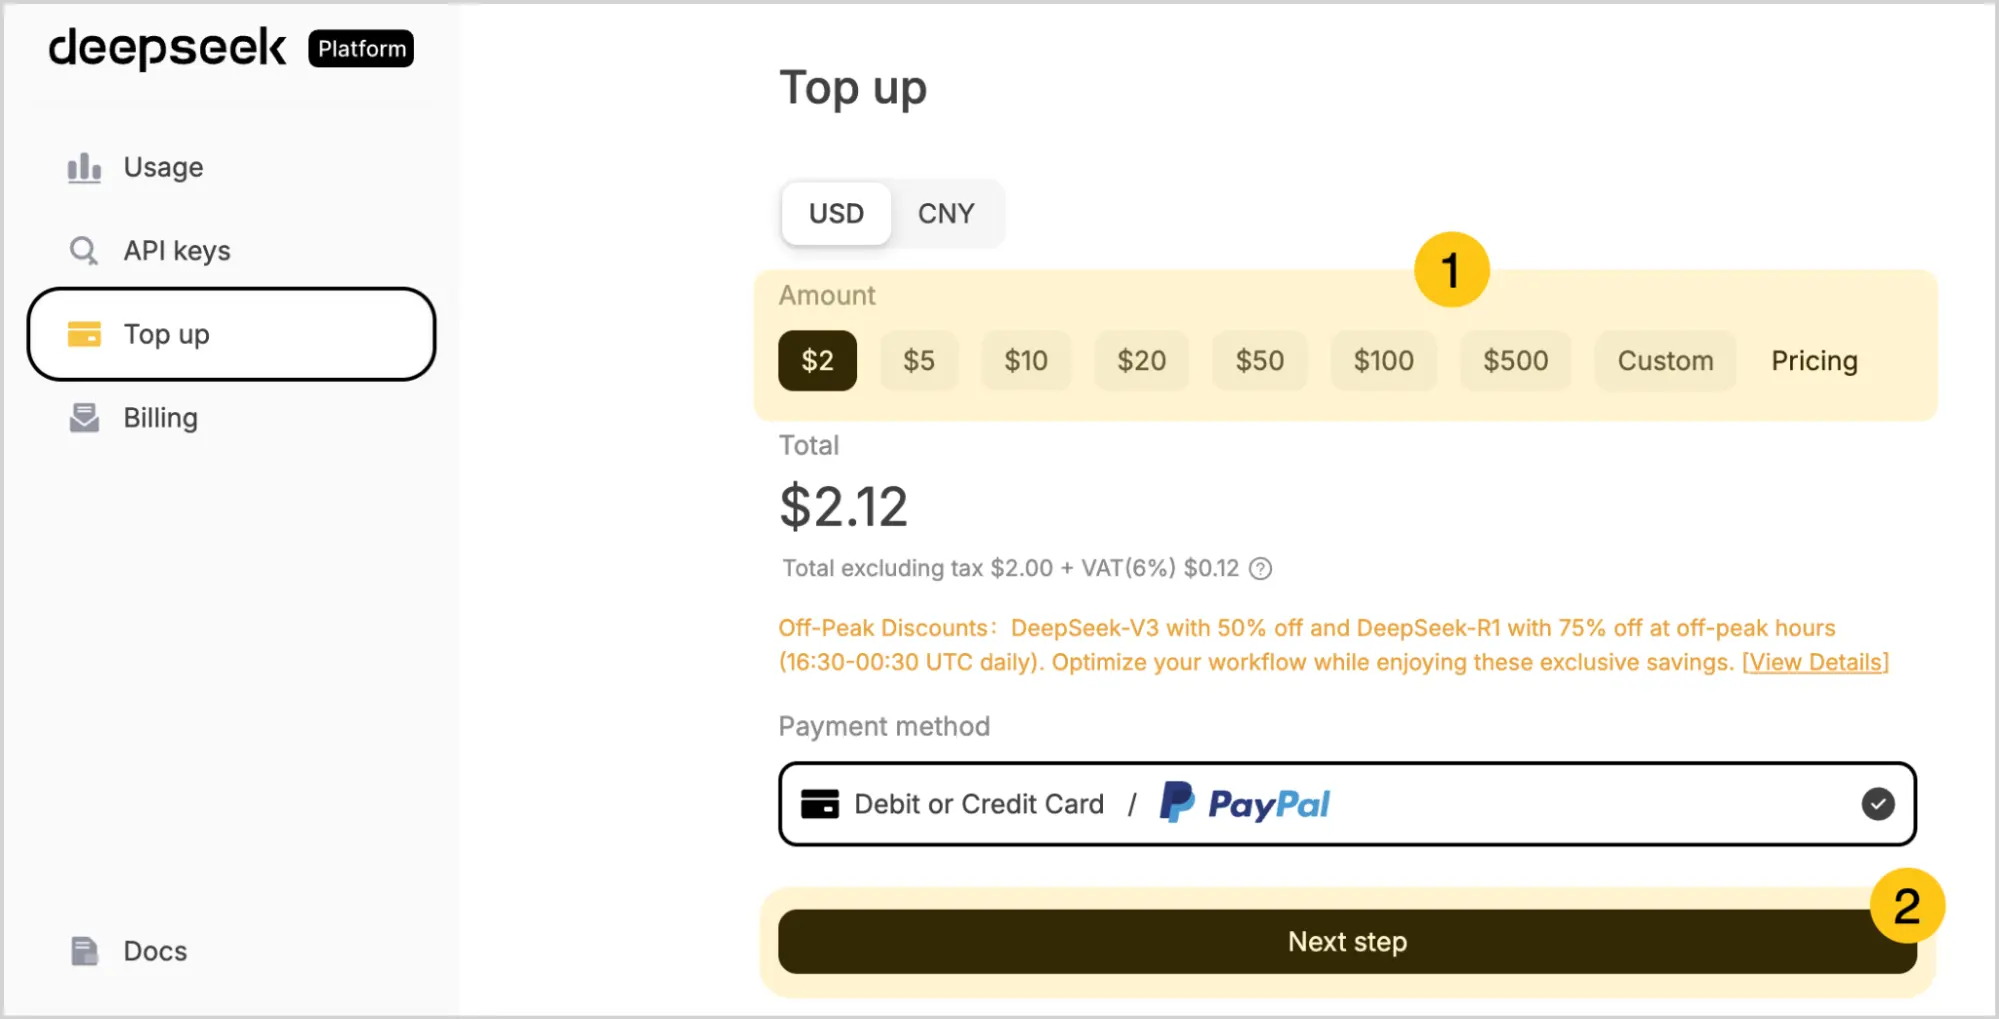
In the Amount 1 section, select the amount you want to add to your balance.
-
Select the Next step 2 button.
-
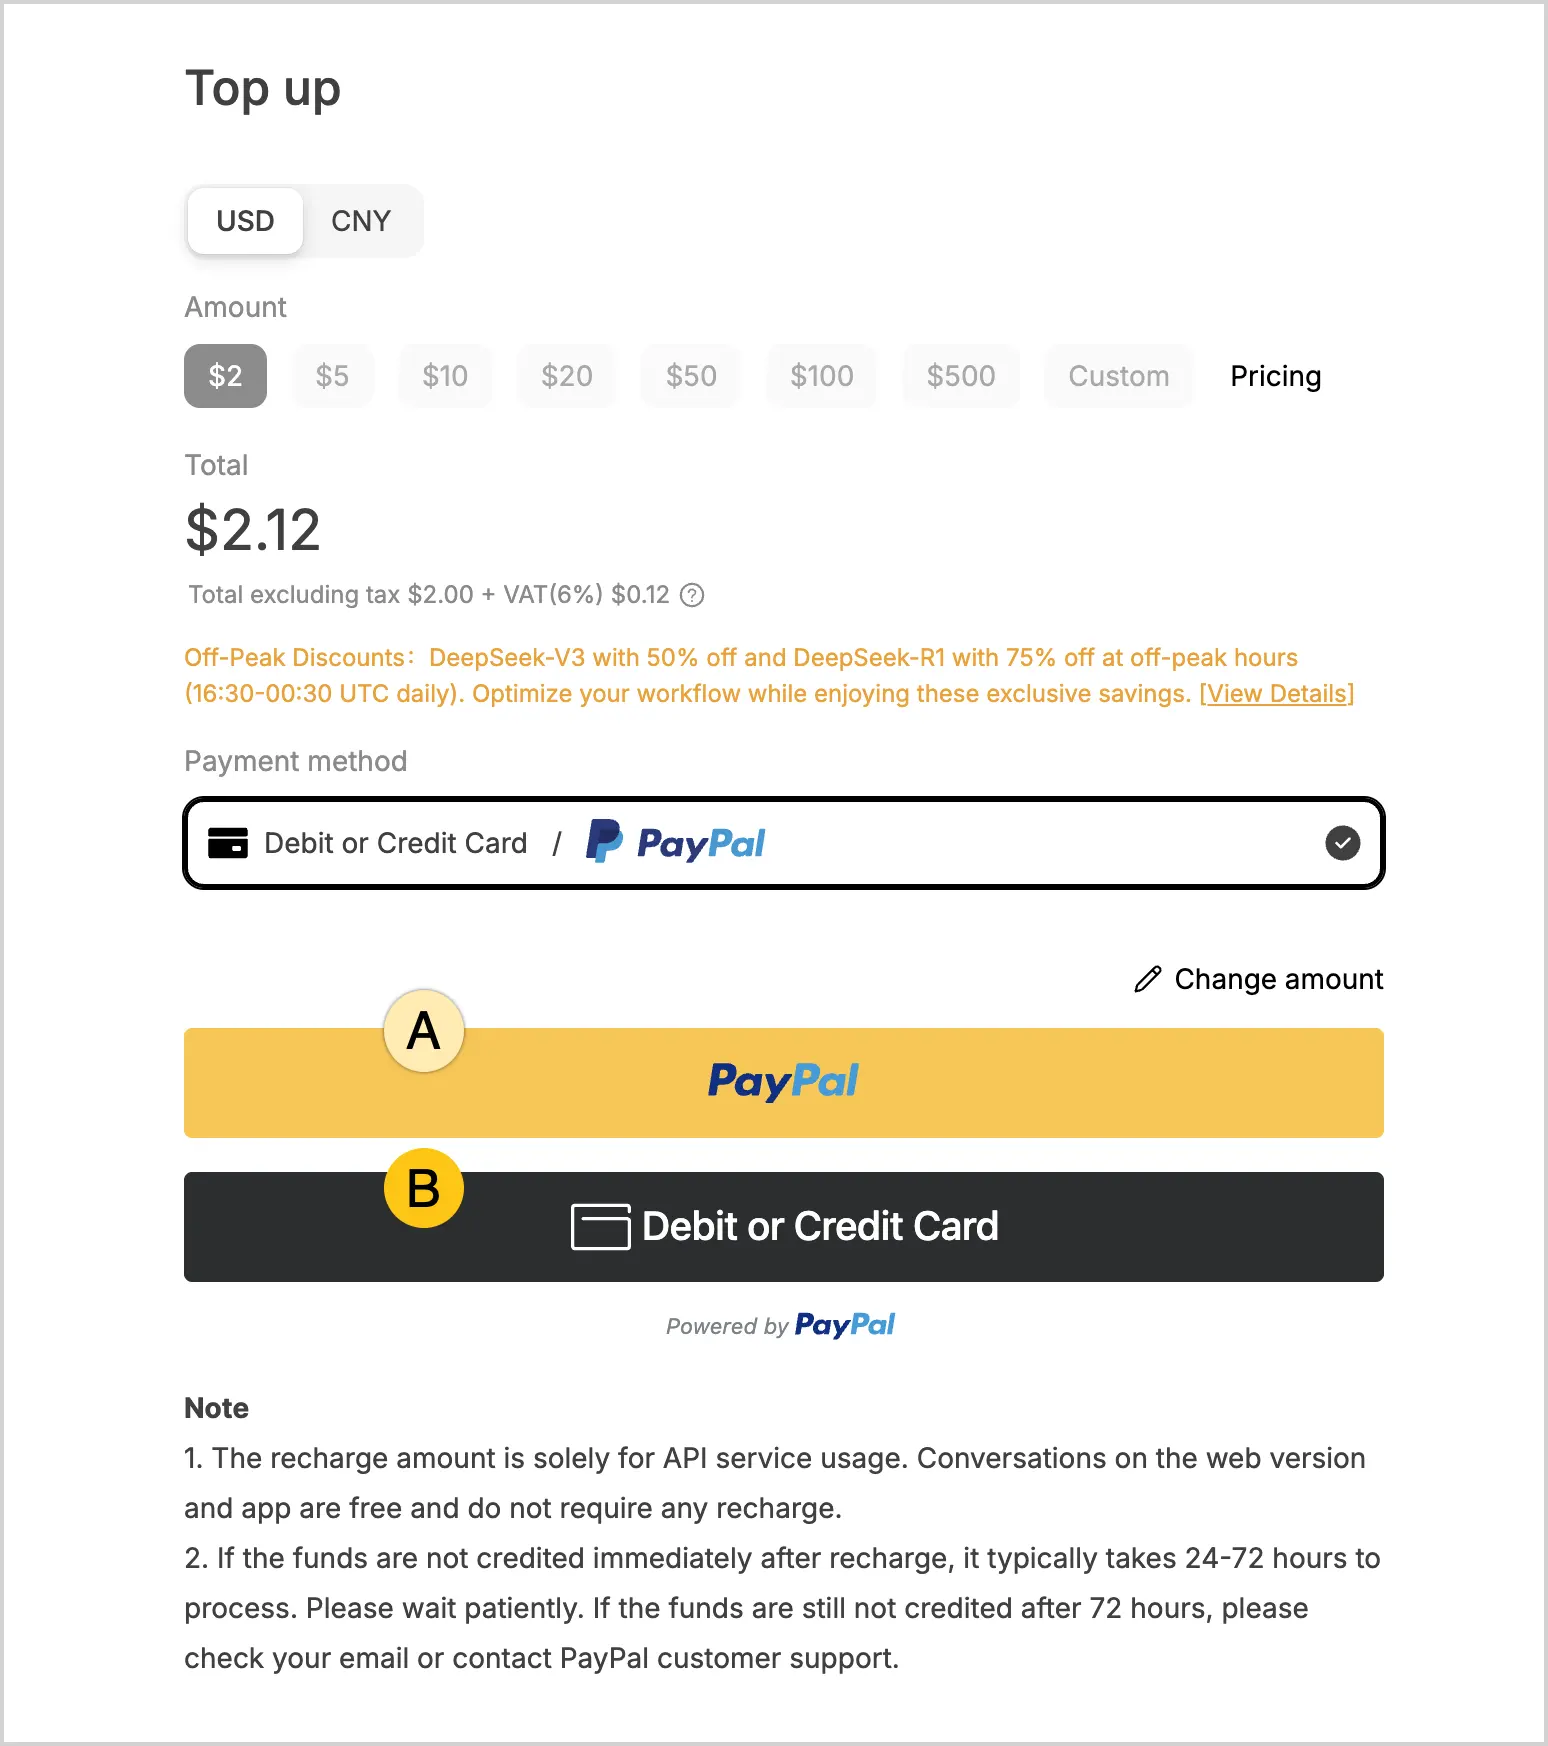
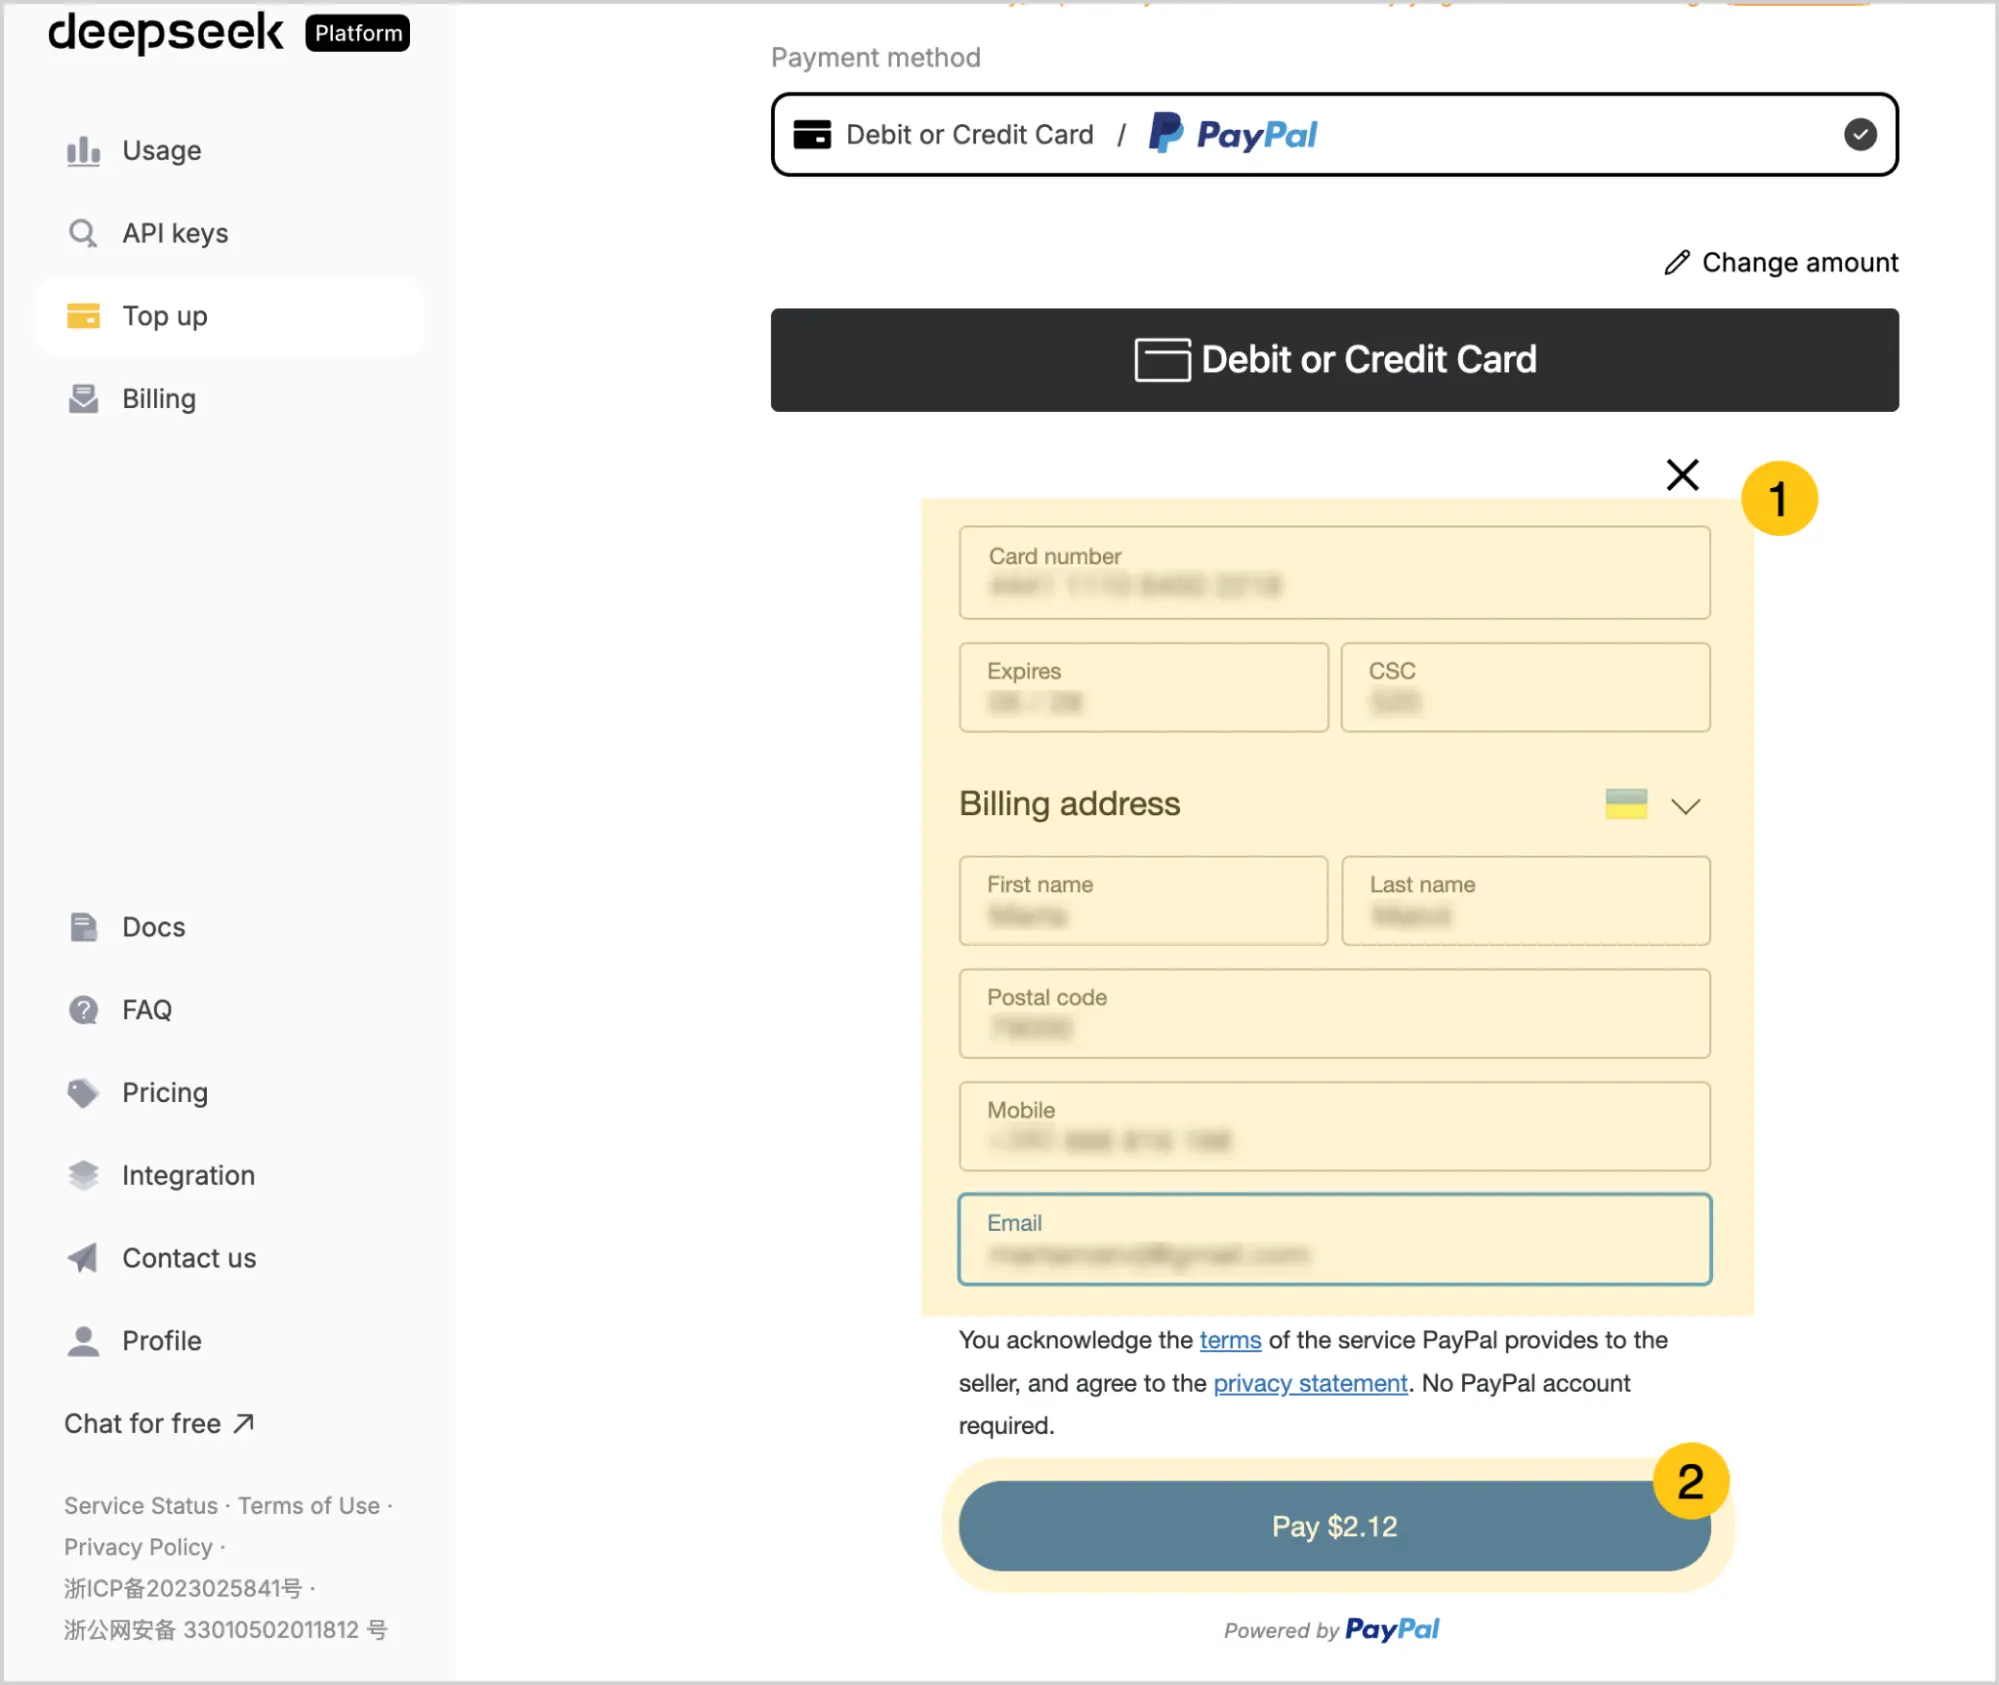
Select one of the available payment methods: PayPal A or bank card B.
-
Enter your payment details 1, then select the Pay 2 button.
-
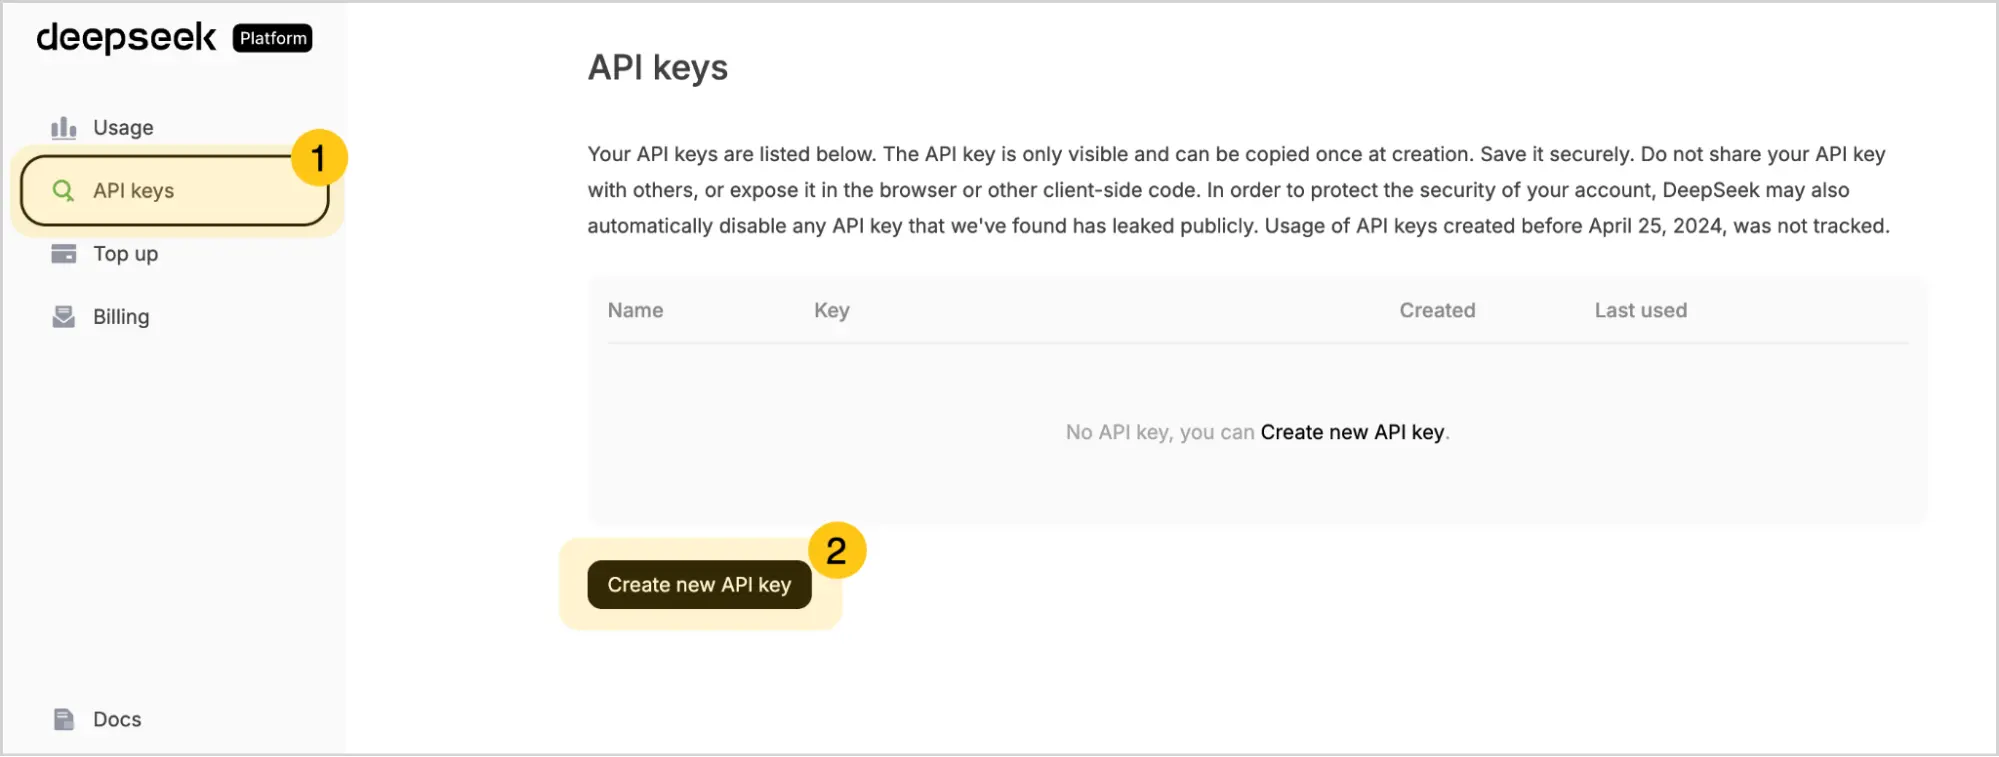
Go to the API keys 1 section, then select the Create new API key 2 button.
-
In the Name field, enter any name for the key, then select the Create API key button.

-
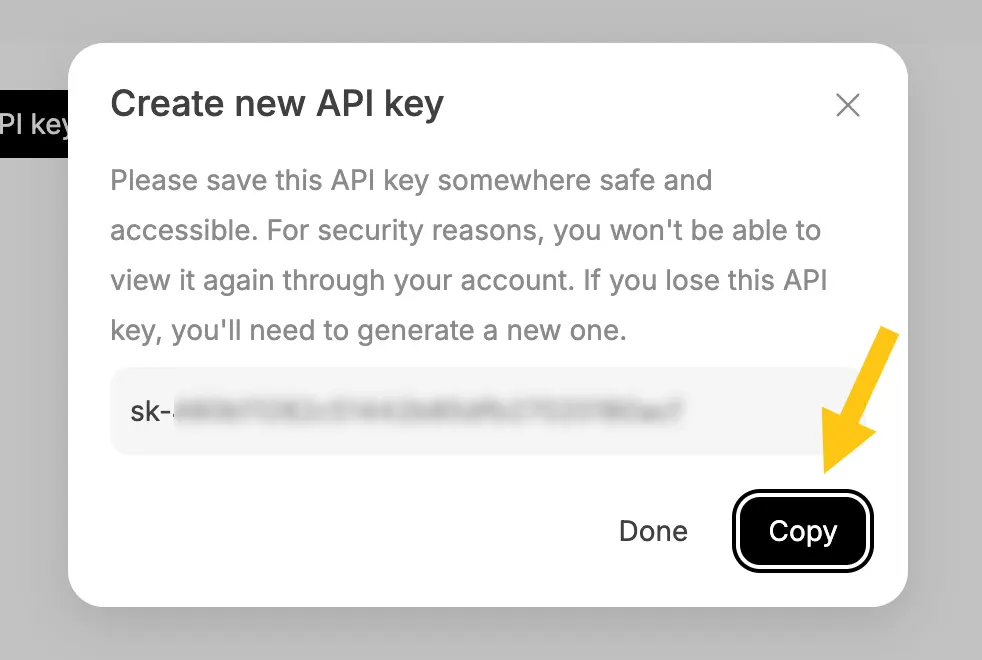
In the Create new API key window, select the Copy button to copy the generated key.
-
Paste this key using Ctrl+V into a safe location, such as a notes app. You will need this key in the subsequent configuration steps.
Warning:After closing this window, for security reasons, you will no longer be able to see this key in the DeepSeek platform. If you do not save the key, you will need to generate a new one.
-
Proceed to the next configuration step: Add an AI Model.
Grok platform
-
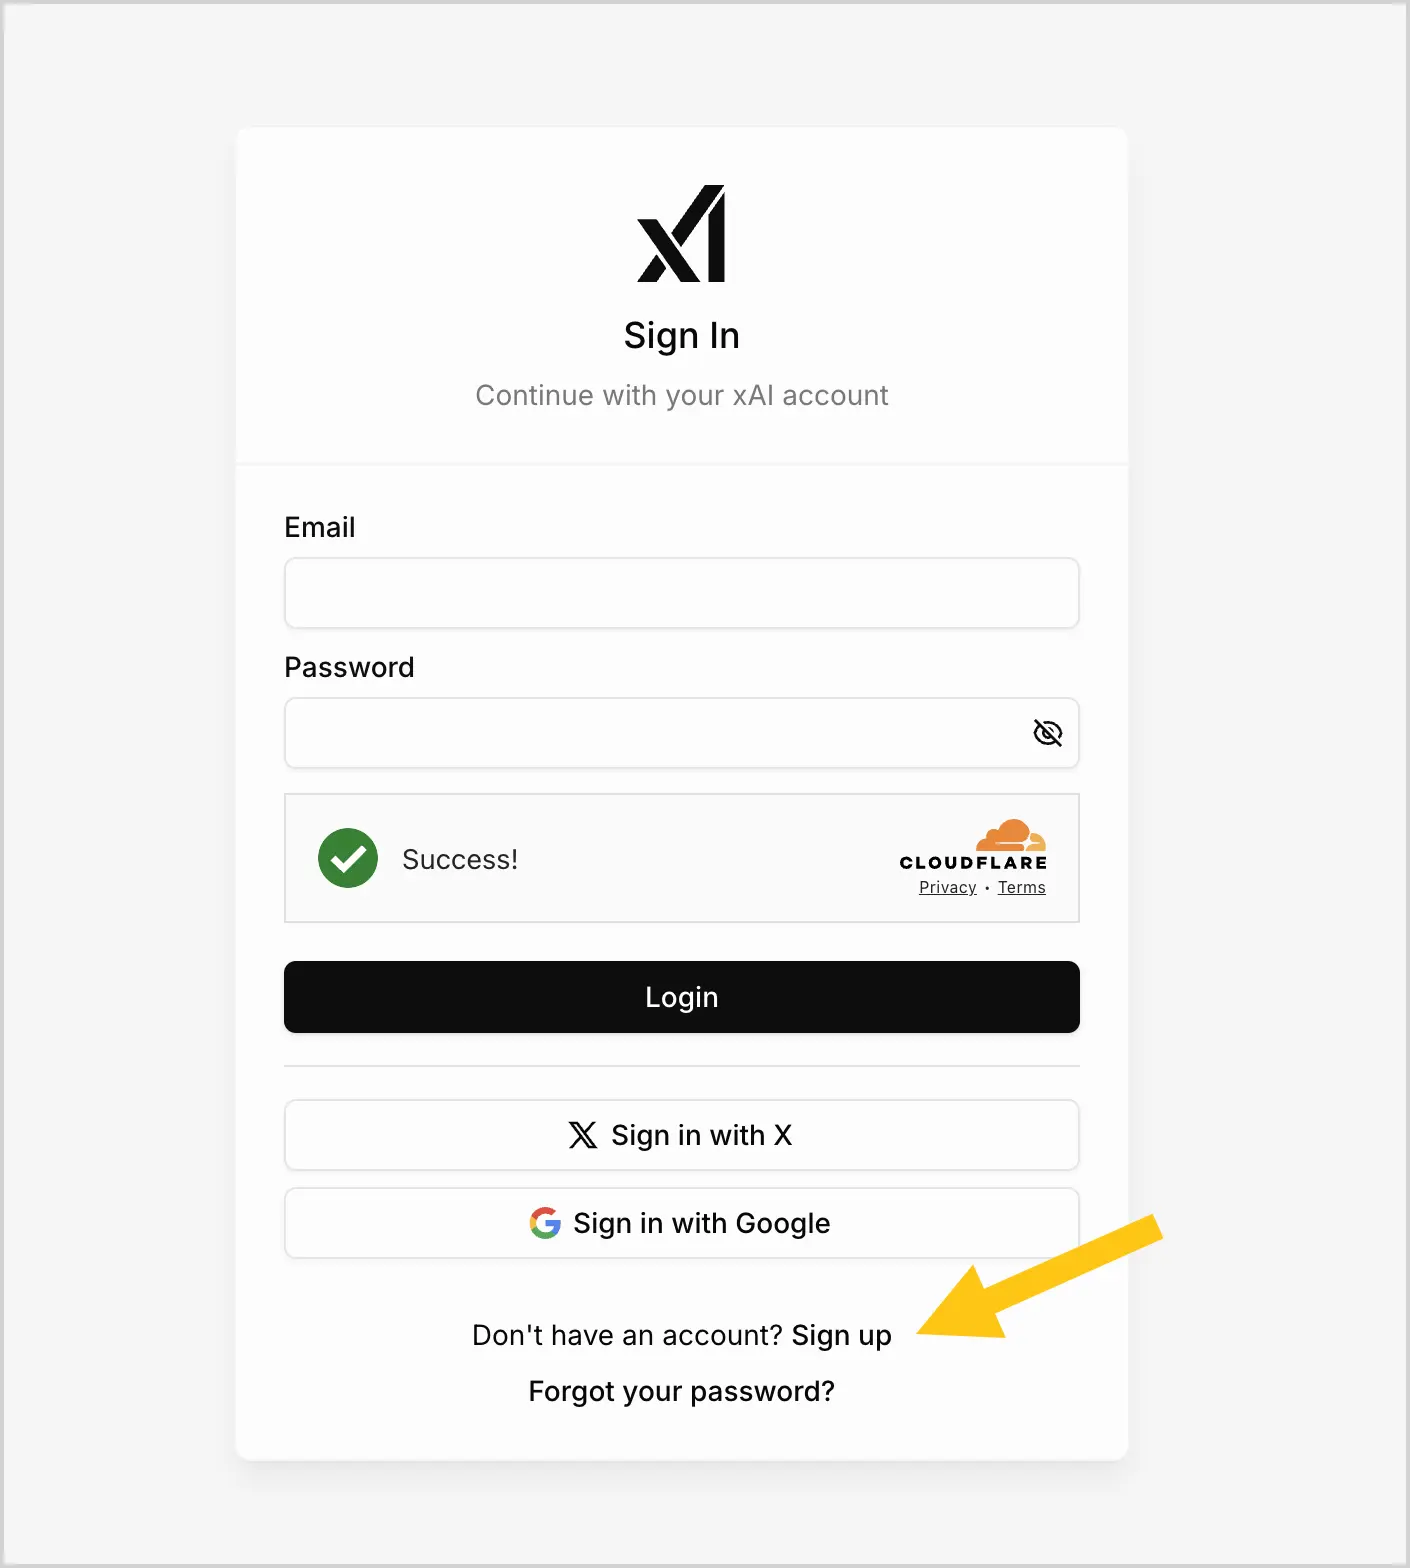
Go to the xAI API console website.
-
Select Sign up.
-
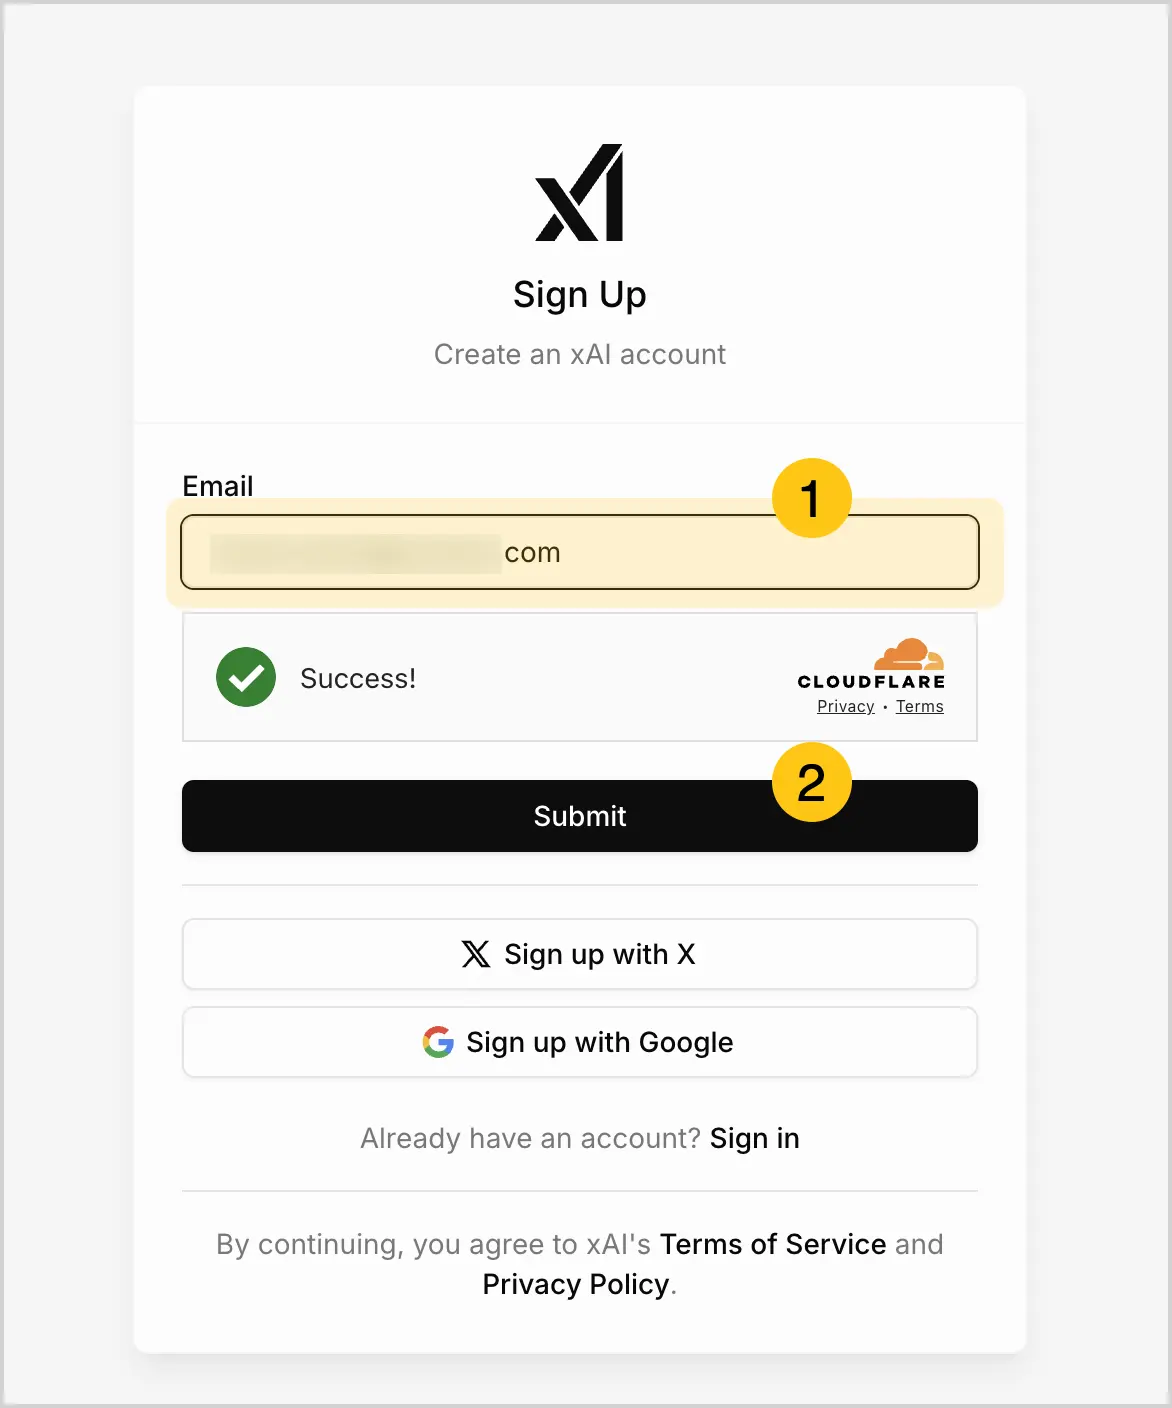
In the Email 1 field, enter your email address, then select the Submit 2 button.
-
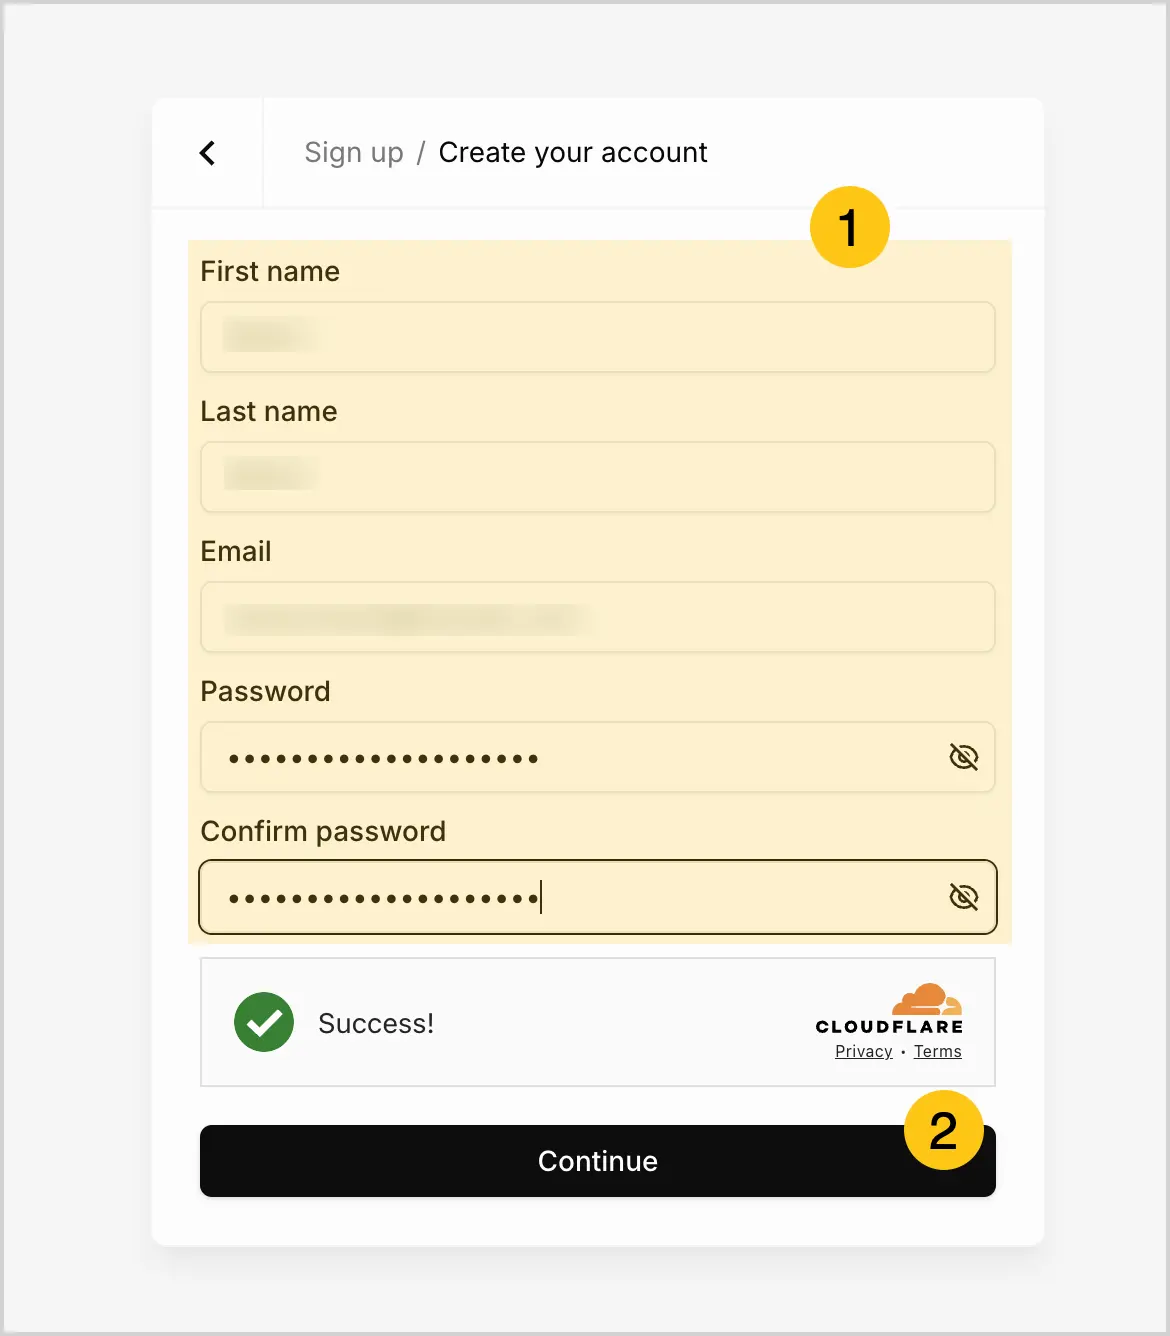
Fill in the remaining fields to create your profile 1, then select the Continue 2 button.
-
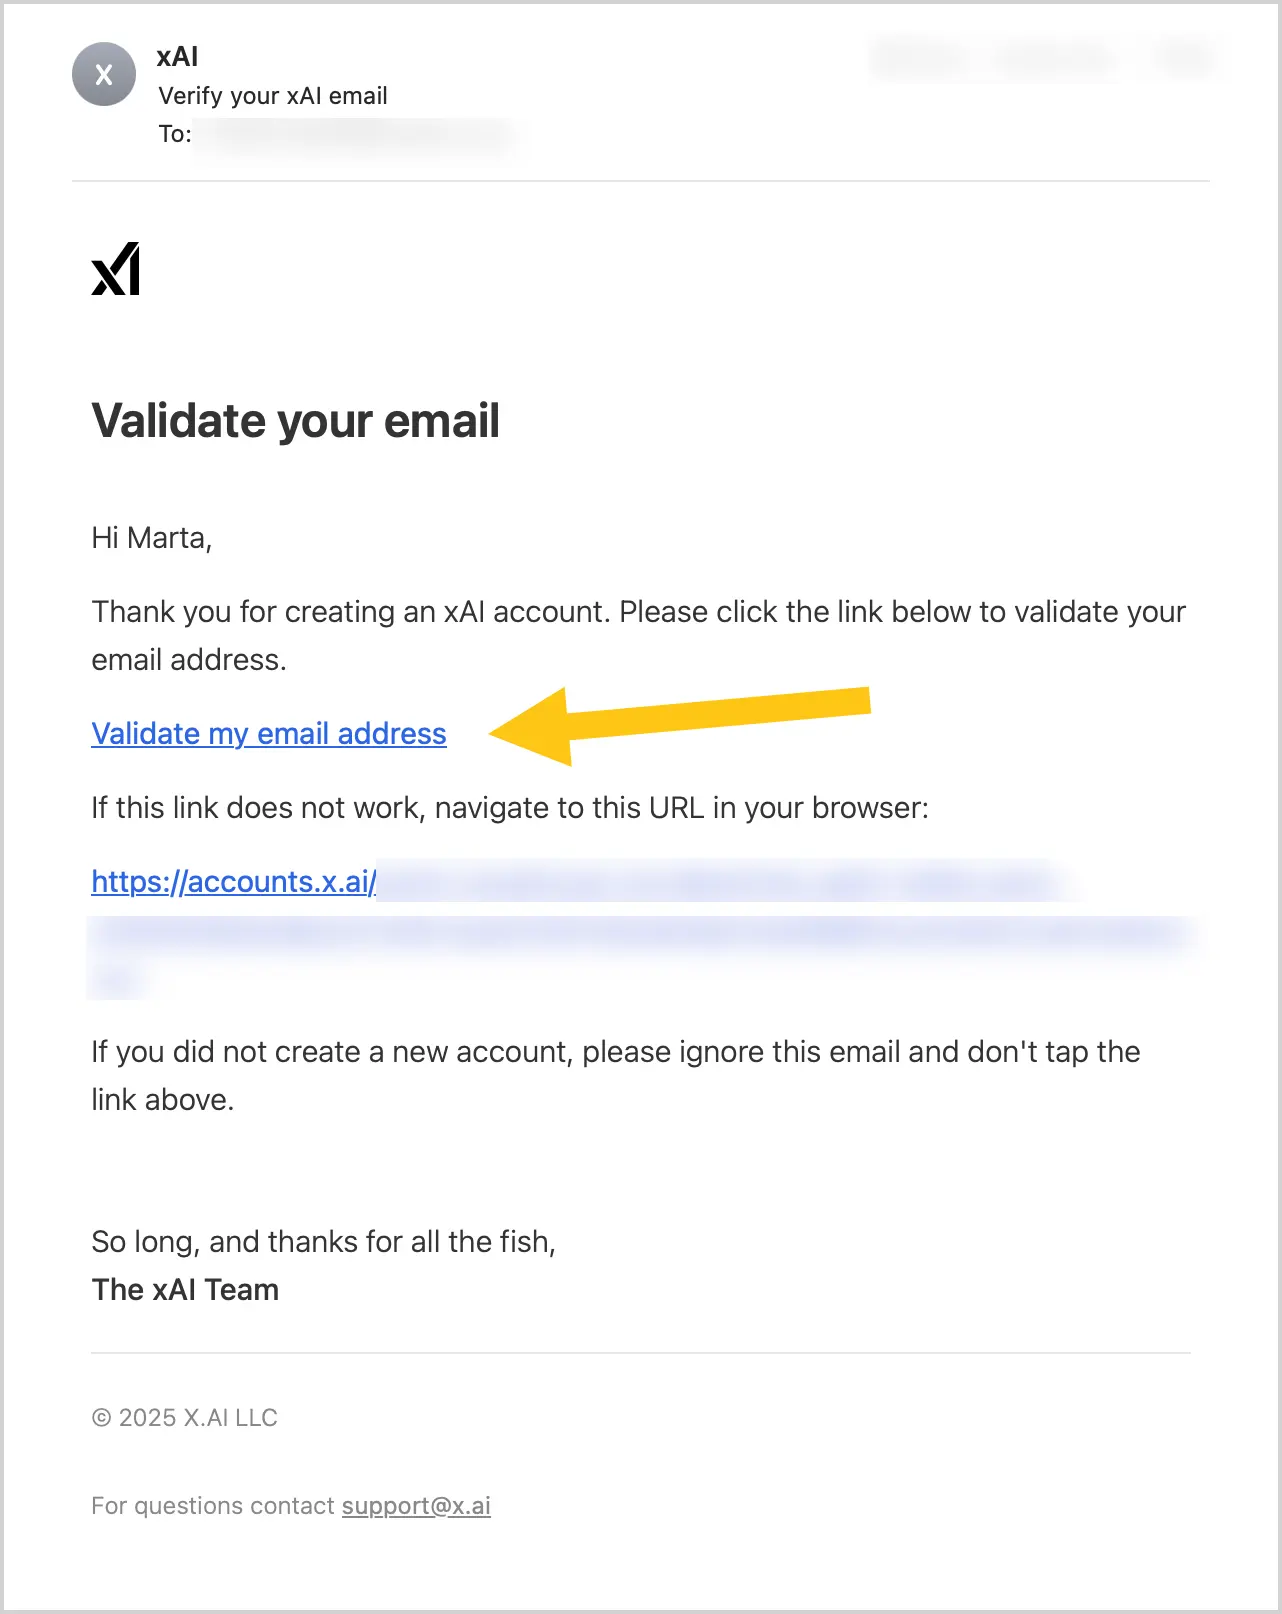
Go to your email inbox, open the letter from xAI, then select Validate my email address to verify your email address.
-
After verification, you will see the Email verified window. You can close this browser tab and return to the previous tab where you were following the previous steps.

-
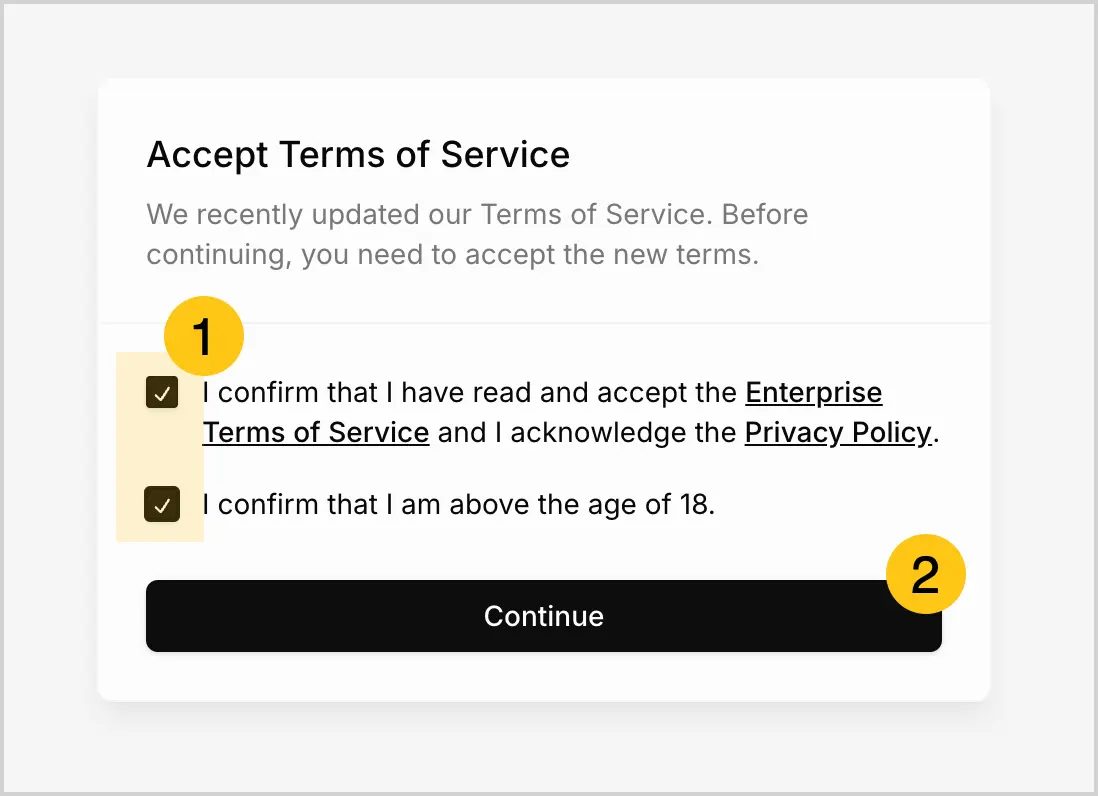
Select the checkboxes to agree to the terms of use and confirm that you are of legal age 1, then select the Continue 2 button.
-
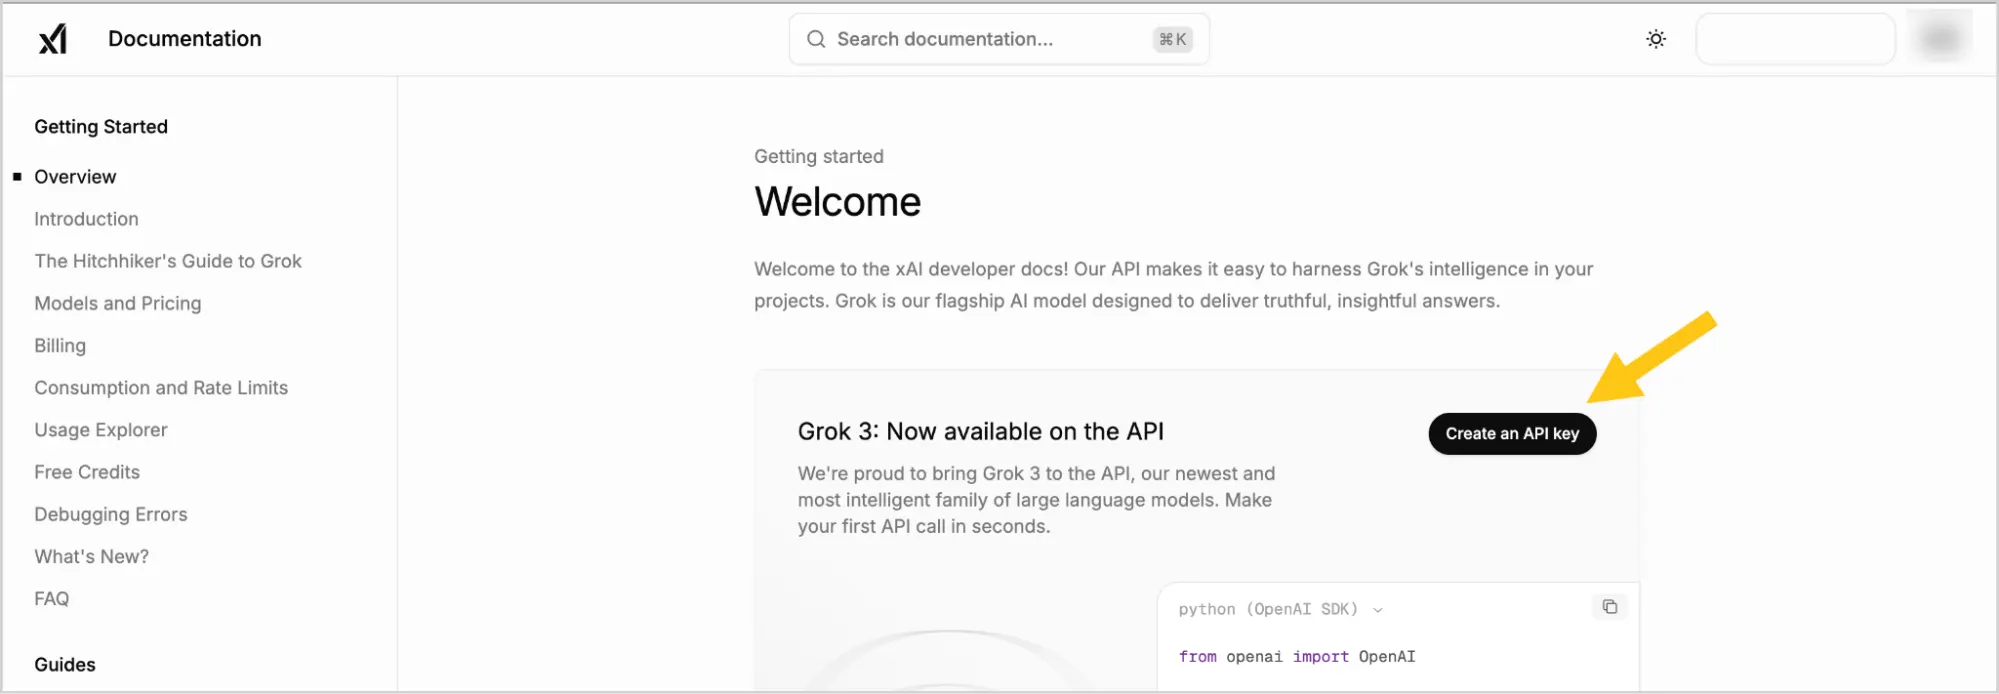
On your profile home page, select the Create an API key button.
-
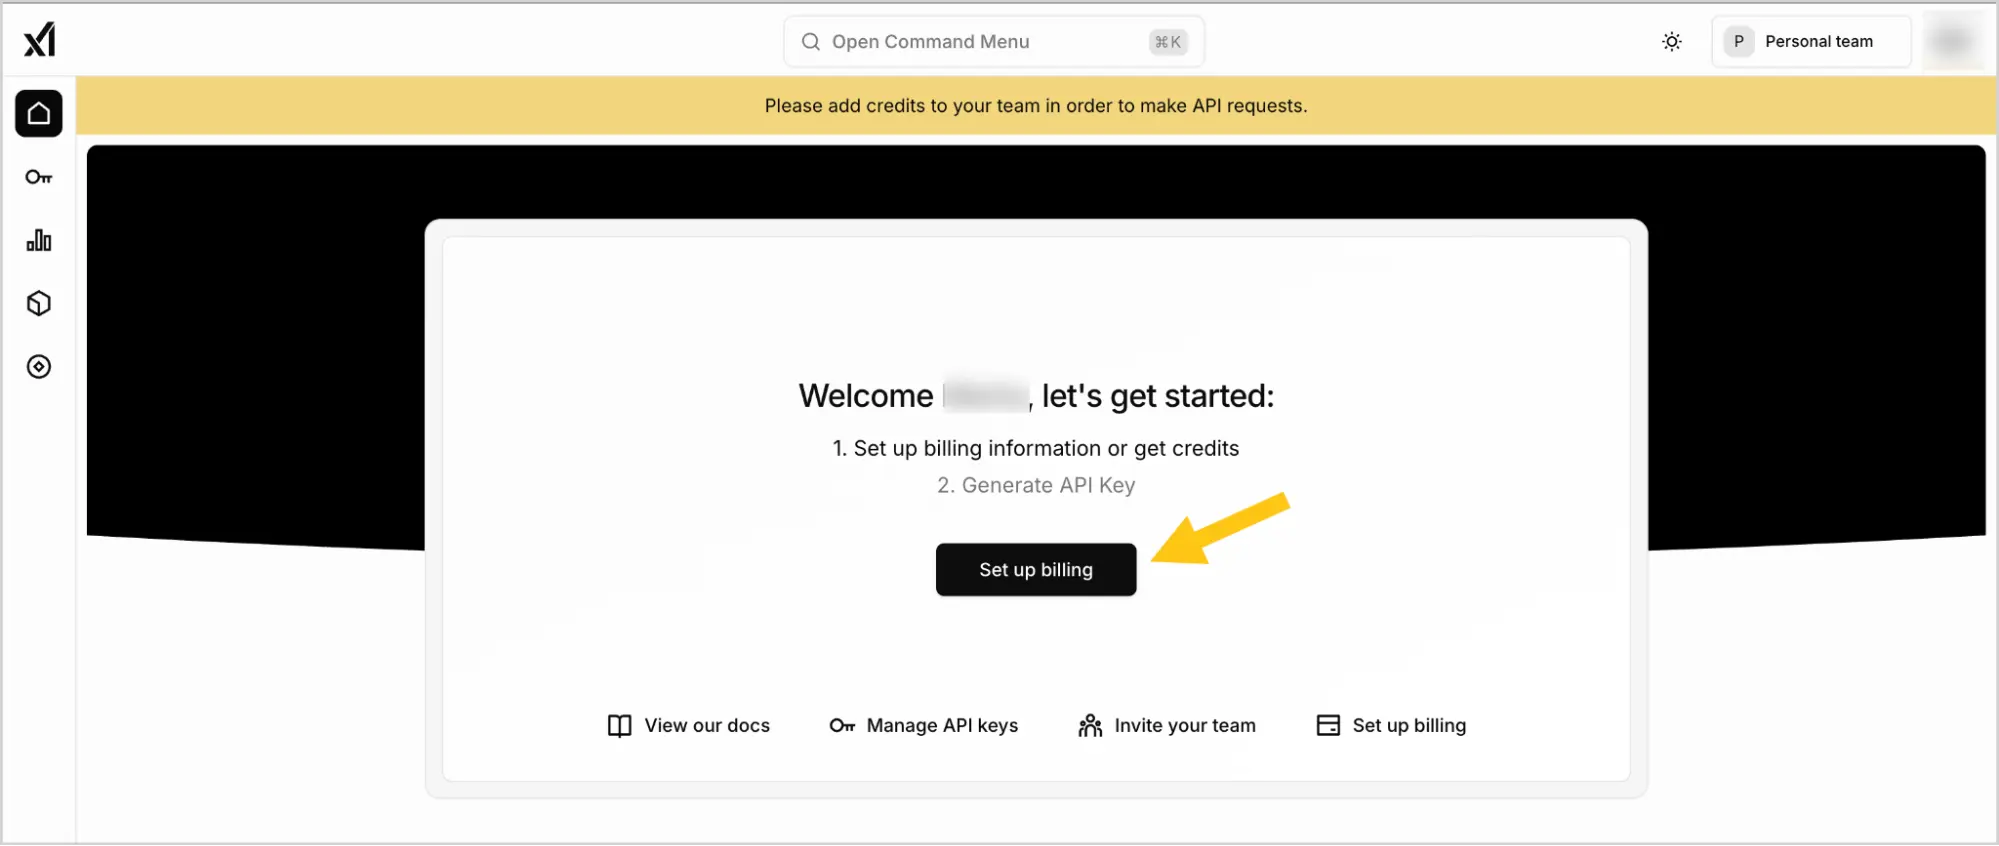
Select the Set up billing button to configure payment for API usage.
-
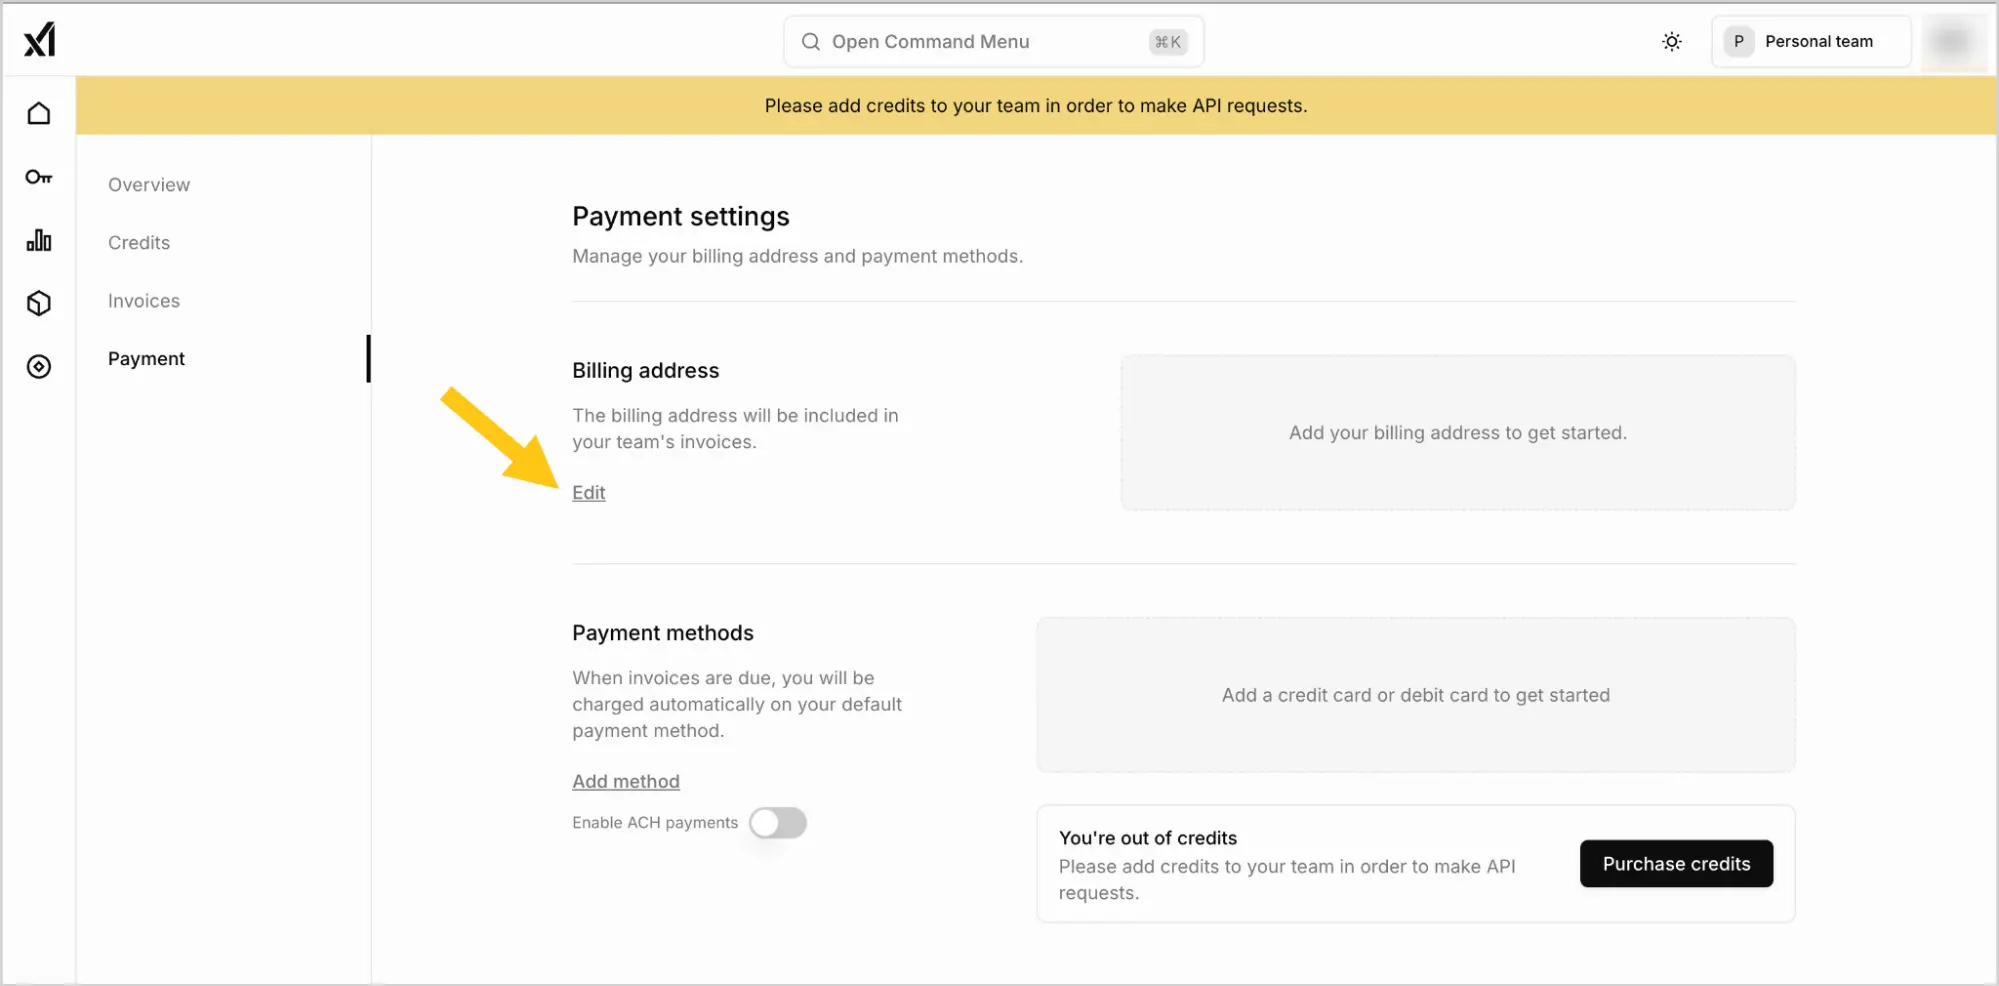
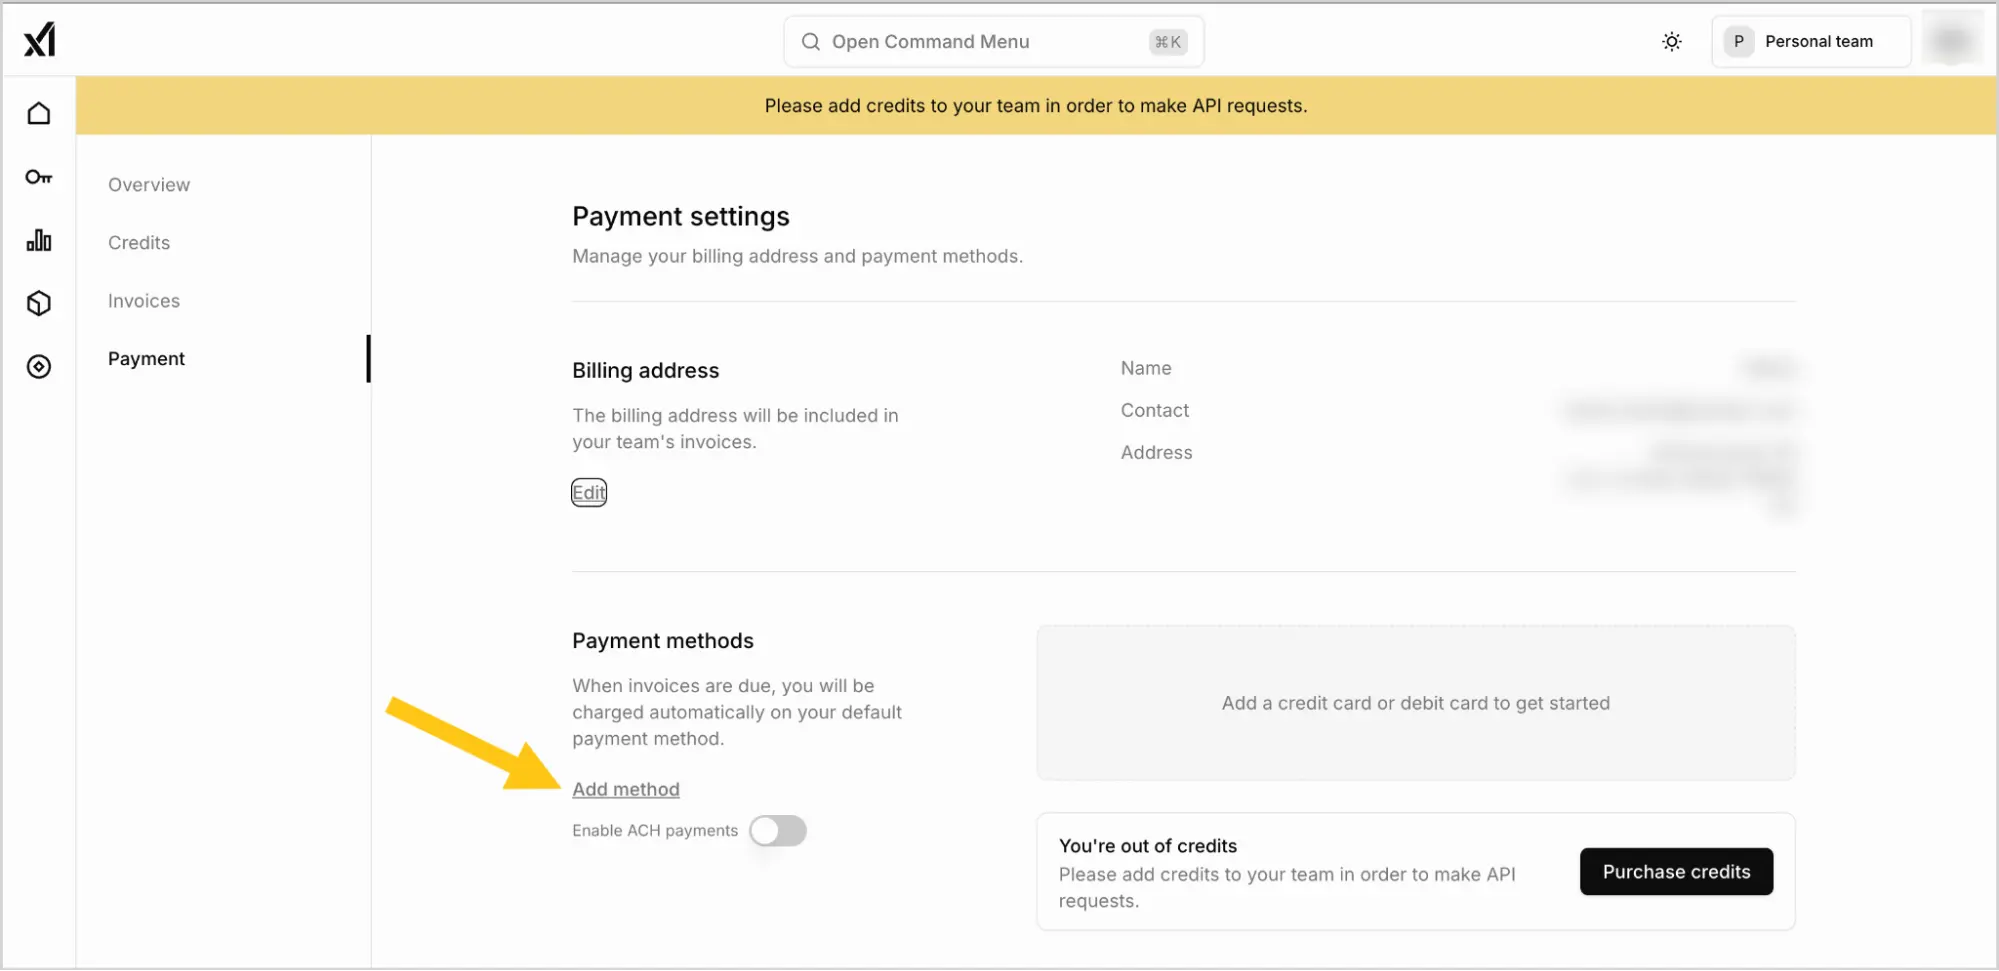
In the Billing address section, select Edit.
-
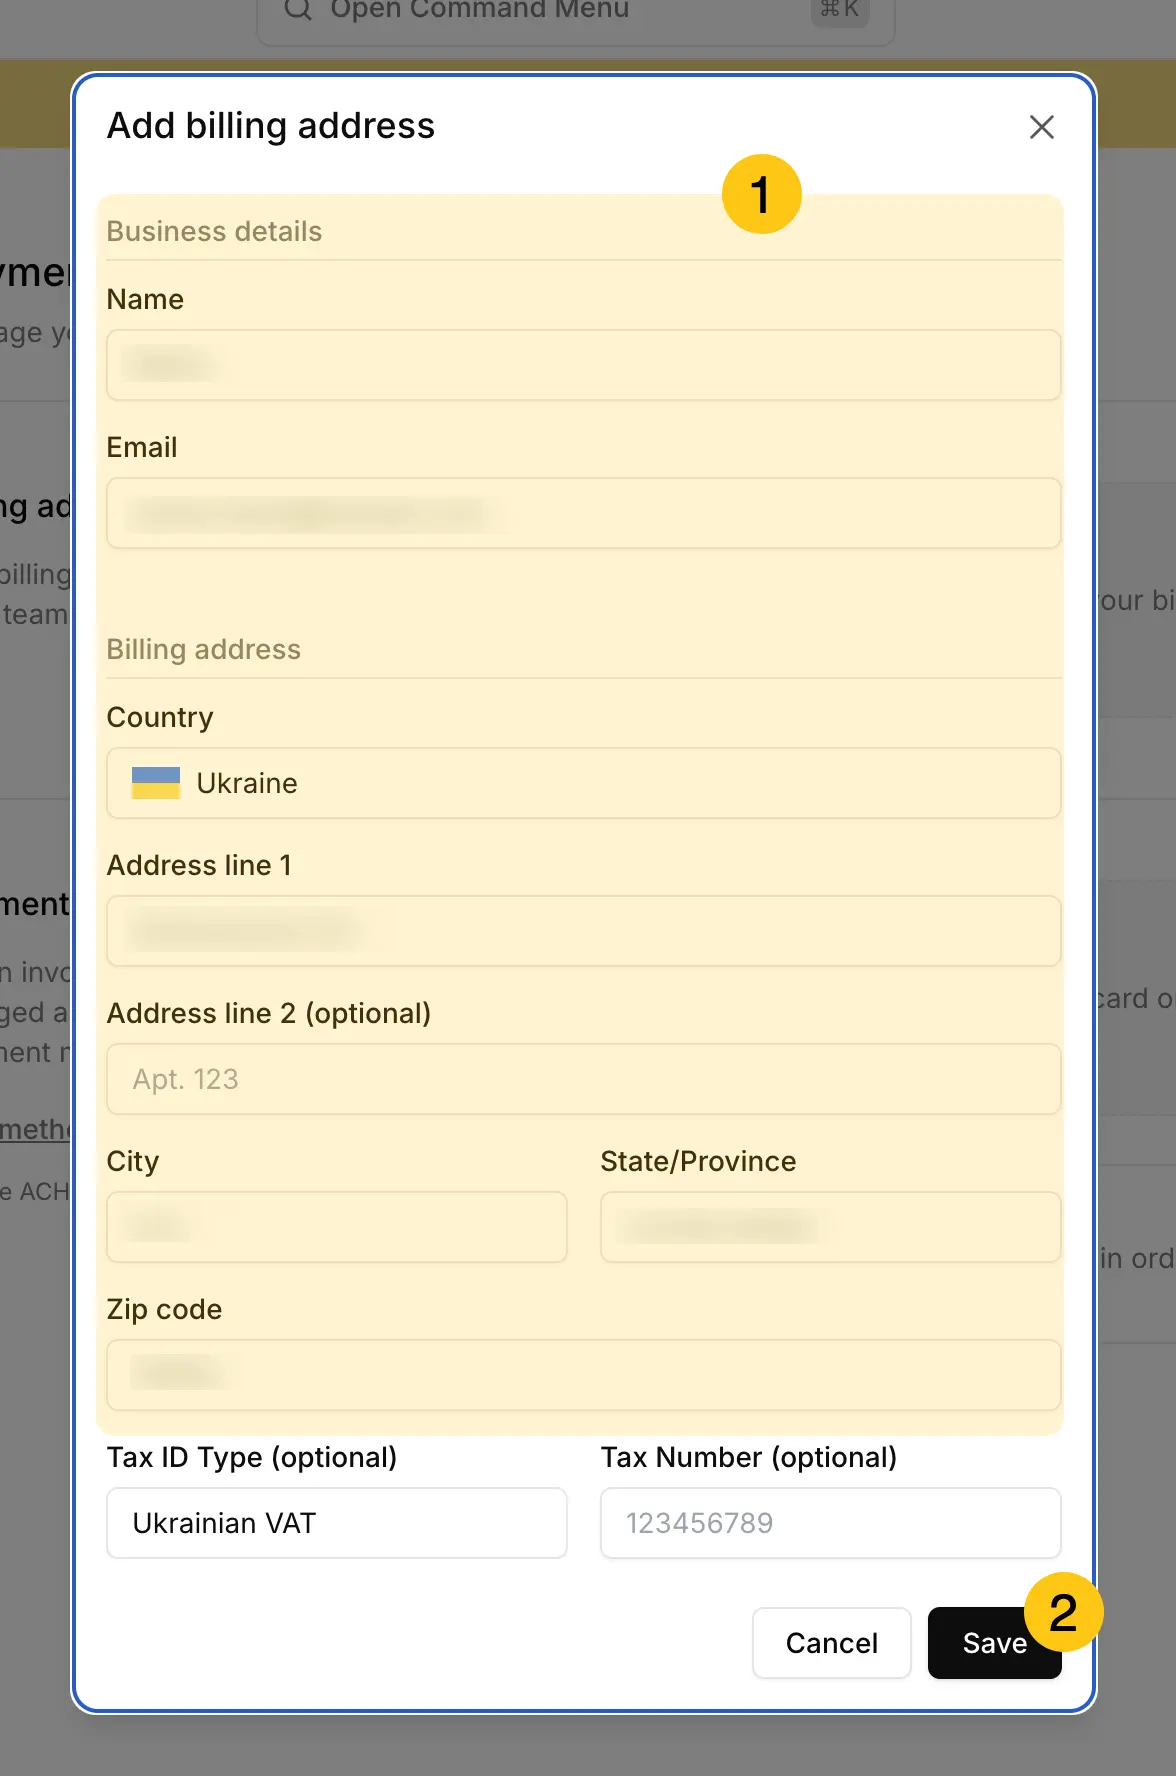
Fill in all required fields for billing 1, then select the Save 2 button.
-
In the Payment methods section, select Add method to add a payment method.
-
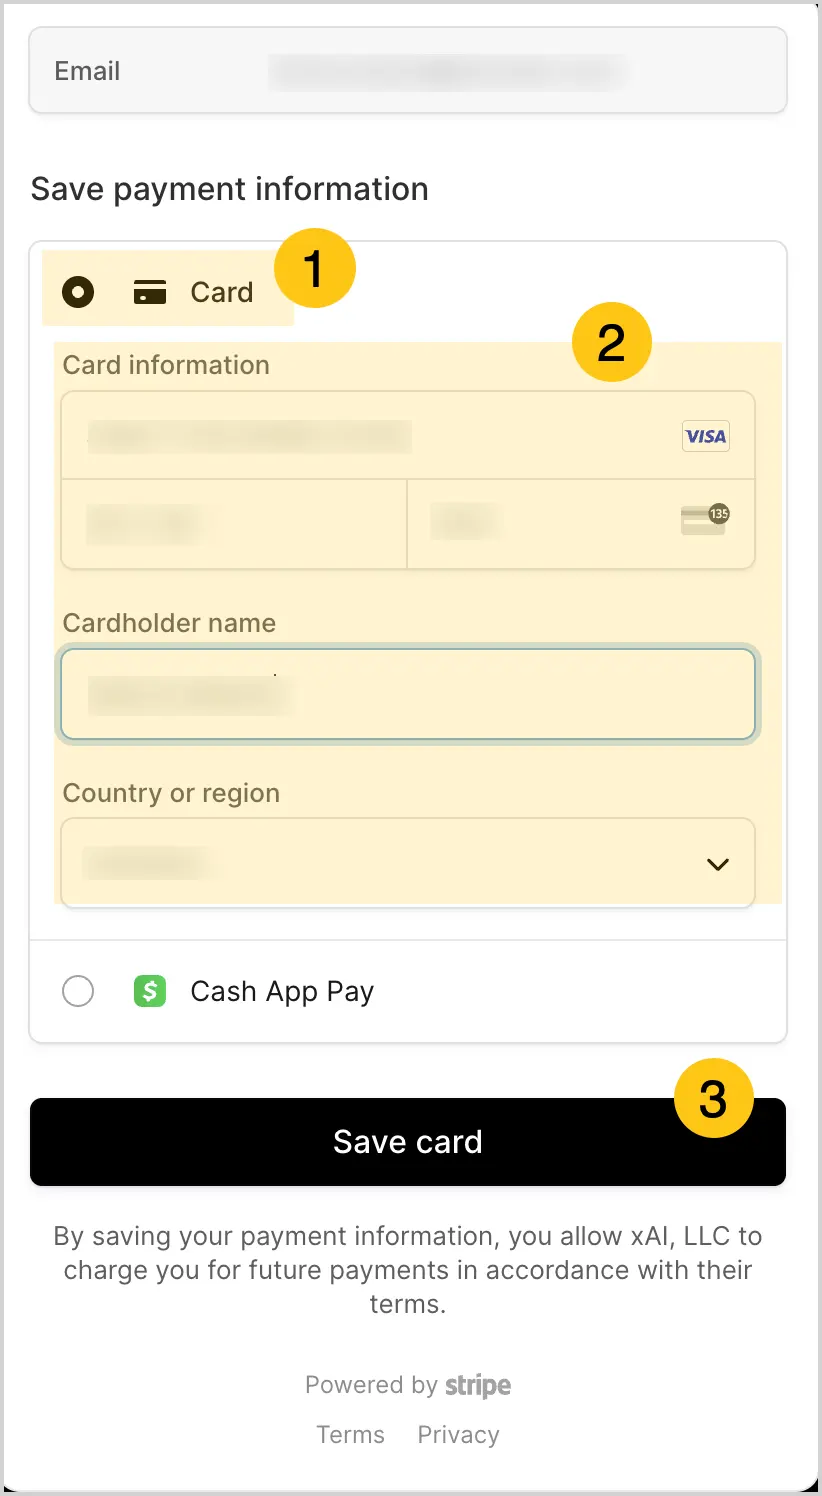
Select a payment method 1, then fill in the payment details 2.
-
Select the Save card 3 button.
-
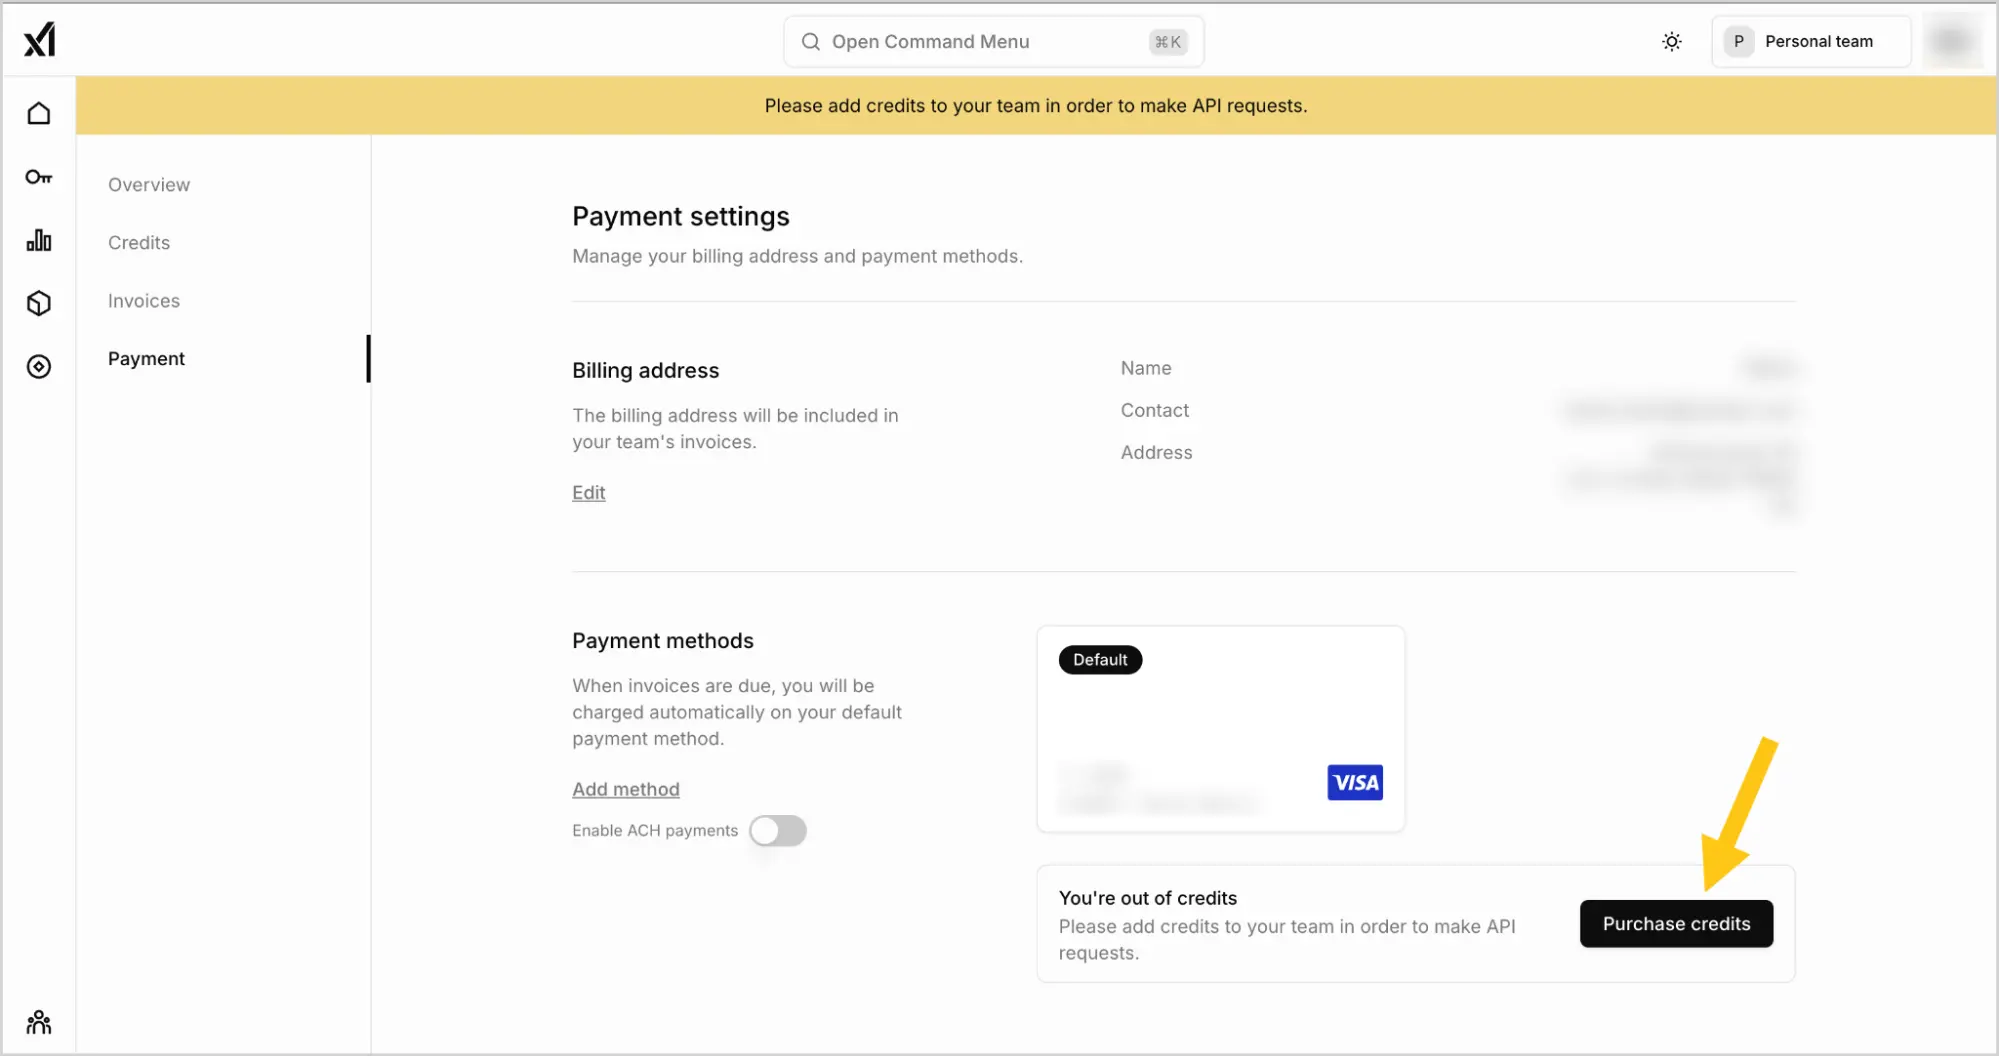
Select Purchase credits to top up your balance.
-
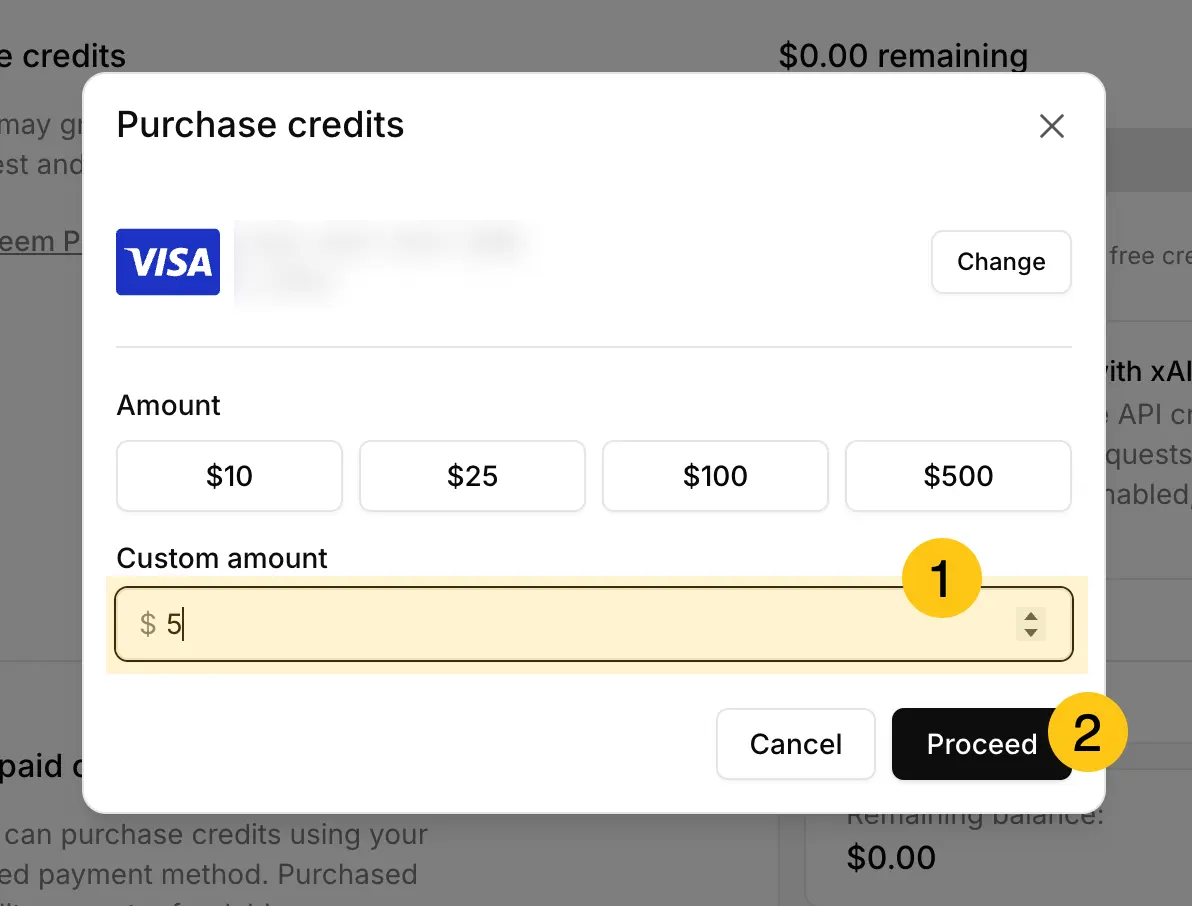
In the Custom amount 1 field, enter the amount you want to add to your balance, then select the Proceed 2 button.
-
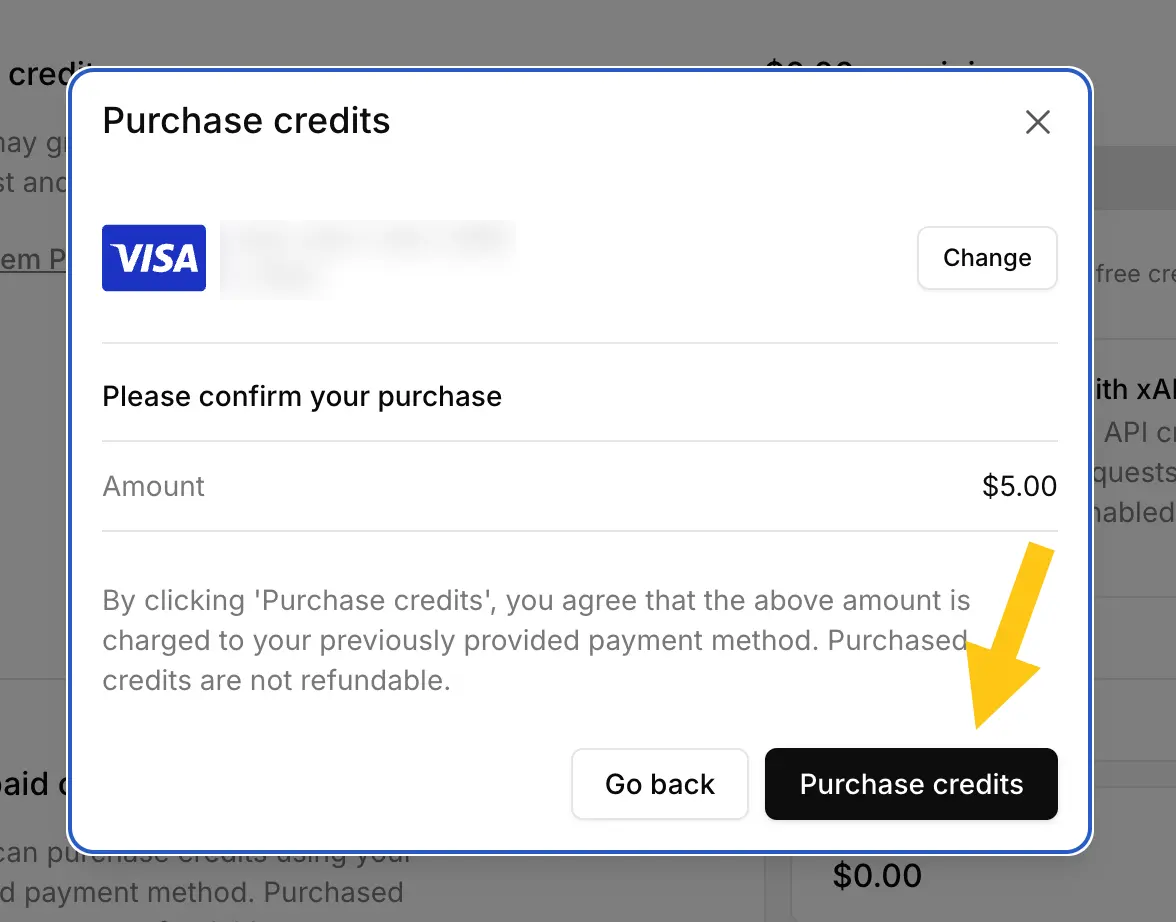
Select the Purchase credits button to confirm the top-up.
-
Open the
 tab 1, then select the Create API key 2 button.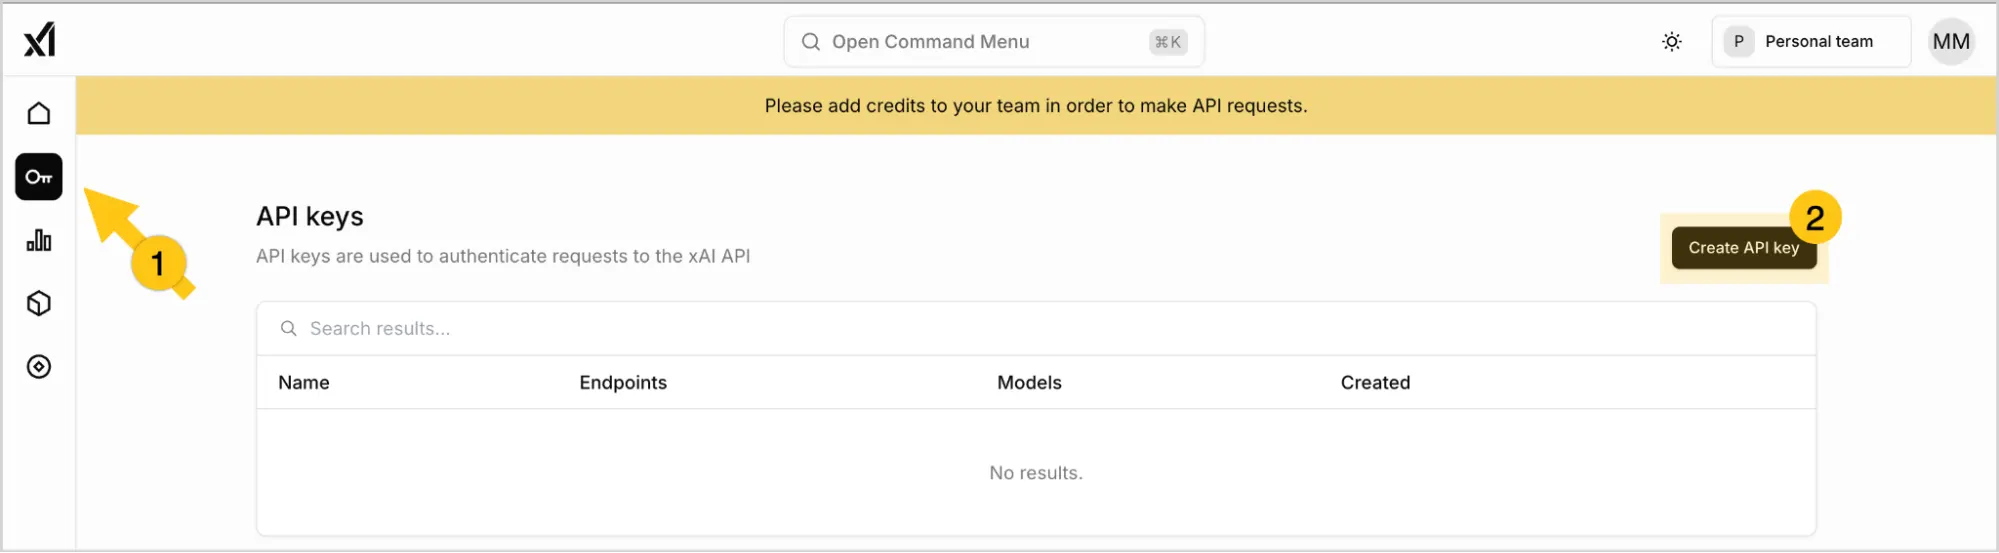
-
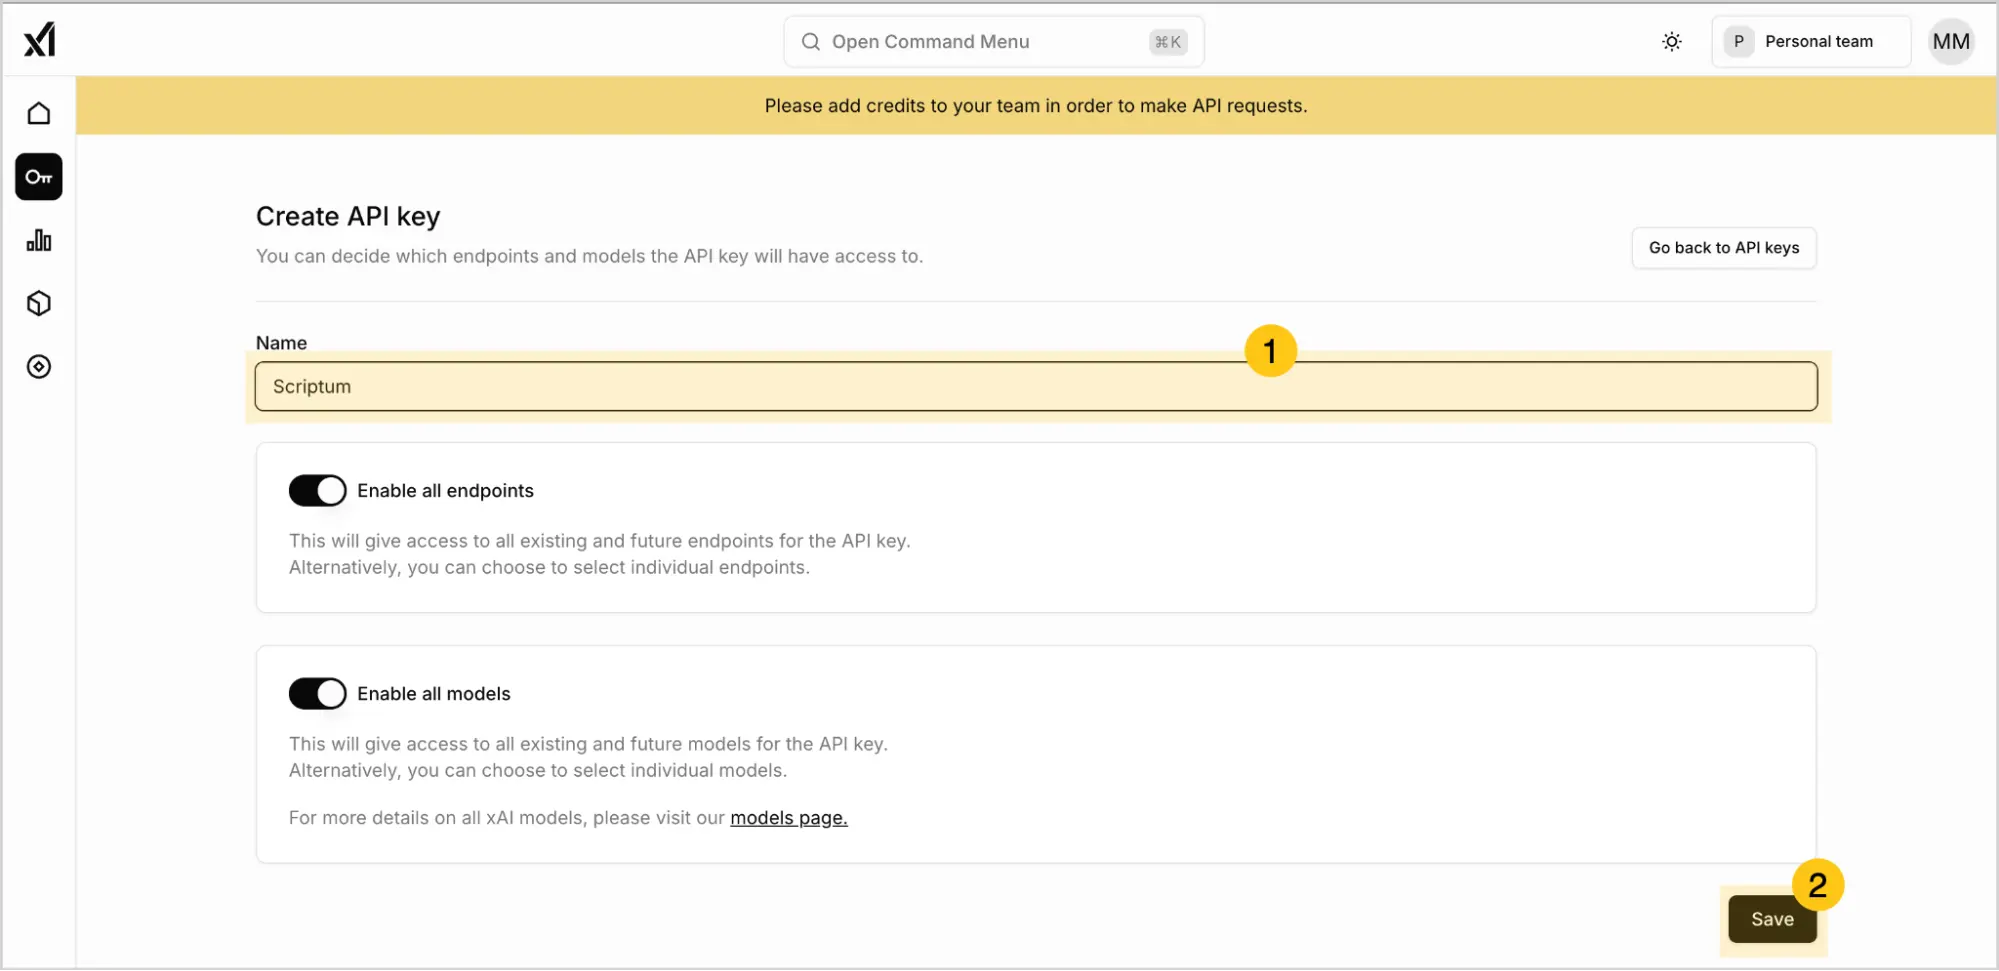
In the Name 1 field, enter any name for the key, then select the Save 2 button.
-
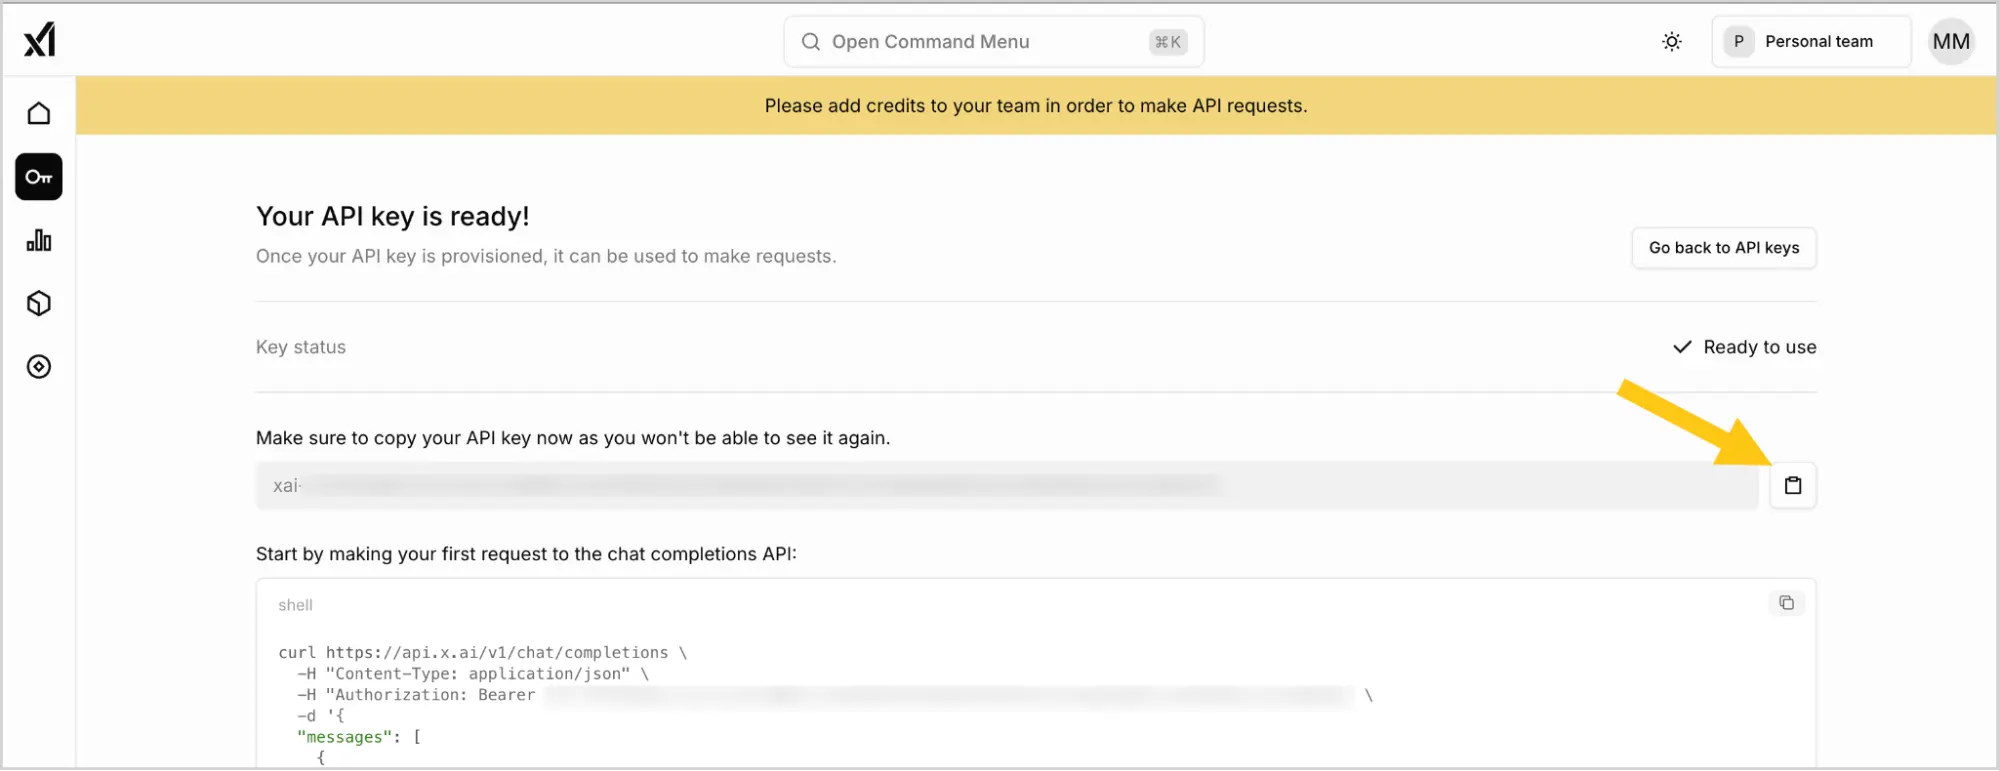
Select the button to copy the API key.
-
Paste this key using Ctrl+V into a safe location, such as a notes app. You will need this key in the subsequent configuration steps.
Warning:After closing this window, for security reasons, you will no longer be able to see this key in the platform. If you do not save the key, you will need to generate a new one.
-
Proceed to the next configuration step: Add an AI Model.
Gemini platform
-
Go to the Gemini API website.
-
Select the Get a Gemini API Key button.
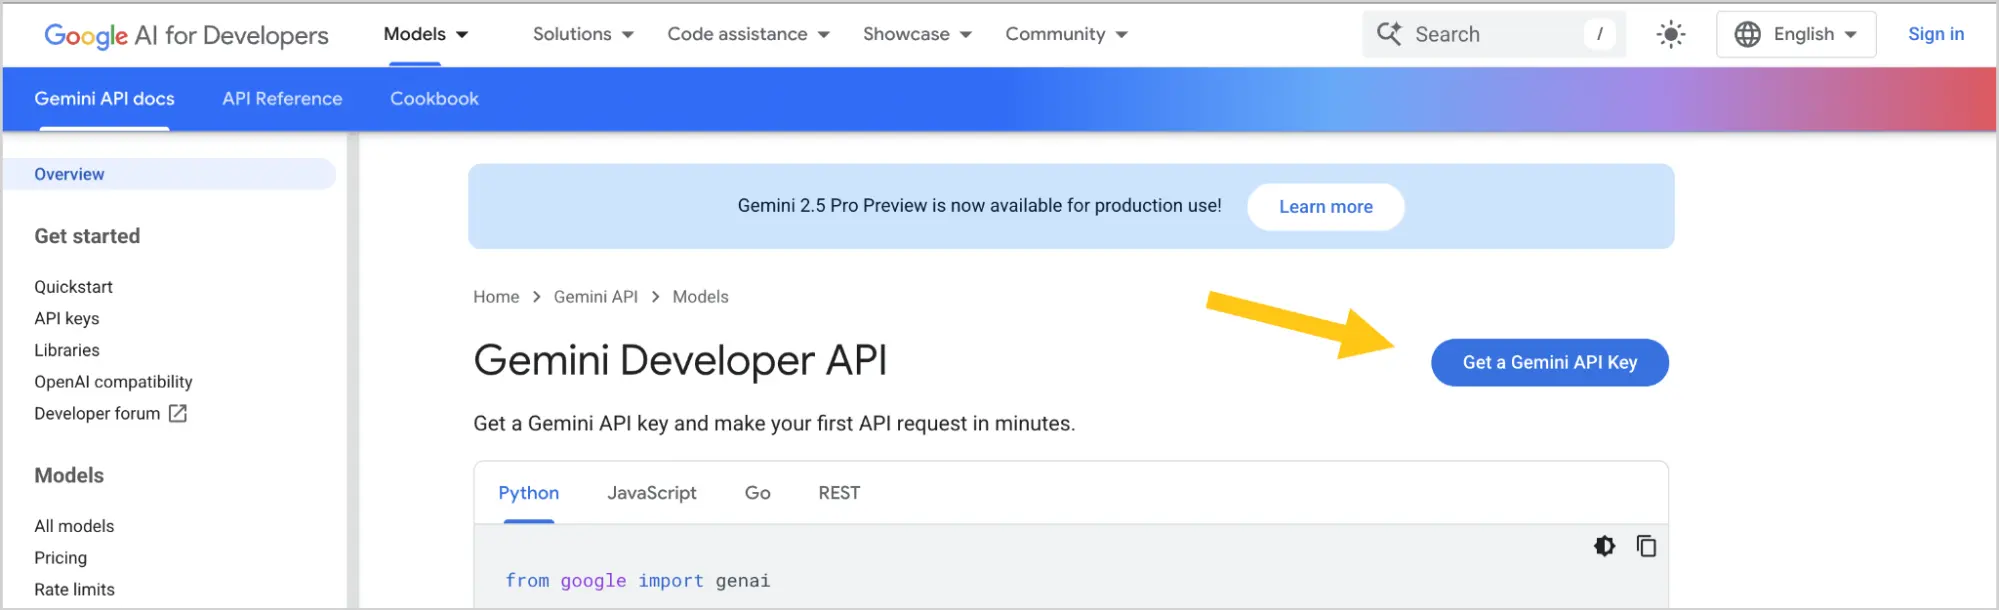
-
Select the Get API key button.
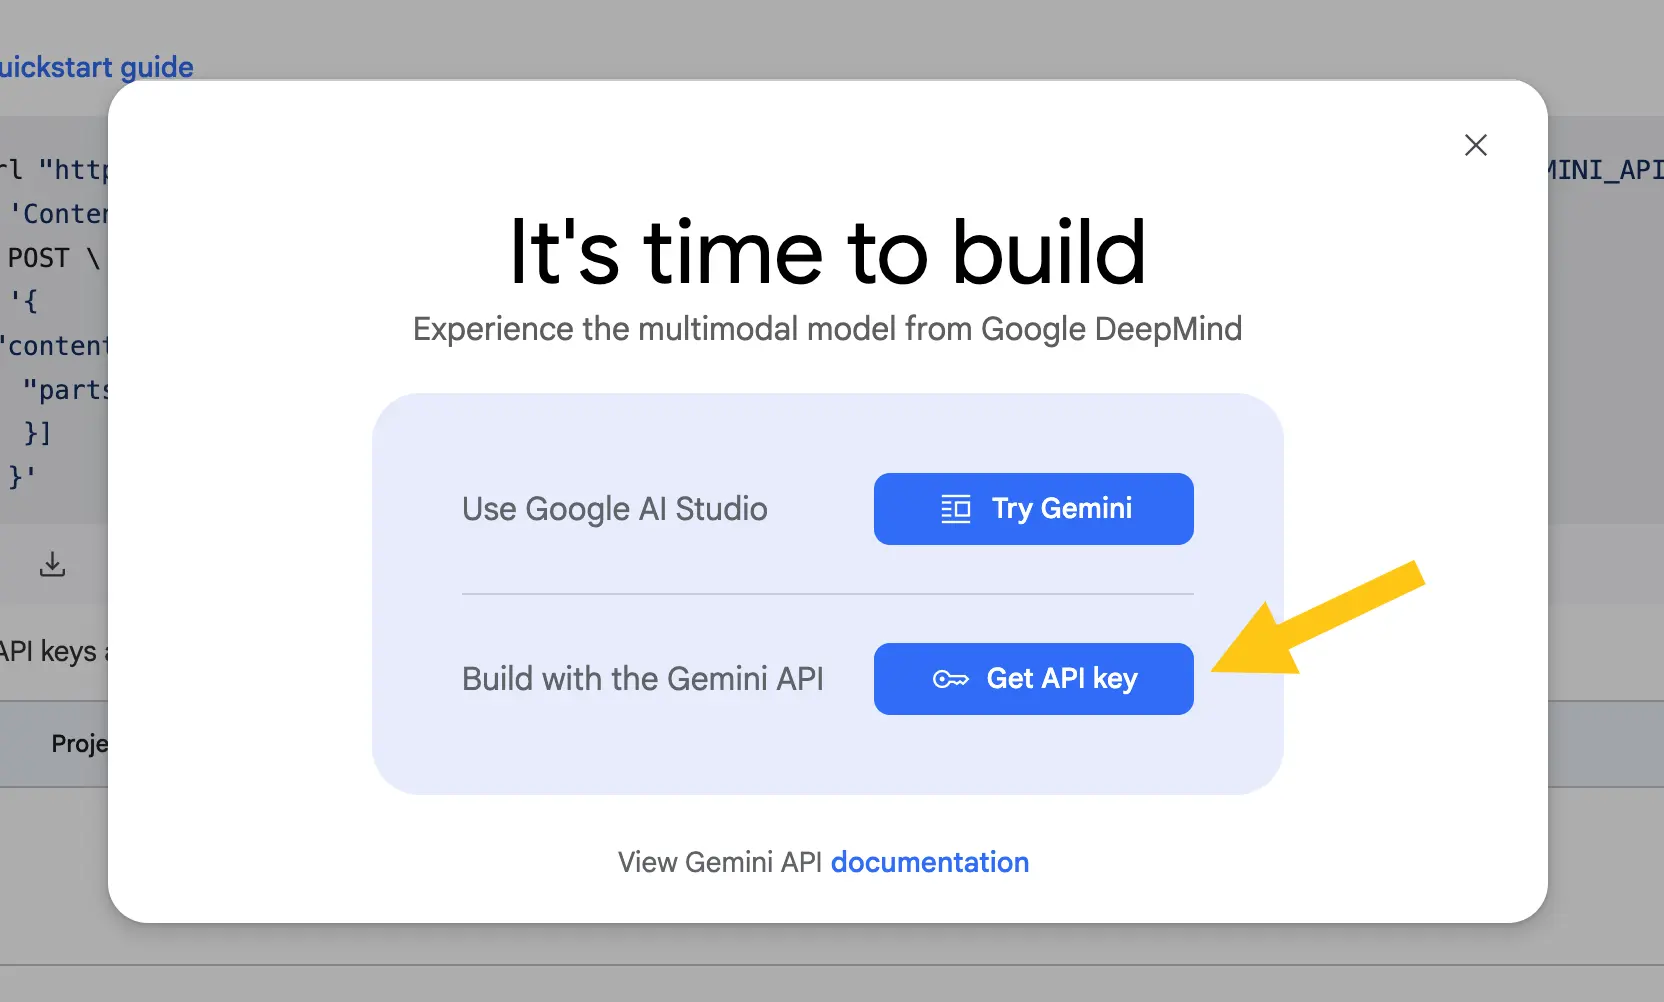
-
Select the I consent to the Google APIs Terms… 1 checkbox, then select the I accept 2 button.
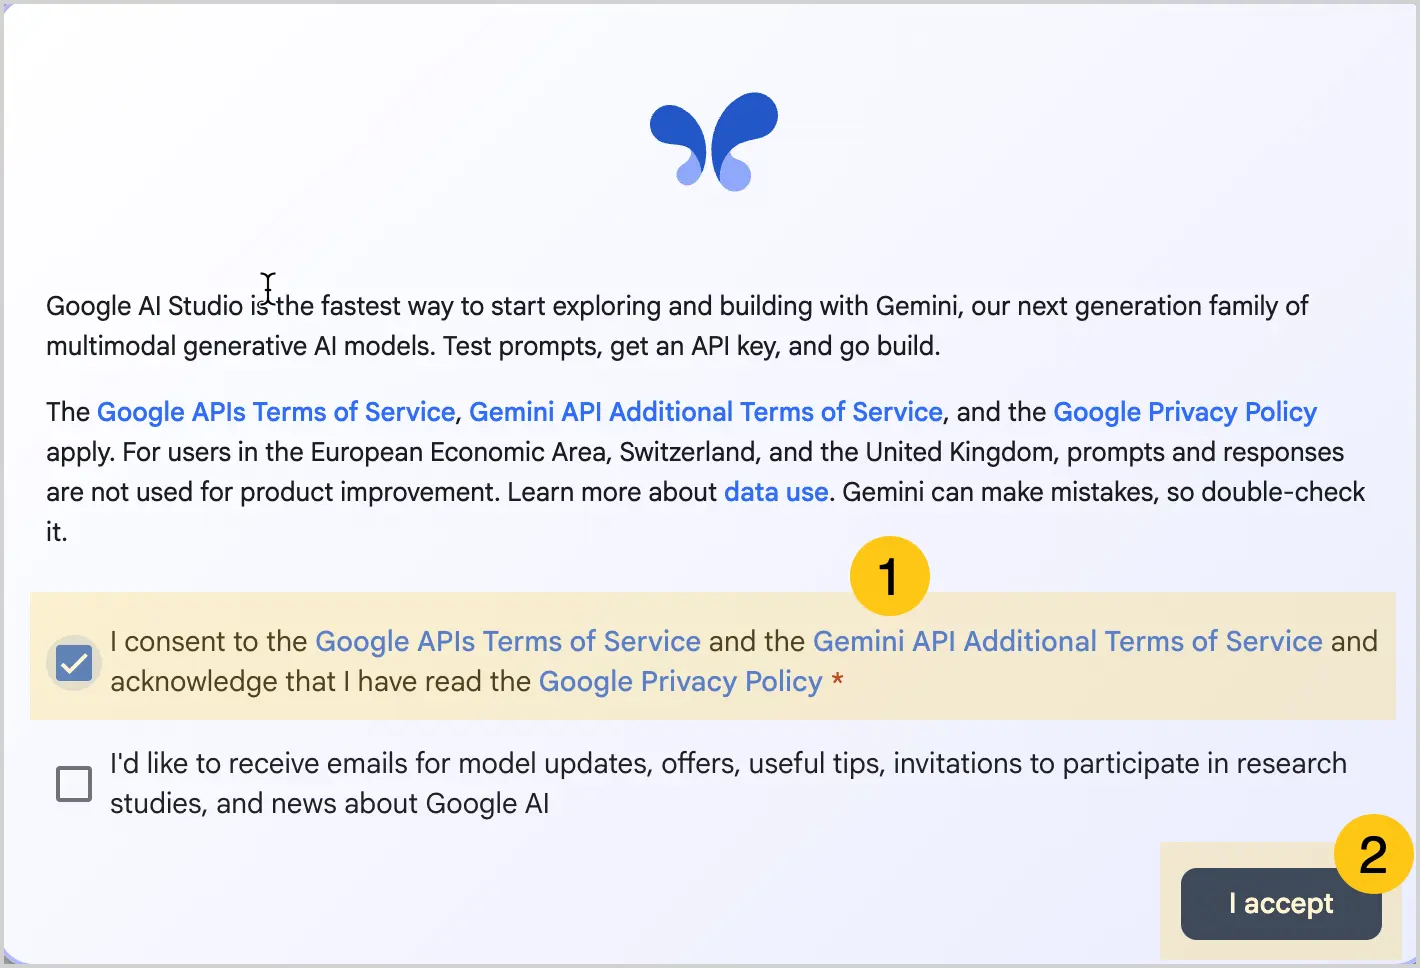
-
Select the Create API key button.
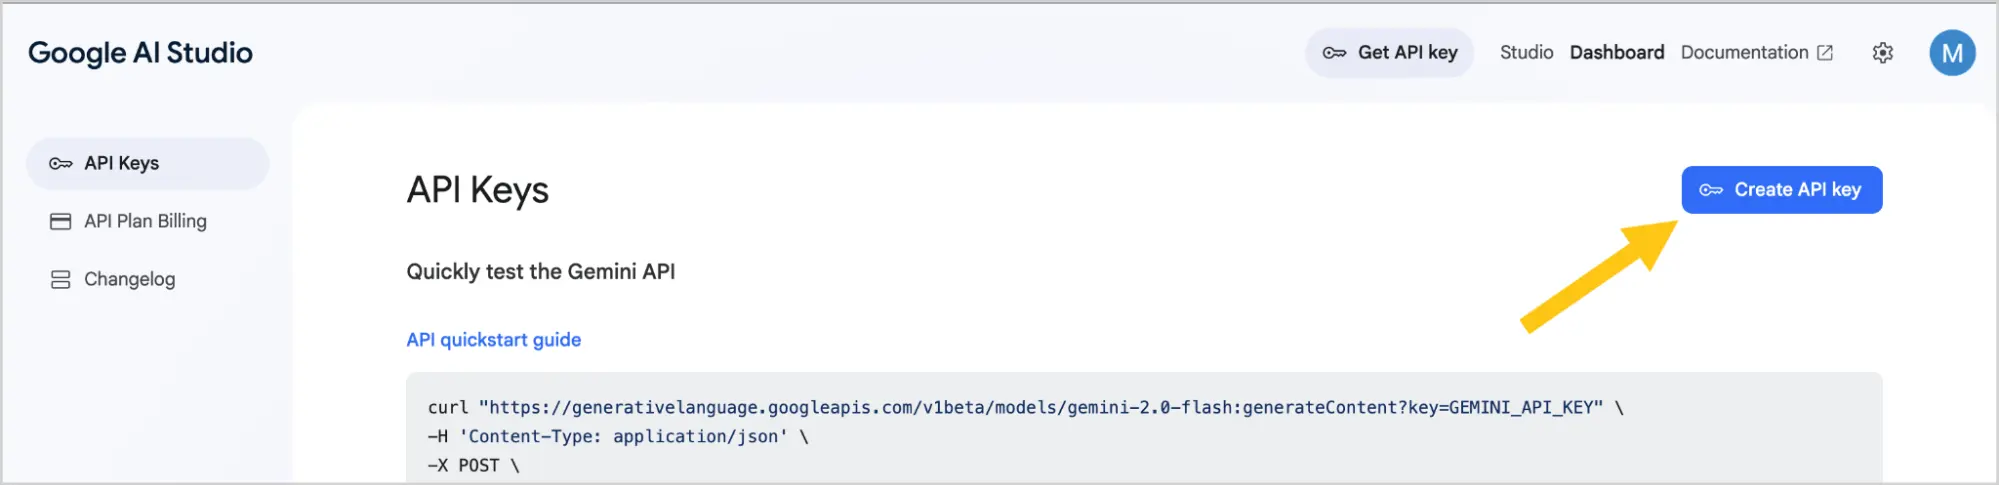
-
Select the Copy button to copy the API key.
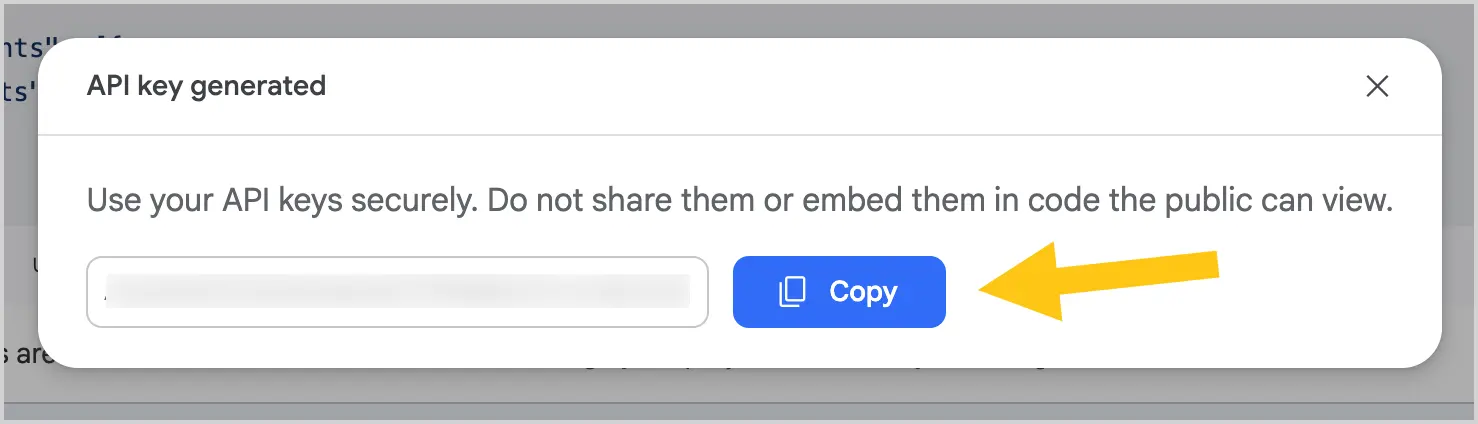
-
Paste this key using Ctrl+V into a safe location, such as a notes app. You will need this key in the subsequent configuration steps.
Warning:After closing this window, for security reasons, you will no longer be able to see this key in the platform. If you do not save the key, you will need to generate a new one.
-
Proceed to the next configuration step: Add an AI Model.
Claude platform
-
Go to the Anthropic API website.
-
Select the Start building button.
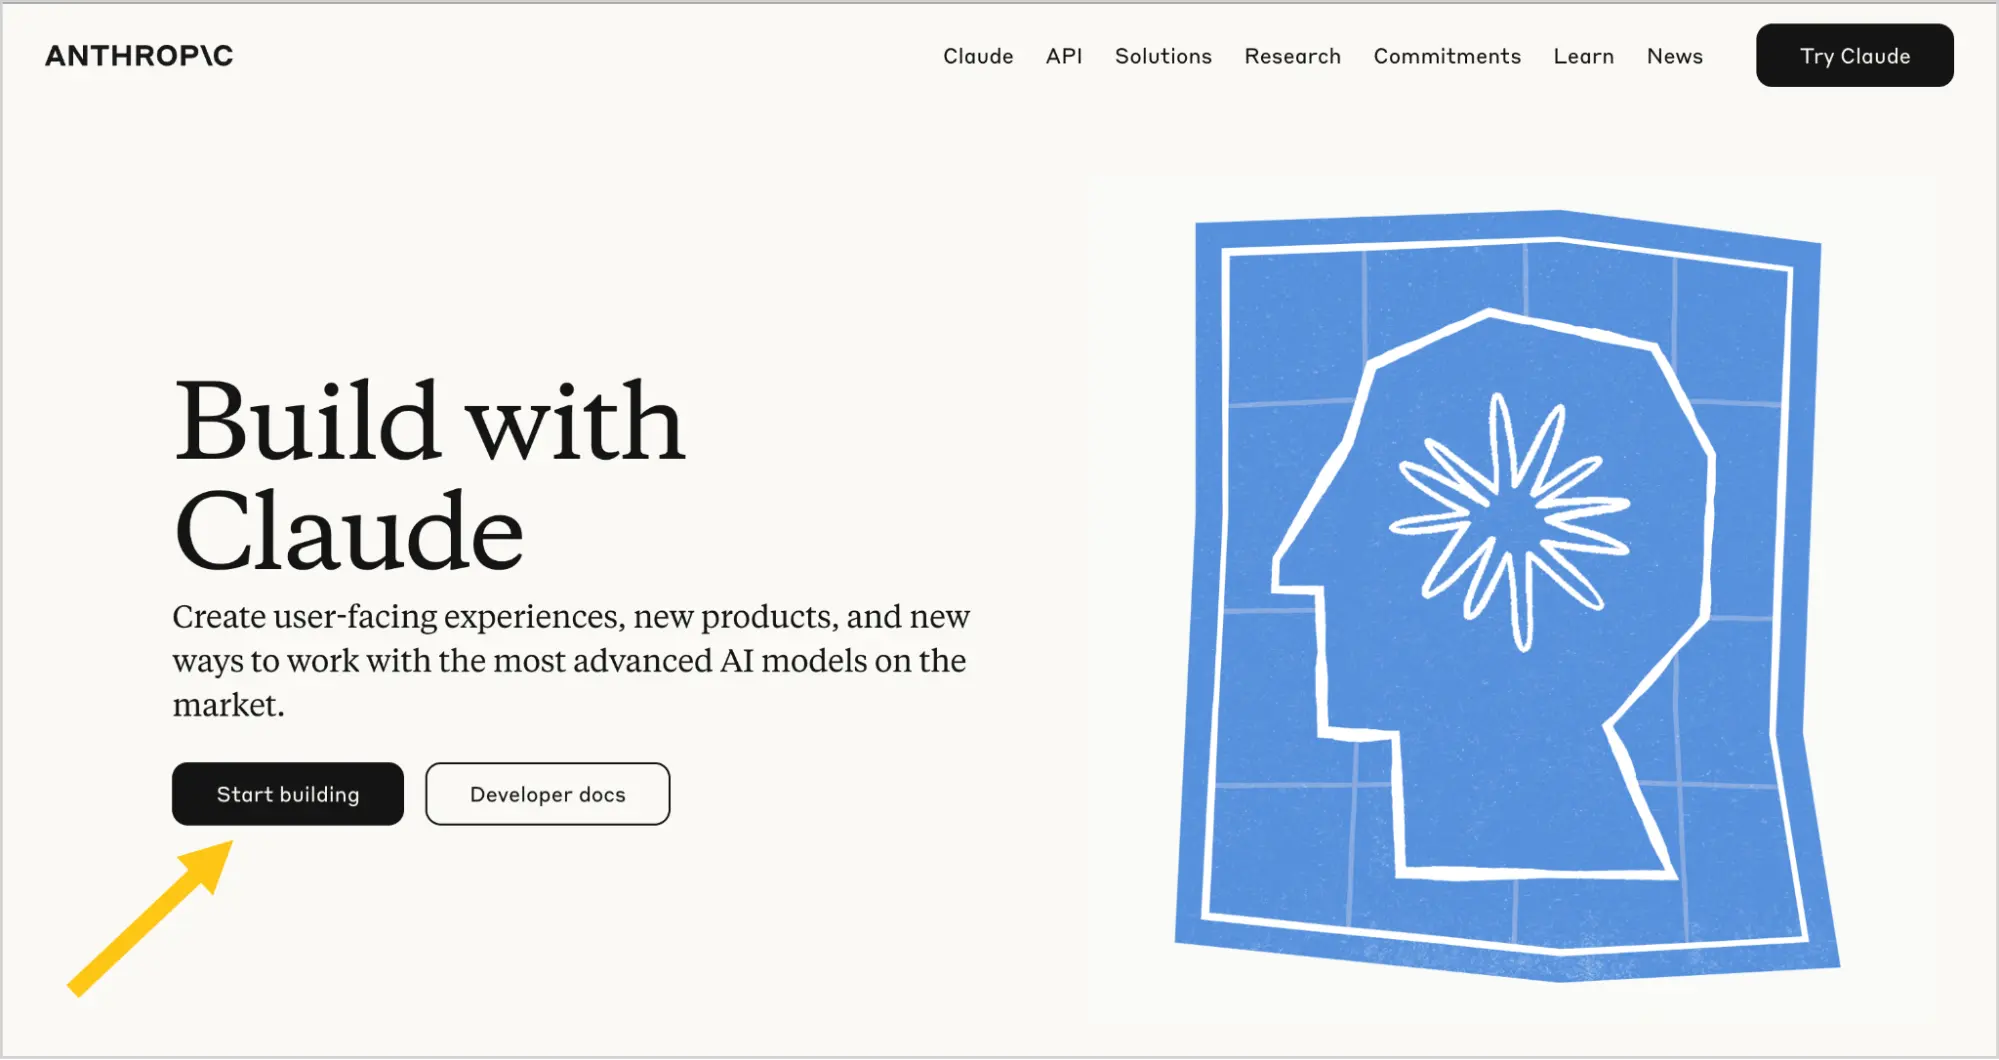
-
In the Email 1 field, enter the email address you want to register the account with, then select the Continue with email 2 button.
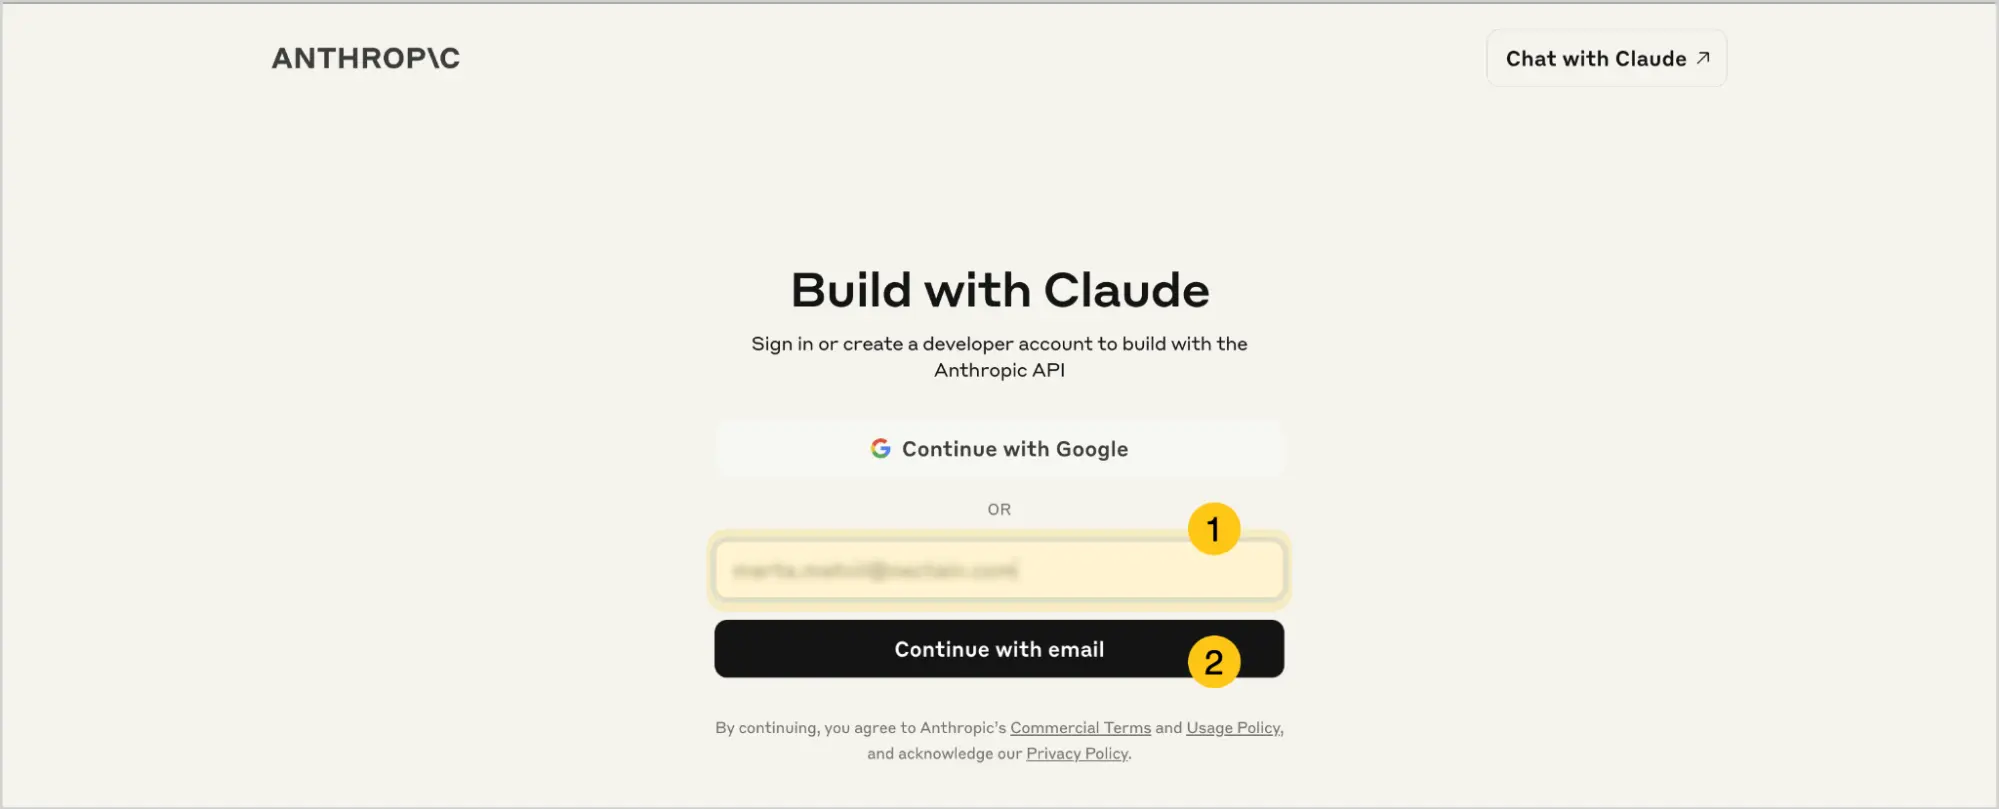
-
Go to your email inbox, open the letter from Anthropic, then select Sign in to Anthropic Console to verify your email address.
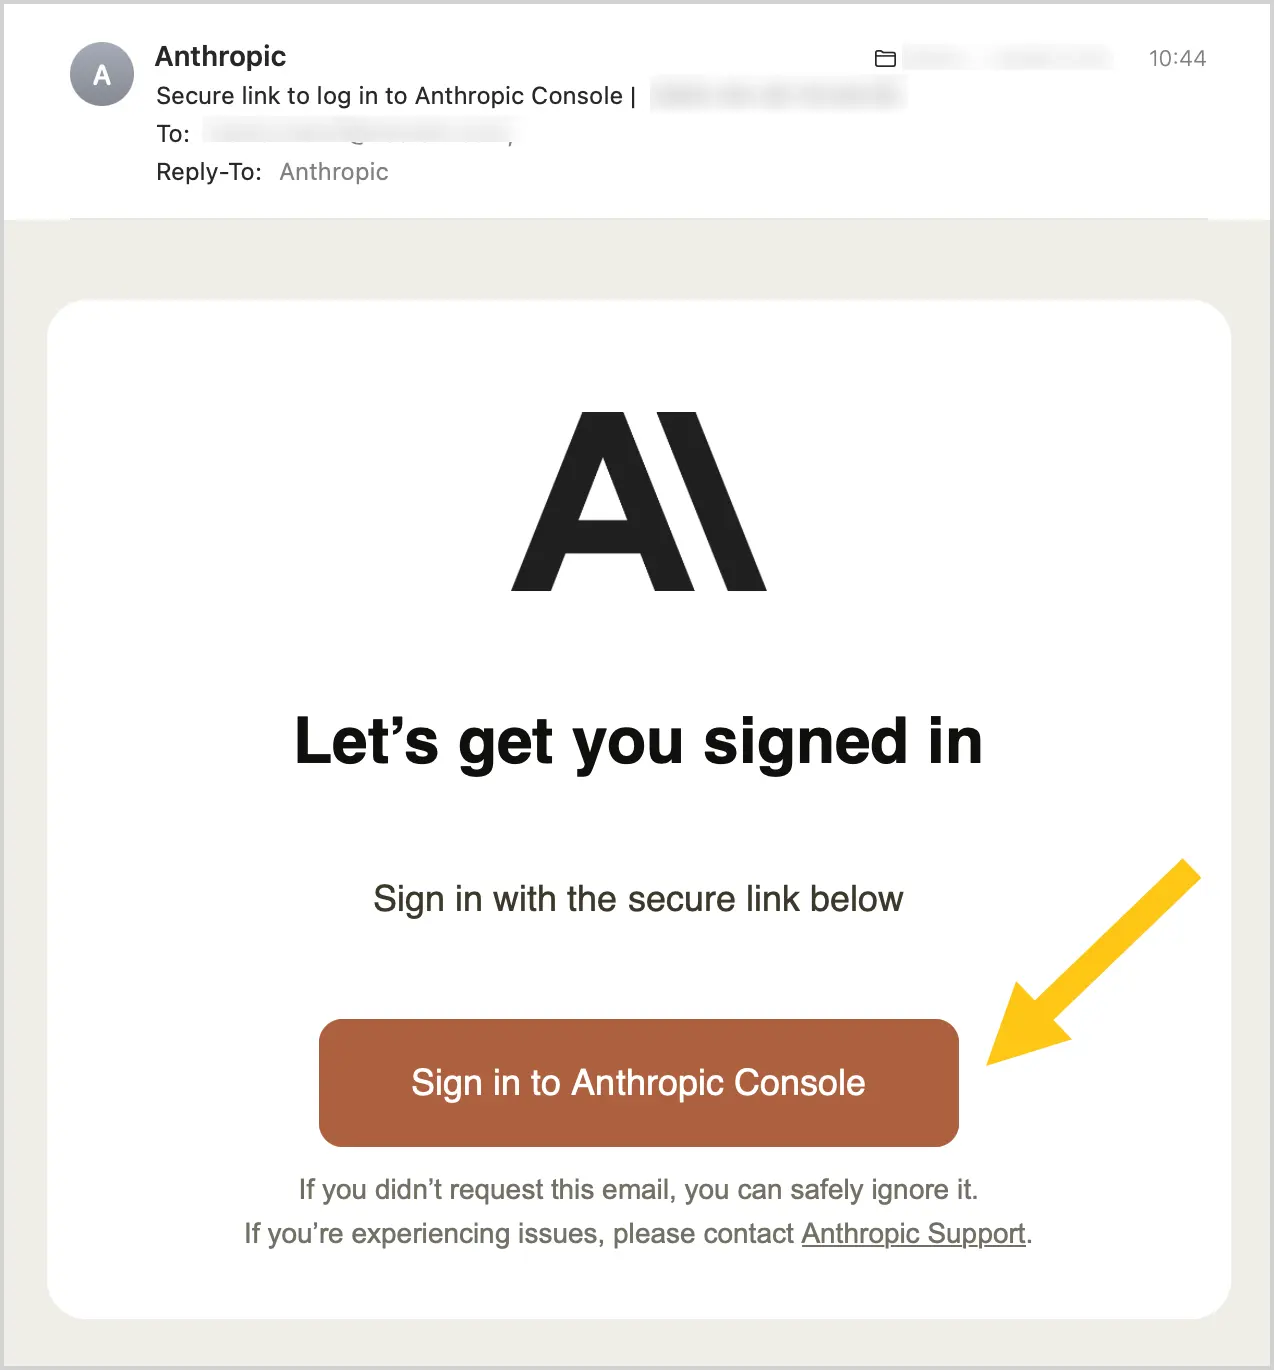
-
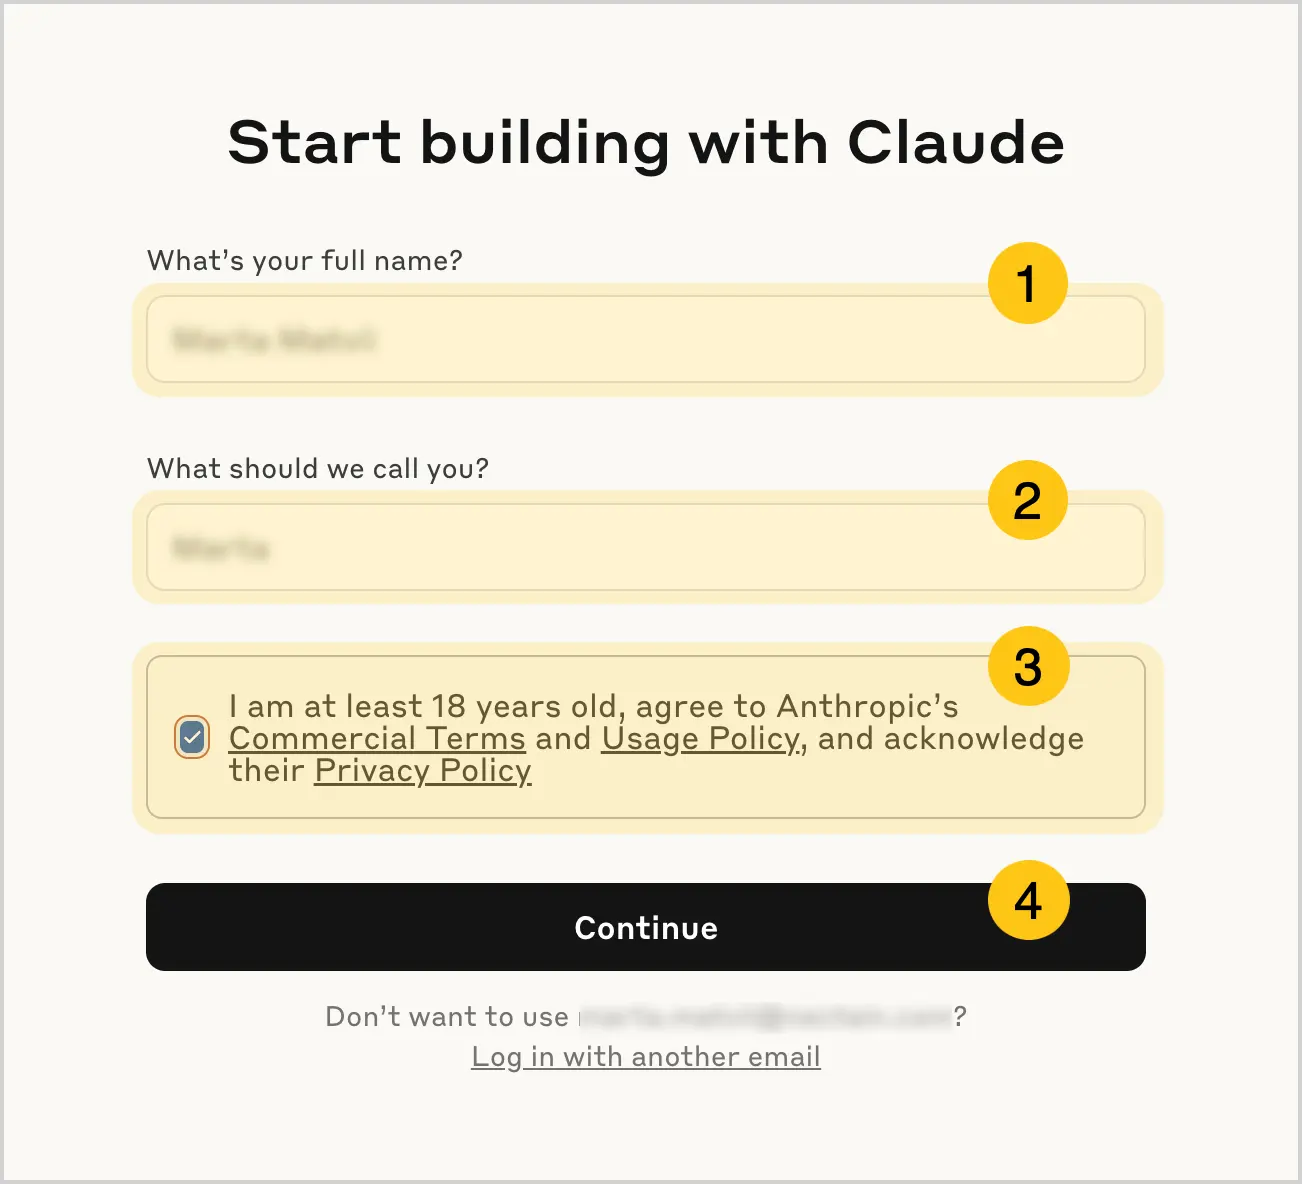
In the What's your full name 1 field, enter your full name, then in the What should we call you 2 field, enter your first name.
-
Select the I'm at least 18 years old… 3 checkbox to confirm you are of legal age, then select the Continue 4 button.
-
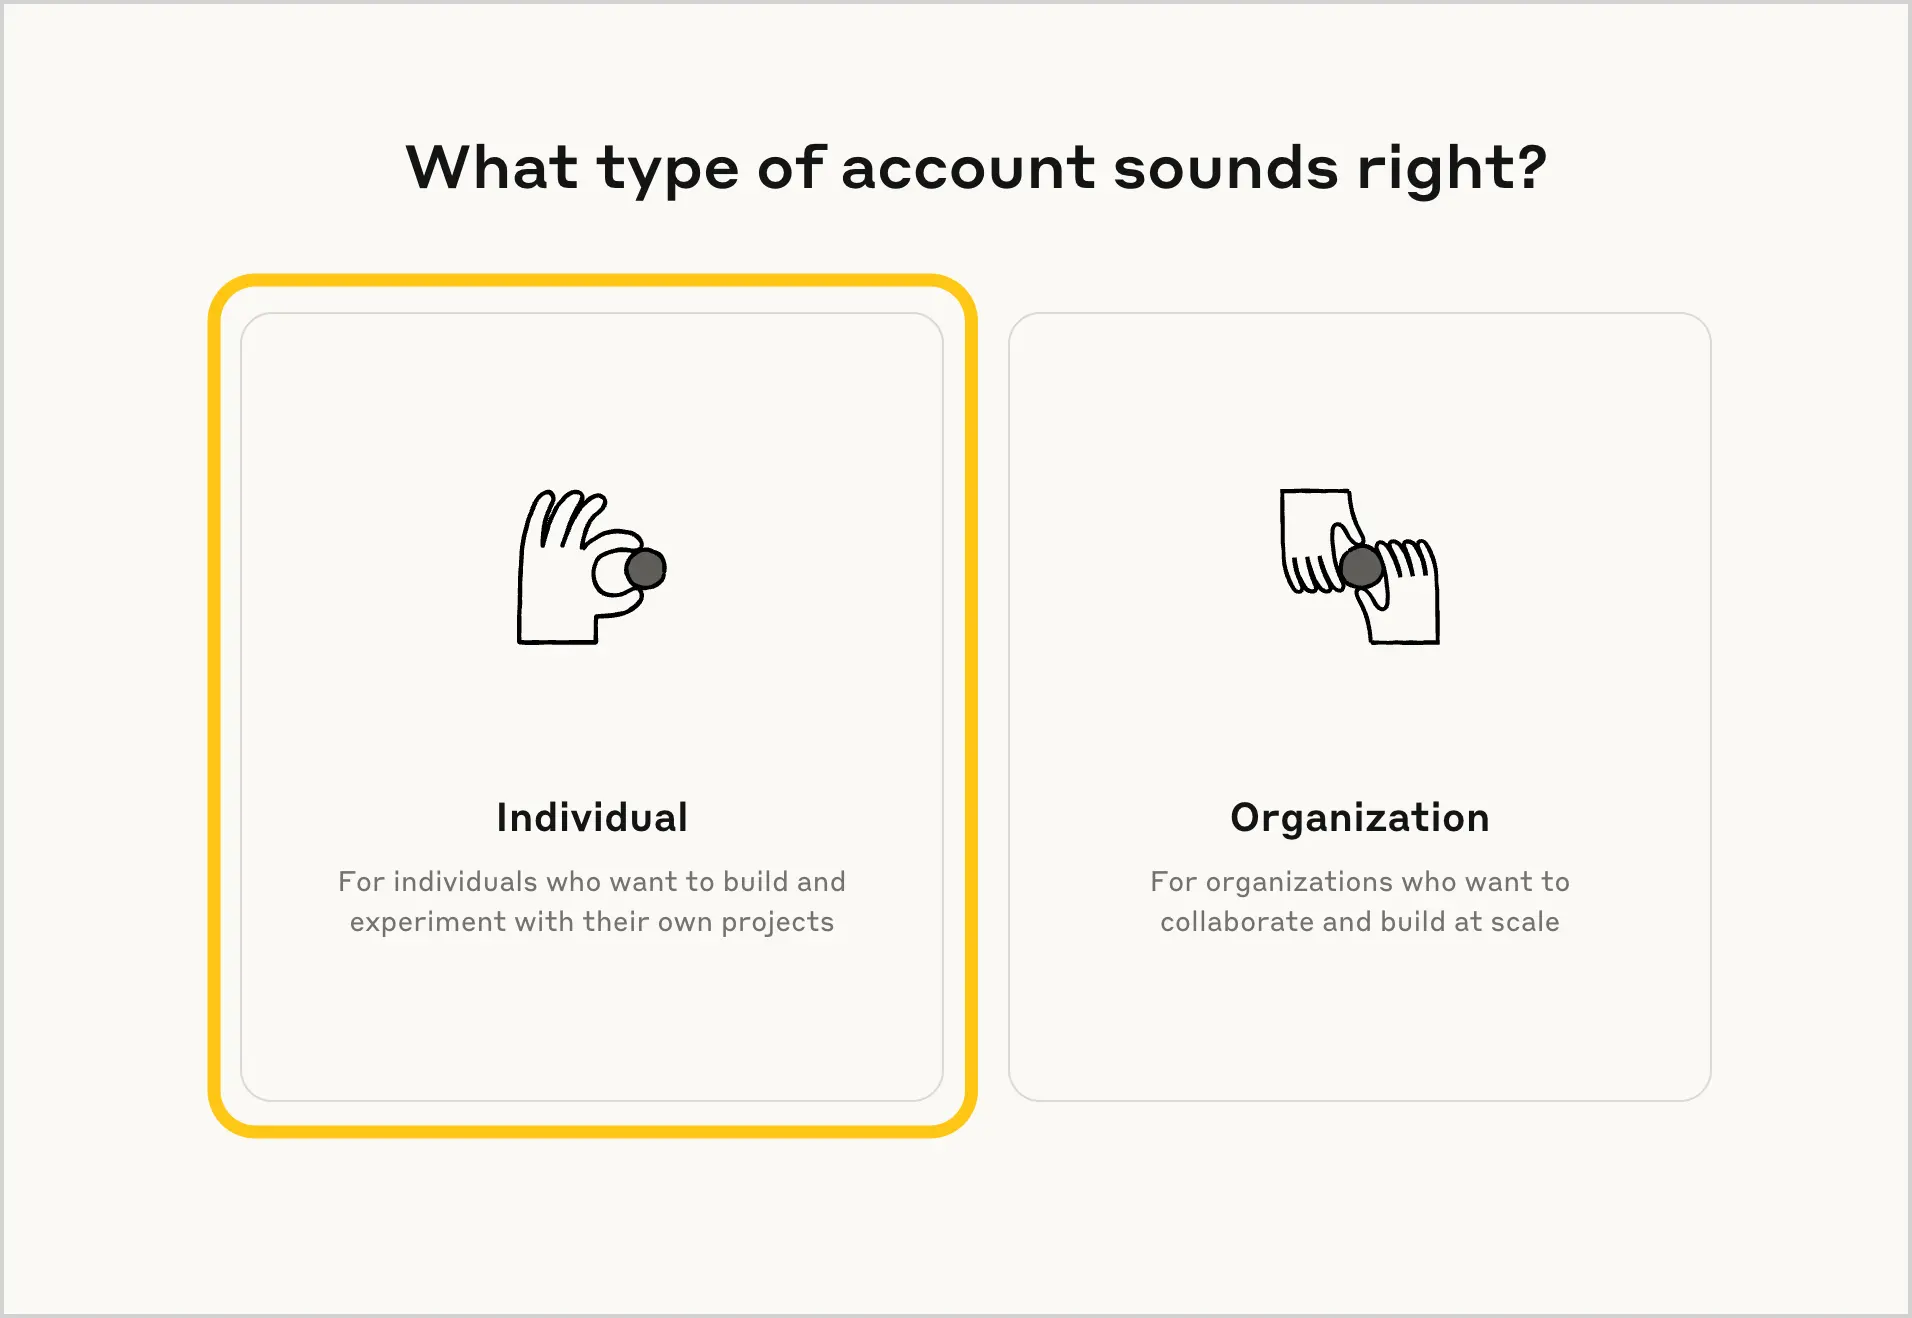
Select your account type, for example Individual, to create a personal account.
-
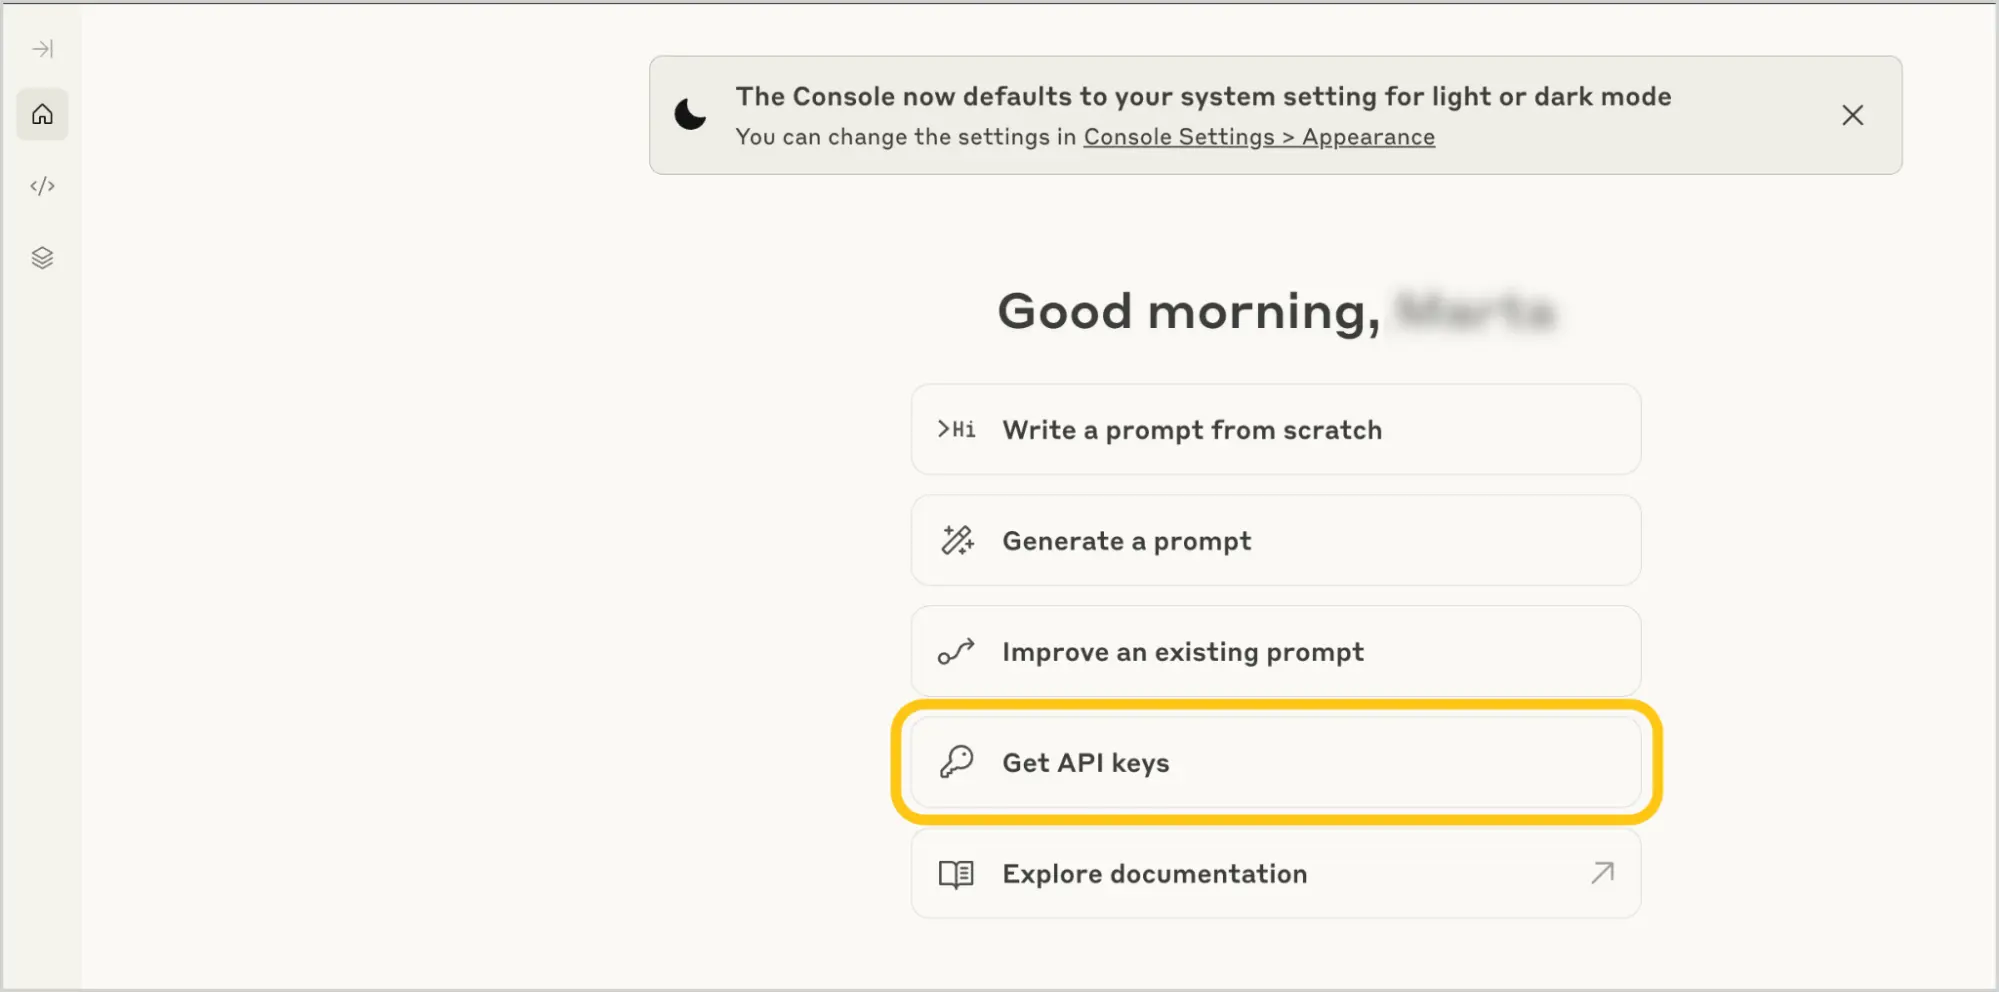
Select the Get API keys tab to generate a key.
-
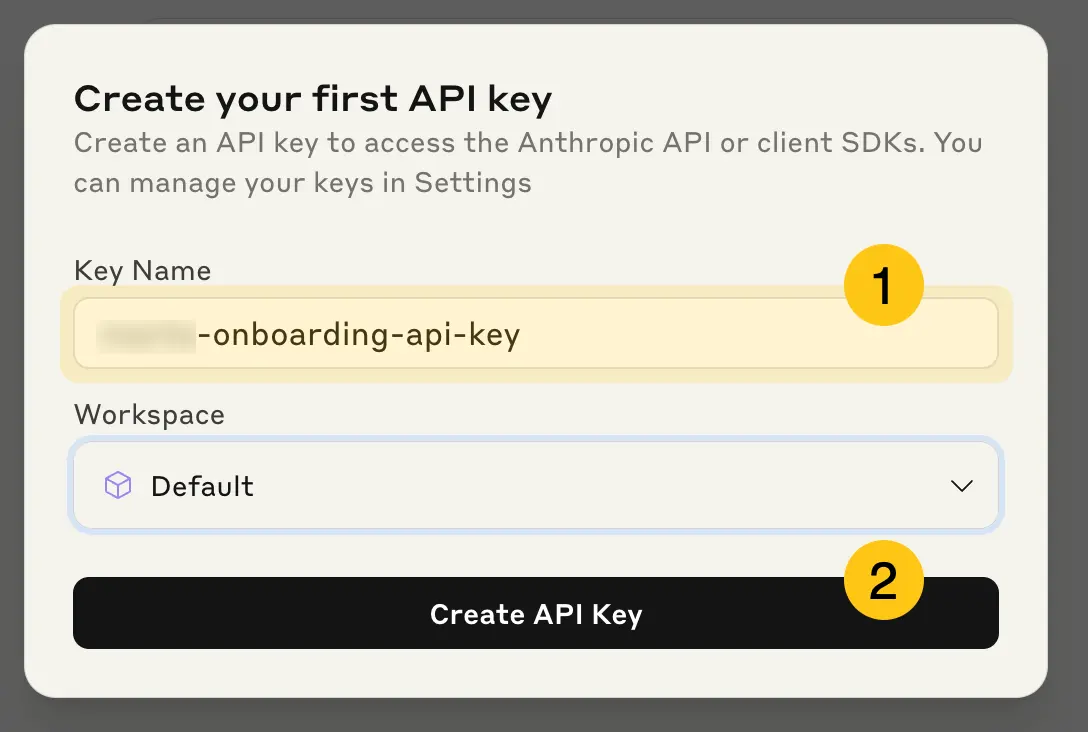
In the Key Name 1 field, edit the key name. You can name the key Nectainium to make its purpose clear.
-
Select the Create API Key 2 button.
-
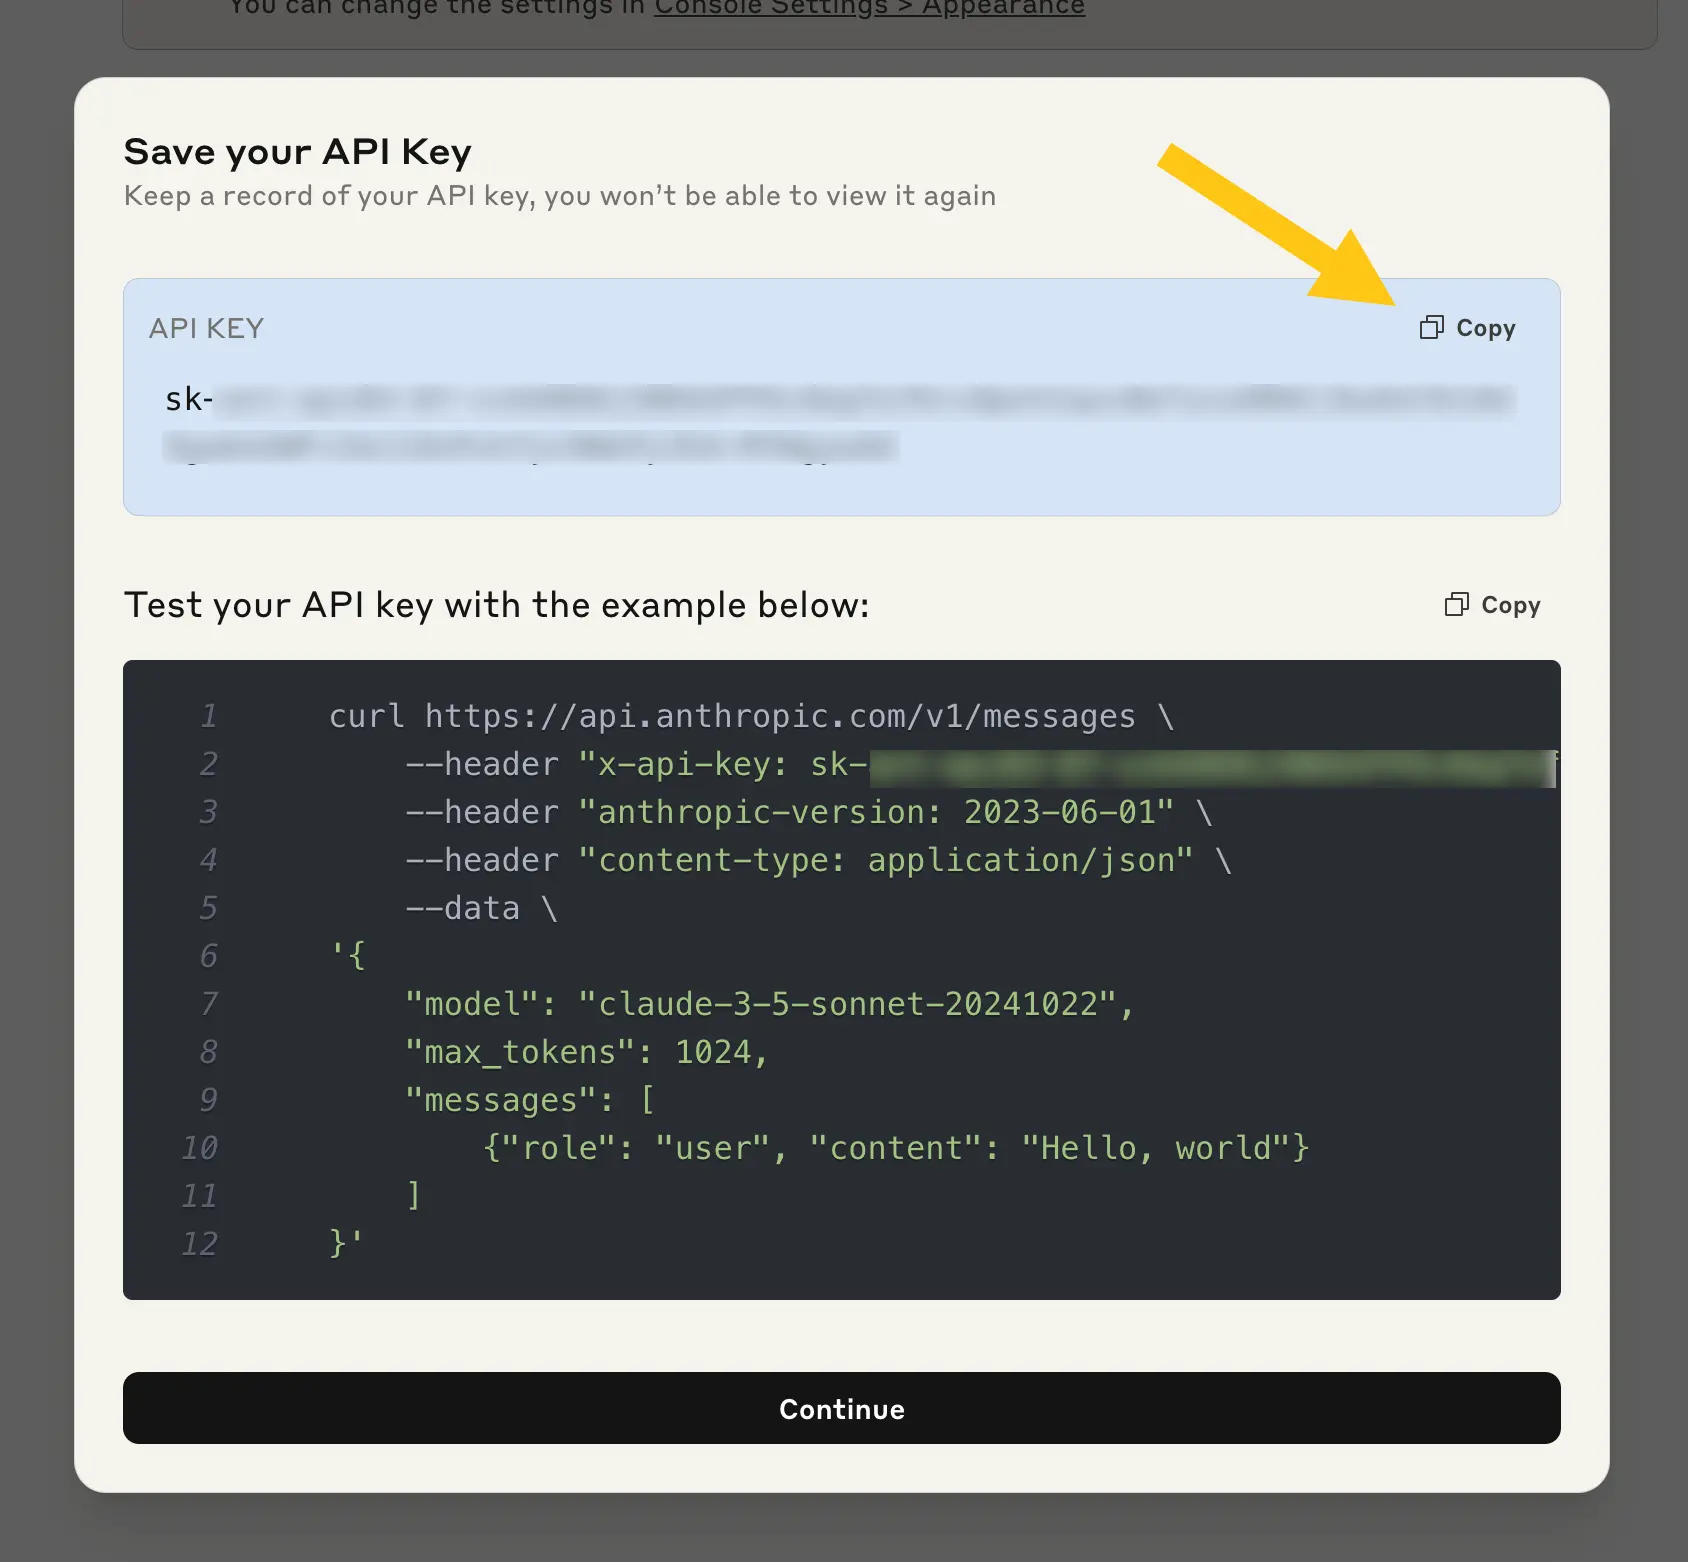
In the API KEY field, select Copy to copy the generated key.
-
Paste this key using Ctrl+V into a safe location, such as a notes app. You will need this key in the subsequent configuration steps.
Warning:After closing this window, for security reasons, you will no longer be able to see this key in the platform. If you do not save the key, you will need to generate a new one.
-
At this point, your key is ready to use. Your balance already includes a free $5 credit provided upon registration. You can proceed to the next configuration steps or add more funds to your balance.
To top up your balance, complete the following steps:
-
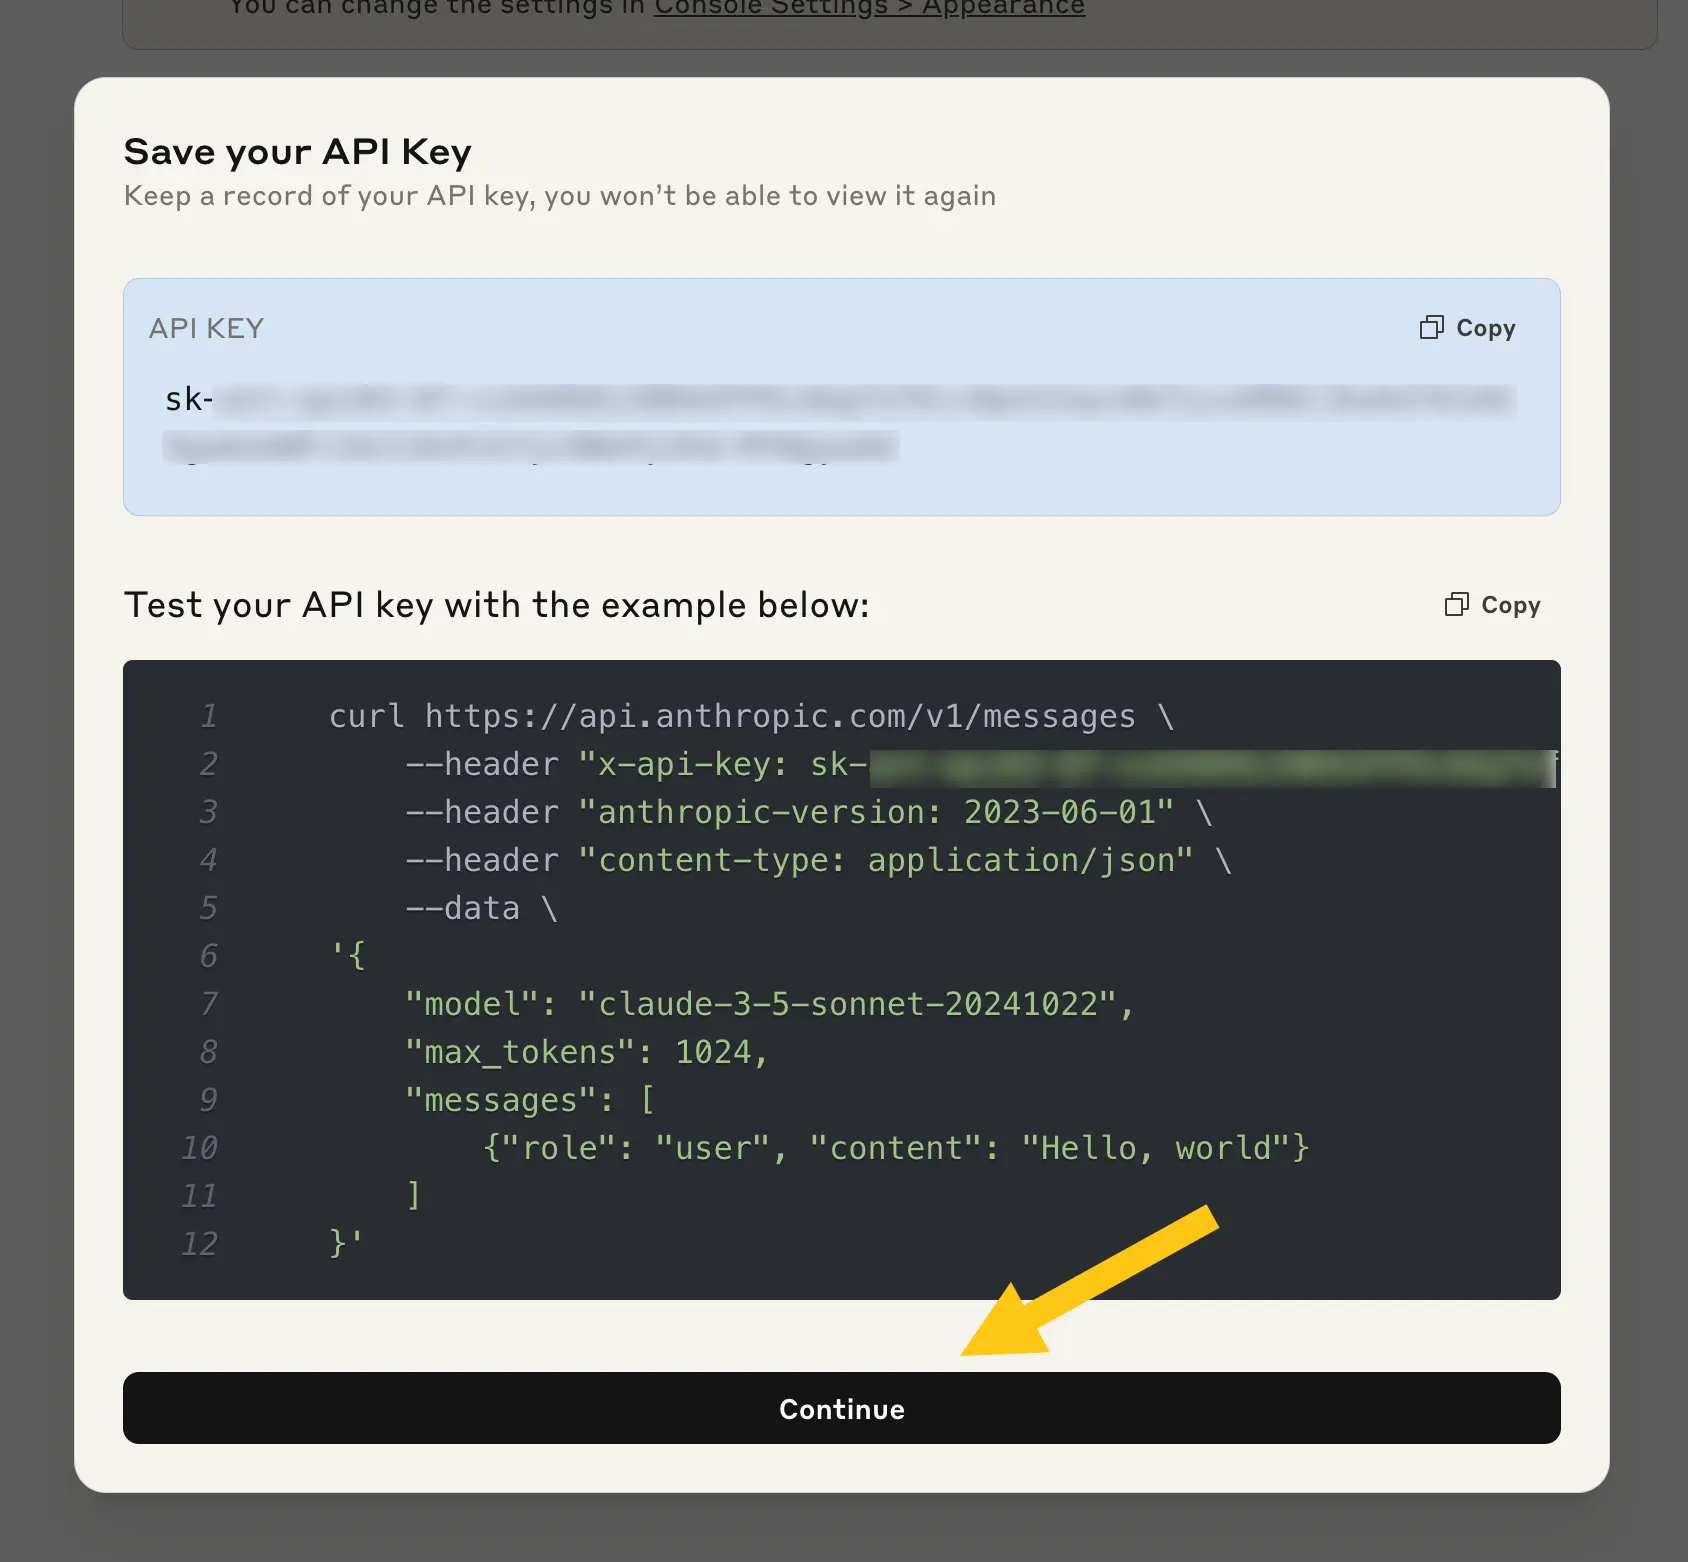
Select the Continue button.
-
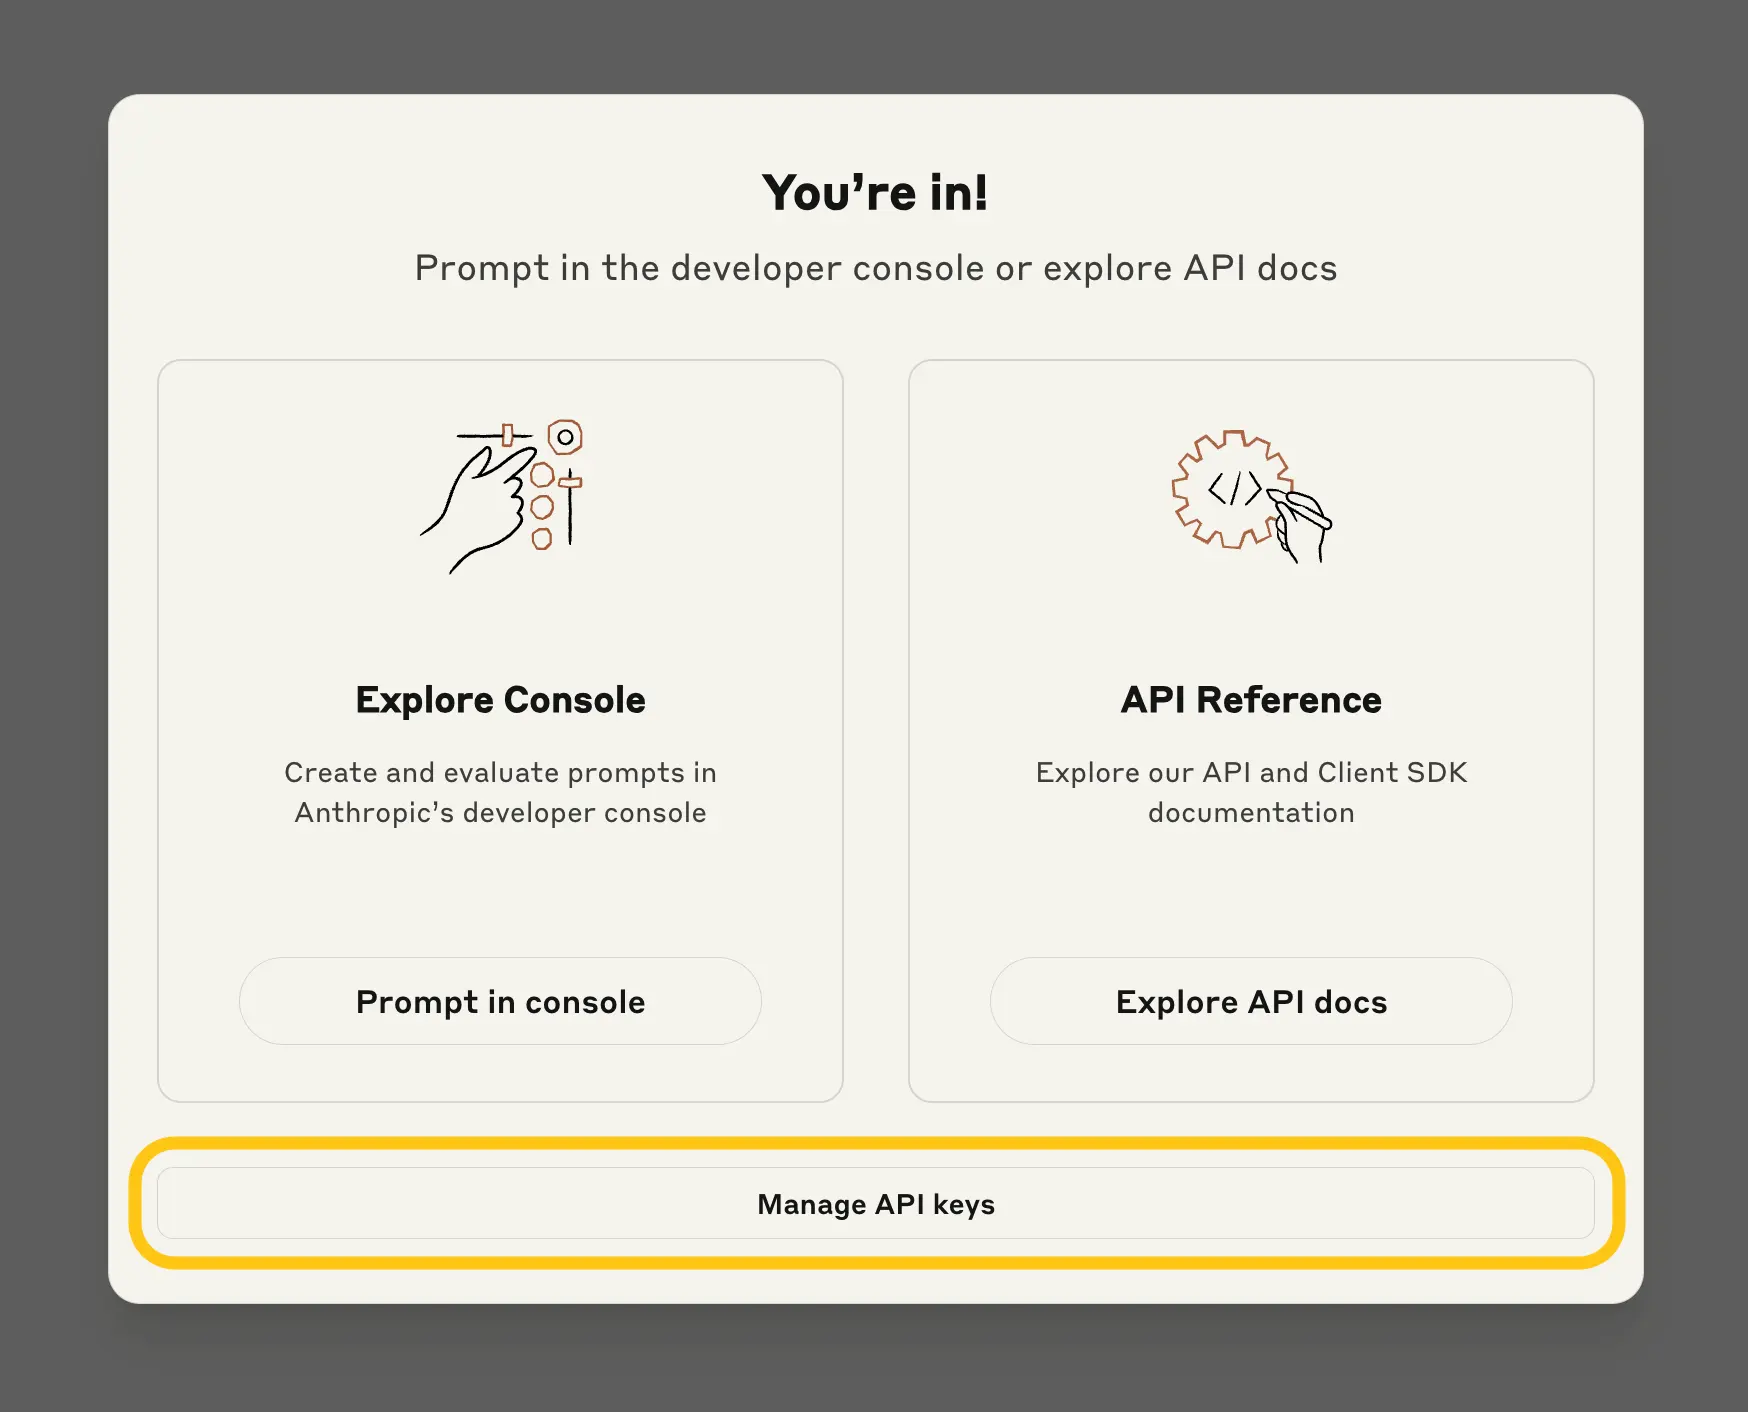
Select the Manage API keys button.
-
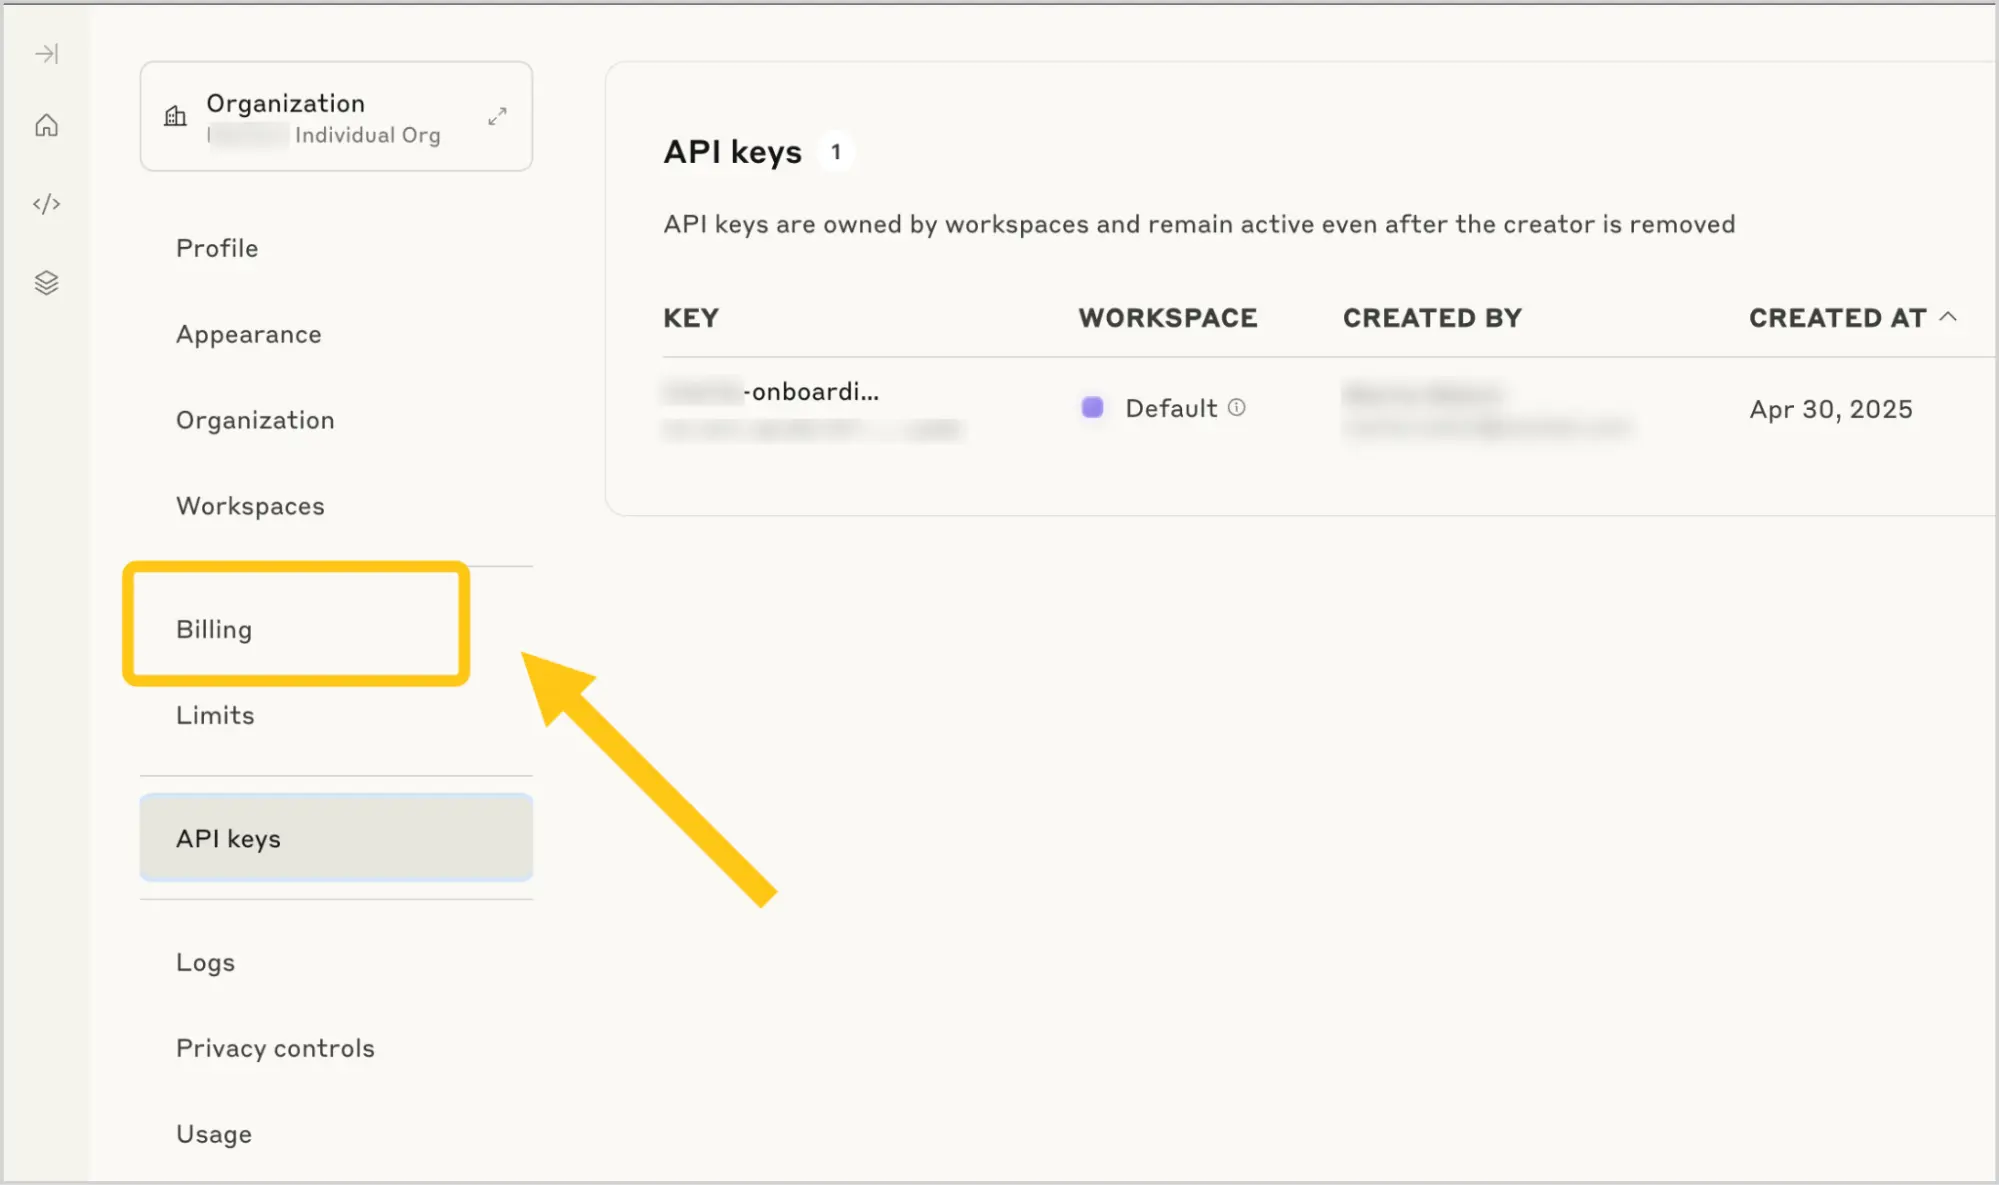
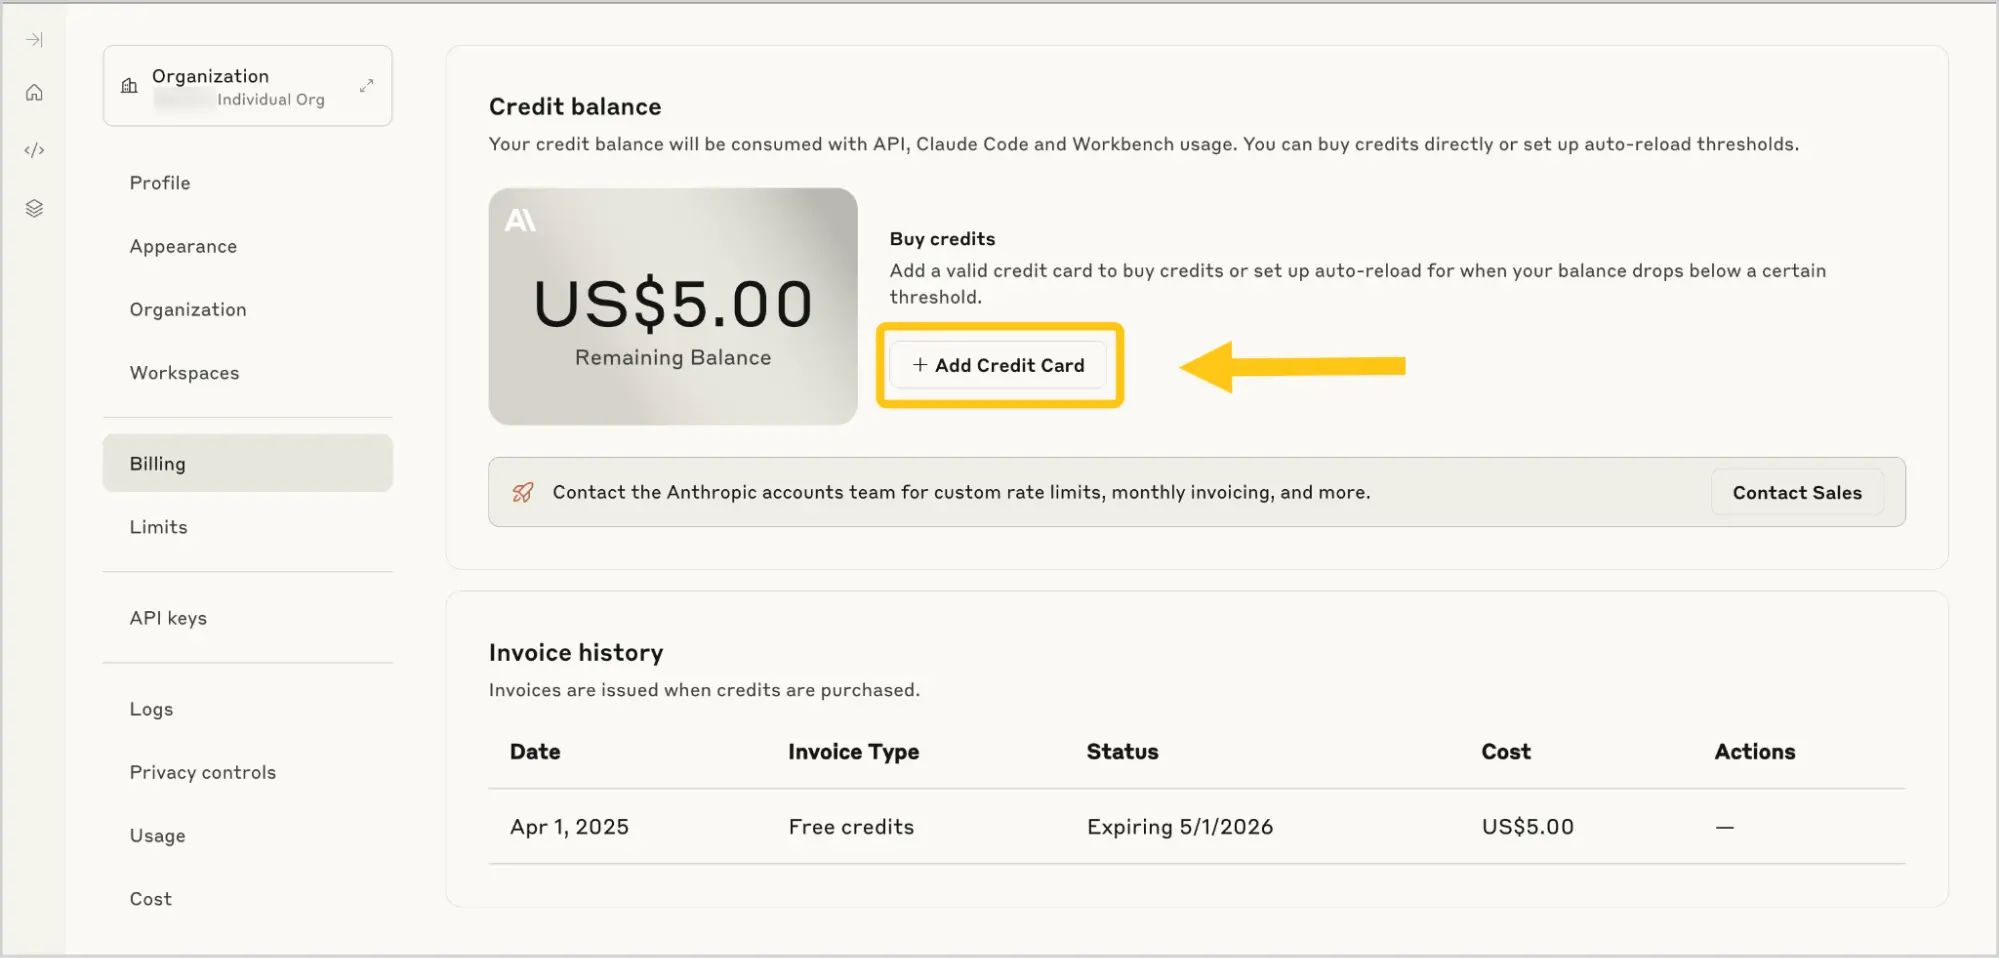
Go to the Billing section.
-
Select the Add Credit Card button.
-
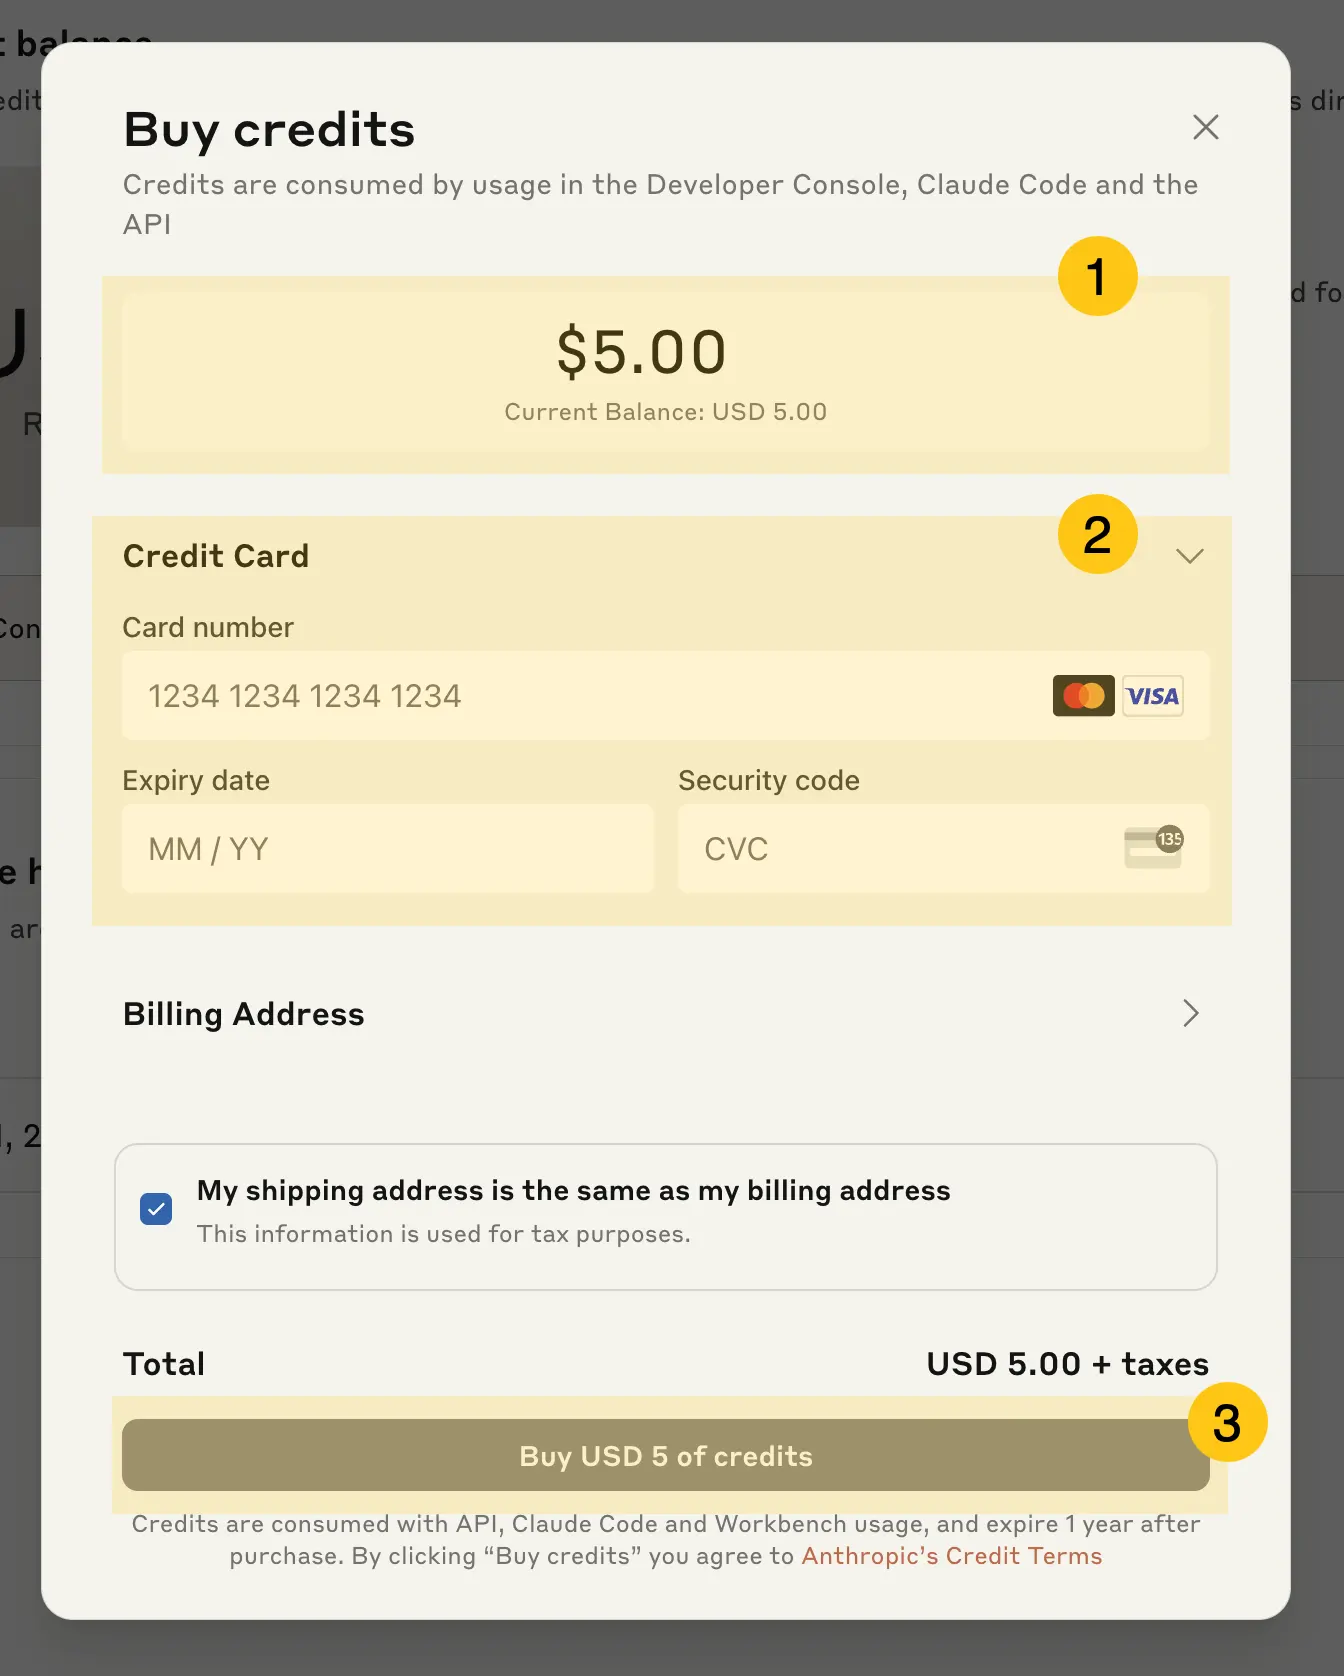
In the Current Balance 1 field, enter the amount you want to add to your balance.
-
In the Credit Card 2 section, enter your bank card details to fund the top-up.
-
Select the Buy credits 3 button to confirm the purchase.
-
Proceed to the next configuration step: Add an AI Model.
2.14.1.1.2. Add an AI Model
-
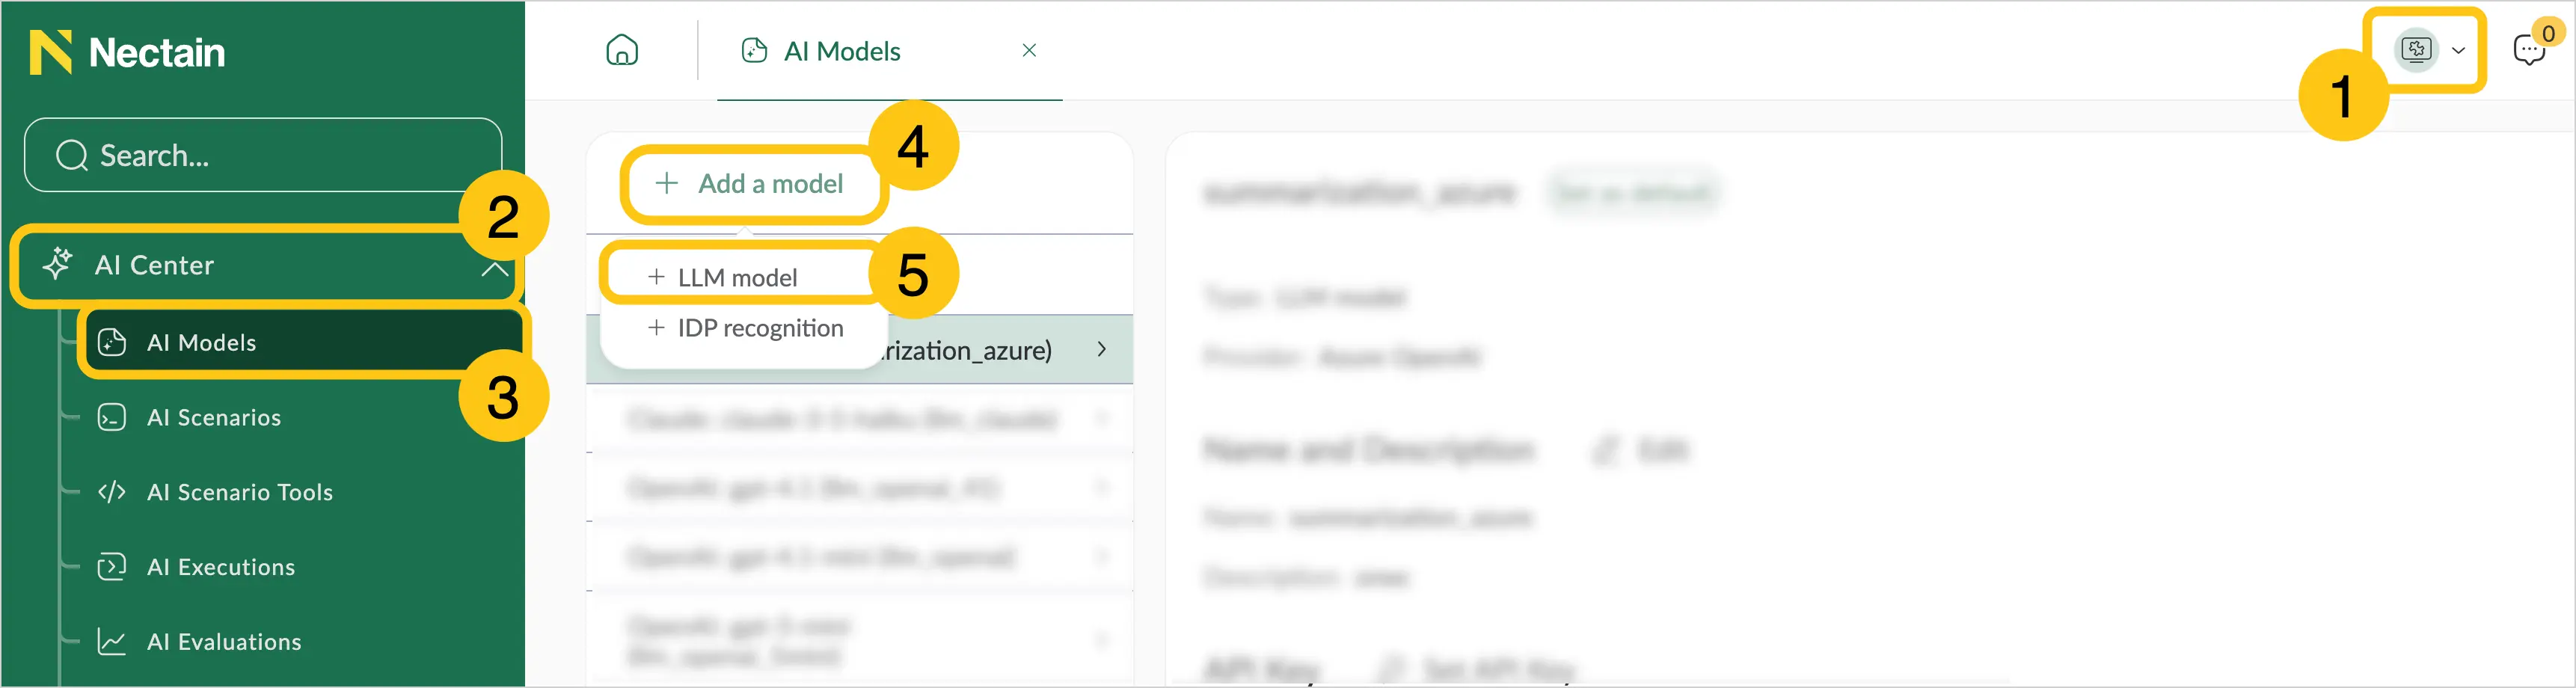
In the navigation panel, select the Studio 1 workspace.
-
Select the AI Center 2 shortcut group, then select the AI Models 3 shortcut.
-
In the toolbar, select Add a model 4.
-
In the dropdown list, select LLM model 5.
-
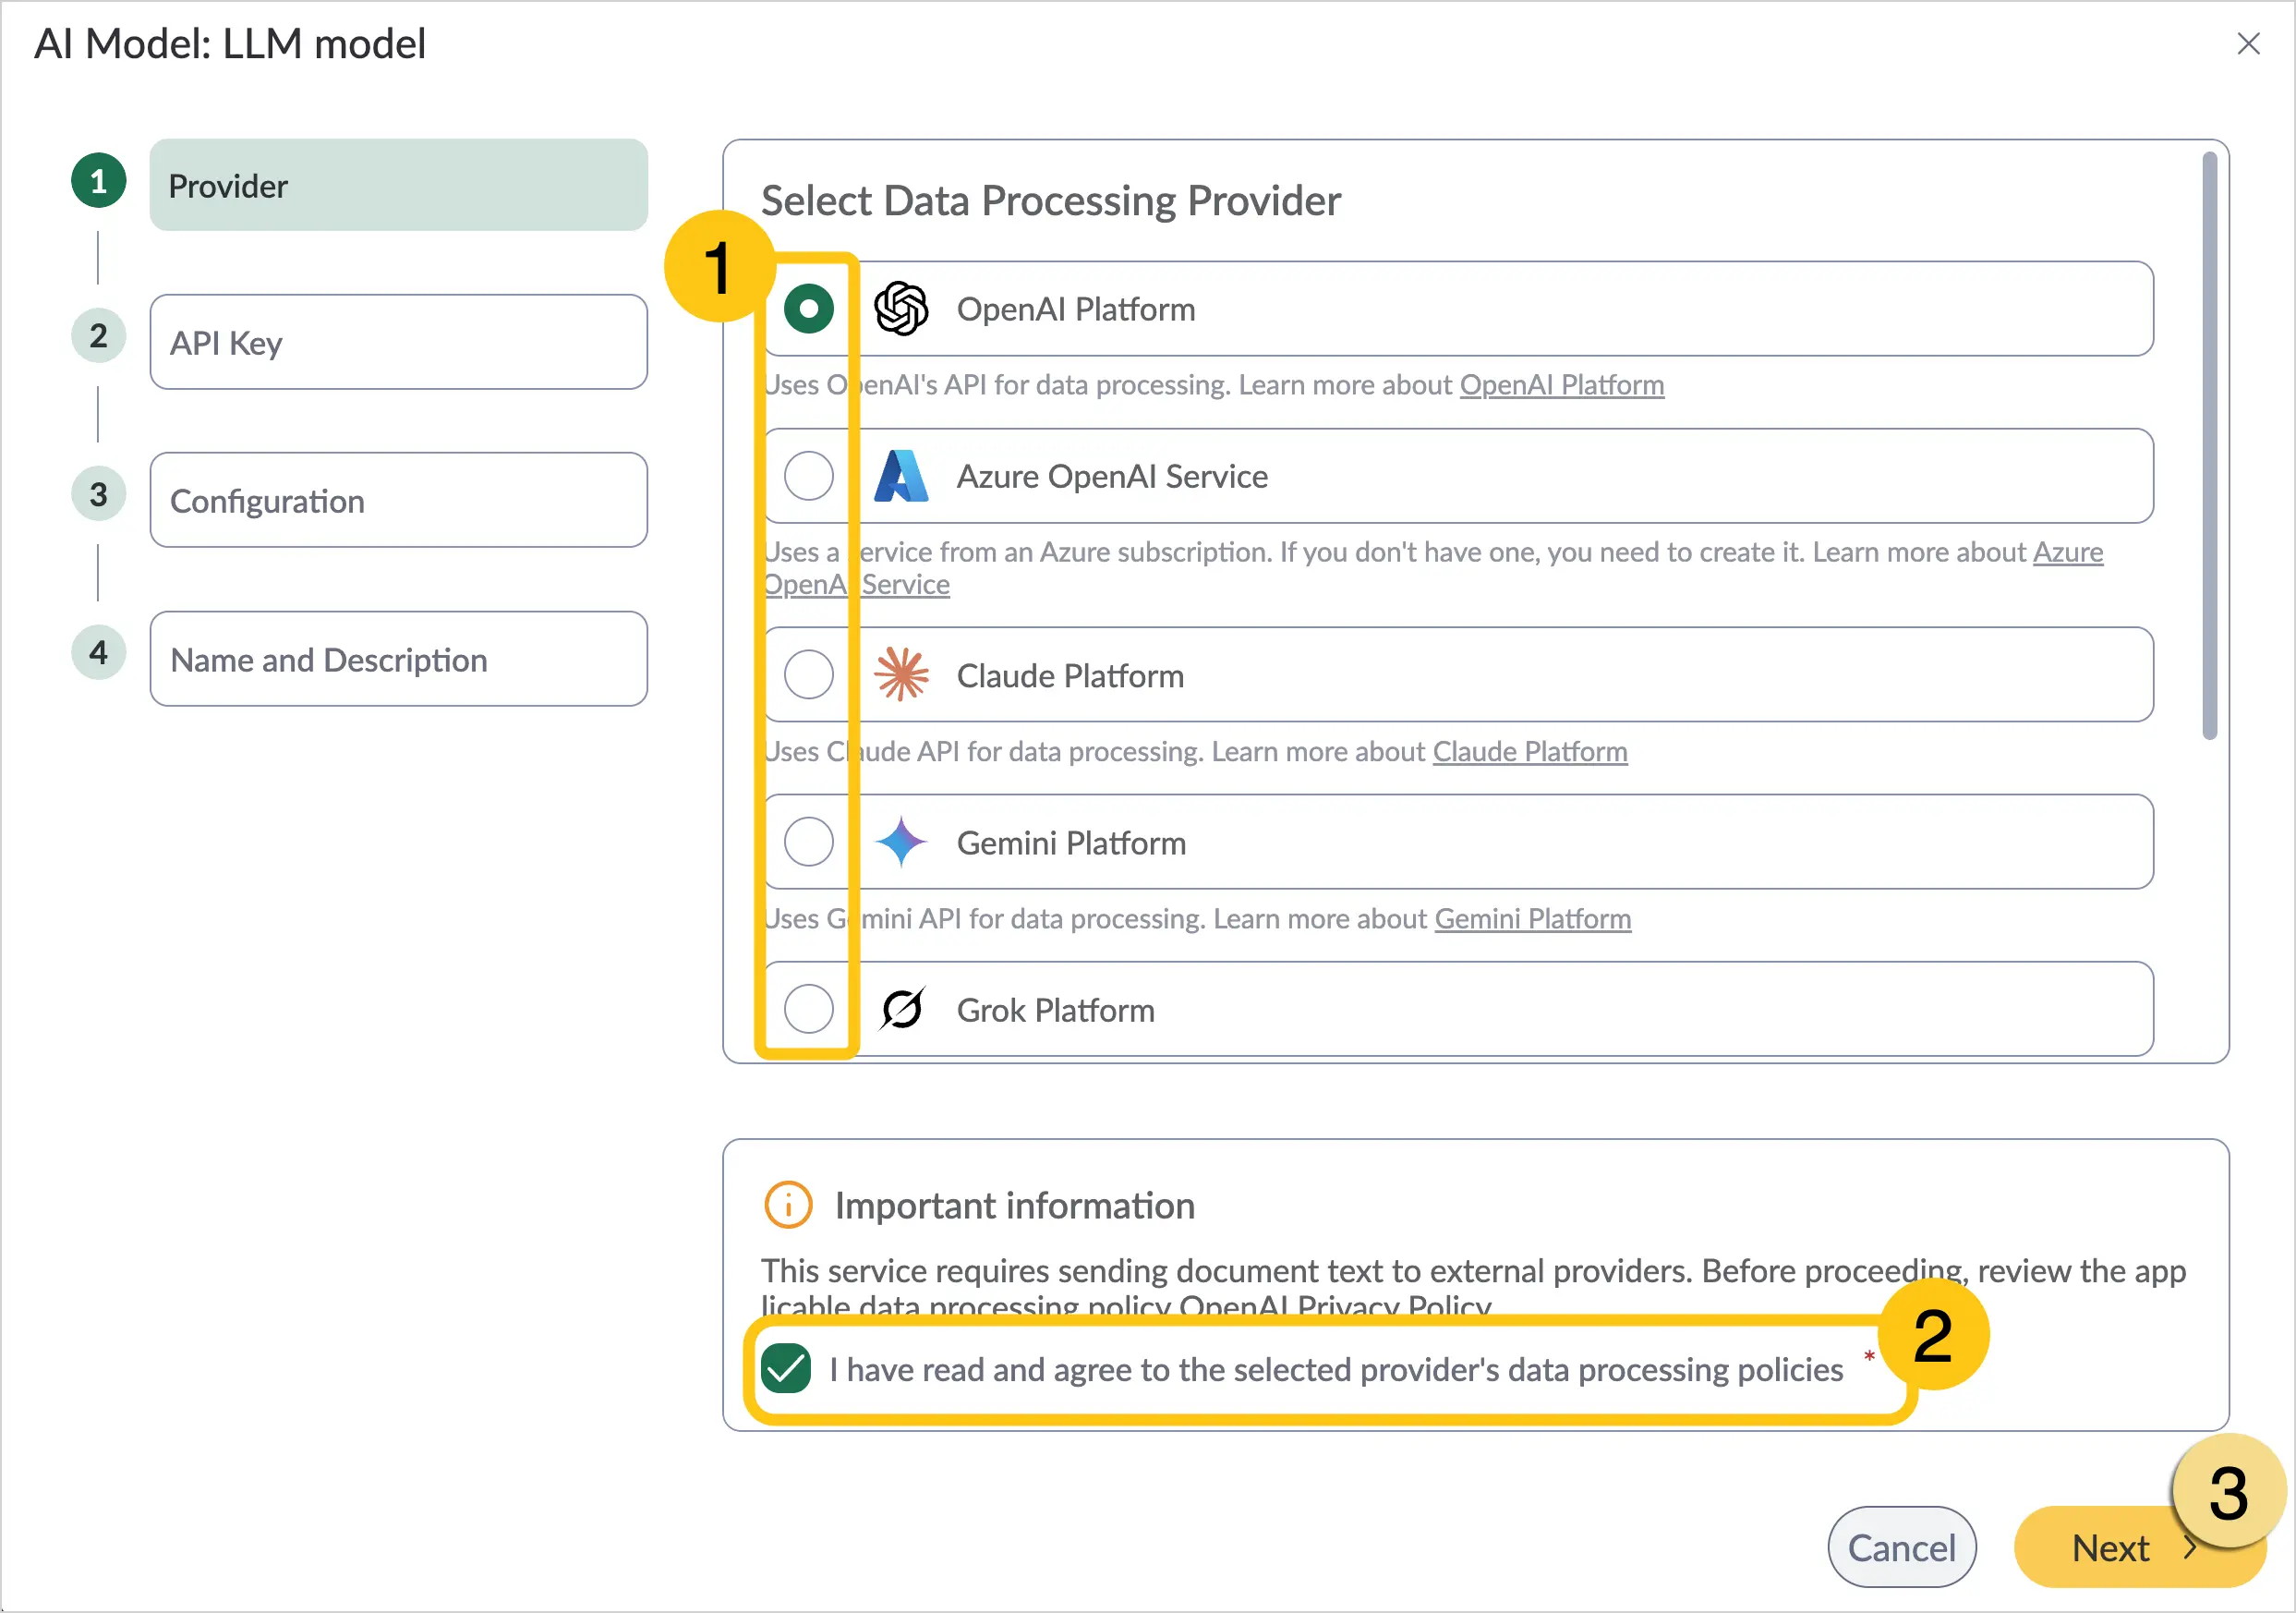
Select the checkbox of the required data processing provider 1, according to the subscription you set up in the previous step.
-
Select the I have read and agree to the selected provider's data processing policies 2 checkbox.
-
Select the Next 3 button.
-
Complete the remaining steps according to your selected provider.
Azure OpenAI provider
-
In the Key 1 field, paste the value from the API key 1 field in the Azure OpenAI resource you created in the Create an Azure OpenAI subscription section (steps 16–21).
-
In the Key expiry date 2 field, select the date until which this key will be valid.
-
If you set a date in the previous field, you can also select the Notify the administrator 15 days before the key expires checkbox.
-
In the URL 1 field, paste the value from the Azure OpenAI endpoint field in the Azure OpenAI resource you created in the Create an Azure OpenAI subscription section (steps 16–21).
-
In the Deployment ID 2 field, paste the value from the Deployment name field of the deployment you created in the Create an Azure OpenAI subscription section (steps 23–24).
-
Select the Verify API key button. If the key is valid, the message API key is valid will appear.
-
Select the I understand that API usage will be charged to my account 1 checkbox. This means that model usage will be billed according to the rates of the provider with whom you set up the subscription.
-
Select the Next 2 button.
-
In the Name 1 field, enter a name for the added model.
-
In the Description 2 field, specify the purpose of the model.
-
Select the Default model 1 checkbox if you want this model to be used automatically for this provider. If you add another model from the same provider, this model will be selected by default.
-
Select the Add 2 button.
OpenAI, DeepSeek, Grok, Gemini, Claude providers
-
In the Key 1 field, paste the API key you generated in the previous step.
-
In the Key expiry date 2 field, select the date until which this key will be valid.
-
Select the Notify the administrator 15 days before the key expires 3 checkbox.
-
Select the Verify API key 4 button. If the key is valid, the message API key is valid will appear.
-
Select the I understand that API usage will be charged to my account 1 checkbox. This means that all charges will be applied according to the rates of the provider with whom you set up the subscription.
-
Select the Next 2 button.
-
In the Model 1 section, select one of the following options:
- Recommended model: each provider offers multiple models, but the Nectainium platform always recommends the one best suited for document processing. For example: the OpenAI platform includes models such as gpt-5-mini, gpt-5.3, gpt-5.2, gpt-4.1-mini, and many others. The Nectainium platform recommends the gpt-5-mini model.
- Custom model: if the platform’s recommended model does not suit your needs, you can select any other model available from your provider. When you select this option, the Custom model 2 field will appear, where you can choose one of the models offered by your provider.
-
Select the Next 3 button.
-
In the Name 1 field, enter a name for the added model.
-
In the Description 2 field, enter the purpose of the model.
-
Select the Default model 3 checkbox if you want this model to be used automatically for this provider. If you add another model from the same provider, this model will be selected by default.
-
Select the Add 4 button.
2.14.1.1.3. Create a Recognition Template
-
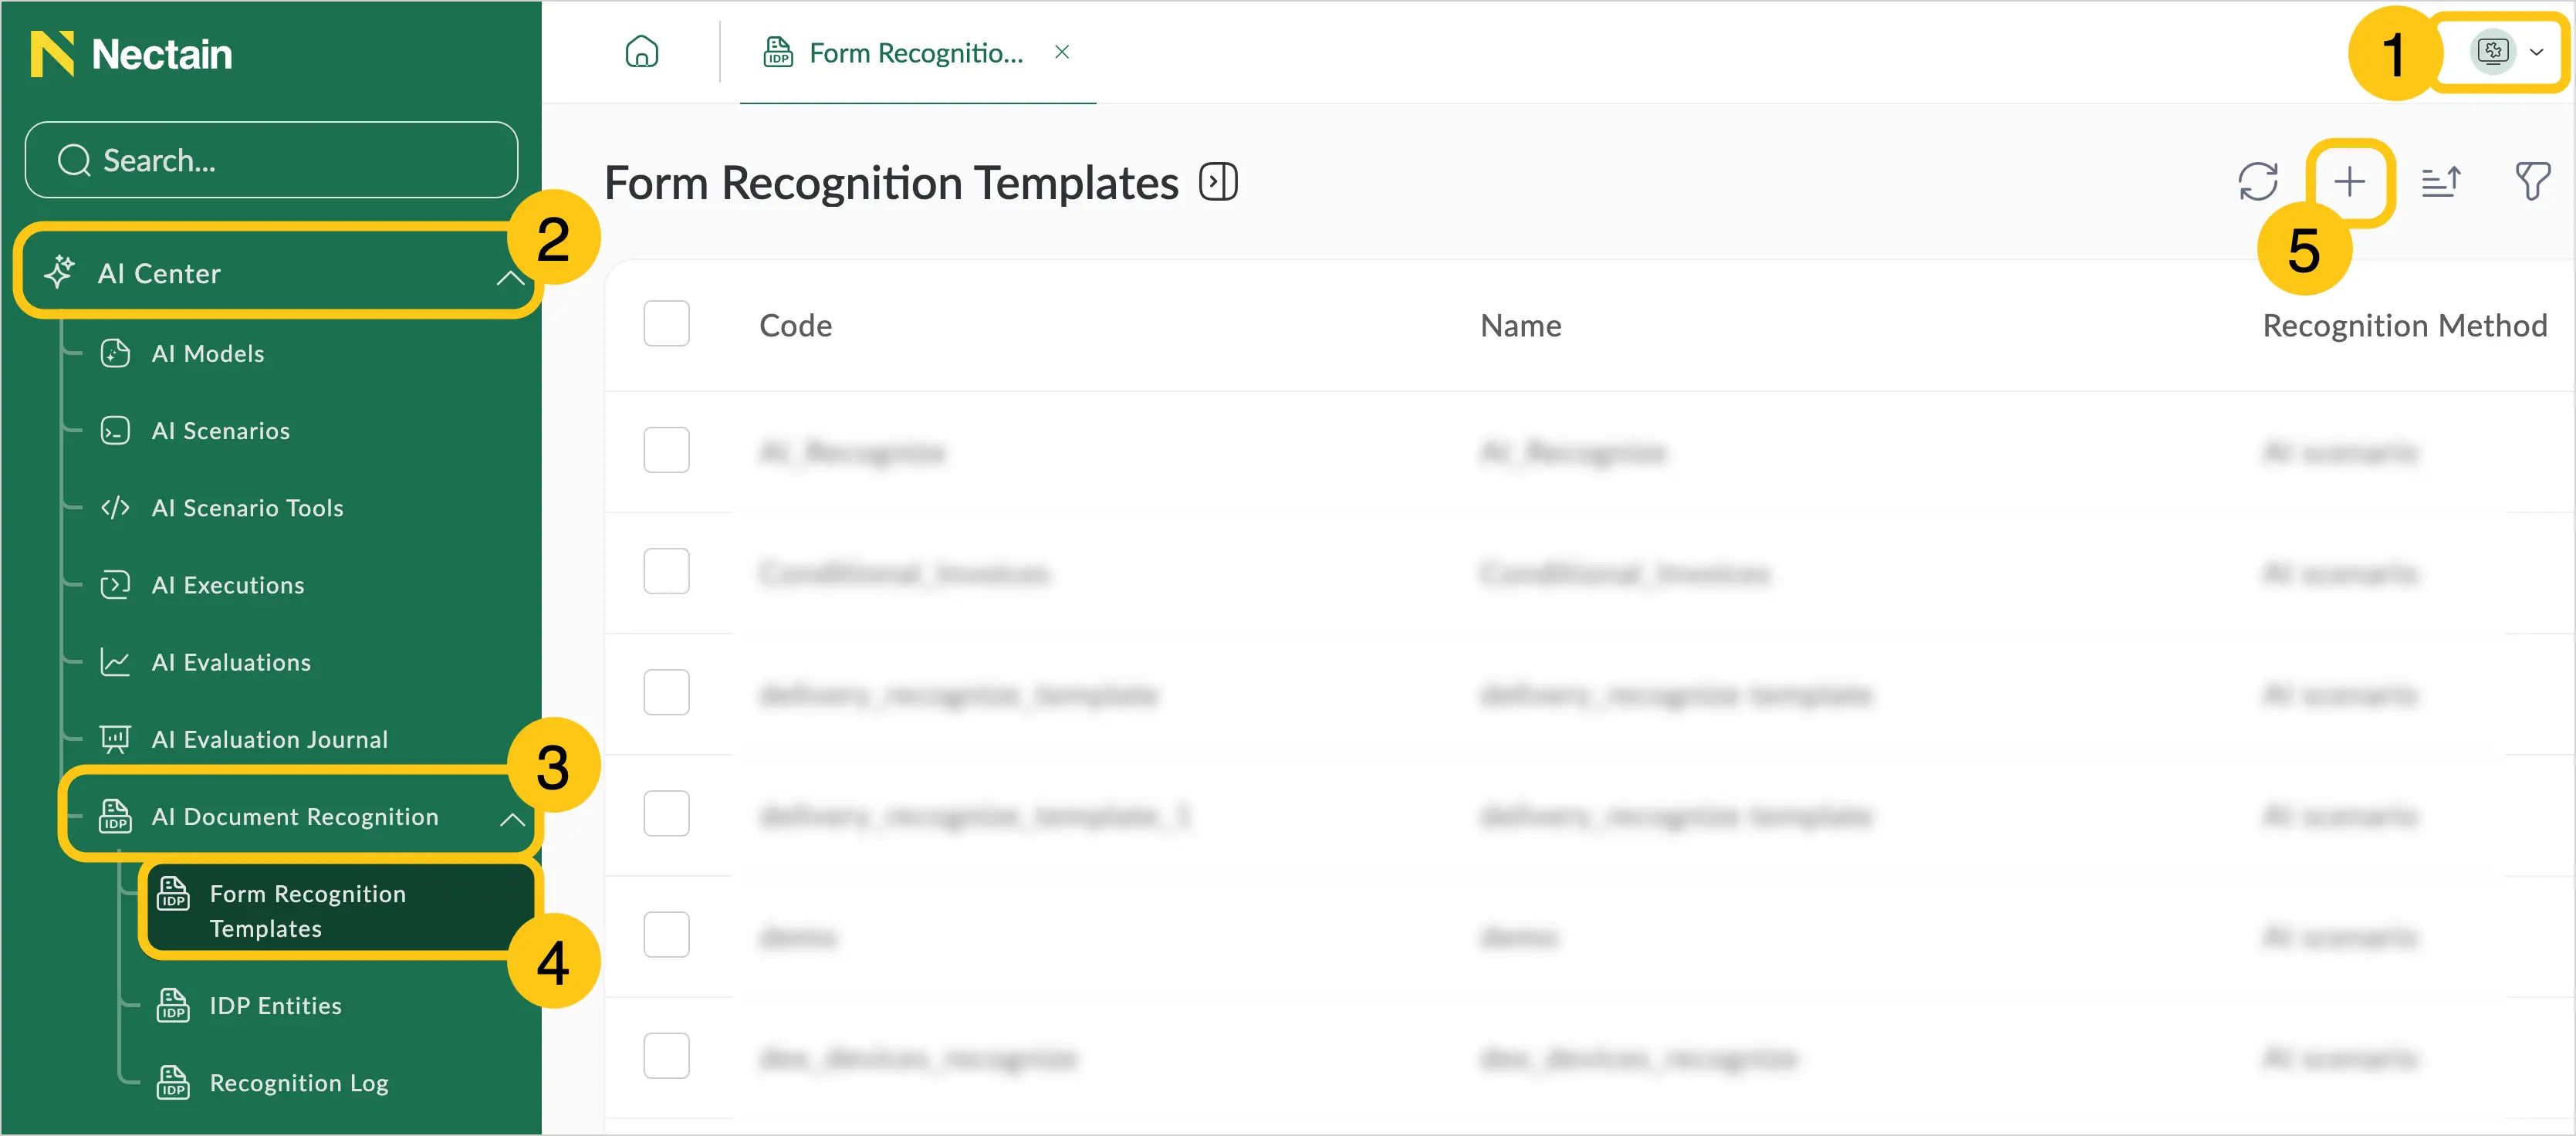
In the navigation panel, select the Studio 1 workspace.
-
Select the AI Center 2 shortcut group, then select the AI Document Recognition 3 shortcut group.
-
Select the Form Recognition Templates 4 shortcut, then in the toolbar select + 5.
-
Fill in the fields using the guidance in the table below.
| Field | Description |
|---|---|
| Code* |
|
| Name* | Enter the template name. |
| Description | If needed, enter a brief description of the template's purpose. |
| Recognition method* | Select the AI Scenario option. |
| AI Scenario* | Select the required AI scenario from the list. The list will display only AI scenarios of the Document Recognition type. You can also select the system scenario sys_doc_recognize, which is designed to recognize both single and multiple documents at once. |
| Document types | Select one of the following options:
|
-
In the toolbar, select Save.
2.14.1.1.4. Configure a Shortcut for Recognition
Any platform users can perform recognition if the administrator grants them access to the shortcut and permission to create documents of the types selected in the shortcut.
-
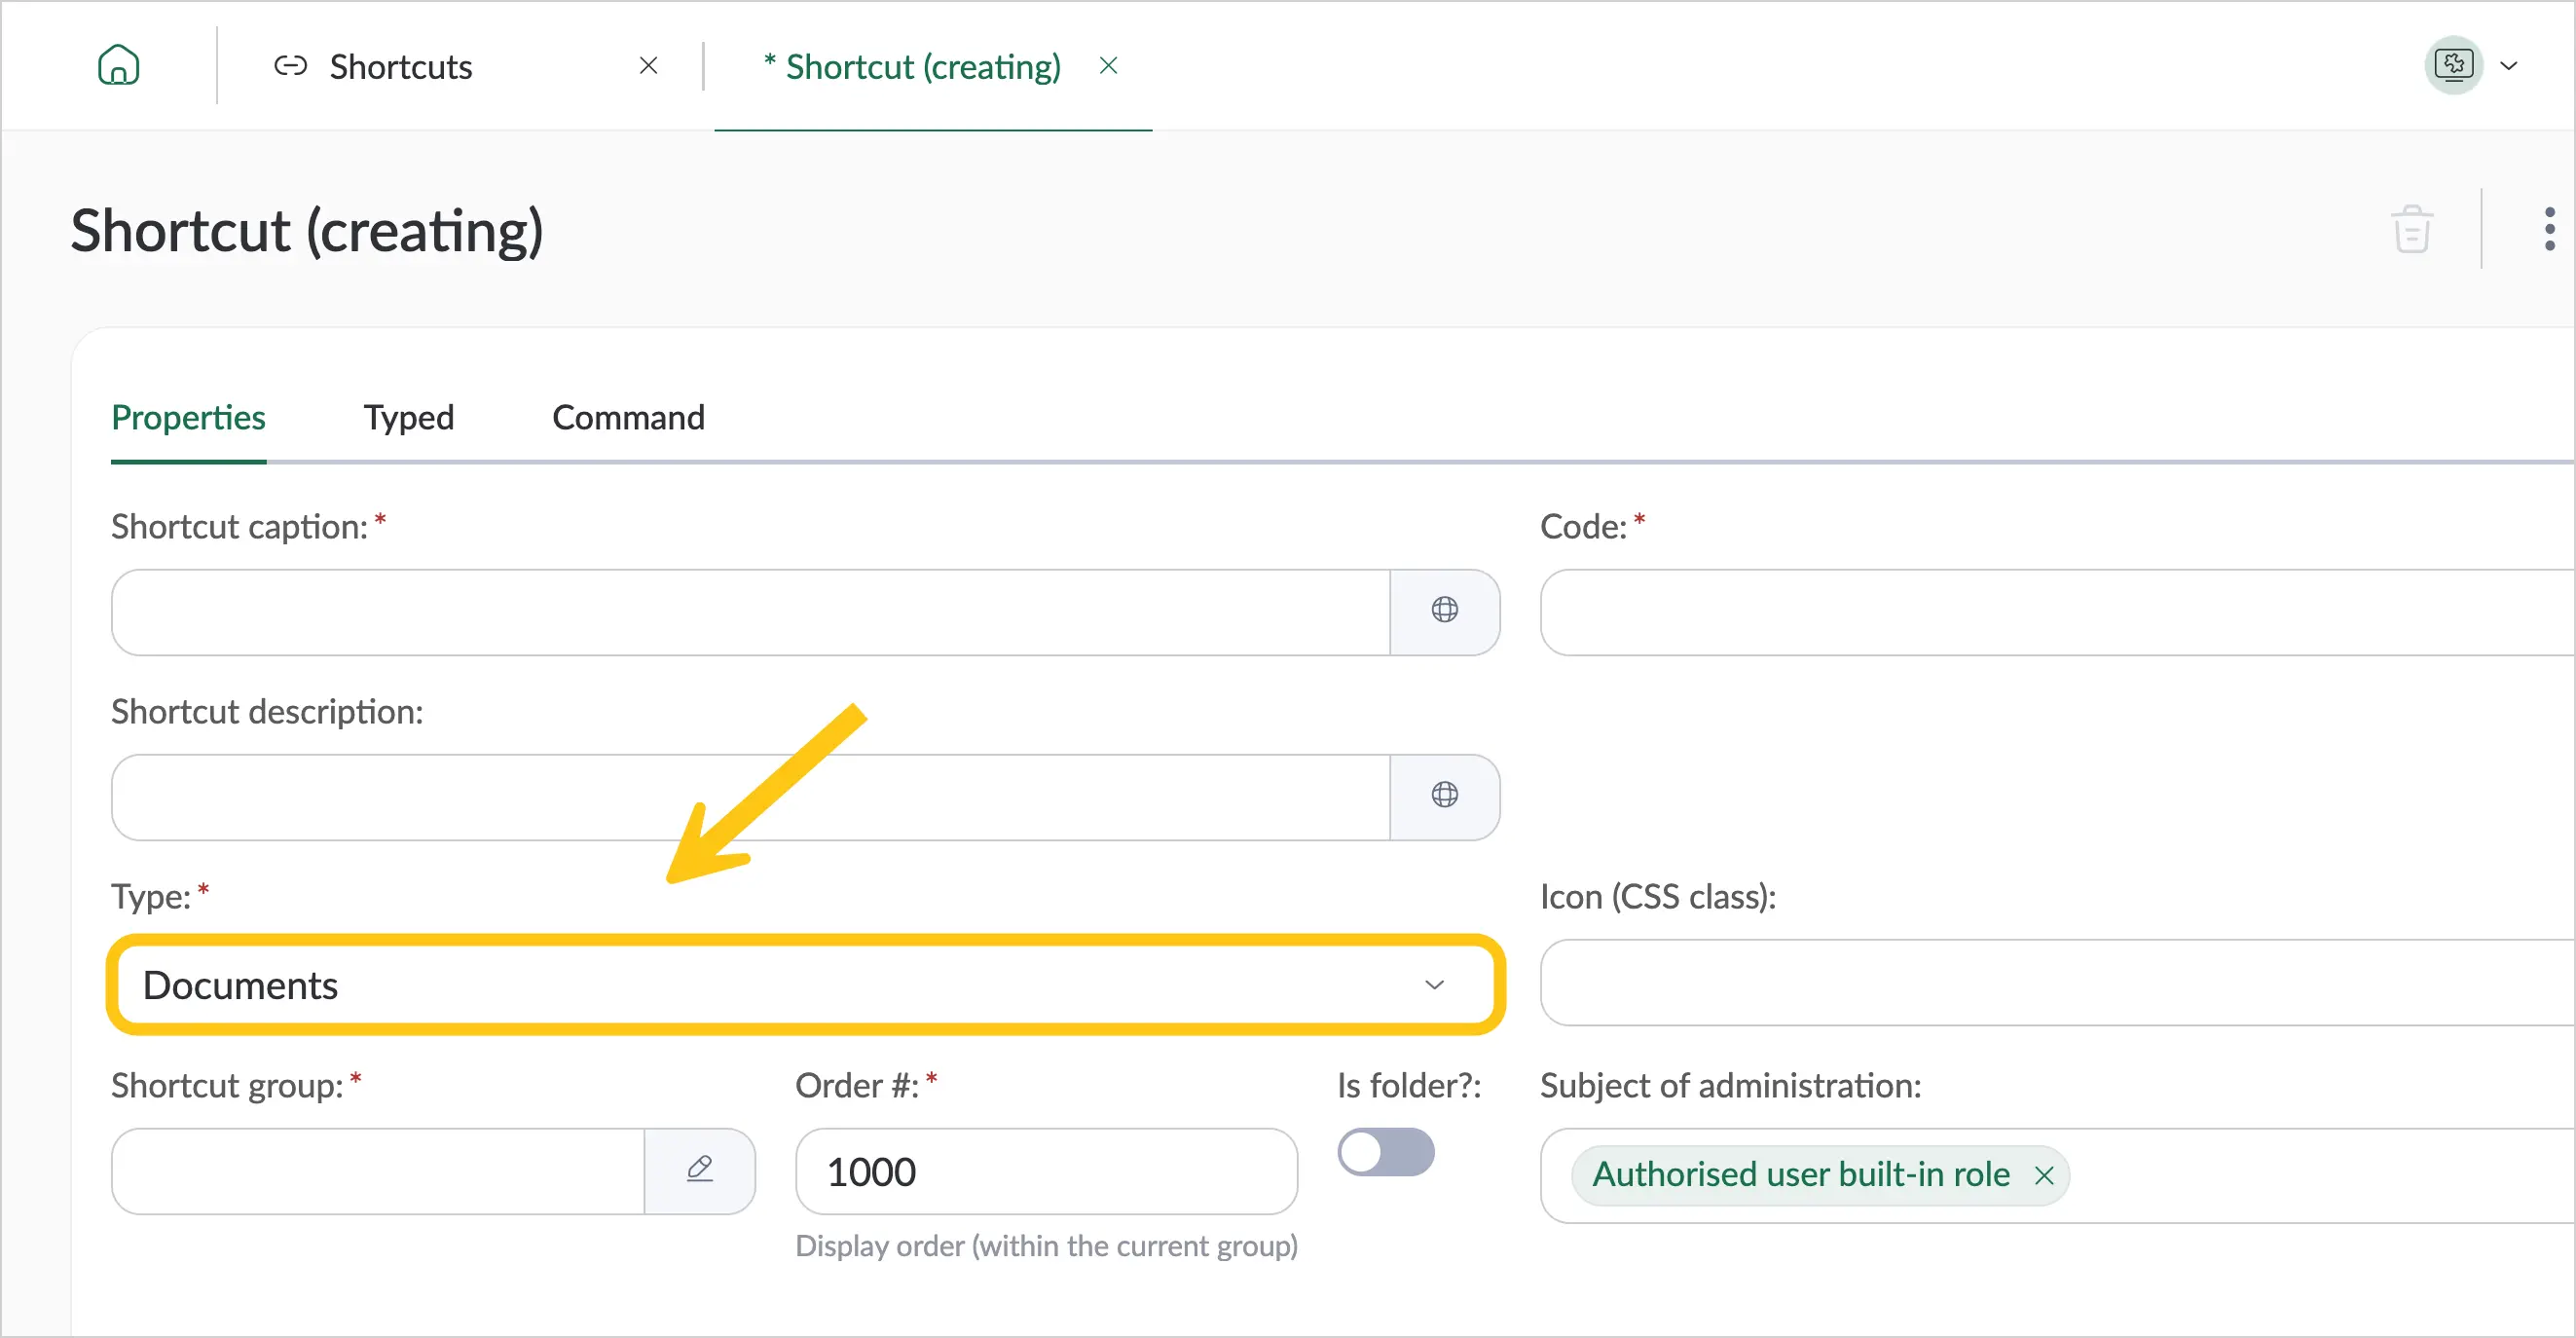
Create a shortcut or open one of the system shortcuts of the Documents type. During creation, pay attention to the following steps.
-
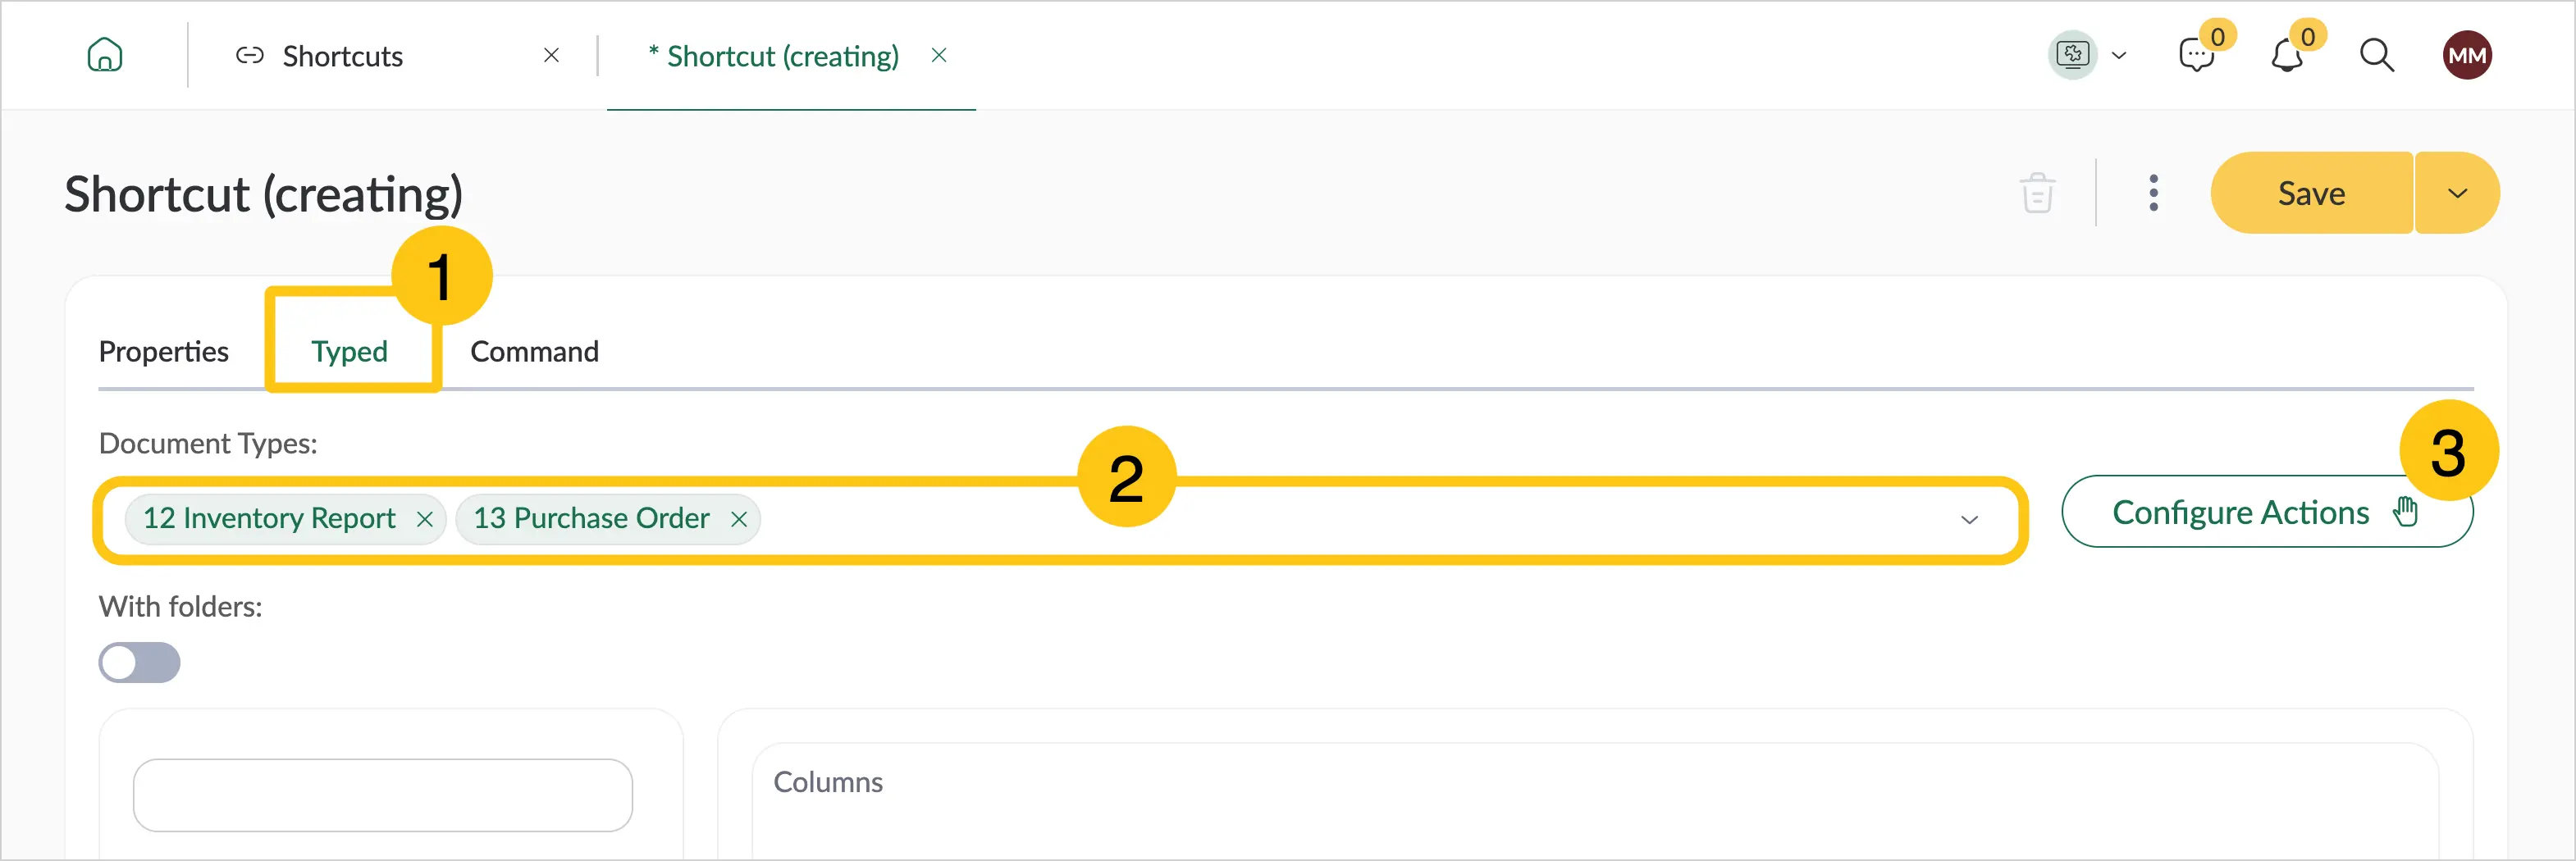
When creating the shortcut, go to the Typed 1 tab.
-
In the Document types 2 field, select the document types that users will work with in this shortcut.
For recognition, the platform uses only those document types that are selected in both the shortcut and the recognition template (intersection of lists). If a document type is selected in only one place (either in the shortcut or in the template), it will not appear in the list of types available for recognition.
-
Select the Configure Actions button 3.
-
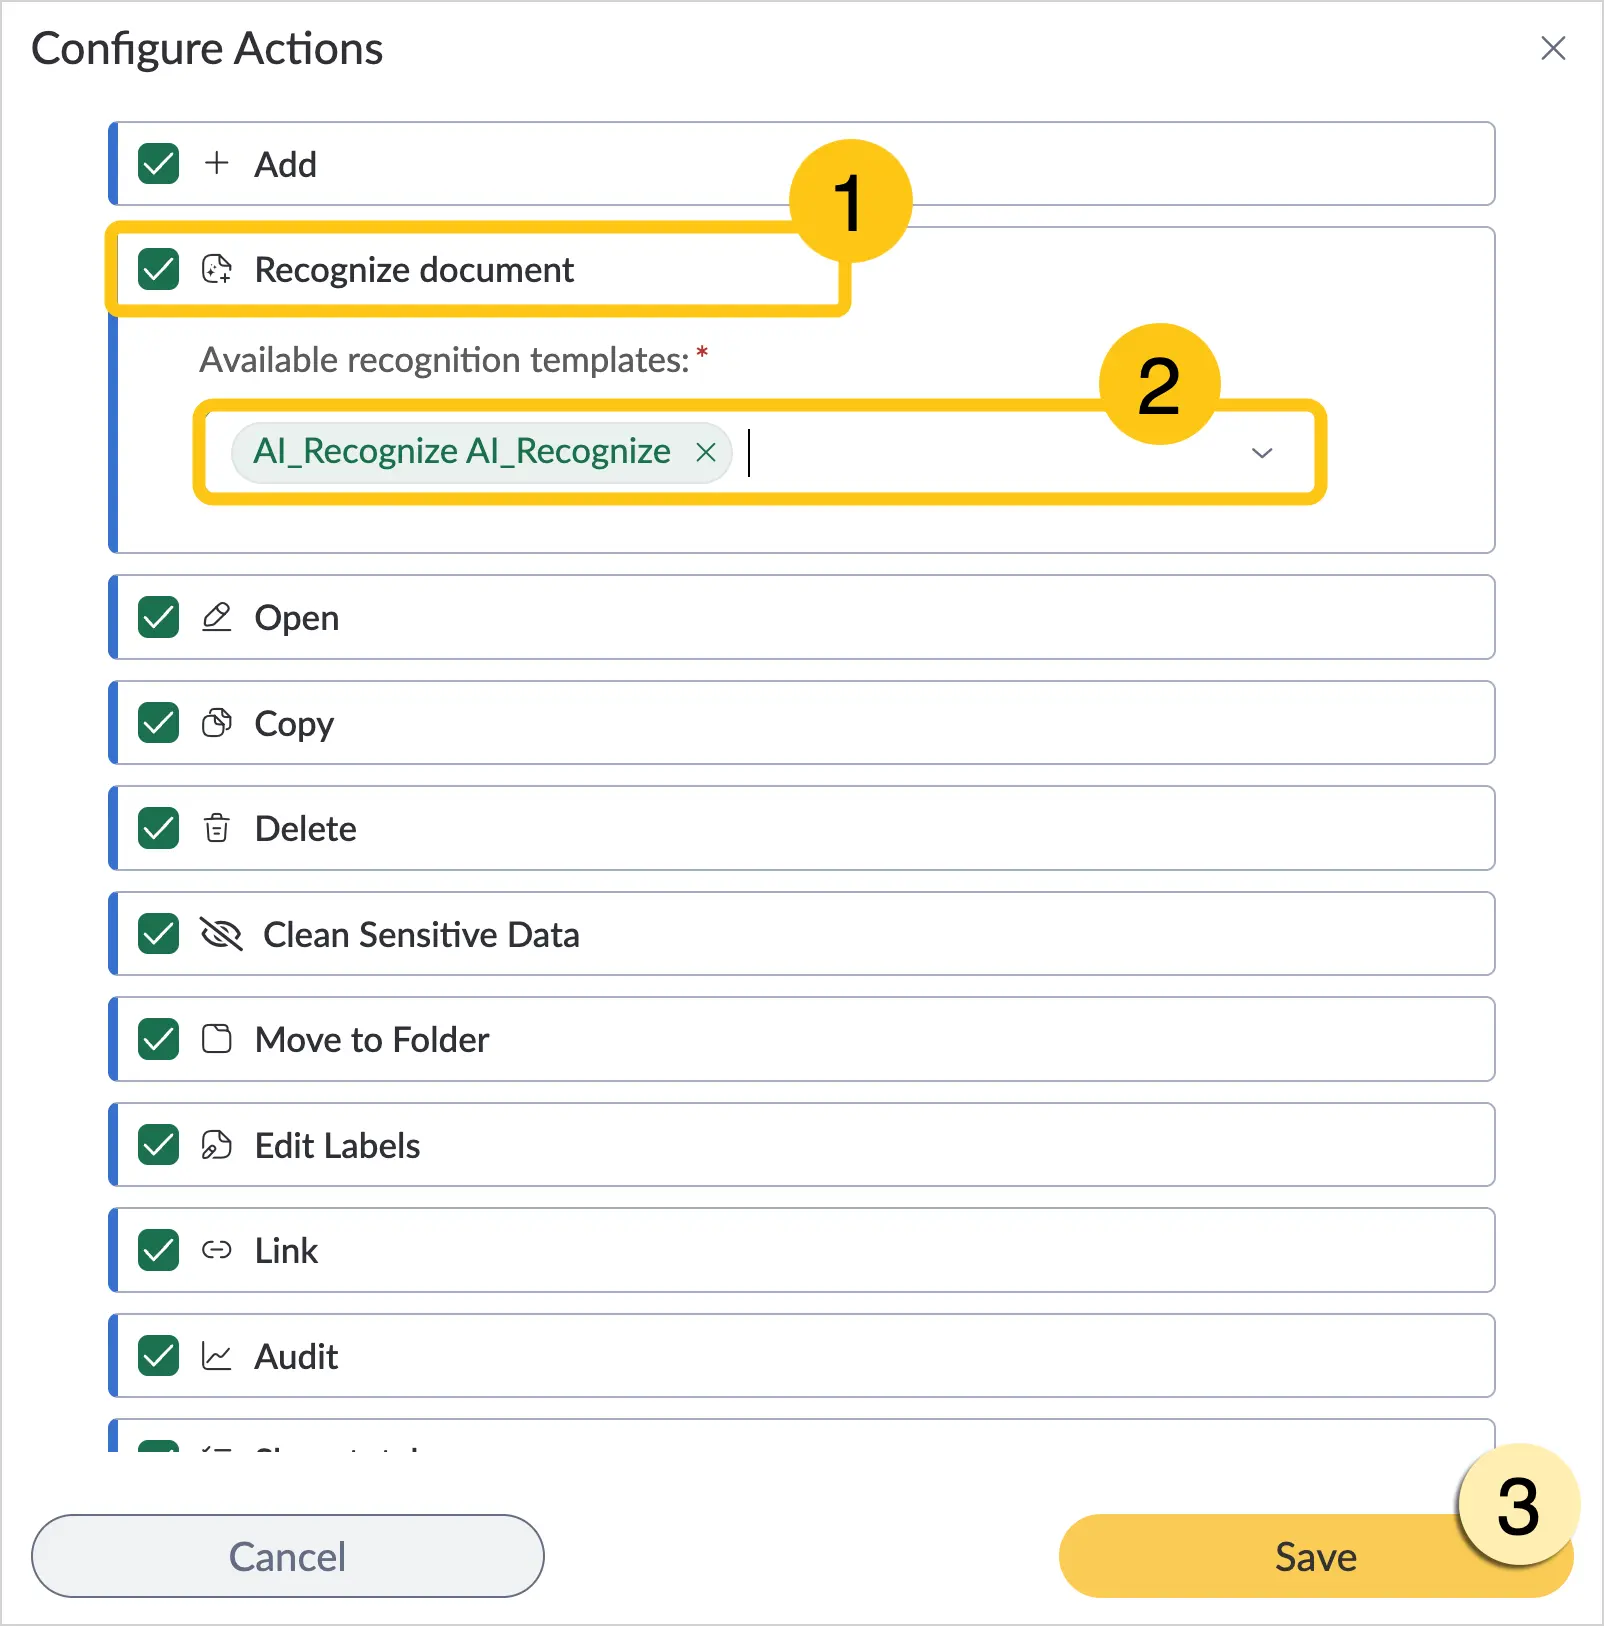
Select the Recognize document 1 action checkbox.
-
In the Available recognition templates 2 field, select the required template from the list (for example, the one you created in the previous section).
Note:You can select multiple recognition templates within a single shortcut. This allows users to choose the required template themselves when selecting the recognition icon.
-
Select the Save 3 button.
-
In the toolbar, select Save.
2.14.1.1.5. Configure Document Type Attributes
This step is optional, but can significantly improve recognition quality. Configuring document type attributes is useful when recognition uses:
- the system scenario
sys_doc_recognize - custom scenarios that work with the
documentTypesvariable
The documentTypes variable passes to the LLM not only the Name, Code, and Type of document type attributes, but also the content of the Description field defined when creating or editing an attribute. You can therefore add additional context to the Description field. The LLM uses this description to more accurately understand where to look for values and how to interpret them.
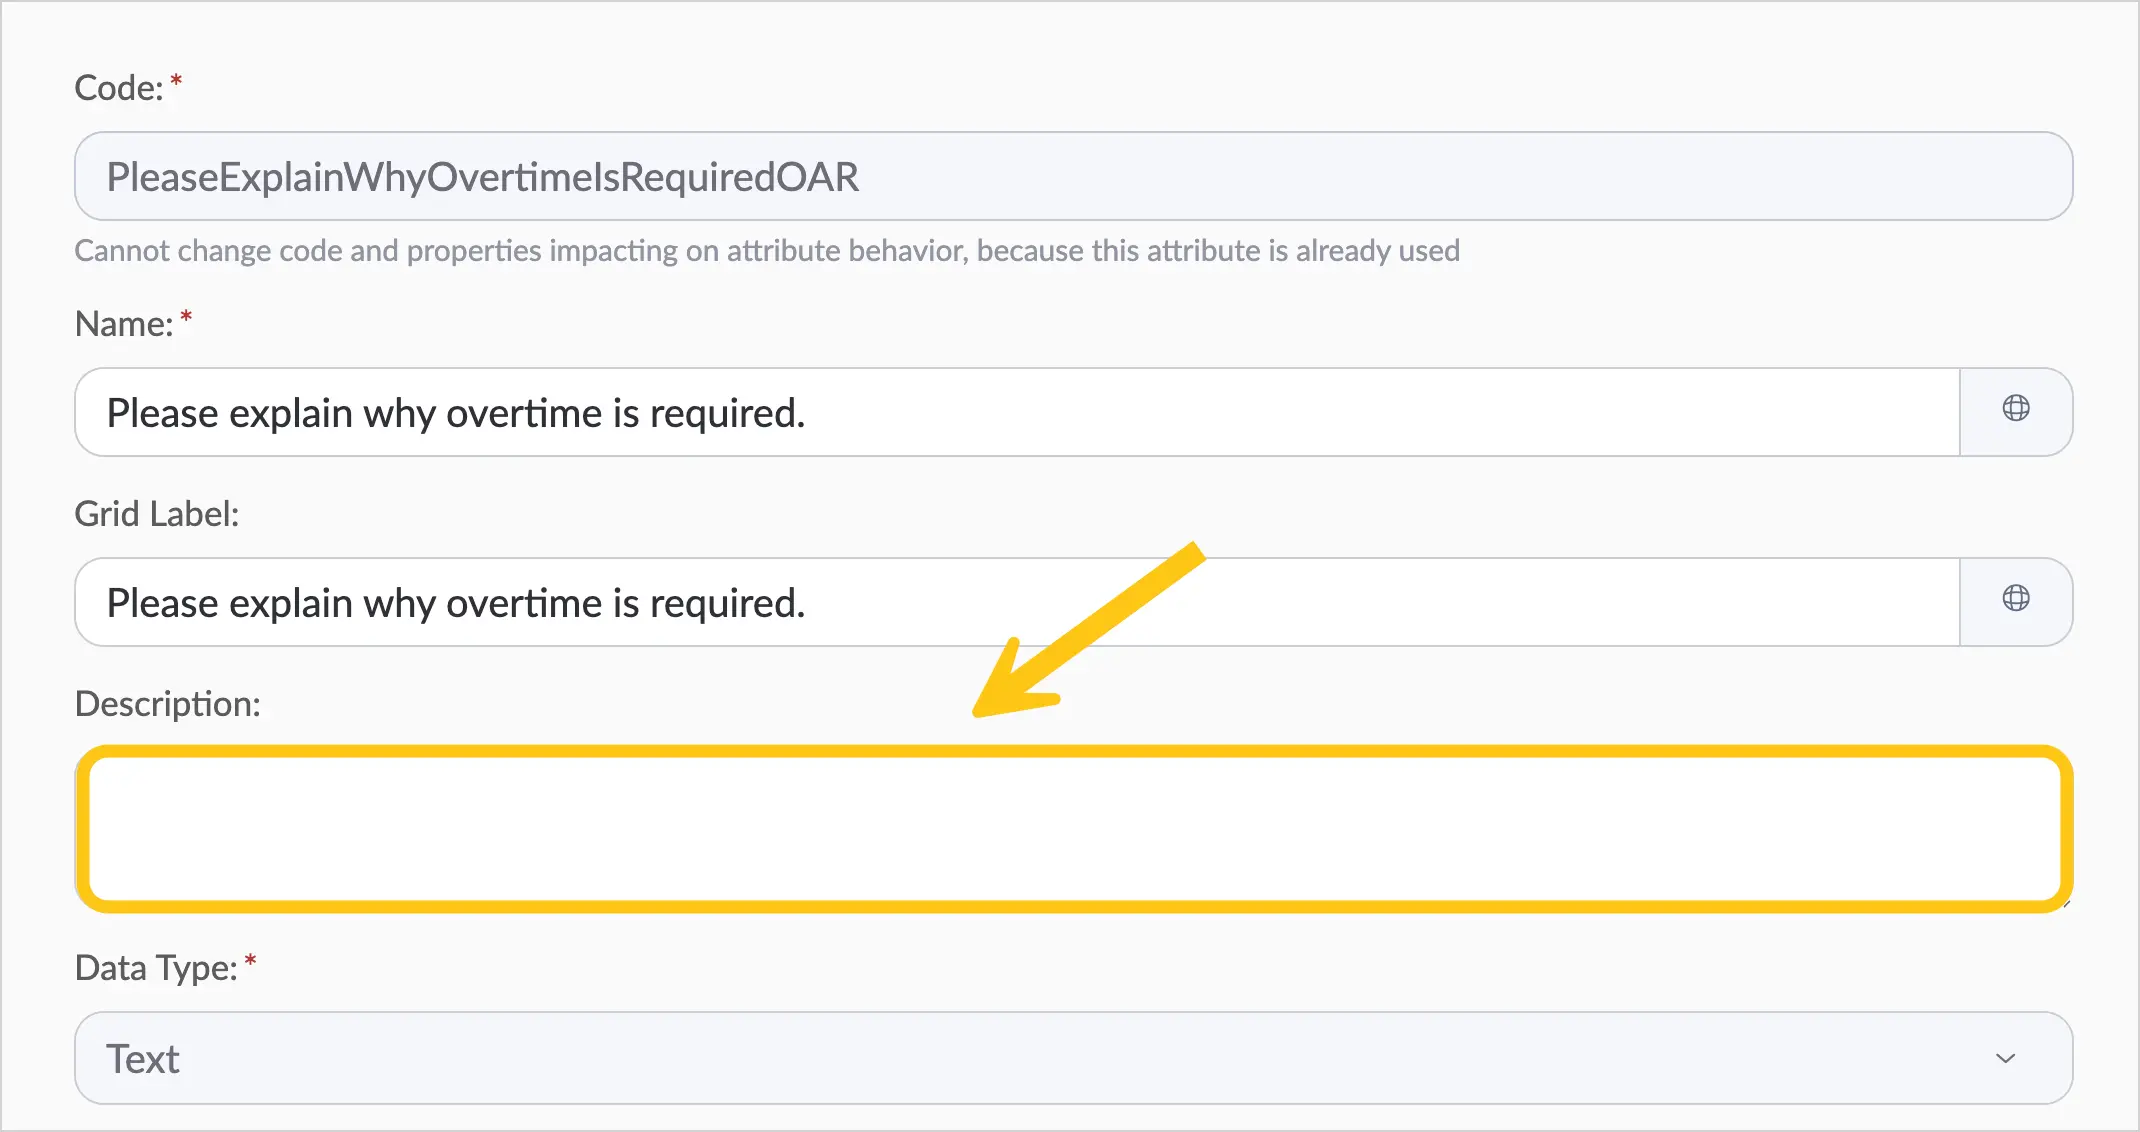
Example:
In this attribute, we want to store address information, so we describe for the LLM where exactly to look for this information in the document:
Usually located on the first page of the document. Written by hand. Located below the "Floor" and "Location" fields.
2.14.1.2. Recognize a Document Using AI
You can recognize a document using artificial intelligence. This helps identify the document content and map it to the corresponding system attributes. Before recognizing a document using AI, make sure you have configured AI recognition.
Method 1: via system shortcut
In this scenario, only the platform administrator can perform recognition.
-
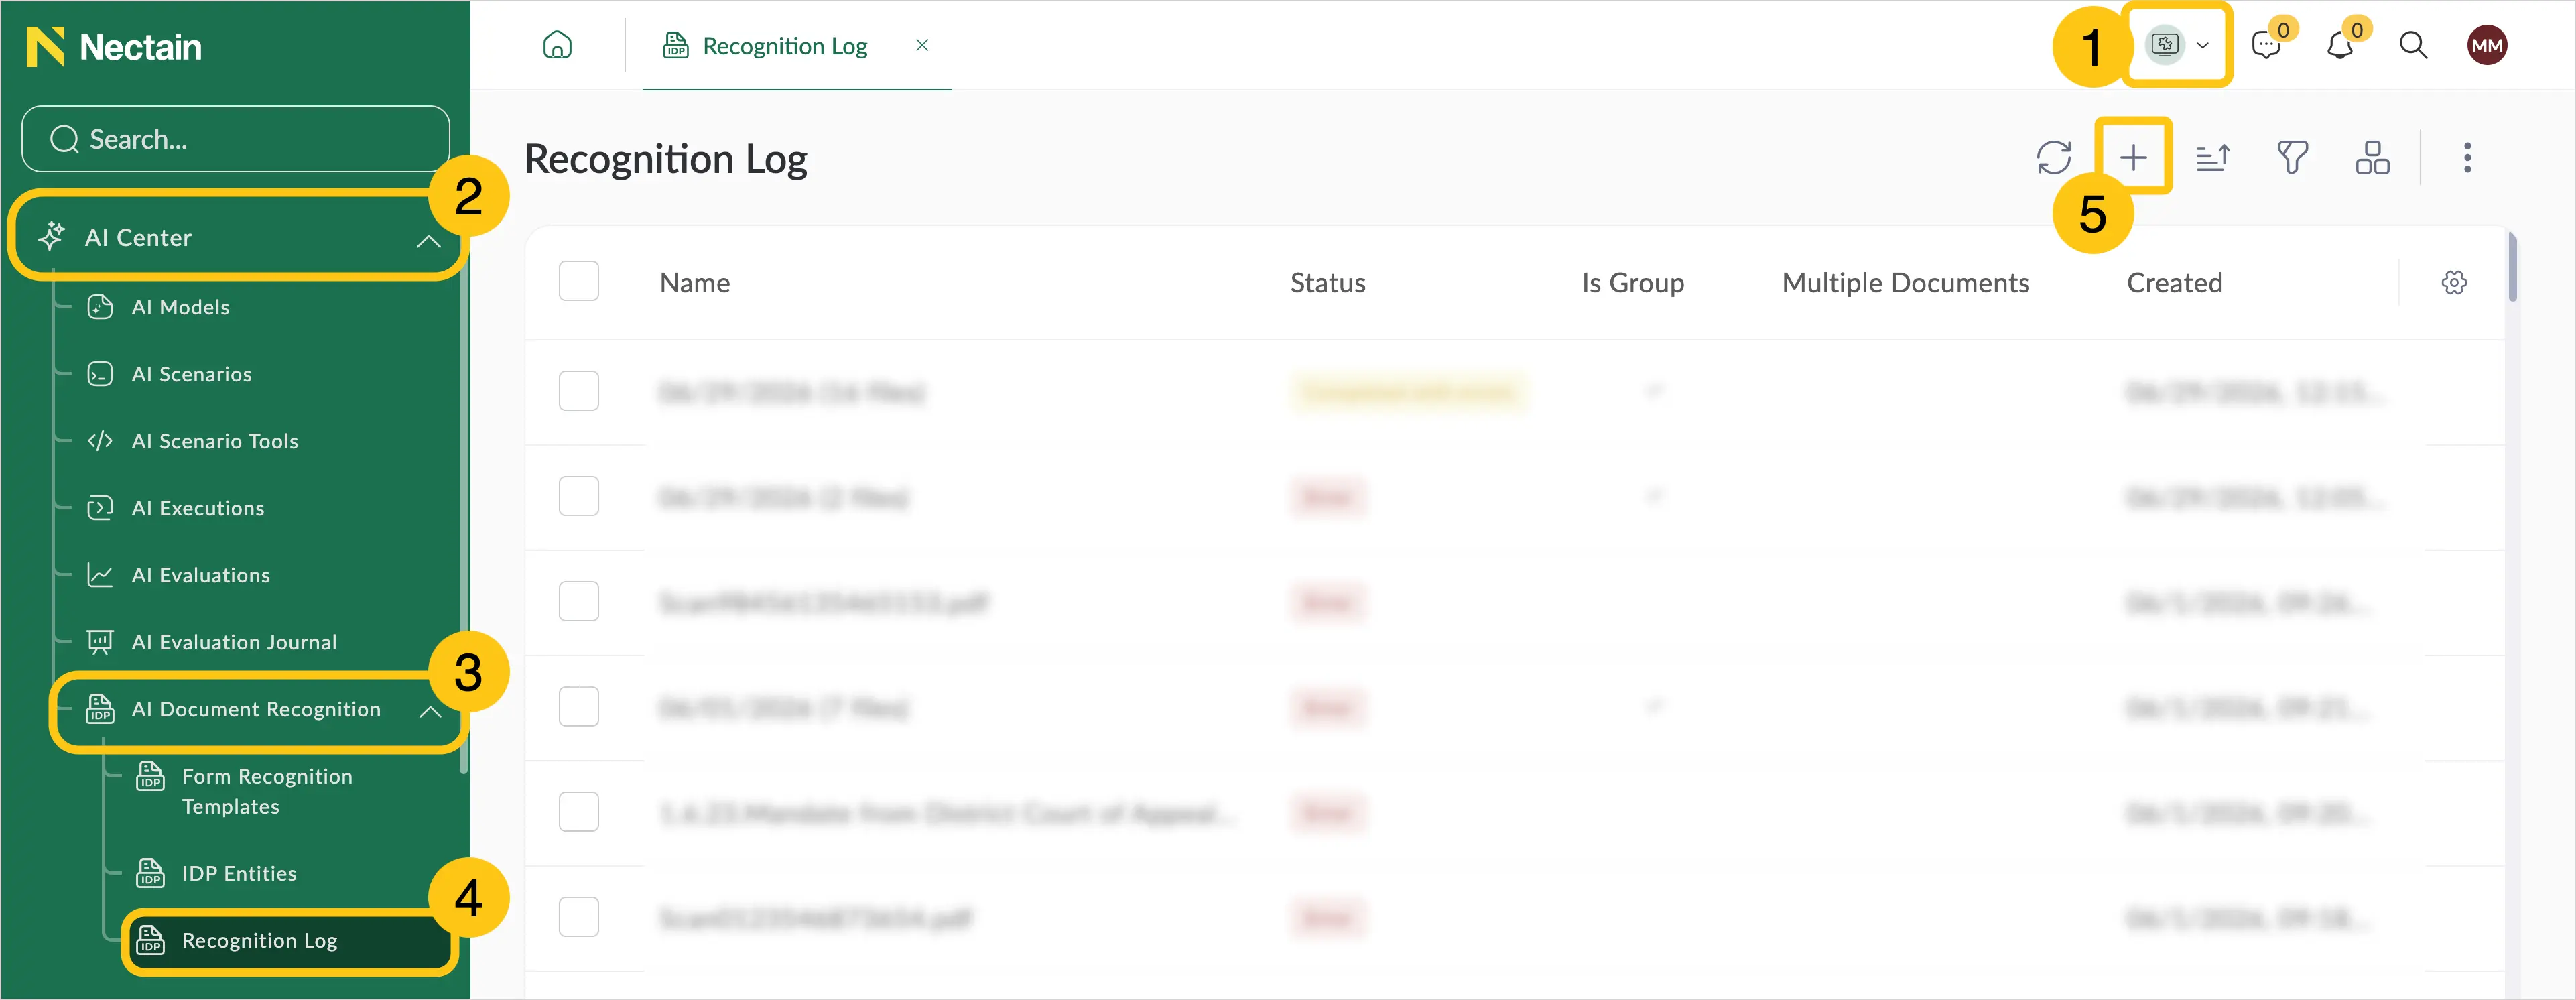
In the navigation panel, select the Studio 1 workspace, select the AI Center 2 shortcut group, then select the AI Document Recognition 3 shortcut group.
-
Select the Recognition Log 4 shortcut, then in the toolbar select + 5.
-
In the Recognition Template 1 field, select the required recognition template.
-
Select the Automatically create document 2 checkbox if you want a document to be created automatically from the recognized data after recognition is complete. If this checkbox is not selected, you will be able to review the recognition result and manually confirm document creation.
Warning:If the recognized data does not meet the attribute validation rules, the system will highlight the attribute in red in the preview window (available when automatic document creation is disabled) — you can correct the value manually before creating the document. If you enabled automatic document creation, the document will not be created because the system cannot automatically fix the validation error.
-
In the toolbar of the File field, select +. You can upload multiple files at once.
Note:The file must match the document type you configured in the shortcut and the recognition template.
Example: if you added the document type Leave Request to the shortcut and template, you will most likely need to upload a specific employee's request: Leave Request of Ivan Honchar.
Note:If you uploaded multiple files, you can use the bottom menu to switch between the uploaded files.
-
Select the Recognize button.
-
The next steps depend on whether you selected the With preview option:
Option 1: you did not select Automatically create document
-
You will see your uploaded document and the recognition result. If needed, you can edit the attribute values 1, then select Create document 2 to confirm saving the result.
-
If the recognition result does not suit you and you do not want to save it — simply close the tab.
If you uploaded multiple files and selected the With preview checkbox, a page will open with the following details: the overall recognition progress A, and the status of each individual document B.
If errors occurred during recognition, the corresponding records will be additionally grouped in the Errors tab 1 for easy review. In this tab, you can open the document that caused the error 2, view the error details 3, and, if needed, retry the recognition 4.
After the recognition process is complete, you can select any recognized document from the list 1, edit the recognition result if needed 2, and then select Create document 3 to confirm saving the result.
Option 2: you selected Automatically create document
-
You will receive a notification from the platform about the start of the recognition process.
-
If recognition is completed successfully, you will receive an additional notification. In the notification text, select Details to view the recognition result, or Created document to open the created document directly.
The uploaded file will be displayed on the left A, and its attributes with the recognized data on the right B.
-
Select Open document if you want to view the created document and edit the attribute values if needed.
If you uploaded multiple files, a page will open with the following details: the overall recognition progress A, and the status of each individual document B.
If errors occurred during recognition, the corresponding records will be additionally grouped in the Errors tab 1 for easy review. In this tab, you can open the document that caused the error 2, view the error details 3, and, if needed, retry the recognition 4.
After the recognition process is complete, you can select any recognized document from the list 1, then select Open document 2 to view the created document and edit the attribute values if needed.
Method 2: via user shortcut
In this scenario, any platform users granted access to the shortcut by the administrator can perform recognition.
-
Go to the shortcut where the Recognize Document action is enabled and configured. (See section Configure a Shortcut for Recognition)
-
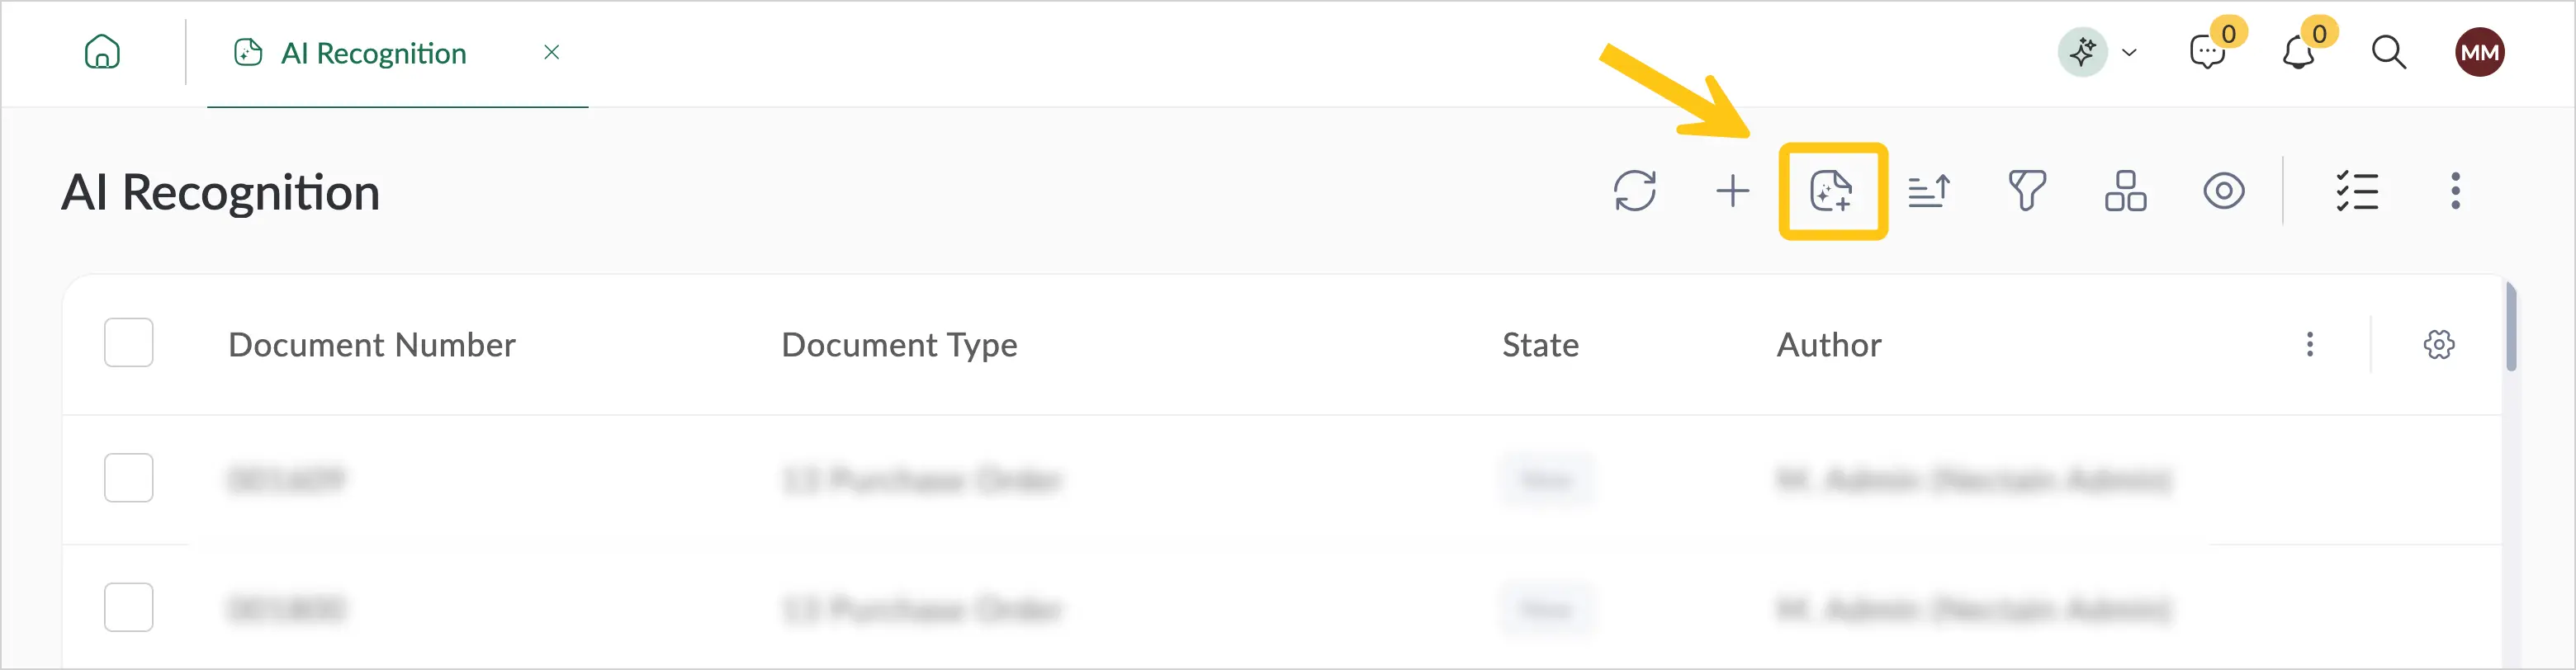
In the toolbar, select the recognition icon.
-
In the Recognition Template 1 field, select the required recognition template.
-
Select the Automatically create document 2 checkbox if you want a document to be created automatically from the recognized data after recognition is complete. If this checkbox is not selected, you will be able to review the recognition result and manually confirm document creation.
Warning:If the recognized data does not meet the attribute validation rules, the system will highlight the attribute in red in the preview window (available when automatic document creation is disabled) — you can correct the value manually before creating the document. If you enabled automatic document creation, the document will not be created because the system cannot automatically fix the validation error.
-
In the toolbar of the File field, select +. You can upload multiple files at once.
Note:The file must match the document type you configured in the shortcut and the recognition template.
Example: if you added the document type Leave Request to the shortcut and template, you will most likely need to upload a specific employee's request: Leave Request of Ivan Honchar.
Note:If you uploaded multiple files, you can use the bottom menu to switch between the uploaded files.
-
Select the Recognize button.
-
The next steps depend on whether you selected the With preview option:
Option 1: you did not select Automatically create document
-
You will see your uploaded document and the recognition result. If needed, you can edit the attribute values 1, then select Create document 2 to confirm saving the result.
-
If the recognition result does not suit you and you do not want to save it — simply close the tab.
If you uploaded multiple files and selected the With preview checkbox, a page will open with the following details: the overall recognition progress A, and the status of each individual document B.
If errors occurred during recognition, the corresponding records will be additionally grouped in the Errors tab 1 for easy review. In this tab, you can open the document that caused the error 2, view the error details 3, and, if needed, retry the recognition 4.
After the recognition process is complete, you can select any recognized document from the list 1, edit the recognition result if needed 2, and then select Create document 3 to confirm saving the result.
Option 2: you selected Automatically create document
-
You will receive a notification from the platform about the start of the recognition process.
-
If recognition is completed successfully, you will receive an additional notification. In the notification text, select Details to view the recognition result, or Created document to open the created document directly.
The uploaded file will be displayed on the left A, and its attributes with the recognized data on the right B.
-
Select Open document if you want to view the created document and edit the attribute values if needed.
If you uploaded multiple files, a page will open with the following details: the overall recognition progress A, and the status of each individual document B.
If errors occurred during recognition, the corresponding records will be additionally grouped in the Errors tab 1 for easy review. In this tab, you can open the document that caused the error 2, view the error details 3, and, if needed, retry the recognition 4.
After the recognition process is complete, you can select any recognized document from the list 1, then select Open document 2 to view the created document and edit the attribute values if needed.
2.14.1.3. View Recognition Status
Using the Recognition Log shortcut, you can view the recognition status of individual documents or entire groups. You can also open the recognition form for each document to view the details.
Method 1: for administrator
-
In the navigation panel, select the Studio 1 workspace.
-
Select the AI Center 2 shortcut group, then select the Document Recognition 3 shortcut group.
-
Select the Recognition Log 4 shortcut.
-
Filter the table results by the Created column to display the most recent recognitions at the top.
-
Select the required group (if you upload multiple files at once, they are combined into a group) or the document whose recognition status you want to view.
-
You will see a list of files you imported for recognition. In the status column, you can view the recognition status. See section Status Values.
Method 2: for user
-
Go to the shortcut where you performed bulk recognition.
-
In the upper-right corner, select the 1 icon.
-
Select Recognition Log 2.
-
Filter the table results by the Created column to display the most recent recognitions at the top.
-
Select the required group (if you upload multiple files at once, they are combined into a group) or the document whose recognition status you want to view.
-
You will see a list of files you imported for recognition. In the status column, you can view the recognition status. See section Status Values.
2.14.1.3.1. Status Values
- New — A recognition request that is queued.
- In progress — The system is still processing this file. Wait for the document to move to the Success or Error status.
-
Success — The system has successfully recognized the document. To view the created document, select the record, then in the toolbar select Created document.
You can also view additional recognition details in the following tabs:
- Document — contains the attributes of the recognized document.
[Table name]— if your document contains table attributes, you will see a separate tab with the name and content of that table.- Raw result — all data that the AI "saw" in the document: both valid values and those that do not match any attributes.
- Extracted values — a filtered result containing only the fields that match the document type attributes. These are the values the system will use to populate the attributes in the created document.
- Processing log — contains errors that occurred during validation. For example, if the Price attribute has a constraint of ≤500 but the file contains 600, the system will clear this field after recognition. Similarly, if an attribute expects a date but the file contains a different format, the document will be created with an empty value for that attribute.
-
Error — The system was unable to recognize the document, so the document was not created. Select the status to see the reason in the Error details field.
You can also select the Retry button.
2.14.1.4. Configure File Splitting
The Document Splitting feature is an auxiliary tool for preparing large multi-page files for subsequent AI document recognition.
Splitting serves two key purposes:
- Prepares the document for recognition — the system divides the source file into several separate parts.
- Allows identifying different document types within a single set of pages.
Example:
- You upload a multi-page document (for example, an 80-page PDF).
- The platform automatically splits it into equal parts. This is needed to optimize the LLM model performance. The smaller the document fragments passed for processing, the better the result.
- The connected AI model recognizes each part separately, identifies the content type and logical document boundaries.
- Based on the recognition, the system forms separate documents with clear boundaries, for example:
- Pages 1–3 — Resume
- Pages 4–15 — Contract
- Pages 16–18 — Act
As a result, from one large set of pages, the system automatically creates a structured set of documents of the corresponding types, ready for further work in the platform.
To configure splitting, complete the following steps:
Before starting the splitting configuration, make sure you have configured AI recognition.
- Create a business process for splitting.
- Create a recognition template to call the process.
- Create a shortcut for recognition.
2.14.1.4.1. Create a Business Process for Splitting
-
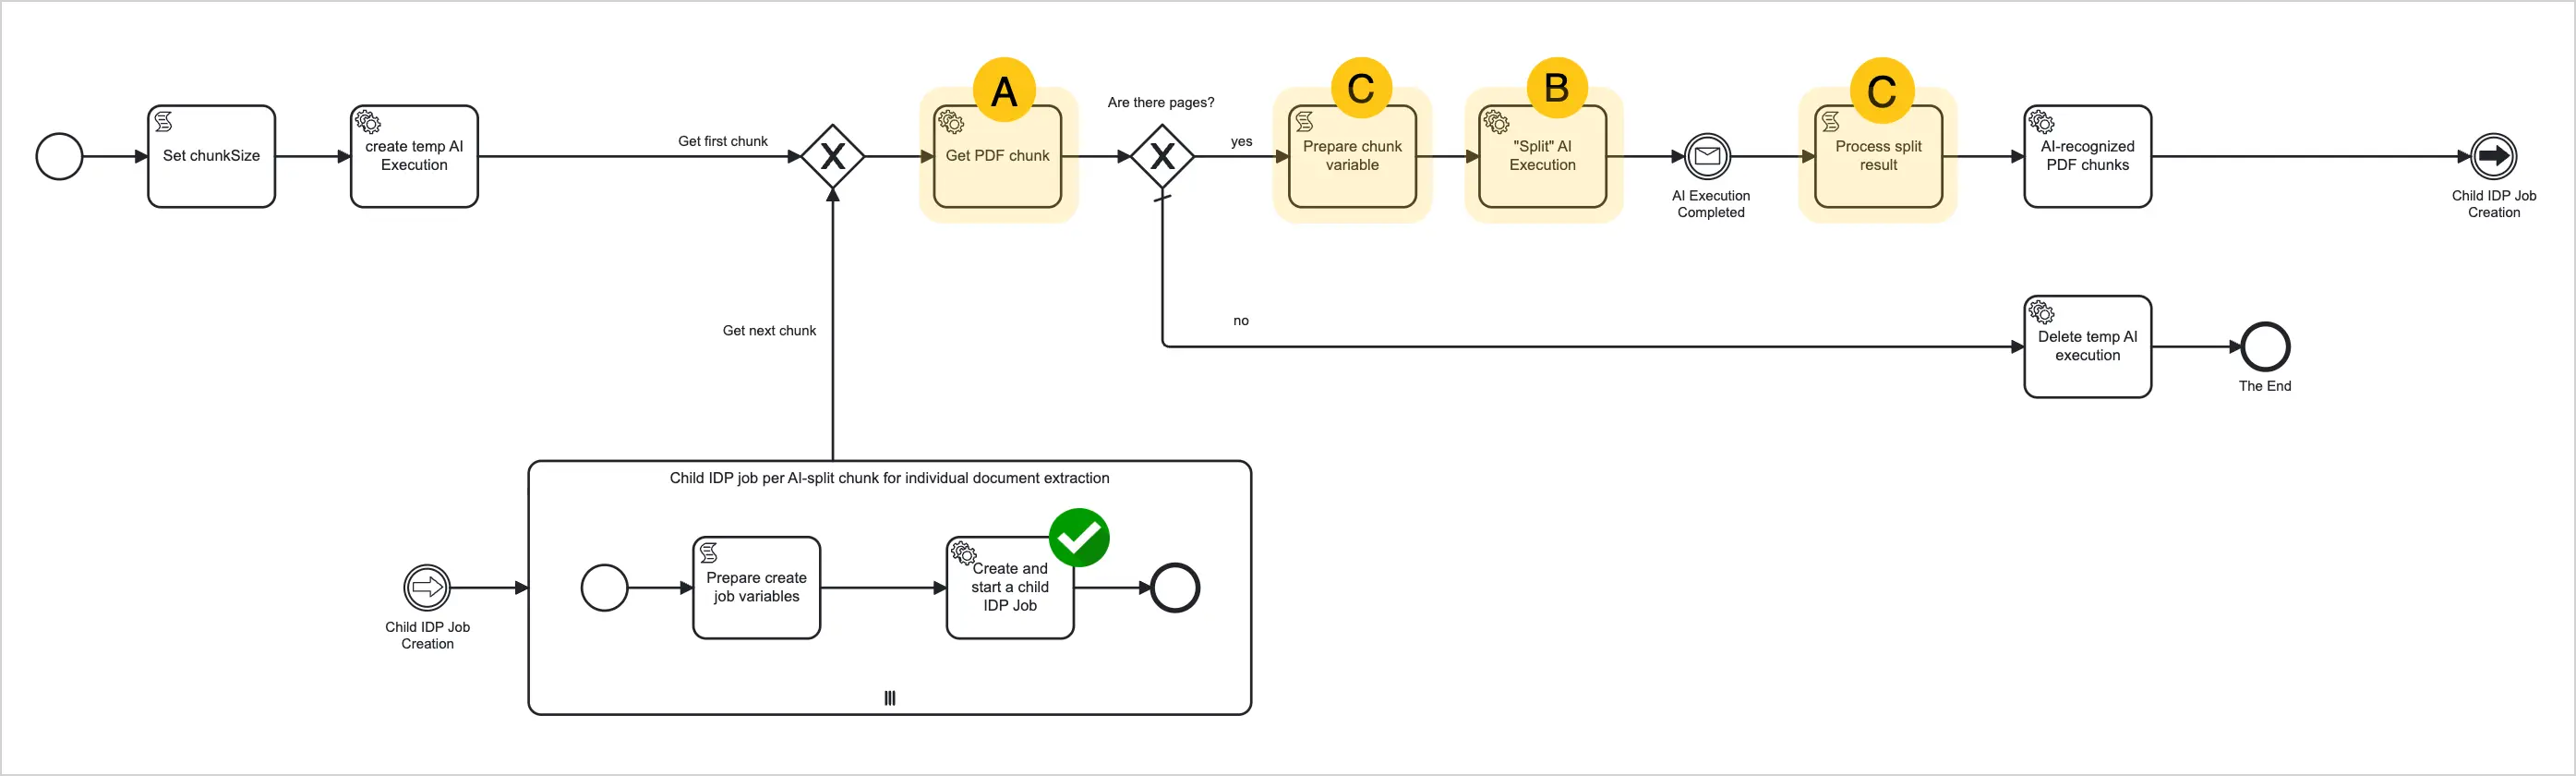
Create a business process definition. Build the process according to your needs. The process can consist of the following stages:
-
A Split the document into equal parts — this is needed to optimize the AI model performance. Can be implemented using a service task (template Call Entity Method). Example of a call scenario using the split PDF method:
var startPage = execution.getVariable('startPage')JSON.stringify({entity: "dfx_AiExecution",method: "splitPDF",execParams: {ID: execution.getVariable('temp_aiExecutionID'),sourceEntity: "dfx_IdpJob",sourceID: execution.getVariable('$ID'),sourceAttribute: "sourceFile",pageRanges: JSON.stringify([[startPage ? startPage : 1,startPage ? startPage + 15 : 15,]])}})The splitPDF method splits a PDF document into one fragment of 15 pages, starting from the page stored in the
startPagevariable. IfstartPageis not set, the range 1–15 is used. This method supports flexible page range definition as an array of ranges and individual pages. You can use the following formats:- Page range:
[1,6]— pages 1 through 6. - Individual pages and ranges:
['1,2,5-6']— pages 1, 2, 5, 6. - Single page:
[1,1]— page 1 only.
- Page range:
-
B Run the system AI scenario for splitting — the AI analyzes the fragment and identifies document type ranges within it. Can be implemented using a service task (template AI Execution). The system scenario for splitting can be connected in the task:
sys_doc_splitter. -
C To correctly transform and pass data between these stages, use a script task.
-
In the service task (marked with the icon), you can define the AI scenario for recognition.
Example of such a process:
-
2.14.1.4.2. Create a Recognition Template to Call the Process
-
In the navigation panel, select the Studio 1 workspace.
-
Select the AI Center 2 shortcut group, then select the AI Document Recognition 3 shortcut group.
-
Select the Form Recognition Templates 4 shortcut, then in the toolbar select + 5.
-
Fill in the fields using the guidance in the table below.
| Field | Description |
|---|---|
| Code* |
|
| Name* | Enter the template name. |
| Description | If needed, enter a brief description of the template's purpose. |
| Recognition method* | Select the BPMN Process option. |
| Process definition* | Select the process definition you created in the previous section from the list. |
| Version* | Select one of the following options:
|
| Document types | Select one of the following options:
|
| Multiple documents | Select the checkbox. |
-
In the toolbar, select Save.
2.14.1.5. Run File Splitting
Before starting, make sure you have configured file splitting.
Follow all steps from the Recognize a Document Using AI section.
After starting recognition, a section with execution details A will appear, showing the number of split, recognized, and skipped pages. Below it, the list of detected document types B is displayed.
In the Detected Documents panel, select a document 1 to view the list of attributes with values recognized by the LLM model 2. If needed, you can edit the attribute values or enter new ones if some attributes are empty. To save the recognition and splitting results, select the Create document 3 button. Repeat this action for each detected document.
If errors occurred during recognition, the corresponding records will be additionally grouped in the Errors 1 tab for convenient review. In this tab, you can open the document that caused the error 2, view the error details 3, and, if needed, retry the recognition 4.
If the automatic splitting incorrectly identified document boundaries or skipped pages, you can manually define the page range for each document.
2.14.1.5.1. Manually Define Page Range Boundaries
The actions described in this section can only be performed by users with the Admin or Developer role.
In some cases, automatic splitting may not work correctly (for example, document boundaries may be incorrectly identified, or pages may be skipped). In such cases, you can manually add the missing parts without restarting the entire recognition process.
For example, you have a 4-page file that the system identified as 4 separate documents — that is, 1 page = 1 document. In reality, the first 2 pages belong to one document, and the other 2 pages belong to another. In this case, you can manually merge the first 2 pages into one document and the other 2 pages into another. Then delete the documents with incorrect page ranges that the system created earlier.
To manually define the page range boundaries for a document:
-
Open the recognition form of the document for which you need to change the page range.
-
On the recognition form, in the Detected Documents section, right-click the document 1 for which you want to manually define the page range boundaries.
-
In the context menu, select Create document from range 2.
-
In the Pages for recognition field, enter the page range to create.
-
Optional: in the Recognition template 1 field, select a different recognition template to apply to this page range.
-
Optional: change the value of the Automatically create document 2 checkbox. If the checkbox is selected, the document will be created immediately after recognition completes. If not selected, the document will not be created automatically, and you will be able to review the result and manually confirm document creation.
-
Select Create task.
A new document with the specified page range will appear in the Detected Documents section.
To delete a document with an incorrect page range that the system created earlier, right-click that document 1, then select Delete 2.
2.14.1.6. Bulk Actions in the "Recognition Log" Shortcut
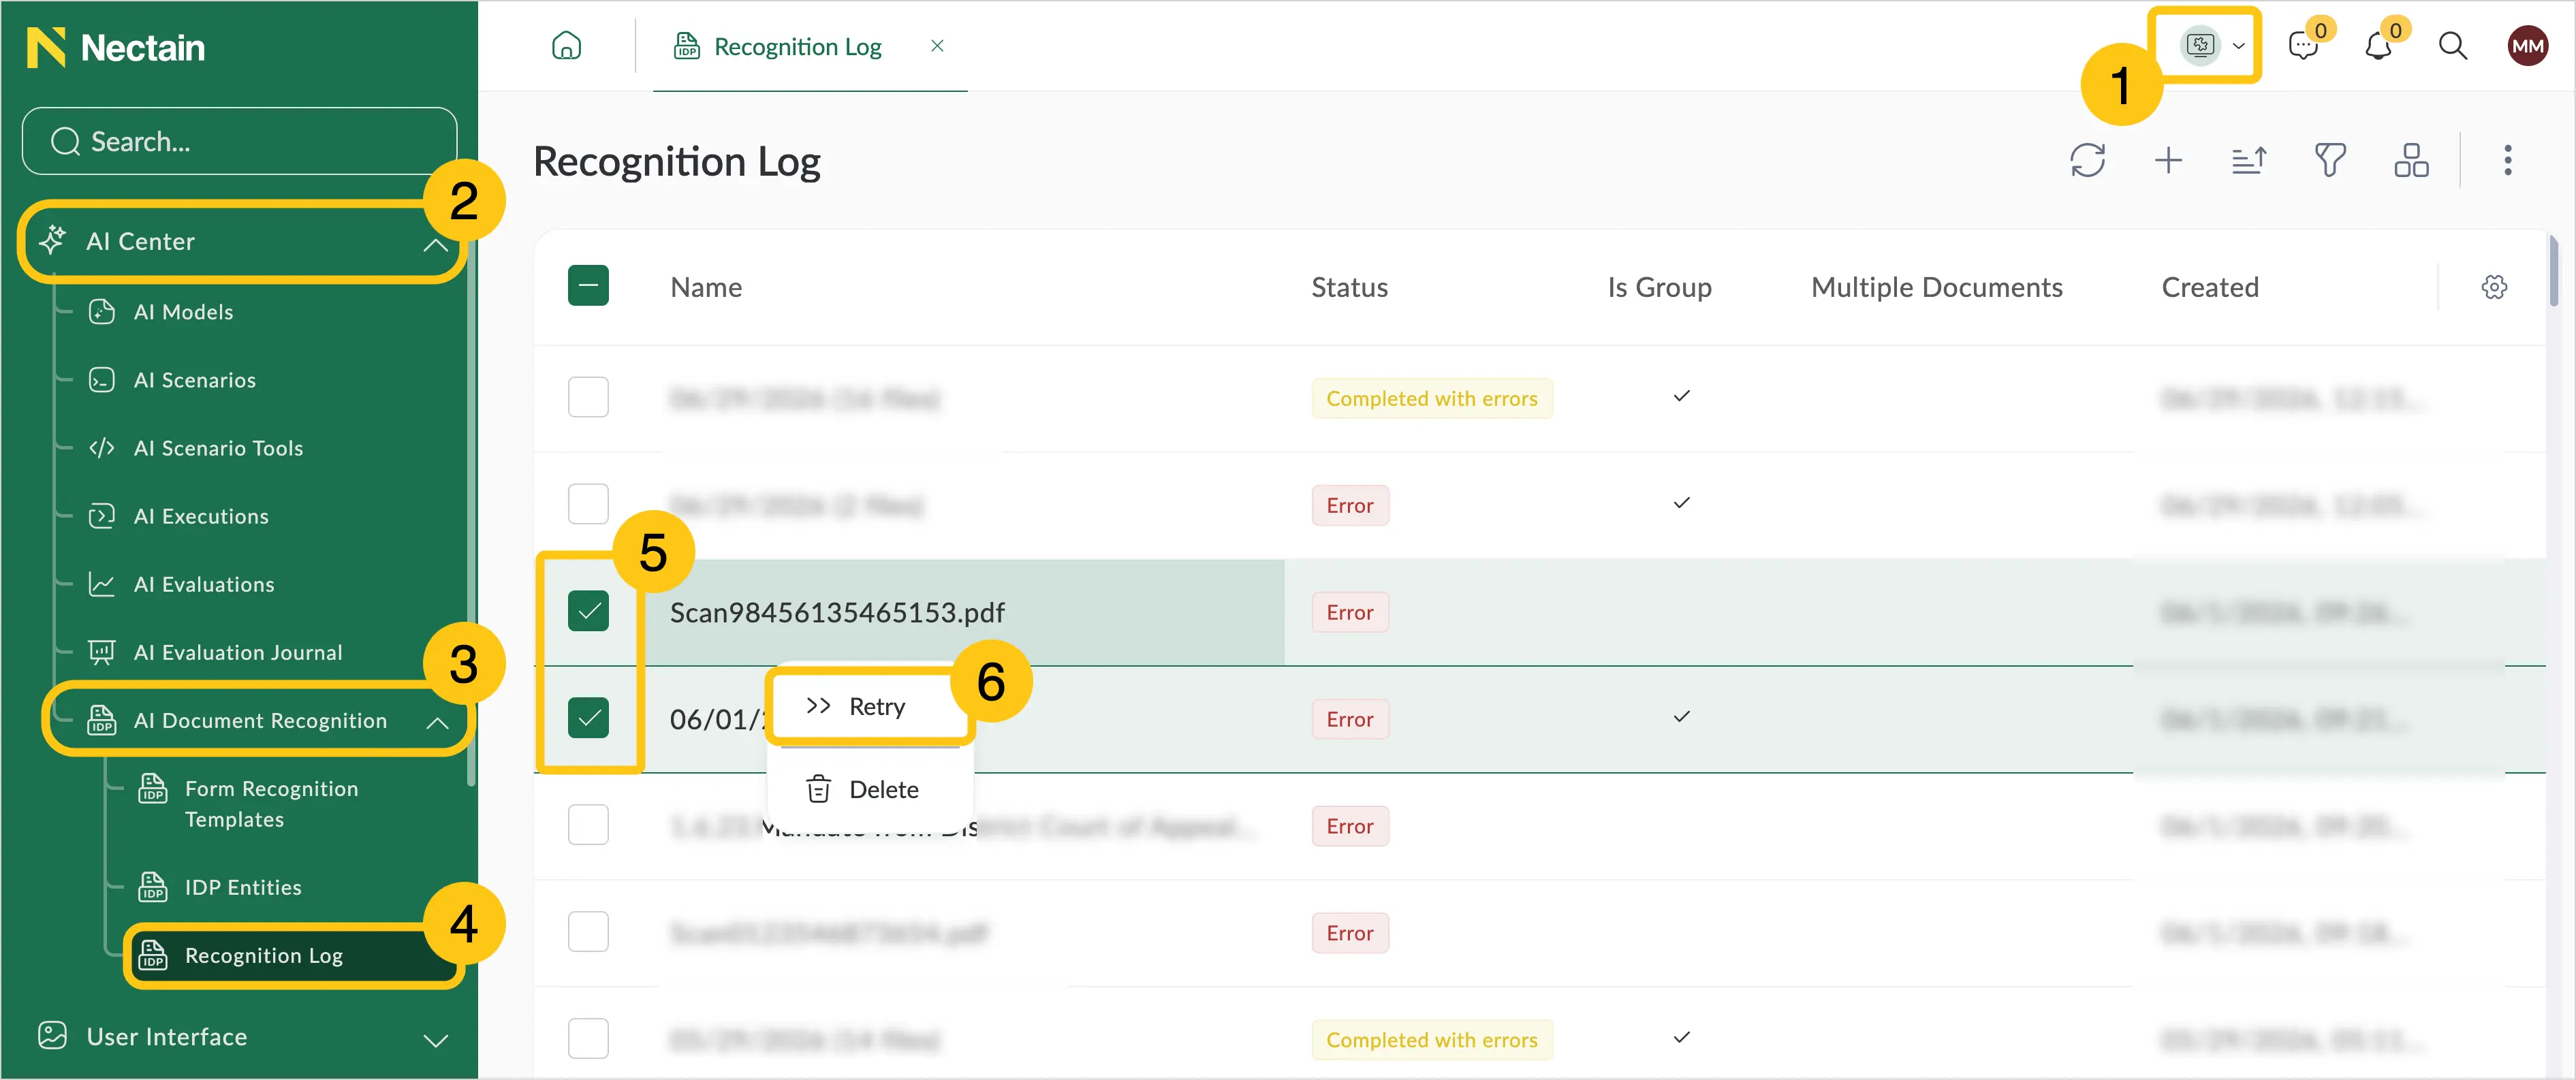
Using the system Recognition Log shortcut, the administrator can view the recognition status and perform actions on multiple execution records at once. This is done using multi-select mode. For example, instead of canceling several recognitions one by one, you can select multiple records in the log and apply the required action to all selected records simultaneously.
The following actions are available for bulk processing:
-
Cancel — stop the recognition. A canceled recognition can be restarted later if needed. This action is available for recognitions with the In progress status.
-
Restart — re-run the recognition for the selected records. Typically used after cancellation or when an error occurred during a previous recognition. This action is available for recognitions with the Error, Completed with errors, Canceled, or Hung statuses.
-
Delete — permanently remove the recognition record from the log. Once deleted, the record cannot be restored.
-
Create document — create a document in the system based on the results of the completed recognition. This action is available for recognitions with the Success status. If the recognition is grouped and its status is Completed with errors, Canceled, or Hung, but at least one of the nested recognitions was completed successfully, it is not possible to create a document from such a record in the grid. In that case, the document can be created from the recognition form.
To perform bulk actions in the Recognition Log shortcut:
-
In the navigation panel, select the Studio 1 workspace.
-
Select the AI Center 2 shortcut group, then select the AI Document Recognition 3 shortcut group.
-
Select the Recognition Log 4 shortcut.
-
Enable Multi-select mode and select the checkboxes next to the required recognition records 5.
-
Right-click and in the context menu select the required action 6.
For the Cancel, Restart, and Create document actions, a table will open showing the selected records A and a button to confirm the action B.
If the selected record does not support the chosen action, it will display the Not applicable status. This may happen, for example, if you attempt to cancel a recognition that has not yet been started.