2.10.4. Docusign
The Docusign Integration feature is available only when the additional package dfx-docusign is installed.
The platform includes integration with Docusign — a service for electronic document signing (integration type: Internal Application). The integration allows users to connect their Docusign account to Nectainium, send files for signing, and track envelope statuses in real time.
2.10.4.1. Configure Docusign Integration
Configuring the Docusign integration consists of the following mandatory stages:
- Docusign configuration — creating a developer profile, generating keys, and adding a custom configuration.
- Nectainium configuration — adding the Docusign profile in the platform and saving the keys and integration parameters.
- Switching the environment to production mode — activating the integration after testing and transitioning to production mode.
- Updating Nectainium configuration with production data — after switching to production mode, all keys generated within the test account must be recreated and their records updated in the Nectainium platform.
2.10.4.1.1. Configure Docusign
-
Go to the Docusign developers website and create a profile:
-
In the top-right corner, select Developer account 1, then select Create account 2.

-
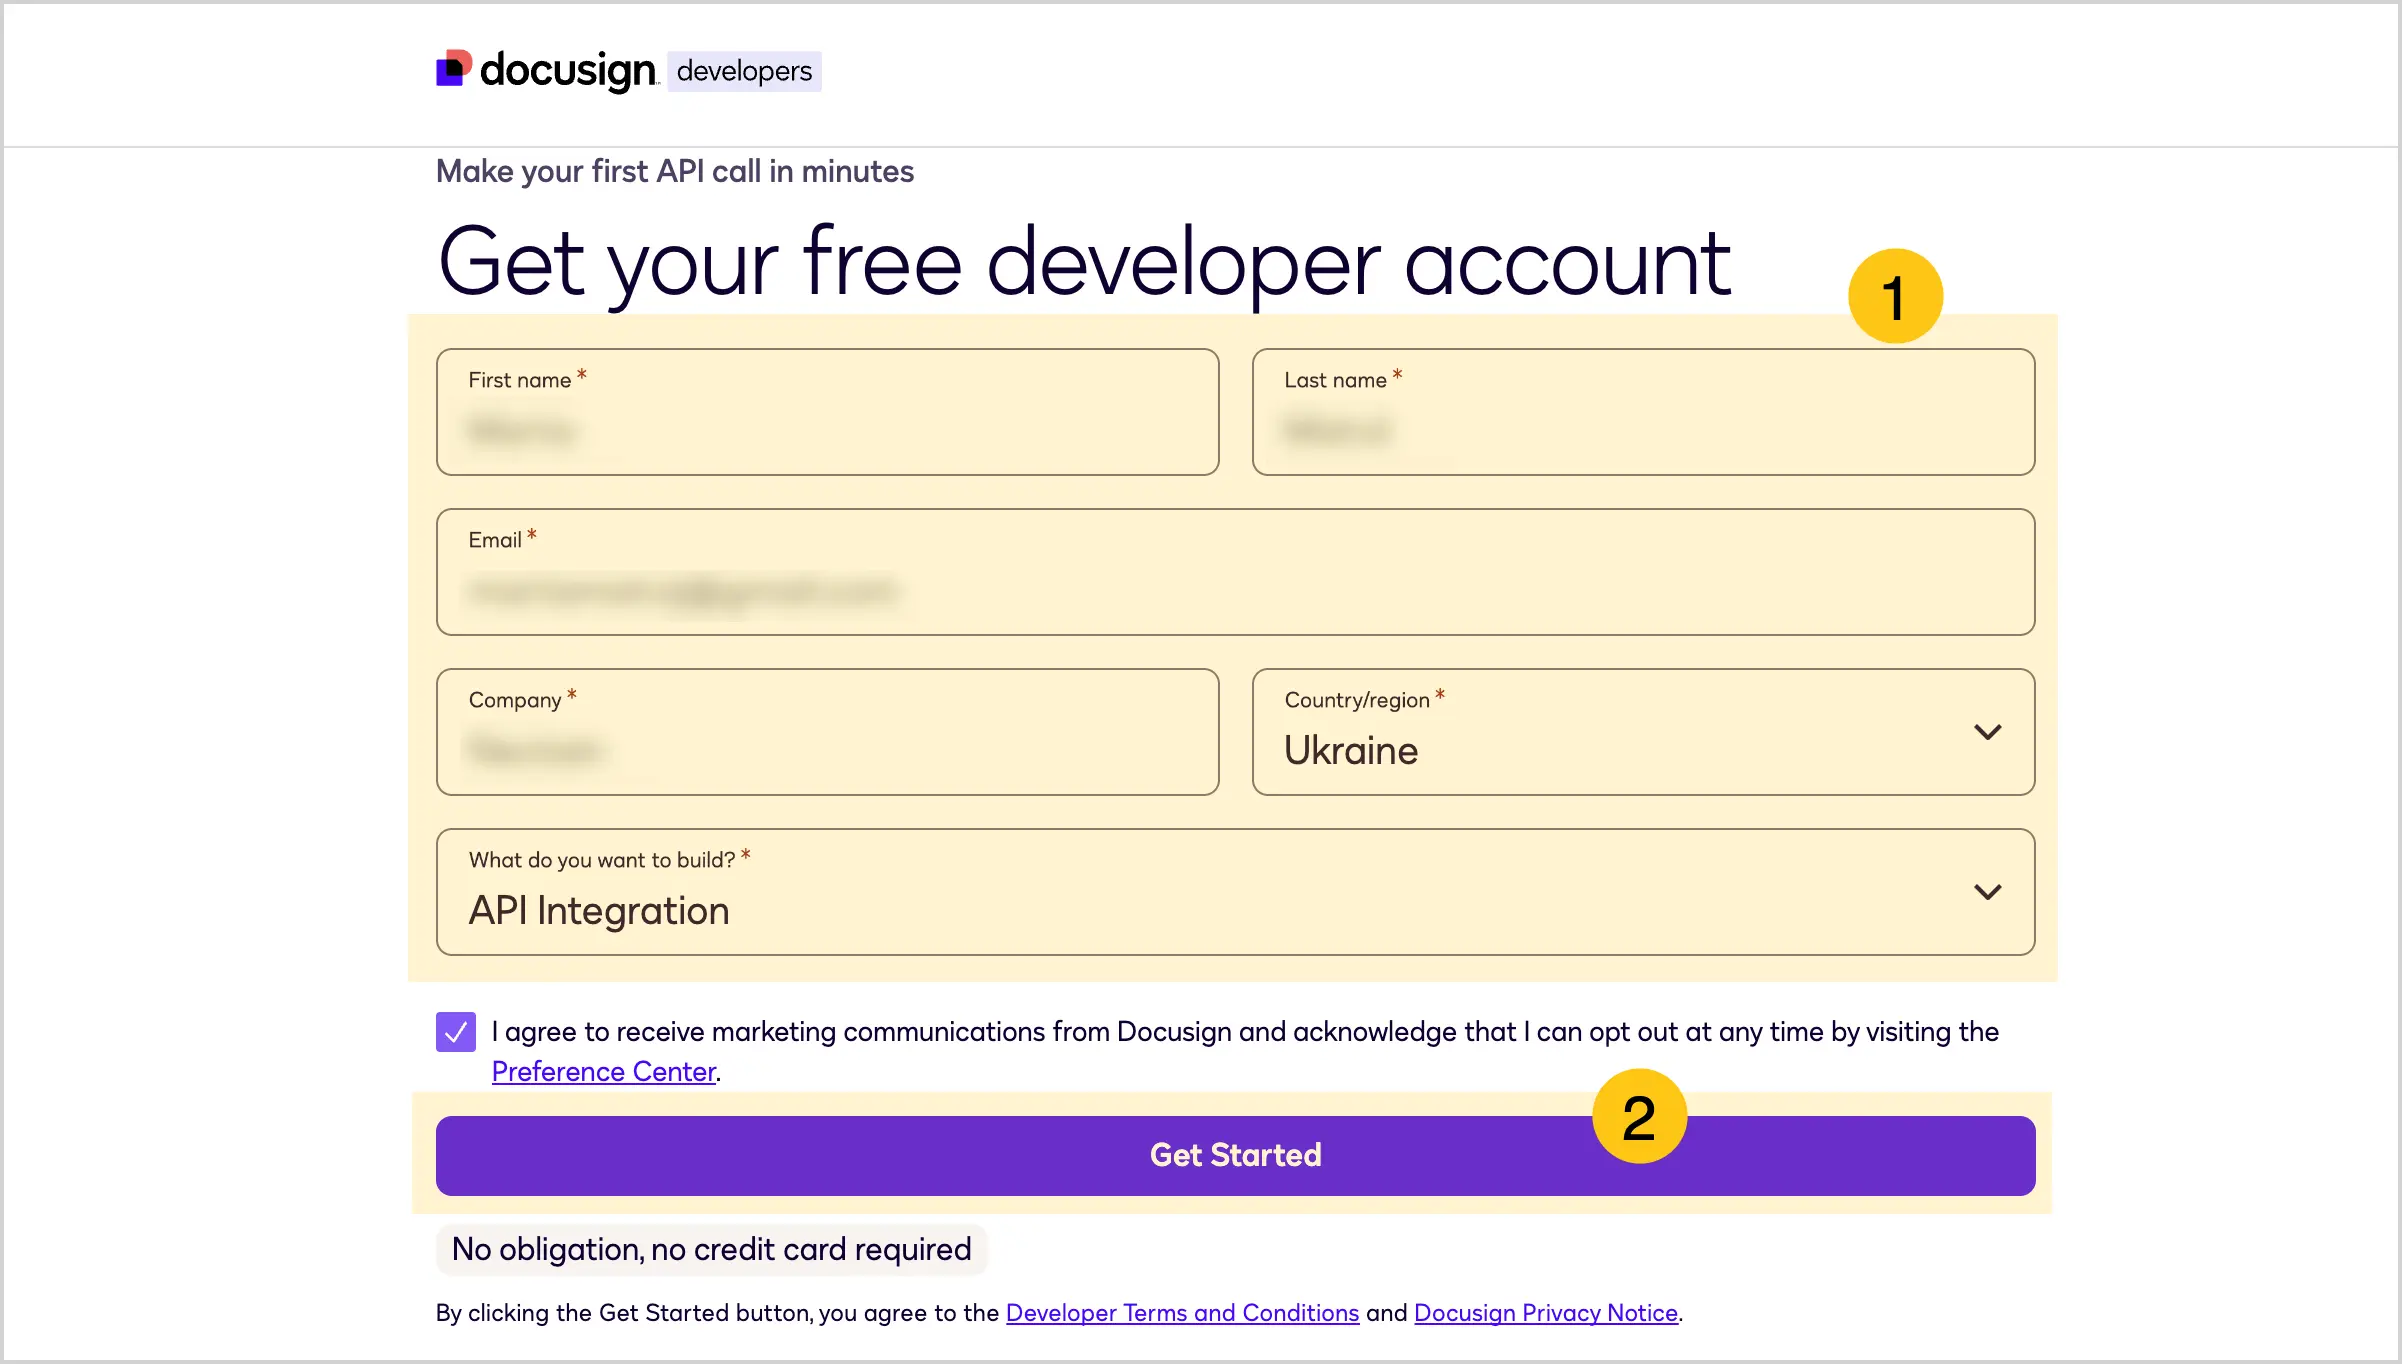
Fill in the required fields 1, then select the Get Started 2 button.
-
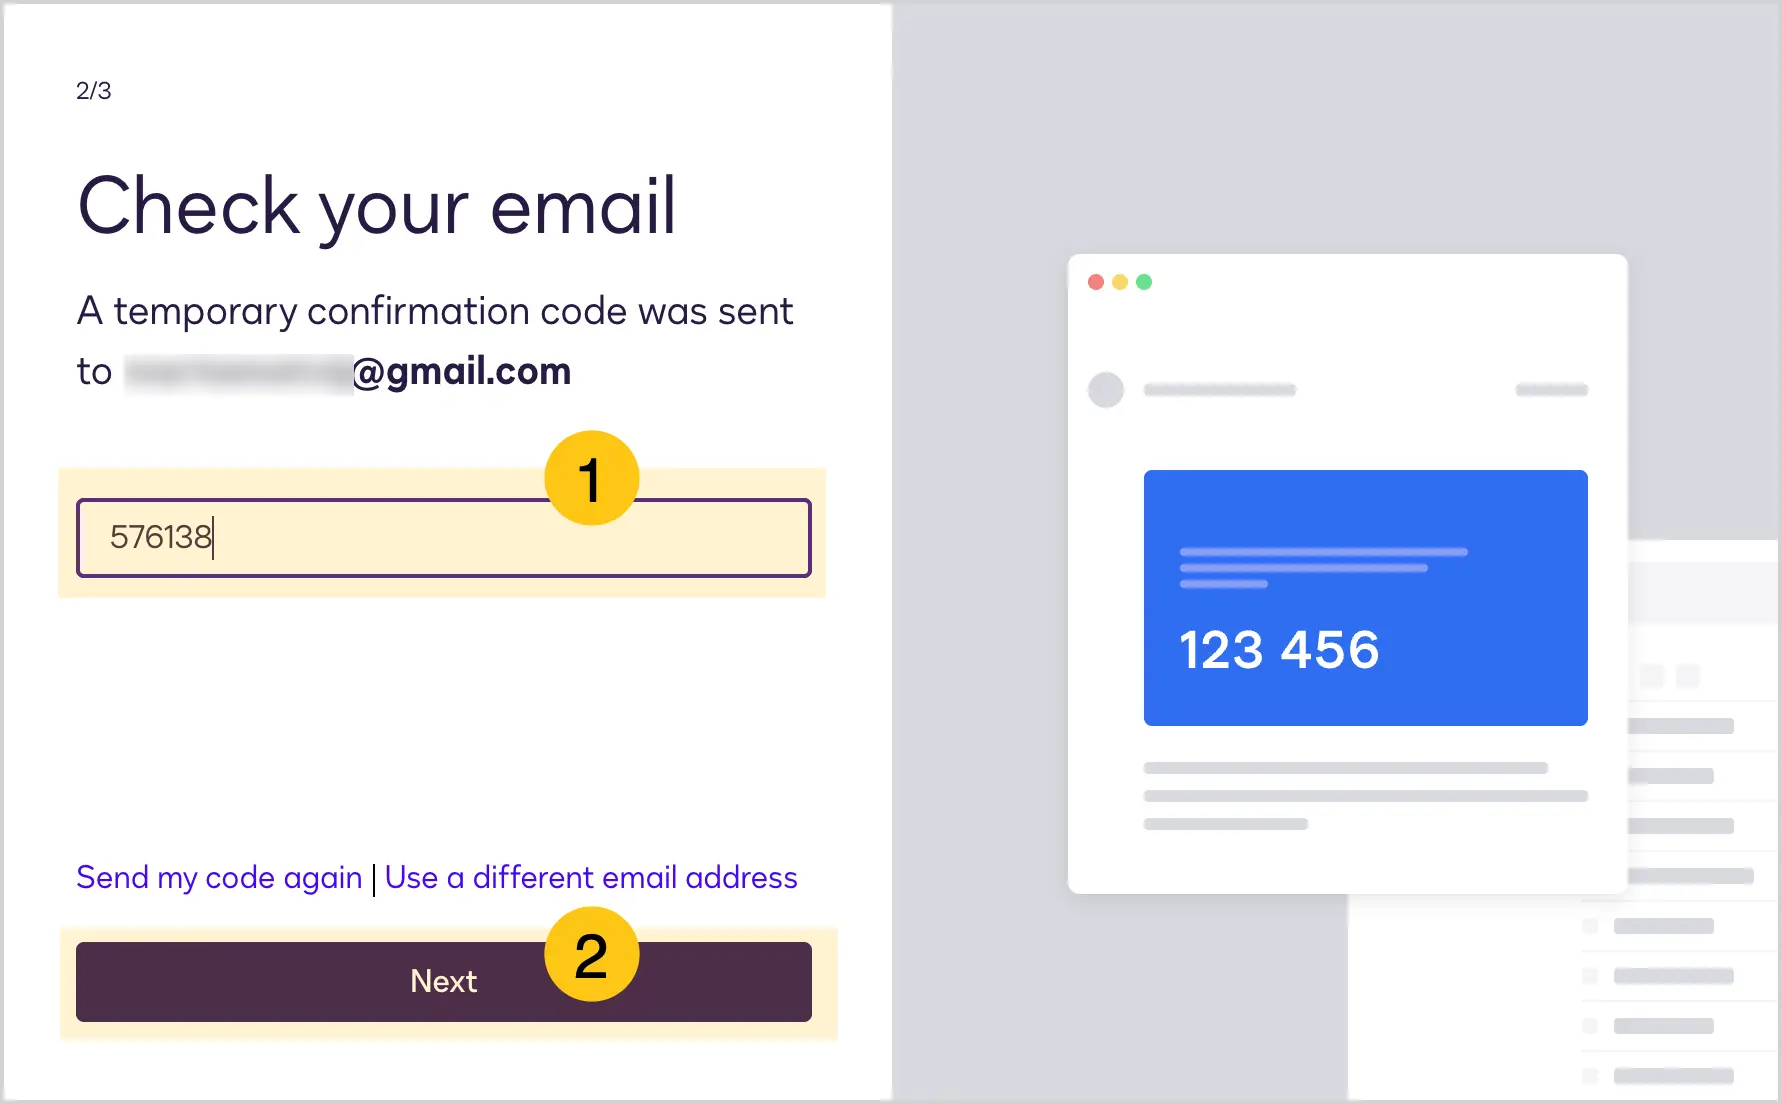
In the Check your email window, enter the code 1 sent to your mailbox, then select Next 2.
-
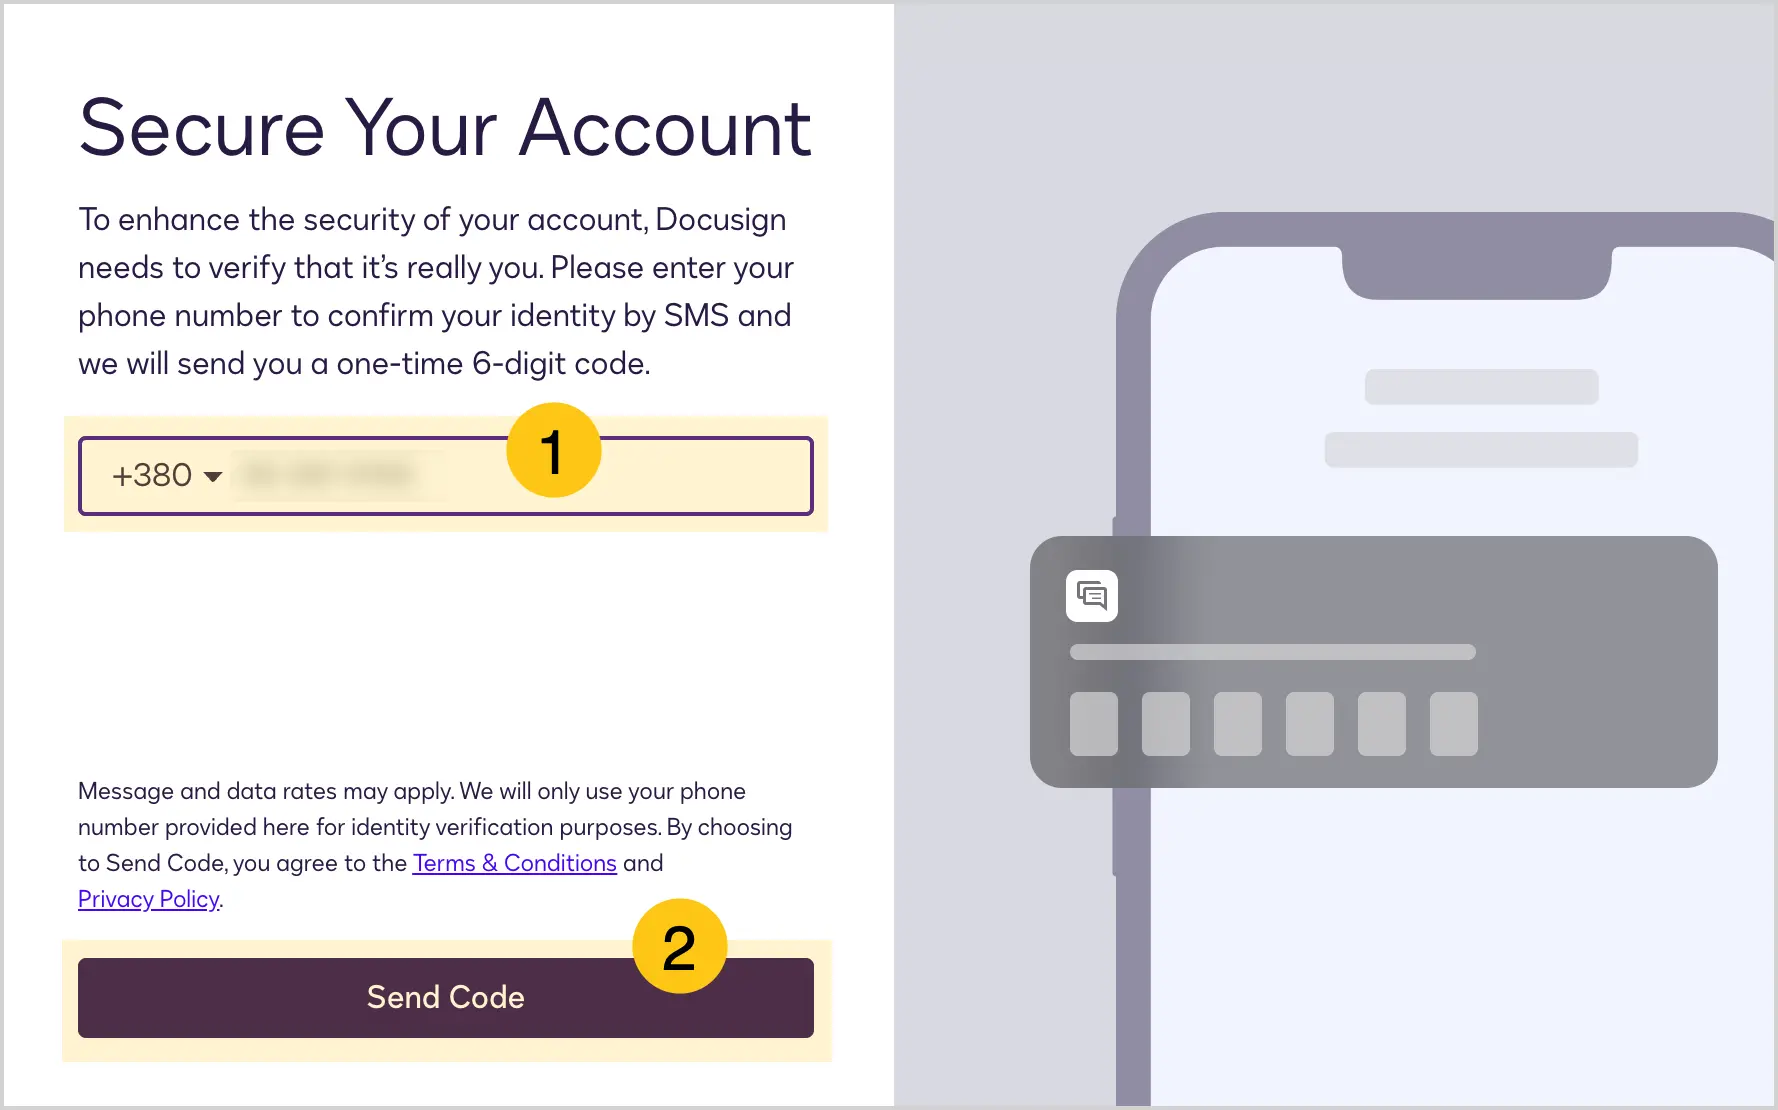
In the Secure Your Account window, enter your phone number 1, then select the Send Code 2 button.
-
Enter the code sent to your phone number via SMS.
-
In the Password field, set your desired profile password.
-
-
Create a key.
-
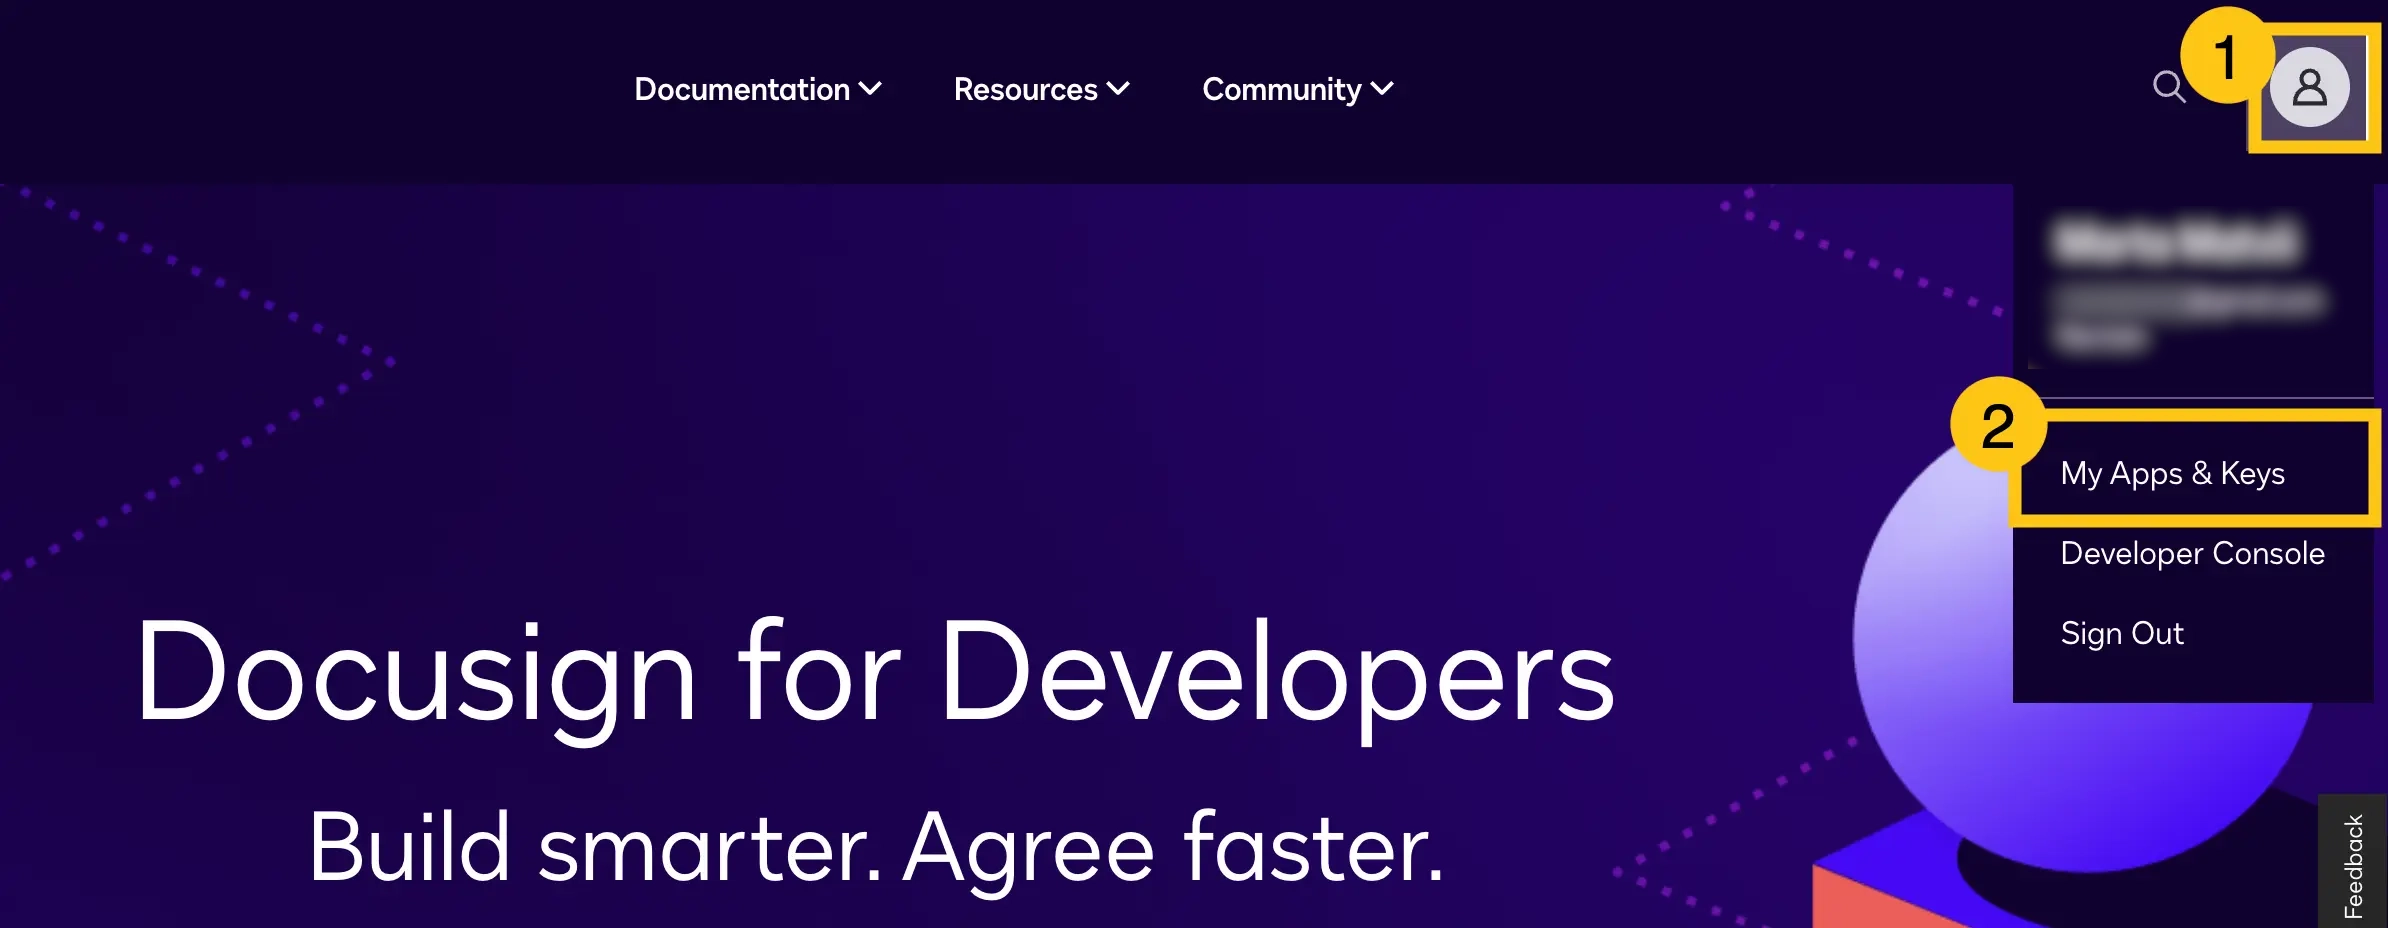
In the top-right corner, select the profile icon 1, then select My Apps & Keys 2.
-
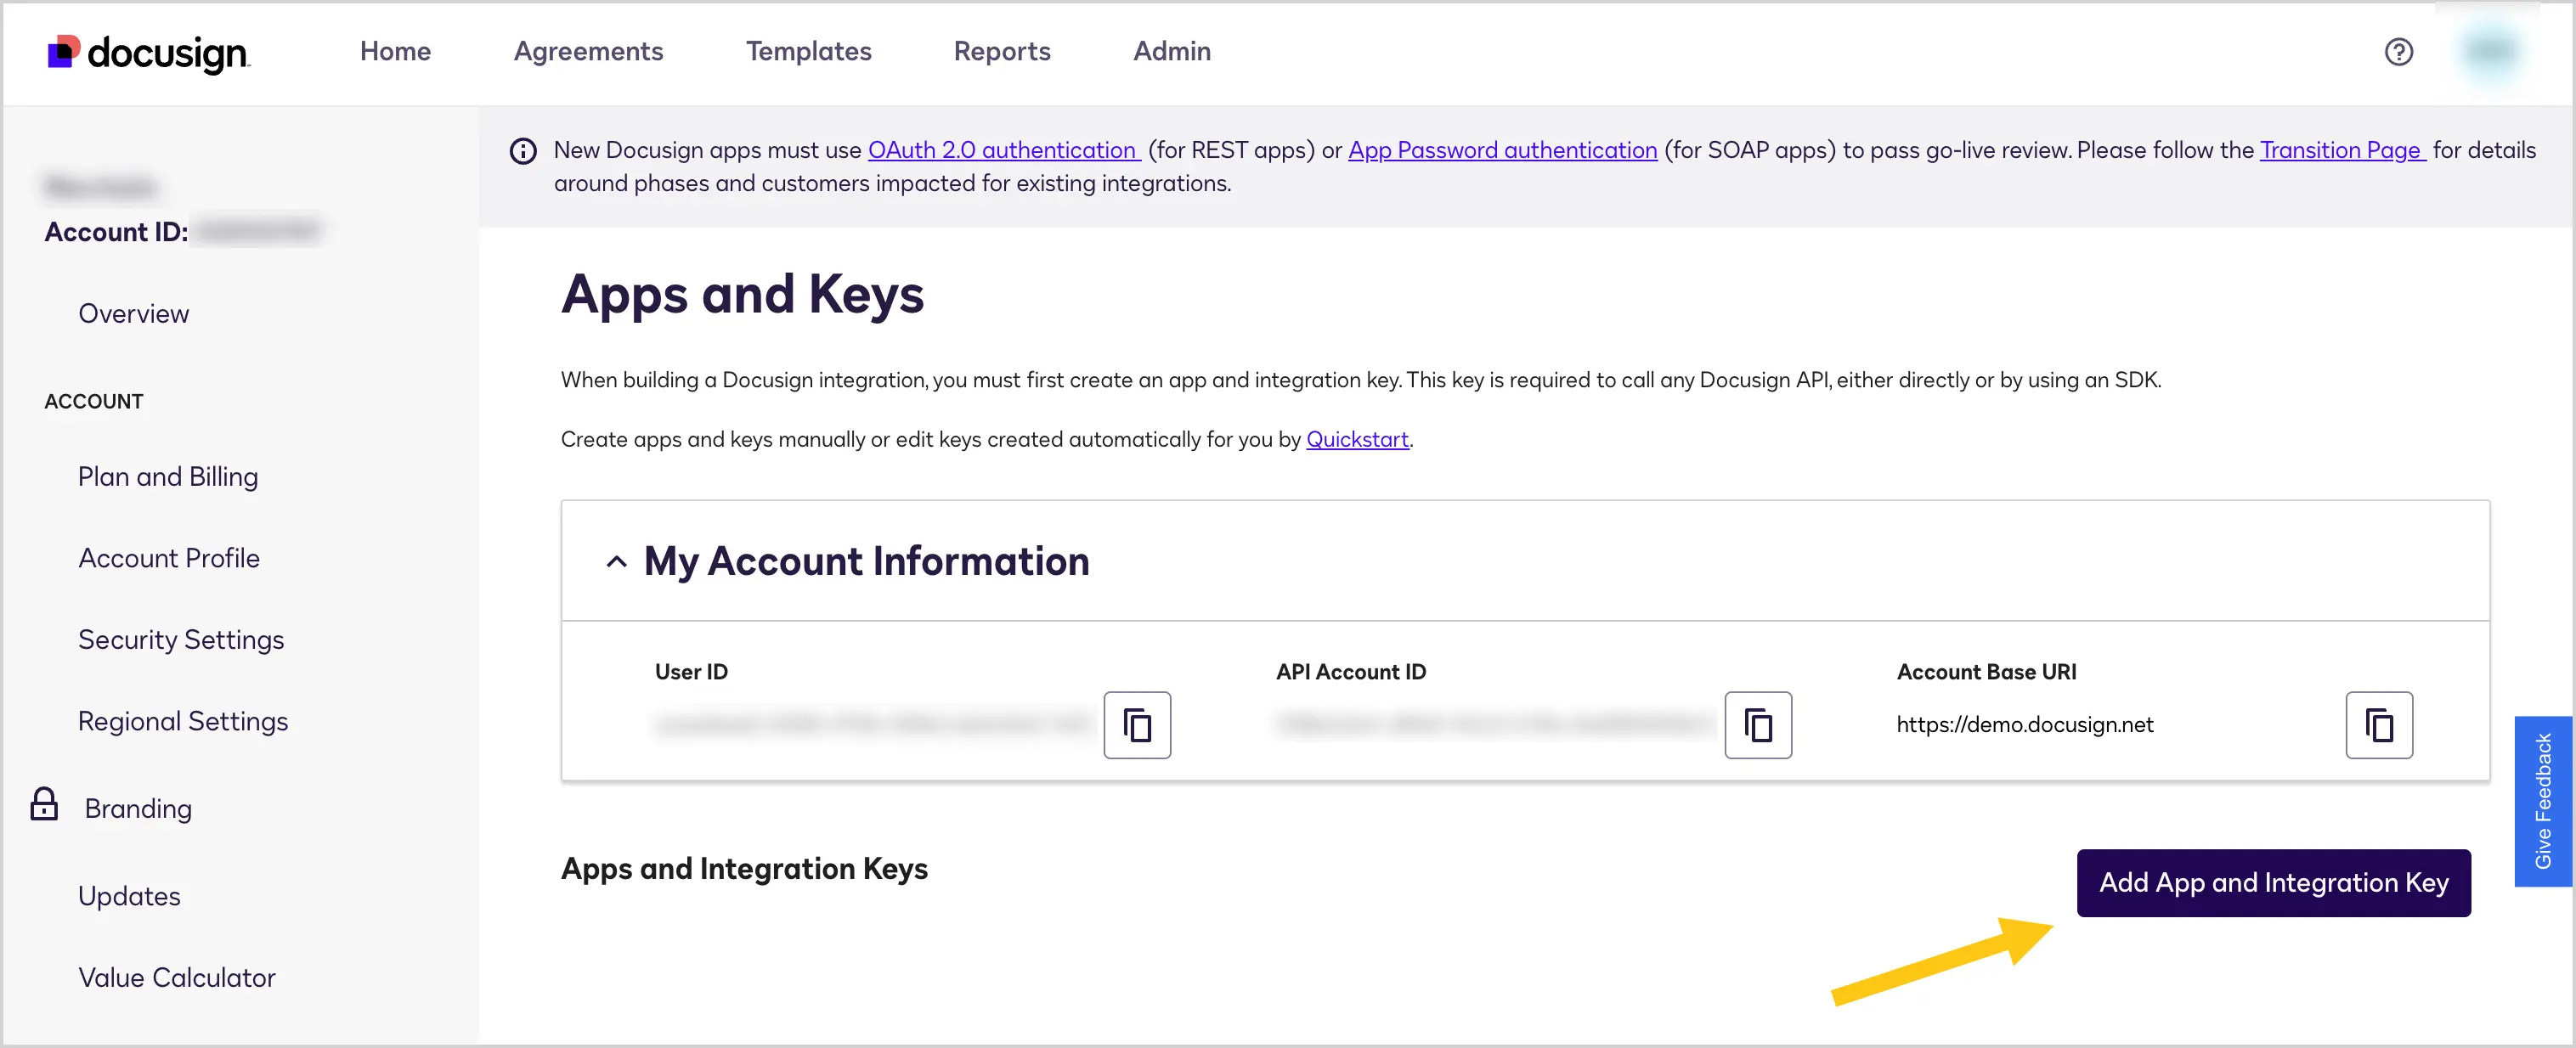
Select the Add App and Integration Key button.
-
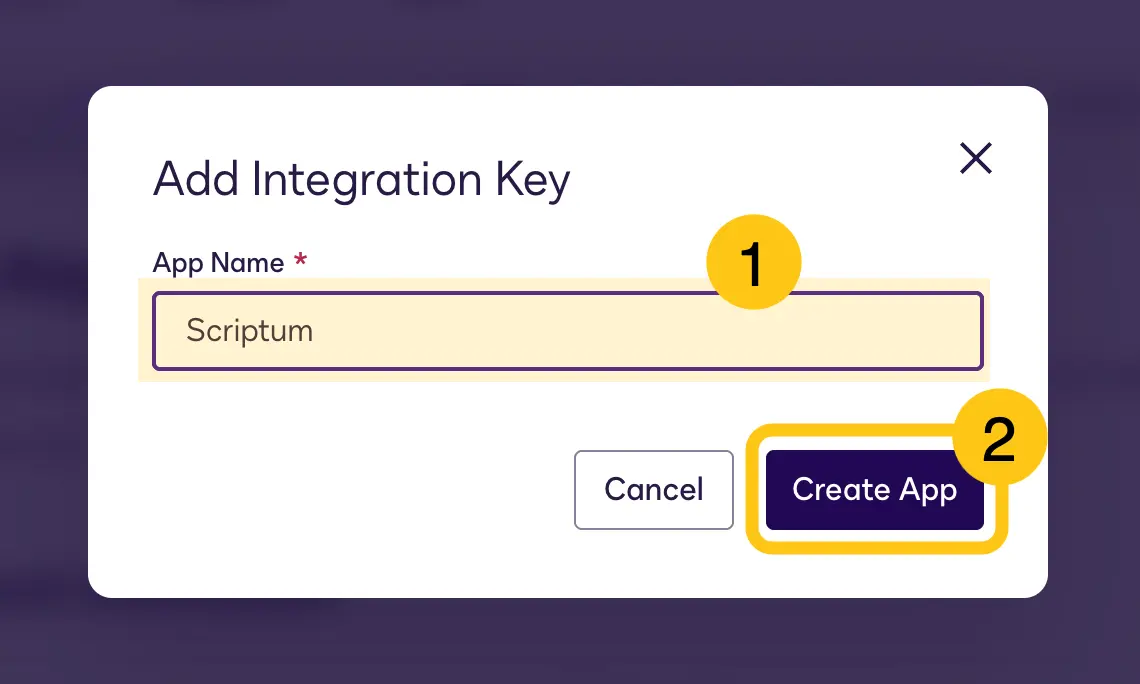
In the App Name 1 field, enter a name, for example Nectainium, then select the Create App 2 button.
-
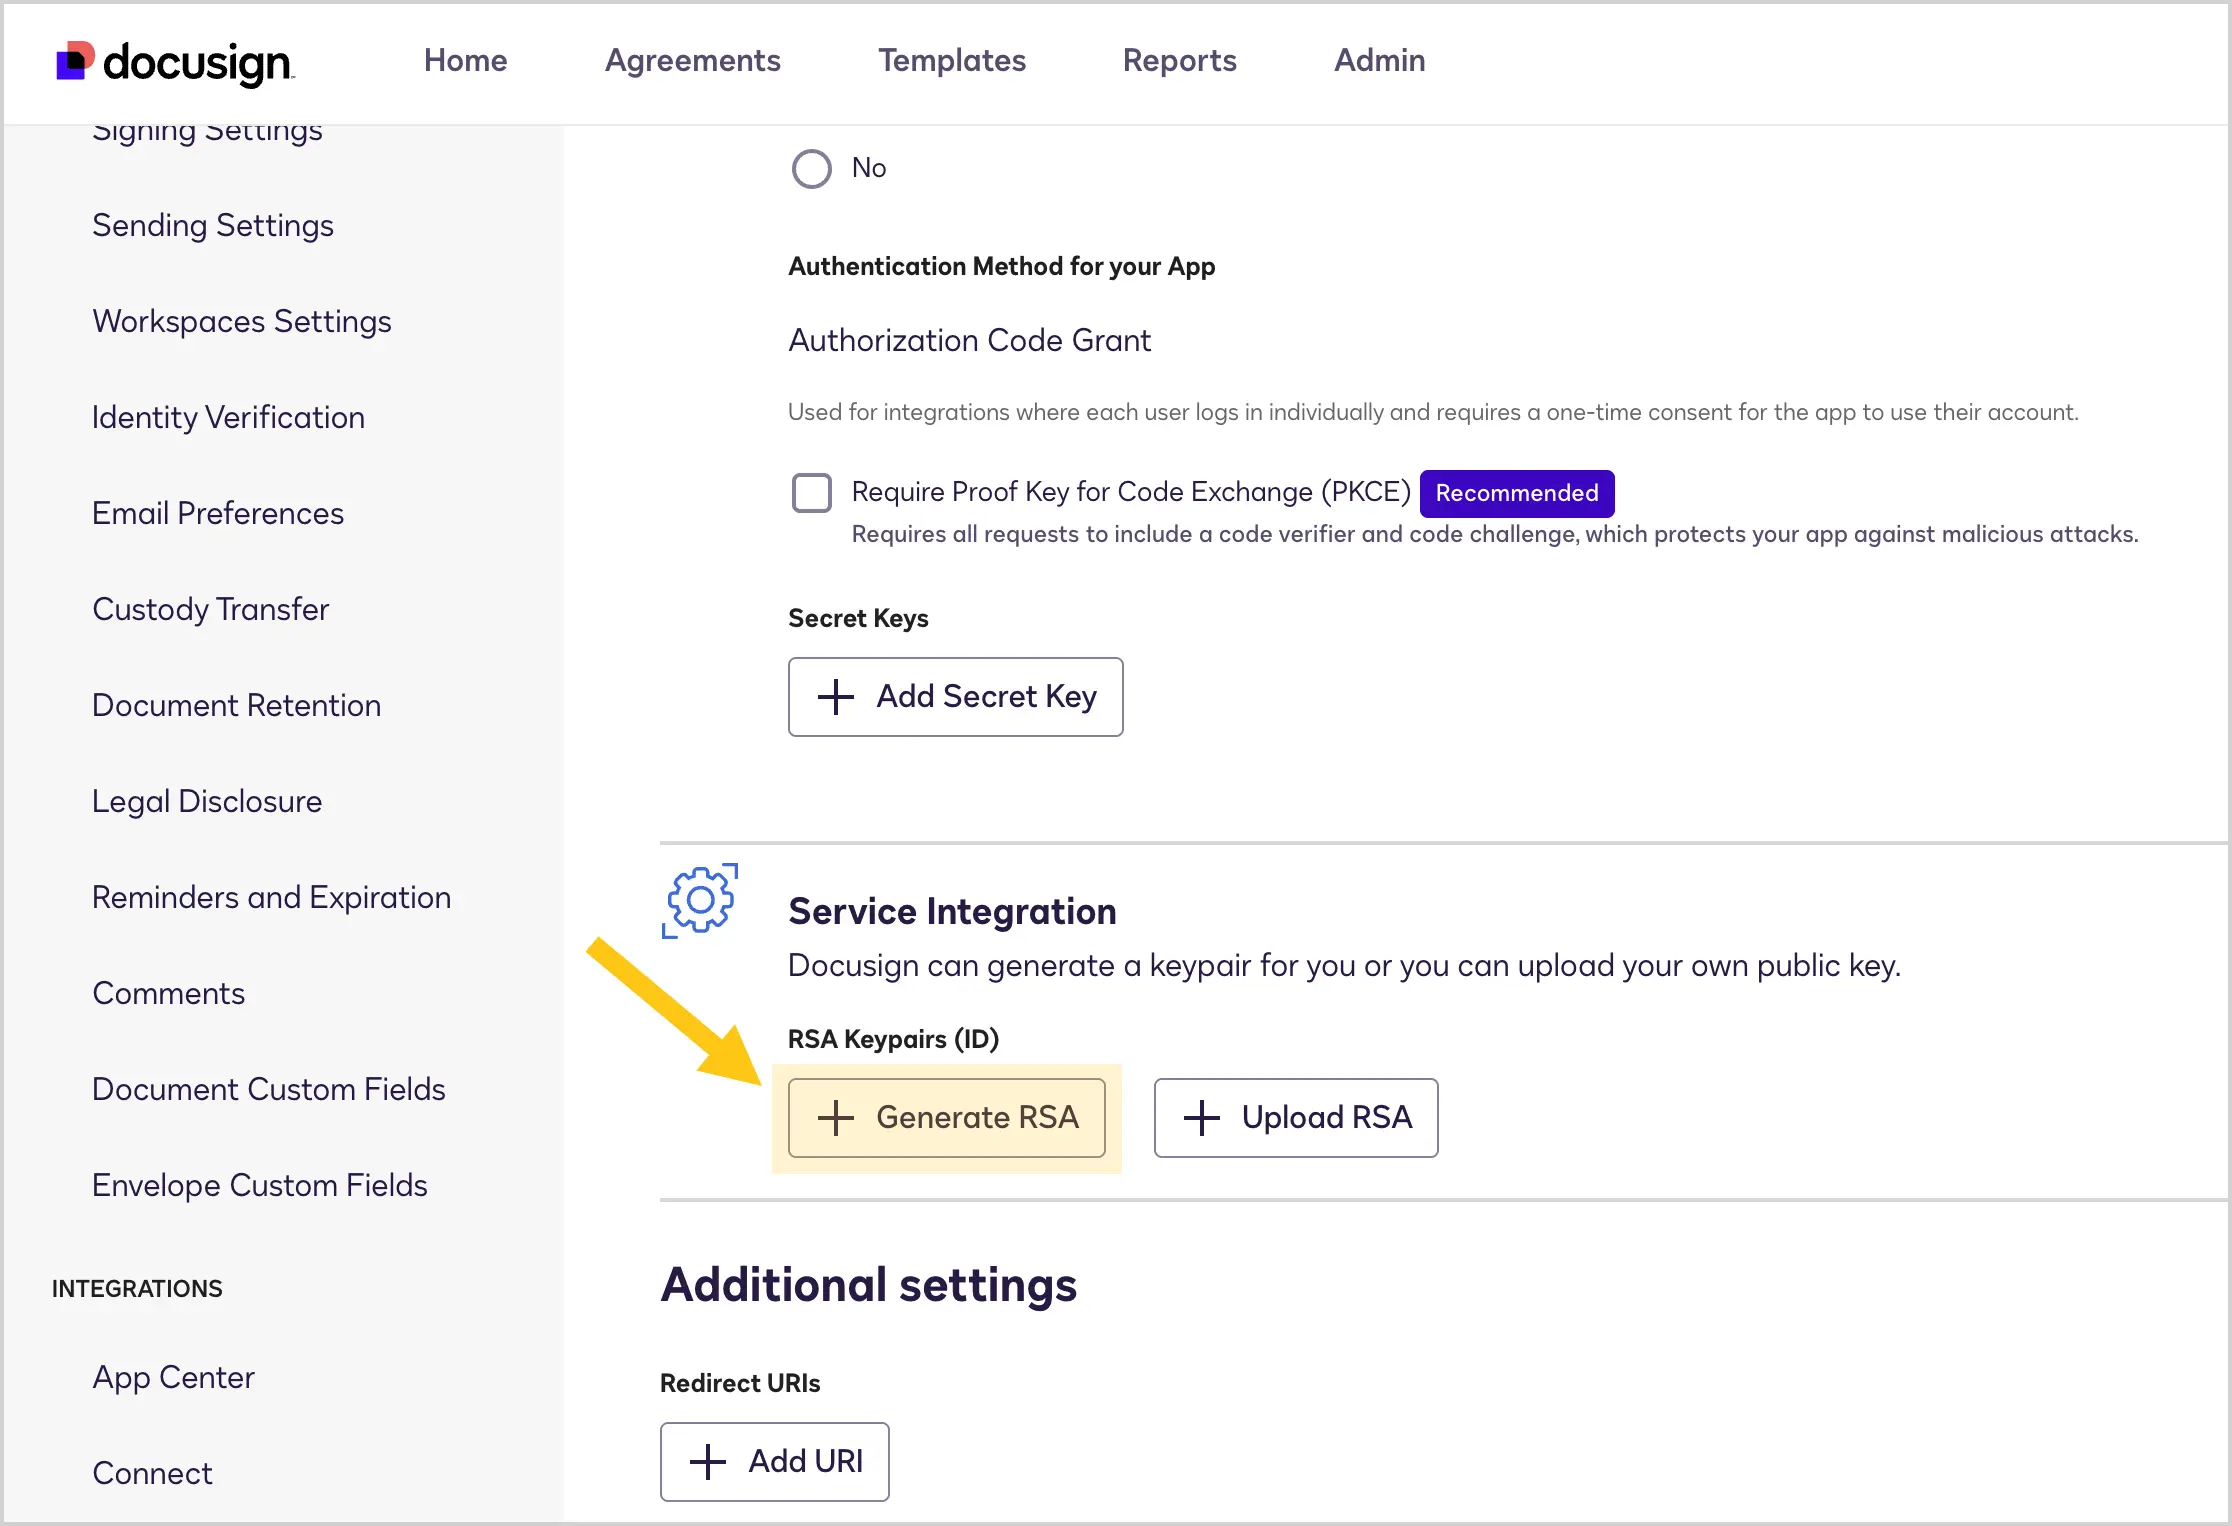
Scroll down to the Service Integration section, then select the Generate RSA button.
-
In the Private key section, select the icon to copy the key, then save it in a secure place, for example in a notes app. In the next steps of this guide, you will need to paste it into the corresponding field in Nectainium.
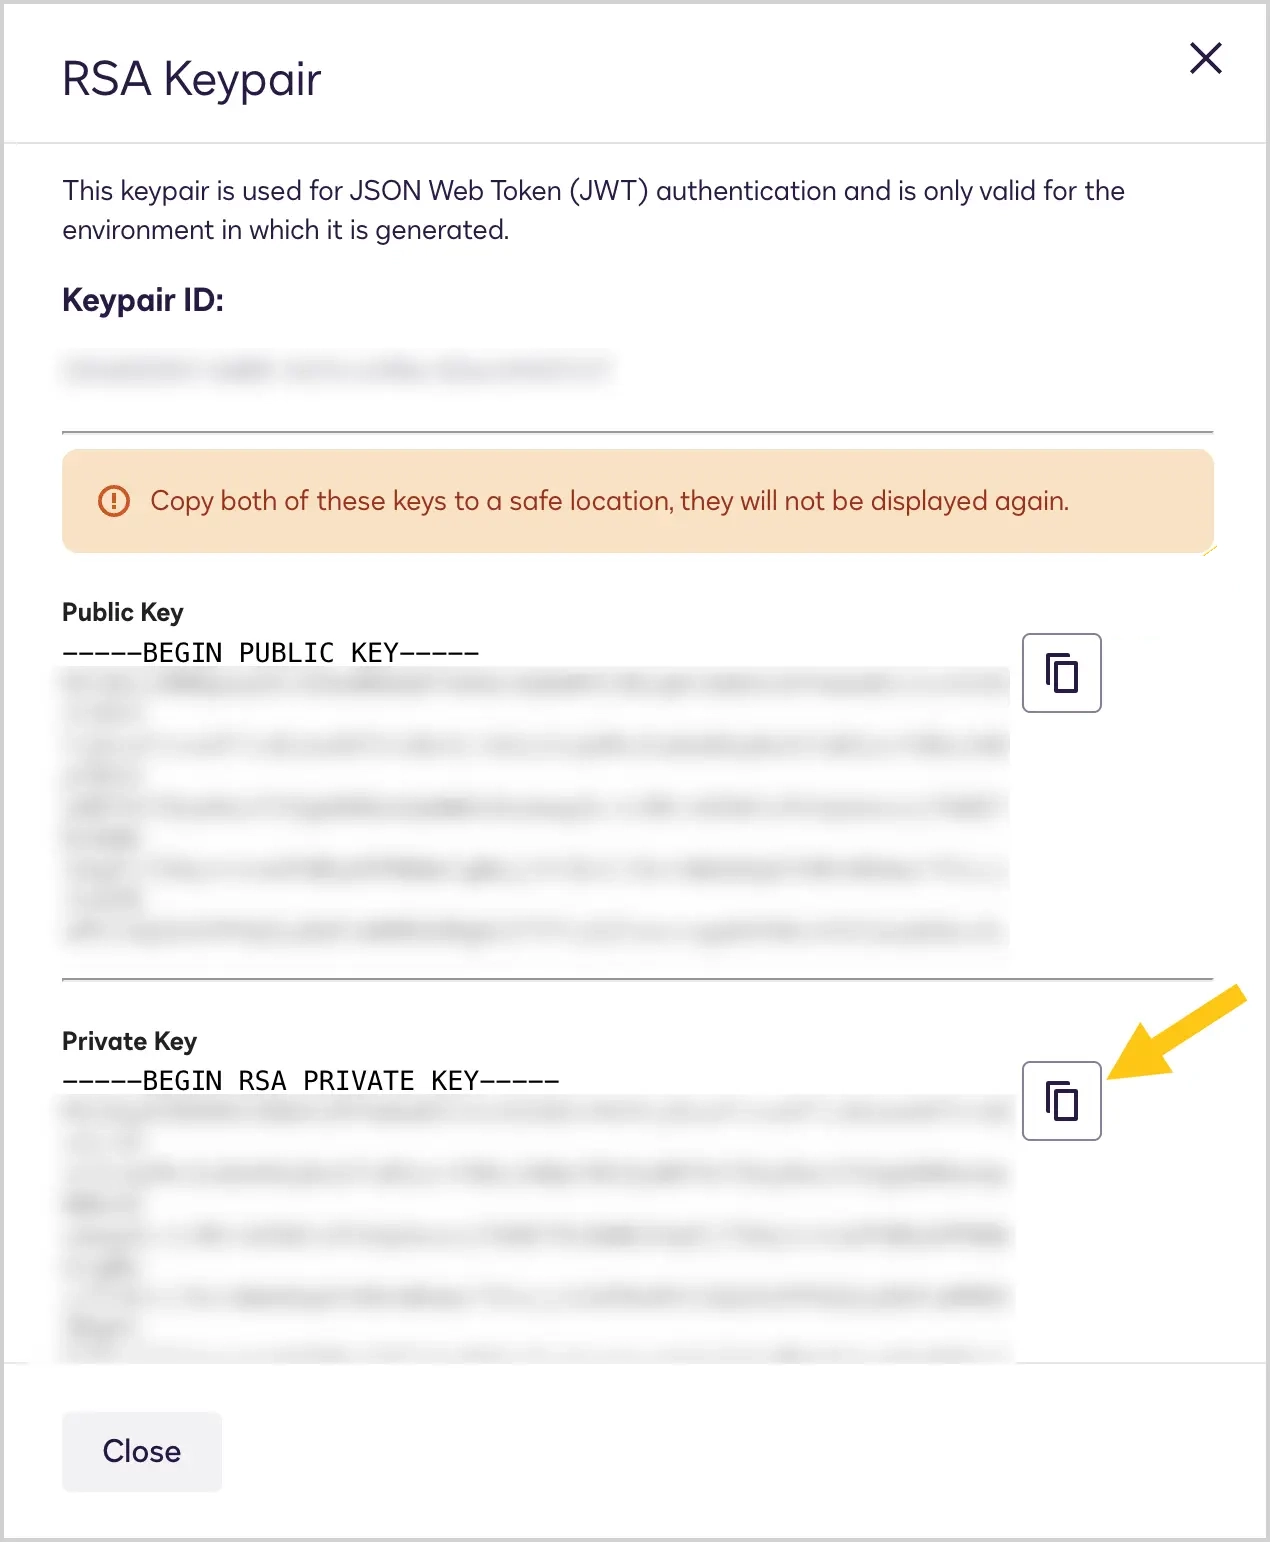 Warning:
After closing this window, for security reasons, you will no longer be able to view this key. If you do not save it, you will need to generate a new one.
-
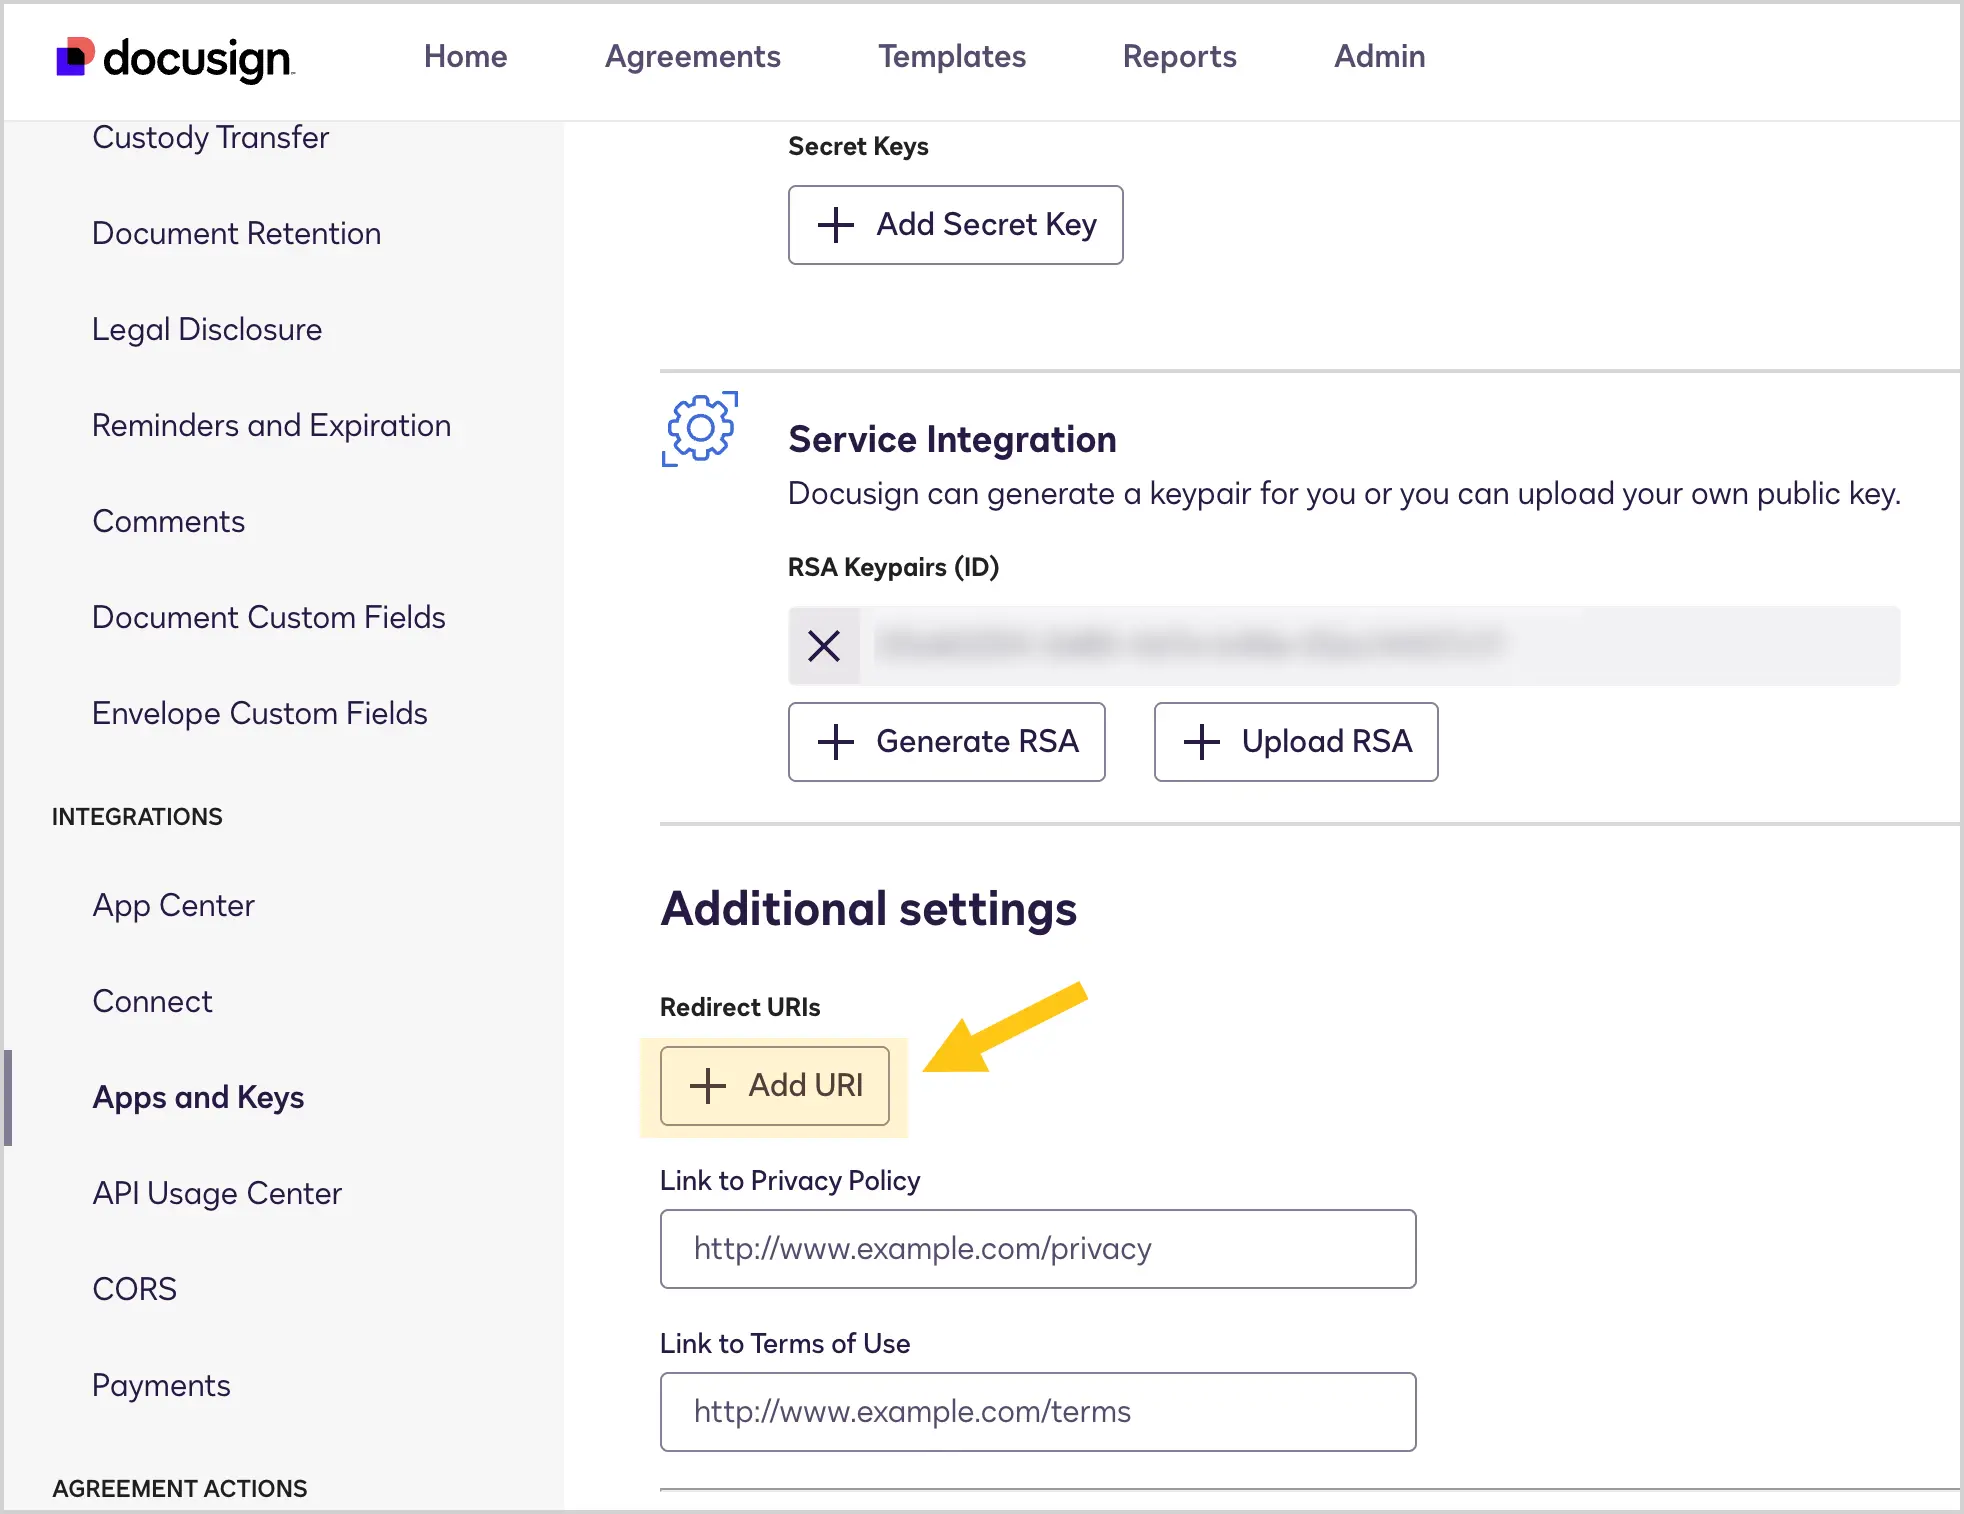
Scroll down to the Additional settings section, then select the Add URI button.
-
In the Redirect URIs field, paste the URL to which Docusign will redirect the user after the authentication process is complete. Enter the URL of your Nectainium platform in the format
https://your-nectainium-domain/.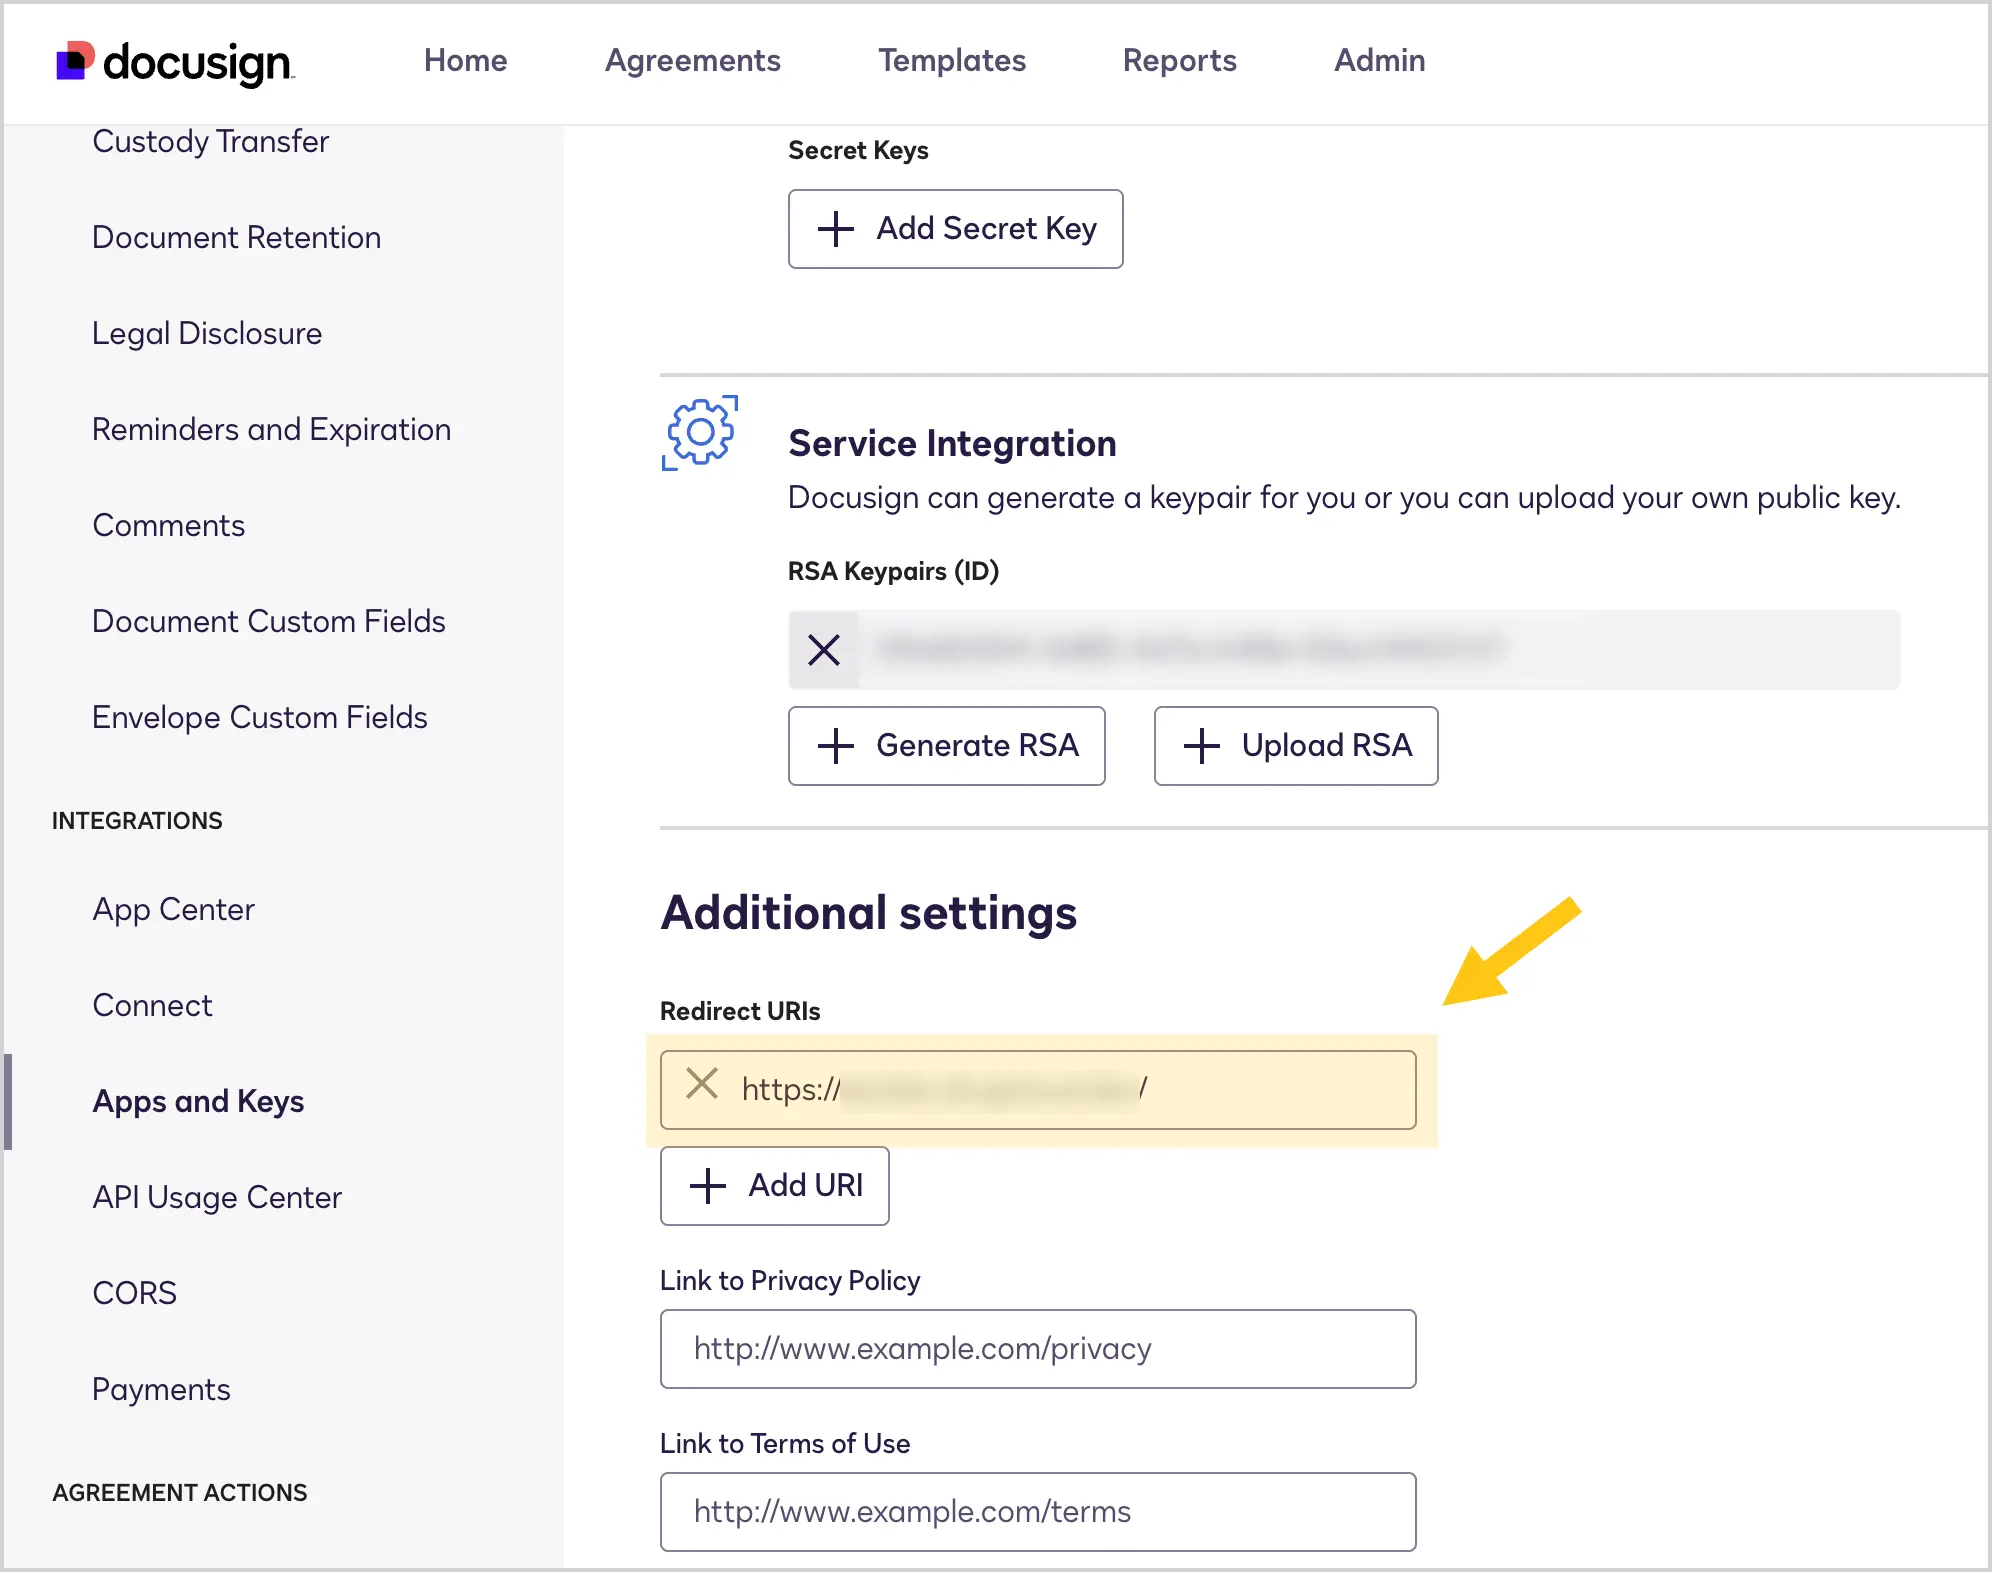
-
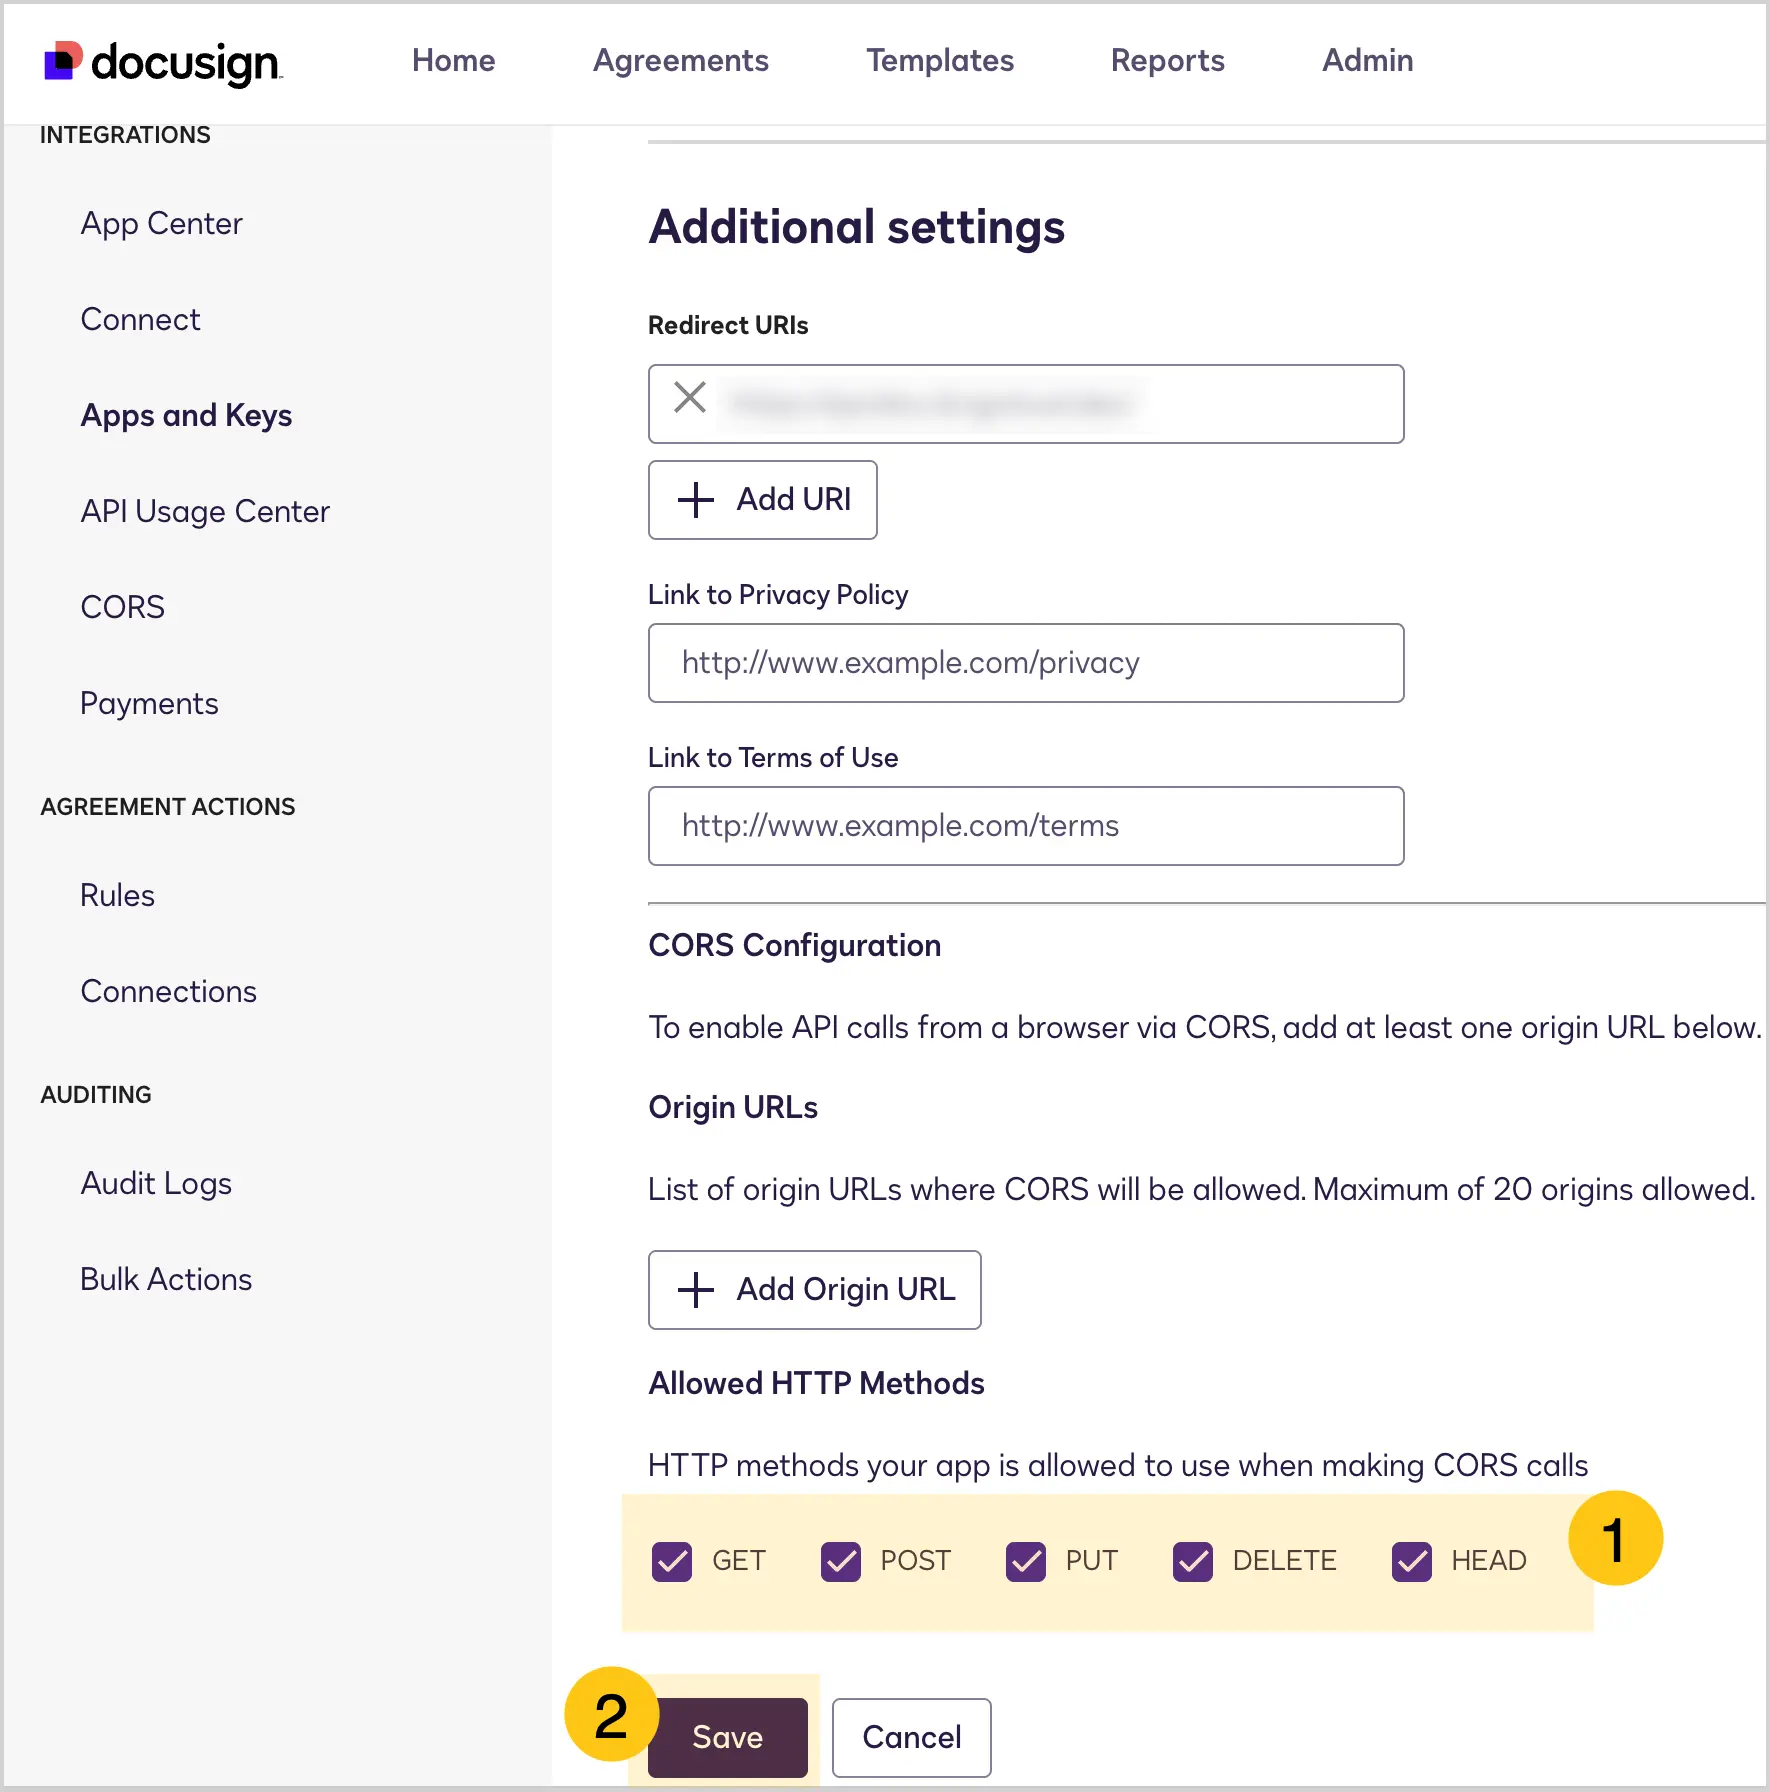
Scroll down to the Allowed HTTP Methods section, select all method checkboxes 1, then select the Save 2 button.
-
-
Add a custom configuration:
-
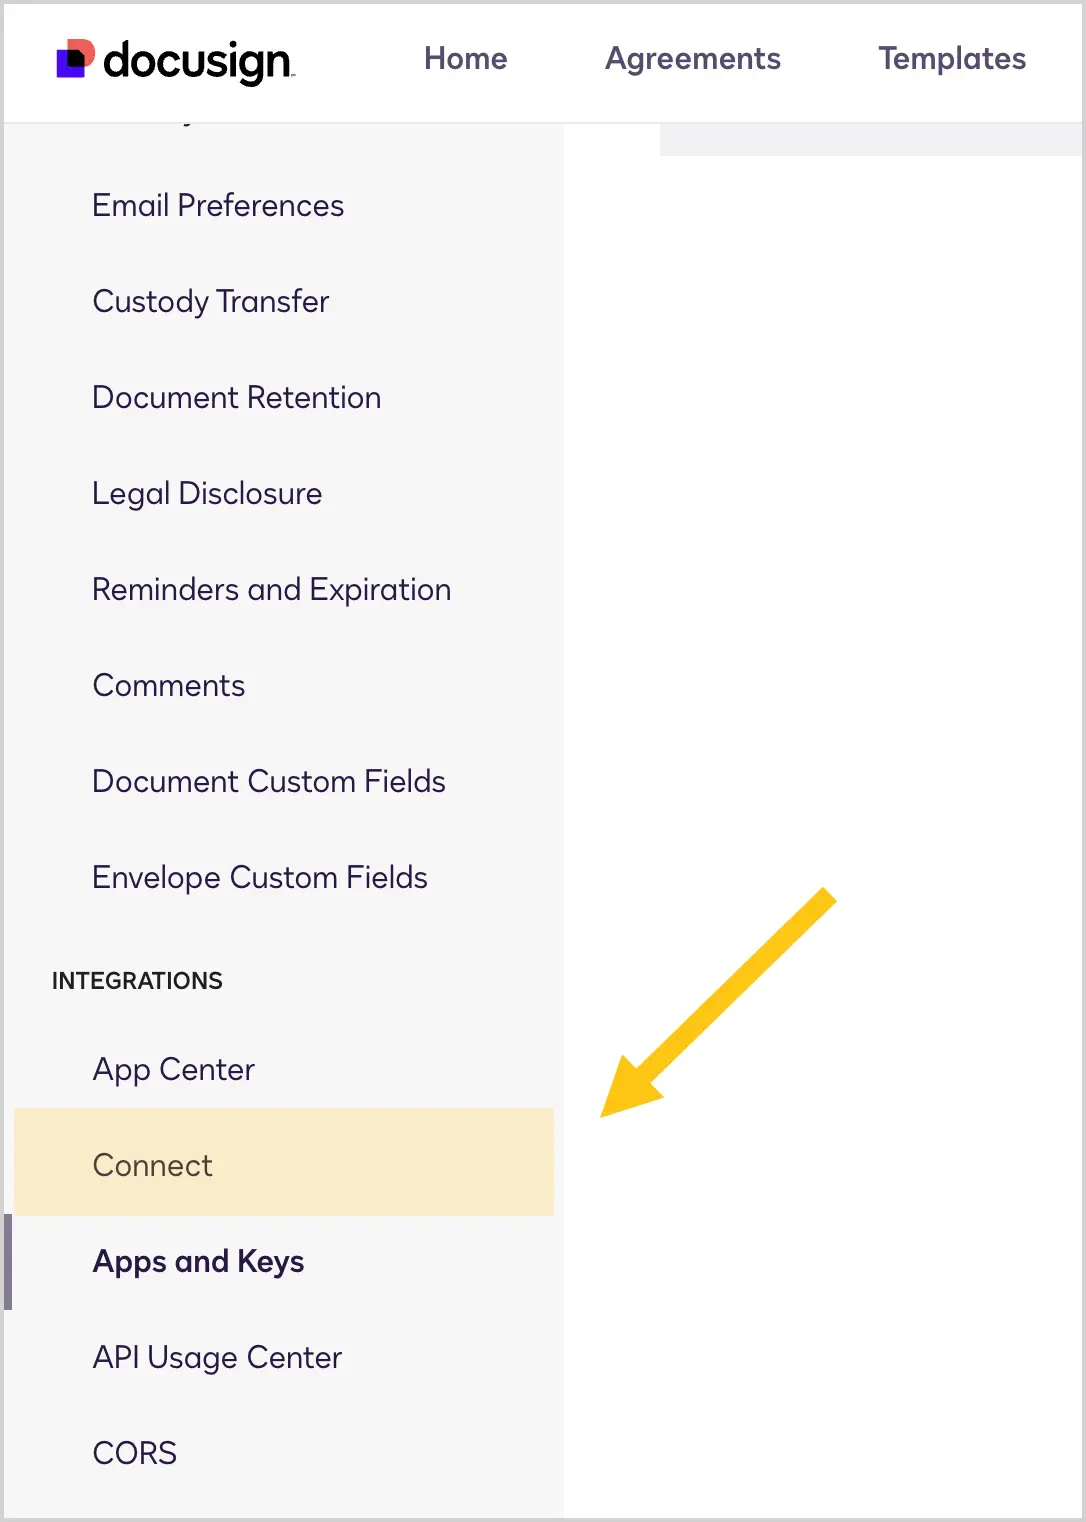
In the menu, in the Integrations section, select Connect.
-
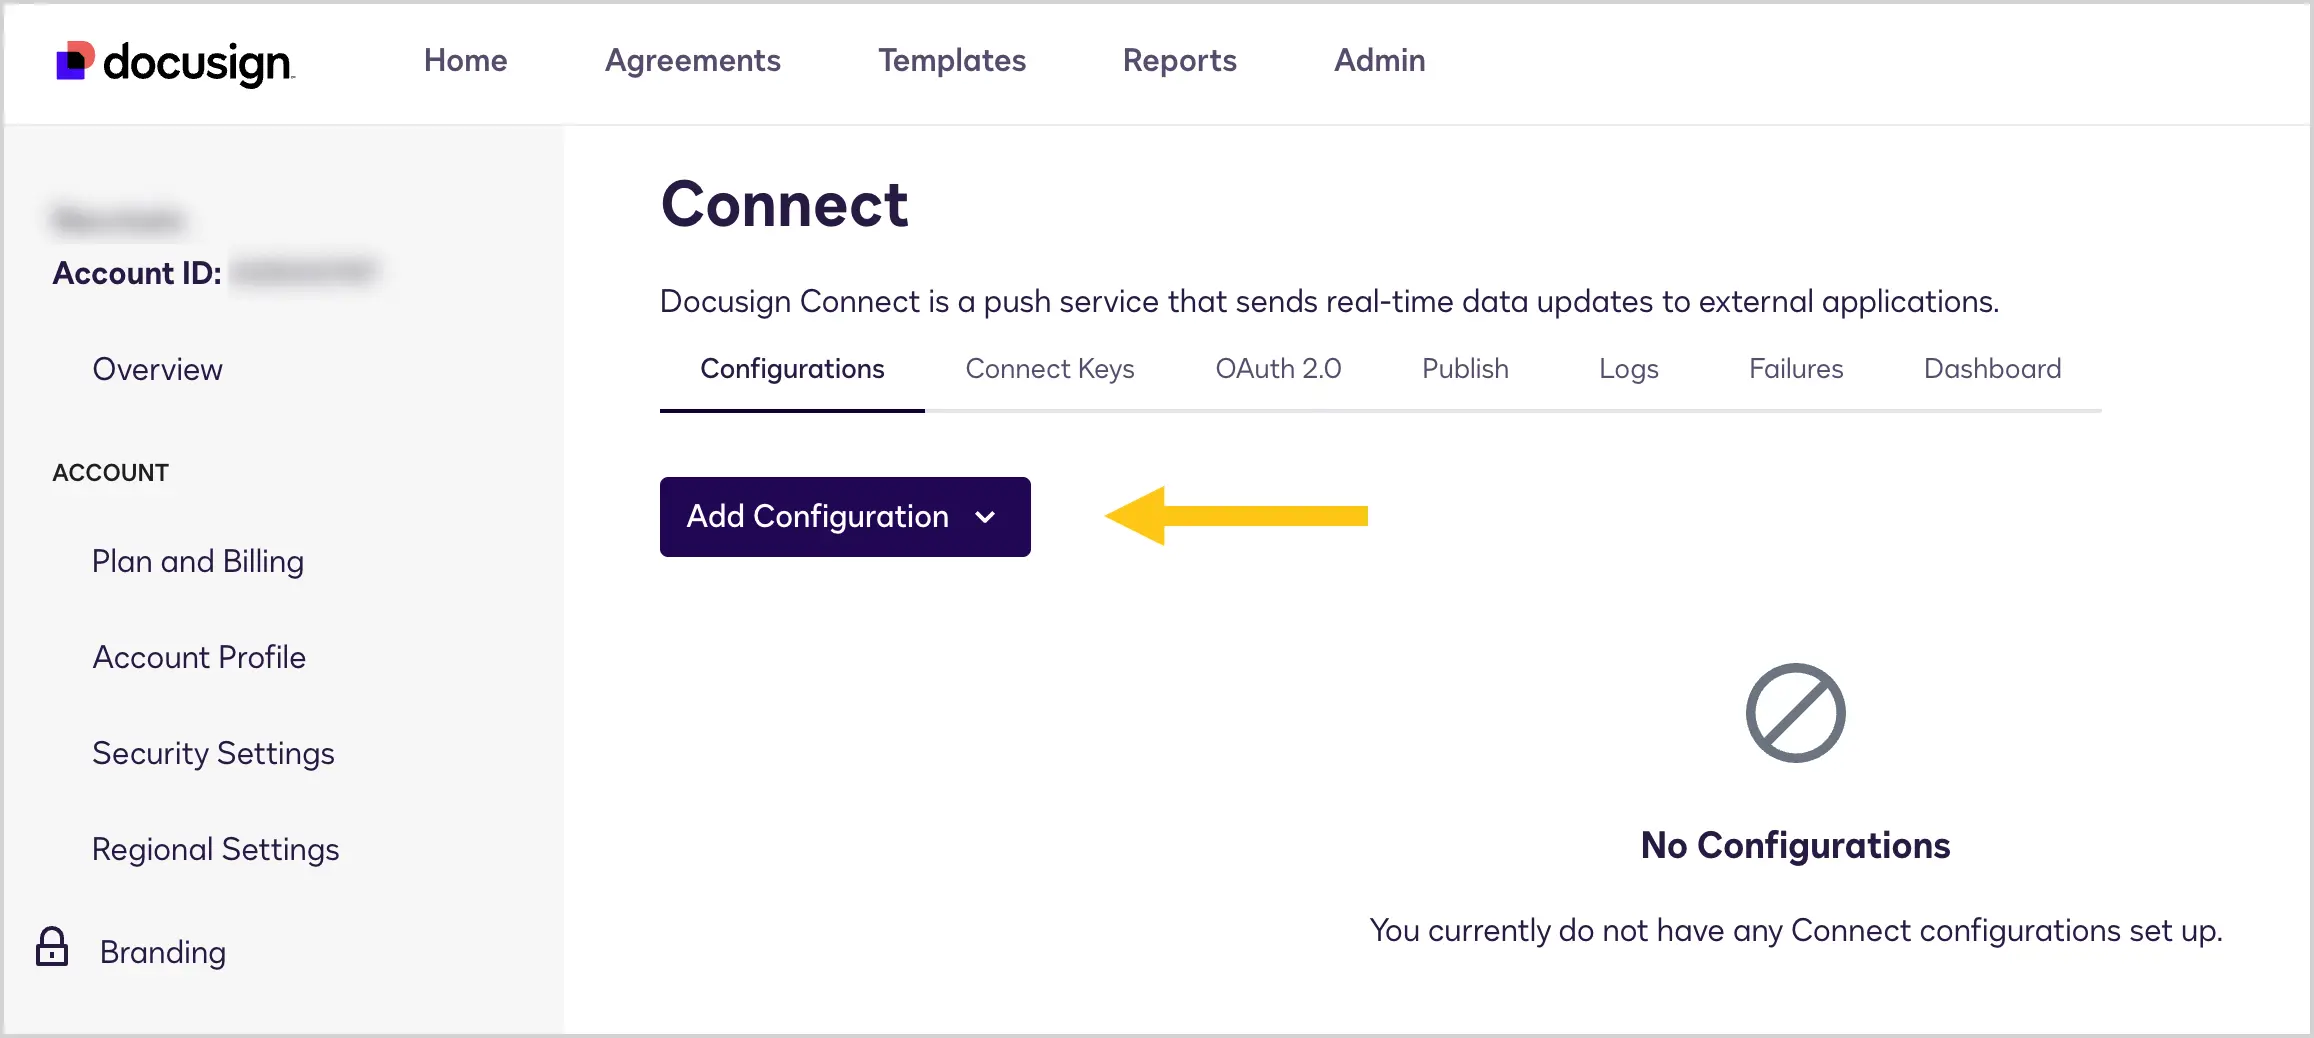
On the Connect page, select the Add Configuration button.
-
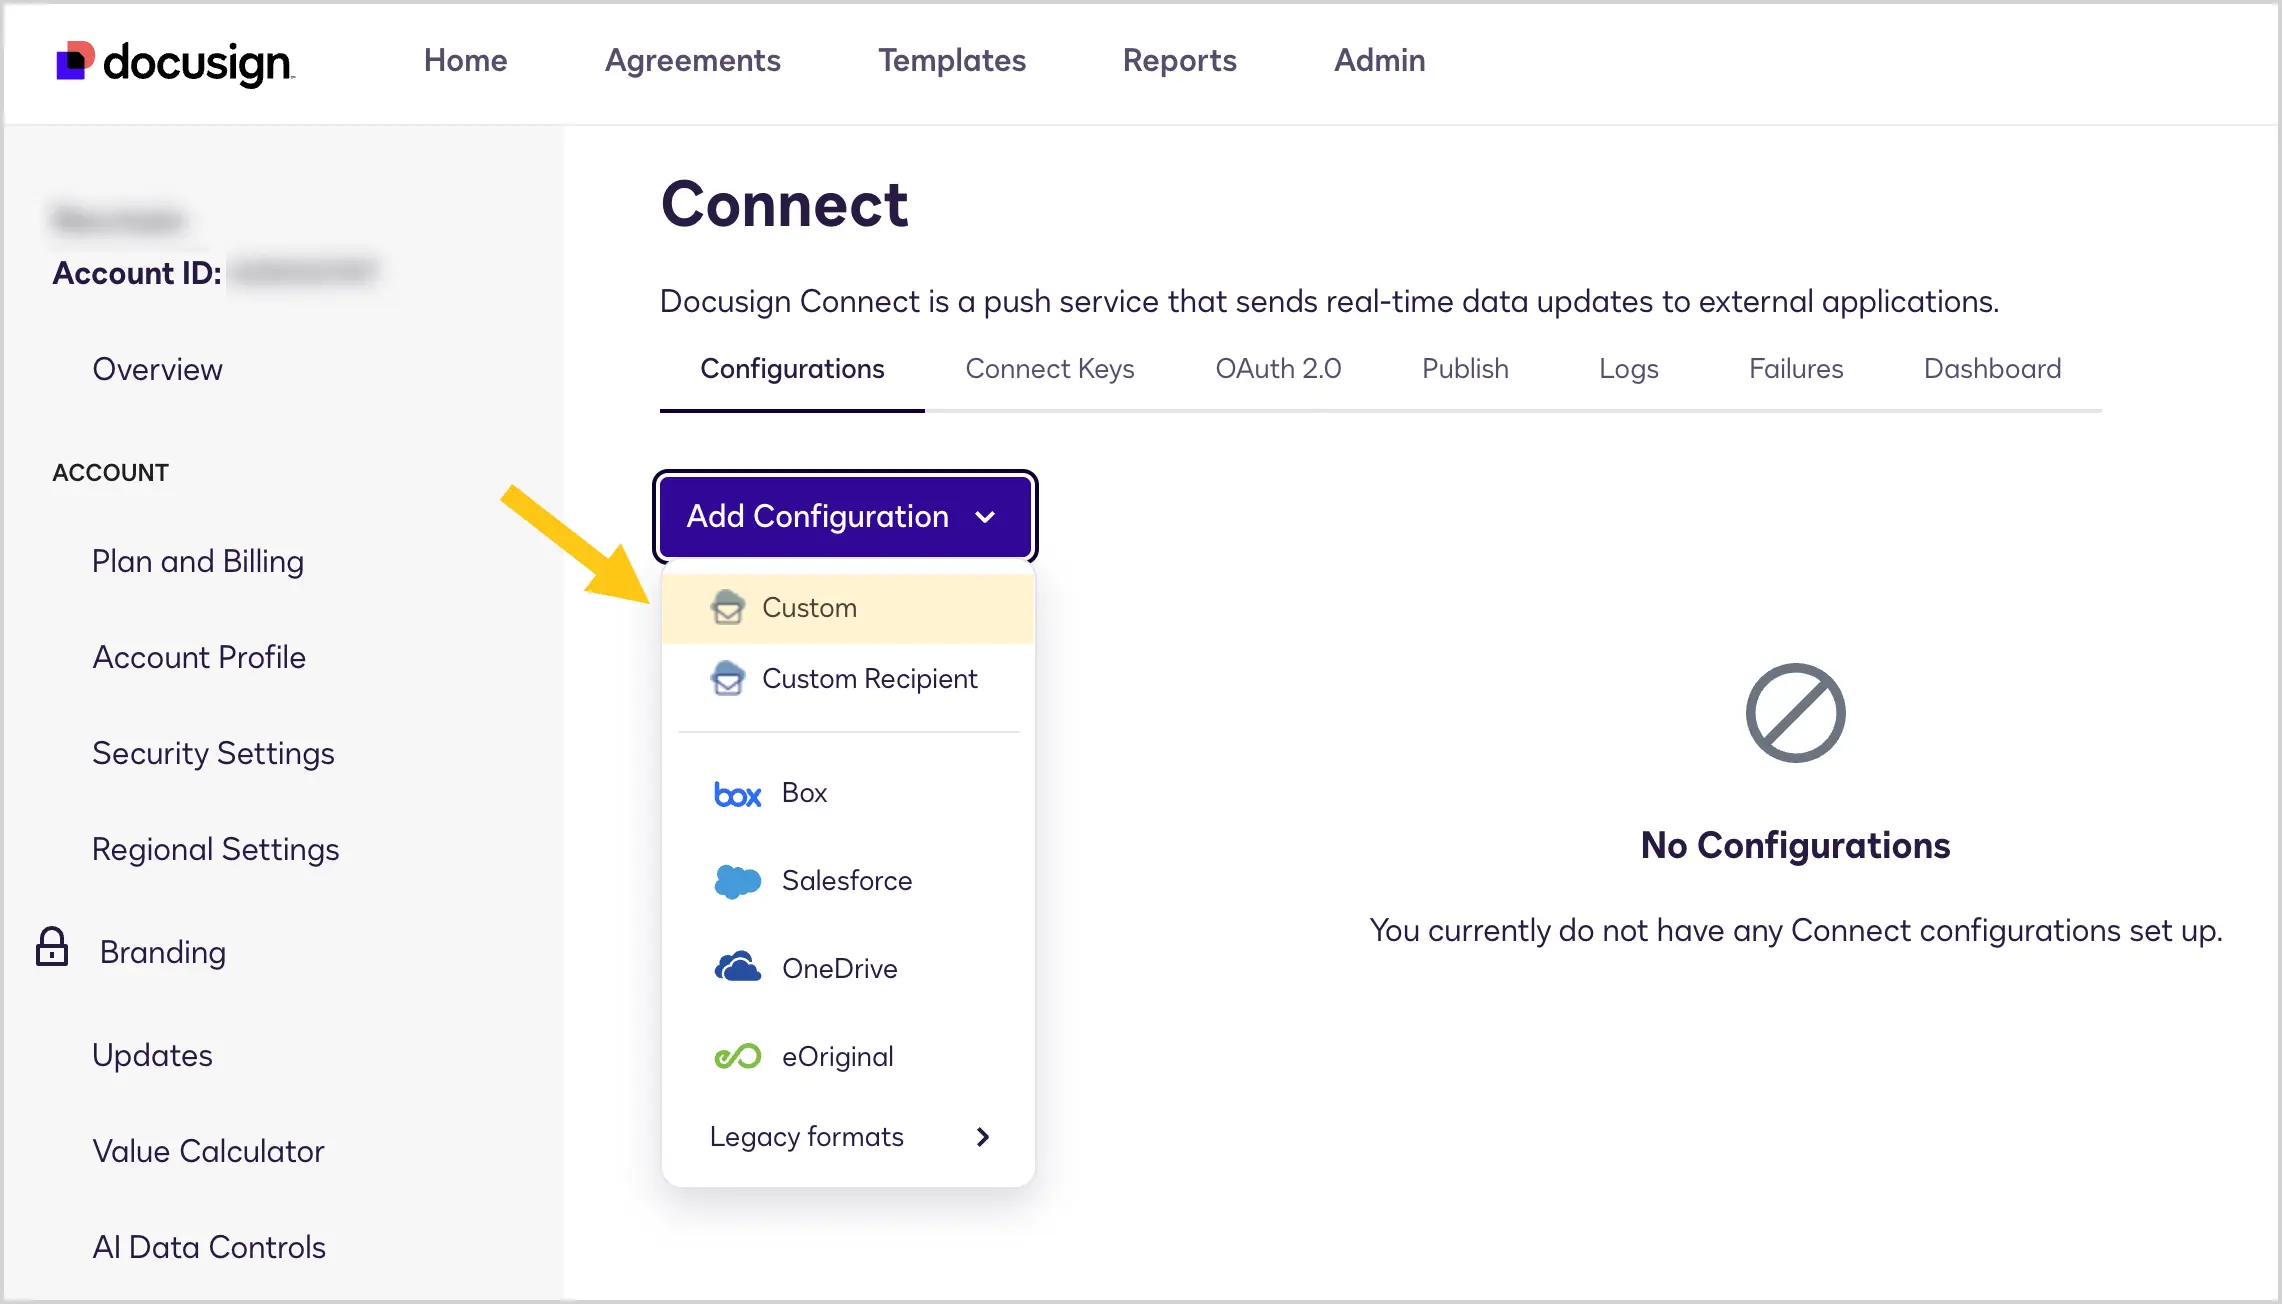
From the list, select Custom.
-
On the Add Custom Configuration page, in the Name 1 field, enter a configuration name, for example Nectainium Integration.
-
In the URL to Publish 2 field, paste the URL using the scheme
https://<env-url>/docusign/code, where<env-url>is your system environment, andcodeis the Docusign profile code you will set when adding the profile in Nectainium.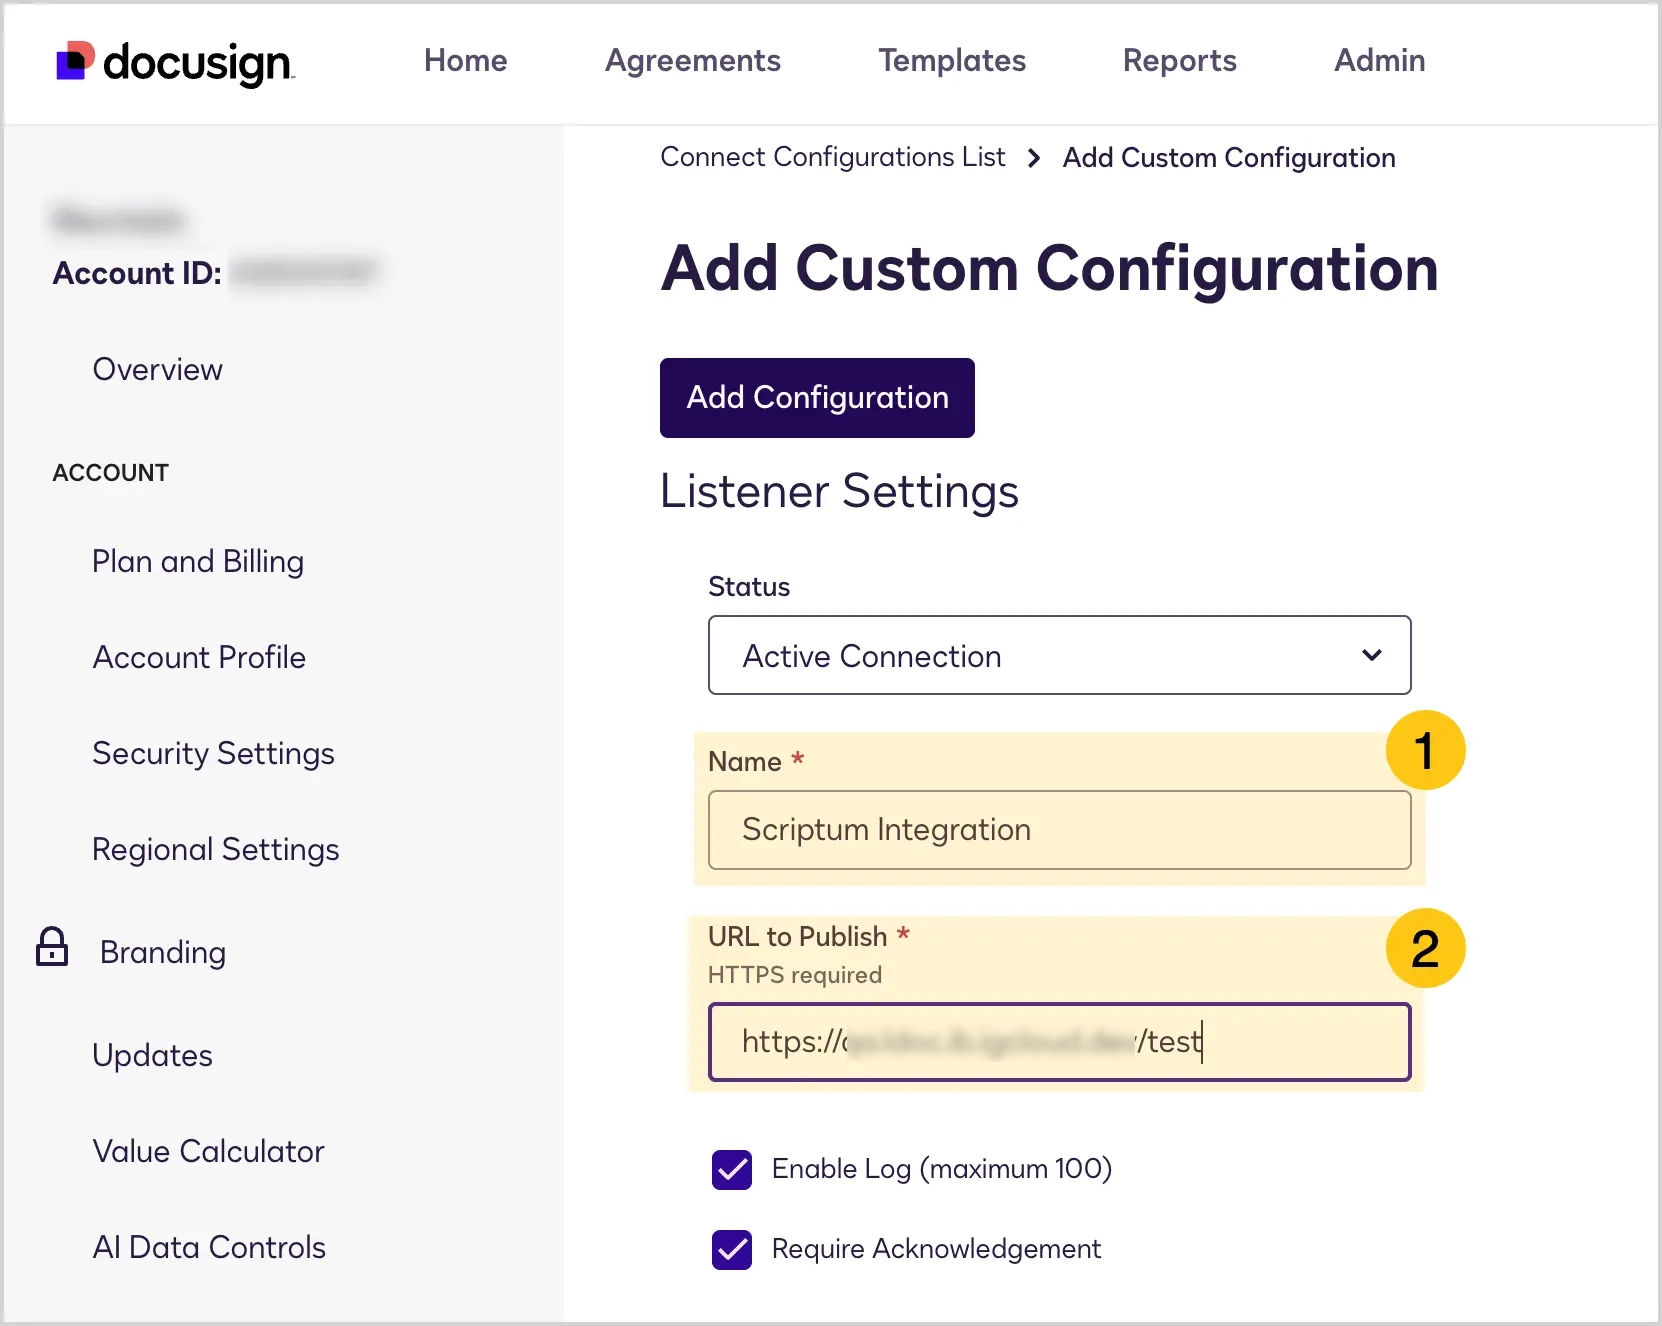
-
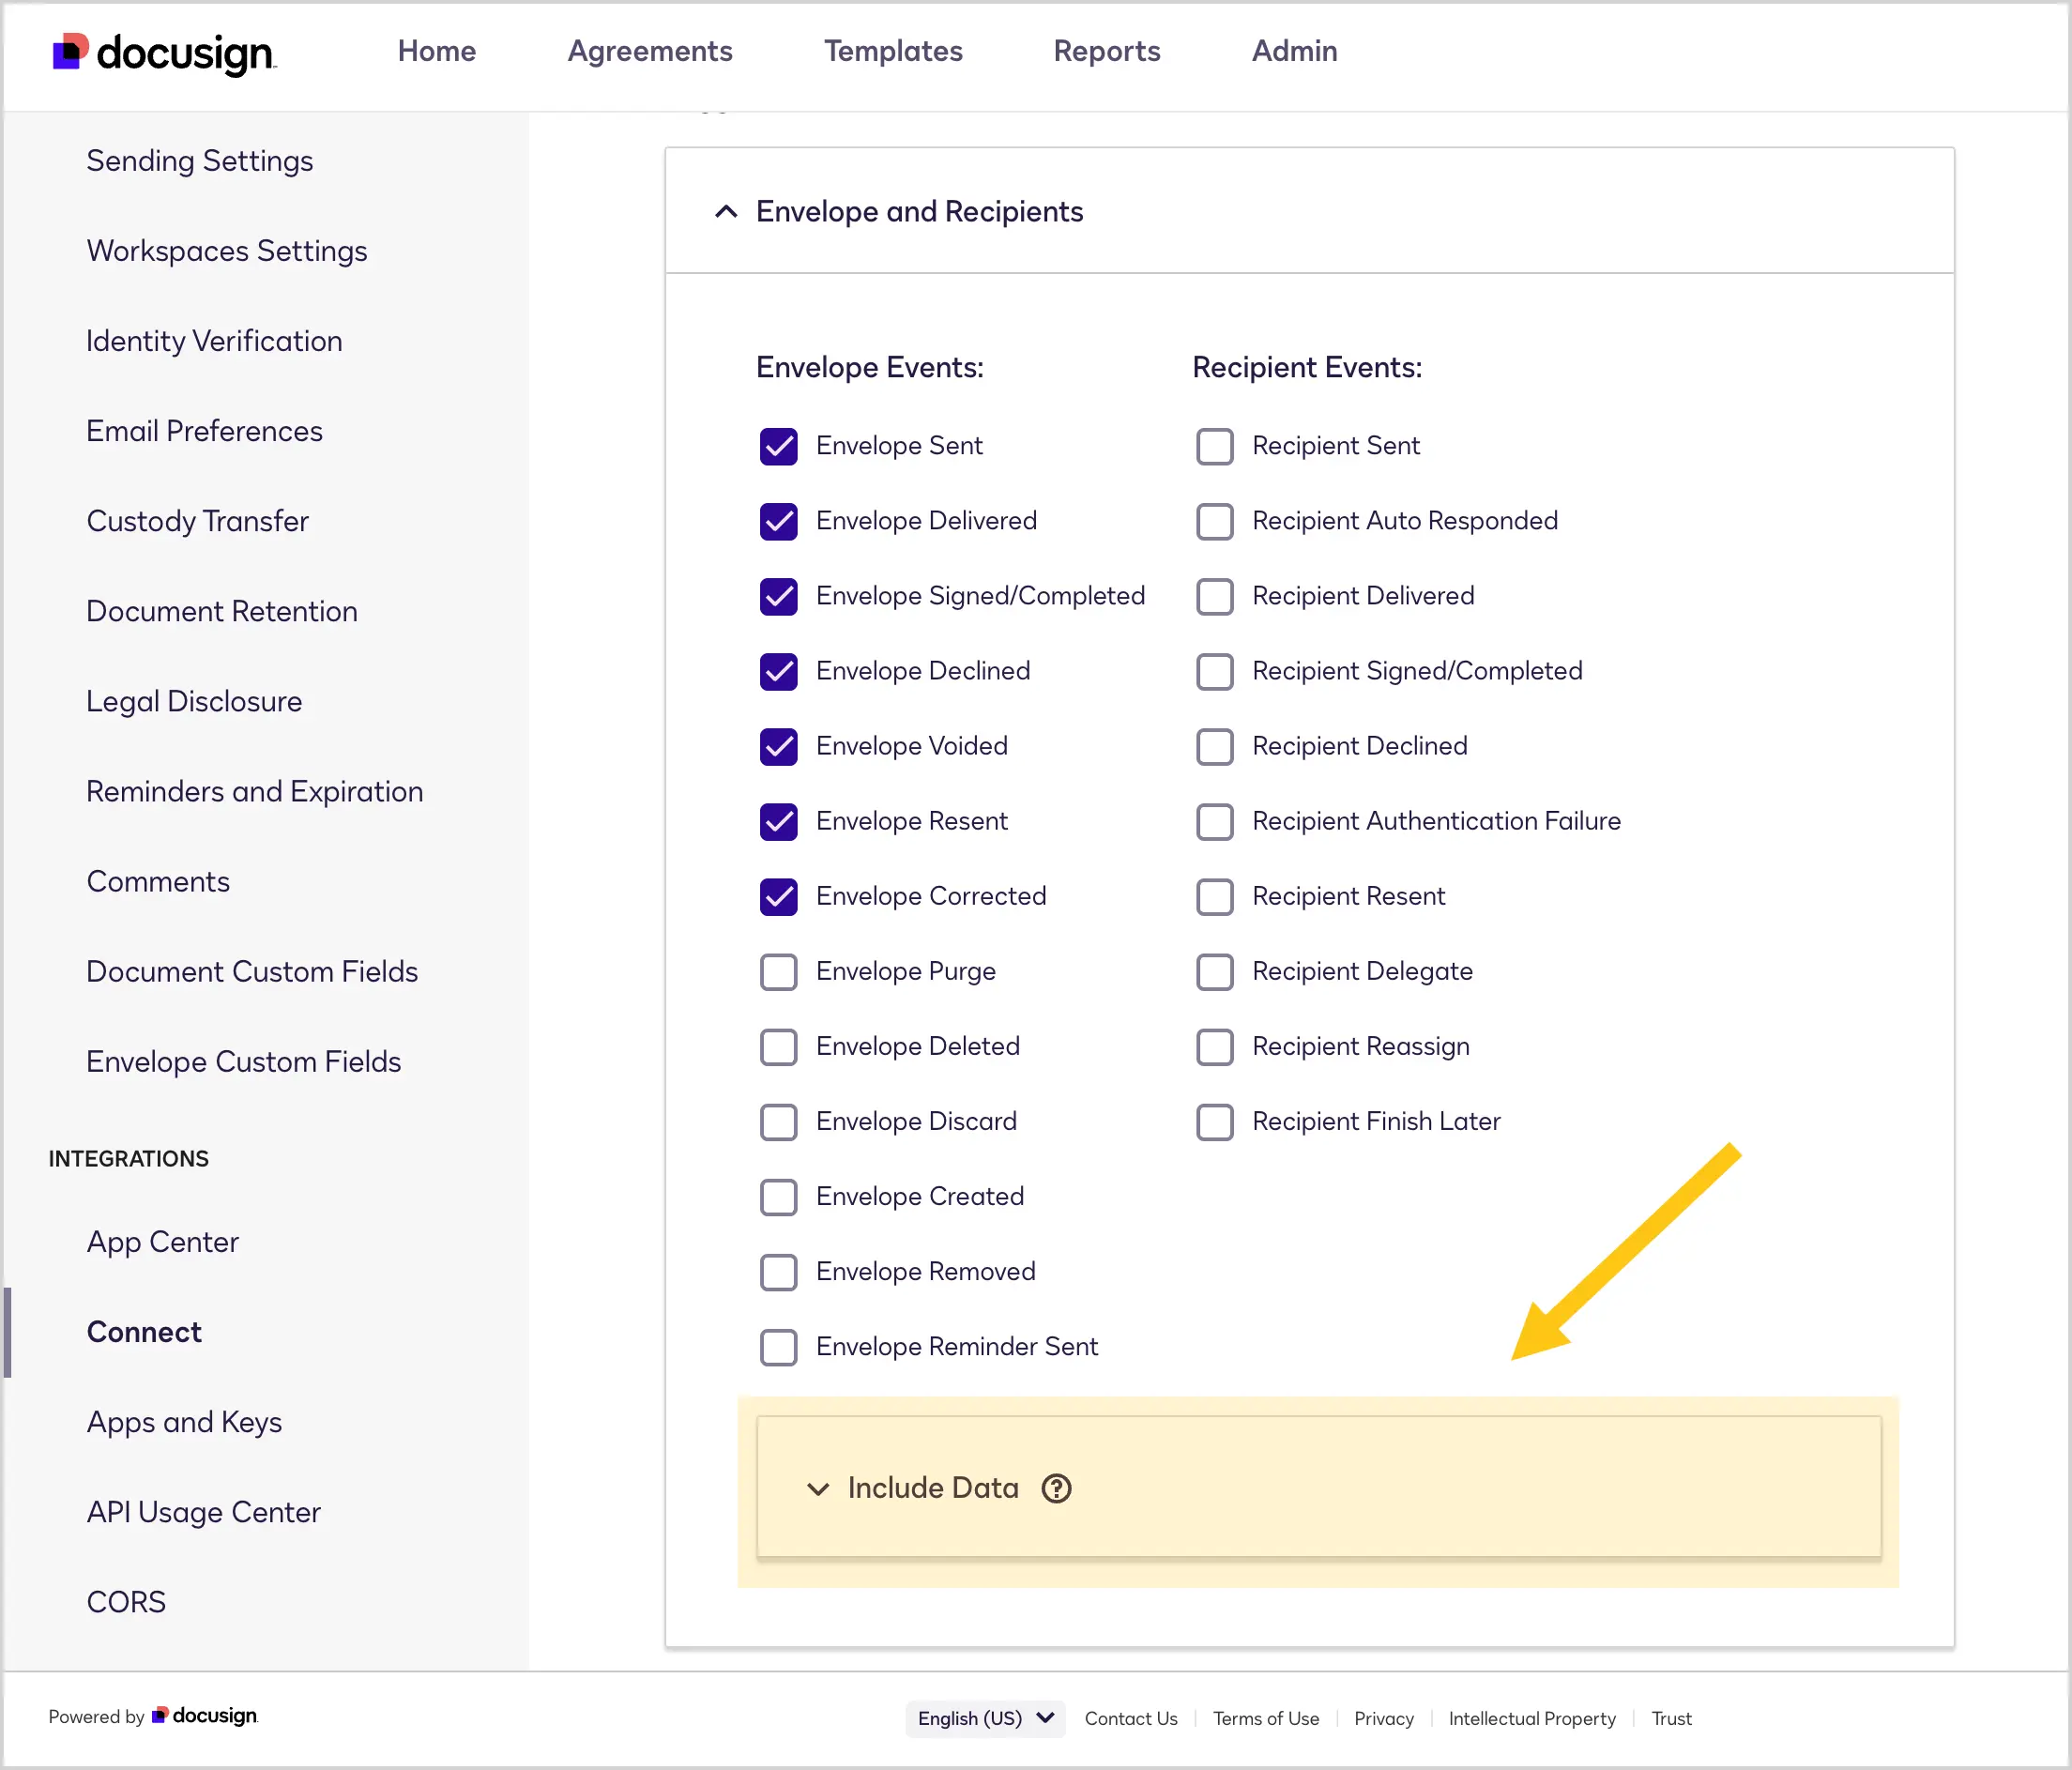
In the Event settings section, expand the Envelope and Recipients 1 tab, then select the following checkboxes 2:
- Envelope Sent
- Envelope Delivered
- Envelope Signed/Completed
- Envelope Declined
- Envelope Voided
- Envelope Resent
- Envelope Corrected
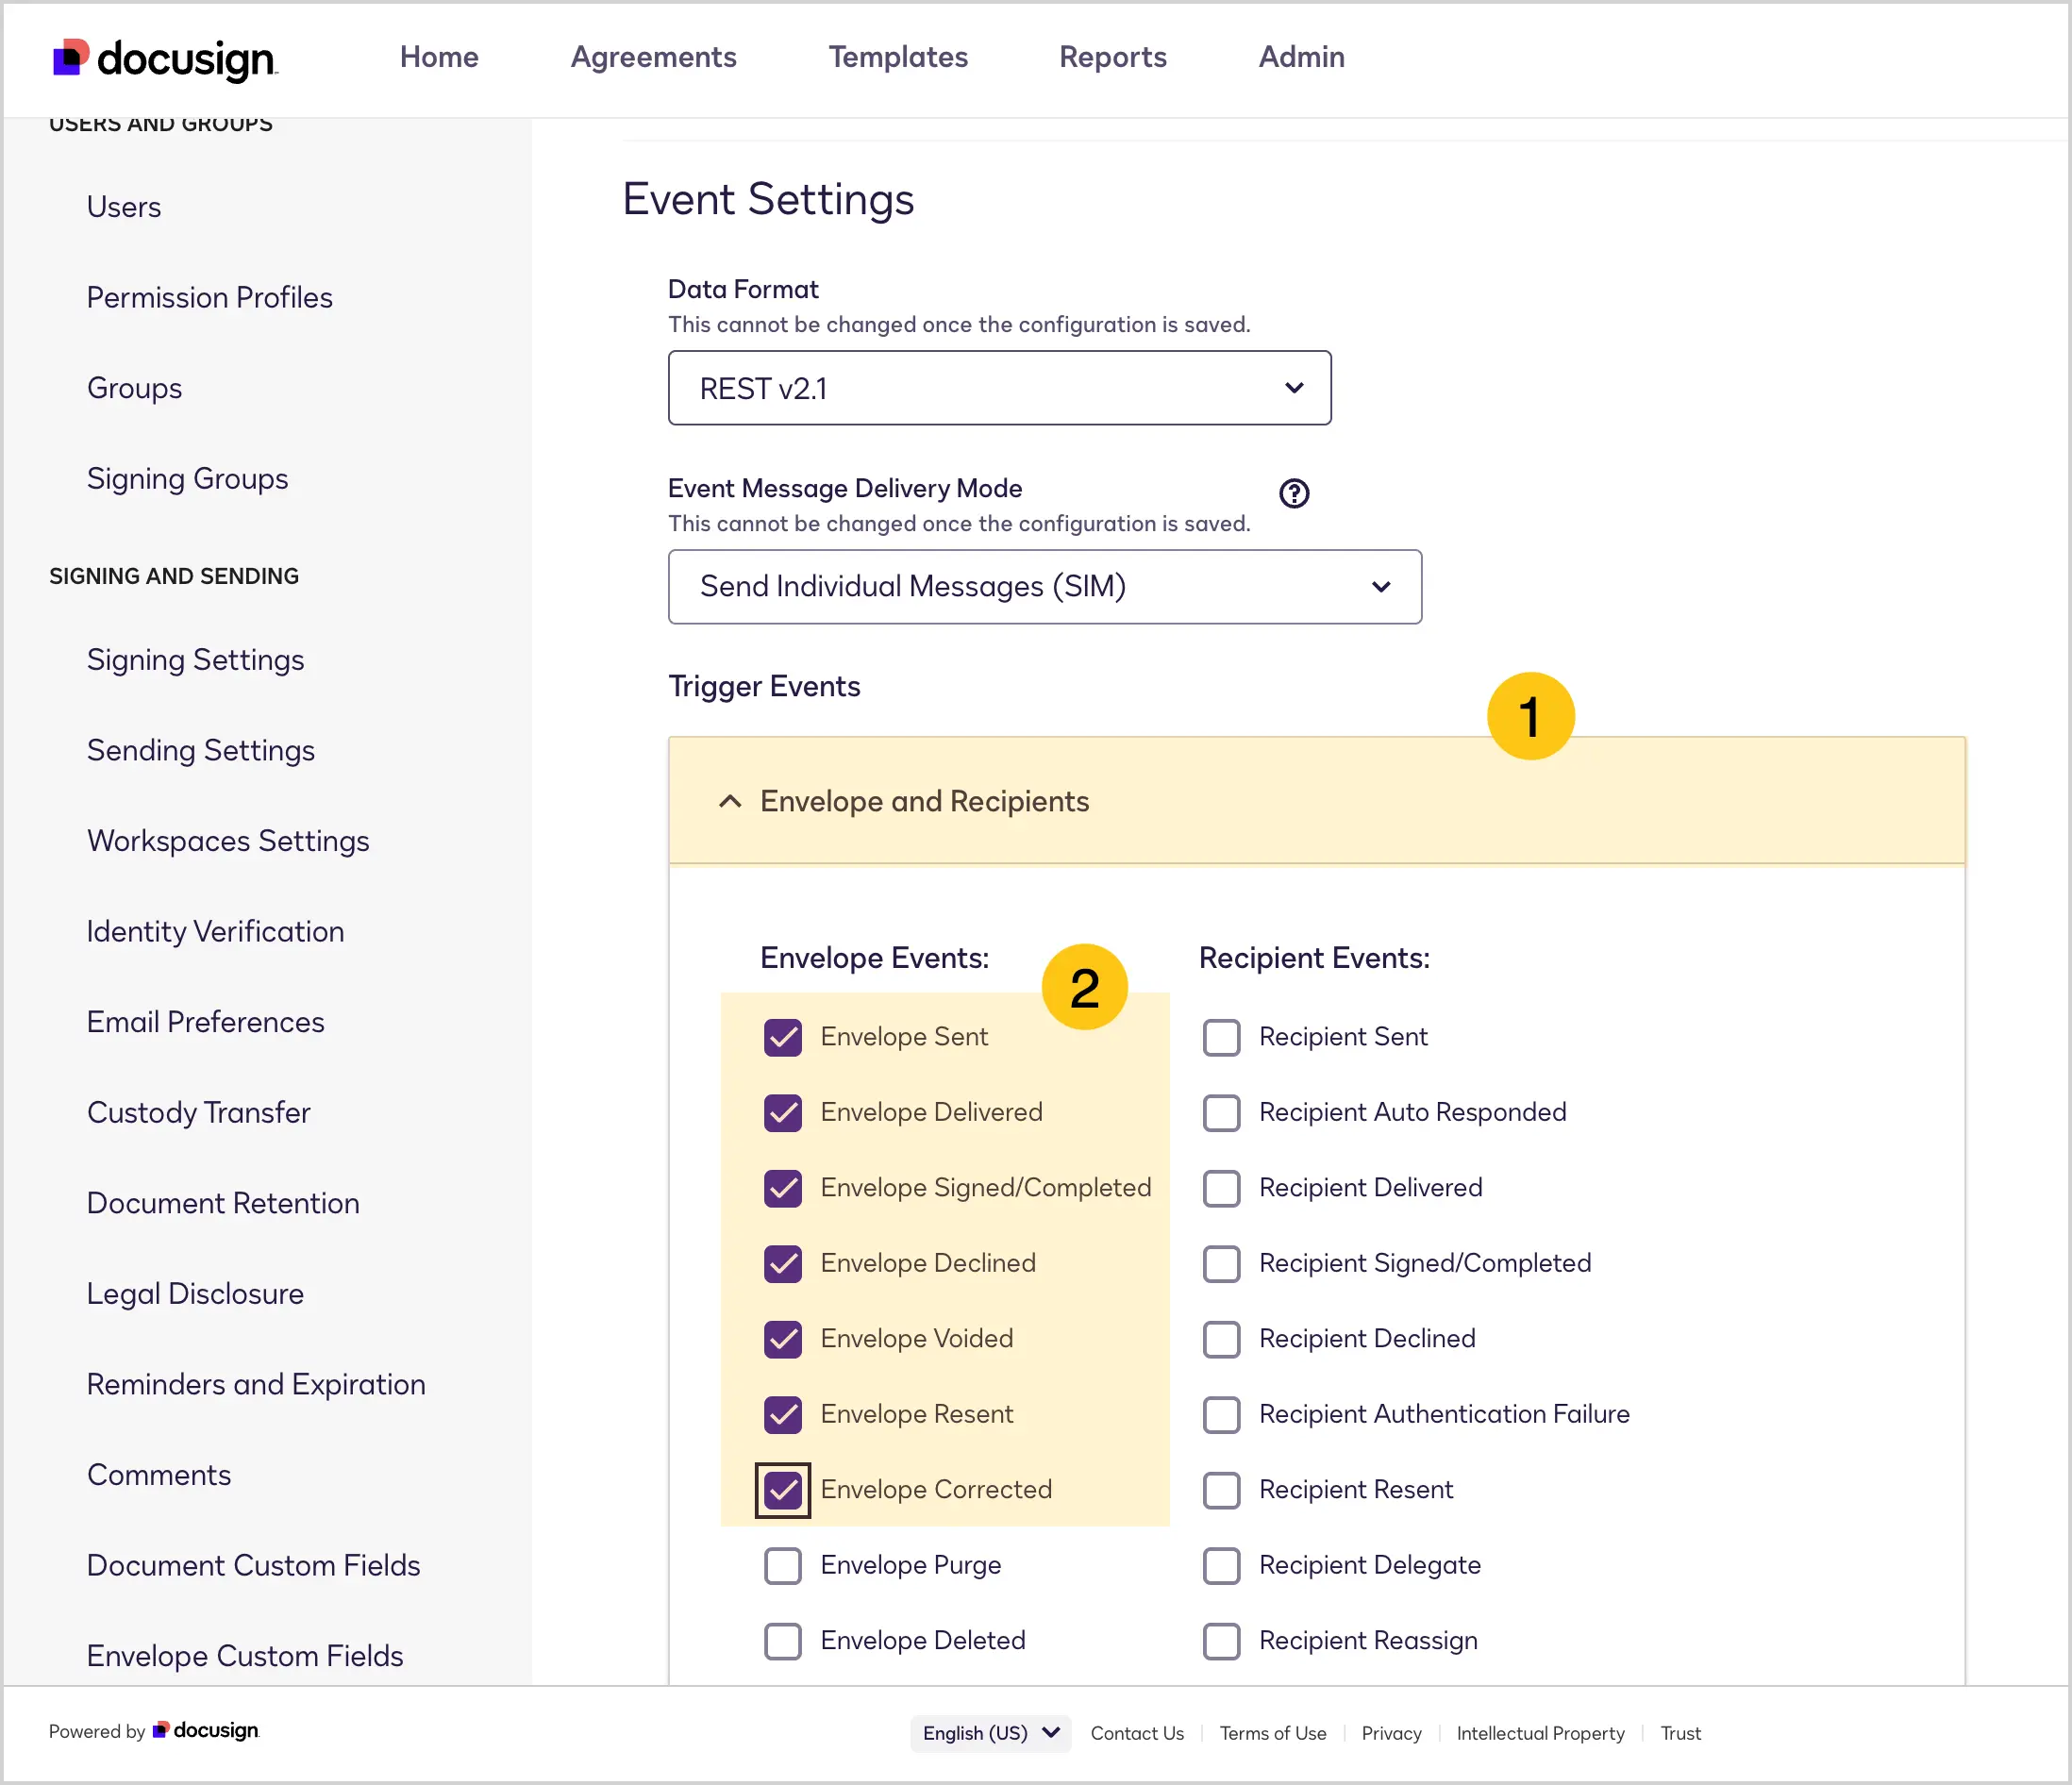
Event Settings — the section responsible for tracking events that occur with envelopes and files. Current statuses for selected events can be viewed in the Docusign Log shortcut.
-
In the Envelope and Recipients tab, expand the nested Include Data tab.
-
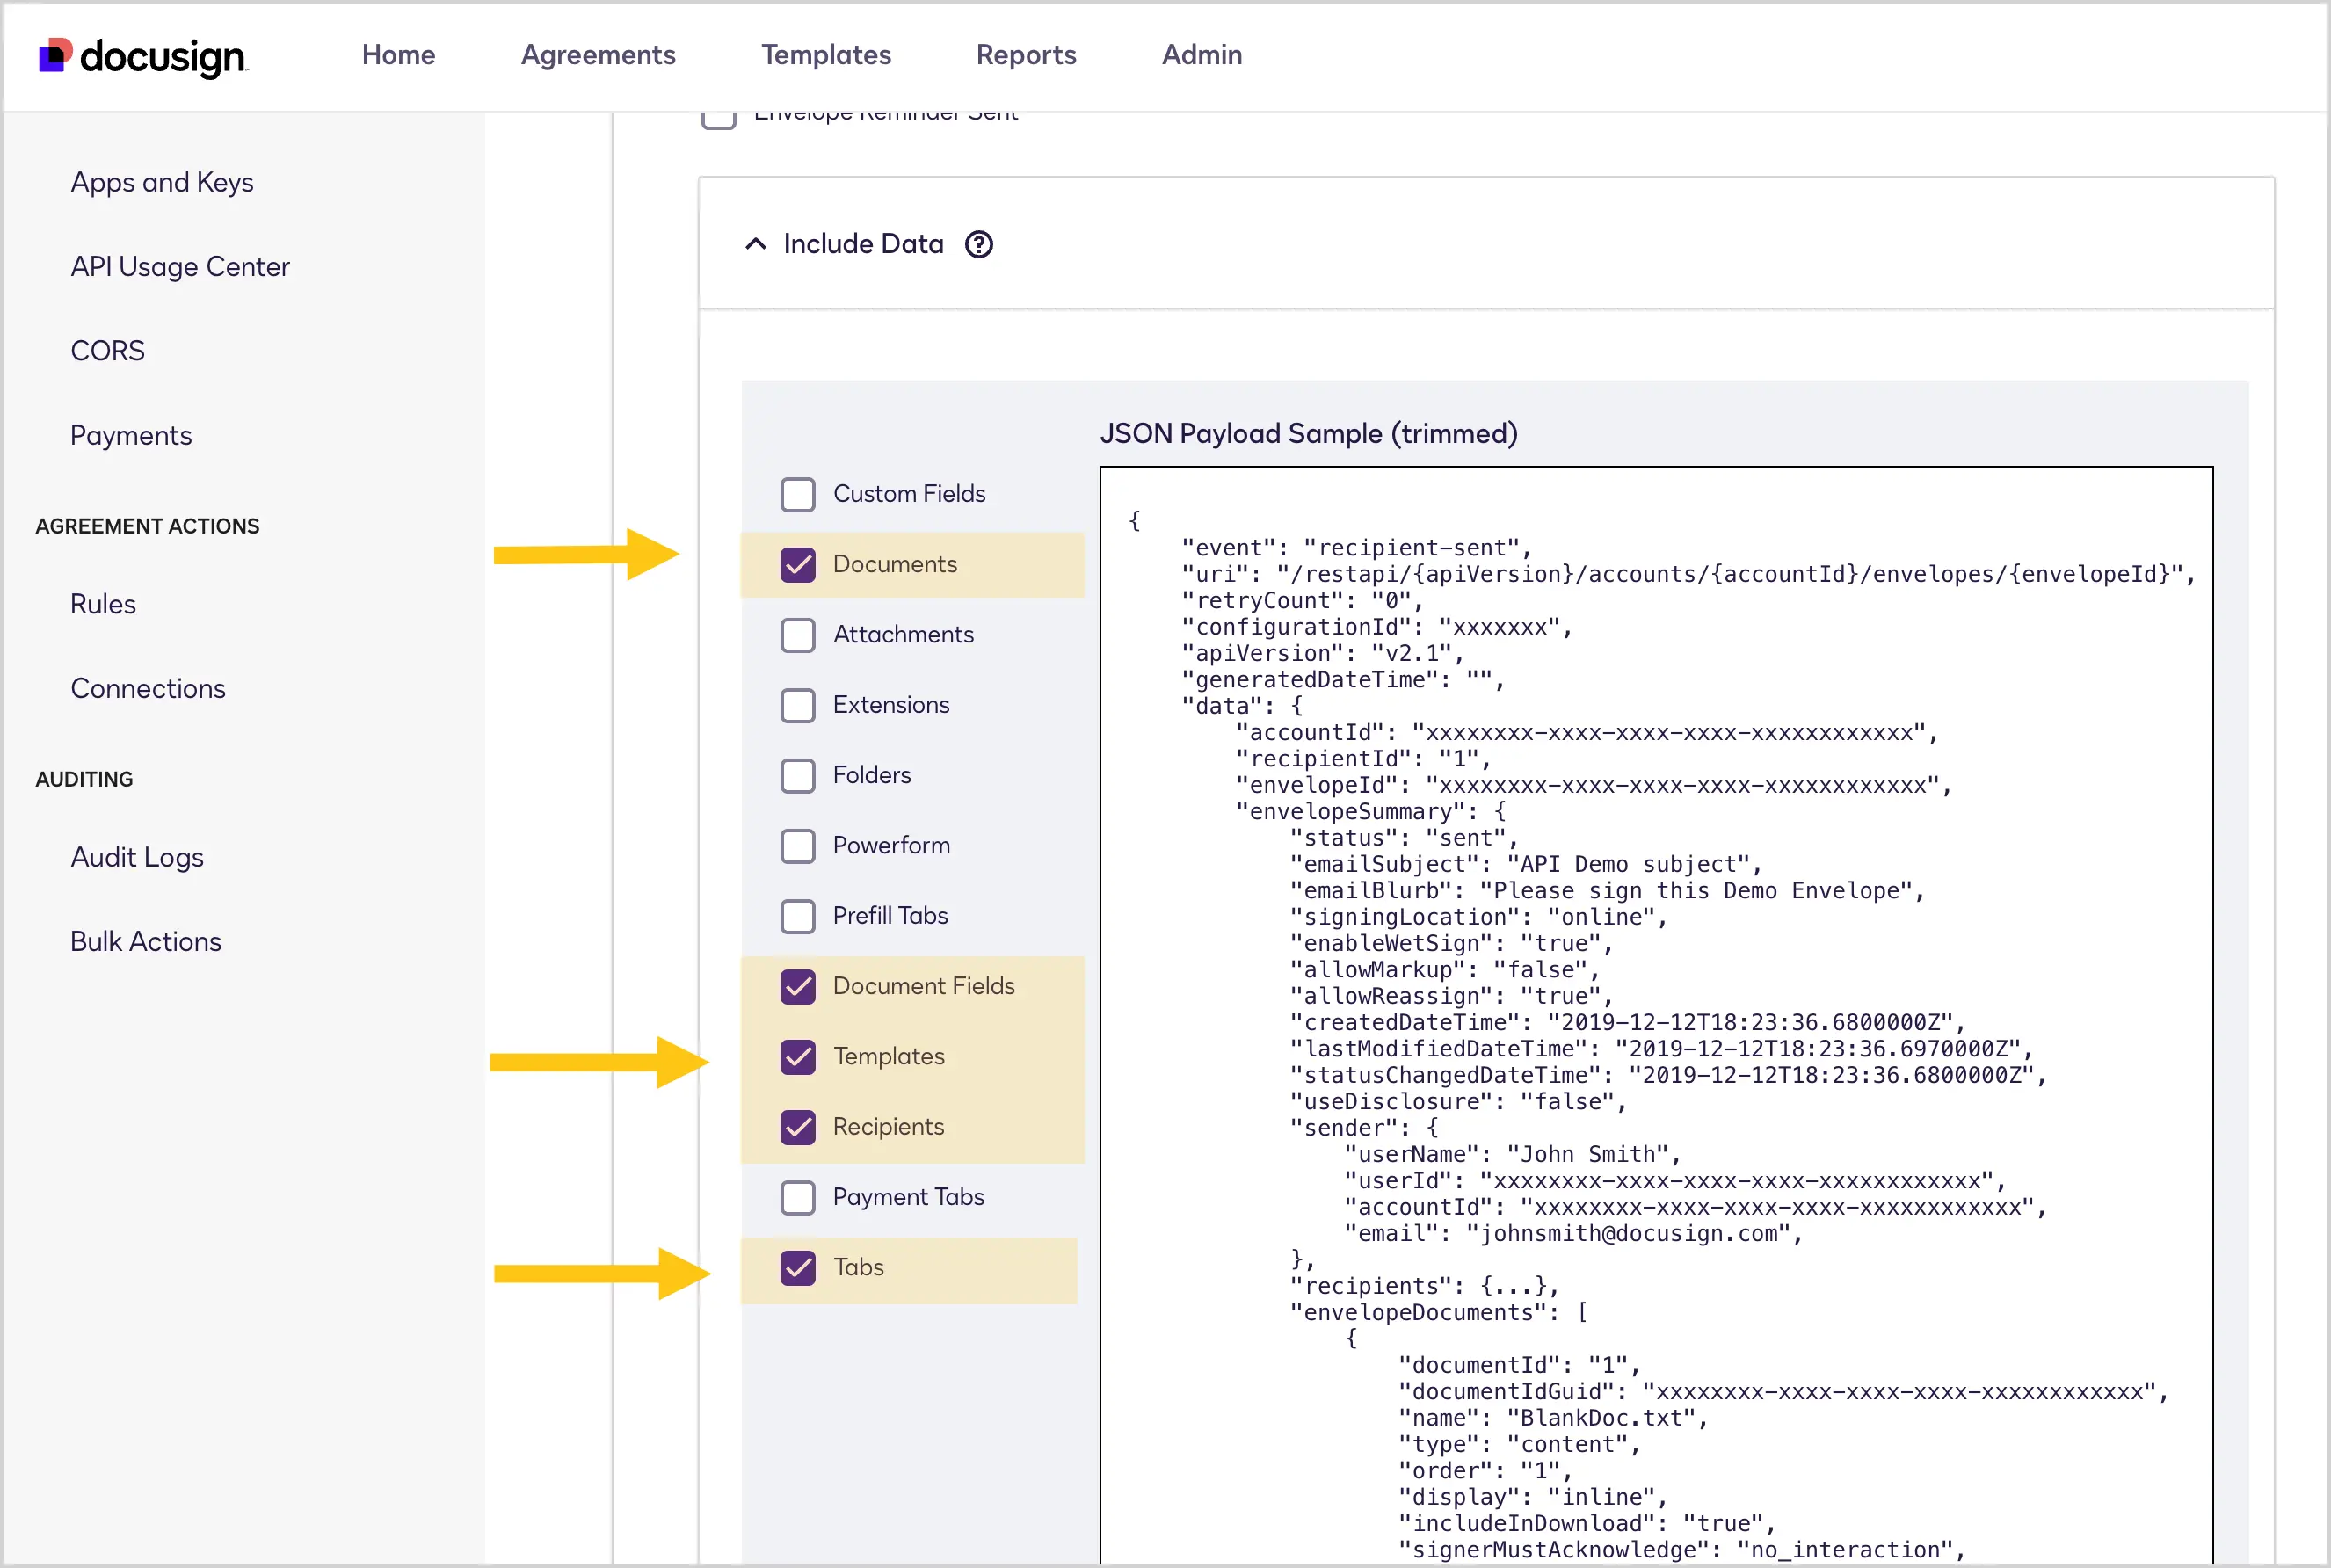
In the Include Data tab, select the following checkboxes:
- Documents
- Document Fields
- Templates
- Recipients
- Tabs
-
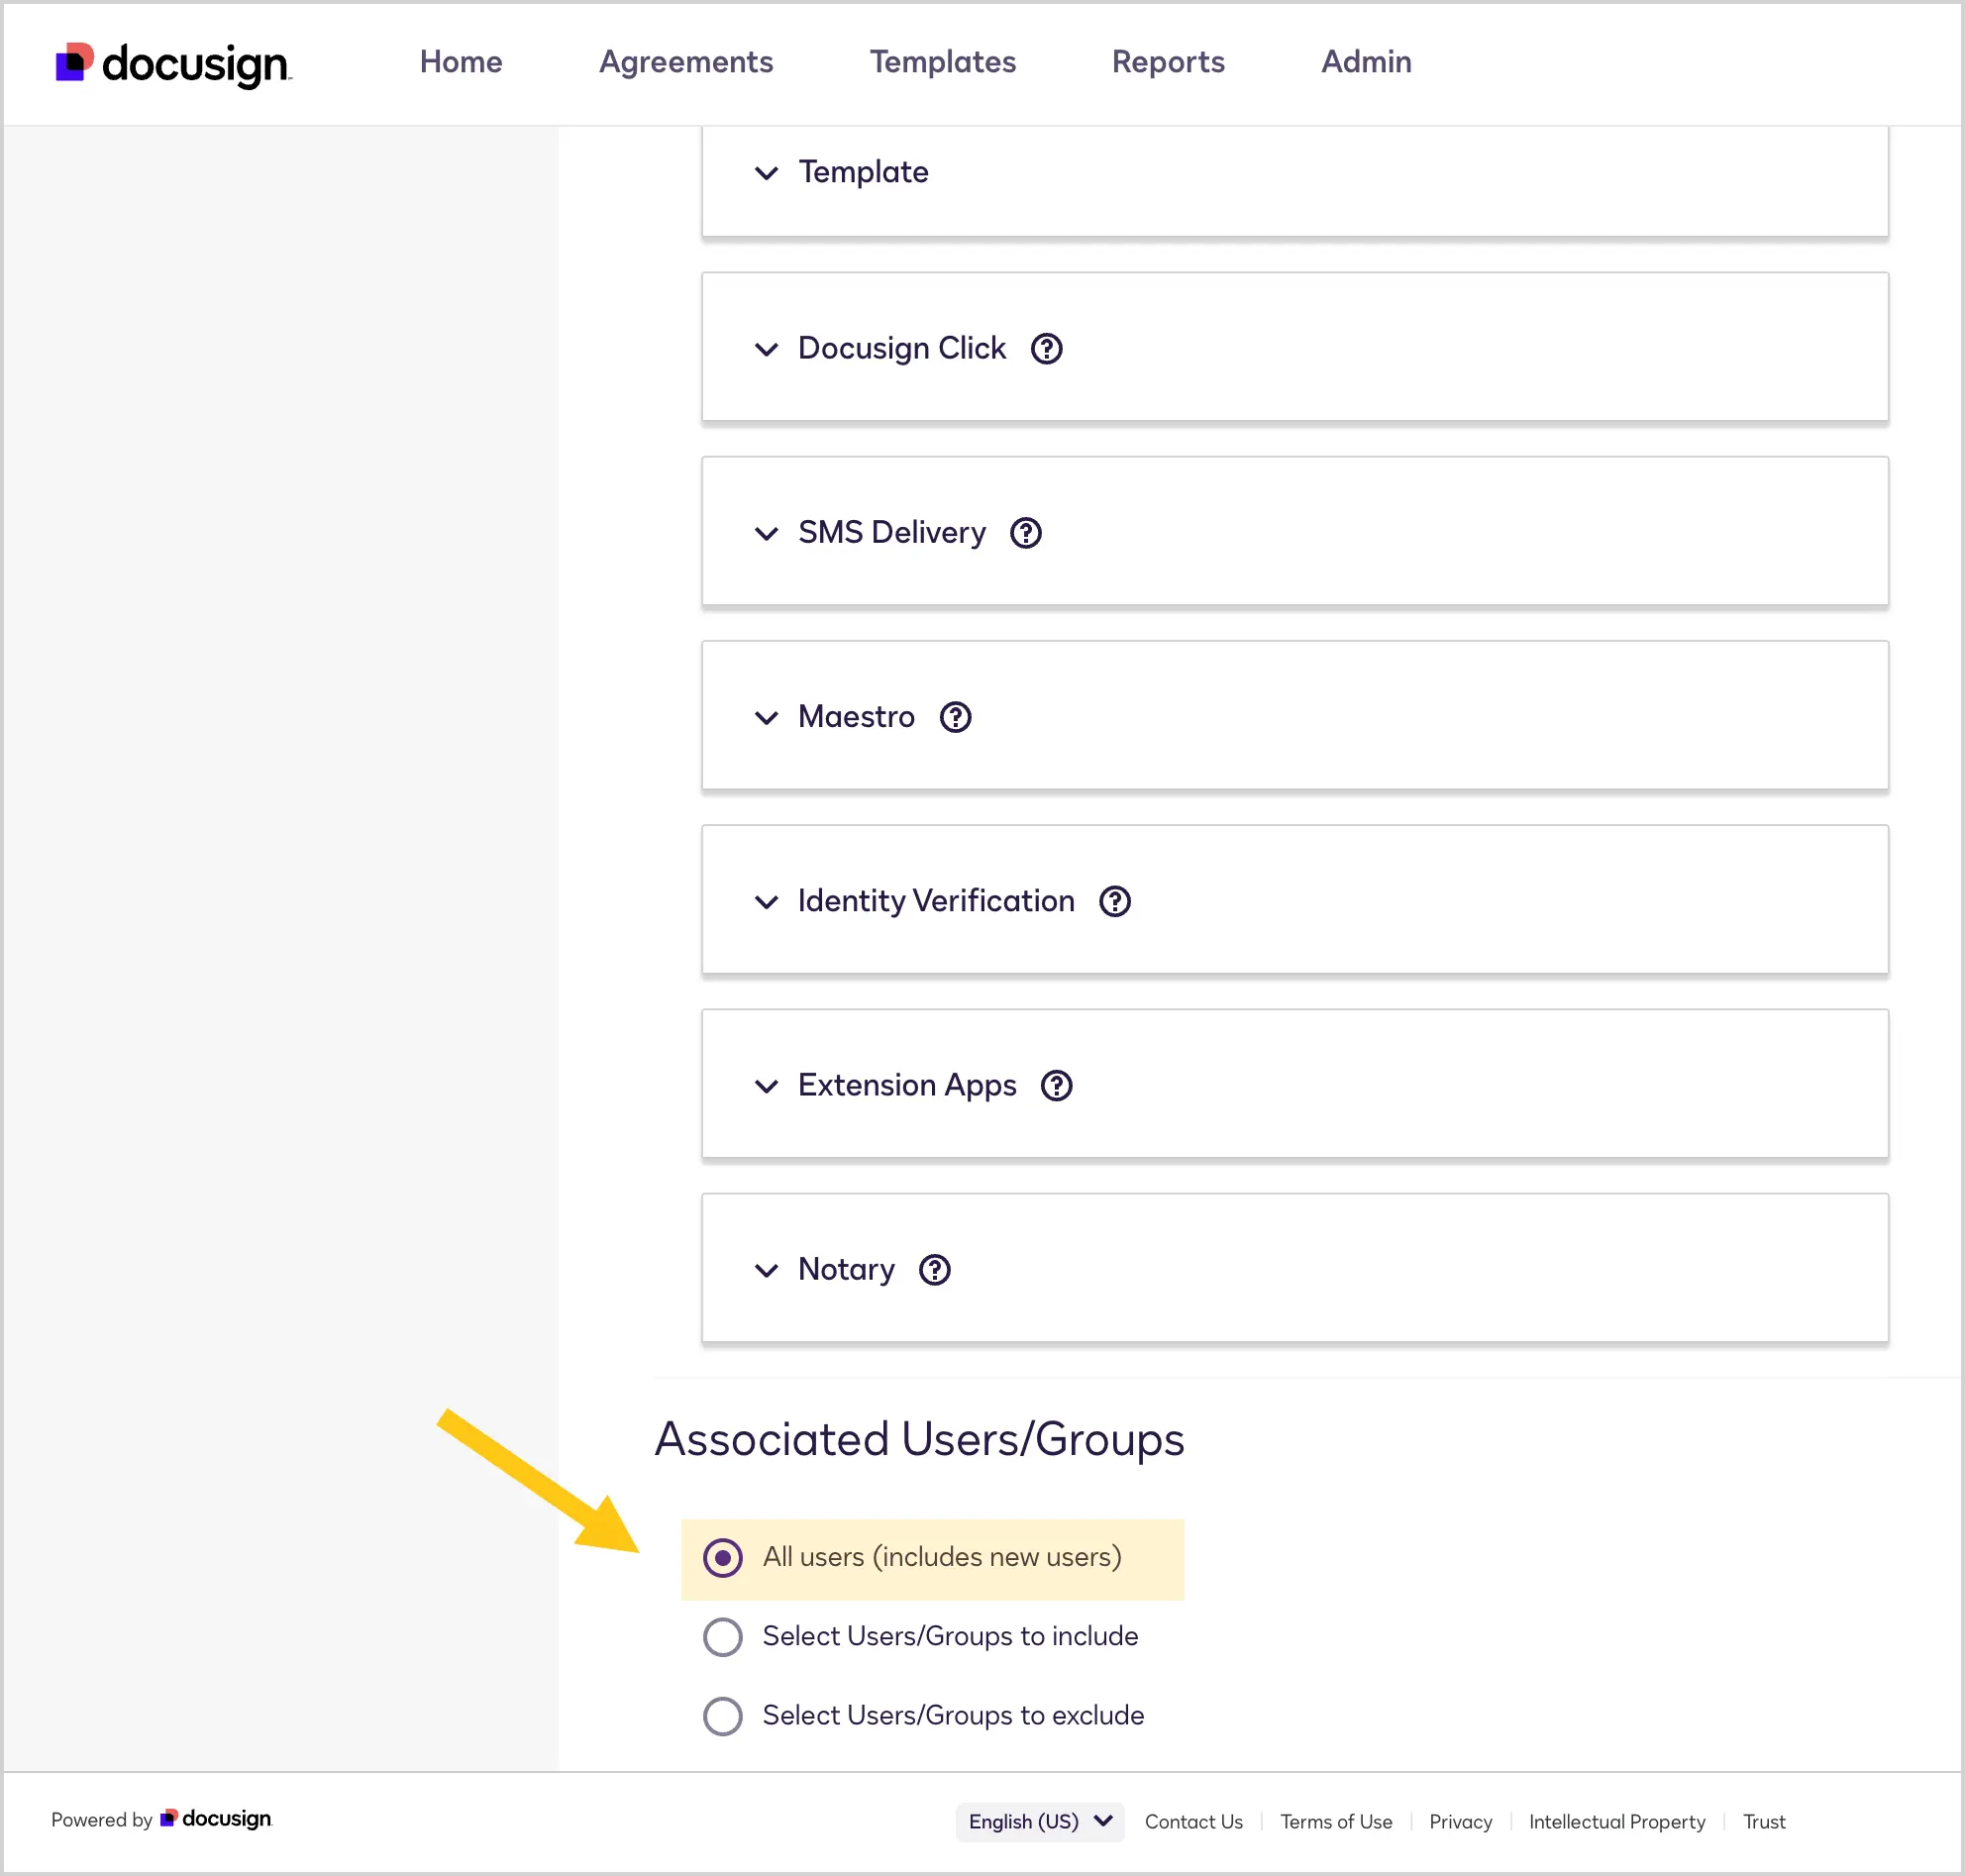
Scroll down to the Associated Users/Groups section, then select All users (includes new users).
-
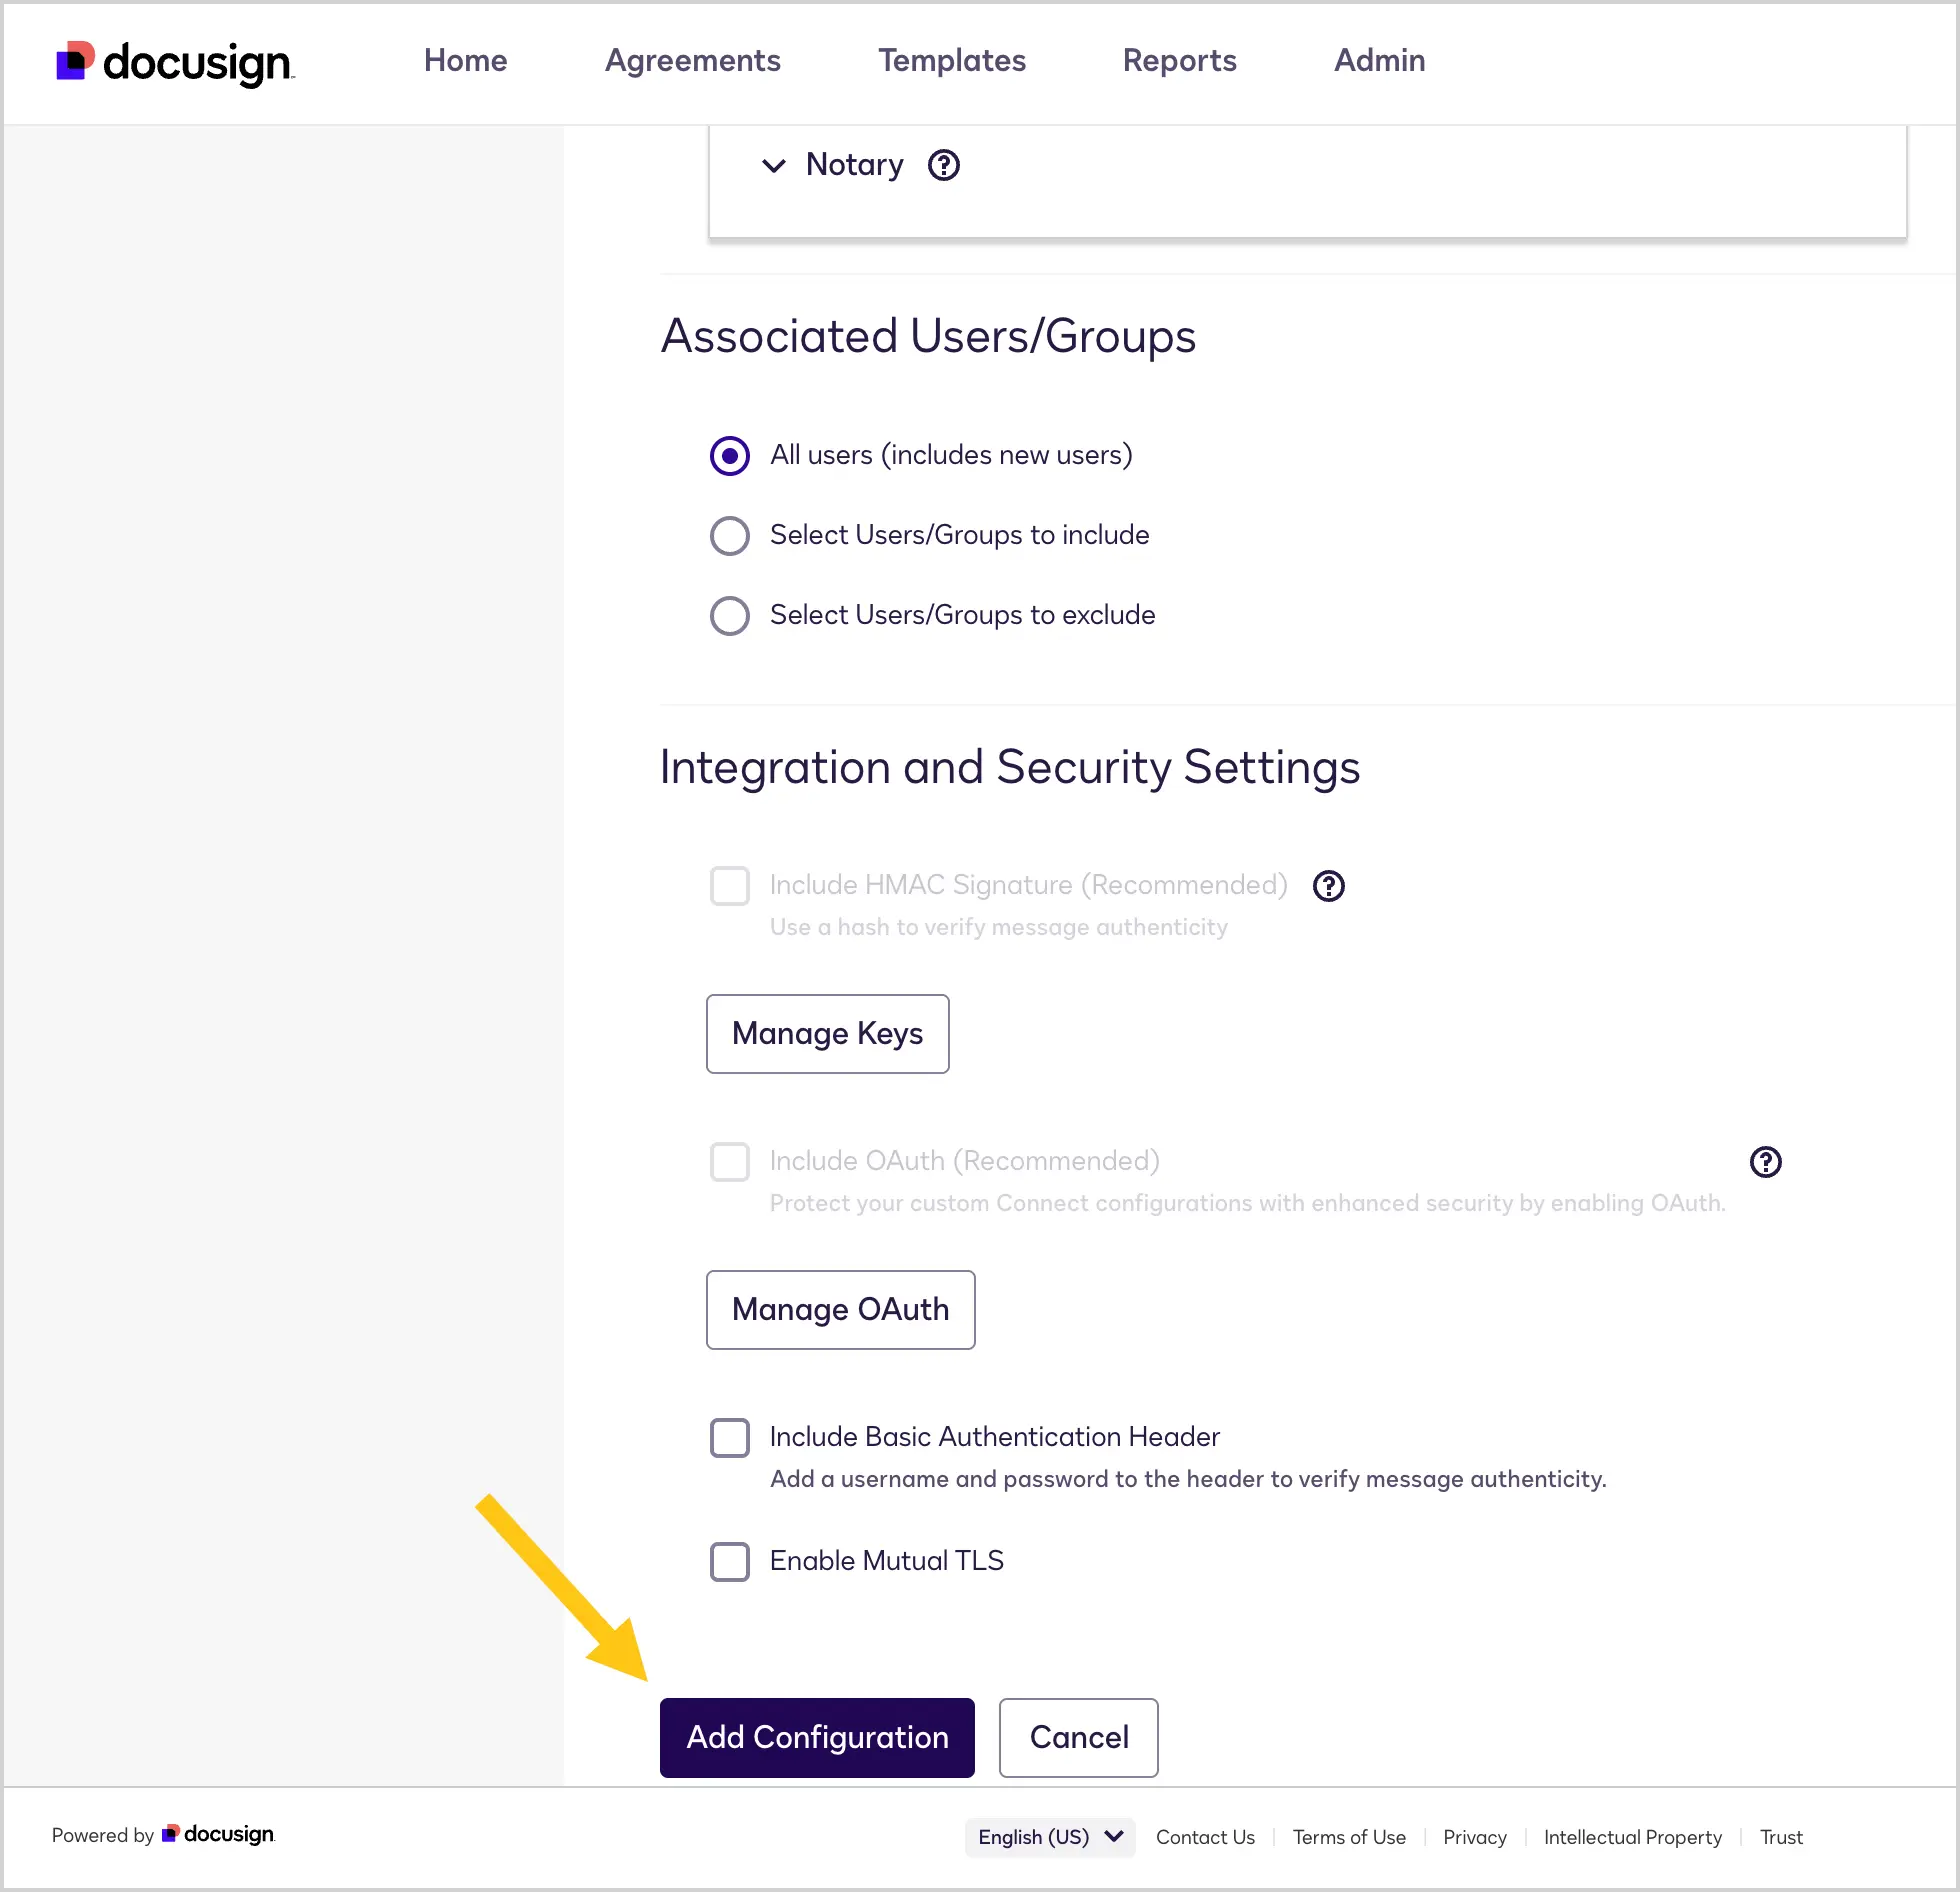
Scroll to the bottom of the page, then select the Add Configuration button.
-
-
Create a secret key for access to the configuration:
-
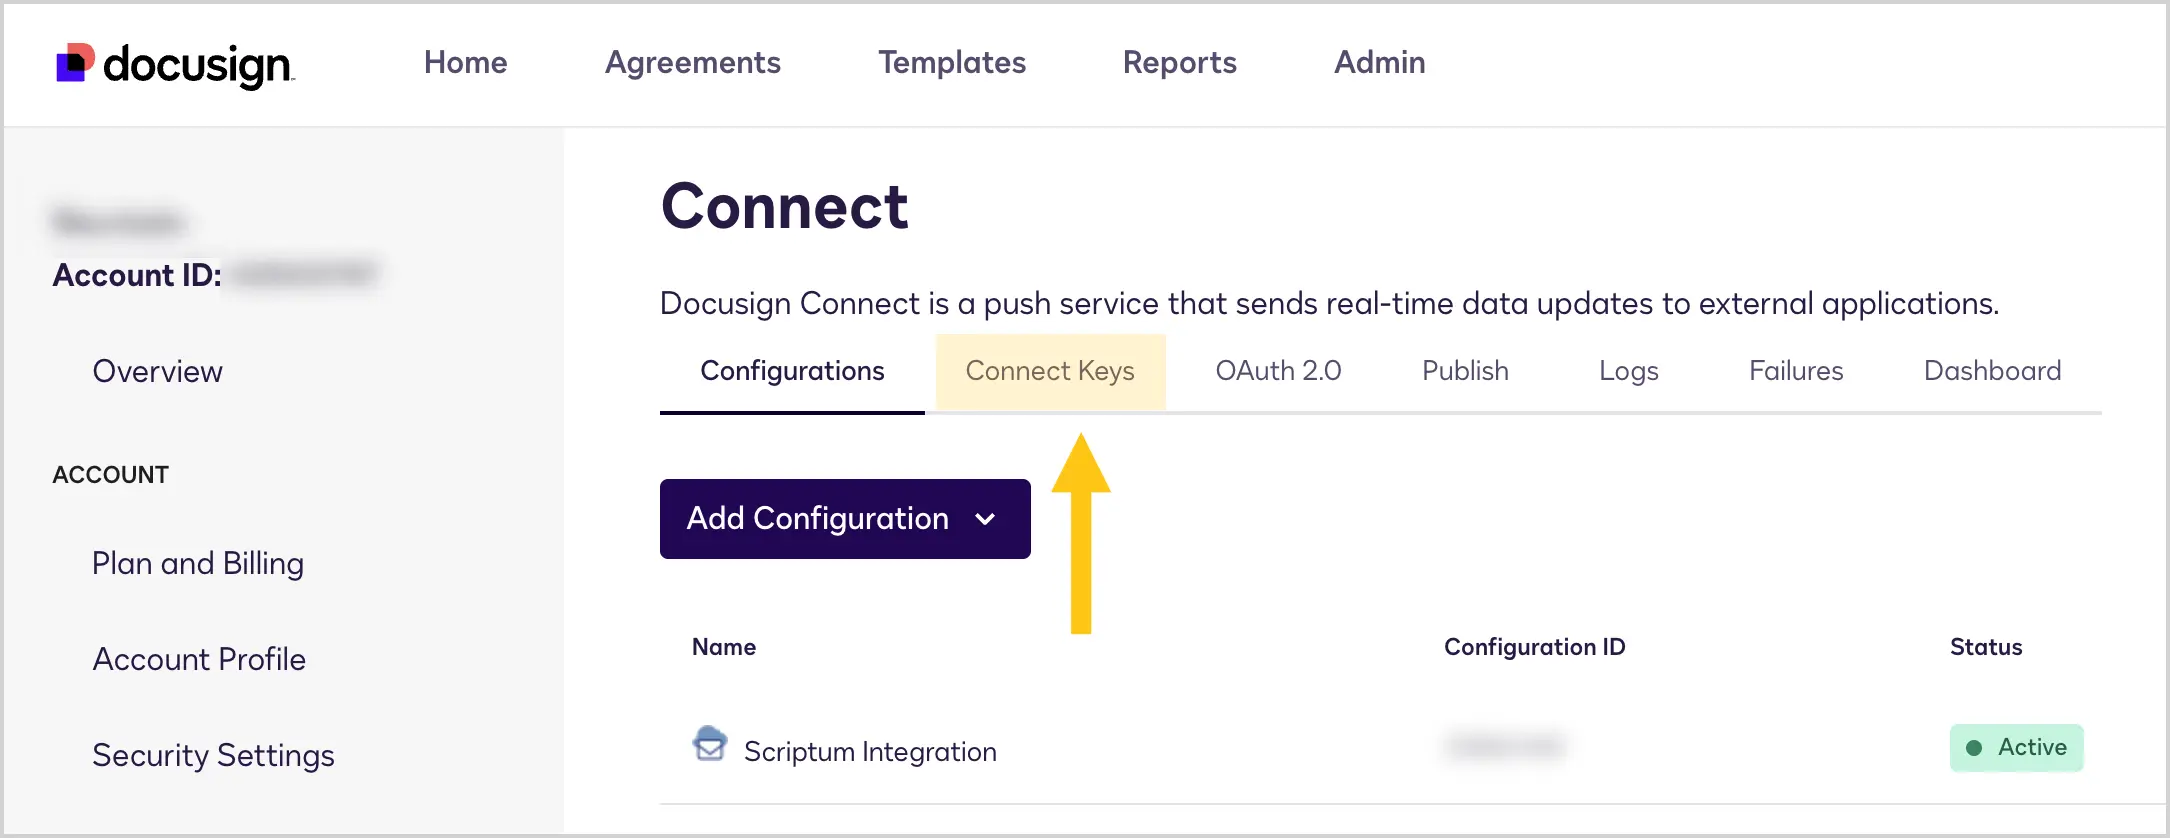
In the top menu, select Connect Keys.
-
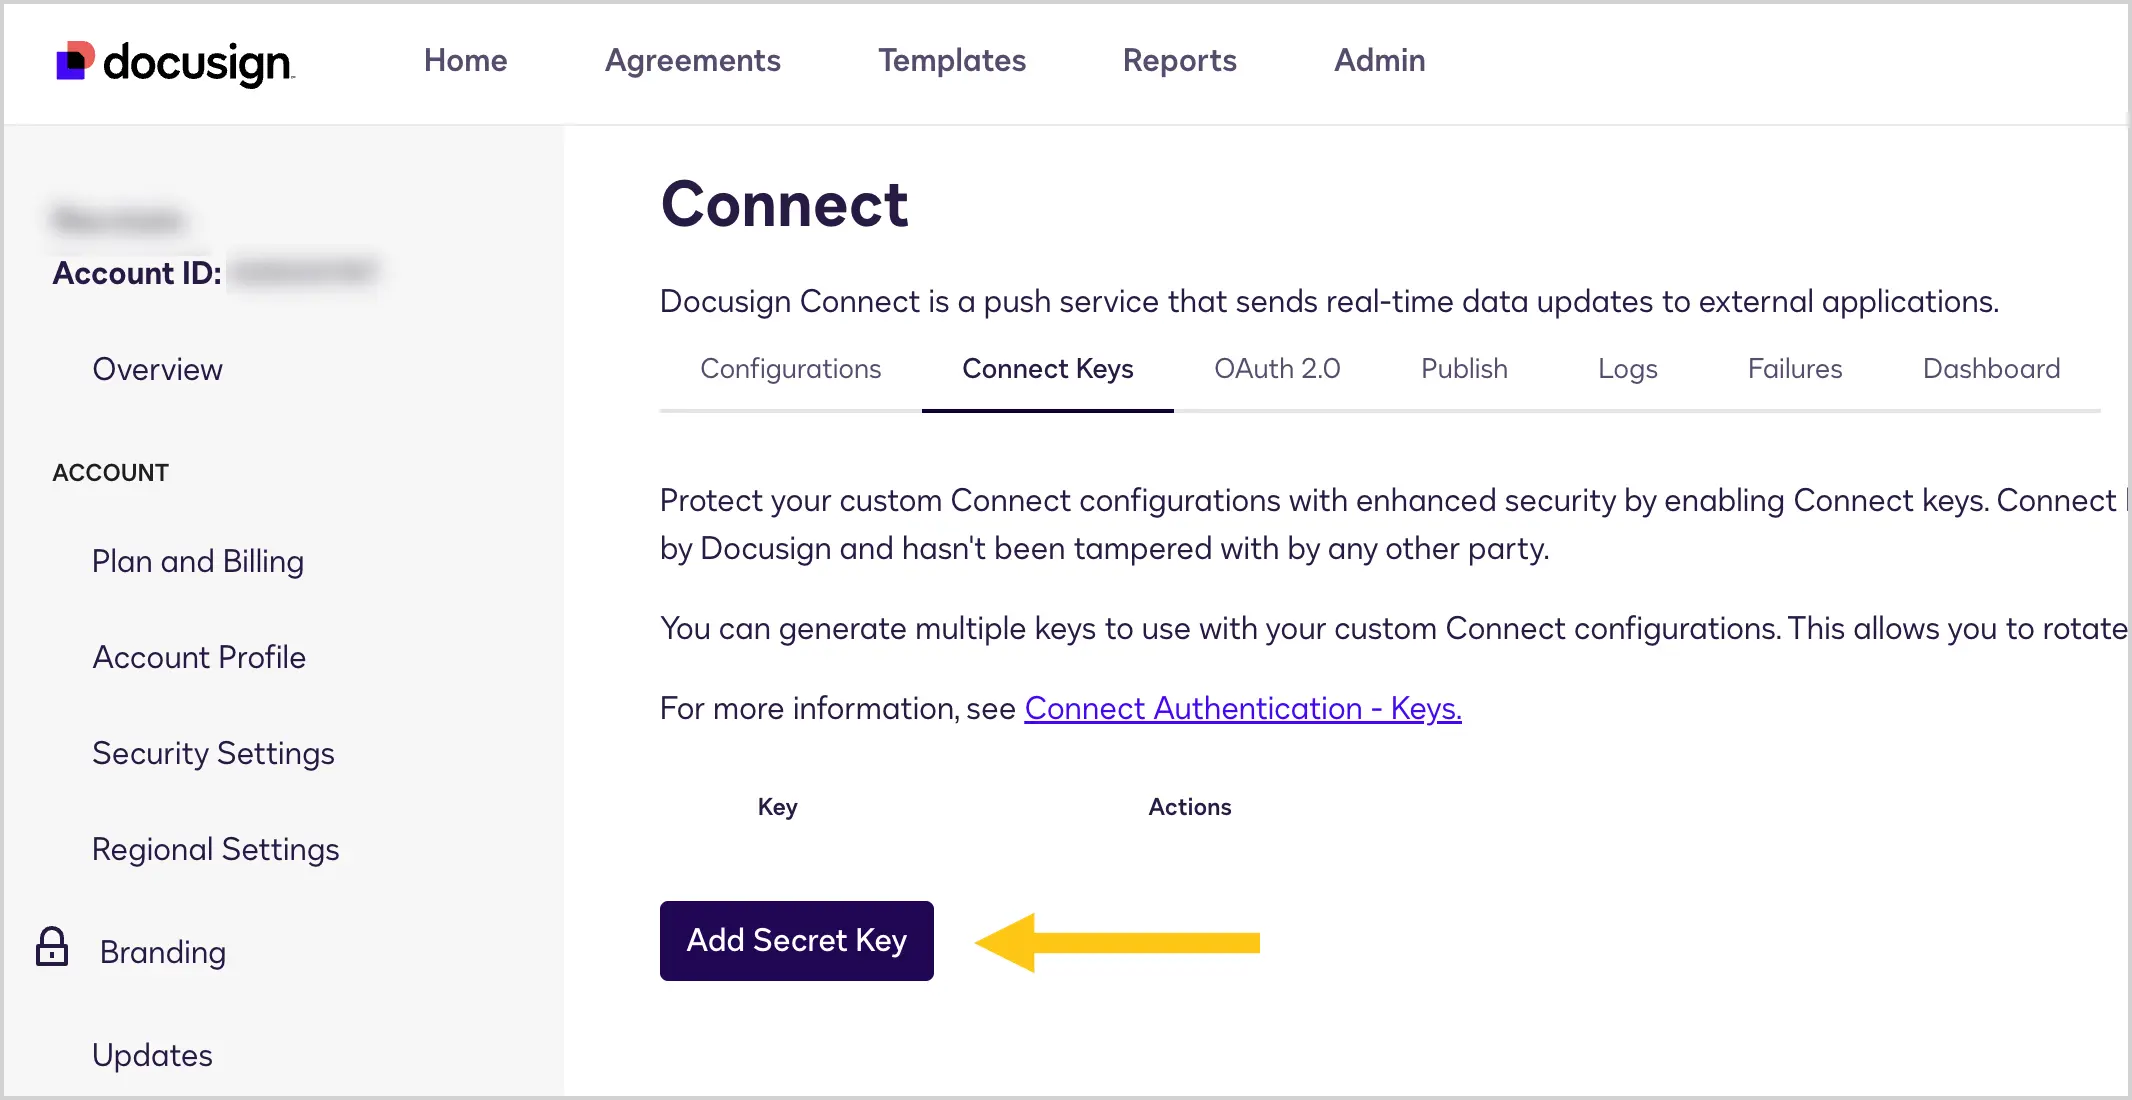
Select the Add Secret Key button.
-
In the field with the generated key, select the icon to copy the key, then save it in a secure place, for example in a notes app.
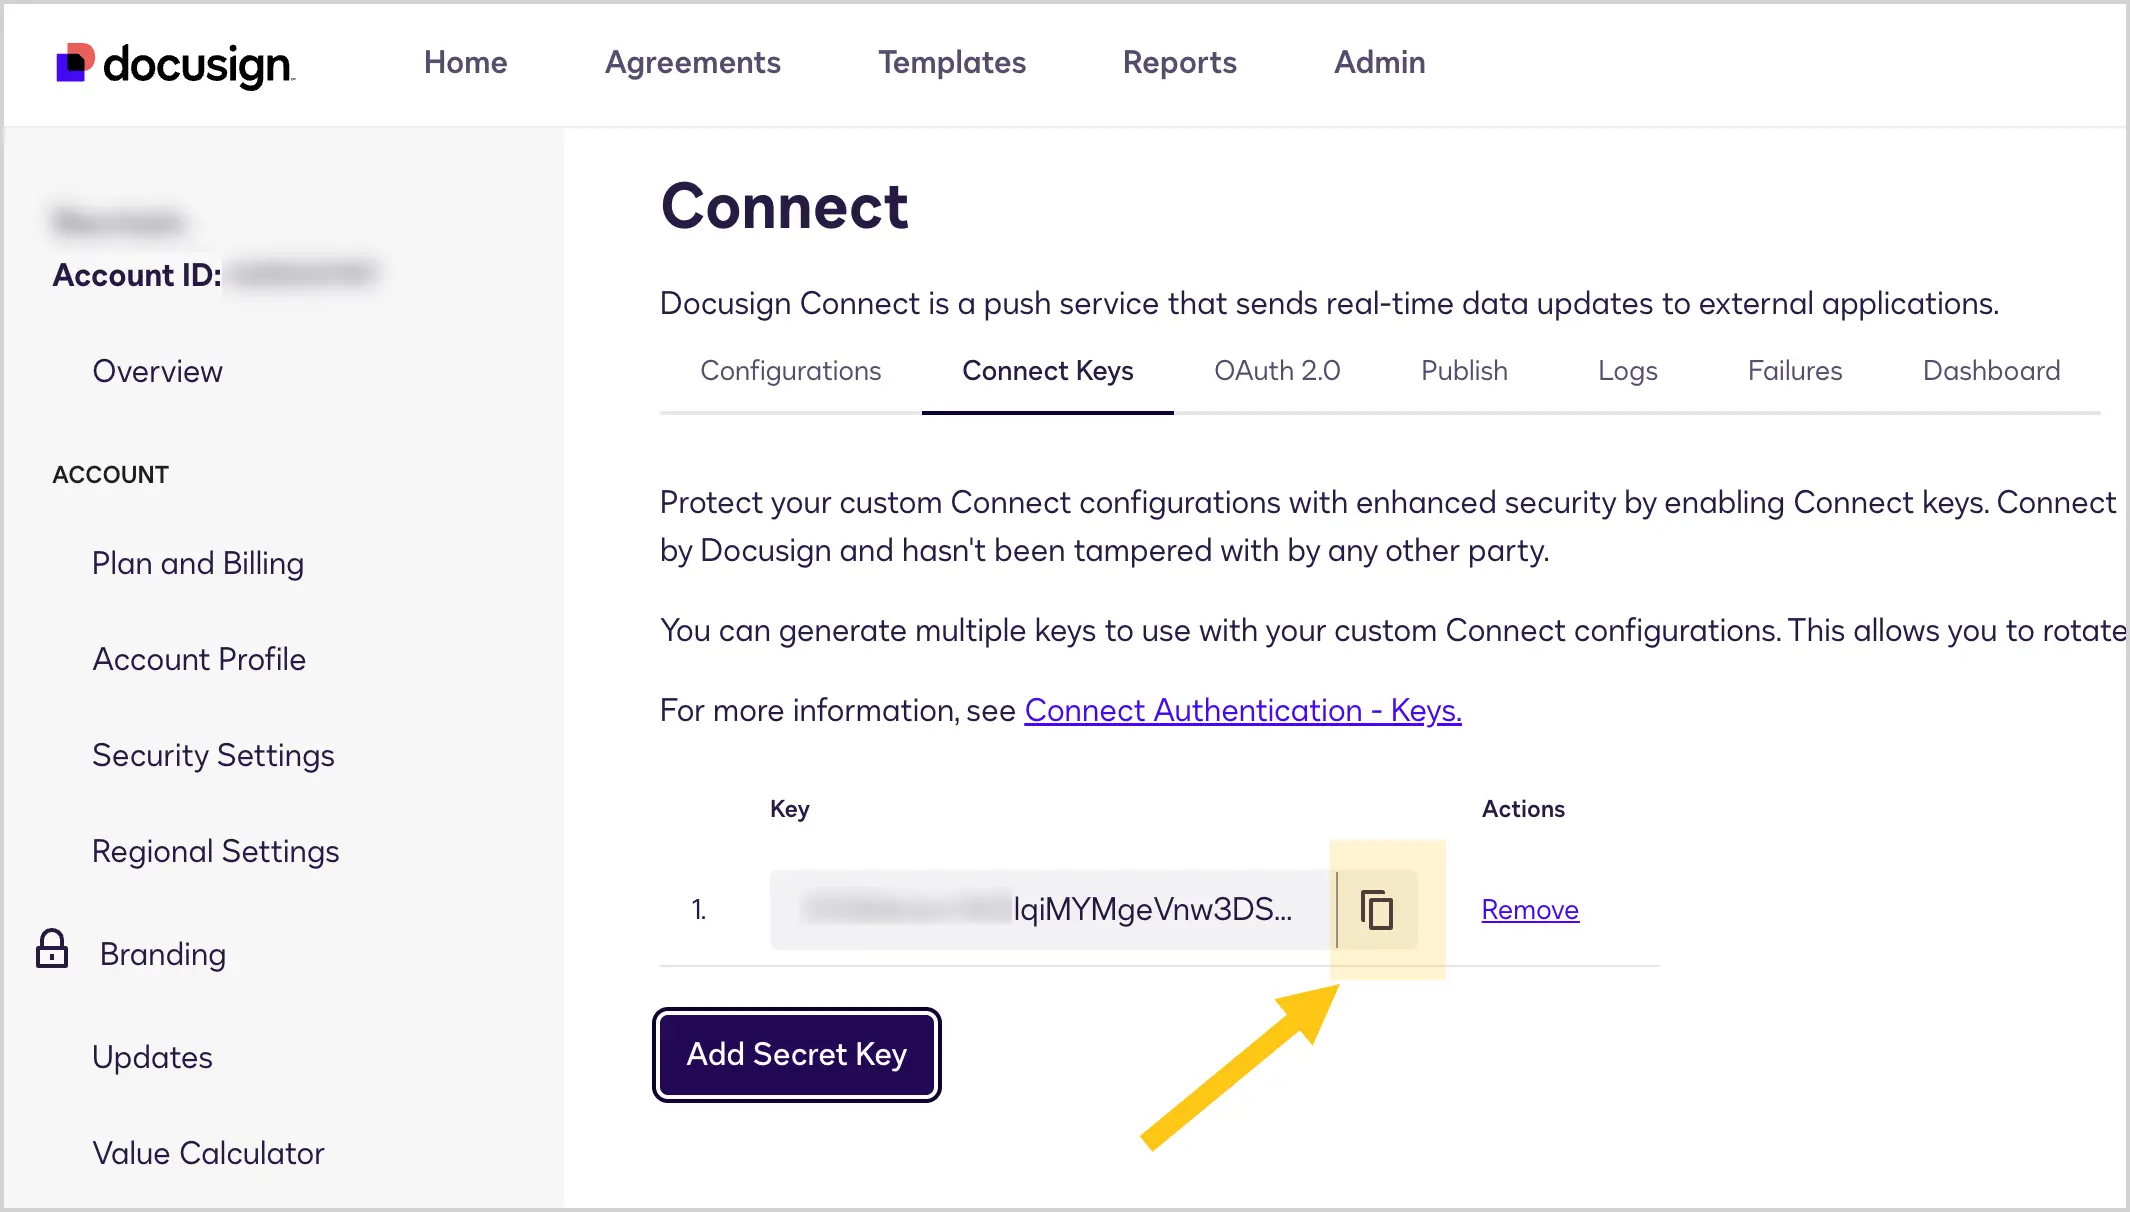
Warning:After closing this window, for security reasons, you will no longer be able to view this key. If you do not save it, you will need to generate a new one.
-
2.10.4.1.2. Configure Nectainium
The Docusign integration can be configured by a user with the Developer or Admin role.
-
In the navigation panel, select the Studio 1 workspace.
-
Select the Integration 2 shortcut group, then select the Docusign 3 shortcut group.
-
Select the Docusign Profile 4 shortcut.
-
In the toolbar, select + 5.
-
In the Code field, enter the code you set in the URL to Publish field as the
codepart. -
In the Name field, enter the desired profile name, for example, "Basic Integration".
-
In the Integration ID field, enter the Integration key specified in the settings of your App in Docusign.
-
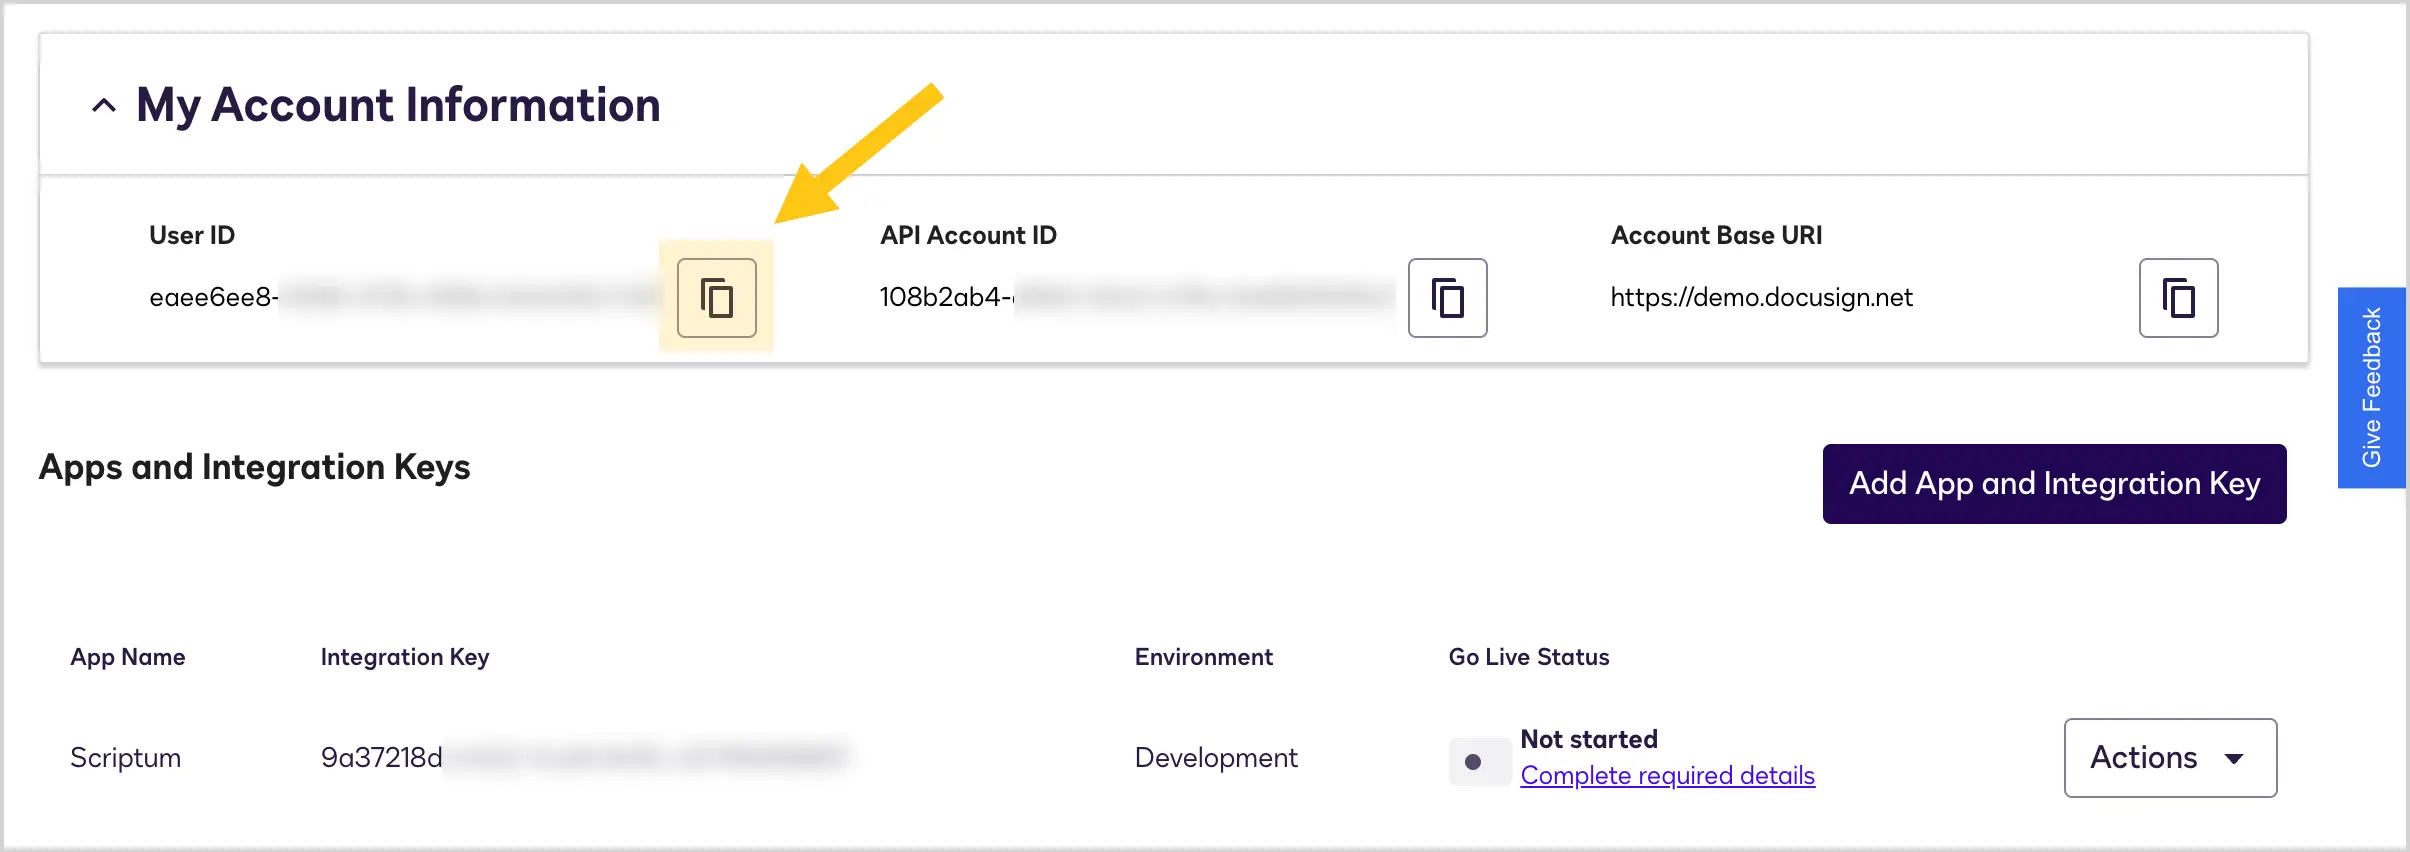
In the User ID field, enter the value from the User ID field in Docusign settings.
To find this field in your Docusign settings:
-
Go to the Docusign developers website.
-
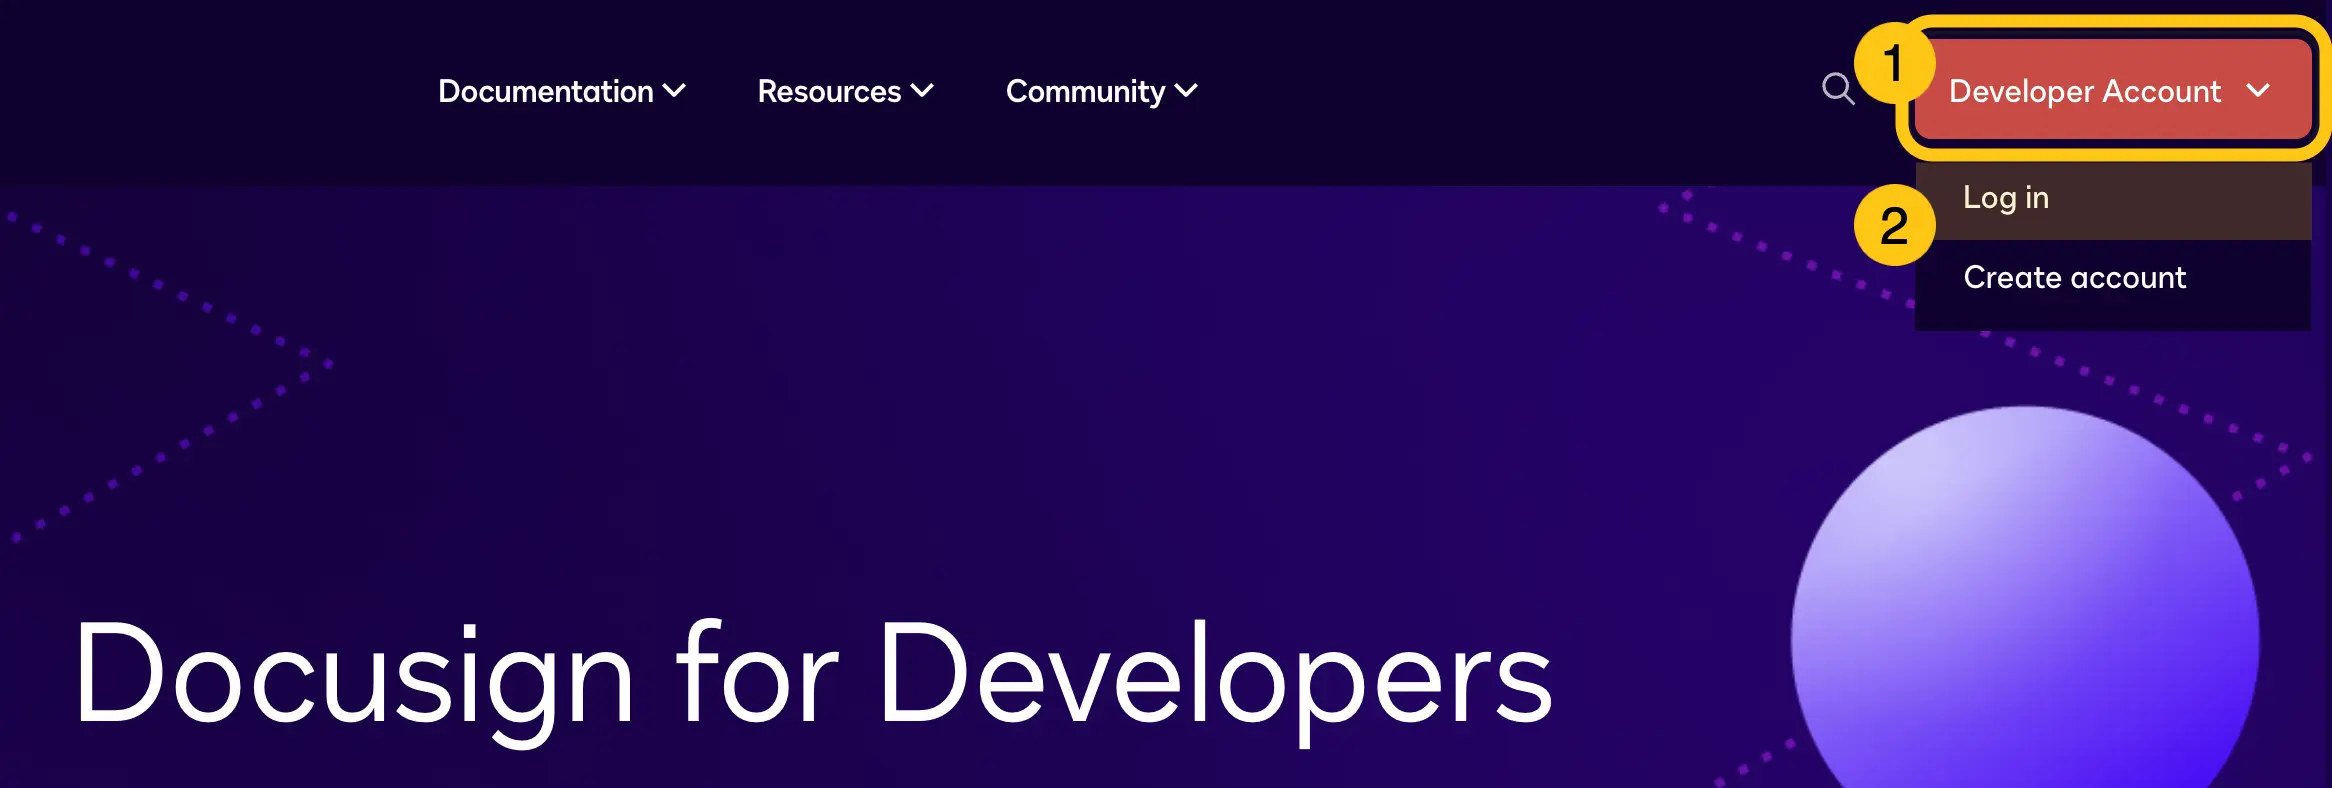
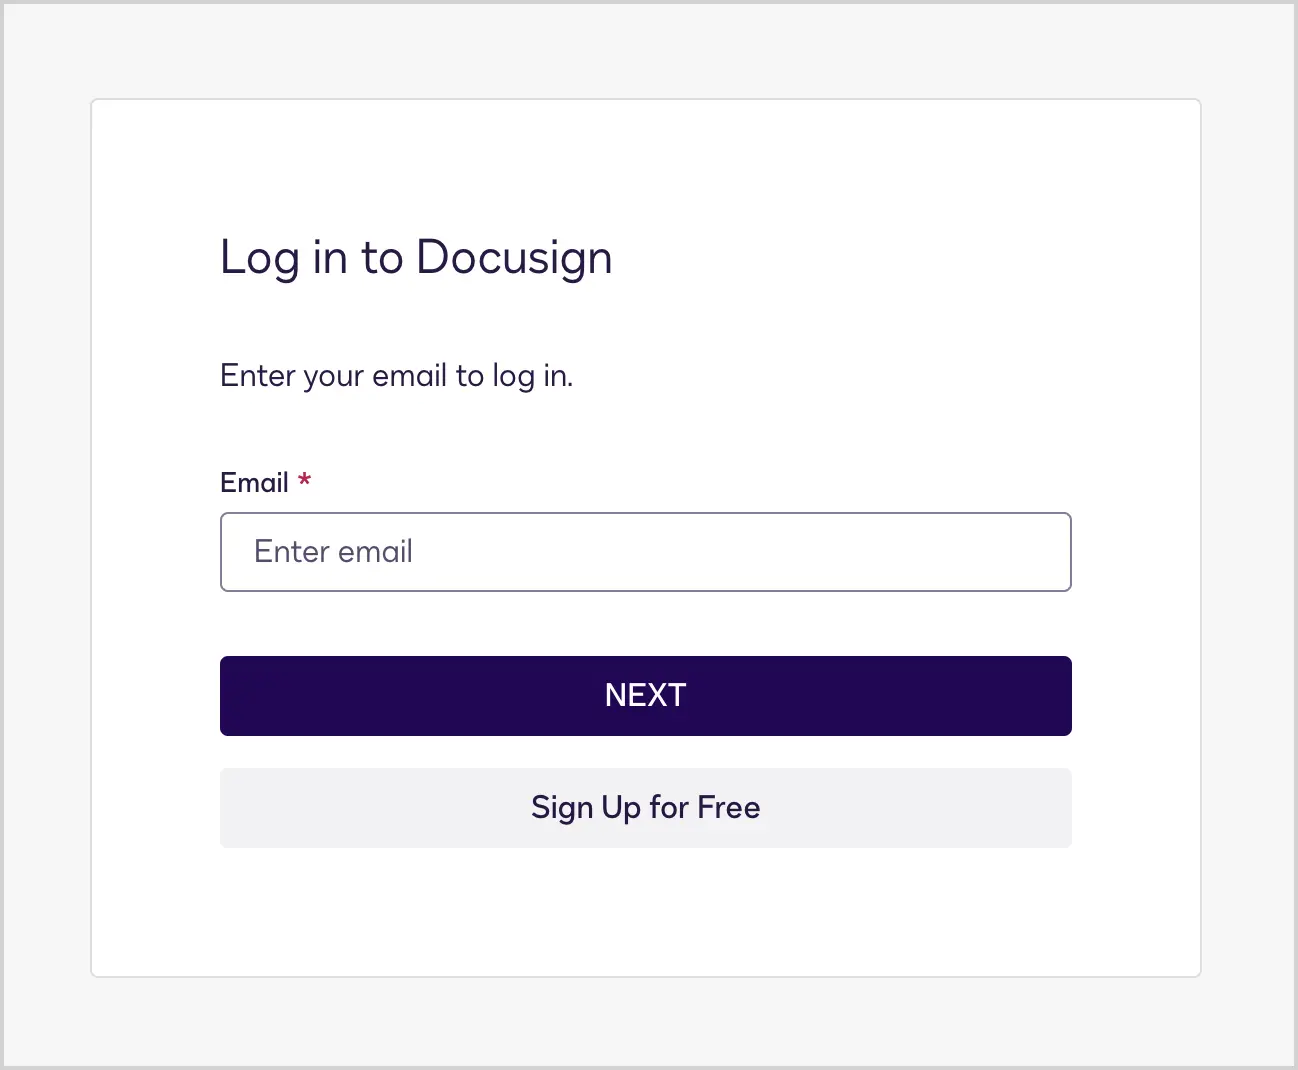
In the top-right corner, select Developer account 1, then select Log in 2.
-
Enter your email and password to log in to the account.
-
In the top-right corner, select the profile icon 1, then select My Apps & Keys 2.
-
In the My Account Information section, next to the User ID field, select the icon to copy the value.
-
-
In the Private RSA Key field, paste the key you copied from the Private key field when configuring Docusign (see section Configure Docusign > step 2 > item v).
-
In the HMAC Secret field, paste the key you copied from the Key field when configuring Docusign (see section Configure Docusign > step 4 > item iii).
-
Docusign will automatically fill in the Event Notification URL field after saving this form. Verify that the value matches the URL to Publish field in Docusign settings.
-
In the toolbar, select Save.
The system will then open a consent window where a link will be automatically generated with the credentials entered during profile configuration.
-
Select Open Link.
-
Select Allow Access.
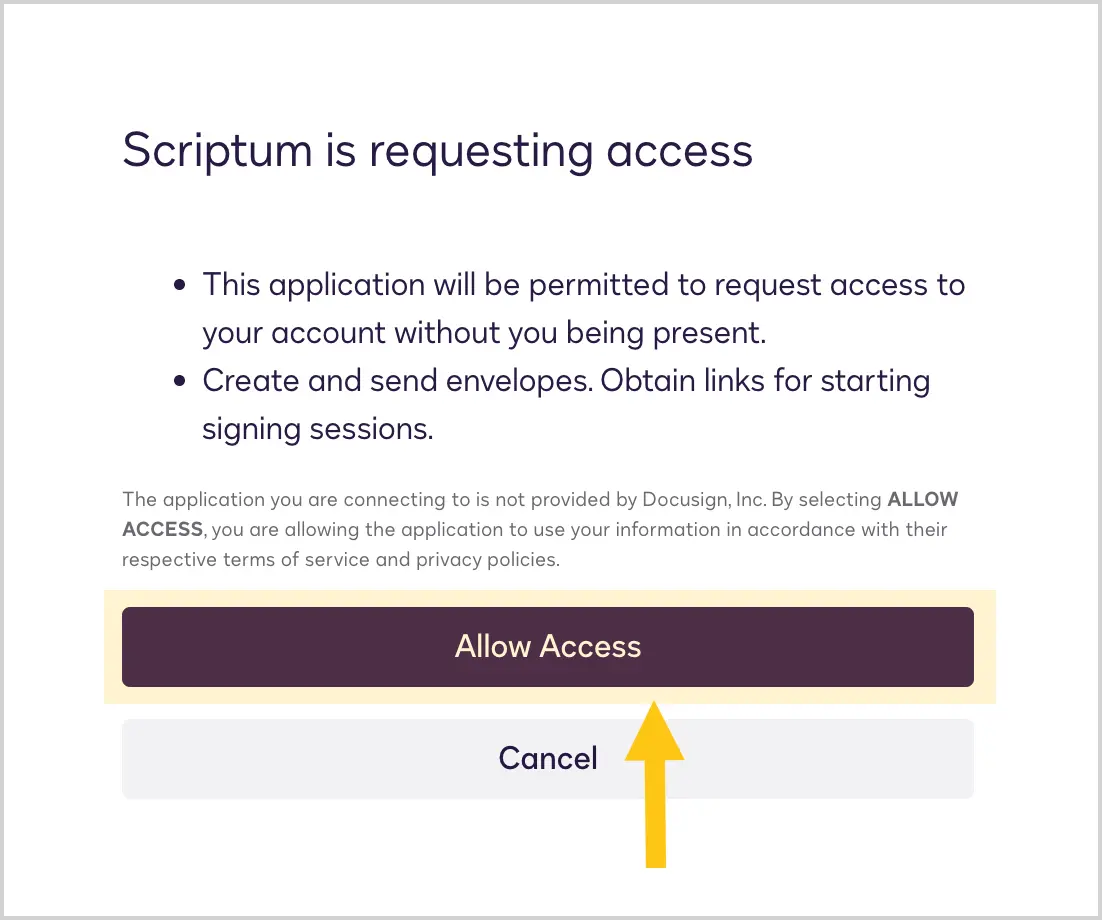
After confirming access, Docusign will redirect you to the environment whose URL you specified in step 2, item vii of section 2.10.4.1.1.
-
Enter your login and password for your Nectainium account 1, then select Sign In 2.
2.10.4.1.3. Switch the Environment to Production Mode
-
Open the Docusign profile you configured:
-
In the navigation panel, select the Studio 1 workspace.
-
Select the Integration 2 shortcut group, then select the Docusign 3 shortcut group.
-
Select the Docusign Profile 4 shortcut.
-
Select the required profile 5.
-
-
Enable the Make Active toggle.
-
Send 20 successful API requests to activate the transition to production mode. Request examples:
Track your requests in the event history using the Docusign Log shortcut.
API request logging in Docusign may be delayed by a few minutes, so your integration testing may not be counted immediately.
-
Go to Docusign.
-
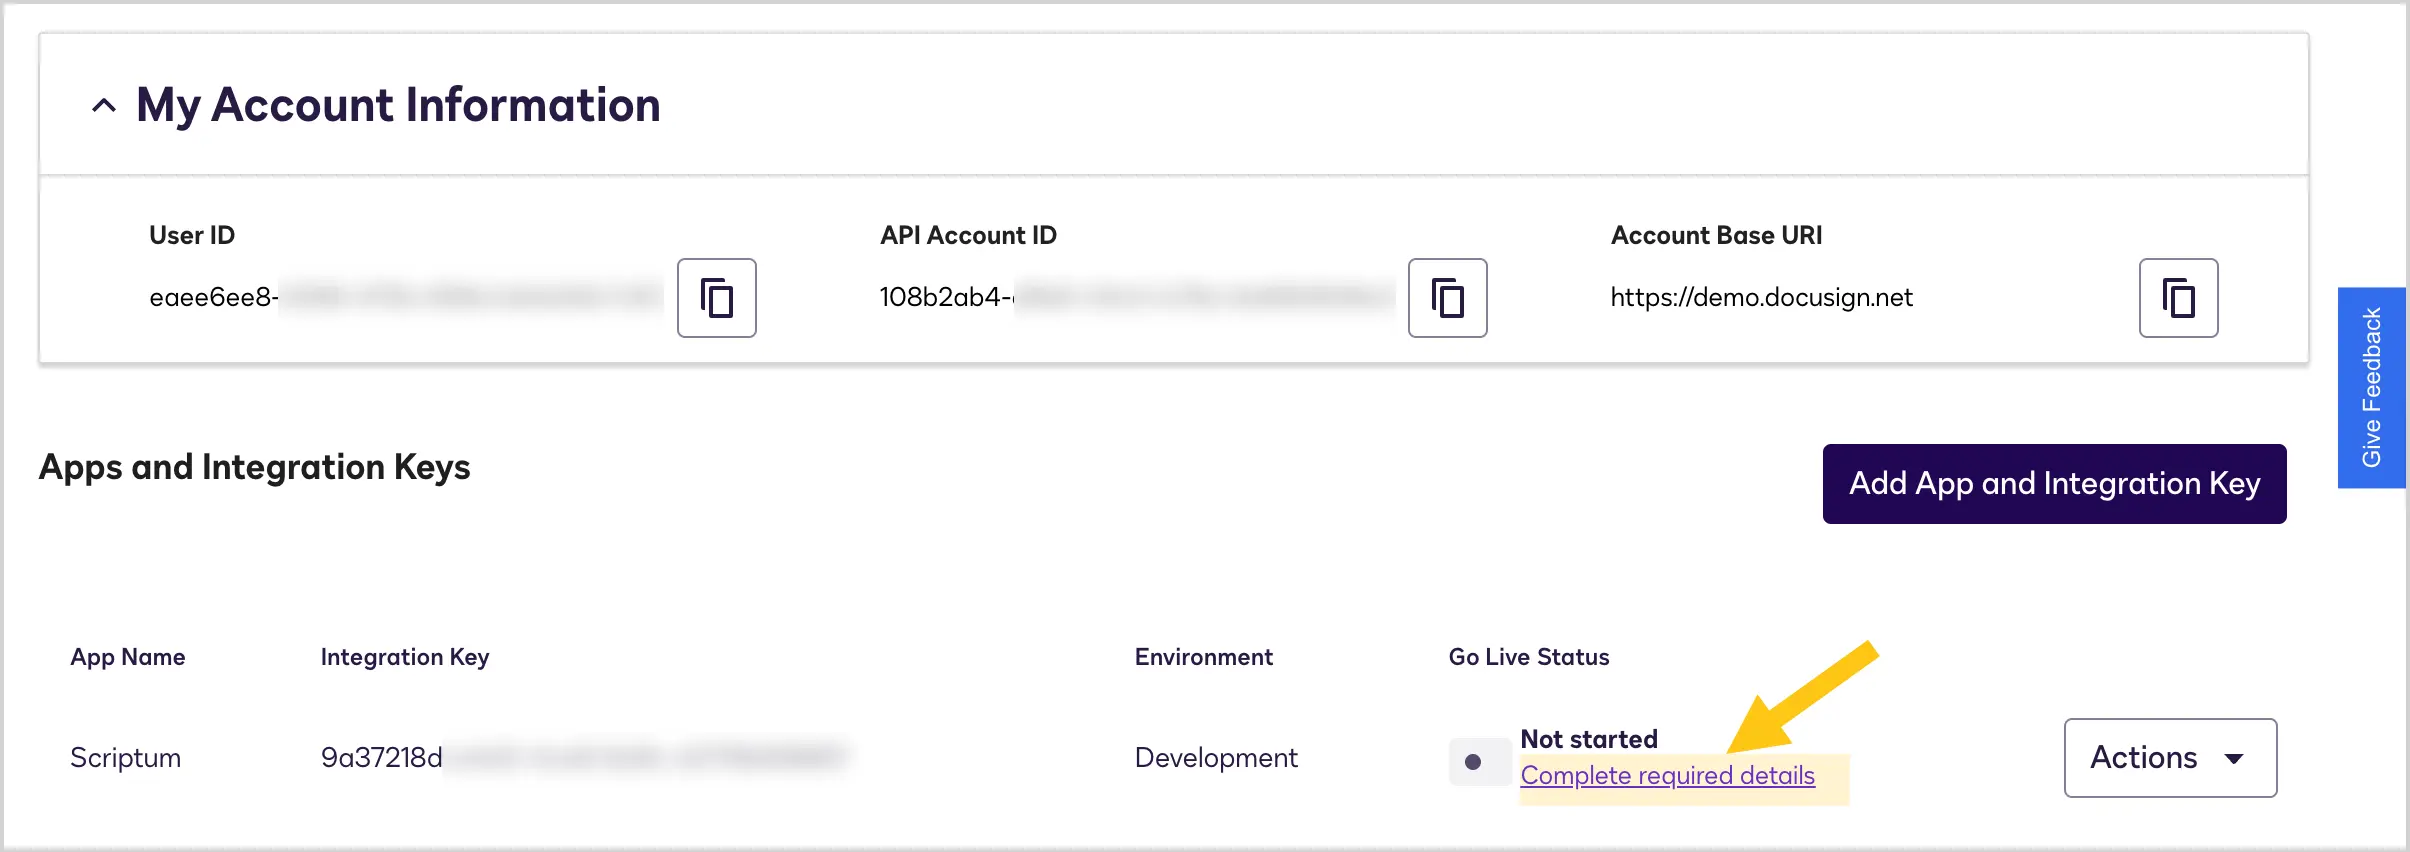
In the top-right corner, select the profile icon 1, then select My Apps & Keys 2.
-
In the Apps and Integration Keys section, find the App you created, then in the Go Live status column, select Complete required details.
-
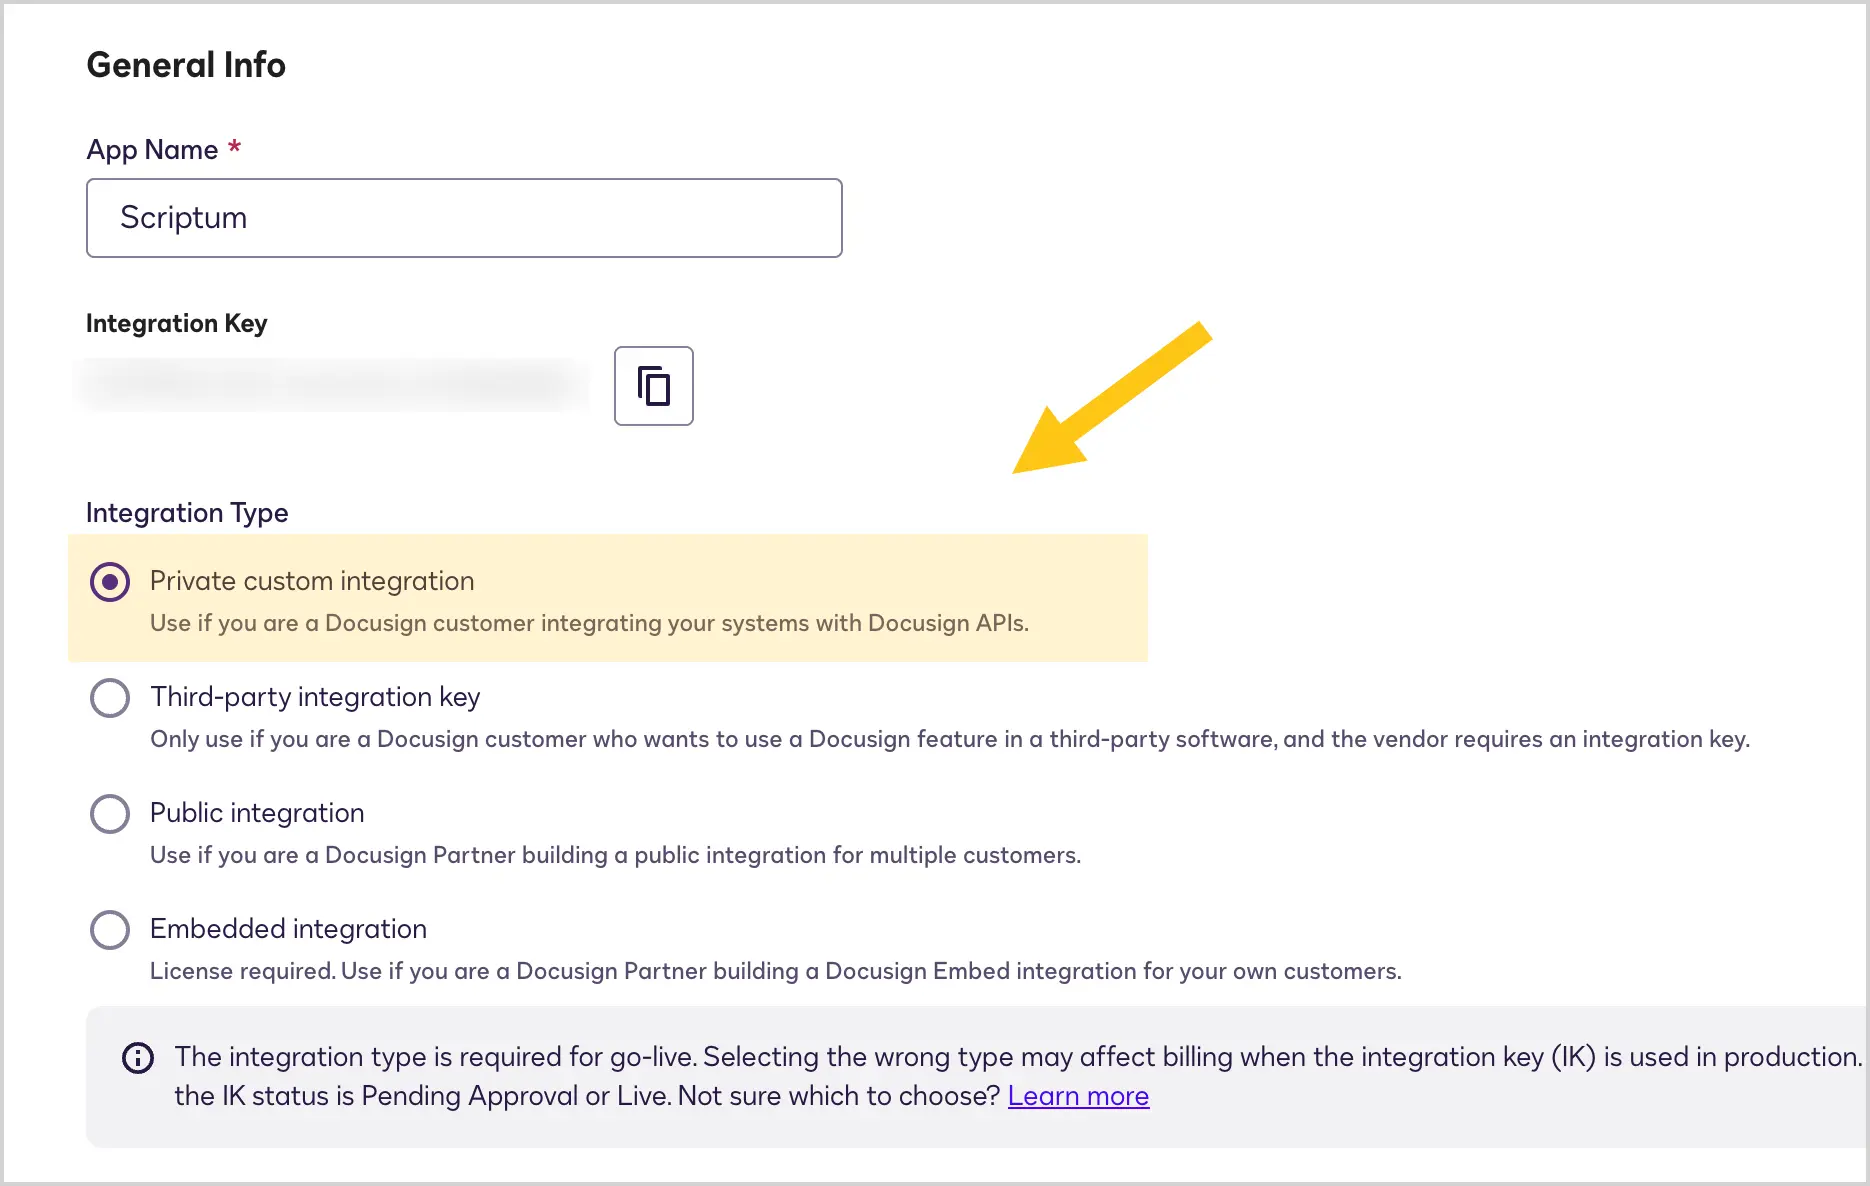
In the Integration Type section, select Private custom integration.
-
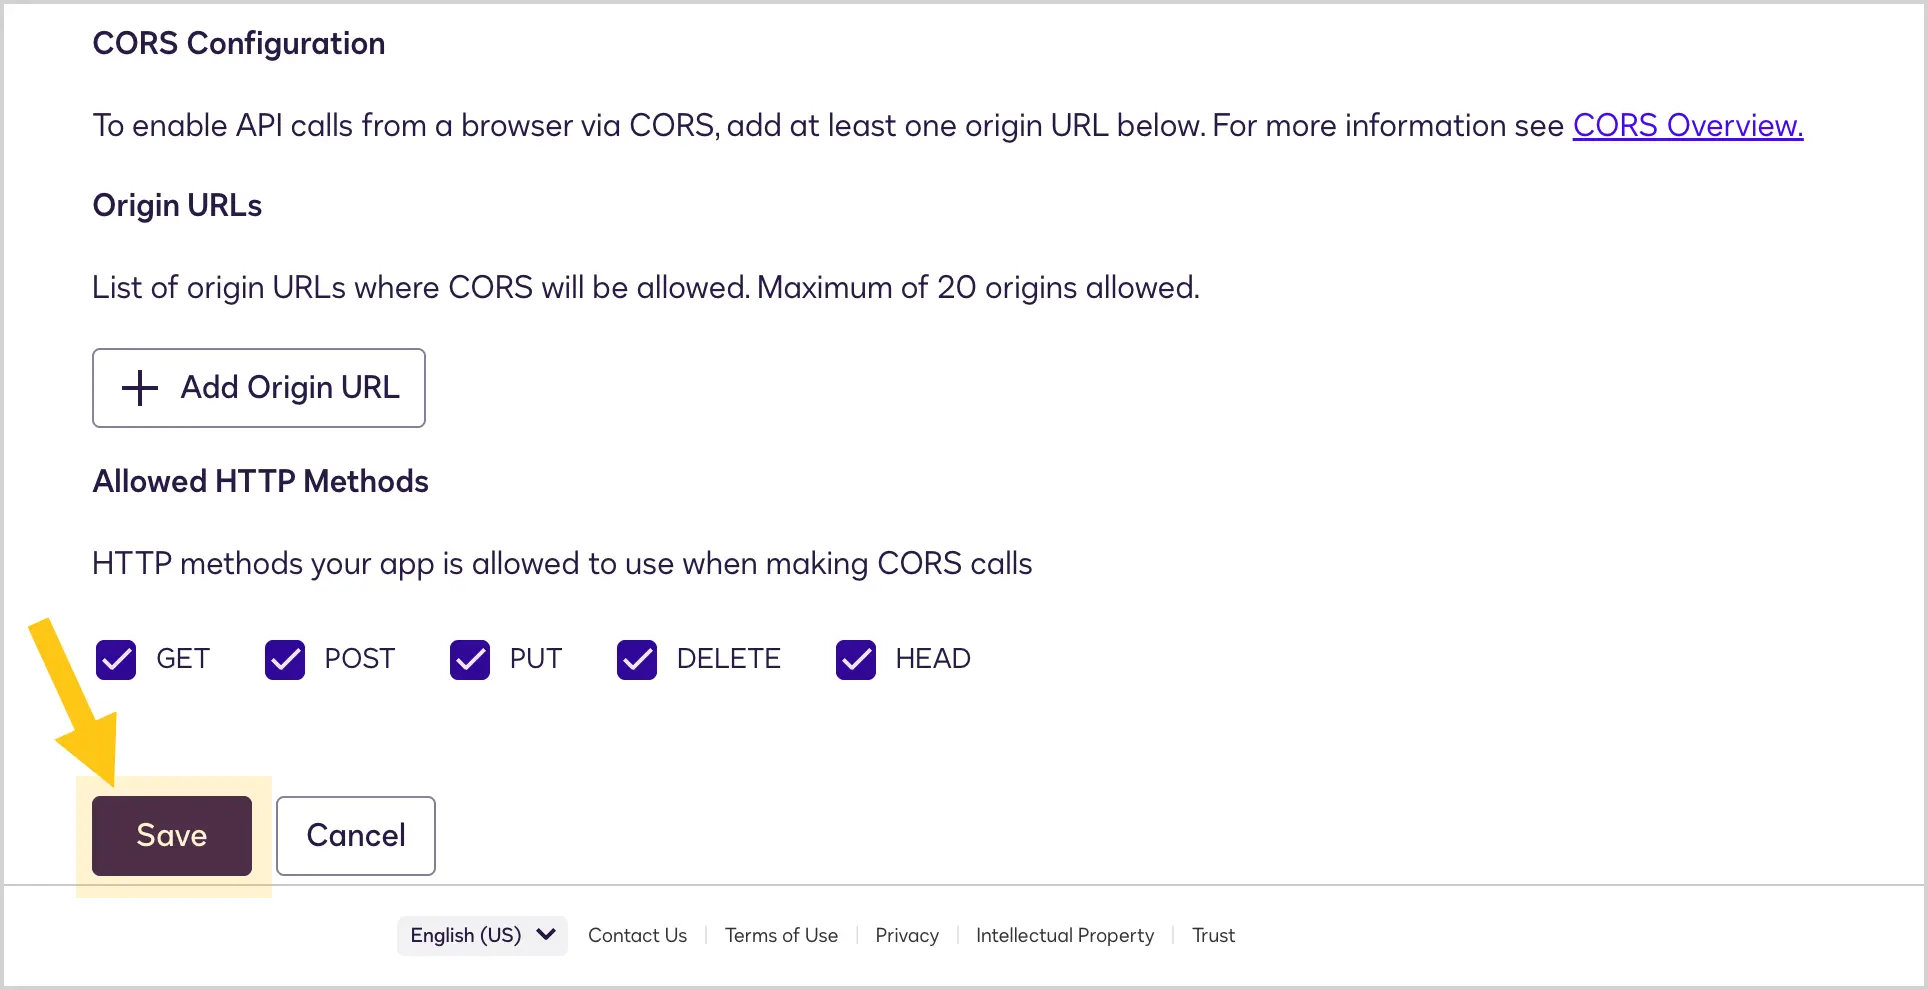
Scroll to the bottom of the page and select Save.
-
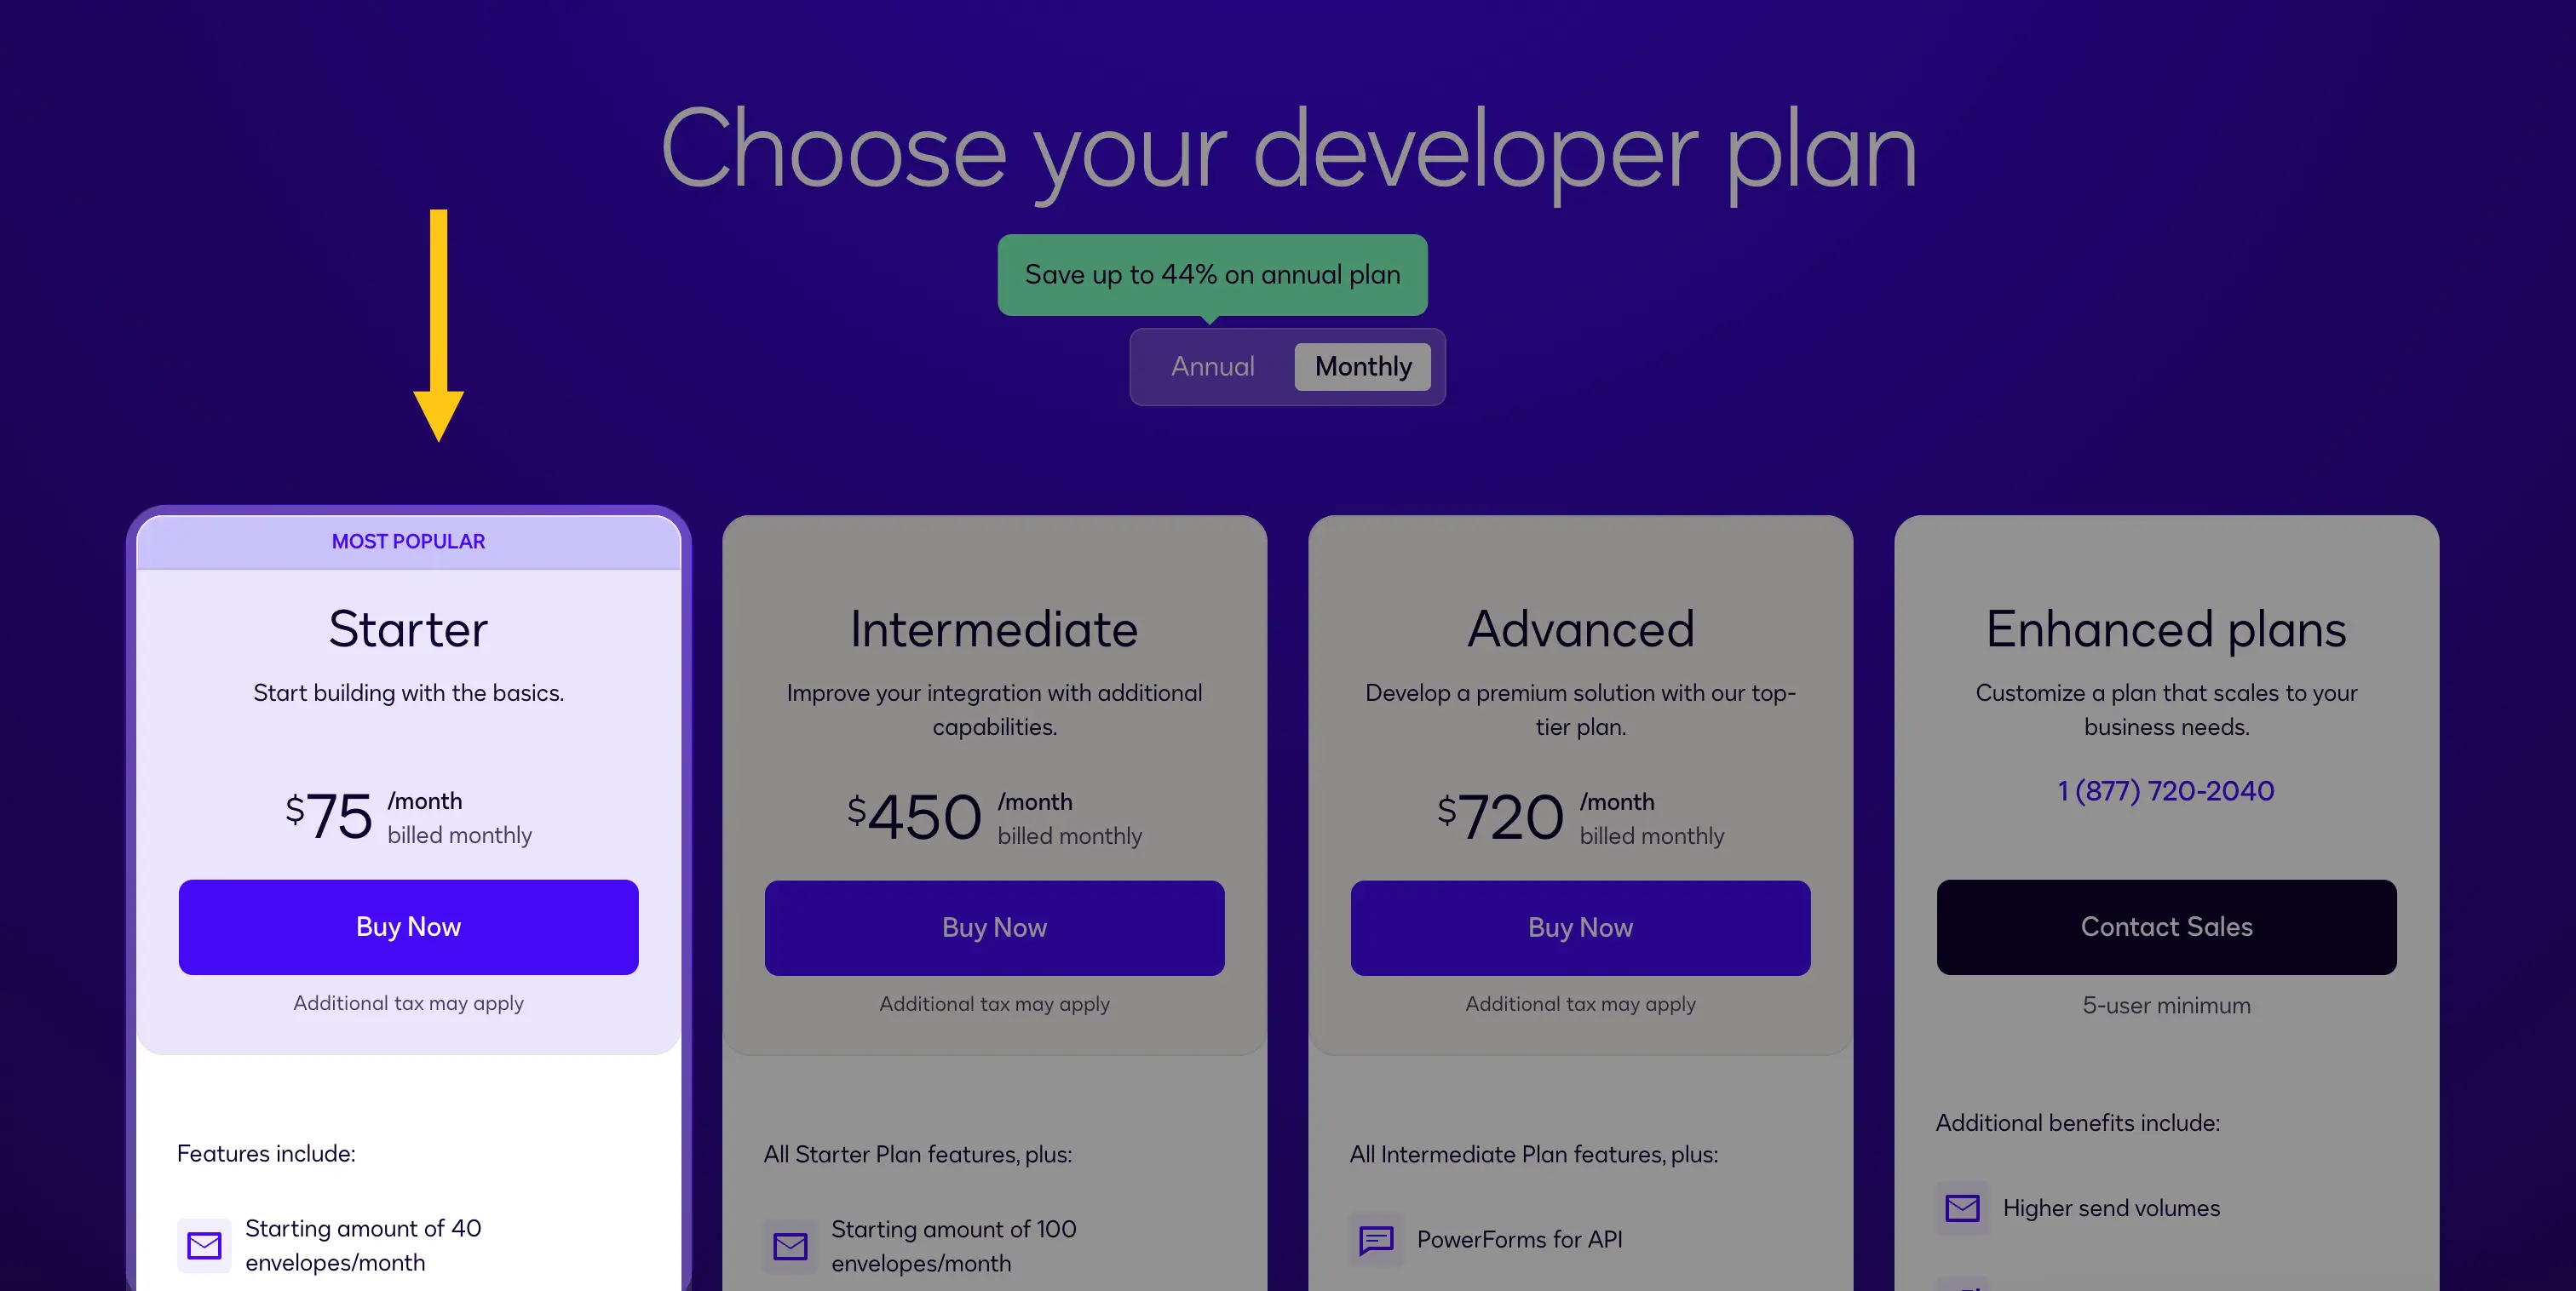
Purchase a paid subscription to switch to production mode. For small and medium teams, the Starter subscription is usually sufficient, as it supports API integrations. See Docusign plans and pricing.
-
In the Apps and Integration Keys section, find the App you created, then in the Go Live status column, select Submit for review.
-
Wait for the application to be approved: Within three business days, you will receive an email confirming the activation. The Review Passed status will appear in the app status, allowing you to proceed to the next step.
-
Switch to production mode:
-
After successfully passing the review, in the Go Live status column, select Go Live.
-
A login window will appear (if it does not appear, temporarily allow pop-ups in your browser).
-
In the next pop-up window after successfully logging in, select Production Account and select Select.
-
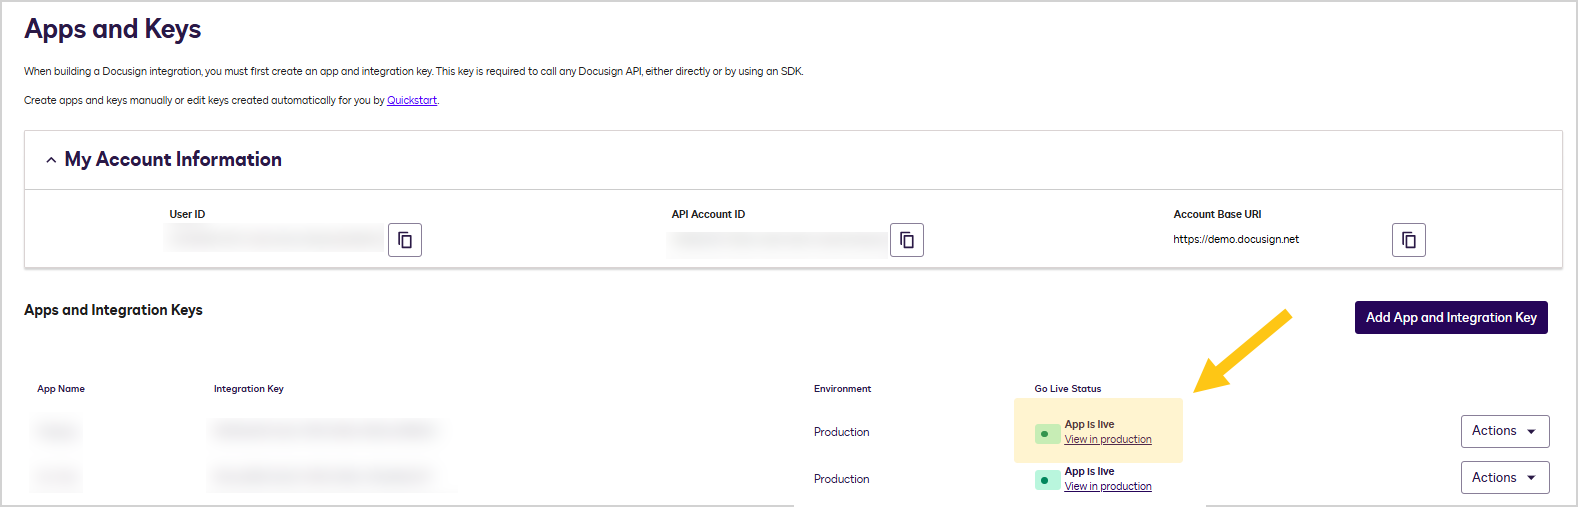
After successfully switching to production mode, the View in production status will appear in the Go Live status column.
-
-
Open the Docusign profile you configured:
-
In the navigation panel, select the Studio 1 workspace.
-
Select the Integration 2 shortcut group, then select the Docusign 3 shortcut group.
-
Select the Docusign Profile 4 shortcut.
-
Select the required profile 5.
-
-
At the bottom of the page, select Switch to Production Mode.
2.10.4.1.4. Update Nectainium Configuration with Production Data
After switching your App to production mode, DocuSign will automatically move it from the free developer account to a new account with a paid subscription. At the same time, all keys generated within the test account must be recreated and updated in the Nectainium platform to ensure the integration works correctly.
-
Go to the Docusign developers website and log in to your new account with a paid subscription.
-
Complete steps 2–4 from section Configure Docusign.
-
Open the Docusign profile you configured in the Nectainium platform:
-
In the navigation panel, select the Studio 1 workspace.
-
Select the Integration 2 shortcut group, then select the Docusign 3 shortcut group.
-
Select the Docusign Profile 4 shortcut.
-
Select the required profile 5.
-
-
Update the values of the following fields with the data you generated in step 2:
1 User ID
Enter the value from the User ID field in Docusign settings. To find this field in your Docusign settings:
-
Go to the Docusign developers website.
-
In the top-right corner, select the profile icon 1, then select My Apps & Keys 2.
-
In the My Account Information section, next to the User ID field, select the icon to copy the value.
2 Private RSA Key
Paste the key you copied from the Private key field when configuring Docusign. (See section Configure Docusign > step 2 > item v)
3 HMAC Secret
Paste the key you copied from the Key field when configuring Docusign. (See section Configure Docusign > step 4 > item iii).
- In the toolbar, select Save.
- Grant consent again for your new account:
-
Build the authorization URL using the following scheme:
https://account.docusign.com/oauth/auth?response_type=code&scope=signature%20impersonation&client_id=******************&redirect_uri=https://nectainium/environmentwhere:
https://nectainium/environment— the URL of your Nectainium environment (for example, https://demo.nectainium.dev/).client_id=******************— the Integration Key of your App in Docusign.
Example: Suppose your Integration Key is 9a37258d-e4d2-4ce3-8afb-a5741b79881f and the URL of your Nectainium environment is https://nectainium.dev/.
In that case, the authorization URL will be:
https://account.docusign.com/oauth/auth?response_type=code&scope=signature%20impersonation&client_id=9a37258d-e4d2-4ce3-8afb-a5741b79881f&redirect_uri=https%3A%2F%2Fnectainium.dev%2F -
Follow the generated link, then select Allow access.
-
After these steps, your platform will be fully integrated with Docusign and ready for further interactions with the service.
2.10.4.2. Update Templates
Docusign templates are templates with a predefined structure and signer roles. They allow you to quickly send documents for signing without having to configure fields manually each time. Updating templates is required to synchronize with the latest versions created directly in Docusign.
To update templates:
-
Open the Docusign profile you configured:
-
In the navigation panel, select the Studio 1 workspace.
-
Select the Integration 2 shortcut group, then select the Docusign 3 shortcut group.
-
Select the Docusign Profile 4 shortcut.
-
Select the required profile 5.
-
-
Go to the Template List tab. This tab displays the templates previously configured in the Docusign account.
-
Select the Update Templates button.
2.10.4.3. Send a Document for Signing in Docusign
-
Open the document type.
-
In the navigation panel, select the Studio 1 workspace.
-
Select the Document Types 2 shortcut group, then select the required document type 3.
-
-
Go to the Constructor tab.
-
Select or add a file attribute.
-
Hover over the selected attribute, then select the icon to configure actions.
-
Select the Send to Docusign 1 and View Docusign Signatures 2 checkboxes.
-
Select Save 3.
-
In the toolbar, select Save.
-
Create a document of this type:
- In the navigation panel, select the Documents 1 workspace.
- Select the Documents 2 shortcut, then in the toolbar select + 3.
- In the Document Type 1 field, select the required type, then select Create 2.
-
On the document form, find the same file attribute for which you enabled the corresponding Docusign actions.
-
In the attribute toolbar, select + and import a file from your device.
You can import files with the following extensions:
Type Supported formats Documents .doc,.docx,.dot,.dotm,.dotx,.htm,.html,.msg,.pdf,.rtf,.txt,.wpd,.xhtmlImages .bmp,.gif,.heic,.jpg,.jpeg,.png,.tif,.tiffPresentations .pot,.potx,.pps,.ppt,.pptm,.pptxSpreadsheets .csv,.xls,.xlsm,.xlsx -
In the toolbar, select the icon to send the document envelope for signing.
-
In the Name 1 field, enter the recipient's full name (for example, John Smith), then in the Email 2 field, enter the email address of the recipient to whom you want to send the document for signing.
Note:You can also use the Docusign Templates method — templates with a predefined structure and signer roles. Such templates must be created directly in Docusign. See Create Templates.
-
On the added recipient's card, select Needs to Sign to choose the action the recipient must perform. From the list, select one of the following actions:
- Needs to Sign — this action is assigned to all recipients by default until another is selected. It provides the maximum set of capabilities.
- Specify Recipients — allows the specified recipient to enter the name and email for recipient roles that are at the same stage or later in the signing order.
- Receives a Copy — allows sending the document to a recipient who does not need to sign or edit it. This recipient can view, download, and print the document, but cannot sign or modify it.
- Needs to View — in this case, the recipient must receive the signed documents for the envelope to be considered complete, but they do not need to (and cannot) sign, initial, date, or add any information.
- Allow to Edit — gives the recipient the ability to make changes to the recipient list and the document during the signing process. This recipient must have a valid Docusign account.
- Update Recipients — allows the assigned recipient to edit the data of other recipients who have not yet signed the documents (i.e., signers later in the signing queue).
Note:If you added more than one recipient, you can set the signing order. To do this, in the Add Recipients section, select the Set Signing Order 1 checkbox, then enter sequential numbers next to the added recipients' cards 2.
-
In the Email Subject 1 field, enter the desired subject of the email that will notify the recipient of the need to sign the document.
-
Select Send 2.
2.10.4.4. View Document Signatures in Docusign
-
Open the document type.
-
In the navigation panel, select the Studio 1 workspace.
-
Select the Document Types 2 shortcut group, then select the required document type 3.
-
-
Go to the Constructor tab.
-
Select or add a file attribute.
-
Hover over the file attribute, then select the icon to configure actions.
-
Select the Send to Docusign 1 and View Docusign Signatures 2 checkboxes.
-
Select Save 3.
-
In the toolbar, select Save.
-
Create a document based on this document type:
- In the navigation panel, select the Documents 1 workspace.
- Select the Documents 2 shortcut, then in the toolbar select + 3.
- In the Document Type 1 field, select the required type, then select Create 2.
-
On the document form, find the same file attribute for which you enabled the corresponding Docusign actions.
-
In the attribute toolbar, select + and import any file from your device.
-
In the toolbar, select the icon to view the signatures applied in the Docusign platform.
-
The Signature Verification Result window will appear. If the signing status is Completed, you can download the signed document by selecting the icon.
You can also copy the unique envelope code to track its status in the Docusign Envelopes shortcut.
2.10.4.5. View Docusign Event History
In the Docusign Log shortcut, you can view all events and envelope status changes sent through the integration. This allows you to track the document sending and signing process in real time.
-
In the navigation panel, select the Studio 1 workspace.
-
Select the Integration 2 shortcut group, then select the Docusign 3 shortcut group.
-
Select the Docusign Log 4 shortcut.
2.10.4.6. View Docusign Envelopes
In the Docusign Envelopes shortcut, you can view all envelopes created and sent through the integration. Their statuses, subjects, and related entities are displayed here, allowing you to quickly find the required documents and monitor their state.
-
In the navigation panel, select the Studio 1 workspace.
-
Select the Integration 2 shortcut group, then select the Docusign 3 shortcut group.
-
Select the Docusign Envelopes 4 shortcut.