1.8. Create Organizational Structure
The platform uses a linked organizational structure consisting of the following levels:
- Internal Organizations ↓
- Departments ↓
- Positions ↓
- Employees of Our Organizations
Access to create or edit the organizational structure is available to users with the OrganizationManager role.
1.8.1. Create an Organization
To create an organizational structure, first create an organization by following these steps:
-
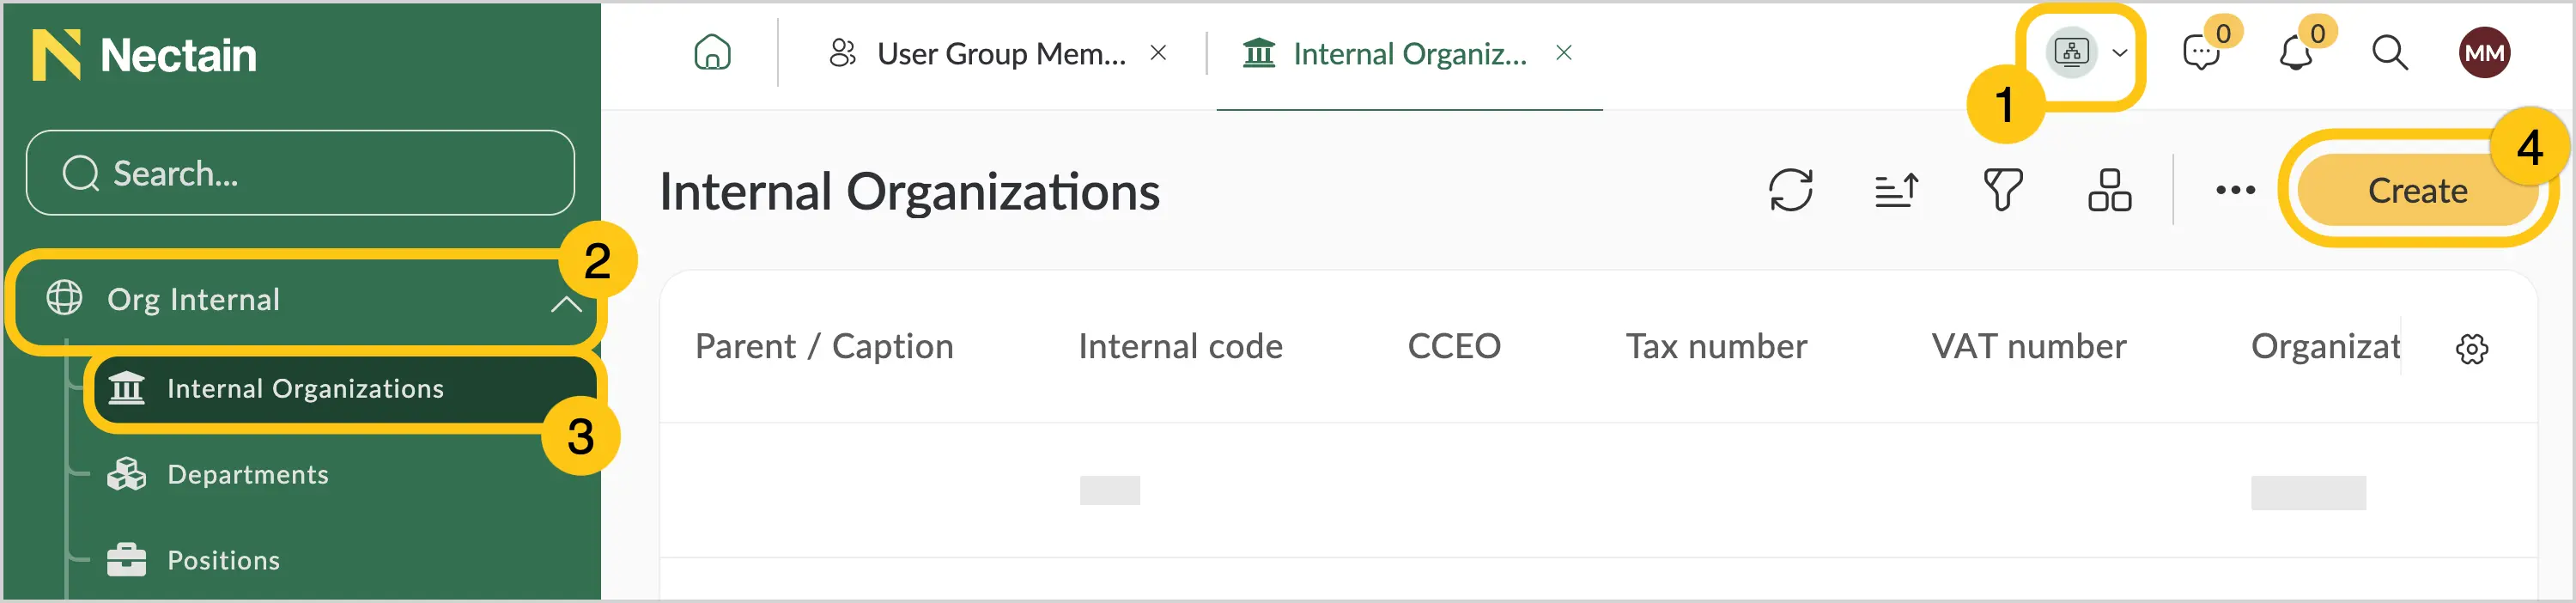
In the navigation panel, select the Organizational Structure desktop 1.
-
Select the Org. Internal shortcut group 2, then select the Internal Organizations shortcut 3.
-
In the toolbar, select Create 4.
-
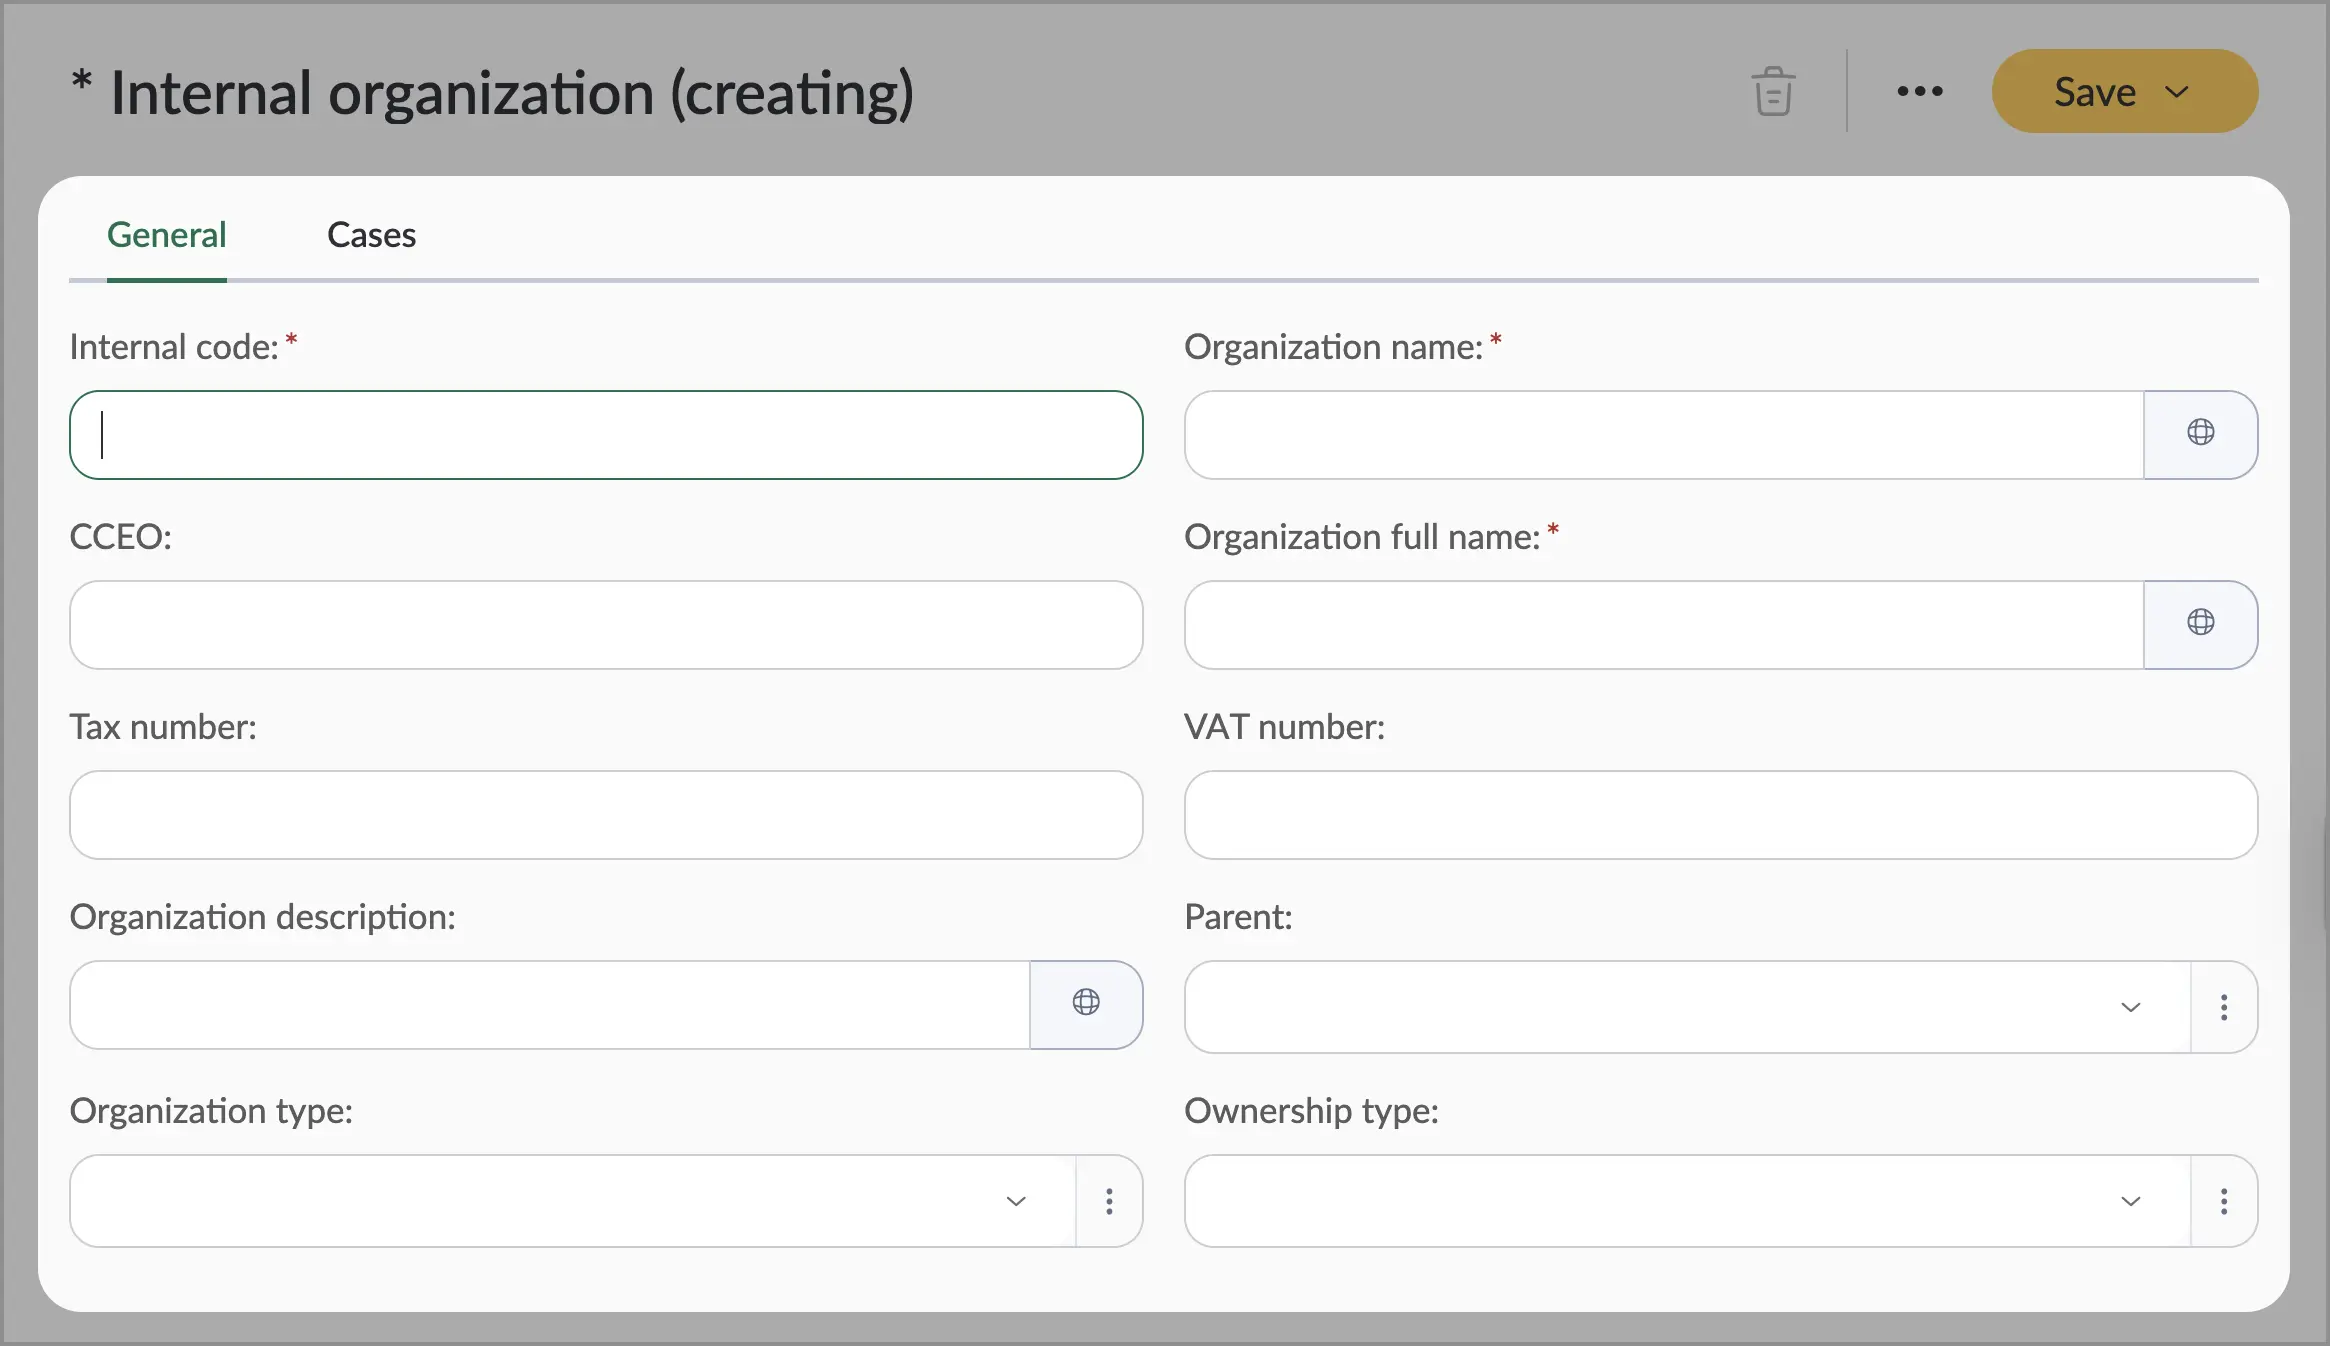
Fill in the fields using the hints in the table below.
| Field Name | Description |
|---|---|
| Code* |
|
| CCEO | Unified State Register of Enterprises and Organizations of Ukraine, 8-digit code. |
| Organization Name* | Short name of the organization. The name must not contain quotes or abbreviations. Example: "Ukrposhta". ℹ️ Note: You can set different name variants for different languages. To do so, select the icon and fill in the fields for other languages. |
| Organization Full Name* | Legal name of the organization. Example: "Joint Stock Company 'Ukrposhta'" ℹ️ Note: You can set different name variants for different languages. To do so, select the icon and fill in the fields for other languages. |
| Tax Number | Individual tax number, usually matches the EDRPOU for legal entities. |
| VAT Number | VAT payer certificate number, if the organization is a VAT payer. |
| Organization Description | Description of the organization, for example, "National postal operator of Ukraine. Provides letter, parcel, and periodical delivery services and performs money transfers throughout the country." ℹ️ Note: You can set alternative description variants for different languages. To do so, select the icon and fill in the fields for other languages. |
| Parent | Parent organization. In this field you can link the organization to another organization previously created in the platform. |
| Organization Type | Select the required organization type from the list. You can create custom organization types, for example "Joint Stock Company (JSC)" or "Limited Liability Company (LLC)". To add an organization type, select , then select Add New. Fill in the fields, then select Save in the top menu. |
| Ownership Type | Select the required ownership type from the list. You can create custom ownership types, for example "State", "Private", "Municipal". To add an ownership type, select , then select Add New. Fill in the fields, then select Save in the top menu. |
Fields marked with * are required.
-
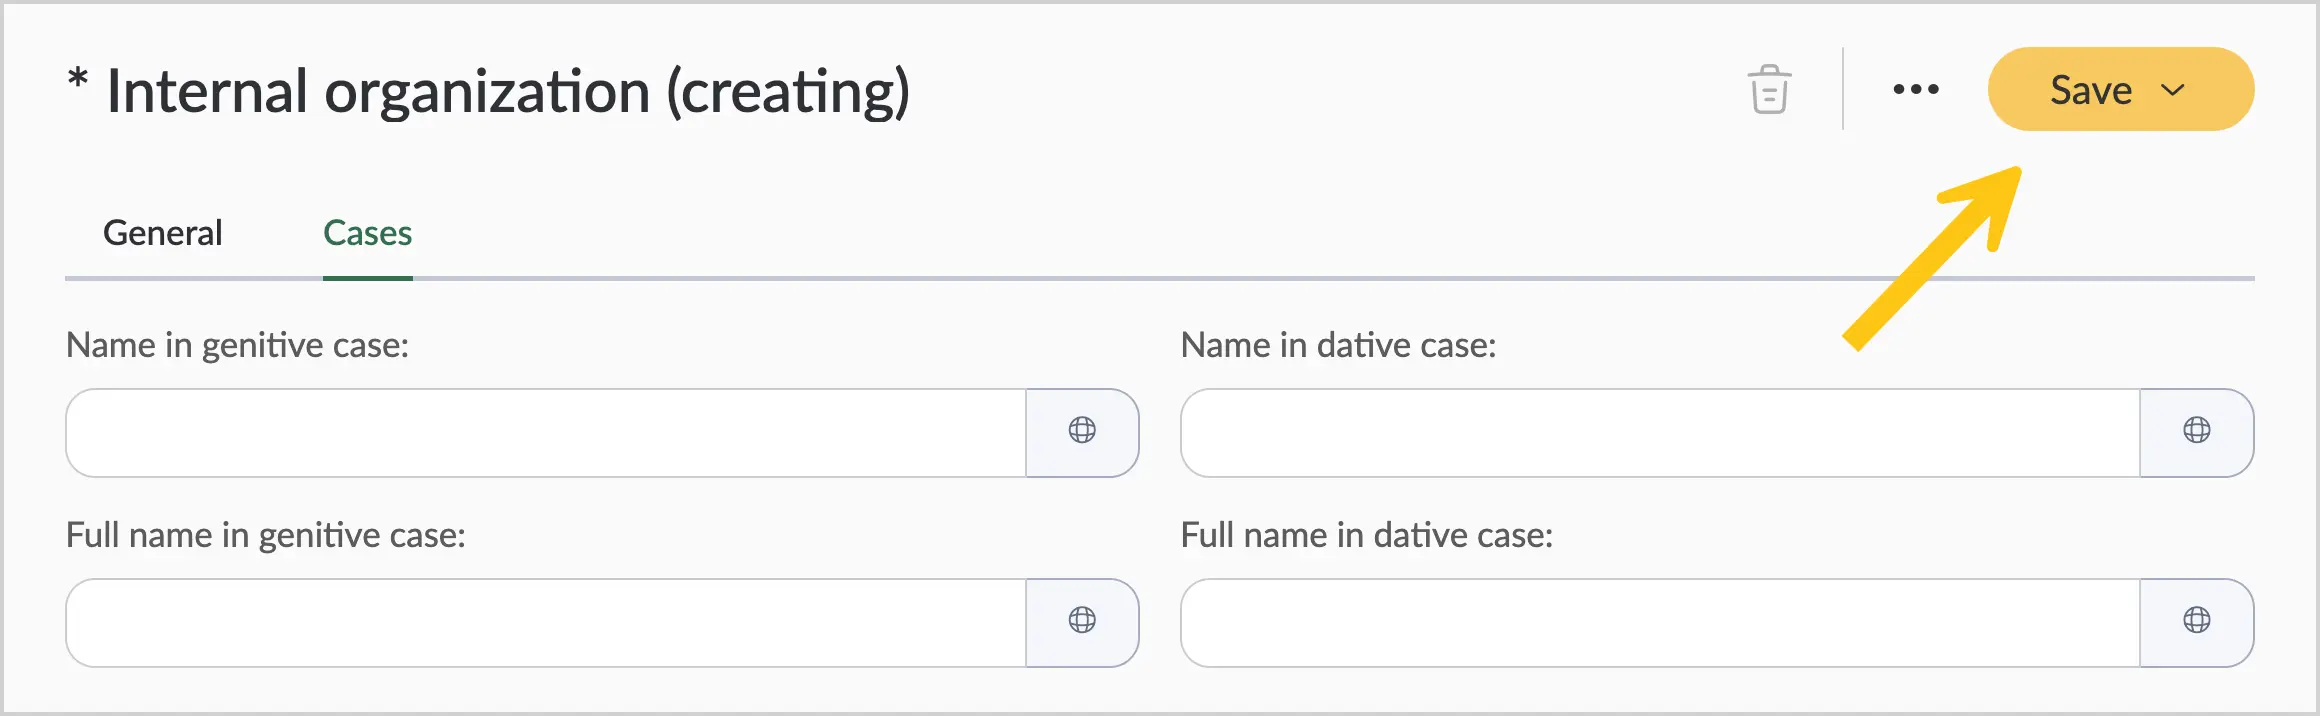
In the toolbar, select Save.
1.8.2. Create a Department
-
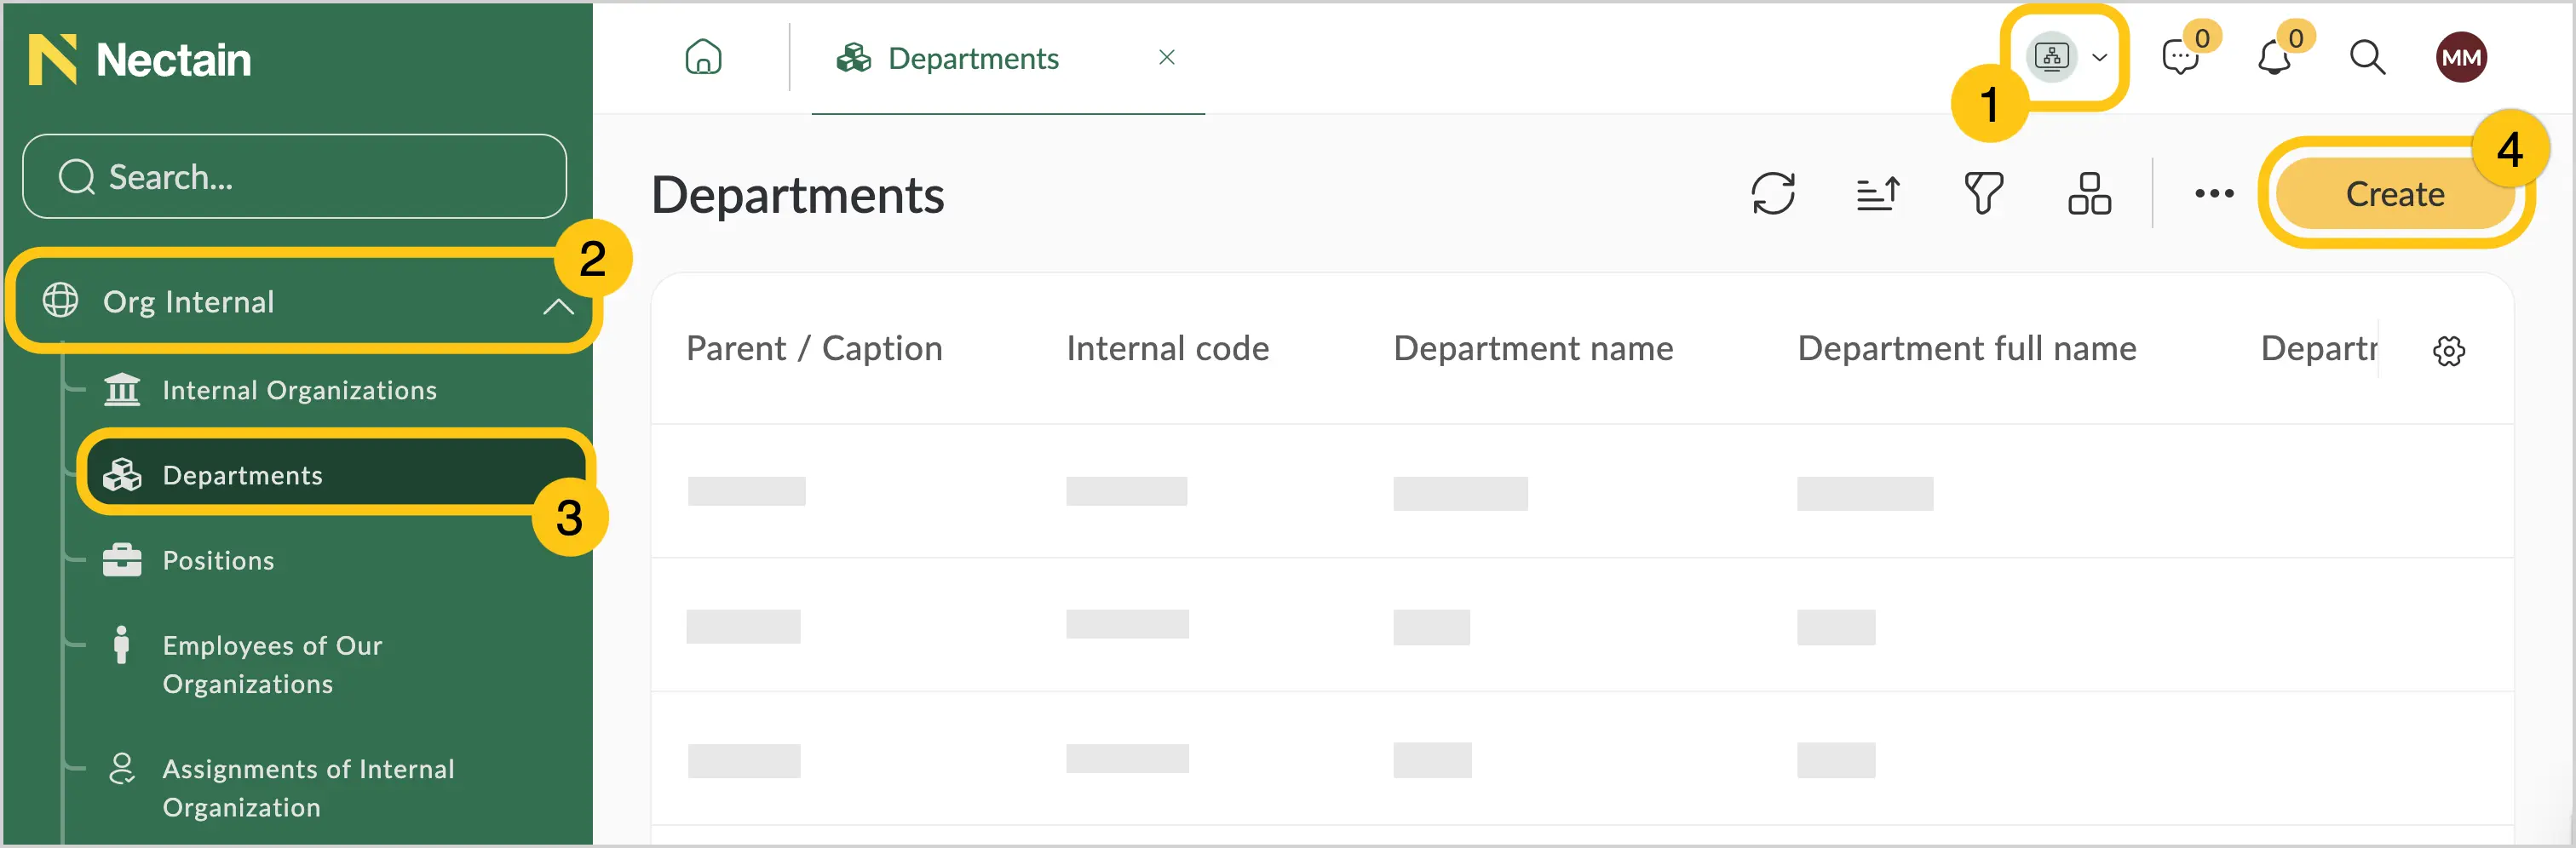
In the navigation panel, select the Organizational Structure desktop 1.
-
Select the Org. Internal shortcut group 2, then select the Departments shortcut 3.
-
In the toolbar, select Create 4.
-
Fill in the fields 1 using the hints in the table below, and then select Save 2.
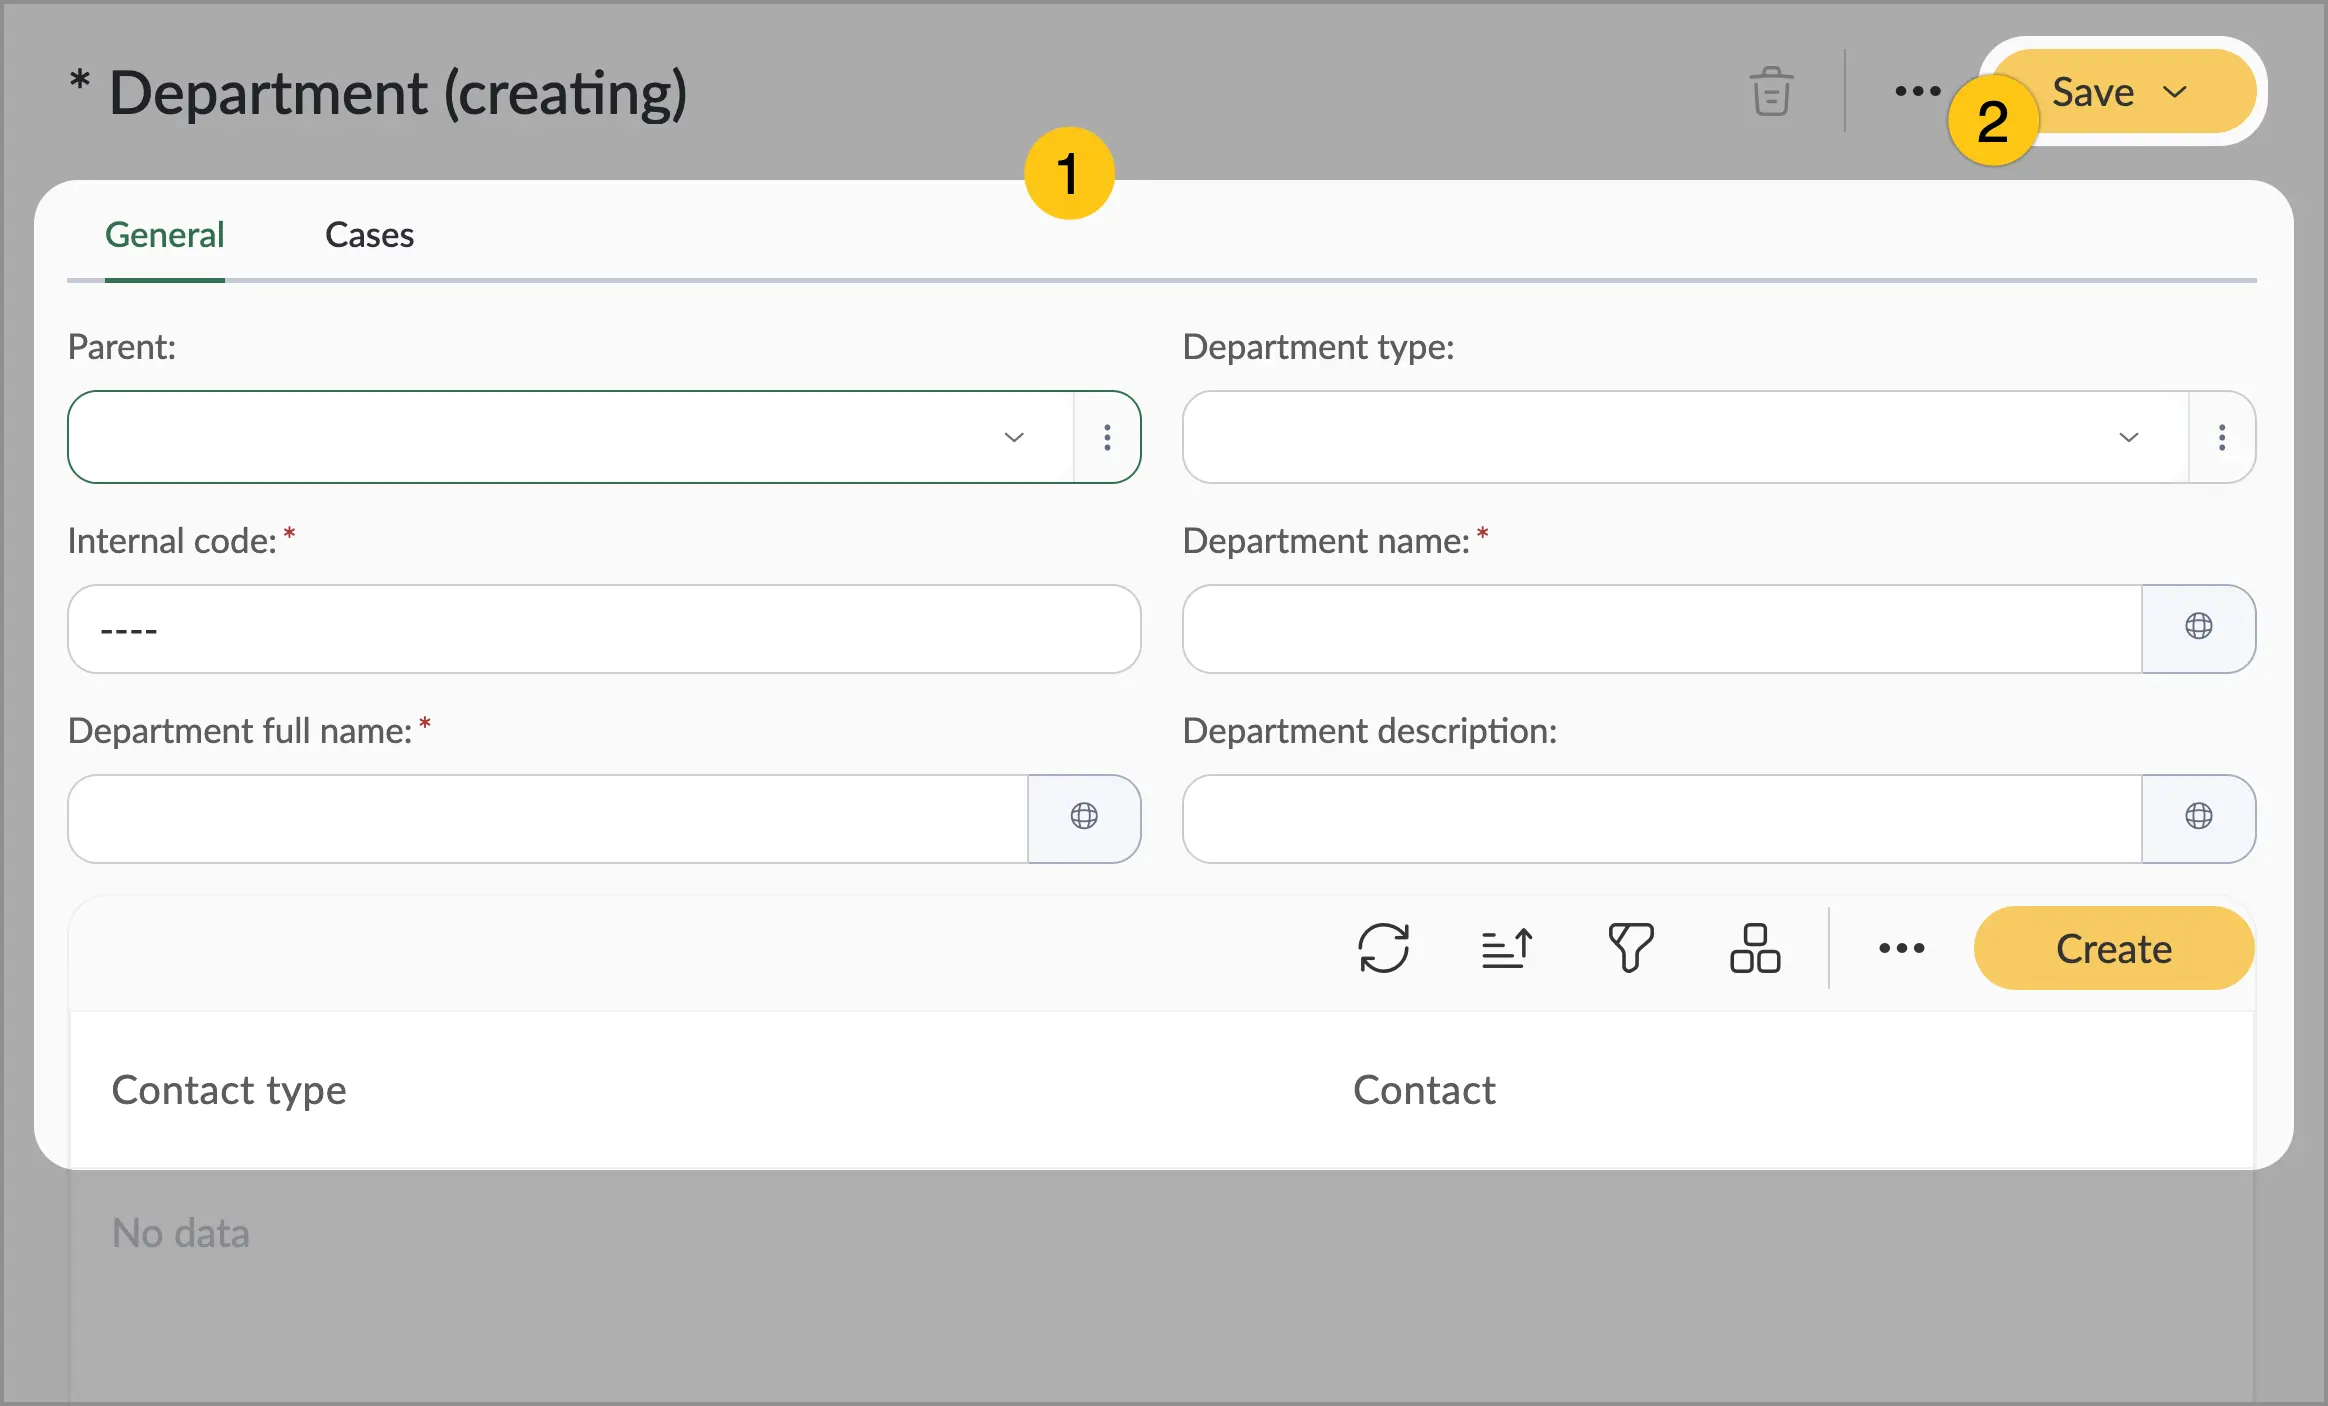
| Field Name | Description |
|---|---|
| Parent | Parent organization or department. In this field you can link the department to a parent organization or department previously created in the system. |
| Internal Code* |
|
| Department Full Name* | Full official name of the department. Example: "Human Resources and Personnel Management Department". ℹ️ Note: You can set different name variants for different languages. To do so, select the icon and fill in the fields for other languages. |
| Department Type | Select the required department type from the list. You can create custom department types, for example "Directorate", "Division", "Department", "Sector". To add a new department type, select , then select Add New. Fill in the fields, then select Save in the top menu. |
| Department Name* | Short name of the department. The name must not contain quotes or abbreviations. Example: "HR Department". ℹ️ Note: You can set different name variants for different languages. To do so, select the icon and fill in the fields for other languages. |
| Department Description | Brief description of the department's functions and purpose. Example: "Responsible for recruitment, onboarding, and personnel development, and for maintaining HR records." ℹ️ Note: You can set different name variants for different languages. To do so, select the icon and fill in the fields for other languages. |
| Department Contacts | Department contact details. To add, select Create, then choose one of the contact types:
|
Fields marked with * are required.
- In the toolbar, select Save.
1.8.3. Create a Position
-
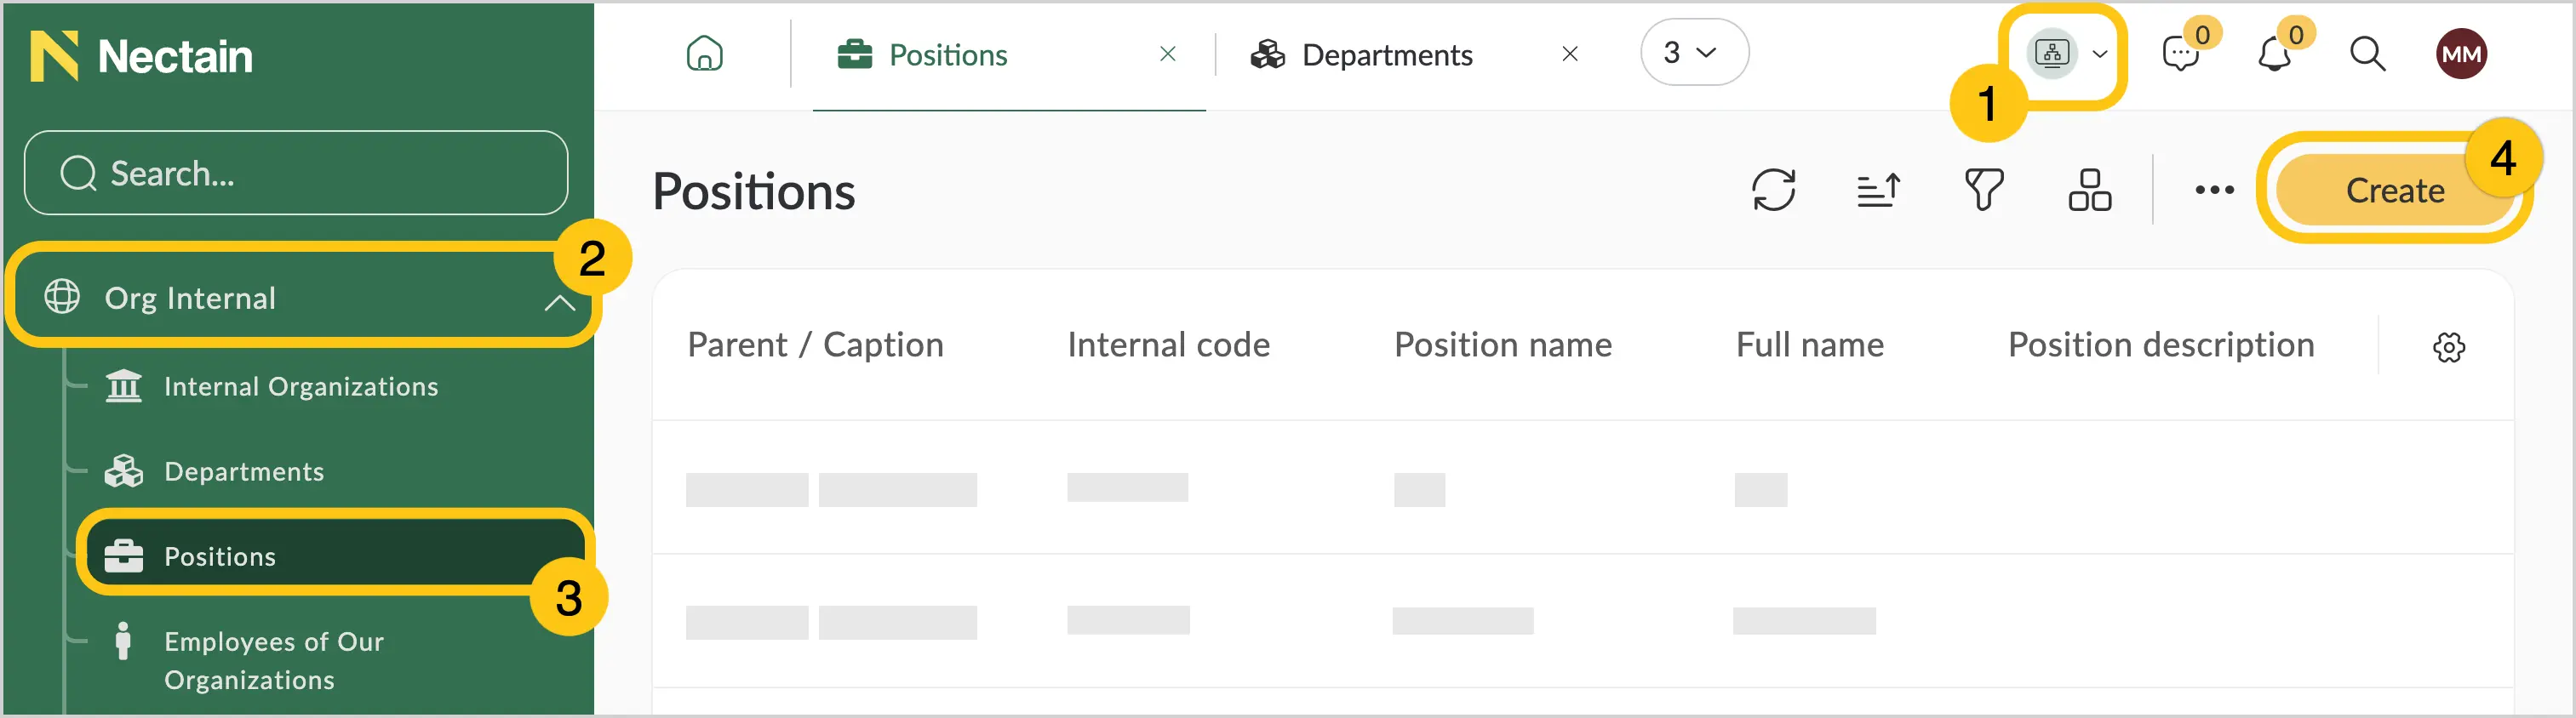
In the navigation panel, select the Organizational Structure desktop 1.
-
Select the Org. Internal shortcut group 2, then select the Positions shortcut 3.
-
In the toolbar, select Create 4.
-
Fill in the fields using the hints in the table below, then select Save.
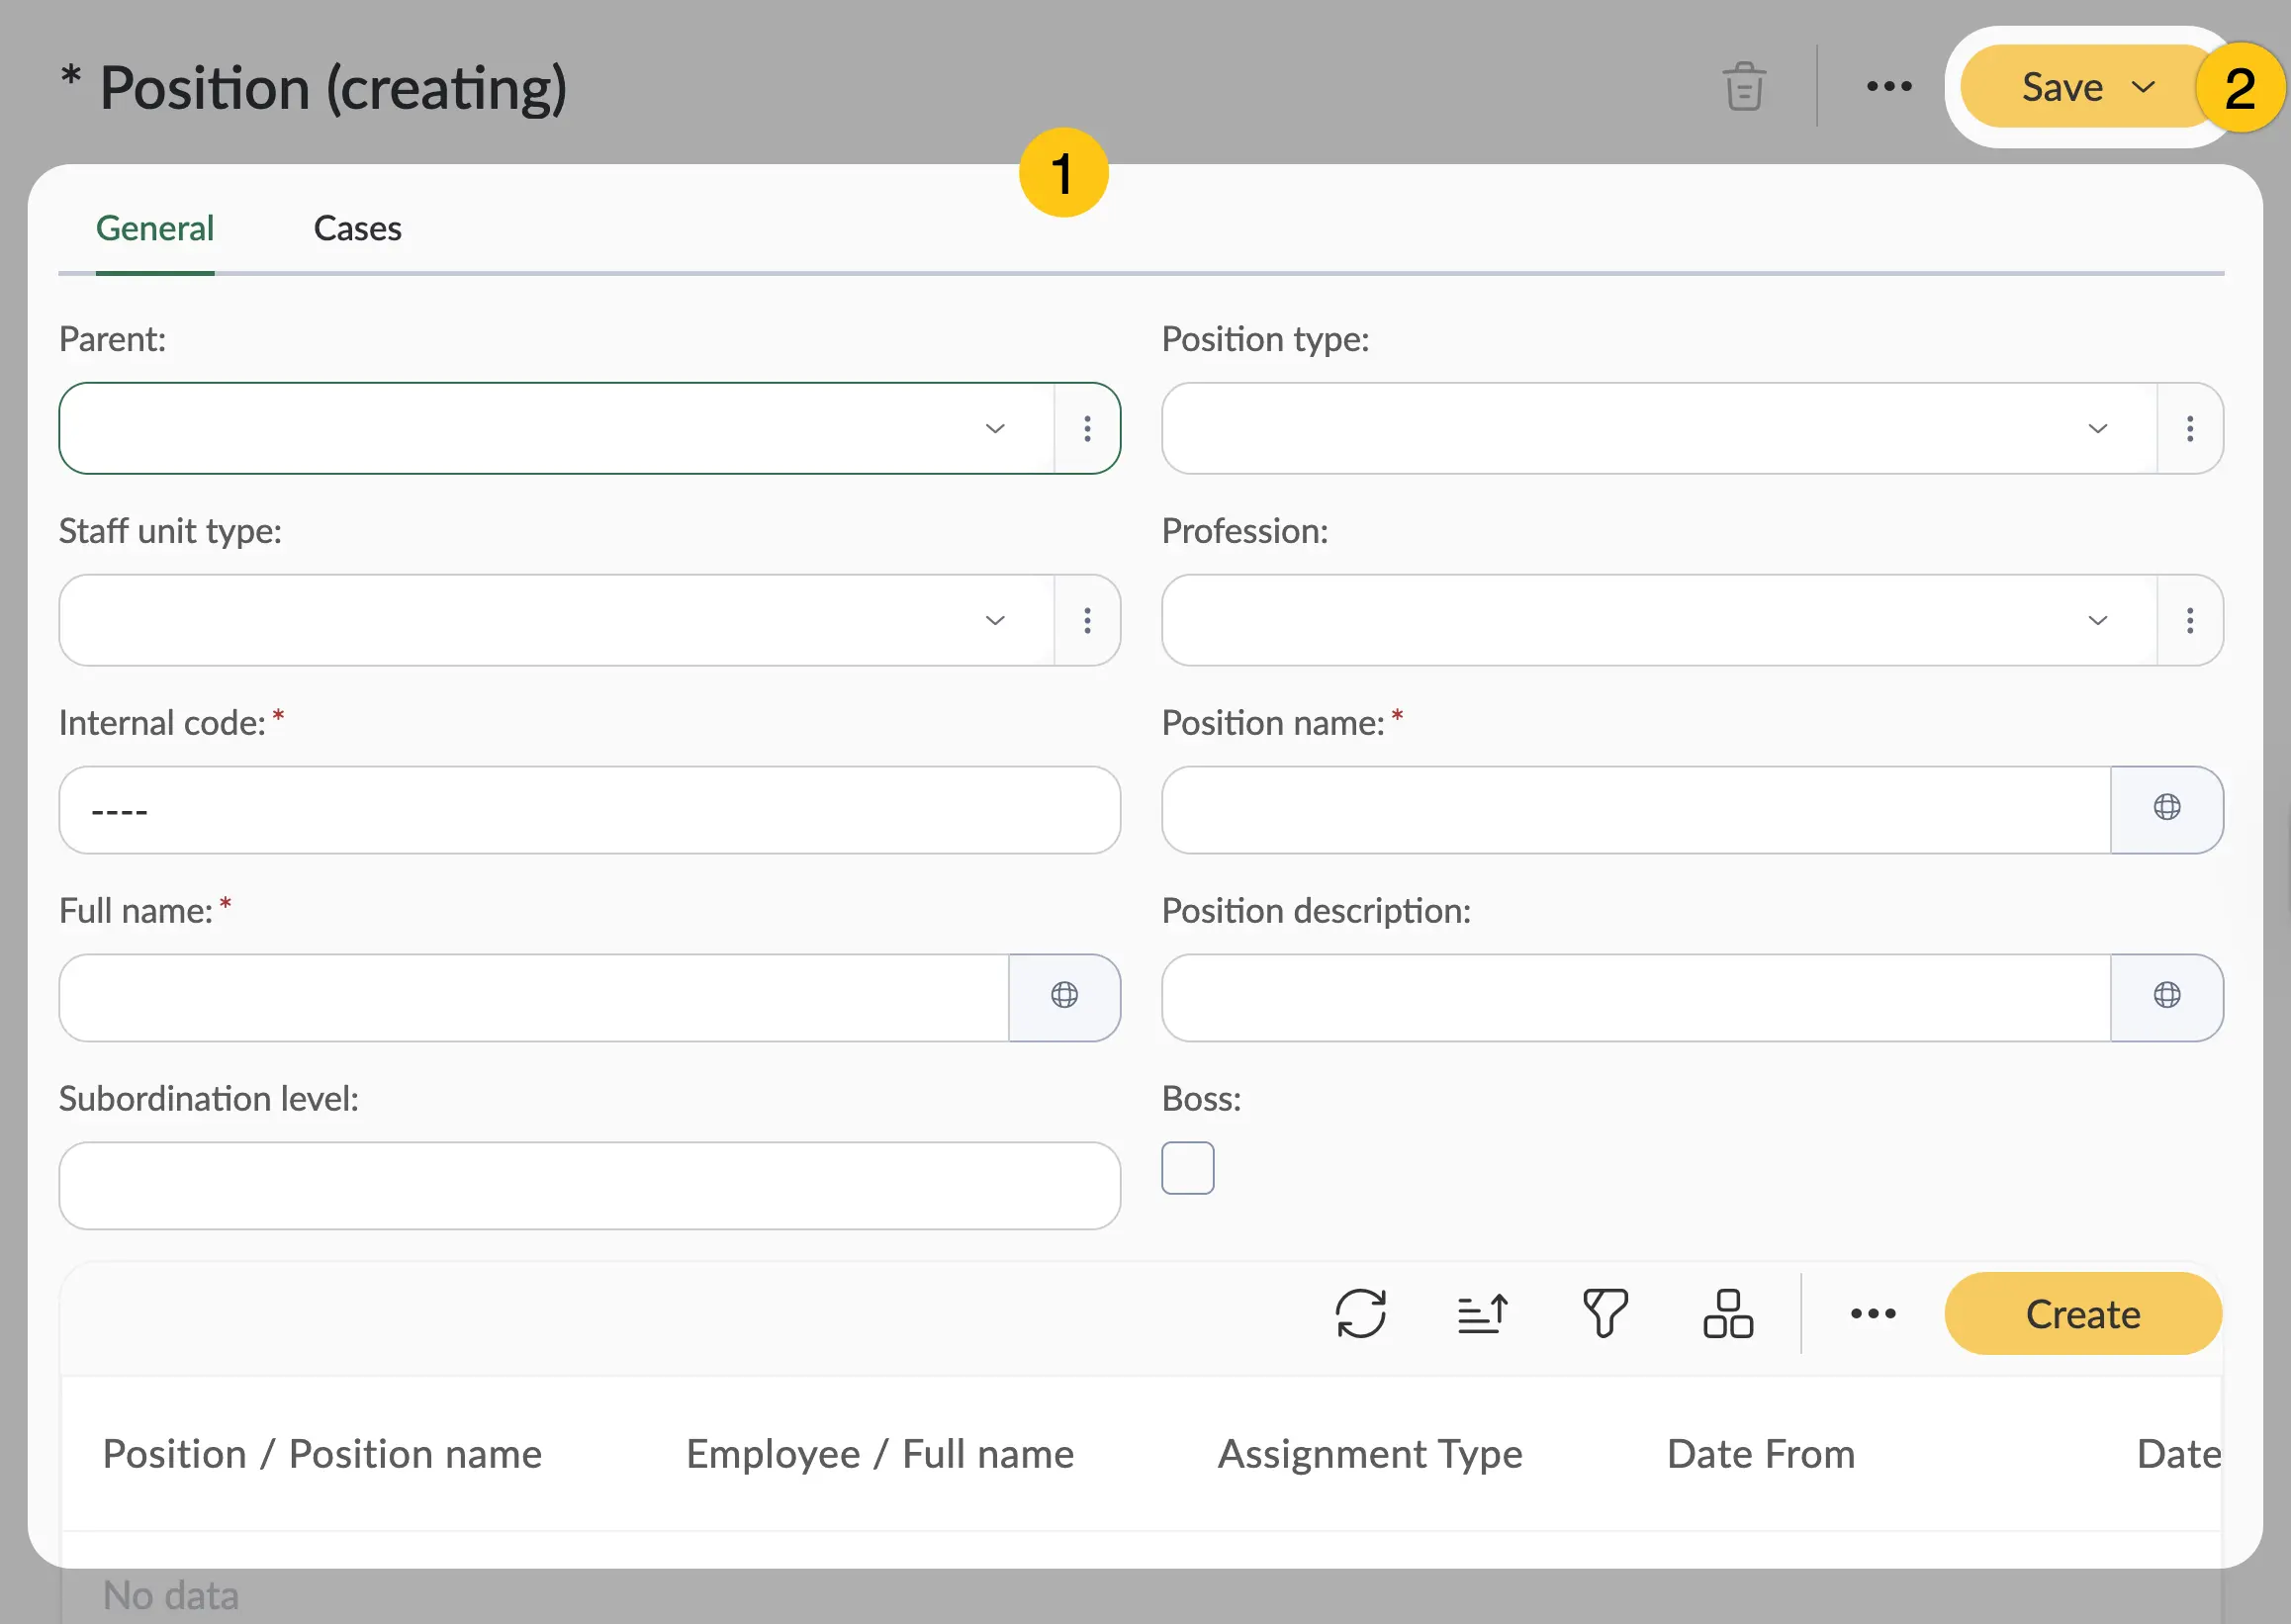
| Field Name | Description |
|---|---|
| Parent | Parent organization or department. In this field you can link the department to a parent organization or department previously created in the platform. |
| Position Type | Select the required position type from the list. You can create custom position types, for example "Accountants", "Lawyers", "Finance Specialists". To add a position type, select, then select Add New. Fill in the fields, then select in the top menu. |
| Staff Unit Type | Select the required staff unit type from the list. You can create custom staff unit types, for example "Management", "Workers", "Specialists". Alternatively, you can use this parameter to indicate a work rate, for example by creating types such as "Full-time" and "Part-time". To add a staff unit type, select, then select Add New. Fill in the fields, then select in the top menu. |
| Profession | Select the required profession from the list. You can create custom professions, for example "Marketer", "Designer", "QA Engineer". To add a profession, select, then select Add New. Fill in the fields, then select in the top menu. |
| Internal Code* |
|
| Position Name* | Short position name, for example "Senior Graphic Designer" or "Junior Content Marketing Manager". ℹ️ Note: You can set different name variants for different languages. To do so, select the icon and fill in the fields for other languages. |
| Full Name* | Full position name, for example "Senior Graphic Designer of the Design Department" or "Junior Content Marketing Manager of the Marketing Department". ℹ️ Note: You can set different name variants for different languages. To do so, select the icon and fill in the fields for other languages. |
| Position Description | Enter a position description, for example, "Responsible for developing and implementing the content marketing strategy, creating and publishing content for various communication channels, and analyzing the effectiveness of content marketing campaigns". ℹ️ Note: You can set different name variants for different languages. To do so, select the icon and fill in the fields for other languages. |
| Subordination Level | Enter the required subordination level for the position, for example "3" (assuming 1 is the CEO level, 2 is department heads). |
| Boss | Enable the toggle if you want to make this position a managerial position within the department specified as the parent element. |
Fields marked with * are required.
- In the toolbar, select Save.
1.8.4. Create an Employee
-
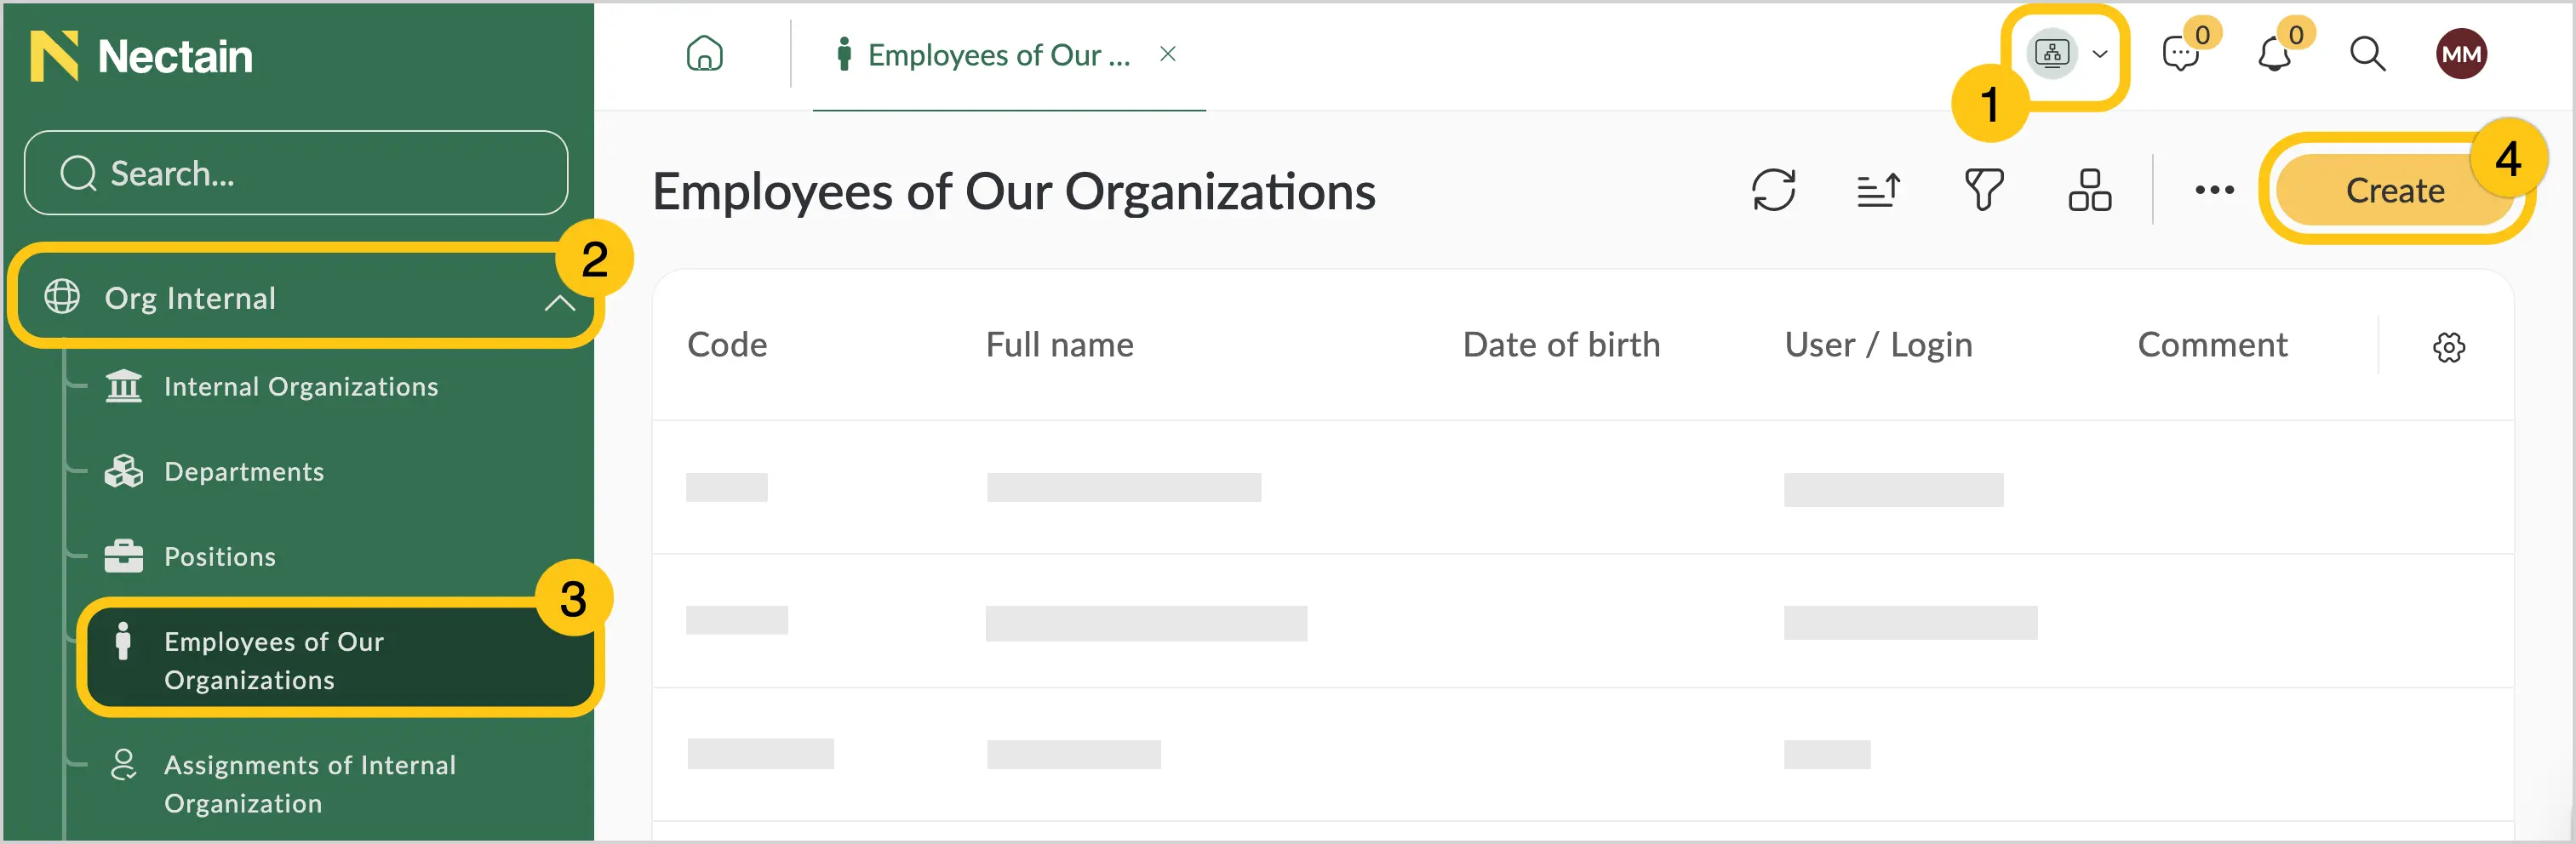
In the navigation panel, select the Organizational Structure desktop 1.
-
Select the Org. Internal shortcut group 2, then select the Employees of Our Organization shortcut 3.
-
In the toolbar, select Create 4.
-
Fill in the fields using the hints in the table below, then select Save.
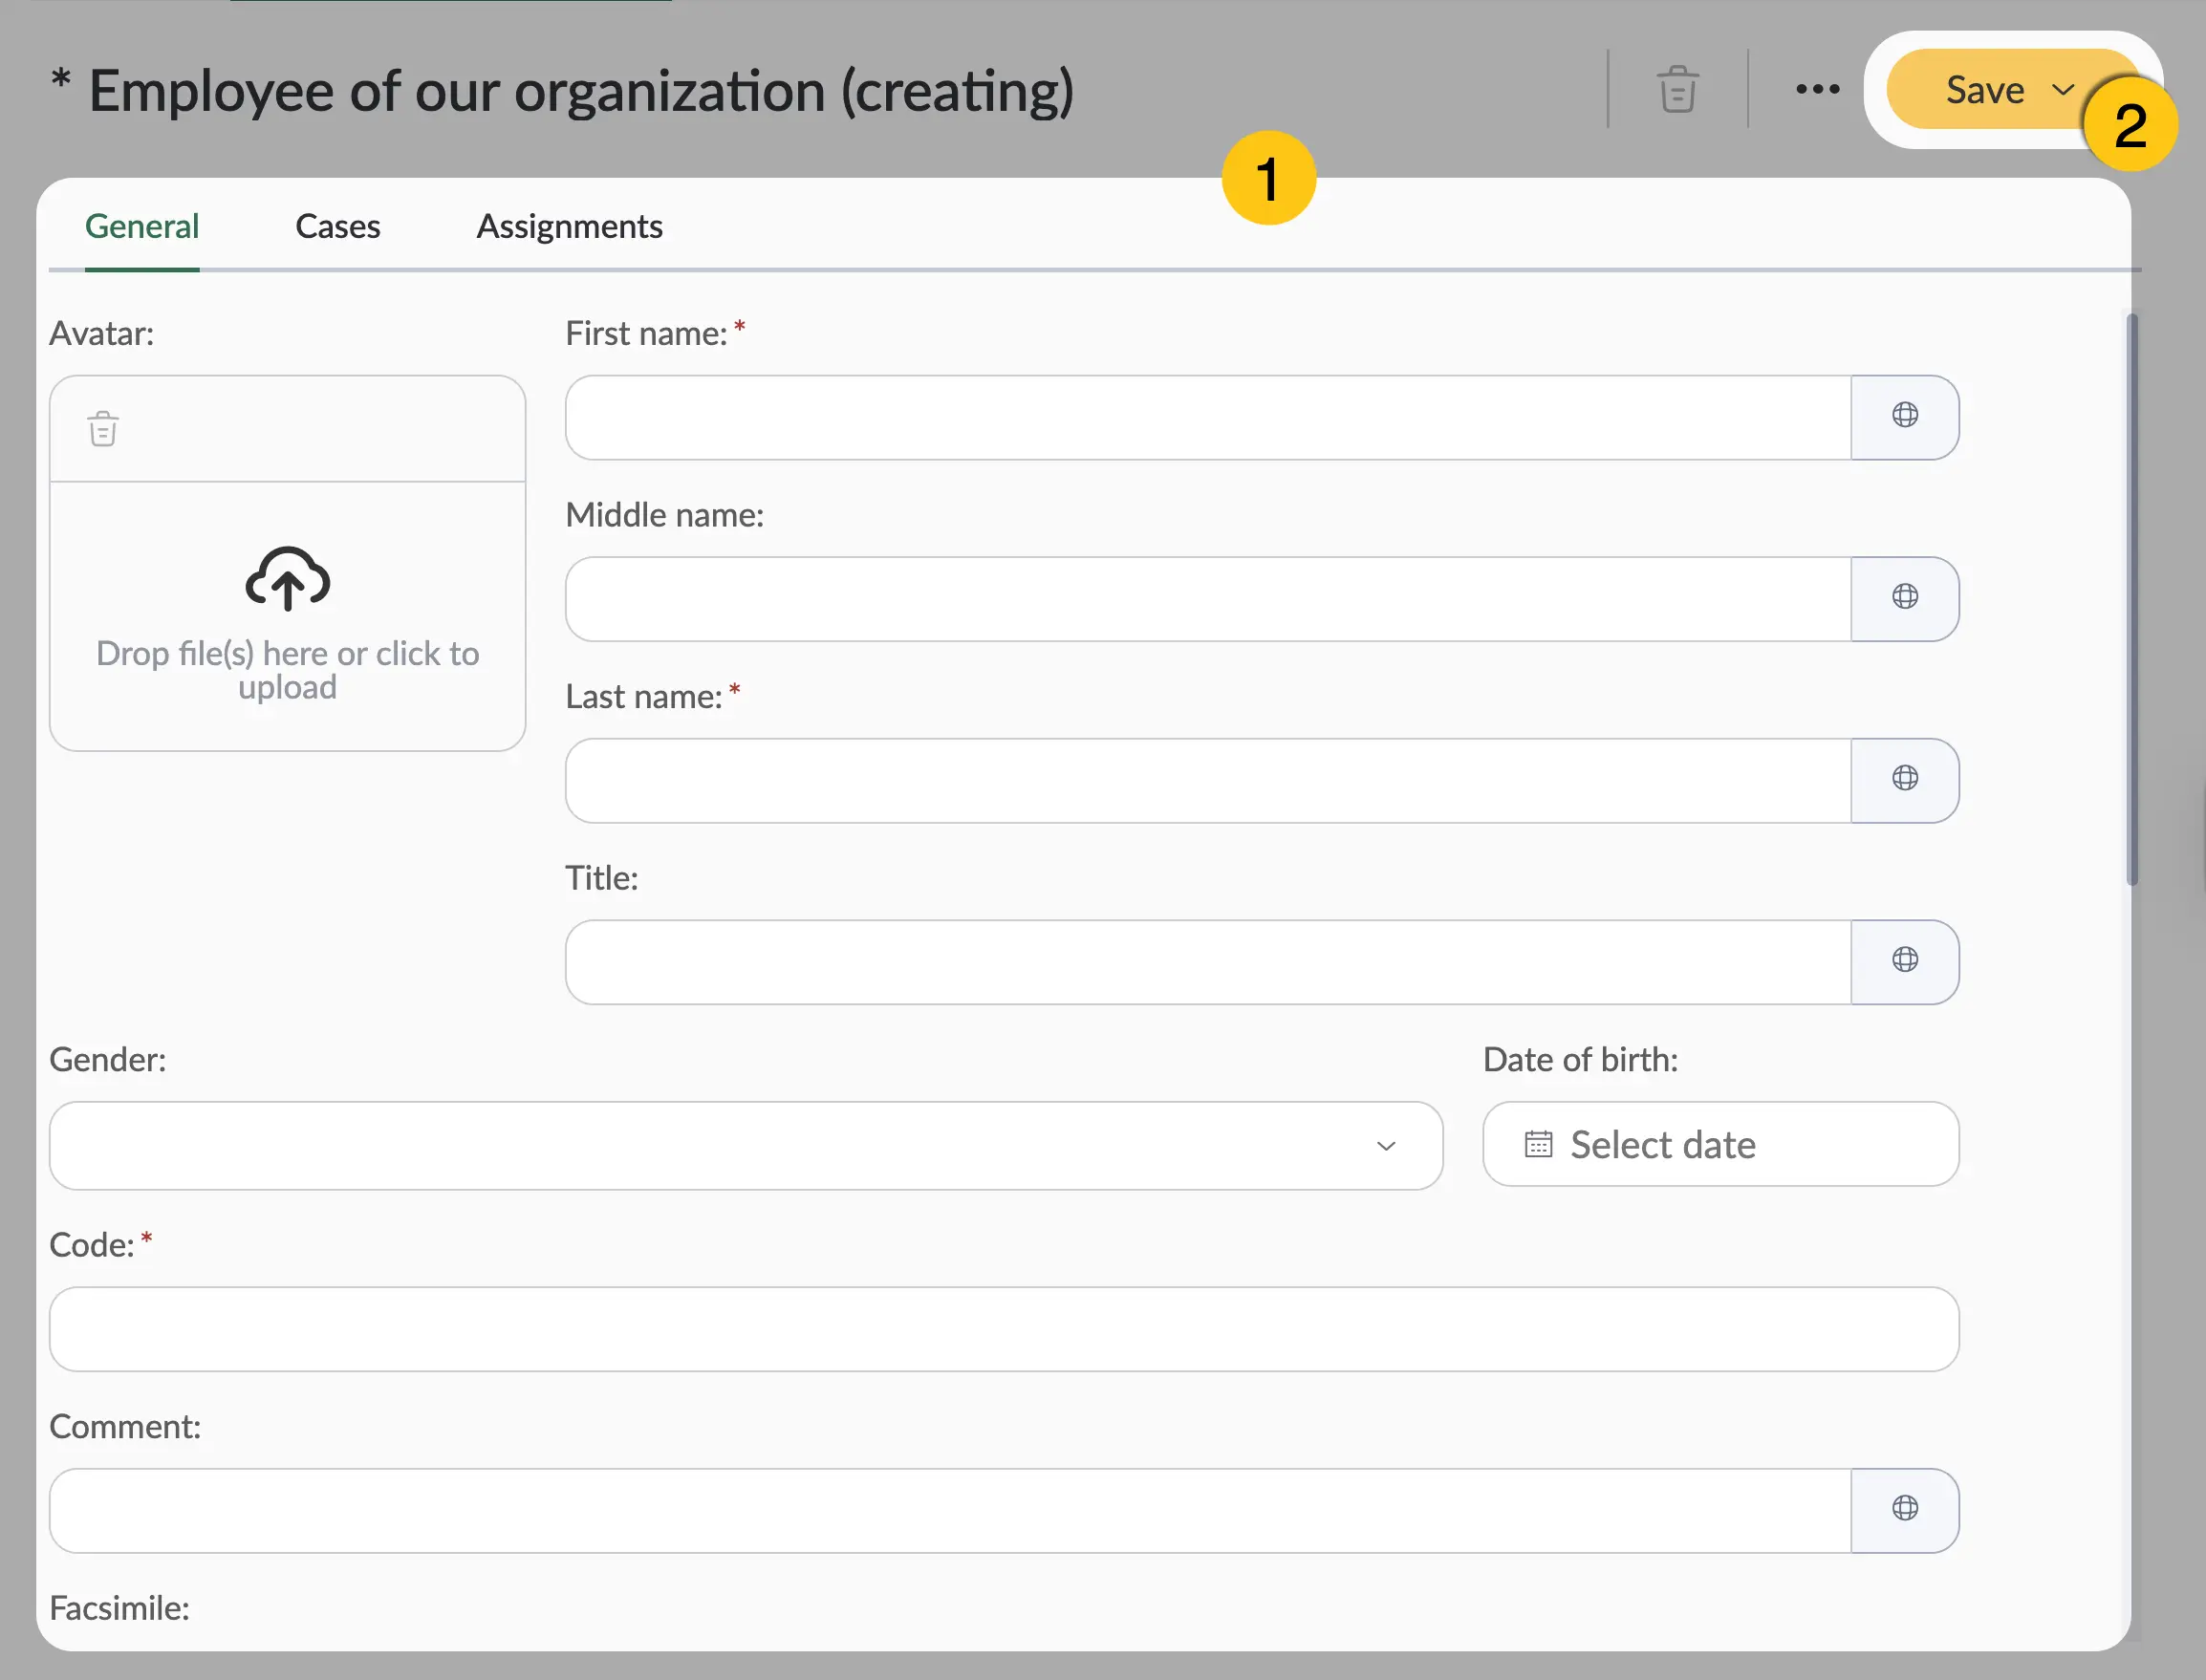
| Field Name | Description |
|---|---|
| Avatar | Upload a photo of the employee. Recommended format: JPG or PNG, size up to 2 MB. A square image is preferred for better display, size should be approximately 200 × 200 px. |
| First Name* ** | Enter the employee's official first name. Example: "Alexander". Use the full name, avoid diminutive forms. |
| Middle Name* ** | Enter the employee's middle name or patronymic. If you do not wish to use a middle name, leave the field empty. |
| Last Name* ** | Enter the employee's last name. |
| Salutation* ** | Select a form of address: "Mr.", "Ms.", "Dr.", etc. This affects the automatic generation of salutations in documents. Example: "Mr. Alexander". |
| Gender | Select from the list: Male, Female, ?. Used for correct declension in documents. |
| Date of Birth | Employee's date of birth. |
| Code* |
|
| Comment* ** | If needed, add any additional information about the employee. Example: "Proficient in English at B2 level" or "Has access to confidential information". |
| Facsimile | Upload a scanned copy of the employee's signature. Format: PNG with transparent background. Used for automatic document signing. |
| Contacts | Employee contact details. To add, select +, then choose one of the contact types:
|
Fields marked with * are required.
Fields marked with "**" support setting alternative values for different languages. To do so, select the icon and fill in the fields for other languages.
1.8.5. Link an Employee to a User
After creating a user (see Create a User) and an employee (see Create an Employee), you need to link the employee to the user. To do so, follow these steps:
-
In the navigation panel, select the Organizational Structure desktop 1.
-
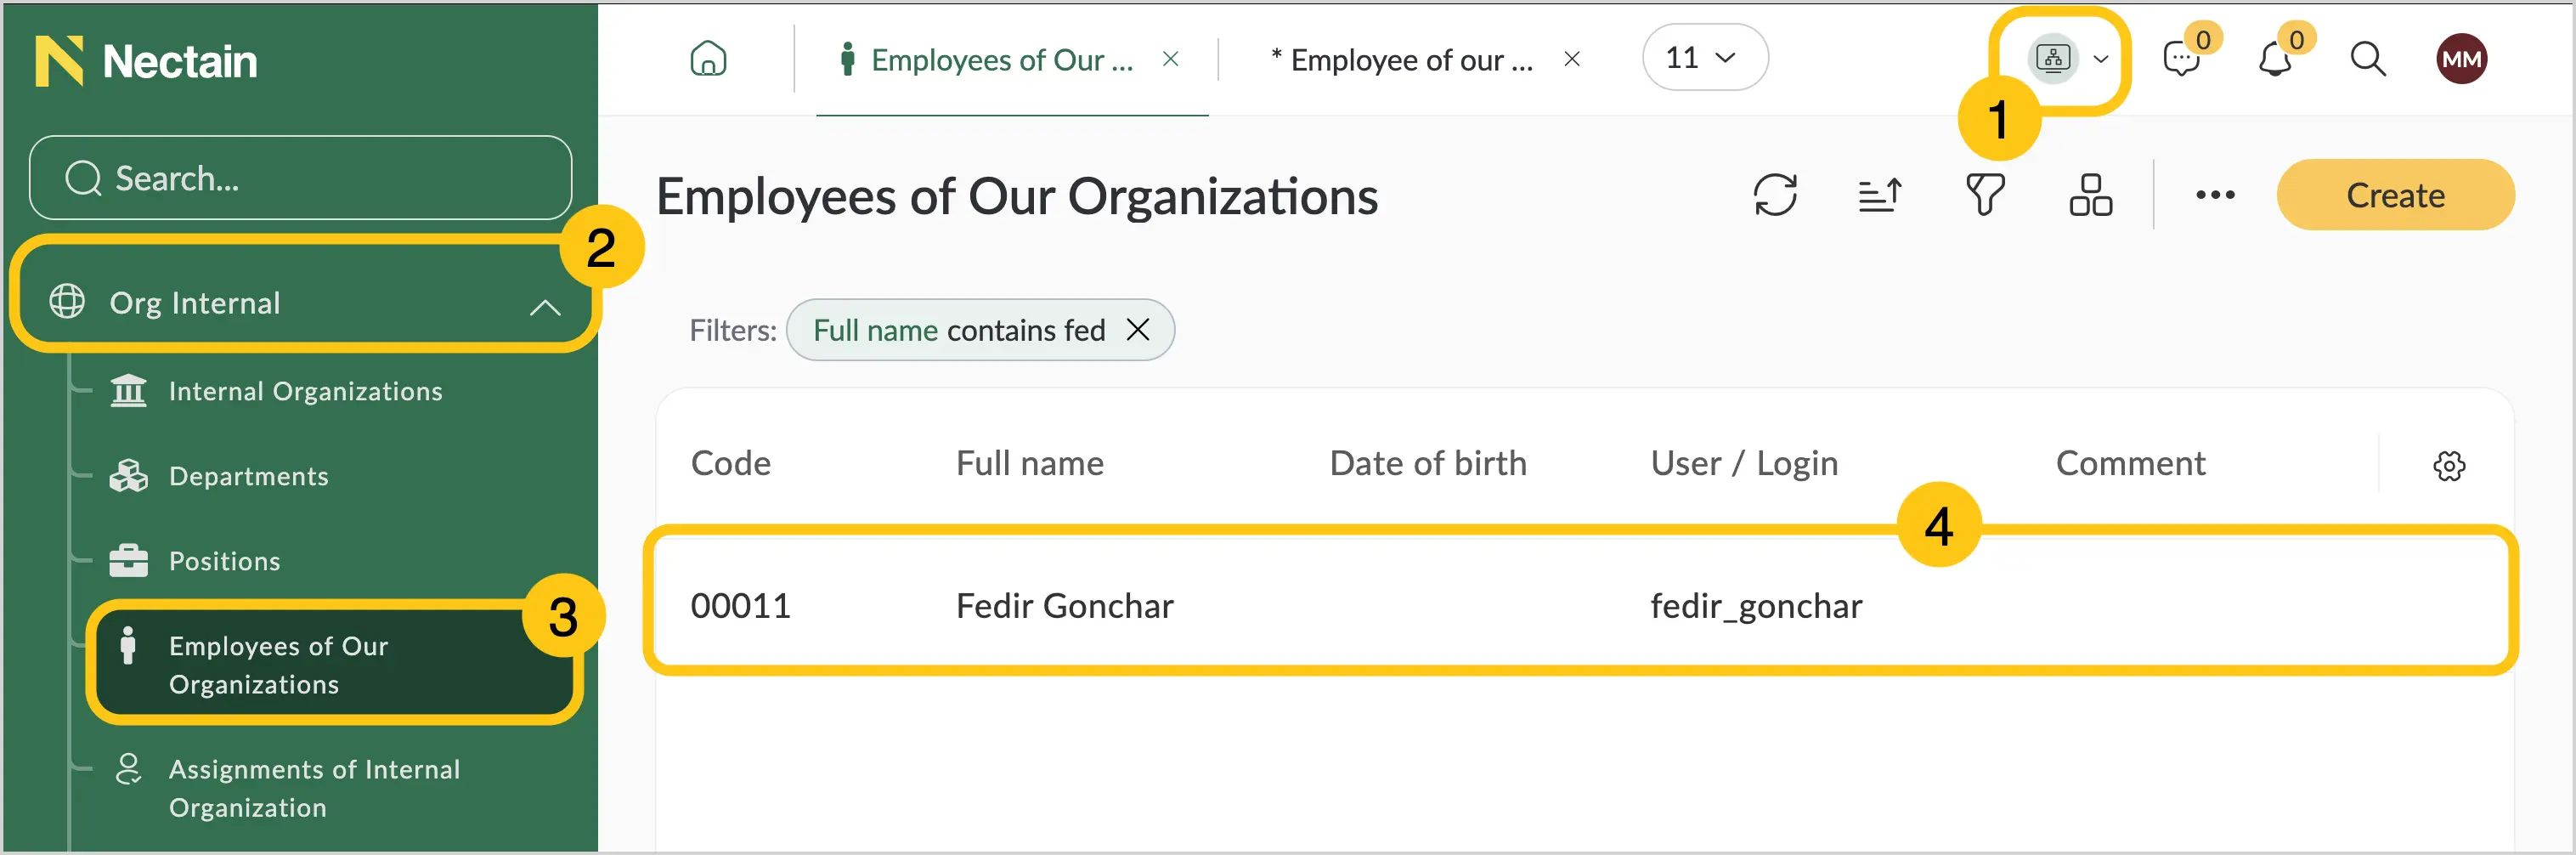
Select the Org. Internal shortcut group 2, then select the Employees of Our Organization shortcut 3.
-
Select the required employee by double-clicking the record.
-
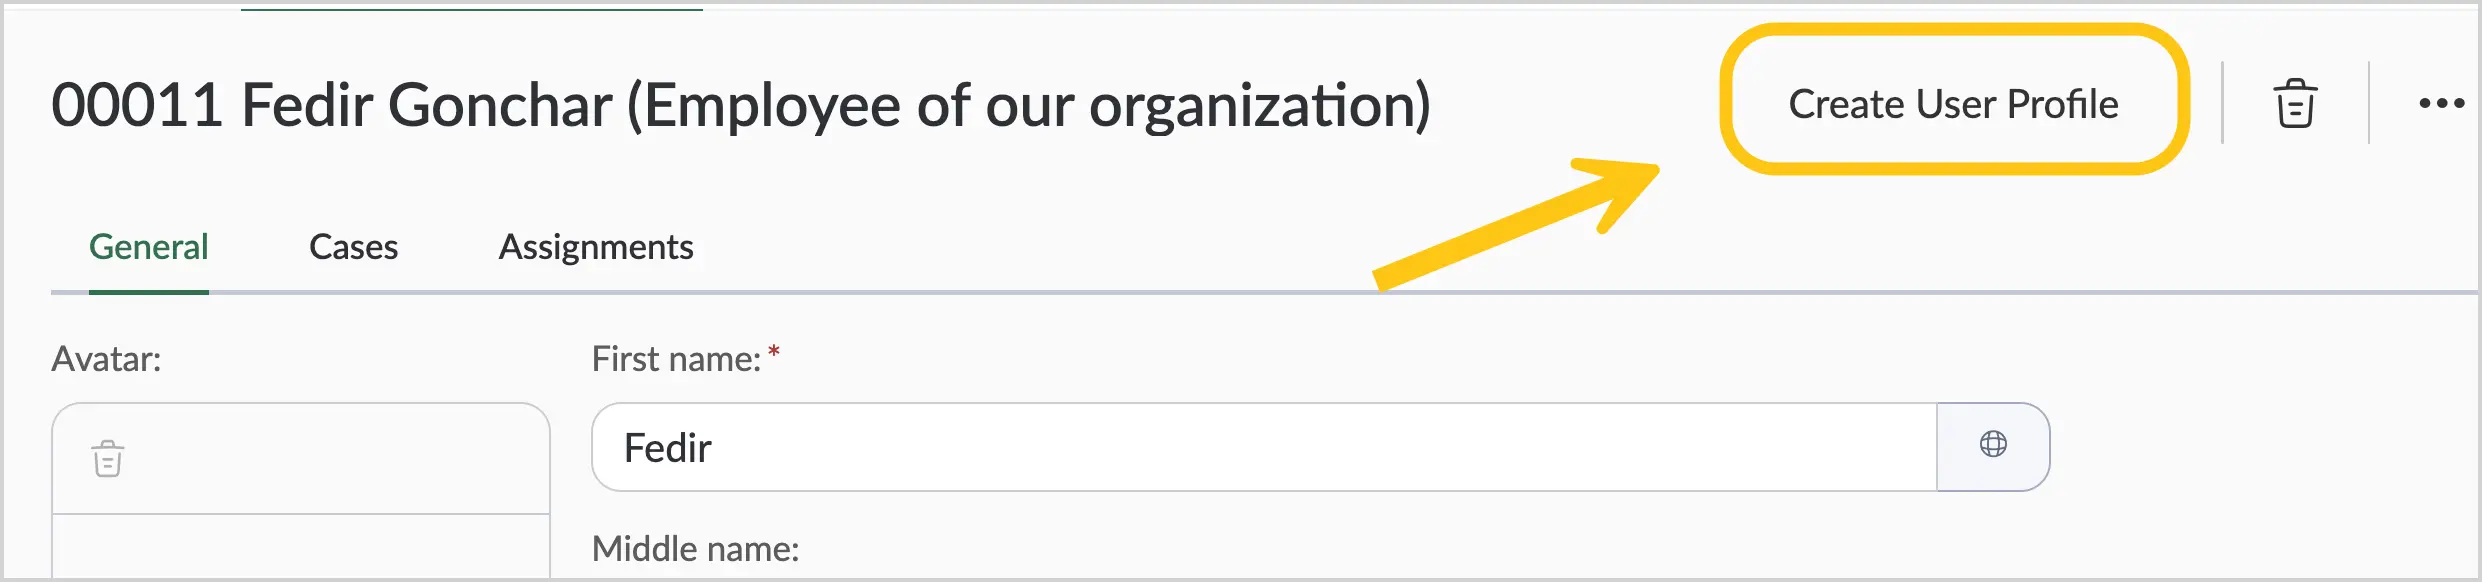
In the toolbar, select Create User Profile.
-
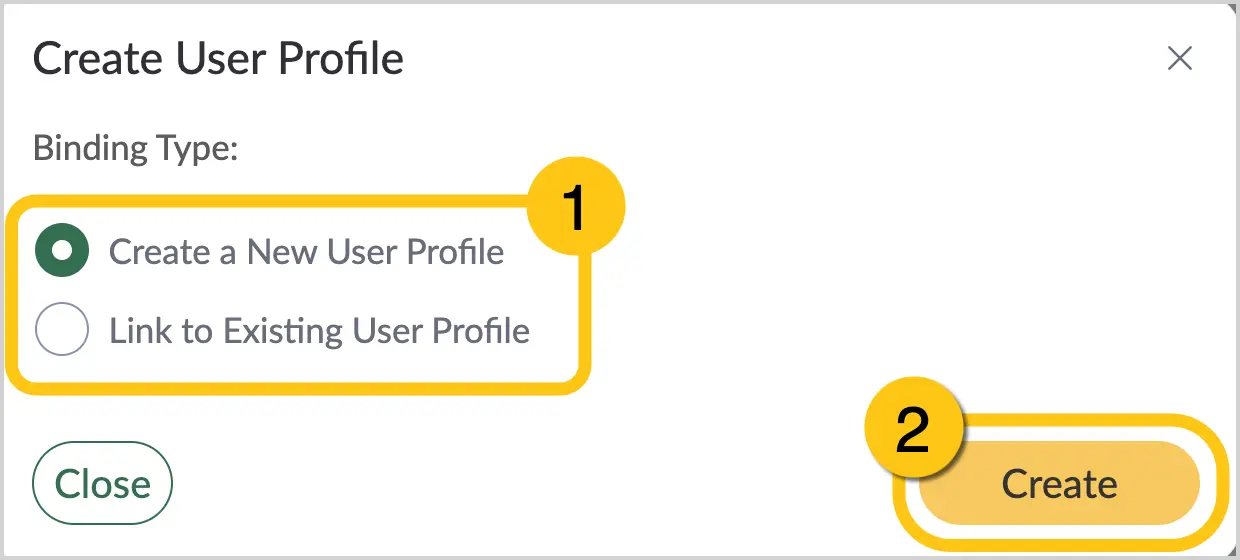
Select one of the following link types 1, then select the Create button 2:
-
Create a new user — by choosing this option, you can link the employee to a user who does not yet exist in the platform. A new user will be created based on the employee record you are linking.
-
Link to an existing user — by choosing this option, you can link the employee to a user who already exists in the platform.
Note:Only one employee can be linked to a user.
-
-
If in the previous step you selected Create a new user, fill in the fields 1 using the hints from the "Create User" table. Then select Save 2.
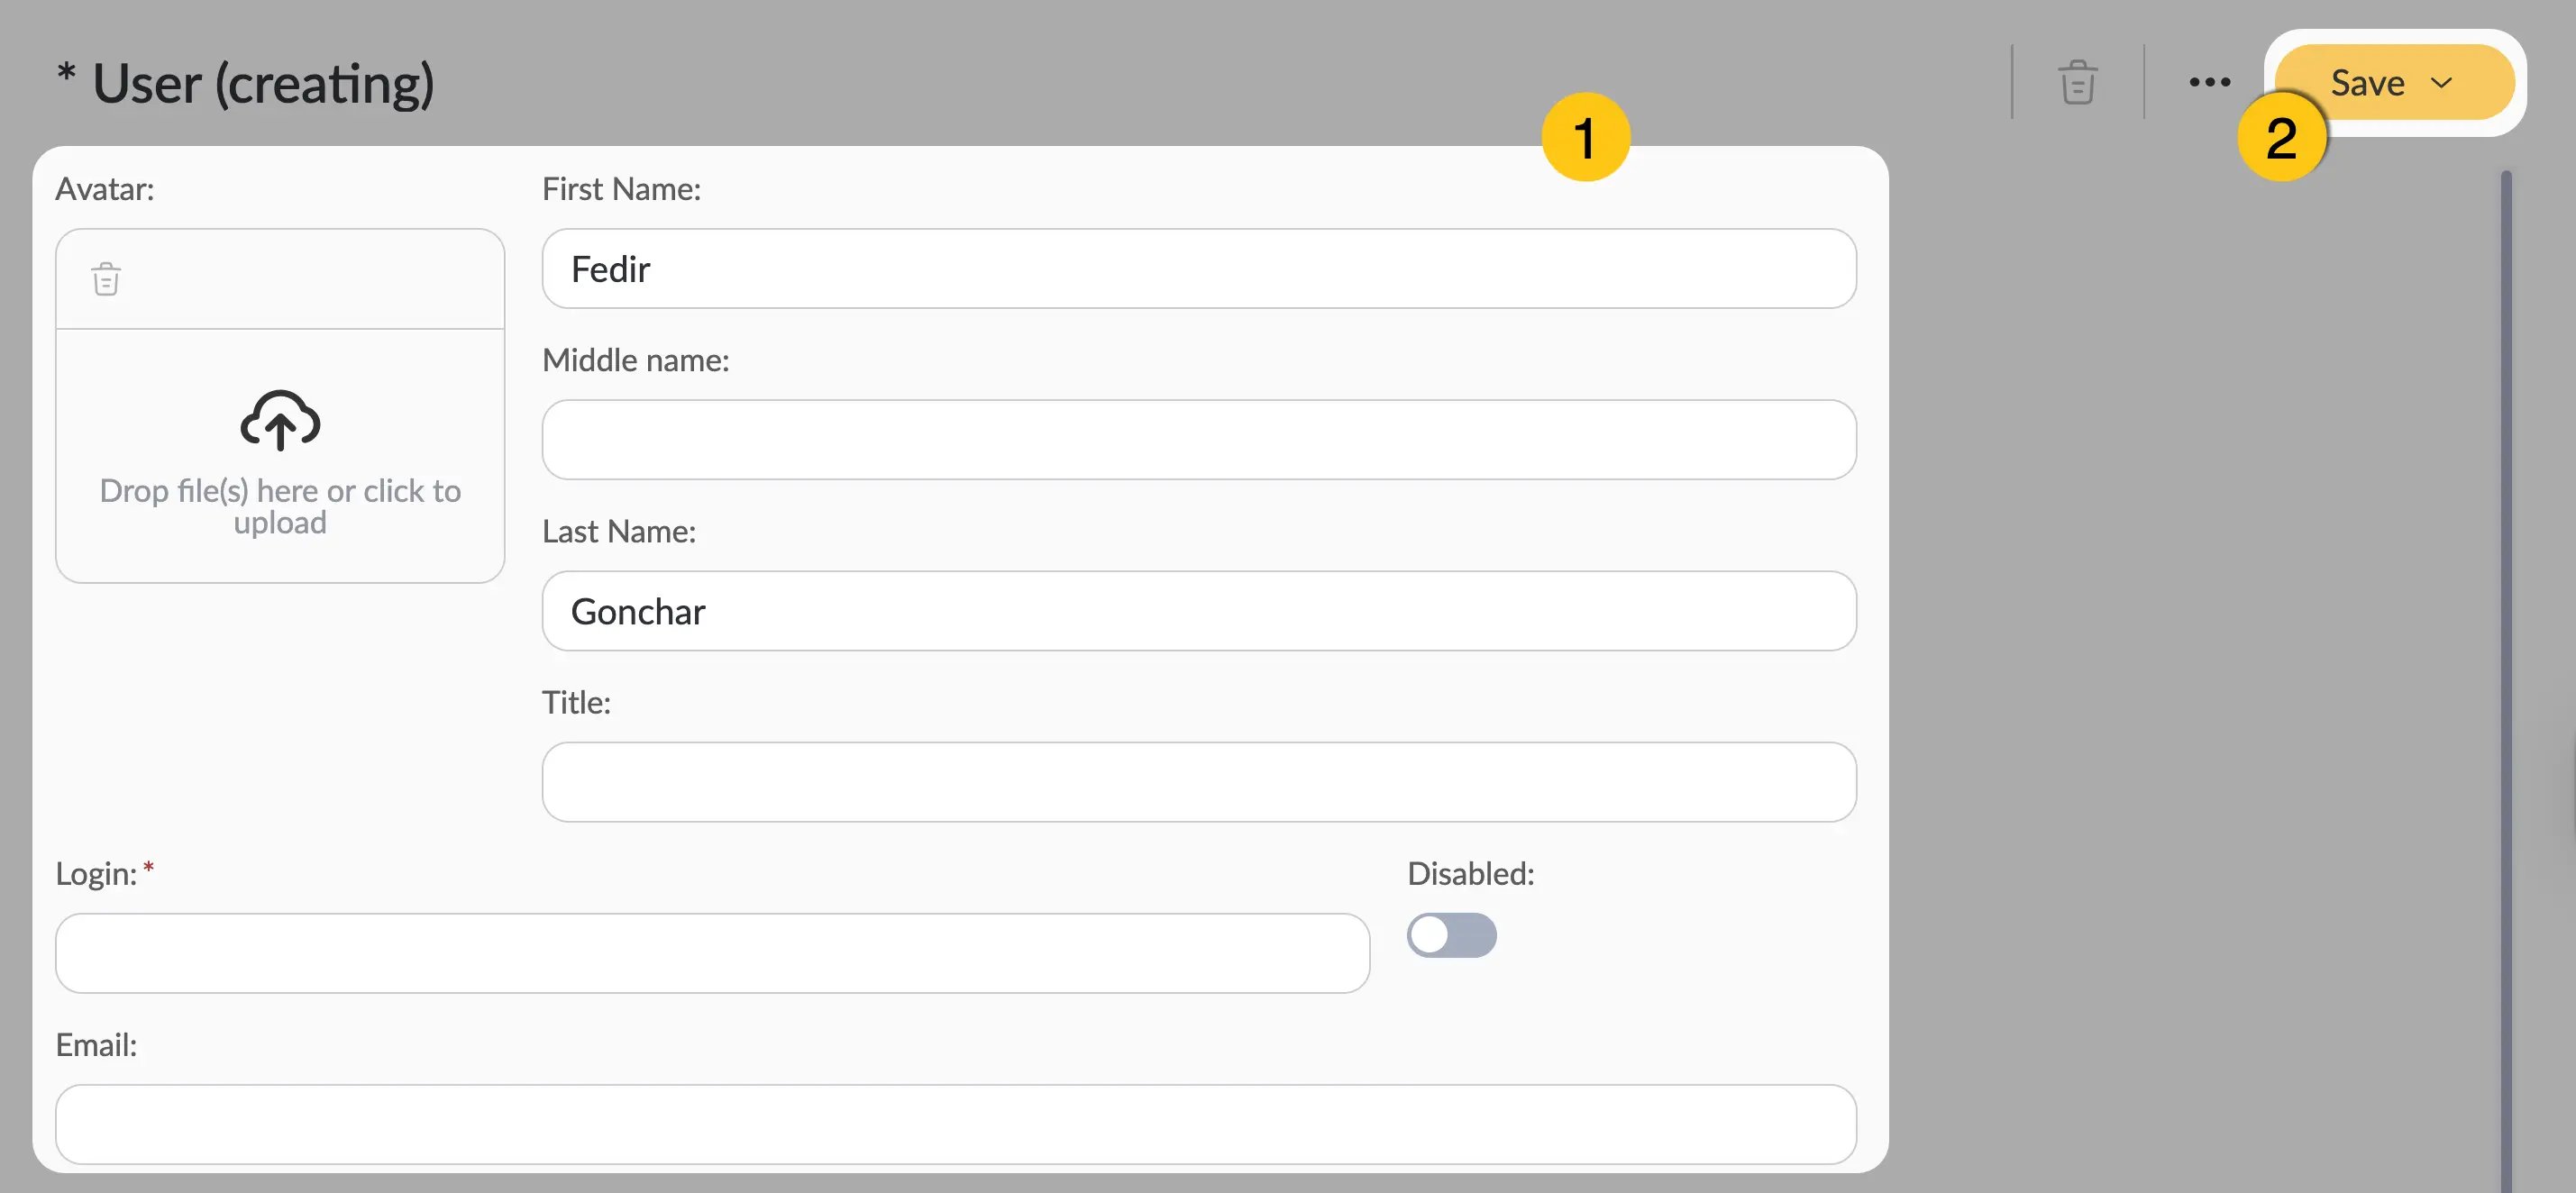
-
If in step 5 you selected Link to an existing user, then in the User field 1, select the required user from the list, then select Link 2.
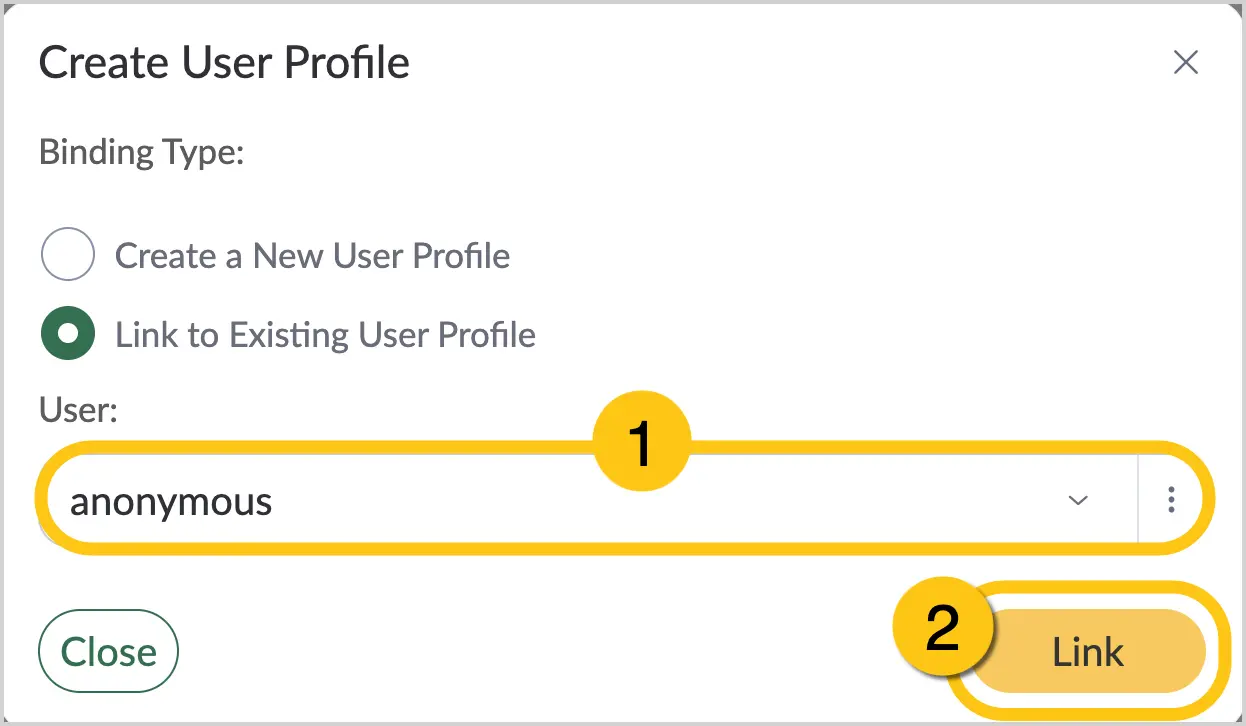
1.8.6. Unlink a User from an Employee
-
In the navigation panel, select the Administration desktop 1.
-
Select the Users and Groups shortcut group 2, then select the Users shortcut 3.
-
Open the user record 4 you want to unlink from an employee.
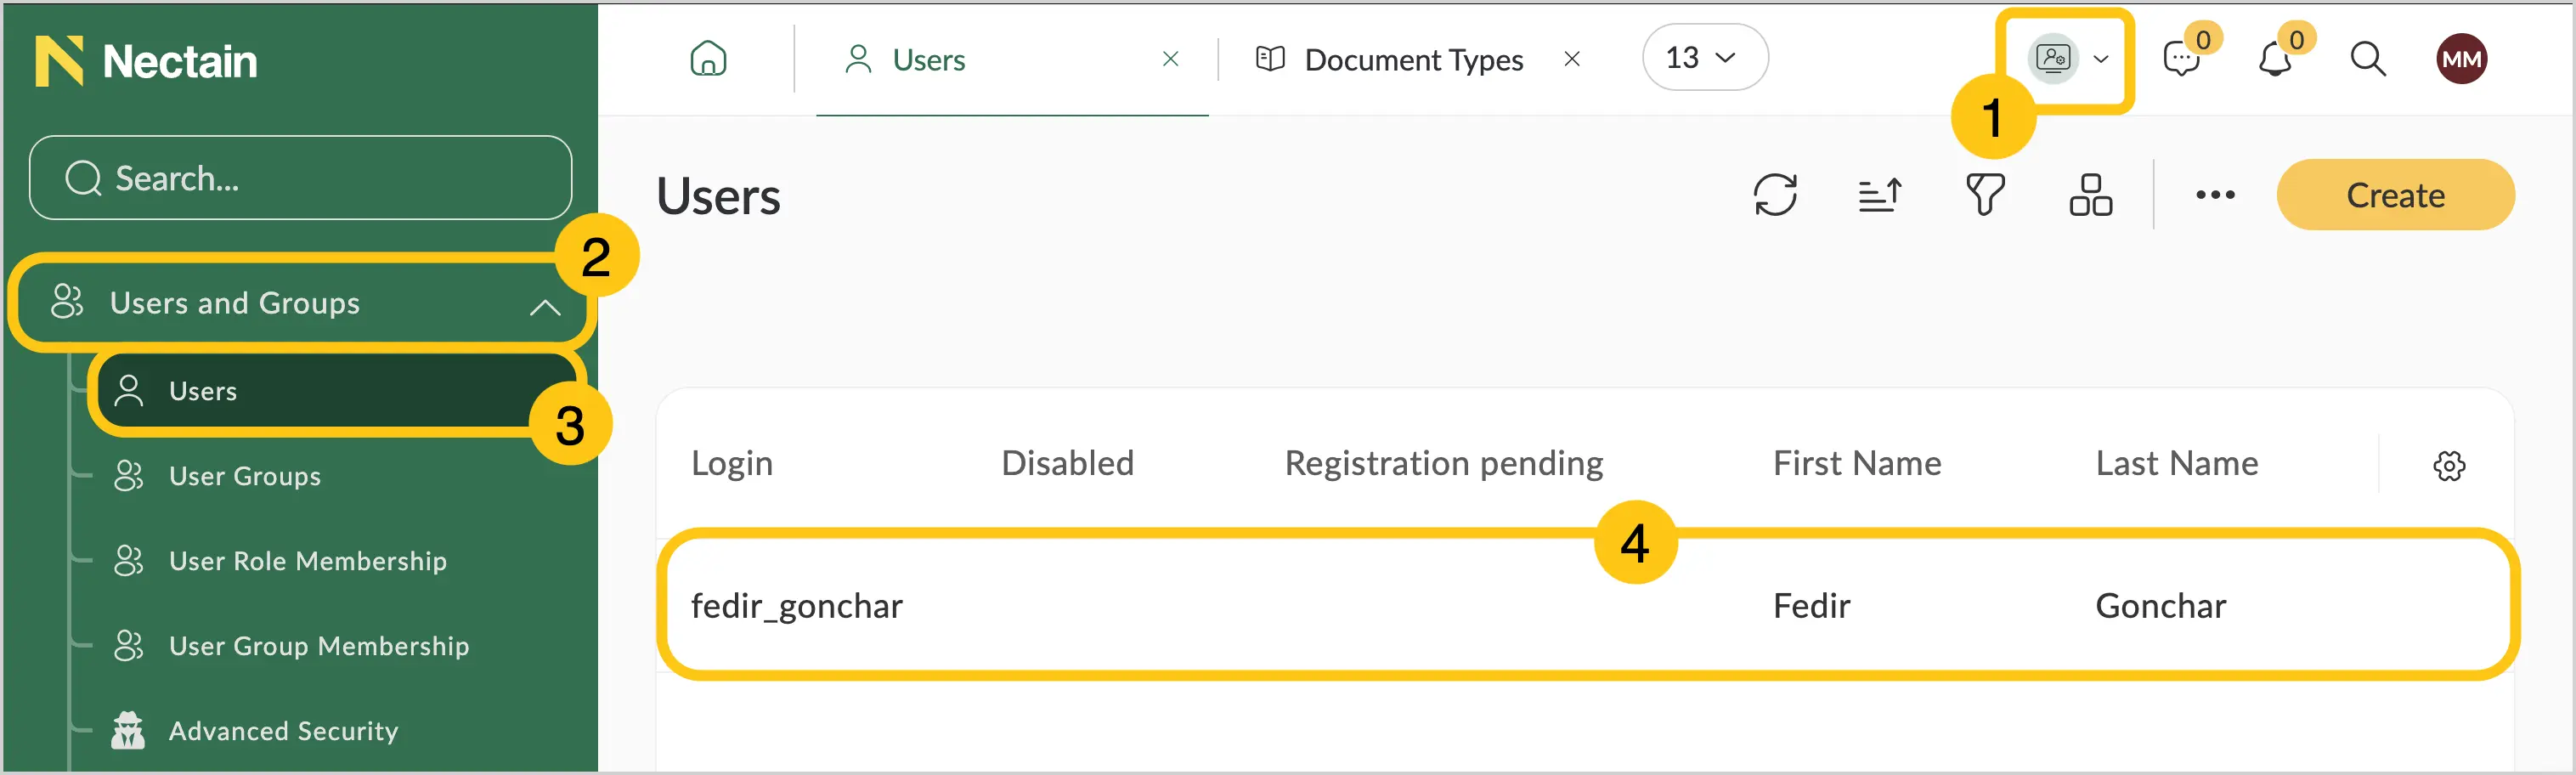
-
In the toolbar, select Open Employee Card.
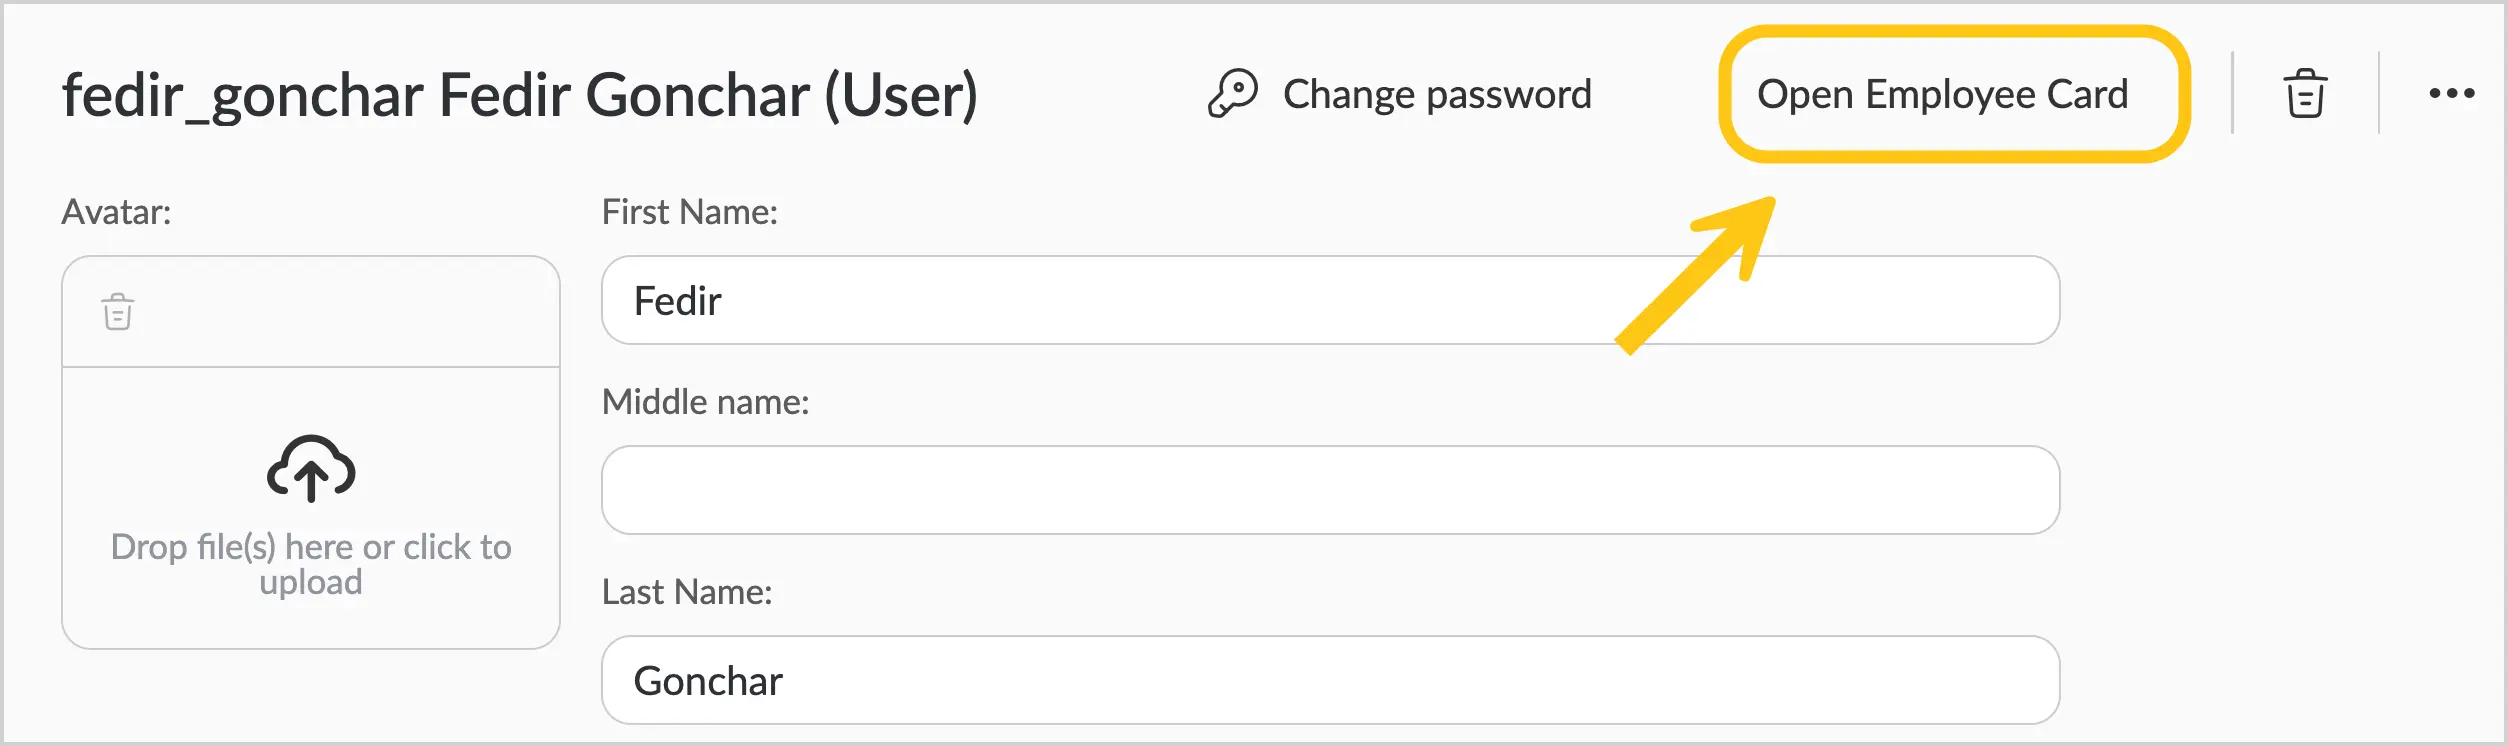
-
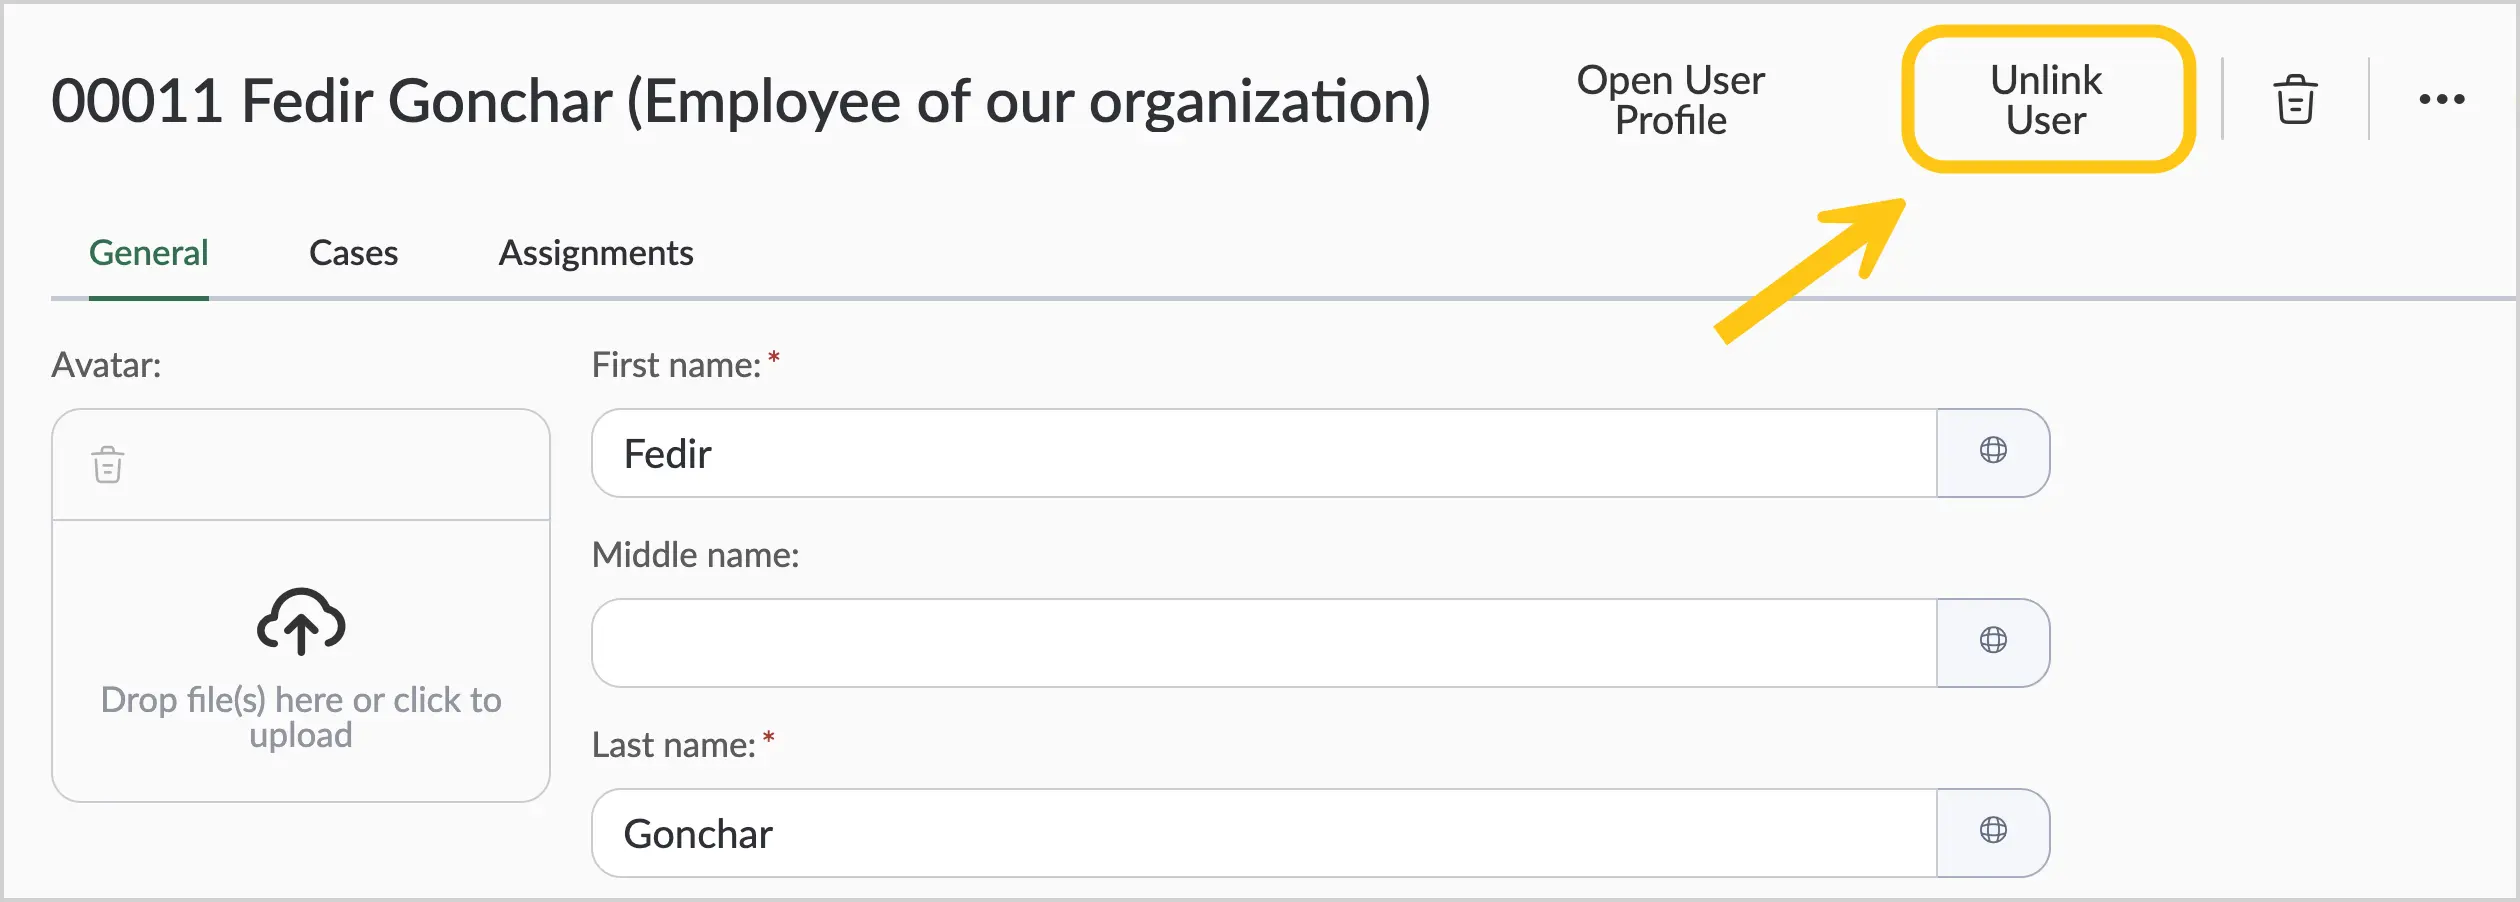
In the employee card, in the toolbar, select Unlink User.
-
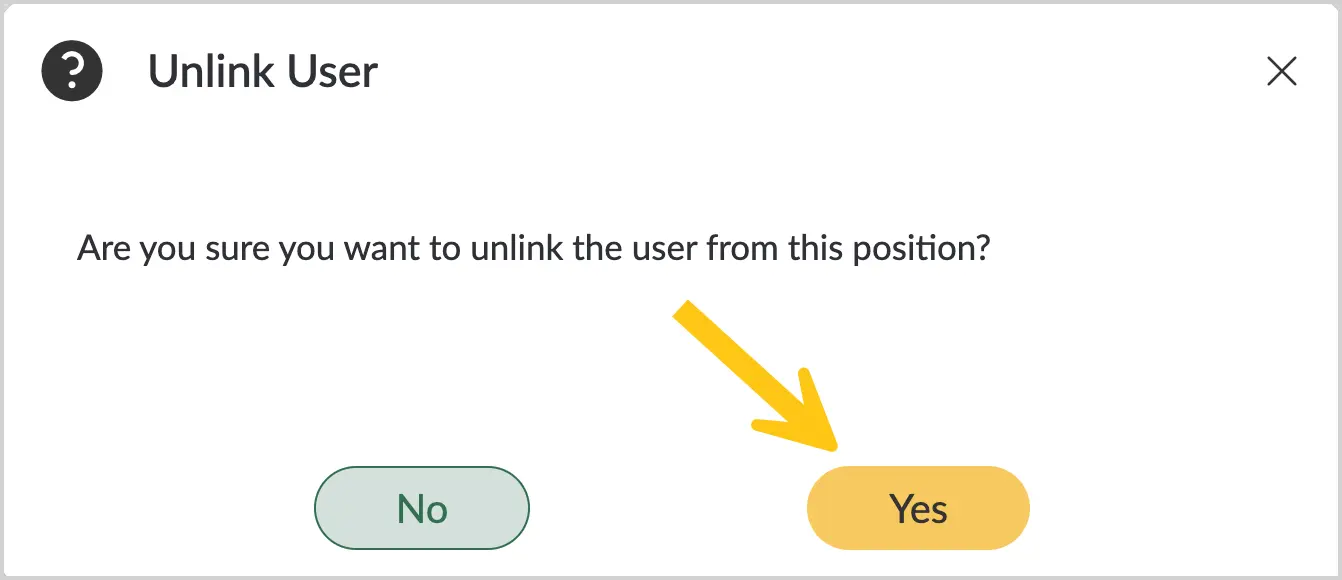
In the Unlink User dialog, select Yes.
1.8.7. Assign an Employee to a Position
Assigning an employee to a position means creating a link between a position and an employee (who is linked to a system user). This can be done in two ways:
1.8.7.1. First Method: Via the Assignments Shortcut
-
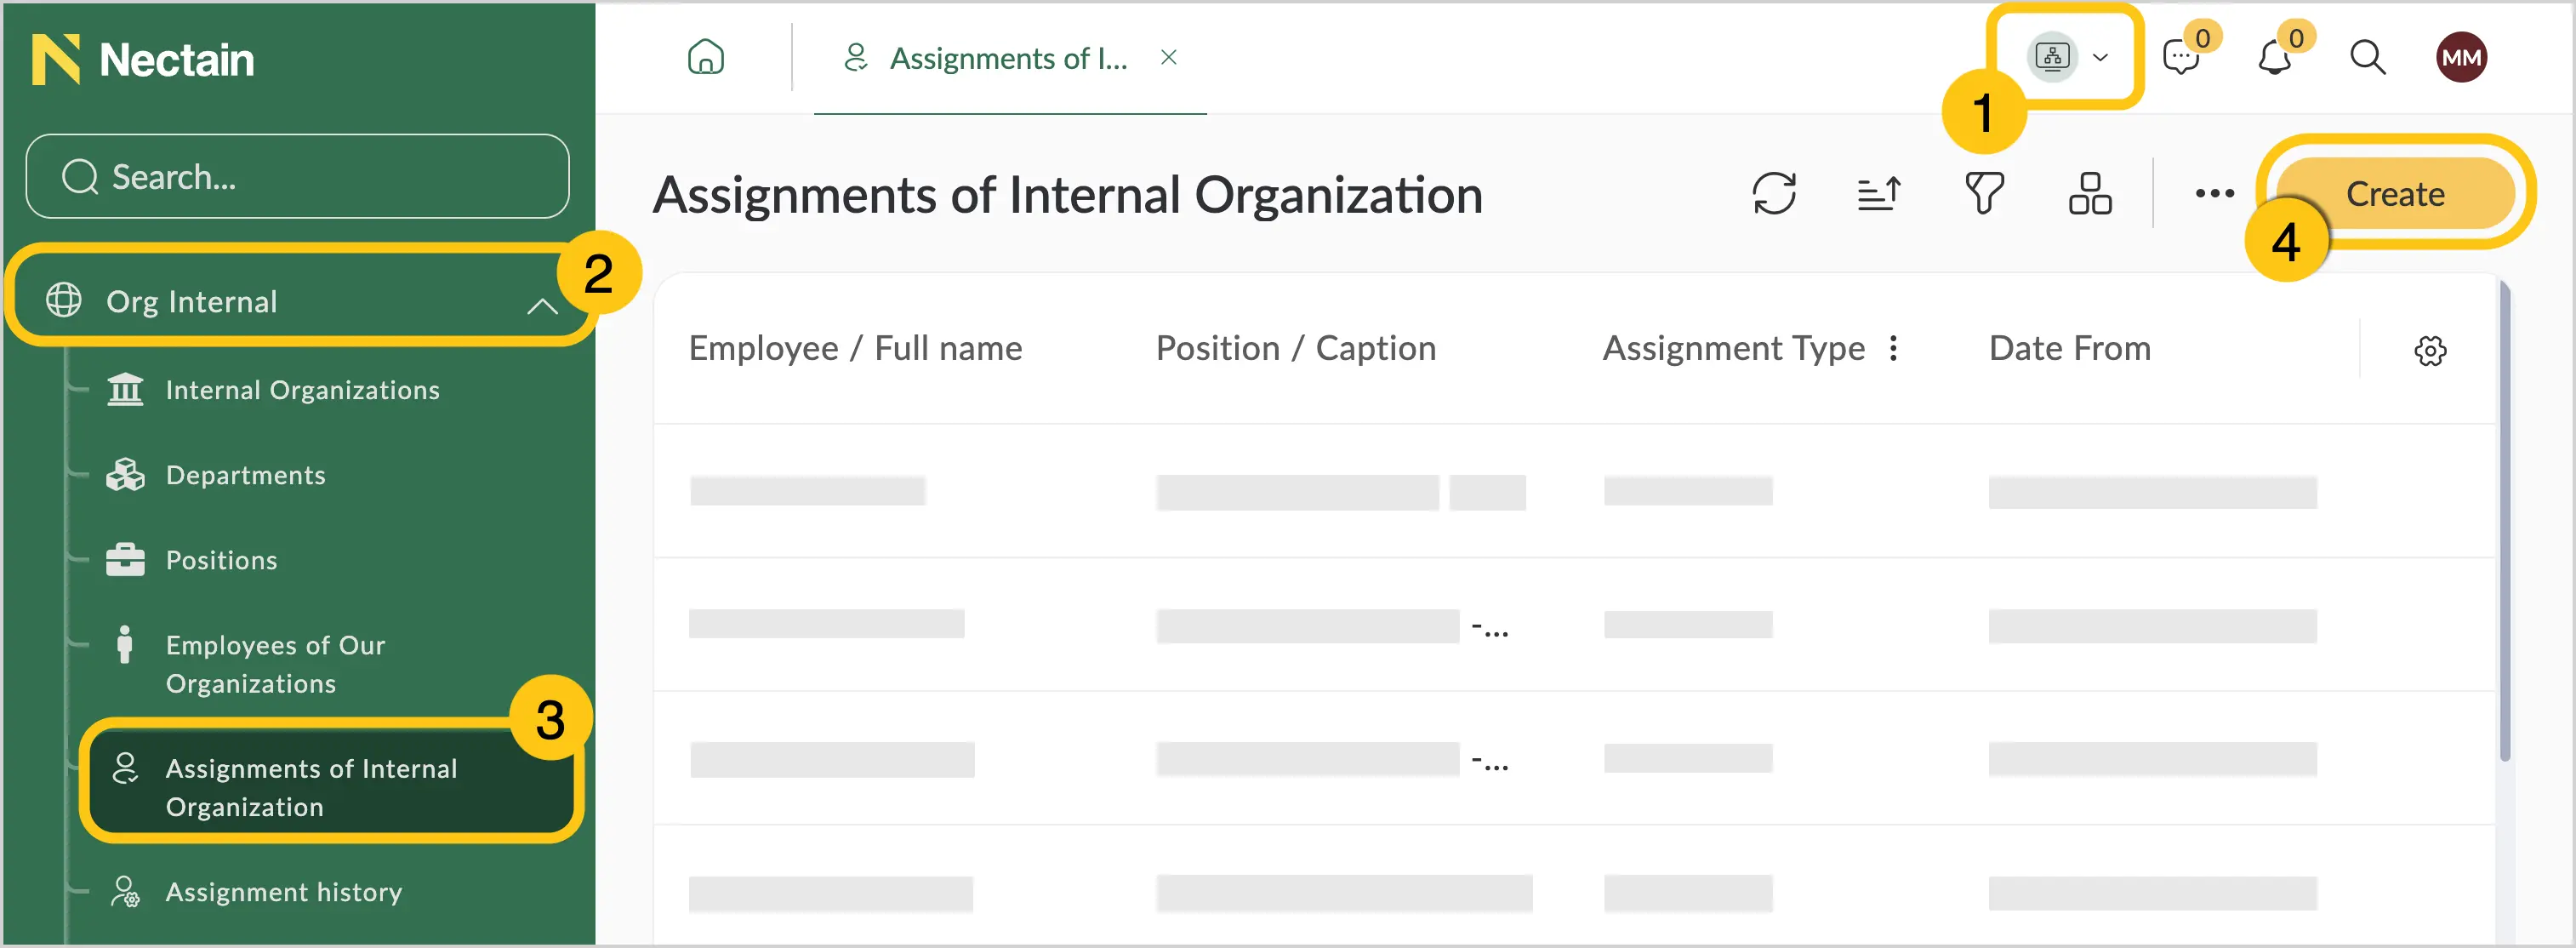
In the navigation panel, select the Organizational Structure desktop 1.
-
Select the Org. Internal shortcut group 2, then select the Our Organization Assignments shortcut 3.
-
In the toolbar, select Create 4.
-
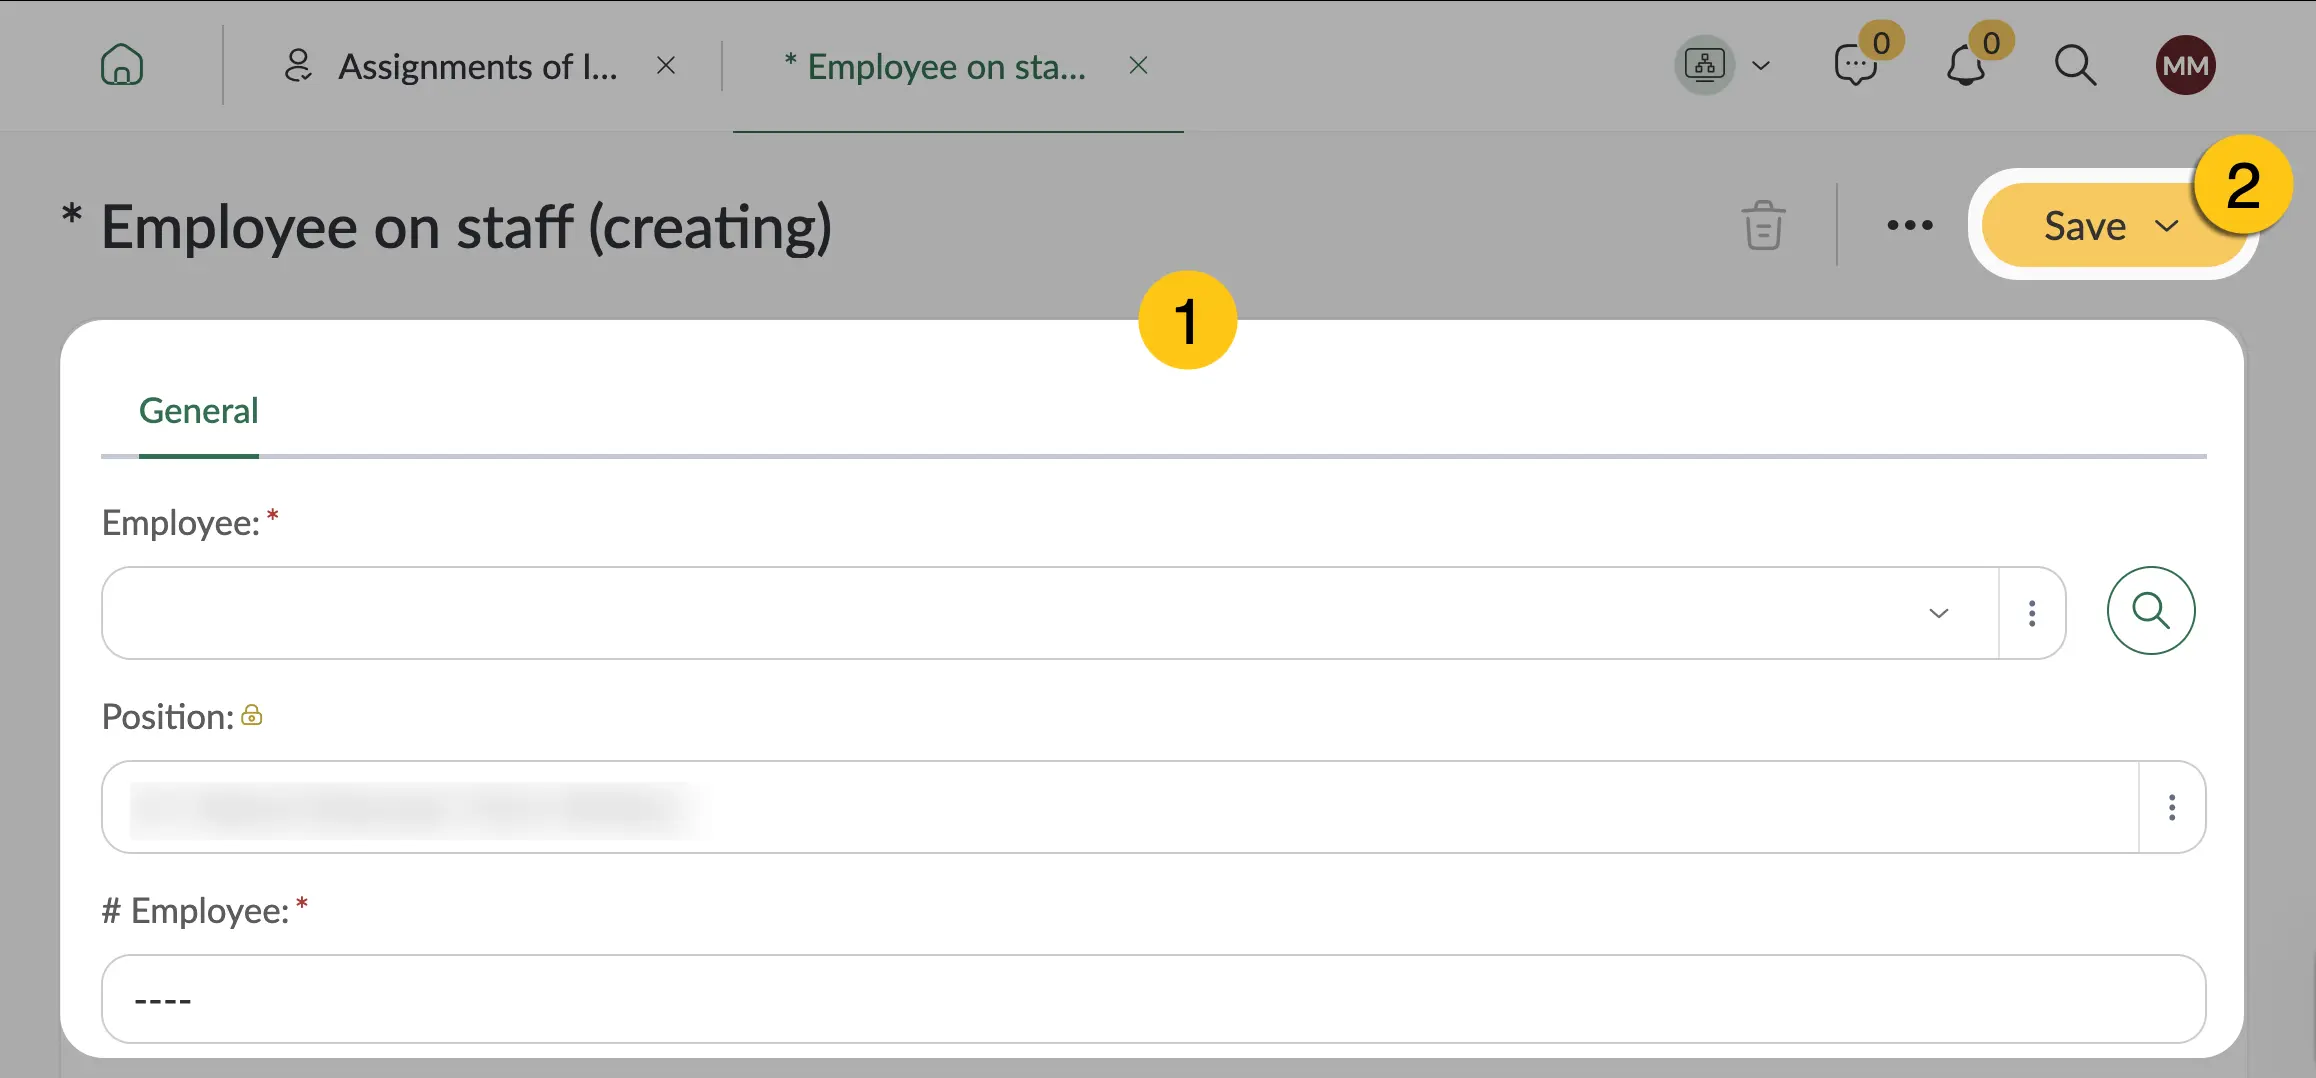
Fill in the fields 1 using the hints in the table below, then select Save 2.
| Field Name | Description |
|---|---|
| Employee* | Select the employee to be assigned to the position |
| Position* | Select the position the employee will be assigned to |
| # Employee* | Filled in automatically when the employee is selected. Takes the value from the Employee Tax ID field. Can be changed if needed. |
| Assignment Type* | Select the assignment type:
|
| Description | Assignment description |
| Date From* | Date from which the employee will be assigned to the position |
| Date To | Date until which the employee will be assigned to the position |
Fields marked with * are required.
1.8.7.2. Second Method: Via the Employee Card
-
In the navigation panel, select the Organizational Structure desktop 1.
-
Select the Org. Internal shortcut group 2, then select the Our Organization Employees shortcut 3.
-
Select the required employee by double-clicking the record.
-
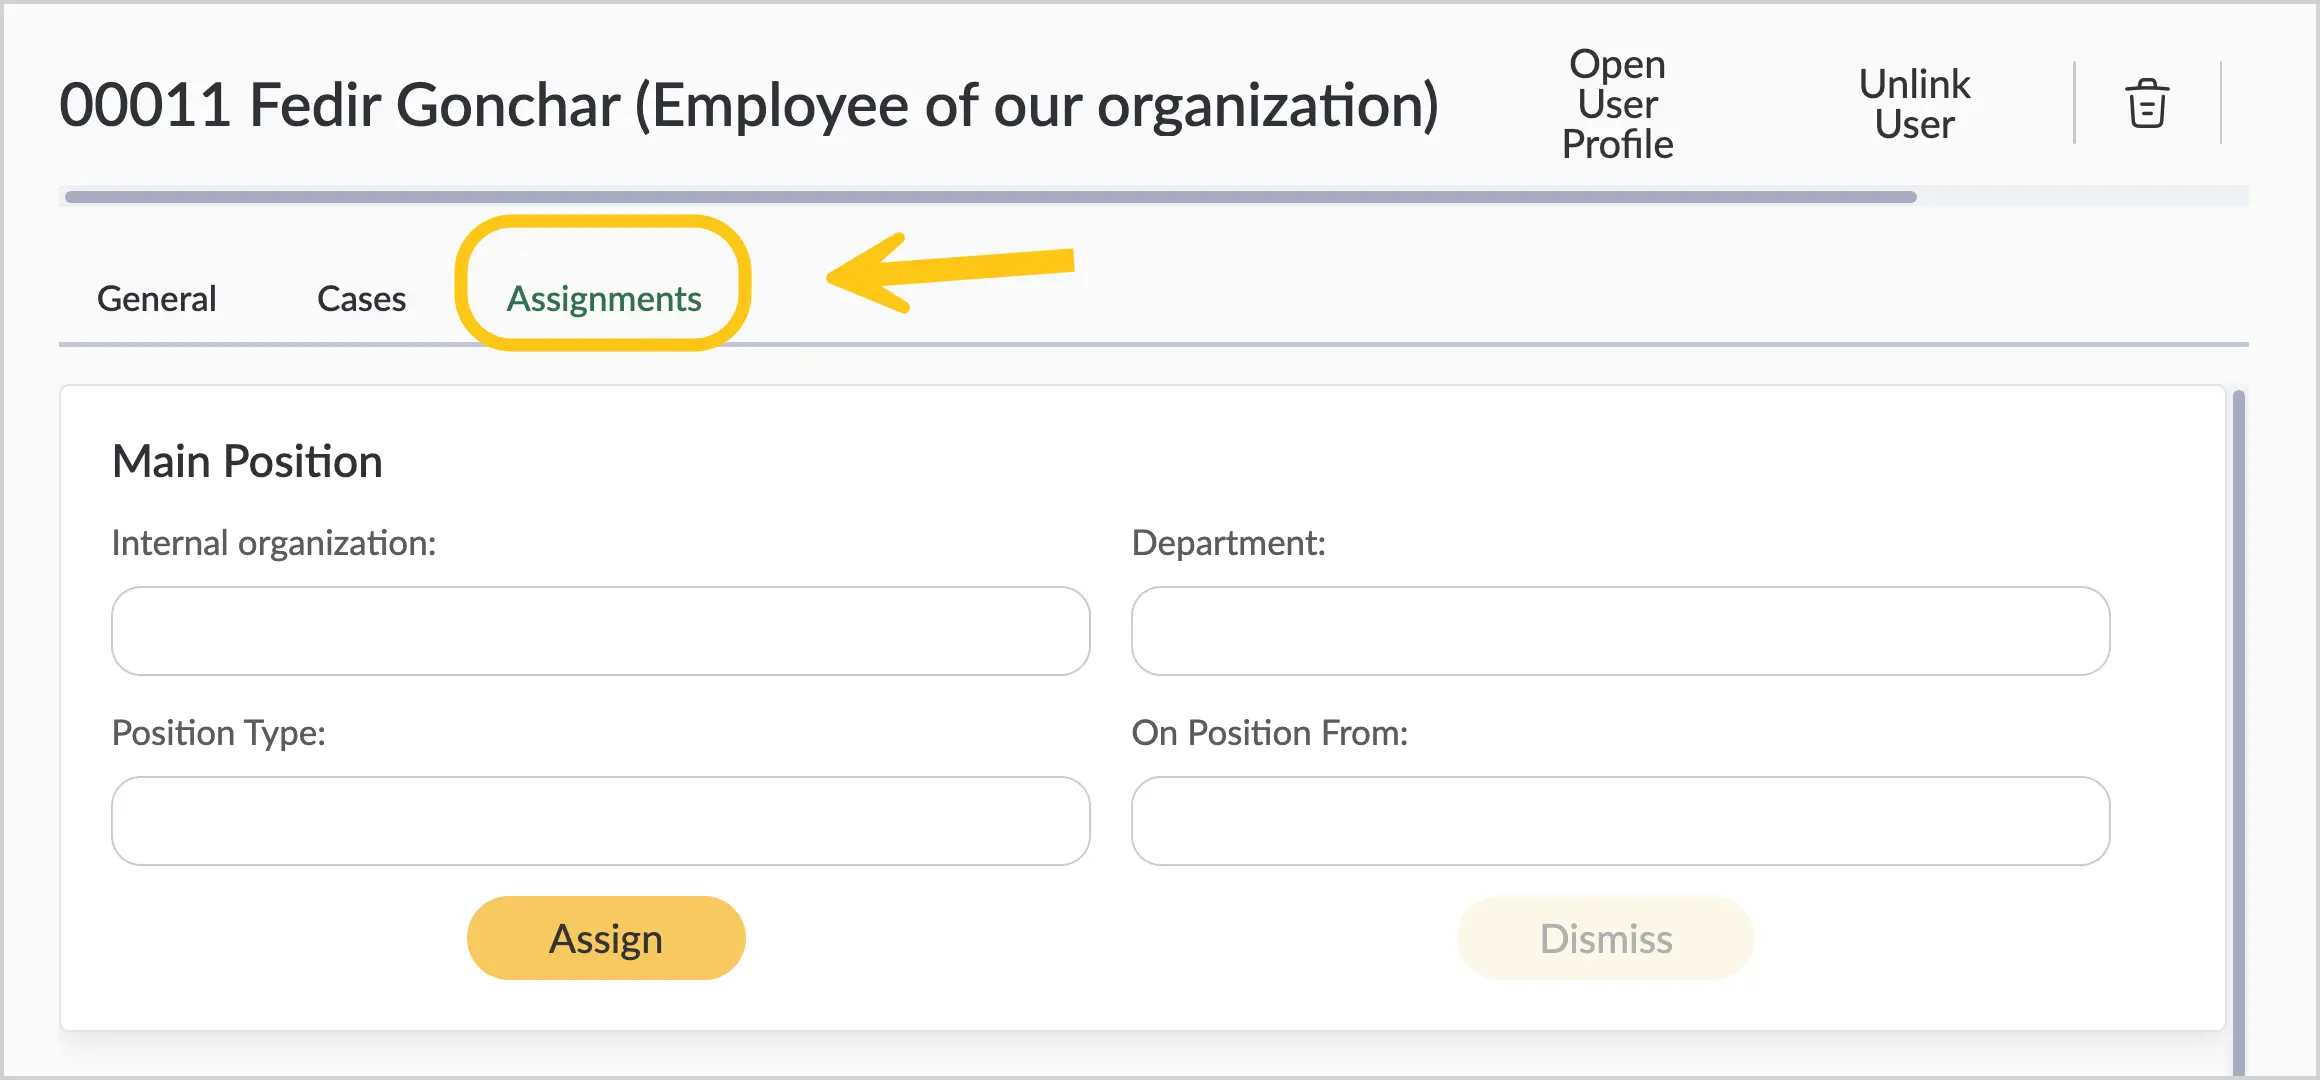
Select the Assignments tab.
-
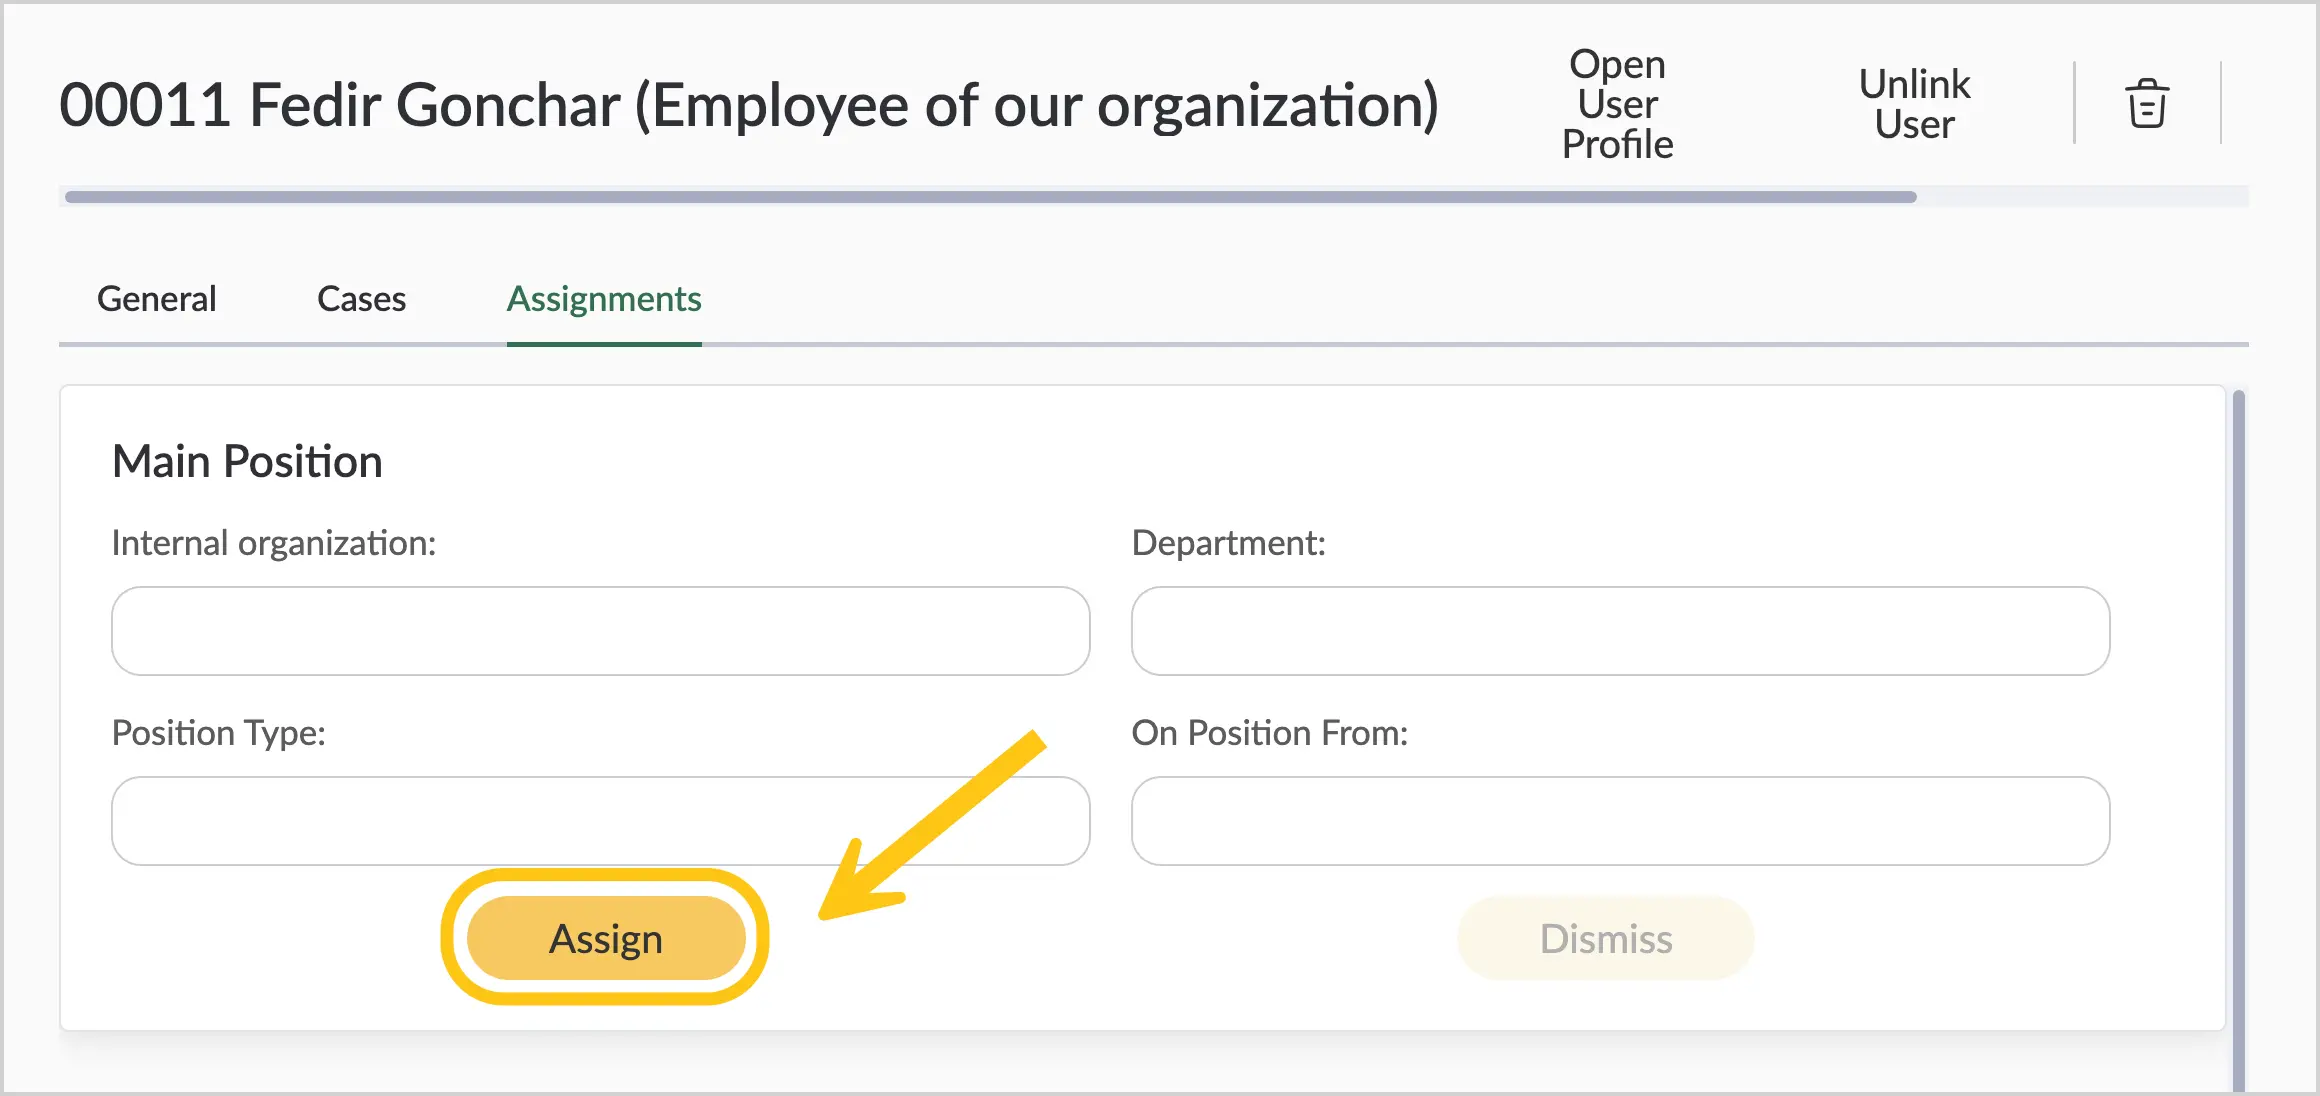
If you need to assign the employee to their main position, select the Assign button in the Main Position block.
or
-
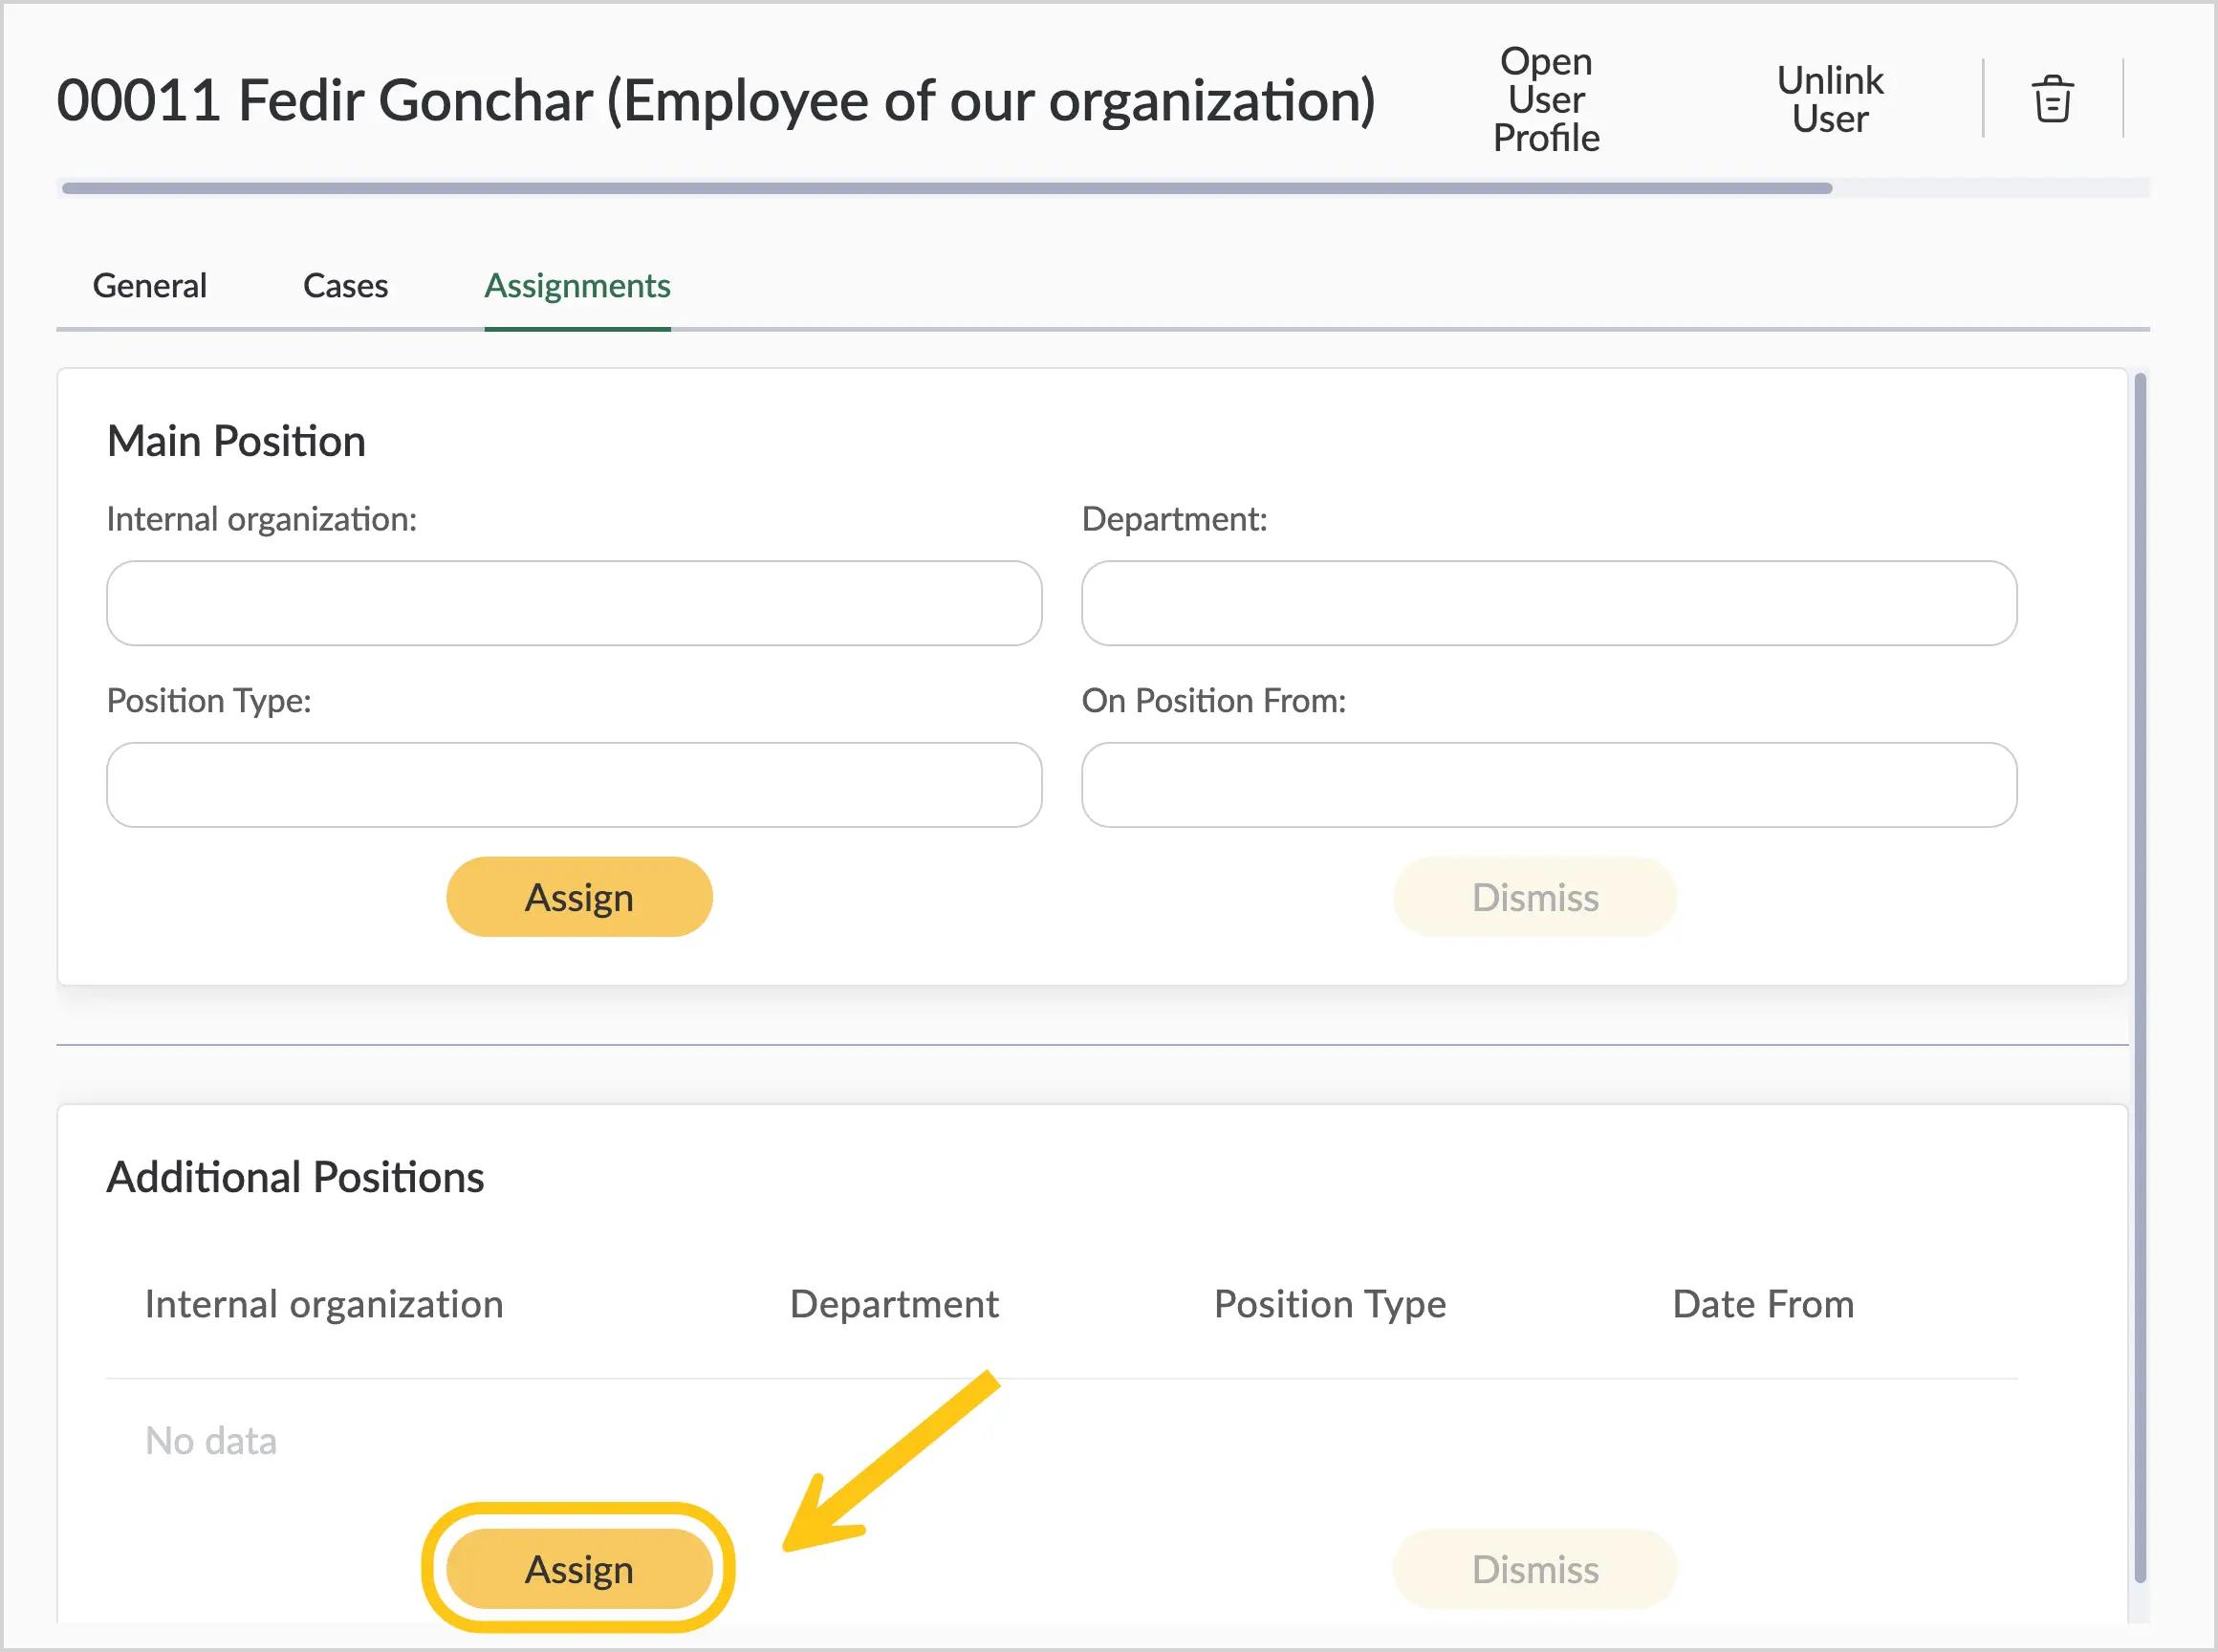
If you need to assign the employee as an acting or assistant type, select the Assign button in the Additional Positions block.
-
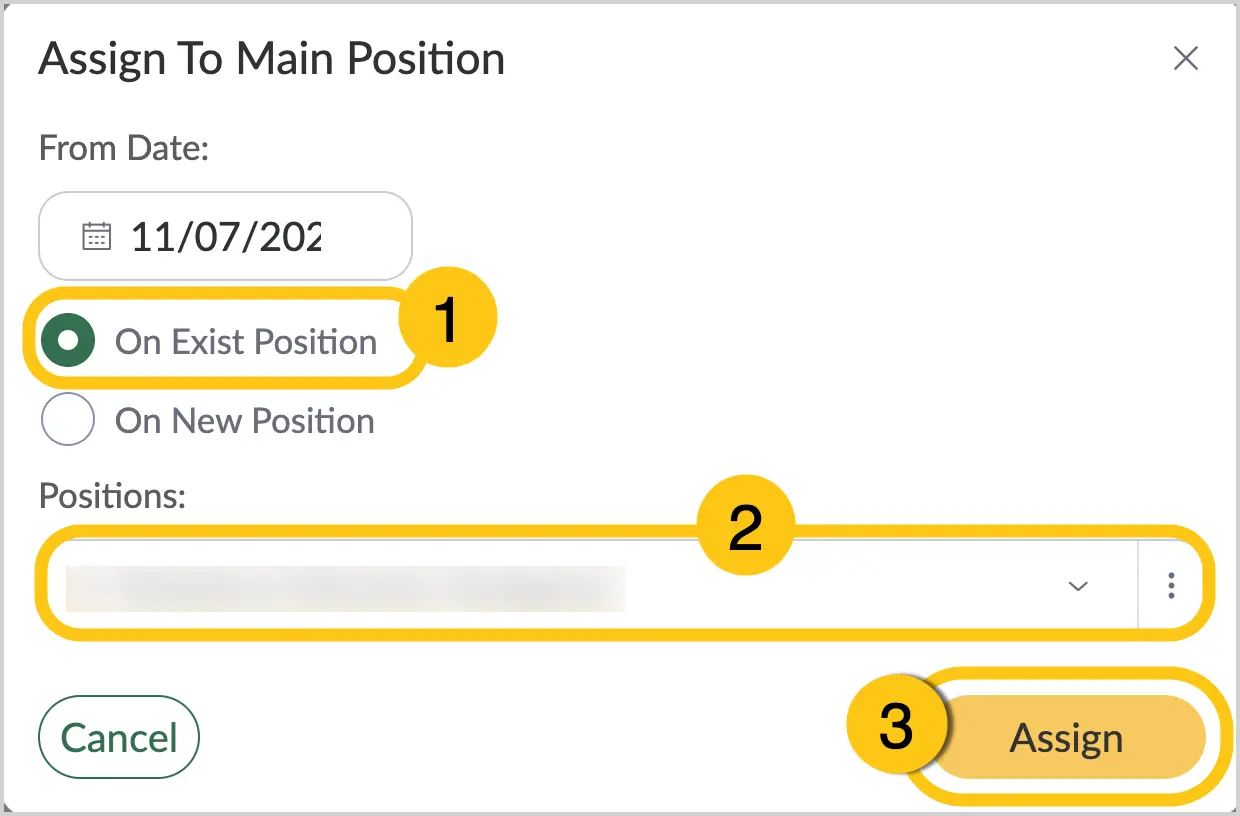
In the pop-up window, in the From Date field, select the date the assignment begins.
-
Select the On Existing Position assignment type 1, then in the Positions field 2, select the required position.
-
Select the Assign button 3.
or
-
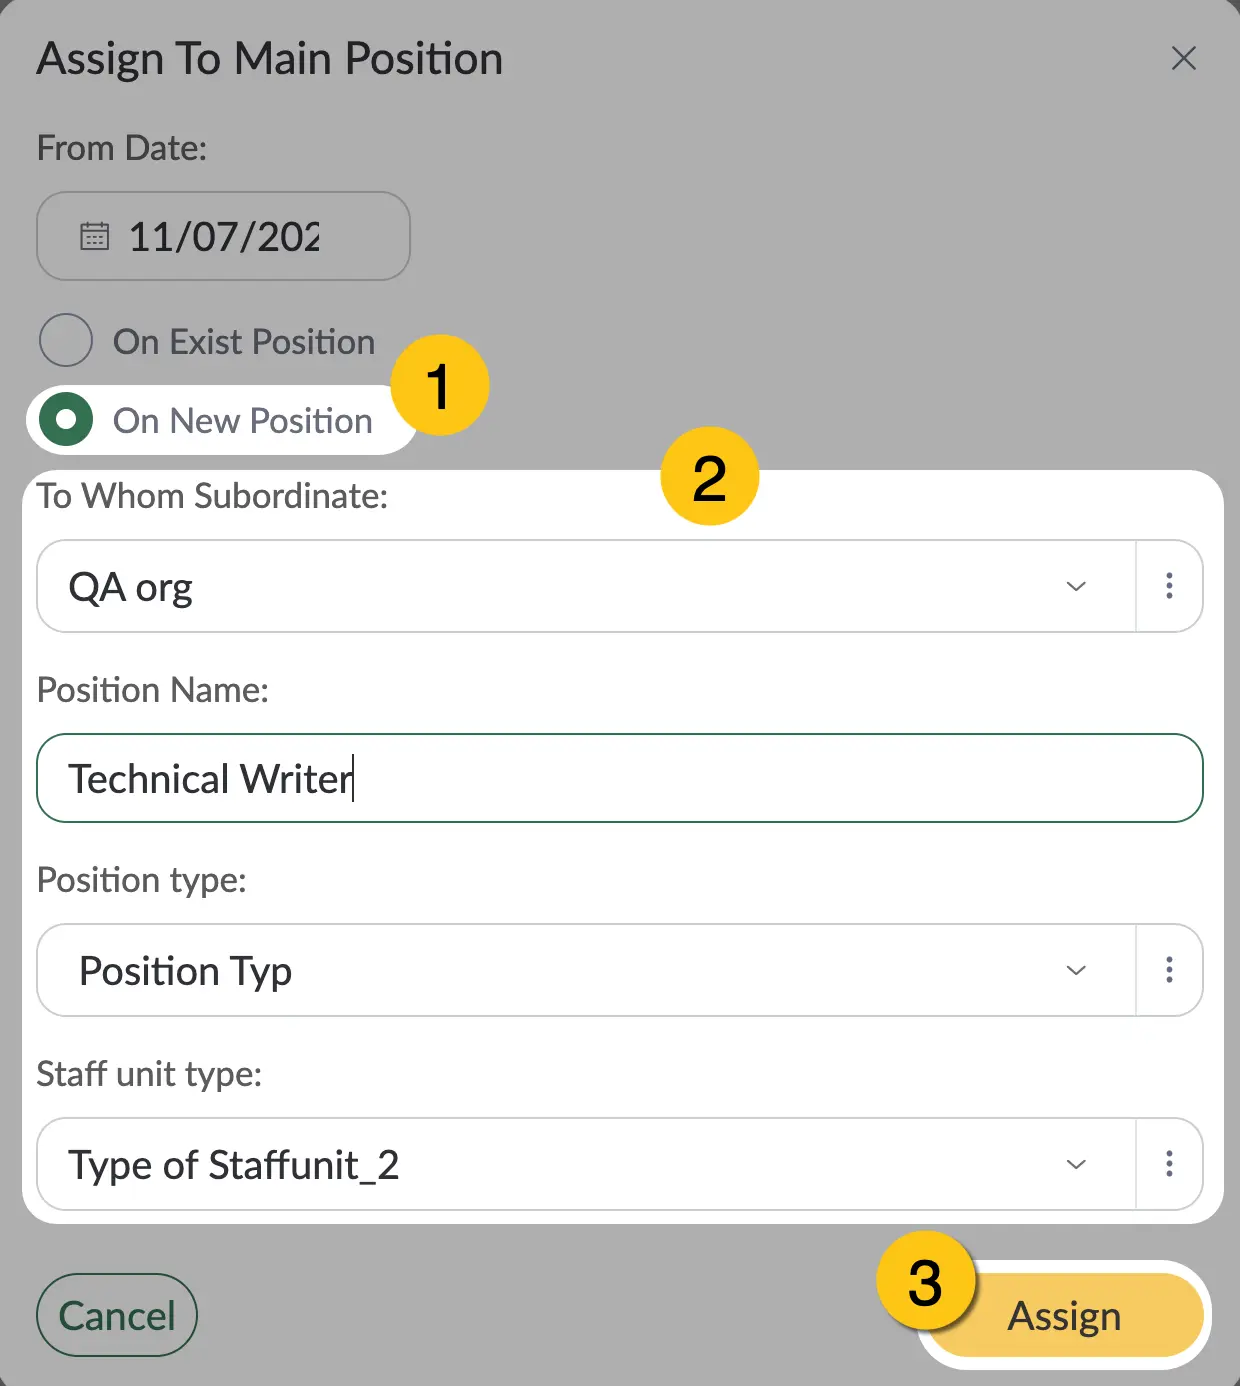
Select the On New Position assignment type 1, then fill in the fields 2 to create a new position.
-
Select the Assign button 3.
1.8.8. Position Delegation
The position delegation feature allows users with the User role to temporarily delegate their authority to other employees in the organization. This creates a mini-assignment to their own role without requiring the involvement of an administrator or HR department. This way, a user with the User role can independently designate another person as an assistant or to temporarily perform their duties (acting).
Practical use cases for the position delegation feature:
- Vacation: Delegating authority during your absence
- Sick leave: Temporarily transferring duties
- Assistance: Giving an assistant access to documents and tasks
- Training: Allowing an intern to access work processes
- Third parties cannot create delegations on behalf of other users — you can only delegate your own authority.
- The delegate must have an active assignment to any position.
- Delegation applies to both document access and task work.
1.8.8.1. Delegate a Position
To delegate your authority (position):
-
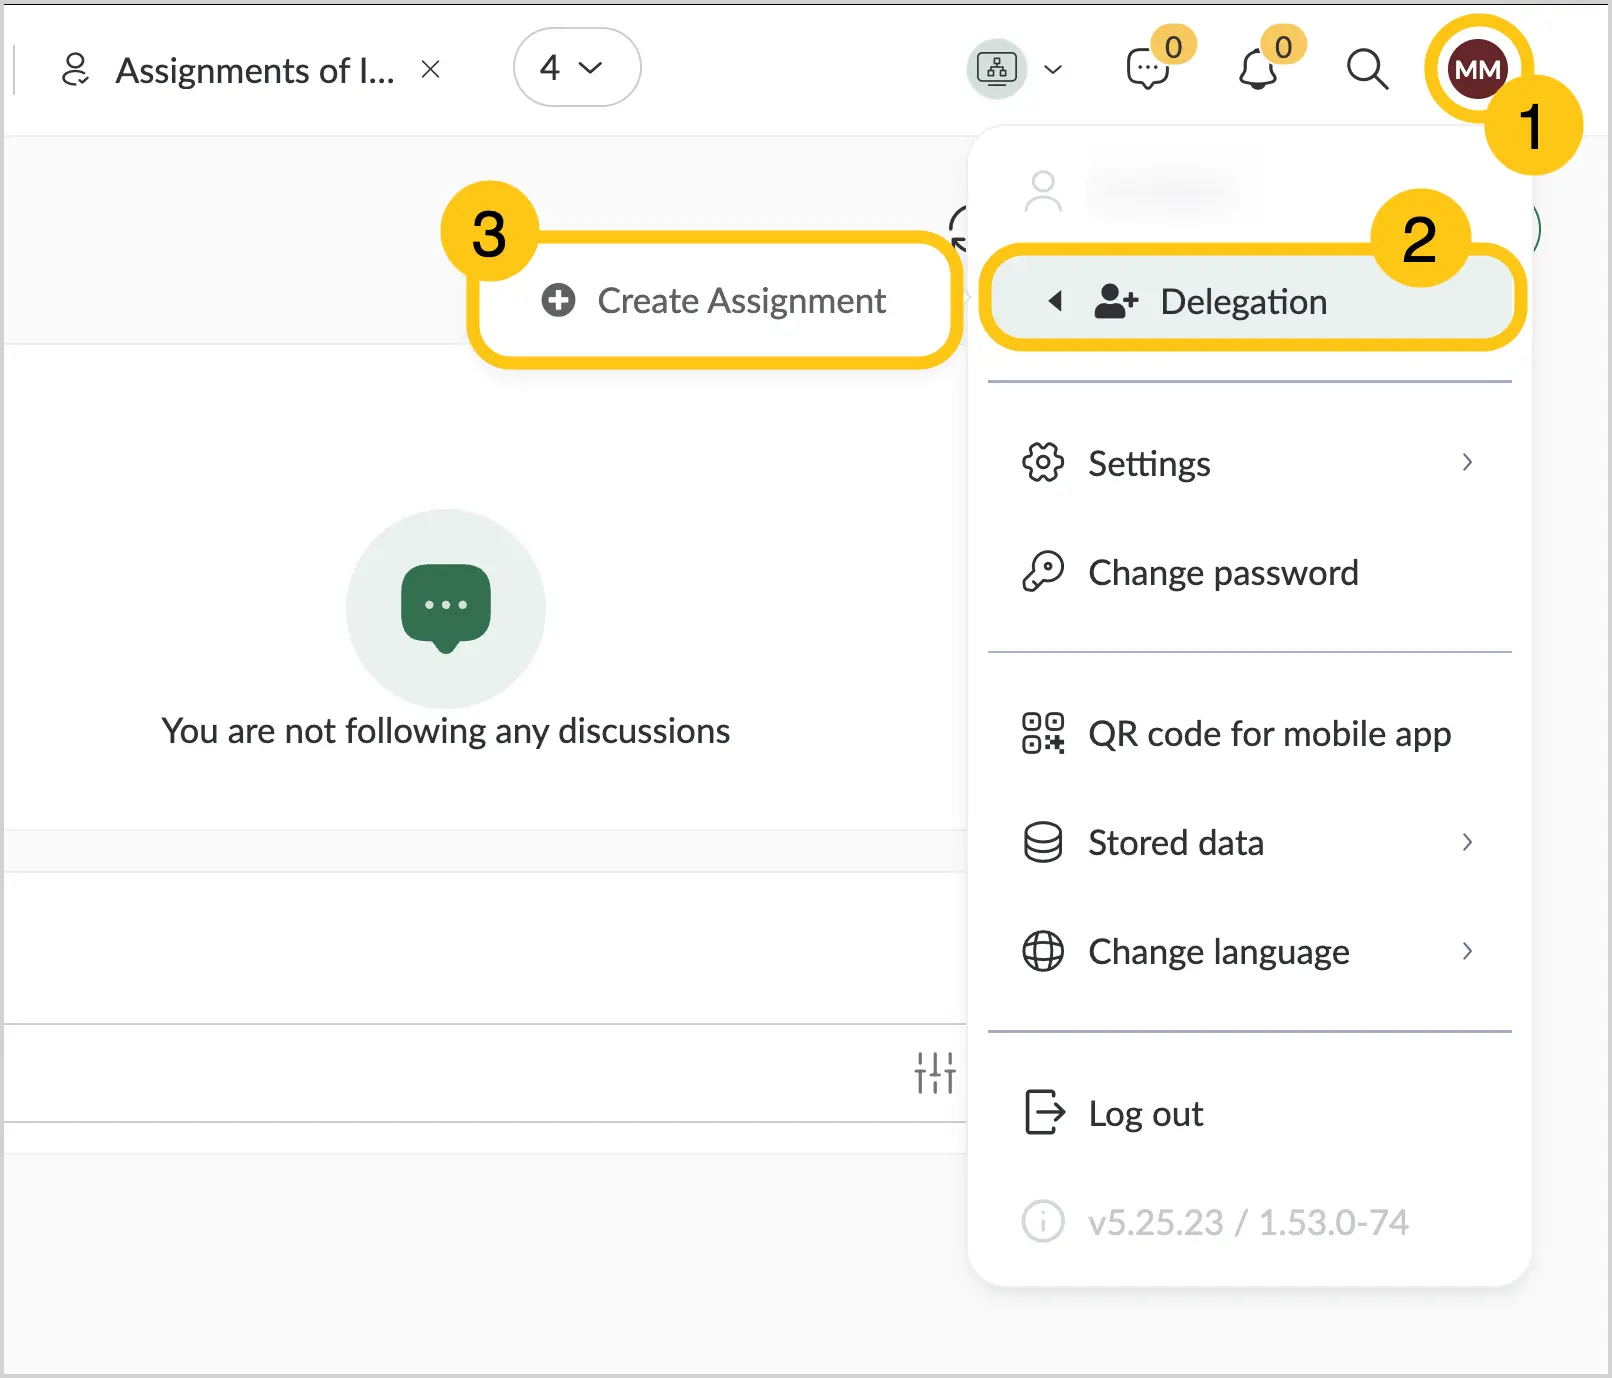
In the User Interface 1, select the Delegation option 2 and select Create Assignment 3.
-
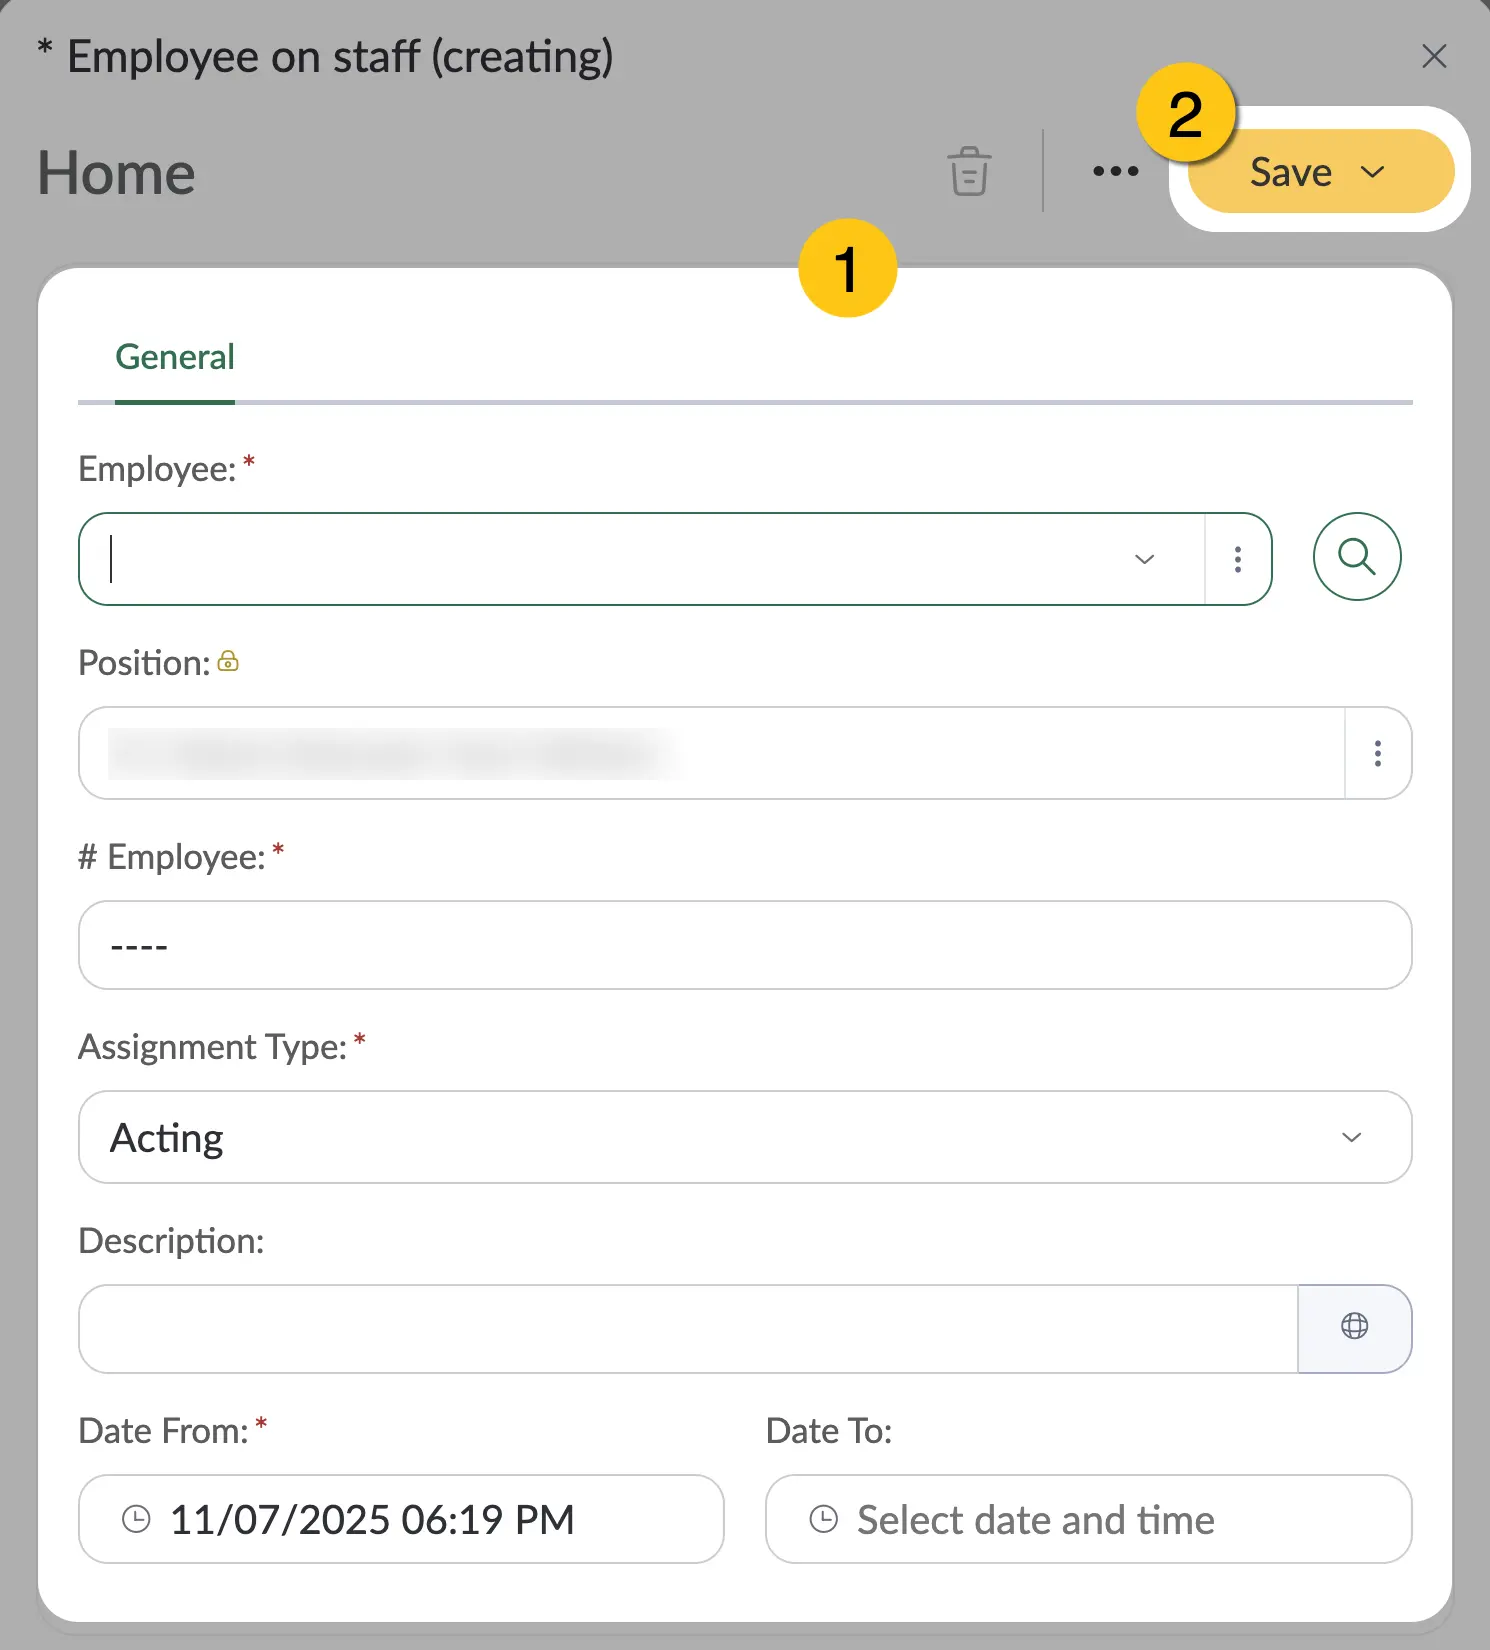
Fill in the delegation form 1, entering the details of the person to whom you want to delegate your authority:
- Employee: Select the employee to whom the authority is being delegated
- Position: Automatically populated with the current user's active position
- Assignment Type: Choose between Acting or Assistant
- From Date: Automatically set to the current time
- To Date: Optional field (can be left empty)
-
To activate the delegation, select Save 2.
After the delegation is created, the receiving employee will automatically gain access to all documents that the authorized executor has access to. You may need to refresh your session for the changes to take effect — simply sign in to the Nectainium system again.
1.8.8.2. Check a User's Delegates
-
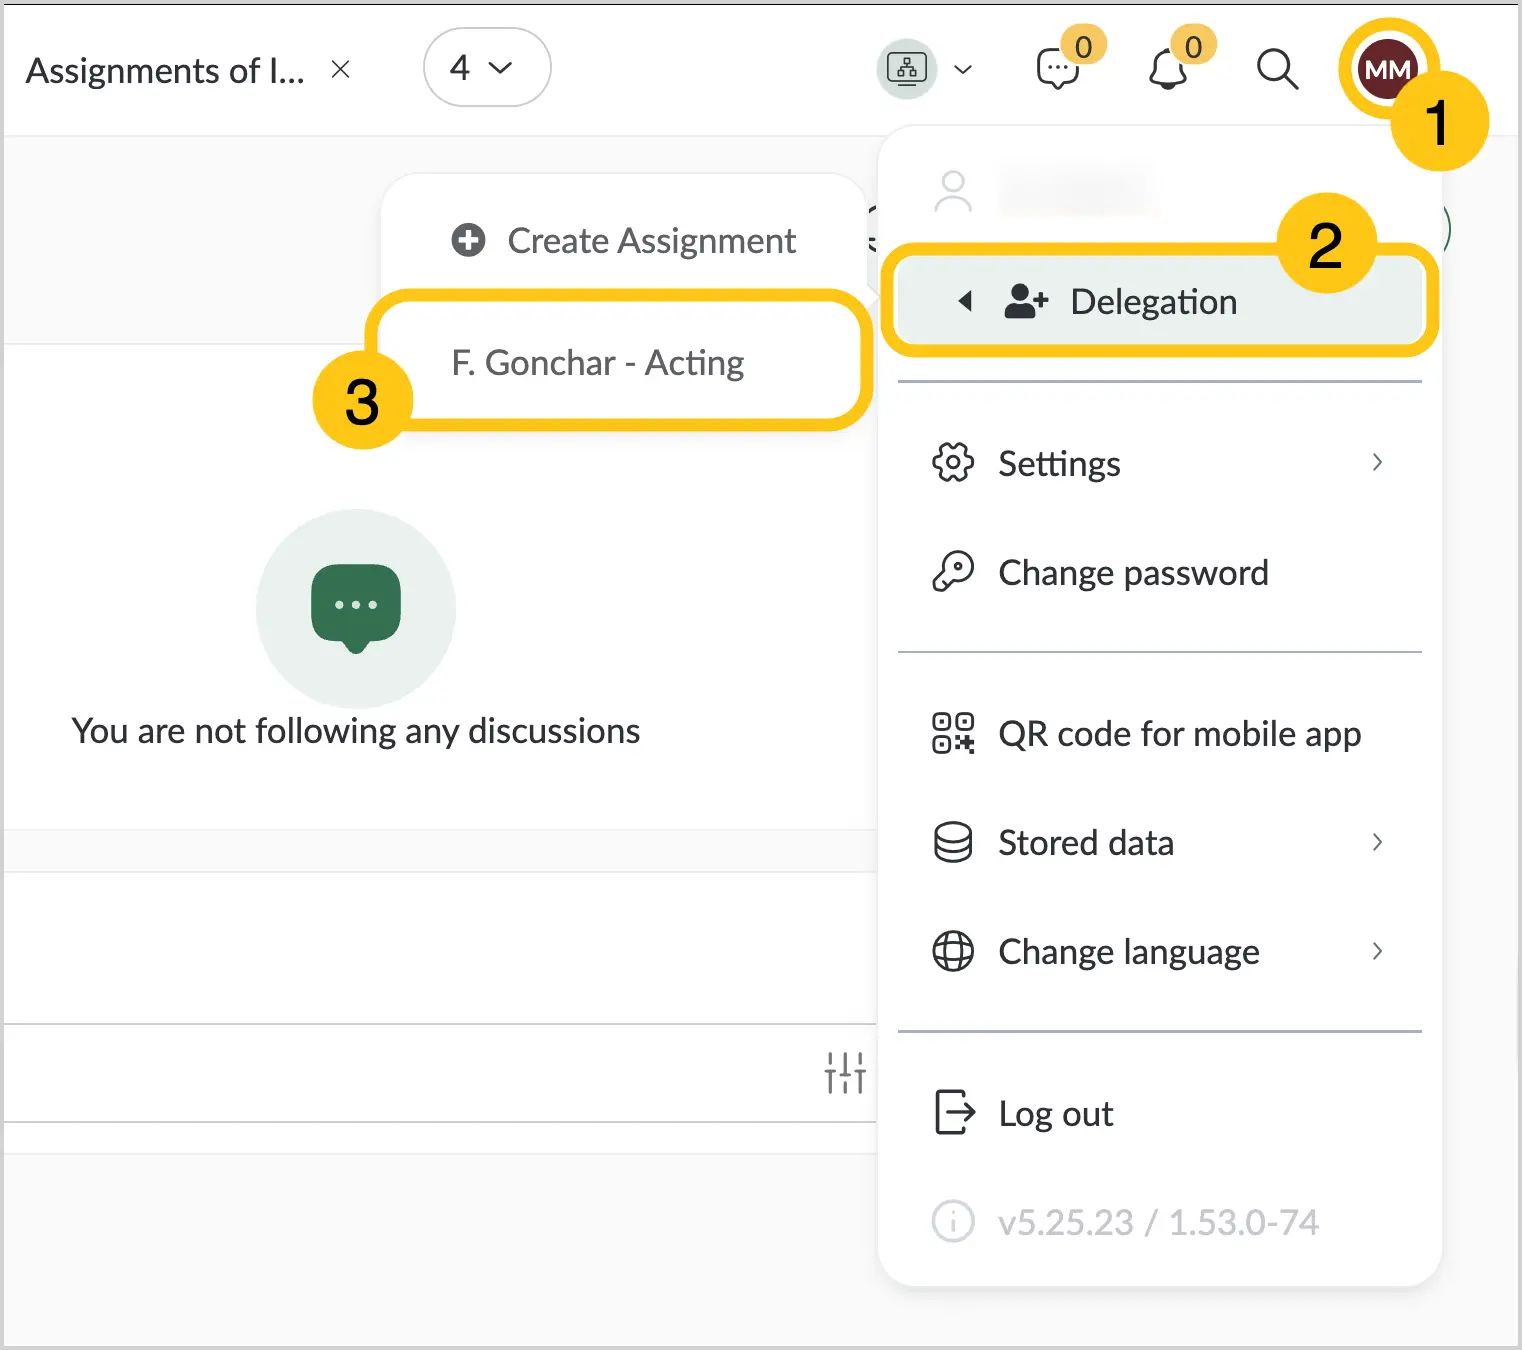
In the User Interface 1, select the Delegation option 2.
-
Review the assignments list 3.
1.8.8.3. Display Delegates in Documents
-
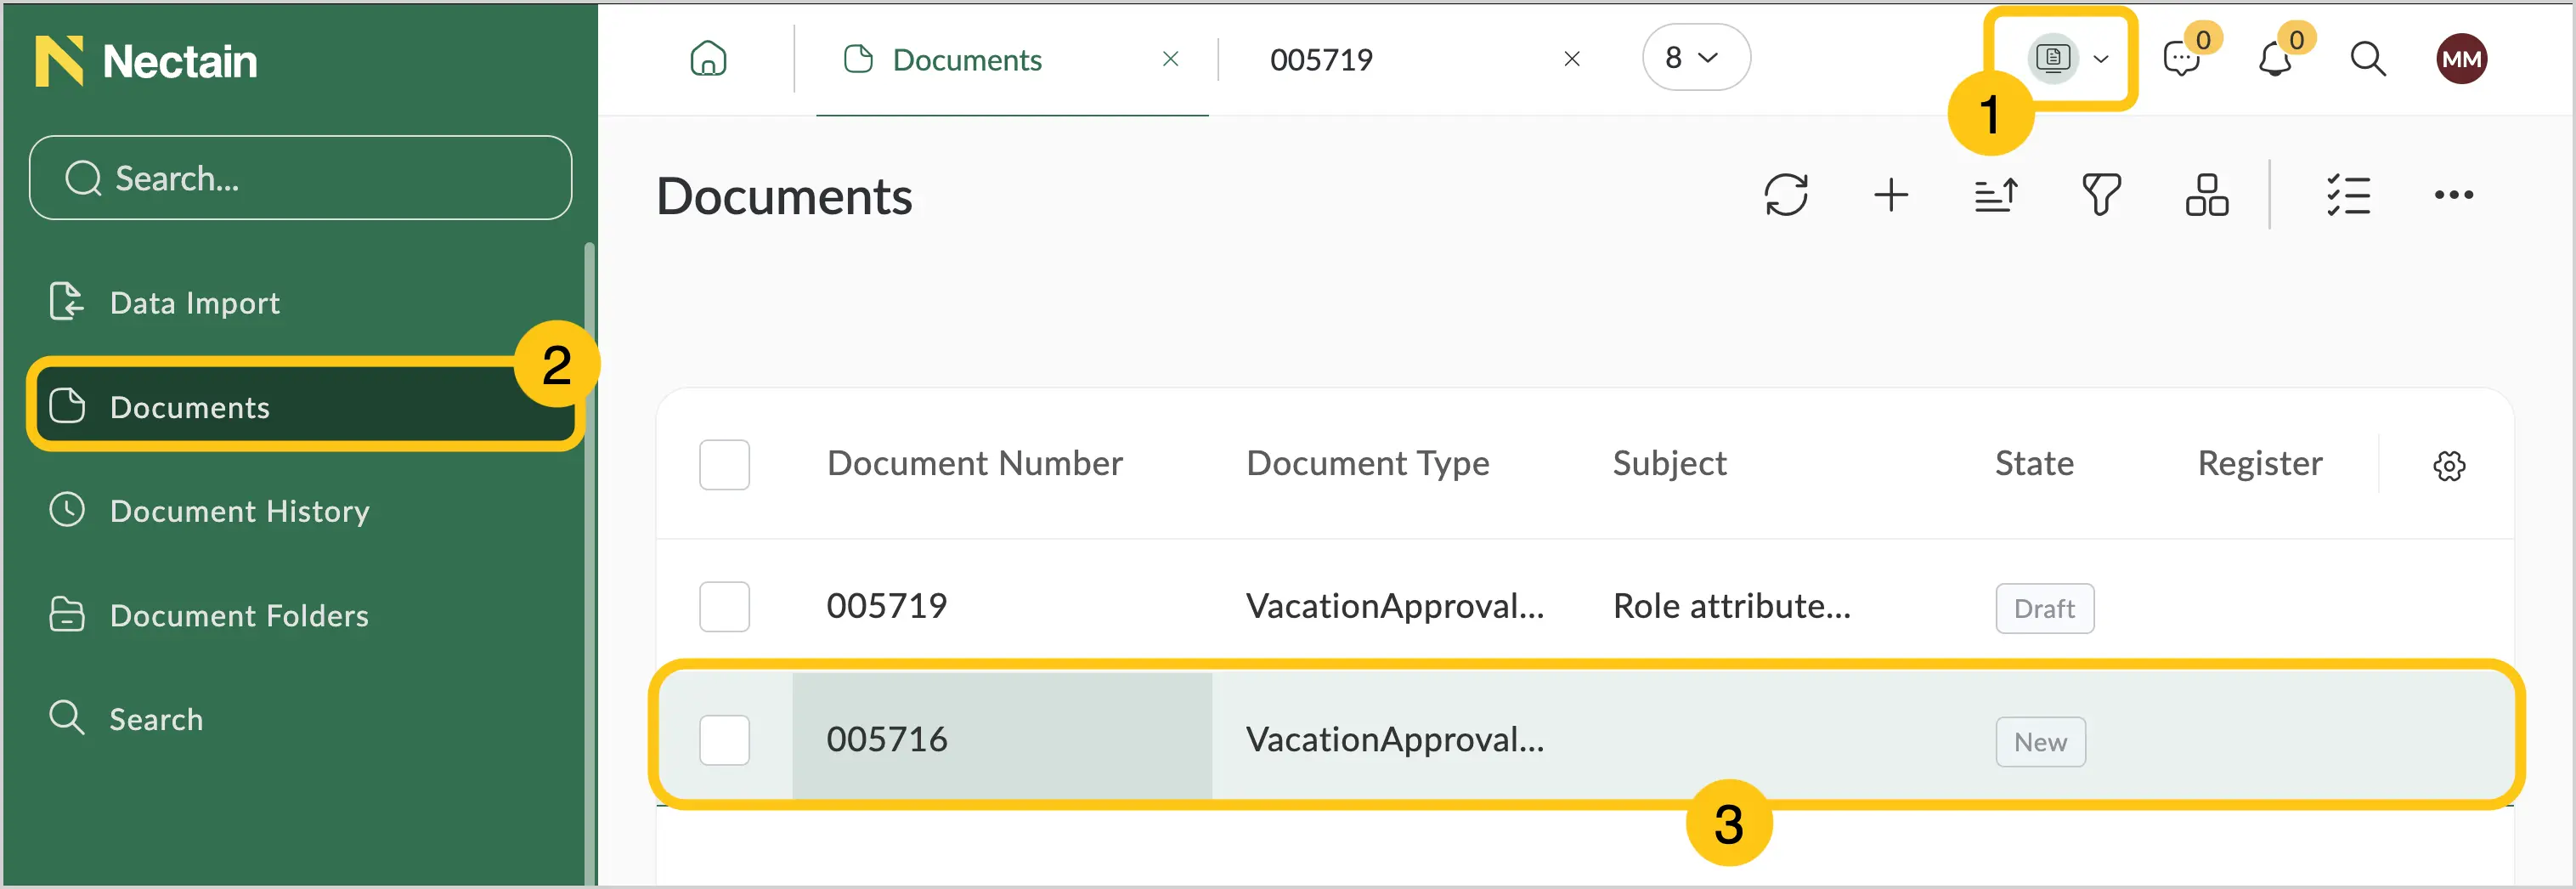
In the navigation panel, select the Documents desktop 1.
-
Select the Documents shortcut 2.
-
Select the required document 3.
-
In the text field under the role for which assignments were made, the following details will be shown:
A Main assignment: Employee name with an asterisk (*).
B Delegation: Employee name without an asterisk, their code and position, separated by a comma after the main assignment.
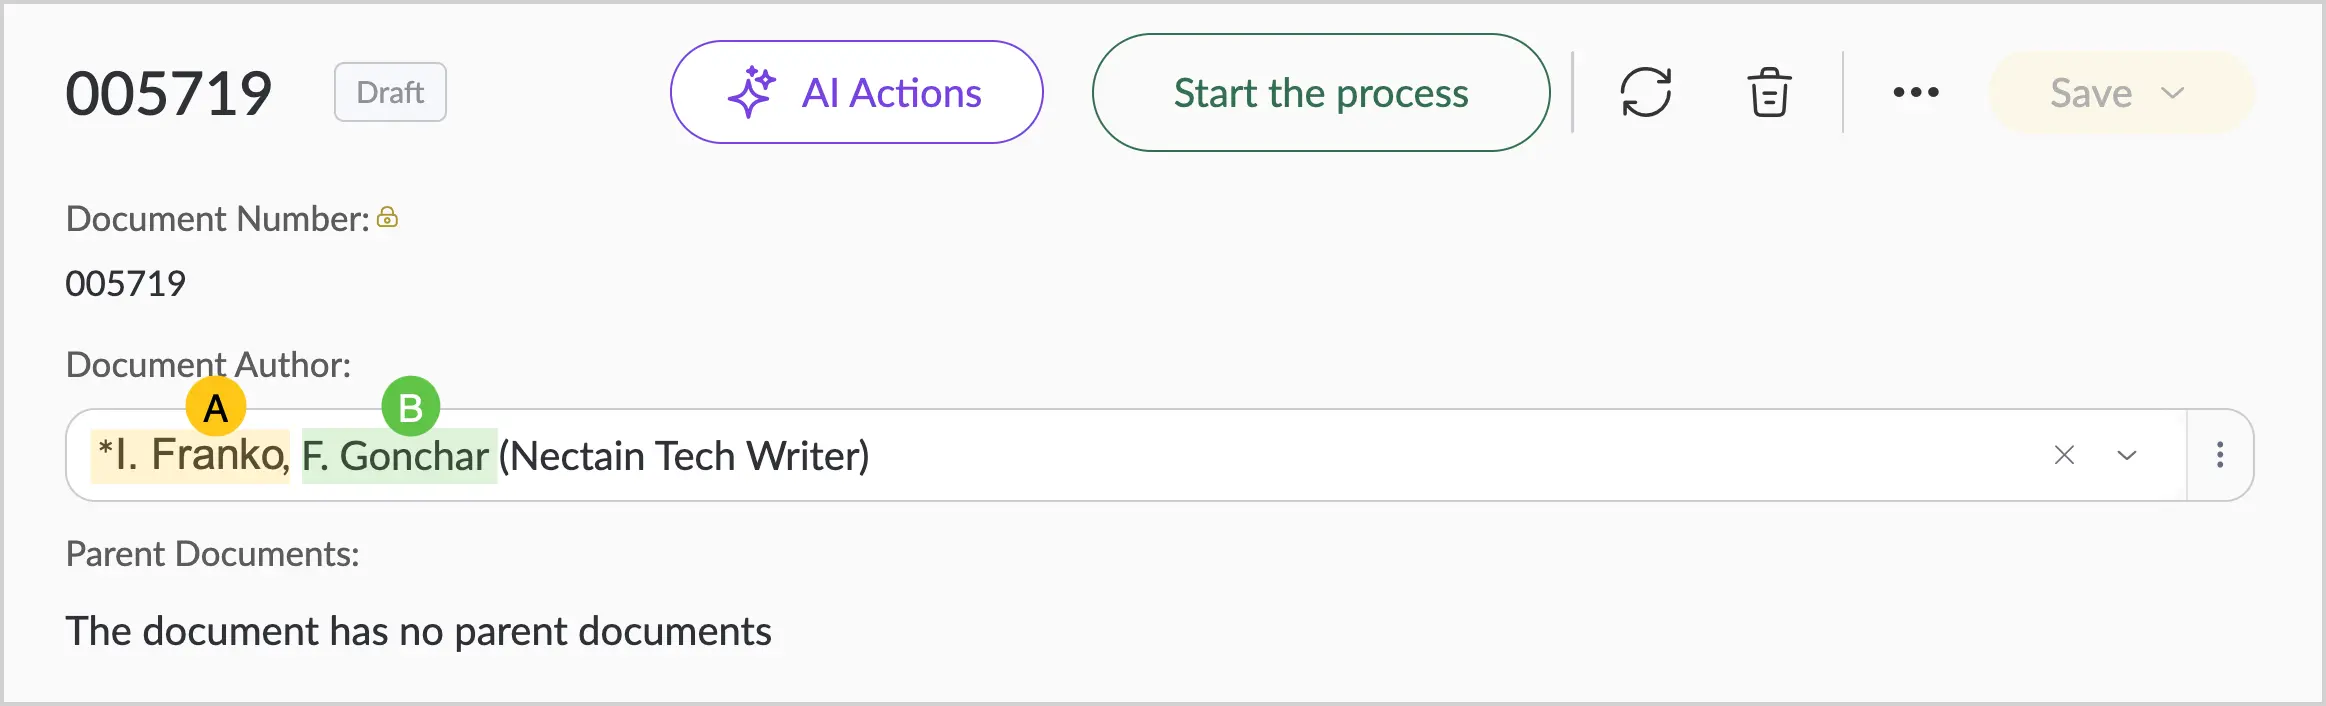
In the organizational structure, delegation is displayed as an additional assignment to the same position, making it possible to see all those who have access to a specific role (delegates will be listed separated by commas).
1.8.8.4. Stop Delegation
-
In the Profile Settings 1, select Delegation 2.
-
Select the needed assignment 3.
-
Go to the Date To field:
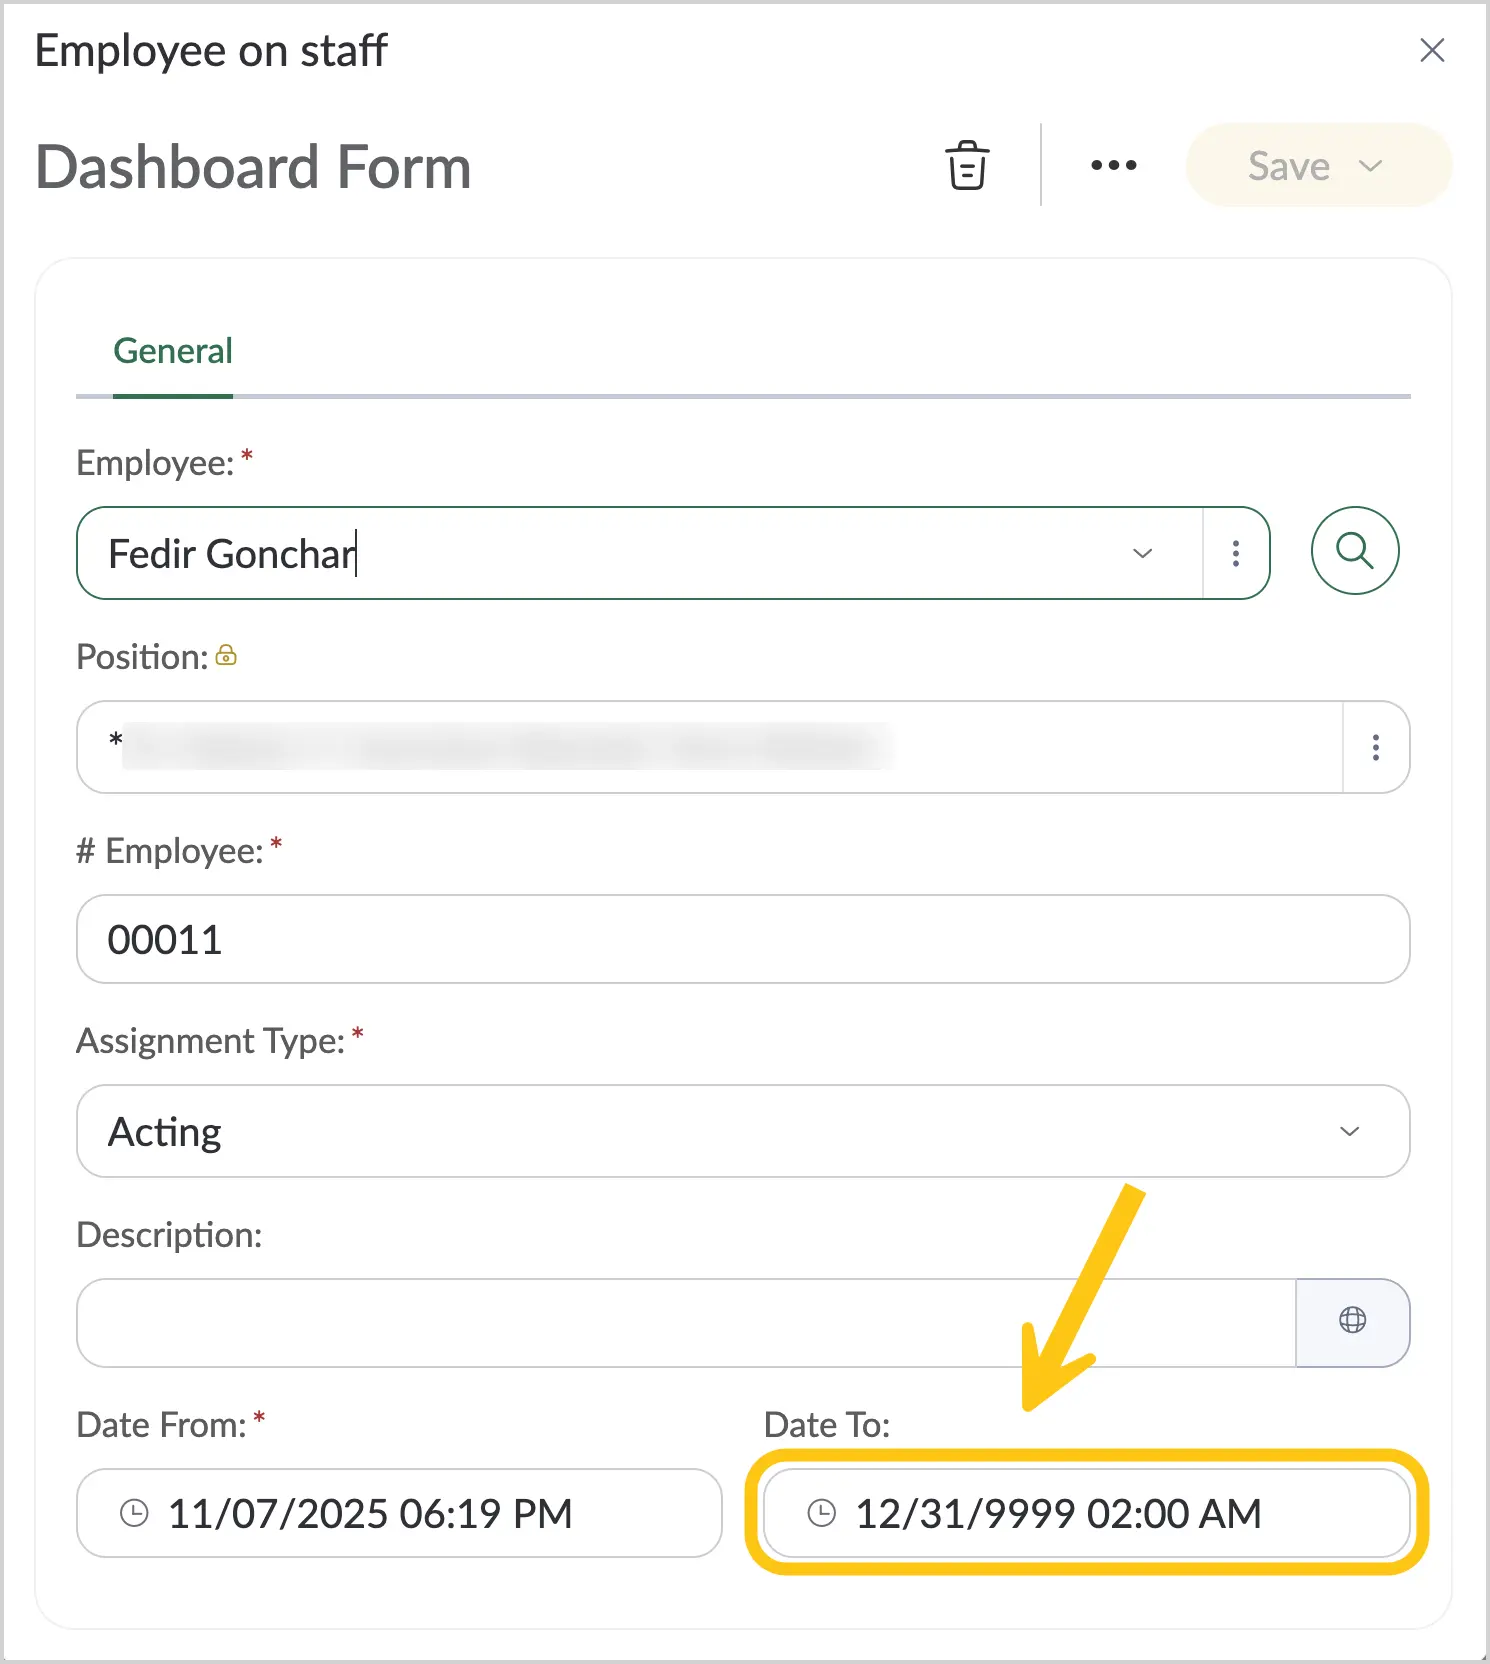
-
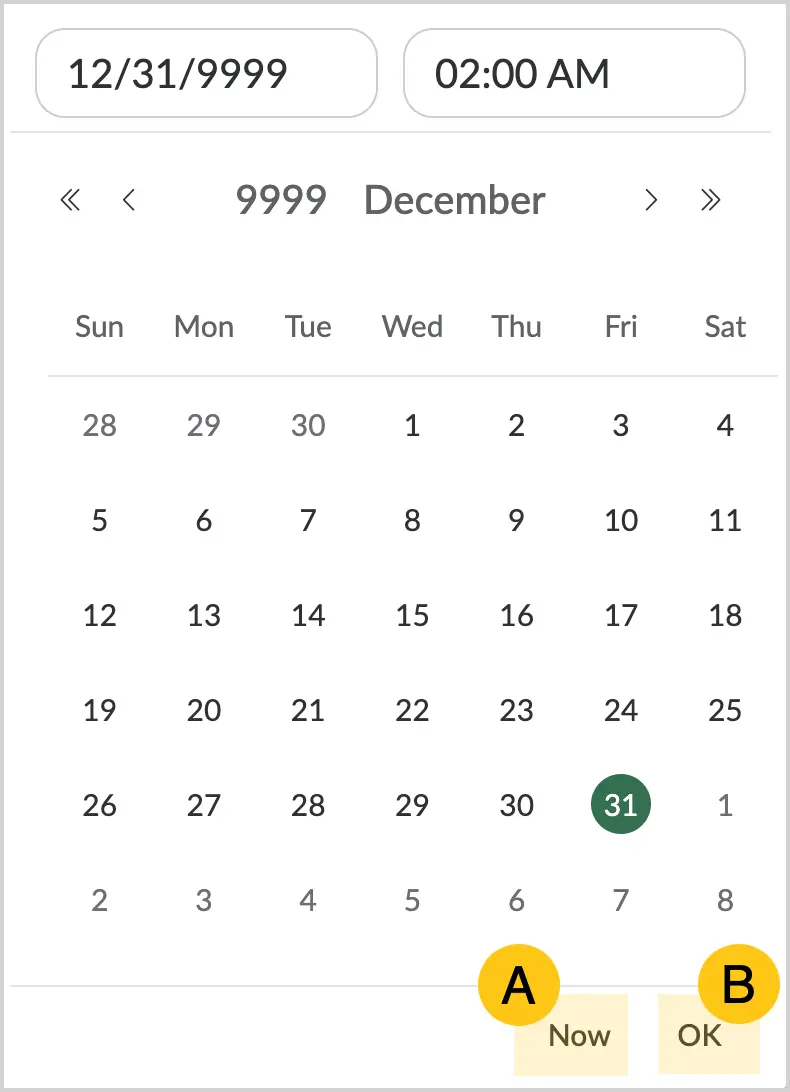
Enter the current date and time:
A Select Now.
B To confirm the action, select OK.
-
To save the changes, select Save.
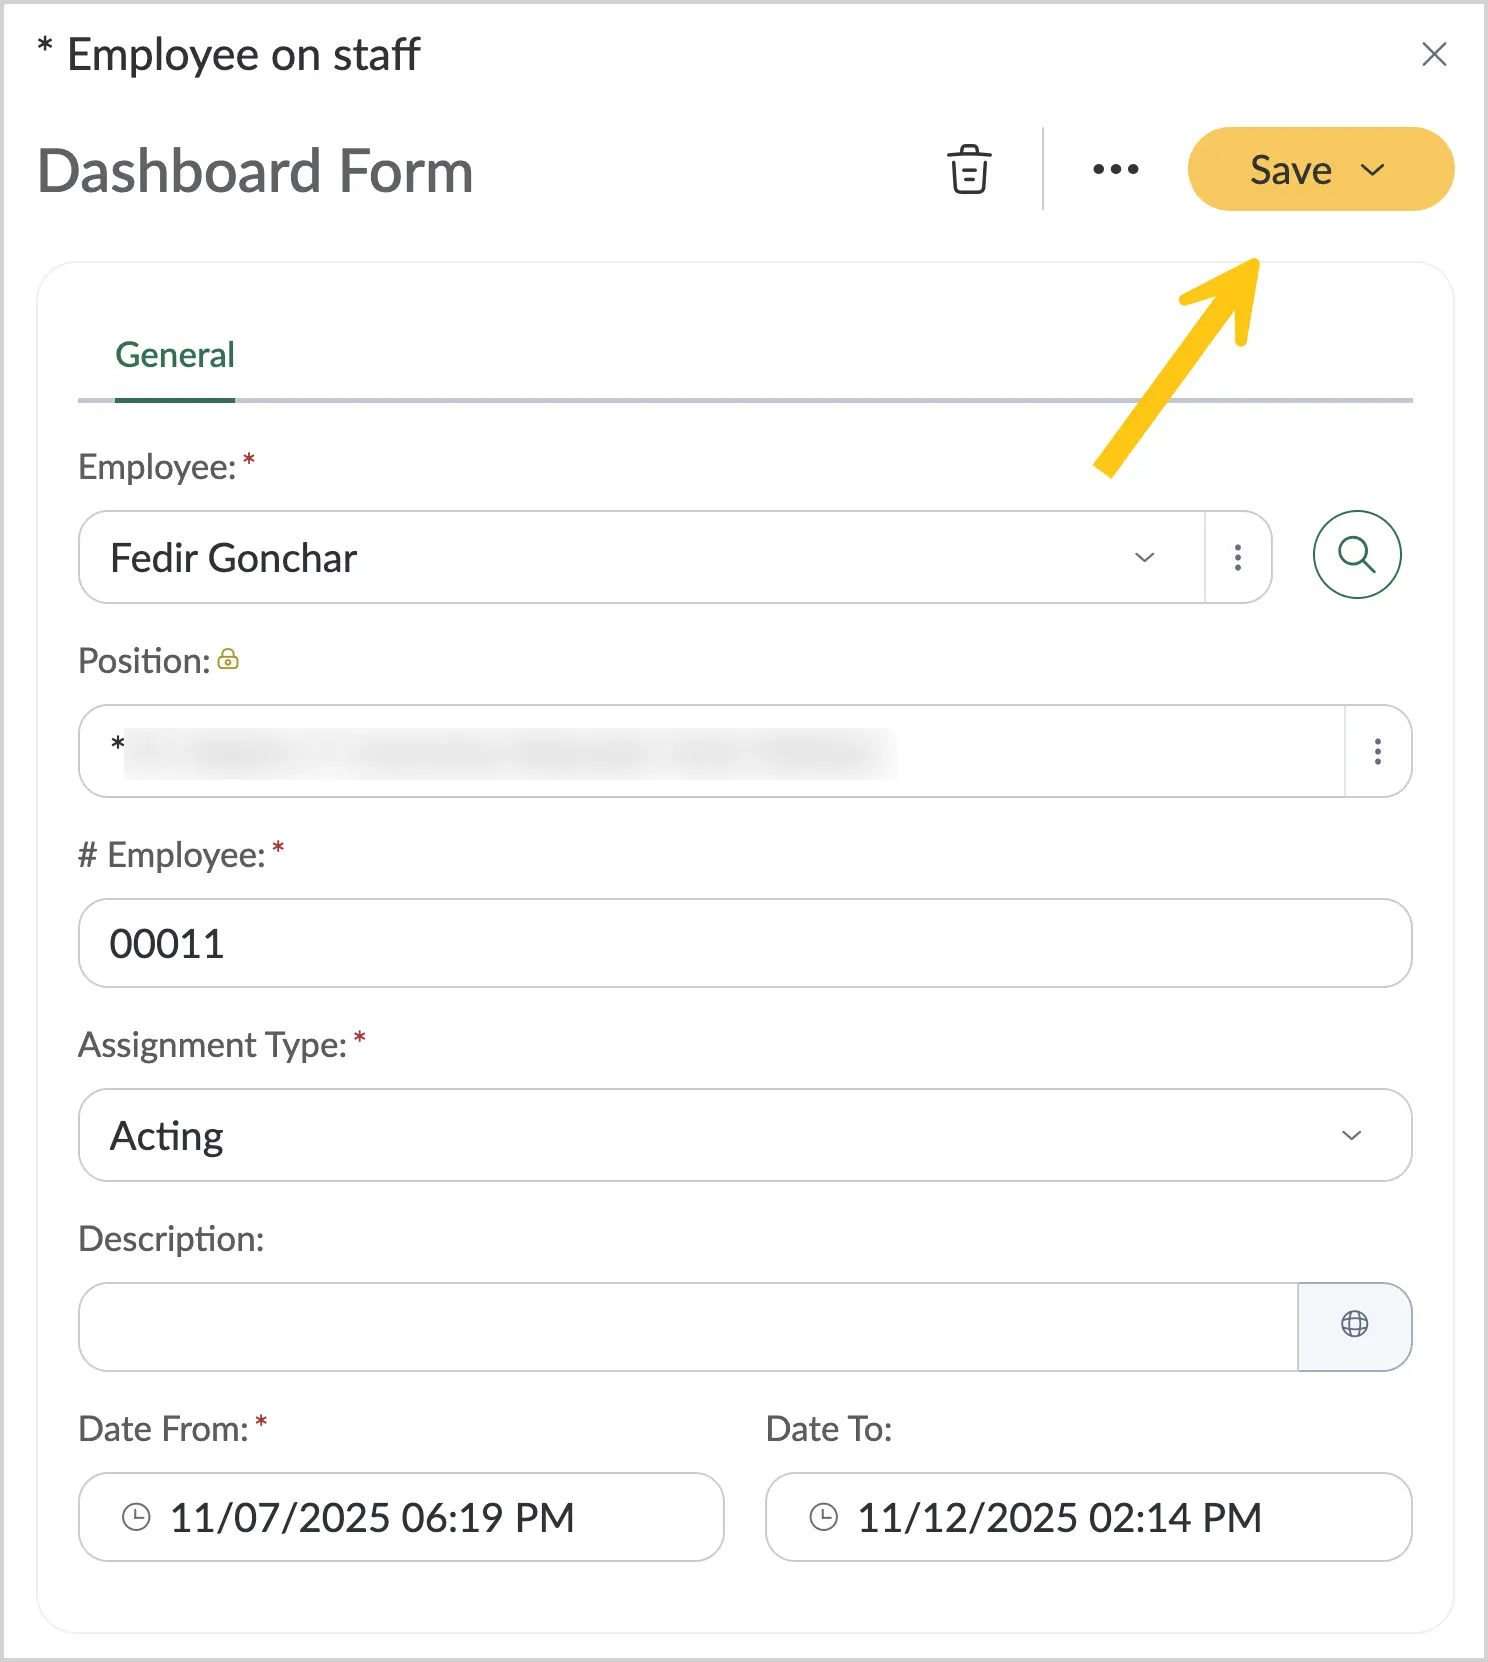
After this, the delegate automatically loses access to the authorized executor's documents and tasks.
1.8.9. View Assignment History
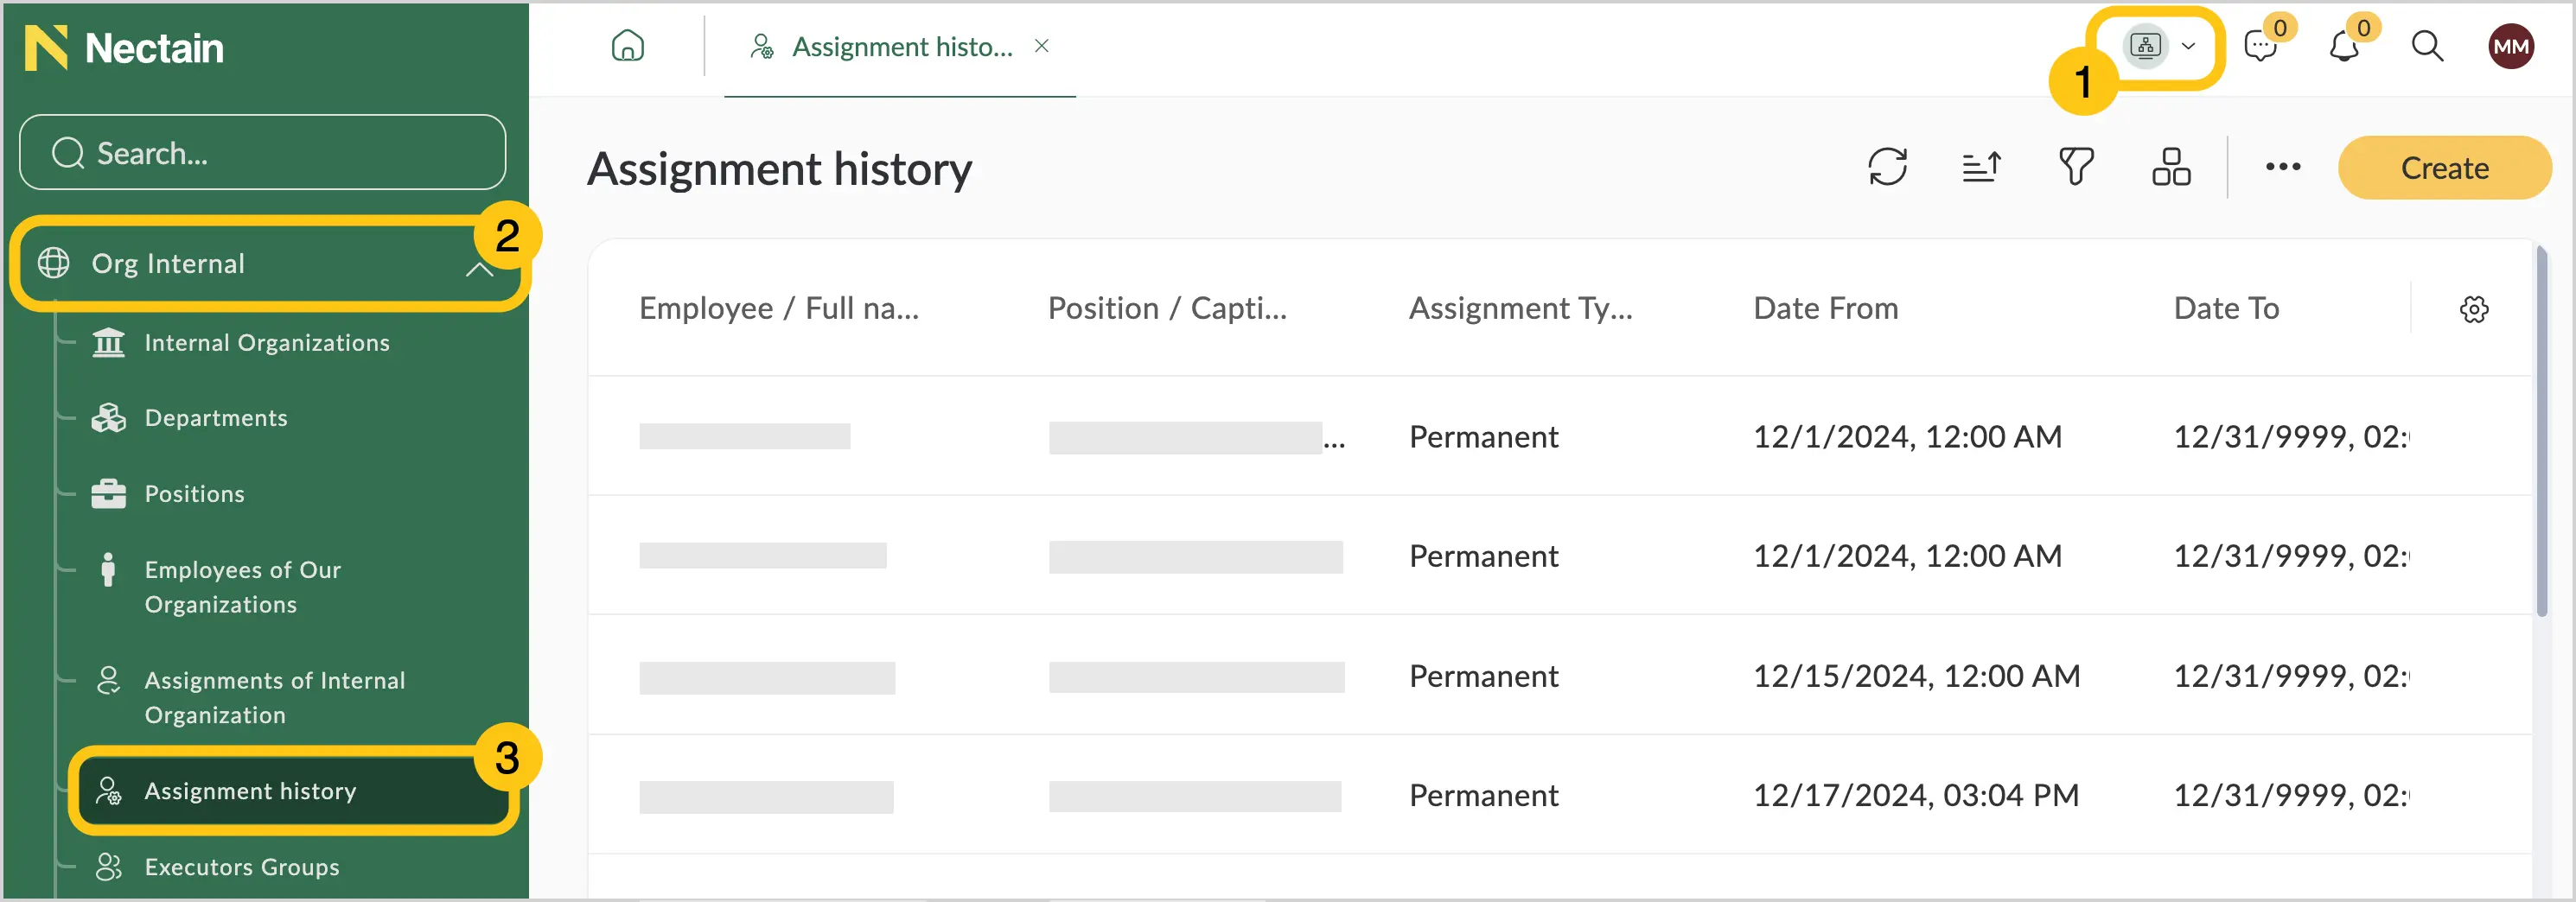
To view the history of all assignments in the platform, follow these steps:
-
In the navigation panel, select the Organizational Structure desktop 1.
-
Select the Org. Internal shortcut group 2, then select the Assignment History shortcut 3.
1.8.10. View Organizational Units
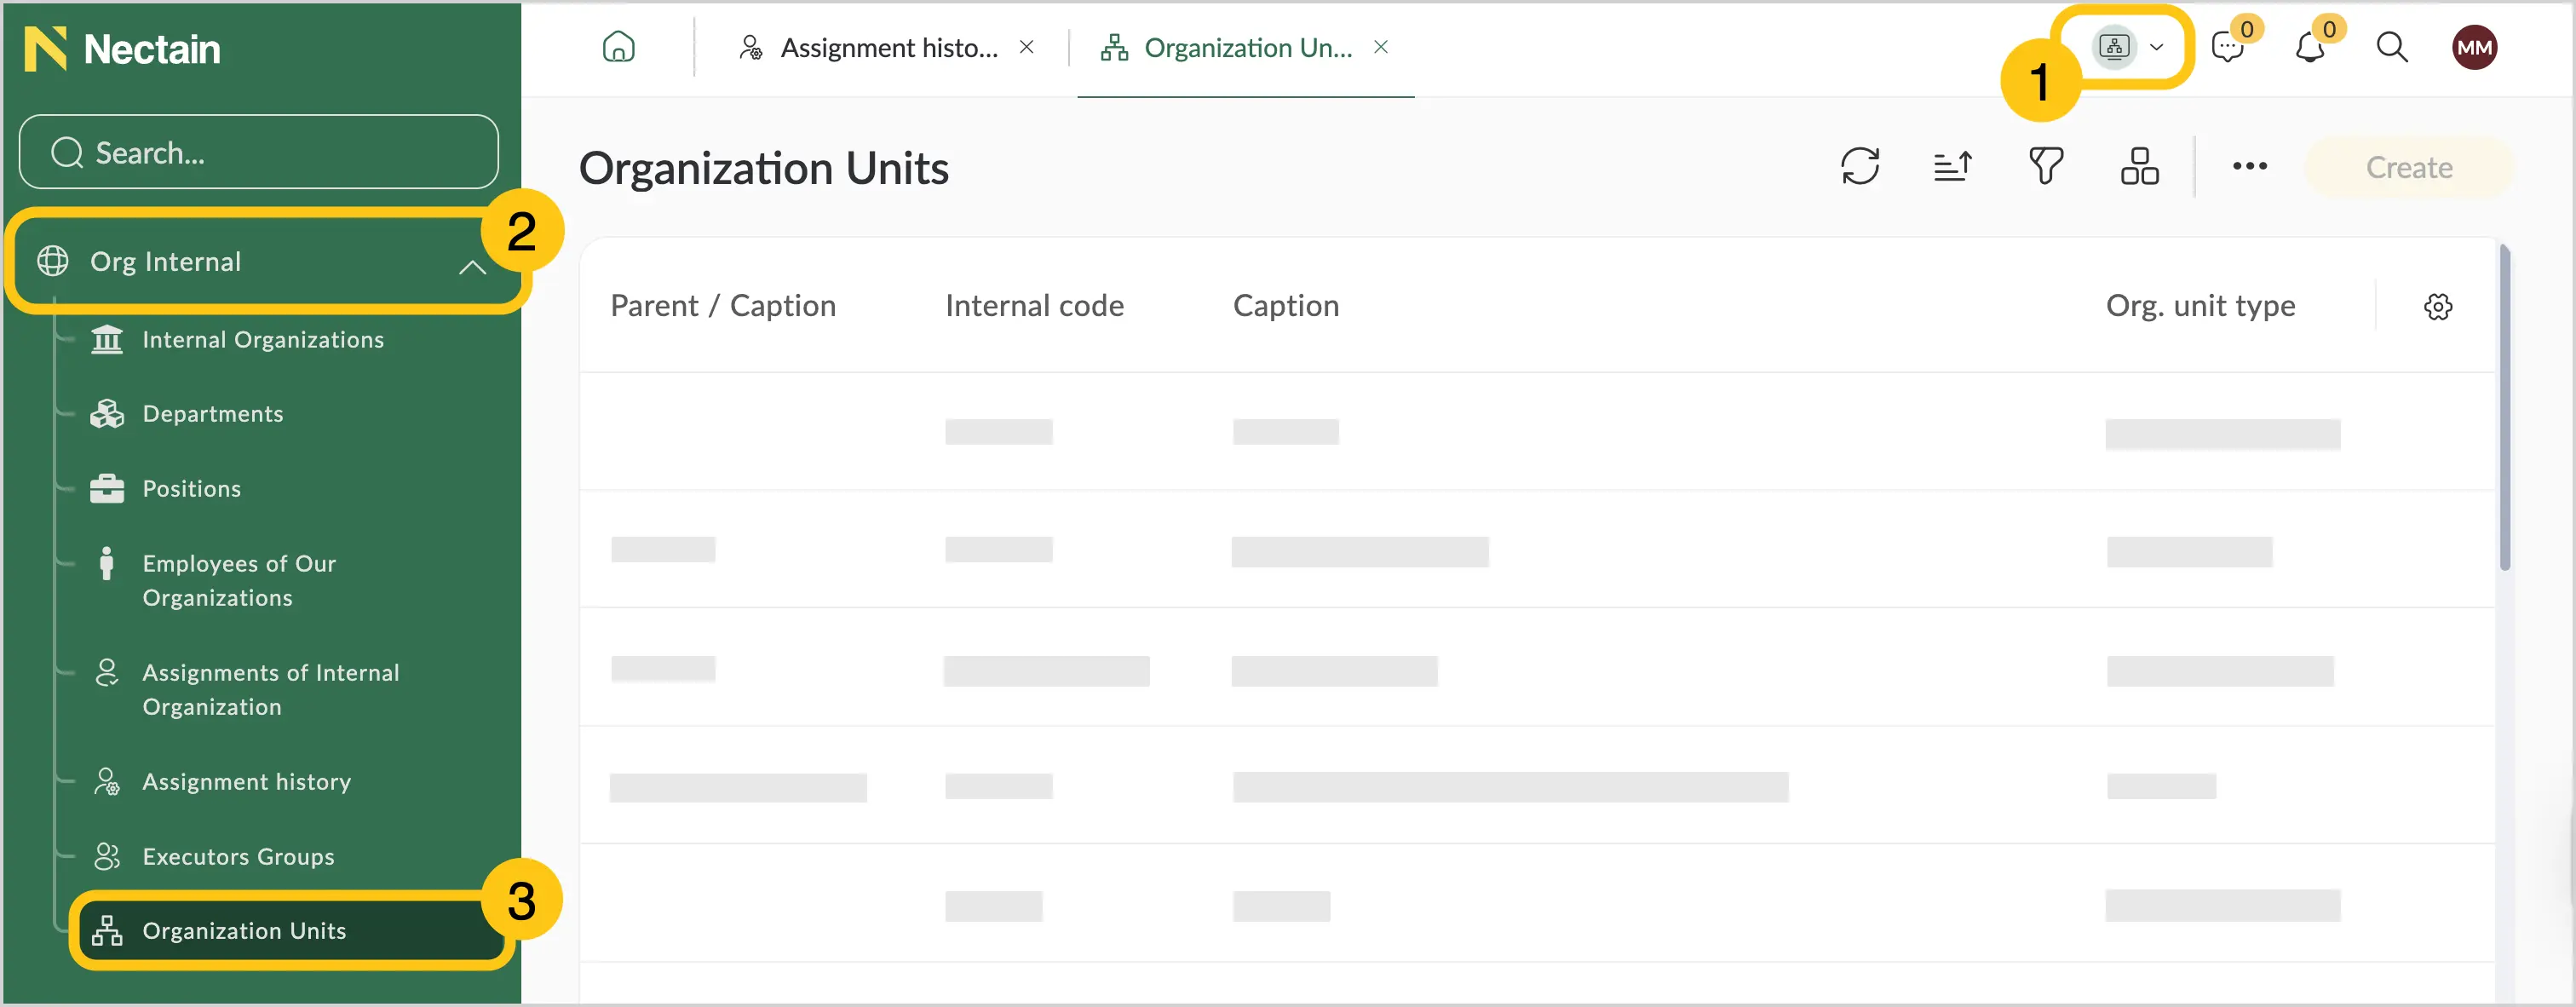
To view all organizational units created in the platform, follow these steps:
-
In the navigation panel, select the Organizational Structure desktop 1.
-
Select the Org. Internal shortcut group 2, then select the Organizational Units shortcut 3.
1.8.11. View Organizational Structure
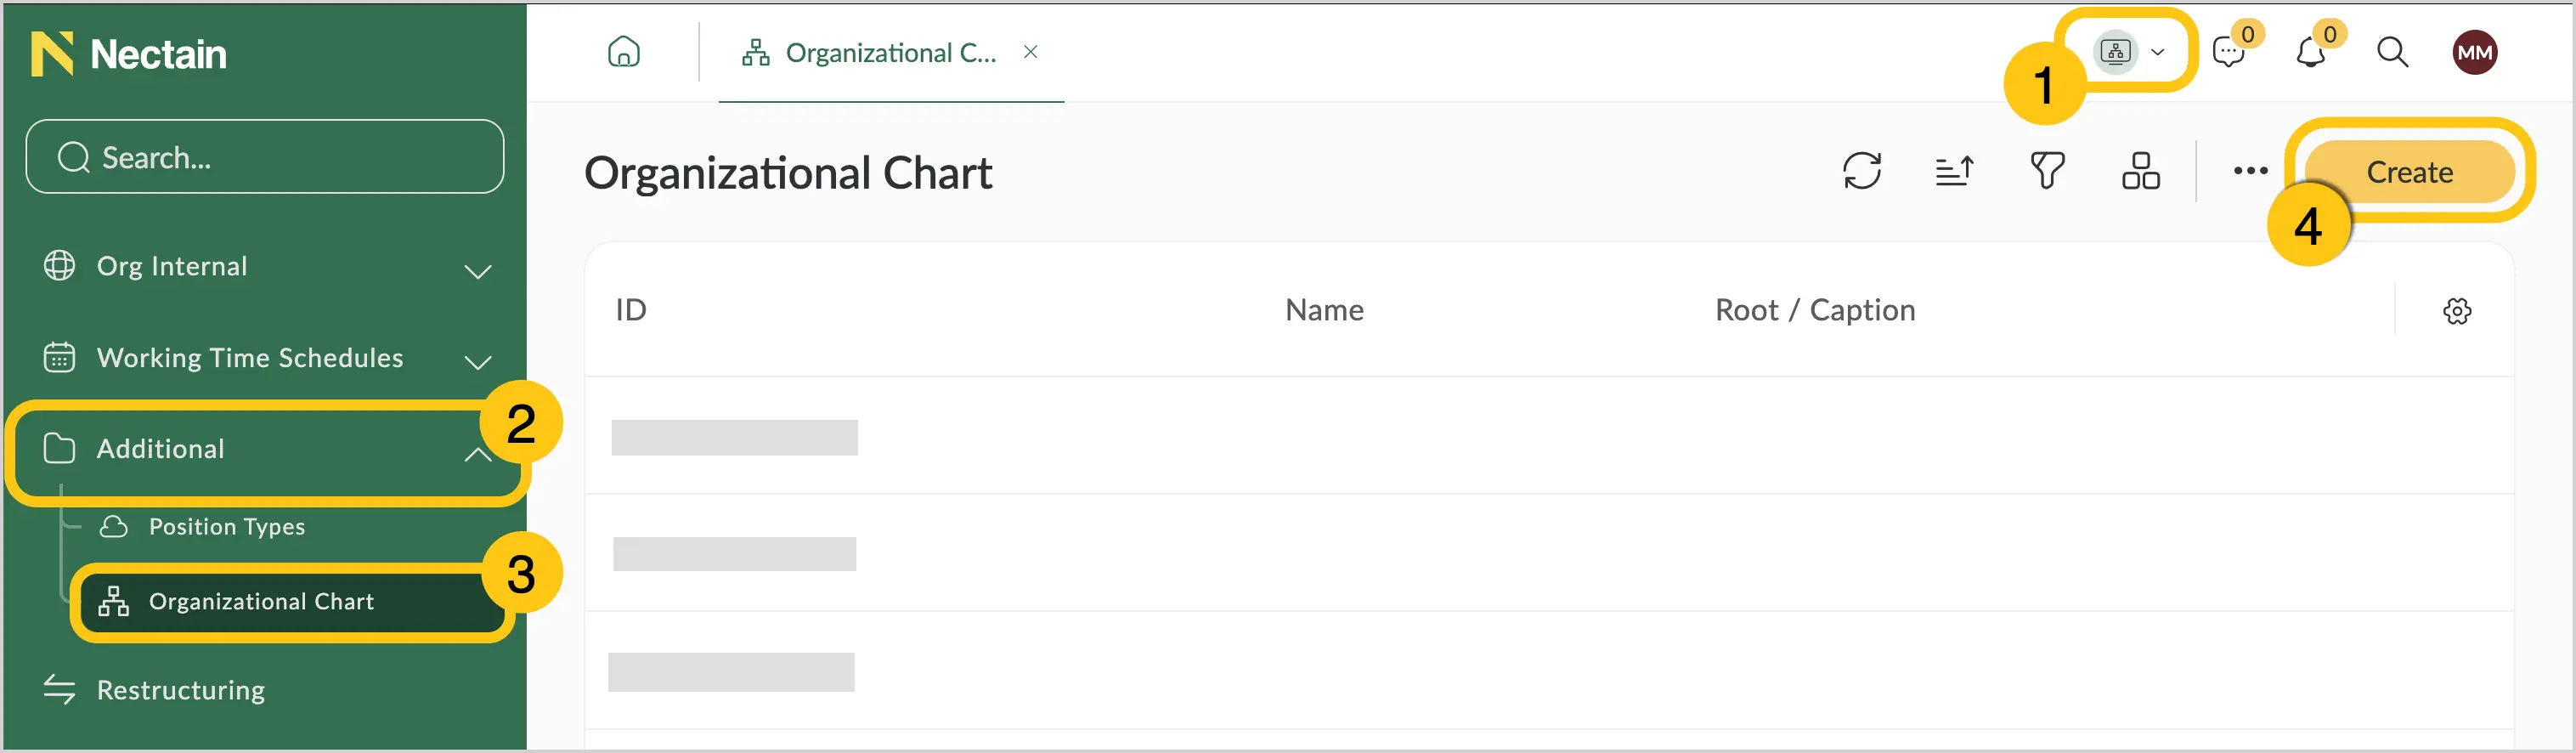
To view the organizational structure as a diagram, you can create an organogram. To do so, follow these steps:
-
In the navigation panel, select the Organizational Structure desktop 1.
-
Select the Additional shortcut group 2, then select the Organograms shortcut 3.
-
In the toolbar, select Create 4.
-
On the diagram, select the block of the required organization, then right-click it.
-
In the context menu, select Open Diagram for Selected Element.
-
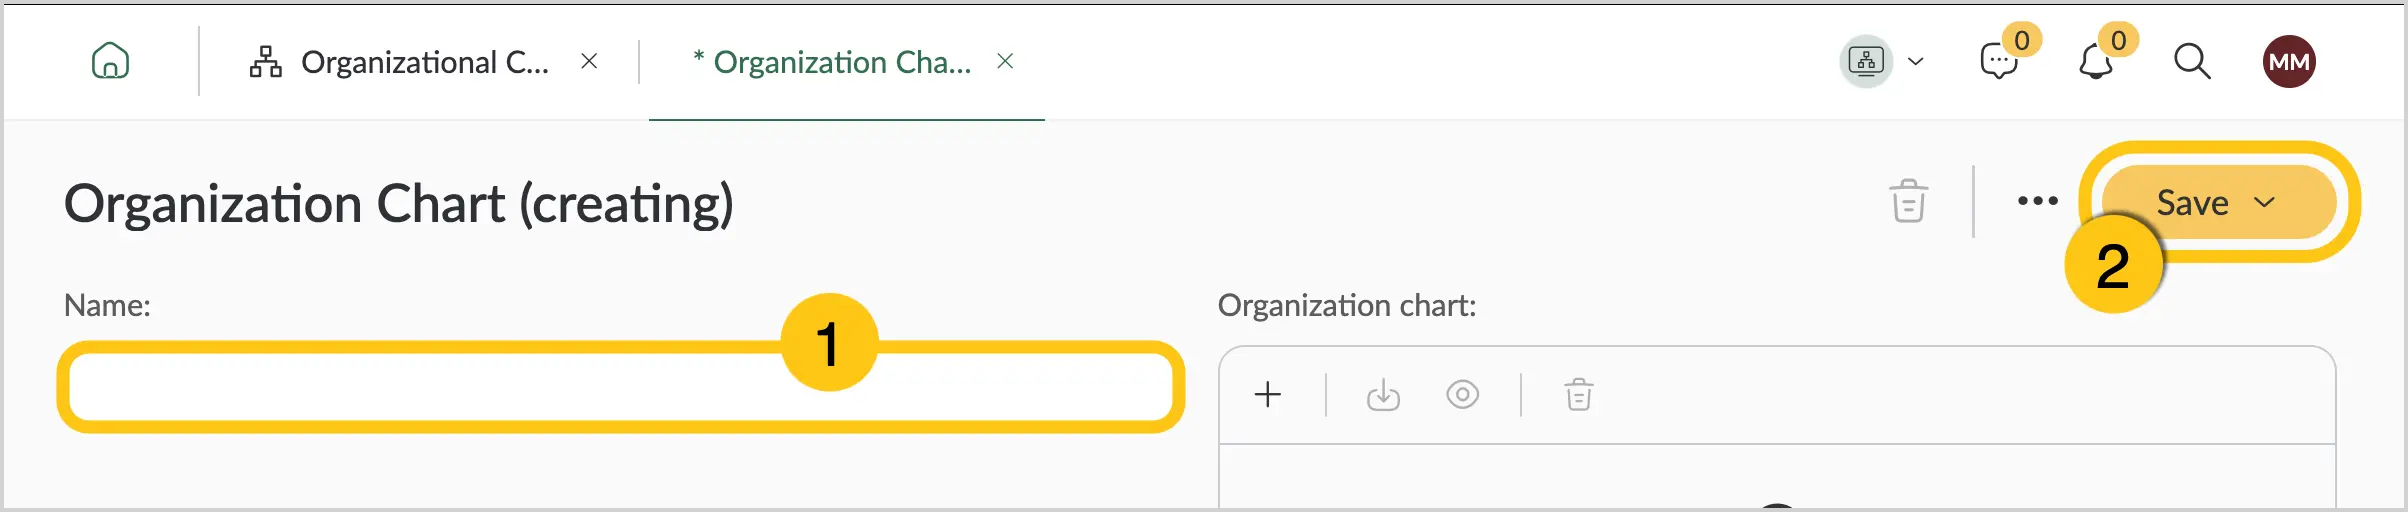
In the Name field 1, enter the desired name for the diagram, then select the Save icon 2.
In the organogram you can expand/collapse levels and change the display orientation (right/down). You can also save or print the organogram.
1.8.12. Create an Executor Group
The system allows you to group executors, after which these groups can be used when granting access in Document Types or other system elements.
A group is created within our organization. Any positions of that organization, or departments/organizations, can be added to the group. When departments/organizations are added to an executor group, all positions from that department will be added.
Access to create or edit executor groups is available to users with the OrganizationManager role.
To create an executor group, follow these steps:
-
In the navigation panel, select the Organizational Structure desktop 1.
-
Select the Org. Internal shortcut group 2, then select the Executor Groups shortcut 3.
-
In the toolbar, select Create 4.
-
Fill in the fields using the hints in the table below.
| Field Name | Description |
|---|---|
| Parent Node* | Selection field where you choose our organization to which the group being created is subordinate |
| Type* | Select the group type from the dropdown list. By default, only the General type exists. |
| Internal Code* |
|
| Group Name* | Display name of the group. 💡 Tip: Use descriptive names for executor groups that reflect their purpose, for example "Department Heads", "Accountants", "IT Specialists". ℹ️ Note: This field supports localization. Select the icon to add values for other languages, fill in the corresponding fields, and select Apply. |
| Description | Add any additional information about the executor group that may be useful to other users. ℹ️ Note: This field supports localization. Select the icon to add values for other languages, fill in the corresponding fields, and select Apply. |
| Group Name in Genitive Case | Group name in the genitive case. If not filled in, the value from the Group Name field will be used. ℹ️ Note: This field supports localization. Select the icon to add values for other languages, fill in the corresponding fields, and select Apply. |
| Group Name in Dative Case | Group name in the dative case. If not filled in, the value from the Group Name field will be used. ℹ️ Note: This field supports localization. Select the icon to add values for other languages, fill in the corresponding fields, and select Apply. |
| Executor | List of positions that will belong to the group. To add, select the required positions, departments, or organizations from the dropdown list. |
Fields marked with "*" are required.
- In the toolbar, select Save.